Post Syndicated from Chetan Makvana original https://aws.amazon.com/blogs/devops/how-to-use-amazon-codewhisperer-using-okta-as-an-external-idp/
Customers using Amazon CodeWhisperer often want to enable their developers to sign in using existing identity providers (IdP), such as Okta. CodeWhisperer provides support for authentication either through AWS Builder Id or AWS IAM Identity Center. AWS Builder ID is a personal profile for builders. It is designed for individual developers, particularly when working on personal projects or in cases when organization does not authenticate to AWS using the IAM Identity Center. IAM Identity Center is better suited for enterprise developers who use CodeWhisperer as employees of organizations that have an AWS account. The IAM Identity Center authentication method expands the capabilities of IAM by centralizing user administration and access control. Many customers prefer using Okta as their external IdP for Single Sign-On (SSO). They aim to leverage their existing Okta credentials to seamlessly access CodeWhisperer. To achieve this, customers utilize the IAM Identity Center authentication method.
Trained on billions of lines of Amazon and open-source code, CodeWhisperer is an AI coding companion that helps developers write code by generating real-time whole-line and full-function code suggestions in their Integrated Development Environments (IDEs). CodeWhisperer comes in two tiers—the Individual Tier is free for individual use, and the Professional Tier offers administrative features, like SSO and IAM Identity Center integration, policy control for referenced code suggestions, and higher limits on security scanning. Customers enable the professional tier of CodeWhisperer for their developers for a business use. When using CodeWhisperer with the professional tier, developers should authenticate with the IAM Identity Center. We will also soon introduce the Enterprise Tier, offering the additional capability to customize CodeWhisperer to generate more relevant recommendations by making it aware of your internal libraries, APIs, best practices, and architectural patterns.
In this blog, we will show you how to set up Okta as an external IdP for IAM Identity Center and enable access to CodeWhisperer using existing Okta credentials.
How it works
The flow for accessing CodeWhisperer through the IAM Identity Center involves the authentication of Okta users using Security Assertion Markup Language (SAML) 2.0 authentication.
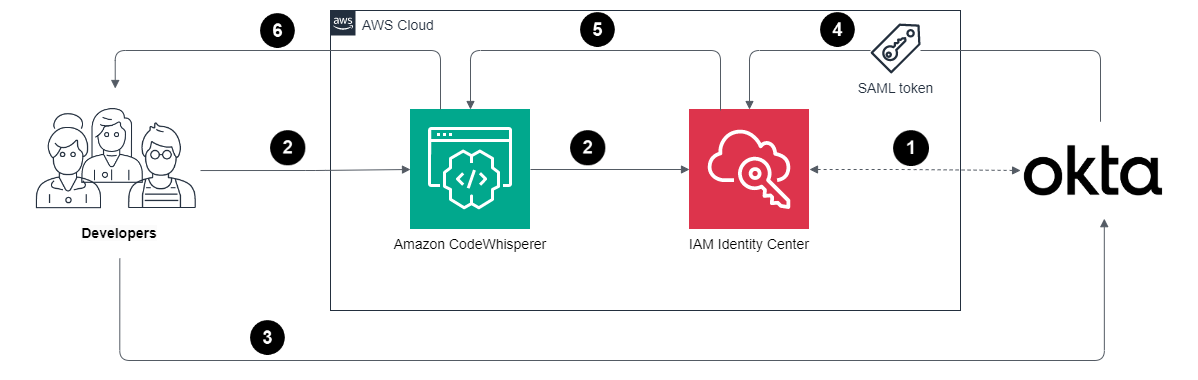
Figure 1: Architecture diagram for sign-in process
The sign-in process follows these steps:
- IAM Identity Center synchronizes users and groups information from Okta into IAM Identity Center using the System for Cross-domain Identity Management (SCIM) v2.0 protocol.
- Developer with an Okta account connects to CodeWhisperer through IAM Identity Center.
- If the developer isn’t already authenticated, they will be redirected to the Okta account login. The developer will sign in using their Okta credentials.
- If the sign-in is successful, Okta processes the request and sends a SAML response containing the developer’s identity and authentication status to IAM Identity Center.
- If the SAML response is valid and the developer is authenticated, IAM Identity Center grants access to CodeWhisperer.
- The developer can now securely access and use CodeWhisperer.
Prerequisites
For this walkthrough, you should have the following prerequisites:
- AWS account
- Okta account with users and group already setup
- An IAM Identity Center-enabled account (free). For more information, see Enable IAM Identity Center.
- Professional tier of Amazon CodeWhisperer enabled. The professional tier comes with associated costs. Please check the pricing.
Configure Okta as an external IdP with IAM Identity Center
Step 1: Enable IAM Identity Center in Okta
- In the Okta Admin Console, Navigate to the Applications Tab > Applications.
- Browse App Catalog for the AWS IAM Identity Center app and Select Add Integration.
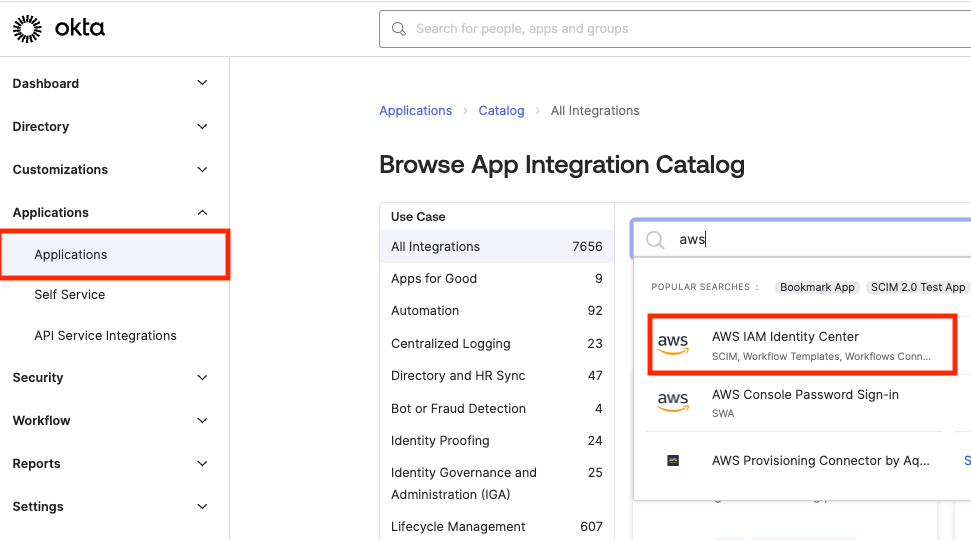
Figure 2: Okta’s App Integration Catalog
- Provide a name for the App Integration, using the Application label. Example: “Demo_AWS IAM Identity Center”.
- Navigate to the Sign On tab for the “Demo_AWS IAM Identity Center” app .
- Under SAML Signing Certificates, select View IdP Metadata from the Actions drop-down menu and Save the contents as metadata.xml
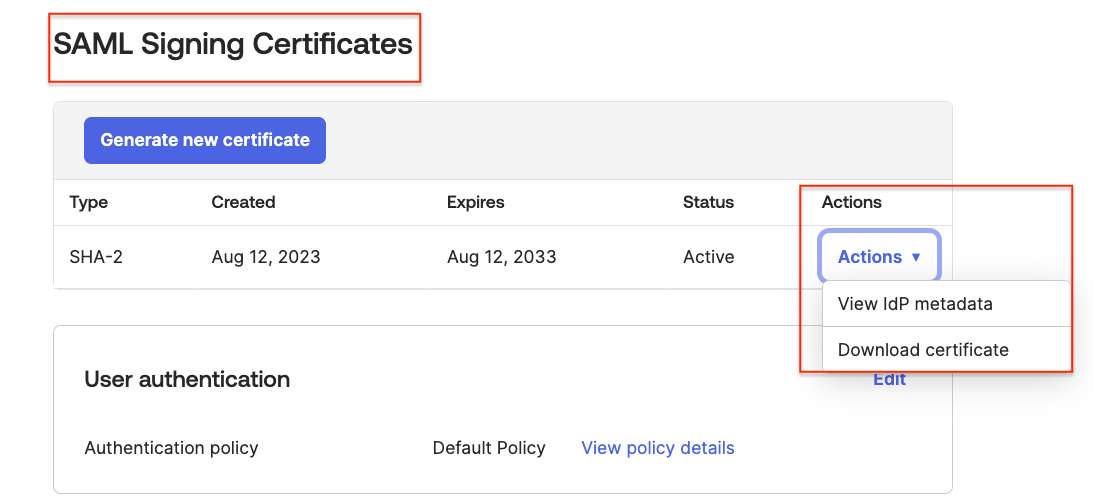
Figure 3: SAML Signing Certificates Page
Step 2: Configure Okta as an external IdP in IAM Identity Center
- In IAM Identity Center Console, navigate to Dashboard.
- Select Choose your identity source.
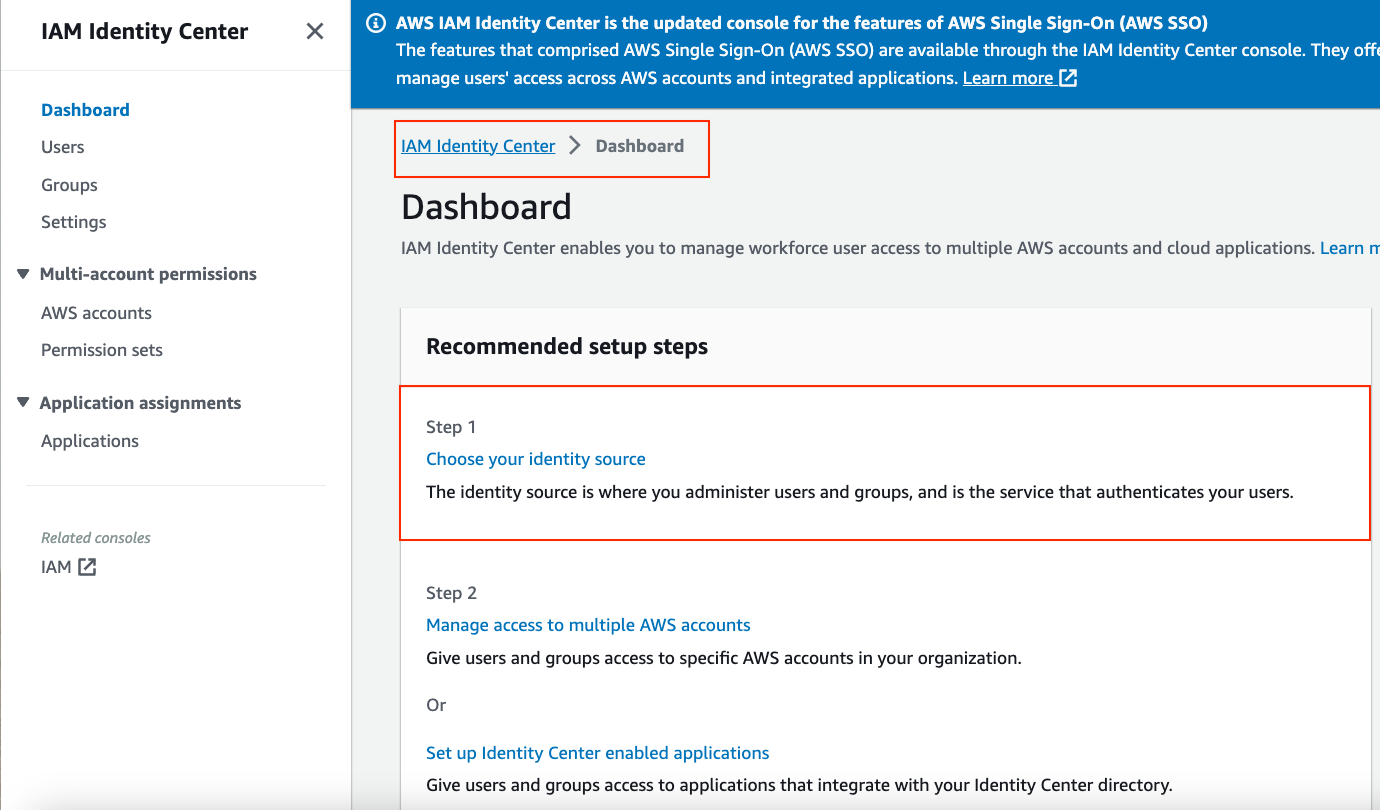
Figure 4: IAM Identity Center Console
- Under Identity source, select Change identity source from the Actions drop-down menu
- On the next page, select External identity provider, then click Next.
- Configure the external identity provider:
-
- IdP SAML metadata: Click Choose file to upload Okta’s IdP SAML metadata you saved in the previous section Step 6.
- Make a copy of the AWS access portal sign-in URL, IAM Identity Center ACS URL, and IAM Identity Center issuer URL values. You’ll need these values later on.
- Click Next.
- Review the list of changes. Once you are ready to proceed, type ACCEPT, then click Change identity source.
Step 3: Configure Okta with IAM Identity Center Sign On details
- In Okta, select the Sign On tab IAM Identity Center SAML app, then click Edit:
-
- Enter AWS IAM Identity Center SSO ACS URL and AWS IAM Identity Center SSO issuer URL values that you copied in previous section step 5b into the corresponding fields.
- Application username format: Select one of the options from the drop-down menu.
- Click Save.
Step 4: Enable provisioning in IAM Identity Center
- In IAM Identity Center Console, choose Settings in the left navigation pane.
- On the Settings page, locate the Automatic provisioning information box, and then choose Enable. This immediately enables automatic provisioning in IAM Identity Center and displays the necessary SCIM endpoint and access token information.
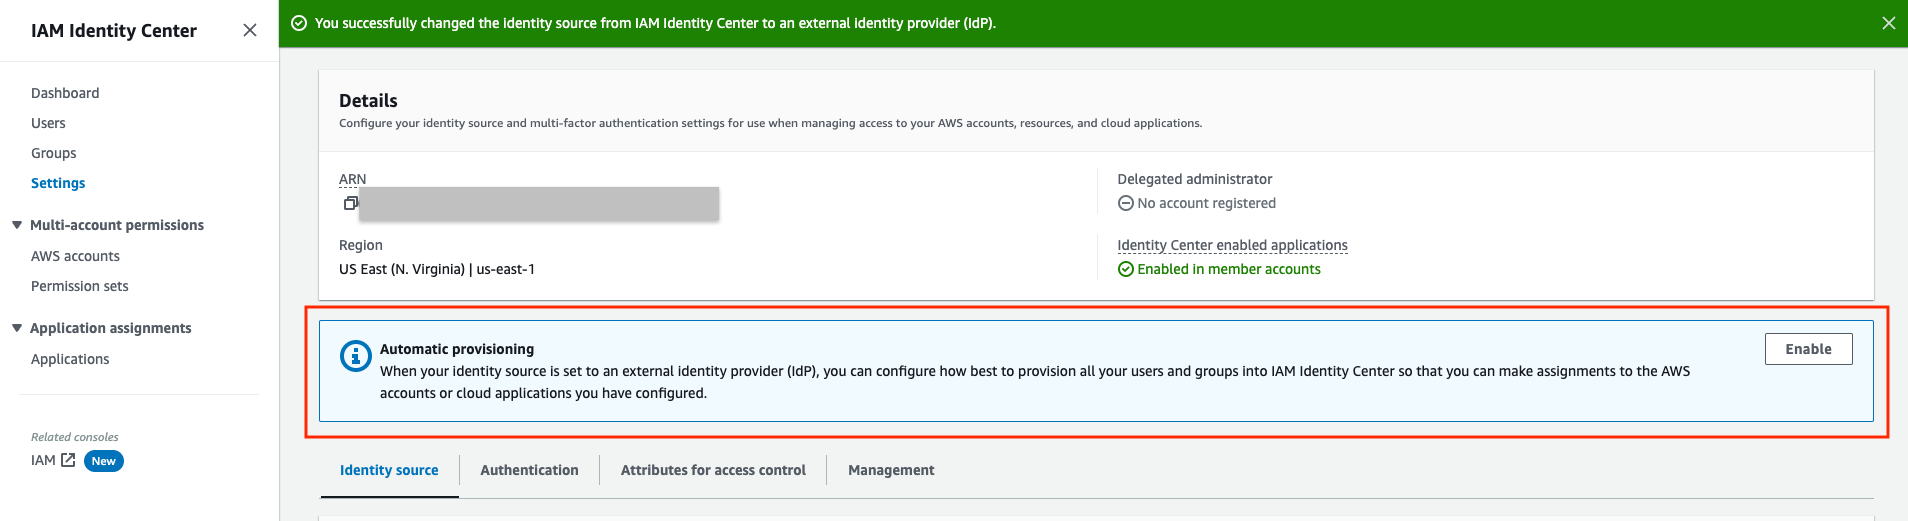
Figure 5: IAM Identity Center Settings for Automatic provisioning
- In the Inbound automatic provisioning dialog box, copy each of the values for the following options. You will need to paste these in later when you configure provisioning in Okta.
- SCIM endpoint
- Access token
- Choose Close.
Step 5: Configure provisioning in Okta
- In a separate browser window, log in to the Okta admin portal and navigate to the IAM Identity Center app.
- On the IAM Identity Center app page, choose the Provisioning tab, and then choose Integration.
- Choose Configure API Integration and then select the check box next to Enable API integration to enable provisioning.
- Paste SCIM endpoint copied in previous step into the Base URL field. Make sure that you remove the trailing forward slash at the end of the URL.
- Paste Access token copied in previous step into the API Token field.
- Choose Test API Credentials to verify the credentials entered are valid.
- Choose Save.
- Under Settings, choose To App, choose Edit, and then select the Enable check box for each of the Provisioning Features you want to enable.
- Choose Save.
Step 6: Assign access for groups in Okta
- In the Okta admin console, navigate to the IAM Identity Center app page, choose the Assignments tab.
- In the Assignments page, choose Assign, and then choose Assign to Groups.
- Choose the Okta group or groups that you want to assign access to the IAM Identity Center app. Choose Assign, choose Save and Go Back, and then choose Done. This starts provisioning the users in the group into the IAM Identity Center.
- Repeat step 3 for all groups that you want to provide access.
- Choose the Push Groups tab. Choose the Okta group or groups that you chose in the previous step.
- Then choose Save. The group status changes to Active after the group and its members have successfully been pushed to IAM Identity Center.

Figure 7: Amazon CodeWhisperer Settings Page

Step 7: Provide access to CodeWhisperer
- In the CodeWhisperer Console, under Settings add the groups which require access to CodeWhisperer.
Figure 7: Amazon CodeWhisperer Settings Page
Set up AWS Toolkit with IAM Identity Center
To use CodeWhisperer, you will now set up the AWS Toolkit within integrated development environments (IDE) to establish authentication with the IAM Identity Center.
Figure 8: Set up AWS Toolkit with IAM Identity Center
- In the IDE, open the AWS extension panel and click Start button under Developer Tools > CodeWhisperer.
- In the resulting pane, expand the section titled Have a Professional Tier subscription? Sign in with IAM Identity Center.
- Enter the IAM Identity Center URL you previously copied into the Start URL field.
- Set the region to us-east-1 and click Sign in button.
- Click Copy Code and Proceed to copy the code from the resulting pop-up.
- When prompted by the Do you want Code to open the external website? pop-up, click Open.
- Paste the code copied in Step 5 and click Next.
- Enter your Okta credentials and click Sign in.
- Click Allow to grant AWS Toolkit to access your data.
- When the connection is complete, a notification indicates that it is safe to close your browser. Close the browser tab and return to IDE.
- Depending on your preference, select Yes if you wish to continue using IAM Identity Center with CodeWhisperer while using current AWS profile, else select No.
- You are now all set to use CodeWhisperer from within IDE, authenticated with your Okta credentials.
Test Configuration
If you have successfully completed the previous step, you will see the code suggested by CodeWhisperer.
Figure 9: Test Step Configurations
Conclusion
In this post, you learned how to leverage existing Okta credential to access Amazon CodeWhisperer via the IAM Identity Center integration. The post walked through the steps detailing the process of setting up Okta as an external IdP with the IAM Identity Center. You then configured the AWS Toolkit to establish an authenticated connection to AWS using Okta credentials, enabling you to access the CodeWhisperer Professional Tier.
About the authors: