Developers today face a constant balancing act – building new features and functionality while also ensuring the security and reliability of their codebase. Two powerful tools, Snyk and Amazon Q Developer, can work in tandem to help developers navigate this challenge with greater efficiency and efficacy.
Snyk is a leading developer security platform that empowers developers to seamlessly secure their code, open-source dependencies, container images, and cloud infrastructure all from a single, unified platform. Amazon Q Developer is a generative AI-powered assistant designed to accelerate a variety of tasks across the software development lifecycle. By combining the security insights from Snyk with the assistive capabilities of Amazon Q Developer, developers can streamline their workflows and focus on delivery.
Getting started with Amazon Q Developer and Snyk IDE Plugins
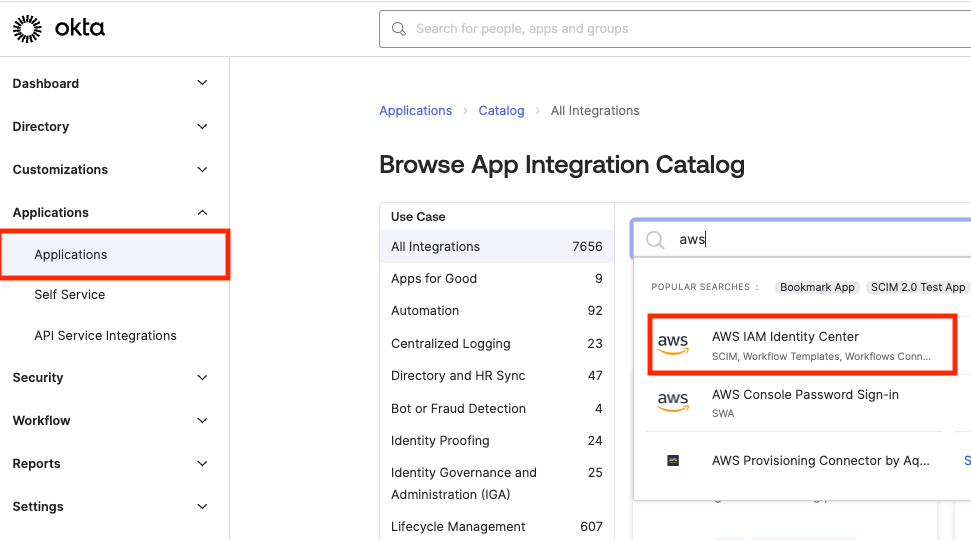
To get started with Amazon Q Developer, you need to have an AWS Builder ID or be part of an organization with an AWS IAM Identity Center instance that allows you to use Amazon Q. To use Amazon Q Developer agents for software development in Visual Studio Code, start by installing the Amazon Q extension. Find the latest version of the extension on the Amazon Q Developer page. The extension is also available for JetBrains, Eclipse (Preview), and Visual Studio IDEs. For a detailed list of supported IDEs and the features available in each, refer to the Amazon Q Developer documentation.
To get started with Snyk, sign up for a free Snyk account or log in with your existing account. To use Snyk in your IDE to automatically find security issues, review the IDE documentation and install Snyk using your IDE extension marketplace. After Snyk is installed, navigate to the Snyk panel in your IDE and follow the on-screen instructions to authenticate with your Snyk account.
After authenticating, Snyk will automatically scan your entire codebase for security issues. Snyk will continue scanning periodically as you write code or generate code with Amazon Q Developer.
Walkthrough
Let’s explore how Snyk and Amazon Q Developer can be used together through a few examples. Imagine that you maintain an open-source project. As a new Snyk user, you would like to find and fix the security issues in the project. In this first and simple scenario, Snyk has identified many cases of security vulnerabilities in specific lines of code. Among the vulnerabilities, we’ll focus on the Information Exposure vulnerability.
Figure 1 – Snyk IDE Plugin displaying vulnerability analysis of an Information Exposure issue, showing severity, affected code, and prevention tips.
Rather than manually researching and implementing the fix, you can simply highlight the flagged line, invoke Amazon Q Developer’s inline chat by pressing ⌘+I (Mac) or Ctrl+I (Windows), and request assistance. Amazon Q Developer will analyze the issue, propose the necessary code changes, and provide you with an inline diff to review and accept. This allows for rapid remediation of security flaws saving time while improving the code.
Figure 2 – Activating Amazon Q Developer inline code generation to fix the detected information exposure vulnerability.
We are happy with the change Amazon Q Developer proposed, so we’ll simply hit enter to accept the suggestions. Of course, we could always hit escape to reject the suggestion if needed.
Figure 3 – Amazon Q Developer displaying an inline code generation to fix the detected information exposure vulnerability.
In addition to the inline chat, you can pass the vulnerability details directly from the Snyk plugin’s Problems view into the Amazon Q Developer /dev agentic capability.
In the chat interface of Q Developer, the /dev agentic capability allows longer conversation, broader workspace context, and handle changes within multiple files and topics. When this workflow is invoked, the Amazon Q Developer Agent will generate code based on the description and existing code in the workspace, provide a list of suggestions to review and add to the workspace, and if needed, iterate on the code based on feedback.
Figure 4 – Using Amazon Q’s /dev agent to implement project-wide fixes for Snyk-detected vulnerabilities across multiple files.
Not all issues are trivial as the prior example. In a more complex case, Snyk may surface a vulnerability that requires a deeper understanding of the code and the potential risk. Let’s look at another issue that Snyk identified in the project we have been discussing.
Figure 5 – Snyk Plugin highlighting a cross-site scripting (XSS) vulnerability, showing the affected code line and prevention recommendations.
Here, you can switch to Amazon Q Developer’s chat interface, provide the details of the issue, and ask for a more thorough explanation. Amazon Q Developer can then dive into the codebase, explain the problem in detail, and walk you through the appropriate fixes. This collaborative approach empowers developers to make informed decisions and gain broader knowledge, rather than simply implementing a suggestion.
Figure 6 – Amazon Q Developer’s chat interface explaining an XSS vulnerability and its security implications through natural language dialogue.
Note that Amazon Q Developer provides links to documentation and other sources for further reading. In addition, you can continue discussing the issue to learn more. For example, imagine that you want to understand real world breaches that have occurred as a result of the issues that Synk has identified. Q provides a few examples for me to learn more.
Figure 7 – Amazon Q Developer discussing notable real-world XSS breach examples and their security impacts.
Beyond fixing issues, Amazon Q Developer can also assist with other development tasks identified by Snyk, such as updating dependencies, refactoring code, or optimizing cloud infrastructure. By integrating these two tools, developers can streamline security scanning, issue investigation, and remediation, dramatically increasing their overall productivity.
Conclusion
In this blog, we took a look at how Snyk and Amazon Q Developer are a powerful duo in the modern developer’s toolkit. Integrating Snyk’s leading security insights with the generative AI capabilities of Amazon Q Developer empowers developers to more efficiently identify, comprehend, and address security vulnerabilities. This combination enables developers to upskill and enhance their own abilities as they work to resolve security issues. Get started with installing the Amazon Q Developer in the IDE and Snyk plugin.
Maximizing the value from Enterprise Software tools requires an understanding of who and how users interact with those tools. As we have worked with builders rolling out Amazon CodeWhisperer to their enterprises, identifying usage patterns has been critical.
This blog post is a result of that work, builds on Introducing Amazon CodeWhisperer Dashboard blog and Amazon CloudWatch metrics and enables customers to build dashboards to support their rollouts. Note that these features are only available in CodeWhisperer Professional plan.
Organizations have leveraged the existing Amazon CodeWhisperer Dashboard to gain insights into developer usage. This blog explores how we can supplement the existing dashboard with detailed user analytics. Identifying leading contributors has accelerated tool usage and adoption within organizations. Acknowledging and incentivizing adopters can accelerate a broader adoption.
The architecture diagram outlines a streamlined process for tracking and analyzing Amazon CodeWhisperer usage events. It begins with logging these events in CodeWhisperer and AWS CloudTrail and then forwarding them to Amazon CloudWatch Logs. Configuring AWS CloudTrail involves using Amazon S3 for storage and AWS Key Management Service (KMS) for log encryption. An AWS Lambda function analyzes the logs, extracting information about user activity. This blog also introduces a AWS CloudFormation template that simplifies the setup process, including creating the CloudTrail with an S3 bucket KMS key and the Lambda function. The template also configures AWS IAM permissions, ensuring the Lambda function has access rights to interact with other AWS services.
Configuring CloudTrail for CodeWhisperer User Tracking
This section details the process for monitoring user interactions while using Amazon CodeWhisperer. The aim is to utilize AWS CloudTrail to record instances where users receive code suggestions from CodeWhisperer. This involves setting up a new CloudTrail trail tailored to log events related to these interactions. By accomplishing this, you lay a foundational framework for capturing detailed user activity data, which is crucial for the subsequent steps of analyzing and visualizing this data through a custom AWS Lambda function and an Amazon CloudWatch dashboard.
Setup CloudTrail for CodeWhisperer
1. Navigate to AWS CloudTrail Service.
2. Create Trail
3. Choose Trail Attributes
a. Click on Create Trail
b. Provide a Trail Name, for example, “cwspr-preprod-cloudtrail”
c. Choose Enable for all accounts in my organization
d. Choose Create a new Amazon S3 bucket to configure the Storage Location
e. For Trail log bucket and folder, note down the given unique trail bucket name in order to view the logs at a future point.
f. Check Enabled to encrypt log files with SSE-KMS encryption
j. Enter an AWS Key Management Service alias for log file SSE-KMS encryption, for example, “cwspr-preprod-cloudtrail”
h. Select Enabled for CloudWatch Logs
i. Select New
j. Copy the given CloudWatch Log group name, you will need this for the testing the Lambda function in a future step.
k. Provide a Role Name, for example, “CloudTrailRole-cwspr-preprod-cloudtrail”
l. Click Next.
4. Choose Log Events
a. Check “Management events“ and ”Data events“
b. Under Management events, keep the default options under API activity, Read and Write
c. Under Data event, choose CodeWhisperer for Data event type
d. Keep the default Log all events under Log selector template
e. Click Next
f. Review and click Create Trail
Please Note: The logs will need to be included on the account which the management account or member accounts are enabled.
Gathering Application ARN for CodeWhisperer application
Step 1: Access AWS IAM Identity Center
1. Locate and click on the Services dropdown menu at the top of the console.
Step 2: Find the Application ARN for CodeWhisperer application
1. In the IAM Identity Center dashboard, click on Application Assignments. -> Applications in the left-side navigation pane.
2. Locate the application with Service as CodeWhisperer and click on it
3. Copy the Application ARN and store it in a secure place. You will need this ID to configure your Lambda function’s JSON event.
User Activity Analysis in CodeWhisperer with AWS Lambda
This section focuses on creating and testing our custom AWS Lambda function, which was explicitly designed to analyze user activity within an Amazon CodeWhisperer environment. This function is critical in extracting, processing, and organizing user activity data. It starts by retrieving detailed logs from CloudWatch containing CodeWhisperer user activity, then cross-references this data with the membership details obtained from the AWS Identity Center. This allows the function to categorize users into active and inactive groups based on their engagement within a specified time frame.
The Lambda function’s capability extends to fetching and structuring detailed user information, including names, display names, and email addresses. It then sorts and compiles these details into a comprehensive HTML output. This output highlights the CodeWhisperer usage in an organization.
Creating and Configuring Your AWS Lambda Function
1. Navigate to the Lambda service.
2. Click on Create function.
3. Choose Author from scratch.
4. Enter a Function name, for example, “AmazonCodeWhispererUserActivity”.
5. Choose Python 3.11 as the Runtime.
6. Click on ‘Create function’ to create your new Lambda function.
7. Access the Function: After creating your Lambda function, you will be directed to the function’s dashboard. If not, navigate to the Lambda service, find your function “AmazonCodeWhispererUserActivity”, and click on it.
8. Copy and paste your Python code into the inline code editor on the function’s dashboard. The lambda function code can be found here.
9. Click ‘Deploy’ to save and deploy your code to the Lambda function.
10. You have now successfully created and configured an AWS Lambda function with our Python code.
Updating the Execution Role for Your AWS Lambda Function
After you’ve created your Lambda function, you need to ensure it has the appropriate permissions to interact with other AWS services like CloudWatch Logs and AWS Identity Store. Here’s how you can update the IAM role permissions:
Locate the Execution Role:
1. Open Your Lambda Function’s Dashboard in the AWS Management Console.
2. Click on the ‘Configuration’ tab located near the top of the dashboard.
3. Set the Time Out setting to 15 minutes from the default 3 seconds
4. Select the ‘Permissions’ menu on the left side of the Configuration page.
5. Find the ‘Execution role’ section on the Permissions page.
6. Click on the Role Name to open the IAM (Identity and Access Management) role associated with your Lambda function.
7. In the IAM role dashboard, click on the Policy Name under the Permissions policies.
8. Edit the existing policy: Replace the policy with the following JSON.
9. Save the changes to the policy.
{
   "Version":"2012-10-17",
   "Statement":[
      {
         "Action":[
            "logs:CreateLogGroup",
            "logs:CreateLogStream",
            "logs:PutLogEvents",
            "logs:StartQuery",
            "logs:GetQueryResults",
            "sso:ListInstances",
            "sso:ListApplicationAssignments"
            "identitystore:DescribeUser",
            "identitystore:ListUsers",
            "identitystore:ListGroupMemberships"
         ],
         "Resource":"*",
         "Effect":"Allow"
      },
      {
         "Action":[
            "cloudtrail:DescribeTrails",
            "cloudtrail:GetTrailStatus"
         ],
         "Resource":"*",
         "Effect":"Allow"
      }
   ]
} Your AWS Lambda function now has the necessary permissions to execute and interact with CloudWatch Logs and AWS Identity Store.
Testing Lambda Function with custom input
1. On your Lambda function’s dashboard.
2. On the function’s dashboard, locate the Test button near the top right corner.
3. Click on Test. This opens a dialog for configuring a new test event.
4. In the dialog, you’ll see an option to create a new test event. If it’s your first test, you’ll be prompted automatically to create a new event.
5. For Event name, enter a descriptive name for your test, such as “TestEvent”.
6. In the event code area, replace the existing JSON with your specific input:
a. log_group_name: The name of the log group in CloudWatch Logs.
b. start_date: The start date and time for the query, formatted as “YYYY-MM-DD HH:MM:SS”.
c. end_date: The end date and time for the query, formatted as “YYYY-MM-DD HH:MM:SS”.
e. codewhisperer_application_arn: The ARN of the Code Whisperer Application in the AWS Identity Store.
f. identity_store_region: The region of the AWS Identity Store.
f. codewhisperer_region: The region of where Amazon CodeWhisperer is configured.
8. Click on Save to store this test configuration.
9. With the test event selected, click on the Test button again to execute the function with this event.
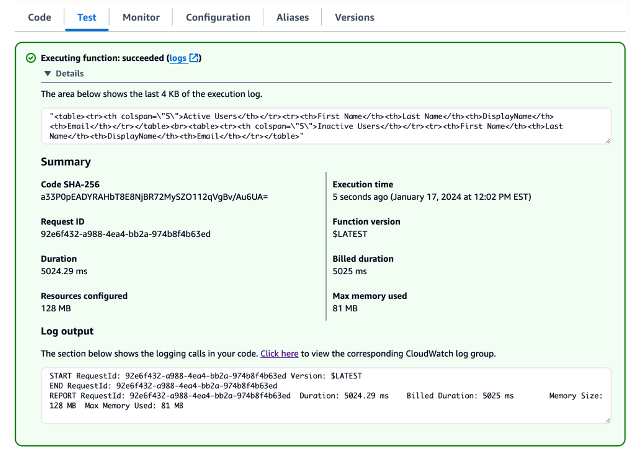
10. The function will run, and you’ll see the execution result at the top of the page. This includes execution status, logs, and output.
11. Check the Execution result section to see if the function executed successfully.
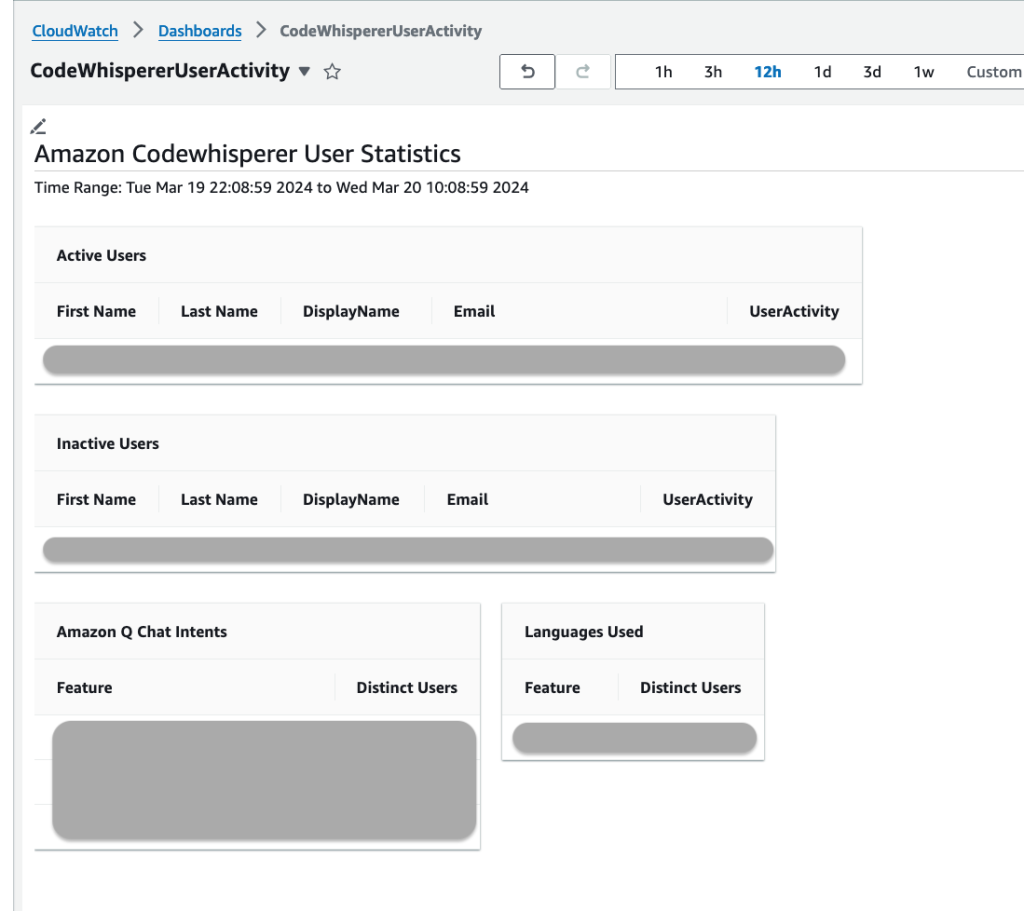
Visualizing CodeWhisperer User Activity with Amazon CloudWatch Dashboard
This section focuses on effectively visualizing the data processed by our AWS Lambda function using a CloudWatch dashboard. This part of the guide provides a step-by-step approach to creating a “CodeWhispererUserActivity” dashboard within CloudWatch. It details how to add a custom widget to display the results from the Lambda Function. The process includes configuring the widget with the Lambda function’s ARN and the necessary JSON parameters.
1.Navigate to the Amazon CloudWatch service from within the AWS Management Console
2. Choose the ‘Dashboards’ option from the left-hand navigation panel.
3. Click on ‘Create dashboard’ and provide a name for your dashboard, for example: “CodeWhispererUserActivity”.
4. Click the ‘Create Dashboard’ button.
5. Select “Other Content Types” as your ‘Data sources types’ option before choosing “Custom Widget” for your ‘Widget Configuration’ and then click ‘Next’.
6. On the “Create a custom widget” page click the ‘Next’ button without making a selection from the dropdown.
7. On the ‘Create a custom widget’ page:
a. Enter your Lambda function’s ARN (Amazon Resource Name) or use the dropdown menu to find and select your “CodeWhispererUserActivity” function.
b. Add the JSON parameters that you provided in the test event, without including the start and end dates.
{ "log_group_name": "{Insert Log Group Name}", “codewhisperer_application_arn”:”{Insert Codewhisperer Application ARN}”, "identity_store_region": "{Insert identity Store Region}", "codewhisperer_region": "{Insert Codewhisperer Region}" }
8. Click the ‘Add widget’ button. The dashboard will update to include your new widget and will run the Lambda function to retrieve initial data. You’ll need to click the “Execute them all” button in the upper banner to let CloudWatch run the initial Lambda retrieval.
9. Customize Your Dashboard: Arrange the dashboard by dragging and resizing widgets for optimal organization and visibility. Adjust the time range and refresh settings as needed to suit your monitoring requirements.
10. Save the Dashboard Configuration: After setting up and customizing your dashboard, click ‘Save dashboard’ to preserve your layout and settings.
CloudFormation Deployment for the CodeWhisperer Dashboard
The blog post concludes with a detailed AWS CloudFormation template designed to automate the setup of the necessary infrastructure for the Amazon CodeWhisperer User Activity Dashboard. This template provisions AWS resources, streamlining the deployment process. It includes the configuration of AWS CloudTrail for tracking user interactions, setting up CloudWatch Logs for logging and monitoring, and creating an AWS Lambda function for analyzing user activity data. Additionally, the template defines the required IAM roles and permissions, ensuring the Lambda function has access to the needed AWS services and resources.
The blog post also provides a JSON configuration for the CloudWatch dashboard. This is because, at the time of writing, AWS CloudFormation does not natively support the creation and configuration of CloudWatch dashboards. Therefore, the JSON configuration is necessary to manually set up the dashboard in CloudWatch, allowing users to visualize the processed data from the Lambda function. The CloudFormation template can be found here.
Create a CloudWatch Dashboard and import the JSON below.
In this blog, we detail a comprehensive process for establishing a user activity dashboard for Amazon CodeWhisperer to deliver data to support an enterprise rollout. The journey begins with setting up AWS CloudTrail to log user interactions with CodeWhisperer. This foundational step ensures the capture of detailed activity events, which is vital for our subsequent analysis. We then construct a tailored AWS Lambda function to sift through CloudTrail logs. Then, create a dashboard in AWS CloudWatch. This dashboard serves as a central platform for displaying the user data from our Lambda function in an accessible, user-friendly format.
You can reference the existing CodeWhisperer dashboard for additional insights. The Amazon CodeWhisperer Dashboard offers a view summarizing data about how your developers use the service.
Overall, this dashboard empowers you to track, understand, and influence the adoption and effective use of Amazon CodeWhisperer in your organizations, optimizing the tool’s deployment and fostering a culture of informed data-driven usage.
A Case Study Presented by CodeWhisperer Customizations
Amazon CodeWhisperer is an AI-powered coding assistant that is trained on a wide variety of data, including Amazon and open-source code. With the launch of CodeWhisperer Customizations, customers can create a customization resource. The customization is produced by augmenting CodeWhisperer using a customer’s private code repositories. This enables organization-specific code recommendations tailored to the customer’s own internal APIs, libraries, and frameworks.
When we started designing CodeWhisperer Customizations, we considered what our guiding principles, our tenets, should be. Customer trust was at the top of the list, but that posed new questions. How could we best earn our customer’s trust with a feature that fundamentally relies on a customer’s sensitive information? How could we properly secure this data so that customers could safely leverage the advanced capabilities we launched for them?
When considering these questions, we analyzed several design principles. It was important to ensure that a customer’s data is never combined, or used alongside, another customer’s. In other words, we needed to store each customer’s data in isolation. Additionally, we also wanted to restrict data processing to single-tenant compute. By this, we mean that any access of the data itself should be done on short-lived and non-shared compute, whenever possible. Another principle we considered was how to prevent unauthorized access of customer data. Across AWS, we build our systems to not only ensure that no customer data is intermingled during normal service operation, but also to mitigate any risk of unauthorized users gaining unintended access to customer data.
These design principles pointed to a set of security controls available via native AWS technologies. We needed to provide data and compute isolation as well as mitigate confused deputy risks at each step of the process. In this blog post, we will consider how each of these security considerations is addressed, utilizing AWS best practices. We will first consider the flow of data through the admin’s management of customization resources. Next, we will outline data interactions when developers send runtime requests to a given customization from their integrated development environment (IDE).
In reading this blog post, you will learn how we developed CodeWhisperer Customizations with security at the forefront. We also hope that you are inspired to leverage some of the same AWS technologies in your own applications.
Diagram
The diagram above depicts the flow of data during an administrator’s management of a customization as well as during a developer’s usage of the customization from their IDE.
API Layer: Authenticates and authorizes each request. Passes data references to the downstream dependencies.
Data Ingestion Layer: Ingests and processes customer data into the format required for CodeWhisperer.
Customization Layer: Produces a customization resource based on the internal representation of the customer data. Shares the customization artifacts for inference.
Model Inference Layer: Provides customer-specific recommendations based on the customization.
AWS IAM Identity Center: Provides user-level authentication.
Organization admins are responsible for managing their customizations. To enable CodeWhisperer to produce these resources, the admin provides access to their private code repositories. CodeWhisperer uses AWS Key Management Service (AWS KMS) encryption for all customization data, and admins can optionally configure their own profile-level encryption keys. Based on the role assumed by the admin in the AWS console, CodeWhisperer accesses and ingests the referenced code data on the user’s behalf.
Data Isolation
During customization management, data storage occurs in two forms:
Short-term/transient (e.g. ephemeral disks on service-managed, serverless compute)
When persisting data in any form, the best security control to apply is encryption. By encrypting the data, only entities with access to the encryption key will be able to see, or use, the data. For example, when encrypted data is stored in Amazon S3, users with access to the bucket can see that the data exists, but will be unable to view the content, unless they also have access to the encryption key.
Within CodeWhisperer, long-term customer data storage in Amazon S3 is cryptographically isolated using KMS keys with customer-level encryption context metadata. The encryption context provides a further safeguard which prevents unauthorized users from accessing the content even if they gain access to the key. It also prevents unintentional, cross-customer data access as the context value is tied to a particular customer’s identity. Having access to the KMS key without this context is like having the physical invitation to a private meeting without knowing the spoken passphrase for the event.
CodeWhisperer gives customers the option to configure their own KMS keys for AWS to use when encrypting their data. Additionally, we restrict programmatic access (i.e. service usage) to Amazon S3 data via scoped-down IAM roles assigned to specific internal components. By doing this, AWS ensures that the KMS grants created for each key are strictly limited to the services that need access to the data for service operation.
When data needs to be persisted for short-term processing, we also encrypt it. CodeWhisperer leverages client-side encryption with service-owned keys for such ephemeral disks. Data is only stored on the disk while the process is executing, and any on-disk data storage is explicitly deleted, alarming on any failures, before the process is terminated. To ensure that there is no cross-over of customer data, each instance of the serverless compute is spun up for a specific operation on a specific resource. No two customer resources are processed by the same workflow or serverless function execution.
Compute Isolation
When creating or activating a customization, customer data is handled in a series of serverless environments. Most of this processing is facilitated through AWS Step Functions workflows – comprised of AWS Lambda, AWS Batch (on AWS Fargate), and nested Step Functions tasks. Each of these serverless tasks are instantiated for a given job in the system. In other words, the compute will not be shared, or reused, between two operations.
The general principle that can be observed here is the reuse of existing AWS services. By leveraging these various serverless options, we did not have to spend undifferentiated development effort on securing the compute usage. Instead, we inherited the security controls baked into these services and focused our energy on enabling the unique capabilities of customizing CodeWhisperer.
Confused Deputy Mitigations
When building a multi-tenant service, it is important to be mindful not only of how data is accessed in the expected cases, but also how it might be accessed in accidental as well as malicious scenarios. This is where the concept of confused deputy mitigations comes into picture.
To prevent cross-customer data access during data ingestion, we have two mitigations in place:
We explicitly check that the AWS credentials received in the request correspond to the account that owns the data reference (i.e. AWS CodeStar Connections ARN).
We utilize a secure token, based on the administrator’s role, to gain permissions to download the data from the customer-provided reference.
Once the data is inside the CodeWhisperer service boundaries though, we are not done. Since CodeWhisperer is built on top of a microservice-based architecture, we also need to ensure that only the expected internal components are able to interact with their respective consumers and dependencies. To prevent unauthorized users from invoking these internal services that handle the customer data, we utilize account-based allowlists. Each internal service is restricted to a set of CodeWhisperer-owned service accounts that have a need to invoke the service’s APIs. No external actors are aware of these internal accounts.
As further protection for the data inside these services, we utilize customer-managed key encryption for all Amazon S3 data. When a customer does not explicitly provide their own key, we utilize a CodeWhisperer-owned KMS key for the same encryption.
KMS key usage requires a grant. These grants provide a given entity the ability to use the key to read, or write, data. To mitigate the risk of improper usage of these grants, we installed certain controls. To limit the number of entities with top-level grant permissions, all grants are managed by a single microservice. To restrict the usage of the grants to the expected CodeWhisperer workflows, the grants are created for the minimum lifecycle. They are immediately retired once the CodeWhisperer operation is complete.
Customization Usage
After an admin creates, activates, and grants access to a customization resource, a developer can select the customization within their IDE. Upon invocation, CodeWhisperer captures the user’s IDE code context and sends it to CodeWhisperer. The request also includes their authentication token and a reference to their target customization resource. Given successful authentication and authorization, CodeWhisperer responds with the customized recommendation(s).
Data Isolation
There is no persistent data storage used during invocations of a customization. These invocations are stateless, meaning that any data passed within the request is not persisted beyond the life of the request itself. To mitigate any data risks within the lifetime of the request, we authenticate and authorize users via IAM Identity Center.
Since a customization is tied to proprietary company data and its recommendations can reproduce such data, it is crucial to maintain tight authorization around the resource access. CodeWhisperer authorizes individual users against the customization resource via Amazon Verified Permissions policies. These policies are configured by a customer admin in the AWS Console when they assign users and groups to a given customization. (Note: CodeWhisperer manages these Verified Permissions policies on behalf of our customers, which is why admins will not see the policies themselves listed in the console directly.) The service internally resolves the policy to the corresponding service-owned resources constituting the customization.
Compute Isolation
The primary compute for CodeWhisperer invocations is an instance hosting the generative model. Generative models run multi-tenanted on a physical host, i.e. each model runs on a dedicated compute resource within a host that has multiple such resources. By tying each request to a particular compute resource, inference calls cannot interact or communicate with any other ongoing inference.
All other runtime processing is executed in independent threads on Amazon Elastic Container Service (Amazon ECS) container instances with Fargate technology. No computation on user data spans across more than one of these threads within a given CodeWhisperer service.
Confused Deputy Mitigations
As we discussed for customization management, confused deputy mitigations are applied to reduce the risk of accidental and malicious access to customer data by unauthorized entities. To address this when a customization is used, we restrict customers, via Verified Permissions permissions, to accessing only the internal resources tied to their selected customization. We further protect against confused deputy risks by configuring a session policy for each inference request. This session policy scopes down the permission to a specific resource name, which is internally managed and not exposed publicly.
Conclusion
In the age of generative AI, data is a chief differentiator for the efficacy of end applications. CodeWhisperer’s foundational model has been trained on a wide array of generic data. This enables CodeWhisperer to boost developer productivity from the baseline and utilize open-source packages that are commonly included throughout software development. To further improve developer productivity, customers can leverage CodeWhisperer’s customization capability to ingest their private data and securely provide tailored recommendations to their developers.
CodeWhisperer Customizations was built with security and customer trust at the forefront. We have the following security invariants baked in from day one:
All asynchronous customer data workloads are fully data isolated.
All customer data is KMS key encrypted at rest, and when possible, encrypted with a customer KMS key.
All customer data access is gated by authorization derived from authenticated contexts obtained from trusted authorities (IAM, Identity Center).
All customer data in customization management workflows is stored in cryptographically enforced isolation.
The command line is used by over thirty million engineers to write, build, run, debug, and deploy software. However, despite how critical it is to the software development process, the command line is notoriously hard to use. Its output is terse, its interface is from the 1970s, and it offers no hints about the ‘right way’ to use it. With tens of thousands of command line applications (called command-line interfaces or CLIs), it’s almost impossible to remember the correct input syntax. The command line’s lack of input validation also means typos can cause unnecessary errors, security risks, and even production outages. It’s no wonder that most software engineers find the command line an error-prone and often frustrating experience.
Announcing Amazon CodeWhisperer for command line Amazon CodeWhisperer for command line is a new set of capabilities and integrations for AI-powered productivity tool, Amazon CodeWhisperer, that makes software developers more productive in the command line. CodeWhisperer for command line modernizes the command line with features such personalized code completions, inline documentation, and AI natural-language-to-code translation. You don’t need to change the tools you use to start benefiting from CodeWhisperer for command line: it integrates directly with your existing tools, such as iTerm2 or the VS Code embedded terminal.
IDE-style completions for 500+ CLIs CodeWhisperer for command line adds IDE-style completions for hundreds of popular CLIs like as Git, npm, Docker, MongoDB Atlas, and the AWS CLI. These typeahead completions increase your productivity by reducing the time spent typing repetitive or boilerplate commands. Inline documentation helps you understand CLI functionality without context-switching to the browser and interrupting your workflow.
Previously, typing a CLI command like git and hitting tab either wouldn’t show you any completions or would show an incomplete list of completions in a clunky interface without descriptions. Now, you can type git and see all the git subcommands, options, and arguments with descriptions, ordered by usage recency. You can also type cd to see a list of all your directories, npm install to see a list of all the node packages available to install, or aws to see a list of all the AWS CLI subcommands.
Natural language-to-bash translation CLI completions are great for tasks where you already know how to do something and just want to move faster. But what do you do when you’re trying to solve a problem and you’re not 100% sure how? Enter: cw ai!
The cw ai command lets you write a natural language instruction and CodeWhisperer will translate it to an instantly executable shell code snippet. For instance, imagine you want to copy a file from your local machine to Amazon Simple Storage Service (Amazon S3). You would write “copy all files in my current directory to s3” and CodeWhisperer will output aws s3 cp . s3://$BUCKET_NAME --recursive — now all you need to do is choose an S3 bucket. Natural language to bash translation is perfect for those workflows you occasionally have to do, but always forget the correct bash syntax like reversing a git commit, finding strings inside files with grep, or compressing files with tar. And just like with CLI completions, cw ai translator works great with the AWS CLI.
Get started CodeWhisperer for command line is available on macOS for all major shells (bash, zsh, and fish) and major terminal emulators such as Terminal, iTerm2, Hyper, and the built-in terminals in Visual Studio Code and JetBrains.
Customers using Amazon CodeWhisperer often want to enable their developers to sign in using existing identity providers (IdP), such as Okta. CodeWhisperer provides support for authentication either through AWS Builder Id or AWS IAM Identity Center. AWS Builder ID is a personal profile for builders. It is designed for individual developers, particularly when working on personal projects or in cases when organization does not authenticate to AWS using the IAM Identity Center. IAM Identity Center is better suited for enterprise developers who use CodeWhisperer as employees of organizations that have an AWS account. The IAM Identity Center authentication method expands the capabilities of IAM by centralizing user administration and access control. Many customers prefer using Okta as their external IdP for Single Sign-On (SSO). They aim to leverage their existing Okta credentials to seamlessly access CodeWhisperer. To achieve this, customers utilize the IAM Identity Center authentication method.
Trained on billions of lines of Amazon and open-source code, CodeWhisperer is an AI coding companion that helps developers write code by generating real-time whole-line and full-function code suggestions in their Integrated Development Environments (IDEs). CodeWhisperer comes in two tiers—the Individual Tier is free for individual use, and the Professional Tier offers administrative features, like SSO and IAM Identity Center integration, policy control for referenced code suggestions, and higher limits on security scanning. Customers enable the professional tier of CodeWhisperer for their developers for a business use. When using CodeWhisperer with the professional tier, developers should authenticate with the IAM Identity Center. We will also soon introduce the Enterprise Tier, offering the additional capability to customize CodeWhisperer to generate more relevant recommendations by making it aware of your internal libraries, APIs, best practices, and architectural patterns.
In this blog, we will show you how to set up Okta as an external IdP for IAM Identity Center and enable access to CodeWhisperer using existing Okta credentials.
How it works
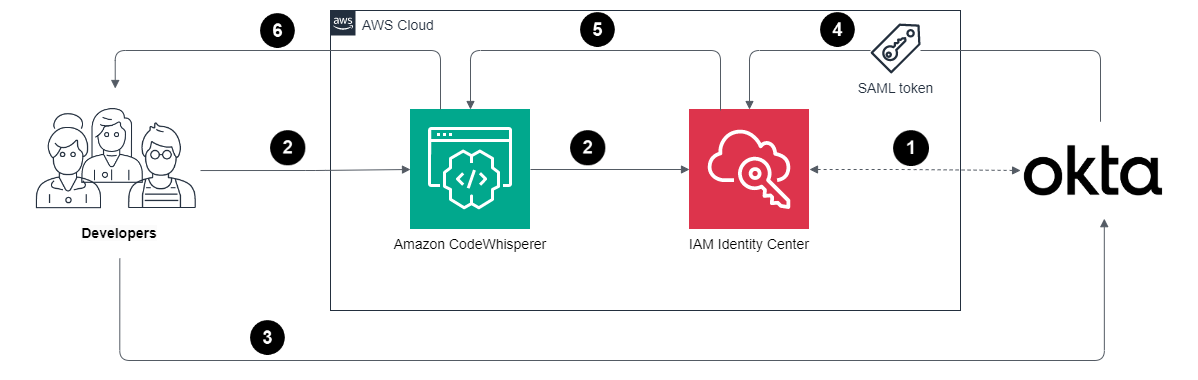
The flow for accessing CodeWhisperer through the IAM Identity Center involves the authentication of Okta users using Security Assertion Markup Language (SAML) 2.0 authentication.
Figure 1: Architecture diagram for sign-in process
The sign-in process follows these steps:
IAM Identity Center synchronizes users and groups information from Okta into IAM Identity Center using the System for Cross-domain Identity Management (SCIM) v2.0 protocol.
Developer with an Okta account connects to CodeWhisperer through IAM Identity Center.
If the developer isn’t already authenticated, they will be redirected to the Okta account login. The developer will sign in using their Okta credentials.
If the sign-in is successful, Okta processes the request and sends a SAML response containing the developer’s identity and authentication status to IAM Identity Center.
If the SAML response is valid and the developer is authenticated, IAM Identity Center grants access to CodeWhisperer.
The developer can now securely access and use CodeWhisperer.
Prerequisites
For this walkthrough, you should have the following prerequisites:
Under Identity source, select Change identity source from the Actions drop-down menu
On the next page, select External identity provider, then click Next.
Configure the external identity provider:
IdP SAML metadata: Click Choose file to upload Okta’s IdP SAML metadata you saved in the previous section Step 6.
Make a copy of the AWS access portal sign-in URL, IAM Identity Center ACS URL, and IAM Identity Center issuer URL values. You’ll need these values later on.
Click Next.
Review the list of changes. Once you are ready to proceed, type ACCEPT, then click Change identity source.
Step 3: Configure Okta with IAM Identity Center Sign On details
In Okta, select the Sign On tab IAM Identity Center SAML app, then click Edit:
Enter AWS IAM Identity Center SSO ACS URL and AWS IAM Identity Center SSO issuer URL values that you copied in previous section step 5b into the corresponding fields.
Application username format: Select one of the options from the drop-down menu.
Click Save.
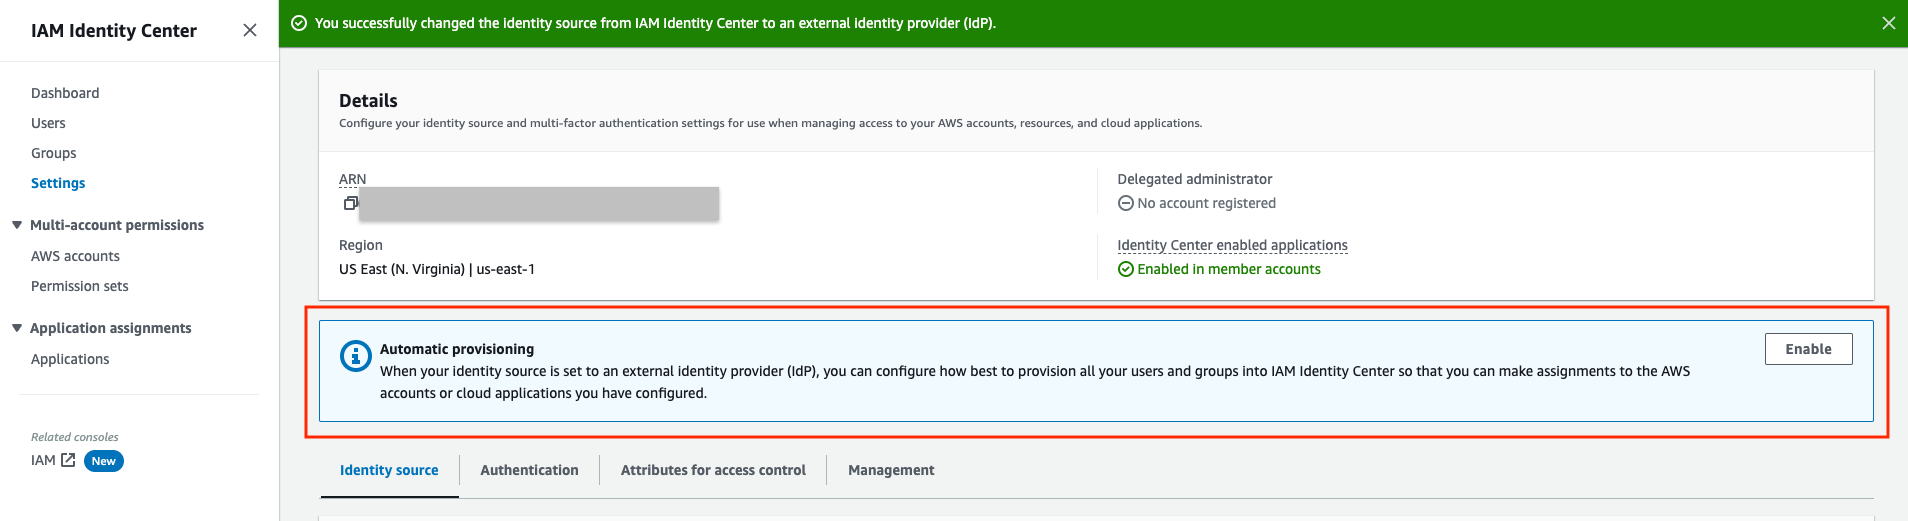
Step 4: Enable provisioning in IAM Identity Center
On the Settings page, locate the Automatic provisioning information box, and then choose Enable. This immediately enables automatic provisioning in IAM Identity Center and displays the necessary SCIM endpoint and access token information.
Figure 5: IAM Identity Center Settings for Automatic provisioning
In the Inbound automatic provisioning dialog box, copy each of the values for the following options. You will need to paste these in later when you configure provisioning in Okta.
SCIM endpoint
Access token
Choose Close.
Step 5: Configure provisioning in Okta
In a separate browser window, log in to the Okta admin portal and navigate to the IAM Identity Center app.
On the IAM Identity Center app page, choose the Provisioning tab, and then choose Integration.
Choose Configure API Integration and then select the check box next to Enable API integration to enable provisioning.
Paste SCIM endpoint copied in previous step into the Base URL field. Make sure that you remove the trailing forward slash at the end of the URL.
Paste Access token copied in previous step into the API Token field.
Choose Test API Credentials to verify the credentials entered are valid.
Choose Save.
Under Settings, choose To App, choose Edit, and then select the Enable check box for each of the Provisioning Features you want to enable.
Choose Save.
Step 6: Assign access for groups in Okta
In the Okta admin console, navigate to the IAM Identity Center app page, choose the Assignments tab.
In the Assignments page, choose Assign, and then choose Assign to Groups.
Choose the Okta group or groups that you want to assign access to the IAM Identity Center app. Choose Assign, choose Save and Go Back, and then choose Done. This starts provisioning the users in the group into the IAM Identity Center.
Repeat step 3 for all groups that you want to provide access.
Choose the Push Groups tab. Choose the Okta group or groups that you chose in the previous step.
Then choose Save. The group status changes to Active after the group and its members have successfully been pushed to IAM Identity Center.
Figure 7: Amazon CodeWhisperer Settings Page
Step 7: Provide access to CodeWhisperer
In the CodeWhisperer Console, under Settings add the groups which require access to CodeWhisperer.
Figure 7: Amazon CodeWhisperer Settings Page
Set up AWS Toolkit with IAM Identity Center
To use CodeWhisperer, you will now set up the AWS Toolkit within integrated development environments (IDE) to establish authentication with the IAM Identity Center.
Figure 8: Set up AWS Toolkit with IAM Identity Center
In the IDE, open the AWS extension panel and click Start button under Developer Tools > CodeWhisperer.
In the resulting pane, expand the section titled Have a Professional Tier subscription? Sign in with IAM Identity Center.
Enter the IAM Identity Center URL you previously copied into the Start URL field.
Set the region to us-east-1 and click Sign in button.
Click Copy Code and Proceed to copy the code from the resulting pop-up.
When prompted by the Do you want Code to open the external website? pop-up, click Open.
Paste the code copied in Step 5 and click Next.
Enter your Okta credentials and click Sign in.
Click Allow to grant AWS Toolkit to access your data.
When the connection is complete, a notification indicates that it is safe to close your browser. Close the browser tab and return to IDE.
Depending on your preference, select Yes if you wish to continue using IAM Identity Center with CodeWhisperer while using current AWS profile, else select No.
You are now all set to use CodeWhisperer from within IDE, authenticated with your Okta credentials.
Test Configuration
If you have successfully completed the previous step, you will see the code suggested by CodeWhisperer.
Figure 9: Test Step Configurations
Conclusion
In this post, you learned how to leverage existing Okta credential to access Amazon CodeWhisperer via the IAM Identity Center integration. The post walked through the steps detailing the process of setting up Okta as an external IdP with the IAM Identity Center. You then configured the AWS Toolkit to establish an authenticated connection to AWS using Okta credentials, enabling you to access the CodeWhisperer Professional Tier.
Amazon CodeWhisperer is an AI coding companion that helps improve developer productivity by offering contextualized code snippets, or suggestions, generated based on coding context and natural language prompts to help developers build software quickly, responsibly, and securely. For enterprise customers, CodeWhisperer offers a Professional tier that adds administrative features, like SSO and IAM Identity Center integration, policy control for code suggestions with references to open-source code, and higher limits on security scanning.
When I work with individual developers, they immediately recognize the productivity gains CodeWhisperer offers. However, it can be difficult to measure that same impact across the entire organization. Enterprise customers have requested to understand how many of their developers use CodeWhisperer, how often they use it, and how often they accept the suggestions that CodeWhisperer offers. This is now possible via the CodeWhisperer Dashboard and metics that CodeWhisperer sends to Amazon CloudWatch enabling enterprises to measure the impact of CodeWhisperer.
In this post, I will walk through the new metrics and dashboard options. Note that these features are only available in CodeWhisperer Professional. If you have not configured CodeWhisperer Professional, you can follow the instructions in the CodeWhisperer User Guide. For the remainder of this post, I will assume that you have configured CodeWhisperer Professional are logged into the AWS Console as a CodeWhisperer Administrator. Note that when using the CodeWhisperer Professional, CodeWhisperer does not collect your content for service improvement purposes.
Using the CodeWhisperer Dashboard
CodeWhisperer now includes a dashboard, shown in the following image, to help enterprises understand how developers are benefiting from CodeWhisperer. This dashboard is designed to answer the most common questions.
The CodeWhisperer Dashboard includes the following sections:
User activity: The User activity section includes the active subscriptions and daily active users. Active subscriptions indicate how many CodeWhisperer seats you have provisioned, while daily active users indicate how many of those seats are used on a daily basis.
Code impact:The Lines of code generated by CodeWhisperer indicates how many lines of code were suggested by CodeWhisperer and accepted by your developers. The percentage of code written by CodeWhisperer indicates how much of your total code is made up of suggestions from CodeWhisperer. This is a great indication of the value your developers are gaining from the service. Accepted suggestionswith references indicates the number of suggestions from CodeWhisperer that developers accepted which are based on open-source projects, the references to which CodeWhisperer makes available to you.
Security scans:CodeWhisperer security scan is a tool that helps identify security vulnerabilities in your developers’ code. The data shown indicates how many scans your developers have run in their Integrated Development Environment (IDE).
Using CloudWatch Metrics
While the CodeWhisperer Dashboard will address the most common questions, CodeWhisperer records additional data that may be of interest. CodeWhisperer records these as Amazon CloudWatch metrics, allowing you to create alarms, and custom dashboards. CodeWhisperer records CloudWatch metrics with various levels of granularity.
First, CodeWhisperer records a few high-level metrics as shown in the following image. Most of these already appear on the Dashboard, including the SubscriptionCount, ActiveUsers and Invocations. However, it is still useful to have them in CloudWatch so you can set alarms and build your own dashboards. In the following image, I show the weekly invocation count over the past two months.
Diving a little deeper, you may want to understand how CodeWhisperer is used for specific languages. For example, I may want to understand how CodeWhisperer benefits the front-end developers, who use JavaScript, and compare that with the back-end developer, who use Python. I can do this by leveraging the Programming Language dimension as shown in the following image.
Finally, if you want to dive even deeper, you could can use the more granular CompletionType, ProgrammingLanguage, SuggestionState dimension. CompletionType can either be BLOCK or LINE. Depending on your use case, CodeWhisperer may generate an entire function block in one suggestion or provide line-by-line suggestion. SuggestionState can be ACCEPT indicating that the user accepted the suggestion, REJECT indicating the user rejected the suggestion, or DISCARD indicating that CodeWhisperer did not make the suggestion.
I could use these metric on their own, but it is often even more powerful to use CloudWatch Math Metric to calculate custom metrics. For example, in the following image, I calculate the accept rate for JavaScript suggestions by dividing the sum of accepted suggestions by the total number of accepted and rejected suggestions.
CodeWhisperer Customizations
Swami Sivasubramanian recently announced Amazon CodeWhisperer customization capability to generate more relevant code suggestions informed by your organization’s code base. This capability uses the latest model and context customization techniques and is now available in preview. With this capability, CodeWhisperer has added additional CloudWatch metrics that let you focus on your customizations. In addition, you can filter the CodeWhisperer dashboard by customization, as shown in the following image.
Of course, you can also filter by customization in CloudWatch. CodeWhisperer publishes additional metrics that include the CustomizationARN dimension. You can use these new metrics to gather details on how your customizations are performing. For example, in the following image, I am graphing the accepted suggestions for Java for my CodeWhisperer customization. I can use this to understand how well the custom version of CodeWhisperer is performing and look for opportunities to improve my customizations.
If you did not get the desired performance improvement, consider increasing the data size and data quality for the customization.
Custom Dashboards
While CloudWatch metrics are interesting on their own, you may want to create a custom dashboard that displays multiple metrics on the screen at once. For example, I would like to see the accept rate and percent of code Written by CodeWhisperer for each of the languages my team uses. These include Python, Java, JavaScript and TypeScript. In the following, image have combined each of these on a single dashboard so I track it once place.
In the past, it was difficult to measure CodeWhisperer’s impact across the entire organization. CodeWhisperer now support CloudWatch Metrics along with a new CodeWhisperer Dashboard that provides insightful data about how your developers use the service. These new features provide the tools to understand how your organization is benefitting from CodeWhisperer. You can read more in the CodeWhisperer Documentation.
Businesses differentiate themselves by delivering new capabilities to their customers faster. They must leverage automation to accelerate their software development by optimizing code quality, improving performance, and ensuring their software meets security/compliance requirements. Trained on billions of lines of Amazon and open-source code, Amazon CodeWhisperer is an AI coding companion that helps developers write code by generating real-time whole-line and full-function code suggestions in their IDEs. Amazon CodeWhisperer has two tiers: the individual tier is free for individual use, and the professional tier provides administrative capabilities for organizations seeking to grant their developers access to CW. This blog provides a high-level overview of how developers can use CodeWhisperer.
Getting Started
Getting started with CodeWhisperer is straightforward and documented here. After setup, CodeWhisperer integrates with the IDE and provides code suggestions based on comments written in the IDE. Use TAB to accept a suggestion, ESC to reject the suggestion ALT+C (Windows)/Option + C(MAC) to force a suggestion, and left and right arrow keys to switch between suggestions.
CodeWhisperer supports code generation for 15 programming languages. CodeWhisperer can be used in various IDEs like Amazon Sagemaker Studio, Visual Studio Code, AWS Cloud9, AWS Lambda and many JetBrains IDEs. Refer to the Amazon CodeWhisperer documentation for the latest updates on supported languages and IDEs.
Contextual Code Suggestions
CodeWhisperer continuously examines code and comments for contextual code suggestions. It will generate code snippets using this contextual information and the location of your cursor. Illustrated below is an example of a code suggestion from inline comments in Visual Studio Code that demonstrates how CodeWhisperer can provide context-specific code suggestions without requiring the user to manually replace variables or parameters. In the comment, the file and Amazon Simple Storage Service (Amazon S3) bucket are specified, and CodeWhisperer uses this context to suggest relevant code.
CodeWhisperer also supports and recommends writing declarative code and procedural code, such as shell scripting and query languages. The following example shows how CodeWhisperer recommend the blocks of code in a shell script to loop through servers to execute the hostname command and save their response to an output file.
In the following example, based on the comment, CodeWhisperer suggests Structured Query Language (SQL) code for using common table expression.
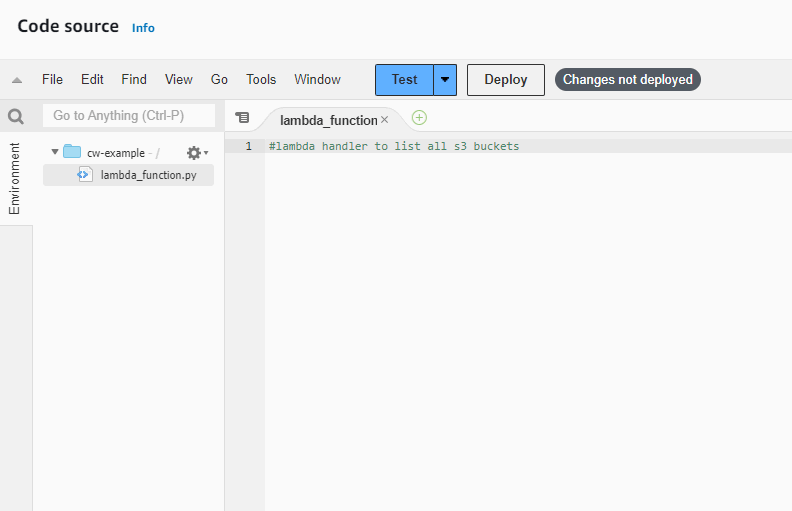
CodeWhisperer works with popular Integrated Development Environments (IDEs), for more information on IDE’s supported please refer to CodeWhisperer’s documentation. Illustrated below is CodeWhisperer integrated with AWS Lambda console.
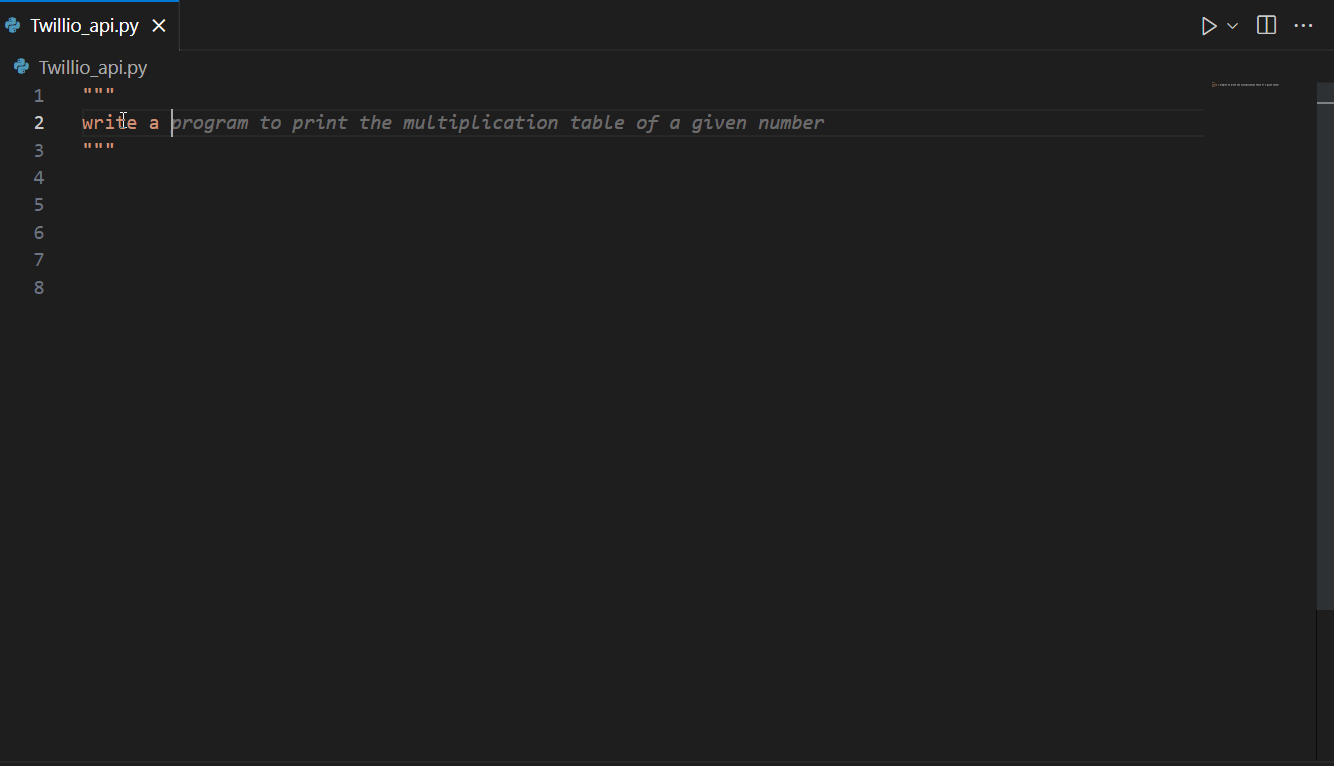
Amazon CodeWhisperer is a versatile AI coding assistant that can aid in a variety of tasks, including AWS-related tasks and API integrations, as well as external (non AWS) API integrations. For example, illustrated below is CodeWhisperer suggesting code for Twilio’s APIs.
Now that we have seen how CodeWhisperer can help with writing code faster, the next section explores how to use AI responsibly.
Use AI responsibly
Developers often leverage open-source code, however run into challenges of license attribution such as attributing the original authors or maintaining the license text. The challenge lies in properly identifying and attributing the relevant open-source components used within a project. With the abundance of open-source libraries and frameworks available, it can be time-consuming and complex to track and attribute each piece of code accurately. Failure to meet the license attribution requirements can result in legal issues, violation of intellectual property rights, and damage to a developer’s reputation. Code Whisperer’s reference tracking continuously monitors suggested code for similarities with known open-source code, allowing developers to make informed decisions about incorporating it into their project and ensuring proper attribution.
Shift left application security
CodeWhisperer can scan code for hard-to-find vulnerabilities such as those in the top ten Open Web Application Security Project (OWASP), or those that don’t meet crypto library best practices, AWS internal security best practices, and others. As of this writing, CodeWhisperer supports security scanning in Python, Java, and JavaScript languages. Below is an illustration of identifying the most known CWEs (Common Weakness Enumeration) along with the ability to dive deep into the problematic line of code with a click of a button.
In the following example, CodeWhisperer provides file-by-file analysis of CWE’s and highlights the top 10 OWASP CWEs such as Unsensitized input is run as code, Cross-site scripting, Resource leak, Hardcoded credentials, SQL injection, OS command injection and Insecure hashing.
Generating Test Cases
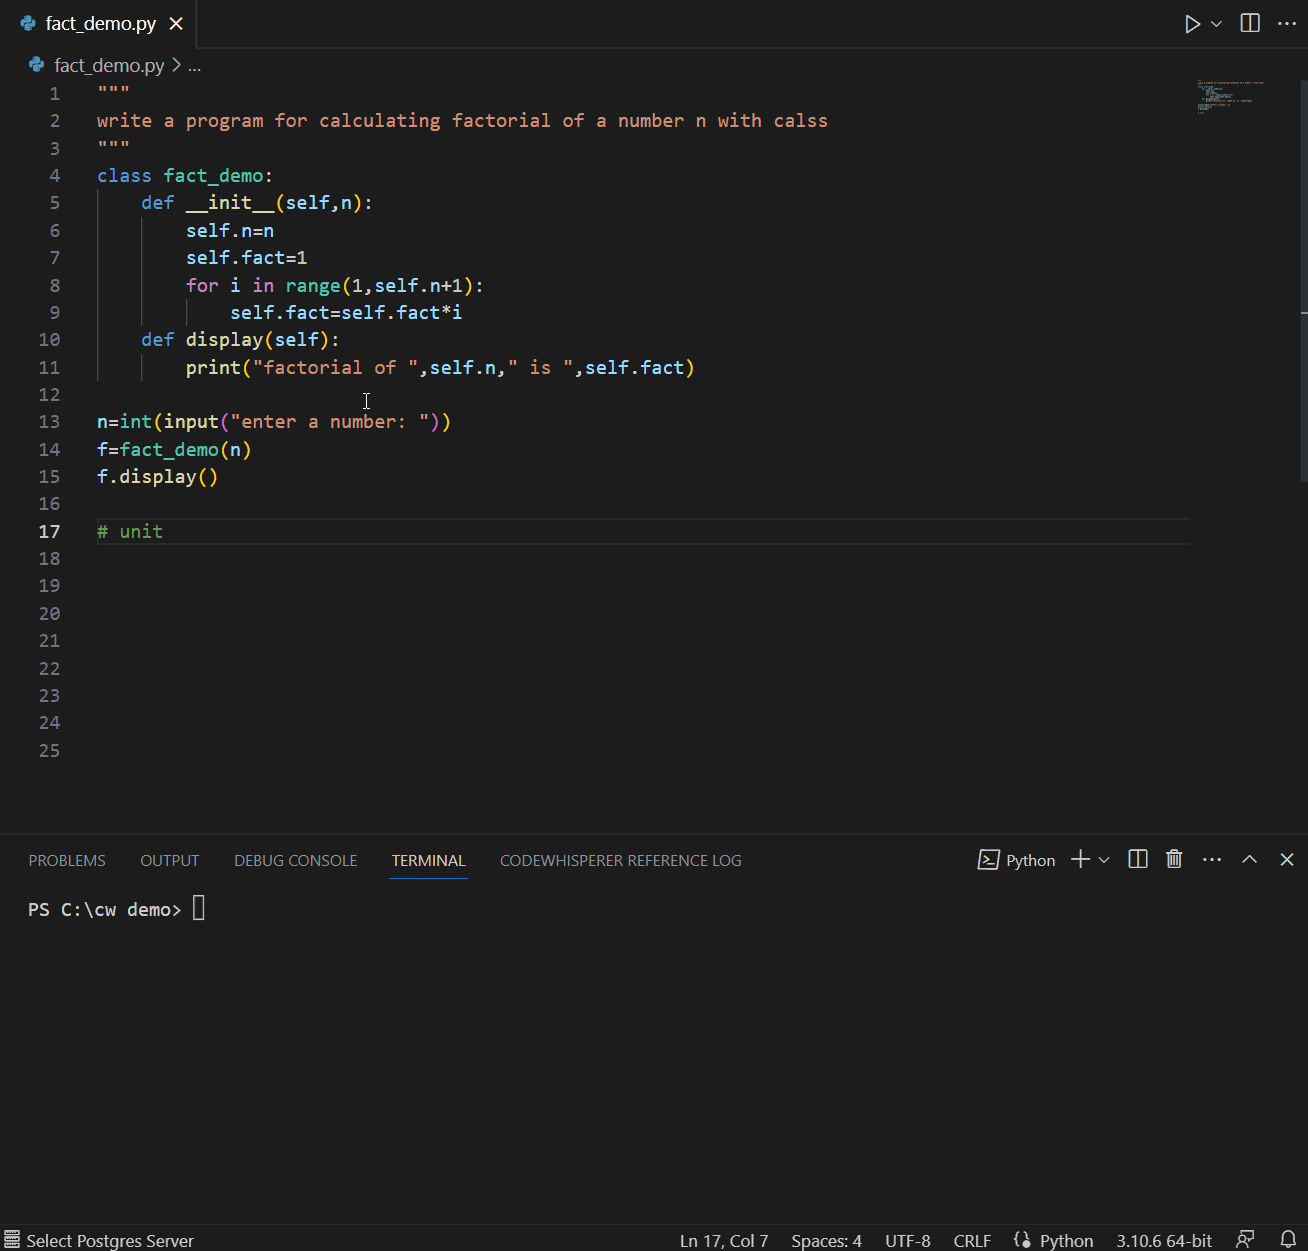
A good developer always writes tests. CodeWhisperer can help suggest test cases and verify the code’s functionality. CodeWhisperer considers boundary values, edge cases, and other potential issues that may need to be tested. In the example below, a comment referring to using fact_demo() function leads CodeWhisperer to suggest a unit test for fact_demo() while leveraging contextual details.
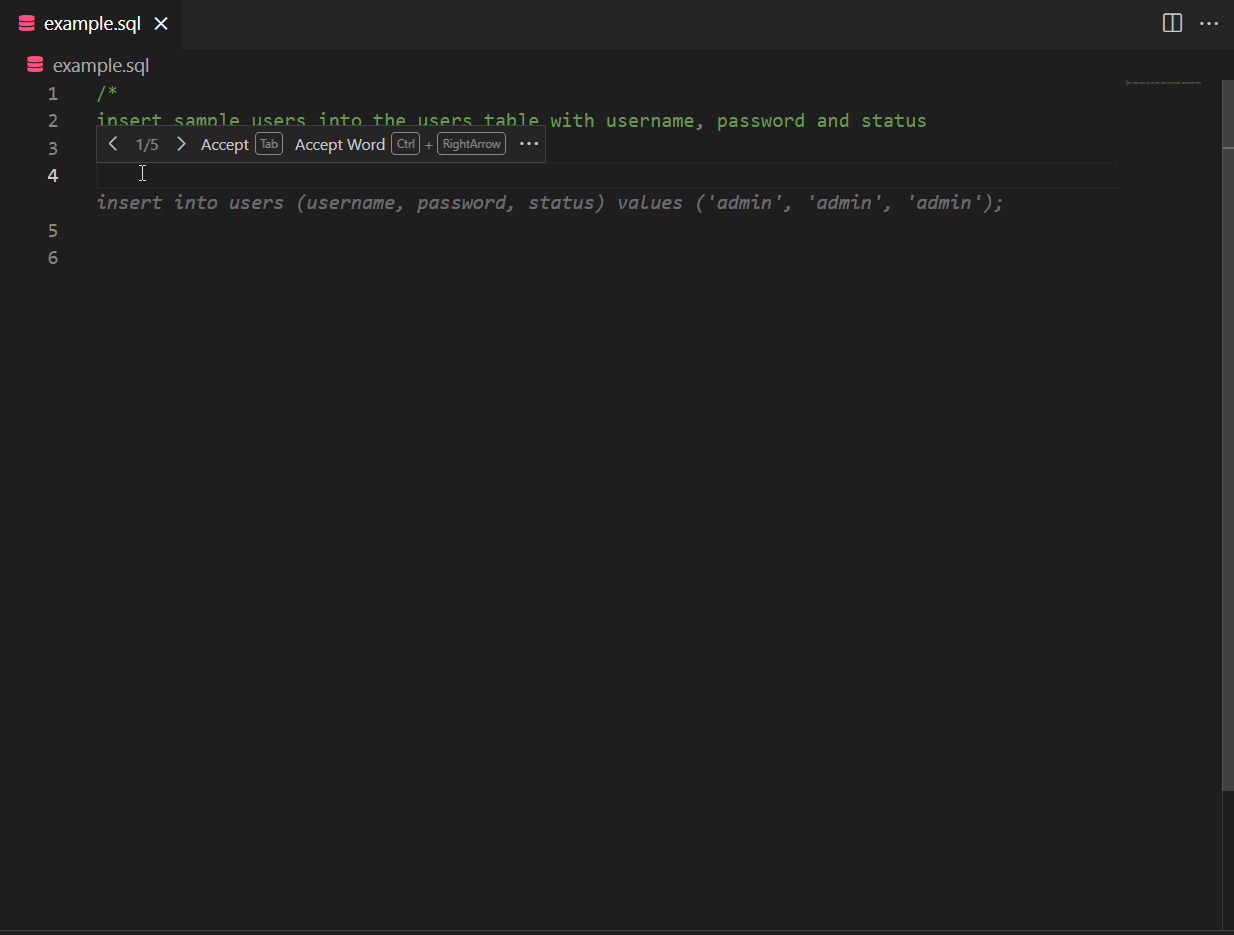
Also, CodeWhisperer can simplify creating repetitive code for unit testing. For example, if you need to create sample data using INSERT statements, CodeWhisperer can generate the necessary inserts based on a pattern.
CodeWhisperer with Amazon SageMaker Studio and Jupyter Lab
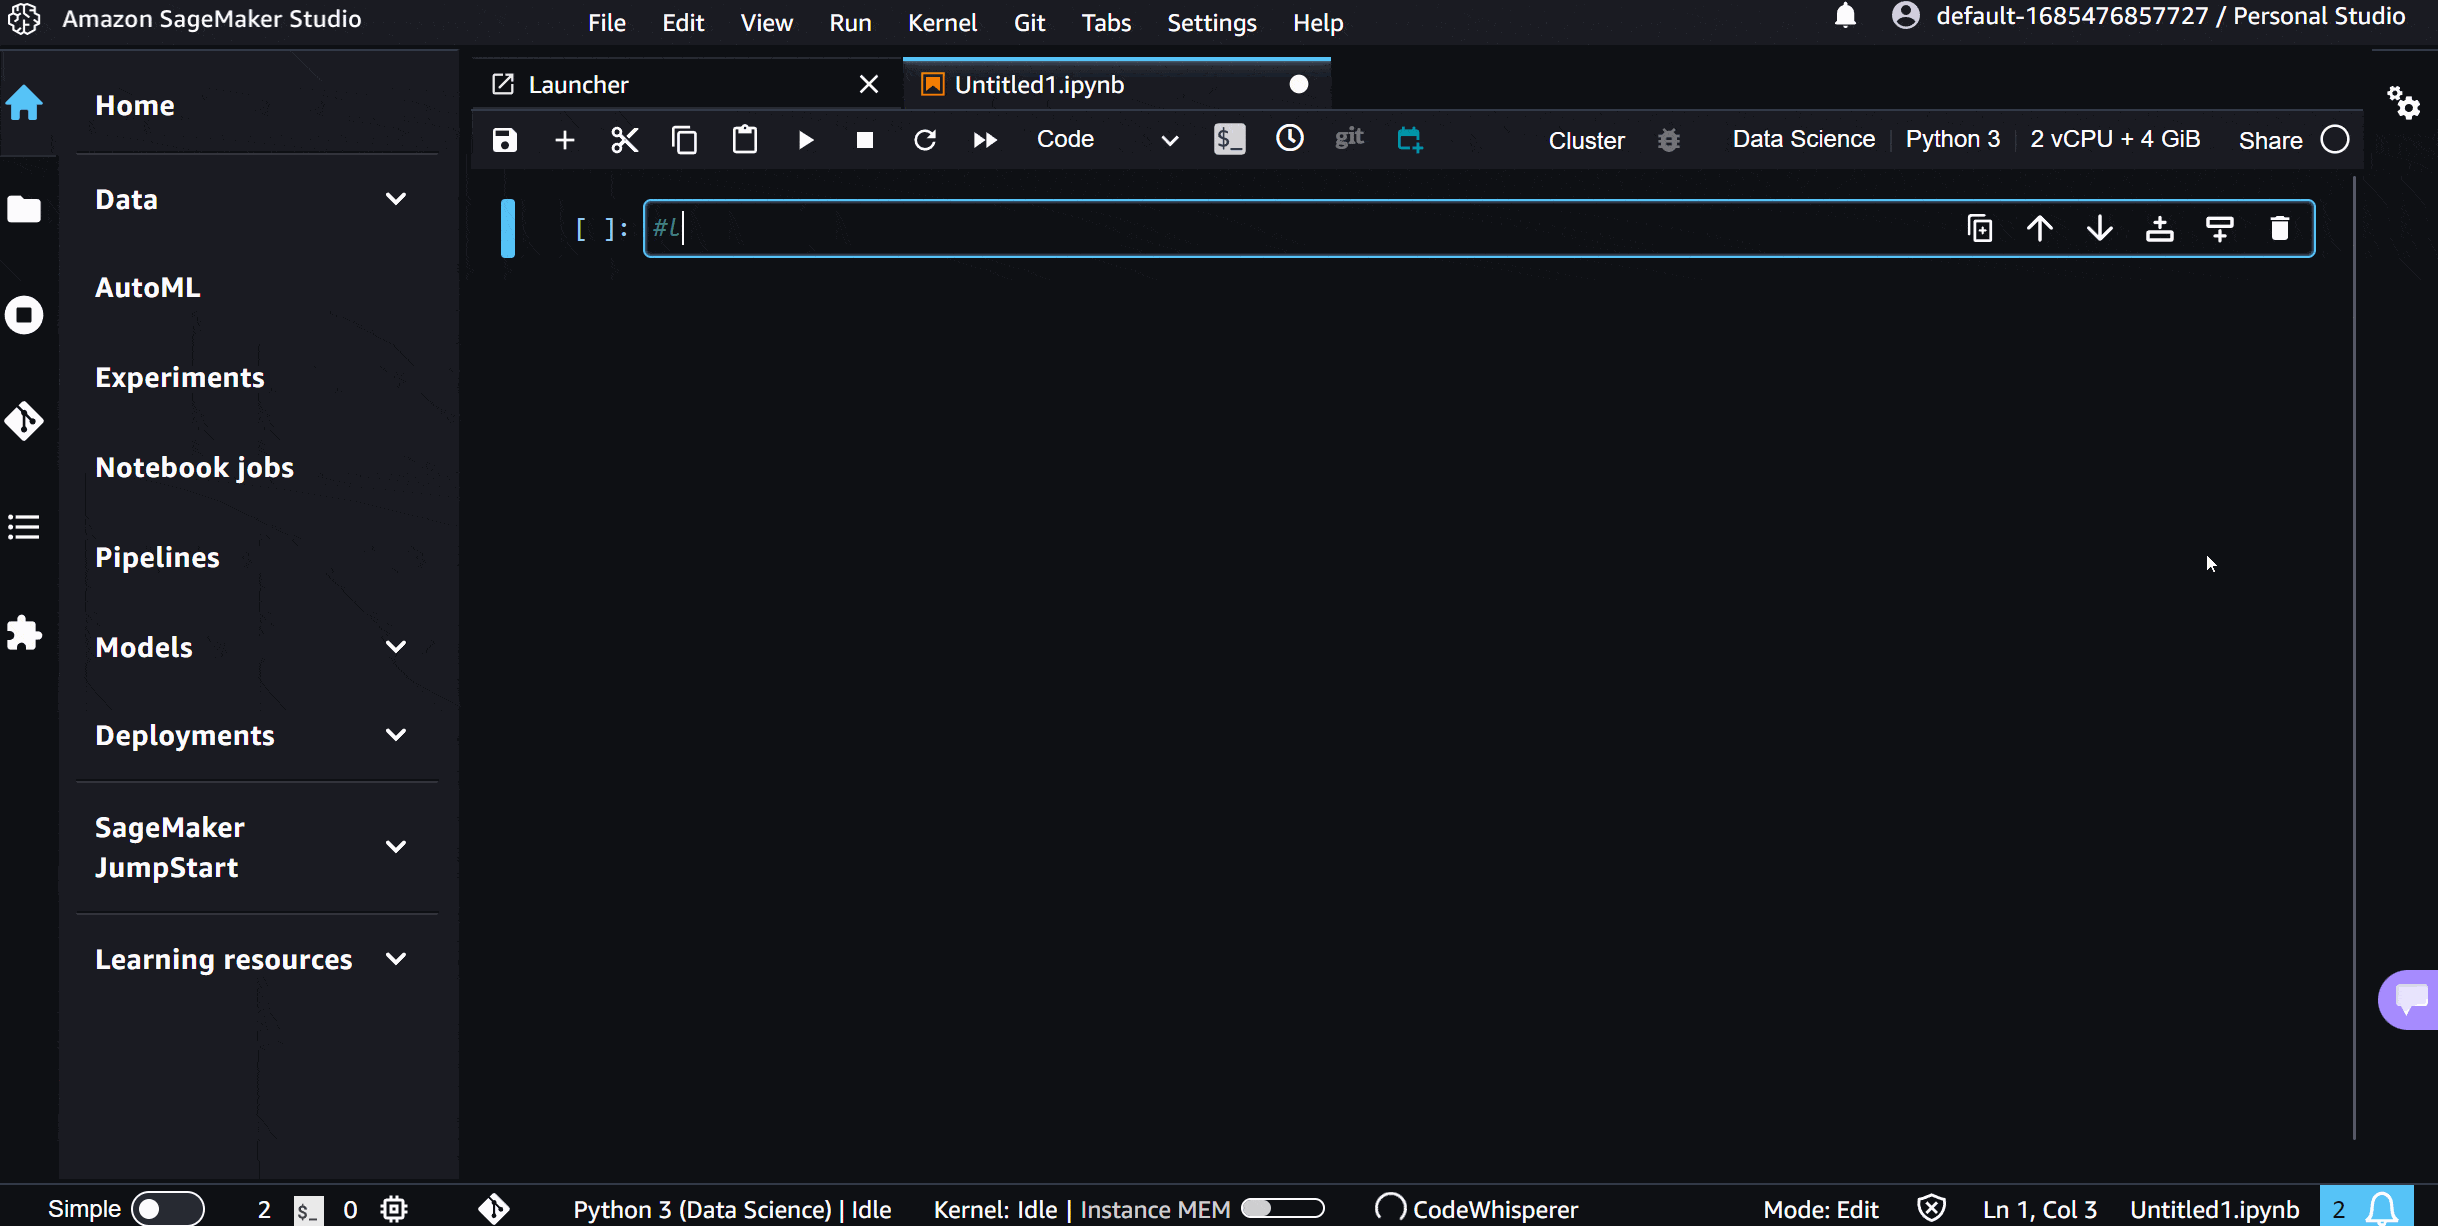
CodeWhisperer works with SageMaker Studio and Jupyter Lab, providing code completion support for Python in code cells. To utilize CodeWhisperer, follow the setup instructions to activate it in Amazon SageMaker Studio and Jupyter Lab. To begin coding, see User actions. The following illustration showcases CodeWhisperer’s code recommendations in SageMaker Studio. It demonstrates the suggested code based on comments for loading and analyzing a dataset.
Conclusion
In conclusion, this blog has highlighted the numerous ways in which developers can leverage CodeWhisperer to increase productivity, streamline workflows, and ensure the development of secure code. By adopting Code Whisperer’s AI-powered features, developers can experience enhanced productivity, accelerated learning, and significant time savings.
To take advantage of CodeWhisperer and optimize your coding process, here are the next steps:
1. Visit feature page to learn more about the benefits of CodeWhisperer.
Amazon CodeWhisperer is a powerful generative AI tool that gives me coding superpowers. Ever since I have incorporated CodeWhisperer into my workflow, I have become faster, smarter, and even more delighted when building applications. However, learning to use any generative AI tool effectively requires a beginner’s mindset and a willingness to embrace new ways of working.
Best practices for tapping into CodeWhisperer’s power are still emerging. But, as an early explorer, I’ve discovered several techniques that have allowed me to get the most out of this amazing tool. In this article, I’m excited to share these techniques with you, using practical examples to illustrate just how CodeWhisperer can enhance your programming workflow. I’ll explore:
If you would like to try these techniques for yourself, you will need to use a code editor with the AWS Toolkit extension installed. VS Code, AWS Cloud9, and most editors from JetBrains will work. Refer to the CodeWhisperer “Getting Started” resources for setup instructions.
CodeWhisperer will present suggestions automatically as you type. If you aren’t presented with a suggestion, you can always manually trigger a suggestion using the Option + C (Mac) or Alt + C (Windows) shortcut. CodeWhisperer will also sometimes present you with multiple suggestions to choose from. You can press the → and ← keys to cycle through all available suggestions.
The suggestions CodeWhisperer offers are non-deterministic, which means you may receive slightly different suggestions than the ones shown in this article. If you receive a suggestion that doesn’t suit your needs, try cycling through all available suggestions using the arrow keys or try rephrasing any code comment prompts slightly. Even punctuation changes can produce fresh suggestions.
The examples in this article are written in JavaScript and TypeScript. However, the techniques I’ll demonstrate are equally suited to many of the programming languages supported by CodeWhisperer. Now, onto the examples!
Typing less
At the most basic level, CodeWhisperer can be used as a supercharged auto-complete, significantly reducing your typing when writing individual lines or blocks of code. To use CodeWhisperer in this way, just write code as you normally would. CodeWhisperer will make automatic suggestions as you type. Accept suggestions when they’re helpful, and ignore suggestions when they’re not. In my experience, using CodeWhisperer in this way alone reduces my typing by 50% or more.
Generating functions
Automatically generating function bodies from signatures
Skilled programmers use clear, descriptive names for their functions and parameters. If you follow this practice in your own programming, CodeWhisperer will have all the context it needs to implement many functions for you.
After I enter the function signature below, CodeWhisperer generates the function body for me.
User input (JavaScript):
function standardDeviation(numbers)
Result:
function standardDeviation(numbers) {
  let mean = numbers.reduce((a, b) => a + b) / numbers.length;
  let variance =
    numbers.reduce((a, b) => a + Math.pow(b - mean, 2)) / numbers.length;
  return Math.sqrt(variance);
}
Generating functions from comments
Sometimes a good function signature alone isn’t enough to convey the desired behavior of a function. In those cases, you can use a detailed code comment as a prompt to CodeWhisperer. I recommend using your language’s doc comment delimiter when using this technique.
User Input (JavaScript):
/**
 * Given a list that contains some numbers and strings, format them into a string
 * in which the numbers are prepended with "#" and the strings are wrapped in
 * double quotes.
 */
Result:
/**
 * Given a list that contains some numbers and strings, format them into a string
 * in which the numbers are prepended with "#" and the strings are wrapped in
 * double quotes.
 */
function formatList(list) {
  return list
    .map((item) => {
      if (typeof item === "number") {
        return `#${item}`;
      } else {
        return `"${item}"`;
      }
    })
    .join(", ");
}
Generating classes
You can generate full or partial class implementations from a single code comment. The comment should describe the key properties and behaviors of the class. Simple descriptions are often all that is required.
User input (TypeScript):
/**
 * A folder has a name, children, and an optional parent. A child can't be added
 * twice.
 */
Result:
After I write the above block comment, CodeWhisperer provides multiple suggestions, including the following implementation, complete with documentation comments for each method!
/**
 * A folder has a name, children, and an optional parent. A child can't be added
 * twice.
 */
export class Folder {
  name: string;
  children: Folder[];
  parent?: Folder;

  constructor(name: string, parent?: Folder) {
    this.name = name;
    this.children = [];
    this.parent = parent;
  }

  /**
   * Add a child to the folder.
   * @param child The child to add.
   * @returns True if the child was added, false if it was already present.
   */
  addChild(child: Folder): boolean {
    if (this.children.includes(child)) {
      return false;
    }
    this.children.push(child);
    child.parent = this;
    return true;
  }

  /**
   * Remove a child from the folder.
   * @param child The child to remove.
   * @returns True if the child was removed, false if it wasn't present.
   */
  removeChild(child: Folder): boolean {
    const index = this.children.indexOf(child);
    if (index === -1) {
      return false;
    }
    this.children.splice(index, 1);
    child.parent = undefined;
    return true;
  }
}
Implementing algorithms
CodeWhisperer enables you to implement well-known algorithms with ease. Simply tell CodeWhisperer which algorithm you want to apply to a particular coding problem, and it will oblige.
User input (JavaScript):
const actors = [ ... ];

// Sort the actors by age using the merge sort algorithm.
Result:
const actors = [ ... ];

// Sort the actors by age using the merge sort algorithm.
function mergeSort(arr) {
  if (arr.length < 2) {
    return arr;
  }

  const middle = Math.floor(arr.length / 2);
  const left = arr.slice(0, middle);
  const right = arr.slice(middle);

  return merge(mergeSort(left), mergeSort(right));
}

function merge(left, right) {
  const result = [];

  while (left.length && right.length) {
    if (left[0].age < right[0].age) {
      result.push(left.shift());
    } else {
      result.push(right.shift());
    }
  }

  while (left.length) {
    result.push(left.shift());
  }

  while (right.length) {
    result.push(right.shift());
  }

  return result;
}

console.log(mergeSort(actors));
Writing unit tests
CodeWhisperer accelerates the implementation of unit tests. Not only is it able to implement the logic for most of the explicit unit tests I ask for, but it often suggests unit tests for edge cases that hadn’t even occurred to me.
When I want CodeWhisperer to implement a unit test, I start with a declaration of the condition I’m testing and the expected result as in the following example.
User input (JavaScript):
describe("Folder.addChild()", () => {
  it("when adding an existing folder should not add duplicate"
Result:
describe("Folder.addChild()", () => {
  it("when adding an existing folder should not add duplicate", () => {
    const folder = new Folder("root");
    const child = new Folder("child");
    folder.addChild(child);
    folder.addChild(child);
    expect(folder.children.length).toBe(1);
  });
});
After you’ve written a test or two, CodeWhisperer is likely to suggest more tests, even without explicit prompting.
Tip: You’ll notice that my test description includes 1) the function I’m testing, 2) the condition I’m testing, and 3) what I expect the result to be. Following this three-part pattern is a great way to ensure CodeWhisperer has the context it needs to implement high quality test logic.
Creating sample data
One of the delightful discoveries I’ve made is that CodeWhisperer can generate dummy data—or really any code that has a repeating pattern. As an illustration, for the following list I entered only the first “user” object as an example, and CodeWhisperer helpfully continued the pattern.
While CodeWhisperer can’t translate natural language into custom regular expressions (yet), it does know a lot of commonly used regular expressions. This saves you time by putting these regular expressions at your fingertips whenever you need them.
Let’s look at one notoriously complex but common regular expression.
User input (JavaScript):
/**
 * Function that validates whether a string is a valid email address.
 */
Result:
/**
 * Function that validates whether a string is a valid email address.
 */
function validateEmail(email: string): boolean {
  const re =
    /^(([^<>()[\]\\.,;:\s@"]+(\.[^<>()[\]\\.,;:\s@"]+)*)|(".+"))@((\[[0-9]{1,3}\.[0-9]{1,3}\.[0-9]{1,3}\.[0-9]{1,3}\])|(([a-zA-Z\-0-9]+\.)+[a-zA-Z]{2,}))$/;
  return re.test(String(email).toLowerCase());
}
Learning third-party code libraries faster
CodeWhisperer helps accelerate my learning when I’m using an unfamiliar library, module, or framework. In the example below, I needed to write a utility function that would take a gzip compressed value coming from an API and translate it into a value that the rest of my code could understand. I knew the “pako” library would help me, but I had no idea how to use it. I just prompted CodeWhisperer with an import statement and a comment describing my goal.
import pako from "pako";

/**
 * Accepts a base64-encoded, gzip-compressed JSON string and returns
 * a parsed JSON object.
 */
Result:
import pako from "pako";

/**
 * Accepts a base64-encoded, gzip-compressed JSON string and returns
 * a parsed JSON object.
 */
export function decodeGzipJson(base64String) {
  const compressed = atob(base64String);
  const uncompressed = pako.inflate(compressed, { to: "string" });
  return JSON.parse(uncompressed);
}
Documenting code
CodeWhisperer is capable of generating docstrings and comments for the code it generates, as well as for your existing code. For example, let’s say I want CodeWhisperer to document the matches() method of this FavoritesFilter TypeScript class I’ve implemented (I’ve omitted some implementation details for brevity).
I can just type a doc comment delimiter (/** */) immediately above the method name and CodeWhisperer will generate the body of the doc comment for me.
Note: When using CodeWhisperer in this way you may have to manually trigger a suggestion using Option + C (Mac) or Alt + C (Windows).
class FavoritesFilter implements IAssetFilter {
  ...
  /**
   * Determines whether the asset matches the filter.
   */
  matches(asset: Asset): boolean {
    ...
  }
}
Conclusion
I hope the techniques above inspire ideas for how CodeWhisperer can make you a more productive coder. Install CodeWhisperer today to start using these time-saving techniques in your own projects. These examples only scratch the surface. As additional creative minds start applying CodeWhisperer to their daily workflows, I’m sure new techniques and best practices will continue to emerge. If you discover a novel approach that you find useful, post a comment to share what you’ve discovered. Perhaps your technique will make it into a future article and help others in the CodeWhisperer community enhance their superpowers.
While writing code to develop applications, developers must keep up with multiple programming languages, frameworks, software libraries, and popular cloud services from providers such as AWS. Even though developers can find code snippets on developer communities, to either learn from them or repurpose the code, manually searching for the snippets with an exact or even similar use case is a distracting and time-consuming process. They have to do all of this while making sure that they’re following the correct programming syntax and best coding practices.
Amazon CodeWhisperer, a machine learning (ML) powered coding aide for developers, lets you overcome those challenges. Developers can simply write a comment that outlines a specific task in plain English, such as “upload a file to S3.” Based on this, CodeWhisperer automatically determines which cloud services and public libraries are best-suited for the specified task, it creates the specific code on the fly, and then it recommends the generated code snippets directly in the IDE. And this isn’t about copy-pasting code from the web, but generating code based on the context of your file, such as which libraries and versions you have, as well as the existing code. Moreover, CodeWhisperer seamlessly integrates with your Visual Studio Code and JetBrains IDEs so that you can stay focused and never leave the development environment. At the time of this writing, CodeWhisperer supports Java, Python, JavaScript, C#, and TypeScript.
To make our application easier to digest, we’ll split it into three segments:
Image download – The user provides an image URL to the first API. A Lambda function downloads the image from the URL and stores it on an S3 bucket. Amazon S3 automatically sends a notification to an Amazon SNS topic informing that a new image is ready for processing. Amazon SNS then delivers the message to an Amazon SQS queue.
Image recognition – A second Lambda function handles the orchestration and processing of the image. It receives the message from the Amazon SQS queue, sends the image for Amazon Rekognition to process, stores the recognition results on a DynamoDB table, and sends a message with those results as JSON to a second Amazon SNS topic used in section three. A user can list the images and the objects present on each image by calling a second API which queries the DynamoDB table.
3rd-party integration – The last Lambda function reads the message from the second Amazon SQS queue. At this point, the Lambda function must deliver that message to a fictitious external e-mail server HTTP API that supports only XML payloads. Because of that, the Lambda function converts the JSON message to XML. Lastly, the function sends the XML object via HTTP POST to the e-mail server.
The following diagram depicts the architecture of our application:
Figure 1. Architecture diagram depicting the application architecture. It contains the service icons with the component explained on the text above.
Prerequisites
Before getting started, you must have the following prerequisites:
We already created the scaffolding for the application that we’ll build, which you can find on this Git repository. This application is represented by a CDK app that describes the infrastructure according to the architecture diagram above. However, the actual business logic of the application isn’t provided. You’ll implement it using CodeWhisperer. This means that we already declared using AWS CDK components, such as the API Gateway endpoints, DynamoDB table, and topics and queues. If you’re new to AWS CDK, then we encourage you to go through the CDK workshop later on.
Deploying AWS CDK apps into an AWS environment (a combination of an AWS account and region) requires that you provision resources that the AWS CDK needs to perform the deployment. These resources include an Amazon S3 bucket for storing files and IAM roles that grant permissions needed to perform deployments. The process of provisioning these initial resources is called bootstrapping. The required resources are defined in an AWS CloudFormation stack, called the bootstrap stack, which is usually named CDKToolkit. Like any CloudFormation stack, it appears in the CloudFormation console once it has been deployed.
After cloning the repository, let’s deploy the application (still without the business logic, which we’ll implement later on using CodeWhisperer). For this post, we’ll implement the application in Python. Therefore, make sure that you’re under the python directory. Then, use the cdk bootstrap command to bootstrap an AWS environment for AWS CDK. Replace {AWS_ACCOUNT_ID} and {AWS_REGION} with corresponding values first:
cdk bootstrap aws://{AWS_ACCOUNT_ID}/{AWS_REGION}
For more information about bootstrapping, refer to the documentation.
Let’s get started by implementing the first Lambda function, which is responsible for downloading an image from the provided URL and storing that image in an S3 bucket. Open the get_save_image.py file from the python/api/runtime/ directory. This file contains an empty Lambda function handler and the needed inputs parameters to integrate this Lambda function.
url is the URL of the input image provided by the user,
name is the name of the image provided by the user, and
S3_BUCKET is the S3 bucket name defined by our application infrastructure.
Write a comment in natural language that describes the required functionality, for example:
# Function to get a file from url
To trigger CodeWhisperer, hit the Enter key after entering the comment and wait for a code suggestion. If you want to manually trigger CodeWhisperer, then you can hit Option + C on MacOS or Alt + C on Windows. You can browse through multiple suggestions (if available) with the arrow keys. Accept a code suggestion by pressing Tab. Discard a suggestion by pressing Esc or typing a character.
You should get a suggested implementation of a function that downloads a file using a specified URL. The following image shows an example of the code snippet that CodeWhisperer suggests:
Figure 2. Screenshot of the code generated by CodeWhisperer on VS Code. It has a function called get_file_from_url with the implementation suggestion to download a file using the requests lib.
Be aware that CodeWhisperer uses artificial intelligence (AI) to provide code recommendations, and that this is non-deterministic. The result you get in your IDE may be different from the one on the image above. If needed, fine-tune the code, as CodeWhisperer generates the core logic, but you might want to customize the details depending on your requirements.
Let’s try another action, this time to upload the image to an S3 bucket:
# Function to upload image to S3
As a result, CodeWhisperer generates a code snippet similar to the following one:
Figure 3. Screenshot of the code generated by CodeWhisperer on VS Code. It has a function called upload_image with the implementation suggestion to download a file using the requests lib and upload it to S3 using the S3 client.
Now that you have the functions with the functionalities to download an image from the web and upload it to an S3 bucket, you can wire up both functions in the Lambda handler function by calling each function with the correct inputs.
Image recognition
Now let’s implement the Lambda function responsible for sending the image to Amazon Rekognition for processing, storing the results in a DynamoDB table, and sending a message with those results as JSON to a second Amazon SNS topic. Open the image_recognition.py file from the python/recognition/runtime/ directory. This file contains an empty Lambda and the needed inputs parameters to integrate this Lambda function.
queue_url is the URL of the Amazon SQS queue to which this Lambda function is subscribed,
table_name is the name of the DynamoDB table, and
topic_arn is the ARN of the Amazon SNS topic to which this Lambda function is published.
Using CodeWhisperer, implement the business logic of the next Lambda function as you did in the previous section. For example, to detect the labels from an image using Amazon Rekognition, write the following comment:
# Detect labels from image with Rekognition
And as a result, CodeWhisperer should give you a code snippet similar to the one in the following image:
Figure 4. Screenshot of the code generated by CodeWhisperer on VS Code. It has a function called detect_labels with the implementation suggestion to use the Rekognition SDK to detect labels on the given image.
You can continue generating the other functions that you need to fully implement the business logic of your Lambda function. Here are some examples that you can use:
# Save labels to DynamoDB
# Publish item to SNS
# Delete message from SQS
Following the same approach, open the list_images.py file from the python/recognition/runtime/ directory to implement the logic to list all of the labels from the DynamoDB table. As you did previously, type a comment in plain English:
# Function to list all items from a DynamoDB table
Other frequently used code
Interacting with AWS isn’t the only way that you can leverage CodeWhisperer. You can use it to implement repetitive tasks, such as creating unit tests and converting message formats, or to implement algorithms like sorting and string matching and parsing. The last Lambda function that we’ll implement as part of this post is to convert a JSON payload received from Amazon SQS to XML. Then, we’ll POST this XML to an HTTP endpoint.
Open the send_email.py file from the python/integration/runtime/ directory. This file contains an empty Lambda function handler. An event is a JSON-formatted document that contains data for a Lambda function to process. Type a comment with your intent to get the code snippet:
# Transform json to xml
As CodeWhisperer uses the context of your files to generate code, depending on the imports that you have on your file, you’ll get an implementation such as the one in the following image:
Figure 5. Screenshot of the code generated by CodeWhisperer on VS Code. It has a function called json_to_xml with the implementation suggestion to transform JSON payload into XML payload.
Repeat the same process with a comment such as # Send XML string with HTTP POST to get the last function implementation. Note that the email server isn’t part of this implementation. You can mock it, or simply ignore this HTTP POST step. Lastly, wire up both functions in the Lambda handler function by calling each function with the correct inputs.
Deploy and test the application
To deploy the application, run the command cdk deploy --all. You should get a confirmation message, and after a few minutes your application will be up and running on your AWS account. As outputs, the APIStack and RekognitionStack will print the API Gateway endpoint URLs. It will look similar to this example:
The first endpoint expects two string parameters: url (the image file URL to download) and name (the target file name that will be stored on the S3 bucket). Use any image URL you like, but remember that you must encode an image URL before passing it as a query string parameter to escape the special characters. Use an online URL encoder of your choice for that. Then, use the curl command to invoke the API Gateway endpoint:
curl -X GET 'https://examp1eid0.execute-api.eu-east-
2.amazonaws.com/prod?url={encoded-image-URL}&name={file-name}'
Replace {encoded-image-URL} and {file-name} with the corresponding values. Also, make sure that you use the correct API endpoint that you’ve noted from the AWS CDK deploy command output as mentioned above.
It will take a few seconds for the processing to happen in the background. Once it’s ready, see what has been stored in the DynamoDB table by invoking the List Images API (make sure that you use the correct URL from the output of your deployed AWS CDK stack):
curl -X GET 'https://examp1eid7.execute-api.eu-east-2.amazonaws.com/prod'
After you’re done, to avoid unexpected charges to your account, make sure that you clean up your AWS CDK stacks. Use the cdk destroy command to delete the stacks.
Conclusion
In this post, we’ve seen how to get a significant productivity boost with the help of ML. With that, as a developer, you can stay focused on your IDE and reduce the time that you spend searching online for code snippets that are relevant for your use case. Writing comments in natural language, you get context-based snippets to implement full-fledged applications. In addition, CodeWhisperer comes with a mechanism called reference tracker, which detects whether a code recommendation might be similar to particular CodeWhisperer training data. The reference tracker lets you easily find and review that reference code and see how it’s used in the context of another project. Lastly, CodeWhisperer provides the ability to run scans on your code (generated by CodeWhisperer as well as written by you) to detect security vulnerabilities.
During the preview period, CodeWhisperer is available to all developers across the world for free. Get started with the free preview on JetBrains, VS Code or AWS Cloud9.
About the author:
The collective thoughts of the interwebz
Manage Consent
To provide the best experiences, we use technologies like cookies to store and/or access device information. Consenting to these technologies will allow us to process data such as browsing behavior or unique IDs on this site. Not consenting or withdrawing consent, may adversely affect certain features and functions.
Functional
Always active
The technical storage or access is strictly necessary for the legitimate purpose of enabling the use of a specific service explicitly requested by the subscriber or user, or for the sole purpose of carrying out the transmission of a communication over an electronic communications network.
Preferences
The technical storage or access is necessary for the legitimate purpose of storing preferences that are not requested by the subscriber or user.
Statistics
The technical storage or access that is used exclusively for statistical purposes.The technical storage or access that is used exclusively for anonymous statistical purposes. Without a subpoena, voluntary compliance on the part of your Internet Service Provider, or additional records from a third party, information stored or retrieved for this purpose alone cannot usually be used to identify you.
Marketing
The technical storage or access is required to create user profiles to send advertising, or to track the user on a website or across several websites for similar marketing purposes.