You can now develop AWS Lambda functions using Node.js 24, either as a managed runtime or using the container base image. Node.js 24 is in active LTS status and ready for production use. It is expected to be supported with security patches and bugfixes until April 2028.
The Lambda runtime for Node.js 24 includes a new implementation of the Runtime Interface Client (RIC), which integrates your functions code with the Lambda service. Written in TypeScript, the new RIC streamlines and simplifies Node.js support in Lambda, removing several legacy features. In particular, callback-based function handlers are no longer supported.
Node.js 24 includes several additions to the language, such as Explicit Resource Management, as well as changes to the runtime implementation and the standard library. With this release, Node.js developers can take advantage of these new features and enhancements when creating serverless applications on Lambda.
This blog post highlights important changes to the Node.js runtime, notable Node.js language updates, and how you can use the new Node.js 24 runtime in your serverless applications.
Node.js 24 runtime changes
The Lambda Runtime for Node.js 24 includes the following changes relative to the Node.js 22 and earlier runtimes.
Removing support for callback-based function handlers
Starting with the Node.js 24 runtime, Lambda no longer supports the callback-based handler signature for asynchronous operations. Callback-based handlers take three parameters, with the third parameter a callback. For example:
export const handler = (event, context, callback) => {
    try {
        // Some processing...

        // Success case
        // First parameter (error) is null, second is the result
        callback(null, {
            statusCode: 200,
            body: JSON.stringify({
                message: "Operation completed successfully"
            })
        });

    } catch (error) {
        // Error case
        // First parameter contains the error
        callback(error);
    }
};
The modern approach to asynchronous programming in Node.js is to use the async/await pattern. Lambda introduced support for async handlers with the Node.js 8 runtime, launched in 2018. Here’s how the above function looks when using an async handler:
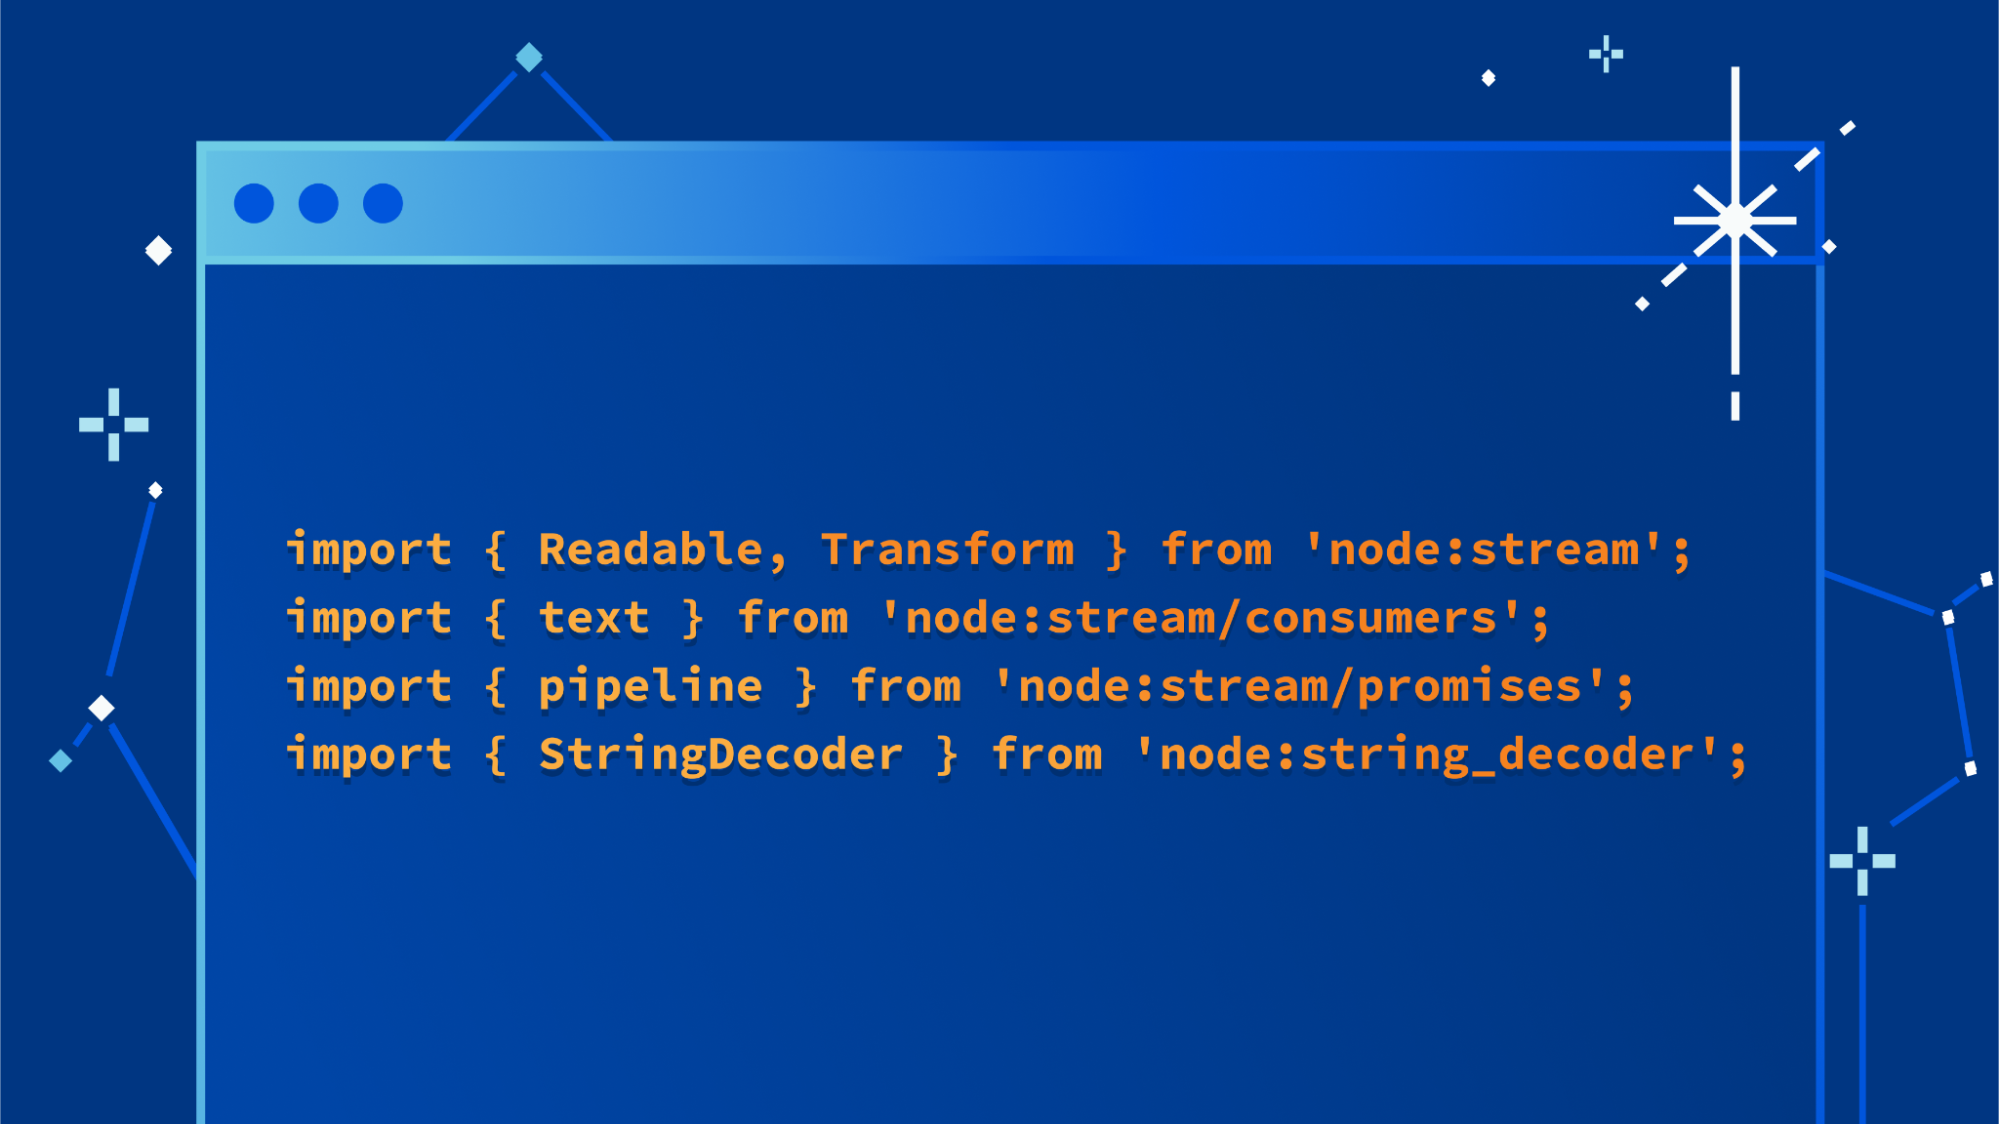
And Node.js 24 still supports response streaming, enabling more responsive applications by accelerating the time-to-first-byte:
export const handler = awslambda.streamifyResponse(async (event, responseStream, context) => {
    // Convert event to a readable stream
    const requestStream = Readable.from(Buffer.from(JSON.stringify(event)));
    // Stream the response using pipeline
    await pipeline(requestStream, responseStream);
});
This change to remove support for callback-based function handlers only affects Node.js 24 (and later) runtimes. Existing runtimes for Node.js 22 and earlier continue to support callback-based function handlers. When migrating functions that use callback-based handlers to Node.js 24, you need to modify your code to use one of the supported function handler signatures
As part of this change, context.callbackWaitsForEmptyEventLoop is removed. In addition, the previously deprecated context.succeed, context.fail, and context.done methods have also been removed. This aligns the runtime with modern Node.js patterns for clearer, more consistent error and result handling.
Harmonizing streaming and non-streaming behavior for unresolved promises
The Node.js 24 runtime also resolves a previous inconsistency in how unresolved promises were handled. Previously, Lambda would not wait for unresolved promises once the handler returns except when using response streaming. Starting with Node.js 24, the response streaming behavior is now consistent with non-streaming behavior, and Lambda no longer waits for unresolved promises once your handler returns or the response stream ends. Any background work (for example, pending timers, fetches, or queued callbacks) is not awaited implicitly. If your response depends on additional asynchronous operations, ensure you await them in your handler or integrate them into the streaming pipeline before closing the stream or returning, so the response only completes after all required work has finished.
Experimental Node.js features
Node.js enables certain experimental features by default in the upstream language releases. Such features include support for importing modules using require() in ECMAScript modules (ES modules) and automatically detecting ES vs CommonJS modules. As they are experimental, these features may be unstable or undergo breaking changes in future Node.js updates. To provide a stable experience, Lambda disables these features by default in the corresponding Lambda runtimes.
Lambda allows you to re-enable these features by adding the --experimental-require-module flag or the --experimental-detect-module flag to the NODE_OPTIONS environment variable. Enabling experimental Node.js features may affect performance and stability, and these features can change or be removed in future Node.js releases; such issues are not covered by AWS Support or the Lambda SLA.
ES modules in CloudFormation inline functions
With AWS CloudFormation inline functions, you provide your function code directly in the CloudFormation template. They’re particularly useful when deploying custom resources. With inline functions, the code filename is always index.js, which by default Node.js interprets as a CommonJS module. With the Node.js 24 runtime, you can use ES modules when authoring inline functions by passing the --experimental-detect-module flag via the NODE_OPTIONS environment variable. Previously, you needed a zip or container package to use ES modules. With Node.js 24, you can write inline functions using standard ESM syntax (import/export) and top‑level await), which simplifies small utilities and bootstrap logic without requiring a packaging step.
Node.js 24 language features
Node.js 24 introduces several language updates and features that enhance developer productivity and improve application performance.
Node.js 24 includes Undici 7, a newer version of the HTTP client that powers global fetch. This version brings performance improvements and broader protocol capabilities. Network‑heavy Lambda functions that call AWS services or external APIs can benefit from better connection management and throughput, especially when reusing clients or using HTTP/2 where supported. Most applications should work without changes, but you should validate behavior for advanced scenarios, such as custom headers or streaming bodies, and continue to define HTTP clients outside of the handler to maximize connection reuse across invocations.
The JavaScript Explicit Resource Management syntax (using and await using) enables deterministic clean-up of resources when a block completes. For Lambda handlers, this makes it easier to ensure short‑lived objects, such as streams, temporary buffers, or file handles, are disposed of promptly, which reduces the risk of resource leaks across warm invocations. You should continue to define long‑lived clients, for example SDK clients or database pools, outside the handler to benefit from connection reuse, and apply explicit disposal only to resources you want to tear down at the end of each invocation.
Finally, the AsyncLocalStorage API now uses AsyncContextFrame by default, improving the performance and reliability of async context propagation. This benefits common serverless patterns such as timers, correlating logs, managing tracing IDs and request‑scoped metadata across async and await boundaries, and streams without manual parameter threading. If you already use AsyncLocalStorage‑based libraries for logging or observability, you may see lower overhead and more consistent context propagation in Node.js 24.
At launch, new Lambda runtimes receive less usage than existing established runtimes. This can result in longer cold start times due to reduced cache residency within internal Lambda sub-systems. Cold start times typically improve in the weeks following launch as usage increases. As a result, AWS recommends not drawing conclusions from side-by-side performance comparisons with other Lambda runtimes until the performance has stabilized. Since performance is highly dependent on workload, customers with performance-sensitive workloads should conduct their own testing, instead of relying on generic test benchmarks.
Builders should continue to measure and test function performance and optimize function code and configuration for any impact. To learn more about how to optimize Node.js performance in Lambda, see our blog post Optimizing Node.js dependencies in AWS Lambda.
Migration from earlier Node.js runtimes
We’ve already discussed changes that are new to the Node.js 24 runtime, such as removing support for callback-based function handlers. As a reminder, we’ll recap some previous changes for customers upgrading from older Node.js functions.
The Node.js 24 runtime is based on the provided.al2023 runtime, which is based on the Amazon Linux 2023 minimal container image. The Amazon Linux 2023 minimal image uses microdnf as a package manager, symlinked as dnf. This replaces the yum package manager used in Node.js 18 and earlier AL2-based images. If you deploy your Lambda function as a container image, you must update your Dockerfile to use dnf instead of yum when upgrading to the Node.js 24 base image from Node.js 18 or earlier.
Finally, we’ll review how to configure your functions to use Node.js 24, using a range of deployment tools.
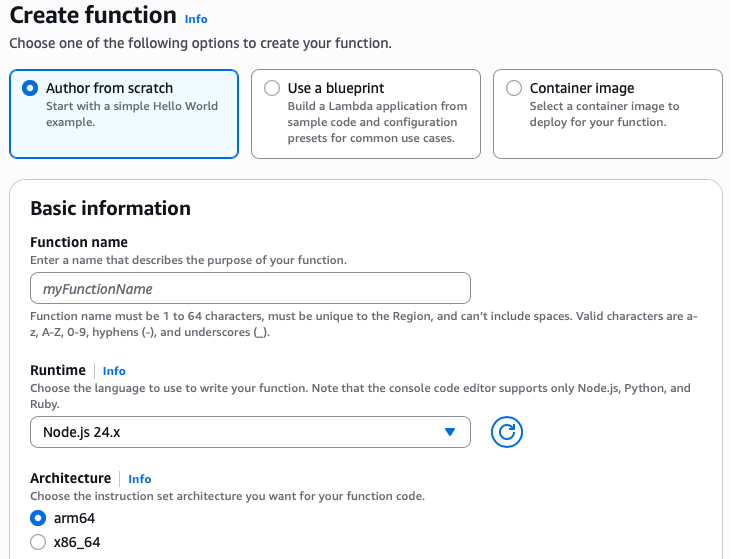
AWS Management Console
When using the AWS Lambda Console, you can choose Node.js 24.x in the Runtime dropdown when creating a function:
Creating Node.js function in the AWS Management Console
To update an existing Lambda function to Node.js 24, navigate to the function in the Lambda console, click Edit in the Runtime settings panel, then choose Node.js 24.x from the Runtime dropdown:
Editing Node.js function runtime
AWS Lambda container image
Change the Node.js base image version by modifying the FROM statement in your Dockerfile.
FROM public.ecr.aws/lambda/nodejs:24
# Copy function code
COPY lambda_handler.mjs ${LAMBDA_TASK_ROOT}
AWS Serverless Application Model
In AWS SAM, set the Runtime attribute to node24.x to use this version:
AWSTemplateFormatVersion: "2010-09-09"
Transform: AWS::Serverless-2016-10-31
Resources:
  MyFunction:
    Type: AWS::Serverless::Function
    Properties:
      Handler: lambda_function.lambda_handler
      Runtime: nodejs24.x
      CodeUri: my_function/.
      Description: My Node.js Lambda Function
AWS SAM supports generating this template with Node.js 24 for new serverless applications using the sam init command. For more information, refer to the AWS SAM documentation.
AWS Cloud Development Kit (AWS CDK)
In AWS CDK, set the runtime attribute to Runtime.NODEJS_24_X to use this version.
import * as cdk from "aws-cdk-lib";
import * as lambda from "aws-cdk-lib/aws-lambda";
import * as path from "path";
import { Construct } from "constructs";
export class CdkStack extends cdk.Stack {
  constructor(scope: Construct, id: string, props?: cdk.StackProps) {
    super(scope, id, props);
    // The code that defines your stack goes here
    // The Node.js 24 enabled Lambda Function
    const lambdaFunction = new lambda.Function(this, "node24LambdaFunction", {
      runtime: lambda.Runtime.NODEJS_24_X,
      code: lambda.Code.fromAsset(path.join(__dirname, "/../lambda")),
      handler: "index.handler",
    });
  }
}
Conclusion
AWS Lambda now supports Node.js 24 as a managed runtime and container base image. This release uses a new runtime interface client, removes support for callback-based function handlers, and includes several other changes to streamline and simplify Node.js support in Lambda.
You can build and deploy functions using Node.js 24 using the AWS Management Console, AWS CLI, AWS SDK, AWS SAM, AWS CDK, or your choice of infrastructure as code tool. You can also use the Node.js 24 container base image if you prefer to build and deploy your functions using container images.
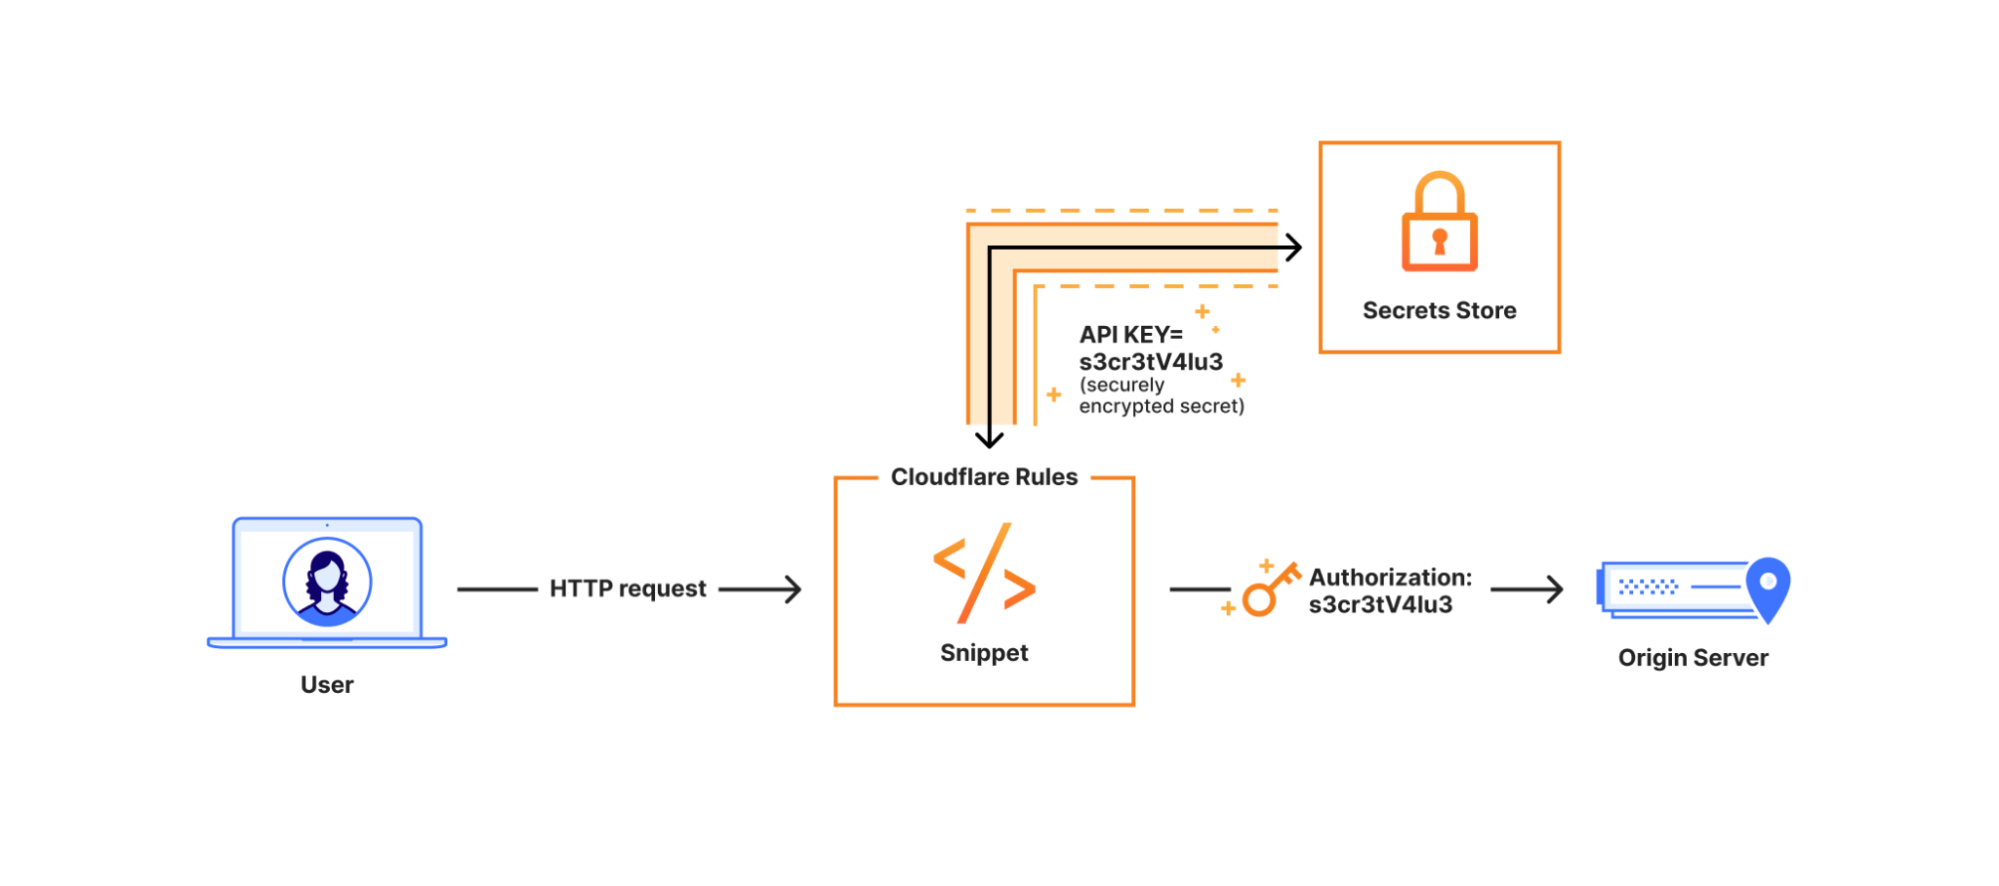
In early September 2025, attackers used a phishing email to compromise one or more trusted maintainer accounts on npm. They used this to publish malicious releases of 18 widely used npm packages (for example chalk, debug, ansi-styles) that account for more than 2 billion downloads per week. Websites and applications that used these compromised packages were vulnerable to hackers stealing crypto assets (“crypto stealing” or “wallet draining”) from end users. In addition, compromised packages could also modify other packages owned by the same maintainers (using stolen npm tokens) and included code to steal developer tokens for CI/CD pipelines and cloud accounts.
As it relates to end users of your applications, the good news is that Cloudflare Page Shield, our client-side security offering will detect compromised JavaScript libraries and prevent crypto-stealing. More importantly, given the AI powering Cloudflare’s detection solutions, customers are protected from similar attacks in the future, as we explain below.
Excerpt from the injected malicious payload, along with the rest of the innocuous normal code.Among other things, the payload replaces legitimate crypto addresses with attacker’s addresses (for multiple currencies, including bitcoin, ethereum, solana).
Finding needles in a 3.5 billion script haystack
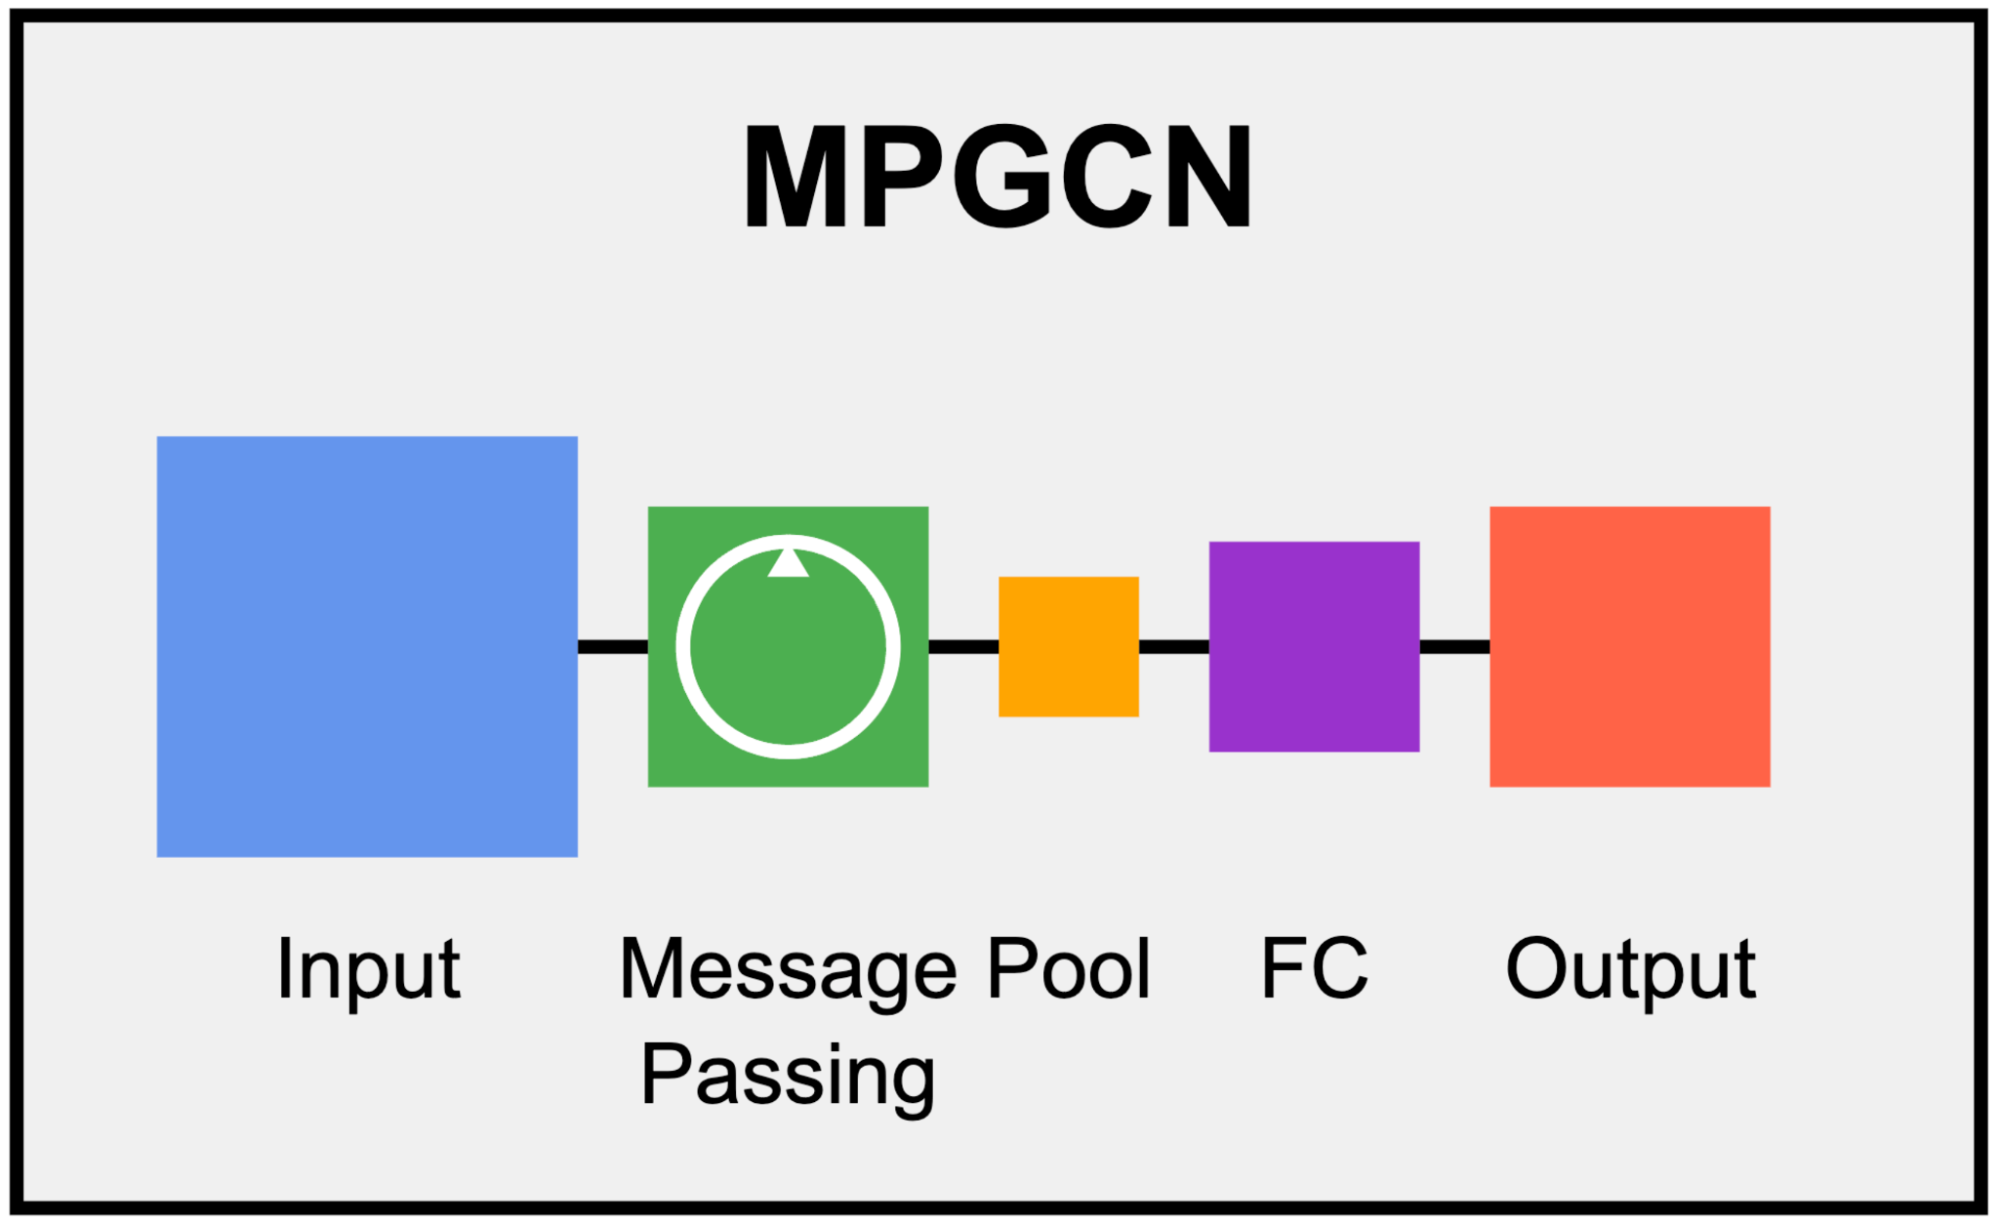
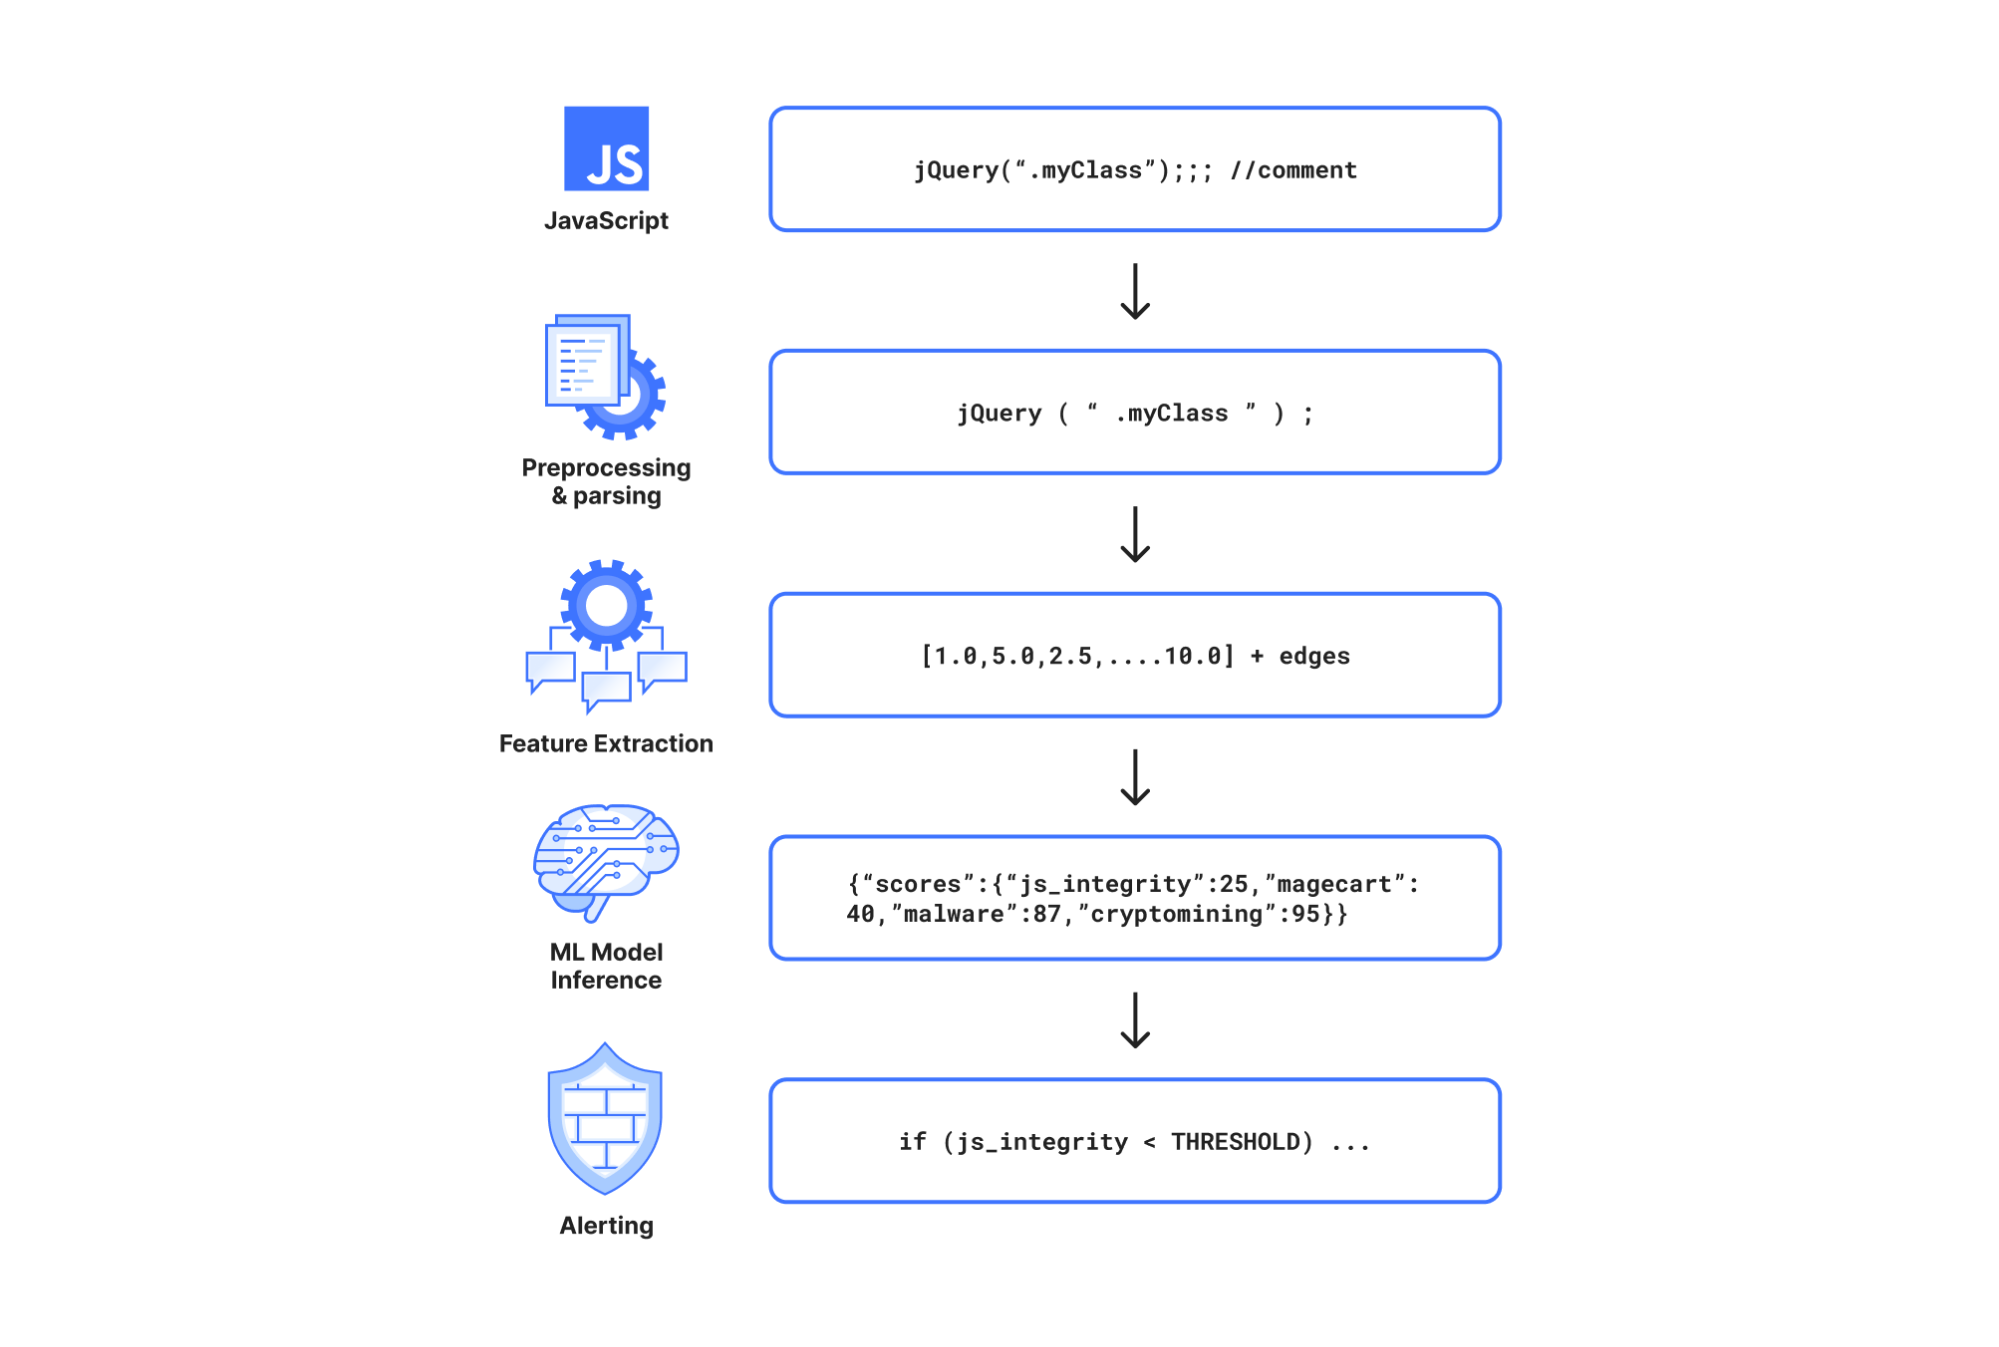
Everyday, Cloudflare Page Shield assesses 3.5 billion scripts per day or 40,000 scripts per second. Of these, less than 0.3% are malicious, based on our machine learning (ML)-based malicious script detection. As explained in a prior blog post, we preprocess JavaScript code into an Abstract Syntax Tree to train a message-passing graph convolutional network (MPGCN) that classifies a given JavaScript file as either malicious or benign.
The intuition behind using a graph-based model is to use both the structure (e.g. function calling, assertions) and code text to learn hacker patterns. For example, in the npm compromise, the malicious code injected in compromised packages uses code obfuscation and also modifies code entry points for crypto wallet interfaces, such as Ethereum’s window.ethereum, to swap payment destinations to accounts in the attacker’s control. Crucially, rather than engineering such behaviors as features, the model learns to distinguish between good and bad code purely from structure and syntax. As a result, it is resilient to techniques used not just in the npm compromise but also future compromise techniques.
Our ML model outputs the probability that a script is malicious which is then transformed into a score ranging from 1 to 99, with low scores indicating likely malicious and high scores indicating benign scripts. Importantly, like many Cloudflare ML models, inferencing happens in under 0.3 seconds.
Model Evaluation
Since the initial launch, our JavaScript classifiers are constantly being evolved to optimize model evaluation metrics, in this case, F1 measure. Our current metrics are
Metric
Latest: Version 2.7
Improvement over prior version
Precision
98%
5%
Recall
90%
233%
F1
94%
123%
Some of the improvements were accomplished through:
More training examples, curated from a combination of open source datasets, security partners, and labeling of Cloudflare traffic
Better training examples, for instance, by removing samples with pure comments in them or scripts with nearly equal structure
Better training set stratification, so that training, validation and test sets all have similar distribution of classes of interest
Tweaking the evaluation criteria to maximize recall with 99% precision
Given the confusion matrix, we should expect about 2 false positives per second, if we assume ~0.3% of the 40,000 scripts per second are flagged as malicious. We employ multiple LLMs alongside expert human security analysts to review such scripts around the clock. Most False Positives we encounter in this way are rather challenging. For example, scripts that read all form inputs except credit card numbers (e.g. reject input values that test true using the Luhn algorithm), injecting dynamic scripts, heavy user tracking, heavy deobfuscation, etc. User tracking scripts often exhibit a combination of these behaviors, and the only reliable way to distinguish truly malicious payloads is by assessing the trustworthiness of their connected domains. We feed all newly labeled scripts back into our ML training (& testing) pipeline.
Most importantly, we verified that Cloudflare Page Shield would have successfully detected all 18 compromised npm packages as malicious (a novel attack, thus, not in the training data)..
Planned improvements
Static script analysis has proven effective and is sometimes the only viable approach (e.g., for npm packages). To address more challenging cases, we are enhancing our ML signals with contextual data including script URLs, page hosts, and connected domains. Modern Agentic AI approaches can wrap JavaScript runtimes as tools in an overall AI workflow. Then, they can enable a hybrid approach that combines static and dynamic analysis techniques to tackle challenging false positive scenarios, such as user tracking scripts.
In the npm attack, we did not see any activity in the Cloudflare network related to this compromise among Page Shield users, though for other exploits, we catch its traffic within minutes. In this case, patches of the compromised npm packages were released in 2 hours or less, and given that the infected payloads had to be built into end user facing applications for end user impact, we suspect that our customers dodged the proverbial bullet. That said, had traffic gotten through, Page Shield was already equipped to detect and block this threat.
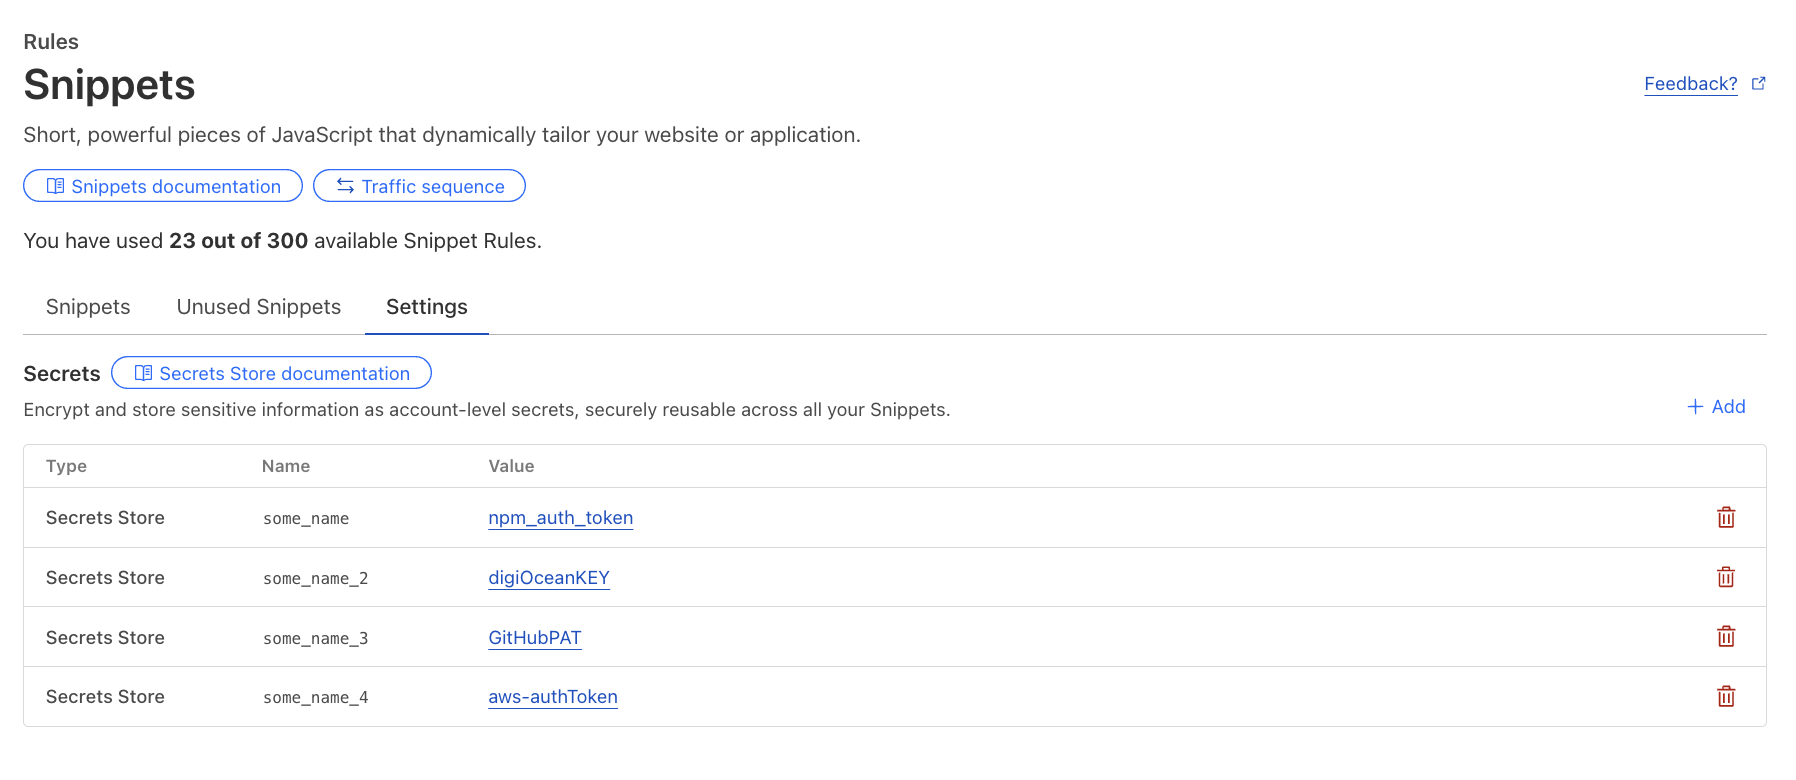
Also make sure to consult our Page Shield Script detection to find malicious packages. Consult the Connections tab within Page Shield to view suspicious connections made by your applications.
Several scripts are marked as malicious.
Several connections are marked as malicious.
And be sure to complete the following steps:
Audit your dependency tree for recently published versions (check package-lock.json / npm ls) and look for versions published around early–mid September 2025 of widely used packages.
Rotate any credentials that may have been exposed to your build environment.
Revoke and reissue CI/CD tokens and service keys that might have been used in build pipelines (GitHub Actions, npm tokens, cloud credentials).
Pin dependencies to known-good versions (or use lockfiles), and consider using a package allowlist / verified publisher features from your registry provider.
Scan build logs and repos for suspicious commits/GitHub Actions changes and remove any unknown webhooks or workflows.
While vigilance is key, automated defenses provide a crucial layer of protection against fast-moving supply chain attacks. Interested in better understanding your client-side supply chain? Sign up for our free, custom Client-Side Risk Assessment.
The web is the most powerful application platform in existence. As long as you have the right API, you can safely run anything you want in a browser.
Well… anything but cryptography.
It is as true today as it was in 2011 that Javascript cryptography is Considered Harmful. The main problem is code distribution. Consider an end-to-end-encrypted messaging web application. The application generates cryptographic keys in the client’s browser that lets users view and send end-to-end encrypted messages to each other. If the application is compromised, what would stop the malicious actor from simply modifying their Javascript to exfiltrate messages?
It is interesting to note that smartphone apps don’t have this issue. This is because app stores do a lot of heavy lifting to provide security for the app ecosystem. Specifically, they provide integrity, ensuring that apps being delivered are not tampered with, consistency, ensuring all users get the same app, and transparency, ensuring that the record of versions of an app is truthful and publicly visible.
It would be nice if we could get these properties for our end-to-end encrypted web application, and the web as a whole, without requiring a single central authority like an app store. Further, such a system would benefit all in-browser uses of cryptography, not just end-to-end-encrypted apps. For example, many web-based confidential LLMs, cryptocurrency wallets, and voting systems use in-browser Javascript cryptography for the last step of their verification chains.
In this post, we will provide an early look at such a system, called Web Application Integrity, Consistency, and Transparency (WAICT) that we have helped author. WAICT is a W3C-backed effort among browser vendors, cloud providers, and encrypted communication developers to bring stronger security guarantees to the entire web. We will discuss the problem we need to solve, and build up to a solution resembling the current transparency specification draft. We hope to build even wider consensus on the solution design in the near future.
Defining the Web Application
In order to talk about security guarantees of a web application, it is first necessary to define precisely what the application is. A smartphone application is essentially just a zip file. But a website is made up of interlinked assets, including HTML, Javascript, WASM, and CSS, that can each be locally or externally hosted. Further, if any asset changes, it could drastically change the functioning of the application. A coherent definition of an application thus requires the application to commit to precisely the assets it loads. This is done using integrity features, which we describe now.
Subresource Integrity
An important building block for defining a single coherent application is subresource integrity (SRI). SRI is a feature built into most browsers that permits a website to specify the cryptographic hash of external resources, e.g.,
This causes the browser to fetch underscore.js from cdnjs.cloudflare.com and verify that its SHA-512 hash matches the given hash in the tag. If they match, the script is loaded. If not, an error is thrown and nothing is executed.
If every external script, stylesheet, etc. on a page comes with an SRI integrity attribute, then the whole page is defined by just its HTML. This is close to what we want, but a web application can consist of many pages, and there is no way for a page to enforce the hash of the pages it links to.
Integrity Manifest
We would like to have a way of enforcing integrity on an entire site, i.e., every asset under a domain. For this, WAICT defines an integrity manifest, a configuration file that websites can provide to clients. One important item in the manifest is the asset hashes dictionary, mapping a hash belonging to an asset that the browser might load from that domain, to the path of that asset. Assets that may occur at any path, e.g., an error page, map to the empty string:
The other main component of the manifest is the integrity policy, which tells the browser which data types are being enforced and how strictly. For example, the policy in the manifest below will:
Reject any script before running it, if it’s missing an SRI tag and doesn’t appear in the hashes
Reject any WASM possibly after running it, if it’s missing an SRI tag and doesn’t appear in hashes
Thus, when both SRI and integrity manifests are used, the entire site and its interpretation by the browser is uniquely determined by the hash of the integrity manifest. This is exactly what we wanted. We have distilled the problem of endowing authenticity, consistent distribution, etc. to a web application to one of endowing the same properties to a single hash.
Achieving Transparency
Recall, a transparent web application is one whose code is stored in a publicly accessible, append-only log. This is helpful in two ways: 1) if a user is served malicious code and they learn about it, there is a public record of the code they ran, and so they can prove it to external parties, and 2) if a user is served malicious code and they don’t learn about it, there is still a chance that an external auditor may comb through the historical web application code and find the malicious code anyway. Of course, transparency does not help detect malicious code or even prevent its distribution, but it at least makes it publicly auditable.
Now that we have a single hash that commits to an entire website’s contents, we can talk about ensuring that that hash ends up in a public log. We have several important requirements here:
Do not break existing sites. This one is a given. Whatever system gets deployed, it should not interfere with the correct functioning of existing websites. Participation in transparency should be strictly opt-in.
No added round trips. Transparency should not cause extra network round trips between the client and the server. Otherwise there will be a network latency penalty for users who want transparency.
User privacy. A user should not have to identify themselves to any party more than they already do. That means no connections to new third parties, and no sending identifying information to the website.
User statelessness. A user should not have to store site-specific data. We do not want solutions that rely on storing or gossipping per-site cryptographic information.
Non-centralization. There should not be a single point of failure in the system—if any single party experiences downtime, the system should still be able to make progress. Similarly, there should be no single point of trust—if a user distrusts any single party, the user should still receive all the security benefits of the system.
Ease of opt-in. The barrier of entry for transparency should be as low as possible. A site operator should be able to start logging their site cheaply and without being an expert.
Ease of opt-out. It should be easy for a website to stop participating in transparency. Further, to avoid accidental lock-in like the defunct HPKP spec, it should be possible for this to happen even if all cryptographic material is lost, e.g., in the seizure or selling of a domain.
Opt-out is transparent. As described before, because transparency is optional, it is possible for an attacker to disable the site’s transparency, serve malicious content, then enable transparency again. We must make sure this kind of attack is detectable, i.e., the act of disabling transparency must itself be logged somewhere.
Monitorability. A website operator should be able to efficiently monitor the transparency information being published about their website. In particular, they should not have to run a high-network-load, always-on program just to notify them if their site has been hijacked.
With these requirements in place, we can move on to construction. We introduce a data structure that will be essential to the design.
Hash Chain
Almost everything in transparency is an append-only log, i.e., a data structure that acts like a list and has the ability to produce an inclusion proof, i.e., a proof that an element occurs at a particular index in the list; and a consistency proof, i.e., a proof that a list is an extension of a previous version of the list. A consistency proof between two lists demonstrates that no elements were modified or deleted, only added.
The simplest possible append-only log is a hash chain, a list-like data structure wherein each subsequent element is hashed into the running chain hash. The final chain hash is a succinct representation of the entire list.
A hash chain. The green nodes represent the chain hash, i.e., the hash of the element below it, concatenated with the previous chain hash.
The proof structures are quite simple. To prove inclusion of the element at index i, the prover provides the chain hash before i, and all the elements after i:
Proof of inclusion for the second element in the hash chain. The verifier knows only the final chain hash. It checks equality of the final computed chain hash with the known final chain hash. The light green nodes represent hashes that the verifier computes.
Similarly, to prove consistency between the chains of size i and j, the prover provides the elements between i and j:
Proof of consistency of the chain of size one and chain of size three. The verifier has the chain hashes from the starting and ending chains. It checks equality of the final computed chain hash with the known ending chain hash. The light green nodes represent hashes that the verifier computes.
Building Transparency
We can use hash chains to build a transparency scheme for websites.
Per-Site Logs
As a first step, let’s give every site its own log, instantiated as a hash chain (we will discuss how these all come together into one big log later). The items of the log are just the manifest of the site at a particular point in time:
A site’s hash chain-based log, containing three historical manifests.
In reality, the log does not store the manifest itself, but the manifest hash. Sites designate an asset host that knows how to map hashes to the data they reference. This is a content-addressable storage backend, and can be implemented using strongly cached static hosting solutions.
A log on its own is not very trustworthy. Whoever runs the log can add and remove elements at will and then recompute the hash chain. To maintain the append-only-ness of the chain, we designate a trusted third party, called a witness. Given a hash chain consistency proof and a new chain hash, a witness:
Verifies the consistency proof with respect to its old stored chain hash, and the new provided chain hash.
If successful, signs the new chain hash along with a signature timestamp.
Now, when a user navigates to a website with transparency enabled, the sequence of events is:
The site serves its manifest, an inclusion proof showing that the manifest appears in the log, and all the signatures from all the witnesses who have validated the log chain hash.
The browser verifies the signatures from whichever witnesses it trusts.
The browser verifies the inclusion proof. The manifest must be the newest entry in the chain (we discuss how to serve old manifests later).
The browser proceeds with the usual manifest and SRI integrity checks.
At this point, the user knows that the given manifest has been recorded in a log whose chain hash has been saved by a trustworthy witness, so they can be reasonably sure that the manifest won’t be removed from history. Further, assuming the asset host functions correctly, the user knows that a copy of all the received code is readily available.
The need to signal transparency. The above algorithm works, but we have a problem: if an attacker takes control of a site, they can simply stop serving transparency information and thus implicitly disable transparency without detection. So we need an explicit mechanism that keeps track of every website that has enrolled into transparency.
The Transparency Service
To store all the sites enrolled into transparency, we want a global data structure that maps a site domain to the site log’s chain hash. One efficient way of representing this is a prefix tree (a.k.a., a trie). Every leaf in the tree corresponds to a site’s domain, and its value is the chain hash of that site’s log, the current log size, and the site’s asset host URL. For a site to prove validity of its transparency data, it will have to present an inclusion proof for its leaf. Fortunately, these proofs are efficient for prefix trees.
A prefix tree with four elements. Each leaf’s path corresponds to a domain. Each leaf’s value is the chain hash of its site’s log.
To add itself to the tree, a site proves possession of its domain to the transparency service, i.e., the party that operates the prefix tree, and provides an asset host URL. To update the entry, the site sends the new entry to the transparency service, which will compute the new chain hash. And to unenroll from transparency, the site just requests to have its entry removed from the tree (an adversary can do this too; we discuss how to detect this below).
Proving to Witnesses and Browsers
Now witnesses only need to look at the prefix tree instead of individual site logs, and thus they must verify whole-tree updates. The most important thing to ensure is that every site’s log is append-only. So whenever the tree is updated, it must produce a “proof” containing every new/deleted/modified entry, as well as a consistency proof for each entry showing that the site log corresponding to that entry has been properly appended to. Once the witness has verified this prefix tree update proof, it signs the root.
The sequence of updating a site’s assets and serving the site with transparency enabled.
The client-side verification procedure is as in the previous section, with two modifications:
The client now verifies two inclusion proofs: one for the integrity policy’s membership in the site log, and one for the site log’s membership in a prefix tree.
The client verifies the signature over the prefix tree root, since the witness no longer signs individual chain hashes. As before, the acceptable public keys are whichever witnesses the client trusts.
Signaling transparency. Now that there is a single source of truth, namely the prefix tree, a client can know a site is enrolled in transparency by simply fetching the site’s entry in the tree. This alone would work, but it violates our requirement of “no added round trips,” so we instead require that client browsers will ship with the list of sites included in the prefix tree. We call this the transparency preload list.
If a site appears in the preload list, the browser will expect it to provide an inclusion proof in the prefix tree, or else a proof of non-inclusion in a newer version of the prefix tree, thereby showing they’ve unenrolled. The site must provide one of these proofs until the last preload list it appears in has expired. Finally, even though the preload list is derived from the prefix tree, there is nothing enforcing this relationship. Thus, the preload list should also be published transparently.
Filling in Missing Properties
Remember we still have the requirements of monitorability, opt-out being transparent, and no single point of failure/trust. We fill in those details now.
Adding monitorability. So far, in order for a site operator to ensure their site was not hijacked, they would have to constantly query every transparency service for its domain and verify that it hasn’t been tampered with. This is certainly better than the 500k events per hour that CT monitors have to ingest, but it still requires the monitor to be constantly polling the prefix tree, and it imposes a constant load for the transparency service.
We add a field to the prefix tree leaf structure: the leaf now stores a “created” timestamp, containing the time the leaf was created. Witnesses ensure that the “created” field remains the same over all leaf updates (and it is deleted when the leaf is deleted). To monitor, a site operator need only keep the last observed “created” and “log size” fields of its leaf. If it fetches the latest leaf and sees both unchanged, it knows that no changes occurred since the last check.
Adding transparency of opt-out. We must also do the same thing as above for leaf deletions. When a leaf is deleted, a monitor should be able to learn when the deletion occurred within some reasonable time frame. Thus, rather than outright removing a leaf, the transparency service responds to unenrollment requests by replacing the leaf with a tombstone value, containing just a “created” timestamp. As before, witnesses ensure that this field remains unchanged until the leaf is permanently deleted (after some visibility period) or re-enrolled.
Permitting multiple transparency services. Since we require that there be no single point of failure or trust, we imagine an ecosystem where there are a handful of non-colluding, reasonably trustworthy transparency service providers, each with their own prefix tree. Like Certificate Transparency (CT), this set should not be too large. It must be small enough that reasonable levels of trust can be established, and so that independent auditors can reasonably handle the load of verifying all of them.
Ok that’s the end of the most technical part of this post. We’re now going to talk about how to tweak this system to provide all kinds of additional nice properties.
(Not) Achieving Consistency
Transparency would be useless if, every time a site updates, it serves 100,000 new versions of itself. Any auditor would have to go through every single version of the code in order to ensure no user was targeted with malware. This is bad even if the velocity of versions is lower. If a site publishes just one new version per week, but every version from the past ten years is still servable, then users can still be served extremely old, potentially vulnerable versions of the site, without anyone knowing. Thus, in order to make transparency valuable, we need consistency, the property that every browser sees the same version of the site at a given time.
We will not achieve the strongest version of consistency, but it turns out that weaker notions are sufficient for us. If, unlike the above scenario, a site had 8 valid versions of itself at a given time, then that would be pretty manageable for an auditor. So even though it’s true that users don’t all see the same version of the site, they will all still benefit from transparency, as desired.
We describe two types of inconsistency and how we mitigate them.
Tree Inconsistency
Tree inconsistency occurs when transparency services’ prefix trees disagree on the chain hash of a site, thus disagreeing on the history of the site. One way to fully eliminate this is to establish a consensus mechanism for prefix trees. A simple one is majority voting: if there are five transparency services, a site must present three tree inclusion proofs to a user, showing the chain hash is present in three trees. This, of course, triples the tree inclusion proof size, and lowers the fault tolerance of the entire system (if three log operators go down, then no transparent site can publish any updates).
Instead of consensus, we opt to simply limit the amount of inconsistency by limiting the number of transparency services. In 2025, Chrome trusts eight Certificate Transparency logs. A similar number of transparency services would be fine for our system. Plus, it is still possible to detect and prove the existence of inconsistencies between trees, since roots are signed by witnesses. So if it becomes the norm to use the same version on all trees, then social pressure can be applied when sites violate this.
Temporal Inconsistency
Temporal inconsistency occurs when a user gets a newer or older version of the site (both still unexpired), depending on some external factors such as geographic location or cookie values. In the extreme, as stated above, if a signed prefix root is valid for ten years, then a site can serve a user any version of the site from the last ten years.
As with tree inconsistency, this can be resolved using consensus mechanisms. If, for example, the latest manifest were published on a blockchain, then a user could fetch the latest blockchain head and ensure they got the latest version of the site. However, this incurs an extra network round trip for the client, and requires sites to wait for their hash to get published on-chain before they can update. More importantly, building this kind of consensus mechanism into our specification would drastically increase its complexity. We’re aiming for v1.0 here.
We mitigate temporal inconsistency by requiring reasonably short validity periods for witness signatures. Making prefix root signatures valid for, e.g., one week would drastically limit the number of simultaneously servable versions. The cost is that site operators must now query the transparency service at least once a week for the new signed root and inclusion proof, even if nothing in the site changed. The sites cannot skip this, and the transparency service must be able to handle this load. This parameter must be tuned carefully.
Beyond Integrity, Consistency, and Transparency
Providing integrity, consistency, and transparency is already a huge endeavor, but there are some additional app store-like security features that can be integrated into this system without too much work.
Code Signing
One problem that WAICT doesn’t solve is that of provenance: where did the code the user is running come from, precisely? In settings where audits of code happen frequently, this is not so important, because some third party will be reading the code regardless. But for smaller self-hosted deployments of open-source software, this may not be viable. For example, if Alice hosts her own version of Cryptpad for her friend Bob, how can Bob be sure the code matches the real code in Cryptpad’s Github repo?
WEBCAT. The folks at the Freedom of Press Foundation (FPF) have built a solution to this, called WEBCAT. This protocol allows site owners to announce the identities of the developers that have signed the site’s integrity manifest, i.e., have signed all the code and other assets that the site is serving to the user. Users with the WEBCAT plugin can then see the developer’s Sigstore signatures, and trust the code based on that.
We’ve made WAICT extensible enough to fit WEBCAT inside and benefit from the transparency components. Concretely, we permit manifests to hold additional metadata, which we call extensions. In this case, the extension holds a list of developers’ Sigstore identities. To be useful, browsers must expose an API for browser plugins to access these extension values. With this API, independent parties can build plugins for whatever feature they wish to layer on top of WAICT.
Cooldown
So far we have not built anything that can prevent attacks in the moment. An attacker who breaks into a website can still delete any code-signing extensions, or just unenroll the site from transparency entirely, and continue with their attack as normal. The unenrollment will be logged, but the malicious code will not be, and by the time anyone sees the unenrollment, it may be too late.
To prevent spontaneous unenrollment, we can enforce unenrollment cooldown client-side. Suppose the cooldown period is 24 hours. Then the rule is: if a site appears on the preload list, then the client will require that either 1) the site have transparency enabled, or 2) the site have a tombstone entry that is at least 24 hours old. Thus, an attacker will be forced to either serve a transparency-enabled version of the site, or serve a broken site for 24 hours.
Similarly, to prevent spontaneous extension modifications, we can enforce extension cooldown on the client. We will take code signing as an example, saying that any change in developer identities requires a 24 hour waiting period to be accepted. First, we require that extension dev-ids has a preload list of its own, letting the client know which sites have opted into code signing (if a preload list doesn’t exist then any site can delete the extension at any time). The client rule is as follows: if the site appears in the preload list, then both 1) dev-ids must exist as an extension in the manifest, and 2) dev-ids-inclusion must contain an inclusion proof showing that the current value of dev-ids was in a prefix tree that is at least 24 hours old. With this rule, a client will reject values of dev-ids that are newer than a day. If a site wants to delete dev-ids, they must 1) request that it be removed from the preload list, and 2) in the meantime, replace the dev-ids value with the empty string and update dev-ids-inclusion to reflect the new value.
Deployment Considerations
There are a lot of distinct roles in this ecosystem. Let’s sketch out the trust and resource requirements for each role.
Transparency service. These parties store metadata for every transparency-enabled site on the web. If there are 100 million domains, and each entry is 256B each (a few hashes, plus a URL), this comes out to 26GB for a single tree, not including the intermediate hashes. To prevent size blowup, there would probably have to be a pruning rule that unenrolls sites after a long inactivity period. Transparency services should have largely uncorrelated downtime, since, if all services go down, no transparency-enabled site can make any updates. Thus, transparency services must have a moderate amount of storage, be relatively highly available, and have downtime periods uncorrelated with each other.
Transparency services require some trust, but their behavior is narrowly constrained by witnesses. Theoretically, a service can replace any leaf’s chain hash with its own, and the witness will validate it (as long as the consistency proof is valid). But such changes are detectable by anyone that monitors that leaf.
Witness. These parties verify prefix tree updates and sign the resulting roots. Their storage costs are similar to that of a transparency service, since they must keep a full copy of a prefix tree for every transparency service they witness. Also like the transparency services, they must have high uptime. Witnesses must also be trusted to keep their signing key secret for a long period of time, at least long enough to permit browser trust stores to be updated when a new key is created.
Asset host. These parties carry little trust. They cannot serve bad data, since any query response is hashed and compared to a known hash. The only malicious behavior an asset host can do is refuse to respond to queries. Asset hosts can also do this by accident due to downtime.
Client. This is the most trust-sensitive part. The client is the software that performs all the transparency and integrity checks. This is, of course, the web browser itself. We must trust this.
We at Cloudflare would like to contribute what we can to this ecosystem. It should be possible to run both a transparency service and a witness. Of course, our witness should not monitor our own transparency service. Rather, we can witness other organizations’ transparency services, and our transparency service can be witnessed by other organizations.
Supporting Alternate Ecosystems
WAICT should be compatible with non-standard ecosystems, ones where the large players do not really exist, or at least not in the way they usually do. We are working with the FPF on defining transparency for alternate ecosystems with different network and trust environments. The primary example we have is that of the Tor ecosystem.
A paranoid Tor user may not trust existing transparency services or witnesses, and there might not be any other trusted party with the resources to self-host these functionalities. For this use case, it may be reasonable to put the prefix tree on a blockchain somewhere. This makes the usual domain validation impossible (there’s no validator server to speak of), but this is fine for onion services. Since an onion address is just a public key, a signature is sufficient to prove ownership of the domain.
One consequence of a consensus-backed prefix tree is that witnesses are now unnecessary, and there is only need for the single, canonical, transparency service. This mostly solves the problems of tree inconsistency at the expense of latency of updates.
Next Steps
We are still very early in the standardization process. One of the more immediate next steps is to get subresource integrity working for more data types, particularly WASM and images. After that, we can begin standardizing the integrity manifest format. And then after that we can start standardizing all the other features. We intend to work on this specification hand-in-hand with browsers and the IETF, and we hope to have some exciting betas soon.
In the meantime, you can follow along with our transparency specification draft, check out the open problems, and share your ideas. Pull requests and issues are always welcome!
Acknowledgements
Many thanks to Dennis Jackson from Mozilla for the lengthy back-and-forth meetings on design, to Giulio B and Cory Myers from FPF for their immensely helpful influence and feedback, and to Richard Hansen for great feedback.
Compatibility with the broad JavaScript developer ecosystem has always been a key strategic investment for us. We believe in open standards and an open web. We want you to see Workers as a powerful extension of your development platform with the ability to just drop code in that Just Works. To deliver on this goal, the Cloudflare Workers team has spent the past year significantly expanding compatibility with the Node.js ecosystem, enabling hundreds (if not thousands) of popular npm modules to now work seamlessly, including the ever popular express framework.
Each of these has been carefully implemented to approximate Node.js’ behavior as closely as possible where feasible. Where matching Node.js‘ behavior is not possible, our implementations will throw a clear error when called, rather than silently failing or not being present at all. This ensures that packages that check for the presence of these APIs will not break, even if the functionality is not available.
In some cases, we had to implement entirely new capabilities within the runtime in order to provide the necessary functionality. For node:fs, we added a new virtual file system within the Workers environment. In other cases, such as with node:net, node:tls, and node:http, we wrapped the new Node.js APIs around existing Workers capabilities such as the Sockets API and fetch.
Most importantly, all of these implementations are done natively in the Workers runtime, using a combination of TypeScript and C++. Whereas our earlier Node.js compatibility efforts relied heavily on polyfills and shims injected at deployment time by developer tooling such as Wrangler, we are moving towards a model where future Workers will have these APIs available natively, without need for any additional dependencies. This not only improves performance and reduces memory usage, but also ensures that the behavior is as close to Node.js as possible.
The networking stack
Node.js has a rich set of networking APIs that allow applications to create servers, make HTTP requests, work with raw TCP and UDP sockets, send DNS queries, and more. Workers do not have direct access to raw kernel-level sockets though, so how can we support these Node.js APIs so packages still work as intended? We decided to build on top of the existing managed Sockets and fetch APIs. These implementations allow many popular Node.js packages that rely on networking APIs to work seamlessly in the Workers environment.
Let’s start with the HTTP APIs.
HTTP client and server support
From the moment we announced that we would be pursuing Node.js compatibility within Workers, users have been asking specifically for an implementation of the node:http module. There are countless modules in the ecosystem that depend directly on APIs like http.get(...) and http.createServer(...).
The node:http and node:https modules provide APIs for creating HTTP clients and servers. We have implemented both, allowing you to create HTTP clients using http.request() and servers using http.createServer(). The HTTP client implementation is built on top of the Fetch API, while the HTTP server implementation is built on top of the Workers runtime’s existing request handling capabilities.
The server side is just as simple but likely even more exciting. We’ve often been asked about the possibility of supporting Express, or Koa, or Fastify within Workers, but it was difficult to do because these were so dependent on the Node.js APIs. With the new additions it is now possible to use both Express and Koa within Workers, and we’re hoping to be able to add Fastify support later.
import { createServer } from "node:http";
import { httpServerHandler } from "cloudflare:node";

const server = createServer((req, res) => {
  res.writeHead(200, { "Content-Type": "text/plain" });
  res.end("Hello from Node.js HTTP server!");
});

export default httpServerHandler(server);
The httpServerHandler() function from the cloudflare:node module integrates the HTTP server with the Workers fetch event, allowing it to handle incoming requests.
The node:dns module
The node:dns module provides an API for performing DNS queries.
At Cloudflare, we happen to have a DNS-over-HTTPS (DoH) service and our own DNS service called 1.1.1.1. We took advantage of this when exposing node:dns in Workers. When you use this module to perform a query, it will just make a subrequest to 1.1.1.1 to resolve the query. This way the user doesn’t have to think about DNS servers, and the query will just work.
The node:net and node:tls modules
The node:net module provides an API for creating TCP sockets, while the node:tls module provides an API for creating secure TLS sockets. As we mentioned before, both are built on top of the existing Workers Sockets API. Note that not all features of the node:net and node:tls modules are available in Workers. For instance, it is not yet possible to create a TCP server using net.createServer() yet (but maybe soon!), but we have implemented enough of the APIs to allow many popular packages that rely on these modules to work in Workers.
What does supporting filesystem APIs mean in a serverless environment? When you deploy a Worker, it runs in Region:Earth and we don’t want you needing to think about individual servers with individual file systems. There are, however, countless existing applications and modules in the ecosystem that leverage the file system to store configuration data, read and write temporary data, and more.
Workers do not have access to a traditional file system like a Node.js process does, and for good reason! A Worker does not run on a single machine; a single request to one worker can run on any one of thousands of servers anywhere in Cloudflare’s global network. Coordinating and synchronizing access to shared physical resources such as a traditional file system harbor major technical challenges and risks of deadlocks and more; challenges that are inherent in any massively distributed system. Fortunately, Workers provide powerful tools like Durable Objects that provide a solution for coordinating access to shared, durable state at scale. To address the need for a file system in Workers, we built on what already makes Workers great.
We implemented a virtual file system that allows you to use the node:fs APIs to read and write temporary, in-memory files. This virtual file system is specific to each Worker. When using a stateless worker, files created in one request are not accessible in any other request. However, when using a Durable Object, this temporary file space can be shared across multiple requests from multiple users. This file system is ephemeral (for now), meaning that files are not persisted across Worker restarts or deployments, so it does not replace the use of the Durable Object Storage mechanism, but it provides a powerful new tool that greatly expands the capabilities of your Durable Objects.
The node:fs module provides a rich set of APIs for working with files and directories:
import fs from 'node:fs';

export default {
  async fetch(request) {
    // Write a temporary file
    await fs.promises.writeFile('/tmp/hello.txt', 'Hello, world!');

    // Read the file
    const data = await fs.promises.readFile('/tmp/hello.txt', 'utf-8');

    return new Response(`File contents: ${data}`);
  }
}
The virtual file system supports a wide range of file operations, including reading and writing files, creating and removing directories, and working with file descriptors. It also supports standard input/output/error streams via process.stdin, process.stdout, and process.stderr, symbolic links, streams, and more.
While the current implementation of the virtual file system is in-memory only, we are exploring options for adding persistent storage in the future that would link to existing Cloudflare storage solutions like R2 or Durable Objects. But you don’t have to wait on us! When combined with powerful tools like Durable Objects and JavaScript RPC, it’s certainly possible to create your own general purpose, durable file system abstraction backed by sqlite storage.
Cryptography with node:crypto
The node:crypto module provides a comprehensive set of cryptographic functionality, including hashing, encryption, decryption, and more. We have implemented a full version of the node:crypto module, allowing you to use familiar cryptographic APIs in your Workers applications. There will be some difference in behavior compared to Node.js due to the fact that Workers uses BoringSSL under the hood, while Node.js uses OpenSSL. However, we have strived to make the APIs as compatible as possible, and many popular packages that rely on node:crypto now work seamlessly in Workers.
To accomplish this, we didn’t just copy the implementation of these cryptographic operations from Node.js. Rather, we worked within the Node.js project to extract the core crypto functionality out into a separate dependency project called ncrypto that is used – not only by Workers but Bun as well – to implement Node.js compatible functionality by simply running the exact same code that Node.js is running.
All major capabilities of the node:crypto module are supported, including:
Hashing (e.g., SHA-256, SHA-512)
HMAC
Symmetric encryption/decryption
Asymmetric encryption/decryption
Digital signatures
Key generation and management
Random byte generation
Key derivation functions (e.g., PBKDF2, scrypt)
Cipher and Decipher streams
Sign and Verify streams
KeyObject class for managing keys
Certificate handling (e.g., X.509 certificates)
Support for various encoding formats (e.g., PEM, DER, base64)
and more…
Process & Environment
In Node.js, the node:process module provides a global object that gives information about, and control over, the current Node.js process. It includes properties and methods for accessing environment variables, command-line arguments, the current working directory, and more. It is one of the most fundamental modules in Node.js, and many packages rely on it for basic functionality and simply assume its presence. There are, however, some aspects of the node:process module that do not make sense in the Workers environment, such as process IDs and user/group IDs which are tied to the operating system and process model of a traditional server environment and have no equivalent in the Workers environment.
When nodejs_compat is enabled, the process global will be available in your Worker scripts or you can import it directly via import process from 'node:process'. Note that the process global is only available when the nodejs_compat flag is enabled. If you try to access process without the flag, it will be undefined and the import will throw an error.
Let’s take a look at the process APIs that do make sense in Workers, and that have been fully implemented, starting with process.env.
Environment variables
Workers have had support for environment variables for a while now, but previously they were only accessible via the env argument passed to the Worker function. Accessing the environment at the top-level of a Worker was not possible:
With the new process.env implementation, you can now access environment variables in a more familiar way, just like in Node.js, and at any scope, including the top-level of your Worker:
import process from 'node:process';
const config = process.env.MY_ENVIRONMENT_VARIABLE;

export default {
  async fetch(request, env) {
    // You can still access env here if you need to
    const configFromEnv = env.MY_ENVIRONMENT_VARIABLE;
    // ...
  }
}
Environment variables are set in the same way as before, via the wrangler.toml or wrangler.jsonc configuration file, or via the Cloudflare dashboard or API. They may be set as simple key-value pairs or as JSON objects:
When accessed via process.env, all environment variable values are strings, just like in Node.js.
Because process.env is accessible at the global scope, it is important to note that environment variables are accessible from anywhere in your Worker script, including third-party libraries that you may be using. This is consistent with Node.js behavior, but it is something to be aware of from a security and configuration management perspective. The Cloudflare Secrets Store can provide enhanced handling around secrets within Workers as an alternative to using environment variables.
Importable environment and waitUntil
When not using the nodejs_compat flag, we decided to go a step further and make it possible to import both the environment, and the waitUntil mechanism, as a module, rather than forcing users to always access it via the env and ctx arguments passed to the Worker function. This can make it easier to access the environment in a more modular way, and can help to avoid passing the env argument through multiple layers of function calls. This is not a Node.js-compatibility feature, but we believe it is a useful addition to the Workers environment:
import { env, waitUntil } from 'cloudflare:workers';

const config = env.MY_ENVIRONMENT_VARIABLE;

export default {
  async fetch(request) {
    // You can still access env here if you need to
    const configFromEnv = env.MY_ENVIRONMENT_VARIABLE;
    // ...
  }
}

function doSomething() {
  // Bindings and waitUntil can now be accessed without
  // passing the env and ctx through every function call.
  waitUntil(env.RPC.doSomethingRemote());
}
One important note about process.env: changes to environment variables via process.env will not be reflected in the env argument passed to the Worker function, and vice versa. The process.env is populated at the start of the Worker execution and is not updated dynamically. This is consistent with Node.js behavior, where changes to process.env do not affect the actual environment variables of the running process. We did this to minimize the risk that a third-party library, originally meant to run in Node.js, could inadvertently modify the environment assumed by the rest of the Worker code.
Stdin, stdout, stderr
Workers do not have a traditional standard input/output/error streams like a Node.js process does. However, we have implemented process.stdin, process.stdout, and process.stderr as stream-like objects that can be used similarly. These streams are not connected to any actual process stdin and stdout, but they can be used to capture output that is written to the logs captured by the Worker in the same way as console.log and friends, just like them, they will show up in Workers Logs.
The process.stdout and process.stderr are Node.js writable streams:
import process from 'node:process';

export default {
  async fetch(request) {
    process.stdout.write('This will appear in the Worker logs\n');
    process.stderr.write('This will also appear in the Worker logs\n');
    return new Response('Hello, world!');
  }
}
Support for stdin, stdout, and stderr is also integrated with the virtual file system, allowing you to write to the standard file descriptors 0, 1, and 2 (representing stdin, stdout, and stderr respectively) using the node:fs APIs:
import fs from 'node:fs';
import process from 'node:process';

export default {
  async fetch(request) {
    // Write to stdout
    fs.writeSync(process.stdout.fd, 'Hello, stdout!\n');
    // Write to stderr
    fs.writeSync(process.stderr.fd, 'Hello, stderr!\n');

    return new Response('Check the logs for stdout and stderr output!');
  }
}
Other process APIs
We cannot cover every node:process API in detail here, but here are some of the other notable APIs that we have implemented:
process.nextTick(fn): Schedules a callback to be invoked after the current execution context completes. Our implementation uses the same microtask queue as promises so that it behaves exactly the same as queueMicrotask(fn).
process.cwd() and process.chdir(): Get and change the current virtual working directory. The current working directory is initialized to /bundle when the Worker starts, and every request has its own isolated view of the current working directory. Changing the working directory in one request does not affect the working directory in other requests.
process.exit(): Immediately terminates the current Worker request execution. This is unlike Node.js where process.exit() terminates the entire process. In Workers, calling process.exit() will stop execution of the current request and return an error response to the client.
Compression with node:zlib
The node:zlib module provides APIs for compressing and decompressing data using various algorithms such as gzip, deflate, and brotli. We have implemented the node:zlib module, allowing you to use familiar compression APIs in your Workers applications. This enables a wide range of use cases, including data compression for network transmission, response optimization, and archive handling.
While Workers has had built-in support for gzip and deflate compression via the Web Platform Standard Compression API, the node:zlib module support brings additional support for the Brotli compression algorithm, as well as a more familiar API for Node.js developers.
Timing & scheduling
Node.js provides a set of timing and scheduling APIs via the node:timers module. We have implemented these in the runtime as well.
import timers from 'node:timers';

export default {
  async fetch(request) {
    timers.setInterval(() => {
      console.log('This will log every half-second');
    }, 500);

    timers.setImmediate(() => {
      console.log('This will log immediately after the current event loop');
    });

    return new Promise((resolve) => {
      timers.setTimeout(() => {
        resolve(new Response('Hello after 1 second!'));
      }, 1000);
    });
  }
}
The Node.js implementations of the timers APIs are very similar to the standard Web Platform with one key difference: the Node.js timers APIs return Timeout objects that can be used to manage the timers after they have been created. We have implemented the Timeout class in Workers to provide this functionality, allowing you to clear or re-fire timers as needed.
Console
The node:console module provides a set of console logging APIs that are similar to the standard console global, but with some additional features. We have implemented the node:console module as a thin wrapper around the existing globalThis.console that is already available in Workers.
How to enable the Node.js compatibility features
To enable the Node.js compatibility features as a whole within your Workers, you can set the nodejs_compatcompatibility flag in your wrangler.jsonc or wrangler.toml configuration file. If you are not using Wrangler, you can also set the flag via the Cloudflare dashboard or API:
{
  "name": "my-worker",
  "main": "src/index.js",
  "compatibility_date": "2025-09-21",
  "compatibility_flags": [
    // Get everything Node.js compatibility related
    "nodejs_compat",
  ]
}
The compatibility date here is key! Update that to the most current date, and you’ll always be able to take advantage of the latest and greatest features.
The nodejs_compat flag is an umbrella flag that enables all the Node.js compatibility features at once. This is the recommended way to enable Node.js compatibility, as it ensures that all features are available and work together seamlessly. However, if you prefer, you can also enable or disable some features individually via their own compatibility flags:
Module
Enable Flag (default)
Disable Flag
node:console
enable_nodejs_console_module
disable_nodejs_console_module
node:fs
enable_nodejs_fs_module
disable_nodejs_fs_module
node:http (client)
enable_nodejs_http_modules
disable_nodejs_http_modules
node:http (server)
enable_nodejs_http_server_modules
disable_nodejs_http_server_modules
node:os
enable_nodejs_os_module
disable_nodejs_os_module
node:process
enable_nodejs_process_v2
node:zlib
nodejs_zlib
no_nodejs_zlib
process.env
nodejs_compat_populate_process_env
nodejs_compat_do_not_populate_process_env
By separating these features, you can have more granular control over which Node.js APIs are available in your Workers. At first, we had started rolling out these features under the one nodejs_compat flag, but we quickly realized that some users perform feature detection based on the presence of certain modules and APIs and that by enabling everything all at once we were risking breaking some existing Workers. Users who are checking for the existence of these APIs manually can ensure new changes don’t break their workers by opting out of specific APIs:
{
  "name": "my-worker",
  "main": "src/index.js",
  "compatibility_date": "2025-09-15",
  "compatibility_flags": [
    // Get everything Node.js compatibility related
    "nodejs_compat",
    // But disable the `node:zlib` module if necessary
    "no_nodejs_zlib",
  ]
}
But, to keep things simple, we recommend starting with the nodejs_compat flag, which will enable everything. You can always disable individual features later if needed. There is no performance penalty to having the additional features enabled.
Handling end-of-life’d APIs
One important difference between Node.js and Workers is that Node.js has a defined long term support (LTS) schedule that allows it to make breaking changes at certain points in time. More specifically, Node.js can remove APIs and features when they reach end-of-life (EOL). On Workers, however, we have a rule that once a Worker is deployed, it will continue to run as-is indefinitely, without any breaking changes as long as the compatibility date does not change. This means that we cannot simply remove APIs when they reach EOL in Node.js, since this would break existing Workers. To address this, we have introduced a new set of compatibility flags that allow users to specify that they do not want the nodejs_compat features to include end-of-life APIs. These flags are based on the Node.js major version in which the APIs were removed:
The remove_nodejs_compat_eol flag will remove all APIs that have reached EOL up to your current compatibility date:
{
  "name": "my-worker",
  "main": "src/index.js",
  "compatibility_date": "2025-09-15",
  "compatibility_flags": [
    // Get everything Node.js compatibility related
    "nodejs_compat",
    // Remove Node.js APIs that have reached EOL up to your
    // current compatibility date
    "remove_nodejs_compat_eol",
  ]
}
The remove_nodejs_compat_eol_v22 flag will remove all APIs that reached EOL in Node.js v22. When using removenodejs_compat_eol, this flag will be automatically enabled if your compatibility date is set to a date after Node.js v22’s EOL date (April 30, 2027).
The remove_nodejs_compat_eol_v23 flag will remove all APIs that reached EOL in Node.js v23. When using removenodejs_compat_eol, this flag will be automatically enabled if your compatibility date is set to a date after Node.js v24’s EOL date (April 30, 2028).
The remove_nodejs_compat_eol_v24 flag will remove all APIs that reached EOL in Node.js v24. When using removenodejs_compat_eol, this flag will be automatically enabled if your compatibility date is set to a date after Node.js v24’s EOL date (April 30, 2028).
If you look at the date for remove_nodejs_compat_eol_v23 you’ll notice that it is the same as the date for remove_nodejs_compat_eol_v24. That is not a typo! Node.js v23 is not an LTS release, and as such it has a very short support window. It was released in October 2023 and reached EOL in May 2024. Accordingly, we have decided to group the end-of-life handling of non-LTS releases into the next LTS release. This means that when you set your compatibility date to a date after the EOL date for Node.js v24, you will also be opting out of the APIs that reached EOL in Node.js v23. Importantly, these flags will not be automatically enabled until your compatibility date is set to a date after the relevant Node.js version’s EOL date, ensuring that existing Workers will have plenty of time to migrate before any APIs are removed, or can choose to just simply keep using the older APIs indefinitely by using the reverse compatibility flags like add_nodejs_compat_eol_v24.
Giving back
One other important bit of work that we have been doing is expanding Cloudflare’s investment back into the Node.js ecosystem as a whole. There are now five members of the Workers runtime team (plus one summer intern) that are actively contributing to the Node.js project on GitHub, two of which are members of Node.js’ Technical Steering Committee. While we have made a number of new feature contributions such as an implementation of the Web Platform Standard URLPattern API and improved implementation of crypto operations, our primary focus has been on improving the ability for other runtimes to interoperate and be compatible with Node.js, fixing critical bugs, and improving performance. As we continue to grow our efforts around Node.js compatibility we will also grow our contributions back to the project and ecosystem as a whole.
Aaron Snell
2025 Summer Intern, Cloudflare Containers Node.js Web Infrastructure Team
Cloudflare is also proud to continue supporting critical infrastructure for the Node.js project through its ongoing strategic partnership with the OpenJS Foundation, providing free access to the project to services such as Workers, R2, DNS, and more.
Give it a try!
Our vision for Node.js compatibility in Workers is not just about implementing individual APIs, but about creating a comprehensive platform that allows developers to run existing Node.js code seamlessly in the Workers environment. This involves not only implementing the APIs themselves, but also ensuring that they work together harmoniously, and that they integrate well with the unique aspects of the Workers platform.
In some cases, such as with node:fs and node:crypto, we have had to implement entirely new capabilities that were not previously available in Workers and did so at the native runtime level. This allows us to tailor the implementations to the unique aspects of the Workers environment and ensure both performance and security.
And we’re not done yet. We are continuing to work on implementing additional Node.js APIs, as well as improving the performance and compatibility of the existing implementations. We are also actively engaging with the community to understand their needs and priorities, and to gather feedback on our implementations. If there are specific Node.js APIs or npm packages that you would like to see supported in Workers, please let us know! If there are any issues or bugs you encounter, please report them on our GitHub repository. While we might not be able to implement every single Node.js API, nor match Node.js’ behavior exactly in every case, we are committed to providing a robust and comprehensive Node.js compatibility layer that meets the needs of the community.
All the Node.js compatibility features described in this post are available now. To get started, simply enable the nodejs_compat compatibility flag in your wrangler.toml or wrangler.jsonc file, or via the Cloudflare dashboard or API. You can then start using the Node.js APIs in your Workers applications right away.
Allow us to introduce Cap’n Web, an RPC protocol and implementation in pure TypeScript.
Cap’n Web is a spiritual sibling to Cap’n Proto, an RPC protocol I (Kenton) created a decade ago, but designed to play nice in the web stack. That means:
Like Cap’n Proto, it is an object-capability protocol. (“Cap’n” is short for “capabilities and”.) We’ll get into this more below, but it’s incredibly powerful.
Cap’n Web is more expressive than almost every other RPC system, because it implements an object-capability RPC model. That means it:
Supports bidirectional calling. The client can call the server, and the server can also call the client.
Supports passing functions by reference: If you pass a function over RPC, the recipient receives a “stub”. When they call the stub, they actually make an RPC back to you, invoking the function where it was created. This is how bidirectional calling happens: the client passes a callback to the server, and then the server can call it later.
Similarly, supports passing objects by reference: If a class extends the special marker type RpcTarget, then instances of that class are passed by reference, with method calls calling back to the location where the object was created.
Supports promise pipelining. When you start an RPC, you get back a promise. Instead of awaiting it, you can immediately use the promise in dependent RPCs, thus performing a chain of calls in a single network round trip.
Supports capability-based security patterns.
In short, Cap’n Web lets you design RPC interfaces the way you’d design regular JavaScript APIs – while still acknowledging and compensating for network latency.
The best part is, Cap’n Web is absolutely trivial to set up.
A client looks like this:
import { newWebSocketRpcSession } from "capnweb";

// One-line setup.
let api = newWebSocketRpcSession("wss://example.com/api");

// Call a method on the server!
let result = await api.hello("World");

console.log(result);
And here’s a complete Cloudflare Worker implementing an RPC server:
import { RpcTarget, newWorkersRpcResponse } from "capnweb";

// This is the server implementation.
class MyApiServer extends RpcTarget {
  hello(name) {
    return `Hello, ${name}!`
  }
}

// Standard Workers HTTP handler.
export default {
  fetch(request, env, ctx) {
    // Parse URL for routing.
    let url = new URL(request.url);

    // Serve API at `/api`.
    if (url.pathname === "/api") {
      return newWorkersRpcResponse(request, new MyApiServer());
    }

    // You could serve other endpoints here...
    return new Response("Not found", {status: 404});
  }
}
That’s it. That’s the app.
You can add more methods to MyApiServer, and call them from the client.
You can have the client pass a callback function to the server, and then the server can just call it.
You can define a TypeScript interface for your API, and easily apply it to the client and server.
It just works.
Why RPC? (And what is RPC anyway?)
Remote Procedure Calls (RPC) are a way of expressing communications between two programs over a network. Without RPC, you might communicate using a protocol like HTTP. With HTTP, though, you must format and parse your communications as an HTTP request and response, perhaps designed in REST style. RPC systems try to make communications look like a regular function call instead, as if you were calling a library rather than a remote service. The RPC system provides a “stub” object on the client side which stands in for the real server-side object. When a method is called on the stub, the RPC system figures out how to serialize and transmit the parameters to the server, invoke the method on the server, and then transmit the return value back.
The merits of RPC have been subject to a great deal of debate. RPC is often accused of committing many of the fallacies of distributed computing.
But this reputation is outdated. When RPC was first invented some 40 years ago, async programming barely existed. We did not have Promises, much less async and await. Early RPC was synchronous: calls would block the calling thread waiting for a reply. At best, latency made the program slow. At worst, network failures would hang or crash the program. No wonder it was deemed “broken”.
Things are different today. We have Promise and async and await, and we can throw exceptions on network failures. We even understand how RPCs can be pipelined so that a chain of calls takes only one network round trip. Many large distributed systems you likely use every day are built on RPC. It works.
The fact is, RPC fits the programming model we’re used to. Every programmer is trained to think in terms of APIs composed of function calls, not in terms of byte stream protocols nor even REST. Using RPC frees you from the need to constantly translate between mental models, allowing you to move faster.
When should you use Cap’n Web?
Cap’n Web is useful anywhere where you have two JavaScript applications speaking to each other over a network, including client-to-server and microservice-to-microservice scenarios. However, it is particularly well-suited to interactive web applications with real-time collaborative features, as well as modeling interactions over complex security boundaries.
Cap’n Web is still new and experimental, so for now, a willingness to live on the cutting edge may also be required!
Features, features, features…
Here’s some more things you can do with Cap’n Web.
HTTP batch mode
Sometimes a WebSocket connection is a bit too heavyweight. What if you just want to make a quick one-time batch of calls, but don’t need an ongoing connection?
For that, Cap’n Web supports HTTP batch mode:
import { newHttpBatchRpcSession } from "capnweb";

let batch = newHttpBatchRpcSession("https://example.com/api");

let result = await batch.hello("World");

console.log(result);
(The server is exactly the same as before.)
Note that once you’ve awaited an RPC in the batch, the batch is done, and all the remote references received through it become broken. To make more calls, you need to start over with a new batch. However, you can make multiple calls in a single batch:
let batch = newHttpBatchRpcSession("https://example.com/api");

// We can call make multiple calls, as long as we await them all at once.
let promise1 = batch.hello("Alice");
let promise2 = batch.hello("Bob");

let [result1, result2] = await Promise.all([promise1, promise2]);

console.log(result1);
console.log(result2);
And that brings us to another feature…
Chained calls (Promise Pipelining)
Here’s where things get magical.
In both batch mode and WebSocket mode, you can make a call that depends on the result of another call, without waiting for the first call to finish. In batch mode, that means you can, in a single batch, call a method, then use its result in another call. The entire batch still requires only one network round trip.
let namePromise = batch.getMyName();
let result = await batch.hello(namePromise);

console.log(result);
Notice the initial call to getMyName() returned a promise, but we used the promise itself as the input to hello(), without awaiting it first. With Cap’n Web, this just works: The client sends a message to the server saying: “Please insert the result of the first call into the parameters of the second.”
Or perhaps the first call returns an object with methods. You can call the methods immediately, without awaiting the first promise, like:
let batch = newHttpBatchRpcSession("https://example.com/api");

// Authencitate the API key, returning a Session object.
let sessionPromise = batch.authenticate(apiKey);

// Get the user's name.
let name = await sessionPromise.whoami();

console.log(name);
This works because the promise returned by a Cap’n Web call is not a regular promise. Instead, it’s a JavaScript Proxy object. Any methods you call on it are interpreted as speculative method calls on the eventual result. These calls are sent to the server immediately, telling the server: “When you finish the call I sent earlier, call this method on what it returns.”
Did you spot the security?
This last example shows an important security pattern enabled by Cap’n Web’s object-capability model.
When we call the authenticate() method, after it has verified the provided API key, it returns an authenticated session object. The client can then make further RPCs on the session object to perform operations that require authorization as that user. The server code might look like this:
class MyApiServer extends RpcTarget {
  authenticate(apiKey) {
    let username = await checkApiKey(apiKey);
    return new AuthenticatedSession(username);
  }
}

class AuthenticatedSession extends RpcTarget {
  constructor(username) {
    super();
    this.username = username;
  }

  whoami() {
    return this.username;
  }

  // ...other methods requiring auth...
}
Here’s what makes this work: It is impossible for the client to “forge” a session object. The only way to get one is to call authenticate(), and have it return successfully.
In most RPC systems, it is not possible for one RPC to return a stub pointing at a new RPC object in this way. Instead, all functions are top-level, and can be called by anyone. In such a traditional RPC system, it would be necessary to pass the API key again to every function call, and check it again on the server each time. Or, you’d need to do authorization outside of the RPC system entirely.
This is a common pain point for WebSockets in particular. Due to the design of the web APIs for WebSocket, you generally cannot use headers nor cookies to authorize them. Instead, authorization must happen in-band, by sending a message over the WebSocket itself. But this can be annoying for RPC protocols, as it means the authentication message is “special” and changes the state of the connection itself, affecting later calls. This breaks the abstraction.
The authenticate() pattern shown above neatly makes authentication fit naturally into the RPC abstraction. It’s even type-safe: you can’t possibly forget to authenticate before calling a method requiring auth, because you wouldn’t have an object on which to make the call. Speaking of type-safety…
TypeScript
If you use TypeScript, Cap’n Web plays nicely with it. You can declare your RPC API once as a TypeScript interface, implement in on the server, and call it on the client:
// Shared interface declaration:
interface MyApi {
  hello(name: string): Promise<string>;
}

// On the client:
let api: RpcStub<MyApi> = newWebSocketRpcSession("wss://example.com/api");

// On the server:
class MyApiServer extends RpcTarget implements MyApi {
  hello(name) {
    return `Hello, ${name}!`
  }
}
Now you get end-to-end type checking, auto-completed method names, and so on.
Note that, as always with TypeScript, no type checks occur at runtime. The RPC system itself does not prevent a malicious client from calling an RPC with parameters of the wrong type. This is, of course, not a problem unique to Cap’n Web – JSON-based APIs have always had this problem. You may wish to use a runtime type-checking system like Zod to solve this. (Meanwhile, we hope to add type checking based directly on TypeScript types in the future.)
An alternative to GraphQL?
If you’ve used GraphQL before, you might notice some similarities. One benefit of GraphQL was to solve the “waterfall” problem of traditional REST APIs by allowing clients to ask for multiple pieces of data in one query. For example, instead of making three sequential HTTP calls:
GET /user
GET /user/friends
GET /user/friends/photos
…you can write one GraphQL query to fetch it all at once.
That’s a big improvement over REST, but GraphQL comes with its own tradeoffs:
New language and tooling. You have to adopt GraphQL’s schema language, servers, and client libraries. If your team is all-in on JavaScript, that’s a lot of extra machinery.
Limited composability. GraphQL queries are declarative, which makes them great for fetching data, but awkward for chaining operations or mutations. For example, you can’t easily say: “create a user, then immediately use that new user object to make a friend request, all-in-one round trip.”
Different abstraction model. GraphQL doesn’t look or feel like the JavaScript APIs you already know. You’re learning a new mental model rather than extending the one you use every day.
How Cap’n Web goes further
Cap’n Web solves the waterfall problem without introducing a new language or ecosystem. It’s just JavaScript. Because Cap’n Web supports promise pipelining and object references, you can write code that looks like this:
let user = api.createUser({ name: "Alice" });
let friendRequest = await user.sendFriendRequest("Bob");
What happens under the hood? Both calls are pipelined into a single network round trip:
Create the user.
Take the result of that call (a new User object).
Immediately invoke sendFriendRequest() on that object.
All of this is expressed naturally in JavaScript, with no schemas, query languages, or special tooling required. You just call methods and pass objects around, like you would in any other JavaScript code.
In other words, GraphQL gave us a way to flatten REST’s waterfalls. Cap’n Web lets us go even further: it gives you the power to model complex interactions exactly the way you would in a normal program, with no impedance mismatch.
But how do we solve arrays?
With everything we’ve presented so far, there’s a critical missing piece to seriously consider Cap’n Web as an alternative to GraphQL: handling lists. Often, GraphQL is used to say: “Perform this query, and then, for every result, perform this other query.” For example: “List the user’s friends, and then for each one, fetch their profile photo.”
In short, we need an array.map() operation that can be performed without adding a round trip.
Cap’n Proto, historically, has never supported such a thing.
But with Cap’n Web, we’ve solved it. You can do:
let user = api.authenticate(token);

// Get the user's list of friends (an array).
let friendsPromise = user.listFriends();

// Do a .map() to annotate each friend record with their photo.
// This operates on the *promise* for the friends list, so does not
// add a round trip.
// (wait WHAT!?!?)
let friendsWithPhotos = friendsPromise.map(friend => {
  return {friend, photo: api.getUserPhoto(friend.id))};
}

// Await the friends list with attached photos -- one round trip!
let results = await friendsWithPhotos;
Wait… How!?
.map() takes a callback function, which needs to be applied to each element in the array. As we described earlier, normally when you pass a function to an RPC, the function is passed “by reference”, meaning that the remote side receives a stub, where calling that stub makes an RPC back to the client where the function was created.
But that is NOT what is happening here. That would defeat the purpose: we don’t want the server to have to round-trip to the client to process every member of the array. We want the server to just apply the transformation server-side.
To that end, .map() is special. It does not send JavaScript code to the server, but it does send something like “code”, restricted to a domain-specific, non-Turing-complete language. The “code” is a list of instructions that the server should carry out for each member of the array. In this case, the instructions are:
Invoke api.getUserPhoto(friend.id).
Return an object {friend, photo}, where friend is the original array element and photo is the result of step 1.
But the application code just specified a JavaScript method. How on Earth could we convert this into the narrow DSL?
The answer is record-replay: On the client side, we execute the callback once, passing in a special placeholder value. The parameter behaves like an RPC promise. However, the callback is required to be synchronous, so it cannot actually await this promise. The only thing it can do is use promise pipelining to make pipelined calls. These calls are intercepted by the implementation and recorded as instructions, which can then be sent to the server, where they can be replayed as needed.
And because the recording is based on promise pipelining, which is what the RPC protocol itself is designed to represent, it turns out that the “DSL” used to represent “instructions” for the map function is just the RPC protocol itself. 🤯
Implementation details
JSON-based serialization
Cap’n Web’s underlying protocol is based on JSON – but with a preprocessing step to handle special types. Arrays are treated as “escape sequences” that let us encode other values. For example, JSON does not have an encoding for Date objects, but Cap’n Web does. You might see a message that looks like this:
To encode a literal array, we simply double-wrap it in []:
{
  names: [["Alice", "Bob", "Carol"]]
}
In other words, an array with just one element which is itself an array, evaluates to the inner array literally. An array whose first element is a type name, evaluates to an instance of that type, where the remaining elements are parameters to the type.
Note that only a fixed set of types are supported: essentially, “structured clonable” types, and RPC stub types.
On top of this basic encoding, we define an RPC protocol inspired by Cap’n Proto – but greatly simplified.
RPC protocol
Since Cap’n Web is a symmetric protocol, there is no well-defined “client” or “server” at the protocol level. There are just two parties exchanging messages across a connection. Every kind of interaction can happen in either direction.
In order to make it easier to describe these interactions, I will refer to the two parties as “Alice” and “Bob”.
Alice and Bob start the connection by establishing some sort of bidirectional message stream. This may be a WebSocket, but Cap’n Web also allows applications to define their own transports. Each message in the stream is JSON-encoded, as described earlier.
Alice and Bob each maintain some state about the connection. In particular, each maintains an “export table”, describing all the pass-by-reference objects they have exposed to the other side, and an “import table”, describing the references they have received. Alice’s exports correspond to Bob’s imports, and vice versa. Each entry in the export table has a signed integer ID, which is used to reference it. You can think of these IDs like file descriptors in a POSIX system. Unlike file descriptors, though, IDs can be negative, and an ID is never reused over the lifetime of a connection.
At the start of the connection, Alice and Bob each populate their export tables with a single entry, numbered zero, representing their “main” interfaces. Typically, when one side is acting as the “server”, they will export their main public RPC interface as ID zero, whereas the “client” will export an empty interface. However, this is up to the application: either side can export whatever they want.
From there, new exports are added in two ways:
When Alice sends a message to Bob that contains within it an object or function reference, Alice adds the target object to her export table. IDs assigned in this case are always negative, starting from -1 and counting downwards.
Alice can send a “push” message to Bob to request that Bob add a value to his export table. The “push” message contains an expression which Bob evaluates, exporting the result. Usually, the expression describes a method call on one of Bob’s existing exports – this is how an RPC is made. Each “push” is assigned a positive ID on the export table, starting from 1 and counting upwards. Since positive IDs are only assigned as a result of pushes, Alice can predict the ID of each push she makes, and can immediately use that ID in subsequent messages. This is how promise pipelining is achieved.
After sending a push message, Alice can subsequently send a “pull” message, which tells Bob that once he is done evaluating the “push”, he should proactively serialize the result and send it back to Alice, as a “resolve” (or “reject”) message. However, this is optional: Alice may not actually care to receive the return value of an RPC, if Alice only wants to use it in promise pipelining. In fact, the Cap’n Web implementation will only send a “pull” message if the application has actually awaited the returned promise.
Putting it together, a code sequence like this:
{
  names: [["Alice", "Bob", "Carol"]]
}
Might produce a message exchange like this:
// Call api.getByName(). `api` is the server's main export, so has export ID 0.
-> ["push", ["pipeline", 0, "getMyName", []]
// Call api.hello(namePromise). `namePromise` refers to the result of the first push,
// so has ID 1.
-> ["push", ["pipeline", 0, "hello", [["pipeline", 1]]]]
// Ask that the result of the second push be proactively serialized and returned.
-> ["pull", 2]
// Server responds.
<- ["resolve", 2, "Hello, Alice!"]
Cap’n Web is new and still highly experimental. There may be bugs to shake out. But, we’re already using it today. Cap’n Web is the basis of the recently-launched “remote bindings” feature in Wrangler, allowing a local test instance of workerd to speak RPC to services in production. We’ve also begun to experiment with it in various frontend applications – expect more blog posts on this in the future.
In any case, Cap’n Web is open source, and you can start using it in your own projects now.
We’re making it easier to run your Node.js applications on Cloudflare Workers by adding support for the node:http client and server APIs. This significant addition brings familiar Node.js HTTP interfaces to the edge, enabling you to deploy existing Express.js, Koa, and other Node.js applications globally with zero cold starts, automatic scaling, and significantly lower latency for your users — all without rewriting your codebase. Whether you’re looking to migrate legacy applications to a modern serverless platform or build new ones using the APIs you already know, you can now leverage Workers’ global network while maintaining your existing development patterns and frameworks.
The Challenge: Node.js-style HTTP in a Serverless Environment
Cloudflare Workers operate in a unique serverless environment where direct tcp connection isn’t available. Instead, all networking operations are fully managed by specialized services outside the Workers runtime itself — systems like our Open Egress Router (OER) and Pingora that handle connection pooling, keeping connections warm, managing egress IPs, and all the complex networking details. This means as a developer, you don’t need to worry about TLS negotiation, connection management, or network optimization — it’s all handled for you automatically.
This fully-managed approach is actually why we can’t support certain Node.js APIs — these networking decisions are handled at the system level for performance and security. While this makes Workers different from traditional Node.js environments, it also makes them better for serverless computing — you get enterprise-grade networking without the complexity.
This fundamental difference required us to rethink how HTTP APIs work at the edge while maintaining compatibility with existing Node.js code patterns.
Our Solution: we’ve implemented the core `node:http` APIs by building on top of the web-standard technologies that Workers already excel at. Here’s how it works:
HTTP Client APIs
The node:http client implementation includes the essential APIs you’re familiar with:
http.get() – For simple GET requests
http.request() – For full control over HTTP requests
Our implementations of these APIs are built on top of the standard fetch() API that Workers use natively, providing excellent performance while maintaining Node.js compatibility.
TLS-specific options are not supported (Workers handle TLS automatically).
HTTP Server APIs
The server-side implementation is where things get particularly interesting. Since Workers can’t create traditional TCP servers listening on specific ports, we’ve created a bridge system that connects Node.js-style servers to the Workers request handling model.
When you create an HTTP server and call listen(port), instead of opening a TCP socket, the server is registered in an internal table within your Worker. This internal table acts as a bridge between http.createServer executions and the incoming fetch requests using the port number as the identifier.
You then use one of two methods to bridge incoming Worker requests to your Node.js-style server.
Manual Integration with handleAsNodeRequest
This approach gives you the flexibility to integrate Node.js HTTP servers with other Worker features, and allows you to have multiple handlers in your default entrypoint such as fetch, scheduled, queue, etc.
import { handleAsNodeRequest } from 'cloudflare:node';
import { createServer } from 'node:http';

// Create a traditional Node.js HTTP server
const server = createServer((req, res) => {
  res.writeHead(200, { 'Content-Type': 'text/plain' });
  res.end('Hello from Node.js HTTP server!');
});

// Register the server (doesn't actually bind to port 8080)
server.listen(8080);

// Bridge from Workers fetch handler to Node.js server
export default {
  async fetch(request) {
    // You can add custom logic here before forwarding
    if (request.url.includes('/admin')) {
      return new Response('Admin access', { status: 403 });
    }

    // Forward to the Node.js server
    return handleAsNodeRequest(8080, request);
  },
  async queue(batch, env, ctx) {
    for (const msg of batch.messages) {
      msg.retry();
    }
  },
  async scheduled(controller, env, ctx) {
    ctx.waitUntil(doSomeTaskOnSchedule(controller));
  },
};
Handle some routes differently while delegating others to the Node.js server
Apply custom middleware or request processing
Automatic Integration with httpServerHandler
For use cases where you want to integrate a Node.js HTTP server without any additional features or complexity, you can use the `httpServerHandler` function. This function automatically handles the integration for you. This solution is ideal for applications that don’t need Workers-specific features.
import { httpServerHandler } from 'cloudflare:node';
import { createServer } from 'node:http';

// Create your Node.js HTTP server
const server = createServer((req, res) => {
  if (req.url === '/') {
    res.writeHead(200, { 'Content-Type': 'text/html' });
    res.end('<h1>Welcome to my Node.js app on Workers!</h1>');
  } else if (req.url === '/api/status') {
    res.writeHead(200, { 'Content-Type': 'application/json' });
    res.end(JSON.stringify({ status: 'ok', timestamp: Date.now() }));
  } else {
    res.writeHead(404, { 'Content-Type': 'text/plain' });
    res.end('Not Found');
  }
});

server.listen(8080);

// Export the server as a Workers handler
export default httpServerHandler({ port: 8080 });
// Or you can simply pass the http.Server instance directly:
// export default httpServerHandler(server);
These HTTP APIs open the door to running popular Node.js frameworks like Express.js on Workers. If any of the middlewares for these frameworks don’t work as expected, please open an issue to Cloudflare Workers repository.
import { httpServerHandler } from 'cloudflare:node';
import express from 'express';

const app = express();

app.get('/', (req, res) => {
  res.json({ message: 'Express.js running on Cloudflare Workers!' });
});

app.get('/api/users/:id', (req, res) => {
  res.json({
    id: req.params.id,
    name: 'User ' + req.params.id
  });
});

app.listen(3000);
export default httpServerHandler({ port: 3000 });
// Or you can simply pass the http.Server instance directly:
// export default httpServerHandler(app.listen(3000));
Getting started with serverless Node.js applications
The node:http and node:https APIs are available in Workers with Node.js compatibility enabled using the nodejs_compat compatibility flag with a compatibility date later than 08-15-2025.
The addition of node:http support brings us closer to our goal of making Cloudflare Workers the best platform for running JavaScript at the edge, whether you’re building new applications or migrating existing ones.
We’ve recently added support for the FinalizationRegistry API in Cloudflare Workers. This API allows developers to request a callback when a JavaScript object is garbage-collected, a feature that can be particularly relevant for managing external resources, such as memory allocated by WebAssembly (Wasm). However, despite its availability, our general advice is: avoid using it directly in most scenarios.
Our decision to add FinalizationRegistry — while still cautioning against using it — opens up a bigger conversation: how memory management works when JavaScript and WebAssembly share the same runtime. This is becoming more common in high-performance web apps, and getting it wrong can lead to memory leaks, out-of-memory errors, and performance issues, especially in resource-constrained environments like Cloudflare Workers.
In this post, we’ll look at how JavaScript and Wasm handle memory differently, why that difference matters, and what FinalizationRegistry is actually useful for. We’ll also explain its limitations, particularly around timing and predictability, walk through why we decided to support it, and how we’ve made it safer to use. Finally, we’ll talk about how newer JavaScript language features offer a more reliable and structured approach to solving these problems.
Memory management 101
JavaScript
JavaScript relies on automatic memory management through a process called garbage collection. This means developers do not need to worry about freeing allocated memory, or lifetimes. The garbage collector identifies and reclaims memory occupied by objects that are no longer needed by the program (that is, garbage). This helps prevent memory leaks and simplifies memory management for developers.
function greet() {
  let name = "Alice";         // String is allocated in memory
  console.log("Hello, " + name);
}                             // 'name' goes out of scope

greet();
// JavaScript automatically frees allocated memory at some point in future
WebAssembly
WebAssembly (Wasm) is an assembly-like instruction format designed to run high-performance applications on the web. While it initially gained prominence in web browsers, Wasm is also highly effective on the server side. At Cloudflare, we leverage Wasm to enable users to run code written in a variety of programming languages, such as Rust and Python, directly within our V8 isolates, offering both performance and versatility.
Wasm runtimes are designed to be simple stack machines, and lack built-in garbage collectors. This necessitates manual memory management (allocation and deallocation of memory used by Wasm code), making it an ideal compilation target for languages like Rust and C++ that handle their own memory.
Wasm modules operate on linear memory: a resizable block of raw bytes, which JavaScript views as an ArrayBuffer. This memory is organized in 64 KB pages, and its initial size is defined when the module is compiled or loaded. Wasm code interacts with this memory using 32-bit offsets — integer values functioning as direct pointers that specify a byte offset from the start of its linear memory. This direct memory access model is crucial for Wasm’s high performance. The host environment (which in Cloudflare Workers is JavaScript) also shares this ArrayBuffer, reading and writing (often via TypedArrays) to enable vital data exchange between Wasm and JavaScript.
A core Wasm design is its secure sandbox. This confines Wasm code strictly to its own linear memory and explicitly declared imports from the host, preventing unauthorized memory access or system calls. Direct interaction with JavaScript objects is blocked; communication occurs through numeric values, function references, or operations on the shared ArrayBuffer. This strong isolation is vital for security, ensuring Wasm modules don’t interfere with the host or other application components, which is especially important in multi-tenant environments like Cloudflare Workers.
Bridging WebAssembly memory with JavaScript often involves writing low-level “glue” code to convert raw byte arrays from Wasm into usable JavaScript types. Doing this manually for every function or data structure is both tedious and error-prone. Fortunately, tools like wasm-bindgen and Emscripten (Embind) handle this interop automatically, generating the binding code needed to pass data cleanly between the two environments. We use these same tools under the hood — wasm-bindgen for Rust-based workers-rs projects, and Emscripten for Python Workers — to simplify integration and let developers focus on application logic rather than memory translation.
Interoperability
High-performance web apps often use JavaScript for interactive UIs and data fetching, while WebAssembly handles demanding operations like media processing and complex calculations for significant performance gains, allowing developers to maximize efficiency. Given the difference in memory management models, developers need to be careful when using WebAssembly memory in JavaScript.
For this example, we’ll use Rust to compile a WebAssembly module manually. Rust is a popular choice for WebAssembly because it offers precise control over memory and easy Wasm compilation using standard toolchains.
Rust
Here we have two simple functions. make_buffer creates a string and returns a raw pointer back to JavaScript. The function intentionally “forgets” the memory allocated so that it doesn’t get cleaned up after the function returns. free_buffer, on the other hand, expects the initial string reference handed back and frees the memory.
// Allocate a fresh byte buffer and hand the raw pointer + length to JS.
// *We intentionally “forget” the Vec so Rust will not free it right away;
//   JS now owns it and must call `free_buffer` later.*
#[no_mangle]
pub extern "C" fn make_buffer(out_len: *mut usize) -> *mut u8 {
    let mut data = b"Hello from Rust".to_vec();
    let ptr = data.as_mut_ptr();
    let len  = data.len();

    unsafe { *out_len = len };

    std::mem::forget(data);
    return ptr;
}

/// Counterpart that **must** be called by JS to avoid a leak.
#[no_mangle]
pub unsafe extern "C" fn free_buffer(ptr: *mut u8, len: usize) {
    let _ = Vec::from_raw_parts(ptr, len, len);
}
JavaScript
Back in JavaScript land, we’ll call these Wasm functions and output them using console.log. This is a common pattern in Wasm-based applications since WebAssembly doesn’t have direct access to Web APIs, and rely on a JavaScript “glue” to interface with the outer world in order to do anything useful.
const { instance } = await WebAssembly.instantiate(WasmBytes, {});

const { memory, make_buffer, free_buffer } = instance.exports;

//  Use the Rust functions
const lenPtr = 0;                 // scratch word in Wasm memory
const ptr = make_buffer(lenPtr);

const len = new DataView(memory.buffer).getUint32(lenPtr, true);
const data = new Uint8Array(memory.buffer, ptr, len);

console.log(new TextDecoder().decode(data)); // “Hello from Rust”

free_buffer(ptr, len); // free_buffer must be called to prevent memory leaks
You can find all code samples along with setup instructions here.
As you can see, working with Wasm memory from JavaScript requires care, as it introduces the risk of memory leaks if allocated memory isn’t properly released. JavaScript developers are often unfamiliar with manual memory management, and it’s easy to forget returning memory to WebAssembly after use. This can become especially tricky when Wasm-allocated data is passed into JavaScript libraries, making ownership and lifetime harder to track.
While occasional leaks may not cause immediate issues, over time they can lead to increased memory usage and degrade performance, particularly in memory-constrained environments like Cloudflare Workers.
FinalizationRegistry
FinalizationRegistry, introduced as part of the TC-39 WeakRef proposal, is a JavaScript API which lets you run “finalizers” (aka cleanup callbacks) when an object gets garbage-collected. Let’s look at a simple example to demonstrate the API:
const my_registry = new FinalizationRegistry((obj) => { console.log("Cleaned up: " + obj); });

{
  let temporary = { key: "value" };
  // Register this object in our FinalizationRegistry -- the second argument,
  // "temporary", will be passed to our callback as its obj parameter
  my_registry.register(temporary, "temporary");
}

// At some point in the future when temporary object gets garbage collected, we'll see "Cleaned up: temporary" in our logs.
Let’s see how we can use this API in our Wasm-based application:
const { instance } = await WebAssembly.instantiate(WasmBytes, {});

const { memory, make_buffer, free_buffer } = instance.exports;

// FinalizationRegistry would be responsible for returning memory back to Wasm
const cleanupFr = new FinalizationRegistry(({ ptr, len }) => {
  free_buffer(ptr, len);
});

//  Use the Rust functions
const lenPtr = 0;                 // scratch word in Wasm memory
const ptr = make_buffer(lenPtr);

const len = new DataView(memory.buffer).getUint32(lenPtr, true);
const data = new Uint8Array(memory.buffer, ptr, len);

// Register the data buffer in our FinalizationRegistry so that it gets cleaned up automatically
cleanupFr.register(data, { ptr, len });

console.log(new TextDecoder().decode(data));   // → “Hello from Rust”

// No need to manually call free_buffer, FinalizationRegistry will do this for us
We can use a FinalizationRegistry to manage any object borrowed from WebAssembly by registering it with a finalizer that calls the appropriate free function. This is the same approach used by wasm-bindgen. It shifts the burden of manual cleanup away from the JavaScript developer and delegates it to the JavaScript garbage collector. However, in practice, things aren’t quite that simple.
Inherent issues with FinalizationRegistry
There is a fundamental issue with FinalizationRegistry: garbage collection is non-deterministic, and may clean up your unused memory at some arbitrary point in the future. In some cases, garbage collection might not even run and your “finalizers” will never be triggered.
“A conforming JavaScript implementation, even one that does garbage collection, is not required to call cleanup callbacks. When and whether it does so is entirely down to the implementation of the JavaScript engine. When a registered object is reclaimed, any cleanup callbacks for it may be called then, or some time later, or not at all.”
Even Emscripten mentions this in their documentation: “… finalizers are not guaranteed to be called, and even if they are, there are no guarantees about their timing or order of execution, which makes them unsuitable for general RAII-style resource management.”
Given their non-deterministic nature, developers seldom use finalizers for any essential program logic. Treat them as a last-ditch safety net, not as a primary cleanup mechanism — explicit, deterministic teardown logic is almost always safer, faster, and easier to reason about.
Enabling FinalizationRegistry in Workers
Given its non-deterministic nature and limited early adoption, we initially disabled the FinalizationRegistry API in our runtime. However, as usage of Wasm-based Workers grew — particularly among high-traffic customers — we began to see new demands emerge. One such customer was running an extremely high requests per second (RPS) workload using WebAssembly, and needed tight control over memory to sustain massive traffic spikes without degradation. This highlighted a gap in our memory management capabilities, especially in cases where manual cleanup wasn’t always feasible or reliable. As a result, we re-evaluated our stance and began exploring the challenges and trade-offs of enabling FinalizationRegistry within the Workers environment, despite its known limitations.
Preventing footguns with safe defaults
Because this API could be misused and cause unpredictable results for our customers, we’ve added a few safeguards. Most importantly, cleanup callbacks are run without an active async context, which means they cannot perform any I/O. This includes sending events to a tail Worker, logging metrics, or making fetch requests.
While this might sound limiting, it’s very intentional. Finalization callbacks are meant for cleanup — especially for releasing WebAssembly memory — not for triggering side effects. If we allowed I/O here, developers might (accidentally) rely on finalizers to perform critical logic that depends on when garbage collection happens. That timing is non-deterministic and outside your control, which could lead to flaky, hard-to-debug behavior.
We don’t have full control over when V8’s garbage collector performs cleanup, but V8 does let us nudge the timing of finalizer execution. Like Node and Deno, Workers queue FinalizationRegistry jobs only after the microtask queue has drained, so each cleanup batch slips into the quiet slots between I/O phases of the event loop.
Security concerns
The Cloudflare Workers runtime is specifically engineered to prevent side-channel attacks in a multi-tenant environment. Prior to enabling the FinalizationRegistry API, we did a thorough analysis to assess its impact on our security model and determine the necessity of additional safeguards. The non-deterministic nature of FinalizationRegistry raised concerns about potential information leaks leading to Spectre-like vulnerabilities, particularly regarding the possibility of exploiting the garbage collector (GC) as a confused deputy or using it to create a timer.
GC as confused deputy
One concern was whether the garbage collector (GC) could act as a confused deputy — a security antipattern where a privileged component is tricked into misusing its authority on behalf of untrusted code. In theory, a clever attacker could try to exploit the GC’s ability to access internal object lifetimes and memory behavior in order to infer or manipulate sensitive information across isolation boundaries.
However, our analysis indicated that the V8 GC is effectively contained and not exposed to confused deputy risks within the runtime. This is attributed to our existing threat models and security measures, such as the isolation of user code, where the V8 Isolate serves as the primary security boundary. Furthermore, even though FinalizationRegistry involves some internal GC mechanics, the callbacks themselves execute in the same isolate that registered them — never across isolates — ensuring isolation remains intact.
GC as timer
We also evaluated the possibility of using FinalizationRegistry as a high-resolution timing mechanism — a common vector in side-channel attacks like Spectre. The concern here is that an attacker could schedule object finalization in a way that indirectly leaks information via the timing of callbacks.
In practice, though, the resolution of such a “GC timer” is low and highly variable, offering poor reliability for side-channel attacks. Additionally, we control when finalizer callbacks are scheduled — delaying them until after the microtask queue has drained — giving us an extra layer of control to limit timing precision and reduce risk.
Following a review with our security research team, we determined that our existing security model is sufficient to support this API.
Predictable cleanups?
JavaScript’s Explicit Resource Management proposal introduces a deterministic approach to handle resources needing manual cleanup, such as file handles, network connections, or database sessions. Drawing inspiration from constructs like C#’s using and Python’s with, this proposal introduces the using and await using syntax. This new syntax guarantees that objects adhering to a specific cleanup protocol are automatically disposed of when they are no longer within their scope.
Let’s look at a simple example to understand it a bit better.
class MyResource {
  [Symbol.dispose]() {
    console.log("Resource cleaned up!");
  }

  use() {
    console.log("Using the resource...");
  }
}

{
  using res = new MyResource();
  res.use();
} // When this block ends, Symbol.dispose is called automatically (and deterministically).
The proposal also includes additional features that offer finer control over when dispose methods are called. But at a high level, it provides a much-needed, deterministic way to manage resource cleanup. Let’s now update our earlier WebAssembly-based example to take advantage of this new mechanism instead of relying on FinalizationRegistry:
const { instance } = await WebAssembly.instantiate(WasmBytes, {});
const { memory, make_buffer, free_buffer } = instance.exports;

class WasmBuffer {
  constructor(ptr, len) {
    this.ptr = ptr;
    this.len = len;
  }

  [Symbol.dispose]() {
    free_buffer(this.ptr, this.len);
  }
}

{
  const lenPtr = 0;
  const ptr = make_buffer(lenPtr);
  const len = new DataView(memory.buffer).getUint32(lenPtr, true);

  using buf = new WasmBuffer(ptr, len);

  const data = new Uint8Array(memory.buffer, ptr, len);
  console.log(new TextDecoder().decode(data));  // → “Hello from Rust”
} // Symbol.dispose or free_buffer gets called deterministically here
Explicit Resource Management provides a more dependable way to clean up resources than FinalizationRegistry, as it runs cleanup logic — such as calling free_buffer in WasmBuffer via [Symbol.dispose]() and the using syntax — deterministically, rather than relying on the garbage collector’s unpredictable timing. This makes it a more reliable choice for managing critical resources, especially memory.
Future
Emscripten already makes use of Explicit Resource Management for handling Wasm memory, using FinalizationRegistry as a last resort, while wasm-bindgen supports it in experimental mode. The proposal has seen growing adoption across the ecosystem and was recently conditionally advanced to Stage 4 in the TC39 process, meaning it’ll soon officially be part of the JavaScript language standard. This reflects a broader shift toward more predictable and structured memory cleanup in WebAssembly applications.
We recently added support for this feature in Cloudflare Workers as well, enabling developers to take advantage of deterministic resource cleanup in edge environments. As support for the feature matures, it’s likely to become a standard practice for managing linear memory safely and reliably.
FinalizationRegistry: still not dead yet?
Explicit Resource Management brings much-needed structure and predictability to resource cleanup in WebAssembly and JavaScript interop applications, but it doesn’t make FinalizationRegistry obsolete. There are still important use cases, particularly when a Wasm-allocated object’s lifecycle is out of your hands or when explicit disposal isn’t practical. In scenarios involving third-party libraries, dynamic lifecycles, or integration layers that don’t follow using patterns, FinalizationRegistry remains a valuable fallback to prevent memory leaks.
Looking ahead, a hybrid approach will likely become the standard in Wasm-JavaScript applications. Developers can use ERM for deterministic cleanup of Wasm memory and other resources, while relying on FinalizationRegistry as a safety net when full control isn’t possible. Together, they offer a more reliable and flexible foundation for managing memory across the JavaScript and WebAssembly boundary.
Program your traffic at the edge — fast, flexible, and free
Cloudflare Snippets are now generally available (GA) for all paid plans, giving you a fast, flexible way to control HTTP traffic using lightweight JavaScript “code rules” — at no extra cost.
Need to transform headers dynamically, fine-tune caching, rewrite URLs, retry failed requests, replace expired links, throttle suspicious traffic, or validate authentication tokens? Snippets provide a production-ready solution built for performance, security, and control.
With GA, we’re introducing a new code editor to streamline writing and testing logic. This summer, we’re also rolling out an integration with Secrets Store — enabling you to bind and manage sensitive values like API keys directly in Snippets, securely and at scale.
What are Snippets?
Snippets bring the power of JavaScript to Cloudflare Rules, letting you write logic that runs before a request reaches your origin or after a response returns from upstream. They’re ideal when built-in rule actions aren’t quite enough. While Cloudflare Rules let you define traffic logic without code, Snippets extend that model with greater flexibility for advanced scenarios.
Automated deployment and versioning via Terraform.
Best of all? Snippets are included at no extra cost for Pro, Business, and Enterprise plans — with no usage-based fees.
The journey to GA: How Snippets became production-grade
Cloudflare Snippets started as a bold idea: bring the power of JavaScript-based logic to Cloudflare Rules, without the complexity of a full-stack developer platform.
Over the past two years, Snippets have evolved into a production-ready “code rules” solution, shaping the future of HTTP traffic control.
2022: Cloudflare Snippets were announced during Developer Week as a solution for users needing flexible HTTP traffic modifications without a full Worker.
2023:Alpha launch — hundreds of users tested Snippets for high-performance traffic logic.
2024:7x traffic growth, processing 17,000 requests per second. Terraform support and production-grade backend were released.
2025:General Availability — Snippets introduces a new code editor, increased limits alongside other Cloudflare Rules products, integration with Trace, and a production-grade experience built for scale, handling over 2 million requests per second at peak. Integration with the Secrets Store is rolling out this summer.
New: Snippets + Trace
Cloudflare Trace now shows exactly which Snippets were triggered on a request. This makes it easier to debug traffic behavior, verify logic execution, and understand how your Snippets interact with other products in the request pipeline.
Whether you’re fine-tuning header logic or troubleshooting a routing issue, Trace gives you real-time insight into how your edge logic behaves in production.
Coming soon: Snippets + Secrets Store
In the third quarter, you’ll be able to securely access API keys, authentication tokens, and other sensitive values from Secrets Store directly in your Snippets. No more plaintext secrets in your code, no more workarounds.
Once rolled out, secrets can be configured for Snippets via the dashboard or API under the new “Settings” button.
When to use Snippets vs. Cloudflare Workers
Snippets are fast, flexible, and free, but how do they compare to Cloudflare Workers? Both allow you to programmatically control traffic. However, they solve different problems:
Feature
Snippets
Workers
Execute scripts based on request attributes (headers, geolocation, cookies, etc.)
✅
❌
Modify HTTP requests/responses or serve a different response
✅
✅
Add, remove, or rewrite headers dynamically
✅
✅
Cache assets at the edge
✅
✅
Route traffic dynamically between origins
✅
✅
Authenticate requests, pre-sign URLs, run A/B testing
✅
✅
Perform compute-intensive tasks (e.g., AI inference, image processing)
❌
✅
Store persistent data (e.g., KV, Durable Objects, D1)
❌
✅
Deploy via CLI (Wrangler)
❌
✅
Use TypeScript, Python, Rust or other programming languages
❌
✅
Use Snippets when:
You need ultra-fast conditional traffic modifications directly on Cloudflare’s network.
You want to extend Cloudflare Rules beyond built-in actions.
You need free, unlimited invocations within the execution limits.
You are migrating from VCL, Akamai’s EdgeWorkers, or on-premise logic.
Use Workers when:
Your application requires state management, Developer Platform product integrations, or high compute limits.
You are building APIs, full-stack applications, or complex workflows.
You need logging, debugging tools, CLI support, and gradual rollouts.
Still unsure? Check out our detailed guide for best practices.
Snippets in action: real-world use cases
Below are practical use cases demonstrating Snippets. Each script can be dynamically triggered using our powerful Rules language, so you can granularly control which requests your Snippets will be applied to.
1. Dynamically modify headers
Inject custom headers, remove unnecessary ones, and tweak values on the fly:
export default {
  async fetch(request) {
    const timestamp = Date.now().toString(16); // convert timestamp to HEX
    const modifiedRequest = new Request(request, { headers: new Headers(request.headers) });
    modifiedRequest.headers.set("X-Hex-Timestamp", timestamp); // send HEX timestamp to upstream

    const response = await fetch(modifiedRequest);
    const newResponse = new Response(response.body, response); // make response from upstream immutable

    newResponse.headers.append("x-snippets-hello", "Hello from Cloudflare Snippets"); // add new response header
    newResponse.headers.delete("x-header-to-delete"); // delete response header
    newResponse.headers.set("x-header-to-change", "NewValue"); // replace the value of existing response header

    return newResponse;
  },
};
2. Serve a custom maintenance page
Route traffic to a maintenance page when your origin is undergoing planned maintenance:
export default {
    async fetch(request) { // for all matching requests, return predefined HTML response with 503 status code
        return new Response(`
            <!DOCTYPE html>
            <html lang="en">
            <head>
                <meta charset="UTF-8">
                <title>We'll Be Right Back!</title>
                <style> body { font-family: Arial, sans-serif; text-align: center; padding: 20px; } </style>
            </head>
            <body>
                <h1>We'll Be Right Back!</h1>
                <p>Our site is undergoing maintenance. Check back soon!</p>
            </body>
            </html>
        `, { status: 503, headers: { "Content-Type": "text/html" } });
    }
};
3. Retry failed requests to a backup origin
Ensure reliability by automatically rerouting requests when your primary origin returns an unexpected response:
export default {
  async fetch(request) {
    const response = await fetch(request); // send original request to the origin

    if (!response.ok && !response.redirected) { // if response is not 200 OK or a redirect, send to another origin
      const newRequest = new Request(request); // clone the original request to construct a new request
      newRequest.headers.set("X-Rerouted", "1"); // add a header to identify a re-routed request at the new origin
      const url = new URL(request.url); // clone the original URL
      url.hostname = "backup.example.com"; // send request to a different origin / hostname
      return await fetch(url, newRequest); // serve response from the backup origin
    }

    return response; // otherwise, serve response from the primary origin
  },
};
4. Redirect users based on their location
Send visitors to region-specific sites for better localization:
export default {
    async fetch(request) {
        const country = request.cf.country; // identify visitor's country using request.cf property
        const redirectMap = { US: "https://example.com/us", EU: "https://example.com/eu" }; // define redirects for each country
        if (redirectMap[country]) return Response.redirect(redirectMap[country], 301); // redirect on match
        return fetch(request); // otherwise, proceed to upstream normally
    }
};
Getting started with Snippets
Snippets are available right now in the Cloudflare dashboard under Rules > Snippets:
Go to Rules → Snippets.
Use prebuilt templates or write your own JavaScript code.
Configure a flexible rule to trigger your Snippet.
Cloudflare Snippets are now generally available, bringing fast, cost-free, and intelligent HTTP traffic control to all paid plans.
With native integration into Cloudflare Rules and Terraform — and Secrets Store integration coming this summer — Snippets provide the most efficient way to manage advanced traffic logic at scale.
Explore Snippets in the Cloudflare Dashboard and start optimizing your traffic with lightweight, flexible rules that enhance performance and reduce complexity.
Today, we are excited to announce that we have contributed an implementation of the URLPattern API to Node.js, and it is available starting with the v23.8.0 update. We’ve done this by adding our URLPattern implementation to Ada URL, the high-performance URL parser that now powers URL handling in both Node.js and Cloudflare Workers. This marks an important step toward bringing this API to the broader JavaScript ecosystem.
Cloudflare Workers has, from the beginning, embraced a standards-based JavaScript programming model, and Cloudflare was one of the founding companies for what has evolved into ECMA’s 55th Technical Committee, focusing on interoperability between Web-interoperable runtimes like Workers, Node.js, Deno, and others. This contribution highlights and marks our commitment to this ongoing philosophy. Ensuring that all the JavaScript runtimes work consistently and offer at least a minimally consistent set of features is critical to ensuring the ongoing health of the ecosystem as a whole.
URLPattern API contribution is just one example of Cloudflare’s ongoing commitment to the open-source ecosystem. We actively contribute to numerous open-source projects including Node.js, V8, and Ada URL, while also maintaining our own open-source initiatives like workerd and wrangler. By upstreaming improvements to foundational technologies that power the web, we strengthen the entire developer ecosystem while ensuring consistent features across JavaScript runtimes. This collaborative approach reflects our belief that open standards and shared implementations benefit everyone – reducing fragmentation, improving developer experience and creating a better Internet.
What is URLPattern?
URLPattern is a standard published by the WHATWG (Web Hypertext Application Technology Working Group) which provides a pattern-matching system for URLs. This specification is available at urlpattern.spec.whatwg.org. The API provides developers with an easy-to-use, regular expression (regex)-based approach to handling route matching, with built-in support for named parameters, wildcards, and more complex pattern matching that works uniformly across all URL components.
URLPattern is part of the WinterTC Minimum Common API, a soon-to-be standardized subset of web platform APIs designed to ensure interoperability across JavaScript runtimes, particularly for server-side and non-browser environments, and includes other APIs such as URL and URLSearchParams.
Cloudflare Workers has supported URLPattern for a number of years now, reflecting our commitment to enabling developers to use standard APIs across both browsers and server-side JavaScript runtimes. Contributing to Node.js and unifying the URLPattern implementation simplifies the ecosystem by reducing fragmentation, while at the same time improving our own implementation in Cloudflare Workers by making it faster and more specification compliant.
The following example demonstrates how URLPattern is used by creating a pattern that matches URLs with a “/blog/:year/:month/:slug” path structure, then tests if one specific URL string matches this pattern, and extracts the named parameters from a second URL using the exec method.
const pattern = new URLPattern({
  pathname: '/blog/:year/:month/:slug'
});

if (pattern.test('https://example.com/blog/2025/03/urlpattern-launch')) {
  console.log('Match found!');
}

const result = pattern.exec('https://example.com/blog/2025/03/urlpattern-launch');
console.log(result.pathname.groups.year); // "2025"
console.log(result.pathname.groups.month); // "03"
console.log(result.pathname.groups.slug); // "urlpattern-launch"
The URLPattern constructor accepts pattern strings or objects defining patterns for individual URL components. The test() method returns a boolean indicating if a URL simply matches the pattern. The exec() method provides detailed match results including captured groups. Behind this simple API, there’s sophisticated machinery working behind the scenes:
When a URLPattern is used, it internally breaks down a URL, matching it against eight distinct components: protocol, username, password, hostname, port, pathname, search, and hash. This component-based approach gives the developer control over which parts of a URL to match.
Upon creation of the instance, URLPattern parses your input patterns for each component and compiles them internally into eight specialized regular expressions (one for each component type). This compilation step happens just once when you create an URLPattern object, optimizing subsequent matching operations.
During a match operation (whether using test() or exec()), these regular expressions are used to determine if the input matches the given properties. The test() method tells you if there’s a match, while exec() provides detailed information about what was matched, including any named capture groups from your pattern.
Fixing things along the way
While implementing URLPattern, we discovered some inconsistencies between the specification and the web-platform tests, a cross-browser test suite maintained by all major browsers to test conformance to web standard specifications. For instance, we found that URLs with non-special protocols (opaque-paths) and URLs with invalid characters in hostnames were not correctly defined and processed within the URLPattern specification. We worked actively with the Chromium and the Safari teams to address these issues.
URLPatterns constructed from hostname components that contain newline or tab characters were expected to fail in the corresponding web-platform tests. This was due to an inconsistency with the original URLPattern implementation and the URLPattern specification.
const pattern = new URL({ "hostname": "bad\nhostname" });
const matched = pattern.test({ "hostname": "badhostname" });
// This now returns true.
We opened several issues to document these inconsistencies and followed up with a pull-request to fix the specification, ensuring that all implementations will eventually converge on the same corrected behavior. This also resulted in fixing several inconsistencies in web-platform tests, particularly around handling certain types of white space (such as newline or tab characters) in hostnames.
Getting started with URLPattern
If you’re interested in using URLPattern today, you can:
Use it natively in modern browsers by accessing the global URLPattern class
Try it in Cloudflare Workers (which has had URLPattern support for some time, now with improved spec compliance and performance)
Here is a more complex example showing how URLPattern can be used for routing in a Cloudflare Worker — a common use case when building API endpoints or web applications that need to handle different URL paths efficiently and differently. The following example shows a pattern for REST APIs that matches both “/users” and “/users/:userId”
const routes = [
  new URLPattern({ pathname: '/users{/:userId}?' }),
];

export default {
  async fetch(request, env, ctx): Promise<Response> {
    const url = new URL(request.url);
    for (const route of routes) {
      const match = route.exec(url);
      if (match) {
        const { userId } = match.pathname.groups;
        if (userId) {
          return new Response(`User ID: ${userId}`);
        }
        return new Response('List of users');
      }
    }
    // No matching route found
    return new Response('Not Found', { status: 404 });
  },
} satisfies ExportedHandler<Env>;
What does the future hold?
The contribution of URLPattern to Ada URL and Node.js is just the beginning. We’re excited about the possibilities this opens up for developers across different JavaScript environments.
In the future, we expect to contribute additional improvements to URLPattern’s performance, enabling more use cases for web application routing. Additionally, efforts to standardize the URLPatternList proposal will help deliver faster matching capabilities for server-side runtimes. We’re excited about these developments and encourage you to try URLPattern in your projects today.
Try it and let us know what you think by creating an issue on the workerd repository. Your feedback is invaluable as we work to further enhance URLPattern.
We hope to do our part to build a unified Javascript ecosystem, and encourage others to do the same. This may mean looking for opportunities, such as we have with URLPattern, to share API implementations across backend runtimes. It could mean using or contributing to web-platform-tests if you are working on a server-side runtime or web-standard APIs, or it might mean joining WinterTC to help define web-interoperable standards for server-side JavaScript.
Modern websites rely heavily on JavaScript. Leveraging third-party scripts accelerates web app development, enabling organizations to deploy new features faster without building everything from scratch. However, supply chain attacks targeting third-party JavaScript are no longer just a theoretical concern — they have become a reality, as recent incidents have shown. Given the vast number of scripts and the rapid pace of updates, manually reviewing each one is not a scalable security strategy.
Cloudflare provides automated client-side protection through Page Shield. Until now, Page Shield could scan JavaScript dependencies on a web page, flagging obfuscated script content which also exfiltrates data. However, these are only indirect indicators of compromise or malicious intent. Our original approach didn’t provide clear insights into a script’s specific malicious objectives or the type of attack it was designed to execute.
Taking things a step further, we have developed a new AI model that allows us to detect the exact malicious intent behind each script. This intelligence is now integrated into Page Shield, available to all Page Shield add-on customers. We are starting with three key threat categories: Magecart, crypto mining, and malware.
Screenshot of Page Shield dashboard showing results of three types of analysis.
With these improvements, Page Shield provides deeper visibility into client-side threats, empowering organizations to better protect their users from evolving security risks. This new capability is available to all Page Shield customers with the add-on. Head over to the dashboard, and you can find the new malicious code analysis for each of the scripts monitored.
In the following sections, we take a deep dive into how we developed this model.
Training the model to detect hidden malicious intent
We built this new Page Shield AI model to detect the intent of JavaScript threats at scale. Training such a model for JavaScript comes with unique challenges, including dealing with web code written in many different styles, often obfuscated yet benign. For instance, the following three snippets serve the same function.
With such a variance of styles (and many more), our machine learning solution needs to balance precision (low false positive rate), recall (don’t miss an attack vector), and speed. Here’s how we do it:
Using syntax trees to classify malicious code
JavaScript files are parsed into syntax trees (connected acyclic graphs). These serve as the input to a Graph Neural Network (GNN). GNNs are used because they effectively capture the interdependencies (relationships between nodes) in executing code, such as a function calling another function. This contrasts with treating the code as merely a sequence of words — something a code compiler, incidentally, does not do. Another motivation to use GNNs is the insight that the syntax trees of malicious versus benign JavaScript tend to be different. For example, it’s not rare to find attacks that consist of malicious snippets inserted into, but otherwise isolated from, the rest of a benign base code.
To parse the files, the tree-sitter library was chosen for its speed. One peculiarity of this parser, specialized for text editors, is that it parses out concrete syntax trees (CST). CSTs retain everything from the original text input, including spacing information, comments, and even nodes attempting to repair syntax errors. This differs from abstract syntax trees (AST), the data structures used in compilers, which have just the essential information to execute the underlying code while ignoring the rest. One key reason for wanting to convert the CST to an AST-like structure, is that it reduces the tree size, which in turn reduces computation and memory usage. To do that, we abstract and filter out unnecessary nodes such as code comments. Consider for instance, how the following snippet
x = `result: ${(10+5) * 3}`;;; //this is a comment
… gets converted to an AST-like representation:
Abstract Syntax Tree (AST) representation of the sample code above. Unnecessary elements get removed (e.g. comments, spacing) whereas others get encoded in the tree structure (order of operations due to parentheses).
One benefit of working with parsed syntax trees is that tokenization comes for free! We collect and treat the node leaves’ text as our tokens, which will be used as features (inputs) for the machine learning model. Note that multiple characters in the original input, for instance backticks to form a template string, are not treated as tokens per se, but remain encoded in the graph structure given to the GNN. (Notice in the sample tree representations the different node types, such as “assignment_expression”). Moreover, some details in the exact text input become irrelevant in the executing AST, such as whether a string was originally written using double quotes vs. single quotes.
We encode the node tokens and node types into a matrix of counts. Currently, we lowercase the nodes’ text to reduce vocabulary size, improving efficiency and reducing sparsity. Note that JavaScript is a case-sensitive language, so this is a trade-off we continue to explore. This matrix and, importantly, the information about the node edges within the tree, is the input to the GNN.
How do we deal with obfuscated code? We don’t treat it specially. Rather, we always parse the JavaScript text as is, which incidentally unescapes escape characters too. For instance, the resulting AST shown below for the following input exemplifies that:
Abstract Syntax Tree (AST) representation of the sample code above. JavaScript escape characters are unescaped.
Moreover, our vocabulary contains several tokens that are commonly used in obfuscated code, such as double escaped hexadecimal-encoded characters. That, together with the graph structure information, is giving us satisfying results — the model successfully classifies malicious code whether it’s obfuscated or not. Analogously, our model’s scores remain stable when applied to plain benign scripts compared to obfuscating them in different ways. In other words, the model’s score on a script is similar to the score on an obfuscated version of the same script. Having said that, some of our model’s false positives (FPs) originate from benign but obfuscated code, so we continue to investigate how we can improve our model’s intelligence.
Architecting the Graph Neural Network
We train a message-passing graph convolutional network (MPGCN) that processes the input trees. The message-passing layers iteratively update each node’s internal representation, encoded in a matrix, by aggregating information from its neighbors (parent and child nodes in the tree). A pooling layer then condenses this matrix into a feature vector, discarding the explicit graph structure (edge connections between nodes). At this point, standard neural network layers, such as fully connected layers, can be applied to progressively refine the representation. Finally, a softmax activation layer produces a probability distribution over the four possible classes: benign, magecart, cryptomining, and malware.
We use the TF-GNN library to implement graph neural networks, with Keras serving as the high-level frontend for model building and training. This works well for us with one exception: TF-GNN does not support sparse matrices / tensors. (That lack of support increases memory consumption, which also adds some latency.) Because of this, we are considering switching to PyTorch Geometric instead.
Graph neural network architecture, transforming the input tree with features down to the 4 classification probabilities.
The model’s output probabilities are finally inverted and scaled into scores (ranging from 1 to 99). The “js_integrity” score aggregates the malicious classes (magecart, malware, cryptomining). A low score means likely malicious, and a high score means likely benign. We use this output format for consistency with other Cloudflare detection systems, such as Bot Management and the WAF Attack Score. The following diagram illustrates the preprocessing and feature analysis pipeline of the model down to the inference results.
Model inference pipeline to sniff out and alert on malicious JavaScript.
Tackling unbalanced data: malicious scripts are the minority
Finding malicious scripts is like finding a needle in a haystack; they are anomalies among plenty of otherwise benign JavaScript. This naturally results in a highly imbalanced dataset. For example, our Magecart-labeled scripts only account for ~6% of the total dataset.
Not only that, but the “benign” category contains an immense variance (and amount) of JavaScript to classify. The lengths of the scripts are highly diverse (ranging from just a few bytes to several megabytes), their coding styles vary widely, some are obfuscated whereas others are not, etc. To make matters worse, malicious payloads are often just small, carefully inserted fragments within an otherwise perfectly valid and functional benign script. This all creates a cacophony of token distributions for an ML model to make sense of.
Still, our biggest problem remains finding enough malevolent JavaScript to add to our training dataset. Thus, simplifying it, our strategy for data collection and annotation is two-fold:
Malicious scripts are about quantity → the more, the merrier (for our model, that is 😉). Of course, we still care about quality and diversity. But because we have so few of them (in comparison to the number of benign scripts), we take what we can.
Benign scripts are about quality → the more variance, the merrier. Here we have the opposite situation. Because we can collect so many of them easily, the value is in adding differentiated scripts.
Learning key scripts only: reduce false positives with minimal annotation time
To filter out semantically-similar scripts (mostly benign), we employed the latest advancements in LLM for generating code embeddings. We added those scripts that are distant enough from each other to our dataset, as measured by vector cosine similarity. Our methodology is simple — for a batch of potentially new scripts:
Call an LLM to generate its embedding. We’ve had good results with starcoder2, and most recently qwen2.5-coder.
Search in the database for the top-1 closest other script’s vectors.
If the distance > threshold (0.10), select it and add it to the database.
Else, discard the script (though we consider it for further validations and tests).
Although this methodology has an inherent bias in gradually favoring the first seen scripts, in practice we’ve used it for batches of newly and randomly sampled JavaScript only. To review the whole existing dataset, we could employ other but similar strategies, like applying HDBSCAN to identify an unknown number of clusters and then selecting the medoids, boundary, and anomaly data points.
We’ve successfully employed this strategy for pinpointing a few highly varied scripts that were relevant for the model to learn from. Our security researchers save a tremendous amount of time on manual annotation, while false positives are drastically reduced. For instance, in a large and unlabeled bucket of scripts, one of our early evaluation models identified ~3,000 of them as malicious. That’s too many to manually review! By removing near duplicates, we narrowed the need for annotation down to only 196 samples, less than 7% of the original amount (see the t-SNE visualization below of selected points and clusters). Three of those scripts were actually malicious, one we could not fully determine, and the rest were benign. By just re-training with these new labeled scripts, a tiny fraction of our whole dataset, we reduced false positives by 50% (as gauged in the same bucket and in a controlled test set). We have consistently repeated this procedure to iteratively enhance successive model versions.
2D visualization of scripts projected onto an embedding space, highlighting those sufficiently dissimilar from one another.
From the lab, to the real world
Our latest model in evaluation has both a macro accuracy and an overall malicious precision nearing 99%(!) on our test dataset. So we are done, right? Wrong! The real world is not the same as the lab, where many more variances of benign JavaScript can be seen. To further assure minimum prediction changes between model releases, we follow these three anti-fool measures:
Evaluate metrics uncertainty
First, we thoroughly estimate the uncertainty of our offline evaluation metrics. How accurate are our accuracy metrics themselves? To gauge that, we calculate the standard error and confidence intervals for our offline metrics (precision, recall, F1 measure). To do that, we calculate the model’s predicted scores on the test set once (the original sample), and then generate bootstrapped resamples from it. We use simple random (re-)sampling as it offers us a more conservative estimate of error than stratified or balanced sampling.
We would generate 1,000 resamples, each a fraction of 15% resampled from the original test sample, then calculate the metrics for each individual resample. This results in a distribution of sampled data points. We measure its mean, the standard deviation (with Bessel’s correction), and finally the standard error and a confidence interval (CI) (using the percentile method, such as the 2.5 and 97.5 percentiles for a 95% CI). See below for an example of a bootstrapped distribution for precision (P), illustrating that a model’s performance is a continuum rather than a fixed value, and that might exhibit subtly (left-)skewed tails. For some of our internally evaluated models, it can easily happen that some of the sub-sampled metrics decrease by up to 20 percentage points within a 95% confidence range. High standard errors and/or confidence ranges signal needs for model improvement and for improving and increasing our test set.
An evaluation metric, here precision (P), might change significantly depending on what’s exactly tested. We thoroughly estimate the metric’s standard error and confidence intervals.
Benchmark against massive offline unlabeled dataset
We run our model on the entire corpus of scripts seen by Cloudflare’s network and temporarily cached in the last 90 days. By the way, that’s nearly 1 TiB and 26 million different JavaScript files! With that, we can observe the model’s behavior against real traffic, yet completely offline (to ensure no impact to production). We check the malicious prediction rate, latency, throughput, etc. and sample some of the predictions for verification and annotation.
Review in staging and shadow mode
Only after all the previous checks were cleared, we then run this new tentative version in our staging environment. For major model upgrades, we also deploy them in shadow mode (log-only mode) — running on production, alongside our existing model. We study the model’s behavior for a while before finally marking it as production ready, otherwise we go back to the drawing board.
AI inference at scale
At the time of writing, Page Shield sees an average of 40,000 scripts per second. Many of those scripts are repeated, though. Everything on the Internet follows a Zipf’s law distribution, and JavaScript seen on the Cloudflare network is no exception. For instance, it is estimated that different versions of the Bootstrap library run on more than 20% of websites. It would be a waste of computing resources if we repeatedly re-ran the AI model for the very same inputs — inference result caching is needed. Not to mention, GPU utilization is expensive!
The question is, what is the best way to cache the scripts? We could take an SHA-256 hash of the plain content as is. However, any single change in the transmitted content (comments, spacing, or a different character set) changes the SHA-256 output hash.
A better caching approach? Since we need to parse the code into syntax trees for our GNN model anyway, this tree structure and content is what we use to hash the JavaScript. As described above, we filter out nodes in the syntax tree like comments or empty statements. In addition, some irrelevant details get abstracted out in the AST (escape sequences are unescaped, the way of writing strings is normalized, unnecessary parentheses are removed for the operations order is encoded in the tree, etc.).
Using such a tree-based approach to caching, we can conclude that at any moment over 99.9% of reported scripts have already been seen in our network! Unless we deploy a new model with significant improvements, we don’t re-score previously seen JavaScript but just return the cached score. As a result, the model only needs to be called fewer than 10 times per minute, even during peak times!
Let AI help ease PCI DSS v4 compliance
One of the most popular use cases for deploying Page Shield is to help meet the two new client-side security requirements in PCI DSS v4 — 6.4.3 and 11.6.1. These requirements make companies responsible for approving scripts used in payment pages, where payment card data could be compromised by malicious JavaScript. Both of these requirements become effective on March 31, 2025.
Page Shield with AI malicious JavaScript detection can be deployed with just a few clicks, especially if your website is already proxied through Cloudflare. Sign up here to fast track your onboarding!
Cloudflare Radar celebrated its fourth birthday in September 2024. As we’ve expanded Radar’s scope over the last four years, the value that it provides as a resource for the global Internet has grown over time, and with Radar data and graphs often appearing in publications and social media around the world, we knew that we needed to make it available in languages beyond English.
Localization is important because most Internet users do not speak English as a first language. According to W3Techs, English usage on the Internet has dropped 8.3 points (57.7% to 49.4%) since January 2023, whereas usage of other languages like Spanish, German, Japanese, Italian, Portuguese and Dutch is steadily increasing. Furthermore, a CSA Research study determined that 65% of Internet users prefer content in their language.
To successfully (and painlessly) localize any product, it must be internationalized first. Internationalization is the process of making a product ready to be translated and adapted into multiple languages and cultures, and it sets the foundation to enable your product to be localized later on at a much faster pace (and at a lower cost, both in time and budget). Below, we review how Cloudflare’s Radar and Globalization teams worked together to deliver a Radar experience spanning twelve languages.
What is localization?
Localization (l10n) is the process of adapting content for a region, including translation, associated imagery, and cultural elements that influence how your content will be perceived. The goal, ideally, is to make the content sound like it was originally written with the region in mind, incorporating relevant cultural nuances instead of merely replacing English with translated text.
Localization includes, among others:
Language: Translation, obviously, but it’s just the beginning.
Tone and message: Localization considers what will resonate with your target audience, not just what’s accurate.
Images: What may be appropriate in one country can be problematic in another (maps, for instance, that tend to include disputed territories).
Date, time, measurement, and number formats: Formats change based on location and may differ even within the same language. In the U.S., the date follows this format: “December 15, 2018.” But in the U.K., that same date would be written like this: “15 December 2018.” Not to mention a constant source of confusion: the month/day/year vs.day/month/year difference:
Pixar movies are a great example of localization. Pixar takes great care to internationalize their movie production process, so they can replace or insert scenes that will resonate with watchers all over the world, not just the US. Let’s consider Inside Out (2015). During the movie, Riley reminisces about playing ice hockey back in Minnesota. Most of the world is not as familiar with ice hockey as in the US, so Pixar wisely decided that they would use soccer elsewhere, allowing a more direct emotional connection with those audiences.
Images: scene from Inside Out (2015), produced by Pixar Animation Studios and Walt Disney Pictures. Copyright Pixar Animation Studios and Walt Disney Pictures. Images used under fair use.
And you don’t have to go to computer animated movies. Here’s an example from The Shining (1980) where the famous “All work and no play makes Jack a dull boy” typewriter scene was localized into all languages differently. The producers, in a pre-Information Technology example of internationalization, shot and cut the localized scene into the local versions of the movie.
Images: scene from The Shining (1980), directed by Stanley Kubrick. Copyright Warner Bros. Pictures. Images used under fair use.
Internationalization
Localization is hard, and no one in the business will tell you otherwise. Fortunately there’s a playbook: the first step to localization is internationalization (i18n). Internationalization is the process of making a product ready to be translated and adapted into multiple languages and cultures. It’s a preparatory step that helps with translation and localization. The more you internationalize your code and the more you take into account language and cultural nuances, the easier the localization will be.
Hard-coding and externalization
The first step to internationalize Radar was to assess how many of the localizable strings were hard-coded. Hard coding is the practice of embedding data directly into the source code of a program. Although a convenient and fast way to write your code, it makes it more difficult to change or localize the code later.
Most of the strings that make up the Radar pages used to be hard-coded, so before we could begin translating, externalization had to be done, which is the process of extracting any text that needs to be localized from the code and moving it into separate files.
Hard-coded strings:
import Card from “~/components/Card”;
import Chart from “~/components/Chart”;

export default function TrafficChart() {
  return (
    <Card
      title="Traffic"
      description="Share of HTTP requests"
    >
      <Chart />
    </Card>
  );
}
Externalized key placeholders:
import { useTranslation } from "react-i18next";
import Card from “~/components/Card”;
import Chart from “~/components/Chart”;

export default function TrafficChart() {
  const { t } = useTranslation();
  return (
    <Card
      title={t("traffic.chart.title")}
      description={t("traffic.chart.description")}
    >
      <Chart />
    </Card>
  );
}
There are several benefits to externalizing strings:
It allows translators to work on separate, isolated files that contain only localizable strings
It prevents accidental changes to the code
It allows developers to deploy updates, changes, and fixes without having to recompile or redeploy code for each language every time
If you look at the example below, when the code is compiled or deployed, upon reaching line 10 (on the left), it will find a key named traffic.chart.title. It will then proceed to match that key within the JSON file on the right, finding it on line 1090 and resolving it to “Traffic” for English, “Tráfego” for Portuguese and “トラフィック” for Japanese, doing this for every localized JSON file present in the code.
Pseudo translation
Not all strings are easily found and some are buried deep in the code, sometimes in legacy, inherited code or APIs. Fortunately, there are some strategies that help detect hard-coded strings. This is where pseudo translation comes into play.
Pseudo translation is a process that replaces all characters in a string with similar-looking ones; pseudo translated strings are enclosed within [ ] characters, and some extra characters are added to them to simulate text expansion (more on that later). It is an invaluable tool to help us find any hard coded strings, and to stress test the UI for language readiness and length variability, while still keeping the content mostly readable. For example, this string:
Routing Information
looks like this once pseudo translated:
[R~óútíñg Í~ñfó~rmát~íóñ]
Once pseudo translation is done, any English strings left intact are most likely hard coded or come from other sources. In the screenshot below you can see how ASN, Country, Name and Prefix Count did not get pseudo translated and had to be externalized by the Radar developers. The Globalization team collaborated with the Radar team to report and fix hard-coded text issues, as well as the issues that are mentioned in the next few sections.
Text expansion
Text expansion occurs when translated content from one language to another takes up more space than the original. Sometimes this expansion is horizontal, as English to German can expand up to an average of 35%, Spanish 30%, and French 20%). Asian languages might contract from the English but expand vertically. Interestingly, the fewer characters English has, the more the localized languages tend to expand.
UI designers and developers need to keep this in mind when creating their applications. Thus, one important consideration is to test the design mock-ups with larger texts and plan the UI to accommodate for text expansion. If some English content barely fits within its container, it will most likely not fit in other languages and possibly break the layout.
Here’s an example of the same button in different languages in Radar’s fixed-width sidebar. Since it’s the main navigation, truncating the text is not appropriate and the only viable option is wrapping, which means localized buttons can end up having different heights. Sometimes it’s necessary to trade visual consistency for usability.
String concatenation
In English, you can easily chain-connect words because most words lack inflections. Almost all programming languages are designed using the English language in mind. An old linguist joke goes like: an English teacher: a teacher of English or a teacher from England? Case in point, it would be nightmarish to translate this example:
A lovely little old rectangular green French silver whittling knife
Most Western languages need to connect words with some glue: prepositions, articles, or inflections. This is why, in general, string concatenation (putting together sentences or sentence parts by combining two or more strings) is a terrible practice for localization, even though it seems efficient from a development point of view. You can’t assume that all languages follow the same sentence structure as English. Most languages don’t.
Sentences may need to be completely reversed for them to sound grammatically correct in other languages. This becomes a particularly severe problem when a string doesn’t include a placeholder because it’s assumed to be concatenated at the beginning or the end of the string, such as this:
"is currently categorized as:"
Developers need to make sure to include any placeholders within the string itself, so that translators can easily move them as needed, for instance:
"Distribution of {{botClass}} traffic by IP version"
would look like this in Simplified Chinese (notice how the {{botClass}} placeholder got moved)
"{{botClass}} 流量分布(按 IP 版本)"
String reuse
As with string concatenation, string reuse (using the same string in more than one place and just swapping out the contents of a placeholder) seems efficient if you’re a developer. A problem arises when translating this into gendered languages, such as most European languages. In Spanish, depending on its position and context, a word as simple as “open” standing by itself, could have all these different translations:
Translators will need to know what will replace the placeholders in strings like the one below, because the surrounding wording may refer to a term that is masculine, feminine, or neutral (for languages that have those, such as German). If a placeholder could be more than one of these (a masculine noun but also a feminine noun), the translation will become grammatically incorrect in at least some of the cases. In the following example, translators would need to know what {link1} and {link2} will be replaced with, so they know which grammatically correct wording to use around them.
Your use of the URL Scanner is subject to our {{link1}}. Any personal data in a submitted URL will be handled in accordance with our {{link2}}.
A better way to do this is to have component placeholders and include the text to be translated for context:
Your use of the URL Scanner is subject to our <link1>Online Service Terms of Use</link1>. Any personal data in a submitted URL will be handled in accordance with our <link2>Privacy Policy</link2>.
Even simple words like Custom, Detected, or Disabled could have different translations depending on their position within a sentence, their location in the UI, depending on whether they accompany a singular, plural, masculine or feminine noun, so extra entries for these may need to be created.
Regional considerations
Date formats
Date formats vary greatly from country to country. Not only can’t you assume that all countries use a month/day/year format, but even the day that the week starts may be different based on the country or culture.
Here’s a comparison of Radar’s date picker in American English against European Spanish (which has weeks starting on Mondays instead of Sundays), and against Simplified Chinese (which uses a completely different format for dates).
Intl.DateTimeFormat receives a locale and formatting options that differ from string tokens commonly found on date libraries such as Day.js or Moment.js. Unless you specifically use the localized string tokens on those libraries, the order of the tokens is fixed, along with any characters or delimiters you might add to the format, which poses a problem because the date format parts order should change according to the locale.
Intl.DateTimeFormat handles all that and saves you the trouble of having to add a date formatting dependency to your project and loading library-specific locale resources.
Here’s an example of a generic React component using Intl.DateTimeFormat and react-i18next. The code below will render the date as “Tue, Oct 1, 2024” for American English (en-US) and as “2024年10月1日(火)” for Japanese (ja-JP).
Similarly, different locales use different notations for numbers. In the US and the UK, a period is used as the decimal separator, and a comma as the thousands separator. Instead, other countries use a comma as the decimal separator and a period (or a space) as the thousands separator. Again, it’s not necessary for developers to know all the odds and ends for this, as they can use Intl.NumberFormat.
Here’s an example of a generic React component using Intl.NumberFormat and react-i18next. The code below will render the number as “12,345,678.90” for American English (en-US) and as “12 345 678,90” for Portuguese (pt-PT). Intl.NumberFormat options can be passed to format numbers as decimals, percentages, currencies, etc, and specify things like number of decimal places and rounding strategies.
As of mid-December, regionalized number formatting is not fully implemented on Radar. We expect this to be complete by the end of Q1 2025.
List sorting
When you have a list of items that appears sorted, such as a country list in a dropdown, it’s not enough to simply translate the items. For instance, when translated into Portuguese, “South Africa” becomes “África do Sul”, which means it should then go near the top of the list. Besides that, each language has different sorting requirements, and those go way beyond the A-Z alphabet. For instance, several Asian languages don’t use Latin characters at all, and may get sorted by stroke or character radical order instead.
Here’s an example of a generic React country selector component using String.localeCompare and react-i18next. The code below imports a list of countries with name and alpha-2 code and sorts the options according to the translated country name for the active locale. Intl.Collator options can be passed to localeCompare() for specific sorting needs.
import { useTranslation } from "react-i18next";

import Select from "~/components/Select";
import COUNTRIES from "~/constants/geo";

export default function CountrySelector() {
  const { t, i18n } = useTranslation();
  const options = COUNTRIES.map(({ name, code }) => ({
    label: t(name, { ns: "countries" }),
    value: code,
  })).sort((a, b) => a.label.localeCompare(b.label, i18n.language));
  return <Select options={options} onChange={(option) => { /* do something */ }} />;
}
API localization
Many of the Radar screens and reports include output from Cloudflare or third-party APIs. Unfortunately, the vast majority of these APIs only output English content. When combining that with the translated part of the site, it may give the impression of a poorly localized site.
To solve this, we take API outputs and map everything into separate files, translate all possible messages, and then display that instead of the original output. But as APIs evolve over time and new messages are added, or existing ones get changed, keeping up with these translations becomes an endless game of “whac-a-mole“.
"Address unreachable error when attempting to load page": "Error de dirección inaccesible al intentar cargar la página",
"Authentication failed": "Autenticación fallida",
"Browser did not fully start before timeout": "El navegador no se ha iniciado por completo antes de agotar el tiempo de espera.",
"Certificate and/or SSL error when attempting to load page": "Error de certificado y/o SSL al intentar cargar la página",
"Crawl took too long to finish": "El rastreo ha tardado demasiado en completarse.",
"DNS resolution failed": "Error de resolución de DNS",
"Network connection aborted.": "Conexión de red cancelada"
It should be a best practice for APIs to accept a locale parameter or header, and for engineers to have multiple languages in mind when building these APIs, even if it’s just the error messages. That could save time and resources for any number of clients they might have.
Project setup
Radar is a Remix project running on Cloudflare Pages. While researching ways to implement internationalization, we came across this Remix blog post, and after some experimenting, we decided to go with Sergio Xalambrí’s remix-i18next. We mostly followed the installation instructions found on the repo, with some changes.
We have multiple translation files on every locale folder, one for each data source, to help us maintain strings that come from APIs. Each file can be used to create a namespace for translations, to avoid key collisions, and also to be loaded separately as needed for each route or component.
On remix-i18next’s instructions, you’ll find the concept of backend plugins to achieve the loading of these files, except that you cannot use i18next-fs-backend with Cloudflare Pages because there’s no access to the filesystem. To solve that we used the resources approach, similar to what can be found on this sample remix-i18next with vite setup, but we didn’t want to have to maintain the resources dictionary each time we add new namespaces, so vite’s Glob imports came in handy:
This creates a server-side only resources dictionary by importing all JSON files in the locales folder to be passed as the resources property for the i18next configuration in Remix’s entry.server.tsx.
To load namespaces on the client side, we created a Remix resource route that uses the resources dictionary and responds with the namespace object of the requested locale:
Namespaces on the server side get picked up by the getRouteNamespaces function on entry.server.tsx:
const ns = i18n.getRouteNamespaces(remixContext);
On the client-side, examples suggested that you’d have to declare the namespaces on each useTranslation() hook instance, but we worked around that in Remix’s root.tsx file:
import { useLocation, useMatches } from "@remix-run/react";
import { useTranslation } from "react-i18next";
import { defaultNS } from “~/i18n”;

export function Layout({ children }) {
  const location = useLocation();
  const matches = useMatches();
  const handle = matches?.find((m) => m.pathname === location.pathname)?.handle || {};
  useTranslation([...new Set([...defaultNS, ...(handle.i18n || [])])]);
  ...
}
This causes the client-side plugin to make calls to the resource route and load the required namespaces.
We also wanted to have the locale in the URL pathname, but not for the default language, so Remix’s optional segments allowed us to do just that. remix-i18next does not have URL locale detection by default, but you can provide your own findLocale function that will receive the request as an argument, and you can then parse the request URL to extract the locale.
Search engine optimization
Once you set up your project for internationalization, you can inform search engines of localized versions of your pages. This allows search engines to display localized results of your website in the same language that is being searched.
You should also localize page titles, descriptions, and relevant Open Graph metadata. To achieve this with Remix and remix-i18next, you use the getFixedT method in route loaders to resolve the translations and return data for the meta export:
import type { LoaderFunctionArgs, MetaArgs } from "@remix-run/server-runtime";
import i18n from "~/i18next.server";

export async function loader({ request }: LoaderFunctionArgs) {
  const t = await i18n.getFixedT(request);
  return {
    meta: {
      title: t("meta.about.title"),
      description: t("meta.about.description"),
      url: request.url,
    },
  };
}

export const meta = ({ data }: MetaArgs<typeof loader>) => data.meta;
If you are defining default meta tags in parent routes you may also need to merge the meta objects.
Conclusion
There is hardly ever an absolute when dealing with languages. Your Spanish, your French, your Japanese will be different from someone else’s, even if you grew up next door to each other. Family, education, environment, relationships will season and give color to your language. It is like a family recipe — it’s unique, it feels like home and it’s not negotiable. It does not make it better or worse, it just makes it yours. And yours will always be different from other languages.
Localization is hard. We have seen that there are many things that can and will go sideways, and there are many unknowns that bubble up to the surface in the process. It can also make a product better, as it stress tests the product’s code and design. A tight relationship between the globalization and Radar teams helped make our efforts go more smoothly. In addition, our translators stepped up to the challenge, familiarizing themselves with Radar, analyzing the English content, finding the right translation that will not only resonate with the audience but also fit in the space allotted, constantly checking for context, previous translations, consistency, industry standards, adapting to style guides, tone, and messaging, and after all of that, ultimately acknowledging the fact that there will be people who will disagree (to varying levels of zeal) with their choice of words.
If you haven’t done so already, we encourage you to explore the localized versions of Cloudflare Radar. Click the language drop-down in the upper right corner of the Radar interface and select your language of choice — Radar will be presented in that language until a new selection is made. Have comments or suggestions about the translations? Let us know at [email protected].
In October 2024, we talked about storing billions of logs from your AI application using AI Gateway, and how we used Cloudflare’s Developer Platform to do this.
With AI Gateway already processing over 3 billion logs and experiencing rapid growth, the number of connections to the platform continues to increase steadily. To help developers manage this scale more effectively, we wanted to offer an alternative to implementing HTTP/2 keep-alive to maintain persistent HTTP(S) connections, thereby avoiding the overhead of repeated handshakes and TLS negotiations with each new HTTP connection to AI Gateway. We understand that implementing HTTP/2 can present challenges, particularly when many libraries and tools may not support it by default and most modern programming languages have well-established WebSocket libraries available.
With this in mind, we used Cloudflare’s Developer Platform and Durable Objects (yes, again!) to build a WebSockets API that establishes a single, persistent connection, enabling continuous communication.
Through this API, all AI providers supported by AI Gateway can be accessed via WebSocket, allowing you to maintain a single TCP connection between your client or server application and the AI Gateway. The best part? Even if your chosen provider doesn’t support WebSockets, we handle it for you, managing the requests to your preferred AI provider.
By connecting via WebSocket to AI Gateway, we make the requests to the inference service for you using the provider’s supported protocols (HTTPS, WebSocket, etc.), and you can keep the connection open to execute as many inference requests as you would like.
To make your connection to AI Gateway more secure, we are also introducing authentication for AI Gateway. The new WebSockets API will require authentication. All you need to do is create a Cloudflare API token with the permission “AI Gateway: Run” and send that in the cf-aig-authorization header.
In the flow diagram above:
1️⃣ When Authenticated Gateway is enabled and a valid token is included, requests will pass successfully.
2️⃣ If Authenticated Gateway is enabled, but a request does not contain the required cf-aig-authorization header with a valid token, the request will fail. This ensures only verified requests pass through the gateway.
3️⃣ When Authenticated Gateway is disabled, the cf-aig-authorization header is bypassed entirely, and any token — whether valid or invalid — is ignored.
How we built it
We recently used Durable Objects (DOs) to scale our logging solution for AI Gateway, so using WebSockets within the same DOs was a natural fit.
When a new WebSocket connection is received by our Cloudflare Workers, we implement authentication in two ways to support the diverse capabilities of WebSocket clients. The primary method involves validating a Cloudflare API token through the cf-aig-authorization header, ensuring the token is valid for the connecting account and gateway.
However, due to limitations in browser WebSocket implementations, we also support authentication via the “sec-websocket-protocol” header. Browser WebSocket clients don’t allow for custom headers in their standard API, complicating the addition of authentication tokens in requests. While we don’t recommend that you store API keys in a browser, we decided to add this method to add more flexibility to all WebSocket clients.
// Built-in WebSocket client in browsers
const socket = new WebSocket("wss://gateway.ai.cloudflare.com/v1/my-account-id/my-gateway/", [
   "cf-aig-authorization.${AI_GATEWAY_TOKEN}"
]);


// ws npm package
import WebSocket from "ws";
const ws = new WebSocket("wss://gateway.ai.cloudflare.com/v1/my-account-id/my-gateway/",{
   headers: {
       "cf-aig-authorization": "Bearer AI_GATEWAY_TOKEN",
   },
});
After this initial verification step, we upgrade the connection to the Durable Object, meaning that it will now handle all the messages for the connection. Before the new connection is fully accepted, we generate a random UUID, so this connection is identifiable among all the messages received by the Durable Object. During an open connection, any AI Gateway settings passed via headers — such as cf-aig-skip-cache (which bypasses caching when set to true) — are stored and applied to all requests in the session. However, these headers can still be overridden on a per-request basis, just like with the Universal Endpoint today.
How it works
Once the connection is established, the Durable Object begins listening for incoming messages. From this point on, users can send messages in the AI Gateway universal format via WebSocket, simplifying the transition of your application from an existing HTTP setup to WebSockets-based communication.
When a new message reaches the Durable Object, it’s processed using the same code that powers the HTTP Universal Endpoint, enabling seamless code reuse across Workers and Durable Objects — one of the key benefits of building on Cloudflare.
For non-streaming requests, the response is wrapped in a JSON envelope, allowing us to include additional information beyond the AI inference itself, such as the AI Gateway log ID for that request.
Here’s an example response for the request above:
{
  "type":"universal.created",
  "metadata":{
     "cacheStatus":"MISS",
     "eventId":"my-request",
     "logId":"01JC3R94FRD97JBCBX3S0ZAXKW",
     "step":"0",
     "contentType":"application/json"
  },
  "response":{
     "result":{
        "response":"Why was the math book sad? Because it had too many problems. Would you like to hear another one?"
     },
     "success":true,
     "errors":[],
     "messages":[]
  }
}
For streaming requests, AI Gateway sends an initial message with request metadata telling the developer the stream is starting.
After this initial message, all streaming chunks are relayed in real-time to the WebSocket connection as they arrive from the inference provider. Note that only the eventId field is included in the metadata for these streaming chunks (more info on what this new field is below).
This approach serves two purposes: first, all request metadata is already provided in the initial message. Second, it addresses the concurrency challenge of handling multiple streaming requests simultaneously.
Handling asynchronous events
With WebSocket connections, client and server can send messages asynchronously at any time. This means the client doesn’t need to wait for a server response before sending another message. But what happens if a client sends multiple streaming inference requests immediately after the WebSocket connection opens?
In this case, the server streams all the inference responses simultaneously to the client. Since everything occurs asynchronously, the client has no built-in way to identify which response corresponds to each request.
To address this, we introduced a new field in the Universal format called eventId, which allows AI Gateway to include a client-defined ID with each message, even in a streaming WebSocket environment.
So, to fully answer the question above: the server streams both responses in parallel chunks, and the client can accurately identify which request each message belongs to based on the eventId.
Once all chunks for a request have been streamed, AI Gateway sends a final message to signal the request’s completion. For added flexibility, this message includes all the metadata again, even though it was also provided at the start of the streaming process.
Then open a WebSocket connection using your Universal Endpoint, and guarantee that it is authenticated with a Cloudflare token with the AI Gateway Run permission.
In Q1 2025, we plan to support WebSocket-to-WebSocket connections (using DOs), allowing you to connect to OpenAI’s new real-time API directly through our platform. In the meantime, you can deploy this Worker in your account to proxy the requests yourself.
We will be highlighting Projen’s powerful features that cater to various aspects of project management and development. We’ll examine how Projen enhances polyglot programming within Amazon Web Services (AWS) Cloud Development Kit constructs. We’ll also touch on its built-in support for common development tools and practices.
In our previous blog, we introduced you to the basics of getting started with Projen. Projen is a powerful project generator that simplifies the management of complex software configurations. In our prior blog, we discussed developing a new AWS cloud development kit (CDK) construct library project. For consistency, we will continue using this construct library project as our example while exploring linting, dependency management, and test coverage. It’s important to note that these practices are equally applicable to CDK applications and other project types.
AWS CDK Polyglot Construct Library
The AWS Cloud Development Kit (AWS CDK) is an open-source software development framework that allows developers to define cloud infrastructure using familiar programming languages. In a CDK application, constructs serve as the foundational elements, allowing developers to represent either a single AWS resource or a complex combination of resources. These constructs are not only reusable but can be incorporated into other AWS CDK projects, promoting efficient and scalable development practices.
Projen and Polyglot Programming
Projen leverages the power of the JSII library, enabling developers to write constructs once and generate equivalent constructs across multiple programming languages. This feature streamlines the development process, especially when working with teams that have expertise in different languages.
Automated Publishing with Projen
With its publisher module, Projen automates the distribution of c ructs to various package managers. This process can be integrated into a GitHub workflow, such as a build job, which triggers the publication of the library to the designated package managers.
Starting with Projen
Initiating an AWS CDK construct library project is straightforward through the Projen command npx projen new <project_type>. By executing the command npx projen new awscdk-construct, you initialize a new project complete with a projenrc file. This file contains the essential configuration for a CDK construct library, setting the stage for further customization and development.
import { awscdk } from 'projen';
const project = new awscdk.AwsCdkConstructLibrary({
  author: 'github username',
  authorAddress: 'github email',
  cdkVersion: '2.1.0',
  defaultReleaseBranch: 'main',
  jsiiVersion: '~5.0.0',
  name: 'cdkconstruct',
  projenrcTs: true,
  repositoryUrl: 'https://github.com/*****/cdkconstruct.git',

  // deps: [],                /* Runtime dependencies of this module. */
  // description: undefined,  /* The description is just a string that helps people understand the purpose of the package. */
  // devDeps: [],             /* Build dependencies for this module. */
  // packageName: undefined,  /* The "name" in package.json. */
});
project.synth();
A release.yml file is generated by projen under the github>workflow directory. This file has the details of the public registry where the construct needs to be published. By default, it will add the details for npm.
release_npm:
    name: Publish to npm
The construct can be developed in typescript under src/main.ts, our previous blog shows how to create one. If the construct needs to be published to other public registries (such as Maven for java, Pypi for python), then a projenrc file can be updated to synthesize a new release.yml file.
For example, to publish a construct developed in typescript to Maven (so that it can be used in a java application) add publishToMaven API to the projenrc file.
This way the construct is built once and published to multiple registries with different programming languages.
Figure 1: High-level Architecture showing publication to multiple public registries
Linting, Dependency Management & Test Coverage
Projen streamlines the setup process by generating a comprehensive package.json file. This file includes pre-configured dependencies for ESLint and Jest, enabling developers to maintain coding standards and ensure robust test coverage right from the start. ESLint, a widely adopted static code analysis utility, empowers developers to enforce consistent coding practices by analyzing the source code and identifying potential errors, bugs, and stylistic issues. Additionally, Jest equips developers with a comprehensive suite of tools for writing and executing unit tests, facilitating comprehensive test coverage for their codebase. While Projen provides Jest as the default testing framework, it offers developers the flexibility to incorporate alternative testing frameworks based on their project requirements.
Following with the awscdk-construct from the previous section, under test>main.test.ts a default test file is created, which can be updated for writing test cases. A default package.json is generated in the root directory.
Projen can be extensively configured. For example, if you need to configure webpack as a module bundler, then you need to add a webpack.config.js file and update the projenrc file project.
The other dependencies can be updated in package.json by adding deps in the projenrc.ts file.
Run npx projen build to synthesize a package.json.
Continuous Integration and Continuous Delivery (CI/CD)
When you create a project using Projen, it comes equipped with an automated build process that triggers upon the submission of a pull request. This is one of the key, “out-of-the-box” features that streamlines development workflows.
Projen orchestrates this process through GitHub Actions, utilizing a sequence of tasks predefined in the project’s base ‘Project’ class.
When a build is initiated, it systematically carries out several sub-tasks:
Synthesis: It starts by synthesizing all the project files, ensuring they are up-to-date and correctly configured.
Bundling: Next, it bundles the necessary assets for the project.
Compilation: The project’s code is then compiled.
Testing: Following compilation, Projen runs the suite of tests defined for the project.
Packaging: Finally, it packages everything together, preparing it for deployment or distribution.
Projen manages these steps by auto-generating a build.yml file, which it places within the workflow directory of your project’s structure. This YAML file contains all the instructions for the GitHub Actions to execute the build process.
For instance, when you run the command npx projen new awscdk-app-ts, Projen sets up a TypeScript application for AWS CDK. It automatically creates a ‘build.yml’ file through the default projenrc file, which can be found in the github/workflow folder of your project repository. This automated process is designed to save time and reduce manual errors, making it an essential feature for efficient project management.
 .github
   workflow
    build.yml
A Projen build is self-mutating because files generated by Projen are part of the source directory. To ensure that a pull request branch always represents the final state of the repository, you can enable the mutableBuild option in your project configuration (currently only supported for projects derived from NodeProject).
The build process can be customized by adding any task in the project class, which can execute a shell command.
const buildproject = project.addTask('build');
buildproject.exec('npm run build');
The Task also supports the condition option that determines if the condition is true before running the task.
const hello = project.addTask('hello', {
  condition: '[ -n "$CI" ]', // only execute if the CI environment variable is defined
  exec: 'echo running in a CI environment'
});
Releases and Versioning
Projen uses Conventional Commits to generate semantic versioning of the releases automatically. This means that based on the commit message format, it can create the release version automatically.
Initially, the project is released under version 0.0.0. Anything may change at any time and public APIs should not be considered stable. Commits marked as a breaking change will increase the minor version. All other commits will increase the patch version.
You need to manually promote the major version to 1 once your project is considered stable. For major versions 1 and above, if a release includes fix commits only, it will increase the patch version. If a release includes any feat commits, then the new version will be a minor version.
One of the nice, out-of-the-box features that comes with Projen for AWS CDK constructs is the creation of API documentation for your constructs. By leveraging jsii-docgen, Projen’s build step will generate API documentation (API.md) from the comments in your code.
This feature is powerful for several reasons. Firstly, it ensures that documentation is kept up-to-date with the codebase, as the API documentation is generated directly from the source code comments. This reduces the risk of discrepancies between the code and its documentation, which can lead to misunderstandings and errors in usage.
Secondly, it streamlines the development process by automating a task that is often tedious and time-consuming. Developers can focus more on writing code and less on updating documentation manually.
Thirdly, it promotes better coding practices, as developers are encouraged to write clear and detailed comments in their code. This not only benefits the generation of documentation, but also helps any new developers who may work on the codebase in the future to understand the code more quickly and thoroughly.
Moreover, having readily available and accurate documentation can significantly enhance the developer experience. It makes it more straightforward for users of the CDK constructs to understand the functionality, parameters, return types, and the structure of the code they are working with.
In the context of team collaboration and open-source projects, this feature is especially beneficial. It ensures that anyone who contributes to the codebase is able to generate and view the latest documentation without any additional setup or configuration, facilitating smoother collaboration and integration processes.
Let’s recap all of the features that Projen can introduce into your project right out of the box:
Projen’s automation for linting and testing to maintain high code quality from the beginning.
Automated API documentation feature to keep your project’s documentation synchronized with the latest code changes.
Polyglot capabilities to cater to a diverse development team, ensuring flexibility in language preference.
The publisher module to streamline the release process across multiple package managers, saving time and reducing the scope for human error.
As we wrap up our deep dive into some of the advanced features of Projen within AWS CDK, it’s clear that Projen helps alleviate a lot of the pain points of a new greenfield project. By leveraging Projen, developers can navigate the complexities of polyglot programming, automate the mundane tasks of publishing and documentation, and ensure consistent code quality through linting and testing. Projen elevates the development workflow to a level where efficiency and scalability are the norms, not the exception.
What’s more compelling is Projen’s commitment to developer empowerment. Through its automated systems, it encourages developers to adhere to best practices without the overhead of manual enforcement. Its ability to seamlessly integrate with various package managers and generate detailed API documentation from inline comments signifies a leap in developer tooling.
Contact an AWS Representative to know how we can help accelerate your business.
polyfill.io, a popular JavaScript library service, can no longer be trusted and should be removed from websites.
Multiple reports, corroborated with data seen by our own client-side security system, Page Shield, have shown that the polyfill service was being used, and could be used again, to inject malicious JavaScript code into users’ browsers. This is a real threat to the Internet at large given the popularity of this library.
We have, over the last 24 hours, released an automatic JavaScript URL rewriting service that will rewrite any link to polyfill.io found in a website proxied by Cloudflare to a link to our mirror under cdnjs. This will avoid breaking site functionality while mitigating the risk of a supply chain attack.
Any website on the free plan has this feature automatically activated now. Websites on any paid plan can turn on this feature with a single click.
You can find this new feature under Security ⇒ Settings on any zone using Cloudflare.
Contrary to what is stated on the polyfill.io website, Cloudflare has never recommended the polyfill.io service or authorized their use of Cloudflare’s name on their website. We have asked them to remove the false statement and they have, so far, ignored our requests. This is yet another warning sign that they cannot be trusted.
If you are not using Cloudflare today, we still highly recommend that you remove any use of polyfill.io and/or find an alternative solution. And, while the automatic replacement function will handle most cases, the best practice is to remove polyfill.io from your projects and replace it with a secure alternative mirror like Cloudflare’s even if you are a customer.
You can do this by searching your code repositories for instances of polyfill.io and replacing it with cdnjs.cloudflare.com/polyfill/ (Cloudflare’s mirror). This is a non-breaking change as the two URLs will serve the same polyfill content. All website owners, regardless of the website using Cloudflare, should do this now.
How we came to this decision
Back in February, the domain polyfill.io, which hosts a popular JavaScript library, was sold to a new owner: Funnull, a relatively unknown company. At the time, we were concerned that this created a supply chain risk. This led us to spin up our own mirror of the polyfill.io code hosted under cdnjs, a JavaScript library repository sponsored by Cloudflare.
The new owner was unknown in the industry and did not have a track record of trust to administer a project such as polyfill.io. The concern, highlighted even by the original author, was that if they were to abuse polyfill.io by injecting additional code to the library, it could cause far reaching security problems on the Internet affecting several hundreds of thousands websites. Or it could be used to perform a targeted supply-chain attack against specific websites.
Unfortunately, that worry came true on June 25, 2024 as the polyfill.io service was being used to inject nefarious code that, under certain circumstances, redirected users to other websites.
We have taken the exceptional step of using our ability to modify HTML on the fly to replace references to the polyfill.io CDN in our customers’ websites with links to our own, safe, mirror created back in February.
In the meantime, additional threat feed providers have also taken the decision to flag the domain as malicious. We have not outright blocked the domain through any of the mechanisms we have because we are concerned it could cause widespread web outages given how broadly polyfill.io is used with some estimates indicating usage on nearly 4% of all websites.
Corroborating data with Page Shield
The original report indicates that malicious code was injected that, under certain circumstances, would redirect users to betting sites. It was doing this by loading additional JavaScript that would perform the redirect, under a set of additional domains which can be considered Indicators of Compromise (IoCs):
(note the intentional misspelling of Google Analytics)
Page Shield, our client side security solution, is available on all paid plans. When turned on, it collects information about JavaScript files loaded by end user browsers accessing your website.
By looking at the database of detected JavaScript files, we immediately found matches with the IoCs provided above starting as far back as 2024-06-08 15:23:51 (first seen timestamp on Page Shield detected JavaScript file). This was a clear indication that malicious activity was active and associated with polyfill.io.
Replacing insecure JavaScript links to polyfill.io
To achieve performant HTML rewriting, we need to make blazing-fast HTML alterations as responses stream through Cloudflare’s network. This has been made possible by leveraging ROFL (Response Overseer for FL). ROFL powers various Cloudflare products that need to alter HTML as it streams, such as Cloudflare Fonts,Email Obfuscation and Rocket Loader
ROFL is developed entirely in Rust. The memory-safety features of Rust are indispensable for ensuring protection against memory leaks while processing a staggering volume of requests, measuring in the millions per second. Rust’s compiled nature allows us to finely optimize our code for specific hardware configurations, delivering performance gains compared to interpreted languages.
The performance of ROFL allows us to rewrite HTML on-the-fly and modify the polyfill.io links quickly, safely, and efficiently. This speed helps us reduce any additional latency added by processing the HTML file.
If the feature is turned on, for any HTTP response with an HTML Content-Type, we parse all JavaScript script tag source attributes. If any are found linking to polyfill.io, we rewrite the src attribute to link to our mirror instead. We map to the correct version of the polyfill service while the query string is left untouched.
The logic will not activate if a Content Security Policy (CSP) header is found in the response. This ensures we don’t replace the link while breaking the CSP policy and therefore potentially breaking the website.
Default on for free customers, optional for everyone else
Cloudflare proxies millions of websites, and a large portion of these sites are on our free plan. Free plan customers tend to have simpler applications while not having the resources to update and react quickly to security concerns. We therefore decided to turn on the feature by default for sites on our free plan, as the likelihood of causing issues is reduced while also helping keep safe a very large portion of applications using polyfill.io.
Paid plan customers, on the other hand, have more complex applications and react quicker to security notices. We are confident that most paid customers using polyfill.io and Cloudflare will appreciate the ability to virtually patch the issue with a single click, while controlling when to do so.
All customers can turn off the feature at any time.
This isn’t the first time we’ve decided a security problem was so widespread and serious that we’d enable protection for all customers regardless of whether they were a paying customer or not. Back in 2014, we enabled Shellshock protection for everyone. In 2021, when the log4j vulnerability was disclosed we rolled out protection for all customers.
Do not use polyfill.io
If you are using Cloudflare, you can remove polyfill.io with a single click on the Cloudflare dashboard by heading over to your zone ⇒ Security ⇒ Settings. If you are a free customer, the rewrite is automatically active. This feature, we hope, will help you quickly patch the issue.
Nonetheless, you should ultimately search your code repositories for instances of polyfill.io and replace them with an alternative provider, such as Cloudflare’s secure mirror under cdnjs (https://cdnjs.cloudflare.com/polyfill/). Website owners who are not using Cloudflare should also perform these steps.
Modern web design has turned websites from static and boring walls of information into ways of providing fun and engaging experiences to the user. Our new ‘More web’ project path shows young creators how to add interaction and animation to a webpage through JavaScript code.
Why learn JavaScript?
As of 2024, JavaScript is the most popular programming language in the world. And it’s easy to see why when you look at its versatility and how it can be used to create dynamic and interactive content on websites. JavaScript lets you handle events and manipulate HTML and CSS so that you can build everything from simple animations, to forms that can be checked for missing or nonsensical answers. If you’ve ever seen a webpage continuously load more content when you reach the end, that’s JavaScript.
The six new projects in the ‘More web’ path move learners beyond the basics of HTML and CSS encountered in our ‘Introduction to web’ path. Youn people will explore what JavaScript makes possible in web developmnent, with plenty of support along the way.
By the end of the ‘More web’ path, learners will have covered the following key programming concepts:
HTML and CSS
JavaScript
Navbars, grid layouts, hero images and image sliders
Form design and handling user input
Accessibility and responsive design
Sizing elements relative to the viewport or container
Creating parallax scrolling effects using background-attachment
Fixing the position of elements and using z-index to layer elements
Local and global variables, and constants
Selection (if, else if, and else)
Repetition (for loops)
Using Console log
Concatenation using template literals
Event listeners
Use of the intersection observer API to animate elements and lazy-load images
Use of the localStorage object to retain user preferences
Writing and calling functions to take advantage of the Document Object Model (DOM)
Use setTimeout() to create time delays
Work with Date() functions
We’ve designed the path to be completed in six one-hour sessions, with one hour per project. However, learners can work at their own speed and the project instructions invite them to take additional time to upgrade their projects if they wish.
Built for our Code Editor and with support in mind
All six projects use our Code Editor, which has been tailored specifically to young people’s needs. This integrated development environment (IDE) helps make learning text-based programming simple, safe, and accessible. The projects include starter code, handy code snippets, and images to help young people build their websites.
The path also follows our Digital Making Framework, with its deliberate format of six projects that become less structured as learners progress. The Explore projects at the start of the path are where the initial learning takes place. Learners then develop their new skills by putting them into practice in the Design and Invent projects, which encourage them to use their imagination and make projects that matter to them.
Meet the projects: Welcome to Antarctica (Explore project 1)
Learners use HTML and CSS to design a website that lets people discover a place they may never get a chance to visit — Antarctica. They discover how to create a navigation bar (or navbar), set accessible colours and fonts, and add a responsive grid layout to hold beautiful images and interesting facts about this fascinating continent.
Comic character (Explore project 2)
In the second Explore project, young people build an interactive website where the user can design a superhero character. Learners use JavaScript to let the user change the text on their website, show and hide elements, and create a hero image slider. They also learn how to let the user set the colour theme for the site and keep their preferences, even if they reload the page.
Animated story (Explore project 3)
Young people create an interactive story with animated text and characters that are triggered when the user scrolls. They will learn how to design for accessibility and improve browser performance by only loading images when they’re needed.
Pick your favourite (Design project 1)
This is where learners can practise their skills and bring in their own interests to make a fan website, which lets a user make choices that change the webpage content.
Quiz time (Design project 2)
The final Design project invites young people to build a personalised web app that lets users test what they know about a topic. Learners choose a topic for their quiz, create and animate their questions, and then show the user their final score. They could make a quiz about history, nature, world records, science, sports, fashion, TV, movies… or anything else they’re an expert in!
Share your world (Invent project)
In this final project, young people bring everything they’ve learnt together and use their new coding powers and modern design skills to create an interactive website to share a part of their world with others. They could provide information about their culture, interests, hobbies or expertise, share fun facts, create quizzes, or write reviews. Learners consider what makes a website useful and informative, as well as fun and accessible.
Next steps in web design
Encourage your young learners to take their next steps in web design, learn JavaScript, and try out this new path of coding projects to create interactive websites that excite and engage users.
Young people can also enter one of their Design or Invent projects into the Web category of the yearly Coolest Projects showcase by taking a short video showing the project and the code used to make it. Their creation will become part of the Coolest Projects online gallery for people all over the world to see!
Polyfill.io is a popular JavaScript library that nullifies differences across old browser versions. These differences often take up substantial development time.
It does this by adding support for modern functions (via polyfilling), ultimately letting developers work against a uniform environment simplifying development. The tool is historically loaded by linking to the endpoint provided under the domain polyfill.io.
In the interest of providing developers with additional options to use polyfill, today we are launching an alternative endpoint under cdnjs. You can replace links to polyfill.io “as is” with our new endpoint. You will then rely on the same service and reputation that cdnjs has built over the years for your polyfill needs.
Our interest in creating an alternative endpoint was also sparked by some concerns raised by the community, and main contributors, following the transition of the domain polyfill.io to a new provider (Funnull).
The concerns are that any website embedding a link to the original polyfill.io domain, will now be relying on Funnull to maintain and secure the underlying project to avoid the risk of a supply chain attack. Such an attack would occur if the underlying third party is compromised or alters the code being served to end users in nefarious ways, causing, by consequence, all websites using the tool to be compromised.
Supply chain attacks, in the context of web applications, are a growing concern for security teams, and also led us to build a client side security product to detect and mitigate these attack vectors: Page Shield.
Irrespective of the scenario described above, this is a timely reminder of the complexities and risks tied to modern web applications. As maintainers and contributors of cdnjs, currently used by more than 12% of all sites, this reinforces our commitment to help keep the Internet safe.
polyfill.io on cdnjs
The full polyfill.io implementation has been deployed at the following URL:
Usage and deployment is intended to be identical to the original polyfill.io site. As a developer, you should be able to simply “replace” the old link with the new cdnjs-hosted link without observing any side effects, besides a possible improvement in performance and reliability.
If you don’t have access to the underlying website code, but your website is behind Cloudflare, replacing the links is even easier, as you can deploy a Cloudflare Worker to update the links for you:
You can also test the Worker on your website without deploying the worker. You can find instructions on how to do this in another blog post we wrote in the past.
The polyfill.io service was hosted on Fastly and used their Rust library. We forked the project to add the compatibility for Cloudflare Workers, and plan to make the fork publicly accessible in the near future.
Worker
The https://cdnjs.cloudflare.com/polyfill/[...].js endpoints are also implemented in a Cloudflare Worker that wraps our Polyfill.io fork. The wrapper uses Cloudflare’s Rust API and looks like the following:
#[event(fetch)]
async fn main(req: Request, env: Env, ctx: Context) -> Result<Response> {
    let metrics = {...};

    let polyfill_store = get_d1(&req, &env)?;
    let polyfill_env = Arc::new(service::Env { polyfill_store, metrics });

    // Run the polyfill.io entrypoint
    let res = service::handle_request(req2, polyfill_env).await;

    let status_code = if let Ok(res) = &res {
        res.status_code()
    } else {
        500
    };
    metrics
        .requests
        .with_label_values(&[&status_code.to_string()])
        .inc();

    ctx.wait_until(async move {
        if let Err(err) = metrics.report_metrics().await {
            console_error!("failed to report metrics: {err}");
        }
    });

    res
}
The wrapper only sets up our internal metrics and logging tools, so we can monitor uptime and performance of the underlying logic while calling the Polyfill.io entrypoint.
Storage for the Polyfill files
All the polyfill files are stored in a key-value store powered by Cloudflare D1. This allows us to fetch as many polyfill files as we need with a single SQL query, as opposed to the original implementation doing one KV get() per file.
For performance, we have one Cloudflare D1 instance per region and the SQL queries are routed to the nearest database.
cdnjs for your JavaScript libraries
cdnjs is hosting over 6k JavaScript libraries as of today. We are looking for ways to improve the service and provide new content. We listen to community feedback and welcome suggestions on our community forum, or cdnjs on GitHub.
Page Shield is also available to all paid plans. Log in to turn it on with a single click to increase visibility and security for your third party assets.
In this post, we’re excited to introduce SafeTest, a revolutionary library that offers a fresh perspective on End-To-End (E2E) tests for web-based User Interface (UI) applications.
The Challenges of Traditional UI Testing
Traditionally, UI tests have been conducted through either unit testing or integration testing (also referred to as End-To-End (E2E) testing). However, each of these methods presents a unique trade-off: you have to choose between controlling the test fixture and setup, or controlling the test driver.
For instance, when using react-testing-library, a unit testing solution, you maintain complete control over what to render and how the underlying services and imports should behave. However, you lose the ability to interact with an actual page, which can lead to a myriad of pain points:
Difficulty in interacting with complex UI elements like <Dropdown /> components.
Inability to test CORS setup or GraphQL calls.
Lack of visibility into z-index issues affecting click-ability of buttons.
Complex and unintuitive authoring and debugging of tests.
Conversely, using integration testing tools like Cypress or Playwright provides control over the page, but sacrifices the ability to instrument the bootstrapping code for the app. These tools operate by remotely controlling a browser to visit a URL and interact with the page. This approach has its own set of challenges:
Difficulty in making calls to an alternative API endpoint without implementing custom network layer API rewrite rules.
Inability to make assertions on spies/mocks or execute code within the app.
Testing something like dark mode entails clicking the theme switcher or knowing the localStorage mechanism to override.
Inability to test segments of the app, for example if a component is only visible after clicking a button and waiting for a 60 second timer to countdown, the test will need to run those actions and will be at least a minute long.
Recognizing these challenges, solutions like E2E Component Testing have emerged, with offerings from Cypress and Playwright. While these tools attempt to rectify the shortcomings of traditional integration testing methods, they have other limitations due to their architecture. They start a dev server with bootstrapping code to load the component and/or setup code you want, which limits their ability to handle complex enterprise applications that might have OAuth or a complex build pipeline. Moreover, updating TypeScript usage could break your tests until the Cypress/Playwright team updates their runner.
Welcome to SafeTest
SafeTest aims to address these issues with a novel approach to UI testing. The main idea is to have a snippet of code in our application bootstrapping stage that injects hooks to run our tests (see the How Safetest Works sections for more info on what this is doing). Note that how this works has no measurable impact on the regular usage of your app since SafeTest leverages lazy loading to dynamically load the tests only when running the tests (in the README example, the tests aren’t in the production bundle at all). Once that’s in place, we can use Playwright to run regular tests, thereby achieving the ideal browser control we want for our tests.
This approach also unlocks some exciting features:
Deep linking to a specific test without needing to run a node test server.
Two-way communication between the browser and test (node) context.
Access to all the DX features that come with Playwright (excluding the ones that come with @playwright/test).
Video recording of tests, trace viewing, and pause page functionality for trying out different page selectors/actions.
Ability to make assertions on spies in the browser in node, matching snapshot of the call within the browser.
Test Examples with SafeTest
SafeTest is designed to feel familiar to anyone who has conducted UI tests before, as it leverages the best parts of existing solutions. Here’s an example of how to test an entire application:
import { describe, it, expect } from 'safetest/jest';
import { render } from 'safetest/react';

describe('my app', () => {
  it('loads the main page', async () => {
    const { page } = await render();

    await expect(page.getByText('Welcome to the app')).toBeVisible();
    expect(await page.screenshot()).toMatchImageSnapshot();
  });
});
We can just as easily test a specific component
import { describe, it, expect, browserMock } from 'safetest/jest'; import { render } from 'safetest/react';
SafeTest utilizes React Context to allow for value overrides during tests. For an example of how this works, let’s assume we have a fetchPeople function used in a component:
import { useAsync } from 'react-use'; import { fetchPerson } from './api/person';
The render function also accepts a function that will be passed the initial app component, allowing for the injection of any desired elements anywhere in the app:
With overrides, we can write complex test cases such as ensuring a service method which combines API requests from /foo, /bar, and /baz, has the correct retry mechanism for just the failed API requests and still maps the return value correctly. So if /bar takes 3 attempts to resolve the method will make a total of 5 API calls.
Overrides aren’t limited to just API calls (since we can use also use page.route), we can also override specific app level values like feature flags or changing some static value:
+const Language = createOverride(navigator.language); export const LanguageChanger = () => { - const language = navigator.language; + const language = Language.useValue(); return <div>Current language is { language } </div>; }
await expect(page.getByText('Current language is abc')).toBeVisible(); }); });
Overrides are a powerful feature of SafeTest and the examples here only scratch the surface. For more information and examples, refer to the Overrides section on the README.
Many large corporations need a form of authentication to use the app. Typically, navigating to localhost:3000 just results in a perpetually loading page. You need to go to a different port, like localhost:8000, which has a proxy server to check and/or inject auth credentials into underlying service calls. This limitation is one of the main reasons that Cypress/Playwright Component Tests aren’t suitable for use at Netflix.
However, there’s usually a service that can generate test users whose credentials we can use to log in and interact with the application. This facilitates creating a light wrapper around SafeTest to automatically generate and assume that test user. For instance, here’s basically how we do it at Netflix:
import { setup } from 'safetest/setup'; import { createTestUser, addCookies } from 'netflix-test-helper';
type Setup = Parameters<typeof setup>[0] & { extraUserOptions?: UserOptions; };
After setting this up, we simply import the above package in place of where we would have used safetest/setup.
Beyond React
While this post focused on how SafeTest works with React, it’s not limited to just React. SafeTest also works with Vue, Svelte, Angular, and even can run on NextJS or Gatsby. It also runs using either Jest or Vitest based on which test runner your scaffolding started you off with. The examples folder demonstrates how to use SafeTest with different tooling combinations, and we encourage contributions to add more cases.
At its core, SafeTest is an intelligent glue for a test runner, a UI library, and a browser runner. Though the most common usage at Netflix employs Jest/React/Playwright, it’s easy to add more adapters for other options.
Conclusion
SafeTest is a powerful testing framework that’s being adopted within Netflix. It allows for easy authoring of tests and provides comprehensive reports when and how any failures occurred, complete with links to view a playback video or manually run the test steps to see what broke. We’re excited to see how it will revolutionize UI testing and look forward to your feedback and contributions.
Last year, we announced the Browser Rendering API – letting users running Puppeteer, a browser automation library, directly in Workers. Puppeteer is one of the most popular libraries used to interact with a headless browser instance to accomplish tasks like taking screenshots, generating PDFs, crawling web pages, and testing web applications. We’ve heard from developers that configuring and maintaining their own serverless browser automation systems can be quite painful.
The Workers Browser Rendering API solves this. It makes the Puppeteer library available directly in your Worker, connected to a real web browser, without the need to configure and manage infrastructure or keep browser sessions warm yourself. You can use @cloudflare/puppeteer to run the full Puppeteer API directly on Workers!
We’ve seen so much interest from the developer community since launching last year. While the Browser Rendering API is still in beta (sign up to our waitlist to get access), we wanted to share a way to get more out of our current limits by using the Browser Rendering API with Durable Objects. We’ll also be sharing pricing for the Rendering API, so you can build knowing exactly what you’ll pay for.
Building a responsive web design testing tool with the Browser Rendering API
As a designer or frontend developer, you want to make sure that content is well-designed for visitors browsing on different screen sizes. With the number of possible devices that users are browsing on are growing, it becomes difficult to test all the possibilities manually. While there are many testing tools on the market, we want to show how easy it is to create your own Chromium based tool with the Workers Browser Rendering API and Durable Objects.
We’ll be using the Worker to handle any incoming requests, pass them to the Durable Object to take screenshots and store them in an R2 bucket. The Durable Object is used to create a browser session that’s persistent. By using Durable Object Alarms we can keep browsers open for longer and reuse browser sessions across requests.
Let’s dive into how we can build this application:
Create a Worker with a Durable Object, Browser Rendering API binding and R2 bucket. This is the resulting wrangler.toml:
name = "rendering-api-demo"
main = "src/index.js"
compatibility_date = "2023-09-04"
compatibility_flags = [ "nodejs_compat"]
account_id = "c05e6a39aa4ccdd53ad17032f8a4dc10"


# Browser Rendering API binding
browser = { binding = "MYBROWSER" }

# Bind an R2 Bucket
[[r2_buckets]]
binding = "BUCKET"
bucket_name = "screenshots"

# Binding to a Durable Object
[[durable_objects.bindings]]
name = "BROWSER"
class_name = "Browser"

[[migrations]]
tag = "v1" # Should be unique for each entry
new_classes = ["Browser"] # Array of new classes
2. Define the Worker
This Worker simply passes the request onto the Durable Object.
export default {
	async fetch(request, env) {

		let id = env.BROWSER.idFromName("browser");
		let obj = env.BROWSER.get(id);

		// Send a request to the Durable Object, then await its response.
		let resp = await obj.fetch(request.url);
		let count = await resp.text();

		return new Response("success");
	}
};
3. Define the Durable Object class
const KEEP_BROWSER_ALIVE_IN_SECONDS = 60;

export class Browser {
	constructor(state, env) {
		this.state = state;
		this.env = env;
		this.keptAliveInSeconds = 0;
		this.storage = this.state.storage;
	}

	async fetch(request) {
		// screen resolutions to test out
		const width = [1920, 1366, 1536, 360, 414]
		const height = [1080, 768, 864, 640, 896]

		// use the current date and time to create a folder structure for R2
		const nowDate = new Date()
		var coeff = 1000 * 60 * 5
		var roundedDate = (new Date(Math.round(nowDate.getTime() / coeff) * coeff)).toString();
		var folder = roundedDate.split(" GMT")[0]

		//if there's a browser session open, re-use it
		if (!this.browser) {
			console.log(`Browser DO: Starting new instance`);
			try {
			  this.browser = await puppeteer.launch(this.env.MYBROWSER);
			} catch (e) {
			  console.log(`Browser DO: Could not start browser instance. Error: ${e}`);
			}
		  }

		// Reset keptAlive after each call to the DO
		this.keptAliveInSeconds = 0;

		const page = await this.browser.newPage();

		// take screenshots of each screen size
		for (let i = 0; i < width.length; i++) {
			await page.setViewport({ width: width[i], height: height[i] });
			await page.goto("https://workers.cloudflare.com/");
			const fileName = "screenshot_" + width[i] + "x" + height[i]
			const sc = await page.screenshot({
				path: fileName + ".jpg"
			}
			);

			this.env.BUCKET.put(folder + "/"+ fileName + ".jpg", sc);
		  }

		// Reset keptAlive after performing tasks to the DO.
		this.keptAliveInSeconds = 0;

		// set the first alarm to keep DO alive
		let currentAlarm = await this.storage.getAlarm();
		if (currentAlarm == null) {
		console.log(`Browser DO: setting alarm`);
		const TEN_SECONDS = 10 * 1000;
		this.storage.setAlarm(Date.now() + TEN_SECONDS);
		}

		await this.browser.close();
		return new Response("success");
	}

	async alarm() {
		this.keptAliveInSeconds += 10;

		// Extend browser DO life
		if (this.keptAliveInSeconds < KEEP_BROWSER_ALIVE_IN_SECONDS) {
		  console.log(`Browser DO: has been kept alive for ${this.keptAliveInSeconds} seconds. Extending lifespan.`);
		  this.storage.setAlarm(Date.now() + 10 * 1000);
		} else console.log(`Browser DO: cxceeded life of ${KEEP_BROWSER_ALIVE_IN_SECONDS}. Browser DO will be shut down in 10 seconds.`);
	  }

  }
That’s it! With less than a hundred lines of code, you can fully customize a powerful tool to automate responsive web design testing. You can even incorporate it into your CI pipeline to automatically test different window sizes with each build and verify the result is as expected by using an automated library like pixelmatch.
How much will this cost?
We’ve spoken to many customers deploying a Puppeteer service on their own infrastructure, on public cloud containers or functions or using managed services. The common theme that we’ve heard is that these services are costly – costly to maintain and expensive to run.
While you won’t be billed for the Browser Rendering API yet, we want to be transparent with you about costs you start building. We know it’s important to understand the pricing structure so that you don’t get a surprise bill and so that you can design your application efficiently.
You pay based on two usage metrics:
Number of sessions: A Browser Session is a new instance of a browser being launched
Number of concurrent sessions: Concurrent Sessions is the number of browser instances open at once
Using Durable Objects to persist browser sessions improves performance by eliminating the time that it takes to spin up a new browser session. Since it re-uses sessions, it cuts down on the number of concurrent sessions needed. We highly encourage this model of session re-use if you expect to see consistent traffic for applications that you build on the Browser Rendering API.
If you have feedback about this pricing, we’re all ears. Feel free to reach out through Discord (channel name: browser-rendering-api-beta) and share your thoughts.
Get Started
Sign up to our waitlist to get access to the Workers Browser Rendering API. We’re so excited to see what you build! Share your creations with us on Twitter/X @CloudflareDev or on our Discord community.
This post is written by Alexander Schüren, Sr Specialist SA, Powertools.
One of the design principles of AWS Lambda is to “develop for retries and failures”. If your function fails, the Lambda service will retry and invoke your function again with the same event payload. Therefore, when your function performs tasks such as processing orders or making reservations, it is necessary for your Lambda function to handle requests idempotently to avoid duplicate payment or order processing, which can result in a poor customer experience.
This article explains what idempotency is and how to make your Lambda functions idempotent using the idempotency utility for Powertools for AWS Lambda (TypeScript). The Powertools idempotency utility for TypeScript was co-developed with Vanguard and is now generally available.
Understanding idempotency
Idempotency is the property of an operation that can be applied multiple times without changing the result beyond the initial execution. You can safely run an idempotent operation multiple times without side effects, such as duplicate records or data inconsistencies. This is especially relevant for payment and order processing or third-party API integrations.
There are key concepts to consider when implementing idempotency in AWS Lambda. For each invocation, you specify which subset of the event payload you want to use to identify an idempotent request. This is called the idempotency key. This key can be a single field such as transactionId, a combination of multiple fields such as customerId and requestId, or the entire event payload.
Because timestamps, dates, and other generated values within the payload affect the idempotency key, we recommend that you define specific fields rather than using the entire event payload.
By evaluating the idempotency key, you can then decide if the function needs to run again or send an existing response to the client. To do this, you need to store the following information for each request in a persistence layer (i.e., Amazon DynamoDB):
Status: IN_PROGRESS, EXPIRED, COMPLETE
Response data: the response to send back to the client instead of executing the function again
Expiration timestamp: when the idempotency record becomes invalid for reuse
The following diagram shows a successful request flow for this idempotency scenario:
When you invoke a Lambda function with a particular event for the first time, it stores a record with a unique idempotency key tied to an event payload in the persistence layer.
The function then executes its code and updates the record in the persistence layer with the function response. For subsequent invocations with the same payload, you must check if the idempotency key exists in the persistence layer. If it exists, the function returns the same response to the client. This prevents multiple invocations of the function, making it idempotent.
There are more edge cases to be mindful of, such as when the idempotency record has expired, or handling of failures between the client, the Lambda function, and the persistence layer. The Powertools for AWS Lambda (TypeScript) documentation covers all request flows in detail.
Idempotency with Powertools for AWS Lambda (TypeScript)
Powertools for AWS Lambda, available in Python, Java, .NET, and TypeScript, provides utilities for Lambda functions to ease the adoption of best practices and to reduce the amount of code needed to perform recurring tasks. In particular, it provides a module to handle idempotency.
This post shows examples using the TypeScript version of Powertools. To get started with the Powertools idempotency module, you must install the library and configure it within your build process. For more details, follow the Powertools for AWS Lambda documentation.
Getting started
Powertools for AWS Lambda (TypeScript) is modular, meaning you can install the idempotency utility independently from the Logger, Tracing, Metrics, or other packages. Install the idempotency utility library and the AWS SDK v3 client for DynamoDB in your project using npm:
npm i @aws-lambda-powertools/idempotency @aws-sdk/client-dynamodb @aws-sdk/lib-dynamodb
Before getting started, you need to create a persistent storage layer where the idempotency utility can store its state. Your Lambda function AWS Identity and Access Management (IAM) role must have dynamodb:GetItem, dynamodb:PutItem, dynamodb:UpdateItem and dynamodb:DeleteItem permissions.
The following sections illustrate how to instrument your Lambda function code to make it idempotent using a wrapper function or using middy middleware.
Using the function wrapper
Assuming you have created a DynamoDB table with the name IdempotencyTable, create a persistence layer in your Lambda function code:
import { makeIdempotent } from "@aws-lambda-powertools/idempotency";
import { DynamoDBPersistenceLayer } from "@aws-lambda-powertools/idempotency/dynamodb";

const persistenceStore = new DynamoDBPersistenceLayer({
  tableName: "IdempotencyTable",
});
Now, apply the makeIdempotent function wrapper to your Lambda function handler to make it idempotent and use the previously configured persistence store.
The function processes the incoming event to create a payment and return the paymentId, message, and status back to the client. Making the Lambda function handler idempotent ensures that payments are only processed once, despite multiple Lambda invocations with the same event payload. You can also apply the makeIdempotent function wrapper to any other function outside of your handler.
Use the following type definitions for this example by adding a types.ts file to your source folder:
type Request = {
  user: string;
  productId: string;
};

type Response = {
  [key: string]: unknown;
};

type SubscriptionResult = {
  id: string;
  productId: string;
};
Using middy middleware
If you are using middy middleware, Powertools provides makeHandlerIdempotent middleware to make your Lambda function handler idempotent:
import { makeHandlerIdempotent } from '@aws-lambda-powertools/idempotency/middleware';
import { DynamoDBPersistenceLayer } from '@aws-lambda-powertools/idempotency/dynamodb';
import middy from '@middy/core';
import type { Context } from 'aws-lambda';
import type { Request, Response, SubscriptionResult } from './types';

const persistenceStore = new DynamoDBPersistenceLayer({
  tableName: 'IdempotencyTable',
});

export const handler = middy(
  async (event: Request, _context: Context): Promise<Response> => {
    try {
      const payment = … // create payment object

      return {
        paymentId: payment.id,
        message: 'success',
        statusCode: 200,
      };
    } catch (error) {
      throw new Error('Error creating payment');
    }
  }
).use(
    makeHandlerIdempotent({
      persistenceStore,
  })
);
Configuration options
The Powertools idempotency utility comes with several configuration options to change the idempotency behavior that will fit your use case scenario. This section highlights the most common configurations. You can find all available customization options in the AWS Powertools for Lambda (TypeScript) documentation.
Persistence layer options
When you create a DynamoDBPersistenceLayer object, only the tableName attribute is required. Powertools will expect the table with a partition key id and will create other attributes with default values.
You can change these default values if needed by passing the options parameter:
import { DynamoDBPersistenceLayer } from '@aws-lambda-powertools/idempotency/dynamodb';

const persistenceStore = new DynamoDBPersistenceLayer({
  tableName: 'idempotencyTableName',
  keyAttr: 'idempotencyKey', // default: id
  expiryAttr: 'expiresAt', // default: expiration
  inProgressExpiryAttr: 'inProgressExpiresAt', // default: in_progress_expiration
  statusAttr: 'currentStatus', // default: status
  dataAttr: 'resultData', // default: data
  validationKeyAttr: 'validationKey', .// default validation
});
Using a subset of the event payload
When you configure idempotency for your Lambda function handler, Powertools will use the entire event payload for idempotency handling by hashing the object.
To prevent that, create an IdempotencyConfig and configure which part of the payload should be hashed for the idempotency logic.
Create the IdempotencyConfig and set eventKeyJmespath to a key within your event payload:
import { IdempotencyConfig } from '@aws-lambda-powertools/idempotency';

// Extract the idempotency key from the request headers
const config = new IdempotencyConfig({
  eventKeyJmesPath: 'headers."X-Idempotency-Key"',
});
Use the X-Idempotency-Key header for your idempotency key. Subsequent invocations with the same header value will be idempotent.
You can then add the configuration to the makeIdempotent function wrapper from the previous example:
There are other configuration options you can apply, such as payload validation, expiration duration, local caching, and others. See the Powertools for AWS Lambda (TypeScript) documentation for more information.
Customizing the AWS SDK configuration
The DynamoDBPersistenceLayer is built-in and allows you to store the idempotency data for all your requests. Under the hood, Powertools uses the AWS SDK for JavaScript v3. Change the SDK configuration by passing a clientConfig object.
The following sample sets the region to eu-west-1:
import { DynamoDBPersistenceLayer } from '@aws-lambda-powertools/idempotency/dynamodb';

const persistenceStore = new DynamoDBPersistenceLayer({
  tableName: 'IdempotencyTable',
  clientConfig: {
    region: 'eu-west-1',
  },
});
If you are using your own client, you can pass it the persistence layer:
import { DynamoDBPersistenceLayer } from '@aws-lambda-powertools/idempotency/dynamodb';
import { DynamoDBClient } from '@aws-sdk/client-dynamodb';

const ddbClient = new DynamoDBClient({ region: 'eu-west-1' });

const dynamoDBPersistenceLayer = new DynamoDBPersistenceLayer({
  tableName: 'IdempotencyTable',
  awsSdkV3Client: ddbClient,
});
Conclusion
Making your Lambda functions idempotent can be a challenge and, if not done correctly, can lead to duplicate data, inconsistencies, and a bad customer experience. This post shows how to use Powertools for AWS Lambda (TypeScript) to process your critical transactions only once when using AWS Lambda.
For more details on the Powertools idempotency feature and its configuration options, see the full documentation.
For more serverless learning resources, visit Serverless Land.
Today we are announcing support for three additional APIs from Node.js in Cloudflare Workers. This increases compatibility with the existing ecosystem of open source npm packages, allowing you to use your preferred libraries in Workers, even if they depend on APIs from Node.js.
We recently added support for AsyncLocalStorage, EventEmitter, Buffer, assert and parts of util. Today, we are adding support for:
We are also sharing a preview of a new module type, available in the open-source Workers runtime, that mirrors a Node.js environment more closely by making some APIs available as globals, and allowing imports without the node: specifier prefix.
The Node.js streams API is the original API for working with streaming data in JavaScript that predates the WHATWG ReadableStream standard. Now, a full implementation of Node.js streams (based directly on the official implementation provided by the Node.js project) is available within the Workers runtime.
Let's start with a quick example:
import {
  Readable,
  Transform,
} from 'node:stream';

import {
  text,
} from 'node:stream/consumers';

import {
  pipeline,
} from 'node:stream/promises';

// A Node.js-style Transform that converts data to uppercase
// and appends a newline to the end of the output.
class MyTransform extends Transform {
  constructor() {
    super({ encoding: 'utf8' });
  }
  _transform(chunk, _, cb) {
    this.push(chunk.toString().toUpperCase());
    cb();
  }
  _flush(cb) {
    this.push('\n');
    cb();
  }
}

export default {
  async fetch() {
    const chunks = [
      "hello ",
      "from ",
      "the ",
      "wonderful ",
      "world ",
      "of ",
      "node.js ",
      "streams!"
    ];

    function nextChunk(readable) {
      readable.push(chunks.shift());
      if (chunks.length === 0) readable.push(null);
      else queueMicrotask(() => nextChunk(readable));
    }

    // A Node.js-style Readable that emits chunks from the
    // array...
    const readable = new Readable({
      encoding: 'utf8',
      read() { nextChunk(readable); }
    });

    const transform = new MyTransform();
    await pipeline(readable, transform);
    return new Response(await text(transform));
  }
};
In this example we create two Node.js stream objects: one stream.Readable and one stream.Transform. The stream.Readable simply emits a sequence of individual strings, piped through the stream.Transform which converts those to uppercase and appends a new-line as a final chunk.
The example is straightforward and illustrates the basic operation of the Node.js API. For anyone already familiar with using standard WHATWG streams in Workers the pattern here should be recognizable.
The Node.js streams API is used by countless numbers of modules published on npm. Now that the Node.js streams API is available in Workers, many packages that depend on it can be used in your Workers. For example, the split2 module is a simple utility that can break a stream of data up and reassemble it so that every line is a distinct chunk. While simple, the module is downloaded over 13 million times each week and has over a thousand direct dependents on npm (and many more indirect dependents). Previously it was not possible to use split2 within Workers without also pulling in a large and complicated polyfill implementation of streams along with it. Now split2 can be used directly within Workers with no modifications and no additional polyfills. This reduces the size and complexity of your Worker by thousands of lines.
import {
  PassThrough,
} from 'node:stream';

import { default as split2 } from 'split2';

const enc = new TextEncoder();

export default {
  async fetch() {
    const pt = new PassThrough();
    const readable = pt.pipe(split2());

    pt.end('hello\nfrom\nthe\nwonderful\nworld\nof\nnode.js\nstreams!');
    for await (const chunk of readable) {
      console.log(chunk);
    }

    return new Response("ok");
  }
};
Path
The Node.js Path API provides utilities for working with file and directory paths. For example:
Note that in the Workers implementation of path, the path.win32 variants of the path API are not implemented, and will throw an exception.
StringDecoder
The Node.js StringDecoder API is a simple legacy utility that predates the WHATWG standard TextEncoder/TextDecoder API and serves roughly the same purpose. It is used by Node.js' stream API implementation as well as a number of popular npm modules for the purpose of decoding UTF-8, UTF-16, Latin1, Base64, and Hex encoded data.
import { StringDecoder } from 'node:string_decoder';
const decoder = new StringDecoder('utf8');

const cent = Buffer.from([0xC2, 0xA2]);
console.log(decoder.write(cent));

const euro = Buffer.from([0xE2, 0x82, 0xAC]);
console.log(decoder.write(euro));
In the vast majority of cases, your Worker should just keep on using the standard TextEncoder/TextDecoder APIs, but the StringDecoder is available directly for workers to use now without relying on polyfills.
Node.js Compat Modules
One Worker can already be a bundle of multiple assets. This allows a single Worker to be made up of multiple individual ESM modules, CommonJS modules, JSON, text, and binary data files.
Soon there will be a new type of module that can be included in a Worker bundles: the NodeJsCompatModule.
A NodeJsCompatModule is designed to emulate the Node.js environment as much as possible. Within these modules, common Node.js global variables such as process, Buffer, and even __filename will be available. More importantly, it is possible to require() our Node.js core API implementations without using the node: specifier prefix. This maximizes compatibility with existing NPM packages that depend on globals from Node.js being present, or don’t import Node.js APIs using the node: specifier prefix.
Support for this new module type has landed in the open source workerd runtime, with deeper integration with Wrangler coming soon.
What’s next
We’re adding support for more Node.js APIs each month, and as we introduce new APIs, they will be added under the nodejs_compat compatibility flag — no need to take any action or update your compatibility date.
Have an NPM package that you wish worked on Workers, or an API you’d like to be able to use? Join the Cloudflare Developers Discord and tell us what you’re building, and what you’d like to see next.
The collective thoughts of the interwebz
Manage Consent
To provide the best experiences, we use technologies like cookies to store and/or access device information. Consenting to these technologies will allow us to process data such as browsing behavior or unique IDs on this site. Not consenting or withdrawing consent, may adversely affect certain features and functions.
Functional
Always active
The technical storage or access is strictly necessary for the legitimate purpose of enabling the use of a specific service explicitly requested by the subscriber or user, or for the sole purpose of carrying out the transmission of a communication over an electronic communications network.
Preferences
The technical storage or access is necessary for the legitimate purpose of storing preferences that are not requested by the subscriber or user.
Statistics
The technical storage or access that is used exclusively for statistical purposes.The technical storage or access that is used exclusively for anonymous statistical purposes. Without a subpoena, voluntary compliance on the part of your Internet Service Provider, or additional records from a third party, information stored or retrieved for this purpose alone cannot usually be used to identify you.
Marketing
The technical storage or access is required to create user profiles to send advertising, or to track the user on a website or across several websites for similar marketing purposes.