Post Syndicated from André Cruz original http://blog.cloudflare.com/webgpu-in-workers/


The browser as an app platform is real and stronger every day; long gone are the Browser Wars. Vendors and standard bodies have done amazingly well over the last years, working together and advancing web standards with new APIs that allow developers to build fast and powerful applications, finally comparable to those we got used to seeing in the native OS' environment.
Today, browsers can render web pages and run code that interfaces with an extensive catalog of modern Web APIs. Things like networking, rendering accelerated graphics, or even accessing low-level hardware features like USB devices are all now possible within the browser sandbox.
One of the most exciting new browser APIs that browser vendors have been rolling out over the last months is WebGPU, a modern, low-level GPU programming interface designed for high-performance 2D and 3D graphics and general purpose GPU compute.
Today, we are introducing WebGPU support to Cloudflare Workers. This blog will explain why it's important, why we did it, how you can use it, and what comes next.
The history of the GPU in the browser
To understand why WebGPU is a big deal, we must revisit history and see how browsers went from relying only on the CPU for everything in the early days to taking advantage of GPUs over the years.
In 2011, WebGL 1, a limited port of OpenGL ES 2.0, was introduced, providing an API for fast, accelerated 3D graphics in the browser for the first time. By then, this was somewhat of a revolution in enabling gaming and 3D visualizations in the browser. Some of the most popular 3D animation frameworks, like Three.js, launched in the same period. Who doesn't remember going to the (now defunct) Google Chrome Experiments page and spending hours in awe exploring the demos? Another option then was using the Flash Player, which was still dominant in the desktop environment, and their Stage 3D API.
Later, in 2017, based on the learnings and shortcomings of its predecessor, WebGL 2 was a significant upgrade and brought more advanced GPU capabilities like compute shaders and more flexible textures and rendering.
WebGL, however, has proved to be a steep and complex learning curve for developers who want to take control of things, do low-level 3D graphics using the GPU, and not use 3rd party abstraction libraries.
Furthermore and more importantly, with the advent of machine learning and cryptography, we discovered that GPUs are great not only at drawing graphics but can be used for other applications that can take advantage of things like high-speed data or blazing-fast matrix multiplications, and one can use them to perform general computation. This became known as GPGPU, short for general-purpose computing on graphics processing units.
With this in mind, in the native desktop and mobile operating system worlds, developers started using more advanced frameworks like CUDA, Metal, DirectX 12, or Vulkan. WegGL stayed behind. To fill this void and bring the browser up to date, in 2017, companies like Google, Apple, Intel, Microsoft, Kronos, and Mozilla created the GPU for Web Community Working Group to collaboratively design the successor of WebGL and create the next modern 3D graphics and computation capabilities APIs for the Web.
What is WebGPU
WebGPU was developed with the following advantages in mind:
- Lower Level Access – WebGPU provides lower-level, direct access to the GPU vs. the high-level abstractions in WebGL. This enables more control over GPU resources.
- Multi-Threading – WebGPU can leverage multi-threaded rendering and compute, allowing improved CPU/GPU parallelism compared to WebGL, which relies on a single thread.
- Compute Shaders – First-class support for general-purpose compute shaders for GPGPU tasks, not just graphics. WebGL compute is limited.
- Safety – WebGPU ensures memory and GPU access safety, avoiding common WebGL pitfalls.
- Portability – WGSL shader language targets cross-API portability across GPU vendors vs. GLSL in WebGL.
- Reduced Driver Overhead – The lower level Vulkan/Metal/D3D12 basis improves overhead vs. OpenGL drivers in WebGL.
- Pipeline State Objects – Predefined pipeline configs avoid per-draw driver overhead in WebGL.
- Memory Management – Finer-grained buffer and resource management vs. WebGL.
The “too long didn't read” version is that WebGPU provides lower-level control over the GPU hardware with reduced overhead. It's safer, has multi-threading, is focused on compute, not just graphics, and has portability advantages compared to WebGL.
If these aren't reasons enough to get excited, developers are also looking at WebGPU as an option for native platforms, not just the Web. For instance, you can use this C API that mimics the JavaScript specification. If you think about this and the power of WebAssembly, you can effectively have a truly platform-agnostic GPU hardware layer that you can use to develop platforms for any operating system or browser.
More than just graphics
As explained above, besides being a graphics API, WebGPU makes it possible to perform tasks such as:
- Machine Learning – Implement ML applications like neural networks and computer vision algorithms using WebGPU compute shaders and matrices.
- Scientific Computing – Perform complex scientific computation like physics simulations and mathematical modeling using the GPU.
- High Performance Computing – Unlock breakthrough performance for parallel workloads by connecting WebGPU to languages like Rust, C/C++ via WebAssembly.
WGSL, the shader language for WebGPU, is what enables the general-purpose compute feature. Shaders, or more precisely, compute shaders, have no user-defined inputs or outputs and are used for computing arbitrary information. Here are some examples of simple WebGPU compute shaders if you want to learn more.
WebGPU in Workers
We've been watching WebGPU since the API was published. Its general-purpose compute features perfectly fit our Workers' ecosystem and capabilities and align well with our vision of providing our customers multiple compute and hardware options and bringing GPU workloads to our global network, close to clients.
Cloudflare also has a track record of pioneering support for emerging web standards on our network and services, accelerating their adoption for our customers. Examples of these are Web Crypto API, HTTP/2, HTTP/3, TLS 1.3, or Early hints, but there are more.
Bringing WebGPU to Workers was both natural and timely. Today, we are announcing that we have released a version of workerd, the open-sourced JavaScript / Wasm runtime that powers Cloudflare Workers, with WebGPU support, that you can start playing and developing applications with, locally.
Starting today anyone can run this on their personal computer and experiment with WebGPU-enabled workers. Implementing local development first allows us to put this API in the hands of our customers and developers earlier and get feedback that will guide the development of this feature for production use.
But before we dig into code examples, let's explain how we built it.
How we built WebGPU on top of Workers
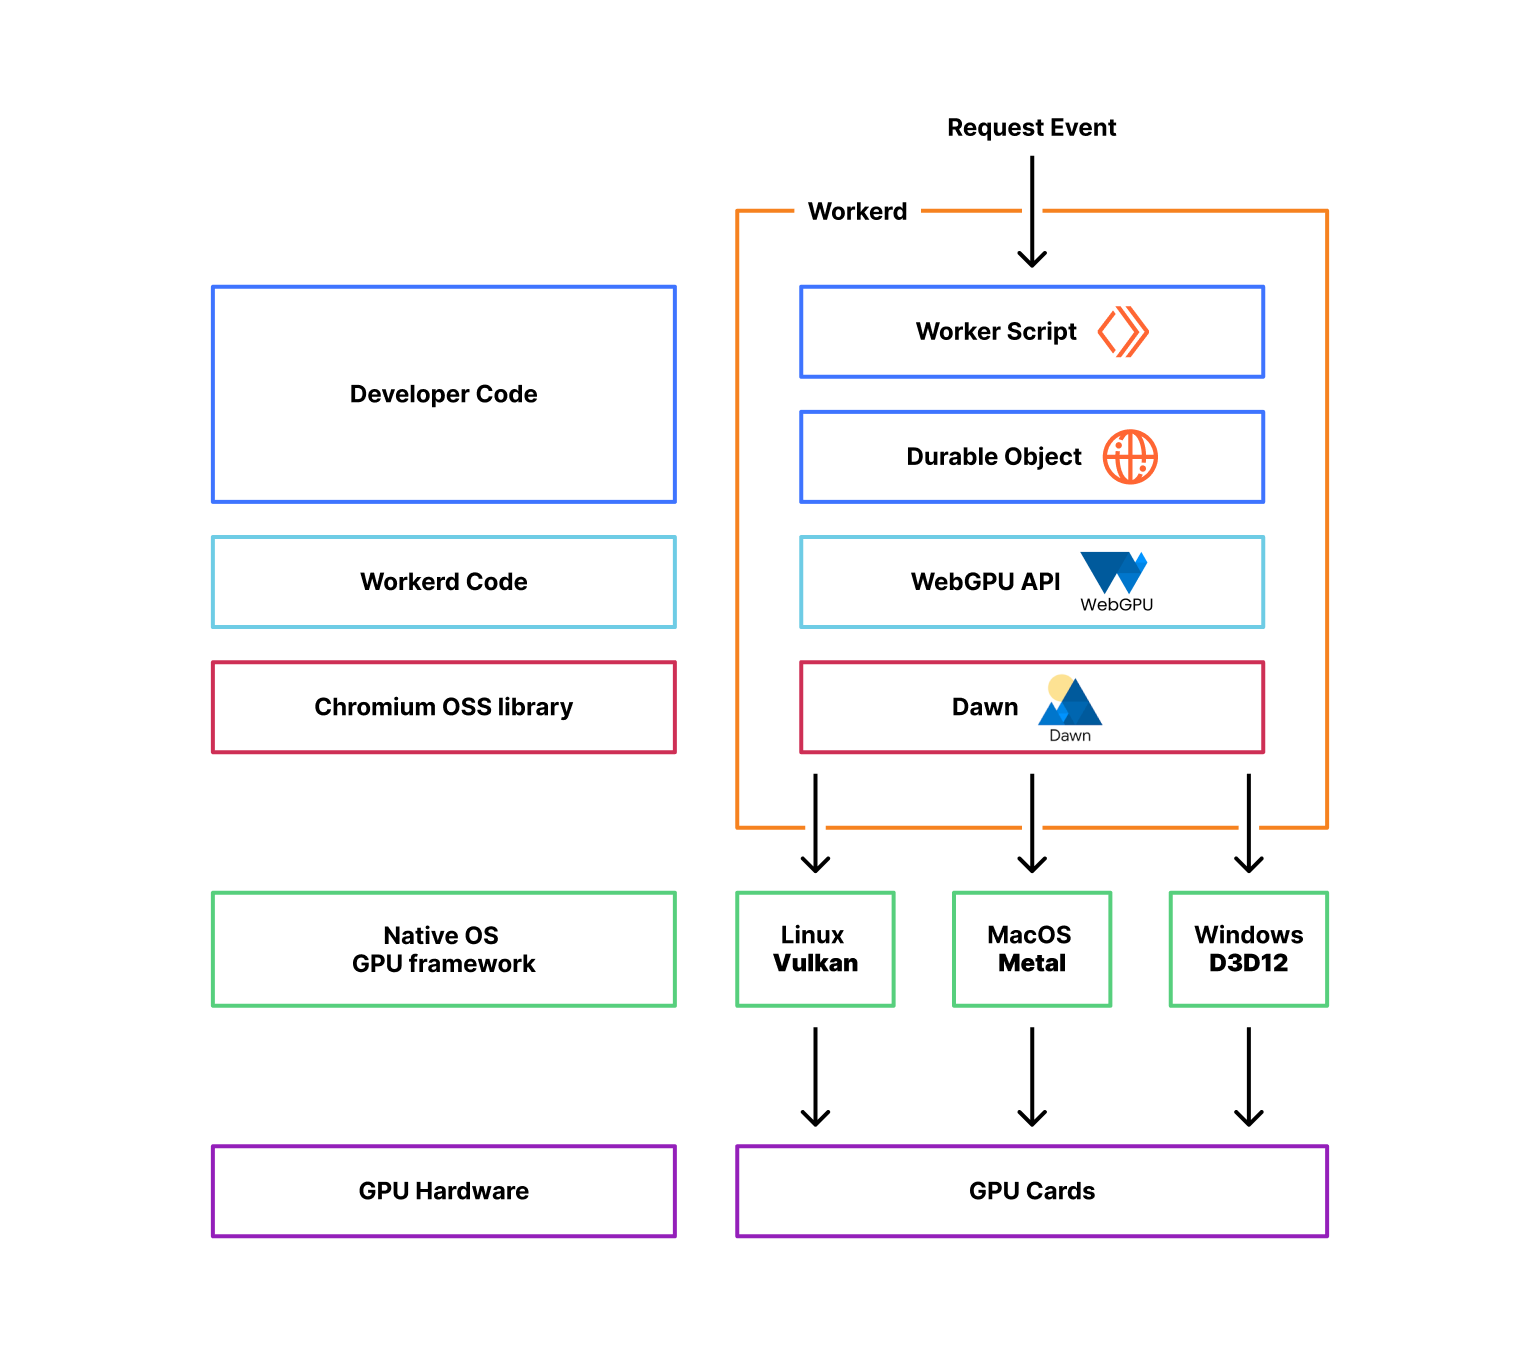
To implement the WebGPU API, we took advantage of Dawn, an open-source library backed by Google, the same used in Chromium and Chrome, that provides applications with an implementation of the WebGPU standard. It also provides the webgpu.h headers file, the de facto reference for all the other implementations of the standard.
Dawn can interoperate with Linux, MacOS, and Windows GPUs by interfacing with each platform's native GPU frameworks. For example, when an application makes a WebGPU draw call, Dawn will convert that draw command into the equivalent Vulkan, Metal, or Direct3D 12 API call, depending on the platform.
From an application standpoint, Dawn handles the interactions with the underlying native graphics APIs that communicate directly with the GPU drivers. Dawn essentially acts as a middle layer that translates the WebGPU API calls into calls for the platform's native graphics API.
Cloudflare workerd is the underlying open-source runtime engine that executes Workers code. It shares most of its code with the same runtime that powers Cloudflare Workers' production environment but with some changes designed to make it more portable to other environments. We then have release cycles that aim to synchronize both codebases; more on later. Workerd is also used with wrangler, our command-line tool for building and interacting with Cloudflare Workers, to support local development.
The WebGPU code that interfaces with the Dawn library can be found here, and can easily be enabled with a flag, checked here.
jsg::Ref<api::gpu::GPU> Navigator::getGPU(CompatibilityFlags::Reader flags) {
  // is this a durable object?
  KJ_IF_MAYBE (actor, IoContext::current().getActor()) {
    JSG_REQUIRE(actor->getPersistent() != nullptr, TypeError,
                "webgpu api is only available in Durable Objects (no storage)");
  } else {
    JSG_FAIL_REQUIRE(TypeError, "webgpu api is only available in Durable Objects");
  };

  JSG_REQUIRE(flags.getWebgpu(), TypeError, "webgpu needs the webgpu compatibility flag set");

  return jsg::alloc<api::gpu::GPU>();
}
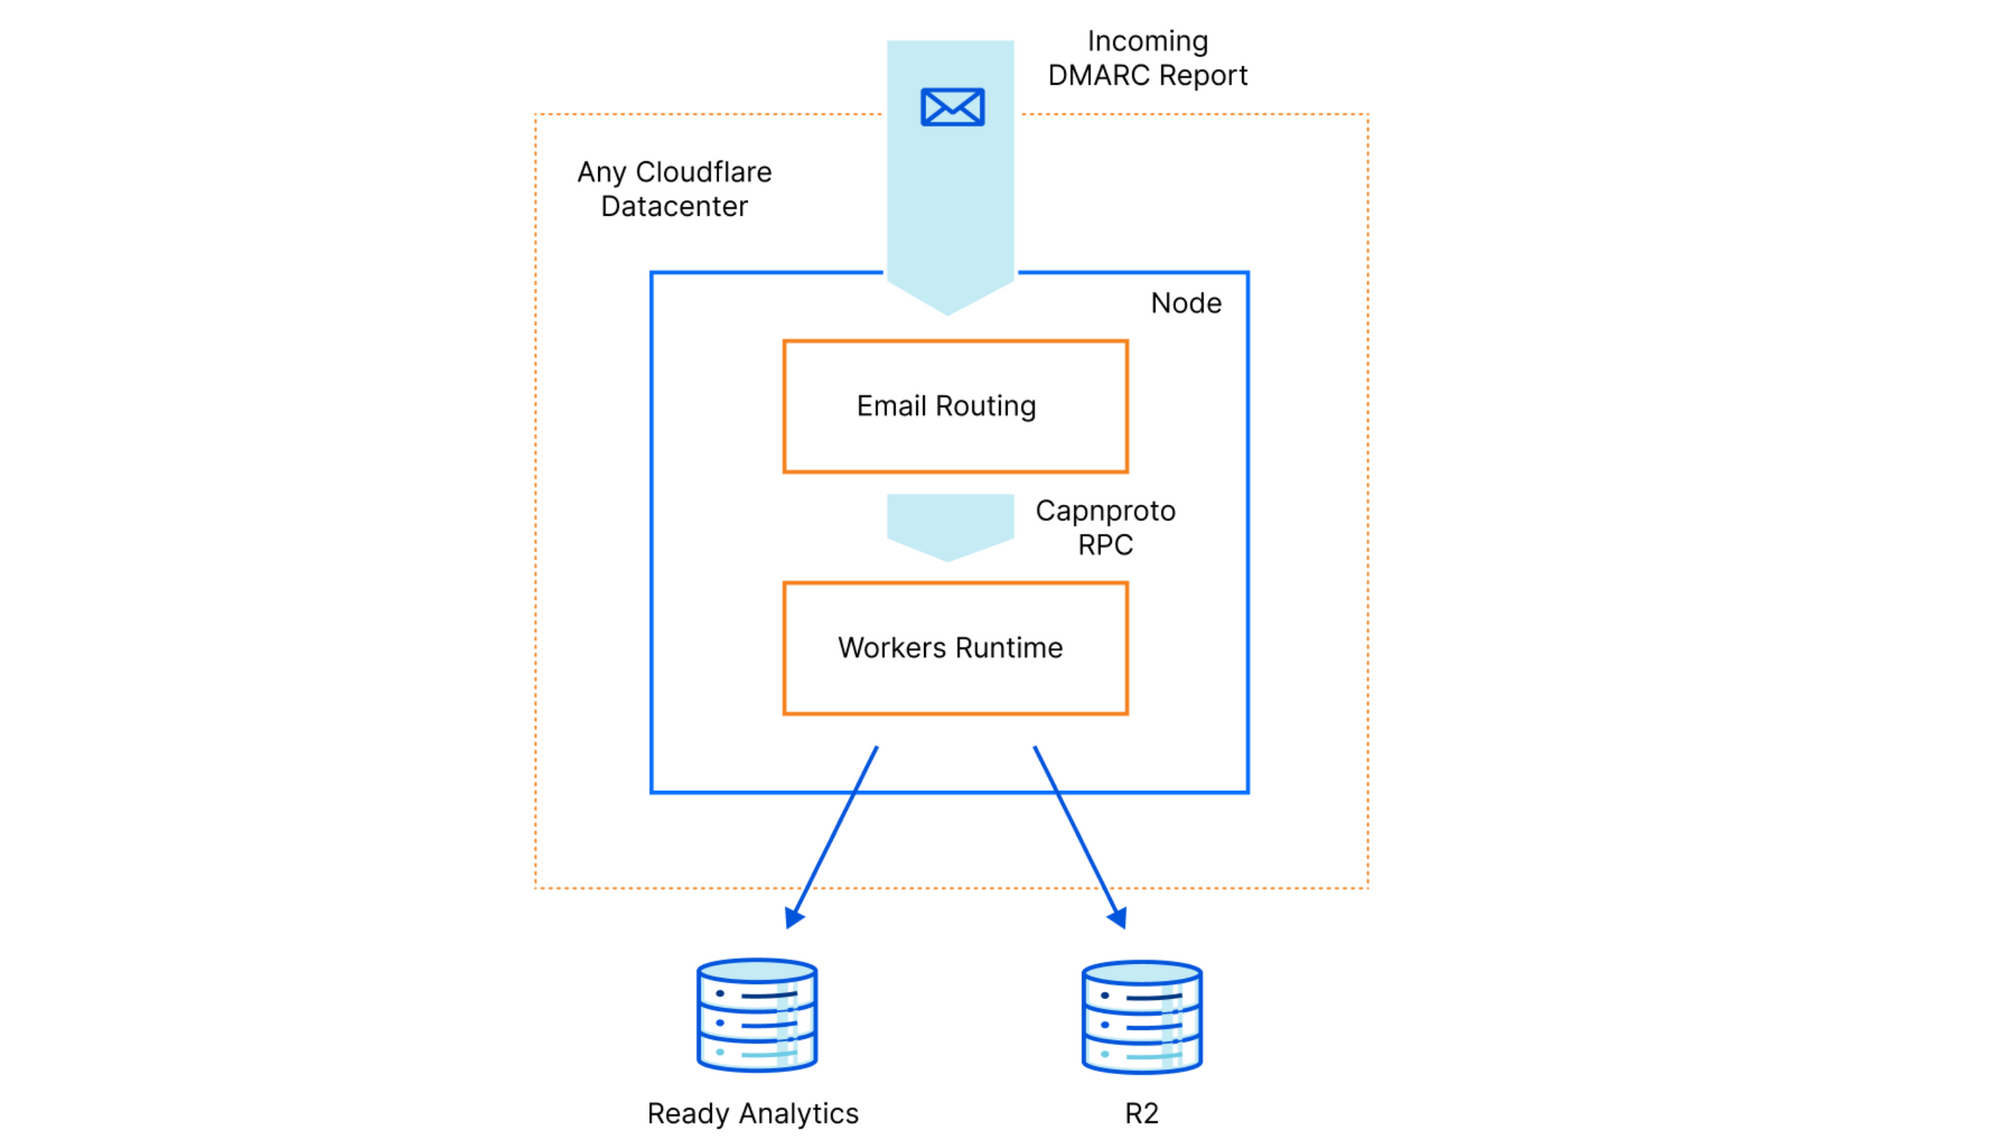
The WebGPU API can only be accessed using Durable Objects, which are essentially global singleton instances of Cloudflare Workers. There are two important reasons for this:
- WebGPU code typically wants to store the state between requests, for example, loading an AI model into the GPU memory once and using it multiple times for inference.
- Not all Cloudflare servers have GPUs yet, so although the worker that receives the request is typically the closest one available, the Durable Object that uses WebGPU will be instantiated where there are GPU resources available, which may not be on the same machine.
Using Durable Objects instead of regular Workers allow us to address both of these issues.
The WebGPU Hello World in Workers
Wrangler uses Miniflare 3, a fully-local simulator for Workers, which in turn is powered by workerd. This means you can start experimenting and doing WebGPU code locally on your machine right now before we prepare things in our production environment.
Let’s get coding then.
Since Workers doesn't render graphics yet, we started with implementing the general-purpose GPU (GPGPU) APIs in the WebGPU specification. In other words, we fully support the part of the API that the compute shaders and the compute pipeline require, but we are not yet focused on fragment or vertex shaders used in rendering pipelines.
Here’s a typical “hello world” in WebGPU. This Durable Object script will output the name of the GPU device that workerd found in your machine to your console.
const adapter = await navigator.gpu.requestAdapter();
const adapterInfo = await adapter.requestAdapterInfo(["device"]);
console.log(adapterInfo.device);
A more interesting example, though, is a simple compute shader. In this case, we will fill a results buffer with an incrementing value taken from the iteration number via global_invocation_id.
For this, we need two buffers, one to store the results of the computations as they happen (storageBuffer) and another to copy the results at the end (mappedBuffer).
We then dispatch four workgroups, meaning that the increments can happen in parallel. This parallelism and programmability are two key reasons why compute shaders and GPUs provide an advantage for things like machine learning inference workloads. Other advantages are:
- Bandwidth – GPUs have a very high memory bandwidth, up to 10-20x more than CPUs. This allows fast reading and writing of all the model parameters and data needed for inference.
- Floating-point performance – GPUs are optimized for high floating point operation throughput, which are used extensively in neural networks. They can deliver much higher TFLOPs than CPUs.
Let’s look at the code:
// Create device and command encoder
const adapter = await navigator.gpu.requestAdapter();
const device = await adapter.requestDevice();
const encoder = device.createCommandEncoder();

// Storage buffer
const storageBuffer = device.createBuffer({
  size: 4 * Float32Array.BYTES_PER_ELEMENT, // 4 float32 values
  usage: GPUBufferUsage.STORAGE | GPUBufferUsage.COPY_SRC,
});

// Mapped buffer
const mappedBuffer = device.createBuffer({
  size: 4 * Float32Array.BYTES_PER_ELEMENT,
  usage: GPUBufferUsage.MAP_READ | GPUBufferUsage.COPY_DST,
});

// Create shader that writes incrementing numbers to storage buffer
const computeShaderCode = `
    @group(0) @binding(0)
    var<storage, read_write> result : array<f32>;

    @compute @workgroup_size(1)
    fn main(@builtin(global_invocation_id) gid : vec3<u32>) {
      result[gid.x] = f32(gid.x);
    }
`;

// Create compute pipeline
const computePipeline = device.createComputePipeline({
  layout: "auto",
  compute: {
    module: device.createShaderModule({ code: computeShaderCode }),
    entryPoint: "main",
  },
});

// Bind group
const bindGroup = device.createBindGroup({
  layout: computePipeline.getBindGroupLayout(0),
  entries: [{ binding: 0, resource: { buffer: storageBuffer } }],
});

// Dispatch compute work
const computePass = encoder.beginComputePass();
computePass.setPipeline(computePipeline);
computePass.setBindGroup(0, bindGroup);
computePass.dispatchWorkgroups(4);
computePass.end();

// Copy from storage to mapped buffer
encoder.copyBufferToBuffer(
  storageBuffer,
  0,
  mappedBuffer,
  0,
  4 * Float32Array.BYTES_PER_ELEMENT //mappedBuffer.size
);

// Submit and read back result
const gpuBuffer = encoder.finish();
device.queue.submit([gpuBuffer]);

await mappedBuffer.mapAsync(GPUMapMode.READ);
console.log(new Float32Array(mappedBuffer.getMappedRange()));
// [0, 1, 2, 3]
Now that we covered the basics of WebGPU and compute shaders, let's move to something more demanding. What if we could perform machine learning inference using Workers and GPUs?
ONNX WebGPU demo
The ONNX runtime is a popular open-source cross-platform, high performance machine learning inferencing accelerator. Wonnx is a GPU-accelerated version of the same engine, written in Rust, that can be compiled to WebAssembly and take advantage of WebGPU in the browser. We are going to run it in Workers using a combination of workers-rs, our Rust bindings for Cloudflare Workers, and the workerd WebGPU APIs.
For this demo, we are using SqueezeNet. This small image classification model can run under lower resources but still achieves similar levels of accuracy on the ImageNet image classification validation dataset as larger models like AlexNet.
In essence, our worker will receive any uploaded image and attempt to classify it according to the 1000 ImageNet classes. Once ONNX runs the machine learning model using the GPU, it will return the list of classes with the highest probability scores. Let’s go step by step.
First we load the model from R2 into the GPU memory the first time the Durable Object is called:
#[durable_object]
pub struct Classifier {
    env: Env,
    session: Option<wonnx::Session>,
}

impl Classifier {
    async fn ensure_session(&mut self) -> Result<()> {
        match self.session {
            Some(_) => worker::console_log!("DO already has a session"),
            None => {
                // No session, so this should be the first request. In this case
                // we will fetch the model from R2, build a wonnx session, and
                // store it for subsequent requests.
                let model_bytes = fetch_model(&self.env).await?;
                let session = wonnx::Session::from_bytes(&model_bytes)
                    .await
                    .map_err(|err| err.to_string())?;
                worker::console_log!("session created in DO");
                self.session = Some(session);
            }
        };
        Ok(())
    }
}
This is only required once, when the Durable Object is instantiated. For subsequent requests, we retrieve the model input tensor, call the existing session for the inference, and return to the calling worker the result tensor converted to JSON:
        let request_data: ArrayBase<OwnedRepr<f32>, Dim<[usize; 4]>> =
            serde_json::from_str(&req.text().await?)?;
        let mut input_data = HashMap::new();
        input_data.insert("data".to_string(), request_data.as_slice().unwrap().into());

        let result = self
            .session
            .as_ref()
            .unwrap() // we know the session exists
            .run(&input_data)
            .await
            .map_err(|err| err.to_string())?;
...
        let probabilities: Vec<f32> = result
            .into_iter()
            .next()
            .ok_or("did not obtain a result tensor from session")?
            .1
            .try_into()
            .map_err(|err: TensorConversionError| err.to_string())?;

        let do_response = serde_json::to_string(&probabilities)?;
        Response::ok(do_response)
On the Worker script itself, we load the uploaded image and pre-process it into a model input tensor:
    let image_file: worker::File = match req.form_data().await?.get("file") {
        Some(FormEntry::File(buf)) => buf,
        Some(_) => return Response::error("`file` part of POST form must be a file", 400),
        None => return Response::error("missing `file`", 400),
    };
    let image_content = image_file.bytes().await?;
    let image = load_image(&image_content)?;
Finally, we call the GPU Durable Object, which runs the model and returns the most likely classes of our image:
    let probabilities = execute_gpu_do(image, stub).await?;
    let mut probabilities = probabilities.iter().enumerate().collect::<Vec<_>>();
    probabilities.sort_unstable_by(|a, b| b.1.partial_cmp(a.1).unwrap());
    Response::ok(LABELS[probabilities[0].0])
We packaged this demo in a public repository, so you can also run it. Make sure that you have a Rust compiler, Node.js, Git and curl installed, then clone the repository:
git clone https://github.com/cloudflare/workers-wonnx.git
cd workers-wonnx
Upload the model to the local R2 simulator:
npx wrangler@latest r2 object put model-bucket-dev/opt-squeeze.onnx --local --file models/opt-squeeze.onnx
And then run the Worker locally:
npx wrangler@latest dev
With the Worker running and waiting for requests you can then open another terminal window and upload one of the image examples in the same repository using curl:
> curl -F "file=@images/pelican.jpeg" http://localhost:8787
n02051845 pelican
If everything goes according to plan the result of the curl command will be the most likely class of the image.
Next steps and final words
Over the upcoming weeks, we will merge the workerd WebGPU code in the Cloudflare Workers production environment and make it available globally, on top of our growing GPU nodes fleet. We didn't do it earlier because that environment is subject to strict security and isolation requirements. For example, we can't break the security model of our process sandbox and have V8 talking to the GPU hardware directly, that would be a problem; we must create a configuration where another process is closer to the GPU and use IPC (inter-process communication) to talk to it. Other things like managing resource allocation and billing are being sorted out.
For now, we wanted to get the good news out that we will support WebGPU in Cloudflare Workers and ensure that you can start playing and coding with it today and learn from it. WebGPU and general-purpose computing on GPUs is still in its early days. We presented a machine-learning demo, but we can imagine other applications taking advantage of this new feature, and we hope you can show us some of them.
As usual, you can talk to us on our Developers Discord or the Community forum; the team will be listening. We are eager to hear from you and learn about what you're building.