Tag Archives: standards

MoQ: Refactoring the Internet’s real-time media stack

Post Syndicated from Mike English original https://blog.cloudflare.com/moq/

For over two decades, we’ve built real-time communication on the Internet using a patchwork of specialized tools. RTMP gave us ingest. HLS and DASH gave us scale. WebRTC gave us interactivity. Each solved a specific problem for its time, and together they power the global streaming ecosystem we rely on today.

But using them together in 2025 feels like building a modern application with tools from different eras. The seams are starting to show—in complexity, in latency, and in the flexibility needed for the next generation of applications, from sub-second live auctions to massive interactive events. We’re often forced to make painful trade-offs between latency, scale, and operational complexity.

Today Cloudflare is launching the first Media over QUIC (MoQ) relay network, running on every Cloudflare server in datacenters in 330+ cities. MoQ is an open protocol being developed at the IETF by engineers from across the industry—not a proprietary Cloudflare technology. MoQ combines the low-latency interactivity of WebRTC, the scalability of HLS/DASH, and the simplicity of a single architecture, all built on a modern transport layer. We’re joining Meta, Google, Cisco, and others in building implementations that work seamlessly together, creating a shared foundation for the next generation of real-time applications on the Internet.

An evolutionary ladder of compromise

To understand the promise of MoQ, we first have to appreciate the history that led us here—a journey defined by a series of architectural compromises where solving one problem inevitably created another.

The RTMP era: Conquering latency, compromising on scale

In the early 2000s, RTMP (Real-Time Messaging Protocol) was a breakthrough. It solved the frustrating “download and wait” experience of early video playback on the web by creating a persistent, stateful TCP connection between a Flash client and a server. This enabled low-latency streaming (2-5 seconds), powering the first wave of live platforms like Justin.tv (which later became Twitch).

But its strength was its weakness. That stateful connection, which had to be maintained for every viewer, was architecturally hostile to scale. It required expensive, specialized media servers and couldn’t use the commodity HTTP-based Content Delivery Networks (CDNs) that were beginning to power the rest of the web. Its reliance on TCP also meant that a single lost packet could freeze the entire stream—a phenomenon known as head-of-line blocking—creating jarring latency spikes. The industry retained RTMP for the “first mile” from the camera to servers (ingest), but a new solution was needed for the “last mile” from servers to your screen (delivery).

The HLS & DASH era: Solving for scale, compromising on latency

The catalyst for the next era was the iPhone’s rejection of Flash. In response, Apple created HLS (HTTP Live Streaming). HLS, and its open-standard counterpart MPEG-DASH abandoned stateful connections and treated video as a sequence of small, static files delivered over standard HTTP.

This enabled much greater scalability. By moving to the interoperable open standard of HTTP for the underlying transport, video could now be distributed by any web server and cached by global CDNs, allowing platforms to reach millions of viewers reliably and relatively inexpensively. The compromise? A significant trade-off in latency. To ensure smooth playback, players needed to buffer at least three video segments before starting. With segment durations of 6-10 seconds, this baked 15-30 seconds of latency directly into the architecture.

While extensions like Low-Latency HLS (LL-HLS) have more recently emerged to achieve latencies in the 3-second range, they remain complex patches fighting against the protocol’s fundamental design. These extensions introduce a layer of stateful, real-time communication—using clever workarounds like holding playlist requests open—that ultimately strain the stateless request-response model central to HTTP’s scalability and composability.

The WebRTC Era: Conquering conversational latency, compromising on architecture

In parallel, WebRTC (Web Real-Time Communication) emerged to solve a different problem: plugin-free, two-way conversational video with sub-500ms latency within a browser. It worked by creating direct peer-to-peer (P2P) media paths, removing central servers from the equation.

But this P2P model is fundamentally at odds with broadcast scale. In a mesh network, the number of connections grows quadratically with each new participant (the “N-squared problem”). For more than a handful of users, the model collapses under the weight of its own complexity. To work around this, the industry developed server-based topologies like the Selective Forwarding Unit (SFU) and Multipoint Control Unit (MCU). These are effective but require building what is essentially a private, stateful, real-time CDN—a complex and expensive undertaking that is not standardized across infrastructure providers.

This journey has left us with a fragmented landscape of specialized, non-interoperable silos, forcing developers to stitch together multiple protocols and accept a painful three-way tension between latency, scale, and complexity.

Introducing MoQ

This is the context into which Media over QUIC (MoQ) emerges. It’s not just another protocol; it’s a new design philosophy built from the ground up to resolve this historical trilemma. Born out of an open, community-driven effort at the IETF, MoQ aims to be a foundational Internet technology, not a proprietary product.

Its promise is to unify the disparate worlds of streaming by delivering:

  1. Sub-second latency at broadcast scale: Combining the latency of WebRTC with the scale of HLS/DASH and the simplicity of RTMP.

  2. Architectural simplicity: Creating a single, flexible protocol for ingest, distribution, and interactive use cases, eliminating the need to transcode between different technologies.

  3. Transport efficiency: Building on QUIC, a UDP based protocol to eliminate bottlenecks like TCP head-of-line blocking.

The initial focus was “Media” over QUIC, but the core concepts—named tracks of timed, ordered, but independent data—are so flexible that the working group is now simply calling the protocol “MoQ.” The name reflects the power of the abstraction: it’s a generic transport for any real-time data that needs to be delivered efficiently and at scale.

MoQ is now generic enough that it’s a data fanout or pub/sub system, for everything from audio/video (high bandwidth data) to sports score updates (low bandwidth data).

A deep dive into the MoQ protocol stack

MoQ’s elegance comes from solving the right problem at the right layer. Let’s build up from the foundation to see how it achieves sub-second latency at scale.

The choice of QUIC as MoQ’s foundation isn’t arbitrary—it addresses issues that have plagued streaming protocols for decades.

By building on QUIC (the transport protocol that also powers HTTP/3), MoQ solves some key streaming problems:

  • No head-of-line blocking: Unlike TCP where one lost packet blocks everything behind it, QUIC streams are independent. A lost packet on one stream (e.g., an audio track) doesn’t block another (e.g., the main video track). This alone eliminates the stuttering that plagued RTMP.

  • Connection migration: When your device switches from Wi-Fi to cellular mid-stream, the connection seamlessly migrates without interruption—no rebuffering, no reconnection.

  • Fast connection establishment: QUIC’s 0-RTT resumption means returning viewers can start playing instantly.

  • Baked-in, mandatory encryption: All QUIC connections are encrypted by default with TLS 1.3.

The core innovation: Publish/subscribe for media

With QUIC solving transport issues, MoQ introduces its key innovation: treating media as subscribable tracks in a publish/subscribe system. But unlike traditional pub/sub, this is designed specifically for real-time media at CDN scale.

Instead of complex session management (WebRTC) or file-based chunking (HLS), MoQ lets publishers announce named tracks of media that subscribers can request. A relay network handles the distribution without needing to understand the media itself.

How MoQ organizes media: The data model

Before we see how media flows through the network, let’s understand how MoQ structures it. MoQ organizes data in a hierarchy:

  • Tracks: Named streams of media, like “video-1080p” or “audio-english”. Subscribers request specific tracks by name.

  • Groups: Independently decodable chunks of a track. For video, this typically means a GOP (Group of Pictures) starting with a keyframe. New subscribers can join at any Group boundary.

  • Objects: The actual packets sent on the wire. Each Object belongs to a Track and has a position within a Group.

This simple hierarchy enables two capabilities:

  1. Subscribers can start playback at Group boundaries without waiting for the next keyframe

  2. Relays can forward Objects without parsing or understanding the media format

The network architecture: From publisher to subscriber

MoQ’s network components are also simple:

  • Publishers: Announce track namespaces and send Objects

  • Subscribers: Request specific tracks by name

  • Relays: Connect publishers to subscribers by forwarding immutable Objects without parsing or transcoding the media

A Relay acts as a subscriber to receive tracks from upstream (like the original publisher) and simultaneously acts as a publisher to forward those same tracks downstream. This model is the key to MoQ’s scalability: one upstream subscription can fan out to serve thousands of downstream viewers.

The MoQ Stack


MoQ’s architecture can be understood as three distinct layers, each with a clear job:

  1. The Transport Foundation (QUIC or WebTransport): This is the modern foundation upon which everything is built. MoQT can run directly over raw QUIC, which is ideal for native applications, or over WebTransport, which is required for use in a web browser. Crucially, the WebTransport protocol and its corresponding W3C browser API make QUIC’s multiplexed reliable streams and unreliable datagrams directly accessible to browser applications. This is a game-changer. Protocols like SRT may be efficient, but their lack of native browser support relegates them to ingest-only roles. WebTransport gives MoQ first-class citizenship on the web, making it suitable for both ingest and massive-scale distribution directly to clients.

  2. The MoQT Layer: Sitting on top of QUIC (or WebTransport), the MoQT layer provides the signaling and structure for a publish-subscribe system. This is the primary focus of the IETF working group. It defines the core control messages—like ANNOUNCE, and SUBSCRIBE—and the basic data model we just covered. MoQT itself is intentionally spartan; it doesn’t know or care if the data it’s moving is H.264 video, Opus audio, or game state updates.

  3. The Streaming Format Layer: This is where media-specific logic lives. A streaming format defines things like manifests, codec metadata, and packaging rules.
    WARP is one such format being developed alongside MoQT at the IETF, but it isn’t the only one. Another standards body, like DASH-IF, could define a CMAF-based streaming format over MoQT. A company that controls both original publisher and end subscriber can develop its own proprietary streaming format to experiment with new codecs or delivery mechanisms without being constrained by the transport protocol.

This separation of layers is why different organizations can build interoperable implementations while still innovating at the streaming format layer.

End-to-End Data Flow

Now that we understand the architecture and the data model, let’s walk through how these pieces come together to deliver a stream. The protocol is flexible, but a typical broadcast flow relies on the ANNOUNCE and SUBSCRIBE messages to establish a data path from a publisher to a subscriber through the relay network.


Here is a step-by-step breakdown of what happens in this flow:

  1. Initiating Connections: The process begins when the endpoints, acting as clients, connect to the relay network. The Original Publisher initiates a connection with its nearest relay (we’ll call it Relay A). Separately, an End Subscriber initiates a connection with its own local relay (Relay B). These endpoints perform a SETUP handshake with their respective relays to establish a MoQ session and declare supported parameters.

  2. Announcing a Namespace: To make its content discoverable, the Publisher sends an ANNOUNCE message to Relay A. This message declares that the publisher is the authoritative source for a given track namespace. Relay A receives this and registers in a shared control plane (a conceptual database) that it is now a source for this namespace within the network.

  3. Subscribing to a Track: When the End Subscriber wants to receive media, it sends a SUBSCRIBE message to its relay, Relay B. This message is a request for a specific track name within a specific track namespace.

  4. Connecting the Relays: Relay B receives the SUBSCRIBE request and queries the control plane. It looks up the requested namespace and discovers that Relay A is the source. Relay B then initiates a session with Relay A (if it doesn’t already have one) and forwards the SUBSCRIBE request upstream.

  5. Completing the Path and Forwarding Objects: Relay A, having received the subscription request from Relay B, forwards it to the Original Publisher. With the full path now established, the Publisher begins sending the Objects for the requested track. The Objects flow from the Publisher to Relay A, which forwards them to Relay B, which in turn forwards them to the End Subscriber. If another subscriber connects to Relay B and requests the same track, Relay B can immediately start sending them the Objects without needing to create a new upstream subscription.

An Alternative Flow: The PUBLISH Model


More recent drafts of the MoQ specification have introduced an alternative, push-based model using a PUBLISH message. In this flow, a publisher can effectively ask for permission to send a track’s objects to a relay without waiting for a SUBSCRIBE request. The publisher sends a PUBLISH message, and the relay’s PUBLISH_OK response indicates whether it will accept the objects. This is particularly useful for ingest scenarios, where a publisher wants to send its stream to an entry point in the network immediately, ensuring the media is available the instant the first subscriber connects.

Advanced capabilities: Prioritization and congestion control

MoQ’s benefits really shine when networks get congested. MoQ includes mechanisms for handling the reality of network traffic. One such mechanism is Subgroups.

Subgroups are subdivisions within a Group that effectively map directly to the underlying QUIC streams. All Objects within the same Subgroup are generally sent on the same QUIC stream, guaranteeing their delivery order. Subgroup numbering also presents an opportunity to encode prioritization: within a Group, lower-numbered Subgroups are considered higher priority. 

This enables intelligent quality degradation, especially with layered codecs (e.g. SVC):

  • Subgroup 0: Base video layer (360p) – must deliver

  • Subgroup 1: Enhancement to 720p – deliver if bandwidth allows

  • Subgroup 2: Enhancement to 1080p – first to drop under congestion

When a relay detects congestion, it can drop Objects from higher-numbered Subgroups, preserving the base layer. Viewers see reduced quality instead of buffering.

The MoQ specification defines a scheduling algorithm that determines the order for all objects that are “ready to send.” When a relay has multiple objects ready, it prioritizes them first by group order (ascending or descending) and then, within a group, by subgroup id. Our implementation supports the group order preference, which can be useful for low-latency broadcasts. If a viewer falls behind and its subscription uses descending group order, the relay prioritizes sending Objects from the newest “live” Group, potentially canceling unsent Objects from older Groups. This can help viewers catch up to the live edge quickly, a highly desirable feature for many interactive streaming use cases. The optimal strategies for using these features to improve QoE for specific use cases are still an open research question. We invite developers and researchers to use our network to experiment and help find the answers.

Implementation: building the Cloudflare MoQ relay

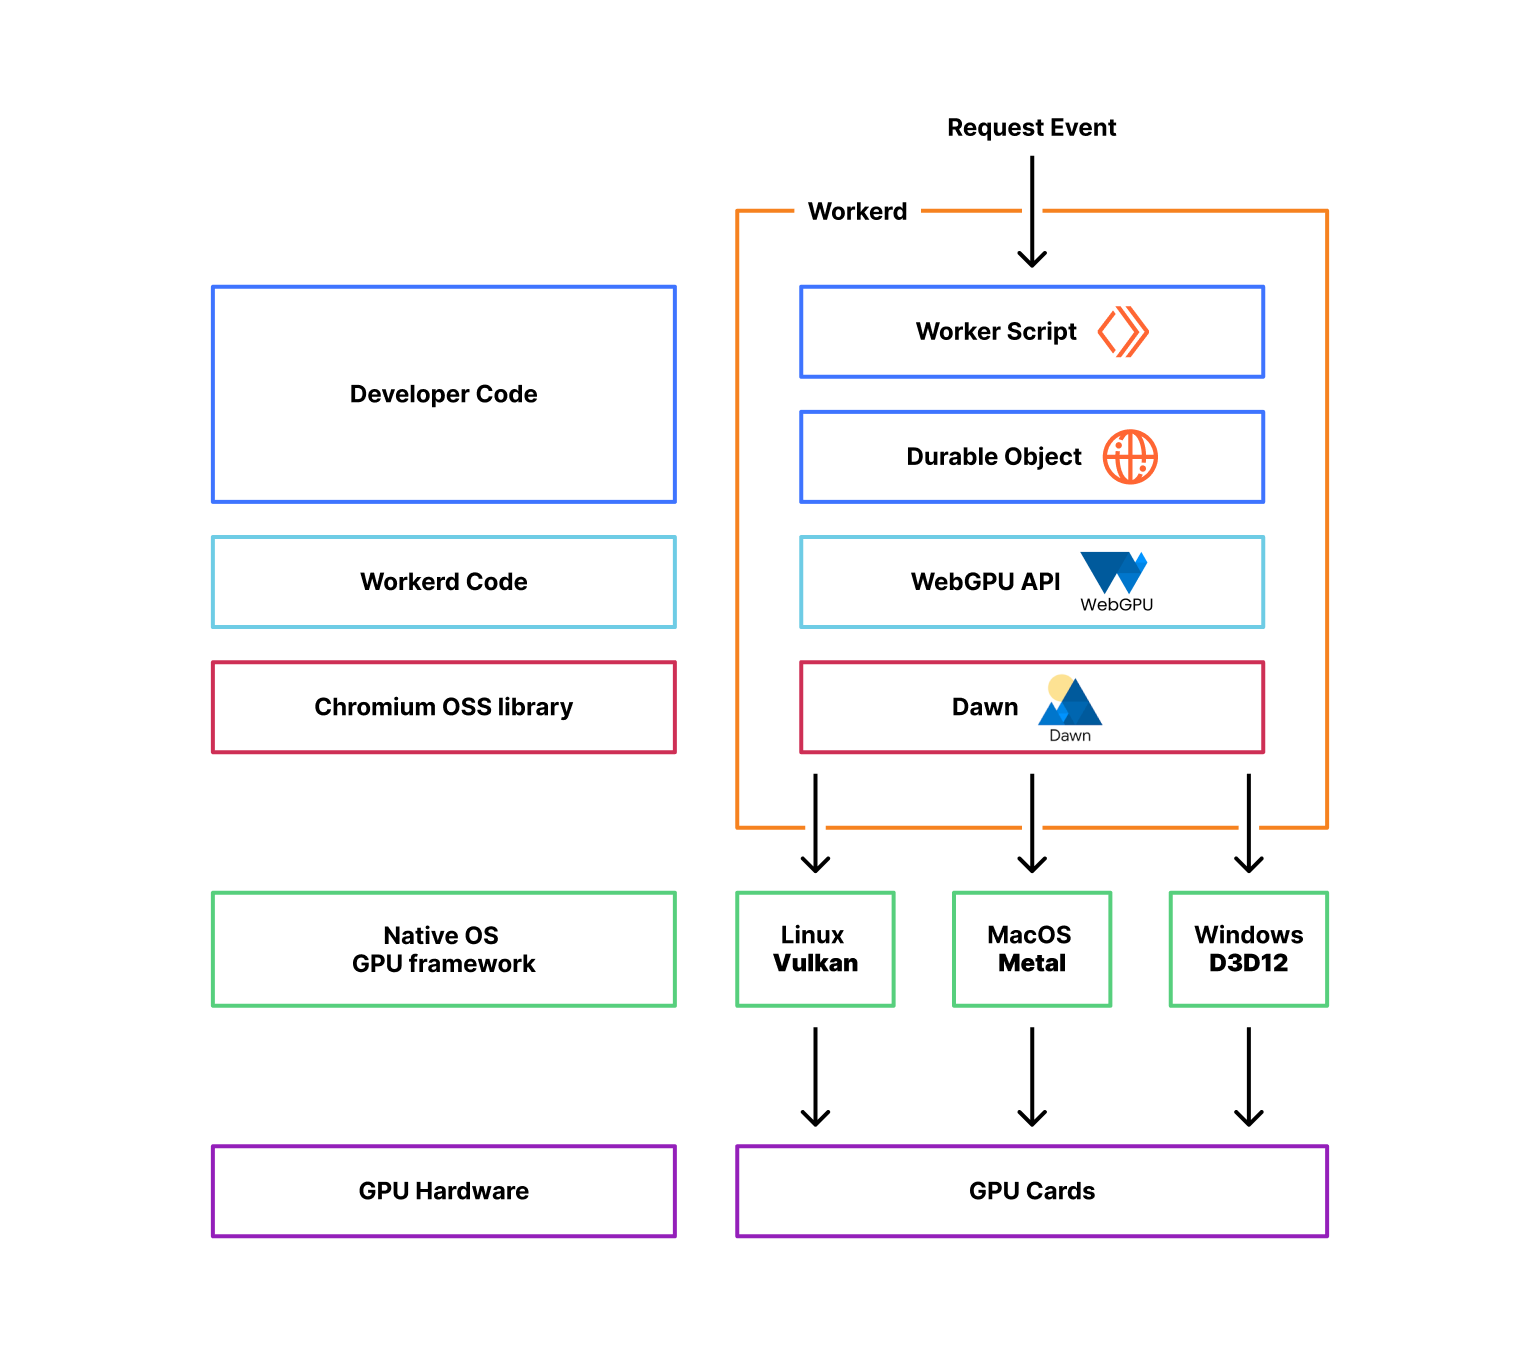
Theory is one thing; implementation is another. To validate the protocol and understand its real-world challenges, we’ve been building one of the first global MoQ relay networks. Cloudflare’s network, which places compute and logic at the edge, is very well suited for this.

Our architecture connects the abstract concepts of MoQ to the Cloudflare stack. In our deep dive, we mentioned that when a publisher ANNOUNCEs a namespace, relays need to register this availability in a “shared control plane” so that SUBSCRIBE requests can be routed correctly. For this critical piece of state management, we use Durable Objects.

When a publisher announces a new namespace to a relay in, say, London, that relay uses a Durable Object—our strongly consistent, single-threaded storage solution—to record that this namespace is now available at that specific location. When a subscriber in Paris wants a track from that namespace, the network can query this distributed state to find the nearest source and route the SUBSCRIBE request accordingly. This architecture builds upon the technology we developed for Cloudflare’s real-time services and provides a solution to the challenge of state management at a global scale.

An Evolving Specification

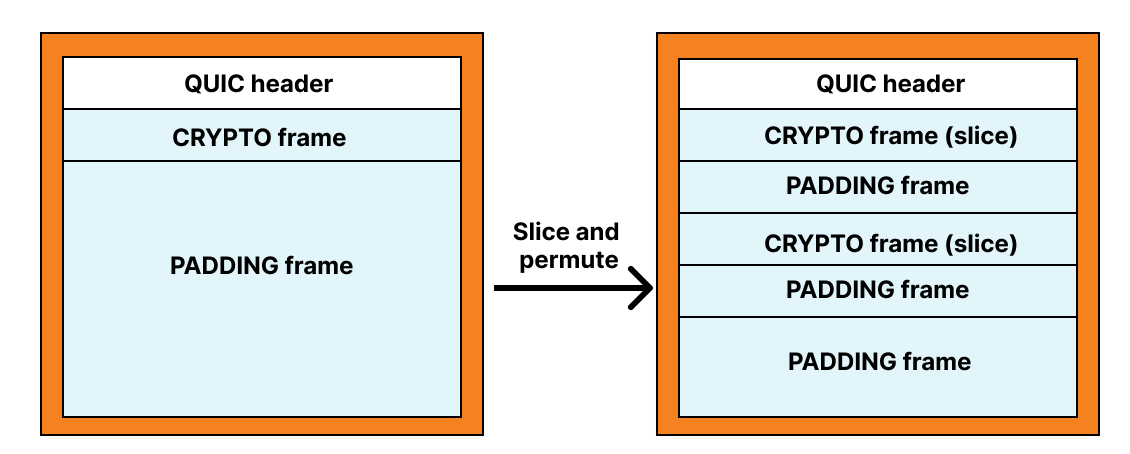
Building on a new protocol in the open means implementing against a moving target. To get MoQ into the hands of the community, we made a deliberate trade-off: our current relay implementation is based on a subset of the features defined in draft-ietf-moq-transport-07. This version became a de facto target for interoperability among several open-source projects and pausing there allowed us to put effort towards other aspects of deploying our relay network.

This draft of the protocol makes a distinction between accessing “past” and “future” content. SUBSCRIBE is used to receive future objects for a track as they arrive—like tuning into a live broadcast to get everything from that moment forward. In contrast, FETCH provides a mechanism for accessing past content that a relay may already have in its cache—like asking for a recording of a song that just played.

Both are part of the same specification, but for the most pressing low-latency use cases, a performant implementation of SUBSCRIBE is what matters most. For that reason, we have focused our initial efforts there and have not yet implemented FETCH.

This is where our roadmap is flexible and where the community can have a direct impact. Do you need FETCH to build on-demand or catch-up functionality? Or is more complete support for the prioritization features within SUBSCRIBE more critical for your use case? The feedback we receive from early developers will help us decide what to build next.

As always, we will announce our updates and changes to our implementation as we continue with development on our developer docs pages.

Kick the tires on the future

We believe in building in the open and interoperability in the community. MoQ is not a Cloudflare technology but a foundational Internet technology. To that end, the first demo client we’re presenting is an open source, community example.

You can access the demo here: https://moq.dev/publish/

Even though this is a preview release, we are running MoQ relays at Cloudflare’s full scale, like we do every production service. This means every server that is part of the Cloudflare network in more than 330 cities is now a MoQ relay.

We invite you to experience the “wow” moment of near-instant, sub-second streaming latency that MoQ enables. How would you use a protocol that offers the speed of a video call with the scale of a global broadcast?

Interoperability

We’ve been working with others in the IETF WG community and beyond on interoperability of publishers, players and other parts of the MoQ ecosystem. So far, we’ve tested with:

The Road Ahead

The Internet’s media stack is being refactored. For two decades, we’ve been forced to choose between latency, scale, and complexity. The compromises we made solved some problems, but also led to a fragmented ecosystem.

MoQ represents a promising new foundation—a chance to unify the silos and build the next generation of real-time applications on a scalable protocol. We’re committed to helping build this foundation in the open, and we’re just getting started.

MoQ is a realistic way forward, built on QUIC for future proofing, easier to understand than WebRTC, compatible with browsers unlike RTMP.

The protocol is evolving, the implementations are maturing, and the community is growing. Whether you’re building the next generation of live streaming, exploring real-time collaboration, or pushing the boundaries of interactive media, consider whether MoQ may provide the foundation you need.

Availability and pricing

We want developers to start building with MoQ today. To make that possible MoQ at Cloudflare is in tech preview – this means it’s available free of charge for testing (at any scale). Visit our developer homepage for updates and potential breaking changes.

Indie developers and large enterprises alike ask about pricing early in their adoption of new technologies. We will be transparent and clear about MoQ pricing. In general availability, self-serve customers should expect to pay 5 cents/GB outbound with no cost for traffic sent towards Cloudflare. 

Enterprise customers can expect usual pricing in line with regular media delivery pricing, competitive with incumbent protocols. This means if you’re already using Cloudflare for media delivery, you should not be wary of adopting new technologies because of cost. We will support you.

If you’re interested in partnering with Cloudflare in adopting the protocol early or contributing to its development, please reach out to us at [email protected]! Engineers excited about the future of the Internet are standing by.

Get involved:

New URLPattern API brings improved pattern matching to Node.js and Cloudflare Workers

Post Syndicated from Yagiz Nizipli original https://blog.cloudflare.com/improving-web-standards-urlpattern/

Today, we are excited to announce that we have contributed an implementation of the URLPattern API to Node.js, and it is available starting with the v23.8.0 update. We’ve done this by adding our URLPattern implementation to Ada URL, the high-performance URL parser that now powers URL handling in both Node.js and Cloudflare Workers. This marks an important step toward bringing this API to the broader JavaScript ecosystem.

Cloudflare Workers has, from the beginning, embraced a standards-based JavaScript programming model, and Cloudflare was one of the founding companies for what has evolved into ECMA’s 55th Technical Committee, focusing on interoperability between Web-interoperable runtimes like Workers, Node.js, Deno, and others. This contribution highlights and marks our commitment to this ongoing philosophy. Ensuring that all the JavaScript runtimes work consistently and offer at least a minimally consistent set of features is critical to ensuring the ongoing health of the ecosystem as a whole.

URLPattern API contribution is just one example of Cloudflare’s ongoing commitment to the open-source ecosystem. We actively contribute to numerous open-source projects including Node.js, V8, and Ada URL, while also maintaining our own open-source initiatives like workerd and wrangler. By upstreaming improvements to foundational technologies that power the web, we strengthen the entire developer ecosystem while ensuring consistent features across JavaScript runtimes. This collaborative approach reflects our belief that open standards and shared implementations benefit everyone – reducing fragmentation, improving developer experience and creating a better Internet. 

What is URLPattern?

URLPattern is a standard published by the WHATWG (Web Hypertext Application Technology Working Group) which provides a pattern-matching system for URLs. This specification is available at urlpattern.spec.whatwg.org. The API provides developers with an easy-to-use, regular expression (regex)-based approach to handling route matching, with built-in support for named parameters, wildcards, and more complex pattern matching that works uniformly across all URL components.

URLPattern is part of the WinterTC Minimum Common API, a soon-to-be standardized subset of web platform APIs designed to ensure interoperability across JavaScript runtimes, particularly for server-side and non-browser environments, and includes other APIs such as URL and URLSearchParams.

Cloudflare Workers has supported URLPattern for a number of years now, reflecting our commitment to enabling developers to use standard APIs across both browsers and server-side JavaScript runtimes. Contributing to Node.js and unifying the URLPattern implementation simplifies the ecosystem by reducing fragmentation, while at the same time improving our own implementation in Cloudflare Workers by making it faster and more specification compliant.

The following example demonstrates how URLPattern is used by creating a pattern that matches URLs with a “/blog/:year/:month/:slug” path structure, then tests if one specific URL string matches this pattern, and extracts the named parameters from a second URL using the exec method.

const pattern = new URLPattern({
  pathname: '/blog/:year/:month/:slug'
});

if (pattern.test('https://example.com/blog/2025/03/urlpattern-launch')) {
  console.log('Match found!');
}

const result = pattern.exec('https://example.com/blog/2025/03/urlpattern-launch');
console.log(result.pathname.groups.year); // "2025"
console.log(result.pathname.groups.month); // "03"
console.log(result.pathname.groups.slug); // "urlpattern-launch"

The URLPattern constructor accepts pattern strings or objects defining patterns for individual URL components. The test() method returns a boolean indicating if a URL simply matches the pattern. The exec() method provides detailed match results including captured groups. Behind this simple API, there’s sophisticated machinery working behind the scenes:

  1. When a URLPattern is used, it internally breaks down a URL, matching it against eight distinct components: protocol, username, password, hostname, port, pathname, search, and hash. This component-based approach gives the developer control over which parts of a URL to match.

  2. Upon creation of the instance, URLPattern parses your input patterns for each component and compiles them internally into eight specialized regular expressions (one for each component type). This compilation step happens just once when you create an URLPattern object, optimizing subsequent matching operations.

  3. During a match operation (whether using test() or exec()), these regular expressions are used to determine if the input matches the given properties. The test() method tells you if there’s a match, while exec() provides detailed information about what was matched, including any named capture groups from your pattern.

Fixing things along the way

While implementing URLPattern, we discovered some inconsistencies between the specification and the web-platform tests, a cross-browser test suite maintained by all major browsers to test conformance to web standard specifications. For instance, we found that URLs with non-special protocols (opaque-paths) and URLs with invalid characters in hostnames were not correctly defined and processed within the URLPattern specification. We worked actively with the Chromium and the Safari teams to address these issues.

URLPatterns constructed from hostname components that contain newline or tab characters were expected to fail in the corresponding web-platform tests. This was due to an inconsistency with the original URLPattern implementation and the URLPattern specification.

const pattern = new URL({ "hostname": "bad\nhostname" });
const matched = pattern.test({ "hostname": "badhostname" });
// This now returns true.

We opened several issues to document these inconsistencies and followed up with a pull-request to fix the specification, ensuring that all implementations will eventually converge on the same corrected behavior. This also resulted in fixing several inconsistencies in web-platform tests, particularly around handling certain types of white space (such as newline or tab characters) in hostnames. 

Getting started with URLPattern

If you’re interested in using URLPattern today, you can:

  • Use it natively in modern browsers by accessing the global URLPattern class

  • Try it in Cloudflare Workers (which has had URLPattern support for some time, now with improved spec compliance and performance)

  • Try it in Node.js, starting from v23.8.0

  • Try it in NativeScript on iOS and Android, starting from v8.9.0

  • Try it in Deno

Here is a more complex example showing how URLPattern can be used for routing in a Cloudflare Worker — a common use case when building API endpoints or web applications that need to handle different URL paths efficiently and differently. The following example shows a pattern for REST APIs that matches both “/users” and “/users/:userId”

const routes = [
  new URLPattern({ pathname: '/users{/:userId}?' }),
];

export default {
  async fetch(request, env, ctx): Promise<Response> {
    const url = new URL(request.url);
    for (const route of routes) {
      const match = route.exec(url);
      if (match) {
        const { userId } = match.pathname.groups;
        if (userId) {
          return new Response(`User ID: ${userId}`);
        }
        return new Response('List of users');
      }
    }
    // No matching route found
    return new Response('Not Found', { status: 404 });
  },
} satisfies ExportedHandler<Env>;

What does the future hold?

The contribution of URLPattern to Ada URL and Node.js is just the beginning. We’re excited about the possibilities this opens up for developers across different JavaScript environments.

In the future, we expect to contribute additional improvements to URLPattern’s performance, enabling more use cases for web application routing. Additionally, efforts to standardize the URLPatternList proposal will help deliver faster matching capabilities for server-side runtimes. We’re excited about these developments and encourage you to try URLPattern in your projects today.

Try it and let us know what you think by creating an issue on the workerd repository. Your feedback is invaluable as we work to further enhance URLPattern.

We hope to do our part to build a unified Javascript ecosystem, and encourage others to do the same. This may mean looking for opportunities, such as we have with URLPattern, to share API implementations across backend runtimes. It could mean using or contributing to web-platform-tests if you are working on a server-side runtime or web-standard APIs, or it might mean joining WinterTC to help define web-interoperable standards for server-side JavaScript.

Enhance your website’s security with Cloudflare’s free security.txt generator

Post Syndicated from Alexandra Moraru original https://blog.cloudflare.com/security-txt


A story of security and simplicity

Meet Georgia, a diligent website administrator at a growing e-commerce company. Every day, Georgia juggles multiple tasks, from managing server uptime to ensuring customer data security. One morning, Georgia receives an email from a security researcher who discovered a potential vulnerability on the website. The researcher struggled to find the right contact information, leading to delays in reporting the issue. Georgia realizes the need for a standardized way to communicate with security researchers, ensuring that vulnerabilities are reported swiftly and efficiently. This is where security.txt comes in.

Why security.txt matters

Security.txt is becoming a widely adopted standard among security-conscious organizations. By providing a common location and format for vulnerability disclosure information, it helps bridge the gap between security researchers and organizations. This initiative is supported by major companies and aligns with global security best practices. By offering an automated security.txt generator for free, we aim to empower all of our users to enhance their security measures without additional costs.

In 2020, Cloudflare published the Cloudflare Worker for the security.txt generator as an open-source project on GitHub, demonstrating our commitment to enhancing web security. This tool is actively used by Cloudflare to streamline vulnerability disclosure processes. However, over the past few years, we’ve observed a growing demand from our customers for an easier way to implement this standard. In response to this demand and to further support the adoption of security.txt across the Internet, we integrated it directly into our dashboard, making it simple for all our users to enhance their security practices. You can learn more about the initial release and its impact in our previous blog post here

Who can use the free Cloudflare security.txt generator

This feature is designed for any Cloudflare user who manages a website, from small business owners to large enterprises, from developers to security professionals. Whether you’re a seasoned security expert or new to website management, this tool provides an easy way to create and manage your security.txt file in your Cloudflare account, ensuring that you’re prepared to handle vulnerability reports effectively.

Technical insights: leveraging Cloudflare’s tools

Our security.txt generator is seamlessly integrated into our dashboard. Here’s how it works:


When the user enters their data in the Cloudflare Dashboard, the information is immediately stored in a highly available and geo-redundant PostgreSQL database. This ensures that all user data is securely kept and can be accessed quickly from any location within our global network.

Instead of creating a static file at the point of data entry, we use a dynamic approach. When a request for the security.txt file is made via the standard .well-known path specified by RFC 9116, our system dynamically constructs the file using the latest data from our database. This method ensures that any updates made by users are reflected in real-time without requiring manual intervention or file regeneration. The data entered by users is synchronized across Cloudflare’s global network using our Quicksilver technology. This allows for rapid propagation of changes, ensuring that any updates to the security.txt file are available almost instantaneously across all servers.

Each security.txt file includes an expiration timestamp, which is set during the initial configuration. This timestamp helps alert users when their information may be outdated, encouraging them to review and update their details regularly. For example, if a user sets an expiration date 365 days into the future, they will receive notifications as this date approaches, prompting them to refresh their information.

To ensure compliance with best practices, we also support optional fields such as encryption keys and signatures within the security.txt file. Users can link to their PGP keys for secure communications or include signatures to verify authenticity, enhancing trust with security researchers.

Users who prefer automation can manage their security.txt files through our API, allowing seamless integration with existing workflows and tools. This feature enables developers to programmatically update their security.txt configurations without manual dashboard interactions.

Users can also find a view of any missing security.txt files via Security Insights under Security Center.

Available now, and free for all Cloudflare users

By making this feature available to all our users at no cost, we aim to support the security efforts of our entire community, helping you protect your digital assets and foster trust with your audience.

With the introduction of our free security.txt generator, we’re taking a significant step towards simplifying security management for everyone. Whether you’re a small business owner or a large enterprise, this tool empowers you to adopt industry best practices and ensure that you’re ready to handle vulnerability reports effectively. Set up security.txt on your websites today!

You can now use WebGPU in Cloudflare Workers

Post Syndicated from André Cruz original http://blog.cloudflare.com/webgpu-in-workers/

You can now use WebGPU in Cloudflare Workers

You can now use WebGPU in Cloudflare Workers

The browser as an app platform is real and stronger every day; long gone are the Browser Wars. Vendors and standard bodies have done amazingly well over the last years, working together and advancing web standards with new APIs that allow developers to build fast and powerful applications, finally comparable to those we got used to seeing in the native OS' environment.

Today, browsers can render web pages and run code that interfaces with an extensive catalog of modern Web APIs. Things like networking, rendering accelerated graphics, or even accessing low-level hardware features like USB devices are all now possible within the browser sandbox.

One of the most exciting new browser APIs that browser vendors have been rolling out over the last months is WebGPU, a modern, low-level GPU programming interface designed for high-performance 2D and 3D graphics and general purpose GPU compute.

Today, we are introducing WebGPU support to Cloudflare Workers. This blog will explain why it's important, why we did it, how you can use it, and what comes next.

The history of the GPU in the browser

To understand why WebGPU is a big deal, we must revisit history and see how browsers went from relying only on the CPU for everything in the early days to taking advantage of GPUs over the years.

In 2011, WebGL 1, a limited port of OpenGL ES 2.0, was introduced, providing an API for fast, accelerated 3D graphics in the browser for the first time. By then, this was somewhat of a revolution in enabling gaming and 3D visualizations in the browser. Some of the most popular 3D animation frameworks, like Three.js, launched in the same period. Who doesn't remember going to the (now defunct) Google Chrome Experiments page and spending hours in awe exploring the demos? Another option then was using the Flash Player, which was still dominant in the desktop environment, and their Stage 3D API.

Later, in 2017, based on the learnings and shortcomings of its predecessor, WebGL 2 was a significant upgrade and brought more advanced GPU capabilities like compute shaders and more flexible textures and rendering.

WebGL, however, has proved to be a steep and complex learning curve for developers who want to take control of things, do low-level 3D graphics using the GPU, and not use 3rd party abstraction libraries.

Furthermore and more importantly, with the advent of machine learning and cryptography, we discovered that GPUs are great not only at drawing graphics but can be used for other applications that can take advantage of things like high-speed data or blazing-fast matrix multiplications, and one can use them to perform general computation. This became known as GPGPU, short for general-purpose computing on graphics processing units.

With this in mind, in the native desktop and mobile operating system worlds, developers started using more advanced frameworks like CUDA, Metal, DirectX 12, or Vulkan. WegGL stayed behind. To fill this void and bring the browser up to date, in 2017, companies like Google, Apple, Intel, Microsoft, Kronos, and Mozilla created the GPU for Web Community Working Group to collaboratively design the successor of WebGL and create the next modern 3D graphics and computation capabilities APIs for the Web.

What is WebGPU

WebGPU was developed with the following advantages in mind:

  • Lower Level Access – WebGPU provides lower-level, direct access to the GPU vs. the high-level abstractions in WebGL. This enables more control over GPU resources.
  • Multi-Threading – WebGPU can leverage multi-threaded rendering and compute, allowing improved CPU/GPU parallelism compared to WebGL, which relies on a single thread.
  • Compute Shaders – First-class support for general-purpose compute shaders for GPGPU tasks, not just graphics. WebGL compute is limited.
  • Safety – WebGPU ensures memory and GPU access safety, avoiding common WebGL pitfalls.
  • Portability – WGSL shader language targets cross-API portability across GPU vendors vs. GLSL in WebGL.
  • Reduced Driver Overhead – The lower level Vulkan/Metal/D3D12 basis improves overhead vs. OpenGL drivers in WebGL.
  • Pipeline State Objects – Predefined pipeline configs avoid per-draw driver overhead in WebGL.
  • Memory Management – Finer-grained buffer and resource management vs. WebGL.

The “too long didn't read” version is that WebGPU provides lower-level control over the GPU hardware with reduced overhead. It's safer, has multi-threading, is focused on compute, not just graphics, and has portability advantages compared to WebGL.

If these aren't reasons enough to get excited, developers are also looking at WebGPU as an option for native platforms, not just the Web. For instance, you can use this C API that mimics the JavaScript specification. If you think about this and the power of WebAssembly, you can effectively have a truly platform-agnostic GPU hardware layer that you can use to develop platforms for any operating system or browser.

More than just graphics

As explained above, besides being a graphics API, WebGPU makes it possible to perform tasks such as:

  • Machine Learning – Implement ML applications like neural networks and computer vision algorithms using WebGPU compute shaders and matrices.
  • Scientific Computing – Perform complex scientific computation like physics simulations and mathematical modeling using the GPU.
  • High Performance Computing – Unlock breakthrough performance for parallel workloads by connecting WebGPU to languages like Rust, C/C++ via WebAssembly.

WGSL, the shader language for WebGPU, is what enables the general-purpose compute feature. Shaders, or more precisely, compute shaders, have no user-defined inputs or outputs and are used for computing arbitrary information. Here are some examples of simple WebGPU compute shaders if you want to learn more.

WebGPU in Workers

We've been watching WebGPU since the API was published. Its general-purpose compute features perfectly fit our Workers' ecosystem and capabilities and align well with our vision of providing our customers multiple compute and hardware options and bringing GPU workloads to our global network, close to clients.

Cloudflare also has a track record of pioneering support for emerging web standards on our network and services, accelerating their adoption for our customers. Examples of these are Web Crypto API, HTTP/2, HTTP/3, TLS 1.3, or Early hints, but there are more.

Bringing WebGPU to Workers was both natural and timely. Today, we are announcing that we have released a version of workerd, the open-sourced JavaScript / Wasm runtime that powers Cloudflare Workers, with WebGPU support, that you can start playing and developing applications with, locally.

Starting today anyone can run this on their personal computer and experiment with WebGPU-enabled workers. Implementing local development first allows us to put this API in the hands of our customers and developers earlier and get feedback that will guide the development of this feature for production use.

But before we dig into code examples, let's explain how we built it.

How we built WebGPU on top of Workers

You can now use WebGPU in Cloudflare Workers

To implement the WebGPU API, we took advantage of Dawn, an open-source library backed by Google, the same used in Chromium and Chrome, that provides applications with an implementation of the WebGPU standard. It also provides the webgpu.h headers file, the de facto reference for all the other implementations of the standard.

Dawn can interoperate with Linux, MacOS, and Windows GPUs by interfacing with each platform's native GPU frameworks. For example, when an application makes a WebGPU draw call, Dawn will convert that draw command into the equivalent Vulkan, Metal, or Direct3D 12 API call, depending on the platform.

From an application standpoint, Dawn handles the interactions with the underlying native graphics APIs that communicate directly with the GPU drivers. Dawn essentially acts as a middle layer that translates the WebGPU API calls into calls for the platform's native graphics API.

Cloudflare workerd is the underlying open-source runtime engine that executes Workers code. It shares most of its code with the same runtime that powers Cloudflare Workers' production environment but with some changes designed to make it more portable to other environments. We then have release cycles that aim to synchronize both codebases; more on later. Workerd is also used with wrangler, our command-line tool for building and interacting with Cloudflare Workers, to support local development.

The WebGPU code that interfaces with the Dawn library can be found here, and can easily be enabled with a flag, checked here.

jsg::Ref<api::gpu::GPU> Navigator::getGPU(CompatibilityFlags::Reader flags) {
  // is this a durable object?
  KJ_IF_MAYBE (actor, IoContext::current().getActor()) {
    JSG_REQUIRE(actor->getPersistent() != nullptr, TypeError,
                "webgpu api is only available in Durable Objects (no storage)");
  } else {
    JSG_FAIL_REQUIRE(TypeError, "webgpu api is only available in Durable Objects");
  };

  JSG_REQUIRE(flags.getWebgpu(), TypeError, "webgpu needs the webgpu compatibility flag set");

  return jsg::alloc<api::gpu::GPU>();
}

The WebGPU API can only be accessed using Durable Objects, which are essentially global singleton instances of Cloudflare Workers. There are two important reasons for this:

  • WebGPU code typically wants to store the state between requests, for example, loading an AI model into the GPU memory once and using it multiple times for inference.
  • Not all Cloudflare servers have GPUs yet, so although the worker that receives the request is typically the closest one available, the Durable Object that uses WebGPU will be instantiated where there are GPU resources available, which may not be on the same machine.

Using Durable Objects instead of regular Workers allow us to address both of these issues.

The WebGPU Hello World in Workers

Wrangler uses Miniflare 3, a fully-local simulator for Workers, which in turn is powered by workerd. This means you can start experimenting and doing WebGPU code locally on your machine right now before we prepare things in our production environment.

Let’s get coding then.

Since Workers doesn't render graphics yet, we started with implementing the general-purpose GPU (GPGPU) APIs in the WebGPU specification. In other words, we fully support the part of the API that the compute shaders and the compute pipeline require, but we are not yet focused on fragment or vertex shaders used in rendering pipelines.

Here’s a typical “hello world” in WebGPU. This Durable Object script will output the name of the GPU device that workerd found in your machine to your console.

const adapter = await navigator.gpu.requestAdapter();
const adapterInfo = await adapter.requestAdapterInfo(["device"]);
console.log(adapterInfo.device);

A more interesting example, though, is a simple compute shader. In this case, we will fill a results buffer with an incrementing value taken from the iteration number via global_invocation_id.

For this, we need two buffers, one to store the results of the computations as they happen (storageBuffer) and another to copy the results at the end (mappedBuffer).

We then dispatch four workgroups, meaning that the increments can happen in parallel. This parallelism and programmability are two key reasons why compute shaders and GPUs provide an advantage for things like machine learning inference workloads. Other advantages are:

  • Bandwidth – GPUs have a very high memory bandwidth, up to 10-20x more than CPUs. This allows fast reading and writing of all the model parameters and data needed for inference.
  • Floating-point performance – GPUs are optimized for high floating point operation throughput, which are used extensively in neural networks. They can deliver much higher TFLOPs than CPUs.

Let’s look at the code:

// Create device and command encoder
const adapter = await navigator.gpu.requestAdapter();
const device = await adapter.requestDevice();
const encoder = device.createCommandEncoder();

// Storage buffer
const storageBuffer = device.createBuffer({
  size: 4 * Float32Array.BYTES_PER_ELEMENT, // 4 float32 values
  usage: GPUBufferUsage.STORAGE | GPUBufferUsage.COPY_SRC,
});

// Mapped buffer
const mappedBuffer = device.createBuffer({
  size: 4 * Float32Array.BYTES_PER_ELEMENT,
  usage: GPUBufferUsage.MAP_READ | GPUBufferUsage.COPY_DST,
});

// Create shader that writes incrementing numbers to storage buffer
const computeShaderCode = `
    @group(0) @binding(0)
    var<storage, read_write> result : array<f32>;

    @compute @workgroup_size(1)
    fn main(@builtin(global_invocation_id) gid : vec3<u32>) {
      result[gid.x] = f32(gid.x);
    }
`;

// Create compute pipeline
const computePipeline = device.createComputePipeline({
  layout: "auto",
  compute: {
    module: device.createShaderModule({ code: computeShaderCode }),
    entryPoint: "main",
  },
});

// Bind group
const bindGroup = device.createBindGroup({
  layout: computePipeline.getBindGroupLayout(0),
  entries: [{ binding: 0, resource: { buffer: storageBuffer } }],
});

// Dispatch compute work
const computePass = encoder.beginComputePass();
computePass.setPipeline(computePipeline);
computePass.setBindGroup(0, bindGroup);
computePass.dispatchWorkgroups(4);
computePass.end();

// Copy from storage to mapped buffer
encoder.copyBufferToBuffer(
  storageBuffer,
  0,
  mappedBuffer,
  0,
  4 * Float32Array.BYTES_PER_ELEMENT //mappedBuffer.size
);

// Submit and read back result
const gpuBuffer = encoder.finish();
device.queue.submit([gpuBuffer]);

await mappedBuffer.mapAsync(GPUMapMode.READ);
console.log(new Float32Array(mappedBuffer.getMappedRange()));
// [0, 1, 2, 3]

Now that we covered the basics of WebGPU and compute shaders, let's move to something more demanding. What if we could perform machine learning inference using Workers and GPUs?

ONNX WebGPU demo

The ONNX runtime is a popular open-source cross-platform, high performance machine learning inferencing accelerator. Wonnx is a GPU-accelerated version of the same engine, written in Rust, that can be compiled to WebAssembly and take advantage of WebGPU in the browser. We are going to run it in Workers using a combination of workers-rs, our Rust bindings for Cloudflare Workers, and the workerd WebGPU APIs.

For this demo, we are using SqueezeNet. This small image classification model can run under lower resources but still achieves similar levels of accuracy on the ImageNet image classification validation dataset as larger models like AlexNet.

In essence, our worker will receive any uploaded image and attempt to classify it according to the 1000 ImageNet classes. Once ONNX runs the machine learning model using the GPU, it will return the list of classes with the highest probability scores. Let’s go step by step.

First we load the model from R2 into the GPU memory the first time the Durable Object is called:

#[durable_object]
pub struct Classifier {
    env: Env,
    session: Option<wonnx::Session>,
}

impl Classifier {
    async fn ensure_session(&mut self) -> Result<()> {
        match self.session {
            Some(_) => worker::console_log!("DO already has a session"),
            None => {
                // No session, so this should be the first request. In this case
                // we will fetch the model from R2, build a wonnx session, and
                // store it for subsequent requests.
                let model_bytes = fetch_model(&self.env).await?;
                let session = wonnx::Session::from_bytes(&model_bytes)
                    .await
                    .map_err(|err| err.to_string())?;
                worker::console_log!("session created in DO");
                self.session = Some(session);
            }
        };
        Ok(())
    }
}

This is only required once, when the Durable Object is instantiated. For subsequent requests, we retrieve the model input tensor, call the existing session for the inference, and return to the calling worker the result tensor converted to JSON:

        let request_data: ArrayBase<OwnedRepr<f32>, Dim<[usize; 4]>> =
            serde_json::from_str(&req.text().await?)?;
        let mut input_data = HashMap::new();
        input_data.insert("data".to_string(), request_data.as_slice().unwrap().into());

        let result = self
            .session
            .as_ref()
            .unwrap() // we know the session exists
            .run(&input_data)
            .await
            .map_err(|err| err.to_string())?;
...
        let probabilities: Vec<f32> = result
            .into_iter()
            .next()
            .ok_or("did not obtain a result tensor from session")?
            .1
            .try_into()
            .map_err(|err: TensorConversionError| err.to_string())?;

        let do_response = serde_json::to_string(&probabilities)?;
        Response::ok(do_response)

On the Worker script itself, we load the uploaded image and pre-process it into a model input tensor:

    let image_file: worker::File = match req.form_data().await?.get("file") {
        Some(FormEntry::File(buf)) => buf,
        Some(_) => return Response::error("`file` part of POST form must be a file", 400),
        None => return Response::error("missing `file`", 400),
    };
    let image_content = image_file.bytes().await?;
    let image = load_image(&image_content)?;

Finally, we call the GPU Durable Object, which runs the model and returns the most likely classes of our image:

    let probabilities = execute_gpu_do(image, stub).await?;
    let mut probabilities = probabilities.iter().enumerate().collect::<Vec<_>>();
    probabilities.sort_unstable_by(|a, b| b.1.partial_cmp(a.1).unwrap());
    Response::ok(LABELS[probabilities[0].0])

We packaged this demo in a public repository, so you can also run it. Make sure that you have a Rust compiler, Node.js, Git and curl installed, then clone the repository:

git clone https://github.com/cloudflare/workers-wonnx.git
cd workers-wonnx

Upload the model to the local R2 simulator:

npx wrangler@latest r2 object put model-bucket-dev/opt-squeeze.onnx --local --file models/opt-squeeze.onnx

And then run the Worker locally:

npx wrangler@latest dev

With the Worker running and waiting for requests you can then open another terminal window and upload one of the image examples in the same repository using curl:

> curl -F "file=@images/pelican.jpeg" http://localhost:8787
n02051845 pelican

If everything goes according to plan the result of the curl command will be the most likely class of the image.

Next steps and final words

Over the upcoming weeks, we will merge the workerd WebGPU code in the Cloudflare Workers production environment and make it available globally, on top of our growing GPU nodes fleet. We didn't do it earlier because that environment is subject to strict security and isolation requirements. For example, we can't break the security model of our process sandbox and have V8 talking to the GPU hardware directly, that would be a problem; we must create a configuration where another process is closer to the GPU and use IPC (inter-process communication) to talk to it. Other things like managing resource allocation and billing are being sorted out.

For now, we wanted to get the good news out that we will support WebGPU in Cloudflare Workers and ensure that you can start playing and coding with it today and learn from it. WebGPU and general-purpose computing on GPUs is still in its early days. We presented a machine-learning demo, but we can imagine other applications taking advantage of this new feature, and we hope you can show us some of them.

As usual, you can talk to us on our Developers Discord or the Community forum; the team will be listening. We are eager to hear from you and learn about what you're building.

Privacy Gateway: a privacy preserving proxy built on Internet standards

Post Syndicated from Mari Galicer original https://blog.cloudflare.com/building-privacy-into-internet-standards-and-how-to-make-your-app-more-private-today/

Privacy Gateway: a privacy preserving proxy built on Internet standards

Privacy Gateway: a privacy preserving proxy built on Internet standards

If you’re running a privacy-oriented application or service on the Internet, your options to provably protect users’ privacy are limited. You can minimize logs and data collection but even then, at a network level, every HTTP request needs to come from somewhere. Information generated by HTTP requests, like users’ IP addresses and TLS fingerprints, can be sensitive especially when combined with application data.

Meaningful improvements to your users’ privacy require a change in how HTTP requests are sent from client devices to the server that runs your application logic. This was the motivation for Privacy Gateway: a service that relays encrypted HTTP requests and responses between a client and application server. With Privacy Gateway, Cloudflare knows where the request is coming from, but not what it contains, and applications can see what the request contains, but not where it comes from. Neither Cloudflare nor the application server has the full picture, improving end-user privacy.

We recently deployed Privacy Gateway for Flo Health, a period tracking app, for the launch of their Anonymous Mode. With Privacy Gateway in place, all request data for Anonymous Mode users is encrypted between the app user and Flo, which prevents Flo from seeing the IP addresses of those users and Cloudflare from seeing the contents of that request data.

With Privacy Gateway in place, several other privacy-critical applications are possible:

  • Browser developers can collect user telemetry in a privacy-respecting manner– what extensions are installed, what defaults a user might have changed — while removing what is still a potentially personal identifier (the IP address) from that data.
  • Users can visit a healthcare site to report a Covid-19 exposure without worrying that the site is tracking their IP address and/or location.
  • DNS resolvers can serve DNS queries without linking who made the request with what website they’re visiting – a pattern we’ve implemented with Oblivious DNS.
    Privacy Gateway is based on Oblivious HTTP (OHTTP), an emerging IETF standard and is built upon standard hybrid public-key cryptography.

How does it work?

The main innovation in the Oblivious HTTP standard – beyond a basic proxy service – is that these messages are encrypted to the application’s server, such that Privacy Gateway learns nothing of the application data beyond the source and destination of each message.

Privacy Gateway enables application developers and platforms, especially those with strong privacy requirements, to build something that closely resembles a “Mixnet”: an approach to obfuscating the source and destination of a message across a network. To that end, Privacy Gateway consists of three main components:

  1. Client: the user’s device, or any client that’s configured to forward requests to Privacy Gateway.
  2. Privacy Gateway: a service operated by Cloudflare and designed to relay requests between the Client and the Gateway, without being able to observe the contents within.
  3. Application server: the origin or application web server responsible for decrypting requests from clients, and encrypting responses back.

If you were to imagine request data as the contents of the envelope (a letter) and the IP address and request metadata as the address on the outside, with Privacy Gateway, Cloudflare is able to see the envelope’s address and safely forward it to its destination without being able to see what’s inside.

Privacy Gateway: a privacy preserving proxy built on Internet standards
An Oblivious HTTP transaction using Privacy Gateway

In slightly more detail, the data flow is as follows:

  1. Client encapsulates an HTTP request using the public key of the application server, and sends it to Privacy Gateway over an HTTPS connection.
  2. Privacy Gateway forwards the request to the server over its own, separate HTTPS connection with the application server.
  3. The application server  decapsulates the request, forwarding it to the target server which can produce the response.
  4. The application server returns an encapsulated response to Privacy Gateway, which then forwards the result to the client.
    As specified in the protocol, requests from the client to the server are encrypted using HPKE, a state-of-the-art standard for public key encryption – which you can read more about here. We’ve taken additional measures to ensure that OHTTP’s use of HPKE is secure by conducting a formal analysis of the protocol, and we expect to publish a deeper analysis in the coming weeks.

How Privacy Gateway improves end-user privacy

This interaction offers two types of privacy, which we informally refer to as request privacy and client privacy.

Request privacy means that the application server does not learn information that would otherwise be revealed by an HTTP request, such as IP address, geolocation, TLS and HTTPS fingerprints, and so on. Because Privacy Gateway uses a separate HTTPS connection between itself and the application server, all of this per-request information revealed to the application server represents that of Privacy Gateway, not of the client. However, developers need to take care to not send personally identifying information in the contents of requests. If the request, once decapsulated, includes information like users’ email, phone number, or credit card info, for example, Privacy Gateway will not meaningfully improve privacy.

Client privacy is a stronger notion. Because Cloudflare and the application server are not colluding to share individual user’s data, from the server’s perspective, each individual transaction came from some unknown client behind Privacy Gateway. In other words, a properly configured Privacy Gateway deployment means that applications cannot link any two requests to the same client. In particular, with Privacy Gateway, privacy loves company. If there is only one end-user making use of Privacy Gateway, then it only provides request privacy (since the client IP address remains hidden from the Gateway). It would not provide client privacy, since the server would know that each request corresponds to the same, single client. Client privacy requires that there be many users of the system, so the application server cannot make this determination.

To better understand request and client privacy, consider the following HTTP request between a client and server:

Privacy Gateway: a privacy preserving proxy built on Internet standards
Normal HTTP configuration with a client anonymity set of size 1

If a client connects directly to the server (or “Gateway” in OHTTP terms), the server is likely to see information about the client, including the IP address, TLS cipher used, and a degree of location data based on that IP address:

- ipAddress: 192.0.2.33 # the client’s real IP address
- ASN: 7922
- AS Organization: Comcast Cable
- tlsCipher: AEAD-CHACHA20-POLY1305-SHA256 # potentially unique
- tlsVersion: TLSv1.3
- Country: US
- Region: California
- City: Campbell

There’s plenty of sensitive information here that might be unique to the end-user. In other words, the connection offers neither request nor client privacy.

With Privacy Gateway, clients do not connect directly to the application server itself. Instead, they connect to Privacy Gateway, which in turn connects to the server. This means that the server only observes connections from Privacy Gateway, not individual connections from clients, yielding a different view:

- ipAddress: 104.16.5.5 # a Cloudflare IP
- ASN: 13335
- AS Organization: Cloudflare
- tlsCipher: ECDHE-ECDSA-AES128-GCM-SHA256 # shared across several clients
- tlsVersion: TLSv1.3
- Country: US
- Region: California
- City: Los Angeles

Privacy Gateway: a privacy preserving proxy built on Internet standards
Privacy Gateway configuration with a client anonymity set of size k

This is request privacy. All information about the client’s location and identity are hidden from the application server. And all details about the application data are hidden from Privacy Gateway. For sensitive applications and protocols like DNS, keeping this metadata separate from the application data is an important step towards improving end-user privacy.

Moreover, applications should take care to not reveal sensitive, per-client information in their individual requests. Privacy Gateway cannot guarantee that applications do not send identifying info – such as email addresses, full names, etc – in request bodies, since it cannot observe plaintext application data. Applications which reveal user identifying information in requests may violate client privacy, but not request privacy. This is why – unlike our full application-level Privacy Proxy product – Privacy Gateway is not meant to be used as a generic proxy-based protocol for arbitrary applications and traffic. It is meant to be a special purpose protocol for sensitive applications, including DNS (as is evidenced by Oblivious DNS-over-HTTPS), telemetry data, or generic API requests as discussed above.

Integrating Privacy Gateway into your application

Integrating with Privacy Gateway requires applications to implement the client and server side of the OHTTP protocol. Let’s walk through what this entails.

Server Integration

The server-side part of the protocol is responsible for two basic tasks:

  1. Publishing a public key for request encapsulation; and
  2. Decrypting encapsulated client requests, processing the resulting request, and encrypting the corresponding response.

A public encapsulation key, called a key configuration, consists of a key identifier (so the server can support multiple keys at once for rotation purposes), cryptographic algorithm identifiers for encryption and decryption, and a public key:

HPKE Symmetric Algorithms {
  HPKE KDF ID (16),
  HPKE AEAD ID (16),
}

OHTTP Key Config {
  Key Identifier (8),
  HPKE KEM ID (16),
  HPKE Public Key (Npk * 8),
  HPKE Symmetric Algorithms Length (16),
  HPKE Symmetric Algorithms (32..262140),
}

Clients need this public key to create their request, and there are lots of ways to do this. Servers could fix a public key and then bake it into their application, but this would require a software update to rotate the key. Alternatively, clients could discover the public key some other way. Many discovery mechanisms exist and vary based on your threat model – see this document for more details. To start, a simple approach is to have clients fetch the public key directly from the server over some API. Below is a snippet of the API that our open source OHTTP server provides:

func (s *GatewayResource) configHandler(w http.ResponseWriter, r *http.Request) {
	config, err := s.Gateway.Config(s.keyID)
	if err != nil {
		http.Error(w, http.StatusText(http.StatusInternalServerError), http.StatusInternalServerError)
		return
	}
	w.Write(config.Marshal())
}

Once public key generation and distribution is solved, the server then needs to handle encapsulated requests from clients. For each request, the server needs to decrypt the request, translate the plaintext to a corresponding HTTP request that can be resolved, and then encrypt the resulting response back to the client.

Open source OHTTP libraries typically offer functions for request decryption and response encryption, whereas plaintext translation from binary HTTP to an HTTP request is handled separately. For example, our open source server delegates this translation to a different library that is specific to how Go HTTP requests are represented in memory. In particular, the function to translate from a plaintext request to a Go HTTP request is done with a function that has the following signature:

func UnmarshalBinaryRequest(data []byte) (*http.Request, error) {
	...
}

Conversely, translating a Go HTTP response to a plaintext binary HTTP response message is done with a function that has the following signature:

type BinaryResponse http.Response

func (r *BinaryResponse) Marshal() ([]byte, error) {
	...
}

While there exist several open source libraries that one can use to implement OHTTP server support, we’ve packaged all of it up in our open source server implementation available here. It includes instructions for building, testing, and deploying to make it easy to get started.

Client integration

Naturally, the client-side behavior of OHTTP mirrors that of the server. In particular, the client must:

  1. Discover or obtain the server public key; and
  2. Encode and encrypt HTTP requests, send them to Privacy Gateway, and decrypt and decode the HTTP responses.

Discovery of the server public key depends on the server’s chosen deployment model. For example, if the public key is available over an API, clients can simply fetch it directly:

$ curl https://server.example/ohttp-configs > config.bin

Encoding, encrypting, decrypting, and decoding are again best handled by OHTTP libraries when available. With these functions available, building client support is rather straightforward. A trivial example Go client using the library functions linked above is as follows:

configEnc := ... // encoded public key
config, err := ohttp.UnmarshalPublicConfig(configEnc)
if err != nil {
	return err
}

request, err := http.NewRequest(http.MethodGet, "https://test.example/index.html", nil)
if err != nil {
	return err
}

binaryRequest := ohttp.BinaryRequest(*request)
encodedRequest, err := binaryRequest.Marshal()
if err != nil {
	return err
}

ohttpClient := ohttp.NewDefaultClient(config)
encapsulatedReq, reqContext, err := ohttpClient.EncapsulateRequest(encodedRequest)

relayRequest, err := http.NewRequest(http.MethodPost, "https://relay.example", bytes.NewReader(encapsulatedReq.Marshal()))
if err != nil {
	return err
}
relayRequest.Header.Set("Content-Type", "message/ohttp-req")

client := http.Client{}
relayResponse, err := client.Do(relayRequest)
if err != nil {
	return err
}
bodyBytes, err := ioutil.ReadAll(relayResponse.Body)
if err != nil {
	return err
}
encapsulatedResp, err := ohttp.UnmarshalEncapsulatedResponse(bodyBytes)
if err != nil {
	return err
}

receivedResp, err := reqContext.DecapsulateResponse(encapsulatedResp)
if err != nil {
	return err
}

response, err := ohttp.UnmarshalBinaryResponse(receivedResp)
if err != nil {
	return err
}

fmt.Println(response)

A standalone client like this isn’t likely very useful to you if you have an existing application. To help integration into your existing application, we created a sample OHTTP client library that’s compatible with iOS and macOS applications. Additionally, if there’s language or platform support you would like to see to help ease integration on either or the client or server side, please let us know!

Interested?

Privacy Gateway is currently in early access – available to select privacy-oriented companies and partners. If you’re interested, please get in touch.

HPKE: Standardizing public-key encryption (finally!)

Post Syndicated from Christopher Wood original https://blog.cloudflare.com/hybrid-public-key-encryption/

HPKE: Standardizing public-key encryption (finally!)

For the last three years, the Crypto Forum Research Group of the Internet Research Task Force (IRTF) has been working on specifying the next generation of (hybrid) public-key encryption (PKE) for Internet protocols and applications. The result is Hybrid Public Key Encryption (HPKE), published today as RFC 9180.

HPKE was made to be simple, reusable, and future-proof by building upon knowledge from prior PKE schemes and software implementations. It is already in use in a large assortment of emerging Internet standards, including TLS Encrypted Client Hello and Oblivious DNS-over-HTTPS, and has a large assortment of interoperable implementations, including one in CIRCL. This article provides an overview of this new standard, going back to discuss its motivation, design goals, and development process.

A primer on public-key encryption

Public-key cryptography is decades old, with its roots going back to the seminal work of Diffie and Hellman in 1976, entitled “New Directions in Cryptography.” Their proposal – today called Diffie-Hellman key exchange – was a breakthrough. It allowed one to transform small secrets into big secrets for cryptographic applications and protocols. For example, one can bootstrap a secure channel for exchanging messages with confidentiality and integrity using a key exchange protocol.

HPKE: Standardizing public-key encryption (finally!)
Unauthenticated Diffie-Hellman key exchange

In this example, Sender and Receiver exchange freshly generated public keys with each other, and then combine their own secret key with their peer’s public key. Algebraically, this yields the same value \(g^{xy} = (g^x)^y = (g^y)^x\). Both parties can then use this as a shared secret for performing other tasks, such as encrypting messages to and from one another.

The Transport Layer Security (TLS) protocol is one such application of this concept. Shortly after Diffie-Hellman was unveiled to the world, RSA came into the fold. The RSA cryptosystem is another public key algorithm that has been used to build digital signature schemes, PKE algorithms, and key transport protocols. A key transport protocol is similar to a key exchange algorithm in that the sender, Alice, generates a random symmetric key and then encrypts it under the receiver’s public key. Upon successful decryption, both parties then share this secret key. (This fundamental technique, known as static RSA, was used pervasively in the context of TLS. See this post for details about this old technique in TLS 1.2 and prior versions.)

At a high level, PKE between a sender and receiver is a protocol for encrypting messages under the receiver’s public key. One way to do this is via a so-called non-interactive key exchange protocol.

To illustrate how this might work, let \(g^y\) be the receiver’s public key, and let \(m\) be a message that one wants to send to this receiver. The flow looks like this:

  1. The sender generates a fresh private and public key pair, \((x, g^x)\).
  2. The sender computes \(g^{xy} = (g^y)^x\), which can be done without involvement from the receiver, that is, non-interactively.
  3. The sender then uses this shared secret to derive an encryption key, and uses this key to encrypt m.
  4. The sender packages up \(g^x\) and the encryption of \(m\), and sends both to the receiver.

The general paradigm here is called “hybrid public-key encryption” because it combines a non-interactive key exchange based on public-key cryptography for establishing a shared secret, and a symmetric encryption scheme for the actual encryption. To decrypt \(m\), the receiver computes the same shared secret \(g^{xy} = (g^x)^y\), derives the same encryption key, and then decrypts the ciphertext.

Conceptually, PKE of this form is quite simple. General designs of this form date back for many years and include the Diffie-Hellman Integrated Encryption System (DHIES) and ElGamal encryption. However, despite this apparent simplicity, there are numerous subtle design decisions one has to make in designing this type of protocol, including:

  • What type of key exchange protocol should be used for computing the shared secret? Should this protocol be based on modern elliptic curve groups like Curve25519? Should it support future post-quantum algorithms?
  • How should encryption keys be derived? Are there other keys that should be derived? How should additional application information be included in the encryption key derivation, if at all?
  • What type of encryption algorithm should be used? What types of messages should be encrypted?
  • How should sender and receiver encode and exchange public keys?

These and other questions are important for a protocol, since they are required for interoperability. That is, senders and receivers should be able to communicate without having to use the same source code.

There have been a number of efforts in the past to standardize PKE, most of which focus on elliptic curve cryptography. Some examples of past standards include: ANSI X9.63 (ECIES), IEEE 1363a, ISO/IEC 18033-2, and SECG SEC 1.

HPKE: Standardizing public-key encryption (finally!)
Timeline of related standards and software

A paper by Martinez et al. provides a thorough and technical comparison of these different standards. The key points are that all these existing schemes have shortcomings. They either rely on outdated or not-commonly-used primitives such as RIPEMD and CMAC-AES, lack accommodations for moving to modern primitives (e.g., AEAD algorithms), lack proofs of IND-CCA2 security, or, importantly, fail to provide test vectors and interoperable implementations.

The lack of a single standard for public-key encryption has led to inconsistent and often non-interoperable support across libraries. In particular, hybrid PKE implementation support is fractured across the community, ranging from the hugely popular and simple-to-use NaCl box and libsodium box seal implementations based on modern algorithm variants like X-SalsaPoly1305 for authenticated encryption, to BouncyCastle implementations based on “classical” algorithms like AES and elliptic curves.

Despite the lack of a single standard, this hasn’t stopped the adoption of ECIES instantiations for widespread and critical applications. For example, the Apple and Google Exposure Notification Privacy-preserving Analytics (ENPA) platform uses ECIES for public-key encryption.

When designing protocols and applications that need a simple, reusable, and agile abstraction for public-key encryption, existing standards are not fit for purpose. That’s where HPKE comes into play.

Construction and design goals

HPKE is a public-key encryption construction that is designed from the outset to be simple, reusable, and future-proof. It lets a sender encrypt arbitrary-length messages under a receiver’s public key, as shown below. You can try this out in the browser at Franziskus Kiefer’s blog post on HPKE!

HPKE: Standardizing public-key encryption (finally!)
HPKE overview

HPKE is built in stages. It starts with a Key Encapsulation Mechanism (KEM), which is similar to the key transport protocol described earlier and, in fact, can be constructed from the Diffie-Hellman key agreement protocol. A KEM has two algorithms: Encapsulation and Decapsulation, or Encap and Decap for short. The Encap algorithm creates a symmetric secret and wraps it for a public key such that only the holder of the corresponding private key can unwrap it. An attacker knowing this encapsulated key cannot recover even a single bit of the shared secret. Decap takes the encapsulated key and the private key associated with the public key, and computes the original shared secret. From this shared secret, HPKE computes a series of derived keys that are then used to encrypt and authenticate plaintext messages between sender and receiver.

This simple construction was driven by several high-level design goals and principles. We will discuss these goals and how they were met below.

Algorithm agility

Different applications, protocols, and deployments have different constraints, and locking any single use case into a specific (set of) algorithm(s) would be overly restrictive. For example, some applications may wish to use post-quantum algorithms when available, whereas others may wish to use different authenticated encryption algorithms for symmetric-key encryption. To accomplish this goal, HPKE is designed as a composition of a Key Encapsulation Mechanism (KEM), Key Derivation Function (KDF), and Authenticated Encryption Algorithm (AEAD). Any combination of the three algorithms yields a valid instantiation of HPKE, subject to certain security constraints about the choice of algorithm.

One important point worth noting here is that HPKE is not a protocol, and therefore does nothing to ensure that sender and receiver agree on the HPKE ciphersuite or shared context information. Applications and protocols that use HPKE are responsible for choosing or negotiating a specific HPKE ciphersuite that fits their purpose. This allows applications to be opinionated about their choice of algorithms to simplify implementation and analysis, as is common with protocols like WireGuard, or be flexible enough to support choice and agility, as is the approach taken with TLS.

Authentication modes

At a high level, public-key encryption ensures that only the holder of the private key can decrypt messages encrypted for the corresponding public key (being able to decrypt the message is an implicit authentication of the receiver.) However, there are other ways in which applications may wish to authenticate messages from sender to receiver. For example, if both parties have a pre-shared key, they may wish to ensure that both can demonstrate possession of this pre-shared key as well. It may also be desirable for senders to demonstrate knowledge of their own private key in order for recipients to decrypt the message (this functionally is similar to signing an encryption, but has some subtle and important differences).

To support these various use cases, HPKE admits different modes of authentication, allowing various combinations of pre-shared key and sender private key authentication. The additional private key contributes to the shared secret between the sender and receiver, and the pre-shared key contributes to the derivation of the application data encryption secrets. This process is referred to as the “key schedule”, and a simplified version of it is shown below.

HPKE: Standardizing public-key encryption (finally!)
Simplified HPKE key schedule

These modes come at a price, however: not all KEM algorithms will work with all authentication modes. For example, for most post-quantum KEM algorithms there isn’t a private key authentication variant known.

Reusability

The core of HPKE’s construction is its key schedule. It allows secrets produced and shared with KEMs and pre-shared keys to be mixed together to produce additional shared secrets between sender and receiver for performing authenticated encryption and decryption. HPKE allows applications to build on this key schedule without using the corresponding AEAD functionality, for example, by exporting a shared application-specific secret. Using HPKE in an “export-only” fashion allows applications to use other, non-standard AEAD algorithms for encryption, should that be desired. It also allows applications to use a KEM different from those specified in the standard, as is done in the proposed TLS AuthKEM draft.

Interface simplicity

HPKE hides the complexity of message encryption from callers. Encrypting a message with additional authenticated data from sender to receiver for their public key is as simple as the following two calls:

// Create an HPKE context to send messages to the receiver
encapsulatedKey, senderContext = SetupBaseS(receiverPublicKey, ”shared application info”)

// AEAD encrypt the message using the context
ciphertext = senderContext.Seal(aad, message)

In fact, many implementations are likely to offer a simplified “single-shot” interface that does context creation and message encryption with one function call.

Notice that this interface does not expose anything like nonce (“number used once”) or sequence numbers to the callers. The HPKE context manages nonce and sequence numbers internally, which means the application is responsible for message ordering and delivery. This was an important design decision done to hedge against key and nonce reuse, which can be catastrophic for security.

Consider what would be necessary if HPKE delegated nonce management to the application. The sending application using HPKE would need to communicate the nonce along with each ciphertext value for the receiver to successfully decrypt the message. If this nonce was ever reused, then security of the AEAD may fall apart. Thus, a sending application would necessarily need some way to ensure that nonces were never reused. Moreover, by sending the nonce to the receiver, the application is effectively implementing a message sequencer. The application could just as easily implement and use this sequencer to ensure in-order message delivery and processing. Thus, at the end of the day, exposing the nonce seemed both harmful and, ultimately, redundant.

Wire format

Another hallmark of HPKE is that all messages that do not contain application data are fixed length. This means that serializing and deserializing HPKE messages is trivial and there is no room for application choice. In contrast, some implementations of hybrid PKE deferred choice of wire format details, such as whether to use elliptic curve point compression, to applications. HPKE handles this under the KEM abstraction.

Development process

HPKE is the result of a three-year development cycle between industry practitioners, protocol designers, and academic cryptographers. In particular, HPKE built upon prior art relating to public-key encryption, iterated on a design and specification in a tight specification, implementation, experimentation, and analysis loop, with an ultimate goal towards real world use.

HPKE: Standardizing public-key encryption (finally!)
HPKE development process

This process isn’t new. TLS 1.3 and QUIC famously demonstrated this as an effective way of producing high quality technical specifications that are maximally useful for their consumers.

One particular point worth highlighting in this process is the value of interoperability and analysis. From the very first draft, interop between multiple, independent implementations was a goal. And since then, every revision was carefully checked by multiple library maintainers for soundness and correctness. This helped catch a number of mistakes and improved overall clarity of the technical specification.

From a formal analysis perspective, HPKE brought novel work to the community. Unlike protocol design efforts like those around TLS and QUIC, HPKE was simpler, but still came with plenty of sharp edges. As a new cryptographic construction, analysis was needed to ensure that it was sound and, importantly, to understand its limits. This analysis led to a number of important contributions to the community, including a formal analysis of HPKE, new understanding of the limits of ChaChaPoly1305 in a multi-user security setting, as well as a new CFRG specification documenting limits for AEAD algorithms. For more information about the analysis effort that went into HPKE, check out this companion blog by Benjamin Lipp, an HPKE co-author.

HPKE’s future

While HPKE may be a new standard, it has already seen a tremendous amount of adoption in the industry. As mentioned earlier, it’s an essential part of the TLS Encrypted Client Hello and Oblivious DoH standards, both of which are deployed protocols on the Internet today. Looking ahead, it’s also been integrated as part of the emerging Oblivious HTTP, Message Layer Security, and Privacy Preserving Measurement standards. HPKE’s hallmark is its generic construction that lets it adapt to a wide variety of application requirements. If an application needs public-key encryption with a key-committing AEAD, one can simply instantiate HPKE using a key-committing AEAD.

Moreover, there exists a huge assortment of interoperable implementations built on popular cryptographic libraries, including OpenSSL, BoringSSL, NSS, and CIRCL. There are also formally verified implementations in hacspec and F*; check out this blog post for more details. The complete set of known implementations is tracked here. More implementations will undoubtedly follow in their footsteps.

HPKE is ready for prime time. I look forward to seeing how it simplifies protocol design and development in the future. Welcome, RFC 9180.

Cloudflare and the IETF

Post Syndicated from Jonathan Hoyland original https://blog.cloudflare.com/cloudflare-and-the-ietf/

Cloudflare and the IETF

Cloudflare and the IETF

The Internet, far from being just a series of tubes, is a huge, incredibly complex, decentralized system. Every action and interaction in the system is enabled by a complicated mass of protocols woven together to accomplish their task, each handing off to the next like trapeze artists high above a virtual circus ring. Stop to think about details, and it is a marvel.

Consider one of the simplest tasks enabled by the Internet: Sending a message from sender to receiver.

Cloudflare and the IETF

The location (address) of a receiver is discovered using DNS, a connection between sender and receiver is established using a transport protocol like TCP, and (hopefully!) secured with a protocol like TLS. The sender’s message is encoded in a format that the receiver can recognize and parse, like HTTP, because the two disparate parties need a common language to communicate. Then, ultimately, the message is sent and carried in an IP datagram that is forwarded from sender to receiver based on routes established with BGP.

Cloudflare and the IETF

Even an explanation this dense is laughably oversimplified. For example, the four protocols listed are just the start, and ignore many others with acronyms of their own. The truth is that things are complicated. And because things are complicated, how these protocols and systems interact and influence the user experience on the Internet is complicated. Extra round trips to establish a secure connection increase the amount of time before useful work is done, harming user performance. The use of unauthenticated or unencrypted protocols reveals potentially sensitive information to the network or, worse, to malicious entities, which harms user security and privacy. And finally, consolidation and centralization — seemingly a prerequisite for reducing costs and protecting against attacks — makes it challenging to provide high availability even for essential services. (What happens when that one system goes down or is otherwise unavailable, or to extend our earlier metaphor, when a trapeze isn’t there to catch?)

These four properties — performance, security, privacy, and availability — are crucial to the Internet. At Cloudflare, and especially in the Cloudflare Research team, where we use all these various protocols, we’re committed to improving them at every layer in the stack. We work on problems as diverse as helping network security and privacy with TLS 1.3 and QUIC, improving DNS privacy via Oblivious DNS-over-HTTPS, reducing end-user CAPTCHA annoyances with Privacy Pass and Cryptographic Attestation of Personhood (CAP), performing Internet-wide measurements to understand how things work in the real world, and much, much more.

Above all else, these projects are meant to do one thing: focus beyond the horizon to help build a better Internet. We do that by developing, advocating, and advancing open standards for the many protocols in use on the Internet, all backed by implementation, experimentation, and analysis.

Standards

The Internet is a network of interconnected autonomous networks. Computers attached to these networks have to be able to route messages to each other. However, even if we can send messages back and forth across the Internet, much like the storied Tower of Babel, to achieve anything those computers have to use a common language, a lingua franca, so to speak. And for the Internet, standards are that common language.

Many of the parts of the Internet that Cloudflare is interested in are standardized by the IETF, which is a standards development organization responsible for producing technical specifications for the Internet’s most important protocols, including IP, BGP, DNS, TCP, TLS, QUIC, HTTP, and so on. The IETF’s mission is:

> to make the Internet work better by producing high-quality, relevant technical documents that influence the way people design, use, and manage the Internet.

Our individual contributions to the IETF help further this mission, especially given our role on the Internet. We can only do so much on our own to improve the end-user experience. So, through standards, we engage with those who use, manage, and operate the Internet to achieve three simple goals that lead to a better Internet:

1. Incrementally improve existing and deployed protocols with innovative solutions;

2. Provide holistic solutions to long-standing architectural problems and enable new use cases; and

3. Identify key problems and help specify reusable, extensible, easy-to-implement abstractions for solving them.

Below, we’ll give an example of how we helped achieve each goal, touching on a number of important technical specifications produced in recent years, including DNS-over-HTTPS, QUIC, and (the still work-in-progress) TLS Encrypted Client Hello.

Incremental innovation: metadata privacy with DoH and ECH

The Internet is not only complicated — it is leaky. Metadata seeps like toxic waste from nearly every protocol in use, from DNS to TLS, and even to HTTP at the application layer.

Cloudflare and the IETF

One critically important piece of metadata that still leaks today is the name of the server that clients connect to. When a client opens a connection to a server, it reveals the name and identity of that server in many places, including DNS, TLS, and even sometimes at the IP layer (if the destination IP address is unique to that server). Linking client identity (IP address) to target server names enables third parties to build a profile of per-user behavior without end-user consent. The result is a set of protocols that does not respect end-user privacy.

Fortunately, it’s possible to incrementally address this problem without regressing security. For years, Cloudflare has been working with the standards community to plug all of these individual leaks through separate specialized protocols:

  • DNS-over-HTTPS encrypts DNS queries between clients and recursive resolvers, ensuring only clients and trusted recursive resolvers see plaintext DNS traffic.
  • TLS Encrypted Client Hello encrypts metadata in the TLS handshake, ensuring only the client and authoritative TLS server see sensitive TLS information.

These protocols impose a barrier between the client and server and everyone else. However, neither of them prevent the server from building per-user profiles. Servers can track users via one critically important piece of information: the client IP address. Fortunately, for the overwhelming majority of cases, the IP address is not essential for providing a service. For example, DNS recursive resolvers do not need the full client IP address to provide accurate answers, as is evidenced by the EDNS(0) Client Subnet extension. To further reduce information exposure on the web, we helped push further with two more incremental improvements:

  • Oblivious DNS-over-HTTPS (ODoH) uses cryptography and network proxies to break linkability between client identity (IP address) and DNS traffic, ensuring that recursive resolvers have only the minimal amount of information to provide DNS answers — the queries themselves, without any per-client information.
  • MASQUE is standardizing techniques for proxying UDP and IP protocols over QUIC connections, similar to the existing HTTP CONNECT method for TCP-based protocols. Generally, the CONNECT method allows clients to use services without revealing any client identity (IP address).

While each of these protocols may seem only an incremental improvement over what we have today, together, they raise many possibilities for the future of the Internet. Are DoH and ECH sufficient for end-user privacy, or are technologies like ODoH and MASQUE necessary? How do proxy technologies like MASQUE complement or even subsume protocols like ODoH and ECH? These are questions the Cloudflare Research team strives to answer through experimentation, analysis, and deployment together with other stakeholders on the Internet through the IETF. And we could not ask the questions without first laying the groundwork.

Architectural advancement: QUIC and HTTP/3

QUIC and HTTP/3 are transformative technologies. Whilst the TLS handshake forms the heart of QUIC’s security model, QUIC is an improvement beyond TLS over TCP, in many respects, including more encryption (privacy), better protection against active attacks and ossification at the network layer, fewer round trips to establish a secure connection, and generally better security properties. QUIC and HTTP/3 give us a clean slate for future innovation.

Perhaps one of QUIC’s most important contributions is that it challenges and even breaks many established conventions and norms used on the Internet. For example, the antiquated socket API for networking, which treats the network connection as an in-order bit pipe is no longer appropriate for modern applications and developers. Modern networking APIs such as Apple’s Network.framework provide high-level interfaces that take advantage of the new transport features provided by QUIC. Applications using this or even higher-level HTTP abstractions can take advantage of the many security, privacy, and performance improvements of QUIC and HTTP/3 today with minimal code changes, and without being constrained by sockets and their inherent limitations.

Another salient feature of QUIC is its wire format. Nearly every bit of every QUIC packet is encrypted and authenticated between sender and receiver. And within a QUIC packet, individual frames can be rearranged, repackaged, and otherwise transformed by the sender.

Cloudflare and the IETF

Together, these are powerful tools to help mitigate future network ossification and enable continued extensibility. (TLS’s wire format ultimately led to the middlebox compatibility mode for TLS 1.3 due to the many middlebox ossification problems that were encountered during early deployment tests.)

Exercising these features of QUIC is important for the long-term health of the protocol and applications built on top of it. Indeed, this sort of extensibility is what enables innovation.

In fact, we’ve already seen a flurry of new work based on QUIC: extensions to enable multipath QUIC, different congestion control approaches, and ways to carry data unreliably in the DATAGRAM frame.

Beyond functional extensions, we’ve also seen a number of new use cases emerge as a result of QUIC. DNS-over-QUIC is an upcoming proposal that complements DNS-over-TLS for recursive to authoritative DNS query protection. As mentioned above, MASQUE is a working group focused on standardizing methods for proxying arbitrary UDP and IP protocols over QUIC connections, enabling a number of fascinating solutions and unlocking the future of proxy and VPN technologies. In the context of the web, the WebTransport working group is standardizing methods to use QUIC as a “supercharged WebSocket” for transporting data efficiently between client and server while also depending on the WebPKI for security.

By definition, these extensions are nowhere near complete. The future of the Internet with QUIC is sure to be a fascinating adventure.

Specifying abstractions: Cryptographic algorithms and protocol design

Standards allow us to build abstractions. An ideal standard is one that is usable in many contexts and contains all the information a sufficiently skilled engineer needs to build a compliant implementation that successfully interoperates with other independent implementations. Writing a new standard is sort of like creating a new Lego brick. Creating a new Lego brick allows us to build things that we couldn’t have built before. For example, one new “brick” that’s nearly finished (as of this writing) is Hybrid Public Key Encryption (HPKE). HPKE allows us to efficiently encrypt arbitrary plaintexts under the recipient’s public key.

Cloudflare and the IETF

Mixing asymmetric and symmetric cryptography for efficiency is a common technique that has been used for many years in all sorts of protocols, from TLS to PGP. However, each of these applications has come up with their own design, each with its own security properties. HPKE is intended to be a single, standard, interoperable version of this technique that turns this complex and technical corner of protocol design into an easy-to-use black box. The standard has undergone extensive analysis by cryptographers throughout its development and has numerous implementations available. The end result is a simple abstraction that protocol designers can include without having to consider how it works under-the-hood. In fact, HPKE is already a dependency for a number of other draft protocols in the IETF, such as TLS Encrypted Client Hello, Oblivious DNS-over-HTTPS, and Message Layer Security.

Modes of Interaction

We engage with the IETF in the specification, implementation, experimentation, and analysis phases of a standard to help achieve our three goals of incremental innovation, architectural advancement, and production of simple abstractions.

Cloudflare and the IETF

Our participation in the standards process hits all four phases. Individuals in Cloudflare bring a diversity of knowledge and domain expertise to each phase, especially in the production of technical specifications. This week, we’ll have a blog about an upcoming standard that we’ve been working on for a number of years and will be sharing details about how we used formal analysis to make sure that we ruled out as many security issues in the design as possible. We work in close collaboration with people from all around the world as an investment in the future of the Internet. Open standards mean that everyone can take advantage of the latest and greatest in protocol design, whether they use Cloudflare or not.

Cloudflare’s scale and perspective on the Internet are essential to the standards process. We have experience rapidly implementing, deploying, and experimenting with emerging technologies to gain confidence in their maturity. We also have a proven track record of publishing the results of these experiments to help inform the standards process. Moreover, we open source as much of the code we use for these experiments as possible to enable reproducibility and transparency. Our unique collection of engineering expertise and wide perspective allows us to help build standards that work in a wide variety of use cases. By investing time in developing standards that everyone can benefit from, we can make a clear contribution to building a better Internet.

One final contribution we make to the IETF is more procedural and based around building consensus in the community. A challenge to any open process is gathering consensus to make forward progress and avoiding deadlock. We help build consensus through the production of running code, leadership on technical documents such as QUIC and ECH, and even logistically by chairing working groups. (Working groups at the IETF are chaired by volunteers, and Cloudflare numbers a few working group chairs amongst its employees, covering a broad spectrum of the IETF (and its related research-oriented group, the IRTF) from security and privacy to transport and applications.) Collaboration is a cornerstone of the standards process and a hallmark of Cloudflare Research, and we apply it most prominently in the standards process.

If you too want to help build a better Internet, check out some IETF Working Groups and mailing lists. All you need to start contributing is an Internet connection and an email address, so why not give it a go? And if you want to join us on our mission to help build a better Internet through open and interoperable standards, check out our open positions, visiting researcher program, and many internship opportunities!

The Syslog Hell

Post Syndicated from Bozho original https://techblog.bozho.net/the-syslog-hell/

Syslog. You’ve probably heard about that, especially if you are into monitoring or security. Syslog is perceived to be the common, unified way that systems can send logs to other systems. Linux supports syslog, many network and security appliances support syslog as a way to share their logs. On the other side, a syslog server is receiving all syslog messages. It sounds great in theory – having a simple, common way to represent logs messages and send them across systems.

Reality can’t be further from that. Syslog is not one thing – there are multiple “standards”, and each of those is implemented incorrectly more often than not. Many vendors have their own way of representing data, and it’s all a big mess.

First, the RFCs. There are two RFCs – RFC3164 (“old” or “BSD” syslog) and RFC5424 (the new variant that obsoletes 3164). RFC3164 is not a standard, while RFC5424 is (mostly).

Those RFCs concern the contents of a syslog message. Then there’s RFC6587 which is about transmitting a syslog message over TCP. It’s also not a standard, but rather “an observation”. Syslog is usually transmitted over UDP, so fitting it into TCP requires some extra considerations. Now add TLS on top of that as well.

Then there are content formats. RFC5424 defines a key-value structure, but RFC 3164 does not – everything after the syslog header is just a non-structured message string. So many custom formats exist. For example firewall vendors tend to define their own message formats. At least they are often documented (e.g. check WatchGuard and SonicWall), but parsing them requires a lot of custom knowledge about that vendor’s choices. Sometimes the documentation doesn’t fully reflect the reality, though.

Instead of vendor-specific formats, there are also de-facto standards like CEF and the less popular LEEF. They define a structure of the message and are actually syslog-independent (you can write CEF/LEEF to a file). But when syslog is used for transmitting CEF/LEEF, the message should respect RFC3164.

And now comes the “fun” part – incorrect implementations. Many vendors don’t really respect those documents. They come up with their own variations of even the simplest things like a syslog header. Date formats are all over the place, hosts are sometimes missing, priority is sometimes missing, non-host identifiers are used in place of hosts, colons are placed frivolously.

Parsing all of that mess is extremely “hacky”, with tons of regexes trying to account for all vendor quirks. I’m working on a SIEM, and our collector is open source – you can check our syslog package. Some vendor-specific parsers are yet missing, but we are adding new ones constantly. The date formats in the CEF parser tell a good story.

If it were just two RFCs with one de-facto message format standard for one of them and a few option for TCP/UDP transmission, that would be fine. But what makes things hell is the fact that too many vendors decided not to care about what is in the RFCs, they decided that “hey, putting a year there is just fine” even though the RFC says “no”, that they don’t really need to set a host in the header, and that they didn’t really need to implement anything new after their initial legacy stuff was created.

Too many vendors (of various security and non-security software) came up with their own way of essentially representing key-value pairs, too many vendors thought their date format is the right one, too many vendors didn’t take the time to upgrade their logging facility in the past 12 years.

Unfortunately that’s representative of our industry (yes, xkcd). Someone somewhere stitches something together and then decades later we have an incomprehensible patchwork of stringly-typed, randomly formatted stuff flying around whatever socket it finds suitable. And it’s never the right time and the right priority to clean things up, to get up to date, to align with others in the field. We, as an industry (both security and IT in general) are creating a mess out of everything. Yes, the world is complex, and technology is complex as well. Our job is to make it all palpable, abstracted away, simplified and standardized. And we are doing the opposite.

The post The Syslog Hell appeared first on Bozho's tech blog.

Innovating on Authentication Standards

Post Syndicated from mikesefanov original https://yahooeng.tumblr.com/post/175238642656

yahoodevelopers:

By George Fletcher and Lovlesh Chhabra

When Yahoo and AOL came together a year ago as a part of the new Verizon subsidiary Oath,  we took on the challenge of unifying their identity platforms based on current identity standards. Identity standards have been a critical part of the Internet ecosystem over the last 20+ years. From single-sign-on and identity federation with SAML; to the newer identity protocols including OpenID Connect, OAuth2, JOSE, and SCIM (to name a few); to the explorations of “self-sovereign identity” based on distributed ledger technologies; standards have played a key role in providing a secure identity layer for the Internet.

As we navigated this journey, we ran across a number of different use cases where there was either no standard or no best practice available for our varied and complicated needs. Instead of creating entirely new standards to solve our problems, we found it more productive to use existing standards in new ways.

One such use case arose when we realized that we needed to migrate the identity stored in mobile apps from the legacy identity provider to the new Oath identity platform. For most browser (mobile or desktop) use cases, this doesn’t present a huge problem; some DNS magic and HTTP redirects and the user will sign in at the correct endpoint. Also it’s expected for users accessing services via their browser to have to sign in now and then.

However, for mobile applications it’s a completely different story. The normal user pattern for mobile apps is for the user to sign in (via OpenID Connect or OAuth2) and for the app to then be issued long-lived tokens (well, the refresh token is long lived) and the user never has to sign in again on the device (entering a password on the device is NOT a good experience for the user).

So the issue is, how do we allow the mobile app to move from one
identity provider to another without the user having to re-enter their
credentials? The solution came from researching what standards currently
exist that might addres this use case (see figure “Standards Landscape”
below) and finding the OAuth 2.0 Token Exchange draft specification (https://tools.ietf.org/html/draft-ietf-oauth-token-exchange-13).

image

The Token Exchange draft allows for a given token to be exchanged for new tokens in a different domain. This could be used to manage the “audience” of a token that needs to be passed among a set of microservices to accomplish a task on behalf of the user, as an example. For the use case at hand, we created a specific implementation of the Token Exchange specification (a profile) to allow the refresh token from the originating Identity Provider (IDP) to be exchanged for new tokens from the consolidated IDP. By profiling this draft standard we were able to create a much better user experience for our consumers and do so without inventing proprietary mechanisms.

During this identity technical consolidation we also had to address how to support sharing signed-in users across mobile applications written by the same company (technically, signed with the same vendor signing key). Specifically, how can a signed-in user to Yahoo Mail not have to re-sign in when they start using the Yahoo Sports app? The current best practice for this is captured in OAuth 2.0 for Natives Apps (RFC 8252). However, the flow described by this specification requires that the mobile device system browser hold the user’s authenticated sessions. This has some drawbacks such as users clearing their cookies, or using private browsing mode, or even worse, requiring the IDPs to support multiple users signed in at the same time (not something most IDPs support).

While, RFC 8252 provides a mechanism for single-sign-on (SSO) across mobile apps provided by any vendor, we wanted a better solution for apps provided by Oath. So we looked at how could we enable mobile apps signed by the vendor to share the signed-in state in a more “back channel” way. One important fact is that mobile apps cryptographically signed by the same vender can securely share data via the device keychain on iOS and Account Manager on Android.

Using this as a starting point we defined a new OAuth2 scope, device_sso, whose purpose is to require the Authorization Server (AS) to return a unique “secret” assigned to that specific device. The precedent for using a scope to define specification behaviour is OpenID Connect itself, which defines the “openid” scope as the trigger for the OpenID Provider (an OAuth2 AS) to implement the OpenID Connect specification. The device_secret is returned to a mobile app when the OAuth2 code is exchanged for tokens and then stored by the mobile app in the device keychain and with the id_token identifying the user who signed in.

At this point, a second mobile app signed by the same vendor can look in the keychain and find the id_token, ask the user if they want to use that identity with the new app, and then use a profile of the token exchange spec to obtain tokens for the second mobile app based on the id_token and the device_secret. The full sequence of steps looks like this:

image

As a result of our identity consolidation work over the past year, we derived a set of principles identity architects should find useful for addressing use cases that don’t have a known specification or best practice. Moreover, these are applicable in many contexts outside of identity standards:

  1. Spend time researching the existing set of standards and draft standards. As the diagram shows, there are a lot of standards out there already, so understanding them is critical.
  2. Don’t invent something new if you can just profile or combine already existing specifications.
  3. Make sure you understand the spirit and intent of the existing specifications.
  4. For those cases where an extension is required, make sure to extend the specification based on its spirit and intent.
  5. Ask the community for clarity regarding any existing specification or draft.
  6. Contribute back to the community via blog posts, best practice documents, or a new specification.

As we learned during the consolidation of our Yahoo and AOL identity platforms, and as demonstrated in our examples, there is no need to resort to proprietary solutions for use cases that at first look do not appear to have a standards-based solution. Instead, it’s much better to follow these principles, avoid the NIH (not-invented-here) syndrome, and invest the time to build solutions on standards.