Tag Archives: DMARC

An Overview of Bulk Sender Changes at Yahoo/Gmail

Post Syndicated from Dustin Taylor original https://aws.amazon.com/blogs/messaging-and-targeting/an-overview-of-bulk-sender-changes-at-yahoo-gmail/

In a move to safeguard user inboxes, Gmail and Yahoo Mail announced a new set of requirements for senders effective from February 2024. Let’s delve into the specifics and what Amazon Simple Email Service (Amazon SES) customers need to do to comply with these requirements.

What are the new email sender requirements?

The new requirements include long-standing best practices that all email senders should adhere to in order to achieve good deliverability with mailbox providers. What’s new is that Gmail, Yahoo Mail, and other mailbox providers will require alignment with these best practices for those who send bulk messages over 5000 per day or if a significant number of recipients indicate the mail as spam.

The requirements can be distilled into 3 categories: 1) stricter adherence to domain authentication, 2) give recipients an easy way to unsubscribe from bulk mail, and 3) monitoring spam complaint rates and keeping them under a 0.3% threshold.

* This blog was originally published in November 2023, and updated on January 12, 2024 to clarify timelines, and to provide links to additional resources.

1. Domain authentication

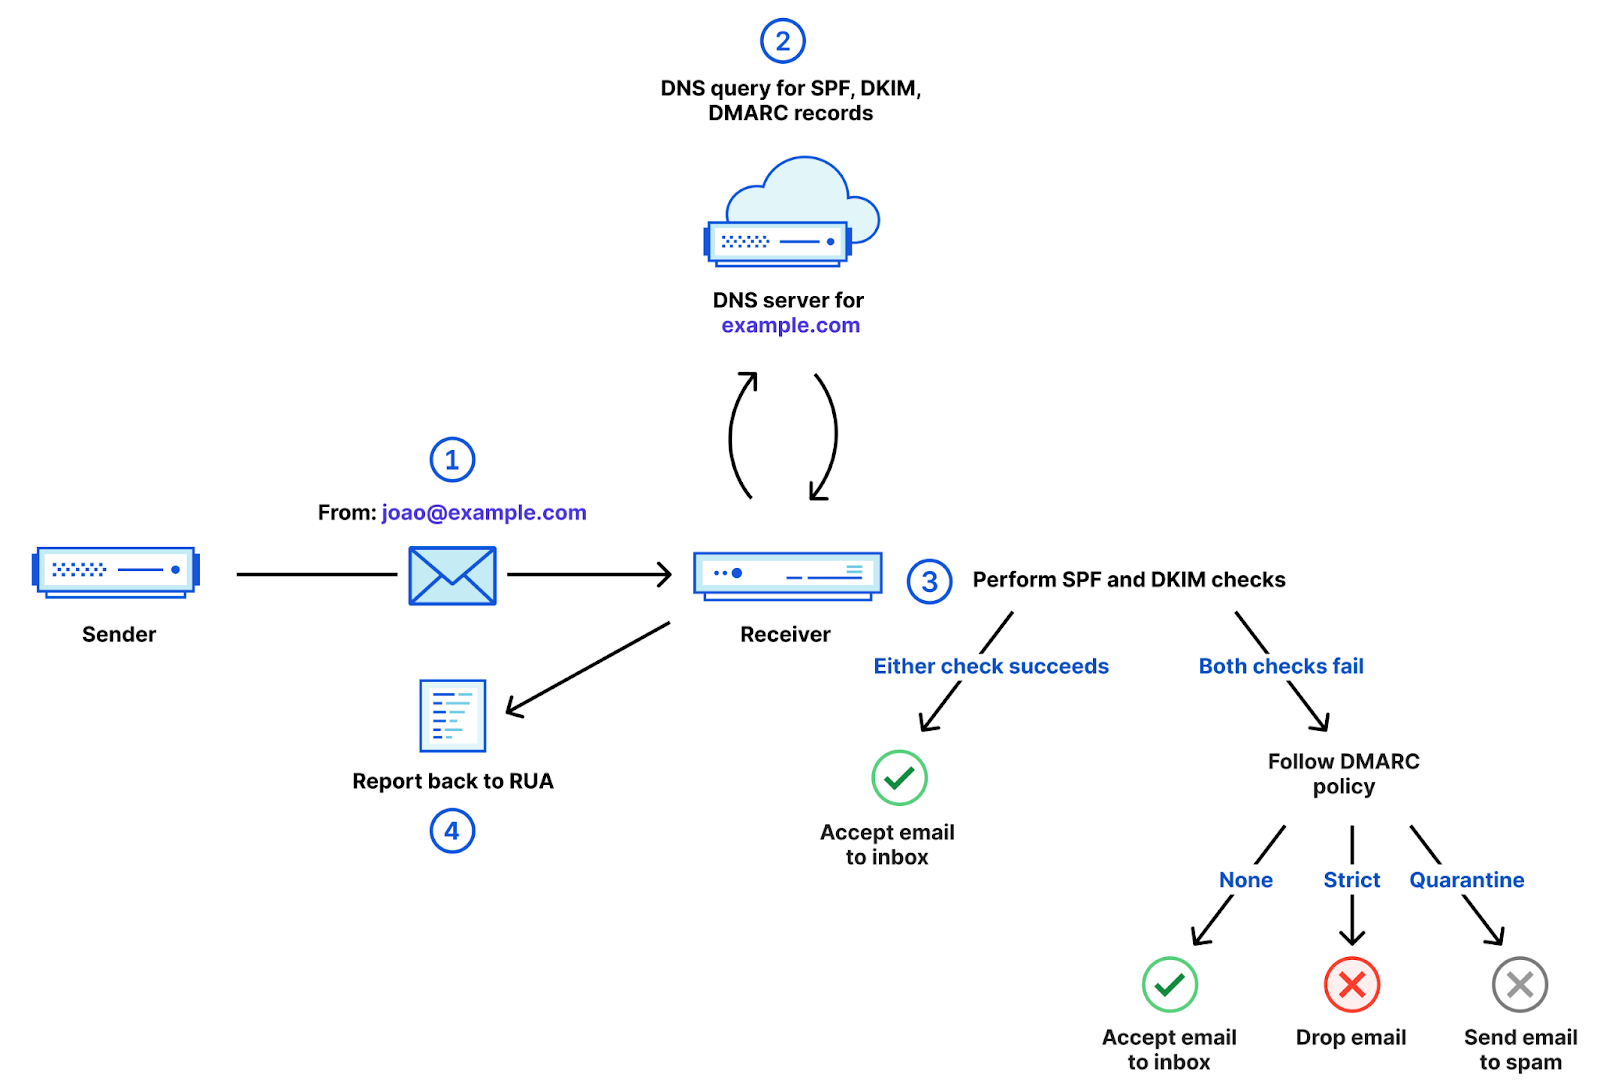
Mailbox providers will require domain-aligned authentication with DKIM and SPF, and they will be enforcing DMARC policies for the domain used in the From header of messages. For example, gmail.com will be publishing a quarantine DMARC policy, which means that unauthorized messages claiming to be from Gmail will be sent to Junk folders.

Read Amazon SES: Email Authentication and Getting Value out of Your DMARC Policy to gain a deeper understanding of SPF and DKIM domain-alignment and maximize the value from your domain’s DMARC policy.

The following steps outline how Amazon SES customers can adhere to the domain authentication requirements:

Adopt domain identities: Amazon SES customers who currently rely primarily on email address identities will need to adopt verified domain identities to achieve better deliverability with mailbox providers. By using a verified domain identity with SES, your messages will have a domain-aligned DKIM signature.

Not sure what domain to use? Read Choosing the Right Domain for Optimal Deliverability with Amazon SES for additional best practice guidance regarding sending authenticated email. 

Configure a Custom MAIL FROM domain: To further align with best practices, SES customers should also configure a custom MAIL FROM domain so that SPF is domain-aligned.

The table below illustrates the three scenarios based on the type of identity you use with Amazon SES

Scenarios using example.com in the From header DKIM authenticated identifier SPF authenticated identifier DMARC authentication results
[email protected] as a verified email address identity amazonses.com email.amazonses.com Fail – DMARC analysis fails as the sending domain does not have a DKIM signature or SPF record that matches.
example.com as a verified domain identity example.com email.amazonses.com Success – DKIM signature aligns with sending domain which will cause DMARC checks to pass.
example.com as a verified domain identity, and bounce.example.com as a custom MAIL FROM domain example.com bounce.example.com Success – DKIM and SPF are aligned with sending domain.

Figure 1: Three scenarios based on the type of identity used with Amazon SES. Using a verified domain identity and configuring a custom MAIL FROM domain will result in both DKIM and SPF being aligned to the From header domain’s DMARC policy.

Be strategic with subdomains: Amazon SES customers should consider a strategic approach to the domains and subdomains used in the From header for different email sending use cases. For example, use the marketing.example.com verified domain identity for sending marketing mail, and use the receipts.example.com verified domain identity to send transactional mail.

Why? Marketing messages may have higher spam complaint rates and would need to adhere to the bulk sender requirements, but transactional mail, such as purchase receipts, would not necessarily have spam complaints high enough to be classified as bulk mail.

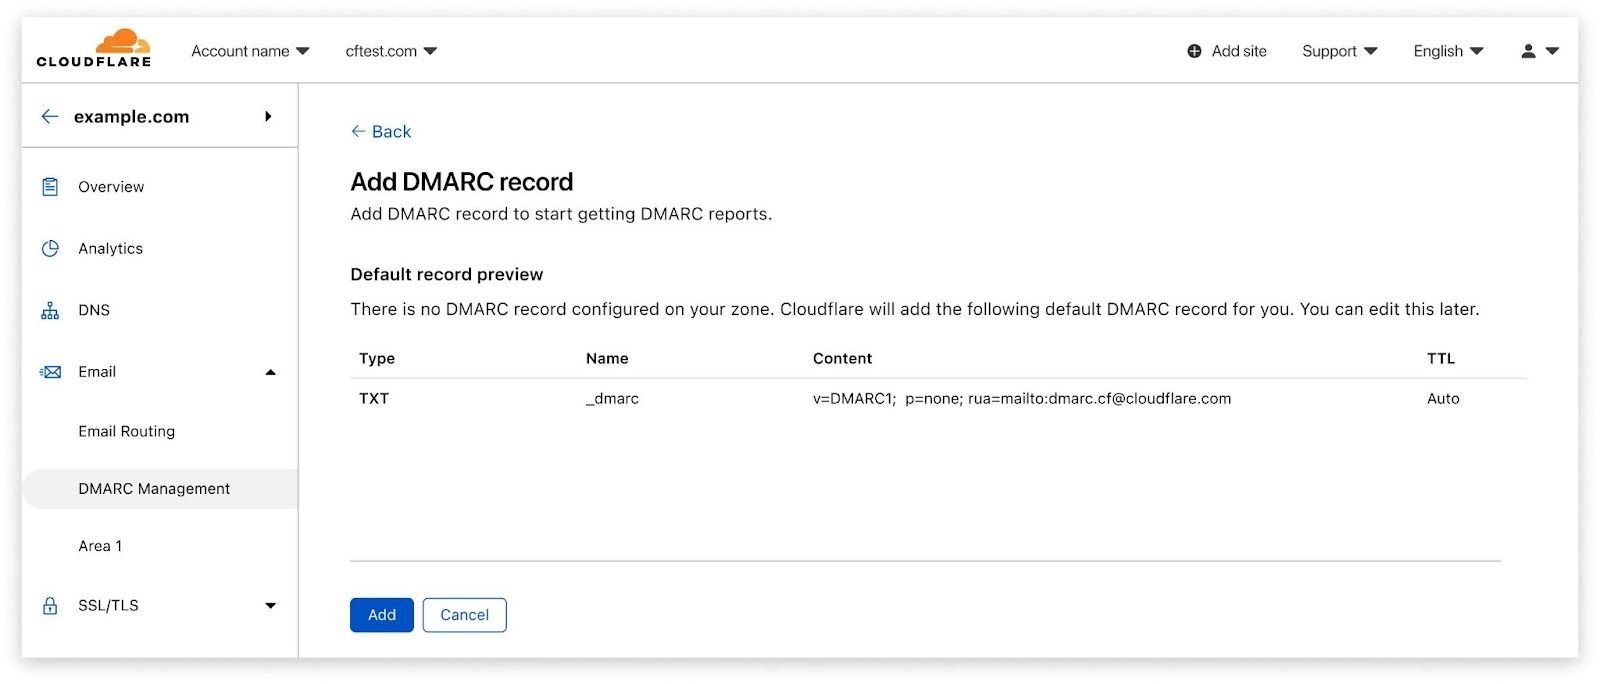
Publish DMARC policies: Publish a DMARC policy for your domain(s). The domain you use in the From header of messages needs to have a policy by setting the p= tag in the domain’s DMARC policy in DNS. The policy can be set to “p=none” to adhere to the bulk sending requirements and can later be changed to quarantine or reject when you have ensured all email using the domain is authenticated with DKIM or SPF domain-aligned authenticated identifiers.

2. Set up an easy unsubscribe for email recipients

Bulk senders are expected to include a mechanism to unsubscribe by adding an easy to find link within the message. The February 2024 mailbox provider rules will require senders to additionally add one-click unsubscribe headers as defined by RFC 2369 and RFC 8058. These headers make it easier for recipients to unsubscribe, which reduces the rate at which recipients will complain by marking messages as spam.

There are many factors that could result in your messages being classified as bulk by any mailbox provider. Volume over 5000 per day is one factor, but the primary factor that mailbox providers use is in whether the recipient actually wants to receive the mail.

If you aren’t sure if your mail is considered bulk, monitor your spam complaint rates. If the complaint rates are high or growing, it is a sign that you should offer an easy way for recipients to unsubscribe.

How to adhere to the easy unsubscribe requirement

The following steps outline how Amazon SES customers can adhere to the easy unsubscribe requirement:

Add one-click unsubscribe headers to the messages you send: Amazon SES customers sending bulk or potentially unwanted messages will need to implement an easy way for recipients to unsubscribe, which they can do using the SES subscription management feature.

Mailbox providers are requiring that large senders give recipients the ability to unsubscribe from bulk email in one click using the one-click unsubscribe header, however it is acceptable for the unsubscribe link in the message to direct the recipient to a landing page for the recipient to confirm their opt-out preferences.

To set up one-click unsubscribe without using the SES subscription management feature, include both of these headers in outgoing messages:

  • List-Unsubscribe-Post: List-Unsubscribe=One-Click
  • List-Unsubscribe: <https://example.com/unsubscribe/example>

When a recipient unsubscribes using one-click, you receive this POST request:

POST /unsubscribe/example HTTP/1.1
Host: example.com
Content-Type: application/x-www-form-urlencoded
Content-Length: 26
List-Unsubscribe=One-Click

Gmail’s FAQ and Yahoo’s FAQ both clarify that the one-click unsubscribe requirement will not be enforced until June 2024 as long as the bulk sender has a functional unsubscribe link clearly visible in the footer of each message.

Honor unsubscribe requests within 2 days: Verify that your unsubscribe process immediately removes the recipient from receiving similar future messages. Mailbox providers are requiring that bulk senders give recipients the ability to unsubscribe from email in one click, and that the senders process unsubscribe requests within two days.

If you adopt the SES subscription management feature, make sure you integrate the recipient opt-out preferences with the source of your email sending lists. If you implement your own one-click unsubscribe (for example, using Amazon API Gateway and an AWS Lambda function), make sure it designed to suppress sending to email addresses in your source email lists.

Review your email list building practices: Ensure responsible email practices by refraining from purchasing email lists, safeguarding opt-in forms from bot abuse, verifying recipients’ preferences through confirmation messages, and abstaining from automatically enrolling recipients in categories that were not requested.

Having good list opt-in hygiene is the best way to ensure that you don’t have high spam complaint rates before you adhere to the new required best practices. To learn more, read What is a Spam Trap, and Why You Should Care.

3. Monitor spam rates

Mailbox providers will require that all senders keep spam complaint rates below 0.3% to avoid having their email treated as spam by the mailbox provider. The following steps outline how Amazon SES customers can meet the spam complaint rate requirement:

Enroll with Google Postmaster Tools: Amazon SES customers should enroll with Google Postmaster Tools to monitor their spam complaint rates for Gmail recipients.

Gmail recommends spam complaint rates stay below 0.1%. If you send to a mix of Gmail recipients and recipients on other mailbox providers, the spam complaint rates reported by Gmail’s Postmaster Tools are a good indicator of your spam complaint rates at mailbox providers who don’t let you view metrics.

Enable Amazon SES Virtual Deliverability Manager: Enable Virtual Deliverability Manager (VDM) in your Amazon SES account. Customers can use VDM to monitor bounce and complaint rates for many mailbox providers. Amazon SES recommends customers to monitor reputation metrics and stay below a 0.1% complaint rate.

Segregate and secure your sending using configuration sets: In addition to segregating sending use cases by domain, Amazon SES customers should use configuration sets for each sending use case.

Using configuration sets will allow you to monitor your sending activity and implement restrictions with more granularity. You can even pause the sending of a configuration set automatically if spam complaint rates exceed your tolerance threshold.

Conclusion

These changes are planned for February 2024, but be aware that the exact timing and methods used by each mailbox provider may vary. If you experience any deliverability issues with any mailbox provider prior to February, it is in your best interest to adhere to these required best practices as a first step.

We hope that this blog clarifies any areas of confusion on this change and provides you with the information you need to be prepared for February 2024. Happy sending!

Helpful links:

Amazon SES: Email Authentication and Getting Value out of Your DMARC Policy

Post Syndicated from Bruno Giorgini original https://aws.amazon.com/blogs/messaging-and-targeting/email-authenctication-dmarc-policy/

Amazon SES: Email Authentication and Getting Value out of Your DMARC Policy

Introduction

For enterprises of all sizes, email is a critical piece of infrastructure that supports large volumes of communication. To enhance the security and trustworthiness of email communication, many organizations turn to email sending providers (ESPs) like Amazon Simple Email Service (Amazon SES). These ESPs allow users to send authenticated emails from their domains, employing industry-standard protocols such as the Sender Policy Framework (SPF) and DomainKeys Identified Mail (DKIM). Messages authenticated with SPF or DKIM will successfully pass your domain’s Domain-based Message Authentication, Reporting, and Conformance (DMARC) policy. This blog post will focus on the DMARC policy enforcement mechanism. The blog will explore some of the reasons why email may fail DMARC policy evaluation and propose solutions to fix any failures that you identify. For an introduction to DMARC and how to carefully choose your email sending domain identity, you can refer to Choosing the Right Domain for Optimal Deliverability with Amazon SES The relationship between DMARC compliance and email deliverability rates is crucial for organizations aiming to maintain a positive sender reputation and ensure successful email delivery. There are many advantages when organizations have this correctly setup, these include:

  • Improved Email Deliverability
  • Reduction in Email Spoofing and Phishing
  • Positive Sender Reputation
  • Reduced Risk of Email Marked as Spam
  • Better Email Engagement Metrics
  • Enhanced Brand Reputation

With this foundation, let’s explore the intricacies of DMARC and how it can benefit your organization’s email communication.

What is DMARC?

DMARC is a mechanism for domain owners to advertise SPF and DKIM protection and to tell receivers how to act if those authentication methods fail. The domain’s DMARC policy protects your domain from third parties attempting to spoof the domain in the “From” header of emails. Malicious email messages that aim to send phishing attempts using your domain will be subject to DMARC policy evaluation, which may result in their quarantine or rejection by the email receiving organization. This stringent policy ensures that emails received by email recipients are genuinely from the claimed sending domain, thereby minimizing the risk of people falling victim to email-based scams. Domain owners publish DMARC policies as a TXT record in the domain’s _dmarc.<domain> DNS record. For example, if the domain used in the “From” header is example.com, then the domain’s DMARC policy would be located in a DNS TXT record named _dmarc.example.com. The DMARC policy can have one of three policy modes:

  • A typical DMARC deployment of an existing domain will start with publishing "p=none". A none policy means that the domain owner is in a monitoring phase; the domain owner is monitoring for messages that aren’t authenticated with SPF and DKIM and seeks to ensure all email is properly authenticated
  • When the domain owner is comfortable that all legitimate use cases are properly authenticated with SPF and/or DKIM, they may change the DMARC policy to "p=quarantine". A quarantine policy means that messages which fail to produce a domain-aligned authenticated identifier via SPF or DKIM will be quarantined by the mail receiving organization. The mail receiving organization may filter these messages into Junk folders, or take another action that they feel best protects their recipients.
  • Finally, domain owners who are confident that all of the legitimate messages using their domain are authenticated with SPF or DKIM, may change the DMARC policy to "p=reject". A reject policy means that messages which fail to produce a domain-aligned authenticated identifier via SPF or DKIM will be rejected by the mail receiving organization.

The following are examples of a TXT record that contains a DMARC policy, depending on the desired policy (the ‘p’ tag):

  Name Type Value
1 _dmarc.example.com TXT “v=DMARC1;p=reject;rua=mailto:[email protected]
2 _dmarc.example.com TXT “v=DMARC1;p=quarantine;rua=mailto:[email protected]
3 _dmarc.example.com TXT “v=DMARC1;p=none;rua=mailto:[email protected]
Table 1 – Example DMARC policy

This policy tells email providers to apply the DMARC policy to messages that fail to produce a DKIM or SPF authenticated identifier that is aligned to the domain in the “From” header. Alignment means that one or both of the following occurs:

  • The messages pass the SPF policy for the MAIL FROM domain and the MAIL FROM domain is the same as the domain in the “From” header, or a subdomain. Reference Using a custom MAIL FROM domain to learn more about how to send SPF aligned messages with SES.
  • The messages have a DKIM signature signed by a public key in DNS at a location within the domain of the “From” header. Reference Authenticating Email with DKIM in Amazon SES to learn more about how to send DKIM aligned messages with SES.

DMARC reporting

The rua tag in the domain’s DMARC policy indicates the location to which mail receiving organizations should send aggregate reports about messages that pass or fail SPF and DKIM alignment. Domain owners analyze these reports to discover messages which are using the domain in the “From” header but are not properly authenticated with SPF or DKIM. The domain owner will attempt to ensure that all legitimate messages are authenticated through analysis of the DMARC aggregate reports over time. Mail receiving organizations which support sending DMARC reports typically send these aggregated reports once per day, although these practices differ from provider to provider.

What does a typical DMARC deployment look like?

A DMARC deployment is the process of:

  1. Ensuring that all emails using the domain in the “From” header are authenticated with DKIM and SPF domain-aligned identifiers. Focus on DKIM as the primary means of authentication.
  2. Publishing a DMARC policy (none, quarantine, or reject) for the domain that reflects how the domain owner would like mail receiving organizations to handle unauthenticated email claiming to be from their domain.

New domains and subdomains

Deploying a DMARC policy is easy for organizations that have created a new domain or subdomain for the purpose of a new email sending use case on SES; for example email marketing, transaction emails, or one-time pass codes (OTP). These domains can start with the "p=reject" DMARC enforcement policy because the policy will not affect existing email sending programs. This strict enforcement is to ensure that there is no unauthenticated use of the domain and its subdomains.

Existing domains

For existing domains, a DMARC deployment is an iterative process because the domain may have a history of email sending by one or multiple email sending programs. It is important to gain a complete understanding of how the domain and its subdomains are being used for email sending before publishing a restrictive DMARC policy (p=quarantine or p=reject) because doing so would affect any unauthenticated email sending programs using the domain in the “From” header of messages. To get started with the DMARC implementation, these are a few actions to take:

  • Publish a p=none DMARC policy (sometimes referred to as monitoring mode), and set the rua tag to the location in which you would like to receive aggregate reports.
  • Analyze the aggregate reports. Mail receiving organizations will send reports which contain information to determine if the domain, and its subdomains, are being used for sending email, and how the messages are (or are not) being authenticated with a DKIM or SPF domain-aligned identifier. An easy to use analysis tool is the Dmarcian XML to Human Converter.
  • Avoid prematurely publishing a “p=quarantine” or “p=reject” policy. Doing so may result in blocked or reduced delivery of legitimate messages of existing email sending programs.

The image below illustrates how DMARC will be applied to an email received by the email receiving server and actions taken based on the enforcement policy:

DMARC flow 
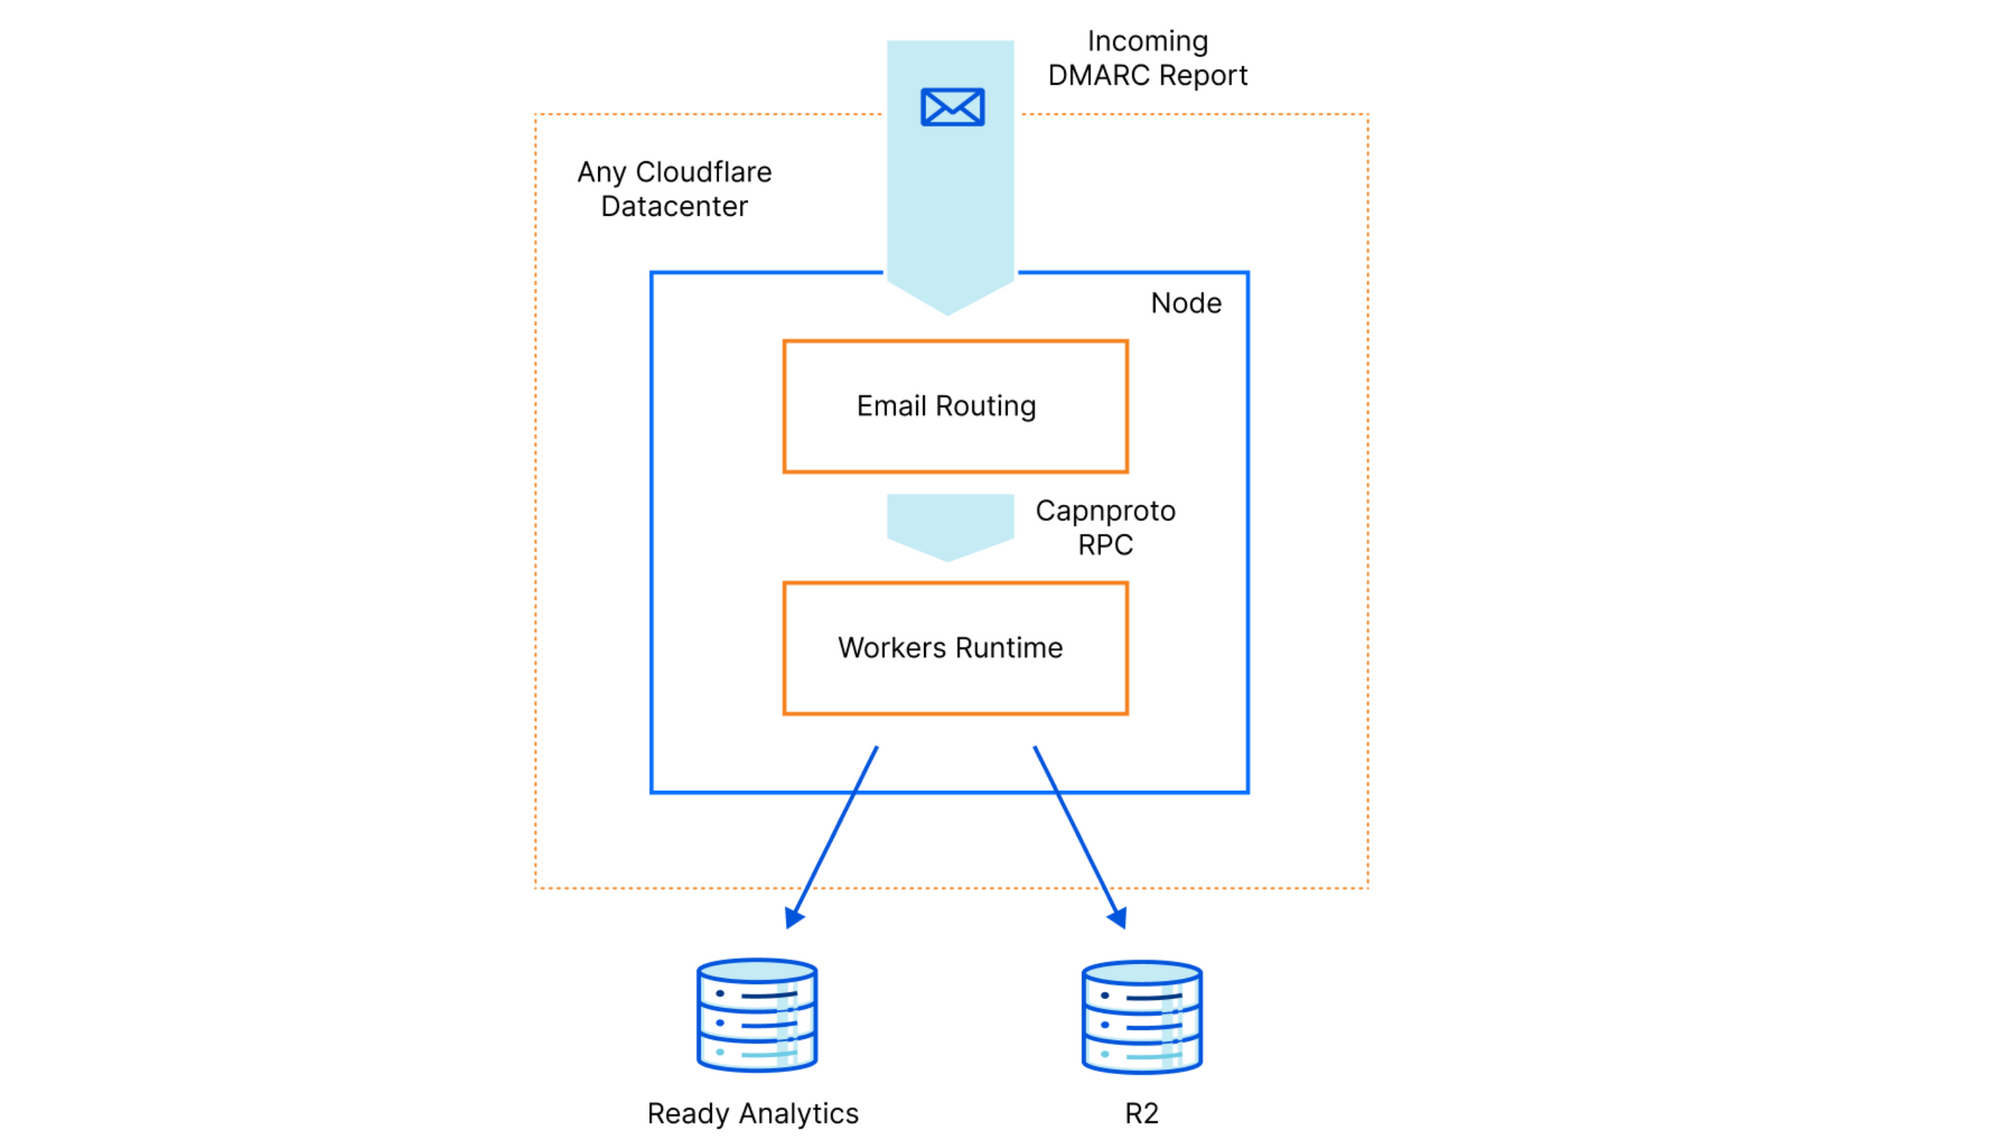
Figure 1 – DMARC Flow

How do SPF and DKIM cause DMARC policies to pass

When you start sending emails using Amazon SES, messages that you send through Amazon SES automatically use a subdomain of amazonses.com as the default MAIL FROM domain. SPF evaluators will see that these messages pass the SPF policy evaluation because the default MAIL FROM domain has a SPF policy which includes the IP addresses of the SES infrastructure that sent the message. SPF authentication will result in an “SPF=PASS” and the authenticated identifier is the domain of the MAIL FROM address. The published SPF record applies to every message that is sent using SES regardless of whether you are using a shared or dedicated IP address. The amazonses.com SPF record lists all shared and dedicated IP addresses, so it is inclusive of all potential IP addresses that may be involved with sending email as the MAIL FROM domain. You can use ‘dig’ to look up the IP addresses that SES will use to send email:

dig txt amazonses.com | grep "v=spf1" amazonses.com. 850 IN TXT "v=spf1 ip4:199.255.192.0/22 ip4:199.127.232.0/22 ip4:54.240.0.0/18 ip4:69.169.224.0/20 ip4:23.249.208.0/20 ip4:23.251.224.0/19 ip4:76.223.176.0/20 ip4:54.240.64.0/19 ip4:54.240.96.0/19 ip4:52.82.172.0/22 ip4:76.223.128.0/19 -all"

Custom MAIL FROM domains

It is best practice for customers to configure a custom MAIL FROM domain, and not use the default amazonses.com MAIL FROM domain. The custom MAIL FROM domain will always be a subdomain of the customer’s verified domain identity. Once you configure the MAIL FROM domain, messages sent using SES will continue to result in an “SPF=PASS” as it does with the default MAIL FROM domain. Additionally, DMARC authentication will result in “DMARC=PASS” because the MAIL FROM domain and the domain in the “From” header are in alignment. It’s important to understand that customers must use a custom MAIL FROM domain if they want “SPF=PASS” to result in a “DMARC=PASS”.

For example, an Amazon SES-verified example.com domain will have the custom MAIL FROM domain “bounce.example.com”. The configured SPF record will be:

dig txt bounce.example.com | grep "v=spf1" "v=spf1 include:amazonses.com ~all"

Note: The chosen MAIL FROM domain could be any sub-domain of your choice. If you have the same domain identity configured in multiple regions, then you should create region-specific custom MAIL FROM domains for each region. e.g. bounce-us-east-1.example.com and bounce-eu-west-2.example.com so that asynchronously bounced messages are delivered directly to the region from which the messages were sent.

DKIM results in DMARC pass

For customers that establish Amazon SES Domain verification using DKIM signatures, DKIM authentication will result in a DKIM=PASS, and DMARC authentication will result in “DMARC=PASS” because the domain that publishes the DKIM signature is aligned to the domain in the “From” header (the SES domain identity).

DKIM and SPF together

Email messages are fully authenticated when the messages pass both DKIM and SPF, and both DKIM and SPF authenticated identifiers are domain-aligned. If only DKIM is domain-aligned, then the messages will still pass the DMARC policy, even if the SPF “pass” is unaligned. Mail receivers will consider the full context of SPF and DKIM when determining how they will handle the disposition of the messages you send, so it is best to fully authenticate your messages whenever possible. Amazon SES has taken care of the heavy lifting of the email authentication process away from our customers, and so, establishing SPF, DKIM and DMARC authentication has been reduced to a few clicks which allows SES customers to get started easily and scale fast.

Why is DMARC failing?

There are scenarios when you may notice that messages fail DMARC, whether your messages are fully authenticated, or partially authenticated. The following are things that you should look out for:

Email Content Modification

Sometimes email content is modified during the delivery to the recipients’ mail servers. This modification could be as a result of a security device or anti-spam agent along the delivery path (for example: the message Subject may be modified with an “[EXTERNAL]” warning to recipients). The modified message invalidates the DKIM signature which causes a DKIM failure. Remember, the purpose of DKIM is to ensure that the content of an email has not been tampered with during the delivery process. If this happens, the DKIM authentication will fail with an authentication error similar to “DKIM-signature body hash not verified“.

Solutions:

  • If you control the full path that the email message will traverse from sender to recipient, ensure that no intermediary mail servers modify the email content in transit.
  • Ensure that you configure a custom MAIL FROM domain so that the messages have a domain-aligned SPF identifier.
  • Keep the DMARC policy in monitoring mode (p=none) until these issues are identified/solved.

Email Forwarding

Email Forwarding There are multiple scenarios in which a message may be forwarded, and they may result in both/either SPF and DKIM failing to produce a domain-aligned authenticated identifier. For SPF, it means that the forwarding mail server is not listed in the MAIL FROM domain’s SPF policy. It is best practice for a forwarding mail server to avoid SPF failures and assume responsibility of mail handling for the messages it forwards by rewriting the MAIL FROM address to be in the domain controlled by the forwarding server. Forwarding servers that do not rewrite the MAIL FROM address pose a risk of impersonation attacks and phishing. Do not add the IP addresses of forwarding servers to your MAIL FROM domain’s SPF policy unless you are in complete control of all sources of mail being forwarded through this infrastructure. For DKIM, it means that the messages are being modified in some way that causes DKIM signature validation failure (see Email Content Modification section above). A responsible forwarding server will rewrite the MAIL FROM domain so that the messages pass SPF with a non-aligned authenticated identifier. These servers will attempt to forward the message without alteration in order to preserve DKIM signatures, but that is sometimes challenging to do in practice. In this scenario, since the messages carry no domain-aligned authenticated identifier, the messages will fail the DMARC policy.

Solution:

  • Email forwarding is an expected type of failure of which you will see in the DMARC aggregate reports. The domain owner must weigh the risk of causing forwarded messages to be rejected against the risk of not publishing a reject DMARC policy. Reference 8.6. Interoperability Considerations. Forwarding servers that wish to forward messages that they know will result in a DMARC failure will commonly rewrite the “From” header address of messages it forwards so that the messages pass a DMARC policy for a domain that the forwarding server is responsible for. The way to identify forwarding servers that rewrite the “From” header in this situation is to publish “p=quarantine pct=0 t=y” in your domain’s DMARC policy before publishing “p=reject”.

Multiple email sending providers are sending using the same domain

Multiple email sending providers: There are situations where an organization will have multiple business units sending email using the same domain, and these business units may be using an email sending provider other than SES. If neither SPF nor DKIM is configured with domain-alignment for these email sending providers, you will see DMARC failures in the DMARC aggregate report.

Solution:

  • Analyze the DMARC aggregate reports to identify other email sending providers, track down the business units responsible for each email sending program, and follow the instructions offered by the email sending provider about how to configure SPF and DKIM to produce a domain-aligned authenticated identifier.

What does a DMARC aggregate report look like?

The following XML example shows the general format of a DMARC aggregate report that you will receive from participating email service providers.

<?xml version="1.0" encoding="UTF-8" ?> 
<feedback> 
  <report_metadata> 
    <org_name>email-service-provider-domain.com</org_name> 
    <email>[email protected]</email> 
    <extra_contact_info>https://email-service-provider-domain.com/> 
    <report_id>620501112281841510</report_id> 
    <date_range> 
      <begin>1685404800</begin> 
      <end>1685491199</end> 
    </date_range> 
  </report_metadata> 
  <policy_published> 
    <domain>example.com</domain>
    <adkim>r</adkim> 
    <aspf>r</aspf> 
    <p>none</p> 
    <sp>none</sp> 
    <pct>100</pct> 
  </policy_published> 
  <record> 
    <row> 
      <source_ip>192.0.2.10</source_ip>
      <count>1</count> 
      <policy_evaluated> 
        <disposition>none</disposition> 
        <dkim>pass</dkim> 
        <spf>fail</spf> 
      </policy_evaluated> 
    </row> 
    <identifiers> 
      <header_from>example.com</header_from>
    </identifiers> 
    <auth_results> 
      <dkim> 
        <domain>example.com</domain> 
        <result>pass</result> 
        <selector>gm5h7da67oqhnr3ccji35fdskt</selector> 
      </dkim> 
      <dkim> 
        <domain>amazonses.com</domain> 
        <result>pass</result> 
        <selector>224i4yxa5dv7c2xz3womw6peua</selector> 
      </dkim> 
      <spf> 
        <domain>amazonses.com</domain> 
        <result>pass</result> 
      </spf> 
    </auth_results> 
  </record> 
</feedback> 


How to address DMARC deployment for domains confirmed to be unused for email (dangling or otherwise)

Deploying DMARC for unused or dangling domains is a proactive step to prevent abuse or unauthorized use of your domain. Once you have confirmed that all subdomains being used for sending email have the desired DMARC policies, you can publish a ‘p=reject’ tag on the organizational domain, which will prevent unauthorized usage of unused subdomains without the need to publish DMARC policies for every conceivable subdomain. For more advanced subdomain policy scenarios, read the “tree walk” definitions in https://datatracker.ietf.org/doc/draft-ietf-dmarc-dmarcbis/

Conclusion:

In conclusion, DMARC is not only a technology but also a commitment to email security, integrity, and trust. By embracing DMARC best practices, organizations can protect their users, maintain a positive brand reputation, and ensure seamless email deliverability. Every message from SES passes SPF and DKIM for “amazonses.com”, but the authenticated identifiers are not always in alignment with the domain in the “From” header which carries the DMARC policy. If email authentication is not fully configured, your messages are susceptible to delivery issues like spam filtering, or being rejected or blocked by the recipient ESP. As a best practice, you can configure both DKIM and SPF to attain optimum deliverability while sending email with SES.


About the Authors

Bruno Giorgini Bruno Giorgini is a Senior Solutions Architect specializing in Pinpoint and SES. With over two decades of experience in the IT industry, Bruno has been dedicated to assisting customers of all sizes in achieving their objectives. When he is not crafting innovative solutions for clients, Bruno enjoys spending quality time with his wife and son, exploring the scenic hiking trails around the SF Bay Area.
Jesse Thompson Jesse Thompson is an Email Deliverability Manager with the Amazon Simple Email Service team. His background is in enterprise IT development and operations, with a focus on email abuse mitigation and encouragement of authenticity practices with open standard protocols. Jesse’s favorite activity outside of technology is recreational curling.
Sesan Komaiya Sesan Komaiya is a Solutions Architect at Amazon Web Services. He works with a variety of customers, helping them with cloud adoption, cost optimization and emerging technologies. Sesan has over 15 year’s experience in Enterprise IT and has been at AWS for 5 years. In his free time, Sesan enjoys watching various sporting activities like Soccer, Tennis and Moto sport. He has 2 kids that also keeps him busy at home.
Mudassar Bashir Mudassar Bashir is a Solutions Architect at Amazon Web Services. He has over ten years of experience in enterprise software engineering. His interests include web applications, containerization, and serverless technologies. He works with different customers, helping them with cloud adoption strategies.
Priya Priya Singh is a Cloud Support Engineer at AWS and subject matter expert in Amazon Simple Email Service. She has a 6 years of diverse experience in supporting enterprise customers across different industries. Along with Amazon SES, she is a Cloudfront enthusiast. She loves helping customers in solving issues related to Cloudfront and SES in their environment.


Why is DMARC failing? How to Fix a DMARC Failure

Post Syndicated from singhzwz original https://aws.amazon.com/blogs/messaging-and-targeting/why-is-dmarc-failing-how-to-fix-a-dmarc-failure/

Why is DMARC failing? How to Fix a DMARC Failure

Introduction

For enterprises of all sizes, email is a critical piece of infrastructure that supports large volumes of communication from an organization. One of the benefits of using an email service or email platform like Amazon Simple Email Service (Amazon SES) is that these managed email services allow you to send emails to your users using popular authentication methods such as DMARC. In this blog post we’ll explore the reasons DMARC may be failing in your emails and best practices to ensure your DMARC does not fail.

What is DMARC?

Domain-based Message Authentication, Reporting and Conformance, is an email authentication protocol that uses Sender Policy Framework (SPF) and DomainKeys Identified Mail (DKIM) to detect email spoofing. Email DMARC, or Domain-based Message Authentication, Reporting, and Conformance, is a technology that helps protect against email fraud and phishing attacks.
When you send an email, it contains information about the sender, recipient, and the content. However, cybercriminals can forge or “spoof” the sender’s address, making it appear as if the email is coming from a trusted source when it’s not.
DMARC helps address this problem by allowing email recipients to check if the incoming email is legitimate or not. It works by using cryptographic techniques to verify the authenticity of the sender’s domain.

Here’s how it simplifies the process:

  • The sender’s domain owner adds a special DMARC record to its DNS (Domain Name System) settings. This record includes information about how to handle incoming emails.
  • When an email recipient’s server receives a message, it checks the sender’s domain for the DMARC record.
  • The recipient’s server then verifies the email’s alignment with the DMARC record.
  • If the DMARC compliance fails, the recipient’s server can take different actions specified in the DMARC record- it may reject or quarantine the email or allow it to pass through.

By implementing DMARC, legitimate email senders can protect their domains from being used for malicious purposes. It helps organizations and individuals combat phishing attacks, protect their reputation, and enhance email security.
Overall, DMARC acts as a security measure to ensure that the emails you receive are genuinely from the claimed sender, minimizing the risk of falling victim to email-based scams.

Solution Overview

DMARC failures may happen if the sender domain of the email is not enabled for DKIM or SPF to comply via DMARC. This blog contains information that will help you troubleshoot DMARC failures and fix them so that the emails you send comply with DMARC via both SPF and DKIM. There are two ways to achieve DMARC validation: Complying with DMARC through SPF and Complying with DMARC through DKIM.

To comply DMARC via SPF:

For an email to comply with DMARC based on SPF, both of the following conditions must be met, either of it failing with result in DMARC failure through SPF:

Condition 1: The email must pass an SPF check. Sender Policy Framework (SPF) is an email validation standard that’s designed to prevent email spoofing. Domain owners use SPF to tell email providers which servers are allowed to send email from their domains. SPF is defined in RFC 7208 in detail.

Condition 2: The domain in the From address of the email header must align with the MAIL FROM domain that the sending mail server specifies to the receiving mail server. When an email is sent, it has two addresses that indicate its source: a From address that’s displayed to the message recipient, and a MAIL FROM address that indicates where the message originated. By using a custom MAIL FROM domain, you are able to use SPF to achieve Domain-based Message Authentication, Reporting and Conformance (DMARC) validation.

To comply DMARC via DKIM:

DomainKeys Identified Mail (DKIM) is an email security standard designed to make sure that an email that claims to have come from a specific domain was indeed authorized by the owner of that domain. It uses public-key cryptography to sign an email with a private key.
For an email to comply with DMARC based on DKIM, both of the following conditions must be met. Either of below conditions failing will result in DMARC failure through DKIM:

Condition 1: The message must have a valid DKIM signature.
Condition 2: The From address in the email header must align with the domain in the DKIM signature. If the domain’s DMARC policy specifies strict alignment for DKIM, these domains must match exactly. If the domain’s DMARC policy specifies relaxed alignment for DKIM, the domain can be a subdomain of the From domain.

About configuring DMARC record :

You may refer to our document here to understand in detail about what is DMARC and how a DMARC record can be configured. It is a DNS record of type “TXT” that needs to be updated in authoritative zone file of the domain in concern. For example, DMARC record for domain “amazon.com” is set up in DNS of this domain as below:

_dmarc.amazon.com. TXT "v=DMARC1; p=quarantine; pct=100; rua=mailto:[email protected]; ruf=mailto:[email protected]"

This document has detailed explanation about syntax of a DMARC record and the associated implication of using each tag with a specific value.

A high level email flow via SES looks like this:
—–
Client Application—> SES—> Recipient ISP–> Recipient inbox
—–

SES is a mail relay service, i.e., it takes the email from the sender mail server and forwards it to the recipient domain’s MTA. SES considers an email is successfully delivered as soon as it gets an 250 OK response from the recipient ISP. After the email is delivered, Amazon SES has no control over the email and can’t guarantee inbox placement. Internet service providers (ISPs) use different mechanisms and algorithms to filter emails to place them in either the recipient’s inbox folder or spam folder.

Some of the scenarios where you may need to investigate DMARC results are:

  • Your legitimate emails are being bounced by Recipient MTA
  • Your legitimate emails are landing in spam folder

Based on how you have configured your DMARC policy any of the above scenarios may occur. This is when we need to analyze your DMARC set up and raw headers received by recipient(in case of email landing in spam).

Email header analysis:
In order to understand what was the authentication performed by recipient ISP and what was the result of it, it is required to analyse detailed headers received at recipient side. You may refer to our public blog here to understand how to gather raw email headers from inbox of recipient.

Below is a sample snippet of email headers captured from recipient inbox and captures DMARC failure:

Delivered-To: [email protected]
Received: by 2002:a54:33ca:0:0:0:0:0 with SMTP id o10csp446075ect;
Mon, 25 Apr 2022 05:56:54 -0700 (PDT)
X-Google-Smtp-Source: ABdhPJzYtjfIvCYojV/yGDa/IWKE9sTfOs95kW9sKMV9bhx4B3GIuyOsGhvS+UUvw831ygQw4Tvt
X-Received: by 2002:a05:622a:14d0:b0:2f3:4279:687c with SMTP id u16-20020a05622a14d000b002f34279687cmr11908123qtx.551.1650891414627;
Mon, 25 Apr 2022 05:56:54 -0700 (PDT)
ARC-Seal: i=1; a=rsa-sha256; t=1650891414; cv=none;
d=google.com; s=arc-20160816;
b=H3q0X5edXZe04nTYfoiyMWWiv+brEhRTc8+QuOOOa4s61q4FriokXnvMycU9M0/5Rk
/CPz46yXdNKV3hlg7021dcowSMxUFoo3gAARXytmFapJVoYGAhpYqM3lFBXkfYYr8Vw/
0CKlp/7bgtkW4Zo7QTT3nasNUIsF05/35zTBGM8H/RNPyCBhE94uLZf+b2b/SVV5KBa1
GRWh41rgvSgQYfOYkWb+5GmA0+sdkT5h8kP7vBeZhvrPmVLpyz+WAEMvDNz+htmmZAH5
A1D4E8XlEyanP174gQZSM8+xqUc7Hkdu5Fn28bN9cBICGVu//zTuL8xV9P3i2OcPJJjQ
wlnA==
ARC-Message-Signature: i=1; a=rsa-sha256; c=relaxed/relaxed; d=google.com; s=arc-20160816;
h=feedback-id:date:message-id:subject:to:from:dkim-signature;
bh=Gx2MAEm0xDXgqYf1y1e7XGf7LPovRt76Xkh1K6Z3T+w=;
b=gRZV/qE9wWxs27C/je108Cu1NCr5AdGyeMnpf5jXsuDhC7TKvjSkBqcWPMontgY9WU
Gc/WPM42zlSkJ7vNX/ey2mjc6gBdoQNHFen2Zq4JHvTe6vq4g7O/F7cPWDOsAK9QqYoP
5C6Hfd8WPVDY3WNv+2AhQfbXN6Q9H3k4XR/GsCDowYHScyTBJRb9z+sAWIOI4J2J0bda
+TYIiUHzLexL69y3M1N3luMP1GnoD8H6NFPvd08CVJaYqRM2qKOoo6K1Oq0/FNiVMPF1
kdSkJ/1p2+V5YQM3679nuWqiZrK70+CsShsRTtBSBoiWtTft4rrlYKnr7wZLEEiVCKsZ
53QA==
ARC-Authentication-Results: i=1; mx.google.com;
dkim=pass [email protected] header.s=6gbrjpgwjskckoa6a5zn6fwqkn67xbtw header.b=GUxUTLBH;
spf=pass (google.com: domain of 0100018060cbd9c7-d7da0315-7127-4369-b439-de6dd9b8d5e7-000000@amazonses.com designates 11.22.33.44 as permitted sender) smtp.mailfrom=0100018060cbd9c7-d7da0315-7127-4369-b439-de6dd9b8d5e7-000000@amazonses.com;
dmarc=fail (p=QUARANTINE sp=QUARANTINE dis=QUARANTINE) header.from=amazon.com
Return-Path: <0100018060cbd9c7-d7da0315-7127-4369-b439-de6dd9b8d5e7-000000@amazonses.com>
Received: from a8-30.smtp-out.amazonses.com (a8-30.smtp-out.amazonses.com. [11.22.33.44])
by mx.google.com with ESMTPS id i13-20020ac85c0d000000b002f367d8d6bfsi873900qti.466.2022.04.25.05.56.54
for <[email protected]>
(version=TLS1_2 cipher=ECDHE-ECDSA-AES128-GCM-SHA256 bits=128/128);
Mon, 25 Apr 2022 05:56:54 -0700 (PDT)
Received-SPF: pass (google.com: domain of 0100018060cbd9c7-d7da0315-7127-4369-b439-de6dd9b8d5e7-000000@amazonses.com designates 11.22.33.44 as permitted sender) client-ip=11.22.33.44;
Authentication-Results: mx.google.com;
dkim=pass [email protected] header.s=6gbrjpgwjskckoa6a5zn6fwqkn67xbtw header.b=GUxUTLBH;
spf=pass (google.com: domain of 0100018060cbd9c7-d7da0315-7127-4369-b439-de6dd9b8d5e7-000000@amazonses.com designates 11.22.33.44 as permitted sender) smtp.mailfrom=0100018060cbd9c7-d7da0315-7127-4369-b439-de6dd9b8d5e7-000000@amazonses.com;
dmarc=fail (p=QUARANTINE sp=QUARANTINE dis=QUARANTINE) header.from=amazon.com
DKIM-Signature: v=1; a=rsa-sha256; q=dns/txt; c=relaxed/simple; s=6gbrjpgwjskckoa6a5zn6fwqkn67xbtw; d=amazonses.com; t=1650891414; h=From:To:Subject:Content-Type:Message-ID:Date:Feedback-ID; bh=ynH00ooK6J9gmzrcdqlUOWlsQMEivO17lTfThw55L2U=; b=GUxUTLBHFWyoCG/hLKzsdvrHfgHSSRN+UyY8x3T6kLnt4/a7Os54kmrEaIiVLqsY Zw2Z8H9ML4NjljwBdAO1M66l1+nl/Z5jNISykpp0BOYwSuD32IGLchNUCXyNmNyDahO opStirAtp+MFVGH1FtCwFxDmXu03rGTJhy5qzuEM=
From: [email protected]
To: [email protected]

The email in headers above was sent from a user having domain “amazon.com” to recipient using domain “gmail.com”.
Now, DMARC compliance can pass either via SPF or DKIM. The logic basically works like below:

DMARC pass = (DKIM must pass) OR (SPF must pass)

So we will analyse DMARC compliance via DKIM and SPF one at a time:

Complying with DMARC through SPF

We shall look carefully at “Authentication-Results” header to see if SPF check passed. The sender IP is “11.22.33.44” and as per below details captured in “Authentication-Results”:

spf=pass (google.com: domain of 0100018060cbd9c7-d7da0315-7127-4369-b439-de6dd9b8d5e7-000000@amazonses.com designates 11.22.33.44 as permitted sender)

From above snippet it can be confirmed that the recipient ISP could verify that sender IP 11.22.33.44 is designated as a valid sender. This confirms that recipient ISP validation on “Condition 1” stated above successfully passed.

Now, the “condition 2” states that the domain in the From address of the email header must align with the MAIL FROM domain. Let’s look at both these headers, sharing it below:


From: [email protected]
Return-Path: <0100018060cbd9c7-d7da0315-7127-4369-b439-de6dd9b8d5e7-000000@amazonses.com>

It can be observed that there is a mismatch in sender domain and MAIL FROM domain i.e. “amazon.com” and “amazonses.com” respectively. This happened because sender has not configured custom MAIL FROM domain in SES settings, so by default a subdomain of amazonses.com was used as default MAIL FROM domain.
To resolve the issue, you should configure MAIL FROM domain which would be a subdomain of sender domain i.e. “amazon.com” in above case.

Complying with DMARC through DKIM

We shall look carefully at “Authentication-Results” header to see if DKIM check passed. Below are the details captured in “Authentication-Results”:


dkim=pass [email protected] header.s=6gbrjpgwjskckoa6a5zn6fwqkn67xbtw header.b=GUxUTLBH; d=amazonses.com

From above snippet it can be confirmed that the recipient ISP could verify DKIM signature was valid. This confirms that recipient ISP validation on “Condition 1” stated above successfully passed.

Now, the “condition 2” states that From address in the email header must align with the domain in the DKIM signature. The domain in the DKIM signature is “amazonses.com” as captured in value “d=amazonses.com” above. This value does not match with domain in header “From” i..e. amazon.com. Since the second condition failed, so overall DMARC compliance failed via DKIM as well.
To resolve this issue, identity “[email protected]” using the domain “amazon.com” must have DKIM enabled. The document here has details about how to enable DKIM for a verified identity.

Now, since DMARC compliance failed both via DKIM as well as SPF overall DMARC compliance failed the received email. This is captured in header “Authentication-Results” below:

dmarc=fail (p=QUARANTINE sp=QUARANTINE dis=QUARANTINE) header.from=amazon.com

The value “p=QUARANTINE” will direct the recipient ISP to put email failing DMARC compliance into spam folder. However, it is up to the recipient ISP to take final action after they complete authentication checks.

Conclusion:

Overall, you will need to ensure that your domain complies with DMARC at least via SPF or DKIM. If DMARC set up for a domain is not complete, it is susceptible to deliverability issues like email landing in spam, being rejected or being blocked by recipient ISP.
As a best practice, you can configure both DKIM and SPF to attain optimum deliverability while sending emails via SES. We hope the process of DMARC related analysis shared above helps you in troubleshooting DMARC compliance and configuring DMARC for your domains.

Choosing the Right Domain for Optimal Deliverability with Amazon SES

Post Syndicated from komaio original https://aws.amazon.com/blogs/messaging-and-targeting/choosing-the-right-domain-for-optimal-deliverability-with-amazon-ses/

Choosing the Right Domain for Optimal Deliverability with Amazon SES

As a sender, selecting the right domain for the visible From header of your outbound messages is crucial for optimal deliverability. In this blog post, we will guide you through the process of choosing the best domain to use with Amazon Simple Email Service (SES)

Understanding domain selection and its impact on deliverability

With SES, you can create an identity at the domain level or you can create an email address identity. Both types of verified identities permit SES to use the email address in the From header of your outbound messages. You should only use email address identities for testing purposes, and you should use a domain identity to achieve optimal deliverability.

Choosing the right email domain is important for deliverability for the following reasons:

  • The domain carries a connotation to the brand associated with the content and purpose of the message.
  • Mail receiving organizations are moving towards domain-based reputational models; away from IP-based reputation.
  • Because the email address is a common target for forgery, domain owners are increasingly publishing policies to control who can and cannot use their domains.

The key takeaway from this blog is that you must be aware of the domain owner’s preference when choosing an identity to use with SES. If you do not have a relationship with the domain owner then you should plan on using your own domain for any email you send from SES.

Let’s dive deep into the technical reasons behind these recommendations.

What is DMARC?

Domain-based Message Authentication, Reporting, and Conformance (DMARC) is a domain-based protocol for authenticating outbound email and for controlling how unauthenticated outbound email should be handled by the mail receiving organization. DMARC has been around for over a decade and has been covered by this blog in the past.

DMARC permits the owner of an email author’s domain name to enable verification of the domain’s use. Mail receiving organizations can use this information when evaluating handling choices for incoming mail. You, as a sender, authenticate your email using DKIM and SPF.

  • DKIM works by applying a cryptographic signature to outbound messages. Mail receiving organizations will use the public key associated with the signing key that was used to verify the signature. The public key is stored in the DNS.
  • SPF works by defining the IP addresses permitted to send email as the MAIL FROM domain. The record of IP addresses is stored in the DNS. The MAIL FROM domain is not the same domain as the domain in the From header of messages sent via SES. It is either domain within amazonses.com or it is a custom MAIL FROM domain that is a subdomain of the verified domain identity. Read more about SPF and Amazon SES.

A message passes the domain’s DMARC policy when the evaluation DKIM or SPF indicate that the message is authenticated with an identifier that matches (or is a subdomain of) the domain in the visible From header.

How can I look up the domain’s DMARC policy?

You must be aware of the DMARC policy of the domain in which your SES identities reside. The domain owner may be using DMARC to protect the domain from forgery by unauthenticated sources. If you are the domain owner, you can use this method to confirm your domain’s current DMARC policy.

You can look up the domain’s DMARC policy in the following ways:

  • Perform a DNS query of type TXT against the hostname called _dmarc.<domain>. For example, you can use the ‘dig’ or ‘nslookup’ command on your computer, or make the same query using a web-based public DNS resolver, such as https://dns.google/
  • Use a 3rd party tool such as:

https://tools.wordtothewise.com/dmarc/
https://mxtoolbox.com/dmarc.aspx
https://dmarcian.com/dmarc-inspector/

The “p” tag in the DMARC record indicates the domain’s policy.

How does the domain’s policy affect how I can use it with SES?

This section will cover each policy scenario and provide guidance to your usage of the domain with SES.

Policy How to Interpret You have verified the domain identity with EasyDKIM You have only email address identities with the domain
No DMARC record The domain owner has not published a DMARC policy. They may not yet be aware of DMARC There is no DMARC policy for mail receiving organizations to apply. Your messages are authenticated with DKIM, so mail receiving organization may leverage a domain-based reputational model for your email. There is no DMARC policy for mail receiving organizations to apply. Your messages are not authenticated, so reputation remains solely based on IP.
none The domain owner is evaluating the DMARC reports that the mail receiving organizations send to the domain owner, but has requested the mail receiving organizations not use DMARC policy logic to evaluate incoming email. There is no DMARC policy for mail receiving organizations to apply. Your messages are authenticated with DKIM, so mail receiving organization may leverage a domain-based reputational model for your email. There is no DMARC policy for mail receiving organizations to apply. Your messages are not authenticated, so reputation remains solely based on IP.
quarantine The domain owner has instructed mail receiving organizations to send any non-authenticated email to a quarantine or to the Junk Mail folders of the recipients. Your messages are authenticated with DKIM and will not be subjected to the domain’s DMARC policy. Mail receiving organizations may not deliver your messages to the inboxes of your intended recipients.
reject The domain owner has instructed mail receiving organizations to reject any non-authenticated email sending from the domain. Your messages are authenticated with DKIM and will not be subjected to the domain’s DMARC policy. Mail receiving organizations may reject these messages which will result in ‘bounce’ events within SES.

Other considerations

If the domain has a none or quarantine policy, you must be aware that the domain owner may have a plan to migrate to a more restrictive policy without consulting with you. This will affect your deliverability in the form of low inboxing/open rates, or high bounce rates. You should consult with the domain owner to determine if they recommend an alternative domain for your email use case.

Not all mail receiving organizations enforce DMARC policies. Some may use their own logic, such as quarantining messages that fail a reject policy. Some may use DMARC logic to build a domain-based reputational model based on your sending patterns even if you do not publish a policy. For example, here is a blueprint showing how you can set up custom filtering logic with SES Inbound.

If you have verified the domain identity with the legacy TXT record method, you must sign your email using a DKIM signature. The DKIM records in the DNS must be within the same domain as the domain in the From header of the messages you are signing.

If you have the domain identity verified with EasyDKIM and you also have email address identities verified within the same domain, then the email address identities will inherit the DKIM settings from the domain identity. Your email will be authenticated with DKIM and will not be subjected to the domain’s DMARC policy.

Can I use SPF instead of DKIM to align to the domain’s DMARC policy?

Messages can also pass a DMARC policy using SPF in addition to DKIM. This is enabled through the use of a custom MAIL FROM domain. The custom MAIL FROM domain needs to be a subdomain of the SES identity and the SES domain identity’s DMARC policy must not be set to strict domain alignment due to the way SES handles feedback forwarding. The domain owner enables a custom MAIL FROM domain by publishing records in the DNS. There is no way to authenticate email without publishing records in the DNS. Read Choosing a MAIL FROM domain to learn more.

The recommended approach is to use EasyDKIM primarily, and optionally enable a custom MAIL FROM domain as an additive form of authentication.

What should I do if I am not the domain owner?

The process of enabling DKIM and SPF authentication involves publishing DNS records within the domain. Only the domain owner may modify DNS for their domain. If you are not the domain owner, here are some alternative solutions.

Option 1: Segregate your email sending programs into subdomains.

This option is best for people within large or complex organizations, or vendors who are contracted to send email on behalf of an organization.

Ask the domain owner to delegate a subdomain for your use case (e.g. marketing.domain.example). Many domain owners are willing to delegate use of a subdomain because allowing for multiple use cases on a single domain becomes a very difficult management and governance challenge.

Through the use of subdomains they can segregate your email sending program from the email sent by normal mailbox users and other email sending programs. This also gives mail receiving organizations the ability to create a reputational model that is specific to your sending patterns, which means that you do not need to inherit any negative reputation incurred by others.

Option 2: Use a domain in which you are the domain owner.

This option is best if you have end-customers (or tenants) who have email addresses within domains which have domain owners that will not allow any form of delegation to you.

Use your own domain as the domain identity, and use subdomains within your domain to distinguish your end-customers from each other (e.g. tenant1.yourdomain.example, tenant2.yourdomain.example, tenant3.yourdomain.example, …). Amazon WorkMail uses this strategy for the awsapps.com domain.

This gives you complete control over the domain as well as your reputation. Use subdomains to segregate reputation between your end-customers if you have a multi-tenant business model.

Here are some additional suggestions to make your email more personable while remaining aligned to the domains’ DMARC policies.

  • You may format the From header of your outgoing messages so that the display name clearly reflects the name of the message author.

From: “John Doe via My App” <[email protected]>

  • Set the Reply-to header of your outbound messages so that when recipients reply, the return messages will go to the intended recipient.

Reply-to: [email protected]

What should I do if the domain is already being used for a different email sending program?

From a deliverability perspective, it is beneficial to compartmentalize your sending into different domains, or subdomains, for different email sending programs. That will limit the reputational blast radius if something were to go wrong with one campaign. Consider using different subdomains for each sending program. For example:

  • marketing.domain.example
  • receipts.domain.example

DMARC was designed for marketing and transactional email use cases, so it is good practice to publish ‘reject’ DMARC policies for those subdomains. Having a strong policy doesn’t give a free pass into recipient inboxes, but it allows the mail receiving organization to know what to do with messages that aren’t authenticated, which can lead to better trust. Building trust is the best way to gain a positive reputation.

If the domain is used by normal users for day-to-day correspondences, the domain owner should be very careful about publishing a DMARC policy because it is known to create interoperability issues with mailing lists and other email providers. Many of these email domains may never publish a ‘reject’ DMARC policy. For new email sending programs, you should strongly consider using a subdomain rather than any domain that is being used for user correspondences.

Conclusion

To ensure optimal deliverability with Amazon SES, it’s essential to be aware of the domain owner’s preferences and use a domain identity for outbound messages. Keep in mind that email address identities should only be used for testing purposes or with domains without DMARC policies. Domain owners can use subdomains to segregate email sending programs, making management and governance easier while allowing mail receiving organizations to build isolated reputational models.

By following the recommendations in this blog, you’ll be better prepared to align with the domain owner’s preferences, achieve higher deliverability rates for your authenticated outbound email, and be compatible with future DMARC developments.

Amazon SES – How to set up EasyDKIM for a new domain

Post Syndicated from Vinay Ujjini original https://aws.amazon.com/blogs/messaging-and-targeting/amazon-ses-how-to-set-up-easydkim-for-a-new-domain/

What is email authentication and why is it important?

Amazon Simple Email Service (SES) lets you reach customers confidently without an on-premises Simple Mail Transfer Protocol (SMTP) system. Amazon SES provides built-in support for email authentication protocols, including DKIM, SPF, and DMARC, which help improve the deliverability and authenticity of outgoing emails.

Email authentication is the process of verifying the authenticity of an email message to ensure that it is sent from a legitimate source and has not been tampered with during transmission. Email authentication methods use cryptographic techniques to add digital signatures or authentication headers to outgoing emails, which can be verified by email receivers to confirm the legitimacy of the email.

Email authentication helps establish a sender’s reputation as a trusted sender. Additionally, when email receivers can verify that emails are legitimately sent from a sender’s domain using authentication methods, it also helps establish the sender’s reputation as a trusted sender. Email authentication involves one or more technical processes used by mail systems (sending and receiving) that make certain key information in an email message verifiable. Email authentication generates signals about the email, which can be utilized in decision-making processes related to spam filtering and other email handling tasks.

There are currently two widely used email authentication mechanisms – SPF (Sender Policy Framework) and DKIM (DomainKeys Identified Mail). They provide information that the receiving domain can use to verify that the sending of the message was authorized in some way by the sending domain. DKIM can also help determine that the content was not altered in transit. And the DMARC (Domain-based Message Authentication, Reporting and Conformance) protocol allows sending domains to publish verifiable policies that can help receiving domains decide how best to handle messages that fail authentication by SPF and DKIM.

Email authentication protocols:

  1. SPF (Sender Policy Framework): SPF is an email authentication protocol that checks which IP addresses are authorized to send mail on behalf of the originating domain. Domain owners use SPF to tell email providers which servers are allowed to send email from their domains. This is an email validation standard that’s designed to prevent email spoofing.
  2. DKIM (DomainKeys Identified Mail): DKIM is an email authentication protocol that allows a domain to attach its identifier to a message. This asserts some level of responsibility or involvement with the message. A sequence of messages signed with the same domain name is assumed to provide a reliable base of information about mail associated with the domain name’s owner, which may feed into an evaluation of the domain’s “reputation”. It uses public-key cryptography to sign an email with a private key. Recipient servers can then use a public key published to a domain’s DNS to verify that parts of the emails have not been modified during the transit.
  3. DMARC (Domain-based Message Authentication, Reporting and Conformance): is an email authentication protocol that uses Sender Policy Framework (SPF) and DomainKeys Identified Mail (DKIM) to detect email spoofing. In order to comply with DMARC, messages must be authenticated through either SPF or DKIM, or both.

Let us dive deep into DKIM in this blog. Amazon SES provides three options for signing your messages using a DKIM signature:

  1. Easy DKIM: To set up a sending identity so that Amazon SES generates a public-private key pair and automatically adds a DKIM signature to every message that you send from that identity.
  2. BYODKIM (Bring Your Own DKIM): To provide your own public-private key pair for so SES adds a DKIM signature to every message that you send from that identity, see Provide your own DKIM authentication token (BYODKIM) in Amazon SES.
  3. Manually add DKIM signature: To add your own DKIM signature to email that you send using the SendRawEmail API, see Manual DKIM signing in Amazon SES.

The purpose of EasyDKIM is to simplify the process of generating DKIM keys, adding DKIM signatures to outgoing emails, and managing DKIM settings, making it easier for users to implement DKIM authentication for their email messages. Using EasyDKIM, Amazon SES aims to improve email deliverability, prevent email fraud and phishing attacks, establish sender reputation, enhance brand reputation, and comply with industry regulations or legal requirements. EasyDKIM doubles as domain verification (simplification) and it eliminates the need for customers to worry about DKIM key rotation (managed automation). By automating and simplifying the DKIM process, EasyDKIM helps users ensure the integrity and authenticity of their email communications, while reducing the risk of fraudulent activities and improving the chances of emails being delivered to recipients’ inboxes.

Setting up Easy DKIM in Amazon SES:

When you set up Easy DKIM for a domain identity, Amazon SES automatically adds a 2048-bit DKIM signature to every email that you send from that identity. You can configure EasyDKIM by using the Amazon SES console, or by using the API.

The procedure in this section is streamlined to just show the steps necessary to configure Easy DKIM on a domain identity that you’ve already created. If you haven’t yet created a domain identity or you want to see all available options for customizing a domain identity, such as using a default configuration set, custom MAIL FROM domain, and tags, see Creating a domain identity. Part of creating an Easy DKIM domain identity is configuring its DKIM-based verification where you will have the choice to either accept the Amazon SES default of 2048 bits, or to override the default by selecting 1024 bits. Steps to set up easyDKIM for a verified identity:

  1. Sign in to the AWS Management Console and open the Amazon SES console at https://console.aws.amazon.com/ses/
  2. In the navigation pane, under Configuration, choose Verified identities.
  3. List of verified identities in SES console

    Verified identities

  4. In the list of identities, choose an identity where the Identity type is Domain.
  5. Under the Authentication tab, in the DomainKeys Identified Mail (DKIM) container, choose Edit.
  6. In the Advanced DKIM settings container, choose the Easy DKIM button in the Identity type field.
  7. Choose EasyDKIM as identity type; RSA_2048_BITT in DKIM signing key length; Check Enabled checkbox under DKIM signatures.

    DKIM settings

  8. In the DKIM signing key length field, choose either RSA_2048_BIT or RSA_1024_BIT.
  9. In the DKIM signatures field, check the Enabled box.
  10. Choose Save changes.
  11. After configuring your domain identity with Easy DKIM, you must complete the verification process with your DNS provider – proceed to Verifying a DKIM domain identity with your DNS provider and follow the DNS authentication procedures for Easy DKIM.

Conclusion:

Email authentication, especially DKIM, is crucial in securing your emails, establishing sender reputation, and improving email deliverability. EasyDKIM provides a simplified and automated way to implement DKIM authentication. It removes the hassles of generating DKIM keys and managing settings, while additionally reducing risks and and enhancing sender authenticity. By following the steps outlined in this blog post, you can easily set up easyDKIM in Amazon SES and start using DKIM authentication for your email campaigns.

About the Author

Vinay Ujjini is an Amazon Pinpoint and Amazon Simple Email Service Worldwide Principal Specialist Solutions Architect at AWS. He has been solving customer’s omni-channel challenges for over 15 years. He is an avid sports enthusiast and in his spare time, enjoys playing tennis & cricket.

Stop brand impersonation with Cloudflare DMARC Management

Post Syndicated from Joao Sousa Botto original https://blog.cloudflare.com/dmarc-management/

Stop brand impersonation with Cloudflare DMARC Management

Stop brand impersonation with Cloudflare DMARC Management

At the end of 2021 Cloudflare launched Security Center, a unified solution that brings together our suite of security products and unique Internet intelligence. It enables security teams to quickly identify potential security risks and threats to their organizations, map their attack surface and mitigate these risks with just a few clicks. While Security Center initially focused on application security, we are now adding crucial zero trust insights to further enhance its capabilities.

When your brand is loved and trusted, customers and prospects are looking forward to the emails you send them. Now picture them receiving an email from you: it has your brand, the subject is exciting, it has a link to register for something unique — how can they resist that opportunity?

But what if that email didn’t come from you? What if clicking on that link is a scam that takes them down the path of fraud or identity theft? And what if they think you did it? The truth is, even security minded people occasionally fall for well crafted spoof emails.

That poses a risk to your business and reputation. A risk you don’t want to take – no one does. Brand impersonation is a significant problem for organizations globally, and that’s why we’ve built DMARC Management – available in Beta today.

With DMARC Management you have full insight on who is sending emails on your behalf. You can one-click approve each source that is a legitimate sender for your domain, and then set your DMARC policy to reject any emails sent from unapproved clients.

Stop brand impersonation with Cloudflare DMARC Management

When the survey platform your company uses is sending emails from your domain, there’s nothing to worry about – you configured it that way. But if an unknown mail service from a remote country is sending emails using your domain that can be quite scary, and something you’ll want to address. Let’s see how.

Anti-spoofing mechanisms

Sender Policy Framework (SPF), DomainKeys Identified Mail (DKIM) and Domain-based Message Authentication Reporting and Conformance (DMARC) are three common email authentication methods. Together, they help prevent spammers, phishers, and other unauthorized parties from sending emails on behalf of a domain they do not own.

SPF is a way for a domain to list all the servers the company sends emails from. Think of it like a publicly available employee directory that helps someone to confirm if an employee works for an organization. SPF records list all the IP addresses of all the servers that are allowed to send emails from the domain.

DKIM enables domain owners to automatically “sign” emails from their domain. Specifically, DKIM uses public key cryptography:

  1. A DKIM record stores the domain’s public key, and mail servers receiving emails from the domain can check this record to obtain the public key.
  2. The private key is kept secret by the sender, who signs the email’s header with this key.
  3. Mail servers receiving the email can verify that the sender’s private key was used by applying the public key. This also guarantees that the email was not tampered with while in transit.

DMARC tells a receiving email server what to do after evaluating the SPF and DKIM results. A domain’s DMARC policy can be set in a variety of ways — it can instruct mail servers to quarantine emails that fail SPF or DKIM (or both), to reject such emails, or to deliver them.

It’s not trivial to configure and maintain SPF and DMARC, though. If your configuration is too strict, legitimate emails will be dropped or marked as spam. If it’s too relaxed, your domain might be misused for email spoofing. The proof is that these authentication mechanisms (SPF / DKIM / DMARC) have existed for over 10 years and still, there are still less than 6 million active DMARC records.

DMARC reports can help, and a full solution like DMARC Management reduces the burden of creating and maintaining a proper configuration.

DMARC reports

All DMARC-compliant mailbox providers support sending DMARC aggregated reports to an email address of your choice. Those reports list the services that have sent emails from your domain and the percentage of messages that passed DMARC, SPF and DKIM. They are extremely important because they give administrators the information they need to decide how to adjust their DMARC policies — for instance, that’s how administrators know if their legitimate emails are failing SPF and DKIM, or if a spammer is trying to send illegitimate emails.

Stop brand impersonation with Cloudflare DMARC Management

But beware, you probably don’t want to send DMARC reports to a human-monitored email address, as these come in fast and furious from virtually every email provider your organization sends messages to, and are delivered in XML format. Typically, administrators set up reports to be sent to a service like our DMARC Management, that boils them down to a more digestible form. Note: These reports do not contain personal identifiable information (PII).

DMARC Management automatically creates an email address for those reports to be sent to, and adds the corresponding RUA record to your Cloudflare DNS to announce to mailbox providers where to send reports to. And yes, if you’re curious, these email addresses are being created using Cloudflare Email Routing.

Note: Today, Cloudflare DNS is a requirement for DMARC Management. Cloudflare Area 1 customers will soon also be able to see DMARC reports even if they’re using third-party DNS services.

Stop brand impersonation with Cloudflare DMARC Management

As reports are received in this dedicated email address, they are processed by a Worker that extracts the relevant data, parses it and sends it over to our analytics solution. And you guessed again, that’s implemented using Email Workers. You can read more about the technical implementation here.

Taking action

Now that reports are coming in, you can review the data and take action.

Note: It may take up to 24 hours for mailbox providers to start sending reports and for these analytics to be available to you.

At the top of DMARC Management you have an at-a-glance view of the outbound security configuration for your domain, more specifically DMARC, DKIM, and SPF. DMARC Management will soon start reporting on inbound email security as well, which includes STARTTLS, MTA-STS, DANE, and TLS reporting.

Stop brand impersonation with Cloudflare DMARC Management

The middle section shows the email volume over time, with individual lines showing those that pass DMARC and those that fail.

Stop brand impersonation with Cloudflare DMARC Management

Below, you have additional details that include the number of email messages sent by each source (per the DMARC reports), and the corresponding DMARC, SPF and DKIM statistics. You can approve (that is, include in SPF) any of these sources by clicking on “…”, and you can easily spot applications that may not have DKIM correctly configured.

Stop brand impersonation with Cloudflare DMARC Management

Clicking on any source gives you the same DMARC, SPF and DKIM statistics per IP address of that source. This is how you identify if there’s an additional IP address you might need to include in your SPF record, for example.

Stop brand impersonation with Cloudflare DMARC Management

The ones that fail are the ones you’ll want to take action on, as they will need to either be approved (which technically means including in the SPF record) if legitimate, or stay unapproved and be rejected by the receiving server when the DMARC policy is configured with p=reject.

Getting to a DMARC reject policy is the goal, but you don’t want to apply such a restrictive policy until you have high confidence that all legitimate sending services are accounted for in SPF (and DKIM, if appropriate). That may take a few weeks, depending on the number of services you have sending messages from your domain, but with DMARC Management you will quickly grasp when you’re ready to go.

What else is needed

Once you have approved all your authorized email senders (sources) and configured DMARC to quarantine or reject, you should be confident that your brand and organization are much safer. From then on, keeping an eye on your approved sources list is a very lightweight operation that doesn’t take more than a few minutes per month from your team. Ideally, when new applications that send emails from your domain are deployed in your company, you would proactively include the corresponding IP addresses in your SPF record.

But even if you don’t, you will find new unapproved senders notices on your Security Center, under the Security Insights tab, alongside other important security issues you can review and manage.

Stop brand impersonation with Cloudflare DMARC Management

Or you can check the unapproved list on DMARC Management every few weeks.

Whenever you see a legitimate sender source show up as unapproved, you know what to do — click “…” and mark them as approved!

What’s coming next

DMARC Management takes email security to the next level, and this is only the beginning.

We’re excited to demonstrate our investments in features that provide customers even more insight into their security. Up next we’ll be connecting security analytics from Cloudflare’s Cloud Access Security Broker (CASB) into the Security Center.

Stop brand impersonation with Cloudflare DMARC Management

This product integration will provide customers a way to understand the status of their wider SaaS security at a glance. By surfacing the makeup of CASB Findings (or security issues identified in popular SaaS apps) by severity, health of the SaaS integration, and the number of hidden issues, IT and security administrators will have a way to understand the status of their wider security surface area from a single source.

Stay tuned for more news on CASB in Security Center. In the meantime you can join the waitlist for DMARC Management beta for free today and, if you haven’t yet, we recommend you also check out Cloudflare Area 1 and request a Phishing Risk Assessment to block phishing, spoof and spam emails from coming into your environment.

How we built DMARC Management using Cloudflare Workers

Post Syndicated from André Cruz original https://blog.cloudflare.com/how-we-built-dmarc-management/

How we built DMARC Management using Cloudflare Workers

What are DMARC reports

How we built DMARC Management using Cloudflare Workers

DMARC stands for Domain-based Message Authentication, Reporting, and Conformance. It’s an email authentication protocol that helps protect against email phishing and spoofing.

When an email is sent, DMARC allows the domain owner to set up a DNS record that specifies which authentication methods, such as SPF (Sender Policy Framework) and DKIM (DomainKeys Identified Mail), are used to verify the email’s authenticity. When the email fails these authentication checks DMARC instructs the recipient’s email provider on how to handle the message, either by quarantining it or rejecting it outright.

DMARC has become increasingly important in today’s Internet, where email phishing and spoofing attacks are becoming more sophisticated and prevalent. By implementing DMARC, domain owners can protect their brand and their customers from the negative impacts of these attacks, including loss of trust, reputation damage, and financial loss.

In addition to protecting against phishing and spoofing attacks, DMARC also provides reporting capabilities. Domain owners can receive reports on email authentication activity, including which messages passed and failed DMARC checks, as well as where these messages originated from.

DMARC management involves the configuration and maintenance of DMARC policies for a domain. Effective DMARC management requires ongoing monitoring and analysis of email authentication activity, as well as the ability to make adjustments and updates to DMARC policies as needed.

Some key components of effective DMARC management include:

  • Setting up DMARC policies: This involves configuring the domain’s DMARC record to specify the appropriate authentication methods and policies for handling messages that fail authentication checks. Here’s what a DMARC DNS record looks like:

v=DMARC1; p=reject; rua=mailto:[email protected]

This specifies that we are going to use DMARC version 1, our policy is to reject emails if they fail the DMARC checks, and the email address to which providers should send DMARC reports.

  • Monitoring email authentication activity: DMARC reports are an important tool for domain owners to ensure email security and deliverability, as well as compliance with industry standards and regulations. By regularly monitoring and analyzing DMARC reports, domain owners can identify email threats, optimize email campaigns, and improve overall email authentication.
  • Making adjustments as needed: Based on analysis of DMARC reports, domain owners may need to make adjustments to DMARC policies or authentication methods to ensure that email messages are properly authenticated and protected from phishing and spoofing attacks.
  • Working with email providers and third-party vendors: Effective DMARC management may require collaboration with email providers and third-party vendors to ensure that DMARC policies are being properly implemented and enforced.

Today we launched DMARC management. This is how we built it.

How we built it

As a leading provider of cloud-based security and performance solutions, we at Cloudflare take a specific approach to test our products. We “dogfood” our own tools and services, which means we use them to run our business. This helps us identify any issues or bugs before they affect our customers.

We use our own products internally, such as Cloudflare Workers, a serverless platform that allows developers to run their code on our global network. Since its launch in 2017, the Workers ecosystem has grown significantly. Today, there are thousands of developers building and deploying applications on the platform. The power of the Workers ecosystem lies in its ability to enable developers to build sophisticated applications that were previously impossible or impractical to run so close to clients. Workers can be used to build APIs, generate dynamic content, optimize images, perform real-time processing, and much more. The possibilities are virtually endless. We used Workers to power services like Radar 2.0, or software packages like Wildebeest.

Recently our Email Routing product joined forces with Workers, enabling processing incoming emails via Workers scripts. As the documentation states: “With Email Workers you can leverage the power of Cloudflare Workers to implement any logic you need to process your emails and create complex rules. These rules determine what happens when you receive an email.” Rules and verified addresses can all be configured via our API.

Here’s how a simple Email Worker looks like:

export default {
  async email(message, env, ctx) {
    const allowList = ["[email protected]", "[email protected]"];
    if (allowList.indexOf(message.headers.get("from")) == -1) {
      message.setReject("Address not allowed");
    } else {
      await message.forward("inbox@corp");
    }
  }
}

Pretty straightforward, right?

With the ability to programmatically process incoming emails in place, it seemed like the perfect way to handle incoming DMARC report emails in a scalable and efficient manner, letting Email Routing and Workers do the heavy lifting of receiving an unbound number of emails from across the globe. A high level description of what we needed is:

  1. Receive email and extract report
  2. Publish relevant details to analytics platform
  3. Store the raw report

Email Workers enable us to do #1 easily. We just need to create a worker with an email() handler. This handler will receive the SMTP envelope elements, a pre-parsed version of the email headers, and a stream to read the entire raw email.

For #2 we can also look into the Workers platform, and we will find the Workers Analytics Engine. We just need to define an appropriate schema, which depends both on what’s present in the reports and the queries we plan to do later. Afterwards we can query the data using either the GraphQL or SQL API.

For #3 we don’t need to look further than our R2 object storage. It is trivial to access R2 from a Worker. After extracting the reports from the email we will store them in R2 for posterity.

We built this as a managed service that you can enable on your zone, and added a dashboard interface for convenience, but in reality all the tools are available for you to deploy your own DMARC reports processor on top of Cloudflare Workers, in your own account, without having to worry about servers, scalability or performance.

Architecture

How we built DMARC Management using Cloudflare Workers

Email Workers is a feature of our Email Routing product. The Email Routing component runs in all our nodes, so any one of them is able to process incoming mail, which is important because we announce the Email ingress BGP prefix from all our datacenters. Sending emails to an Email Worker is as easy as setting a rule in the Email Routing dashboard.

How we built DMARC Management using Cloudflare Workers

When the Email Routing component receives an email that matches a rule to be delivered to a Worker, it will contact our internal version of the recently open-sourced workerd runtime, which also runs on all nodes. The RPC schema that governs this interaction is defined in a Capnproto schema, and allows the body of the email to be streamed to Edgeworker as it’s read. If the worker script decides to forward this email, Edgeworker will contact Email Routing using a capability sent in the original request.

jsg::Promise<void> ForwardableEmailMessage::forward(kj::String rcptTo, jsg::Optional<jsg::Ref<Headers>> maybeHeaders) {
  auto req = emailFwdr->forwardEmailRequest();
  req.setRcptTo(rcptTo);

  auto sendP = req.send().then(
      [](capnp::Response<rpc::EmailMetadata::EmailFwdr::ForwardEmailResults> res) mutable {
    auto result = res.getResponse().getResult();
    JSG_REQUIRE(result.isOk(), Error, result.getError());
  });
  auto& context = IoContext::current();
  return context.awaitIo(kj::mv(sendP));
}

In the context of DMARC reports this is how we handle the incoming emails:

  1. Fetch the recipient of the email being processed, this is the RUA that was used. RUA is a DMARC configuration parameter that indicates where aggregate DMARC processing feedback should be reported pertaining to a certain domain. This recipient can be found in the “to” attribute of the message.
const ruaID = message.to
  1. Since we handle DMARC reports for an unbounded number of domains, we use Workers KV to store some information about each one and key this information on the RUA. This also lets us know if we should be receiving these reports.
const accountInfoRaw = await env.KV_DMARC_REPORTS.get(dmarc:${ruaID})
  1. At this point, we want to read the entire email into an arrayBuffer in order to parse it. Depending on the size of the report we may run into the limits of the free Workers plan. If this happens, we recommend that you switch to the Workers Unbound resource model which does not have this issue.
const rawEmail = new Response(message.raw)
const arrayBuffer = await rawEmail.arrayBuffer()
  1. Parsing the raw email involves, among other things, parsing its MIME parts. There are multiple libraries available that allow one to do this. For example, you could use postal-mime:
const parser = new PostalMime.default()
const email = await parser.parse(arrayBuffer)
  1. Having parsed the email we now have access to its attachments. These attachments are the DMARC reports themselves and they can be compressed. The first thing we want to do is store them in their compressed form in R2 for long-term storage. They can be useful later on for re-processing or investigating interesting reports. Doing this is as simple as calling put() on the R2 binding. In order to facilitate retrieval later we recommend that you spread the report files across directories based on the current time.
await env.R2_DMARC_REPORTS.put(
    `${date.getUTCFullYear()}/${date.getUTCMonth() + 1}/${attachment.filename}`,
    attachment.content
  )
  1. We now need to look into the attachment mime type. The raw form of DMARC reports is XML, but they can be compressed. In this case we need to decompress them first. DMARC reporter files can use multiple compression algorithms. We use the MIME type to know which one to use. For Zlib compressed reports pako can be used while for ZIP compressed reports unzipit is a good choice.

  2. Having obtained the raw XML form of the report, fast-xml-parser has worked well for us in parsing them. Here’s how the DMARC report XML looks:

<feedback>
  <report_metadata>
    <org_name>example.com</org_name>
    <[email protected]</email>
   <extra_contact_info>http://example.com/dmarc/support</extra_contact_info>
    <report_id>9391651994964116463</report_id>
    <date_range>
      <begin>1335521200</begin>
      <end>1335652599</end>
    </date_range>
  </report_metadata>
  <policy_published>
    <domain>business.example</domain>
    <adkim>r</adkim>
    <aspf>r</aspf>
    <p>none</p>
    <sp>none</sp>
    <pct>100</pct>
  </policy_published>
  <record>
    <row>
      <source_ip>192.0.2.1</source_ip>
      <count>2</count>
      <policy_evaluated>
        <disposition>none</disposition>
        <dkim>fail</dkim>
        <spf>pass</spf>
      </policy_evaluated>
    </row>
    <identifiers>
      <header_from>business.example</header_from>
    </identifiers>
    <auth_results>
      <dkim>
        <domain>business.example</domain>
        <result>fail</result>
        <human_result></human_result>
      </dkim>
      <spf>
        <domain>business.example</domain>
        <result>pass</result>
      </spf>
    </auth_results>
  </record>
</feedback>
  1. We now have all the data in the report at our fingertips. What we do from here on depends a lot on how we want to present the data. For us, the goal was to display meaningful data extracted from them in our Dashboard. Therefore we needed an Analytics platform where we could push the enriched data. Enter, Workers Analytics Engine. The Analytics engine is perfect for this task since it allows us to send data to it from a worker, and exposes a GraphQL API to interact with the data afterwards. This is how we obtain the data to show in our dashboard.

In the future, we are also considering integrating Queues in the workflow to asynchronously process the report and avoid waiting for the client to complete it.

We managed to implement this project end-to-end relying only on the Workers infrastructure, proving that it’s possible, and advantageous, to build non-trivial apps without having to worry about scalability, performance, storage and security issues.

Open sourcing

As we mentioned before, we built a managed service that you can enable and use, and we will manage it for you. But, everything we did can also be deployed by you, in your account, so that you can manage your own DMARC reports. It’s easy, and free. To help you with that, we are releasing an open-source version of a Worker that processes DMARC reports in the way described above: https://github.com/cloudflare/dmarc-email-worker

If you don’t have a dashboard where to show the data, you can also query the Analytics Engine from a Worker. Or, if you want to store them in a relational database, then there’s D1 to the rescue. The possibilities are endless and we are excited to find out what you’ll build with these tools.

Please contribute, make your own, we’ll be listening.

Final words

We hope that this post has furthered your understanding of the Workers platform. Today Cloudflare takes advantage of this platform to build most of our services, and we think you should too.

Feel free to contribute to our open-source version and show us what you can do with it.

The Email Routing is also working on expanding the Email Workers API more functionally, but that deserves another blog soon.

Three ways to boost your email security and brand reputation with AWS

Post Syndicated from Michael Davie original https://aws.amazon.com/blogs/security/three-ways-to-boost-your-email-security-and-brand-reputation-with-aws/

If you own a domain that you use for email, you want to maintain the reputation and goodwill of your domain’s brand. Several industry-standard mechanisms can help prevent your domain from being used as part of a phishing attack. In this post, we’ll show you how to deploy three of these mechanisms, which visually authenticate emails sent from your domain to users and verify that emails are encrypted in transit. It can take as little as 15 minutes to deploy these mechanisms on Amazon Web Services (AWS), and the result can help to provide immediate and long-term improvements to your organization’s email security.

Phishing through email remains one of the most common ways that bad actors try to compromise computer systems. Incidents of phishing and related crimes far outnumber the incidents of other categories of internet crime, according to the most recent FBI Internet Crime Report. Phishing has consistently led to large annual financial losses in the US and globally.

Overview of BIMI, MTA-STS, and TLS reporting

An earlier post has covered how you can use Amazon Simple Email Service (Amazon SES) to send emails that align with best practices, including the IETF internet standards: Sender Policy Framework (SPF), DomainKeys Identified Mail (DKIM), and Domain-based Message Authentication, Reporting, and Conformance (DMARC). This post will show you how to build on this foundation and configure your domains to align with additional email security standards, including the following:

  • Brand Indicators for Message Identification (BIMI) – This standard allows you to associate a logo with your email domain, which some email clients will display to users in their inbox. Visit the BIMI Group’s Where is my BIMI Logo Displayed? webpage to see how logos are displayed in the user interfaces of BIMI-supporting mailbox providers; Figure 1 shows a mock-up of a typical layout that contains a logo.
  • Mail Transfer Agent Strict Transport Security (MTA-STS) – This standard helps ensure that email servers always use TLS encryption and certificate-based authentication when they send messages to your domain, to protect the confidentiality and integrity of email in transit.
  • SMTP TLS reporting – This reporting allows you to receive reports and monitor your domain’s TLS security posture, identify problems, and learn about attacks that might be occurring.
Figure 1: A mock-up of how BIMI enables branded logos to be displayed in email user interfaces

Figure 1: A mock-up of how BIMI enables branded logos to be displayed in email user interfaces

These three standards require your Domain Name System (DNS) to publish specific records, for example by using Amazon Route 53, that point to web pages that have additional information. You can host this information without having to maintain a web server by storing it in Amazon Simple Storage Service (Amazon S3) and delivering it through Amazon CloudFront, secured with a certificate provisioned from AWS Certificate Manager (ACM).

Note: This AWS solution works for DKIM, BIMI, and DMARC, regardless of what you use to serve the actual email for your domains, which services you use to send email, and where you host DNS. For purposes of clarity, this post assumes that you are using Route 53 for DNS. If you use a different DNS hosting provider, you will manually configure DNS records in your existing hosting provider.

Solution architecture

The architecture for this solution is depicted in Figure 2.

Figure 2: The architecture diagram showing how the solution components interact

Figure 2: The architecture diagram showing how the solution components interact

The interaction points are as follows:

  1. The web content is stored in an S3 bucket, and CloudFront has access to this bucket through an origin access identity, a mechanism of AWS Identity and Access Management (IAM).
  2. As described in more detail in the BIMI section of this blog post, the Verified Mark Certificate is obtained from a BIMI-qualified certificate authority and stored in the S3 bucket.
  3. When an external email system receives a message claiming to be from your domain, it looks up BIMI records for your domain in DNS. As depicted in the diagram, a DNS request is sent to Route 53.
  4. To retrieve the BIMI logo image and Verified Mark Certificate, the external email system will make HTTPS requests to a URL published in the BIMI DNS record. In this solution, the URL points to the CloudFront distribution, which has a TLS certificate provisioned with ACM.

A few important warnings

Email is a complex system of interoperating technologies. It is also brittle: a typo or a missing DNS record can make the difference between whether an email is delivered or not. Pay close attention to your email server and the users of your email systems when implementing the solution in this blog post. The main indicator that something is wrong is the absence of email. Instead of seeing an error in your email server’s log, users will tell you that they’re expecting to receive an email from somewhere and it’s not arriving. Or they will tell you that they sent an email, and their recipient can’t find it.

The DNS uses a lot of caching and time-out values to improve its efficiency. That makes DNS records slow and a little unpredictable as they propagate across the internet. So keep in mind that as you monitor your systems, it can be hours or even more than a day before the DNS record changes have an effect that you can detect.

This solution uses AWS Cloud Development Kit (CDK) custom resources, which are supported by AWS Lambda functions that will be created as part of the deployment. These functions are configured to use CDK-selected runtimes, which will eventually pass out of support and require you to update them.

Prerequisites

You will need permission in an AWS account to create and configure the following resources:

  • An Amazon S3 bucket to store the files and access logs
  • A CloudFront distribution to publicly deliver the files from the S3 bucket
  • A TLS certificate in ACM
  • An origin access identity in IAM that CloudFront will use to access files in Amazon S3
  • Lambda functions, IAM roles, and IAM policies created by CDK custom resources

You might also want to enable these optional services:

  • Amazon Route 53 for setting the necessary DNS records. If your domain is hosted by another DNS provider, you will set these DNS records manually.
  • Amazon SES or an Amazon WorkMail organization with a single mailbox. You can configure either service with a subdomain (for example, [email protected]) such that the existing domain is not disrupted, or you can create new email addresses by using your existing email mailbox provider.

BIMI has some additional requirements:

  • BIMI requires an email domain to have implemented a strong DMARC policy so that recipients can be confident in the authenticity of the branded logos. Your email domain must have a DMARC policy of p=quarantine or p=reject. Additionally, the domain’s policy cannot have sp=none or pct<100.

    Note: Do not adjust the DMARC policy of your domain without careful testing, because this can disrupt mail delivery.

  • You must have your brand’s logo in Scaled Vector Graphics (SVG) format that conforms to the BIMI standard. For more information, see Creating BIMI SVG Logo Files on the BIMI Group website.
  • Purchase a Verified Mark Certificate (VMC) issued by a third-party certificate authority. This certificate attests that the logo, organization, and domain are associated with each other, based on a legal trademark registration. Many email hosting providers require this additional certificate before they will show your branded logo to their users. Others do not currently support BIMI, and others might have alternative mechanisms to determine whether to show your logo. For more information about purchasing a Verified Mark Certificate, see the BIMI Group website.

    Note: If you are not ready to purchase a VMC, you can deploy this solution and validate that BIMI is correctly configured for your domain, but your branded logo will not display to recipients at major email providers.

What gets deployed in this solution?

This solution deploys the DNS records and supporting files that are required to implement BIMI, MTA-STS, and SMTP TLS reporting for an email domain. We’ll look at the deployment in more detail in the following sections.

BIMI

BIMI is described by the Internet Engineering Task Force (IETF) as follows:

Brand Indicators for Message Identification (BIMI) permits Domain Owners to coordinate with Mail User Agents (MUAs) to display brand-specific Indicators next to properly authenticated messages. There are two aspects of BIMI coordination: a scalable mechanism for Domain Owners to publish their desired Indicators, and a mechanism for Mail Transfer Agents (MTAs) to verify the authenticity of the Indicator. This document specifies how Domain Owners communicate their desired Indicators through the BIMI Assertion Record in DNS and how that record is to be interpreted by MTAs and MUAs. MUAs and mail-receiving organizations are free to define their own policies for making use of BIMI data and for Indicator display as they see fit.

If your organization has a trademark-protected logo, you can set up BIMI to have that logo displayed to recipients in their email inboxes. This can have a positive impact on your brand and indicates to end users that your email is more trustworthy. The BIMI Group shows examples of how brand logos are displayed in user inboxes, as well as a list of known email service providers that support the display of BIMI logos.

As a domain owner, you can implement BIMI by publishing the relevant DNS records and hosting the relevant files. To have your logo displayed by most email hosting providers, you will need to purchase a Verified Mark Certificate from a BIMI-qualified certificate authority.

This solution will deploy a valid BIMI record in Route 53 (or tell you what to publish in the DNS if you’re not using Route 53) and will store your provided SVG logo and Verified Mark Certificate files in Amazon S3, to be delivered through CloudFront with a valid TLS certificate from ACM.

To support BIMI, the solution makes the following changes to your resources:

  1. A DNS record of type TXT is published at the following host:
    default._bimi.<your-domain>. The value of this record is: v=BIMI1; l=<url-of-your-logo> a=<url-of-verified-mark-certificate>. The value of <your-domain> refers to the domain that is used in the From header of messages that your organization sends.
  2. The logo and optional Verified Mark Certificate are hosted publicly at the HTTPS locations defined by <url-of-your-logo> and <url-of-verified-mark-certificate>, respectively.

MTA-STS

MTA-STS is described by the IETF in RFC 8461 as follows:

SMTP (Simple Mail Transport Protocol) MTA Strict Transport Security (MTA-STS) is a mechanism enabling mail service providers to declare their ability to receive Transport Layer Security (TLS) secure SMTP connections and to specify whether sending SMTP servers should refuse to deliver to MX hosts that do not offer TLS with a trusted server certificate.

Put simply, MTA-STS helps ensure that email servers always use encryption and certificate-based authentication when sending email to your domains, so that message integrity and confidentiality are preserved while in transit across the internet. MTA-STS also helps to ensure that messages are only sent to authorized servers.

This solution will deploy a valid MTA-STS policy record in Route 53 (or tell you what value to publish in the DNS if you’re not using Route 53) and will create an MTA-STS policy document to be hosted on S3 and delivered through CloudFront with a valid TLS certificate from ACM.

To support MTA-STS, the solution makes the following changes to your resources:

  1. A DNS record of type TXT is published at the following host: _mta-sts.<your-domain>. The value of this record is: v=STSv1; id=<unique value used for cache invalidation>.
  2. The MTA-STS policy document is hosted at and obtained from the following location: https://mta-sts.<your-domain>/.well-known/mta-sts.txt.
  3. The value of <your-domain> in both cases is the domain that is used for routing inbound mail to your organization and is typically the same domain that is used in the From header of messages that your organization sends externally. Depending on the complexity of your organization, you might receive inbound mail for multiple domains, and you might choose to publish MTA-STS policies for each domain.

Is it ever bad to encrypt everything?

In the example MTA-STS policy file provided in the GitHub repository and explained later in this post, the MTA-STS policy mode is set to testing. This means that your email server is advertising its willingness to negotiate encrypted email connections, but it does not require TLS. Servers that want to send mail to you are allowed to connect and deliver mail even if there are problems in the TLS connection, as long as you’re in testing mode. You should expect reports when servers try to connect through TLS to your mail server and fail to do so.

Be fully prepared before you change the MTA-STS policy to enforce. After this policy is set to enforce, servers that follow the MTA-STS policy and that experience an enforceable TLS-related error when they try to connect to your mail server will not deliver mail to your mail server. This is a difficult situation to detect. You will simply stop receiving email from servers that comply with the policy. You might receive reports from them indicating what errors they encountered, but it is not guaranteed. Be sure that the email address you provide in SMTP TLS reporting (in the following section) is functional and monitored by people who can take action to fix issues. If you miss TLS failure reports, you probably won’t receive email. If the TLS certificate that you use on your email server expires, and your MTA-STS policy is set to enforce, this will become an urgent issue and will disrupt the flow of email until it is fixed.

SMTP TLS reporting

SMTP TLS reporting is described by the IETF in RFC 8460 as follows:

A number of protocols exist for establishing encrypted channels between SMTP Mail Transfer Agents (MTAs), including STARTTLS, DNS-Based Authentication of Named Entities (DANE) TLSA, and MTA Strict Transport Security (MTA-STS). These protocols can fail due to misconfiguration or active attack, leading to undelivered messages or delivery over unencrypted or unauthenticated channels. This document describes a reporting mechanism and format by which sending systems can share statistics and specific information about potential failures with recipient domains. Recipient domains can then use this information to both detect potential attacks and diagnose unintentional misconfigurations.

As you gain the security benefits of MTA-STS, SMTP TLS reporting will allow you to receive reports from other internet email providers. These reports contain information that is valuable when monitoring your TLS security posture, identifying problems, and learning about attacks that might be occurring.

This solution will deploy a valid SMTP TLS reporting record on Route 53 (or provide you with the value to publish in the DNS if you are not using Route 53).

To support SMTP TLS reporting, the solution makes the following changes to your resources:

  1. A DNS record of type TXT is published at the following host: _smtp._tls.<your-domain>. The value of this record is: v=TLSRPTv1; rua=mailto:<report-receiver-email-address>
  2. The value of <report-receiver-email-address> might be an address in your domain or in a third-party provider. Automated systems that process these reports must be capable of processing GZIP compressed files and parsing JSON.

Deploy the solution with the AWS CDK

In this section, you’ll learn how to deploy the solution to create the previously described AWS resources in your account.

  1. Clone the following GitHub repository:

    git clone https://github.com/aws-samples/serverless-mail
    cd serverless-mail/email-security-records

  2. Edit CONFIG.py to reflect your desired settings, as follows:
    1. If no Verified Mark Certificate is provided, set VMC_FILENAME = None.
    2. If your DNS zone is not hosted on Route 53, or if you do not want this app to manage Route 53 DNS records, set ROUTE_53_HOSTED = False. In this case, you will need to set TLS_CERTIFICATE_ARN to the Amazon Resource Name (ARN) of a certificate hosted on ACM in us-east-1. This certificate is used by CloudFront and must support two subdomains: mta-sts and your configured BIMI_ASSET_SUBDOMAIN.
  3. Finalize the preparation, as follows:
    1. Place your BIMI logo and Verified Mark Certificate files in the assets folder.
    2. Create an MTA-STS policy file at assets/.well-known/mta-sts.txt to reflect your mail exchange (MX) servers and policy requirements. An example file is provided at assets/.well-known/mta-sts.txt.example
  4. Deploy the solution, as follows:
    1. Open a terminal in the email-security-records folder.
    2. (Recommended) Create and activate a virtual environment by running the following commands.
      python3 -m venv .venv
      source .venv/bin/activate
    3. Install the Python requirements in your environment with the following command.
      pip install -r requirements.txt
    4. Assume a role in the target account that has the permissions outlined in the Prerequisites section of this post.

      Using AWS CDK version 2.17.0 or later, deploy the bootstrap in the target account by running the following command. To learn more, see Bootstrapping in the AWS CDK Developer Guide.
      cdk bootstrap

    5. Run the following command to synthesize the CloudFormation template. Review the output of this command to verify what will be deployed.
      cdk synth
    6. Run the following command to deploy the CloudFormation template. You will be prompted to accept the IAM changes that will be applied to your account.
      cdk deploy

      Note: If you use Route53, these records are created and activated in your DNS zones as soon as the CDK finishes deploying. As the records propagate through the DNS, they will gradually start affecting the email in the affected domains.

    7. If you’re not using Route53 and instead are using a third-party DNS provider, create the CNAME and TXT records as indicated. In this case, your email is not affected by this solution until you create the records in DNS.

Testing and troubleshooting

After you have deployed the CDK solution, you can test it to confirm that the DNS records and web resources are published correctly.

BIMI

  1. Query the BIMI DNS TXT record for your domain by using the dig or nslookup command in your terminal.

    dig +short TXT default._bimi.<your-domain.example>

    Verify the response. For example:

    "v=BIMI1; l=https://bimi-assets.<your-domain.example>/logo.svg"

  2. In your web browser, open the URL from that response (for example, https://bimi-assets.<your-domain.example>/logo.svg) to verify that the logo is available and that the HTTPS certificate is valid.
  3. The BIMI group provides a tool to validate your BIMI configuration. This tool will also validate your VMC if you have purchased one.

MTA-STS

  1. Query the MTA-STS DNS TXT record for your domain.

    dig +short TXT _mta-sts.<your-domain.example>

    The value of this record is as follows:

    v=STSv1; id=<unique value used for cache invalidation>

  2. You can load the MTA-STS policy document using your web browser. For example, https://mta-sts.<your-domain.example>/.well-known/mta-sts.txt
  3. You can also use third party tools to examine your MTA-STS configuration, such as MX Toolbox.

TLS reporting

  1. Query the TLS reporting DNS TXT record for your domain.

    dig +short TXT _smtp._tls.<your-domain.example>

    Verify the response. For example:

    "v=TLSRPTv1; rua=mailto:<your email address>"

  2. You can also use third party tools to examine your TLS reporting configuration, such as Easy DMARC.

Depending on which domains you communicate with on the internet, you will begin to see TLS reports arriving at the email address that you have defined in the TLS reporting DNS record. We recommend that you closely examine the TLS reports, and use automated analytical techniques over an extended period of time before changing the default testing value of your domain’s MTA-STS policy. Not every email provider will send TLS reports, but examining the reports in aggregate will give you a good perspective for making changes to your MTA-STS policy.

Cleanup

To remove the resources created by this solution:

  1. Open a terminal in the cdk-email-security-records folder.
  2. Assume a role in the target account with permission to delete resources.
  3. Run cdk destroy.

Note: The asset and log buckets are automatically emptied and deleted by the cdk destroy command.

Conclusion

When external systems send email to or receive email from your domains they will now query your new DNS records and will look up your domain’s BIMI, MTA-STS, and TLS reporting information from your new CloudFront distribution. By adopting the email domain security mechanisms outlined in this post, you can improve the overall security posture of your email environment, as well as the perception of your brand.

 
If you have feedback about this post, submit comments in the Comments section below. If you have questions about this post, contact AWS Support.

Want more AWS Security news? Follow us on Twitter.

Michael Davie

Michael Davie

Michael is a Senior Industry Specialist with AWS Security Assurance. He works with our customers, their regulators, and AWS teams to help raise the bar on secure cloud adoption and usage. Michael has over 20 years of experience working in the defence, intelligence, and technology sectors in Canada and is a licensed professional engineer.

Jesse Thompson

Jesse Thompson

Jesse is an Email Deliverability Manager with the Amazon Simple Email Service team. His background is in enterprise IT development and operations, with a focus on email abuse mitigation and encouragement of authenticity practices with open standard protocols. Jesse’s favorite activity outside of technology is recreational curling.

How to configure an incoming email security gateway with Amazon WorkMail

Post Syndicated from Jesse Thompson original https://aws.amazon.com/blogs/security/how-to-configure-an-incoming-email-security-gateway-with-amazon-workmail/

This blog post will walk you through the steps needed to integrate Amazon WorkMail with an email security gateway. Configuring WorkMail this way can provide a versatile defense strategy for inbound email threats.

Amazon WorkMail is a secure, managed business email and calendar service. WorkMail leverages the email receiving capabilities of Amazon Simple Email Service (Amazon SES) to scan all incoming and outgoing email for spam, malware, and viruses to help protect your users from harmful email. AWS Lambda for Amazon WorkMail functions can tap into the capabilities of other AWS services to accomplish additional business objectives, such as controlling message delivery or message modification.

For many organizations, existing features and integrations with Amazon SES are sufficient for their spam, malware, and virus detection. Other organizations may need either a dedicated on-premise security solution, or have other reasons to use an additional inspection point in the overall mail flow. A number of commercial and community-supported tools include features like special encryption capabilities, data loss prevention (DLP) content inspection engines, and embedded-hyperlink transformation features to protect end-user mailboxes.

Prerequisites

To implement this solution, you need:

  • A domain name and permission to alter domain name system (DNS) records in Amazon Route 53 or your existing DNS provider. This could be your organization’s existing domain (such as example.org), a new domain (such as example.net), or a subdomain (such as sub.example.org).
  • Access to an AWS account so you can configure WorkMail and Amazon SES. Optionally, you may also need the ability to create AWS Lambda functions to integrate with WorkMail.
  • Access to configure the email security gateway of your choosing.

How email flows with an email security gateway

Email security gateways function by handling the initial ingress of email via the Simple Mail Transport Protocol (SMTP). When email servers send messages to your domain’s email addresses, they look at your domain’s mail exchange (MX) record in the DNS. After processing an email message, the email security gateway delivers it to the downstream mailbox hosting service, such as WorkMail, by means of Amazon SES via SMTP. You can also optionally configure an AWS Lambda for Amazon WorkMail function to synchronously deliver messages into end-user junk email folders, or to take other actions. 

Figure 1. Interaction points while architecting an email security gateway

Figure 1. Interaction points while architecting an email security gateway

The interaction points are as follows:

  1. The email sender looks up the mail exchange (MX) record for the domain hosted by WorkMail. The domain name system (DNS) domain may be hosted in Route 53, or by another DNS hosting provider. The value of the MX record contains the internet protocol (IP) address of the email security gateway.
  2. The email sender connects to the email security gateway, and sends the message using the Simple Mail Transfer Protocol (SMTP)
  3. The email security gateway accepts, processes, and then delivers the message to the ingress SMTP endpoint for WorkMail. Amazon Simple Email Service (Amazon SES) handles inbound email receiving for WorkMail.
  4. Optionally, an AWS Lambda for Amazon WorkMail function can synchronously process messages before delivery to WorkMail.
  5. WorkMail receives the message for final delivery to the end-user.

The gateway assumes responsibility for inspecting incoming email, because the initial point of ingress is an important component of a multi-layer defense strategy against email-borne threats. The gateway could refuse or quarantine risky messages, it could modify the email subjects and body to add warnings visible to recipients, or it could append metadata to the email headers for downstream processing by an AWS Lambda function.

Why point of ingress email authentication is important

What is email authentication

SMTP was built at a time when networking was less reliable than it is today, and consequently, it was designed to be able to allow any domain to store and later forward messages on behalf of other domains to mitigate connection problems. While that helped at the time, today it presents real problems in authenticating who truly sent a message: the owner of the domain, or just someone else claiming to be the owner? To overcome this issue, the messaging industry has adopted three protocols to help verify the authenticity of a message: SPF, DKIM, and DMARC. These protocols aren’t perfect, but understanding how to use them is important when adding new steps to your message processing workflow, because they can affect how you receive inbound mail.

Sender Policy Framework

Sender Policy Framework (SPF) permits domain owners to declare which SMTP servers are allowed to send email messages claiming to be from their domain. This establishes an identity relationship between the owner of the domain and the authorized party that controls the SMTP server. When SPF is used, a message can only be handed off directly from an authorized SMTP server; it cannot be relayed through a second, unauthorized server without changing the originating address.

DomainKeys Identified Mail (DKIM)

DomainKeys Identified Mail (DKIM) permits domain owners to advertise a public key that a mail recipient’s system can use to verify the sender’s digital signature. This allows SMTP servers and other downstream applications to check the validity of the digital signature against the public key of the domain which had the matching private key to create the signature. DKIM signatures attached to messages can remain intact through intermediary SMTP servers, but if message contents (email body or email headers) are modified by intermediary servers, the final destination will find that the signature is no longer valid.

Domain-based Message Authentication, Reporting and Conformance (DMARC)

Domain-based Message Authentication, Reporting and Conformance (DMARC) permits domain owners to publish a policy telling receiving servers what to do when SPF or DKIM are not valid, such as if a message originated from an unauthorized server, or if it was tampered with after being sent. DMARC checks if a message matches what it knows about the sender via SPF and DKIM, a process known as alignment. The recipient’s server can then enforce the DMARC policy, for example by rejecting or quarantining non-aligned messages.

Tying it all together

Amazon WorkMail normally performs DMARC enforcement for inbound messages, based on their alignment when they were received by Amazon SES. But when an email security gateway acts as an intermediary SMTP server between the original sender and WorkMail, that breaks the relationship with the SMTP servers authorized by SPF, and if the gateway modifies the message, that invalidates the DKIM signature. This is why it’s necessary for the SMTP server at the point of ingress to perform the evaluation of SPF, DKIM, and DMARC. The email security gateway at the border should be made responsible for enforcing DMARC on messages that don’t align, and WorkMail DMARC enforcement should be disabled.

Figure 2. Diagram of SPF policy enforcement process. The full details of the interaction points are outlined below.

Figure 2. Diagram of SPF policy enforcement process. The full details of the interaction points are outlined below.

The interaction points for SPF policy enforcement are as follows:

  1. The email sender delivers the message to the email security gateway with a MAIL FROM address within a domain the sender owns.
  2. The email security gateway looks up the sender’s domain’s Sender Permitted From (SPF) policy in DNS to determine if the sending mail server’s IP address is authorized.
  3. The email security gateway delivers the message to Amazon SES with the same MAIL FROM address. The email security gateway has a different IP address than the original sending email server.
  4. When Amazon SES looks up the MAIL FROM domain’s SPF, it will not find the email security gateway’s IP address as authorized. From the perspective of Amazon SES, and the resulting logs in Amazon Cloudwatch, the message will appear to be unauthorized by the SPF policy. This result is ignored by disabling DMARC checks in the WorkMail organization configuration.
  5. The message continues delivery to WorkMail with an optional integration with AWS Lambda for Amazon WorkMail synchronous run configuration, which can analyze message headers to get a more complete picture of the message’s authenticity.

Choosing an email security gateway

Many email security vendors offer software as a service (SaaS) solutions. This offloads all management responsibilities to the software vendor’s platform. These solutions work as long as they support the email gateway features necessary for this solution as depicted in Figure 2 and described in the Why point of ingress email authentication is important section above.

If you wish to build and maintain your own email security gateway, you may deploy one available from the AWS Marketplace or add an open source application into your Amazon Virtual Private Cloud (Amazon VPC). You will need to remove port 25 restriction from your EC2 instance for the email security gateway within your Amazon VPC to send email to Amazon WorkMail.

How to configure Amazon WorkMail

Follow this procedure to configure your WorkMail organization and Amazon SES IP address filters to allow the email security gateway to process inbound email receiving.

To configure Amazon WorkMail

  1. From the WorkMail console, select your organization, navigate to Organization settings, and select Advanced. Edit the Inbound DMARC Settings and set Enforcement enabled to Off. This ensures that WorkMail does not re-evaluate DMARC.

    Figure 3. Picture of the AWS WorkMail console showing the advanced configuration depicting Inbound DMARC enforcement disabled

    Figure 3. Picture of the AWS WorkMail console showing the advanced configuration depicting Inbound DMARC enforcement disabled

  2. From the Amazon SES console, navigate to Email receiving and create IP address filters to allow the IP address or IP address range of the gateway(s).
  3. Add another rule to block 0.0.0.0/0. This prevents malicious actors from bypassing your email security gateway.

    Figure 4. Picture of the Amazon SES console showing example IP address filters to allow the email security gateway IP addresses and blocking every other IP Address

    Figure 4. Picture of the Amazon SES console showing example IP address filters to allow the email security gateway IP addresses and blocking every other IP Address

  4. From the Route 53 console, navigate to Hosted zones, select the domain and edit the MX record to the IP address or hostname of the gateway. This causes all email senders to deliver to your gateway, instead of delivering directly to WorkMail.
    Follow the instructions of your DNS provider if the domain’s DNS is hosted elsewhere.

    Figure 5. Picture of the Amazon Route 53 console showing that the DMS MX record for the domain needs to be configured with the IP address of the email security gateway

    Figure 5. Picture of the Amazon Route 53 console showing that the DMS MX record for the domain needs to be configured with the IP address of the email security gateway

  5. From the WorkMail console, navigate to Domains, select your domain to show the Domain verification status page.
  6. Copy the host name from the value of the MX record type as depicted in Figure 6.

    Figure 6. Picture showing the section of the MX record value to copy from the WorkMail console.

    Figure 6. Picture showing the section of the MX record value to copy from the WorkMail console.

  7. Configure your email security gateway with the value that you just copied (e.g. inbound-smtp.us-east-1.amazonaws.com) to send inbound messages to your WorkMail organization. Instructions for doing this will vary depending on which email security gateway you are using.

Some specifics of this configuration depend on which gateway you are using, how it is designed for high availability, and the type of features configured. Test your WorkMail integration with a non-production domain before changing your production domain.

It is normal for Amazon CloudWatch logs for WorkMail, as well as the individual message headers, to show that SPF fails for all messages which traverse the gateway. Configure the email security gateway to record its SPF evaluation in the message headers so that it remains available for troubleshooting and further processing.

Junk E-Mail folder integration

WorkMail normally moves spam messages into the Junk E-mail folder within each recipient’s mailbox. To replicate this behavior for spam messages identified by the email security gateway, use AWS Lambda for Amazon WorkMail with a synchronous run configuration to run a function for every inbound message to a group of recipients.

To configure an AWS Lambda function for every inbound message (optional)

  1. Configure the email security gateway to include a spam verdict in the message headers for all incoming mail.
  2. Create a synchronous run configuration using AWS Lambda for Amazon WorkMail  to interpret the message headers and return a response to WorkMail with type: BYPASS_SPAM_CHECK or MOVE_TO_JUNK. A sample Amazon WorkMail Upstream Gateway Filter solution is available in the AWS Serverless Application Repository.

Conclusion

By integrating an email security gateway and leveraging AWS Lambda for Amazon WorkMail, you will gain additional security and management control over your organization’s inbound email. To learn more, read the Amazon WorkMail FAQs and Amazon WorkMail documentation.

 
If you have feedback about this post, submit comments in the Comments section below.

Want more AWS Security news? Follow us on Twitter.

Jesse Thompson

Jesse Thompson

Jesse is a worldwide public sector senior solutions architect at AWS. His background is in public sector enterprise IT development and operations, with a focus on abuse mitigation and encouragement of authenticity practices with open standard protocols.

How to use domain with Amazon SES in multiple accounts or regions

Post Syndicated from Leonardo Azize original https://aws.amazon.com/blogs/messaging-and-targeting/how-to-use-domain-with-amazon-ses-in-multiple-accounts-or-regions/

Sometimes customers want to use their email domain with Amazon Simples Email Service (Amazon SES) across multiple accounts, or the same account but across multiple regions.

For example, AnyCompany is an insurance company with marketing and operations business units. The operations department sends transactional emails every time customers perform insurance simulations. The marketing department sends email advertisements to existing and prospective customers. Since they are different organizations inside AnyCompany, they want to have their own Amazon SES billing. At the same time, they still want to use the same AnyCompany domain.

Other use-cases include customers who want to setup multi-region redundancy, need to satisfy data residency requirements, or need to send emails on behalf of several different clients. In all of these cases, customers can use different regions, in the same or across different accounts.

This post shows how to verify and configure your domain on Amazon SES across multiple accounts or multiple regions.

Overview of solution

You can use the same domain with Amazon SES across multiple accounts or regions. Your options are: different accounts but the same region, different accounts and different regions, and the same account but different regions.

In all of these scenarios, you will have two SES instances running, each sending email for example.com domain – let’s call them SES1 and SES2. Every time you configure a domain in Amazon SES it will generate a series of DNS records you will have to add on your domain authoritative DNS server, which is unique for your domain. Those records are different for each SES instance.

You will need to modify your DNS to add one TXT record, with multiple values, for domain verification. If you decide to use DomainKeys Identified Mail (DKIM), you will modify your DNS to add six CNAME records, three records from each SES instance.

When you configure a domain on Amazon SES, you can also configure a MAIL FROM domain. If you decide to do so, you will need to modify your DNS to add one TXT record for Sender Policy Framework (SPF) and one MX record for bounce and complaint notifications that email providers send you.

Furthermore, your domain can be configured to support DMAC for email spoofing detection. It will rely on SPF or DKIM configured above. Below we walk you through these steps.

  • Verify domain
    You will take TXT values from both SES1 and SES2 instances and add them in DNS, so SES can validate you own the domain
  • Complying with DMAC
    You will add a TXT value with DMAC policy that applies to your domain. This is not tied to any specific SES instance
  • Custom MAIL FROM Domain and SPF
    You will take TXT and MX records related from your MAIL FROM domain from both SES1 and SES2 instances and add them in DNS, so SES can comply with DMARC

Here is a sample matrix of the various configurations:

Two accounts, same region Two accounts, different regions One account, two regions
TXT records for domain verification*

1 record with multiple values

_amazonses.example.com = “VALUE FROM SES1”
“VALUE FROM SES2”

CNAMES for DKIM verification

6 records, 3 from each SES instance

record1-SES1._domainkey.example.com = VALUE FROM SES1
record2-SES1._domainkey.example.com = VALUE FROM SES1
record3-SES1._domainkey.example.com = VALUE FROM SES1
record1-SES2._domainkey.example.com = VALUE FROM SES2
record2-SES2._domainkey.example.com = VALUE FROM SES2
record3-SES2._domainkey.example.com = VALUE FROM SES2

TXT record for DMARC

1 record. It is not related to SES instance or region

_dmarc.example.com = DMARC VALUE

MAIL FROM MX record to define message sender for SES

1 record for entire region

mail.example.com = 10 feedback-smtp.us-east-1.amazonses.com

2 records, one for each region

mail1.example.com = 10 feedback-smtp.us-east-1.amazonses.com
mail2.example.com = 10 feedback-smtp.eu-west-1.amazonses.com

MAIL FROM TXT record for SPF

1 record for entire region

mail.example.com = “v=spf1 include:amazonses.com ~all”

2 records, one for each region

mail1.example.com = “v=spf1 include:amazonses.com ~all”
mail2.example.com = “v=spf1 include:amazonses.com ~all”

* Considering your DNS supports multiple values for a TXT record

Setup SES1 and SES2

In this blog, we call SES1 your primary or existing SES instance. We assume that you have already setup SES, but if not, you can still follow the instructions and setup both at the same time. The settings on SES2 will differ slightly, and therefore you will need to add new DNS entries to support the two-instance setup.

In this document we will use configurations from the “Verification,” “DKIM,” and “Mail FROM Domain” sections of the SES Domains screen and configure SES2 and setup DNS correctly for the two-instance configuration.

Verify domain

Amazon SES requires that you verify, in DNS, your domain, to confirm that you own it and to prevent others from using it. When you verify an entire domain, you are verifying all email addresses from that domain, so you don’t need to verify email addresses from that domain individually.

You can instruct multiple SES instances, across multiple accounts or regions to verify your domain.  The process to verify your domain requires you to add some records in your DNS provider. In this post I am assuming Amazon Route 53 is an authoritative DNS server for example.com domain.

Verifying a domain for SES purposes involves initiating the verification in SES console, and adding DNS records and values to confirm you have ownership of the domain. SES will automatically check DNS to complete the verification process. We assume you have done this step for SES1 instance, and have a _amazonses.example.com TXT record with one value already in your DNS. In this section you will add a second value, from SES2, to the TXT record. If you do not have SES1 setup in DNS, complete these steps twice, once for SES1 and again for SES2. This will prove to both SES instances that you own the domain and are entitled to send email from them.

Initiate Verification in SES Console

Just like you have done on SES1, in the second SES instance (SES2) initiate a verification process for the same domain; in our case example.com

  1. Sign in to the AWS Management Console and open the Amazon SES console.
  2. In the navigation pane, under Identity Management, choose Domains.
  3. Choose Verify a New Domain.
  4. In the Verify a New Domain dialog box, enter the domain name (i.e. example.com).
  5. If you want to set up DKIM signing for this domain, choose Generate DKIM Settings.
  6. Click on Verify This Domain.
  7. In the Verify a New Domain dialog box, you will see a Domain Verification Record Set containing a Name, a Type, and a Value. Copy Name and Value and store them for the step below, where you will add this value to DNS.
    (This information is also available by choosing the domain name after you close the dialog box.)

To complete domain verification, add a TXT record with the displayed Name and Value to your domain’s DNS server. For information about Amazon SES TXT records and general guidance about how to add a TXT record to a DNS server, see Amazon SES domain verification TXT records.

Add DNS Values for SES2

To complete domain verification for your second account, edit current _amazonses TXT record and add the Value from the SES2 to it. If you do not have an _amazonses TXT record create it, and add the Domain Verification values from both SES1 and SES2 to it. We are showing how to add record to Route 53 DNS, but the steps should be similar in any DNS management service you use.

  1. Sign in to the AWS Management Console and open the Amazon Route 53 console.
  2. In the navigation pane, choose Hosted zones.
  3. Choose the domain name you are verifying.
  4. Choose the _amazonses TXT record you created when you verified your domain for SES1.
  5. Under Record details, choose Edit record.
  6. In the Value box, go to the end of the existing attribute value, and then press Enter.
  7. Add the attribute value for the additional account or region.
  8. Choose Save.
  9. To validate, run the following command:
    dig TXT _amazonses.example.com +short
  10. You should see the two values returned:
    "4AjLMzUu4nSjrz4QVqDD8rXq8X2AHr+JhGSl4foiMmU="
    "abcde12345Sjrz4QVqDD8rXq8X2AHr+JhGSl4foiMmU="

Please note:

  1. if your DNS provider does not allow underscores in record names, you can omit _amazonses from the Name.
  2. to help you easily identify this record within your domain’s DNS settings, you can optionally prefix the Value with “amazonses:”.
  3. some DNS providers automatically append the domain name to DNS record names. To avoid duplication of the domain name, you can add a period to the end of the domain name in the DNS record. This indicates that the record name is fully qualified and the DNS provider need not append an additional domain name.
  4. if your DNS server does not support two values for a TXT record, you can have one record named _amazonses.example.com and another one called example.com.

Finally, after some time SES will complete its validation of the domain name and you should see the “pending validation” change to “verified”.

Verify DKIM

DomainKeys Identified Mail (DKIM) is a standard that allows senders to sign their email messages with a cryptographic key. Email providers then use these signatures to verify that the messages weren’t modified by a third party while in transit.

An email message that is sent using DKIM includes a DKIM-Signature header field that contains a cryptographically signed representation of the message. A provider that receives the message can use a public key, which is published in the sender’s DNS record, to decode the signature. Email providers then use this information to determine whether messages are authentic.

When you enable DKIM it generates CNAME records you need to add into your DNS. As it generates different values for each SES instance, you can use DKIM with multiple accounts and regions.

To complete the DKIM verification, copy the three (3) DKIM Names and Values from SES1 and three (3) from SES2 and add them to your DNS authoritative server as CNAME records.

You will know you are successful because, after some time SES will complete the DKIM verification and the “pending verification” will change to “verified”.

Configuring for DMARC compliance

Domain-based Message Authentication, Reporting and Conformance (DMARC) is an email authentication protocol that uses Sender Policy Framework (SPF) and/or DomainKeys Identified Mail (DKIM) to detect email spoofing. In order to comply with DMARC, you need to setup a “_dmarc” DNS record and either SPF or DKIM, or both. The DNS record for compliance with DMARC is setup once per domain, but SPF and DKIM require DNS records for each SES instance.

  1. Setup “_dmarc” record in DNS for your domain; one time per domain. See instructions here
  2. To validate it, run the following command:
    dig TXT _dmarc.example.com +short
    "v=DMARC1;p=quarantine;pct=25;rua=mailto:[email protected]"
  3. For DKIM and SPF follow the instructions below

Custom MAIL FROM Domain and SPF

Sender Policy Framework (SPF) is an email validation standard that’s designed to prevent email spoofing. Domain owners use SPF to tell email providers which servers are allowed to send email from their domains. SPF is defined in RFC 7208.

To comply with Sender Policy Framework (SPF) you will need to use a custom MAIL FROM domain. When you enable MAIL FROM domain in SES console, the service generates two records you need to configure in your DNS to document who is authorized to send messages for your domain. One record is MX and another TXT; see screenshot for mail.example.com. Save these records and enter them in your DNS authoritative server for example.com.

Configure MAIL FROM Domain for SES2

  1. Open the Amazon SES console at https://console.aws.amazon.com/ses/.
  2. In the navigation pane, under Identity Management, choose Domains.
  3. In the list of domains, choose the domain and proceed to the next step.
  4. Under MAIL FROM Domain, choose Set MAIL FROM Domain.
  5. On the Set MAIL FROM Domain window, do the following:
    • For MAIL FROM domain, enter the subdomain that you want to use as the MAIL FROM domain. In our case mail.example.com.
    • For Behavior if MX record not found, choose one of the following options:
      • Use amazonses.com as MAIL FROM – If the custom MAIL FROM domain’s MX record is not set up correctly, Amazon SES will use a subdomain of amazonses.com. The subdomain varies based on the AWS Region in which you use Amazon SES.
      • Reject message – If the custom MAIL FROM domain’s MX record is not set up correctly, Amazon SES will return a MailFromDomainNotVerified error. Emails that you attempt to send from this domain will be automatically rejected.
    • Click Set MAIL FROM Domain.

You will need to complete this step on SES1, as well as SES2. The MAIL FROM records are regional and you will need to add them both to your DNS authoritative server.

Set MAIL FROM records in DNS

From both SES1 and SES2, take the MX and TXT records provided by the MAIL FROM configuration and add them to the DNS authoritative server. If SES1 and SES2 are in the same region (us-east-1 in our example) you will publish exactly one MX record (mail.example.com in our example) into DNS, pointing to endpoint for that region. If SES1 and SES2 are in different regions, you will create two different records (mail1.example.com and mail2.example.com) into DNS, each pointing to endpoint for specific region.

Verify MX record

Example of MX record where SES1 and SES2 are in the same region

dig MX mail.example.com +short
10 feedback-smtp.us-east-1.amazonses.com.

Example of MX records where SES1 and SES2 are in different regions

dig MX mail1.example.com +short
10 feedback-smtp.us-east-1.amazonses.com.

dig MX mail2.example.com +short
10 feedback-smtp.eu-west-1.amazonses.com.

Verify if it works

On both SES instances (SES1 and SES2), check that validations are complete. In the SES Console:

  • In Verification section, Status should be “verified” (in green color)
  • In DKIM section, DKIM Verification Status should be “verified” (in green color)
  • In MAIL FROM Domain section, MAIL FROM domain status should be “verified” (in green color)

If you have it all verified on both accounts or regions, it is correctly configured and ready to use.

Conclusion

In this post, we explained how to verify and use the same domain for Amazon SES in multiple account and regions and maintaining the DMARC, DKIM and SPF compliance and security features related to email exchange.

While each customer has different necessities, Amazon SES is flexible to allow customers decide, organize, and be in control about how they want to uses Amazon SES to send email.

Author bio

Leonardo Azize Martins is a Cloud Infrastructure Architect at Professional Services for Public Sector.

His background is on development and infrastructure for web applications, working on large enterprises.

When not working, Leonardo enjoys time with family, read technical content, watch movies and series, and play with his daughter.

Contributor

Daniel Tet is a senior solutions architect at AWS specializing in Low-Code and No-Code solutions. For over twenty years, he has worked on projects for Franklin Templeton, Blackrock, Stanford Children’s Hospital, Napster, and Twitter. He has a Bachelor of Science in Computer Science and an MBA. He is passionate about making technology easy for common people; he enjoys camping and adventures in nature.


Complying with DMARC across multiple accounts using Amazon SES

Post Syndicated from Brendan Paul original https://aws.amazon.com/blogs/messaging-and-targeting/complying-with-dmarc-across-multiple-accounts-using-amazon-ses/

Introduction

For enterprises of all sizes, email is a critical piece of infrastructure that supports large volumes of communication from an organization. As such, companies need a robust solution to deal with the complexities this may introduce. In some cases, companies have multiple domains that support several different business units and need a distributed way of managing email sending for those domains. For example, you might want different business units to have the ability to send emails from subdomains, or give a marketing company the ability to send emails on your behalf. Amazon Simple Email Service (Amazon SES) is a cost-effective, flexible, and scalable email service that enables developers to send mail from any application. One of the benefits of Amazon SES is that you can configure Amazon SES to authorize other users to send emails from addresses or domains that you own (your identities) using their own AWS accounts. When allowing other accounts to send emails from your domain, it is important to ensure this is done securely. Amazon SES allows you to send emails to your users using popular authentication methods such as DMARC. In this blog, we walk you through 1/ how to comply with DMARC when using Amazon SES and 2/ how to enable other AWS accounts to send authenticated emails from your domain.

DMARC: what is it, why is it important?

DMARC stands for “Domain-based Message Authentication, Reporting & Conformance”, and it is an email authentication protocol (DMARC.org). DMARC gives domain owners and email senders a way to protect their domain from being used by malicious actors in phishing or spoofing attacks. Email spoofing can be used as a way to compromise users’ financial or personal information by taking advantage of their trust of well-known brands. DMARC makes it easier for senders and recipients to determine whether or not an email was actually sent by the domain that it claims to have been sent by.

Solution Overview

In this solution, you will learn how to set up DKIM signing on Amazon SES, implement a DMARC Policy, and enable other accounts in your organization to send emails from your domain using Sending Authorization. When you set up DKIM signing, Amazon SES will attach a digital signature to all outgoing messages, allowing recipients to verify that the email came from your domain. You will then set your DMARC Policy, which tells an email receiver what to do if an email is not authenticated. Lastly, you will set up Sending Authorization so that other AWS accounts can send authenticated emails from your domain.

Prerequisites

In order to complete the example illustrated in this blog post, you will need to have:

  1. A domain in an Amazon Route53 Hosted Zone or third-party provider. Note: You will need to add/update records for the domain. For this blog we will be using Route53.
  2. An AWS Organization
  3. A second AWS account to send Amazon SES Emails within a different AWS Organizations OU. If you have not worked with AWS Organizations before, review the Organizations Getting Started Guide

How to comply with DMARC (DKIM and SPF) in Amazon SES

In order to comply with DMARC, you must authenticate your messages with either DKIM (DomainKeys Identified Mail), SPF (Sender Policy Framework), or both. DKIM allows you to send email messages with a cryptographic key, which enables email providers to determine whether or not the email is authentic. SPF defines what servers are allowed to send emails for their domain. To use SPF for DMARC compliance you need to set up a custom MAIL FROM domain in Amazon SES. To authenticate your emails with DKIM in Amazon SES, you have the option of:

In this blog, you will be setting up a sending identity.

Setting up DKIM Signing in Amazon SES

  1. Navigate to the Amazon SES Console 
  2. Select Verify a New Domain and type the name of your domain in
  3. Select Generate DKIM Settings
  4. Choose Verify This Domain
    1. This will generate the DNS records needed to complete domain verification, DKIM signing, and routing incoming mail.
    2. Note: When you initiate domain verification using the Amazon SES console or API, Amazon SES gives you the name and value to use for the TXT record. Add a TXT record to your domain’s DNS server using the specified Name and Value. Amazon SES domain verification is complete when Amazon SES detects the existence of the TXT record in your domain’s DNS settings.
  5. If you are using Route 53 as your DNS provider, choose the Use Route 53 button to update the DNS records automatically
    1. If you are not using Route 53, go to your third-party provider and add the TXT record to verify the domain as well as the three CNAME records to enable DKIM signing. You can also add the MX record at the end to route incoming mail to Amazon SES.
    2. A list of common DNS Providers and instructions on how to update the DNS records can be found in the Amazon SES documentation
  6. Choose Create Record Sets if you are using Route53 as shown below or choose Close after you have added the necessary records to your third-party DNS provider.


Note: in the case that you previously verified a domain, but did NOT generate the DKIM settings for your domain, follow the steps below. Skip these steps if this is not the case:

  1. Go to the Amazon SES Console, and select your domain
  2. Select the DKIM dropdown
  3. Choose Generate DKIM Settings and copy the three values in the record set shown
    1. You may also download the record set as a CSV file
  4. Navigate to the Route53 console or your third-party DNS provider. Instructions on how to update the DNS records in your third-party can be found in the Amazon SES documentation
  5. Select the domain you are using
  6. Choose Create Record

  1. Enter the values that Amazon SES has generated for you, and add the three CNAME records to your domain
  2. Wait a few minutes, and go back to your domain in the Amazon SES Console
  3. Check that the DKIM status is verified

You also want to set up a custom MAIL FROM domain that you will use later on. To do so, follow the steps in the documentation.

Setting up a DMARC policy on your domain

DMARC policies are TXT records you place in DNS to define what happens to incoming emails that don’t align with the validations provided when setting up DKIM and SPF. With this policy, you can choose to allow the email to pass through, quarantine the email into a folder like junk or spam, or reject the email.

As a best practice, you should start with a DMARC policy that doesn’t reject all email traffic and collect reports on emails that don’t align to determine if they should be allowed. You can also set a percentage on the DMARC policy to perform filtering on a subset of emails to, for example, quarantine only 50% of the emails that don’t align. Once you are in a state where you can begin to reject non-compliant emails, flip the policy to reject failed authentications. When you set the DMARC policy for your domain, any subdomains that are authorized to send on behalf of your domain will inherit this policy and the same rule will apply. For more information on setting up a DMARC policy, see our documentation.

In a scenario where you have multiple subdomains sending emails, you should be setting the DMARC policy for the organizational domain that you own. For example, if you own the domain example.com and also want to use the sub-domain sender.example.com to send emails you can set the organizational DMARC policy (as a DNS TXT record) to:

Name Type Value
1 _dmarc.example.com TXT “v=DMARC1;p=quarantine;pct=50;rua=mailto:[email protected]

This DMARC policy states that 50% of emails coming from example.com that fail authentication should be quarantined and you want to send a report of those failures to [email protected]. For your sender.example.com sub-domain, this policy will be inherited unless you specify another DMARC policy for our sub-domain. In the case where you want to be stricter on the sub-domain you could add another DMARC policy like you see in the following table.


Name Type Value
1 _dmarc.sender.example.com TXT “v=DMARC1;p=reject;pct=100;rua=mailto:[email protected];ruf=mailto:[email protected]

This policy would apply to emails coming from sender.example.com and would reject any email that fails authentication. It would also send aggregate feedback to [email protected] and detailed message-specific failure information to [email protected] for further analysis.

Sending Authorization in Amazon SES – Allowing Other Accounts to Send Authenticated Emails

Now that you have configured Amazon SES to comply with DMARC in the account that owns your identity, you may want to allow other accounts in your organization the ability to send emails in the same way. Using Sending Authorization, you can authorize other users or accounts to send emails from identities that you own and manage. An example of where this could be useful is if you are an organization which has different business units in that organization. Using sending authorization, a business unit’s application could send emails to their customers from the top-level domain. This application would be able to leverage the authentication settings of the identity owner without additional configuration. Another advantage is that if the business unit has its own subdomain, the top-level domain’s DKIM settings can apply to this subdomain, so long as you are using Easy DKIM in Amazon SES and have not set up Easy DKIM for the specific subdomains.

Setting up sending authorization across accounts

Before you set up sending authorization, note that working across multiple accounts can impact bounces, complaints, pricing, and quotas in Amazon SES. Amazon SES documentation provides a good understanding of the impacts when using multiple accounts. Specifically, delegated senders are responsible for bounces and complaints and can set up notifications to monitor such activities. These also count against the delegated senders account quotas. To set up Sending Authorization across accounts:

  1. Navigate to the Amazon SES Console from the account that owns the Domain
  2. Select Domains under Identity Management
  3. Select the domain that you want to set up sending authorization with
  4. Select View Details
  5. Expand Identity Policies and Click Create Policy
  6. You can either create a policy using the policy generator or create a custom policy. For the purposes of this blog, you will create a custom policy.
  7. For the custom policy, you will allow a particular Organization Unit (OU) from our AWS Organization access to our domain. You can also limit access to particular accounts or other IAM principals. Use the following policy to allow a particular OU to access the domain:

{
  “Version”: “2012-10-17”,
  “Id”: “AuthPolicy”,
  “Statement”: [
    {
      “Sid”: “AuthorizeOU”,
      “Effect”: “Allow”,
      “Principal”: “*”,
      “Action”: [
        “SES:SendEmail”,
        “SES:SendRawEmail”
      ],
      “Resource”: “<Arn of Verified Domain>”,
      “Condition”: {
        “ForAnyValue:StringLike”: {
          “aws:PrincipalOrgPaths”: “<Organization Id>/<Root OU Id>/<Organizational Unit Id>”
        }
      }
    }
  ]
}

9. Make sure to replace the escaped values with your Verified Domain ARN and the Org path of the OU you want to limit access to.


You can find more policy examples in the documentation. Note that you can configure sending authorization such that all accounts under your AWS Organization are authorized to send via a certain subdomain.

Testing

You can now test the ability to send emails from your domain in a different AWS account. You will do this by creating a Lambda function to send a test email. Before you create the Lambda function, you will need to create an IAM role for the Lambda function to use.

Creating the IAM Role:

  1. Log in to your separate AWS account
  2. Navigate to the IAM Management Console
  3. Select Role and choose Create Role
  4. Under Choose a use case select Lambda
  5. choose Next: Permissions
  6. In the search bar, type SES and select the check box next to AmazonSESFullAccess
  7. Choose Next:Tags and Review
  8. Give the role a name of your choosing, and choose Create Role

Navigate to Lambda Console

  1. Select Create Function
  2. Choose the box marked Author from Scratch
  3. Give the function a name of your choosing (Ex: TestSESfunction)
  4. In this demo, you will be using Python 3.8 runtime, but feel free to modify to your language of choice
  5. Select the Change default execution role dropdown, and choose the Use an existing role radio button
  6. Under Existing Role, choose the role that you created in the previous step, and create the function

Edit the function

  1. Navigate to the Function Code portion of the page and open the function python file
  2. Replace the default code with the code shown below, ensuring that you put your own values in based on your resources
  3. Values needed:
    1. Test Email Address: an email address you have access to
      1. NOTE: If you are still operating in the Amazon SES Sandbox, this will need to be a verified email in Amazon SES. To verify an email in Amazon SES, follow the process here. Alternatively, here is how you can move out of the Amazon SES Sandbox
    2. SourceArn: The arn of your domain. This can be found in Amazon SES Console → Domains → <YourDomain> → Identity ARN
    3. ReturnPathArn: The same as your Source ARN
    4. Source: This should be your Mail FROM Domain @ your domain
      1. Your Mail FROM Domain can be found under Domains → <YourDomain> → Mail FROM Domain dropdown
      2. Ex: [email protected]
    5. Use the following function code for this example

import json
import boto3
from botocore.exceptions import ClientError

client = boto3.client('ses')
def lambda_handler(event, context):
    # Try to send the email.
    try:
        #Provide the contents of the email.
        response = client.send_email(
            Destination={
                'ToAddresses': [
                    '<[email protected]>',
                ],
            },
            Message={
                'Body': {
                    'Html': {
                        'Charset': 'UTF-8',
                        'Data': 'This email was sent with Amazon SES.',
                    },
                },
                'Subject': {
                    'Charset': 'UTF-8',
                    'Data': 'Amazon SES Test',
                },
            },
            SourceArn='<your-ses-identity-ARN>',
            ReturnPathArn='<your-ses-identity-ARN>',
            Source='<[email protected]>',
             )
    # Display an error if something goes wrong.
    except ClientError as e:
        print(e.response['Error']['Message'])
    else:
        print("Email sent! Message ID:"),
        print(response['ResponseMetadata']['RequestId'])

  1. Once you have replaced the appropriate values, choose the Deploy button to deploy your changes

Run a Test invocation

  1. After you have deployed your changes, select the “Test” Panel above your function code

  1. You can leave all of these keys and values as default, as the function does not use any event parameters
  2. Choose the Invoke button in the top right corner
  3. You should see this above the test event window:

Verifying that the Email has been signed properly

Depending on your email provider, you may be able to check the DKIM signature directly in the application. As an example, for Outlook, right click on the message, and choose View Source from the menu. You should see line that shows the Authentication Results and whether or not the DKIM/SPF signature passed. For Gmail, go to your Gmail Inbox on the Gmail web app. Choose the message you wish to inspect, and choose the More Icon. Choose View Original from the drop-down menu. You should then see the SPF and DKIM “PASS” Results.

Cleanup

To clean up the resources in your account,

  1. Navigate to the Route53 Console
  2. Select the Hosted Zone you have been working with
  3. Select the CNAME, TXT, and MX records that you created earlier in this blog and delete them
  4. Navigate to the SES Console
  5. Select Domains
  6. Select the Domain that you have been working with
  7. Click the drop down Identity Policies and delete the one that you created in this blog
  8. If you verified a domain for the sake of this blog: navigate to the Domains tab, select the domain and select Remove
  9. Navigate to the Lambda Console
  10. Select Functions
  11. Select the function that you created in this exercise
  12. Select Actions and delete the function

Conclusion

In this blog post, we demonstrated how to delegate sending and management of your sub-domains to other AWS accounts while also complying with DMARC when using Amazon SES. In order to do this, you set up a sending identity so that Amazon SES automatically adds a DKIM signature to your messages. Additionally, you created a custom MAIL FROM domain to comply with SPF. Lastly, you authorized another AWS account to send emails from a sub-domain managed in a different account, and tested this using a Lambda function. Allowing other accounts the ability to manage and send email from your sub-domains provides flexibility and scalability for your organization without compromising on security.

Now that you have set up DMARC authentication for multiple accounts in your enviornment, head to the AWS Messaging & Targeting Blog to see examples of how you can combine Amazon SES with other AWS Services!

If you have more questions about Amazon Simple Email Service, check out our FAQs or our Developer Guide.

If you have feedback about this post, submit comments in the Comments section below.