Security teams know all too well the grind of manual investigations and remediation. With the mass adoption of AI and increasingly automated attacks, defenders cannot afford to rely on overly manual, low priority, and complex workflows.
Heavily burdensome manual response introduces delays as analysts bounce between consoles and high alert volumes, contributing to alert fatigue. Even worse, it prevents security teams from dedicating time to high-priority threats and strategic, innovative work. To keep pace, SOCs need automated responses that contain and remediate common threats at machine speed before they become business-impacting incidents.
Expanding our capabilities with CrowdStrike Falcon® Fusion’ SOAR
That’s why today, we’re excited to announce a new integration between the Cloudflare One platform and CrowdStrike’s Falcon® Fusion SOAR.
As part of our ongoing partnership with CrowdStrike, this integration introduces two out-of-the-box integrations for Zero Trust and Email Security designed for organizations already leveraging CrowdStrike Falcon® Insight XDR or CrowdStrike Falcon® Next-Gen SIEM.
This allows SOC teams to gain powerful new capabilities to stop phishing, malware, and suspicious behavior faster, with less manual effort.
Out-of-the-box integrations
Although teams can always create custom automations, we’ve made it simple to get started with two pre-built integrations focused on Zero Trust Access and Email Security. Both follow the same general structure and are available directly in the CrowdStrike Content Library.
Cloudflare within CrowdStrike Content Library
The actions you can take within CrowdStrike from these integrations are the following:
Email Security
– Update Allow Policy
– Search Email Messages
– List Trusted Domains
– List Protected Domains
– List Blocked Senders
– List Allow Policies
– Get Trusted Domain
– Get Message Details
– Get Detection Details
– Get Allow Policy
– Delete Trusted Domain
– Delete Allow Policy
Delete Blocked Sender
Create Trusted Domain
Create Blocked Sender
Create Allow Policy
Get Blocked Sender
Zero Trust Access
– Update Reusable Policy
– Update Access Group
– Revoke Application Tokens
– Read Metadata For A Key
– List Reusable Policies
– List Access Groups
– List Access Applications
– List Access App Policies
– Get Access Reusable Policy
– Get Access Group
– Get Access Application
– Get Access App Policy
– Delete Reusable Policy
– Delete Access Group
– Delete Access Application
– Delete Access App Policy
– Create Reusable Policy
– Create Access Group
– Create Access App Policy
Using these signals, customers can create automated workflows that run with minimal to no human intervention. Falcon Fusion SOAR’s drag-and-drop editor makes it easy to chain together Cloudflare actions with other signals (from CrowdStrike or even third-party vendors) to automate large portions of the SOC workflow.
An example flow that you could create is:
A phishing email is detected by Cloudflare Email Security.
Falcon Fusion SOAR automatically retrieves detection details, blocks the sender, and updates allow/deny lists.
Cloudflare Zero Trust revokes active session tokens for the impacted account.
If Falcon confirms the endpoint is compromised, the device is automatically isolated.
Another example of how a workflow like above would show in the UI is the following:
An example automated flow using Cloudflare
From the Cloudflare UI, customers can navigate to the Logpush section where they can set up a job with CrowdStrike. To do this customers need to create a job with “HTTP destination”:
From here, customers can input the HTTP endpoint provided by CrowdStrike in the data connector setup to start sending logs over to Falcon Fusion SOAR. This URL will show up in the following way: ingest.us-2.crowdstrike.com/api/ingest/hec/<CRWDconnectionID>/v1/services/collector/raw
CrowdStrike URL Location
Working Logpush to CrowdStrike
This end-to-end automation allows teams to reduce mean time-to-response from minutes to seconds.
How detection and remediation are made possible
At a technical level, the integration relies on webhook and API integrations between Cloudflare’s SASE platform and CrowdStrike Falcon Fusion SOAR. For example:
From endpoint to network: When the CrowdStrike Falcon® platform detects an endpoint compromise, it triggers a workflow to Cloudflare’s API, which enforces step-up authentication or session revocation across SaaS, private apps, or email access. This is done via Cloudflare’s Access product.
From network to endpoint: When Cloudflare flags suspicious behavior (e.g., abnormal login patterns, anomalous traffic, or unsafe email activity), it notifies CrowdStrike Falcon Fusion SOAR, which then isolates the device and launches remediation playbooks.
This bidirectional exchange makes sure threats are contained from both sides, endpoint and network, without requiring manual intervention from analysts.
How to get started
If your organization already uses CrowdStrike Falcon Fusion SOAR with Cloudflare’s SASE platform, you can enable these workflows today directly from the Cloudflare Dashboard and CrowdStrike Falcon console (Zero Trust, Email Security). You can also search for Cloudflare within the content library in CrowdStrike to find the integrations.
For organizations looking to customize further, both platforms allow extensibility through APIs and custom playbooks so SOC teams can tailor response actions to their unique risk posture.
To learn more about our integrations, feel free to reach out to us to get started with a consultation.
As email continues to be a critical communication channel for businesses, ensuring proper authentication and maintaining high deliverability rates are increasingly difficult challenges. This post explores how Amazon Simple Email Service (SES) and Valimail work together to provide a robust solution for email authentication and deliverability, with a focus on meeting Microsoft’s new sender requirements.
The evolving landscape of email authentication
Email authentication protocols such as SPF and DKIM play a crucial role in preventing email spoofing and phishing attacks, with DMARC reports providing visibility into email authentication status. However, implementing and maintaining these protocols can be challenging, especially as major mailbox providers like Microsoft implement stricter requirements.
As of May 5, 2025, Microsoft began enforcing new authentication standards for bulk senders targeting their consumer domains. Senders who don’t meet these requirements now face SMTP rejections, potentially impacting their email deliverability and business communications.
Addressing authentication challenges
To help customers navigate these changes and maintain strong deliverability, Amazon SES is collaborating with Valimail, a leader in email authentication. This collaboration offers two flexible solutions:
Valimail Monitor (Free): Monitor helps you identify the sending services sending from your domains and provides a dynamic real-time check into compliance for Google, Microsoft, & Yahoo’s DKIM, SPF, and DMARC requirements.
Valimail Enforce (Premium): Enforce is an automated DMARC solution that helps simplify and speed up the process of getting to DMARC enforcement and includes unlimited SPF, in-depth reporting, notifications and expert product support.
Both solutions complement Amazon SES, allowing customers to leverage the scalability and reliability of SES while helping align their email sending with the latest authentication requirements.
Email authentication flow and security
The combination of Amazon SES and Valimail enhances the email sending process:
Emails are sent through Amazon SES.
Valimail continuously monitors the authentication status of these emails.
For Valimail Enforce users, automatic adjustments are made to SPF, DKIM, and DMARC configurations as needed.
Detailed reports provide insights into authentication issues and potential threats.
Emails that pass authentication checks are delivered to recipients with improved inbox placement.
This process helps customers properly authenticate emails sent via Amazon SES, reducing the risk of spoofing and improving overall deliverability.
Gaining visibility into your domain with Valimail Monitor:
Continuously protecting your domain with Valimail Enforce:
Combined benefits of Amazon SES and Valimail
When you combine Amazon SES with Valimail, you gain comprehensive visibility into your email ecosystem while maintaining the robust sending capabilities of SES. The combination enables you to assess your compliance with the latest sender requirements from major providers like Microsoft, Google, and Yahoo. You’ll have clear insights into which of your domains are successfully passing DMARC, SPF, and DKIM authentication checks, and which ones need attention.
Beyond basic authentication status, Valimail provides a global view of all email traffic being sent on your behalf, helping you maintain control over your sending reputation. For organizations looking to strengthen their email security, this serves as the first step towards achieving DMARC enforcement, while seamlessly fitting into your existing Amazon SES workflows.
With Valimail Enforce, you get the added benefit of automated management of your authentication protocols, helping you comply with evolving standards while maintaining optimal deliverability rates. This not only helps improve your inbox placement but also helps enhance your protection against email-based threats and spoofing attempts.
Conclusion
The combination of Amazon SES and Valimail provides a powerful solution for organizations looking to enhance their email authentication and maintain high deliverability rates. This collaboration allows businesses to leverage the scalability of Amazon SES while helping them comply with the latest email authentication standards.
Additional resources
Take the next step in optimizing your email authentication and deliverability:
Today, we are excited to announce that Forrester has recognized Cloudflare Email Security as a Strong Performer and among the top three providers in the ‘current offering’ category in “The Forrester Wave™: Email, Messaging, And Collaboration Security Solutions, Q2 2025” report. Get a complimentary copy of the report here. According to Forrester:
“Cloudflare is a solid choice for organizations looking to augment current email, messaging, and collaboration security tooling with deep content analysis and processing and malware detection capabilities.”
Cloudflare’s top-ranked criteria
In this evaluation, Forrester analyzed 10 Email Security vendors across 27 different criteria. Cloudflare received the highest scores possible in nine key evaluation criteria, and also scored among the top three in the current offering category. We believe this recognition is due to our ability to deliver stronger security outcomes across email and collaboration tools. These highlights showcase the strength and maturity of our Email Security solution:
Antimalware & sandboxing
Cloudflare’s advanced sandboxing engine analyzes files, whether directly attached or linked via cloud storage, using both static and dynamic analysis. Our AI-powered detectors evaluate attachment structure and behavior in real time, enabling protection not only against known malware but also emerging threats.
Malicious URL detection & web security
URLs are analyzed at delivery and again at click-time using Cloudflare’s global network. Our OCR and machine learning models extract and analyze metadata and page behavior to determine the maliciousness of a URL. Customers can also isolate suspicious links in remote browser sessions preventing user compromise. We continuously monitor URLs and retroactively remediate messages if the risk changes.
Threat intelligence
With over 4.4 trillion signals ingested daily across DNS, HTTP, and email layers, Cloudflare operates one of the most comprehensive real-time threat intelligence ecosystems. Campaigns observed via our DNS or HTTP layers are used to preemptively block related email threats well before traditional feeds.
Content analysis & processing
Cloudflare uses an ensemble of large language models (LLMs), natural language processing (NLP) techniques, and machine learning (ML) classifiers to analyze message tone, thread behavior, QR codes, and invoice language. These models detect indicators of fraud, business email compromise (BEC), and social engineering that legacy engines often miss.
Reporting & dashboards
Cloudflare’s unified Zero Trust dashboard gives SOC teams full visibility across email, web, cloud, data events. Analysts can pivot across user activity in just a few clicks and export data when needed.
User quarantine
Our quarantine workflow is designed to minimize disruption. Customers can choose several ways to get notifications to users about messages that have been quarantined.
Email authentication
Cloudflare enforces SPF, DKIM, and DMARC alignment automatically. We also offer a free DMARC reporting tool that gives customers visibility into email authentication failures and helps them take control of email brand protection.
Product security
Security is core to Cloudflare’s DNA. All services undergo continuous penetration testing, adhere to SOC 2 Type II and ISO 27001 standards, and operate on Cloudflare’s own infrastructure.
Partner ecosystem
Cloudflare integrates natively with Splunk, Microsoft Sentinel, Palo Alto XSOAR, and ServiceNow, making it easy to bring Cloudflare Email Security into existing SOC workflows. We also partner with leading human risk and awareness platforms to give organizations a more user-centric view of risk and behavior.
These strengths reflect Cloudflare’s commitment to building a comprehensive email security platform, one that’s designed to protect email inboxes and workspaces.
Our email vision
We agree with Forrester’s perspective on where the email security market is headed. Across our customer base, from Fortune 100 enterprises to fast-growing startups, we’ve seen a clear evolution:
Phishing is no longer confined to the inbox.
Attackers are increasingly luring users into external apps, unaudited chat platforms, or legitimate third-party services, bypassing traditional security controls. This shift is forcing SOC teams to think beyond just email and adopt a more holistic approach to workspace security.
Cloudflare was one of the first vendors to position email security as part of a broader SASE and Zero Trust strategy, securing not just messages, but the entire user surface. Looking ahead, we’re doubling down on this integrated vision of workspace security to give SOC teams simpler investigations and faster response.
What’s next: our strategic focus
We will continue to:
Build AI-driven automation Reduce alert fatigue and manual triage by using LLMs to summarize incidents, auto-label threats, and recommend next steps, allowing junior analysts to act with senior-level confidence.
Deepen integrations across the Cloudflare ecosystem Continue to unify signals across email, web, cloud, and data to give security teams a single view of user behavior driving faster remediations.
Enhance real-time user coaching Deliver contextual guidance at the moment of risk, whether via banners, isolation flows, or in-app warnings, to help users make safer and more informed decisions.
Develop best-in-class detections Continue investing in advanced models detecting new and novel phishing campaigns by leveraging global telemetry from our network edge to stop novel threats faster.
Cloudflare has always approached email security not as a standalone point solution, but as a core pillar of unified threat protection, deeply integrated across the modern enterprise security stack.
Ready to enhance your email security?
We provide all organizations (whether a Cloudflare customer or not) with free access to our Retro Scan tool, allowing them to use our predictive AI models to scan existing inbox messages. Retro Scan will detect and highlight any threats found, enabling organizations to remediate them directly in their email accounts. With these insights, organizations can implement further controls, either using Cloudflare Email Security or their preferred solution, to prevent similar threats from reaching their inboxes in the future.
If you are interested in how Cloudflare can help secure your inboxes, sign up for a phishing risk assessment here.
Forrester does not endorse any company, product, brand, or service included in its research publications and does not advise any person to select the products or services of any company or brand based on the ratings included in such publications. Information is based on the best available resources. Opinions reflect judgment at the time and are subject to change. For more information, read about Forrester’s objectivity here .
Thank you for following along with another Security Week at Cloudflare. We’re extremely proud of the work our team does to make the Internet safer and to help meet the challenge of emerging threats. As our CISO Grant Bourzikas outlined in his kickoff post this week, security teams are facing a landscape of rapidly increasing complexity introduced by vendor sprawl, an “AI Boom”, and an ever-growing surface area to protect.
As we continuously work to meet new challenges, Innovation Weeks like Security Week give us an invaluable opportunity to share our point of view and engage with the wider Internet community. Cloudflare’s mission is to help build a better Internet. We want to help safeguard the Internet from the arrival of quantum supercomputers, help protect the livelihood of content creators from unauthorized AI scraping, help raise awareness of the latest Internet threats, and help find new ways to help reduce the reuse of compromised passwords. Solving these challenges will take a village. We’re grateful to everyone who has engaged with us on these issues via social media, contributed to our open source repositories, and reached out through our technology partner program to work with us on the issues most important to them. For us, that’s the best part.
We’re thrilled to announce that organizations can now protect their sensitive corporate network traffic against quantum threats by tunneling it through Cloudflare’s Zero Trust platform.
Cloudflare has made significant progress in boosting multi-factor authentication (MFA) adoption. With the addition of Apple and Google social logins, we’ve made secure access easier for our users.
We’re excited to announce that Cloudflare for Campaigns now includes Email Security, adding an extra layer of protection to email systems that power political campaigns.
Nearly half of login attempts across websites protected by Cloudflare involved leaked credentials. The pervasive issue of password reuse is enabling automated bot attacks on a massive scale.
Threat research from the network that sees the most threats
Gain real-time insights with our new threat events platform. This tool empowers your cybersecurity defense with actionable intelligence to stay ahead of attacks and protect your critical assets.
Cloudflare introduces a single platform for unified security posture management, helping protect SaaS and web applications deployed across various environments.
We are excited to announce support for Zero Trust datasets, and custom dashboards where customers can monitor critical metrics for suspicious or unusual activity
For Security Week 2025, we are adding several new DDoS-focused graphs, new insights into leaked credential trends, and a new Bots page to Cloudflare Radar.
With Cloudflare for AI, developers, security teams, and content creators can leverage Cloudflare’s network and portfolio of tools to secure, observe, and make AI applications resilient and safe to use.
Learn more about how Cloudflare developed an AI model to uncover malicious JavaScript intent using a Graph Neural Network, from pre-processing data to inferencing at scale.
It’s hard to tell the difference between web content produced by humans and web content produced by AI. We’re taking a new approach to making AI content distinguishable without impacting performance.
How Cloudflare uses generative AI to slow down, confuse, and waste the resources of AI Crawlers and other bots that don’t respect “no crawl” directives.
Firewall for AI discovers and protects your public LLM-powered applications, and is seamlessly integrated with Cloudflare WAF. Join the beta now and take control of your generative AI security
By building and integrating a new heuristics framework into the Cloudflare Ruleset Engine, we now have a more flexible system to write rules and deploy new releases rapidly
We’re introducing a new Application Security experience in the Cloudflare dashboard, with a reworked UI organized by use cases, making it easier for customers to navigate and secure their accounts
Cloudflare Aegis provides dedicated egress IPs for Zero Trust origin access strategies, now supporting BYOIP and customer-facing configurability, with observability of Aegis IP address utilization coming soon.
We are closing the cleartext HTTP ports entirely for Cloudflare API traffic. This prevents the risk of clients unintentionally leaking their secret API keys in cleartext during the initial request, before we can reject the connection at the server side.
Cloudflare now provides clientless, browser-based support for the Remote Desktop Protocol (RDP). It natively enables secure, remote Windows server access without VPNs or RDP clients, to support third-party access and BYOD security.
Cloudflare’s Data Loss Prevention is reducing false positives by using a self-improving AI-powered algorithm, built on Cloudflare’s Developer Platform, to improve detection accuracy through AI context analysis.
This post is a beginner’s guide to lattices, the math at the heart of the transition to post-quantum (PQ) cryptography. It explains how to do lattice-based encryption and authentication from scratch.
Cloudflare is now assessed at the IRAP PROTECTED level, bringing our products and services to the Australian Public Sector.
Tune in to the latest on Cloudflare TV
For a deeper dive on many of the great announcements from Security Week, check out our CFTV segments where our team shares even more details on our latest updates.
See you for our next Innovation Week
We appreciate everyone who’s taken the time to read Cloudflare’s Security Week blog posts or engage with us on these topics via social media. Our next innovation week, Developer Week, is right around the corner in April. We look forward to seeing you then!
Email continues to be a critical communication channel for businesses, powering essential communications across time zones and locations. But as cyber threats grow more sophisticated, how can organizations protect their most vulnerable communication channel? With the increasing complexity of email-based security risks, businesses need robust solutions to safeguard their digital communications. Today, we’re excited to announce the launch of Hornetsecurity’sVade Advanced Email Security Add On for Amazon Simple Email Service (SES) Mail Manager, a powerful new tool in the fight against email-borne threats.
Amazon SES: Powering email communication at scale
Amazon SES is a cloud-based email service that helps you automate high-volume email communications seamlessly. In May 2024, we launched Mail Manager, introducing email relay and gateway features that help you manage email traffic, ensure compliance and enforce corporate policies. The launch also included an introduction to Mail Manager Email Add Ons which provides optional access to a collection of powerful security tools from certified providers that help you manage and filter incoming emails. Add Ons from our partners deliver advanced email security with flexible, meter-based pricing that is easily activated and integrated into your email workflows directly from the Mail Manager console or Mail Manager APIs.
In this blog, we’ll introduce Hornetsecurity’s Vade Email Add On for Amazon SES Mail Manager, and demonstrate how to enable its advanced email security capabilities to help protect your critical email communications.
Introducing the Vade Email Add On by Hornet Security
Hornetsecurity, a global leader in email security, produces next-generation cloud-based security, compliance, backup, and security awareness solutions that help companies and organizations of all sizes around the world. Its email filters process billions of emails daily, using a vast global email database to power their artificial intelligence (AI) engine. This approach allows the Vade Email Add On to continuously refine and adapt to the latest email threats and filter-bypassing techniques.
The Vade Email Add On brings Vade’s expertise directly to you, providing a seamless and powerful email security solution within the familiar AWS environment:
“Enhance your email service with advanced cybersecurity capabilities by integrating Vade Email Security’s state-of-the-art filtering solution. This Add On empowers users with automated, real-time defense against spam, malware, and phishing—ensuring safer communication. Vade’s AI-powered technology employs a multi-layered approach—combining heuristics, behavioral analysis, and natural language processing—to analyze messages in real time. Strengthen your platform by ensuring ongoing protection against evolving cyber threats.”
Advanced Email Security with the Vade Add On for Mail Manager
Hornetsecurity’s Vade Add On for Mail Manager provides automated, real-time defense against spam, malware, and phishing, which help ensure safer communication, including:
Advanced Threat Detection: Identifies and blocks sophisticated phishing attempts, malware, and ransomware, providing comprehensive protection against a wide range of cyber threats.
Behavioral Analysis: Examines the behavior patterns of message senders and content based on over 130 potential data points in each message to detect anomalies and potential threats.
Patented AI Technology: Leverages proprietary AI algorithms to analyze communication patterns and detect misuse of your service’s digital assets. This technology is powered by our global network of over 1 billion protected mailboxes.
Real-Time Scanning: Instantly analyze attachments without delaying delivery, thanks to its real time code interpreter.
Ease of Use: Seamless integration with Mail Manager rules, scanning only messages that meet specific criteria.
The Vade Email Add-On integrates with Mail Manager’s rules engine. This engine routes messages based on Vade’s scan results and optional detailed verdicts. These verdicts enable precise categorization and handling of incoming emails, improving security and email management.
Configure the Vade Email Add On
In the following example, we’ll walk thru the steps needed to subscribe and configure a rule set with two rules that are processed in priority order:
Rule 1 – drop-all-malicious-emails This rule has a condition that uses Vade to scan all incoming email and identify messages that are malicious (contain malware or phishing). These messages are then processed by Rule 1’s “Drop action“. Messages that are deemed “safe” are passed to Rule 2 after automatically being inspected and marked as “likely to be spam”, or “not-spam”.
Rule 2 – forward-to-mailbox Messages passed into Rule 2 are immediately forwarded to the user’s mailbox. In our example, we’re using Amazon WorkMail and Mail Manager’s built-in “Deliver to mailbox” action.
The Vade Add On also distinguishes between spam and clean email, and automatically adds a corresponding header to each message (see below) that can be used to route spam into the user’s “junk” folder.
Thanks to the seamless integration between Mail Manager Add Ons and WorkMail, messages marked as spam are automatically sent to the user’s Junk folder, enhancing both security and user experience.
Follow the steps below to configure the Vade Email Add On using the Amazon SES console for the simple mail flow described above (note – the SES Mail Manager API can be used in lieu of the console).
Open the Amazon SES console and in the left navigation rail, expand Mail Manager and click Email Add Ons.
Select the Vade Add On, read the description. Click Subscribe and read the Terms and Conditions. Click Subscribe again to activate the Vade Advanced Email Security Add On in your SES account.
Pricing is detailed in the Email Add On description page. When this blog was published the price per 1,000 emails processed = $0.415 USD (subject to change, please refer to SES Pricing for the most up to date information).
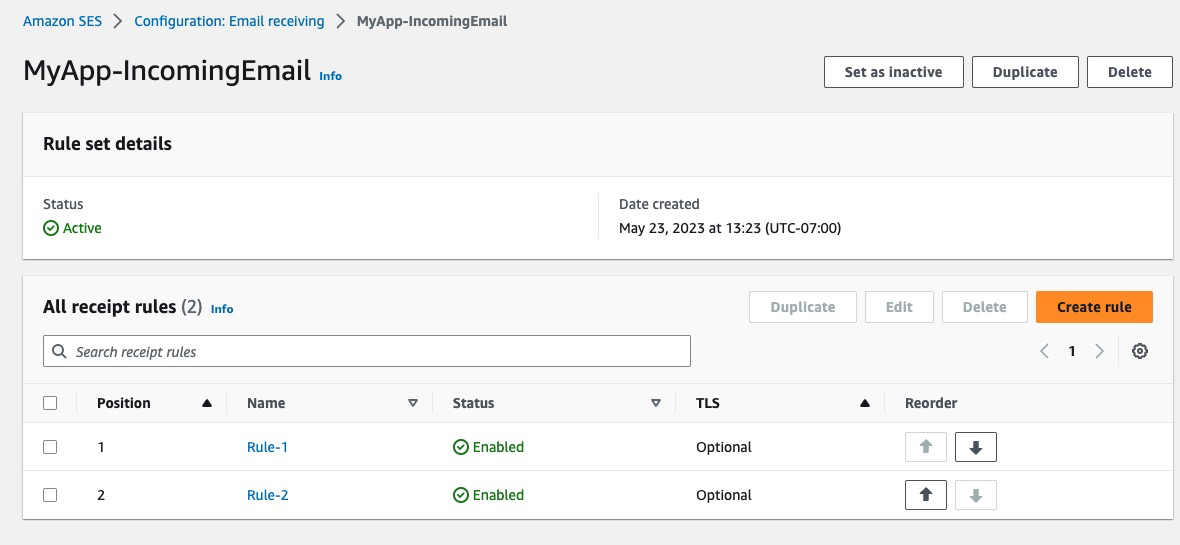
In the left navigation rail under Mail Manager, click Rule Sets.
Create a new Rule set ( process-via-vade ) (or modify an existing Rule set).
Create a rule ( drop-all-malicious-emails )
Under Rule conditions, click select property and select Vade Advanced Email Security Category from the drop-down menu (note the property modifiers allow for increasingly detailed inspection / results for the scan).
Click the Select operator drop-down and select Equals from the menu.
Click the Value drop-down and select Phishing and Malware.
Under Actions, select Drop action to stop processing and discard messages that are found to be malicious.
Create rule ( forward-to-mailbox ) to process messages that were passed along by Rule 1.
Under Actions, select Deliver to mailbox (note – if not using Amazon WorkMail, you would select a previously configured SMTPRelay action to send messages to your inbox provider. See this blog for more info).
Provide your WorkMail ARN
Select an IAM role that has permission for SES Mail Manager to access to your WorkMail mailbox
Save the Rule set (it will look like this):
To use this new Rule set, add it to an active Mail Manager Ingress endpoint. When you click save, the Ingress endpoint will begin using the new Rule set immediately.
The Vade Add-On’s rule conditions (below) enable granular control of email routing. When combined with customizable actions, these rules create an automated email handling system that matches your business needs.
Conclusion
Hornetsecurity’s Vade Email Add On for Amazon SES Mail Manager represents a significant step forward in email security for Amazon SES Mail Manager customers. By combining an advanced artificial intelligence (AI)-driven security engine with the powerful management capabilities of Mail Manager, you can enhance your defense against email-borne threats while maintaining precise control over your email workflows.
Get started today and take your email security to the next level with the Vade Add On for Amazon SES Mail Manager
We encourage you to try the Vade Add On for Amazon SES Mail Manager and experience the benefits of enhanced email security firsthand. To learn more about implementation details and best practices, please visit:
Join the Conversation: Connect with other administrators and security professionals on the AWS re:Post community to share insights and learn best practices.
Cloudflare Email Security customers using Microsoft Outlook can now enhance their data protection using our new DLP Assist capability. This application scans emails in real time as users compose them, identifying potential data loss prevention (DLP) violations, such as Social Security or credit card numbers. Administrators can instantly alert users of violations and take action downstream, whether by blocking or encrypting messages, to prevent sensitive information from leaking. DLP Assist is lightweight, easy to deploy, and helps organizations maintain compliance without disrupting workflow.
Making DLP more accessible
After speaking with our customers, we discovered a common challenge: many wanted to implement a data loss prevention policy for Outlook, but found existing solutions either too complex to set up or too costly to adopt.
That’s why we created DLP Assist to be a lightweight application that can be installed in minutes. Unlike other solutions, it doesn’t require changes to outbound email connectors or provide concerns about IP reputation to customers. By fully leveraging the Microsoft ecosystem, DLP Assist makes email DLP accessible to all organizations, whether they have dedicated IT teams or none at all.
We also recognized that traditional DLP solutions often demand significant financial investment in not just software but also in team members to configure and monitor them. DLP Assist aims to eliminate these barriers. Customers can use the application as part of our Email Security product, avoiding the need for additional purchases. Plus, with our DLP engine powered by optical character recognition (OCR), confidence levels, and other detection mechanisms, organizations don’t need a dedicated team to constantly oversee it.
By eliminating the complexities of legacy DLP and email systems, we allow customers to quickly begin preventing the unauthorized egress of sensitive data. With DLP Assist, organizations can be confident in controlling and protecting the information that leaves their environment.
How does it work?
Our DLP Assist is an application that integrates with the Desktop (Mac and Windows) and Web Outlook clients, passively scanning emails as they are composed. Running in the background within Microsoft Outlook, DLP Assist continuously monitors new text and attachments added to emails that users are drafting.
When a customer downloads and installs the application, Cloudflare creates a unique client ID specifically for emails read from the DLP Assist application, which serves as an identifier solely for use by DLP Assist within Cloudflare’s backend. When a user begins drafting a message, the DLP Assist application invokes several Microsoft Outlook APIs to gather information about how the message is changing. These APIs let the Cloudflare application continuously access different parts of the message like subject, body, attachments, etc. While the application is reading the changes within the message, it also establishes a secure, encrypted connection with a Cloudflare Worker.
As raw data about the email and attachments is sent to the Worker, the Worker relays the information to our DLP engine, which is at the heart of our scanning process. It leverages OCR technology to analyze attachments, extract text from images, and detect DLP violations across both email content and embedded data. It also examines raw text to ensure a comprehensive analysis of every part of the email and its attachments. While our engine supports most attachment types, it currently does not process video or audio files.
The DLP engine runs on all of our servers, and we also store the customer DLP profile configuration data on all of our servers. By keeping DLP policy configuration data on all servers alongside our analysis engine, we eliminate the need to reroute requests across our network allowing for low-latency, real-time DLP checks. The customer’s client ID enables us to find and apply their defined DLP profiles and accurately determine policy violations, delivering results directly to the Cloudflare Worker. If a violation is found, the Worker responds to the application to take action within Outlook.
Our architecture ensures real-time scanning with minimal latency, as end users are always near a Cloudflare Worker, regardless of their location. Additionally, this design provides built-in resilience — if a Cloudflare Worker becomes unavailable, another can take over, allowing for uninterrupted DLP enforcement. By scanning in real time, this allows us to provide immediate feedback to the user about any DLP violations that they have within their email, rather than the user having to wait till the message has been sent.
If a violation is detected, the application first displays an insight message — a ribbon notification at the top of the email — alerting the user to the issue. Administrators have full control over this message and can customize it to provide specific guidance or warnings. We find that most of our customers point users to documentation reminding them what is allowed to be sent outside of the organization.
When a DLP violation occurs, DLP Assist also injects a header into the EML file to indicate the violation. If the user removes the content that is in violation, the header is automatically removed as well.
If the violation remains unchanged, DLP Assist invokes a Microsoft Outlook API which prompts the user with a final warning, giving them another opportunity to revise the message before sending.
If the user proceeds without making changes, the email will be sent from the client with headers embedded into the EML showing that message contains a DLP violation. Organizations can configure their outbound mail transfer agent (MTA) to take appropriate action based on these headers. For those with Microsoft as their outbound MTA, Cloudflare’s DLP Assist integrates with Microsoft Purview, enabling organizations to block, encrypt, or require approval before sending.
For example, if an organization configures Purview to block the email, users will receive a notification similar to this one.
Violations detected by the DLP Assist application can also be sent externally through our Logpush feature. Customers have the flexibility to integrate this data with SIEM or SOAR platforms for deeper analysis, or store it in bucket storage solutions like Cloudflare R2. Additionally, customers can enhance their reporting capabilities by viewing block data directly within their outbound gateway.
As we continue to improve our DLP engine, we’re introducing more advanced ways to analyze messages. During Security Week 2025, we’re unveiling new AI methodologies that automatically fine-tune DLP confidence levels using machine learning models. Initially, these enhancements will be rolled out for Gateway violations, but we plan to extend them to email scanning in the near future. For more details, see the associated blog post.
Cloudflare One’s DLP Assist is designed for quick deployment, enabling organizations to implement a data loss prevention solution with minimal effort. It allows customers to immediately begin scanning emails for sensitive data and take action to prevent unauthorized sharing, ensuring compliance and security from day one.
How can I start using it?
To get started, navigate to the Zero Trust dashboard and click on the Email Security tab. From there, select the Outbound DLP tab.
To install DLP Assist, organizations can download the manifest file, which provides Microsoft with the necessary instructions to install the application within Outlook. Administrators can then upload this manifest file by going to Integrated Apps within the Microsoft 365 Admin Center and selecting Upload Custom Apps:
This application is best suited for use with OWA (Outlook Web Access) and the desktop (Mac and Windows) Outlook client. Due to Microsoft limitations, a stable experience on mobile devices is not yet available.
We’re continuously expanding our solutions to help organizations protect their data. Exciting new DLP and Email Security features are on the way throughout 2025, so stay tuned for upcoming announcements.
To learn more about our DLP and Email Security solutions, reach out to your Cloudflare representative. Want to see our detections in action? Run a free Retro Scan to uncover any potentially malicious messages hiding in your inbox.
In today’s fast-paced digital landscape, companies are managing an increasingly complex mix of environments — from SaaS applications and public cloud platforms to on-prem data centers and hybrid setups. This diverse infrastructure offers flexibility and scalability, but also opens up new attack surfaces.
To support both business continuity and security needs, “security must evolve from being reactive to predictive”. Maintaining a healthy security posture entails monitoring and strengthening your security defenses to identify risks, ensure compliance, and protect against evolving threats. With our newest capabilities, you can now use Cloudflare to achieve a healthy posture across your SaaS and web applications. This addresses any security team’s ultimate (daily) question: How well are our assets and documents protected?
A predictive security posture relies on the following key components:
Real-time discovery and inventory of all your assets and documents
Continuous asset-aware threat detection and risk assessment
Prioritised remediation suggestions to increase your protection
Today, we are sharing how we have built these key components across SaaS and web applications, and how you can use them to manage your business’s security posture.
Your security posture at a glance
Regardless of the applications you have connected to Cloudflare’s global network, Cloudflare actively scans for risks and misconfigurations associated with each one of them on a regular cadence. Identified risks and misconfigurations are surfaced in the dashboard under Security Center as insights.
Insights are grouped by their severity, type of risks, and corresponding Cloudflare solution, providing various angles for you to zoom in to what you want to focus on. When applicable, a one-click resolution is provided for selected insight types, such as setting minimum TLS version to 1.2 which is recommended by PCI DSS. This simplicity is highly appreciated by customers that are managing a growing set of assets being deployed across the organization.
To help shorten the time to resolution even further, we have recently added role-based access control (RBAC) to Security Insights in the Cloudflare dashboard. Now for individual security practitioners, they have access to a distilled view of the insights that are relevant for their role. A user with an administrator role (a CSO, for example) has access to, and visibility into, all insights.
In addition to account-wide Security Insights, we also provide posture overviews that are closer to the corresponding security configurations of your SaaS and web applications. Let’s dive into each of them.
Securing your SaaS applications
Without centralized posture management, SaaS applications can feel like the security wild west. They contain a wealth of sensitive information – files, databases, workspaces, designs, invoices, or anything your company needs to operate, but control is limited to the vendor’s settings, leaving you with less visibility and fewer customization options. Moreover, team members are constantly creating, updating, and deleting content that can cause configuration drift and data exposure, such as sharing files publicly, adding PII to non-compliant databases, or giving access to third party integrations. With Cloudflare, you have visibility across your SaaS application fleet in one dashboard.
Posture findings across your SaaS fleet
From the account-wide Security Insights, you can review insights for potential SaaS security issues:
You can choose to dig further with Cloud Access Security Broker (CASB) for a thorough review of the misconfigurations, risks, and failures to meet best practices across your SaaS fleet. You can identify a wealth of security information including, but not limited to:
Publicly available or externally shared files
Third-party applications with read or edit access
Unknown or anonymous user access
Databases with exposed credentials
Users without two-factor authentication
Inactive user accounts
You can also explore the Posture Findings page, which provides easy searching and navigation across documents that are stored within the SaaS applications.
Additionally, you can create policies to prevent configuration drift in your environment. Prevention-based policies help maintain a secure configuration and compliance standards, while reducing alert fatigue for Security Operations teams, and these policies can prevent the inappropriate movement or exfiltration of sensitive data. Unifying controls and visibility across environments makes it easier to lock down regulated data classes, maintain detailed audit trails via logs, and improve your security posture to reduce the risk of breaches.
How it works: new, real-time SaaS documents discovery
Delivering SaaS security posture information to our customers requires collecting vast amounts of data from a wide range of platforms. In order to ensure that all the documents living in your SaaS apps (files, designs, etc.) are secure, we need to collect information about their configuration — are they publicly shared, do third-party apps have access, is multi-factor authentication (MFA) enabled?
We previously did this with crawlers, which would pull data from the SaaS APIs. However, we were plagued with rate limits from the SaaS vendors when working with larger datasets. This forced us to work in batches and ramp scanning up and down as the vendors permitted. This led to stale findings and would make remediation cumbersome and unclear – for example, Cloudflare would be reporting that a file is still shared publicly for a short period after the permissions were removed, leading to customer confusion.
To fix this, we upgraded our data collection pipeline to be dynamic and real-time, reacting to changes in your environment as they occur, whether it’s a new security finding, an updated asset, or a critical alert from a vendor. We started with our Microsoft asset discovery and posture findings, providing you real-time insight into your Microsoft Admin Center, OneDrive, Outlook, and SharePoint configurations. We will be rapidly expanding support to additional SaaS vendors going forward.
Listening for update events from Cloudflare Workers
Cloudflare Workers serve as the entry point for vendor webhooks, handling asset change notifications from external services. The workflow unfolds as follows:
Webhook listener: An initial Worker acts as the webhook listener, receiving asset change messages from vendors.
Data storage & queuing: Upon receiving a message, the Worker uploads the raw payload of the change notification to Cloudflare R2 for persistence, and publishes it to a Cloudflare Queue dedicated to raw asset changes.
Transformation Worker: A second Worker, bound as a consumer to the raw asset change queue, processes the incoming messages. This Worker transforms the raw vendor-specific data into a generic format suitable for CASB. The transformed data is then:
Stored in Cloudflare R2 for future reference.
Published on another Cloudflare Queue, designated for transformed messages.
CASB Processing: Consumers & Crawlers
Once the transformed messages reach the CASB layer, they undergo further processing:
Polling consumer: CASB has a consumer that polls the transformed message queue. Upon receiving a message, it determines the relevant handler required for processing.
Crawler execution: The handler then maps the message to an appropriate crawler, which interacts with the vendor API to fetch the most up-to-date asset details.
Data storage: The retrieved asset data is stored in the CASB database, ensuring it is accessible for security and compliance checks.
With this improvement, we are now processing 10 to 20 Microsoft updates per second, or 864,000 to 1.72 million updates daily, giving customers incredibly fast visibility into their environment. Look out for expansion to other SaaS vendors in the coming months.
Securing your web applications
A unique challenge of securing web applications is that no one size fits all. An asset-aware posture management bridges the gap between a universal security solution and unique business needs, offering tailored recommendations for security teams to protect what matters.
Posture overview from attacks to threats and risks
Starting today, all Cloudflare customers have access to Security Overview, a new landing page customized for each of your onboarded domains. This page aggregates and prioritizes security suggestions across all your web applications:
Any (ongoing) attacks detected that require immediate attention
Disposition (mitigated, served by Cloudflare, served by origin) of all proxied traffic over the last 7 days
Summary of currently active security modules that are detecting threats
Suggestions of how to improve your security posture with a step-by-step guide
And a glimpse of your most active and lately updated security rules
These tailored security suggestions are surfaced based on your traffic profile and business needs, which is made possible by discovering your proxied web assets.
Discovery of web assets
Many web applications, regardless of their industry or use case, require similar functionality: user identification, accepting payment information, etc. By discovering the assets serving this functionality, we can build and run targeted threat detection to protect them in depth.
As an example, bot traffic towards marketing pages versus login pages have different business impacts. Content scraping may be happening targeting your marketing materials, which you may or may not want to allow, while credential stuffing on your login page deserves immediate attention.
Web assets are described by a list of endpoints; and labelling each of them defines their business goals. A simple example can be POST requests to path /portal/login, which likely describes an API for user authentication. While the GET requests to path /portal/login denote the actual login webpage.
To describe business goals of endpoints, labels come into play. POST requests to the /portal/login endpoint serving end users and to the /api/admin/login endpoint used by employees can both can be labelled using the same cf-log-inmanaged label, letting Cloudflare know that usernames and passwords would be expected to be sent to these endpoints.
API Shield customers can already make use of endpoint labelling. In early Q2 2025, we are adding label discovery and suggestion capabilities, starting with three labels, cf-log-in, cf-sign-up, and cf-rss-feed. All other customers can manually add these labels to the saved endpoints. One example, explained below, is preventing disposable emails from being used during sign-ups.
Always-on threat detection and risk assessment
Use-case driven threat detection
Customers told us that, with the growing excitement around generative AI, they need support to secure this new technology while not hindering innovation. Being able to discover LLM-powered services allows fine-tuning security controls that are relevant for this particular technology, such as inspecting prompts, limit prompting rates based on token usage, etc. In a separate Security Week blog post, we will share how we build Cloudflare Firewall for AI, and how you can easily protect your generative AI workloads.
Account fraud detection, which encompasses multiple attack vectors, is another key area that we are focusing on in 2025.
On many login and signup pages, a CAPTCHA solution is commonly used to only allow human beings through, assuming only bots perform undesirable actions. Put aside that most visual CAPTCHA puzzles can be easily solved by AI nowadays, such an approach cannot effectively solve the root cause of most account fraud vectors. For example, human beings using disposable emails to sign up single-use accounts to take advantage of signup promotions.
To solve this fraudulent sign up issue, a security rule currently under development could be deployed as below to block all attempts that use disposable emails as a user identifier, regardless of whether the requester was automated or not. All existing or future cf-log-in and cf-sign-up labelled endpoints are protected by this single rule, as they both require user identification.
Our fast expanding use-case driven threat detections are all running by default, from the first moment you onboarded your traffic to Cloudflare. The instant available detection results can be reviewed through security analytics, helping you make swift informed decisions.
API endpoint risk assessment
APIs have their own set of risks and vulnerabilities, and today Cloudflare is delivering seven new risk scans through API Posture Management. This new capability of API Shield helps reduce risk by identifying security issues and fixing them early, before APIs are attacked. Because APIs are typically made up of many different backend services, security teams need to pinpoint which backend service is vulnerable so that development teams may remediate the identified issues.
Our new API posture management risk scans do exactly that: users can quickly identify which API endpoints are at risk to a number of vulnerabilities, including sensitive data exposure, authentication status, Broken Object Level Authorization (BOLA) attacks, and more.
Authentication Posture is one risk scan you’ll see in the new system. We focused on it to start with because sensitive data is at risk when API authentication is assumed to be enforced but is actually broken. Authentication Posture helps customers identify authentication misconfigurations for APIs and alerts of their presence. This is achieved by scanning for successful requests against the API and noting their authentication status. API Shield scans traffic daily and labels API endpoints that have missing and mixed authentication for further review.
For customers that have configured session IDs in API Shield, you can find the new risk scan labels and authentication details per endpoint in API Shield. Security teams can take this detail to their development teams to fix the broken authentication.
We’re launching today with scans for authentication posture, sensitive data, underprotected APIs, BOLA attacks, and anomaly scanning for API performance across errors, latency, and response size.
Simplify maintaining a good security posture with Cloudflare
Achieving a good security posture in a fast-moving environment requires innovative solutions that can transform complexity into simplicity. Bringing together the ability to continuously assess threats and risks across both public and private IT environments through a single platform is our first step in supporting our customers’ efforts to maintain a healthy security posture.
To further enhance the relevance of security insights and suggestions provided and help you better prioritize your actions, we are looking into integrating Cloudflare’s global view of threat landscapes. With this, you gain additional perspectives, such as what the biggest threats to your industry are, and what attackers are targeting at the current moment. Stay tuned for more updates later this year.
If you haven’t done so yet, onboard your SaaS and web applications to Cloudflare today to gain instant insights into how to improve your business’s security posture.
At Cloudflare, we believe that every political candidate — regardless of their affiliation — should be able to run their campaign without the constant worry of cyber attacks. Unfortunately, malicious actors, such as nation-states, financially motivated attackers, and hackers, are often looking to disrupt campaign operations and messaging. These threats have the potential to interfere with the democratic process, weaken public confidence, and cause operational challenges for campaigns of all scales.
In 2020, in partnership with the non-profit, non-partisan Defending Digital Campaigns(DDC), we launched Cloudflare for Campaigns to offer a free package of cybersecurity tools to political campaigns, especially smaller ones with limited resources. Since then, we have helped over 250 political campaigns and parties across the US, regardless of affiliation.
This is why we are excited to announce that we have extended our Cloudflare for Campaigns product suite to include Email Security, to secure email systems that are essential to safeguarding the integrity and success of a political campaign. By preventing phishing, spoofing, and other email threats, it helps protect candidates, staff, and supporters from cyberattacks that could compromise sensitive data.
The front line of protection is email security
Phishing attacks on political campaigns have been a major cybersecurity threat in recent years, often leading to data breaches, leaks, and misinformation. In 2016,attackers targeted Democratic National Committee (DNC) staff with spear phishing emails disguised as Google security alerts, allowing hackers to access thousands of emails. In 2018, Russian intelligence agentsattempted to infiltrate Senator Claire McCaskill’s re-election campaign by sending emails to her staff, urging them to change their passwords.
This unsettling trend has affected political parties as well. In 2020, the Republican Party of Wisconsin fell victim to a phishing attack that resulted in hackers stealing $2.3 million.
During the2022 US midterm elections, Cloudflare safeguarded the email inboxes of more than 100 campaigns, election officials, and public organizations involved in the election process. These ranged from first-time candidates in local races to seasoned incumbents at the national level. In the three months leading up to the 2022 midterms, Cloudflare processed over 20 million emails and successfully blocked around 150,000 phishing attempts targeting campaign staff.
During the 2024 US election, we actively protected state and local election offices, political campaigns, state parties, independent media, and voting rights organizations. In addition, we safeguarded the inboxes of hundreds of political campaigns, ensuring secure and uninterrupted communications to help campaigns focus on their message and outreach without the fear of cyberattack derailing their efforts. Over the course of the year, Cloudflare:
Scanned 5.7 million emails for campaigns and political parties
Blocked 400,000 malicious messages before they reached campaign staff and teams
Detected and blocked 21,000 suspicious emails
Prevented 14,000 unique spoofing attempts
Providing tools to help political campaigns and parties stay secure online
We launched Cloudflare for Campaigns in 2020 to help political campaigns stay online amid cyber attacks. US campaign finance laws prohibit corporations from donating money or services to federal candidates or parties. However, we partner with Defending Digital Campaigns (DDC), approved by the Federal Election Commission, to offer free and discounted cybersecurity services. Through DDC, we provide tailored security solutions for resource-limited campaigns and parties facing heightened cyber threats.
“DDC is thrilled that Cloudflare is expanding their product offerings to campaigns with the addition of Email Security. This will expedite robust protections from the real and serious threats posed by phishing. Now campaigns, in concert with the DDoS protection Cloudflare provides via Cloudflare for Campaigns, will be able to easily enable a suite of core protections. This new offering further exemplifies Cloudflare’s extraordinary and generous commitment to protecting campaigns. Cloudflare has been one of DDC’s core partners since we were founded.”– Michael Kaiser, President & CEO of Defending Digital Campaigns
Over five years, our partnership has strengthened protections against DDoS attacks and web vulnerabilities. However, campaigns have frequently asked for help combating malicious emails that target campaign staff.
Cloudflare acquired Area 1 Security in 2022 to enhance its Zero Trust platform by integrating an email security solution that proactively identifies and blocks phishing threats before they reach users’ inboxes. Before the acquisition, Area 1 provided low-cost email security to political campaigns with direct FEC approval.
Fast-forward to 2025, and we are excited to officially integrate Email Security into our full Cloudflare for Campaigns portfolio to better protect US political parties and campaigns.
Access free Email Security for your political campaign or party with Cloudflare for Campaigns
Phishing protection: AI-powered threat detection that automatically identifies and blocks malicious emails before they reach their target
Email authentication: Built-in support for DMARC, DKIM, and SPF to prevent email spoofing
Real-time monitoring: Continuous scanning for suspicious activities and anomalies
Seamless integration: Easily integrates with existing email providers without disrupting workflows
Insightful reporting: Actionable analytics and reports to track security events and improve defenses
At Cloudflare, we are committed to helping build a better Internet — one where election campaigns can operate securely, free from the threat of cyber attacks.
Current campaigns and political parties that are protected under Cloudflare for Campaigns will receive an email with information on how to enable Email Security. If you are a campaign or a political party interested in applying for the project to get access to the full suite of products, please visit https://www.cloudflare.com/campaigns/usa.
[Amazon Simple Email Service] provides a secure email solution that scales with your business needs. Unfortunately, all email systems, including Amazon SES, remain the primary target for spammers and bad actors due to email’s widespread use and accessibility.
While SES offers powerful features for application-based email sending, its SMTP credentials require careful management to prevent unauthorized access. Compromised credentials enable bad actors to send malicious emails through legitimate domains, which can bypass security filters and damage sender reputation.
To protect your SES implementation, you must encrypt SMTP credentials during storage and transmission. Additionally, implementing role-based access controls helps restrict credential access to authorized personnel only. Regular credential rotation at fixed intervals, typically every 90 days, minimizes potential security breaches. Automating this rotation process eliminates human error and ensures consistent security practices across your organization.
Problem Statement
Imagine you are the administrator for a large financial institution. You recently began using Amazon SES to send email from two dozen on-premises servers. Your email servers authenticate with SES using SMTP credentials to access the SES SMTP interface. Your organization’s security policies mandate regular credential rotation, including the ability to rotate them on-demand. How can you automate SMTP credential rotation such that you can meet your organization’s security policies?
This blog post will present two solutions that automate the secure management and automatic rotation of SMTP credentials for Amazon SES. Each will help enhance email security, comply with regulations, and minimize operational overhead.
Both solutions provide SES customers who use SMTP with additional tools to improve email security, ensure compliance, and reduce operational overhead. You can deploy the option that best suites your needs by following the guidance in this blog post.
If your environment supports automated rotation, AWS Systems Manager Documents (SSM Documents) can help by providing pre-defined or custom automation workflows for securely managing secrets rotation, deploy Option 1.
If your environment does not support automated rotation, you can still implement an auditable, managed rotation solution by storing your secrets in AWS Systems Manager Parameter Store by deploying Option 2.
As a pay-per-use platform, the underlying AWS services used in either deployment option will only charge you for the resources that you actually consume. You can leverage the AWS Pricing Calculator to estimate the run-time costs for your specific workload. Alternatively, you can work directly with your AWS account team to understand the pricing for these solutions.
Getting SES SMTP Credentials
To send emails through the Amazon SES SMTP interface, email servers must first authenticate with SES using dedicated SES SMTP credentials. Typically, a systems administrator logs into the AWS SES console, clicks the Create SMTP Credentials button, and navigates to the AWS Identity and Access Management] (IAM) console. There, the administrator creates an IAM user with permissions for SES. The administrator then uses the IAM user’s secret access key to generate the SES SMTP password, which they use to configure their email servers or SMTP-enabled applications for use with SES.
The SES SMTP interface authenticates requests using an SMTP credential derived from an IAM user’s access key ID and secret access key. Since temporary access keys cannot be used to derive SES SMTP credentials, you must deploy and regularly rotate a long-lived key.
While the manual process of creating SES SMTP credentials works for a small number of credentials, it becomes cumbersome for customers with numerous email servers or strict password rotation policies. These customers may find the automated credential rotation mechanisms described in the following solutions better suited to their production needs.
Option 1 – Fully Automated Credential Rotation:
The fully automated version of this solution uses a custom Lambda function to create an SMTP password, which is stored in AWS Secrets Manager. AWS Secrets Manager’s built-in rotation feature then triggers the rotation of SES SMTP credentials. AWS Systems Manager Documents utilize AWS Systems Manager Agents to automatically make the changes to the authentication configuration on email servers.
The key advantages of using AWS Systems Manager to make the email server configuration changes include:
Ability to deploy changes to on-premises and Amazon EC2 hosts, allowing rotation of secrets across a hybrid estate. Customization of the document to specific email software configurations. Targeting the secret (SMTP credential) rotation document on all email servers based on tags.
Let’s dive deep into Option 1 – Fully Automated Credential Rotation.
How Option 1 works:
Refer to the image above for the workflow:
AWS Secrets Manager initiates a rotation request, either on a schedule or via an authorized user’s request, triggering the “rotation Lambda” to rotate the SES SMTP credentials.
The SES Secret Rotation Function Lambda (see figure x above):
a. Creates a new IAM secret access key for the designated SES IAM user, derives the new SES SMTP password, and stores it in AWS Secrets Manager.
b. Connects to SES to verify the new SMTP password can authenticate.
c. Initiates an AWS Systems Manager Run Command to update the new SMTP password on target email servers using a pre-configured Systems Manager Document.
d. (and e.) Monitors the status of the Systems Manager Document execution until all updates complete successfully
f. Deletes the old IAM access and secret access keys.
With this fully automated solution, SES SMTP credentials can be rotated on a schedule or triggered manually, with no impact to email service uptime.
Deploying the Fully Automated Solution in Your AWS Account (Option 1)
Prerequisites for the Fully Automated Solution
AWS Account Access, typically with admin-level permission to allow for the deployment.
Alternatively, you can use the AWS CLI from the AWS CloudShell in your browser.
Clone the Github repository (for this solution, you only need the README.md and sesautomaticrotation.yaml files found in /ses-credential-rotation/automatic-rotation).
Note – We follow the principles of least privilege in this solution. The CloudFormation templates we’ve supplied require you to specify an identity, or configuration-set resource to use in the SES sending operation. You can find guidance on defining these values at Actions, resources, and condition keys for Amazon SES. Additionally, we’ve limited the IAM User to the ses:SendRawEmail action, which you can adjust as appropriate).
Console access to your AWS SES account that is properly configured to send emails via at least one verified identity.
Target email server(s) properly configured to send email via SES using SES SMTP authentication.
The AWS Systems Manager agent(s) must be correctly installed and configured on your target email server(s) as detailed in Setting up AWS Systems Manager.
The target email servers must be decorated with the tag (“SSMServerTag“) and value (“SSMServerTagValue“). These values allow the Systems Manager Document to identify them.
We use the tag “EmailServer” and the value “True” in our example, but you can use any tag and value that you wish).
An email address (or list) to receive SMTP rotation notifications.
Console access to your AWS Secrets Manager.
Console access to your AWS Systems Manager.
Deployment Steps
Clone the GitHub repository to your IDE
If using AWS CloudShell, ensure you are in the same region as your AWS Systems and Secrets Manager
Update the appropriate AWS Systems Manager sample document created by the CloudFormation Template to reflect your email server environments. These can be found in the AWS Systems Manager console under Documents > Owned by me
The ExampleWindowsIISSMTPSESpasswordrotator sample provides an example for Microsoft Windows hosts using the runPowerShellScript action to update the server’s SMTP credentials.
The ExamplePostfixSESpasswordrotator sample provides an example for Linux hosts using the runShellScript action to update the server’s SMTP credentials.
The partially automated version uses a custom AWS Lambda function to create an SMTP password, which is stored in AWS Systems Manager Parameter Store. This solution simplifies credential rotation, where manual changes must be conducted by support staff. By wrapping the manual change process with AWS Step Functions, you can ensure a robust and auditable process to regularly rotate the SES SMTP credential.
How Option 2 works:
The credential rotation AWS Step Function creates a new SES SMTP credential and updates it in AWS Systems Manager Parameter Store.
It retrieves a list of servers from an Amazon DynamoDB table and launches a manual confirmation AWS Step Function execution for each server to initiate and track the manual step.
The manual confirmation AWS Step Function emails the designated address, requesting support staff to arrange the rotation. The email includes a link specific to that server.
The person completing the manual change confirms back to the AWS Step Function via the link that the rotation is complete.
Once the rotation on a server is confirmed, the manual confirmation AWS Step Function for that server is marked as complete.
After all server rotations are complete, the credential rotation AWS Step Function continues, disabling the old SES SMTP credential and deleting it after a few days.
AWS Step Function executions can last up to 365 days, providing sufficient time for the manual rotation and confirmation.
The screenshot below shows a graphical representation of the credential rotation AWS Step Function execution status, providing a real-time view of the rotation progress.
You can also track the status of individual servers via the manual rotation step function execution list.
The partially automated solution for rotating Amazon SES SMTP credentials is illustrated and detailed below:
Refer to the image above for the option 2 workflow:
EventBridge Scheduler Trigger: An EventBridge scheduler rule triggers a custom Starter Function Lambda (SF Lambda) on the last day of every 3rd month (this can be adjusted to suit your needs in the CloudFormation template).
Credential Rotation Step Function: The Starter Function Lambda triggers the Credential Rotation AWS Step Function, providing a clearly defined name to facilitate auditing (“password-rotation-dd-mm-yy“).
Credential Rotation Step Function Actions:
Creates a new IAM (Identity and Access Management) secret access key for the SES IAM user.
Triggers the SMTP Credential Generator Lambda to derive the SES SMTP password from the newly created IAM secret access key (using the algorithm provided in the SES documentation.
Reads a list of servers that are utilizing this credential from a DynamoDB table.
Manual Confirmation Step Function:
For each server, a manual confirmation AWS Step Function is triggered, sending a message on the Amazon Simple Notification Service (SNS) topic.
The SNS notification prompts the server administrator via email to manually rotate the SMTP credentials on the on-premises email server.
The server administrator uses a link in the email to confirm the credential has been rotated and tested on the server.
The link triggers the Confirmation Lambda exposed via API Gateway, which marks the ManualConfirmation step function as complete.
Credential Rotation Completion: The CredentialRotation step function waits until all manual confirmation step functions have completed before proceeding.
Old IAM Access Key Deletion: Once confirmation has been received for all servers, the step function deletes the old IAM access key.
Deployment
To deploy the partially automated solution in your AWS account, you will need the following prerequisites:
Prerequisites for the Partially Automated Solution
AWS Account Access, typically with admin-level permission to allow for the deployment.
SES enabled, configured, and properly sending emails.
External email server(s) currently configured to use SES with SMTP.
Administrator email address to receive notifications.
AWS Secrets Manager and AWS Systems Manager set up.
AWS Systems Manager agent(s) correctly installed and configured on your target email servers as detailed in Setting up AWS Systems Manager.
Amazon EC2 instance with Postfix configured to send emails through SES
Target email servers must be decorated with a tag (“SSMServerTag“) and value (“SSMServerTagValue“) that will be used to identify them by the Systems Manager Document (we used “server” and “email”)
AWS Parameter Store and AWS Step Functions.
Once you have the prerequisites in place, follow the instructions in the GitHub project.
Conclusion
Implementing an automated credential rotation process for Amazon SES SMTP enhances security and compliance, streamlines operations, and reduces the risk of downtime and human error. By leveraging AWS Secrets Manager and AWS Systems Manager (option 1) or AWS Systems Manager Parameter Store and Step Functions (option 2), organizations can centralize SES SMTP credential management, maintain an audit trail, and quickly update email application servers with new SMTP credentials.
Need additional guidance?
Join the conversation and connect with other administrators and security professionals on the AWS re:Post community to share insights and learn best practices.
For many organizations, Simple Mail Transfer Protocol (SMTP) relay is a critical email delivery mechanism that facilitates the transmission of email messages between different domains and servers. When an email is sent to a recipient outside the sender’s domain, SMTP relay(s) ensures the message is routed correctly and delivered to the intended destination.
Traditionally, on-premises SMTP relay servers were used by messaging and security teams to manage email sending from on-premises applications on behalf of their organizations’ domains. This approach helps to:
Guard against brand damage and loss of sensitive data
Protect recipients from fraud
Provide straightforward control over email sending
However, as applications are modernized and migrated to the cloud, email sending has changed. Many organizations now outsource bulk email sending to cloud service providers such as Amazon SES. This shift has made it challenging for internal teams to regulate their organization’s email effectively.
Addressing modernization challenges
Amazon Web Services (AWS) is a popular choice for developing and modernizing applications, with Amazon SES offering a secure, scalable and cost effective service for applications to send email. To address the need for additional security and control over email, Proofpoint offers their popular Secure Email Relay (SER) on the AWS Marketplace.
Using Amazon SES with Proofpoint SER combines the convenience and features of Amazon SES with Proofpoint SER’s ability to:
Regulate and govern outbound application email
Support migration from on-premises relay to the cloud
Apply security controls to application emails
Email flow and security
SES Mail Manager allows emails to be conditionally routed from Amazon SES to Proofpoint SER. The process includes:
Scanning emails with Proofpoint threat detection technologies
Applying centrally managed Proofpoint SER policies
Performing DKIM-signing and distributing DMARC compliant emails
Sending mail to recipients
Two configuration options are available:
Proofpoint SER handles distribution to final recipients (Figure 1)
Emails are routed back to Amazon SES for distribution after Proofpoint SER processing (Figure 2)
In the first configuration, email is sent to SES and routed through a Mail Manager SMTP relay to Proofpoint SER where it is processed for threat detection, malware, spam, sensitive data, and more. In this configuration, Proofpoint SER distributes the email to recipients through a STMP relay or another email sending service beyond Proofpoint. Deliverability reporting, archiving, and other capabilities are left to Proofpoint or downstream providers.
Figure 1: Proofpoint SER applying security controls to application emails before sending.
In the second configuration, email is sent to SES which routes through a Mail Manager SMTP relay to Proofpoint SER to be processed for threat detection, malware, spam, sensitive data, and more. Proofpoint SER then sends the processed emails back to SES via Mail Manager STMP relay. Deliverability reporting, archiving and other capabilities such as Amazon Q Business can be provided by SES or other AWS services.
Figure 2. Security controls applied by Proofpoint SER before routing emails back to Amazon SES for distribution.
Conclusion
The integration of Amazon SES and Proofpoint SER offers a powerful solution for organizations looking to modernize their email sending processes while maintaining robust security. This collaboration allows businesses to leverage the scalability and convenience of cloud-based email services without compromising on control and protection.
Call to Action
Take the next step in modernizing your email infrastructure while enhancing security and control. To learn more about how Amazon SES and Proofpoint SER can benefit your organization:
Join our webinar with Proofpoint on December 18, 2025 (or view the recording) to learn more about modern email governance and security with subject-matter experts from the Amazon SES Mail Manager and Proofpoint SER teams.
We’re excited to announce that Kivera, a cloud security, data protection, and compliance company, has joined Cloudflare. This acquisition extends our SASE portfolio to incorporate inline cloud app controls, empowering Cloudflare One customers with preventative security controls for all their cloud services.
In today’s digital landscape, cloud services and SaaS (software as a service) apps have become indispensable for the daily operation of organizations. At the same time, the amount of data flowing between organizations and their cloud providers has ballooned, increasing the chances of data leakage, compliance issues, and worse, opportunities for attackers. Additionally, many companies — especially at enterprise scale — are working directly with multiple cloud providers for flexibility based on the strengths, resiliency against outages or errors, and cost efficiencies of different clouds.
Security teams that rely on Cloud Security Posture Management (CSPM) or similar tools for monitoring cloud configurations and permissions and Infrastructure as code (IaC) scanning are falling short due to detecting issues only after misconfigurations occur with an overwhelming volume of alerts. The combination of Kivera and Cloudflare One puts preventive controls directly into the deployment process, or ‘inline’, blocking errors before they happen. This offers a proactive approach essential to protecting cloud infrastructure from evolving cyber threats, maintaining data security, and accelerating compliance.
An early warning system for cloud security risks
In a significant leap forward in cloud security, the combination of Kivera’s technology and Cloudflare One adds preventive, inline controls to enforce secure configurations for cloud resources. By inspecting cloud API traffic, these new capabilities equip organizations with enhanced visibility and granular controls, allowing for a proactive approach in mitigating risks, managing cloud security posture, and embracing a streamlined DevOps process when deploying cloud infrastructure.
Kivera will add the following capabilities to Cloudflare’s SASE platform:
One-click security: Customers benefit from immediate prevention of the most common cloud breaches caused by misconfigurations, such as accidentally allowing public access or policy inconsistencies.
Enforced cloud tenant control: Companies can easily draw boundaries around their cloud resources and tenants to ensure that sensitive data stays within their organization.
Prevent data exfiltration: Easily set rules to prevent data being sent to unauthorized locations.
Reduce ‘shadow’ cloud infrastructure: Ensure that every interaction between a customer and their cloud provider is in line with preset standards.
Streamline cloud security compliance: Customers can automatically assess and enforce compliance against the most common regulatory frameworks.
Flexible DevOps model: Enforce bespoke controls independent of public cloud setup and deployment tools, minimizing the layers of lock-in between an organization and a cloud provider.
Complementing other cloud security tools: Create a first line of defense for cloud deployment errors, reducing the volume of alerts for customers also using CSPM tools or Cloud Native Application Protection Platforms (CNAPPs).
An intelligent proxy that uses a policy-based approach to
enforce secure configuration of cloud resources.
Better together with Cloudflare One
As a SASE platform, Cloudflare One ensures safe access and provides data controls for cloud and SaaS apps. This integration broadens the scope of Cloudflare’s SASE platform beyond user-facing applications to incorporate increased cloud security through proactive configuration management of infrastructure services, beyond what CSPM and CASB solutions provide. With the addition of Kivera to Cloudflare One, customers now have a unified platform for all their inline protections, including cloud control, access management, and threat and data protection. All of these features are available with single-pass inspection, which is 50% faster than Secure Web Gateway (SWG) alternatives.
With the earlier acquisition of BastionZero, a Zero Trust infrastructure access company, Cloudflare One expanded the scope of its VPN replacement solution to cover infrastructure resources as easily as it does apps and networks. Together Kivera and BastionZero enable centralized security management across hybrid IT environments, and provide a modern DevOps-friendly way to help enterprises connect and protect their hybrid infrastructure with Zero Trust best practices.
Beyond its SASE capabilities, Cloudflare One is integral to Cloudflare’s connectivity cloud, enabling organizations to consolidate IT security tools on a single platform. This simplifies secure access to resources, from developer privileged access to technical infrastructure and expanding cloud services. As Forrester echoes, “Cloudflare is a good choice for enterprise prospects seeking a high-performance, low-maintenance, DevOps-oriented solution.”
The growing threat of cloud misconfigurations
The cloud has become a prime target for cyberattacks. According to the 2023 Cloud Risk Report, CrowdStrike observed a 95% increase in cloud exploitation from 2021 to 2022, with a staggering 288% jump in cases involving threat actors directly targeting the cloud.
Misconfigurations in cloud infrastructure settings, such as improperly set security parameters and default access controls, provide adversaries with an easy path to infiltrate the cloud. According to the 2023 Thales Global Cloud Security Study, which surveyed nearly 3,000 IT and security professionals from 18 countries, 44% of respondents reported experiencing a data breach, with misconfigurations and human error identified as the leading cause, accounting for 31% of the incidents.
Further, according to GartnerⓇ, “Through 2027, 99% of records compromised in cloud environments will be the result of user misconfigurations and account compromise, not the result of an issue with the cloud provider.”1
Several factors contribute to the rise of cloud misconfigurations:
Rapid adoption of cloud services: Leaders are often driven by the scalability, cost-efficiency, and ability to support remote work and real-time collaboration that cloud services offer. These factors enable rapid adoption of cloud services which can lead to unintentional misconfigurations as IT teams struggle to keep up with the pace and complexity of these services.
Complexity of cloud environments: Cloud infrastructure can be highly complex with multiple services and configurations to manage. For example, AWS alone offers 373 services with 15,617 actions and 140,000+ parameters, making it challenging for IT teams to manage settings accurately.
Decentralized management: In large organizations, cloud infrastructure resources are often managed by multiple teams or departments. Without centralized oversight, inconsistent security policies and configurations can arise, increasing the risk of misconfigurations.
Continuous Integration and Continuous Deployment (CI/CD): CI/CD pipelines promote the ability to rapidly deploy, change and frequently update infrastructure. With this velocity comes the increased risk of misconfigurations when changes are not properly managed and reviewed.
Insufficient training and awareness: Employees may lack the cross-functional skills needed for cloud security, such as understanding networks, identity, and service configurations. This knowledge gap can lead to mistakes and increases the risk of misconfigurations that compromise security.
Common exploitation methods
Threat actors exploit cloud services through various means, including targeting misconfigurations, abusing privileges, and bypassing encryption. Misconfigurations such as exposed storage buckets or improperly secured APIs offer attackers easy access to sensitive data and resources. Privilege abuse occurs when attackers gain unauthorized access through compromised credentials or poorly managed identity and access management (IAM) policies, allowing them to escalate their access and move laterally within the cloud environment. Additionally, unencrypted data enables attackers to intercept and decrypt data in transit or at rest, further compromising the integrity and confidentiality of sensitive information.
Here are some other vulnerabilities that organizations should address:
Unrestricted access to cloud tenants: Allowing unrestricted access exposes cloud platforms to data exfiltration by malicious actors. Limiting access to approved tenants with specific IP addresses and service destinations helps prevent unauthorized access.
Exposed access keys: Exposed access keys can be exploited by unauthorized parties to steal or delete data. Requiring encryption for the access keys and restricting their usage can mitigate this risk.
Excessive account permissions: Granting excessive privileges to cloud accounts increases the potential impact of security breaches. Limiting permissions to necessary operations helps prevent lateral movement and privilege escalation by threat actors.
Inadequate network segmentation: Poorly managed network security groups and insufficient segmentation practices can allow attackers to move freely within cloud environments. Drawing boundaries around your cloud resources and tenants ensures that data stays within your organization.
Improper public access configuration: Incorrectly exposing critical services or storage resources to the internet increases the likelihood of unauthorized access and data compromise. Preventing public access drastically reduces risk.
Shadow cloud infrastructure: Abandoned or neglected cloud instances are often left vulnerable to exploitation, providing attackers with opportunities to access sensitive data left behind. Preventing untagged or unapproved cloud resources to be created can reduce the risk of exposure.
Limitations of existing tools
Many organizations turn to CSPM tools to give them more visibility into cloud misconfigurations. These tools often alert teams after an issue occurs, putting security teams in a reactive mode. Remediation efforts require collaboration between security teams and developers to implement changes, which can be time-consuming and resource-intensive. This approach not only delays issue resolution but also exposes companies to compliance and legal risks, while failing to train employees on secure cloud practices. On average, it takes 207 days to identify these breaches and an additional 70 days to contain them.
Addressing the growing threat of cloud misconfigurations requires proactive security measures and continuous monitoring. Organizations must adopt proactive security solutions that not only detect and alert but also prevent misconfigurations from occuring in the first place and enforce best practices. Creating a first line of defense for cloud deployment errors reduces the volume of alerts for customers, especially those also using CSPM tools or CNAPPs.
By implementing these proactive strategies, organizations can safeguard their cloud environments against the evolving landscape of cyber threats, ensuring robust security and compliance while minimizing risks and operational disruptions.
What’s next for Kivera
The Kivera product will not be a point solution add-on. We’re making it a core part of our Cloudflare One offering because integrating features from products like our Secure Web Gateway give customers a comprehensive solution that works better together.
We’re excited to welcome Kivera to the Cloudflare team. Through the end of 2024 and into early 2025, Kivera’s team will focus on integrating their preventive inline cloud app controls directly into Cloudflare One. We are looking for early access testers and teams to provide feedback about what they would like to see. If you’d like early access, please join the waitlist.
[1] Source: Outcome-Driven Metrics You Can Use to Evaluate Cloud Security Controls, Gartner, Charlie Winckless, Paul Proctor, Manuel Acosta, 09/28/2023
GARTNER is a registered trademark and service mark of Gartner, Inc. and/or its affiliates in the U.S. and internationally and is used herein with permission. All rights reserved.
Being a bad guy on the Internet is a really good business. In more than 90% of cybersecurity incidents, phishing is the root cause of the attack, and during this third week of August phishing attacks were reported against the U.S. elections, in the geopolitical conflict between the U.S., Israel, and Iran, and to cause $60M in corporate losses.
You might think that after 30 years of email being the top vector for attack and risk we are helpless to do anything about it, but that would be giving too much credit to bad actors, and a misunderstanding of how defenders focused on detections can take control and win.
Phishing isn’t about email exclusively, or any specific protocol for that matter. Simply put, it is an attempt to get a person, like you or me, to take an action that unwittingly leads to damages. These attacks work because they appear to be authentic, visually or organizationally, such as pretending to be the CEO or CFO of your company, and when you break it down they are three main attack vectors that Cloudflare has seen most impactful from the bad emails we protect our customers from: 1. Clicking links (deceptive links are 35.6% of threat indicators) 2. Downloading files or malware (malicious attachments are 1.9% of threat indicators) 3. Business email compromise (BEC) phishing that elicits money or intellectual property with no links or files (0.5% of threat indicators).
Today, we at Cloudflare see an increase in what we’ve termed multi-channel phishing. What other channels are there to send links, files and elicit BEC actions? There’s SMS (text messaging) and public and private messaging applications, which are increasingly common attack vectors that take advantage of the ability to send links over those channels, and also how people consume information and work. There’s cloud collaboration, where attackers rely on links, files, and BEC phishing on commonly used collaboration tools like Google Workspace, Atlassian, and Microsoft Office 365. And finally, there’s web and social phishing targeting people on LinkedIn and X. Ultimately, any attempt to stop phishing needs to be comprehensive enough to detect and protect against these different vectors.
Learn more about these technologies and products here
A real example
It’s one thing to tell you this, but we’d love to give you an example of how a multi-channel phish plays out with a sophisticated attacker.
Here’s an email message that an executive notices is in their junk folder. That’s because our Email Security product noticed there’s something off about it and moved it there, but it relates to a project the executive is working on, so the executive thinks it’s legitimate. There’s a request for a company org chart, and the attacker knows that this is the kind of thing that’s going to be caught if they continue on email, so they include a link to a real Google form:
The executive clicks the link, and because it is a legitimate Google form, it displays the following:
There’s a request to upload the org chart here, and that’s what they try to do:
The executive drags it in, but it doesn’t finish uploading because in the document there is an “internal only” watermark that our Gateway and digital loss prevention (DLP) engine detected, which in turn prevented the upload.
Sophisticated attackers use urgency to drive better outcomes. Here, the attackers know the executive has an upcoming deadline for the consultant to report back to the CEO. Unable to upload the document, they respond back to the attacker. The attacker suggests that they try another method of upload or, in the worst case scenario, send the document on WhatsApp.
The executive attempts to upload the org chart to the website they were provided in the second email, not knowing that this site would have loaded malware, but because it was loaded in Cloudflare’s Browser Isolation, it kept the executive’s device safe. Most importantly, when trying to upload sensitive company documents, the action is stopped again:
Finally they try WhatsApp, and again, we block it:
Ease of use
Setting up a security solution and maintaining it is critical to long term protection. However, having IT administration teams constantly tweak each product, configuration, and monitor each users’ needs is not only costly but risky as well, as it puts a large amount of overhead on these teams.
Protecting the executive in the example above required just four steps:
Install and login to Cloudflare’s device agent for protection
With just a few clicks, anyone with the device agent client can be protected against multi-channel phish, making it easy for end users and administrators. For organizations that don’t allow clients to be installed, an agentless deployment is also available.
2. Configure policies that apply to all your user traffic routed through our secure web gateway. These policies can block access outright to high risk sites, such as those known to participate in phishing campaigns. For sites that may be suspicious, such as newly registered domains, isolated browser access allows users to access the website, but limits their interaction.
The executive was also unable to upload the org chart to a free cloud storage service because their organization is using Cloudflare One’s Gateway and Browser Isolation solutions that were configured to load any free cloud storage websites in a remote isolated environment, which not only prevented the upload but also removed the ability to copy and paste information as well.
Also, while the executive was able to converse with the bad actor over WhatsApp, their files were blocked because of Cloudflare One’s Gateway solution, configured by the administrator to block all uploads and downloads on WhatsApp.
3. Set up DLP policies based on what shouldn’t be uploaded, typed, or copied and pasted.
The executive was unable to upload the org chart to the Google form because the organization is using Cloudflare One’s Gateway and DLP solutions. This protection is implemented by configuring Gateway to block any DLP infraction, even on a valid website like Google.
4. Deploy Email Security and set up auto-move rules based on the types of emails detected.
In the example above, the executive never received any of the multiple malicious emails that were sent to them because Cloudflare’s Email Security was protecting their inbox. The phishing emails that did arrive were put into their Junk folder because the email was impersonating someone that didn’t match the signature in the email, and the configuration in Email Security automatically moved it there because of a one-click configuration set by the executive’s IT administrator.
But even with best-in-class detections, it goes without saying that it is important to have the ability to drill down on any metric to learn about individual users that are being impacted by an ongoing attack. Below is a mockup of our upcoming improved email security monitoring dashboard.
What’s next
While phishing, despite being around for three decades, continues to be a clear and present danger, effective detections in a seamless and comprehensive solution are really the only way to stay protected these days.
If you’re simply thinking about purchasing email security by itself, you can see why that just isn’t enough. Multi-layered protection is absolutely necessary to protect modern workforces, because work and data don’t just sit in email. They’re everywhere and on every device. Your phishing protection needs to be as well.
While you can do this by stitching together multiple vendors, it just won’t all work together. And besides the cost, a multi-vendor approach also usually increases overhead for investigation, maintenance, and uniformity for IT teams that are already stretched thin.
Whether or not you are at the start of your journey with Cloudflare, you can see how getting different parts of the Cloudflare One product suite can help holistically with phishing. And if you are already deep in your journey with Cloudflare, and are looking for 99.99% effective email detections trusted by the Fortune 500, global organizations, and even government entities, you can see how our Email Security helps.
If you’re running Office 365, and you’d like to see what we can catch that your current provider cannot, you can start right now with Retro Scan.
And if you are using our Email Security solution already, you can learn more about our comprehensive protection here.
In the ever-evolving landscape of cyber threats, a subtle yet potent form of phishing has emerged — quishing, short for QR phishing. It has been 30 years since the invention of QR codes, yet quishing still poses a significant risk, especially after the era of COVID, when QR codes became the norm to check statuses, register for events, and even order food.
Since 2020, Cloudflare’s cloud email security solution (previously known as Area 1) has been at the forefront of fighting against quishing attacks, taking a proactive stance in dissecting them to better protect our customers. Let’s delve into the mechanisms behind QR phishing, explore why QR codes are a preferred tool for attackers, and review how Cloudflare contributes to the fight against this evolving threat.
How quishing works
The impact of phishing and quishing are quite similar, as both can result in users having their credentials compromised, devices compromised, or even financial loss. They also leverage malicious attachments or websites to provide bad actors the ability to access something they normally wouldn’t be able to. Where they differ is that quishing is typically highly targeted and uses a QR code to further obfuscate itself from detection.
Since phish detection engines require inputs like URLs or attachments inside an email in order to detect, quish succeeds by hampering the detection of these inputs. In Example A below, the phish’s URL was crawled and after two redirects landed on a malicious website that automatically tries to run key logging malware that copies login names and passwords. For Example A, this clearly sets off the detectors, but Example B has no link to crawl and therefore the same detections that worked on Example A are rendered inert.
Strange you say, if my phone can scan that QR code then can’t a detection engine recognize the QR code as well? Simply put, no, because phish detection engines are optimized for catching phish, but to identify and scan QR codes requires a completely different engine – a computer vision engine. This brings us to why QR codes are a preferred tool for attackers.
Why QR codes for phishing?
There are three main reasons QR codes are popular in phishing attacks. First, QR codes boast strong error correction capabilities, allowing them to withstand resizing, pixel shifting, variations in lighting, partial cropping, and other distortions. Indeed, computer vision models can scan QR codes, but identifying which section of an email, image, or webpage linked in an email has a QR code is quite difficult for a machine, and even more so if the QR codes have been obfuscated to hide themselves from some computer vision models. For example, by inverting them, blending them with other colors or images, or making them extremely small, computer vision models will have trouble even identifying the presence of QR codes, much less even being able to scan them. Though filters and additional processing can be applied to any image, not knowing what or where to apply makes the deobfuscation of a QR code an extremely expensive computational problem. This not only makes catching all quish hard, but is likely to cause frustration for an end user who won’t get their emails quickly because an image or blob of text looks similar to a QR code, resulting in delivery delays.
Even though computer vision models may have difficulty deobfuscating QR codes, we have discovered from experience that when a human encounters these obfuscated QR codes, with enough time and effort, they are usually able to scan the QR code. By doing everything from increasing the brightness of their screen, to printing out the email, to resizing the codes themselves, they can make a QR code that has been hidden from machines scan successfully.
Don’t believe us? Try it for yourself with the QR codes that have been obfuscated for machines. They all link to https://blog.cloudflare.com/
If you scanned any of the example QR codes above, you have just proven the next reason bad actors favor quish. The devices used for accessing QR codes are typically personal devices with a limited security posture, making them susceptible to exploitation. While secured corporate devices typically have measures to warn, stop, or sandbox users when they access malicious links, these protections are not available natively on personal devices. This can be especially worrisome, as we have seen a trend towards custom QR codes targeting executives in organizations.
QR codes can also be seamlessly layered in with other obfuscation techniques, such as encrypted attachments, mirrors that mimic well-known websites, validations to prove you are human before malicious content is revealed, and more. This versatility makes them an attractive choice for cybercriminals seeking innovative ways to deceive unsuspecting users by adding QR codes to previously successful phishing vectors that have now been blocked by security products.
Cloudflare’s protection strategy
Cloudflare has been at the forefront of defending against quishing attacks. We employ a multi-faceted approach, and instead of focusing on archaic, layered email configuration rules, we have trained our machine learning (ML) detection models on almost a decade’s worth of detection data and have a swath of proactive computer vision models to ensure all of our customers start with a turnkey solution.
For quish detections, we break it into two parts: 1) identification and scanning of QR codes 2) analysis of decoded QR codes.
The first part is solved by our own QR code detection heuristics that inform how, when, and where for our computer vision models to execute. We then leverage the newest libraries and tools to help identify, process, and most importantly decode QR codes. While it is relatively easy for a human to identify a QR code, there is almost no limit to how many ways they can be obfuscated to machines. The examples we provided above are just a small sample of what we’ve seen in the wild, and bad actors are constantly discovering new methods to make QR codes hard to quickly find and identify, making it a constant cat and mouse game that requires us to regularly update our tools for the trending obfuscation technique.
The second part, analysis of decoded QR codes, goes through all the same treatment we apply to phish and then some. We have engines that deconstruct complex URLs and drill down to the final URL, from redirect to redirect, whether they are automatic or not. Along the way, we scan for malicious attachments and malicious websites and log findings for future detections to cross-reference. If we encounter any files or content that are encrypted or password protected, we leverage another group of engines that attempt to decrypt and unprotect them, so we can identify if there was any obfuscated malicious content. Most importantly, with all of this information, we continuously update our databases with this new data, including the obfuscation of the QR code, to make better assessments of similar attacks that leverage the methods we have documented.
However, even with a well-trained suite of phish detection tools, quite often the malicious content is at the end of a long chain of redirects that prevent automated web crawlers from identifying anything at all, much less malicious content. In between redirects, there might be a hard block that requires human validation, such as a CAPTCHA, which makes it virtually impossible for an automated process to crawl past, and therefore unable to classify any content at all. Or there might be a conditional block with campaign identification requirements, so if anyone is outside the original target’s region or has a web browser and operating system version that doesn’t meet the campaign requirements, they would simply view a benign website, while the target would be exposed to the malicious content. Over the years, we have built tools to identify and pass these validations, so we can determine malicious content that may be there.
However, even with all the technologies we’ve built over the years, there are cases where we aren’t able to easily get to the final content. In those cases, our link reputation machine learning models, which have been trained on multiple years of scanned links and their metadata, have proven to be quite valuable and are easily applied after QR codes are decoded as well. By correlating things like domain metadata, URL structure, URL query strings, and our own historical data sets, we are able to make inferences to protect our customers. We also take a proactive approach and leverage our ML models to tell us where to hunt for QR codes, even if they aren’t immediately obvious, and by scrutinizing domains, sentiment, context, IP addresses, historical use, and social patterns between senders and recipients, Cloudflare identifies and neutralizes potential threats before they can inflict harm.
Creative examples and real world instances
With the thousands of QR codes we process daily, we see some interesting trends. Notable companies, including Microsoft and DocuSign, have frequently been the subjects of impersonation for quishing attacks. What makes this more confusing for users, and even more likely to scan them, is that these companies actually use QR codes in their legitimate workflows. This further underscores the urgency for organizations to fortify their defenses against this evolving threat.
Below are three examples of the most interesting quish we have found and compared against the real use cases by the respective companies. The QR codes used in these emails have been masked.
Microsoft Authenticator
Microsoft uses QR codes as a faster way to complete MFA instead of sending six digit SMS codes to users’ phones that can be delayed and are also considered safer, as SMS MFA can be intercepted through SIM swap attacks. Users would have independently registered their devices and would have previously seen the registration screen on the right, so receiving an email that says they need to re-authenticate doesn’t seem especially odd.
DocuSign
DocuSign uses QR codes to make it easier for users to download their mobile app tosign documents, identity verification via a mobile device to take photos, and supports embedding DocuSign features in third party apps which have their own QR code scanning functionality. The use of QR codes in native DocuSign apps and non-native apps makes it confusing for frequent DocuSign users and not at all peculiar for users that rarely use DocuSign. While the QR code for downloading the DocuSign app is not used in signature requests, to a frequent user, it might just seem like a fast method to open the request in the app they already have downloaded on their mobile device.
Microsoft Teams
Microsoft uses QR codes for Teams to allow users to quickly join a team via a mobile device, and while Teams doesn’t use QR codes for voicemails, it does have a voicemail feature. The email on the left seems like a reminder to check voicemail in Teams and combines the two real use cases on the right.
How you can help prevent quishing
As we confront the persistent threat of quishing, it’s crucial for individuals and organizations to be vigilant. While no solution can guarantee 100% protection, collective diligence can significantly reduce the risk, and we encourage collaboration in the fight against quishing.
If you are already a Cloud Email Security customer, we remind you to submit instances of quish from within our portal to help stop current threats and enhance the capabilities of future machine learning models, leading to more proactive defense strategies. If you aren’t a customer, you can still submit original quish samples as an attachment in EML format to [email protected], and remember to leverage your email security provider’s submission process to inform them of these quishing vectors as well.
The battle against quishing is ongoing, requiring continuous innovation and collaboration. To support submissions of quish, we are developing new methods for customers to provide targeted feedback to our models and also adding additional transparency to our metrics to facilitate tracking a variety of vectors, including quish.
The next 12 months have the potential to reshape the global political landscape with elections occurring in more than 80 nations, in 2024, while new technologies, such as AI, capture our imagination and pose new security challenges.
Against this backdrop, the role of CISOs has never been more important. Grant Bourzikas, Cloudflare’s Chief Security Officer, shared his views on what the biggest challenges currently facing the security industry are in the Security Week opening blog.
Over the past week, we announced a number of new products and features that align with what we believe are the most crucial challenges for CISOs around the globe. We released features that span Cloudflare’s product portfolio, ranging from application security to securing employees and cloud infrastructure. We have also published a few stories on how we take a Customer Zero approach to using Cloudflare services to manage security at Cloudflare.
We hope you find these stories interesting and are excited by the new Cloudflare products. In case you missed any of these announcements, here is a recap of Security Week:
Cloudflare announced the development of Firewall for AI, a protection layer that can be deployed in front of Large Language Models (LLMs) to identify abuses and attacks.
Defensive AI is the framework Cloudflare uses when integrating intelligent systems into its solutions. Cloudflare’s AI models look at customer traffic patterns, providing that organization with a tailored defense strategy unique to their environment.
We released a natural language assistant as part of Security Analytics. Now it is easier than ever to get powerful insights about your applications by exploring log and security events using the new natural language query interface.
Generative AI is being used by malicious actors to make phishing attacks much more convincing. Learn how Cloudflare’s email security systems are able to see past the deception using advanced machine learning models.
Maintaining visibility and control as applications and clouds change
Introducing Magic Cloud Networking, a new set of capabilities to visualize and automate cloud networks to give our customers easy, secure, and seamless connection to public cloud environments.
Security Center now includes new tools to address a common challenge: ensuring comprehensive deployment of Cloudflare products across your infrastructure. Gain precise insights into where and how to optimize your security posture.
Cloudflare One now supports Optical Character Recognition and detects source code as part of its Data Loss Prevention service. These two features make it easier for organizations to protect their sensitive data and reduce the risks of breaches.
We are introducing user risk scoring as part of Cloudflare One, a new set of capabilities to detect risk based on user behavior, so that you can improve security posture across your organization.
The Cybersecurity & Infrastructure Security Agency issued an Emergency Directive due to the Ivanti Connect Secure and Policy Secure vulnerabilities. In this post, we discuss the threat actor tactics exploiting these vulnerabilities and how Cloudflare One can mitigate these risks.
Protecting online privacy starts with knowing what cookies are used by your websites. Our client-side security solution, Page Shield, extends transparent monitoring to HTTP cookies.
Cloudflare Secure Web Gateway now supports the detection, logging, and filtering of network protocols using packet payloads without the need for inspection.
Our Security Center now houses Requests for Information and Priority Intelligence Requirements. These features are available via API as well and Cloudforce One customers can start leveraging them today for enhanced security analysis.
With the combined power of Security Analytics and Log Explorer, security teams can analyze, investigate, and monitor logs natively within Cloudflare, reducing time to resolution and overall cost of ownership by eliminating the need of third-party logging systems.
Cloudflare expands the Descaler program to Authorized Service Delivery Partners (ASDPs). Cloudflare is also launching Deskope, a new set of tooling to help migrate existing Netskope customers to Cloudflare One.
Express Cloudflare Network Interconnect makes it fast and easy to connect your network to Cloudflare. Customers can now order Express CNIs directly from the Cloudflare dashboard.
The turbulence in the SASE market is driving many customers to seek help. We’re doing our part to help VeloCloud customers who are caught in the crosshairs of shifting strategies.
Learn how to use Cloudflare Pages and Turnstile to deploy your website quickly and easily while protecting it from bots, without compromising user experience.
At Cloudflare, we’re actively supporting a range of players in the election space by providing security, performance, and reliability tools to help facilitate the democratic process.
Learn how a sophisticated Magecart attack was behind a campaign against e-commerce websites. This incident underscores the critical need for a strong client side security posture.
Discover the enhanced URL Scanner API, now integrated with the Security Center Investigate Portal. Enjoy unlisted scans, multi-device screenshots, and seamless integration with the Cloudflare ecosystem.
Security considerations should be an integral part of software’s design, not an afterthought. Explore how Cloudflare adheres to Cybersecurity & Infrastructure Security Agency’s Secure by Design principles to shift the industry.
Nearly two percent of all TLS 1.3 connections established with Cloudflare are secured with post-quantum cryptography. In this blog post we discuss where we are now in early 2024, what to expect for the coming years, and what you can do today.
This post illustrates some of the Linux kernel features that are helping Cloudflare keep its production systems more secure. We do a deep dive into how they work and why you should consider enabling them.
Cloudflare is the fastest provider for 95th percentile connection time in 44% of networks around the world. We dig into the data and talk about how we do it.
This blog discusses the new sources of “chaos” that have been added to LavaRand and how you can make use of that harnessed chaos in your next application.
The new Email Security section on Cloudflare Radar provides insights into the latest trends around threats found in malicious email, sources of spam and malicious email, and the adoption of technologies designed to prevent abuse of email.
A final word
Thanks for joining us this week, and stay tuned for our next Innovation Week in early April, focused on the developer community.
During 2021’s Birthday Week, we announced our Email Routing service, which allows users to direct different types of email messages (such as marketing, transactional, or administrative) to separate accounts based on criteria such as the recipient’s address or department. Its capabilities and the volume of messages routed have grown significantly since launch.
Just a few months later, on February 23, 2022, we announced our intent to acquire Area 1 Security to protect users from phishing attacks in email, web, and network environments. Since the completion of the acquisition on April 1, 2022, Area 1’s email security capabilities have been integrated into Cloudflare’s secure access service edge (SASE) solution portfolio, and now processes tens of millions of messages daily.
Processing millions of email messages each day on behalf of our customers gives us a unique perspective on the threats posed by malicious emails, spam volume, the adoption of email authentication methods like SPF, DMARC, and DKIM, and the use of IPv4/IPv6 and TLS by email servers. Today, we are launching a new Email Security section on Cloudflare Radar to share these perspectives with you. The insights in this new section can help you better understand the state of email security as viewed across various metrics, as well as understanding real-time trends in email-borne threats. (For instance, correlating an observed increase within your organization in messages containing malicious links with a similar increase observed by Cloudflare.) Below, we review the new metrics that are now available on Radar.
Tracking malicious email
As Cloudflare’s email security service processes email messages on behalf of customers, we are able to identify and classify offending messages as malicious. As examples, malicious emails may attempt to trick recipients into sharing personal information like login details, or the messages could attempt to spread malware through embedded images, links, or attachments. The new Email Security section on Cloudflare Radar now provides insight at a global level into the aggregate share of processed messages that we have classified as malicious over the selected timeframe. During February 2024, as shown in the figure below, we found that an average of 2.1% of messages were classified as being malicious. Spikes in malicious email volume were seen on February 10 and 11, accounting for as much as 29% of messages. These spikes occurred just ahead of the Super Bowl, in line with previous observations of increases in malicious email volume in the week ahead of the game. Other notable (but lower) spikes were seen on February 13, 15, 17, 24, and 25. The summary and time series data for malicious email share are available through the Radar API.
Threat categorization
The Cloudflare Radar 2023 Year in Review highlighted some of the techniques used by attackers when carrying out attacks using malicious email messages. As noted above, these can include links or attachments leading to malware, as well as approaches like identity deception, where the message appears to be coming from a trusted contact, and brand impersonation, where the message appears to be coming from a trusted brand. In analyzing malicious email messages, Cloudflare’s email security service categorizes the threats that it finds these messages contain. (Note that a single message can contain multiple types of threats — the sender could be impersonating a trusted contact while the body of the email contains a link leading to a fake login page.)
Based on these assessments, Cloudflare Radar now provides insights into trends observed across several different groups of threat types including “Attachment”, “Link”, “Impersonation”, and “Other”. “Attachment” groups individual threat types where the attacker has attached a file to the email message, “Link” groups individual threat types where the attacker is trying to get the user to click on something, and “Impersonation” groups individual threat types where the attacker is impersonating a trusted brand or contact. The “Other” grouping includes other threat types not covered by the previous three.
During February 2024 for the “Link” grouping, as the figure below illustrates, link-based threats were unsurprisingly the most common, and were found in 58% of malicious emails. Since the display text for a link (i.e., hypertext) in HTML can be arbitrarily set, attackers can make a URL appear as if it links to a benign site when, in fact, it is actually malicious. Nearly a third of malicious emails linked to something designed to harvest user credentials. The summary and time series data for these threat categories are available through the Radar API.
For the “Attachment” grouping, during February 2024, nearly 13% of messages were found to have a malicious attachment that when opened or executed in the context of an attack, includes a call-to-action (e.g. lures target to click a link) or performs a series of actions set by an attacker. The share spiked several times throughout the month, reaching as high as 70%. The attachments in nearly 6% of messages attempted to download additional software (presumably malware) once opened.
If an email message appears to be coming from a trusted brand, users may be more likely to open it and take action, like checking the shipping status of a package or reviewing a financial transaction. During February 2024, on average, over a quarter of malicious emails were sent by attackers attempting to impersonate well-known brands. Similar to other threat categories, this one also saw a number of significant spikes, reaching as high as 88% of February 17. Just over 18% of messages were found to be trying to extort users in some fashion. It appears that such campaigns were very active in the week ahead of Valentine’s Day (February 14), although the peak was seen on February 15, at over 95% of messages.
Identity deception occurs when an attacker or someone with malicious intent sends an email claiming to be someone else, whether through use of a similar-looking domain or display name manipulation. This was the top threat category for the “Other” grouping, seen in over 36% of malicious emails during February 2024. The figure below shows three apparent “waves” of the use of this technique — the first began at the start of the month, the second around February 9, and the third around February 20. Over 11% of messages were categorized as malicious because of the reputation of the network (autonomous system) that they were sent from; some network providers are well-known sources of malicious and unwanted email.
Dangerous domains
Top-level domains, also known as TLDs, are found in the right-most portion of a hostname. For example, radar.cloudflare.com is in the .comgeneric Top Level Domain (gTLD), while bbc.co.uk is in the .ukcountry code Top Level Domain (ccTLD). As of February 2024, there are nearly 1600 Top Level Domains listed in the IANA Root Zone Database. Over the last 15 years or so, several reports have been published that look at the “most dangerous TLDs” — that is, which TLDs are most favored by threat actors. The “top” TLDs in these reports are often a mix of ccTLDs from smaller counties and newer gTLDs. On Radar, we are now sharing our own perspective on these dangerous TLDs, highlighting those where we have observed the largest shares of malicious and spam emails. The analysis is based on the sending domain’s TLD, found in the From: header of an email message. For example, if a message came from [email protected], then example.com is the sending domain, and .com is the associated TLD.
On Radar, users can view shares of spam and malicious email, and can also filter by timeframe and “type” of TLD, with options to view all (the complete list), ccTLDs (country codes), or “classic” TLDs (the original set of gTLDs specified in RFC 1591). Note that spam percentages shown here may be lower than those published in other industry analyses. Cloudflare cloud email security customers may be performing initial spam filtering before messages arrive at Cloudflare for processing, resulting in a lower percentage of messages characterized as spam by Cloudflare.
Looking back across February 2024, we found that new gTLD associates and the ccTLD zw (Zimbabwe) were the TLDs with domains originating the largest shares of malicious email, at over 85% each. New TLDs academy, directory, and bar had the largest shares of spam in email sent by associated domains, at upwards of 95%.
TLDs with the highest percentage of malicious email in February 2024TLDs with the highest percentage of spam email in February 2024
The figure below breaks out ccTLDs, where we found that at least half of the messages coming from domains in zw (Zimbabwe, at 85%) and bd (Bangladesh, at 50%) were classified as malicious. While the share of malicious email vastly outweighed the share of spam seen from zw domains, it was much more balanced in bd and pw (Palau). A total of 80 ccTLDs saw fewer than 1% of messages classified as malicious in February 2024.
ccTLDs with the highest percentage of malicious email in February 2024
Among the “classic” TLDs, we can see that the shares of both malicious emails and spam are relatively low. Perhaps unsurprisingly, as the largest TLD, com has the largest shares of both in February 2024. Given the restrictions around registering int and gov domains, it is interesting to see that even 2% of the messages from associated domains are classified as malicious.
Classic TLDs with the highest percentage of malicious email in February 2024.
The reasons that some TLDs are responsible for a greater share of malicious and/or spam email vary — some may have loose or non-existent registration requirements, some may be more friendly to so-called “domain tasting”, and some may have particularly low domain registration fees.The malicious and spam summary shares per TLD are available through the Radar API.
Sender Policy Framework (SPF) is a way for a domain to list all the servers they send emails from, with SPF records in the DNS listing the IP addresses of all the servers that are allowed to send emails from the domain. Mail servers that receive an email message can check it against the SPF record before passing it on to the recipient’s inbox. DomainKeys Identified Mail (DKIM) enables domain owners to automatically “sign” emails from their domain with a digital “signature” that uses cryptography to mathematically verify that the email came from the domain. Domain-based Message Authentication Reporting and Conformance (DMARC) tells a receiving email server what to do, given the results after checking SPF and DKIM. A domain’s DMARC policy, stored in DMARC records, can be set in a variety of ways, instructing mail servers to quarantine emails that fail SPF or DKIM (or both), to reject such emails, or to deliver them.
These authentication methods have recently taken on increased importance, as both Google and Yahoo! have announced that during the first quarter of 2024, as part of a more aggressive effort to reduce spam, they will require bulk senders to follow best practices that include implementing stronger email authentication using standards like SPF, DKIM, and DMARC. When a given email message is evaluated against these three methods, the potential outcomes are PASS, FAIL, and NONE. The first two are self-explanatory, while NONE means that there was no associated SPF/DKIM/DMARC policy associated with the message’s sending domain.
Reviewing the average shares across February 2024, we find that over 93% of messages passed SPF authentication, while just 2.7% failed. When considering this metric, FAIL is the outcome of greater interest because SPF is easier to spoof than DKIM, and also because failure may be driven by “shadow IT” situations, such as when a company’s Marketing department uses a third party to send email on behalf of the company, but fails to add that third party to the associated SPF records. An average of 88.5% of messages passed DKIM evaluation in February, while just 2.1% failed. For DKIM, the focus should be on PASS, as there are potential non-malicious reasons that a given signature may fail to verify. For DMARC, 86.5% of messages passed authentication, while 4.2% failed, and the combination of PASS and FAIL is the focus, as the presence of an associated policy is of greatest interest for this metric, and whether the message passed or failed less so. For all three methods in this section, NONE indicates the lack of an associated policy. SPF (summary, time series), DKIM (summary, time series), and DMARC (summary, time series) data is available through the Radar API.
Protocol usage
Cloudflare has long evangelized IPv6 adoption, although it has largely been focused on making Web resources available via this not-so-new version of the protocol. However, it’s also important that other Internet services begin to support and use IPv6, and this is an area where our recent research shows that providers may be lacking.
Through analysis of inbound connections from senders’ mail servers to Cloudflare’s email servers, we can gain insight into the distribution of these connections across IPv4 and IPv6. Looking at this distribution for February 2024, we find that 95% of connections were made over IPv4, while only 5% used IPv6. This distribution is in sharp contrast to the share of IPv6 requests for IPv6-capable (dual stacked) Web content, which was 37% for the same time period. The summary and time series data for IPv4/v6 distribution are available through the Radar API.
Cloudflare has also been a long-time advocate for secure connections, launching Universal SSL during 2014’s Birthday Week, to enable secure connections between end users and Cloudflare for all of our customers’ sites (which numbered ~2 million at the time). Over the last 10 years, SSL has completed its evolution to TLS, and although many think of TLS as only being relevant for Web content, possibly due to years of being told to look for the 🔒 padlock in our browser’s address bar, TLS is also used to encrypt client/server connections across other protocols including SMTP (email), FTP (file transfer), and XMPP (messaging).
Similar to the IPv4/v6 analysis discussed above, we can also calculate the share of inbound connections to Cloudflare’s email servers that are using TLS. Messages are encrypted in transit when the connection is made over TLS, while messages sent over unencrypted connections can potentially be read or modified in transit. Fortunately, the vast majority of messages received by Cloudflare’s email servers are made over encrypted connections, with just 6% sent unencrypted during February 2024. The summary and time series data for TLS usage are available through the Radar API.
Conclusion
Although younger Internet users may eschew email in favor of communicating through a variety of messaging apps, email remains an absolutely essential Internet service, relied on by individuals, enterprises, online and offline retailers, governments, and more. However, because email is so ubiquitous, important, and inexpensive, it has also become an attractive threat vector. Cloudflare’s email routing and security services help customers manage and secure their email, and Cloudflare Radar’s new Email Security section can help security researchers, email administrators, and other interested parties understand the latest trends around threats found in malicious email, sources of spam and malicious email, and the adoption of technologies designed to prevent abuse of email.
Amazon SES: Email Authentication and Getting Value out of Your DMARC Policy
Introduction
For enterprises of all sizes, email is a critical piece of infrastructure that supports large volumes of communication. To enhance the security and trustworthiness of email communication, many organizations turn to email sending providers (ESPs) like Amazon Simple Email Service (Amazon SES). These ESPs allow users to send authenticated emails from their domains, employing industry-standard protocols such as the Sender Policy Framework (SPF) and DomainKeys Identified Mail (DKIM). Messages authenticated with SPF or DKIM will successfully pass your domain’s Domain-based Message Authentication, Reporting, and Conformance (DMARC) policy. This blog post will focus on the DMARC policy enforcement mechanism. The blog will explore some of the reasons why email may fail DMARC policy evaluation and propose solutions to fix any failures that you identify. For an introduction to DMARC and how to carefully choose your email sending domain identity, you can refer to Choosing the Right Domain for Optimal Deliverability with Amazon SES The relationship between DMARC compliance and email deliverability rates is crucial for organizations aiming to maintain a positive sender reputation and ensure successful email delivery. There are many advantages when organizations have this correctly setup, these include:
Improved Email Deliverability
Reduction in Email Spoofing and Phishing
Positive Sender Reputation
Reduced Risk of Email Marked as Spam
Better Email Engagement Metrics
Enhanced Brand Reputation
With this foundation, let’s explore the intricacies of DMARC and how it can benefit your organization’s email communication.
What is DMARC?
DMARC is a mechanism for domain owners to advertise SPF and DKIM protection and to tell receivers how to act if those authentication methods fail. The domain’s DMARC policy protects your domain from third parties attempting to spoof the domain in the “From” header of emails. Malicious email messages that aim to send phishing attempts using your domain will be subject to DMARC policy evaluation, which may result in their quarantine or rejection by the email receiving organization. This stringent policy ensures that emails received by email recipients are genuinely from the claimed sending domain, thereby minimizing the risk of people falling victim to email-based scams. Domain owners publish DMARC policies as a TXT record in the domain’s _dmarc.<domain> DNS record. For example, if the domain used in the “From” header is example.com, then the domain’s DMARC policy would be located in a DNS TXT record named _dmarc.example.com. The DMARC policy can have one of three policy modes:
A typical DMARC deployment of an existing domain will start with publishing "p=none". A none policy means that the domain owner is in a monitoring phase; the domain owner is monitoring for messages that aren’t authenticated with SPF and DKIM and seeks to ensure all email is properly authenticated
When the domain owner is comfortable that all legitimate use cases are properly authenticated with SPF and/or DKIM, they may change the DMARC policy to "p=quarantine". A quarantine policy means that messages which fail to produce a domain-aligned authenticated identifier via SPF or DKIM will be quarantined by the mail receiving organization. The mail receiving organization may filter these messages into Junk folders, or take another action that they feel best protects their recipients.
Finally, domain owners who are confident that all of the legitimate messages using their domain are authenticated with SPF or DKIM, may change the DMARC policy to "p=reject". A reject policy means that messages which fail to produce a domain-aligned authenticated identifier via SPF or DKIM will be rejected by the mail receiving organization.
The following are examples of a TXT record that contains a DMARC policy, depending on the desired policy (the ‘p’ tag):
This policy tells email providers to apply the DMARC policy to messages that fail to produce a DKIM or SPF authenticated identifier that is aligned to the domain in the “From” header. Alignment means that one or both of the following occurs:
The messages pass the SPF policy for the MAIL FROM domain and the MAIL FROM domain is the same as the domain in the “From” header, or a subdomain. Reference Using a custom MAIL FROM domain to learn more about how to send SPF aligned messages with SES.
The messages have a DKIM signature signed by a public key in DNS at a location within the domain of the “From” header. Reference Authenticating Email with DKIM in Amazon SES to learn more about how to send DKIM aligned messages with SES.
DMARC reporting
The rua tag in the domain’s DMARC policy indicates the location to which mail receiving organizations should send aggregate reports about messages that pass or fail SPF and DKIM alignment. Domain owners analyze these reports to discover messages which are using the domain in the “From” header but are not properly authenticated with SPF or DKIM. The domain owner will attempt to ensure that all legitimate messages are authenticated through analysis of the DMARC aggregate reports over time. Mail receiving organizations which support sending DMARC reports typically send these aggregated reports once per day, although these practices differ from provider to provider.
What does a typical DMARC deployment look like?
A DMARC deployment is the process of:
Ensuring that all emails using the domain in the “From” header are authenticated with DKIM and SPF domain-aligned identifiers. Focus on DKIM as the primary means of authentication.
Publishing a DMARC policy (none, quarantine, or reject) for the domain that reflects how the domain owner would like mail receiving organizations to handle unauthenticated email claiming to be from their domain.
New domains and subdomains
Deploying a DMARC policy is easy for organizations that have created a new domain or subdomain for the purpose of a new email sending use case on SES; for example email marketing, transaction emails, or one-time pass codes (OTP). These domains can start with the "p=reject" DMARC enforcement policy because the policy will not affect existing email sending programs. This strict enforcement is to ensure that there is no unauthenticated use of the domain and its subdomains.
Existing domains
For existing domains, a DMARC deployment is an iterative process because the domain may have a history of email sending by one or multiple email sending programs. It is important to gain a complete understanding of how the domain and its subdomains are being used for email sending before publishing a restrictive DMARC policy (p=quarantine or p=reject) because doing so would affect any unauthenticated email sending programs using the domain in the “From” header of messages. To get started with the DMARC implementation, these are a few actions to take:
Publish a p=none DMARC policy (sometimes referred to as monitoring mode), and set the rua tag to the location in which you would like to receive aggregate reports.
Analyze the aggregate reports. Mail receiving organizations will send reports which contain information to determine if the domain, and its subdomains, are being used for sending email, and how the messages are (or are not) being authenticated with a DKIM or SPF domain-aligned identifier. An easy to use analysis tool is the Dmarcian XML to Human Converter.
Avoid prematurely publishing a “p=quarantine” or “p=reject” policy. Doing so may result in blocked or reduced delivery of legitimate messages of existing email sending programs.
The image below illustrates how DMARC will be applied to an email received by the email receiving server and actions taken based on the enforcement policy:
Figure 1 – DMARC Flow
How do SPF and DKIM cause DMARC policies to pass
When you start sending emails using Amazon SES, messages that you send through Amazon SES automatically use a subdomain of amazonses.com as the default MAIL FROM domain. SPF evaluators will see that these messages pass the SPF policy evaluation because the default MAIL FROM domain has a SPF policy which includes the IP addresses of the SES infrastructure that sent the message. SPF authentication will result in an “SPF=PASS” and the authenticated identifier is the domain of the MAIL FROM address. The published SPF record applies to every message that is sent using SES regardless of whether you are using a shared or dedicated IP address. The amazonses.com SPF record lists all shared and dedicated IP addresses, so it is inclusive of all potential IP addresses that may be involved with sending email as the MAIL FROM domain. You can use ‘dig’ to look up the IP addresses that SES will use to send email:
It is best practice for customers to configure a custom MAIL FROM domain, and not use the default amazonses.com MAIL FROM domain. The custom MAIL FROM domain will always be a subdomain of the customer’s verified domain identity. Once you configure the MAIL FROM domain, messages sent using SES will continue to result in an “SPF=PASS” as it does with the default MAIL FROM domain. Additionally, DMARC authentication will result in “DMARC=PASS” because the MAIL FROM domain and the domain in the “From” header are in alignment. It’s important to understand that customers must use a custom MAIL FROM domain if they want “SPF=PASS” to result in a “DMARC=PASS”.
For example, an Amazon SES-verified example.com domain will have the custom MAIL FROM domain “bounce.example.com”. The configured SPF record will be:
Note: The chosen MAIL FROM domain could be any sub-domain of your choice. If you have the same domain identity configured in multiple regions, then you should create region-specific custom MAIL FROM domains for each region. e.g. bounce-us-east-1.example.com and bounce-eu-west-2.example.com so that asynchronously bounced messages are delivered directly to the region from which the messages were sent.
DKIM results in DMARC pass
For customers that establish Amazon SES Domain verification using DKIM signatures, DKIM authentication will result in a DKIM=PASS, and DMARC authentication will result in “DMARC=PASS” because the domain that publishes the DKIM signature is aligned to the domain in the “From” header (the SES domain identity).
DKIM and SPF together
Email messages are fully authenticated when the messages pass both DKIM and SPF, and both DKIM and SPF authenticated identifiers are domain-aligned. If only DKIM is domain-aligned, then the messages will still pass the DMARC policy, even if the SPF “pass” is unaligned. Mail receivers will consider the full context of SPF and DKIM when determining how they will handle the disposition of the messages you send, so it is best to fully authenticate your messages whenever possible. Amazon SES has taken care of the heavy lifting of the email authentication process away from our customers, and so, establishing SPF, DKIM and DMARC authentication has been reduced to a few clicks which allows SES customers to get started easily and scale fast.
Why is DMARC failing?
There are scenarios when you may notice that messages fail DMARC, whether your messages are fully authenticated, or partially authenticated. The following are things that you should look out for:
Email Content Modification
Sometimes email content is modified during the delivery to the recipients’ mail servers. This modification could be as a result of a security device or anti-spam agent along the delivery path (for example: the message Subject may be modified with an “[EXTERNAL]” warning to recipients). The modified message invalidates the DKIM signature which causes a DKIM failure. Remember, the purpose of DKIM is to ensure that the content of an email has not been tampered with during the delivery process. If this happens, the DKIM authentication will fail with an authentication error similar to “DKIM-signature body hash not verified“.
Solutions:
If you control the full path that the email message will traverse from sender to recipient, ensure that no intermediary mail servers modify the email content in transit.
Ensure that you configure a custom MAIL FROM domain so that the messages have a domain-aligned SPF identifier.
Keep the DMARC policy in monitoring mode (p=none) until these issues are identified/solved.
Email Forwarding
Email Forwarding There are multiple scenarios in which a message may be forwarded, and they may result in both/either SPF and DKIM failing to produce a domain-aligned authenticated identifier. For SPF, it means that the forwarding mail server is not listed in the MAIL FROM domain’s SPF policy. It is best practice for a forwarding mail server to avoid SPF failures and assume responsibility of mail handling for the messages it forwards by rewriting the MAIL FROM address to be in the domain controlled by the forwarding server. Forwarding servers that do not rewrite the MAIL FROM address pose a risk of impersonation attacks and phishing. Do not add the IP addresses of forwarding servers to your MAIL FROM domain’s SPF policy unless you are in complete control of all sources of mail being forwarded through this infrastructure. For DKIM, it means that the messages are being modified in some way that causes DKIM signature validation failure (see Email Content Modification section above). A responsible forwarding server will rewrite the MAIL FROM domain so that the messages pass SPF with a non-aligned authenticated identifier. These servers will attempt to forward the message without alteration in order to preserve DKIM signatures, but that is sometimes challenging to do in practice. In this scenario, since the messages carry no domain-aligned authenticated identifier, the messages will fail the DMARC policy.
Solution:
Email forwarding is an expected type of failure of which you will see in the DMARC aggregate reports. The domain owner must weigh the risk of causing forwarded messages to be rejected against the risk of not publishing a reject DMARC policy. Reference 8.6. Interoperability Considerations. Forwarding servers that wish to forward messages that they know will result in a DMARC failure will commonly rewrite the “From” header address of messages it forwards so that the messages pass a DMARC policy for a domain that the forwarding server is responsible for. The way to identify forwarding servers that rewrite the “From” header in this situation is to publish “p=quarantine pct=0 t=y” in your domain’s DMARC policy before publishing “p=reject”.
Multiple email sending providers are sending using the same domain
Multiple email sending providers: There are situations where an organization will have multiple business units sending email using the same domain, and these business units may be using an email sending provider other than SES. If neither SPF nor DKIM is configured with domain-alignment for these email sending providers, you will see DMARC failures in the DMARC aggregate report.
Solution:
Analyze the DMARC aggregate reports to identify other email sending providers, track down the business units responsible for each email sending program, and follow the instructions offered by the email sending provider about how to configure SPF and DKIM to produce a domain-aligned authenticated identifier.
What does a DMARC aggregate report look like?
The following XML example shows the general format of a DMARC aggregate report that you will receive from participating email service providers.
How to address DMARC deployment for domains confirmed to be unused for email (dangling or otherwise)
Deploying DMARC for unused or dangling domains is a proactive step to prevent abuse or unauthorized use of your domain. Once you have confirmed that all subdomains being used for sending email have the desired DMARC policies, you can publish a ‘p=reject’ tag on the organizational domain, which will prevent unauthorized usage of unused subdomains without the need to publish DMARC policies for every conceivable subdomain. For more advanced subdomain policy scenarios, read the “tree walk” definitions in https://datatracker.ietf.org/doc/draft-ietf-dmarc-dmarcbis/
Conclusion:
In conclusion, DMARC is not only a technology but also a commitment to email security, integrity, and trust. By embracing DMARC best practices, organizations can protect their users, maintain a positive brand reputation, and ensure seamless email deliverability. Every message from SES passes SPF and DKIM for “amazonses.com”, but the authenticated identifiers are not always in alignment with the domain in the “From” header which carries the DMARC policy. If email authentication is not fully configured, your messages are susceptible to delivery issues like spam filtering, or being rejected or blocked by the recipient ESP. As a best practice, you can configure both DKIM and SPF to attain optimum deliverability while sending email with SES.
About the Authors
Bruno Giorgini is a Senior Solutions Architect specializing in Pinpoint and SES. With over two decades of experience in the IT industry, Bruno has been dedicated to assisting customers of all sizes in achieving their objectives. When he is not crafting innovative solutions for clients, Bruno enjoys spending quality time with his wife and son, exploring the scenic hiking trails around the SF Bay Area.
Jesse Thompson is an Email Deliverability Manager with the Amazon Simple Email Service team. His background is in enterprise IT development and operations, with a focus on email abuse mitigation and encouragement of authenticity practices with open standard protocols. Jesse’s favorite activity outside of technology is recreational curling.
Sesan Komaiya is a Solutions Architect at Amazon Web Services. He works with a variety of customers, helping them with cloud adoption, cost optimization and emerging technologies. Sesan has over 15 year’s experience in Enterprise IT and has been at AWS for 5 years. In his free time, Sesan enjoys watching various sporting activities like Soccer, Tennis and Moto sport. He has 2 kids that also keeps him busy at home.
Mudassar Bashir is a Solutions Architect at Amazon Web Services. He has over ten years of experience in enterprise software engineering. His interests include web applications, containerization, and serverless technologies. He works with different customers, helping them with cloud adoption strategies.
Priya Singh is a Cloud Support Engineer at AWS and subject matter expert in Amazon Simple Email Service. She has a 6 years of diverse experience in supporting enterprise customers across different industries. Along with Amazon SES, she is a Cloudfront enthusiast. She loves helping customers in solving issues related to Cloudfront and SES in their environment.
We are excited to announce an extended partnership between CrowdStrike and Cloudflare to bring together Cloudflare Email Security and CrowdStrike Falcon® LogScale. With this integration, joint customers who have both Falcon LogScale and Cloudflare Email Security can now send detection data to be ingested and displayed within their Falcon LogScale dashboard.
What is CrowdStrike Falcon LogScale?
CrowdStrike Falcon LogScale enables organizations to ingest, aggregate and analyze massive volumes of streaming log data from a wide array of sources at petabyte scale. It offers search and visualization capabilities, enabling users to easily query and explore their log data to gain valuable insights and identify security threats or anomalies.
Falcon LogScale helps customers by providing:
Log Ingestion It supports the collection of logs from diverse sources and can handle high volumes of log data in real time.
Real-Time Search Users can perform fast searches across their log data, enabling quick detection and investigation of security incidents or operational issues.
Dashboards and Visualizations Falcon LogScale offers customizable dashboards and visualizations to help teams gain insights from their log data.
All of these capabilities enable proactive threat hunting by leveraging advanced analytics. It helps security teams identify potential threats, detect anomalies, and quickly remediate security incidents. Falcon LogScale is designed to handle large-scale log data ingestion and analysis. It can scale to accommodate growing log volumes and provide consistent performance.
Falcon LogScale is the solution for organizations that are looking to consolidate their log management and analysis efforts. It makes monitoring and securing their environments effective and efficient.
How Cloudflare Email works with Falcon LogScale
Customers who have both Cloudflare Email Security and CrowdStrike Falcon LogScale can now send detection data to Falcon LogScale. Within Falcon LogScale, this detection information can be visualized and queried.
To set up Cloudflare Email Security detections to flow into Falcon LogScale, navigate to the Settings section and choose the Marketplace tab in the lefthand toolbar, as shown in the screenshot below.
After installing the package, an ingest token needs to be generated. Navigate to the “Ingest Tokens” tab under Settings and create one.
Copy the ingest token to save it for later. From here, customers can navigate to the Cloudflare Email Security dashboard, go to the Settings section, select the Alert Webhooks tab and choose “+ New Webhook”. Then click the SIEM option, choose Other from the dropdown, and input the following information:
Customers can choose which events to send to Falcon LogScale by selecting the expanded option. In the screenshot above, the user has chosen to only send malicious and suspicious detections.
A few minutes after creating a new webhook, Cloudflare Email Security will start sending detection data to the Falcon LogScale instance.
When the Cloudflare Email Security package from the Falcon LogScale marketplace is installed, customers are provided with a parser for field extraction and out-of-box content through a dashboard. The parser allows the Falcon LogScale product to be able to query the detection data while the dashboard allows organizations to quickly get the relevant information about their email security. Below is what the dashboard looks like:
As you can see, we have included visualizations and queries to get teams up and running quickly, but it is meant to be a starting point for customers to build on. Customers can write their own queries and use them to create their own widgets. From there, they can create their own rendition of this dashboard to fit their needs.
We are currently looking to expand the integration of Cloudflare products with Falcon LogScale. Our plan is to extend the integration to the remaining components of the Zero Trust Suite, enabling the relaying of logs and detection data to Falcon LogScale. This will allow customers to visualize and analyze data from these products, similar to the existing Cloudflare Email Security integration. If you are interested and would like to learn more, please reach out to your Cloudflare account contact.
After shutting down a ‘phishing-as-a-service’ operation that impacted thousands of victims in 43 countries, INTERPOL recently noted, “Cyberattacks such as phishing may be borderless and virtual in nature, but their impact on victims is real and devastating.” Business email compromise (BEC), a type of malware-less attack that tricks recipients into transferring funds — for example — has cost victims worldwide more than $50 billion, according to the FBI.
It is estimated that 90% of successful cyber attacks start with email phishing, which continues to be very lucrative for attackers. There is not much today that can be done to stop phishing attempts. However, to prevent successful attacks, it is important to understand (and proactively address) evolving phishing trends — including the ways attackers cleverly exploit intended victims’ trust in “known” email senders. To that end, this week Cloudflare published its first Phishing Threats Report.
This report explores key phishing trends and related recommendations, based on email security data from May 2022 to May 2023. During that time, Cloudflare processed approximately 13 billion emails, which included blocking approximately 250 million malicious messages from reaching customers’ inboxes. The report is also informed by a Cloudflare-commissioned survey of 316 security decision-makers across North America, EMEA, and APAC (you can download that separate study here).
Check out the full report to understand our three key takeaways:
Attackers using deceptive links as the #1 phishing tactic — and how they are evolving how they get you to click and when they weaponize the link;
Identity deception takes multiple forms (including business email compromise (BEC) and brand impersonation), and can easily bypass email authentication standards;
Attackers pretend to be hundreds of different organizations, but they primarily impersonate the entities we trust and need to get work done.
Here are a few other things to keep in mind as you read the 2023 Phishing Threats report.
Email threat categorization
Attackers typically use a combination of social engineering and technical obfuscation techniques to make their messages seem legitimate. Therefore, Cloudflare uses a number of advanced detection techniques to analyze “fuzzy” signals (not just content that’s visible to the naked eye) to identify unwanted emails. Those signals include:
Structural analysis of headers, body copy, images, links, attachments, payloads, and more, using heuristics and machine learning models specifically designed for phishing signals;
Sentiment analysis to detect changes in patterns and behaviors (e.g., writing patterns and expressions);
Trust graphs that evaluate partner social graphs, email sending history, and potential partner impersonations
Our email security service also incorporates threat intelligence from Cloudflare’s global network, which blocks an average of 140 billion cyber threats each day.
Those and many other signals lead to email dispositions of malicious, BEC, spoof, or spam; our dashboard tells customers the specific reasons (i.e., the threat indicator ‘categories’) for a particular email disposition.
Below is a snapshot of the top email threat indicators we observed between May 2, 2022, to May 2, 2023. We categorize threat indicators into more than 30 different categories; over that period, the top threat indicators included deceptive links, domain age (newly registered domains), identity deception, credential harvesting, and brand impersonation.
Below are brief descriptions of each of the top categories (detailed in more depth in the report’s appendix).
If clicked, a deceptive link will open the user’s default web browser and render the data referenced in the link, or open an application directly (e.g. a PDF). Since the display text for a link (i.e., hypertext) in HTML can be arbitrarily set, attackers can make a URL appear as if it links to a benign site when, in fact, it is actually malicious.
Domain age is related to domain reputation, which is the overall score assigned to a domain. For example, domains that send out numerous new emails immediately after domain registration will tend to have a poorer reputation, and thus a lower score.
Identity deception occurs when an attacker or someone with malicious intent sends an email claiming to be someone else. The mechanisms and tactics of this vary widely. Some tactics include registering domains that look similar (aka domain impersonation), are spoofed, or use display name tricks to appear to be sourced from a trusted domain. Other variations include sending email using domain fronting and high-reputation web services platforms.
Credential harvesters are set up by an attacker to deceive users into providing their login credentials. Unwitting users may enter their credentials, ultimately providing attackers with access to their accounts.
Brand impersonation is a form of identity deception where an attacker sends a phishing message that impersonates a recognizable company or brand. Brand impersonation is conducted using a wide range of techniques.
An attachment to an email that, when opened or executed in the context of an attack, includes a call-to-action (e.g. lures target to click a link) or performs a series of actions set by an attacker.
Cloudflare regularly observes multiple threat indicators in one phishing email. For example, one Silicon Valley Bank-themed phishing campaign (detailed in this March 2023 blog) combined brand impersonation with a deceptive link and malicious attachment.
The attackers leveraged the SVB brand in a DocuSign-themed template. The email included HTML code that contains an initial link and a complex redirect chain that is four deep. The included HTML file in the attack would have sent the recipient to a WordPress instance that has recursive redirection capability.
(Speaking of links, deceptive links were the #1 threat category, appearing in 35.6% of our detections. And attackers aren’t just using links in email channels; the rise of multi-channel phishing threats — which exploit other applications such as SMS/text, chat, and social media — are also covered in the report).
Trusted (and most impersonated) brands
Silicon Valley Bank was just one of approximately 1,000 different brands we observed being impersonated in emails targeting Cloudflare customers between May 2022 and May 2023. (Cloudflare employees were directly targeted via brand impersonation in the “Oktapus” phishing attack that the Cloudflare One suite of products thwarted in July 2022).
However, as detailed in the Phishing Threats Report, we observed that email attackers most often (51.7% of the time) impersonated one of 20 well-known global brands, with Microsoft being #1 on their list.
Rank
Impersonated brand
1
Microsoft
2
World Health Organization
3
Google
4
SpaceX
5
Salesforce
6
Apple
7
Amazon
8
T-Mobile
9
YouTube
10
MasterCard
11
Notion.so
12
Comcast
13
Line Pay
14
MasterClass
15
Box
16
Truist Financial Corp
17
Facebook
18
Instagram
19
AT&T
20
Louis Vuitton
Example of a Microsoft credential harvesting attempt
Earlier this year, Cloudflare detected and blocked a phishing campaign leveraging the Microsoft brand in an attempt to harvest credentials through a legitimate — but compromised — site.
In the email example below, there is no text in the body of the email despite its appearance. The entire body is a hyperlinked JPEG image. Thus, if the recipient clicks anywhere in the body (even if they don’t intend to click the link), they are effectively clicking the link.
Initially, the hyperlink for this image appears to be a benign Baidu URL – hxxp://www.baidu[.]com/link?url=-yee3T9X9U41UHUa3VV6lx1j5eX2EoI6XpZqfDgDcf-2NYQ8RVpOn5OYkDTuk8Wg#<recipient’s email address base64 encoded>. However, if this link is clicked, the target’s browser would be redirected to a site that had been compromised and used to host a credential harvester.
The attacker used Microsoft Office 365 branding, but attempted to circumvent any brand detection techniques by including the brand information within the image (i.e., there was no plaintext or HTML text that could be inspected to identify the brand).
However, using optical character recognition (OCR), Cloudflare successfully identified “Office 365” and “Microsoft” in the image. Using OCR, we also identified the use of suspicious account lures related to passwords.
In this example, attackers’ techniques included:
Inclusion of only a JPEG image (impossible to detect words without OCR)
Embedding a hyperlink in that image (clicking anywhere in the body would result in clicking the link)
Hyperlinking to a Baidu URL (used to bypass reputation-based URL detection techniques)
The Baidu URL redirecting the recipient’s browser to a credential harvesting site (i.e., would circumvent other email security defenses that are not capable of deep link inspection)
Hosting the credential harvester on a legitimate site that had been compromised by the attacker (even with deep link inspection, will again attempt to bypass URL detection techniques based on reputation)
This attack vector leverages the high reputation and authenticity of Baidu to bypass the reputation of the true host/IP where the credential harvester is hosted.
While this specific campaign focused on harvesting Microsoft credentials, we often see attackers using similar methods to bypass brand detection techniques and trick victims into downloading malware and other malicious payloads.
URL redirection techniques are often seen in phishing campaigns, but threat actors are continuing to refine their approach by abusing more and more legitimate domains like baidu.com, bing.com, goo.gl, etc. Our numerous detection capabilities allow us to conduct deep link inspection of URLs using redirection techniques of all kinds, including those that abuse legitimate domains.
What about SPF, DKIM, and DMARC?
Email authentication (specifically the SPF, DKIM, and DMARC standards) are often mentioned as useful against brand impersonation: these standards help validate server and tenant origins, protect message integrity, provide policy enforcement, and more.
However, attackers can still find ways to bypass authentication to trick email suites; and we actually observed that 89% of unwanted messages “passed” SPF, DKIM, and/or DMARC checks.
Some limitations of email authentication include:
SPF (Sender Policy Framework)
Key benefits: Validating server origin (i.e., validates where a message originates from) Defining which email servers and services are allowed to send messages on a domain owner’s behalf
Limitations: Does not prevent lookalike email, domain, or display name spoofing Does not validate the “From” header; uses envelope “From” to determine sending domain Validation ineffective when emails are forwarded or when messages sent to a mailing list are sent to each subscriber SPF evaluation process can be limited to a certain number of DNS lookups Does not protect against attacks using “validated” emails with embedded URLs, malicious payloads, or attachments
DKIM (Domain Keys Identified Mail)
Key benefits: Providing tenant origin validation (i.e., checks that an email was sent/authorized by the owner of the domain via a digital signature) Ensuring email is not altered while transferred from server to server; protecting message integrity
Limitations: Does not prevent lookalike email, domain, or display name spoofing Does not protect against replay attacks (DKIM only signs specific parts of a message. Attackers can add other header fields to emails passing DKIM then forward them.) Does not protect against attacks using “validated” emails with embedded URLs, malicious payloads or attachments
DMARC (Domain-based Message Authentication, Reporting and Conformance)
Key benefits: Providing policy enforcement and reporting for SPF and DKIM Stipulating what policy to follow if an email doesn’t pass SPF or DKIM authentication (e.g. reject/delete, quarantine, no policy/send) Reporting function allows domain owners to see who is sending email on their behalf (i.e., protecting against spoofing of your own domain and brand abuse)
Limitations: Does not prevent spoofing of another brand’s domain Does not prevent lookalike email, domain, or display name spoofing Domain owners specify what percentage of mail DMARC policies it applies to; application percentages of less than 100% are less effective Does not protect against attacks using “validated” emails with embedded URLs, malicious payloads or attachments
Conclusions
Attackers are constantly evolving their tactics. Multiple protection layers must be enacted before, during, and after messages reach the inbox. Cloudflare never inherently “trusts” any type of email communication (whether it appears to be internal, external, or from a ‘known’ business partner).
Likewise, we recommend that — first and foremost — all organizations extend the Zero Trust security model of “never trust, always verify” not just to the network and applications, but also to the email inbox.
In addition to securing email with a Zero Trust approach, we also recommend:
Augmenting cloud email with multiple anti-phishing controls. As noted in this Forrester blog from June, “The use of messaging, collaboration, file sharing, and enterprise software-as-a-service applications across multiple devices all contribute to employee productivity and experience. Many of these environments are considered ‘closed,’ but one successful phish of a supply chain partner’s credentials opens your organization up to data loss, credential theft, fraud, and ransomware attacks. Protections developed for the email inbox must extend to these environments and throughout the day-to-day workflows of your employees.”
Adopting phishing-resistant multifactor authentication (MFA). While not all MFA provides the same layer of security, hardware security keys are among the most secure authentication methods for preventing successful phishing attacks. They can protect networks even if attackers gain access to usernames and passwords.
Make it harder for humans to make mistakes. Meet employees and teams where they are by making the tools they already use more secure, and preventing them from making mistakes. For example, remote browser isolation (RBI) technology, when integrated with cloud email security, can automatically isolate suspicious email links to prevent users from being exposed to potentially malicious web content. Keyboard inputs can also be disabled on untrusted websites, protecting users from accidentally entering sensitive information within a form fill or credential harvesting. This provides a layer of defense against multi-channel phishing attacks by effectively allowing users to safely open links without disrupting their workflow.
If you’re interested in the full findings, you can download the 2023 Phishing Threats Report here, as well as our recommendations for preventing successful phishing attacks. And if you’d like to see Cloudflare’s email security in action, you can request a free phishing risk assessment here.
Are you looking for an efficient way to handle incoming emails and streamline your email processing workflows? In this blog post, we’ll guide you through setting up Amazon Simple Email Service (SES) for incoming email, focusing on the setup, monitoring, and use of receipt rules to optimize your email handling.
Amazon SES is a powerful and flexible cloud-based email service that enables you to send and receive emails at scale, while ensuring high deliverability and maintaining compliance with email best practices. By using Amazon SES for incoming email, you can customize your email processing pipeline and seamlessly integrate with other AWS services such as Amazon S3, AWS Lambda, and Amazon SNS.
We’ll start by walking you through the process of verifying your domain and setting up DomainKeys Identified Mail (DKIM) to ensure your emails are secure and authenticated. Next, we’ll explain how to create and manage receipt rule sets and add receipt rules with various actions for different processing scenarios. We’ll also cover monitoring your email processing using Amazon CloudWatch metrics.
As we progress, we’ll dive into advanced topics such as conditional receipt rules and chaining receipt rules, which can help you build complex and tailored email processing workflows, including multi-tenant scenarios. By the end of this post, you’ll have a comprehensive understanding of how to harness the power of Amazon SES for your incoming email needs.
So, let’s get started on simplifying your incoming email processing with Amazon SES!
Setting up Amazon SES for email receiving
Identifying the AWS region
For new users of the Amazon Simple Email Service (SES) inbound feature, it’s important to understand that all AWS resources used for receiving email with Amazon SES, except for Amazon S3 buckets, need to be in the same AWS Region as the Amazon SES endpoint. This means that if you are using Amazon SES in a specific region, such as US West (Oregon), any additional resources like Amazon SNS topics, AWS KMS keys, and Lambda functions also need to be created in the same US West (Oregon) Region. Additionally, to successfully receive email with Amazon SES within a particular Region, you must create an active receipt rule set specifically in that Region. By adhering to these guidelines, new users can effectively configure and utilize the inbound feature of Amazon SES, ensuring seamless email reception and efficient management of related resources. Amazon SES only supports email receiving in certain AWS Regions. For a complete list of Regions where email receiving is supported, see Amazon Simple Email Service endpoints and quotas in the AWS General Reference.
Verifying your domain
Before you can start receiving emails with Amazon SES, you must verify your domain. Domain verification is a crucial step in the setup process, as it confirms your ownership of the domain and helps prevent unauthorized use. In this section, we’ll walk you through the process of verifying your domain in the Amazon SES console.
In the navigation pane, under Configuration, choose Verified identities.
In the list of Identities section, choose Create identity.
Under Identity details, choose Domain as the Identity type field. You must have access to the domain’s DNS settings to complete the domain verification process.
Enter the name of the domain or subdomain in the Domain field.
You must configure DKIM as part of the domain verification process. For Advanced DKIM settings, ensure that the Enabled box is checked in the DKIM signatures field.
Choose Create identity.
This will generate a list of DNS records that you need to add to your domain’s DNS configuration. These can be found in the DomainKeys Identified Mail (DKIM) container,under Publish DNS records.
Publish DNS records
Add the generated DNS records to your domain’s DNS configuration. These records include a Legacy TXT record for domain verification and CNAME records for DKIM authentication. You may need to consult your domain registrar’s documentation for instructions on adding DNS records.
Once the DNS records have been added, return to the Amazon SES console and wait for your domain’s verification status to change from “Verification pending” to “Verified.” This process may take up to 72 hours, depending on your domain registrar’s DNS propagation time.
Publishing an MX record for Amazon SES email receiving
To enable email receiving with Amazon SES, you need to publish an MX (Mail Exchange) record in your domain’s DNS configuration. The MX record directs incoming emails to Amazon SES for processing. Follow these steps to publish the MX record:
Log in to your domain registrar or DNS management console.
Locate the DNS management section for your domain.
Create a new MX record by specifying the following details:
Host/Name/Record: Leave this field blank or enter “@” to represent the root domain.
Value/Points to/Target: Enter the value “10 inbound-smtp.[AWS Region].amazonaws.com“, replacing [AWS Region] with the AWS region where you are using Amazon SES for email receiving. For example, if you are using US West (Oregon) region, the value should be “10 inbound-smtp.us-west-2.amazonaws.com“.
TTL (Time to Live): Set a TTL value according to your preference or leave it as the default.
Save the MX record.
Once the MX record is published with the correct value, incoming emails addressed to your domain will be routed to Amazon SES for processing. Remember to ensure that any other email-related resources, such as SNS topics or Lambda functions, are also created in the same AWS region as your Amazon SES endpoint.
For more detailed information on publishing MX records for Amazon SES email receiving, you can refer to the official documentation.
Creating a Receipt Rule set
A receipt rule set is a collection of rules that define how Amazon SES processes incoming emails for your domain. Each rule contains one or more actions that determine the processing flow of incoming emails. In this section, we’ll guide you through the process of creating a new receipt rule set in the Amazon SES console and activating it for your domain.
In the navigation pane, under Configuration, choose Email receiving.
Note: if you don’t see the Email receiving option in the menu, check again that you’re in fact in a region supporting this feature.
Under the Receipt rule sets tab in the Email receiving pane, choose Create rule set.
Enter a name for your new rule set in the Rule set name field. This name should be descriptive and easy to identify, such as “MyApp-IncomingEmail.”
After entering a unique name, choose Create rule set.
To activate the newly created rule set, choose Set as active next to your rule set’s name. This action will ensure that Amazon SES uses this rule set for processing incoming emails to your domain. Your new rule set will now be listed in the Active rule set section.
For more information on creating and managing receipt rule sets, you can refer to the official documentation.
In the next section, we’ll explore adding receipt rules to your rule set, which define the specific actions to be taken for incoming emails.
Adding Receipt Rules
Receipt rules define the specific actions that Amazon SES should take when processing incoming emails for your domain. Common actions include saving the email to an Amazon S3 bucket, invoking an AWS Lambda function, or publishing a notification to an Amazon SNS topic. In this section, we’ll guide you through the process of adding receipt rules to your rule set in the Amazon SES console and provide examples of when to use each action.
In the navigation pane, under Configuration, choose Email receiving.
Under the Email receiving pane, in the Receipt rule sets tab, select the name of your active rule set from the All rule sets section. This will navigate to the details page for that rule set.
Choose Create rule to begin creating a new receipt rule.
On the Define rule settings page, under Receipt rule details, enter a unique Rule name.
For Status, only clear the Enabled checkbox if you don’t want to run this rule after creation.
(Optional) For Transport Layer Security (TLS), by selecting Required you can enforce a specific TLS policy for incoming emails that match this rule. By default, Amazon SES will use the Optional policy, which means it will attempt to use TLS but will not require it.
For Spam and virus scanning, only clear the Enabled checkbox if you don’t want Amazon SES to scan incoming messages for spam and viruses.
After entering a unique rule name, choose Next.
On the Add recipients conditions page, under Recipients conditions, use the following procedure to specify one or more recipient conditions. You can have a maximum of 100 recipient conditions per receipt rule.
Under Recipient condition, specify the email addresses or domains that this rule should apply to. You can use wildcards to match multiple addresses or domains. For example, you can enter example.com and .example.com to apply the rule to all email addresses within the example.com domain and within all of its subdomains.
Repeat this step for each recipient condition you want to add. When you finish adding recipient conditions, choose Next.
On the Add actions page, open the Add new action menu and select the desired action from the list, such as Deliver to S3 bucket, Invoke AWS Lambda function, or Publish to Amazon SNS topic. Configure the selected action’s settings as required.
Deliver to S3 bucket: Choose this action if you’re expecting emails with large attachments, need to store emails for archival purposes, or plan to process emails using other AWS services that integrate with Amazon S3. You’ll need to specify the Amazon S3 bucket where the incoming emails should be stored.
Invoke AWS Lambda function: Choose this action if you want to process incoming emails using custom logic, such as filtering, parsing, or modifying the email content. You’ll need to specify the AWS Lambda function that should be invoked when an incoming email matches this rule.
Publish to Amazon SNS topic: Choose this action if you’re processing smaller emails or want to receive real-time notifications when an email arrives. You’ll need to specify the Amazon SNS topic where notifications should be published.
For more information and additional actions, see the Action options section of the Developer Guide.
Once configured, choose Next to proceed to the Review page.
On the Review page, review the settings and actions of the rule. If you need to make changes, choose the Edit option.
When finished, choose Create rule to add the new receipt rule to your rule set. The rule will now be applied to incoming emails that match the specified recipient conditions.
You can create multiple receipt rules within a rule set, each with different actions and conditions. Amazon SES will apply the rules in the order they appear in the rule set. For more information on creating and managing receipt rules, you can refer to the official documentation.
Monitoring your incoming email
Configuring Amazon CloudWatch metrics
Once you have enabled email receiving in Amazon SES and created receipt rules for your emails, you can monitor and view the metrics using Amazon CloudWatch. Follow these steps to configure Amazon CloudWatch metrics for Amazon SES email receiving:
Open the Amazon CloudWatch console.
Navigate to the Metrics section and select All metrics.
In the list of available metrics, locate and select SES to view SES-related metrics.
Expand the Receipt Rule Set Metrics and Receipt Rule Metrics sections to access the specific metrics for your receipt rule sets and rules.
Under Receipt Rule Set Metrics, you will find the following metrics:
“Received”: Indicates whether SES successfully received a message that has at least one rule applying. The metric value is always 1.
“PublishSuccess”: Indicates whether SES successfully executed all rules within a rule set.
“PublishFailure”: Indicates if SES encountered an error while executing rules within a rule set. The error may allow for retrying the execution.
“PublishExpired”: Indicates that SES will no longer retry executing the rules within a rule set after four hours.
These metrics can be filtered by the dimension RuleSetName to obtain data specific to individual rule sets.
Under Receipt Rule Metrics, you will find the following metrics:
“Received”: Indicates whether SES successfully received a message and will try to process the applied rule. The metric value is always 1.
“PublishSuccess”: Indicates whether SES successfully executed a rule that applies to the received message.
“PublishFailure”: Indicates if SES encountered an error while executing the actions in a rule. The error may allow for retrying the execution.
“PublishExpired”: Indicates that SES will no longer retry executing the actions of a rule after four hours.
These metrics can be filtered by the dimension RuleName to obtain data specific to individual rules.
Note that the metrics will only appear in the CloudWatch console if you have enabled email receiving, created receipt rules, and received mail that matches any of your rules.
Keep in mind that changes made to fix your receipt rule set will only apply to emails received by Amazon SES after the update. Emails are always evaluated against the receipt rule set in place at the time of receipt.
Amazon SES also provides an Automatic Dashboard for SES in the CloudWatch console, which offers a preconfigured set of SES metrics and alarms to monitor your email sending and receiving activity. This dashboard provides a consolidated view of key metrics, making it easier to track the performance and health of your Amazon SES environment.
By configuring Amazon CloudWatch metrics, you can gain valuable insights into the performance and execution of your receipt rule sets and rules within Amazon SES. For more detailed information on viewing metrics for Amazon SES email receiving using Amazon CloudWatch, refer to the official documentation.
Using receipt rules effectively
Chaining Receipt Rules
Chaining receipt rules enable you to create sophisticated email processing workflows by linking multiple rules together, allowing each rule to apply specific actions based on the outcome of the previous rule. This advanced technique can help you achieve greater flexibility and precision in handling your incoming emails with Amazon SES. In this section, we’ll explain how to create chained receipt rules and provide examples of common use cases.
Under the Email receiving pane, in the Receipt rule sets tab, select the name of your active rule set from the All rule sets section
Review the existing rules in your rule set and ensure that they are ordered correctly. Chaining relies on the order of the rules, as each rule’s conditions and actions are evaluated sequentially. Under the Reorder tab, the rule orders can be modified by selecting the corresponding arrow associated with each.
To chain additional rules, follow the steps previously outlined in the Adding Receipt Rules section and adjust the rule orders as necessary.
Chaining receipt rules can help you build complex email processing workflows with Amazon SES. Some common use cases include:
Executing multiple filtering criteria in an order that you specify. For example, adding a specific header value and then sending to additional AWS services such as Amazon S3, Amazon SNS, or AWS Lambda.
Creating multi-stage processing pipelines, where the output of one action (e.g., saving an email to Amazon S3) is used as the input for the next action (e.g., processing the email with AWS Lambda).
Implementing fallback actions, where the first rule in the chain attempts a specific action (e.g., saving an email to a primary S3 bucket), and if it fails, the next rule in the chain applies a different action (e.g., saving the email to a secondary S3 bucket).
The following figure shows how receipt rules, rule sets, and actions relate to each other.
For more information on creating and managing receipt rules, you can refer to the official documentation.
Handling the 200 Receipt Rules per Rule Set limit
For each AWS account, Amazon SES imposes a limit of 200 receipt rules per receipt rule set. While this limit is sufficient for most use cases, there might be situations where you need to process a higher volume of incoming emails with more complex rule sets. These are some strategies to work around the 200 receipt rule limit using Amazon SES and other AWS services:
Utilize rule chaining: As mentioned earlier, chaining receipt rules allows you to link multiple rules together, effectively extending the number of actions you can perform for a single email. By chaining rules, you can create more complex processing workflows without exceeding the 200 rule limit.
Combine rules with actions: Instead of creating separate rules for each scenario, consider combining multiple actions within a single rule. This approach can help you reduce the total number of rules while still catering to various email processing requirements.
Use AWS Lambda for custom processing: Leverage AWS Lambda to perform custom processing on incoming emails. By incorporating Lambda functions in your receipt rules, you can handle more complex processing tasks without increasing the number of rules. This approach also allows you to offload some processing logic from Amazon SES to Lambda, providing additional flexibility.
Consolidate similar actions: If you have several rules performing similar actions, it is advisable to consolidate them into a single rule with multiple actions. This consolidation can help you reduce the total number of rules while maintaining the desired functionality.
Evaluate rule usage: Regularly review and evaluate your existing receipt rules to identify any rules that are no longer in use or can be optimized. Removing or consolidating unnecessary rules can help you stay within the 200 rule limit while still addressing your email processing requirements.
By implementing these strategies, you can effectively work around the 200 receipt rule limit in Amazon SES and build more complex email processing workflows to cater to your specific needs. Remember to monitor and optimize your rule sets regularly to make the most of the available resources and maintain efficient email processing.
For more information on the inbound quotas and limits in Amazon SES, you can refer to the official AWS documentation at Quotas related to email receiving.
Best Practices for multi-tenant scenarios
When dealing with multi-tenant scenarios in your application, it’s crucial to manage incoming emails efficiently to ensure smooth operation and a seamless experience for your users. In this section, we’ll provide best practices to handle incoming emails in multi-tenant environments using Amazon SES.
In a multi-tenant scenario, where multiple customers or tenants share a single AWS account, it’s important to consider the limit of 200 receipt rules per receipt rule set imposed by Amazon SES. To ensure compliance with this limit and maintain optimal email processing, the following practices are recommended:
Segregate tenants using email subdomains: Create unique subdomains for each tenant and route their incoming emails accordingly. This approach makes it easier to manage email processing rules and helps isolate tenants from potential issues.
Create separate rule sets for each tenant: By creating dedicated rule sets for each tenant, you can maintain better control over email processing rules and actions specific to their needs. This can simplify management and make it easier to update rules for individual tenants without affecting others.
Use tags to identify tenant-specific emails: Apply tags to incoming emails using the AddHeader action in your receipt rules. These tags can include tenant-specific identifiers, which will help you route and process emails correctly. You can later use these tags in other AWS services (e.g., AWS Lambda) to process tenant-specific emails.
Leverage conditional receipt rules: Utilize conditional receipt rules to apply tenant-specific processing based on email headers, recipients, or other criteria. This way, you can ensure that the right actions are taken for each tenant’s incoming emails.
Monitor tenant-specific metrics: Configure Amazon CloudWatch metrics and alarms for each tenant to track their email processing performance separately. This enables you to keep a close eye on individual tenants and take appropriate actions when needed.
Implement rate limiting: To prevent tenants from overwhelming your email processing pipeline, consider implementing rate limiting based on the number of incoming emails per tenant. This can help ensure fair resource allocation and prevent potential abuse.
Ensure security and privacy: Always encrypt tenant data at rest and in transit, and follow best practices for data protection and privacy. Consider using AWS Key Management Service (KMS) to manage encryption keys for each tenant.
Test and validate rule sets: Before deploying rule sets for tenants, thoroughly test and validate them to ensure they function as intended. This can help prevent unexpected behavior and maintain a high level of service quality.
By following these best practices for handling incoming emails in multi-tenant scenarios with Amazon SES, you can ensure a robust and efficient email processing pipeline that caters to each tenant’s unique requirements. As you continue to work with Amazon SES in multi-tenant environments, stay up to date with AWS documentation and best practices to further optimize your email processing workflows.
Conclusion
In this blog post, we’ve explored how to set up Amazon Simple Email Service (SES) for incoming email processing using receipt rules, rule sets, and various actions. We’ve covered domain verification, DKIM setup, creating and managing rule sets, adding receipt rules, and configuring Amazon CloudWatch metrics and alarms. We’ve also delved into advanced topics such as chaining receipt rules for more complex email processing workflows.
By following this guide, you can effectively leverage Amazon SES to process and manage your incoming emails, optimizing your email workflows, and maintaining high email deliverability standards. With Amazon SES, you can customize your email processing pipeline to meet your specific needs and seamlessly integrate with other AWS services such as Amazon S3, AWS Lambda, Amazon SNS, and Amazon CloudWatch.
In future blog posts, we will explore monitoring and alerting in more detail, providing you with additional insights on how to effectively monitor your email processing pipelines and set up alerts for critical events. Stay tuned for more information on this important aspect of managing your email infrastructure.
As you continue to work with Amazon SES and its email receiving capabilities, remember to review AWS best practices and documentation to stay up to date with new features and improvements. Don’t hesitate to experiment with different rule sets, actions, and conditions to find the perfect email processing solution for your use case.
What is email authentication and why is it important?
Amazon Simple Email Service (SES) lets you reach customers confidently without an on-premises Simple Mail Transfer Protocol (SMTP) system. Amazon SES provides built-in support for email authentication protocols, including DKIM, SPF, and DMARC, which help improve the deliverability and authenticity of outgoing emails.
Email authentication is the process of verifying the authenticity of an email message to ensure that it is sent from a legitimate source and has not been tampered with during transmission. Email authentication methods use cryptographic techniques to add digital signatures or authentication headers to outgoing emails, which can be verified by email receivers to confirm the legitimacy of the email.
Email authentication helps establish a sender’s reputation as a trusted sender. Additionally, when email receivers can verify that emails are legitimately sent from a sender’s domain using authentication methods, it also helps establish the sender’s reputation as a trusted sender. Email authentication involves one or more technical processes used by mail systems (sending and receiving) that make certain key information in an email message verifiable. Email authentication generates signals about the email, which can be utilized in decision-making processes related to spam filtering and other email handling tasks.
There are currently two widely used email authentication mechanisms – SPF (Sender Policy Framework) and DKIM (DomainKeys Identified Mail). They provide information that the receiving domain can use to verify that the sending of the message was authorized in some way by the sending domain. DKIM can also help determine that the content was not altered in transit. And the DMARC (Domain-based Message Authentication, Reporting and Conformance) protocol allows sending domains to publish verifiable policies that can help receiving domains decide how best to handle messages that fail authentication by SPF and DKIM.
Email authentication protocols:
SPF (Sender Policy Framework): SPF is an email authentication protocol that checks which IP addresses are authorized to send mail on behalf of the originating domain. Domain owners use SPF to tell email providers which servers are allowed to send email from their domains. This is an email validation standard that’s designed to prevent email spoofing.
DKIM (DomainKeys Identified Mail): DKIM is an email authentication protocol that allows a domain to attach its identifier to a message. This asserts some level of responsibility or involvement with the message. A sequence of messages signed with the same domain name is assumed to provide a reliable base of information about mail associated with the domain name’s owner, which may feed into an evaluation of the domain’s “reputation”. It uses public-key cryptography to sign an email with a private key. Recipient servers can then use a public key published to a domain’s DNS to verify that parts of the emails have not been modified during the transit.
DMARC (Domain-based Message Authentication, Reporting and Conformance): is an email authentication protocol that uses Sender Policy Framework (SPF) and DomainKeys Identified Mail (DKIM) to detect email spoofing. In order to comply with DMARC, messages must be authenticated through either SPF or DKIM, or both.
Let us dive deep into DKIM in this blog. Amazon SES provides three options for signing your messages using a DKIM signature:
Easy DKIM: To set up a sending identity so that Amazon SES generates a public-private key pair and automatically adds a DKIM signature to every message that you send from that identity.
Manually add DKIM signature: To add your own DKIM signature to email that you send using the SendRawEmail API, see Manual DKIM signing in Amazon SES.
The purpose of EasyDKIM is to simplify the process of generating DKIM keys, adding DKIM signatures to outgoing emails, and managing DKIM settings, making it easier for users to implement DKIM authentication for their email messages. Using EasyDKIM, Amazon SES aims to improve email deliverability, prevent email fraud and phishing attacks, establish sender reputation, enhance brand reputation, and comply with industry regulations or legal requirements. EasyDKIM doubles as domain verification (simplification) and it eliminates the need for customers to worry about DKIM key rotation (managed automation). By automating and simplifying the DKIM process, EasyDKIM helps users ensure the integrity and authenticity of their email communications, while reducing the risk of fraudulent activities and improving the chances of emails being delivered to recipients’ inboxes.
Setting up Easy DKIM in Amazon SES:
When you set up Easy DKIM for a domain identity, Amazon SES automatically adds a 2048-bit DKIM signature to every email that you send from that identity. You can configure EasyDKIM by using the Amazon SES console, or by using the API.
The procedure in this section is streamlined to just show the steps necessary to configure Easy DKIM on a domain identity that you’ve already created. If you haven’t yet created a domain identity or you want to see all available options for customizing a domain identity, such as using a default configuration set, custom MAIL FROM domain, and tags, see Creating a domain identity. Part of creating an Easy DKIM domain identity is configuring its DKIM-based verification where you will have the choice to either accept the Amazon SES default of 2048 bits, or to override the default by selecting 1024 bits. Steps to set up easyDKIM for a verified identity:
In the navigation pane, under Configuration, choose Verified identities.
Verified identities
In the list of identities, choose an identity where the Identity type is Domain.
Under the Authentication tab, in the DomainKeys Identified Mail (DKIM) container, choose Edit.
In the Advanced DKIM settings container, choose the Easy DKIM button in the Identity type field.
DKIM settings
In the DKIM signing key length field, choose either RSA_2048_BIT or RSA_1024_BIT.
In the DKIM signatures field, check the Enabled box.
Choose Save changes.
After configuring your domain identity with Easy DKIM, you must complete the verification process with your DNS provider – proceed to Verifying a DKIM domain identity with your DNS provider and follow the DNS authentication procedures for Easy DKIM.
Conclusion:
Email authentication, especially DKIM, is crucial in securing your emails, establishing sender reputation, and improving email deliverability. EasyDKIM provides a simplified and automated way to implement DKIM authentication. It removes the hassles of generating DKIM keys and managing settings, while additionally reducing risks and and enhancing sender authenticity. By following the steps outlined in this blog post, you can easily set up easyDKIM in Amazon SES and start using DKIM authentication for your email campaigns.
About the Author
Vinay Ujjini is an Amazon Pinpoint and Amazon Simple Email Service Worldwide Principal Specialist Solutions Architect at AWS. He has been solving customer’s omni-channel challenges for over 15 years. He is an avid sports enthusiast and in his spare time, enjoys playing tennis & cricket.
The collective thoughts of the interwebz
Manage Consent
To provide the best experiences, we use technologies like cookies to store and/or access device information. Consenting to these technologies will allow us to process data such as browsing behavior or unique IDs on this site. Not consenting or withdrawing consent, may adversely affect certain features and functions.
Functional
Always active
The technical storage or access is strictly necessary for the legitimate purpose of enabling the use of a specific service explicitly requested by the subscriber or user, or for the sole purpose of carrying out the transmission of a communication over an electronic communications network.
Preferences
The technical storage or access is necessary for the legitimate purpose of storing preferences that are not requested by the subscriber or user.
Statistics
The technical storage or access that is used exclusively for statistical purposes.The technical storage or access that is used exclusively for anonymous statistical purposes. Without a subpoena, voluntary compliance on the part of your Internet Service Provider, or additional records from a third party, information stored or retrieved for this purpose alone cannot usually be used to identify you.
Marketing
The technical storage or access is required to create user profiles to send advertising, or to track the user on a website or across several websites for similar marketing purposes.


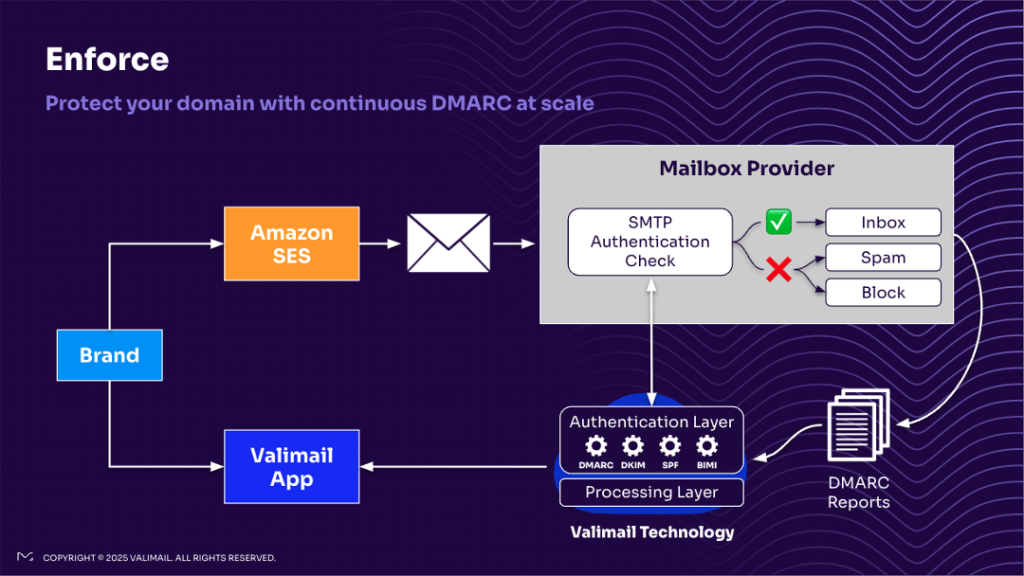


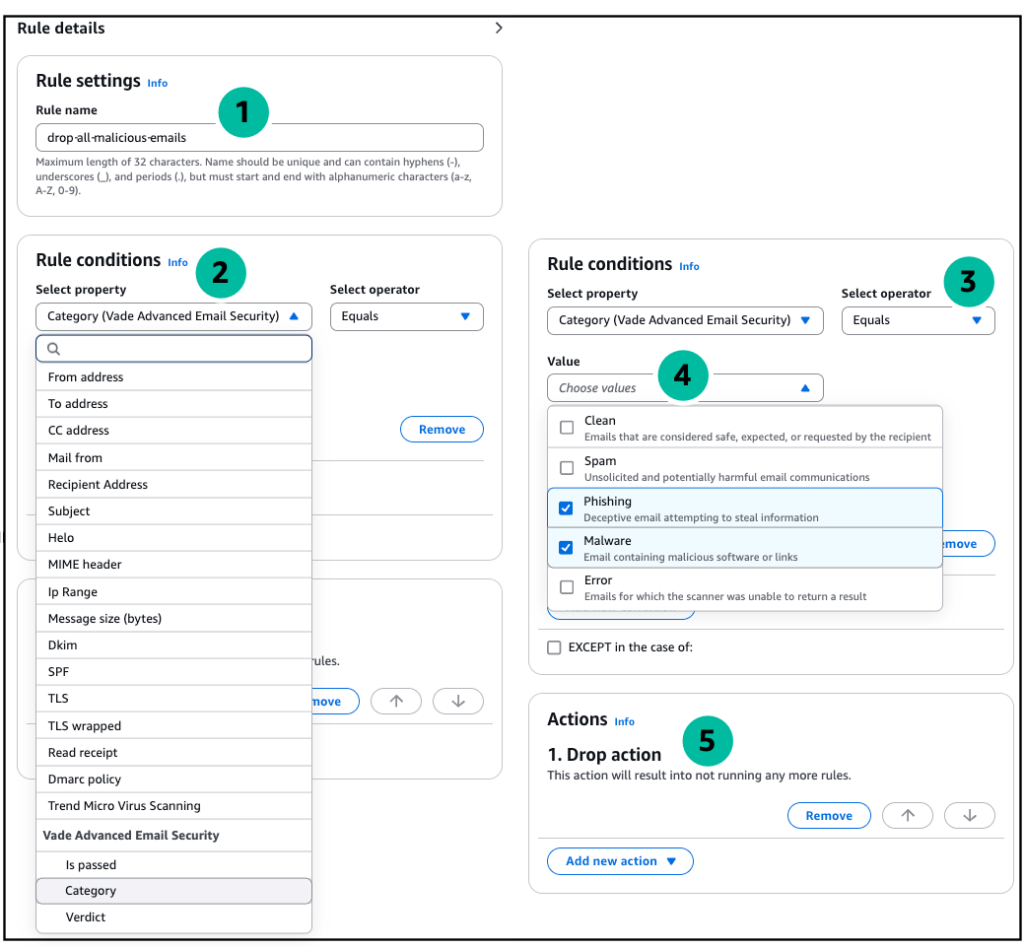


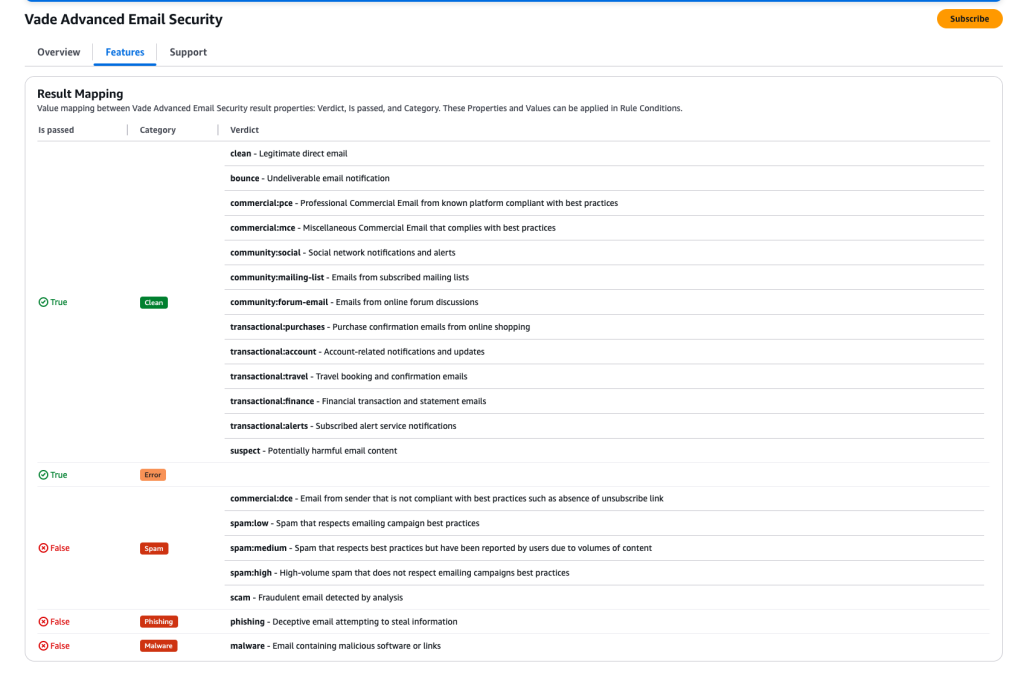

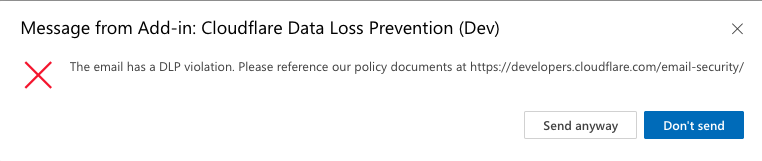
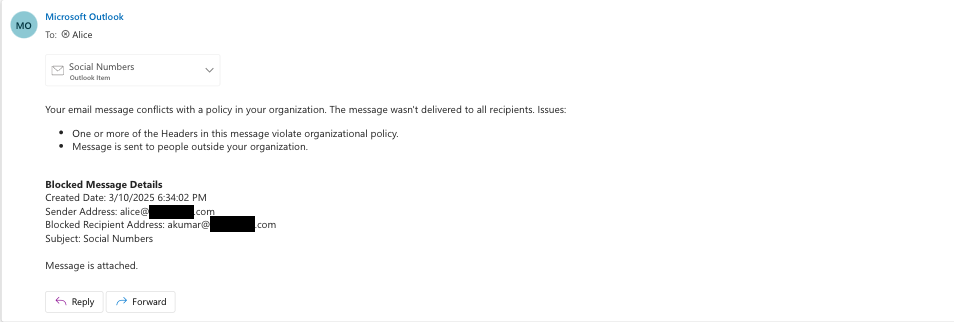
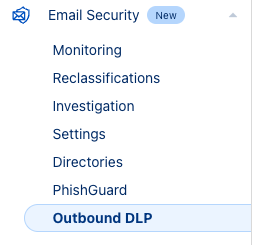

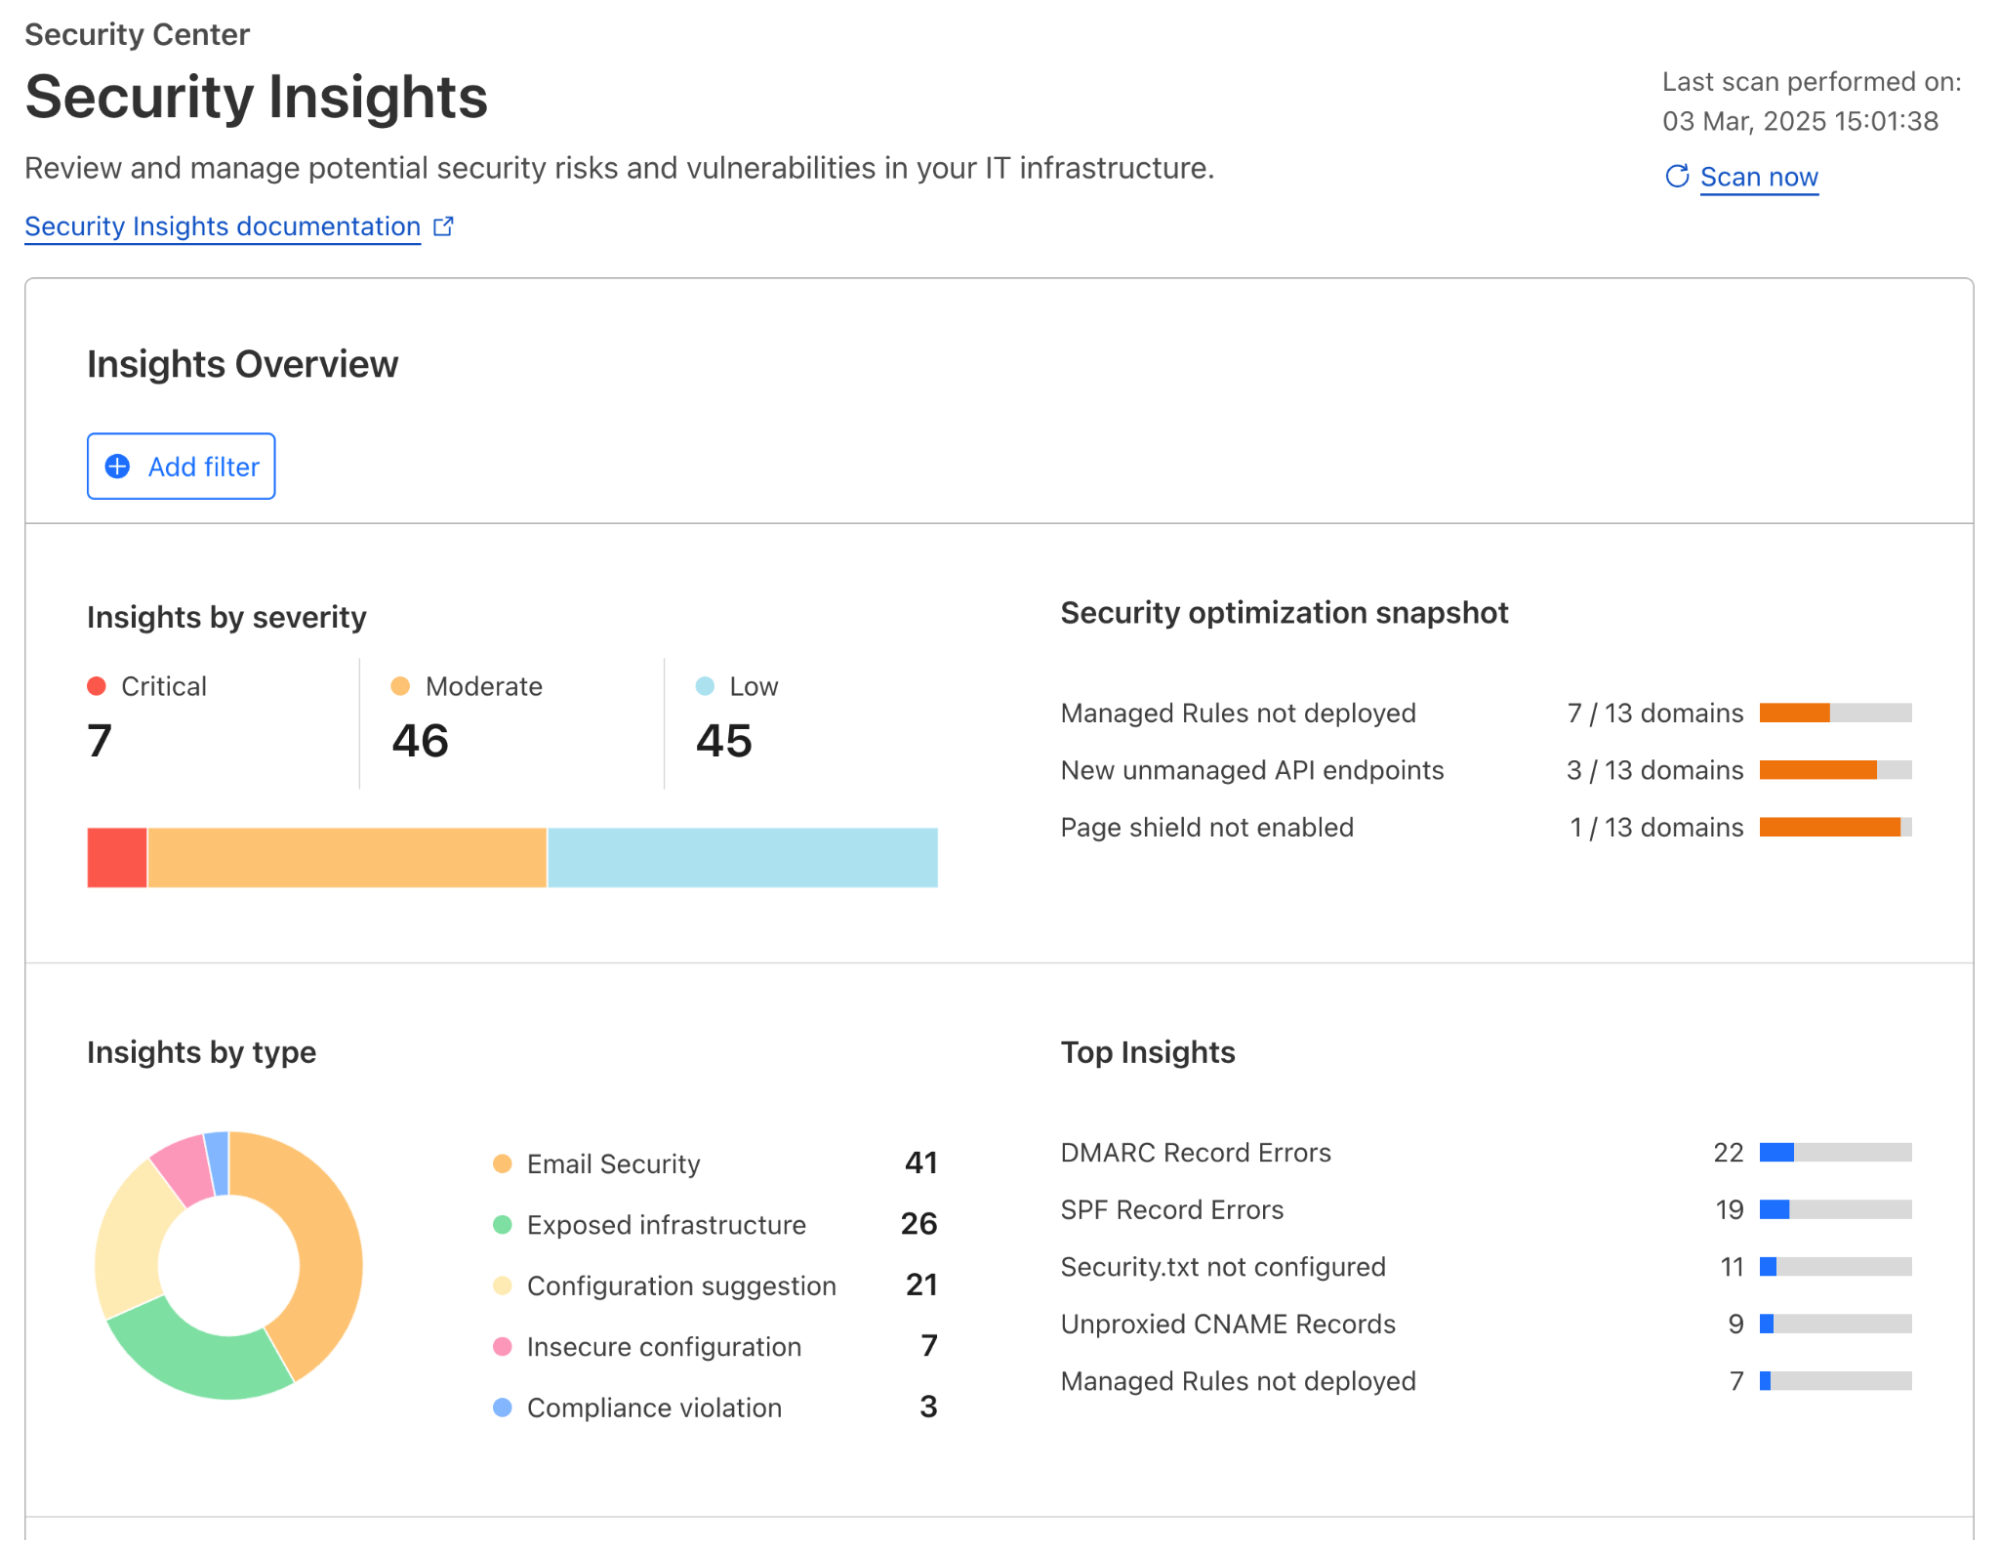
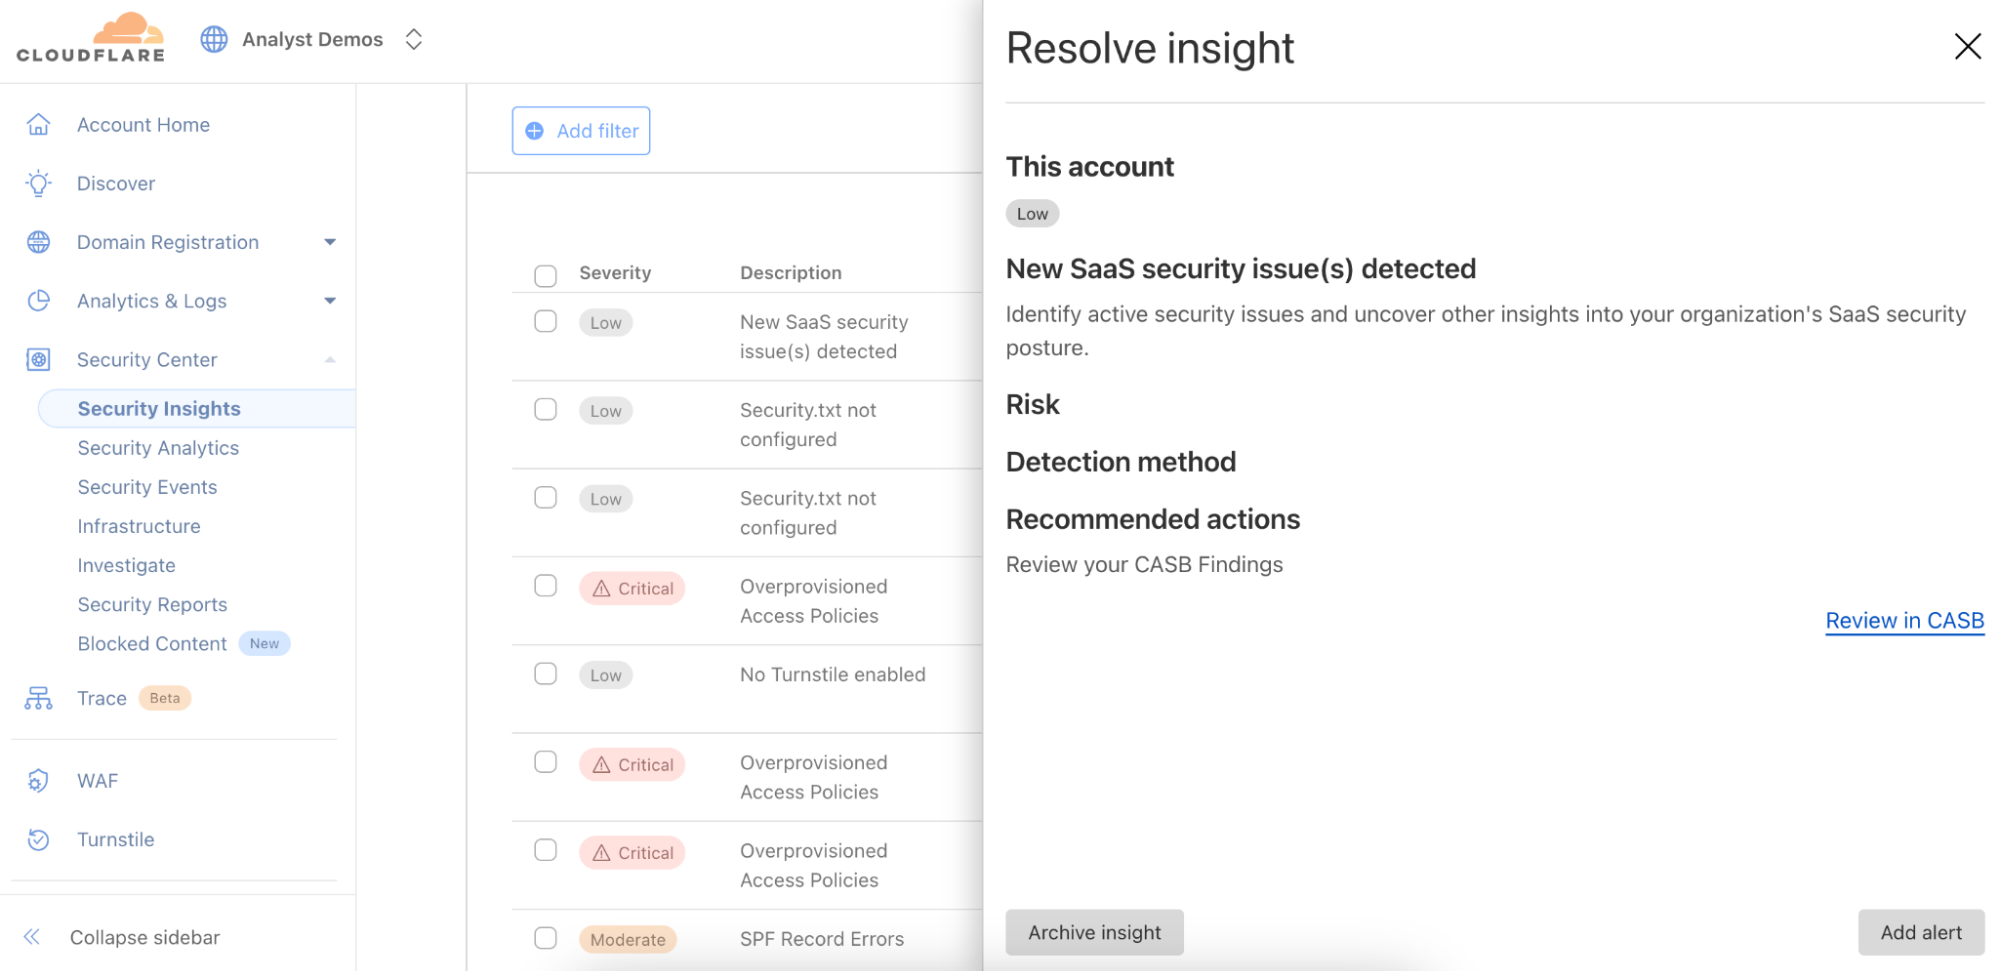

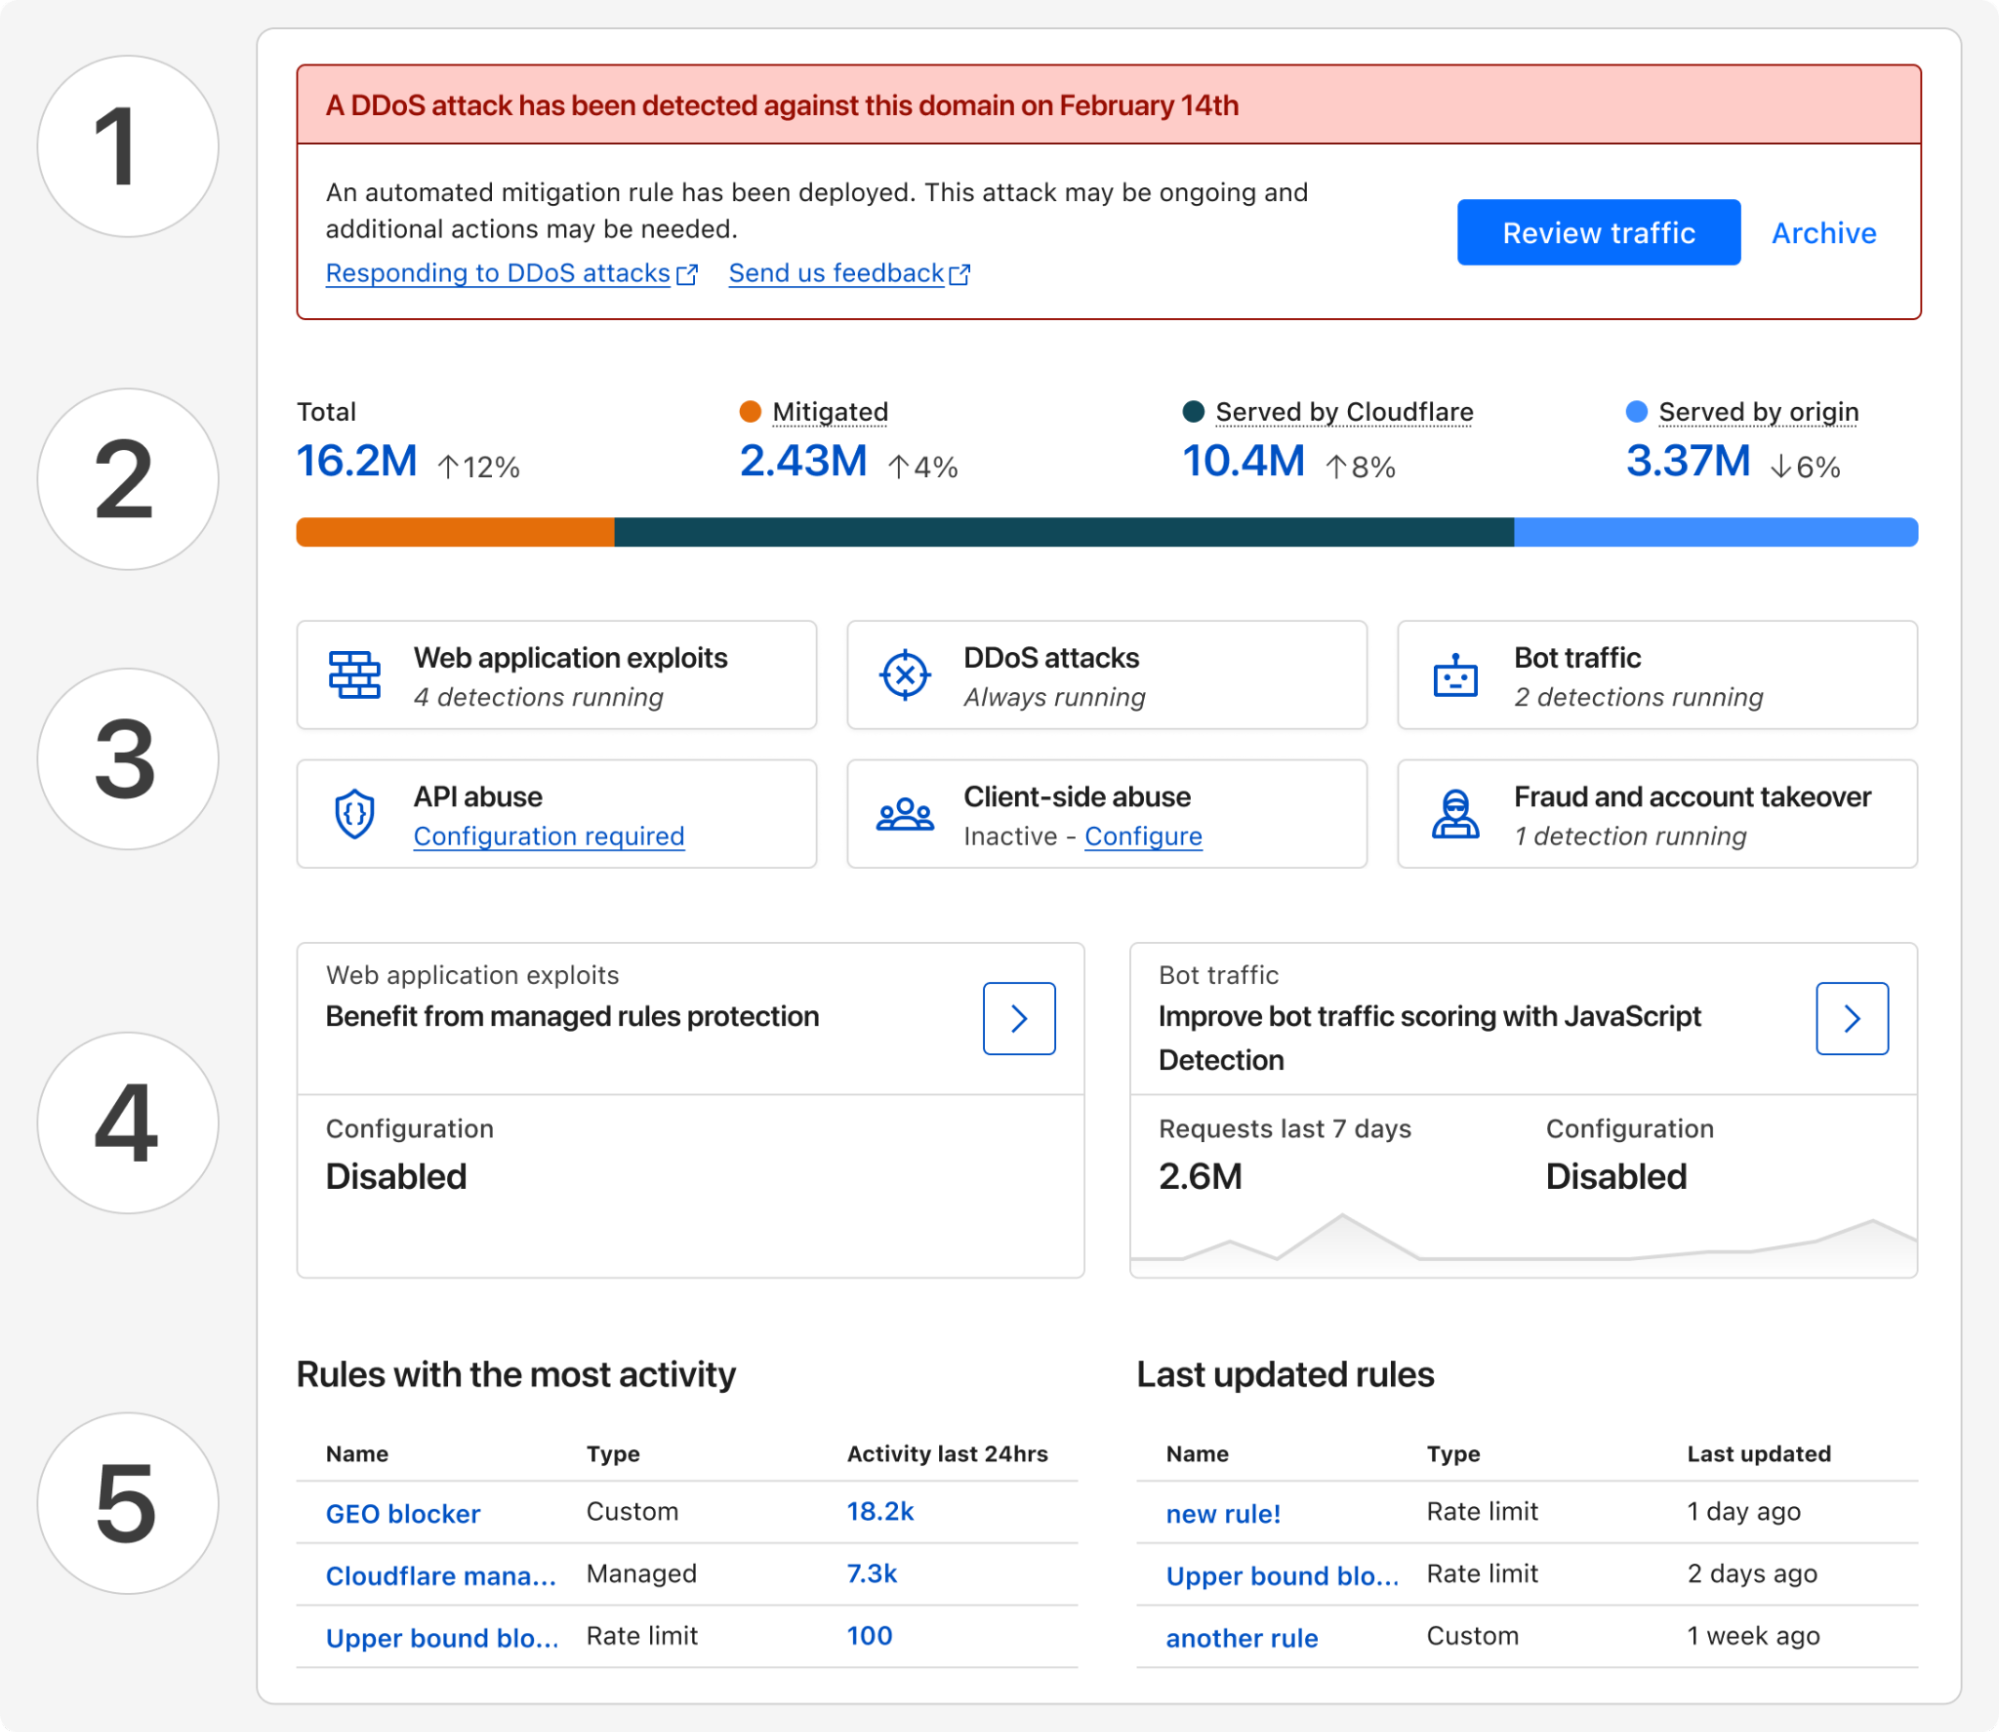
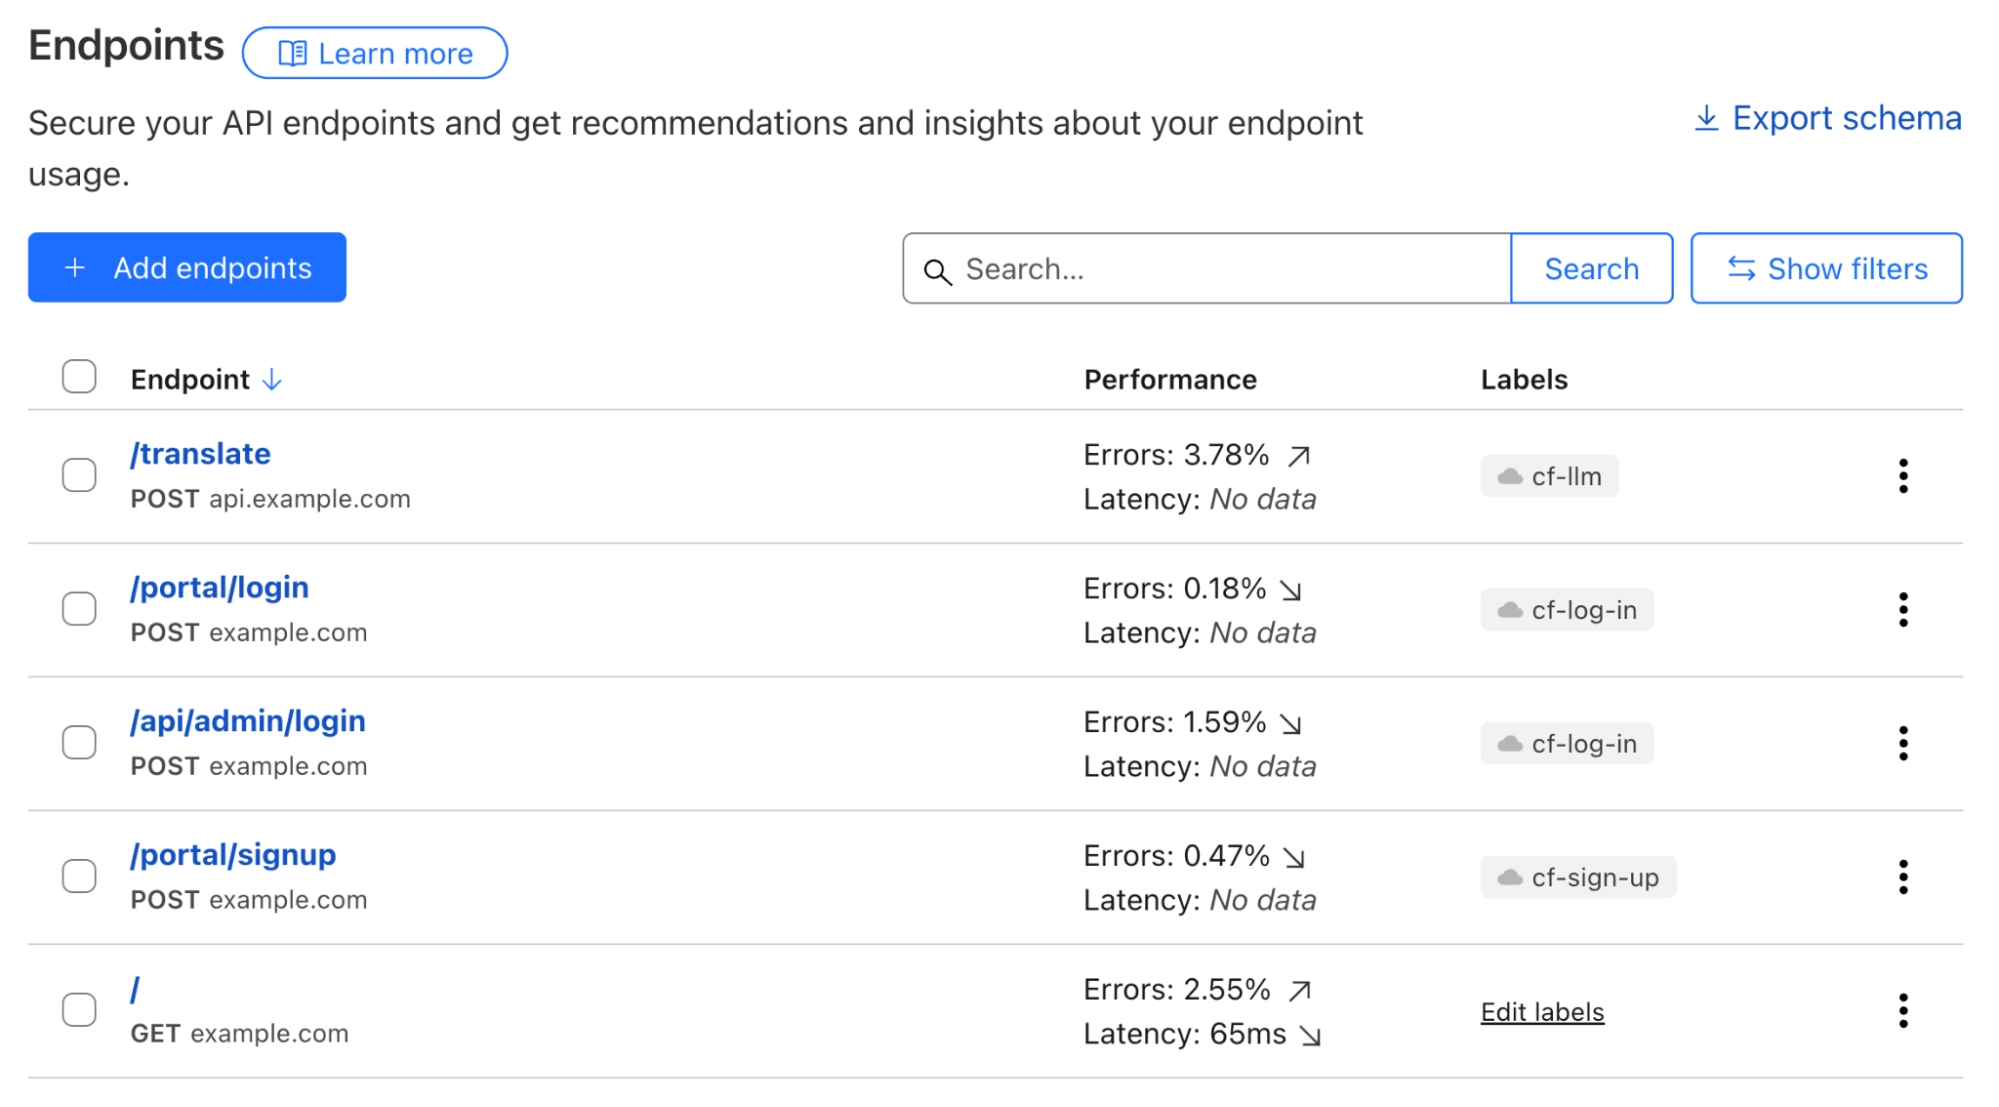
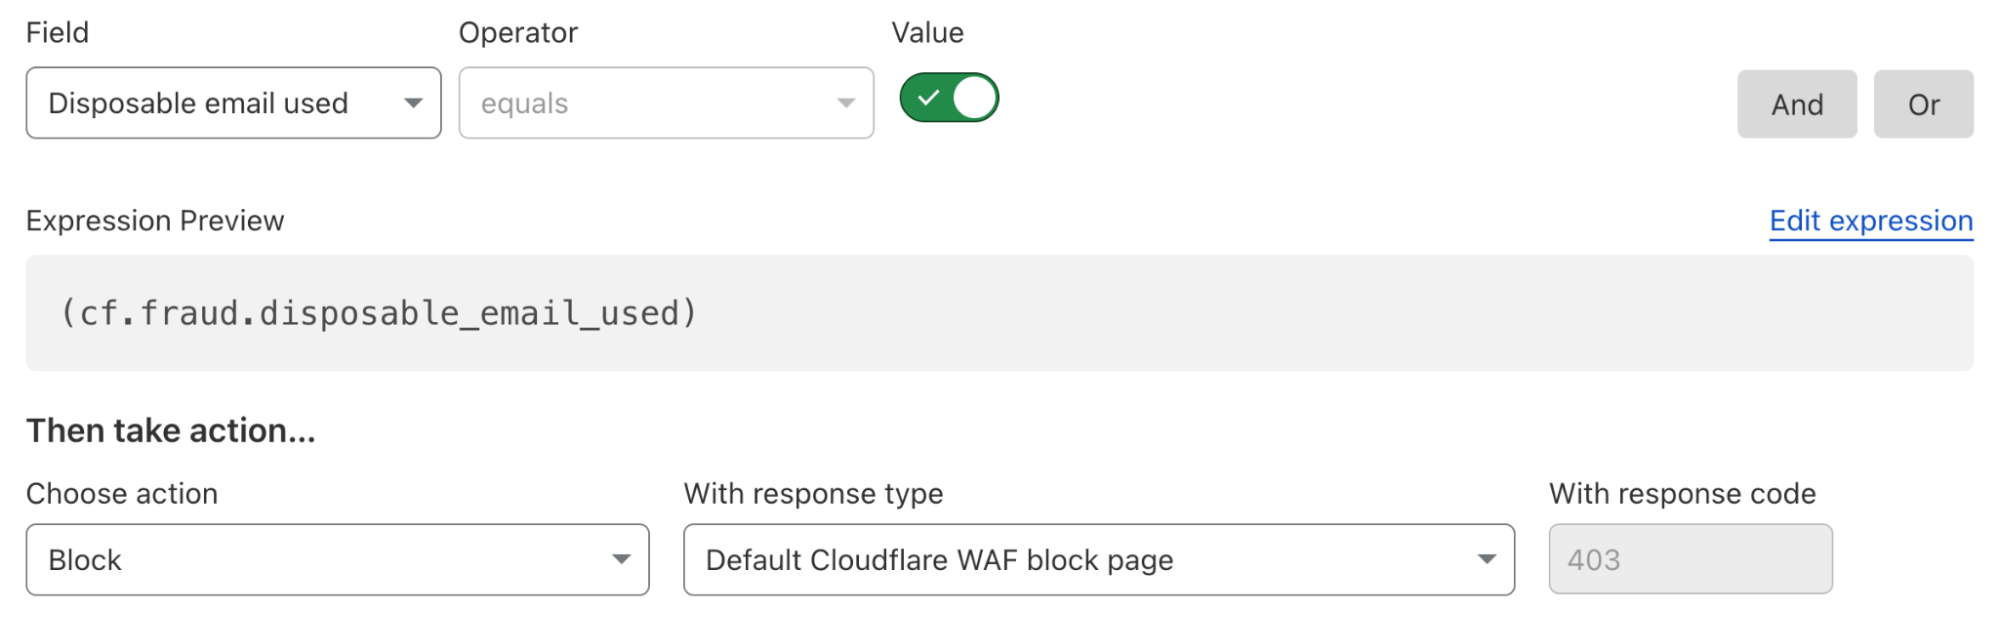
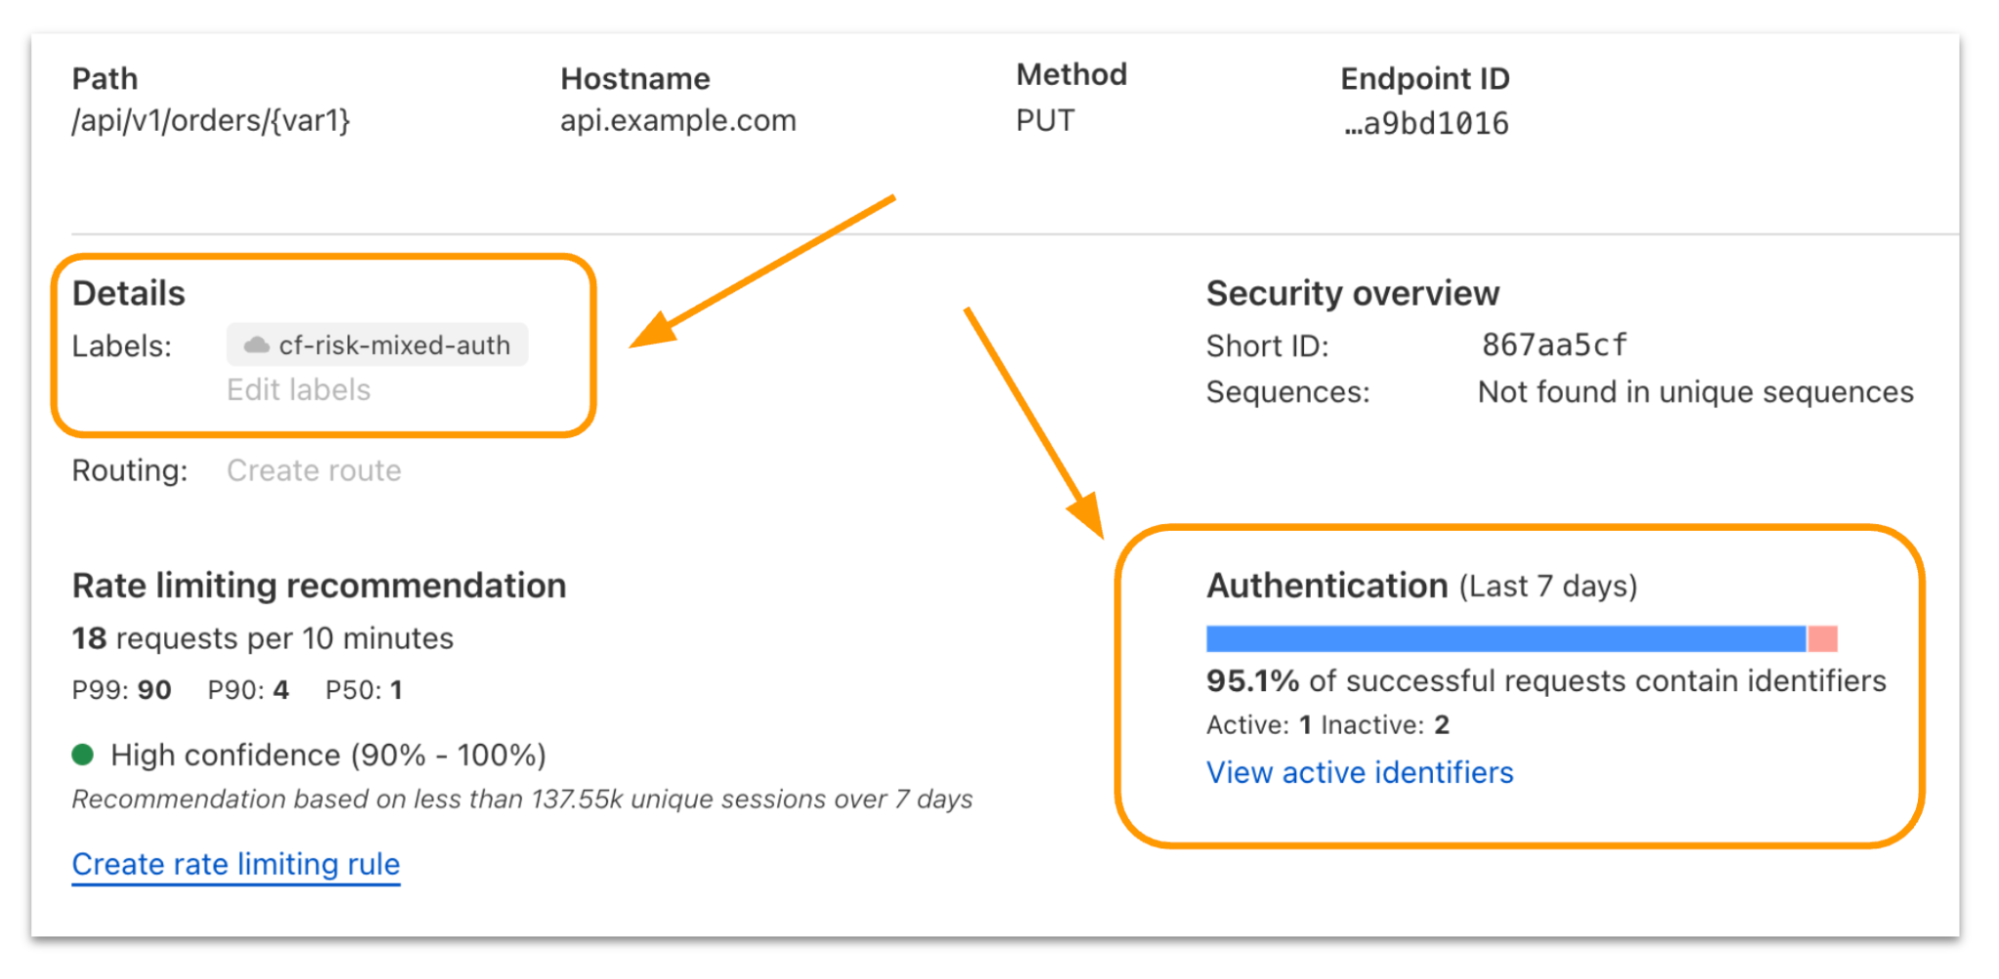


 Figure 2. Security controls applied by Proofpoint SER before routing emails back to Amazon SES for distribution.
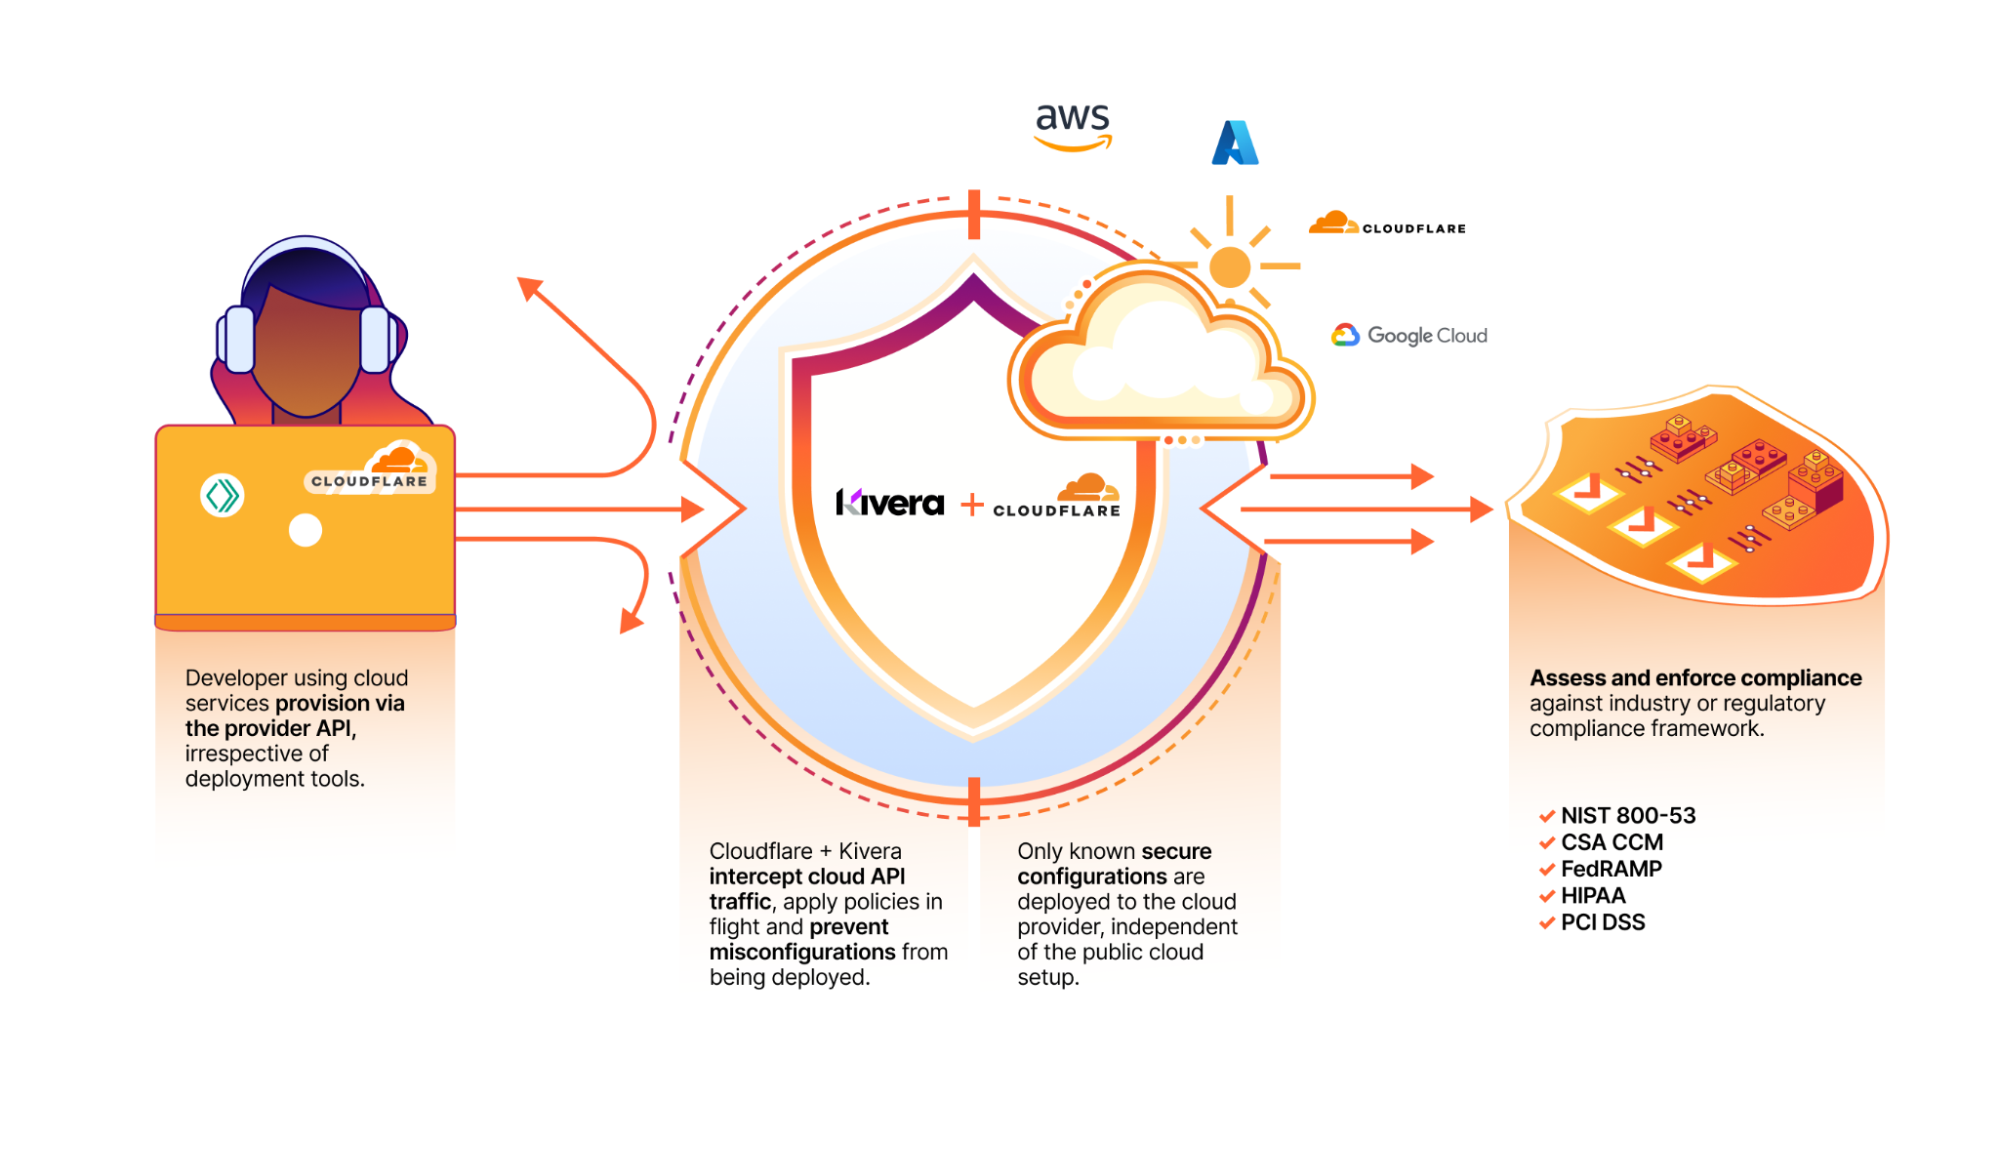

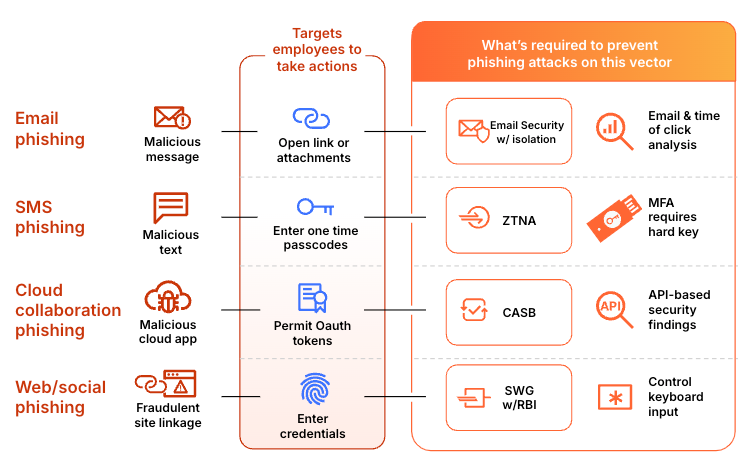

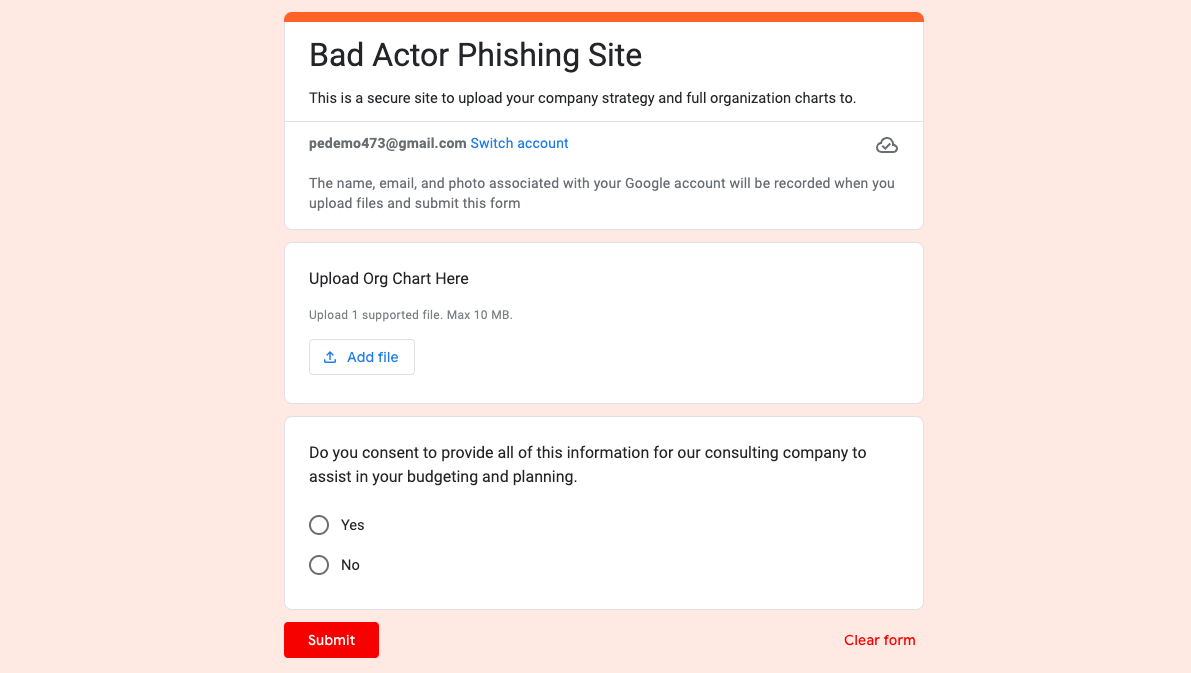
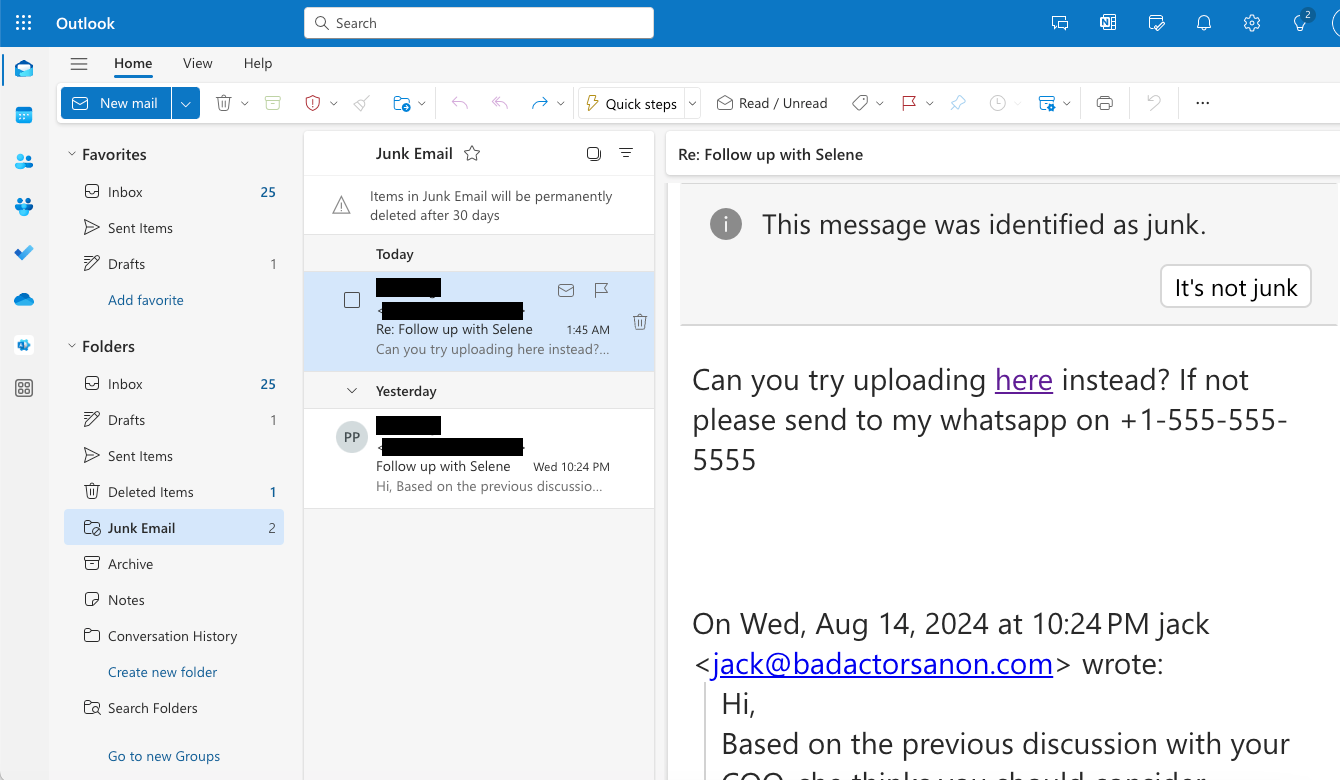
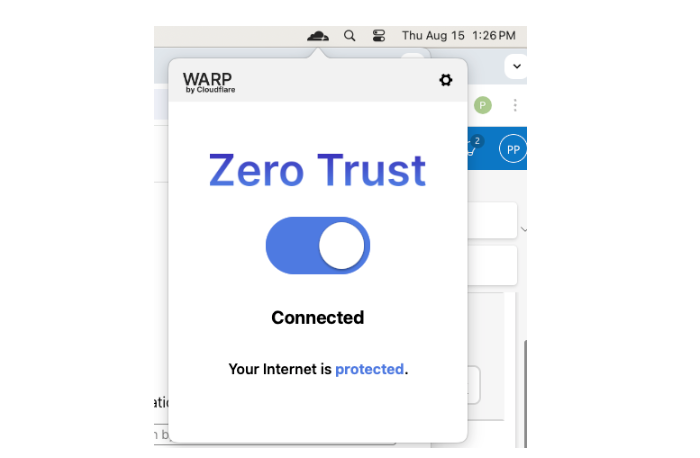
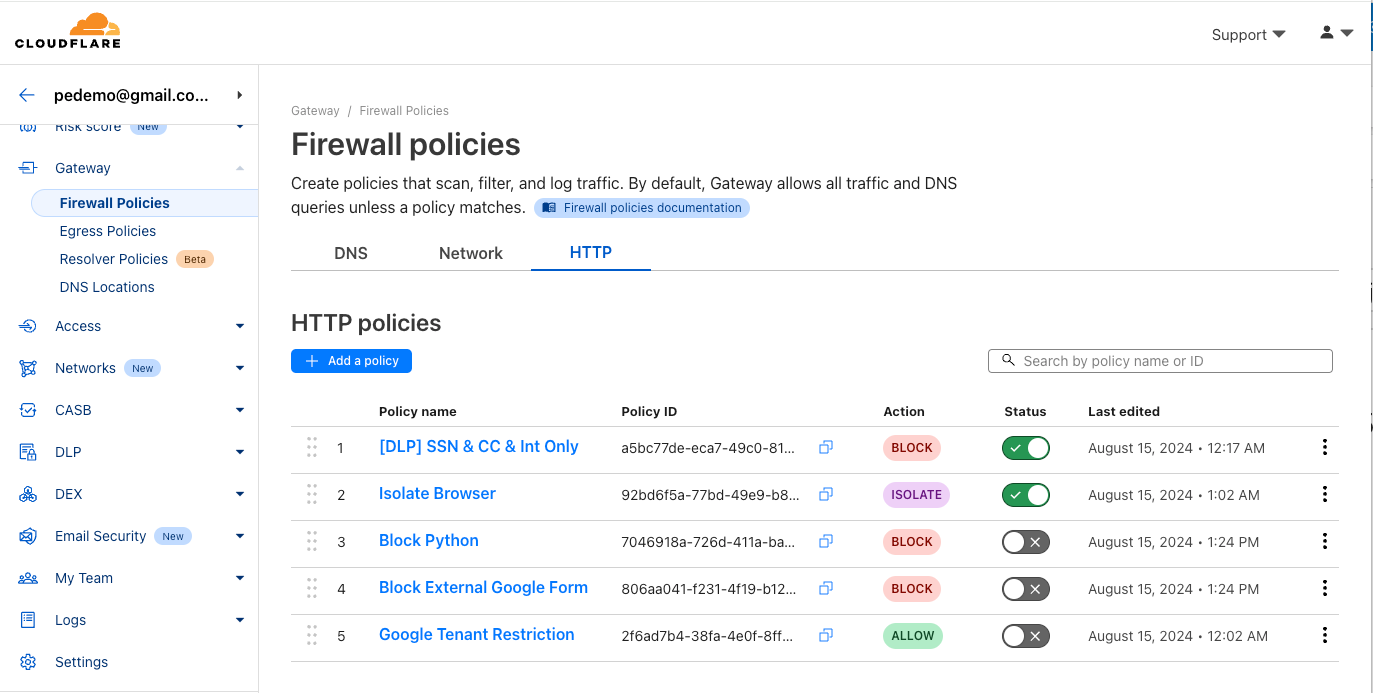
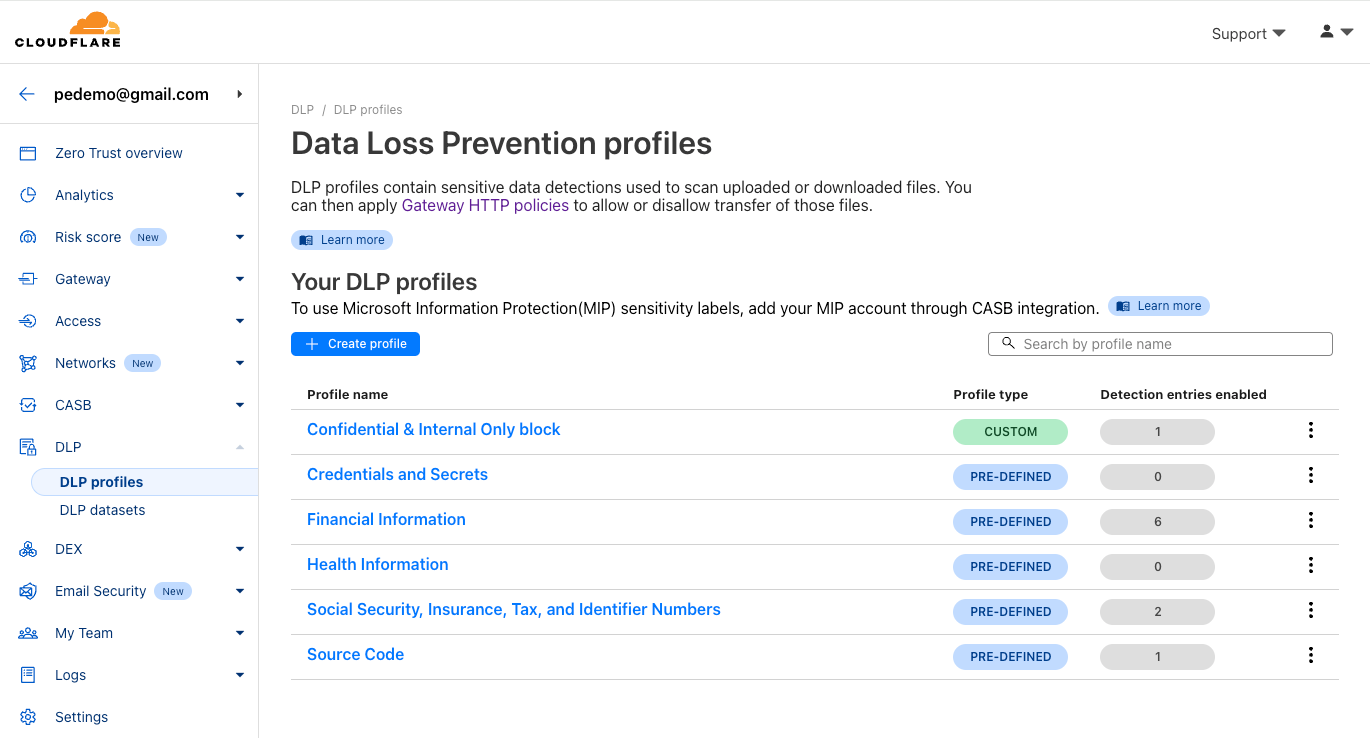
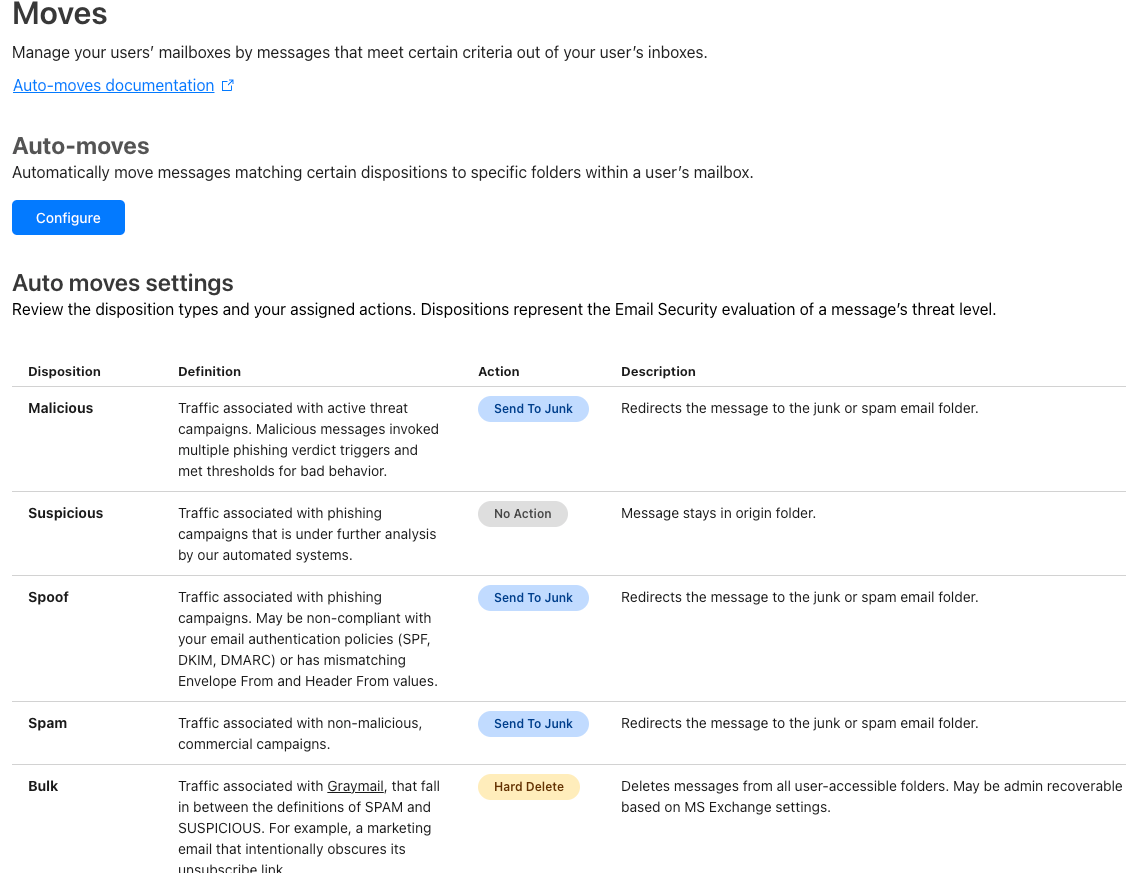


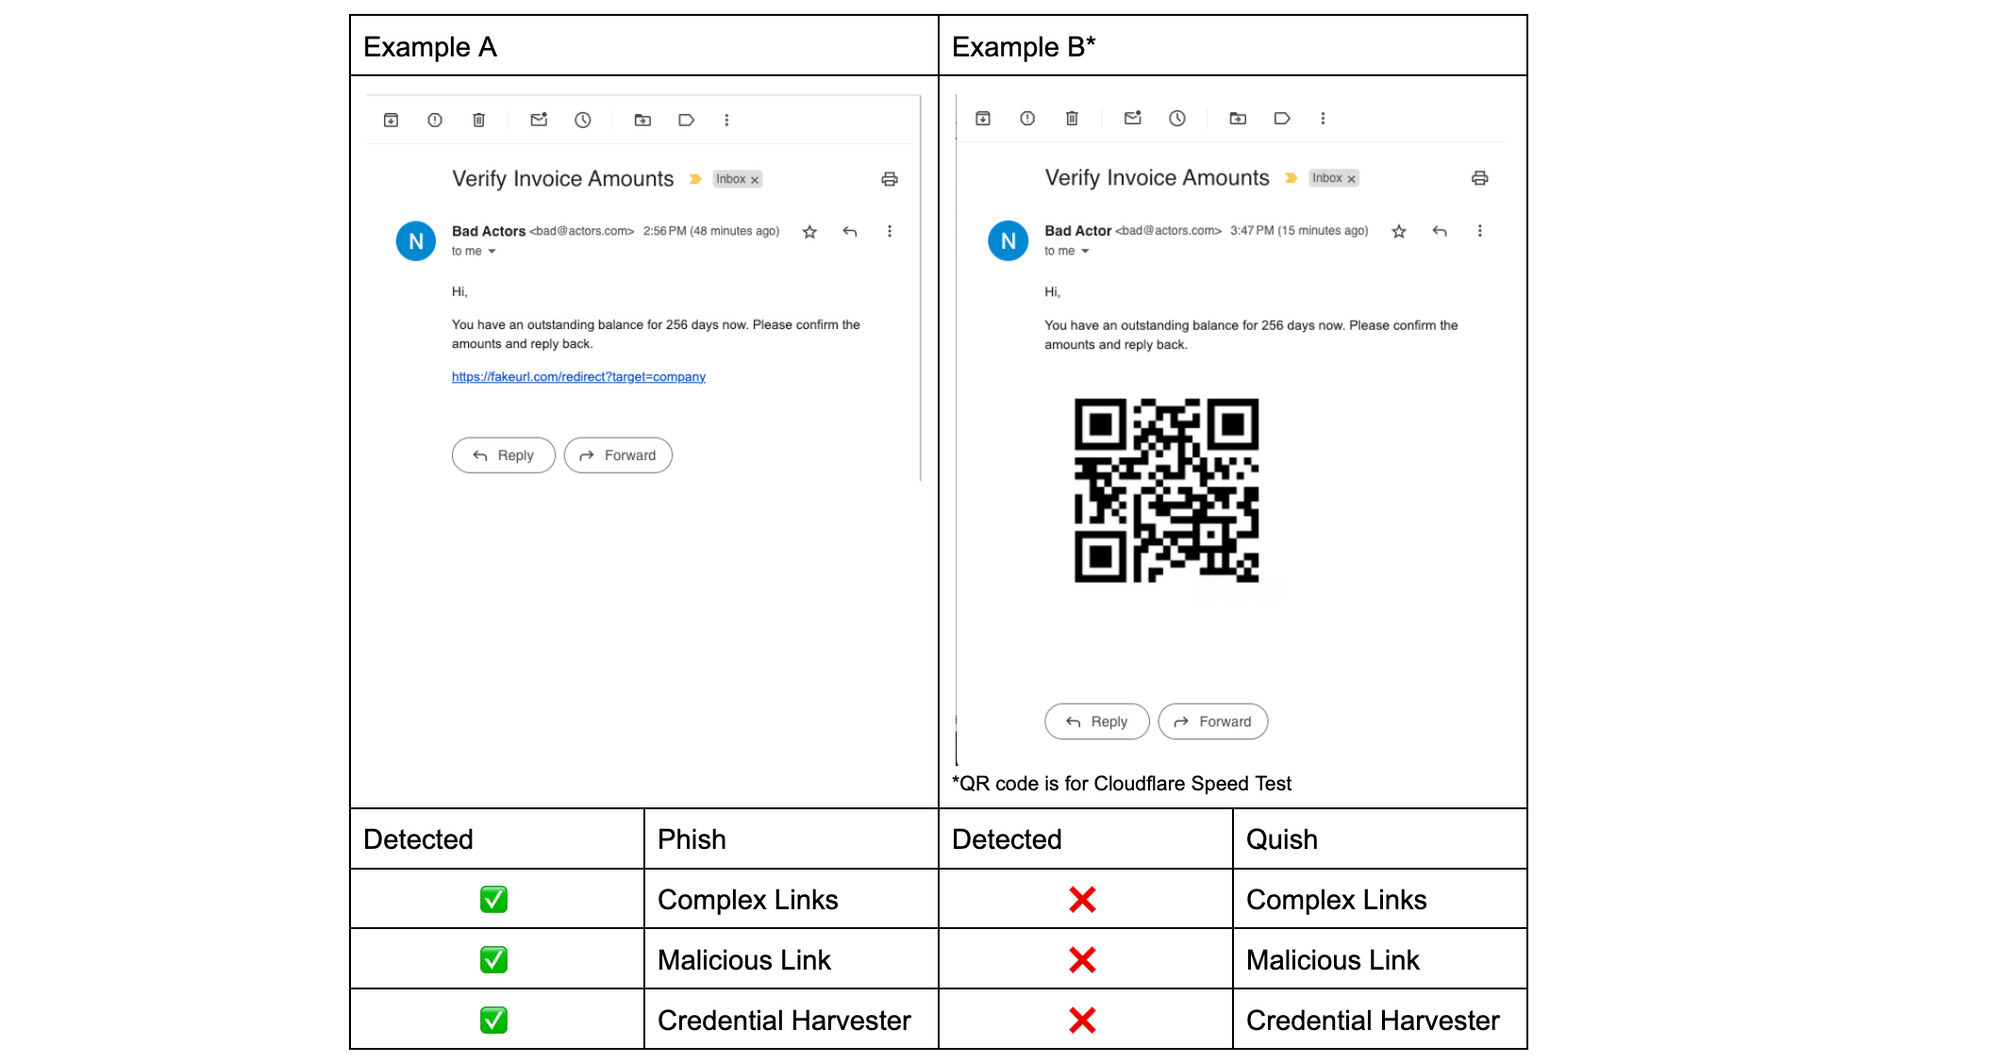
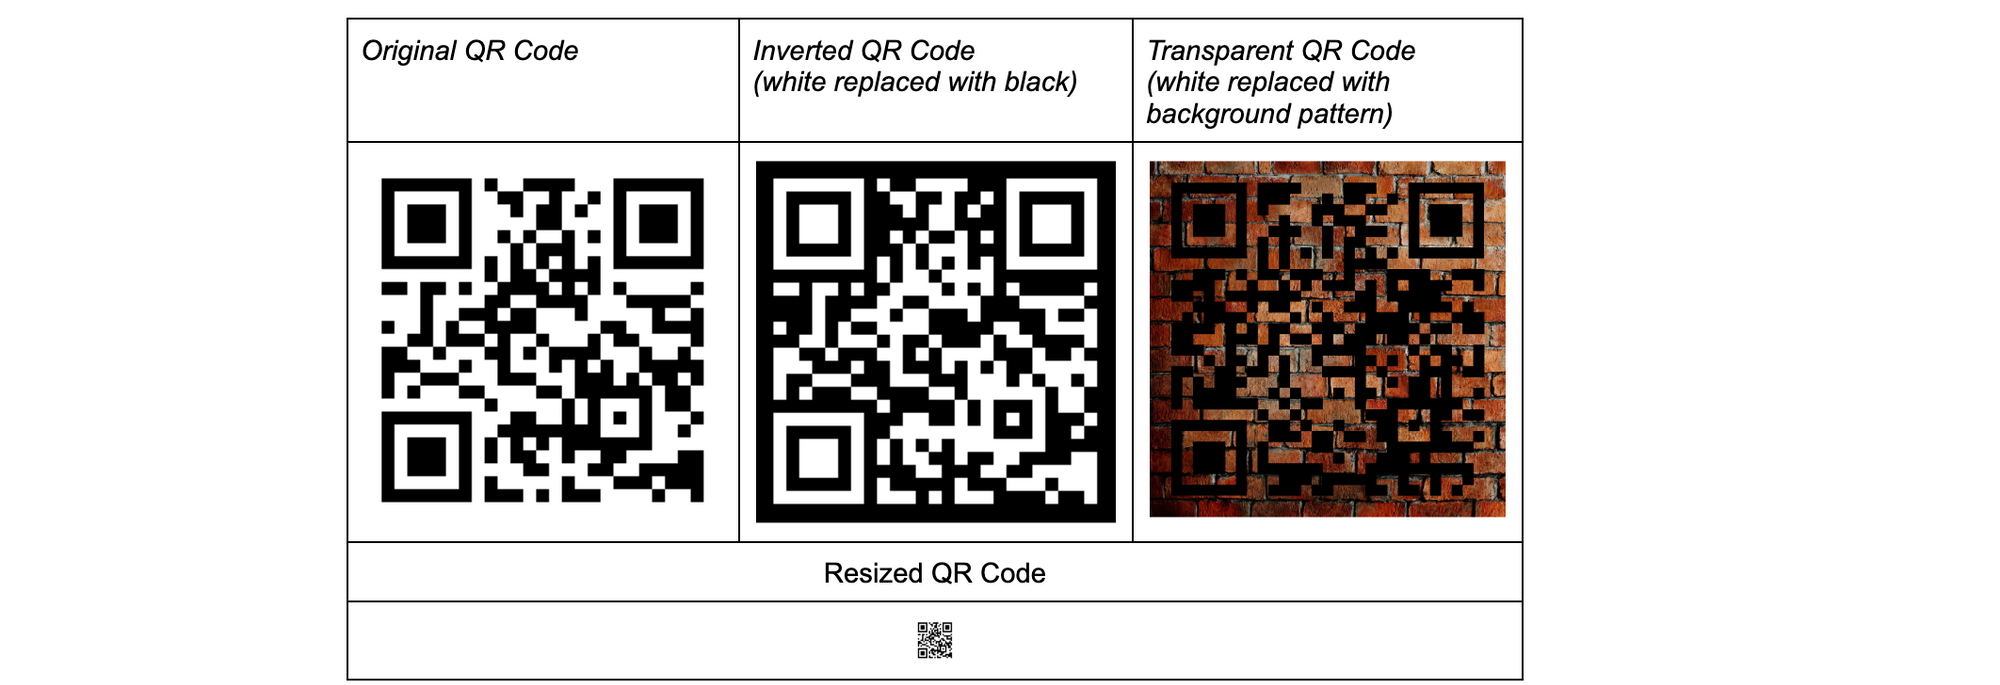
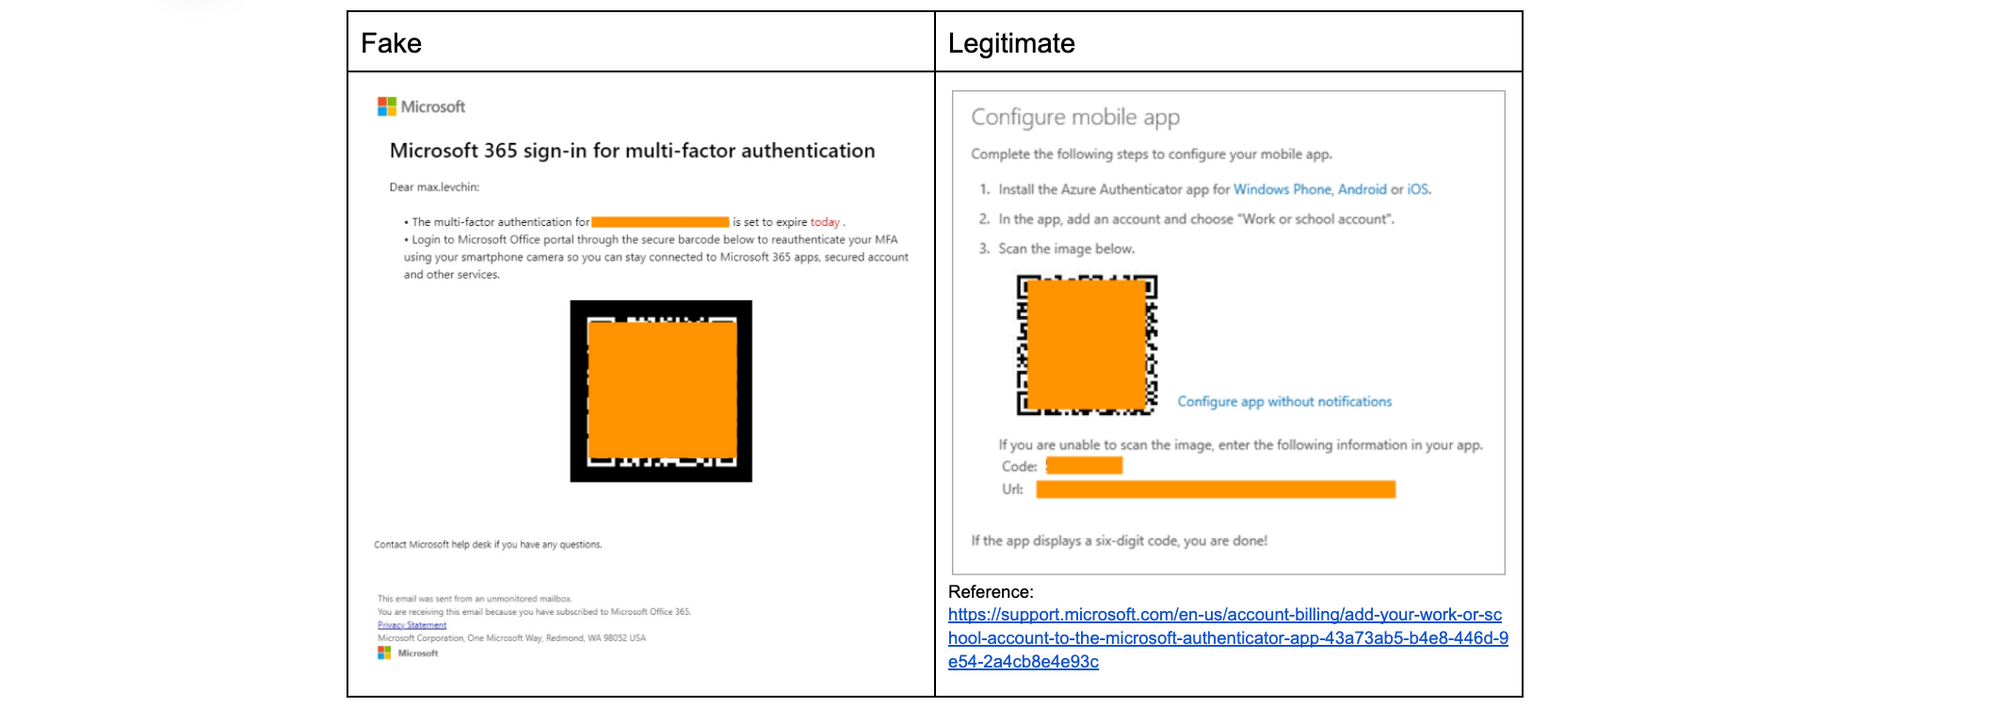
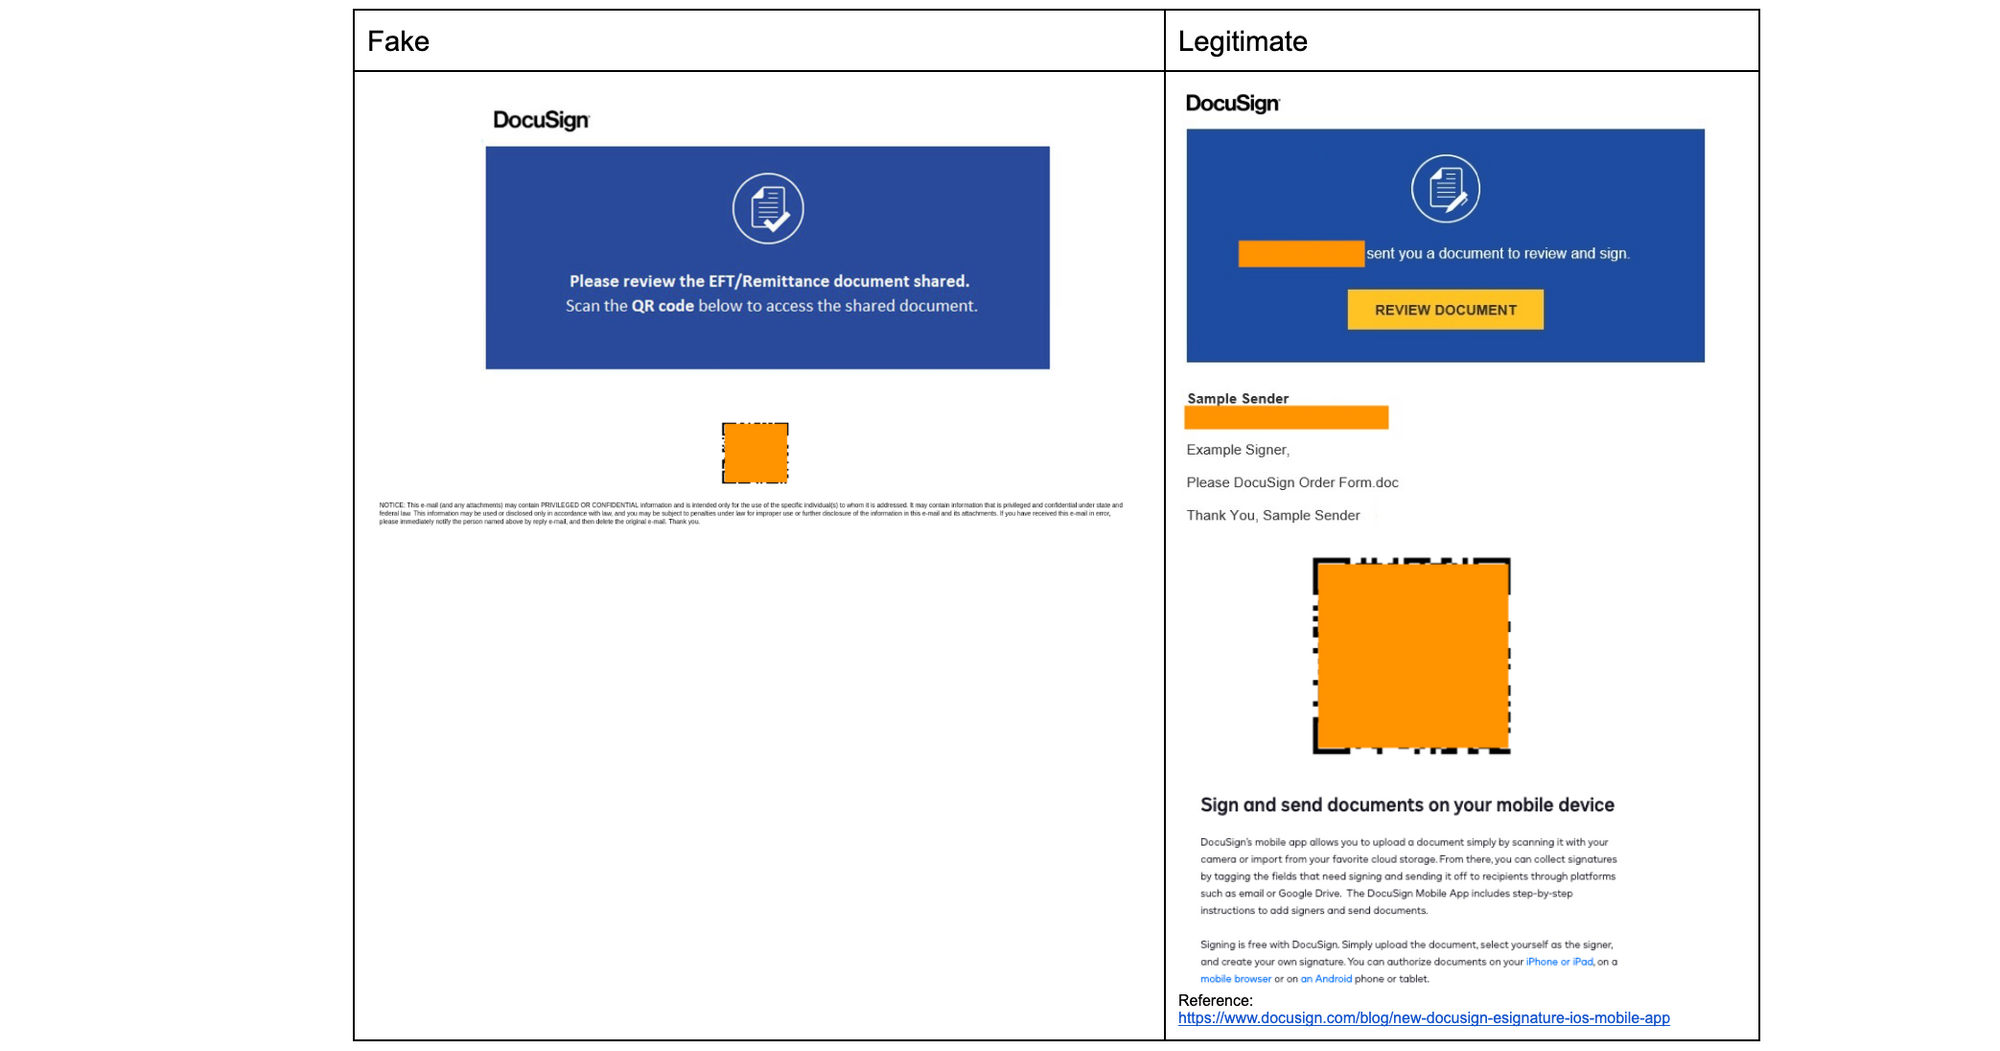
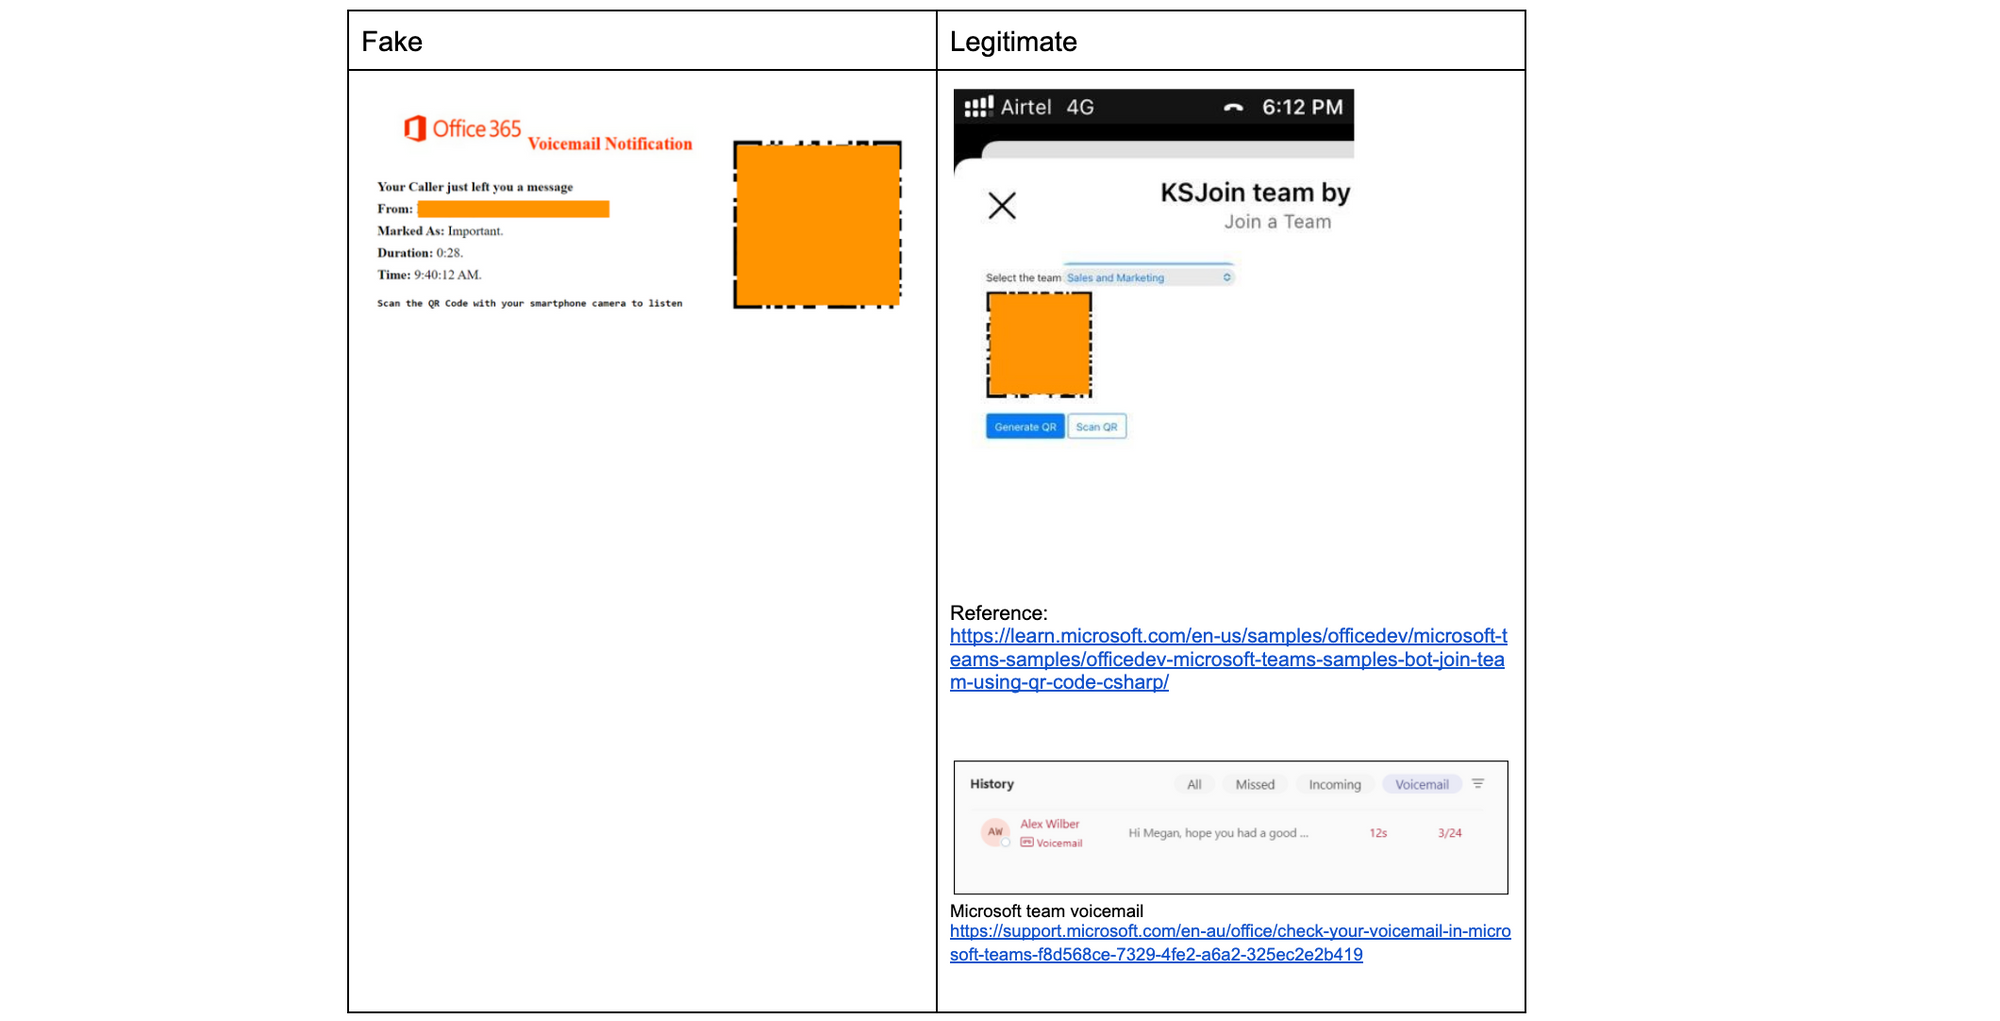


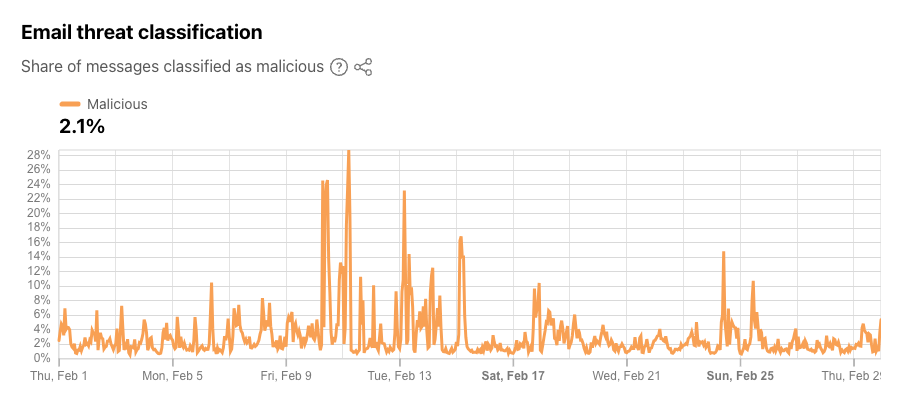
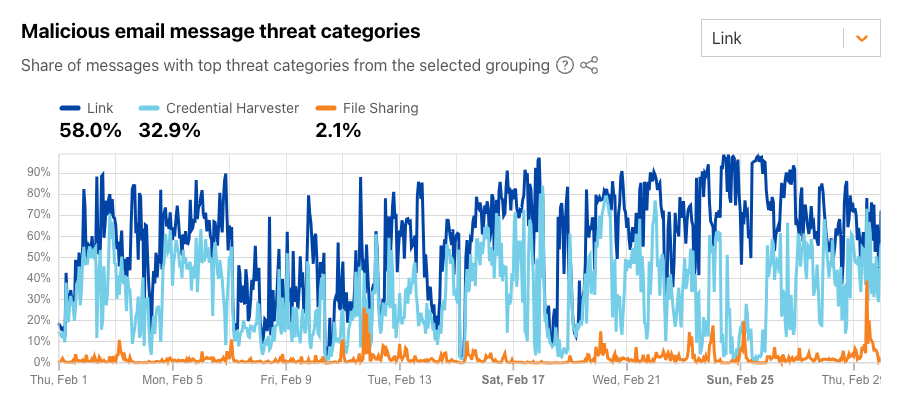
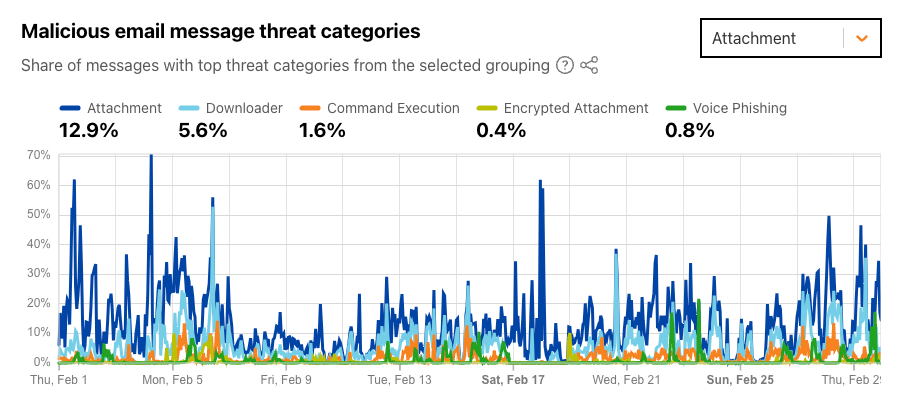
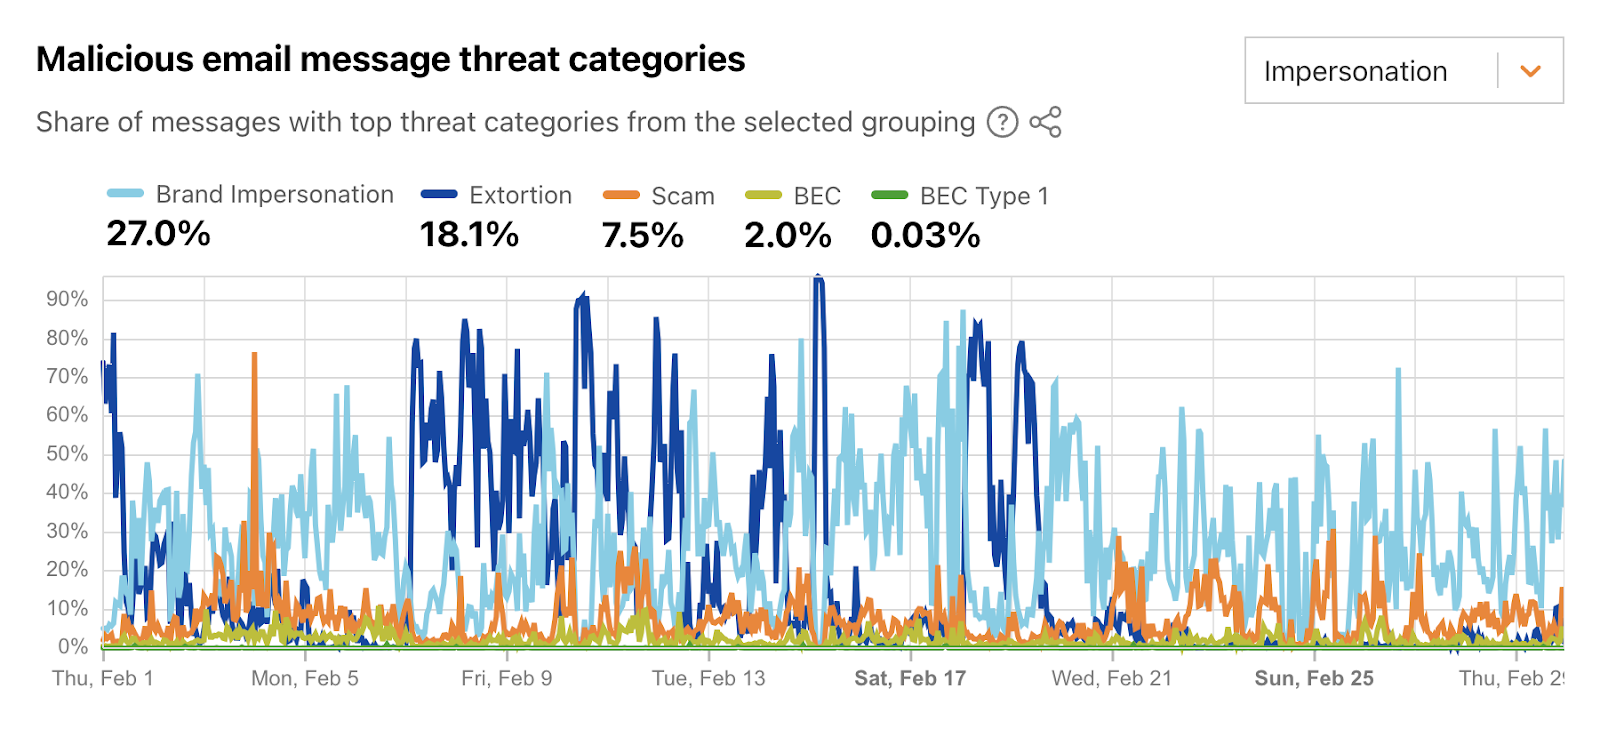
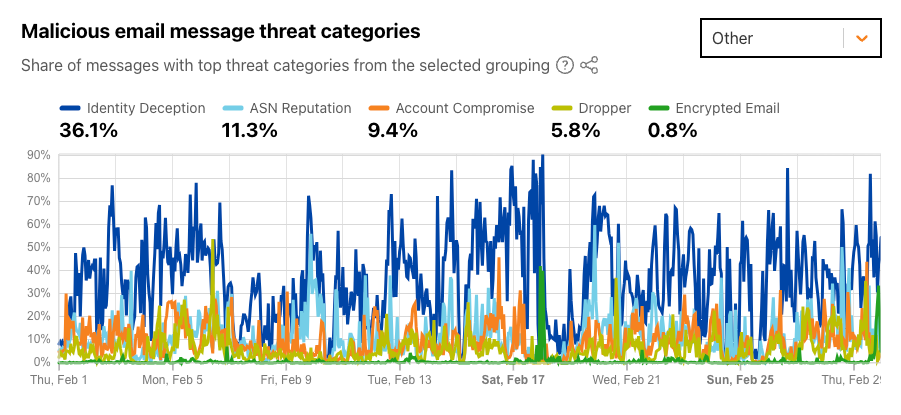
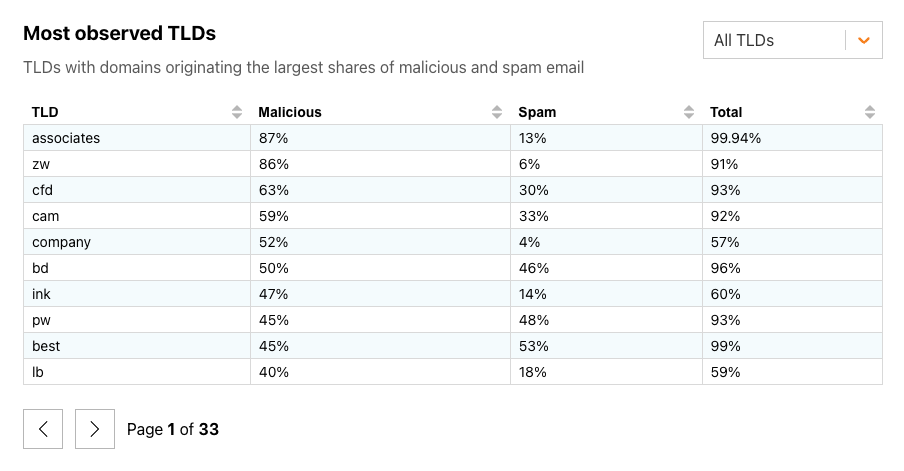
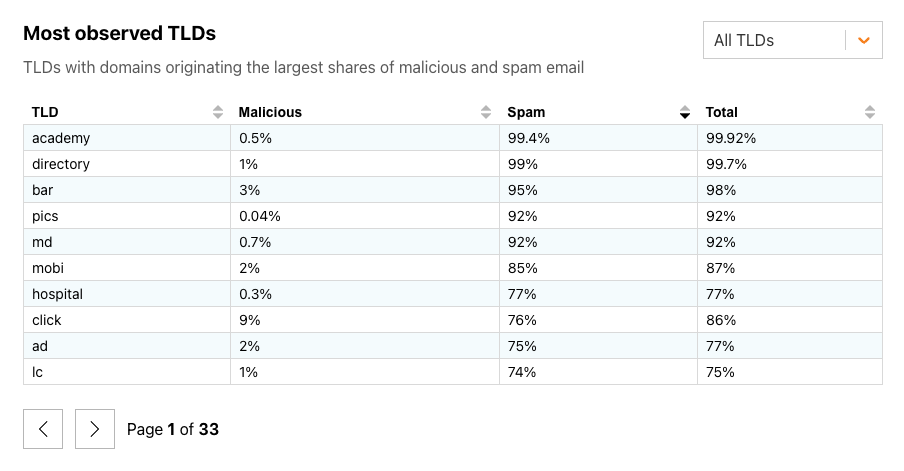
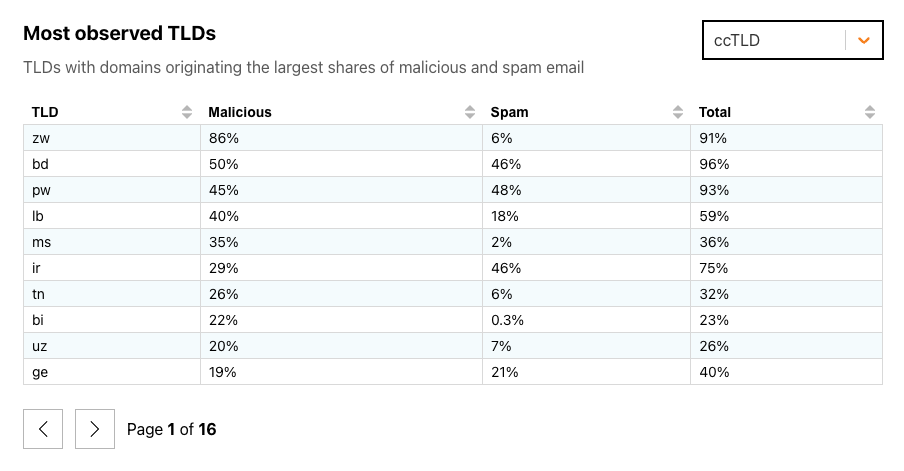
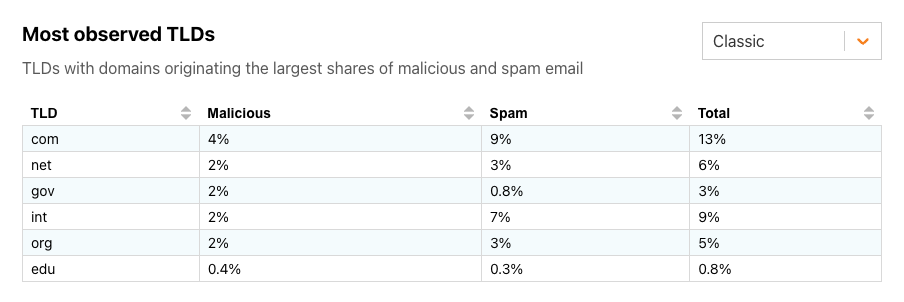
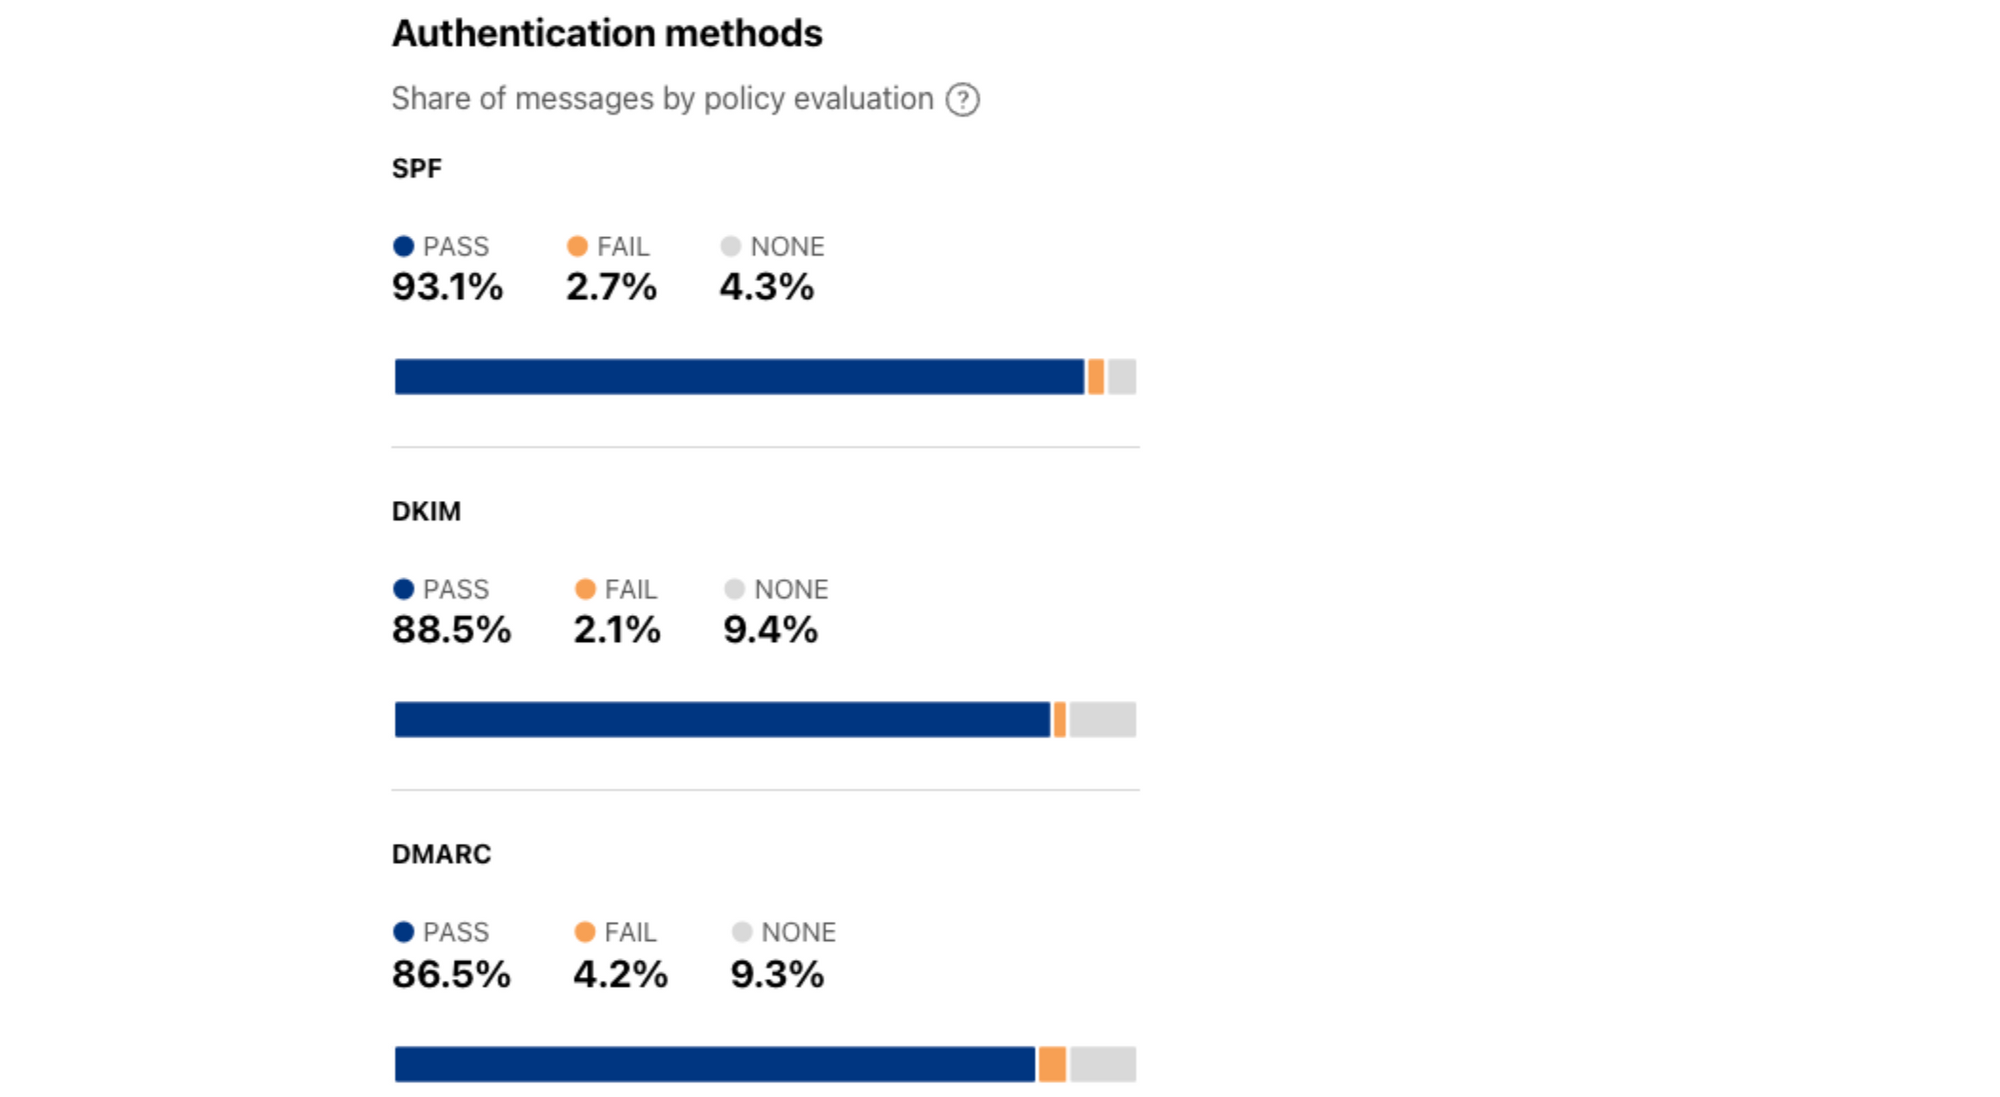
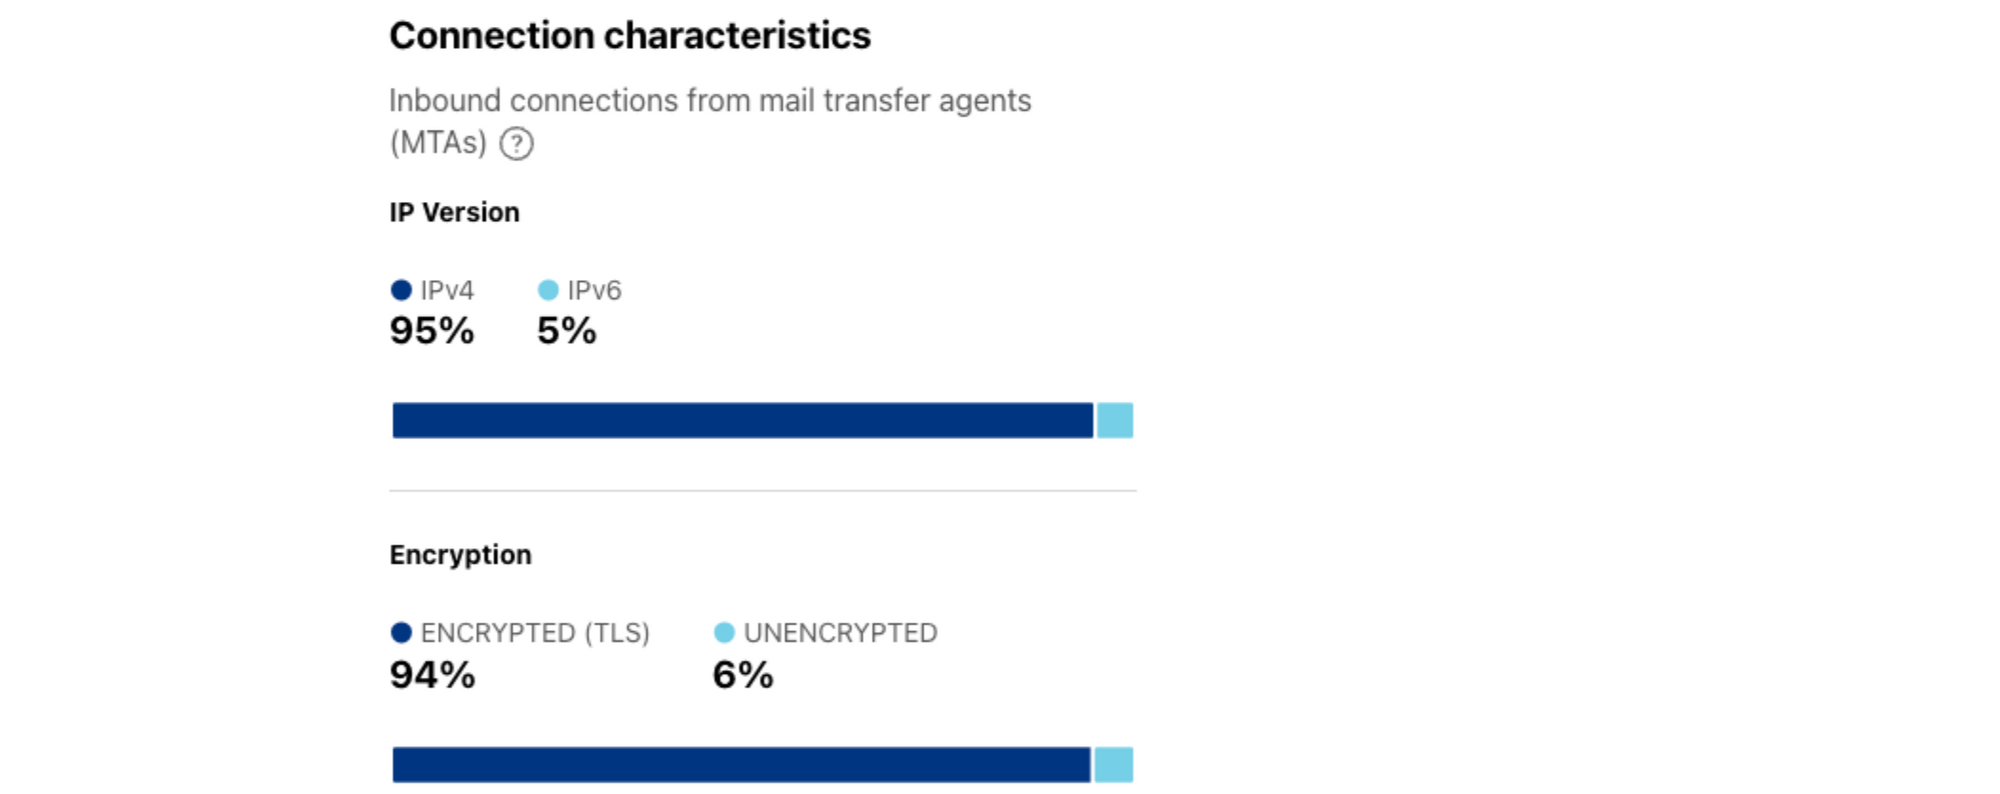
 Figure 1 – DMARC Flow