All posts by Changbin Gong

Use Karpenter to speed up Amazon EMR on EKS autoscaling

Post Syndicated from Changbin Gong original https://aws.amazon.com/blogs/big-data/use-karpenter-to-speed-up-amazon-emr-on-eks-autoscaling/

Amazon EMR on Amazon EKS is a deployment option for Amazon EMR that allows organizations to run Apache Spark on Amazon Elastic Kubernetes Service (Amazon EKS). With EMR on EKS, the Spark jobs run on the Amazon EMR runtime for Apache Spark. This increases the performance of your Spark jobs so that they run faster and cost less than open source Apache Spark. Also, you can run Amazon EMR-based Apache Spark applications with other types of applications on the same EKS cluster to improve resource utilization and simplify infrastructure management.

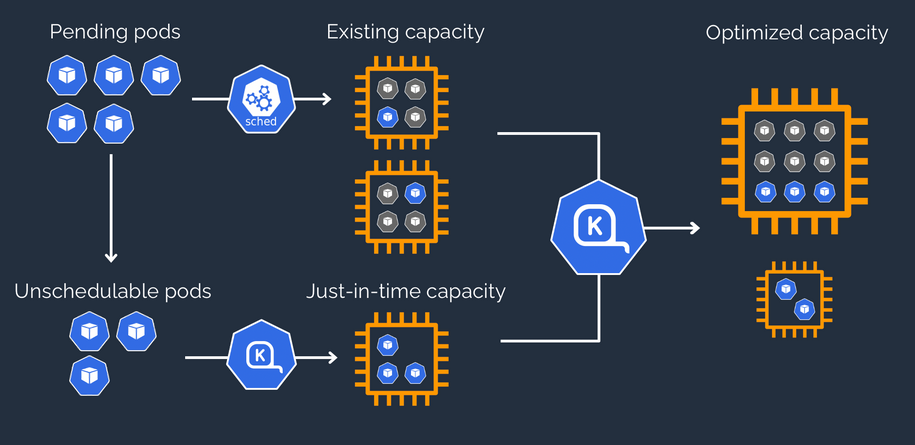
Karpenter was introduced at AWS re:Invent 2021 to provide a dynamic, high performance, open-source cluster auto scaling solution for Kubernetes. It automatically provisions new nodes in response to unschedulable pods. It observes the aggregate resource requests of unscheduled pods and makes decisions to launch new nodes and terminate stop them to reduce scheduling latencies as well as infrastructure costs.

To configure Karpenter, you create provisioners that define how Karpenter manages the pods that are pending and expires nodes. Although most use cases are addressed with a single provisioner, multiple provisioners are useful in multi-tenant use cases such as isolating nodes for billing, using different node constraints (such as no GPUs for a team), or using different deprovisioning settings. Karpenter launches nodes with minimal compute resources to fit un-schedulable pods for efficient binpacking. It works in tandem with the Kubernetes scheduler to bind un-schedulable pods to the new nodes that are provisioned. The following diagram illustrates how it works.

This post shows how to integrate Karpenter into your EMR on EKS architecture to achieve faster and capacity-aware auto scaling capabilities to speed up your big data and machine learning (ML) workloads while reducing costs. We run the same workload using both Cluster Autoscaler and Karpenter, to see some of the improvements we discuss in the next section.

Improvements compared to Cluster Autoscaler

Like Karpenter, Kubernetes Cluster Autoscaler (CAS) is designed to add nodes when requests come in to run pods that can’t be met by current capacity. Cluster Autoscaler is part of the Kubernetes project, with implementations by major Kubernetes cloud providers. By taking a fresh look at provisioning, Karpenter offers the following improvements:

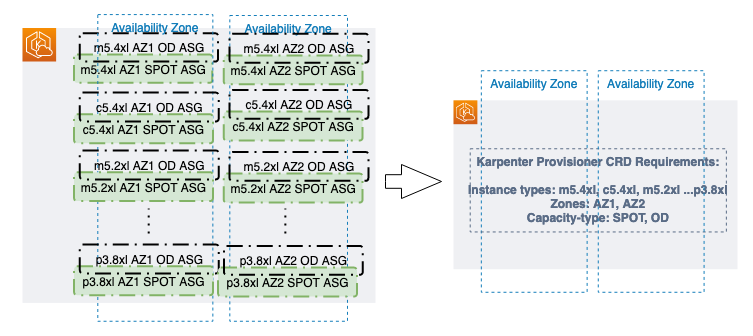
  • No node group management overhead – Because you have different resource requirements for different Spark workloads along with other workloads in your EKS cluster, you need to create separate node groups that can meet your requirements, like instance sizes, Availability Zones, and purchase options. This can quickly grow to tens and hundreds of node groups, which adds additional management overhead. Karpenter manages each instance directly, without the use of additional orchestration mechanisms like node groups, taking a group-less approach by calling the EC2 Fleet API directly to provision nodes. This allows Karpenter to use diverse instance types, Availability Zones, and purchase options by simply creating a single provisioner, as shown in the following figure.
  • Quick retries – If the Amazon Elastic Compute Cloud (Amazon EC2) capacity isn’t available, Karpenter can retry in milliseconds instead of minutes. This is can be a really useful if you’re using EC2 Spot Instances and you’re unable to get capacity to specific instance types.
  • Designed to handle full flexibility of the cloud – Karpenter has the ability to efficiently address the full range of instance types available through AWS. Cluster Autoscaler wasn’t originally built with the flexibility to handle hundreds of instance types, Availability Zones, and purchase options. We recommend being as flexible as you can be to enable Karpenter get the just-in-time capacity you need.
  • Improves the overall node utilization by binpacking – Karpenter batches pending pods and then binpacks them based on CPU, memory, and GPUs required, taking into account node overhead (for example, daemon set resources required). After the pods are binpacked on the most efficient instance type, Karpenter takes other instance types that are similar or larger than the most efficient packing, and passes the instance type options to an API called EC2 Fleet, following some of the best practices of instance diversification to improve the chances of getting the request capacity.

Best practices using Karpenter with EMR on EKS

For general best practices with Karpenter, refer to Karpenter Best Practices. The following are additional things to consider with EMR on EKS:

  • Avoid inter-AZ data transfer cost by either configuring the Karpenter provisioner to launch in a single Availability Zone or use node selector or affinity and anti-affinity to schedule the driver and the executors of the same job to a single Availability Zone. See the following code:
    nodeSelector:
      topology.kubernetes.io/zone: us-east-1a

  • Cost optimize Spark workloads using EC2 Spot Instances for executors and On-Demand Instances for the driver by using the node selector with the label karpenter.sh/capacity-type in the pod templates. We recommend using pod templates to specify driver pods to run on On-Demand Instances and executor pods to run on Spot Instances. This allows you to consolidate provisioner specs because you don’t need two specs per job type. It also follows the best practice of using customization defined on workload types and to keep provisioner specs to support a broader number of use cases.
  • When using EC2 Spot Instances, maximize the instance diversification in the provisioner configuration to adhere to the best practices. To select suitable instance types, you can use the ec2-instance-selector, a CLI tool and go library that recommends instance types based on resource criteria like vCPUs and memory.

Solution overview

This post provides an example of how to set up both Cluster Autoscaler and Karpenter in an EKS cluster and compare the auto scaling improvements by running a sample EMR on EKS workload.

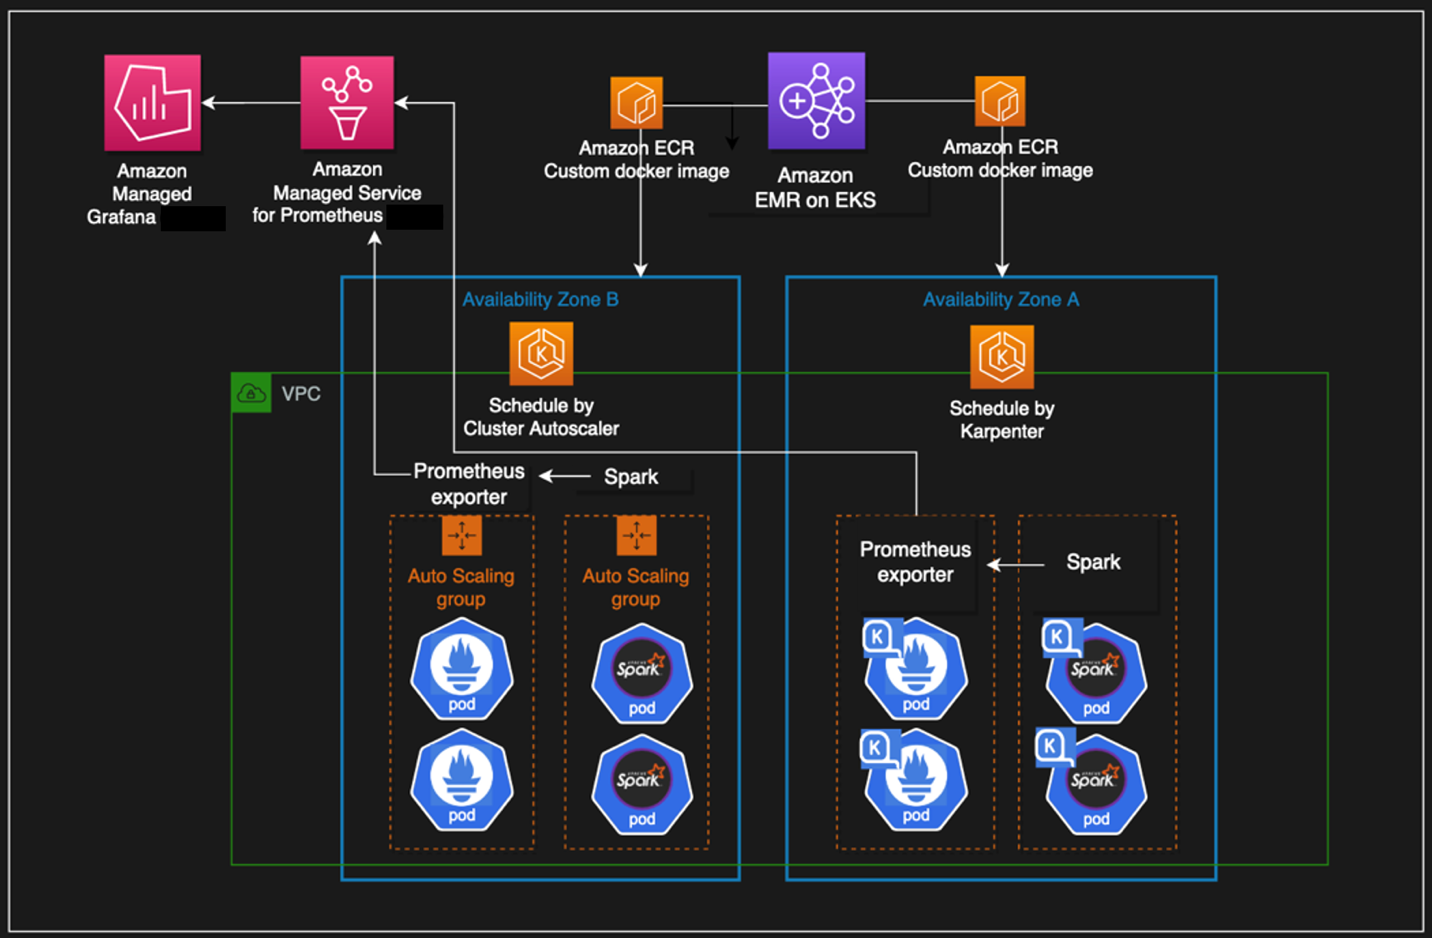
The following diagram illustrates the architecture of this solution.

We use the Transaction Processing Performance Council-Decision Support (TPC-DS), a decision support benchmark to sequentially run three Spark SQL queries (q70-v2.4, q82-v2.4, q64-v2.4) with a fixed number of 50 executors, against 17.7 billion records, approximately 924 GB compressed data in Parquet file format. For more details on TPC-DS, refer to the eks-spark-benchmark GitHub repo.

We submit the same job with different Spark driver and executor specs to mimic different jobs solely to observe the auto scaling behavior and binpacking. We recommend you right-size your Spark executors based on the workload characteristics for production workloads.

The following code is an example Spark configuration that results in pod spec requests of 4 vCPU and 15 GB:

--conf spark.executor.instances=50 --conf spark.driver.cores=4 --conf spark.driver.memory=10g --conf spark.driver.memoryOverhead=5g --conf spark.executor.cores=4 --conf spark.executor.memory=10g  --conf spark.executor.memoryOverhead=5g

We use pod templates to schedule Spark drivers on On-Demand Instances and executors on EC2 Spot Instances (which can save up to 90% over On-Demand Instance prices). Spark’s inherent resiliency has the driver launch new executors to replace the ones that fail due to Spot interruptions. See the following code:

apiVersion: v1
kind: Pod
spec:
  nodeSelector:
    karpenter.sh/capacity-type: spot
  containers:
  - name: spark-kubernetes-executor


apiVersion: v1
kind: Pod
spec:
  nodeSelector:
    karpenter.sh/capacity-type: on-demand
  containers:
  - name: spark-kubernetes-driver

Prerequisites

We use an AWS Cloud9 IDE to run all the instructions throughout this post.

To create your IDE, run the following commands in AWS CloudShell. The default Region is us-east-1, but you can change it if needed.

# clone the repo
git clone https://github.com/black-mirror-1/karpenter-for-emr-on-eks.git
cd karpenter-for-emr-on-eks
./setup/create-cloud9-ide.sh

Navigate to the AWS Cloud9 IDE using the URL from the output of the script.

Install tools on the AWS Cloud9 IDE

Install the following tools required on the AWS Cloud9 environment by the running a script:

Run the following instructions in your AWS Cloud9 environment and not CloudShell.

  1. Clone the GitHub repository:
    cd ~/environment
    git clone https://github.com/black-mirror-1/karpenter-for-emr-on-eks.git
    cd ~/environment/karpenter-for-emr-on-eks

  2. Set up the required environment variables. Feel free to adjust the following code according to your needs:
    # Install envsubst (from GNU gettext utilities) and bash-completion
    sudo yum -y install jq gettext bash-completion moreutils
    
    # Setup env variables required
    export EKSCLUSTER_NAME=aws-blog
    export EKS_VERSION="1.23"
    # get the link to the same version as EKS from here https://docs.aws.amazon.com/eks/latest/userguide/install-kubectl.html
    export KUBECTL_URL="https://s3.us-west-2.amazonaws.com/amazon-eks/1.23.7/2022-06-29/bin/linux/amd64/kubectl"
    export HELM_VERSION="v3.9.4"
    export KARPENTER_VERSION="v0.18.1"
    # get the most recent matching version of the Cluster Autoscaler from here https://github.com/kubernetes/autoscaler/releases
    export CAS_VERSION="v1.23.1"

  3. Install the AWS Cloud9 CLI tools:
    cd ~/environment/karpenter-for-emr-on-eks
    ./setup/c9-install-tools.sh

Provision the infrastructure

We set up the following resources using the provision infrastructure script:

  1. Create the EMR on EKS and Karpenter infrastructure:
    cd ~/environment/karpenter-for-emr-on-eks
    ./setup/create-eks-emr-infra.sh

  2. Validate the setup:
    # Should have results that are running
    kubectl get nodes
    kubectl get pods -n karpenter
    kubectl get po -n kube-system -l app.kubernetes.io/instance=cluster-autoscaler
    kubectl get po -n prometheus

Understanding Karpenter configurations

Because the sample workload has driver and executor specs that are of different sizes, we have identified the instances from c5, c5a, c5d, c5ad, c6a, m4, m5, m5a, m5d, m5ad, and m6a families of sizes 2xlarge, 4xlarge, 8xlarge, and 9xlarge for our workload using the amazon-ec2-instance-selector CLI. With CAS, we need to create a total of 12 node groups, as shown in eksctl-config.yaml, but can define the same constraints in Karpenter with a single provisioner, as shown in the following code:

apiVersion: karpenter.sh/v1alpha5
kind: Provisioner
metadata:
  name: default
spec:
  provider:
    launchTemplate: {EKSCLUSTER_NAME}-karpenter-launchtemplate
    subnetSelector:
      karpenter.sh/discovery: {EKSCLUSTER_NAME}
  labels:
    app: kspark
  requirements:
    - key: "karpenter.sh/capacity-type"
      operator: In
      values: ["on-demand","spot"]
    - key: "kubernetes.io/arch" 
      operator: In
      values: ["amd64"]
    - key: karpenter.k8s.aws/instance-family
      operator: In
      values: [c5, c5a, c5d, c5ad, m5, c6a]
    - key: karpenter.k8s.aws/instance-size
      operator: In
      values: [2xlarge, 4xlarge, 8xlarge, 9xlarge]
    - key: "topology.kubernetes.io/zone"
      operator: In
      values: ["{AWS_REGION}a"]

  limits:
    resources:
      cpu: "2000"

  ttlSecondsAfterEmpty: 30

We have set up both auto scalers to scale down nodes that are empty for 30 seconds using ttlSecondsAfterEmpty in Karpenter and --scale-down-unneeded-time in CAS.

Karpenter by design will try to achieve the most efficient packing of the pods on a node based on CPU, memory, and GPUs required.

Run a sample workload

To run a sample workload, complete the following steps:

  1. Lets review the AWS Command Line Interface (AWS CLI) command to submit a sample job:
    aws emr-containers start-job-run \
      --virtual-cluster-id $VIRTUAL_CLUSTER_ID \
      --name karpenter-benchmark-${CORES}vcpu-${MEMORY}gb  \
      --execution-role-arn $EMR_ROLE_ARN \
      --release-label emr-6.5.0-latest \
      --job-driver '{
      "sparkSubmitJobDriver": {
          "entryPoint": "local:///usr/lib/spark/examples/jars/eks-spark-benchmark-assembly-1.0.jar",
          "entryPointArguments":["s3://blogpost-sparkoneks-us-east-1/blog/BLOG_TPCDS-TEST-3T-partitioned","s3://'$S3BUCKET'/EMRONEKS_TPCDS-TEST-3T-RESULT-KA","/opt/tpcds-kit/tools","parquet","3000","1","false","q70-v2.4,q82-v2.4,q64-v2.4","true"],
          "sparkSubmitParameters": "--class com.amazonaws.eks.tpcds.BenchmarkSQL --conf spark.executor.instances=50 --conf spark.driver.cores='$CORES' --conf spark.driver.memory='$EXEC_MEMORY'g --conf spark.executor.cores='$CORES' --conf spark.executor.memory='$EXEC_MEMORY'g"}}' \
      --configuration-overrides '{
        "applicationConfiguration": [
          {
            "classification": "spark-defaults", 
            "properties": {
              "spark.kubernetes.node.selector.app": "kspark",
              "spark.kubernetes.node.selector.topology.kubernetes.io/zone": "'${AWS_REGION}'a",
    
              "spark.kubernetes.container.image":  "'$ECR_URL'/eks-spark-benchmark:emr6.5",
              "spark.kubernetes.driver.podTemplateFile": "s3://'$S3BUCKET'/pod-template/karpenter-driver-pod-template.yaml",
              "spark.kubernetes.executor.podTemplateFile": "s3://'$S3BUCKET'/pod-template/karpenter-executor-pod-template.yaml",
              "spark.network.timeout": "2000s",
              "spark.executor.heartbeatInterval": "300s",
              "spark.kubernetes.executor.limit.cores": "'$CORES'",
              "spark.executor.memoryOverhead": "'$MEMORY_OVERHEAD'G",
              "spark.driver.memoryOverhead": "'$MEMORY_OVERHEAD'G",
              "spark.kubernetes.executor.podNamePrefix": "karpenter-'$CORES'vcpu-'$MEMORY'gb",
              "spark.executor.defaultJavaOptions": "-verbose:gc -XX:+UseG1GC",
              "spark.driver.defaultJavaOptions": "-verbose:gc -XX:+UseG1GC",
    
              "spark.ui.prometheus.enabled":"true",
              "spark.executor.processTreeMetrics.enabled":"true",
              "spark.kubernetes.driver.annotation.prometheus.io/scrape":"true",
              "spark.kubernetes.driver.annotation.prometheus.io/path":"/metrics/executors/prometheus/",
              "spark.kubernetes.driver.annotation.prometheus.io/port":"4040",
              "spark.kubernetes.driver.service.annotation.prometheus.io/scrape":"true",
              "spark.kubernetes.driver.service.annotation.prometheus.io/path":"/metrics/driver/prometheus/",
              "spark.kubernetes.driver.service.annotation.prometheus.io/port":"4040",
              "spark.metrics.conf.*.sink.prometheusServlet.class":"org.apache.spark.metrics.sink.PrometheusServlet",
              "spark.metrics.conf.*.sink.prometheusServlet.path":"/metrics/driver/prometheus/",
              "spark.metrics.conf.master.sink.prometheusServlet.path":"/metrics/master/prometheus/",
              "spark.metrics.conf.applications.sink.prometheusServlet.path":"/metrics/applications/prometheus/"
             }}
        ]}'

  2. Submit four jobs with different driver and executor vCPUs and memory sizes on Karpenter:
    # the arguments are vcpus and memory
    export EMRCLUSTER_NAME=${EKSCLUSTER_NAME}-emr
    ./sample-workloads/emr6.5-tpcds-karpenter.sh 4 7
    ./sample-workloads/emr6.5-tpcds-karpenter.sh 8 15
    ./sample-workloads/emr6.5-tpcds-karpenter.sh 4 15
    ./sample-workloads/emr6.5-tpcds-karpenter.sh 8 31 

  3. To monitor the pods’s autoscaling status in real time, open a new terminal in Cloud9 IDE and run the following command (nothing is returned at the start):
    watch -n1 "kubectl get pod -n emr-karpenter"

  4. Observe the EC2 instance and node auto scaling status in a second terminal tab by running the following command (by design, Karpenter schedules in Availability Zone a):
    watch -n1 "kubectl get node --label-columns=node.kubernetes.io/instance-type,karpenter.sh/capacity-type,topology.kubernetes.io/zone,app -l app=kspark"

Compare with Cluster Autoscaler (Optional)

We have set up Cluster Autoscaler during the infrastructure setup step with the following configuration:

  • Launch EC2 nodes in Availability Zone b
  • Contain 12 node groups (6 each for On-Demand and Spot)
  • Scale down unneeded nodes after 30 seconds with --scale-down-unneeded-time
  • Use the least-waste expander on CAS, which can select the node group that will have the least idle CPU for binpacking efficiency
  1. Submit four jobs with different driver and executor vCPUs and memory sizes on CAS:
    # the arguments are vcpus and memory
    ./sample-workloads/emr6.5-tpcds-ca.sh 4 7
    ./sample-workloads/emr6.5-tpcds-ca.sh 8 15
    ./sample-workloads/emr6.5-tpcds-ca.sh 4 15
    ./sample-workloads/emr6.5-tpcds-ca.sh 8 31

  2. To monitor the pods’s autoscaling status in real time, open a new terminal in Cloud9 IDE and run the following command (nothing is returned at the start):
    watch -n1 "kubectl get pod -n emr-ca"

  3. Observe the EC2 instance and node auto scaling status in a second terminal tab by running the following command (by design, CAS schedules in Availability Zone b):
    watch -n1 "kubectl get node --label-columns=node.kubernetes.io/instance-type,eks.amazonaws.com/capacityType,topology.kubernetes.io/zone,app -l app=caspark"

Observations

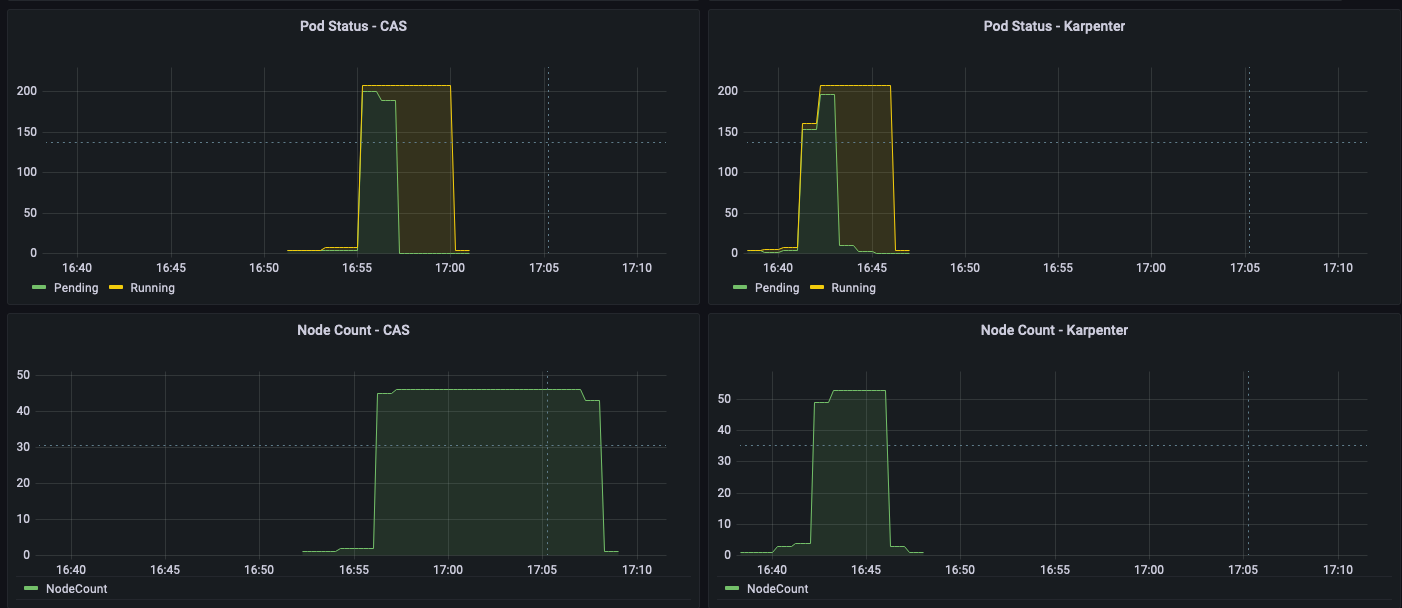
The time from pod creation to being scheduled on average is less with Karpenter than CAS, as shown in the following figure; you can see a noticeable difference when you run large scale workloads.

As shown in the following figures, as the jobs were completed, Karpenter was able to scale down the nodes that aren’t needed within seconds. In contrast, CAS takes minutes, because it sends a signal to the node groups, adding additional latency. This in turn helps reduce overall costs by reducing the number of seconds unneeded EC2 instances are running.

Clean up

To clean up your environment, delete all the resources created in reverse order by running the cleanup script:

export EKSCLUSTER_NAME=aws-blog
cd ~/environment/karpenter-for-emr-on-eks
./setup/cleanup.sh

Conclusion

In this post, we showed you how to use Karpenter to simplify EKS node provisioning, and speed up auto scaling of EMR on EKS workloads. We encourage you to try Karpenter and provide any feedback by creating a GitHub issue.

Further reading


About the Authors

Changbin Gong is a Principal Solutions Architect at Amazon Web Services. He engages with customers to create innovative solutions that address customer business problems and accelerate the adoption of AWS services. In his spare time, Changbin enjoys reading, running, and traveling.

Sandeep Palavalasa is a Sr. Specialist Containers SA at Amazon Web Services. He is a software technology leader with over 12 years of experience in building large-scale, distributed software systems. His professional career started with a focus on monitoring and observability and he has a strong cloud architecture background. He likes working on distributed systems and is excited to talk about microservice architecture design. His current interests are in the areas of container services and serverless technologies.

Choose the right storage tier for your needs in Amazon OpenSearch Service

Post Syndicated from Changbin Gong original https://aws.amazon.com/blogs/big-data/choose-the-right-storage-tier-for-your-needs-in-amazon-opensearch-service/

Amazon OpenSearch Service (successor to Amazon Elasticsearch Service) enables organizations to perform interactive log analytics, real-time application monitoring, website search, and more. OpenSearch is an open-source, distributed search and analytics suite derived from Elasticsearch. Amazon OpenSearch Service offers the latest versions of OpenSearch, support for 19 versions of Elasticsearch (1.5 to 7.10 versions), and visualization capabilities powered by OpenSearch Dashboards and Kibana (1.5 to 7.10 versions).

In this post, we present three storage tiers of Amazon OpenSearch Service—hot, UltraWarm, and cold storage—and discuss how to effectively choose the right storage tier for your needs. This post can help you understand how these storage tiers integrate together and what the trade-off is for each storage tier. To choose a storage tier of Amazon OpenSearch Service for your use case, you need to consider the performance, latency, and cost of these storage tiers in order to make the right decision.

Amazon OpenSearch Service storage tiers overview

There are three different storage tiers for Amazon OpenSearch Service: hot, UltraWarm, and cold. The following diagram illustrates these three storage tiers.

Hot storage

Hot storage for Amazon OpenSearch Service is used for indexing and updating, while providing fast access to data. Standard data nodes use hot storage, which takes the form of instance store or Amazon Elastic Block Store (Amazon EBS) volumes attached to each node. Hot storage provides the fastest possible performance for indexing and searching new data.

You get the lowest latency for reading data in the hot tier, so you should use the hot tier to store frequently accessed data driving real-time analysis and dashboards. As your data ages, you access it less frequently and can tolerate higher latency, so keeping data in the hot tier is no longer cost-efficient.

If you want to have low latency and fast access to the data, hot storage is a good choice for you.

UltraWarm storage

UltraWarm nodes use Amazon Simple Storage Service (Amazon S3) with related caching solutions to improve performance. UltraWarm offers significantly lower costs per GiB for read-only data that you query less frequently and don’t need the same performance as hot storage. Although you can’t modify the data while in UltraWarm, you can move the data to the hot storage tier for edits before moving it back.

When calculating UltraWarm storage requirements, you consider only the size of the primary shards. When you query for the list of shards in UltraWarm, you still see the primary and replicas listed. Both shards are stubs for the same, single copy of the data, which is in Amazon S3. The durability of data in Amazon S3 removes the need for replicas, and Amazon S3 abstracts away any operating system or service considerations. In the hot tier, accounting for one replica, 20 GB of index uses 40 GB of storage. In the UltraWarm tier, it’s billed at 20 GB.

The UltraWarm tier acts like a caching layer on top of the data in Amazon S3. UltraWarm moves data from Amazon S3 onto the UltraWarm nodes on demand, which speeds up access for subsequent queries on that data. For that reason, UltraWarm works best for use cases that access the same, small slice of data multiple times. You can add or remove UltraWarm nodes to increase or decrease the amount of cache against your data in Amazon S3 to optimize your cost per GB. To dial in your cost, be sure to test using a representative dataset. To monitor performance, use the WarmCPUUtilization and WarmJVMMemoryPressure metrics. See UltraWarm metrics for a complete list of metrics.

The combined CPU cores and RAM allocated to UltraWarm nodes affects performance for simultaneous searches across shards. We recommend deploying enough UltraWarm instances so that you store no more than 400 shards per ultrawarm1.medium.search node and 1,000 shards per ultrawarm1.large.search node (including both primaries and replicas). We recommend a maximum shard size of 50 GB for both hot and warm tiers. When you query UltraWarm, each shard uses a CPU and moves data from Amazon S3 to local storage. Running single or concurrent queries that access many indexes can overwhelm the CPU and local disk resources. This can cause longer latencies through inefficient use of local storage, and even cause cluster failures.

UltraWarm storage requires OpenSearch 1.0 or later, or Elasticsearch version 6.8 or later.

If you have large amounts of read-only data and want to balance the cost and performance, use UltraWarm for your infrequently accessed, older data.

Cold storage

Cold storage is optimized to store infrequently accessed or historical data at $0.024 per GB per month. When you use cold storage, you detach your indexes from the UltraWarm tier, making them inaccessible. You can reattach these indexes in a few seconds when you need to query that data. Cold storage is a great fit for scenarios in which a low ROI necessitates an archive or delete action on historical data, or if you need to conduct research or perform forensic analysis on older data with Amazon OpenSearch Service.

Cold storage doesn’t have specific instance types because it doesn’t have any compute capacity attached to it. You can store any amount of data in cold storage.

Cold storage requires OpenSearch 1.0 or later, or Elasticsearch version 7.9 or later and UltraWarm.

Manage storage tiers in OpenSearch Dashboards

OpenSearch Dashboards installed on your Amazon OpenSearch Service domain provides a useful UI for managing indexes in different storage tiers on your domain. From the OpenSearch Dashboards main menu, you can view all indexes in hot, UltraWarm, and cold storage. You can also see the indexes managed by Index State Management (ISM) policies. OpenSearch Dashboards enables you to migrate indexes between UltraWarm and cold storage, and monitor index migration status, without using the AWS Command Line Interface (AWS CLI) or configuration API. For more information on OpenSearch Dashboards, see Using OpenSearch Dashboards with Amazon OpenSearch Service.

Cost considerations

The hot tier requires you to pay for what is provisioned, which includes the hourly rate for the instance type. Storage is either Amazon EBS or a local SSD instance store. For Amazon EBS-only instance types, additional EBS volume pricing applies. You pay for the amount of storage you deploy.

UltraWarm nodes charge per hour just like other node types, but you only pay for the storage actually stored in Amazon S3. For example, although the instance type ultrawarm1.large.elasticsearch provides up to 20 TiB addressable storage on Amazon S3, if you only store 2 TiB of data, you’re only billed for 2 TiB. Like the standard data node types, you also pay an hourly rate for each UltraWarm node. For more information, see Pricing for Amazon OpenSearch Service.

Cold storage doesn’t incur compute costs, and like UltraWarm, you’re only billed for the amount of data stored in Amazon S3. There are no additional transfer charges when moving data between cold and UltraWarm storage.

Example use case

Let’s look at an example with 1 TB of source data per day, 7 days hot, 83 days warm, 365 days cold. For more information on sizing the cluster, see Sizing Amazon OpenSearch Service domains.

For hot storage, you can go through a baseline estimation with the calculation as: storage needed = (daily source data in bytes * 1.25) * (number_of_replicas + 1) * number of days retention. With the best practice for two replicas, we should use two replicas here. The minimum storage requirement to retain 7 TB of data on the hot tier is (7TB*1.25)*(2+1)= 26.25 TB. For this amount of storage, we need 6x R6g.4xlarge.search instances given the Amazon EBS size limit.

We also need to verify from the CPU side, we need 25 primary shards (1TB*1.25/50GB) =25. We have two replicas. With that, we have total 75 active shards. With that, the total vCPU needed is 75*1.5=112.5 vCPU. This means 8x R6g.4xlarge.search instances. This also requires three dedicated c6g.xlarge.search leader nodes.

When calculating UltraWarm storage requirements, you consider only the size of the primary shards, because that’s the amount of data stored in Amazon S3. For this example, the total primary shard size for warm storage is 83*1.25=103.75 TB. Each ultrawarm1.large.search instance has 16 CPU cores and can address up to 20 TiB of storage on Amazon S3. A minimum of six ultrawarm1.large.search nodes is recommended. You’re charged for the actual storage, which is 103.75 TB.

For cold storage, you only pay for the cost of storing 365*1.25=456.25 TB on Amazon S3. The following table contains a breakdown of the monthly costs (USD) you’re likely to incur. This assumes a 1-year reserved instance for the cluster instances with no upfront payment in the US East (N. Virgina) Region.

Cost Type Pricing Usage Cost per month
Instance Usage R6g.4xlarge.search = $0.924 per hour 8 instances * 730 hours in a month = 5,840 hours 5,840 hours * $0.924 = $5,396.16
c6g.xlarge.search = $0.156 per hour 3 instances (leader nodes) * 730 hours in a month = 2,190 hours 2,190 hours * $0.156 = $341.64
ultrawarm1.large.search = $2.68 per hour 6 instances * 730 hours = 4,380 hours 4,380 hours * $2.68 = $11,738.40
Storage Cost Hot storage cost (Amazon EBS) EBS general purpose SSD (gp3) = $0.08 per GB per month 7 days host = 26.25TB 26,880 GB * $0.08 = $2,150.40
UltraWarm managed storage cost = $0.024 per GB per month 83 days warm = 103.75 TB per month 106,240 GB * $0.024 = $2,549.76
Cold storage cost on Amazon S3 = $0.022 per GB per month 365 days cold = 456.25 TB per month 467,200 GB * $0.022 = $10,278.40

The total monthly cost is $32,454.76. The hot tier costs $7,888.20, UltraWarm costs $14,288.16, and cold storage is $10,278.40. UltraWarm allows 83 days of additional retention for slightly more cost than the hot tier, which only provides 7 days. For nearly the same cost as the hot tier, the cold tier stores the primary shards for up to 1 year.

Conclusion

Amazon OpenSearch Service supports three integrated storage tiers: hot, UltraWarm, and cold storage. Based on your data retention, query latency, and budgeting requirements, you can choose the best strategy to balance cost and performance. You can also migrate data between different storage tiers. To start using these storage tiers, sign in to the AWS Management Console, use the AWS SDK, or AWS CLI, and enable the corresponding storage tier.


About the Author

Changbin Gong is a Senior Solutions Architect at Amazon Web Services (AWS). He engages with customers to create innovative solutions that address customer business problems and accelerate the adoption of AWS services. In his spare time, Changbin enjoys reading, running, and traveling.

Rich Giuli is a Principal Solutions Architect at Amazon Web Service (AWS). He works within a specialized group helping ISVs accelerate adoption of cloud services. Outside of work Rich enjoys running and playing guitar.