Post Syndicated from Chido Chemambo original https://aws.amazon.com/blogs/security/how-to-protect-a-self-managed-dns-service-against-ddos-attacks-using-aws-global-accelerator-and-aws-shield-advanced/
In this blog post, I show you how to improve the distributed denial of service (DDoS) resilience of your self-managed Domain Name System (DNS) service by using AWS Global Accelerator and AWS Shield Advanced. You can use those services to incorporate some of the techniques used by Amazon Route 53 to protect against DDoS attacks.
DNS routes users to your application by quickly translating a human-readable domain name to a machine-readable IP address. When protecting the availability of your application against DDoS attacks, it’s important to consider every part of the stack, including domain name resolution. The recommended best practice is to create hosted zones on Route 53, a scalable, highly available DNS service that’s protected against large DDoS attacks and query floods. Route 53 uses anycast routing to serve DNS queries from more than 150 edge locations around the globe. With anycast routing, DNS queries are served from locations that are closer to your users and the globally distributed DDoS mitigation capacity of Amazon Web Services (AWS) reduces the impact of attacks.
Optionally, you can also build your own DNS service on Amazon Elastic Compute Cloud (Amazon EC2). For example, you can run your own proprietary DNS server to take advantage of custom features that you wrote to integrate with an existing DNS service that isn’t running on AWS. When you register a domain name, you’re usually required to provide at least two name servers that can respond to queries from your users. It’s possible to build a DNS service on only two instances, but that provides limited DDoS resilience.
Solution overview
To protect your self-managed DNS service using this solution, you need a strong understanding of DNS and how to operate a distributed, self-managed DNS service on Amazon EC2. This solution improves upon an existing self-managed DNS service by significantly enhancing its ability to withstand DDoS attacks. There are two components that you add to your application:
- You use Global Accelerator to provide your application with two static IP addresses that act as a fixed entry point to Amazon EC2 instances in multiple AWS Regions. Global Accelerator uses anycast to route your traffic to a point of entry close to the source of the traffic. In addition to providing availability and performance benefits, this gives you access to global DDoS mitigation capacity through AWS.
- You use Shield Advanced to monitor the availability of your application and automatically engage the AWS Shield Response Team (SRT) if its availability is affected by a DDoS attack. When you associate a Route 53 health check to your protected resources, Shield Advanced uses the health of the application as an input for detection and as a signal to SRT to contact your operations center when needed. You can also engage with SRT to write custom mitigations for your application. For your self-managed DNS service use case, this can include mitigations like DNS packet validation and suspicion scoring that gives a higher priority to queries that are more likely to be legitimate traffic for your application.
As part of this solution, you will build a DNS canary that uses Amazon CloudWatch to update the status of a Route 53 health check if your self-managed DNS service stops responding to queries. An example architecture using Amazon EC2 based DNS behind Global Accelerator and Shield is shown in figure 1.
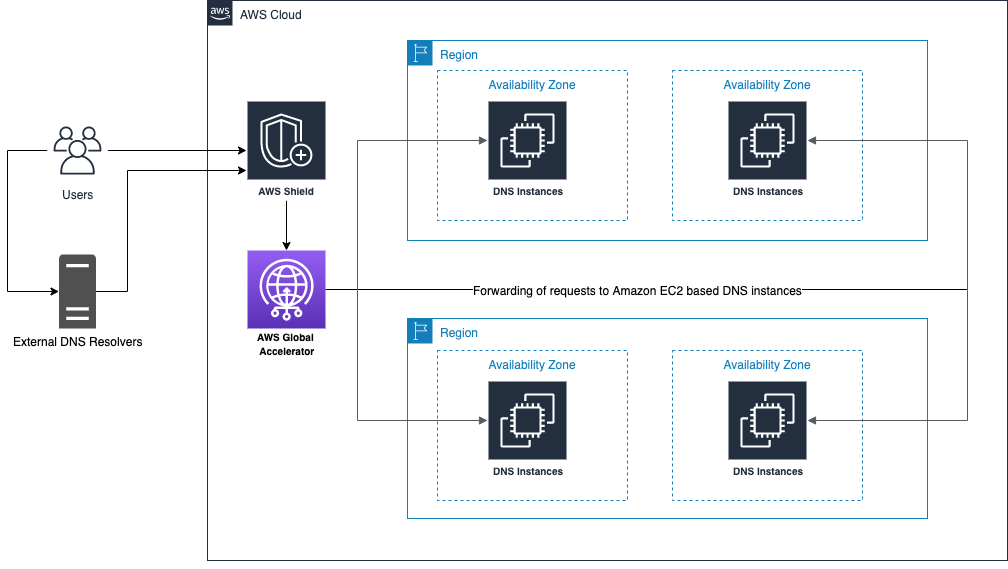
Figure 1: Amazon EC2 based DNS behind Global Accelerator and Shield
Create and configure an accelerator
To begin, create an accelerator and add your existing DNS servers as endpoints. The newly created accelerator will receive queries and forward them to your DNS service.
To create and configure an accelerator
Step 1: Create an accelerator
- Navigate to the AWS Global Accelerator dashboard.
- Choose Create accelerator.
- Enter a name for your accelerator.
- Choose Next.
Step 2: Add listeners
Since DNS uses both TCP and UDP protocols, you must create separate listeners to handle requests for each protocol.
At the Add Listeners step, enter the following:
- Ports: 53
- Protocol: TCP
- Client affinity: None
Choose Add listener again to add the UDP listener. Enter the following:
- Ports: 53
- Protocol: UDP
- Client affinity: None
- Choose Next
To learn more about the different options available in this step, see To create a listener in Getting started with AWS Global Accelerator.
Step 3: Add endpoint groups
Starting with the TCP listener, enter the following settings:
- Region: Choose a Region that your DNS instances are located in, for example, us-east-1.
- Traffic dial: 100
- If you have additional DNS instances in another AWS Region, choose Add endpoint group and repeat steps a) and b), entering the appropriate Region.
- Repeat steps a) through c) to add endpoint groups for the UDP listener, and then choose Next.
To learn more about the different options available in this step, for example, Traffic dial, see the Add endpoint groups in Getting started with AWS Global Accelerator.
Step 4: Add endpoints
Starting with the TCP listener, enter the following in the form boxes for each Region specified in the previous step:
- Endpoint type: Select EC2 instance from the drop-down list.
- Endpoint: Select a DNS instance from the drop-down list.
- Weight: 128
If you have additional DNS instances in the Region, choose Add endpoint and repeat the preceding steps, but select a DNS instance that hasn’t been added as an endpoint.
Repeat all of the preceding steps for the UDP listener, then choose Create accelerator.
To learn more about the different options available in this step, see the Add endpoints in Getting started with AWS Global Accelerator.
Step 5: Verification
When you choose the Create accelerator button, you’re redirected to a Global Accelerator console page that lists all the accelerators in your account. On this page, you can view the global IPs and DNS name allocated to your newly created accelerator, in addition to the current status.
Wait until the status of the accelerators changes to Deployed before proceeding with any tests.
Configure Shield Advanced and Shield Advanced proactive engagement
Protect your accelerator with Shield Advanced, monitor the health of your application, and configure proactive engagement. When you turn on proactive engagement, the SRT will directly contact you if an Amazon Route 53 health check associated with your protected resource becomes unhealthy during an event that’s detected by Shield Advanced.
To configure proactive engagement
Step 1: Create a Route 53 health check
If you already have a Route 53 health check that monitors the health of your DNS service, you can proceed to step 2 of this section. If you don’t yet have a health check, you can use this AWS CloudFormation template to create one. The template will:
- Create a Lambda function that queries your DNS server through the accelerator global IPs. This function posts metrics to CloudWatch to indicate whether the query was successful or not.
- Create a CloudWatch alarm that will detect when DNS queries fail.
- Create a Route 53 health check that tracks the CloudWatch alarm and changes status to unhealthy when the alarm changes to the Alarm state.
Step 2: Subscribe to Shield Advanced
Please note that with AWS Shield Advanced, you pay a monthly fee of $3,000 per month per organization. In addition, you also pay for AWS Shield Advanced Data Transfer usage fees for AWS resources enabled for advanced protection.
- Navigate to the AWS Shield console.
- In the AWS Shield navigation bar, choose Getting started, and then choose Subscribe to Shield Advanced.
- On the Subscribe to Shield Advanced page, read the terms of agreement, and then select all of the check boxes to indicate that you accept the terms.
- Choose Subscribe to Shield Advanced.
Step 3: Add resources to protect
- Do one of the following, depending on if you were already subscribed to Shield Advanced.
- If you just subscribed to Shield Advanced by completing Step 2 above, choose Add resources to protect.
- If you were already subscribed to Shield Advanced, open the Shield console and choose Protected Resources, and then choose Add resources to protect.
- In the Choose resources to protect with Shield Advanced page, select the Regions and resource types that you want to protect, then choose Load resources.
- Select the resources that you want to protect, and then choose Protect with Shield Advanced.
- In the Configure health check based DDoS detection page, under the Protected resources section, select a Route 53 health check to add—either one that you created previously, or a health check created by the AWS CloudFormation template—as the Associated Health Check.
- Choose Next until you reach the Review and configure DDoS mitigation and visibility page, and then review the settings and choose Finish configuration.
Step 4: Add contacts
- Navigate to the Overview tab of the AWS Shield console.
- In the Proactive engagements and contacts section, choose Edit under the Contacts heading.
- In the Add contact form, add the contact’s Email, Phone number, and Notes.
- Choose Save.
Step 5: Request proactive engagement
- Choose Edit proactive engagement feature.
- Select Enable.
- Choose Save.
Step 6: Configuration review with the SRT
After you enable proactive engagement, the state will be Proactive engagement requested and pending.
SRT will contact you to schedule a configuration review. The review will include a review of your Route 53 health check configuration and a consultation about custom mitigations that can be configured to support your DNS use case. Following this review, SRT will complete your request to enable proactive engagement.
Summary
DNS is a foundational part of the user experience for any application that is accessed via a human readable domain name. Your DNS service should be highly available, DDoS resilient, and accessible to your users with minimal latency. If you run your own DNS service on Amazon EC2, you can improve the DDoS resiliency using Global Accelerator and Shield Advanced. This solution provides your users with a low latency path to your DNS service and provides you with some of the DDoS mitigation that protects Route 53. To learn more about DDoS best practices, see AWS Best Practices for DDoS Resiliency.
If you have feedback about this post, submit comments in the Comments section below. If you have questions about this post, start a new thread on the AWS Shield forum or contact AWS Support.
Want more AWS Security how-to content, news, and feature announcements? Follow us on Twitter.