Tag Archives: AWS Global Accelerator

New for AWS Global Accelerator – Internet Protocol Version 6 (IPv6) Support

Post Syndicated from Danilo Poccia original https://aws.amazon.com/blogs/aws/new-for-aws-global-accelerator-internet-protocol-version-6-ipv6-support/

IPv6 adoption has consistently increased over the last few years, especially among mobile networks. The main reasons to move to IPv6 are:

  • The limited availability of IPv4 addresses can limit the ability to scale up public-facing web and applications servers.
  • IPv6 users from mobile networks experience better performance when their network traffic doesn’t need to manage IPv6 to IPv4 translation.
  • You might need to comply with regulatory rules (such as the Federal Acquisition Regulation in US) to run specific internet traffic over IPv6.

Based on this, we found that we could help improve the network path that your customers use to reach your applications by adding IPv6 support to AWS Global Accelerator. Global Accelerator uses the AWS global network to route network traffic and keep packet loss, jitter, and latency consistently low. Customers like Atlassian, New Relic, and SkyScanner already use Global Accelerator to improve the global availability and performance of their applications.

Global Accelerator provides two global static public IPs that act as a fixed entry point to your application. You can update your application endpoints without making user-facing changes to the IP address. If you configure more than one application endpoint, Global Accelerator automatically reroutes your traffic to your nearest healthy available endpoint to mitigate endpoint failure.

Starting today, you can provide better network performance by routing IPv6 traffic through Global Accelerator to your application endpoints running in AWS Regions. Global Accelerator now supports two types of accelerators: dual-stack and IPv4-only. With a dual-stack accelerator, you are provided with a pair of IPv4 and IPv6 global static IP addresses that can serve both IPv4 and IPv6 traffic.

For existing IPv4-only accelerators, you can update your accelerators to dual-stack to serve both IPv4 and IPv6 traffic. This update enables your accelerator to serve IPv6 traffic and doesn’t impact existing IPv4 traffic served by the accelerator.

Dual-stack accelerators supporting both IPv6 and IPv4 traffic require dual-stack endpoints in the back end. For example, Application Load Balancers (ALBs) can have their IP address type configured as either IPv4-only or dual stack, allowing them to accept both IPv4 or IPv6 client connections. Today, dual-stack ALBs are supported as endpoints for dual-stack accelerators.

Deploying a Dual-Stack Application
To test this new feature, I need a dual-stack application with an ALB entry point. The application must be deployed in Amazon Virtual Private Cloud (Amazon VPC) and support IPv6 traffic. I don’t happen to have IPv6-ready VPCs in my account. I can follow these instructions to migrate an existing VPC that supports IPv4 only to IPv6, or I can create a VPC that supports IPv6 addressing. For this post, I choose to create a VPC.

In the AWS Management Console, I navigate to the Amazon VPC Dashboard. I choose Launch VPC Wizard. In the wizard, I enter a value for the Name tag. This value will be used to auto-generate Name tags for all resources in the VPC. Then, I select the option to associate an Amazon-provided IPv6 CIDR block. I leave all other options to their default values and choose Create VPC.

Console screenshot.

After less than a minute, the VPC is ready. I edit the settings of both public subnets to enable the Auto-assign IP settings to automatically request both a public IPv4 address and an IPv6 address for new network interfaces in this subnet.

Console screenshot.

Now, I want to deploy an application in this VPC. The application will be the endpoint for my accelerator. I view and download the WordPress scalable and durable AWS CloudFormation template from the Sample solutions section of the CloudFormation documentation. This template deploys a full WordPress website behind an ALB. The web tier is scalable and implemented as an EC2 Auto Scaling group. The MySQL database is managed by Amazon Relational Database Service (RDS).

Before deploying the stack, I edit the template to make a few changes. First, I add a DBSubnetGroup resource:

"DBSubnetGroup" : {
  "Type": "AWS::RDS::DBSubnetGroup",
  "Properties": {
    "DBSubnetGroupDescription" : "DB subnet group",
    "SubnetIds" : { "Ref" : "Subnets"}
  }
},

Then, I add the DBSubnetGroupName property to the DBInstance resource. In this way, the database created by the template will be deployed in the same subnets (and VPC) as the web servers.

"DBSubnetGroupName" : { "Ref" : "DBSubnetGroup" },

The last change adds the IpAddressType property to the ApplicationLoadBalancer resource to create a dual-stack load balancer that has IPv6 addresses and will be ready to be used with the new dual-stack option of Global Accelerator.

"IpAddressType": "dualstack",

Because IpAddressType is set to dualstack, the ALB created by the stack will also have IPv6 addresses and will be ready to be used with the new dual-stack option of Global Accelerator.

In the CloudFormation console, I create a stack and upload the template I just edited. In the template parameters, I enter a database user and password to use. For the VpcId parameter, I select the IPv6-ready VPC I just created. For the Subnets parameter, I select the two public subnets of the same VPC. After that, I go to the next steps and create the stack.

After a few minutes, the stack creation is complete. To access the website, I need to open network access to the load balancer. In the EC2 console, I create a security group that allows public access using the HTTP and HTTPS protocols (ports 80 and 443).

Console screenshot.

I choose Load balancers from the navigation pane and select the ALB used by my application. In the Security section, I choose Edit security groups and add the security group I just created to allow web access.

Console screenshot.

Now, I look for the dual-stack (A or AAAA Record) DNS name of the load balancer. I open a browser and connect using the DNS name to complete the configuration of WordPress.

Website.

When connecting again to the endpoint, I see my new (and empty) WordPress website.

Website.

Using Dual-Stack Accelerators with Support for Both IPv6 and IPv4 traffic
Now that my application is ready, I add a dual-stack accelerator in front of the dual-stack ALB. In the Global Accelerator console, I choose Create accelerator. I enter a name for the accelerator and choose the Standard accelerator type.

Console screenshot.

To route both IPv4 and IPv6 through this accelerator, I select the Dual-stack option for the IP address type.

Console screenshot.

Then I add a listener for port 80 using the TCP protocol.

Console screenshot.

For that listener, I configure an endpoint group in the AWS Region where I have my application deployed.

Console screenshot.

I choose Application Load Balancer for the Endpoint type and select the ALB in the CloudFormation stack.

Console screenshot.

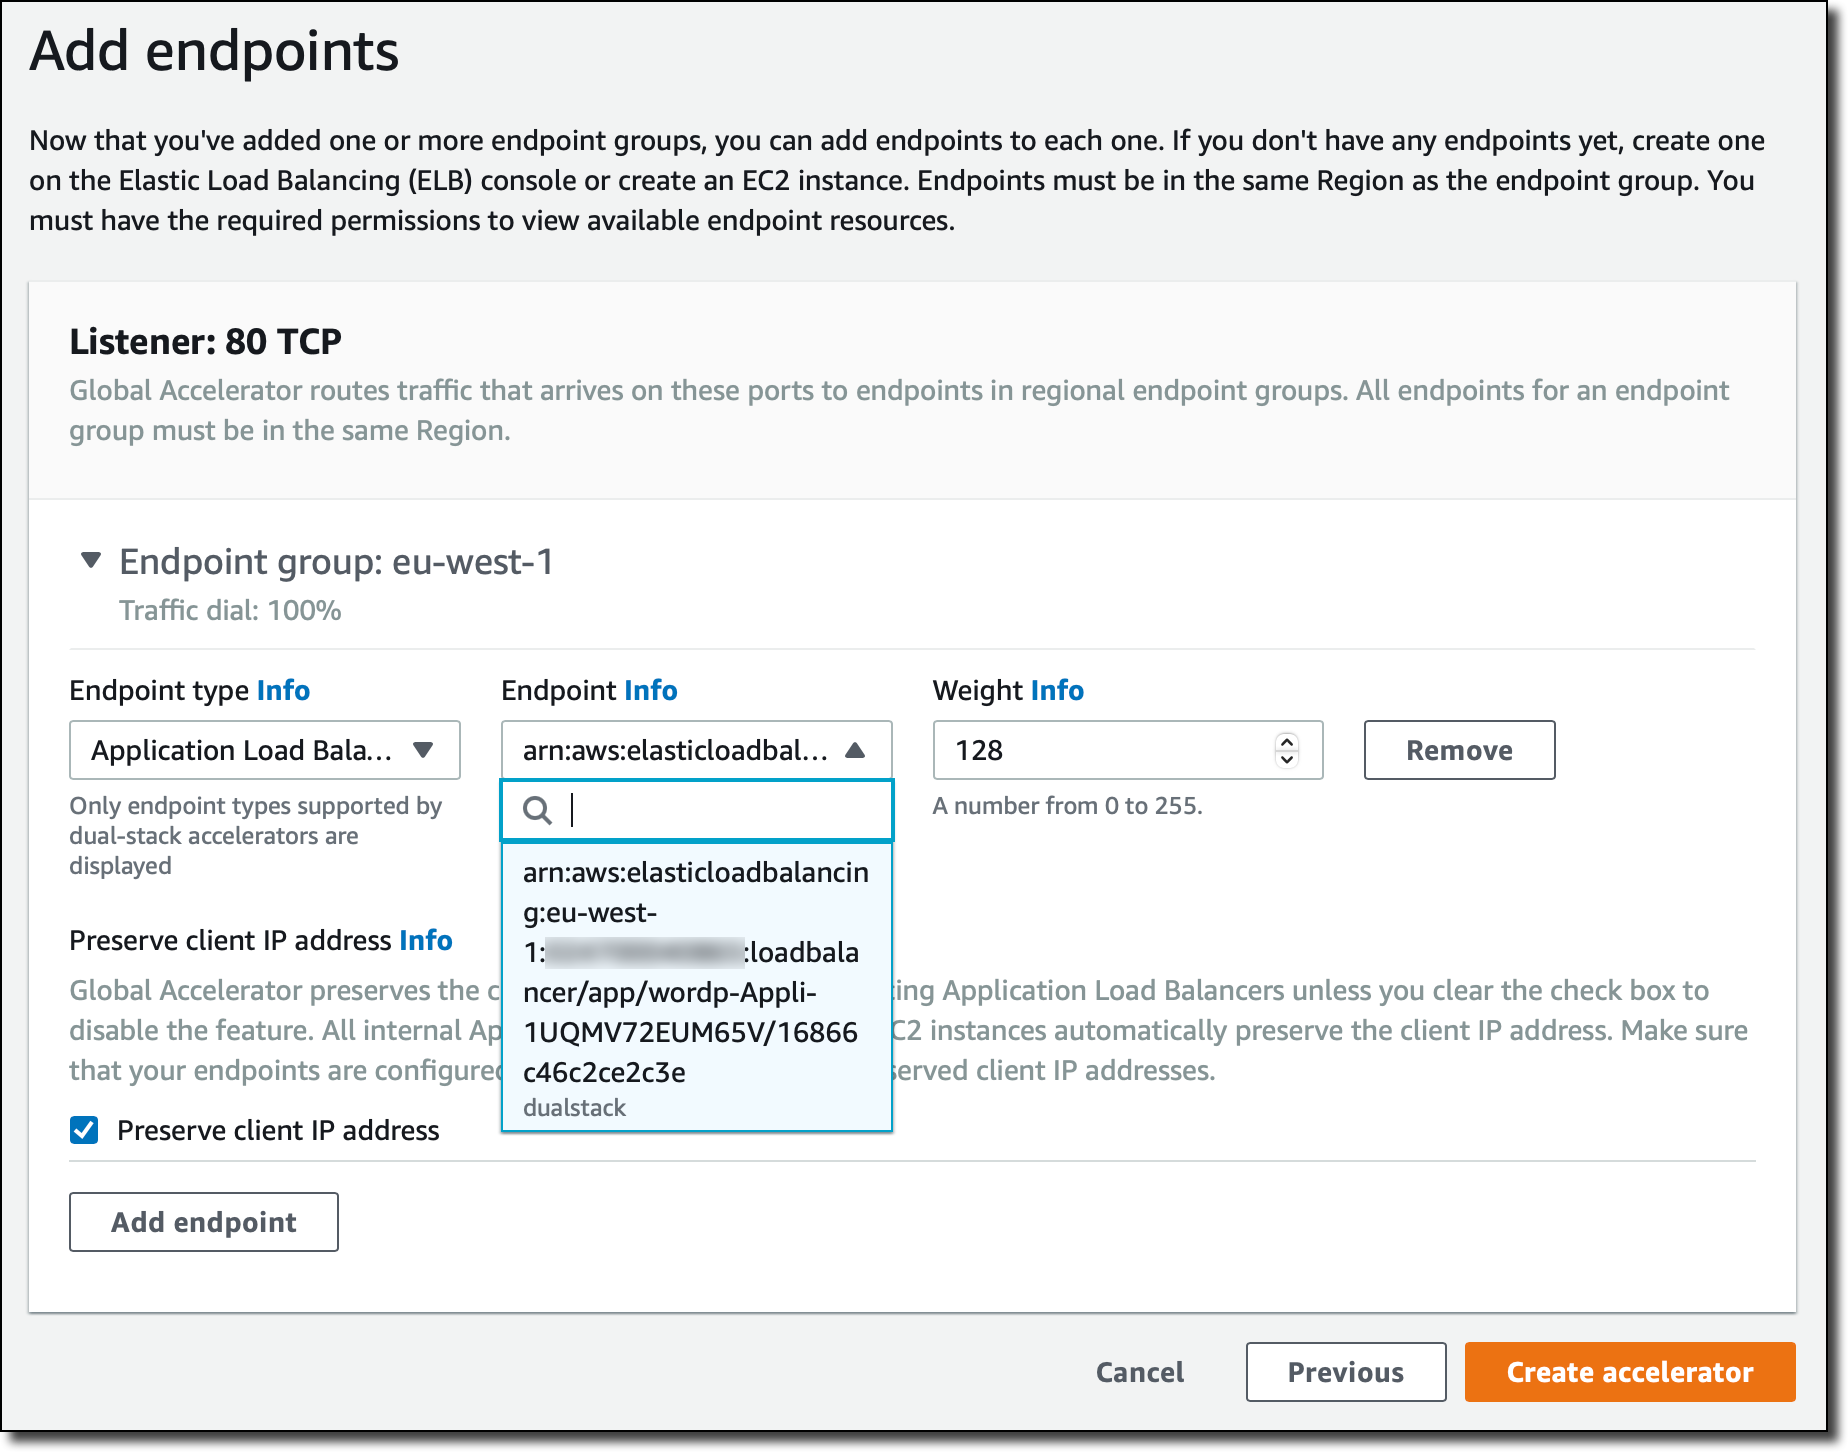
Then, I choose Create accelerator. After a few minutes, the accelerator is deployed, and I have a dual-stack DNS name to reach the ALB using IPv4 or IPv6 depending on the network used by the client.

Console screenshot.

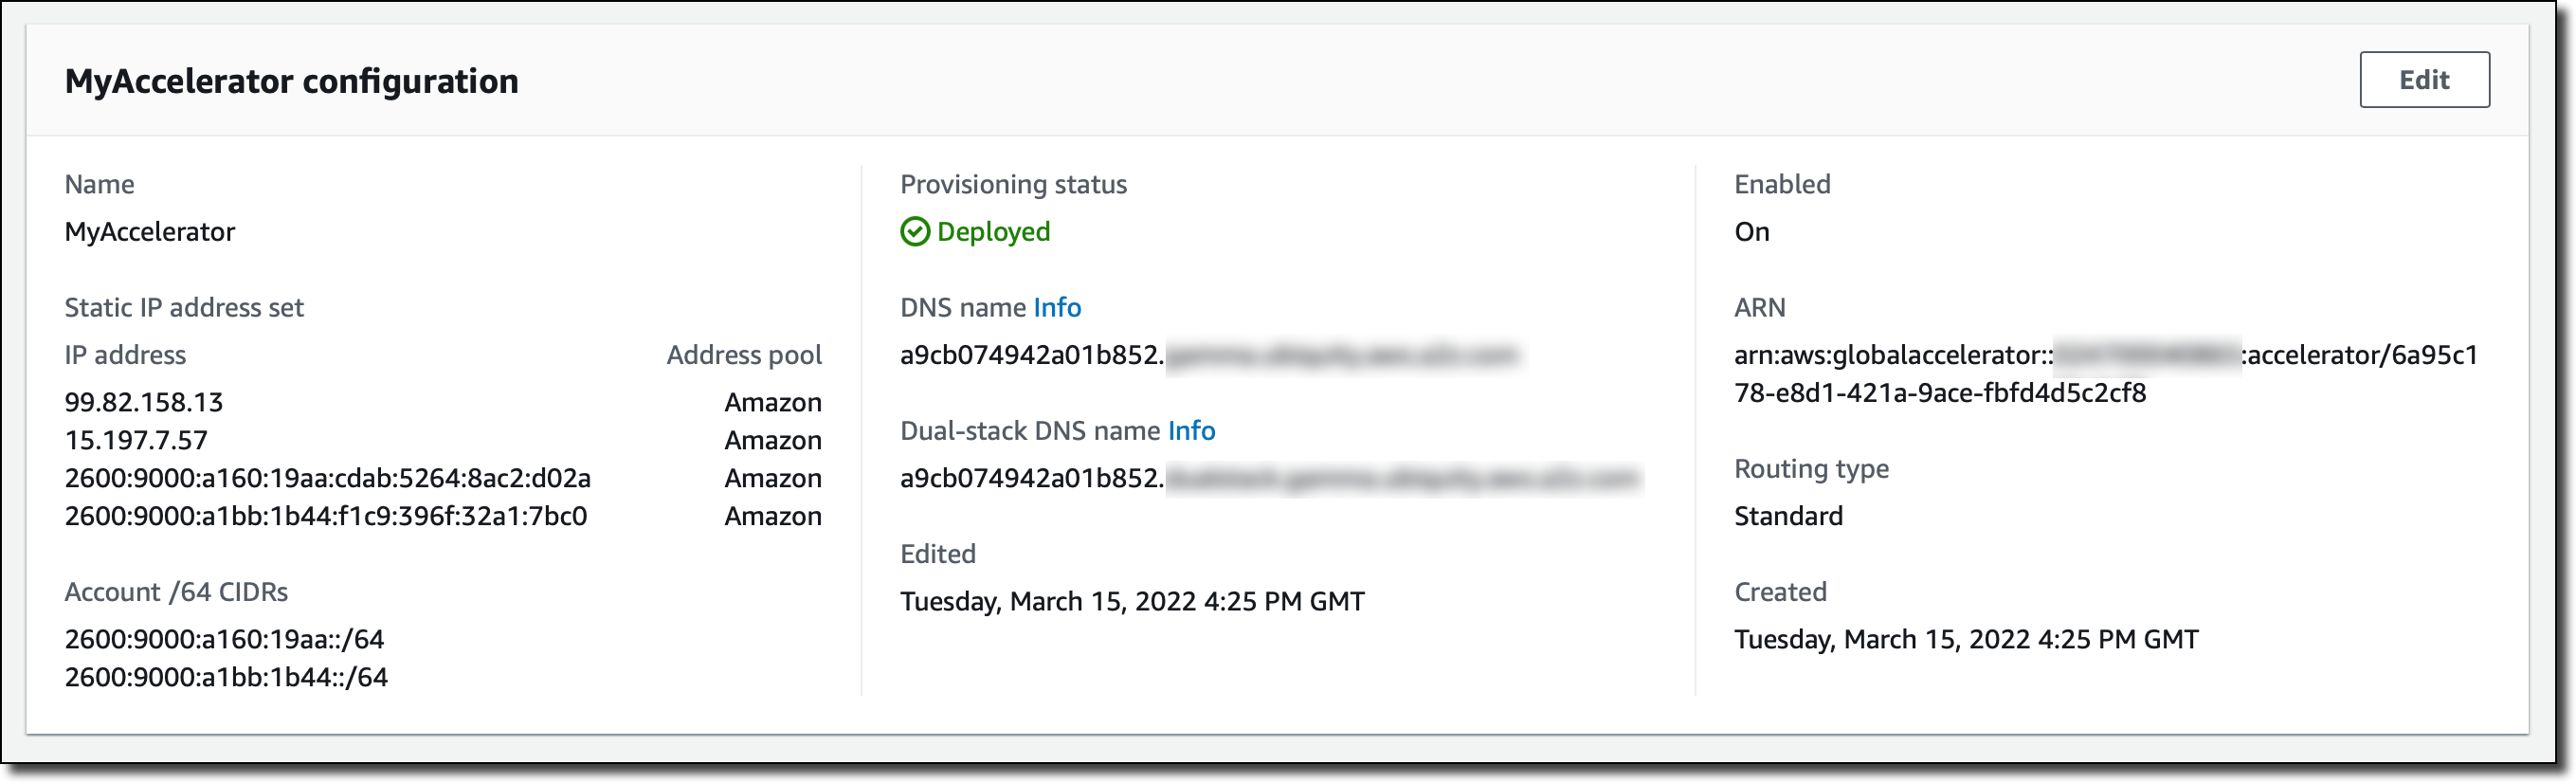
Now, my customers can use the IPv4 and IPv6 addresses or, even better, the dual-stack DNS name of the accelerator to connect to the WordPress website. If there is a front-end or mobile application my customers use to connect to the WordPress REST APIs, I can use the dual-stack DNS name so that clients will connect using their preferred IPv4 or IPv6 route.

To understand if the communication between Global Accelerator and the ALB is working, I can monitor the new FlowsDrop Amazon CloudWatch metric. This metric tells me if Global Accelerator is unable to route IPv6 traffic through the endpoint. For example, that can happen if, after the creation of the accelerator, the configuration of the ALB is updated to use IPv4 only.

Availability and Pricing
You can configure dual-stack accelerators using the AWS Management Console, the AWS Command Line Interface (CLI), and AWS SDKs. You can use dual-stack accelerators to optimize access to your applications deployed in any commercial AWS Region.

Protocol translation is not supported, neither IPv4 to IPv6 nor IPv6 to IPv4. For example, Global Accelerator will not allow me to configure a dual-stack accelerator with an IPv4-only ALB endpoint. Also, for IPv6 ALB endpoints, client IP preservation must be enabled.

There are no additional costs for using dual-stack accelerators. You pay for the hours and the amount of data transfer in the dominant direction used by traffic to or from the accelerator. Data transfer costs depend on the location of your clients and the AWS Regions where you are running your applications. For more information, see the Global Accelerator pricing page.

Optimize the IPv6 and IPv4 network paths used by your customers to reach your applications with AWS Global Accelerator.

Danilo

Creating a Multi-Region Application with AWS Services – Part 2, Data and Replication

Post Syndicated from Joe Chapman original https://aws.amazon.com/blogs/architecture/creating-a-multi-region-application-with-aws-services-part-2-data-and-replication/

In Part 1 of this blog series, we looked at how to use AWS compute, networking, and security services to create a foundation for a multi-Region application.

Data is at the center of many applications. In this post, Part 2, we will look at AWS data services that offer native features to help get your data where it needs to be.

In Part 3, we’ll look at AWS application management and monitoring services to help you build, monitor, and maintain a multi-Region application.

Considerations with replicating data

Data replication across the AWS network can happen quickly, but we are still limited by the speed of light. For this reason, data consistency must be considered when building a multi-Region application. Generally speaking, the longer a physical distance is, the longer it will take the data to get there.

When building a distributed system, consider the consistency, availability, partition tolerance (CAP) theorem. This theorem states that an application can only pick 2 out of the 3, and tradeoffs should be considered.

  • Consistency – all clients always have the same view of data
  • Availability – all clients can always read and write data
  • Partition Tolerance – the system will continue to work despite physical partitions

CAP diagram

Achieving consistency and availability is common for single-Region applications. For example, when an application connects to a single in-Region database. However, this becomes more difficult with multi-Region applications due to the latency added by transferring data over long distances. For this reason, highly distributed systems will typically follow an eventual consistency approach, favoring availability and partition tolerance.

Replicating objects and files

To ensure objects are in multiple Regions, Amazon Simple Storage Service (Amazon S3) can be set up to replicate objects across AWS Regions automatically with one-way or two-way replication. A subset of objects in an S3 bucket can be replicated with S3 replication rules. If low replication lag is critical, S3 Replication Time Control can help meet requirements by replicating 99.99% of objects within 15 minutes, and most within seconds. To monitor the replication status of objects, Amazon S3 events and metrics will track replication and can send an alert if there’s an issue.

Traditionally, each S3 bucket has its own single, Regional endpoint. To simplify connecting to and managing multiple endpoints, S3 Multi-Region Access Points create a single global endpoint spanning multiple S3 buckets in different Regions. When applications connect to this endpoint, it will route over the AWS network using AWS Global Accelerator to the bucket with the lowest latency. Failover routing is also automatically handled if the connectivity or availability to a bucket changes.

For files stored outside of Amazon S3, AWS DataSync simplifies, automates, and accelerates moving file data across Regions and accounts. It supports homogeneous and heterogeneous file migrations across Elastic File System (Amazon EFS), Amazon FSx, AWS Snowcone, and Amazon S3. It can even be used to sync on-premises files stored on NFS, SMB, HDFS, and self-managed object storage to AWS for hybrid architectures.

File and object replication should be expected to be eventually consistent. The rate at which a given dataset can transfer is a function of the amount of data, I/O bandwidth, network bandwidth, and network conditions.

Copying backups

Scheduled backups can be set up with AWS Backup, which automates backups of your data to meet business requirements. Backup plans can automate copying backups to one or more AWS Regions or accounts. A growing number of services are supported, and this can be especially useful for services that don’t offer real-time replication to another Region such as Amazon Elastic Block Store (Amazon EBS) and Amazon Neptune.

Figure 1 shows how these data transfer services can be combined for each resource.

Storage replication services

Figure 1. Storage replication services

Spanning non-relational databases across Regions

Amazon DynamoDB global tables provide multi-Region and multi-writer features to help you build global applications at scale. A DynamoDB global table is the only AWS managed offering that allows for multiple active writers in a multi-Region topology (active-active and multi-Region). This allows for applications to read and write in the Region closest to them, with changes automatically replicated to other Regions.

Global reads and fast recovery for Amazon DocumentDB (with MongoDB compatibility) can be achieved with global clusters. These clusters have a primary Region that handles write operations. Dedicated storage-based replication infrastructure enables low-latency global reads with a lag of typically less than one second.

Keeping in-memory caches warm with the same data across Regions can be critical to maintain application performance. Amazon ElastiCache for Redis offers global datastore to create a fully managed, fast, reliable, and secure cross-Region replica for Redis caches and databases. With global datastore, writes occurring in one Region can be read from up to two other cross-Region replica clusters – eliminating the need to write to multiple caches to keep them warm.

Spanning relational databases across Regions

For applications that require a relational data model, Amazon Aurora global database provides for scaling of database reads across Regions in Aurora PostgreSQL-compatible and MySQL-compatible editions. Dedicated replication infrastructure utilizes physical replication to achieve consistently low replication lag that outperforms the built-in logical replication database engines offer, as shown in Figure 2.

SysBench OLTP (write-only) stepped every 600 seconds on R4.16xlarge

Figure 2. SysBench OLTP (write-only) stepped every 600 seconds on R4.16xlarge

With Aurora global database, one primary Region is designated as the writer, and secondary Regions are dedicated to reads. Aurora MySQL supports write forwarding, which forwards write requests from a secondary Region to the primary Region to simplify logic in application code. Failover testing can happen by utilizing managed planned failover, which will change the active write cluster to another Region while keeping the replication topology intact. All databases discussed in this post employ eventual consistency when used across Regions, but Aurora PostgreSQL has an option to set the maximum a replica lag allowed with managed recovery point objective (managed RPO).

Logical replication, which utilizes a database engine’s built-in replication technology, can be set up for Amazon Relational Database Service (Amazon RDS) for MariaDB, MySQL, Oracle, PostgreSQL, and Aurora databases. A cross-Region read replica will receive these changes from the writer in the primary Region. For applications built on RDS for Microsoft SQL Server, cross-Region replication can be achieved by utilizing the AWS Database Migration Service. Cross-Region replicas allow for quicker local reads and can reduce data loss and recovery times in the case of a disaster by being promoted to a standalone instance.

For situations where a longer RPO and recovery time objective (RTO) are acceptable, backups can be copied across Regions. This is true for all of the relational and non-relational databases mentioned in this post, except for ElastiCache for Redis. Amazon Redshift can also automatically do this for your data warehouse. Backup copy times will vary depending on size and change rates.

A purpose-built database strategy offers many benefits, Figure 3 forms a purpose-built global database architecture.

Purpose-built global database architecture

Figure 3. Purpose-built global database architecture

Summary

Data is at the center of almost every application. In this post, we reviewed AWS services that offer cross-Region data replication to get your data where it needs to be quickly. Whether you need faster local reads, an active-active database, or simply need your data durably stored in a second Region, we have a solution for you. In the 3rd and final post of this series, we’ll cover application management and monitoring features.

Ready to get started? We’ve chosen some AWS Solutions, AWS Blogs, and Well-Architected labs to help you!

Related posts

Creating a Multi-Region Application with AWS Services – Part 1, Compute and Security

Post Syndicated from Joe Chapman original https://aws.amazon.com/blogs/architecture/creating-a-multi-region-application-with-aws-services-part-1-compute-and-security/

Building a multi-Region application requires lots of preparation and work. Many AWS services have features to help you build and manage a multi-Region architecture, but identifying those capabilities across 200+ services can be overwhelming.

In this 3-part blog series, we’ll explore AWS services with features to assist you in building multi-Region applications. In Part 1, we’ll build a foundation with AWS security, networking, and compute services. In Part 2, we’ll add in data and replication strategies. Finally, in Part 3, we’ll look at the application and management layers.

Considerations before getting started

AWS Regions are built with multiple isolated and physically separate Availability Zones (AZs). This approach allows you to create highly available Well-Architected workloads that span AZs to achieve greater fault tolerance. There are three general reasons that you may need to expand beyond a single Region:

  • Expansion to a global audience as an application grows and its user base becomes more geographically dispersed, there can be a need to reduce latencies for different parts of the world.
  • Reducing Recovery Point Objectives (RPO) and Recovery Time Objectives (RTO) as part of disaster recovery (DR) plan.
  • Local laws and regulations may have strict data residency and privacy requirements that must be followed.

Ensuring security, identity, and compliance

Creating a security foundation starts with proper authentication, authorization, and accounting to implement the principle of least privilege. AWS Identity and Access Management (IAM) operates in a global context by default. With IAM, you specify who can access which AWS resources and under what conditions. For workloads that use directory services, the AWS Directory Service for Microsoft Active Directory Enterprise Edition can be set up to automatically replicate directory data across Regions. This allows applications to reduce lookup latencies by using the closest directory and creates durability by spanning multiple Regions.

Applications that need to securely store, rotate, and audit secrets, such as database passwords, should use AWS Secrets Manager. It encrypts secrets with AWS Key Management Service (AWS KMS) keys and can replicate secrets to secondary Regions to ensure applications are able to obtain a secret in the closest Region.

Encrypt everything all the time

AWS KMS can be used to encrypt data at rest, and is used extensively for encryption across AWS services. By default, keys are confined to a single Region. AWS KMS multi-Region keys can be created to replicate keys to a second Region, which eliminates the need to decrypt and re-encrypt data with a different key in each Region.

AWS CloudTrail logs user activity and API usage. Logs are created in each Region, but they can be centralized from multiple Regions and multiple accounts into a single Amazon Simple Storage Service (Amazon S3) bucket. As a best practice, these logs should be aggregated to an account that is only accessible to required security personnel to prevent misuse.

As your application expands to new Regions, AWS Security Hub can aggregate and link findings to a single Region to create a centralized view across accounts and Regions. These findings are continuously synced between Regions to keep you updated on global findings.

We put these features together in Figure 1.

Multi-Region security, identity, and compliance services

Figure 1. Multi-Region security, identity, and compliance services

Building a global network

For resources launched into virtual networks in different Regions, Amazon Virtual Private Cloud (Amazon VPC) allows private routing between Regions and accounts with VPC peering. These resources can communicate using private IP addresses and do not require an internet gateway, VPN, or separate network appliances. This works well for smaller networks that only require a few peering connections. However, as the number of peered connections increases, the mesh of peered connections can become difficult to manage and troubleshoot.

AWS Transit Gateway can help reduce these difficulties by creating a central transitive hub to act as a cloud router. A Transit Gateway’s routing capabilities can expand to additional Regions with Transit Gateway inter-Region peering to create a globally distributed private network.

Building a reliable, cost-effective way to route users to distributed Internet applications requires highly available and scalable Domain Name System (DNS) records. Amazon Route 53 does exactly that.

Route 53 routing policies can route traffic to a record with the lowest latency, or automatically fail over a record. If a larger failure occurs, the Route 53 Application Recovery Controller can simplify the monitoring and failover process for application failures across Regions, AZs, and on-premises.

Amazon CloudFront’s content delivery network is truly global, built across 300+ points of presence (PoP) spread throughout the world. Applications that have multiple possible origins, such as across Regions, can use CloudFront origin failover to automatically fail over the origin. CloudFront’s capabilities expand beyond serving content, with the ability to run compute at the edge. CloudFront functions make it easy to run lightweight JavaScript functions, and AWS Lambda@Edge makes it easy to run Node.js and Python functions across these 300+ PoPs.

AWS Global Accelerator uses the AWS global network infrastructure to provide two static anycast IPs for your application. It automatically routes traffic to the closest Region deployment, and if a failure is detected it will automatically redirect traffic to a healthy endpoint within seconds.

Figure 2 brings these features together to create a global network across two Regions.

AWS VPC connectivity and content delivery

Figure 2. AWS VPC connectivity and content delivery

Building the compute layer

An Amazon Elastic Compute Cloud (Amazon EC2) instance is based on an Amazon Machine Image (AMI). An AMI specifies instance configurations such as the instance’s storage, launch permissions, and device mappings. When a new standard image needs to be created, EC2 Image Builder can be used to streamline copying AMIs to selected Regions.

Although EC2 instances and their associated Amazon Elastic Block Store (Amazon EBS) volumes live in a single AZ, Amazon Data Lifecycle Manager can automate the process of taking and copying EBS snapshots across Regions. This can enhance DR strategies by providing a relatively easy cold backup-and-restore option for EBS volumes.

As an architecture expands into multiple Regions, it can become difficult to track where instances are provisioned. Amazon EC2 Global View helps solve this by providing a centralized dashboard to see Amazon EC2 resources such as instances, VPCs, subnets, security groups, and volumes in all active Regions.

Microservice-based applications that use containers benefit from quicker start-up times. Amazon Elastic Container Registry (Amazon ECR) can help ensure this happens consistently across Regions with private image replication at the registry level. An ECR private registry can be configured for either cross-Region or cross-account replication to ensure your images are ready in secondary Regions when needed.

We bring these compute layer features together in Figure 3.

AMI and EBS snapshot copy across Regions

Figure 3. AMI and EBS snapshot copy across Regions

Summary

It’s important to create a solid foundation when architecting a multi-Region application. These foundations pave the way for you to move fast in a secure, reliable, and elastic way as you build out your application. In this post, we covered options across AWS security, networking, and compute services that have built-in functionality to take away some of the undifferentiated heavy lifting. We’ll cover data, application, and management services in future posts.

Ready to get started? We’ve chosen some AWS Solutions and AWS Blogs to help you!

Looking for more architecture content? AWS Architecture Center provides reference architecture diagrams, vetted architecture solutions, Well-Architected best practices, patterns, icons, and more!

How to Accelerate Performance and Availability of Multi-region Applications with Amazon S3 Multi-Region Access Points

Post Syndicated from Alex Casalboni original https://aws.amazon.com/blogs/aws/s3-multi-region-access-points-accelerate-performance-availability/

Building multi-region applications allows you to improve latency for end users, achieve higher availability and resiliency in case of unexpected disasters, and adhere to business requirements related to data durability and data residency. For example, you might want to reduce the overall latency of dynamic API calls to your backend services . Or you might want to extend a single-region deployment to handle internet routing issues, failures of submarine cables, or regional connectivity issues – and therefore avoid costly downtime. Today, thanks to multi-region data replication functions such as Amazon DynamoDB global tables, Amazon Aurora global database, Amazon ElastiCache global datastore, and Amazon Simple Storage Service (Amazon S3) cross-region replication, you can build multi-region applications across 25 AWS Regions worldwide.

Yet, when it comes to implementing multi-region applications, you often have to make your code region-aware and take care of the heavy lifting of interacting with the correct regional resources, whether it’s the closest or the most available. For example, you might have three S3 buckets with object replication across three AWS Regions. Your application code needs to be aware of how many copies of the bucket exist and where they are located, which bucket is the closest to the caller, and how to fall back to other buckets in case of issues. The complexity grows when you add new regions to your multi-region architecture and redeploy your stack in each region whenever a global configuration changes.

Today, I’m happy to announce the general availability of Amazon S3 Multi-Region Access Points, a new S3 feature that allows you to define global endpoints that span buckets in multiple AWS Regions. With S3 Multi-Region Access Points, you can build multi-region applications with the same simple architecture used in a single region.

S3 Multi-Region Access Points deliver built-in network resilience, building on top AWS Global Accelerator to route S3 requests over the AWS global network. This is especially important to minimize network congestion and overall latency, while maintaining a simple application architecture. AWS Global Accelerator constantly monitors for regional availability and can shift requests to another region within seconds. By dynamically routing your requests to the lowest latency copy of your data, S3 Multi-Region Access Points increase upload and download performance by up to 60%. This is great not just for server-side applications that rely on S3 for reading configuration files or application data, but also for edge applications that need a performant and reliable write-only endpoint, such as IoT devices or autonomous vehicles.

S3 Multi-Region Access Points in Action
To get started, you create an S3 Multi-Region Access Point in the S3 console, via API, or with AWS CloudFormation.

Let me show you how to create one using the S3 console. Each access point needs a name, unique at the account level.

After it’s created, you can access it through its alias, which is generated automatically and globally unique. The alias will look like a random string ending with .mrap – for example, mmqdt41e4bf6x.mrap. It can also be accessed over the internet via https://mmqdt41e4bf6x.mrap.s3-global.amazonaws.com, via VPC, or on-premises using AWS PrivateLink.

Then, you associate multiple buckets (new or existing) to the access point, one per Region. If you need data replication, you’ll need to enable bucket versioning too.

Finally, you configure the Block Public Access settings for the access point. By default, all public access is blocked, which works fine for most cases.

The creation process is asynchronous, you can view the creation status in the Console or by listing the S3 Multi-Region Access Points from the CLI. When it becomes Ready, you can configure optional settings for the access point policy and object replication.

Similar to regular access points, you can customize the access control policy to limit the use of the access point with respect to the bucket’s permission. Keep in mind that both the access point and the underlying buckets must permit a request. S3 Multi-Region Access Points cannot extend the permissions, just limit (or equal) them. You can also use IAM Access Analyzer to verify public and cross-account access for buckets that use S3 Multi-Region Access Points and preview access to your buckets before deploying permissions changes.

Your S3 Multi-Region Access Point access policy might look like this:

{
  "Version": "2012-10-17",
  "Statement": [
    {
      "Sid": "Default",
      "Effect": "Allow",
      "Principal": {
        "AWS": "YOUR_ACCOUNT_ID" 
      },
      "Action": ["s3:GetObject", "s3:PutObject"],
      "Resource": "arn:aws:s3::YOUR_ACCOUNT_ID:accesspoint/YOUR_ALIAS/object/*"
    }
   ]
}

To replicate data between buckets used with your S3 Multi-Region Access Point, you configure S3 Replication. In some cases, you might want to store different content in each bucket, or have a portion of a regional bucket for use with a global endpoint and other portions that aren’t replicated and used only with a regional access point or direct bucket access. For example, an IoT device configuration might include references to other regional API endpoints or regional resources that will be different for each bucket.

The new S3 console provides two basic templates that you can use to easily and centrally create replication rules:

  • Replicate objects from one or more source bucket to one or more destination buckets: This is ideal for ready-only use cases where data is always generated in a specific AWS Region and you want it to be available in all other Regions, too.
  • Replicate objects among all specified buckets: This is ideal for the IoT scenario I mentioned, where you’d define a write-only access point that devices use to upload data to the closest region, and you need this data to be available in all regions.

Of course, thanks to filters and conditions, you can create more sophisticated replication setups. For example, you might want to replicate only certain objects based on a prefix or tags.

Keep in mind that bucket versioning must be enabled for cross-region replication.

The console will take care of creating and configuring the replication rules and IAM roles. Note that to add or remove buckets, you would create a new the S3 Multi-Region Access Point with the revised list.

In addition to the replication rules, here is where you configure replication options such as Replication Time Control (RTC), replication metrics and notifications, and bidirectional sync. RTC allows you to replicate most new objects in seconds, and 99.99% of those objects within 15 minutes, for use cases where replication speed is important; replications metrics allow you to monitor how synchronized are your buckets in terms of object and byte count; bidirectional sync allows you to achieve an active-active configuration for put-heavy use cases in which object metadata needs to be replicated across buckets too.

After replication is configured, you get a very useful visual and interactive summary that allows you to verify which AWS Regions are enabled. You’ll see where they are on the map, the name of the regional buckets, and which replication rules are being applied.

After the S3 Multi-Region Access Point is defined and correctly configured, you can start interacting with it through the S3 API, AWS CLI, or the AWS SDKs. For example, this is how you’d write and read a new object using the CLI (don’t forget to upgrade to the latest CLI version):

# create a new object
aws s3api put-object --bucket arn:aws:s3::YOUR_ACCOUNT_ID:accesspoint/YOUR_ALIAS --key test.png --body test.png
# retrieve the same object
aws s3api get-object --bucket arn:aws:s3::YOUR_ACCOUNT_ID:accesspoint/YOUR_ALIAS --key test.png test.png

Last but not least, you can use bucket metrics in Amazon CloudWatch to keep track of how user requests are distributed across buckets in multiple AWS Regions.

CloudFormation Support at Launch
Today, you can start using two new CloudFormation resources to easily define an S3 Multi-Region Access Point: AWS::S3::MultiRegionAccessPoint and AWS::S3::MultiRegionAccessPointPolicy.

Here is an example:

Resources:
  MyS3MultiRegionAccessPoint:
    Type: AWS::S3::MultiRegionAccessPoint
    Properties:
      Regions:
        - Bucket: regional-bucket-ireland
        - Bucket: regional-bucket-australia
        - Bucket: regional-bucket-us-east
      PublicAccessBlockConfiguration:
        BlockPublicAcls: true
        IgnorePublicAcls: true
        BlockPublicPolicy: true
        RestrictPublicBuckets: true
  MyMultiRegionAccessPointPolicy:
    Type: AWS::S3::MultiRegionAccessPointPolicy
    Properties:
      MrapName: !Ref MyS3MultiRegionAccessPoint
      Policy:
        Version: 2012-10-17
        Statement:
          - Action: '*'
            Effect: Allow
            Resource: !Sub
              - 'arn:aws:s3::${AWS::AccountId}:accesspoint/${mrapalias}/object/*'
              - mrapalias: !GetAtt
                  - MyS3MultiRegionAccessPoint
                  - Alias
            Principal: {"AWS": !Ref "AWS::AccountId"}

The AWS::S3::MultiRegionAccessPoint resource depends only on the S3 bucket names. You don’t need to reference other regional stacks and you can easily centralize the S3 Multi-Region Access Point definition into its own stack. On the other hand, cross-region replication needs to be configured on each S3 bucket.

Cost considerations
When you use an S3 Multi-Region Access Point to route requests within the AWS global network, you pay a data routing cost of $0.0033 per GB processed, in addition to the standard charges for S3 requests, storage, data transfer, and replication. If your applications access the S3 Multi-Region Access Point over the internet, you’re also charged an internet acceleration cost per GB. This cost depends on the transfer type (upload or download) and whether the client and the bucket are in the same or different locations. For details, visit the S3 pricing page and select the data transfer tab.

Let me share a few practical examples:

  • All traffic within an AWS Region: In this simple case, your application runs in US East (N. Virginia) and you configure two S3 buckets in US East (N. Virginia) and US West (Oregon). The application uploads 100GB of data and the lowest latency bucket is in US East(N. Virginia). All the data is routed by your S3 Multi-Region Access Point in the same region and the total cost is $0.33.
  • All traffic across two AWS Regions: In this case, your application runs in US East (N. Virginia) and you configure two S3 buckets in US East (Ohio) and US West (Oregon). The application uploads 100GB of data and the lowest latency bucket is in US East (Ohio). All the data is routed by your S3 Multi-Region Access Point across two AWS Regions. The data routing cost for 100GB is the same of the previous example ($0.33), plus the S3 data transfer cost of $0.01 per GB, resulting in a total cost of $1.33.
  • All traffic over the internet across North America, Europe, and Asia Pacific (download and upload): In this case, your application runs on customer devices in North America, Europe, and Asia, and you configure two S3 buckets in US East (N. Virginia) and Europe (Ireland). One customer in North America uploads 50GB of data, which is routed to the bucket in US East (N. Virginia); a second customer in Europe downloads 50GB of data from the bucket in Europe (Ireland); a third customer in Asia downloads 50GB of data from the bucket in Europe (Ireland). The data routing cost for 150GB is $0.495. Plus the data transfer out from S3 to Europe of $0.09 per GB ($9), the internet acceleration cost from North America to the S3 bucket in US East (N. Virginia) of $0.0025 per GB ($0.125), the internet acceleration cost from the S3 bucket in Europe (Ireland) to Europe of $0.005 per GB ($0.25), and the internet acceleration cost from the S3 bucket in Europe (Ireland) to Asia of $0.05 per GB ($2.5). The total cost is $12.37. Please note that this example is intended to demonstrate how the internet acceleration cost works across continents. Also note that the internet acceleration cost to Asia might be reduced by an order of magnitude with an additional S3 bucket in Asia (see next example).
  • All the traffic over the internet across North America, Europe, and Asia Pacific (only upload): In this case, we consider the same conditions of the previous example. The only difference is that all customers only upload data and that you configure an additional bucket in Asia Pacific (Singapore). The data routing cost is the same ($0.495). Plus the internet acceleration cost from North America to the S3 bucket in US East (N. Virginia) of $0.0025 per GB ($0.125), the internet acceleration cost from Europe to the S3 bucket in Europe (Ireland) of $0.0025 per GB ($0.125), and the internet acceleration cost from Asia to the S3 bucket in Asia Pacific (Singapore) of $0.01 per GB ($0.5). The total cost is $1.24.

In other words, the routing cost is easy to estimate and doesn’t depend on the application type or data access pattern. The internet acceleration cost depends on the access pattern (downloads are more expensive than uploads) and on the client location with respect to the closest AWS Region. For global applications that upload or download data over the internet, you can minimize the internet acceleration cost by configuring at least one S3 bucket in each continent.

Available Today
Amazon S3 Multi-Region Access Points allow you to increase resiliency and accelerate application performance up to 60% when accessing data across multiple AWS Regions. We look forward to feedback about your use cases so that we can iterate quickly and simplify how you design and implement multi-region applications.

You can get started using the S3 API, CLI, SDKs, AWS CloudFormation or the S3 Console. This new functionality is available in 17 AWS Regions worldwide (see the full list of supported AWS Regions).

Learn More

Watch this video to hear more about S3 Multi-Region Access Points and see a short demo.

Check out the technical documentation for S3 Multi-Region Access Points.

Alex

Disaster Recovery (DR) Architecture on AWS, Part IV: Multi-site Active/Active

Post Syndicated from Seth Eliot original https://aws.amazon.com/blogs/architecture/disaster-recovery-dr-architecture-on-aws-part-iv-multi-site-active-active/

In my first blog post of this series, I introduced you to four strategies for disaster recovery (DR). My subsequent posts shared details on the backup and restore, pilot light, and warm standby active/passive strategies.

In this post, you’ll learn how to implement an active/active strategy to run your workload and serve requests in two or more distinct sites. Like other DR strategies, this enables your workload to remain available despite disaster events such as natural disasters, technical failures, or human actions.

DR strategies: Multi-site active/active

As we know from our now familiar DR strategies diagram (Figure 1), the multi-site active/active strategy will give you the lowest RTO (recovery time objective) and RPO (recovery point objective). However, this must be weighed against the potential cost and complexity of operating active stacks in multiple sites.

DR strategies

Figure 1. DR strategies

Implementing multi-site active/active

The architecture in Figure 2 shows you how to use AWS Regions as your active sites, creating a multi-Region active/active architecture. Only two Regions are shown, which is common, but more may be used. Each Region hosts a highly available, multi-Availability Zone (AZ) workload stack. In each Region, data is replicated live between the data stores and also backed up. This protects against disasters that include data deletion or corruption, since the data backup can be restored to the last known good state.

Multi-site active/active DR strategy

Figure 2. Multi-site active/active DR strategy

Traffic routing

Each regional stack serves production traffic. How you implement traffic routing determines which Region will receive a given request. Figure 2 shows Amazon Route 53, a highly available and scalable cloud Domain Name System (DNS), used for routing. Route 53 offers multiple routing policies. For example, the geolocation or latency routing policies are good choices for active/active deployments. For geolocation routing, you configure which Region a request goes to based on the origin location of the request. For latency routing, AWS automatically sends requests to the Region that provides the shortest round-trip time.

Your data governance strategy helps inform which routing policy to use. Geolocation routing lets you distribute requests in a deterministic way. This allows you to keep data for certain users within a specific Region, or you can control where write operations are routed to prevent contention. If optimizing for performance is your top priority, then latency routing is a good choice.

Read/write patterns

Read local/write local pattern

The Region to which a request is routed is called the “local Region” for that request. To maintain low latencies and reduce the potential for network error, serve all read and write requests from the local Region of your multi-Region active/active architecture.

I use Amazon DynamoDB for the example architecture in Figure 2. DynamoDB global tables replicate a table to multiple Regions. Writes to the table in any Region are replicated to other Regions within a second. This makes it a good choice when using the read local/write local pattern. However, there is the possibility of write contention if updates are made to the same item in different Regions at about the same time. To help ensure eventual consistency, DynamoDB global tables use a last writer wins reconciliation between concurrent updates. In this case, the data written by the first writer is lost. If your application cannot handle this and you require strong consistency, use another write pattern to avoid write contention.

Read local/write global pattern

With a write global pattern, you choose a Region to be the global write Region and only accept writes in that Region. DynamoDB global tables are still an excellent choice for replicating data globally; however, you must ensure that locally received write requests are re-directed to the global write Region.

Amazon Aurora is another good choice. When deployed as an Aurora global database, a primary cluster is deployed to your global write Region, and read-only instances (Aurora Replicas) are deployed to other AWS Regions. Data is replicated to these read-only instances with typical latency of under a second. Aurora global database write forwarding (available using Aurora MySQL-Compatible Edition) allows Aurora Replicas in the secondary cluster to forward write operations to the primary cluster in the global write Region. This way, you can treat the read-only replicas in all your Regions as if they were read/write capable. Using write forwarding, the request travels over the AWS network and not the public internet, reducing latency.

Amazon ElastiCache for Redis also can replicate data across Regions. For example, to store session data, you write to your global write Region and use Global Datastore to ensure that this data is available to be read from other Regions.

Read local/write partitioned pattern

For write-heavy workloads with users located around the world, your application may not be suited to incur the round trip to the global write Region with every write. Consider using a write partitioned pattern to mitigate this. With this pattern, each item or record is assigned a home Region. This can be done based on the Region it was first written to. Or it can be based on a partition key in the record (such as user ID) by pre-assigning a home Region for each value of this key. As shown in Figure 3, records for this user are assigned to the left AWS Region as their home Region. The goal is to try to map records to a home Region close to where most write requests will originate.

Read local/write partitioned pattern for multi-site active/active DR strategy

Figure 3. Read local/write partitioned pattern for multi-site active/active DR strategy

When the user in Figure 3 travels away from home, they will read local, but writes will be routed back to their home Region. Usually writes will not incur long round trips as they are expected to typically come from near the home Region. Since writes are accepted in all Regions (for records homed to that respective Region), DynamoDB global tables, which accept writes in all Regions, are a good choice here also.

Failover

With a multi-Region active/active strategy, if your workload cannot operate in a Region, failover will route traffic away from the impacted Region to healthy Region(s). You can accomplish this with Route 53 by updating the DNS records. Make sure you set TTL (time to live) on these records low enough so that DNS resolvers will reflect your changes quickly enough to meet your RTO targets. Alternatively, you can use AWS Global Accelerator for routing and failover. It does not rely on DNS. Global Accelerator gives you two static IP addresses. You then configure which Regions user traffic goes to based on traffic dials and weights you set.

If you’re using a write global pattern and the impacted Region is the global write Region, then a new Region needs to be promoted to be the new global write Region. If you’re using a write partitioned pattern, your workload must repartition so that the records homed in the impacted Region are assigned to one of the remaining Regions. Using write local, all Regions can accept writes. With no changes needed to the data storage layer, this pattern can have the fastest (near zero) RTO.

Conclusion

Consider the multi-site active/active strategy for your workload if you need DR with the quickest recovery time (lowest RTO) and least data loss (lowest RPO). Implementing it across Regions (multi-Region) is a good option if you are looking for the most separation and complete independence of your sites, or if you need to provide low latency access to the workload from users in globally diverse locations.

Also consider the trade-offs. Implementing and operating this strategy, particularly using multi-Region, can be more complicated and more expensive, than other DR strategies. When implementing multi-Region active/active in AWS, you have access to resources to choose the routing policy and the read/write pattern that is right for your workload.

Related information

How to protect a self-managed DNS service against DDoS attacks using AWS Global Accelerator and AWS Shield Advanced

Post Syndicated from Chido Chemambo original https://aws.amazon.com/blogs/security/how-to-protect-a-self-managed-dns-service-against-ddos-attacks-using-aws-global-accelerator-and-aws-shield-advanced/

In this blog post, I show you how to improve the distributed denial of service (DDoS) resilience of your self-managed Domain Name System (DNS) service by using AWS Global Accelerator and AWS Shield Advanced. You can use those services to incorporate some of the techniques used by Amazon Route 53 to protect against DDoS attacks.

DNS routes users to your application by quickly translating a human-readable domain name to a machine-readable IP address. When protecting the availability of your application against DDoS attacks, it’s important to consider every part of the stack, including domain name resolution. The recommended best practice is to create hosted zones on Route 53, a scalable, highly available DNS service that’s protected against large DDoS attacks and query floods. Route 53 uses anycast routing to serve DNS queries from more than 150 edge locations around the globe. With anycast routing, DNS queries are served from locations that are closer to your users and the globally distributed DDoS mitigation capacity of Amazon Web Services (AWS) reduces the impact of attacks.

Optionally, you can also build your own DNS service on Amazon Elastic Compute Cloud (Amazon EC2). For example, you can run your own proprietary DNS server to take advantage of custom features that you wrote to integrate with an existing DNS service that isn’t running on AWS. When you register a domain name, you’re usually required to provide at least two name servers that can respond to queries from your users. It’s possible to build a DNS service on only two instances, but that provides limited DDoS resilience.

Solution overview

To protect your self-managed DNS service using this solution, you need a strong understanding of DNS and how to operate a distributed, self-managed DNS service on Amazon EC2. This solution improves upon an existing self-managed DNS service by significantly enhancing its ability to withstand DDoS attacks. There are two components that you add to your application:

  • You use Global Accelerator to provide your application with two static IP addresses that act as a fixed entry point to Amazon EC2 instances in multiple AWS Regions. Global Accelerator uses anycast to route your traffic to a point of entry close to the source of the traffic. In addition to providing availability and performance benefits, this gives you access to global DDoS mitigation capacity through AWS.
  • You use Shield Advanced to monitor the availability of your application and automatically engage the AWS Shield Response Team (SRT) if its availability is affected by a DDoS attack. When you associate a Route 53 health check to your protected resources, Shield Advanced uses the health of the application as an input for detection and as a signal to SRT to contact your operations center when needed. You can also engage with SRT to write custom mitigations for your application. For your self-managed DNS service use case, this can include mitigations like DNS packet validation and suspicion scoring that gives a higher priority to queries that are more likely to be legitimate traffic for your application.

As part of this solution, you will build a DNS canary that uses Amazon CloudWatch to update the status of a Route 53 health check if your self-managed DNS service stops responding to queries. An example architecture using Amazon EC2 based DNS behind Global Accelerator and Shield is shown in figure 1.

Figure 1: Amazon EC2 based DNS behind Global Accelerator and Shield

Figure 1: Amazon EC2 based DNS behind Global Accelerator and Shield

Create and configure an accelerator

To begin, create an accelerator and add your existing DNS servers as endpoints. The newly created accelerator will receive queries and forward them to your DNS service.

To create and configure an accelerator

Step 1: Create an accelerator

  1. Navigate to the AWS Global Accelerator dashboard.
  2. Choose Create accelerator.
  3. Enter a name for your accelerator.
  4. Choose Next.

Step 2: Add listeners

Since DNS uses both TCP and UDP protocols, you must create separate listeners to handle requests for each protocol.

At the Add Listeners step, enter the following:

  1. Ports: 53
  2. Protocol: TCP
  3. Client affinity: None

Choose Add listener again to add the UDP listener. Enter the following:

  1. Ports: 53
  2. Protocol: UDP
  3. Client affinity: None
  4. Choose Next

To learn more about the different options available in this step, see To create a listener in Getting started with AWS Global Accelerator.

Step 3: Add endpoint groups

Starting with the TCP listener, enter the following settings:

  1. Region: Choose a Region that your DNS instances are located in, for example, us-east-1.
  2. Traffic dial: 100
  3. If you have additional DNS instances in another AWS Region, choose Add endpoint group and repeat steps a) and b), entering the appropriate Region.
  4. Repeat steps a) through c) to add endpoint groups for the UDP listener, and then choose Next.

To learn more about the different options available in this step, for example, Traffic dial, see the Add endpoint groups in Getting started with AWS Global Accelerator.

Step 4: Add endpoints

Starting with the TCP listener, enter the following in the form boxes for each Region specified in the previous step:

  1. Endpoint type: Select EC2 instance from the drop-down list.
  2. Endpoint: Select a DNS instance from the drop-down list.
  3. Weight: 128

If you have additional DNS instances in the Region, choose Add endpoint and repeat the preceding steps, but select a DNS instance that hasn’t been added as an endpoint.

Repeat all of the preceding steps for the UDP listener, then choose Create accelerator.

To learn more about the different options available in this step, see the Add endpoints in Getting started with AWS Global Accelerator.

Step 5: Verification

When you choose the Create accelerator button, you’re redirected to a Global Accelerator console page that lists all the accelerators in your account. On this page, you can view the global IPs and DNS name allocated to your newly created accelerator, in addition to the current status.

Wait until the status of the accelerators changes to Deployed before proceeding with any tests.

Configure Shield Advanced and Shield Advanced proactive engagement

Protect your accelerator with Shield Advanced, monitor the health of your application, and configure proactive engagement. When you turn on proactive engagement, the SRT will directly contact you if an Amazon Route 53 health check associated with your protected resource becomes unhealthy during an event that’s detected by Shield Advanced.

To configure proactive engagement

Step 1: Create a Route 53 health check

If you already have a Route 53 health check that monitors the health of your DNS service, you can proceed to step 2 of this section. If you don’t yet have a health check, you can use this AWS CloudFormation template to create one. The template will:

  1. Create a Lambda function that queries your DNS server through the accelerator global IPs. This function posts metrics to CloudWatch to indicate whether the query was successful or not.
  2. Create a CloudWatch alarm that will detect when DNS queries fail.
  3. Create a Route 53 health check that tracks the CloudWatch alarm and changes status to unhealthy when the alarm changes to the Alarm state.

Step 2: Subscribe to Shield Advanced

Please note that with AWS Shield Advanced, you pay a monthly fee of $3,000 per month per organization. In addition, you also pay for AWS Shield Advanced Data Transfer usage fees for AWS resources enabled for advanced protection.

  1. Navigate to the AWS Shield console.
  2. In the AWS Shield navigation bar, choose Getting started, and then choose Subscribe to Shield Advanced.
  3. On the Subscribe to Shield Advanced page, read the terms of agreement, and then select all of the check boxes to indicate that you accept the terms.
  4. Choose Subscribe to Shield Advanced.

Step 3: Add resources to protect

  1. Do one of the following, depending on if you were already subscribed to Shield Advanced.
    • If you just subscribed to Shield Advanced by completing Step 2 above, choose Add resources to protect.
    • If you were already subscribed to Shield Advanced, open the Shield console and choose Protected Resources, and then choose Add resources to protect.
  2. In the Choose resources to protect with Shield Advanced page, select the Regions and resource types that you want to protect, then choose Load resources.
  3. Select the resources that you want to protect, and then choose Protect with Shield Advanced.
  4. In the Configure health check based DDoS detection page, under the Protected resources section, select a Route 53 health check to add—either one that you created previously, or a health check created by the AWS CloudFormation template—as the Associated Health Check.
  5. Choose Next until you reach the Review and configure DDoS mitigation and visibility page, and then review the settings and choose Finish configuration.

Step 4: Add contacts

  1. Navigate to the Overview tab of the AWS Shield console.
  2. In the Proactive engagements and contacts section, choose Edit under the Contacts heading.
  3. In the Add contact form, add the contact’s Email, Phone number, and Notes.
  4. Choose Save.

Step 5: Request proactive engagement

  1. Choose Edit proactive engagement feature.
  2. Select Enable.
  3. Choose Save.

Step 6: Configuration review with the SRT

After you enable proactive engagement, the state will be Proactive engagement requested and pending.

SRT will contact you to schedule a configuration review. The review will include a review of your Route 53 health check configuration and a consultation about custom mitigations that can be configured to support your DNS use case. Following this review, SRT will complete your request to enable proactive engagement.

Summary

DNS is a foundational part of the user experience for any application that is accessed via a human readable domain name. Your DNS service should be highly available, DDoS resilient, and accessible to your users with minimal latency. If you run your own DNS service on Amazon EC2, you can improve the DDoS resiliency using Global Accelerator and Shield Advanced. This solution provides your users with a low latency path to your DNS service and provides you with some of the DDoS mitigation that protects Route 53. To learn more about DDoS best practices, see AWS Best Practices for DDoS Resiliency.

If you have feedback about this post, submit comments in the Comments section below. If you have questions about this post, start a new thread on the AWS Shield forum or contact AWS Support.

Want more AWS Security how-to content, news, and feature announcements? Follow us on Twitter.

Author

Chido Chemambo

Chido is a Security Engineer on the AWS Shield Team with 12 years of experience in the telecommunications industry. He specializes in network security and enjoys working with colleagues to improve AWS Shield, and with customers to improve their cloud architectures. Outside of work, Chido enjoys jumping rope, improving his development skills, and watching English Premier League soccer and Formula 1.