Readers of a certain age may remember the so-called “dot com boom” that took place in the early 2000’s. The boom’s “dot com” is what is known as a Top-Level Domain (TLD). Originally intended to organize domain names into a small set of categorical groupings, over the past 40+ years, the set of TLDs has expanded to include country code top-level domains (ccTLDs, like .us, .pt, and .cn), as well as additional generic top-level domains (gTLDs) beyond the initial seven, such as .biz, .shop, and .nyc. Internationalized TLDs, such as .сайт, .онлайн,.شبكة, .游戏, and brand TLDs, like .google and .nike have also been added. As of October 2025, over 1,400 entries can be found in ICANN’s list of all valid top-level domains, and a further expansion is expected to begin in April 2026.
Building on this, today we are launching a new TLD page on Radar that, based on aggregated data from multiple Cloudflare services, provides insights into TLD popularity, activity, and security, along with links directly into Cloudflare Registrar to enable users to register domain names in supported TLDs.
Initial security-related insights
Before today, Radar already offered insights into TLDs, though these were distributed across a couple of different pages and datasets.
In March 2024, when we launched the Email Security page, we introduced the “Most abused TLDs” metric. This chart highlights TLDs associated with the largest shares of malicious and spam email. The analysis is based on the sending domain’s TLD, extracted from the From: header in email messages, with data sourced from Cloudflare’s cloud email security service.
More recently, during 2025’s Birthday Week, we introducedCertificate Transparency (CT) insights on Radar, leveraging data from CT logs monitored by Cloudflare. One highlight is the Certificate Coverage section, which visualizes the distribution of pre-certificates across the top 10 TLDs. These insights give a different perspective on TLD activity, complementing email-based metrics by showing which domains are actively securing web traffic.
A new aggregate overview based on DNS Magnitude
Today, we’re excited to announce the new TLD page on Radar. The landing page and the dedicated per-TLD pages provide TLD managers and site owners with a perspective on the relative popularity of TLDs they manage or may be considering domains in, as well as insights into TLD traffic volume and distribution.
Located under the DNS menu, the landing page introduces a ranking of top-level domains based on DNS Magnitude — a metric originally developed by nic.at to estimate a domain’s overall visibility on the Internet.
Instead of simply counting the total number of DNS queries, DNS Magnitude incorporates a sense of how many unique clients send queries to domains within the TLD. This approach gives a more accurate picture of a TLD’s reach, since a small number of sources can generate a large number of queries. Our ranking is based on queries observed at Cloudflare’s 1.1.1.1 resolver. We aggregate individual client IP addresses into subnets, referred to here as “networks”.
The magnitude value ranges from 0 to 10, with higher values (closer to 10) indicating that the TLD is queried by a broader range of networks. This reflects greater global visibility and, in some cases, a higher likelihood of name collision across different systems. According to ICANN, a name collision occurs when an attempt to resolve a name used in a private name space (such as under a non-delegated Top-Level Domain) results in a query to the public Domain Name System (DNS). When the administrative boundaries of private and public namespaces overlap, name resolution may yield unintended or harmful results. For example, if ICANN were to delegate .home, that could cause significant issues for hobbyists that use the (currently non-delegated) TLD within their local networks.
The table displays a paginated ranking of the top 2,500 TLDs, along with several key attributes. Each entry includes the TLD itself — which links to a dedicated page for delegated TLDs — as well as its type:
gTLD (generic TLD): used for general purposes, such as .com or.info.
grTLD (generic restricted TLD): limited to specific communities or uses, such as.name.
ccTLD (country code TLD): assigned to individual countries or territories, such as.uk or .jp.
iTLD (infrastructure TLD): reserved for technical infrastructure, such as .arpa.
sTLD (sponsored TLD): operated by a sponsoring organization representing a defined community, such as .edu or .gov.
The status column indicates whether the TLD is delegated, meaning it is officially assigned and active in the root zone of the DNS, or non-delegated, meaning it is not currently part of the public DNS. The table also shows the manager of each TLD — typically the organization or registry responsible for its operation — and the corresponding DNS magnitude value.
While the top 10 TLDs include stalwarts such as .com/.net/.org and ccTLDs that have been commercially repurposed, such as .io/.co/.tv, the TLD at the top of the list may be a bit surprising: .su.
This TLD was delegated for the Soviet Union back in 1990, but its use waned after the dissolution of the USSR, with constituent republics becoming independent and using their own dedicated ccTLDs. (ICANN reportedly plans to retire.su in 2030.) Looking at a single day’s worth of data, the .su TLD does not rank #1 by unique networks. However, over a longer period of time, such as seven days, it sees queries from more unique networks than other TLDs, placing it atop the magnitude list. Further analysis of the top hostnames observed within this TLD suggests that they are mostly associated with a popular online world-building game. Interestingly, over half of the queries for .su domains come from the United States, Germany, and Brazil.
More detailed TLD insights
The new TLD section also offers dedicated pages for individual TLDs. By clicking on a TLD in the DNS Magnitude table or searching for a TLD in the top search bar, users can access a page with detailed insights and information about that TLD. It’s important to note that while non-delegated TLDs are included in the DNS Magnitude ranking, TLD-specific pages are only available for delegated TLDs. The list of delegated TLDs, along with their type and manager, is sourced from the IANA’s Root Zone Database.
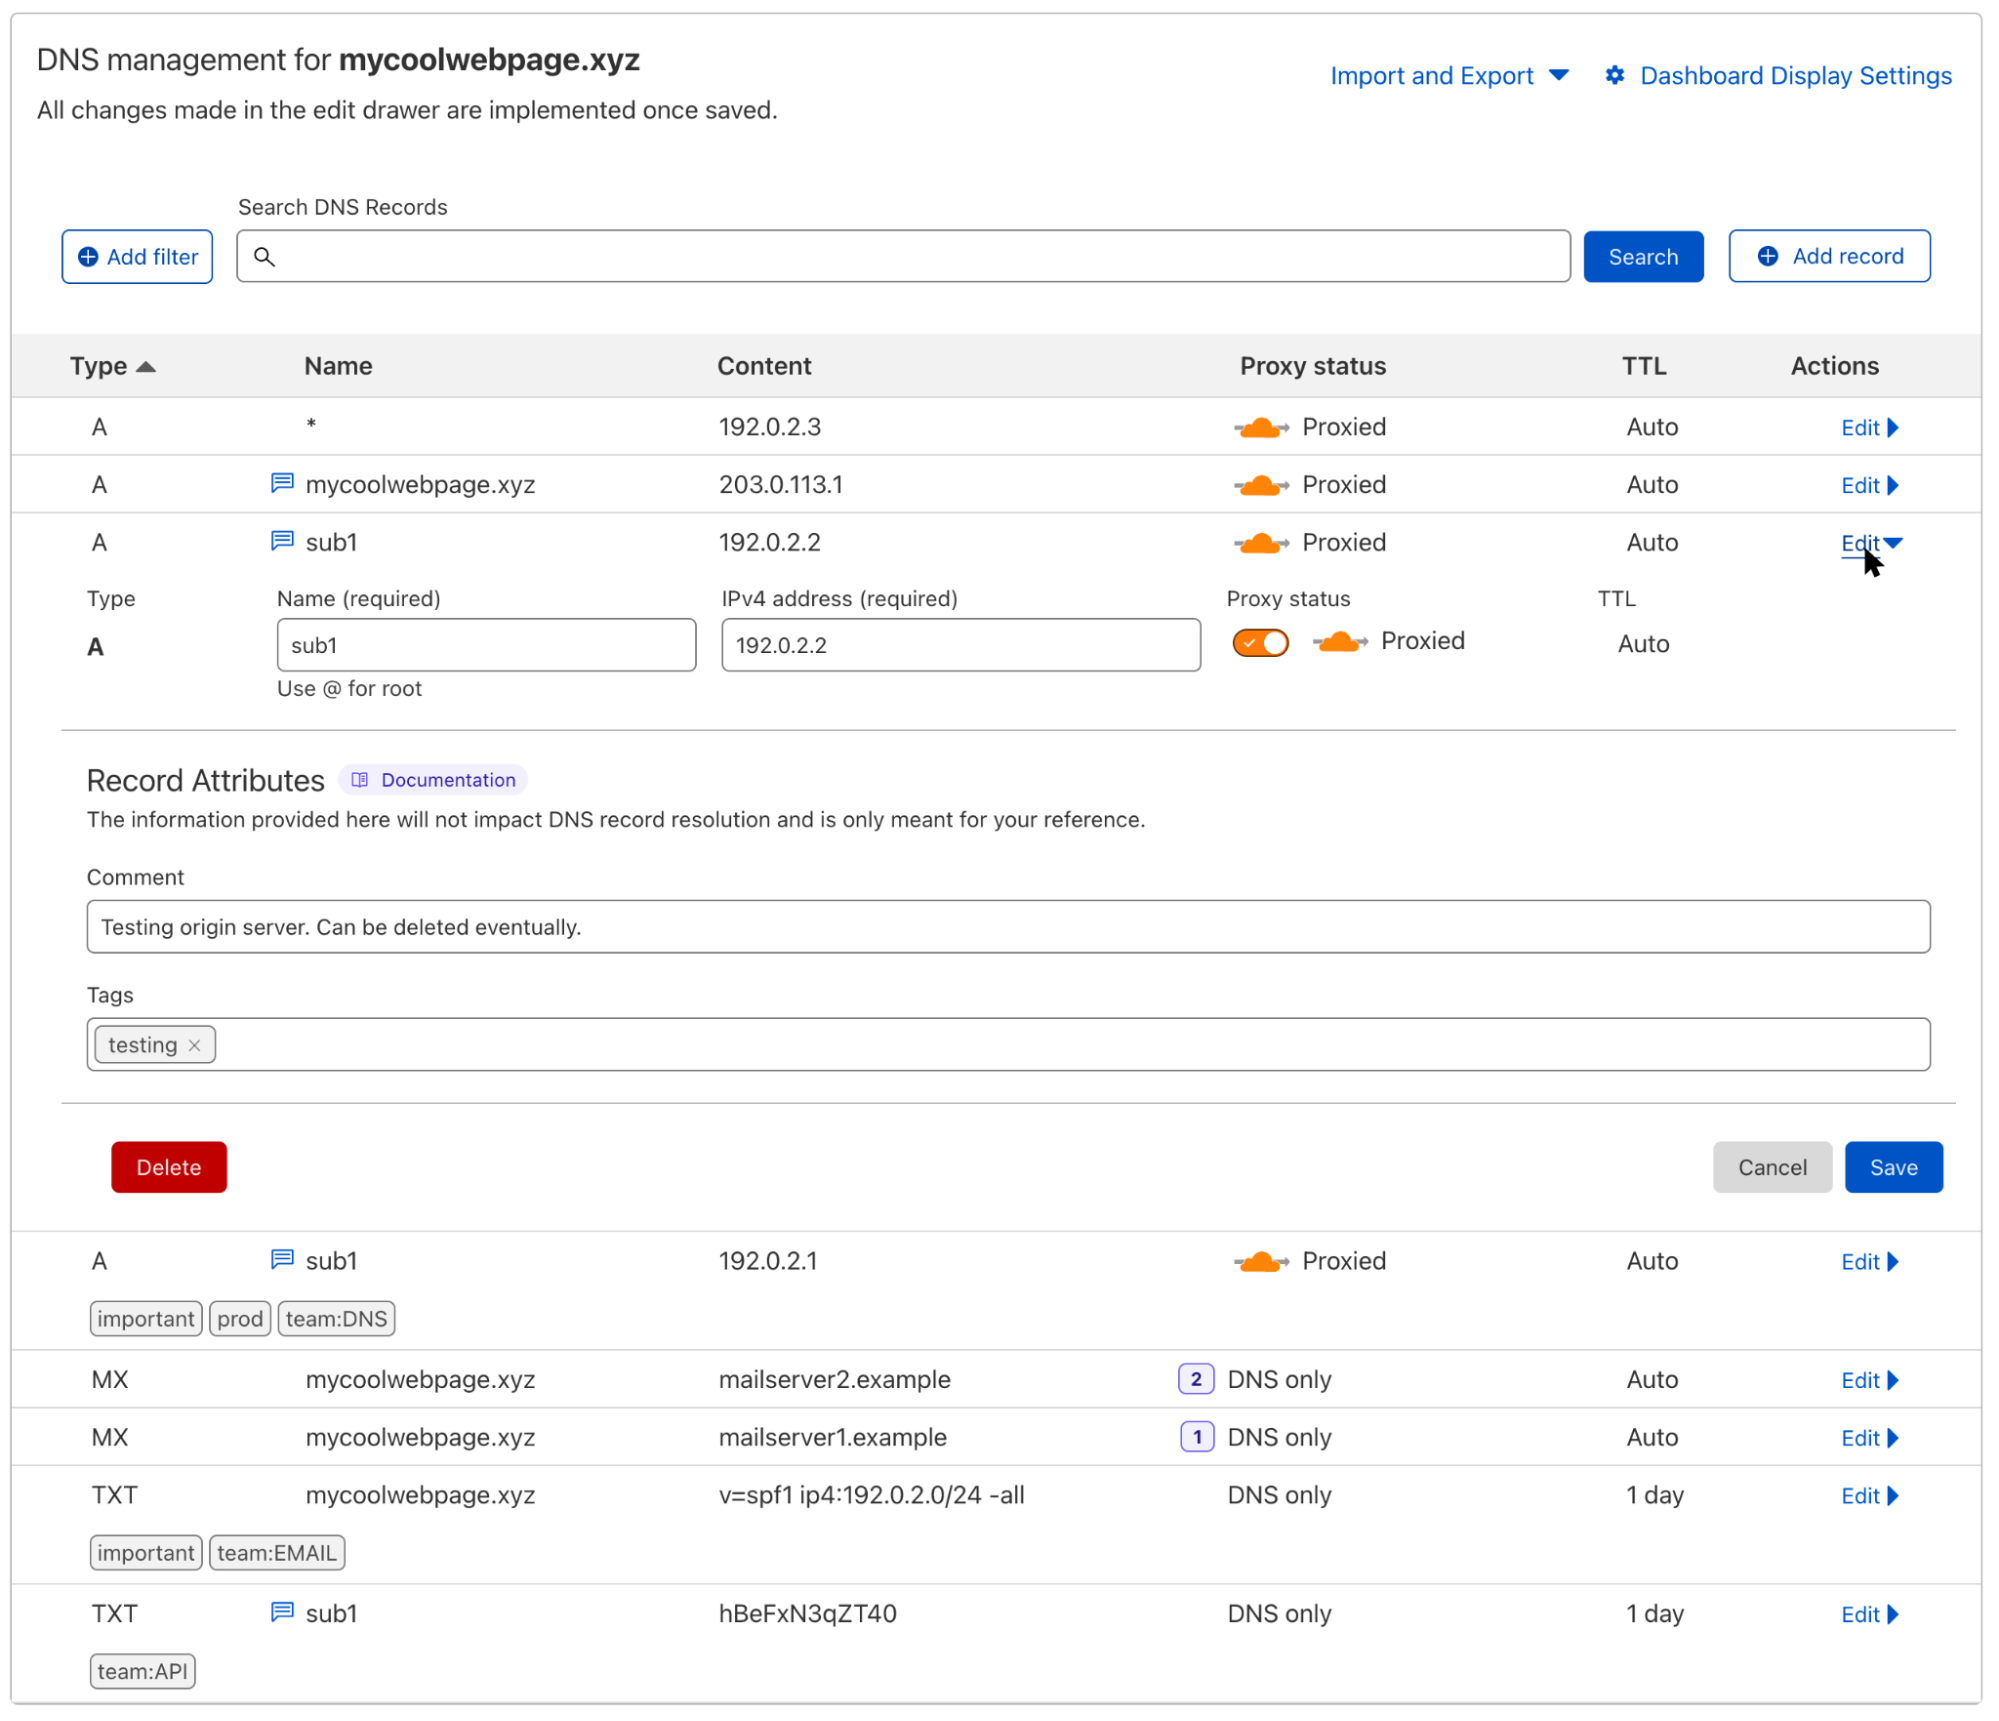
When a user enters an individual TLD page, they see two main cards. The first card provides general information about the TLD, including its type, manager, DNS magnitude value, DNSSEC support, and RDAP support. DNSSEC support is determined by checking whether the TLD has a Delegation Signer (DS) record in the root zone. We also parse the record to get the associated DNSSEC algorithm. RDAP support is indicated if the TLD is listed in the IANA RDAP bootstrap file. RDAP (Registration Data Access Protocol) is a new standard for querying domain contact and nameserver information for all registered domains.
The second card contains WHOIS data for the TLD, including its creation date, the date of the last update, and the list of nameservers. If the TLD is supported by Cloudflare Registrar, an additional card appears, giving users direct access to registration options. As of today, Cloudflare Registrar supports over 400 TLDs.
Below these cards, the page features the DNS query volume section, which presents insights based on queries to Cloudflare’s 1.1.1.1 resolver for domains under the TLD. This section includes a chart showing DNS queries over the selected time period, along with a donut chart breaking down queries by type, response code, and DNSSEC support. A choropleth map further illustrates the percentage of DNS queries by country, highlighting which regions generate the most queries for domains under the TLD.
Each individual TLD page also includes a Certificate Transparency section, offering visibility into TLS/SSL certificate issuance for the TLD. This section displays a line chart showing the total number of certificates issued over the selected period, as well as a donut chart depicting the distribution of certificate issuance among the top Certificate Authorities.
When we launched the DNS page earlier in 2025, we provided query volumes by TLDs, but this was limited to ccTLDs. Today, we’re extending that dataset to include all delegated TLDs. With these new insights, we’ve added the “Top-level domain distribution” section to the DNS page, featuring a line chart that shows the distribution of queries to 1.1.1.1 across the top 10 TLDs, alongside a table extending this ranking to the top 100. Not surprisingly, .com tops the ranking with more than 60% of queries, followed by .net, .arpa (an infrastructure TLD), and .org.
Because TLDs are a foundational component of the Domain Name System, it is critical that the associated name servers are highly performant. Based on billions of daily queries to these name servers, we plan to add insights into their performance to Radar’s TLD pages in 2026. These insights will provide TLD managers with an external perspective on query responsiveness, and will give developers and site owners a perspective on the potential impact of the performance of the associated TLD name servers as they look to register new domain names.
The underlying data for these new TLD pages is available via the API and can be interactively explored in more detail using Radar’s Data Explorer and AI Assistant. And as always, Radar and Data Assistant charts and graphs are downloadable for sharing, and embeddable for use in your own blog posts, websites, or dashboards.
If you share our TLD charts and graphs on social media, be sure to tag us: @CloudflareRadar (X), noc.social/@cloudflareradar (Mastodon), and radar.cloudflare.com (Bluesky). If you have questions or comments, or suggestions for data that you’d like to see us add to Radar, you can reach out to us on social media, or contact us via email.
Over the past few days Cloudflare has been notified through our vulnerability disclosure program and the certificate transparency mailing list that unauthorized certificates were issued by Fina CA for 1.1.1.1, one of the IP addresses used by our public DNS resolver service. From February 2024 to August 2025, Fina CA issued twelve certificates for 1.1.1.1 without our permission. We did not observe unauthorized issuance for any properties managed by Cloudflare other than 1.1.1.1.
We have no evidence that bad actors took advantage of this error. To impersonate Cloudflare’s public DNS resolver 1.1.1.1, an attacker would not only require an unauthorized certificate and its corresponding private key, but attacked users would also need to trust the Fina CA. Furthermore, traffic between the client and 1.1.1.1 would have to be intercepted.
While this unauthorized issuance is an unacceptable lapse in security by Fina CA, we should have caught and responded to it earlier. After speaking with Fina CA, it appears that they issued these certificates for the purposes of internal testing. However, no CA should be issuing certificates for domains and IP addresses without checking control. At present all certificates have been revoked. We are awaiting a full post-mortem from Fina.
While we regret this situation, we believe it is a useful opportunity to walk through how trust works on the Internet between networks like ourselves, destinations like 1.1.1.1, CAs like Fina, and devices like the one you are using to read this. To learn more about the mechanics, please keep reading.
Background
Cloudflare operates a public DNS resolver 1.1.1.1 service that millions of devices use to resolve domain names from a human-readable format such as example.com to an IP address like 192.0.2.42 or 2001:db8::2a.
The 1.1.1.1 service is accessible using various methods, across multiple domain names, such as cloudflare-dns.com and one.one.one.one, and also using various IP addresses, such as 1.1.1.1, 1.0.0.1, 2606:4700:4700::1111, and 2606:4700:4700::1001. 1.1.1.1 for Families also provides public DNS resolver services and is hosted on different IP addresses — 1.1.1.2, 1.1.1.3, 1.0.0.2, 1.0.0.3, 2606:4700:4700::1112, 2606:4700:4700::1113, 2606:4700:4700::1002, 2606:4700:4700::1003.
As originally specified in RFC 1034 and RFC 1035, the DNS protocol includes no privacy or authenticity protections. DNS queries and responses are exchanged between client and server in plain text over UDP or TCP. These represent around 60% of queries received by the Cloudflare 1.1.1.1 service. The lack of privacy or authenticity protection means that any intermediary can potentially read the DNS query and response and modify them without the client or the server being aware.
To address these shortcomings, we have helped develop and deploy multiple solutions at the IETF. The two of interest to this post are DNS over TLS (DoT, RFC 7878) and DNS over HTTPS (DoH, RFC 8484). In both cases the DNS protocol itself is mainly unchanged, and the desirable security properties are implemented in a lower layer, replacing the simple use of plain-text in UDP and TCP in the original specification. Both DoH and DoT use TLS to establish an authenticated, private, and encrypted channel over which DNS messages can be exchanged. To learn more you can read DNS Encryption Explained.
During the TLS handshake, the server proves its identity to the client by presenting a certificate. The client validates this certificate by verifying that it is signed by a Certification Authority that it already trusts. Only then does it establish a connection with the server. Once connected, TLS provides encryption and integrity for the DNS messages exchanged between client and server. This protects DoH and DoT against eavesdropping and tampering between the client and server.
The TLS certificates used in DoT and DoH are the same kinds of certificates HTTPS websites serve. Most website certificates are issued for domain names like example.com. When a client connects to that website, they resolve the name example.com to an IP like 192.0.2.42, then connect to the domain on that IP address. The server responds with a TLS certificate containing example.com, which the device validates.
However, DNS server certificates tend to be used slightly differently. Certificates used for DoT and DoH have to contain the service IP addresses, not just domain names. This is due to clients being unable to resolve a domain name in order to contact their resolver, like cloudflare-dns.com. Instead, devices are first set up by connecting to their resolver via a known IP address, such as 1.1.1.1 in the case of Cloudflare public DNS resolver. When this connection uses DoT or DoH, the resolver responds with a TLS certificate issued for that IP address, which the client validates. If the certificate is valid, the client believes that it is talking to the owner of 1.1.1.1 and starts sending DNS queries.
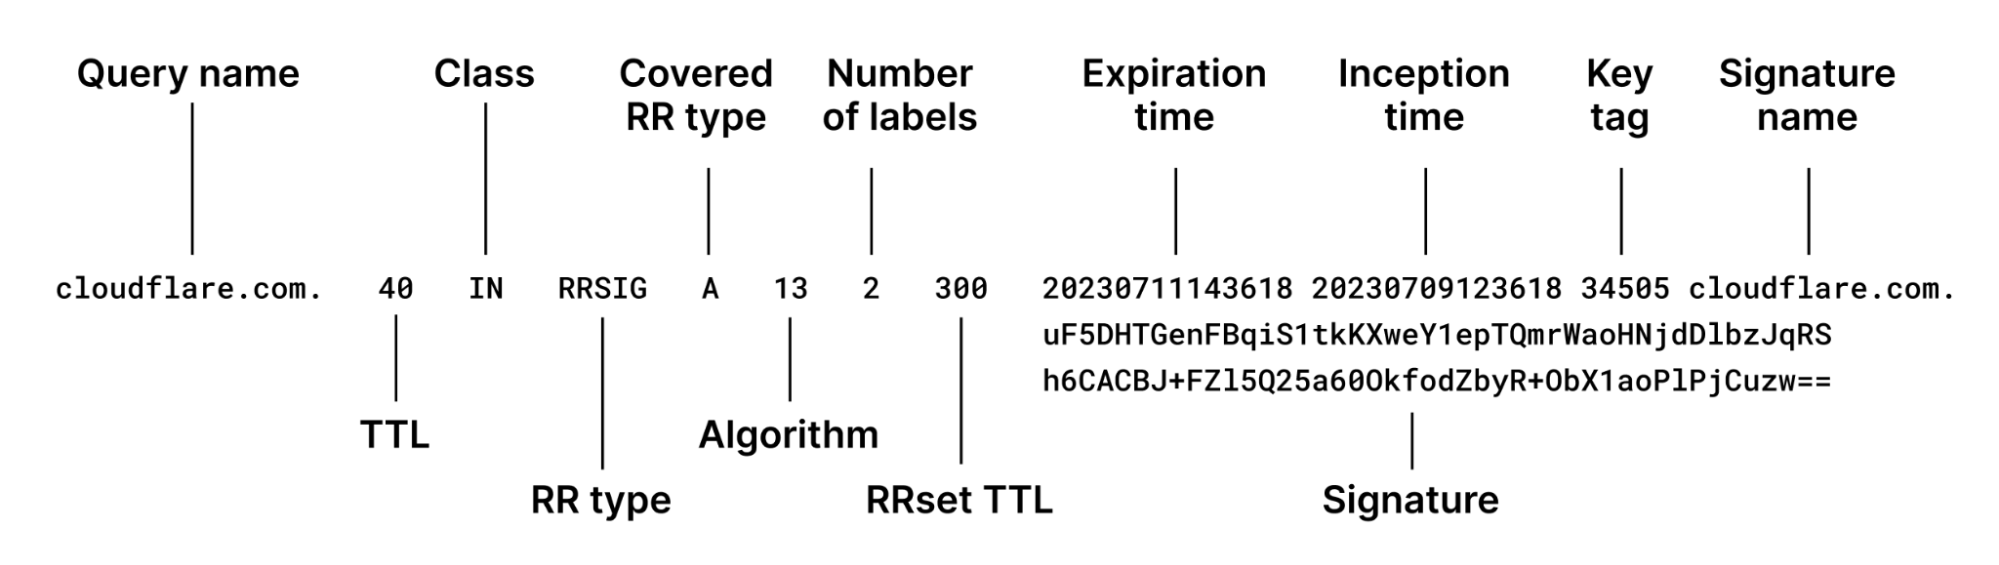
You can see that the IP addresses are included in the certificate Cloudflare’s public resolver uses for DoT/DoH:
Certificate:
  Data:
      Version: 3 (0x2)
      Serial Number:
          02:7d:c8:c5:e1:72:94:ae:c9:ed:3f:67:72:8e:8a:08
      Signature Algorithm: sha256WithRSAEncryption
      Issuer: C=US, O=DigiCert Inc, CN=DigiCert Global G2 TLS RSA SHA256 2020 CA1
      Validity
          Not Before: Jan  2 00:00:00 2025 GMT
          Not After : Jan 21 23:59:59 2026 GMT
      Subject: C=US, ST=California, L=San Francisco, O=Cloudflare, Inc., CN=cloudflare-dns.com
      X509v3 extensions:
          X509v3 Subject Alternative Name:
              DNS:cloudflare-dns.com, DNS:*.cloudflare-dns.com, DNS:one.one.one.one, IP Address:1.0.0.1, IP Address:1.1.1.1, IP Address:162.159.36.1, IP Address:162.159.46.1, IP Address:2606:4700:4700:0:0:0:0:1001, IP Address:2606:4700:4700:0:0:0:0:1111, IP Address:2606:4700:4700:0:0:0:0:64, IP Address:2606:4700:4700:0:0:0:0:6400
Rogue certificate issuance
The section above describes normal, expected use of Cloudflare public DNS resolver 1.1.1.1 service, using certificates managed by Cloudflare. However, Cloudflare has been made aware of other, unauthorized certificates being issued for 1.1.1.1. Since certificate validation is the mechanism by which DoH and DoT clients establish the authenticity of a DNS resolver, this is a concern. Let’s now dive a little further in the security model provided by DoH and DoT.
Consider a client that is preconfigured to use the 1.1.1.1 resolver service using DoT. The client must establish a TLS session with the configured server before it can send any DNS queries. To be trusted, the server needs to present a certificate issued by a CA that the client trusts. The collection of certificates trusted by the client is also called the root store.
A Certification Authority (CA) is an organisation, such as DigiCert in the section above, whose role is to receive requests to sign certificates and verify that the requester has control of the domain. In this incident, Fina CA issued certificates for 1.1.1.1 without Cloudflare’s involvement. This means that Fina CA did not properly check whether the requestor had legitimate control over 1.1.1.1. According to Fina CA:
“They were issued for the purpose of internal testing of certificate issuance in the production environment. An error occurred during the issuance of the test certificates when entering the IP addresses and as such they were published on Certificate Transparency log servers.”
Although it’s not clear whether Fina CA sees it as an error, we emphasize that it is not an error to publish test certificates on Certificate Transparency (more about what that is later on). Instead, the error at hand is Fina CA using their production keys to sign a certificate for an IP address without permission of the controller. We have talked about misuse of 1.1.1.1 in documentation, lab, and testing environments at length. Instead of the Cloudflare public DNS resolver 1.1.1.1 IP address, Fina should have used an IP address it controls itself.
Unauthorized certificates are unfortunately not uncommon, whether due to negligence — such as IdenTrust in November 2024 — or compromise. Famously in 2011, the Dutch CA DigiNotar was hacked, and its keys were used to issue hundreds of certificates. This hack was a wake-up call and motivated the introduction of Certificate Transparency (CT), later formalised in RFC 6962. The goal of Certificate Transparency is not to directly prevent misissuance, but to be able to detect any misissuance once it has happened, by making sure every certificate issued by a CA is publicly available for inspection.
In certificate transparency several independent parties, including Cloudflare, operate public logs of issued certificates. Many modern browsers do not accept certificates unless they provide proof in the form of signed certificate timestamps (SCTs) that the certificate has been logged in at least two logs. Domain owners can therefore monitor all public CT logs for any certificate containing domains they care about. If they see a certificate for their domains that they did not authorize, they can raise the alarm. CT is also the data source for public services such as crt.sh and Cloudflare Radar’s certificate transparency page.
Not all clients require proof of inclusion in certificate transparency. Browsers do, but most DNS clients don’t. We were fortunate that Fina CA did submit the unauthorized certificates to the CT logs, which allowed them to be discovered.
Investigation into potential malicious use
Our immediate concern was that someone had maliciously used the certificates to impersonate the 1.1.1.1 service. Such an attack would require all the following:
An attacker would require a rogue certificate and its corresponding private key.
Attacked clients would need to trust the Fina CA.
Traffic between the client and 1.1.1.1 would have to be intercepted.
In light of this incident, we have reviewed these requirements one by one:
1. We know that a certificate was issued without Cloudflare’s involvement. We must assume that a corresponding private key exists, which is not under Cloudflare’s control. This could be used by an attacker. Fina CA wrote to us that the private keys were exclusively in Fina’s controlled environment and were immediately destroyed even before the certificates were revoked. As we have no way to verify this, we have and continue to take steps to detect malicious use as described in point 3.
2. Furthermore, some clients trust Fina CA. It is included by default in Microsoft’s root store and in an EU Trust Service provider. We can exclude some clients, as the CA certificate is not included by default in the root stores of Android, Apple, Mozilla, or Chrome. These users cannot have been affected with these default settings. For these certificates to be used nefariously, the client’s root store must include the Certification Authority (CA) that issued them. Upon discovering the problem, we immediately reached out to Fina CA, Microsoft, and the EU Trust Service provider. Microsoft responded quickly, and started rolling out an update to their disallowed list, which should cause clients that use it to stop trusting the certificate.
3. Finally, we have launched an investigation into possible interception between users and 1.1.1.1. The first way this could happen is when the attacker is on-path of the client request. Such man-in-the-middle attacks are likely to be invisible to us. Clients will get responses from their on-path middlebox and we have no reliable way of telling that is happening. On-path interference has been a persistent problem for 1.1.1.1, which we’ve been working on ever since we announced 1.1.1.1.
A second scenario can occur when a malicious actor is off-path, but is able to hijack 1.1.1.1 routing via BGP. These are scenarios we have discussed in aprevious blog post, and increasing adoption of RPKI route origin validation (ROV) makes BGP hijacks with high penetration harder. We looked at the historical BGP announcements involving 1.1.1.1, and have found no evidence that such routing hijacks took place.
Although we cannot be certain, so far we have seen no evidence that these certificates have been used to impersonate Cloudflare public DNS resolver 1.1.1.1 traffic. In later sections we discuss the steps we have taken to prevent such impersonation in the future, as well as concrete actions you can take to protect your own systems and users.
A closer look at the unauthorized certificates attributes
All unauthorized certificates for 1.1.1.1 were valid for exactly one year and included other domain names. Most of these domain names are not registered, which indicates that the certificates were issued without proper domain control validation. This violates sections 3.2.2.4 and 3.2.2.5 of the CA/Browser Forum’s Baseline Requirements, and sections 3.2.2.3 and 3.2.2.4 of the Fina CA Certificate Policy.
The full list of domain names we identified on the unauthorized certificates are as follows:
It’s also worth noting that the Subject attribute points to a fictional organisation TEST D.D., as can be seen on this unauthorized certificate:
        Serial Number:
            a5:30:a2:9c:c1:a5:da:40:00:00:00:00:56:71:f2:4c
        Signature Algorithm: sha256WithRSAEncryption
        Issuer: C=HR, O=Financijska agencija, CN=Fina RDC 2015
        Validity
            Not Before: Nov  2 23:45:15 2024 GMT
            Not After : Nov  2 23:45:15 2025 GMT
        Subject: C=HR, O=TEST D.D., L=ZAGREB, CN=testssl.finatest.hr, serialNumber=VATHR-32343828408.306
        X509v3 extensions:
            X509v3 Subject Alternative Name:
                DNS:testssl.finatest.hr, DNS:testssl2.finatest.hr, IP Address:1.1.1.1
Incident timeline and impact
All timestamps are UTC. All certificates are identified by their date of validity.
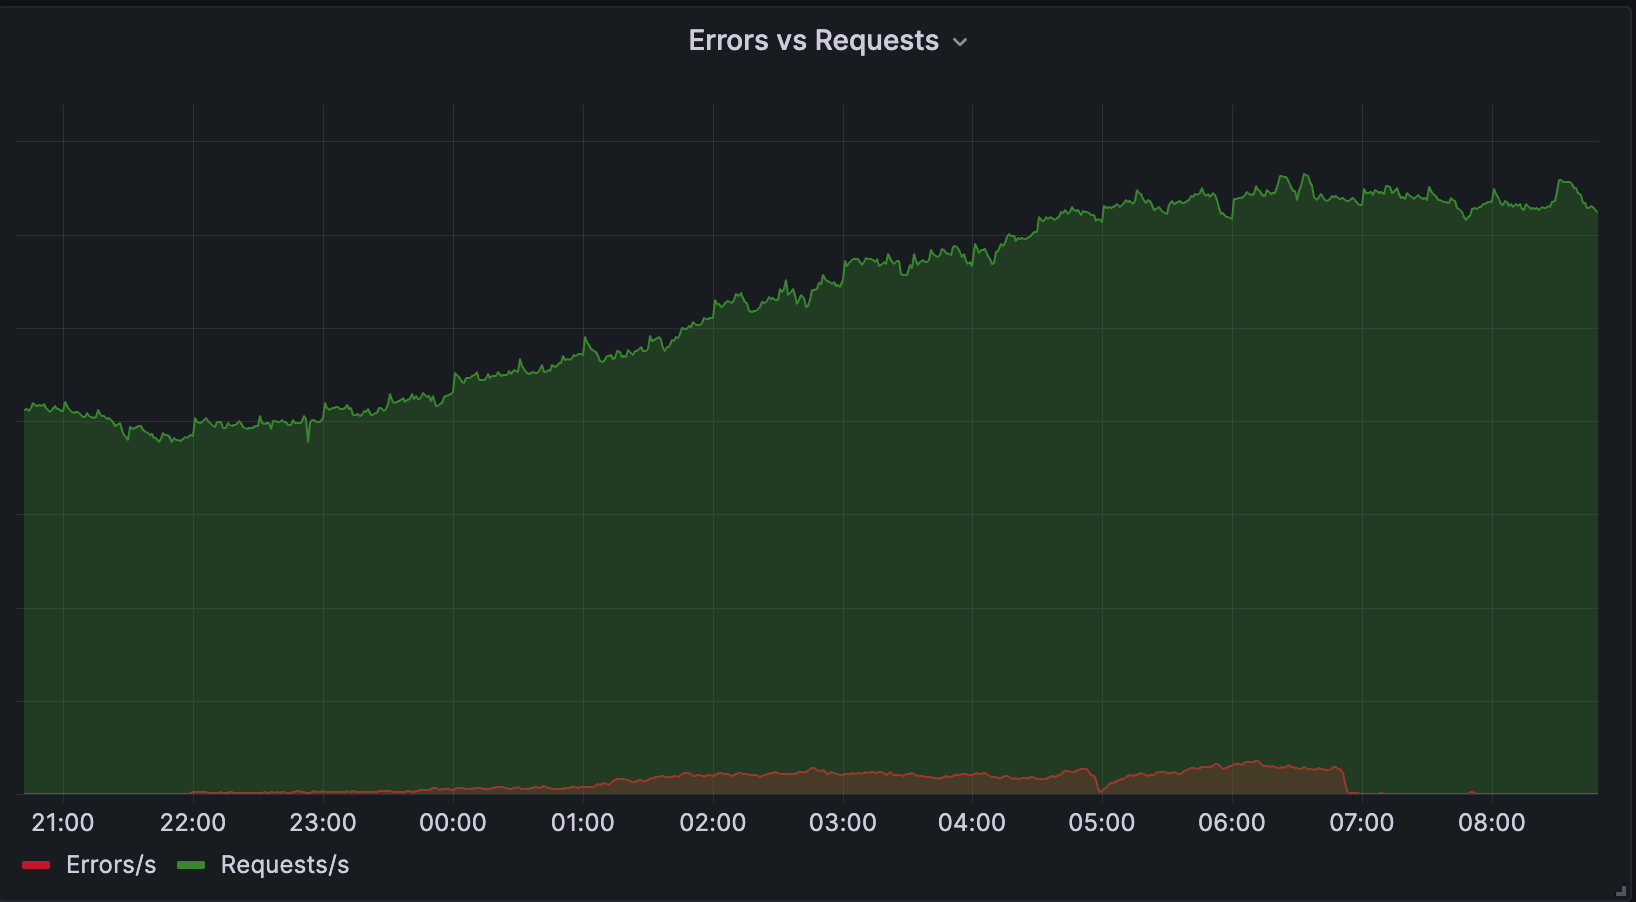
The first certificate was issued to be valid starting February 2024, and revoked 33 min later. 11 certificate issuances with common name 1.1.1.1 followed from February 2024 to August 2025. Public reports have been made on Hacker News and on the certificate-transparency mailing list early in September 2025, which Cloudflare responded to.
While responding to the incident, we identified the full list of misissued certificates, their revocation status, and which clients trust them.
First response by Cloudflare on the mailing list about starting the investigation
2025-09-03 12:08:00
Incident declared
2025-09-03 12:16:00
Notification of an unauthorised issuance sent to Fina CA, Microsoft Root Store, and EU Trust service provider
2025-09-03 12:23:00
Cloudflare identifies an initial list of nine rogue certificates
2025-09-03 12:24:00
Outreach to Fina CA to inform them about the unauthorized issuance, requesting revocation
2025-09-03 12:26:00
Identify the number of requests served on 1.1.1.1 IP address, and associated names/services
2025-09-03 12:42:00
As a precautionary measure, began investigation to rule out the possibility of a BGP hijack for 1.1.1.1
2025-09-03 18:48:00
Second notification of the incident to Fina CA
2025-09-03 21:27:00
Microsoft Root Store notifies us that they are preventing further use of the identified unauthorized certificates by using their quick-revocation mechanism.
2025-09-04 06:13:27
Fina revoked all certificates.
2025-09-04 12:44:00
Cloudflare receives a response from Fina indicating “an error occurred during the issuance of the test certificates when entering the IP addresses and as such they were published on Certificate Transparency log servers. […] Fina will eliminate the possibility of such an error recurring.”
It is therefore disappointing that we failed to properly monitor certificates for our own domain. We failed three times. The first time because 1.1.1.1 is an IP certificate and our system failed to alert on these. The second time because even if we were to receive certificate issuance alerts, as any of our customers can, we did not implement sufficient filtering. With the sheer number of names and issuances we manage it has not been possible for us to keep up with manual reviews. Finally, because of this noisy monitoring, we did not enable alerting for all of our domains. We are addressing all three shortcomings.
We double-checked all certificates issued for our names, including but not limited to 1.1.1.1, using certificate transparency, and confirmed that as of 3 September, the Fina CA issued certificates are the only unauthorized issuances. We contacted Fina, and the root programs we know that trust them, to ask for revocation and investigation. The certificates have been revoked.
Despite no indication of usage of these certificates so far, we take this incident extremely seriously. We have identified several steps we can take to address the risk of these sorts of problems occurring in the future, and we plan to start working on them immediately:
Alerting: Cloudflare will improve alerts and escalation for issuance of certificates for missing Cloudflare owned domains including 1.1.1.1 certificates.
Transparency: The issuance of these unauthorised 1.1.1.1 certificates were detected because Fina CA used Certificate Transparency. Transparency inclusion is not enforced by most DNS clients, which implies that this detection was a lucky one. We are working on bringing transparency to non-browser clients, in particular DNS clients that rely on TLS.
Bug Bounty: Our procedure for triaging reports made through our vulnerability disclosure program was the cause for a delayed response. We are working to revise our triaging process to ensure such reports get the right visibility.
Monitoring: During this incident, our team relied on crt.sh to provide us a convenient UI to explore CA issued certificates. We’d like to give a shout to the Sectigo team for maintaining this tool. Given Cloudflare is an active CT Monitor, we have started to build a dedicated UI to explore our data in Radar. We are looking to enable exploration of certs with IP addresses as common names to Radar as well.
What steps should you take?
This incident demonstrates the disproportionate impact that the current root store model can have. It is enough for a single certification authority going rogue for everyone to be at risk.
If you are an IT manager with a fleet of managed devices, you should consider whether you need to take direct action to revoke these unauthorized certificates. We provide the list in the timeline section above. As the certificates have since been revoked, it is possible that no direct intervention should be required; however, system-wide revocation is not instantaneous and automatic and hence we recommend checking.
If you are tasked to review the policy of a root store that includes Fina CA, you should take immediate actions to review their inclusion in your program. The issue that has been identified through the course of this investigation raises concerns, and requires a clear report and follow-up from the CA. In addition, to make it possible to detect future such incidents, you should consider having a requirement for all CAs in your root store to participate in Certificate Transparency. Without CT logs, problems such as the one we describe here are impossible to address before they result in impact to end users.
We are not suggesting that you should stop using DoH or DoT. DNS over UDP and TCP are unencrypted, which puts every single query and response at risk of tampering and unauthorised surveillance. However, we believe that DoH and DoT client security could be improved if clients required that server certificates be included in a certificate transparency log.
Conclusion
This event is the first time we have observed a rogue issuance of a certificate used by our public DNS resolver 1.1.1.1 service. While we have no evidence this was malicious, we know that there might be future attempts that are.
We plan to accelerate how quickly we discover and alert on these types of issues ourselves. We know that we can catch these earlier, and we plan to do so.
The identification of these kinds of issues rely on an ecosystem of partners working together to support Certificate Transparency. We are grateful for the monitors who noticed and reported this issue.
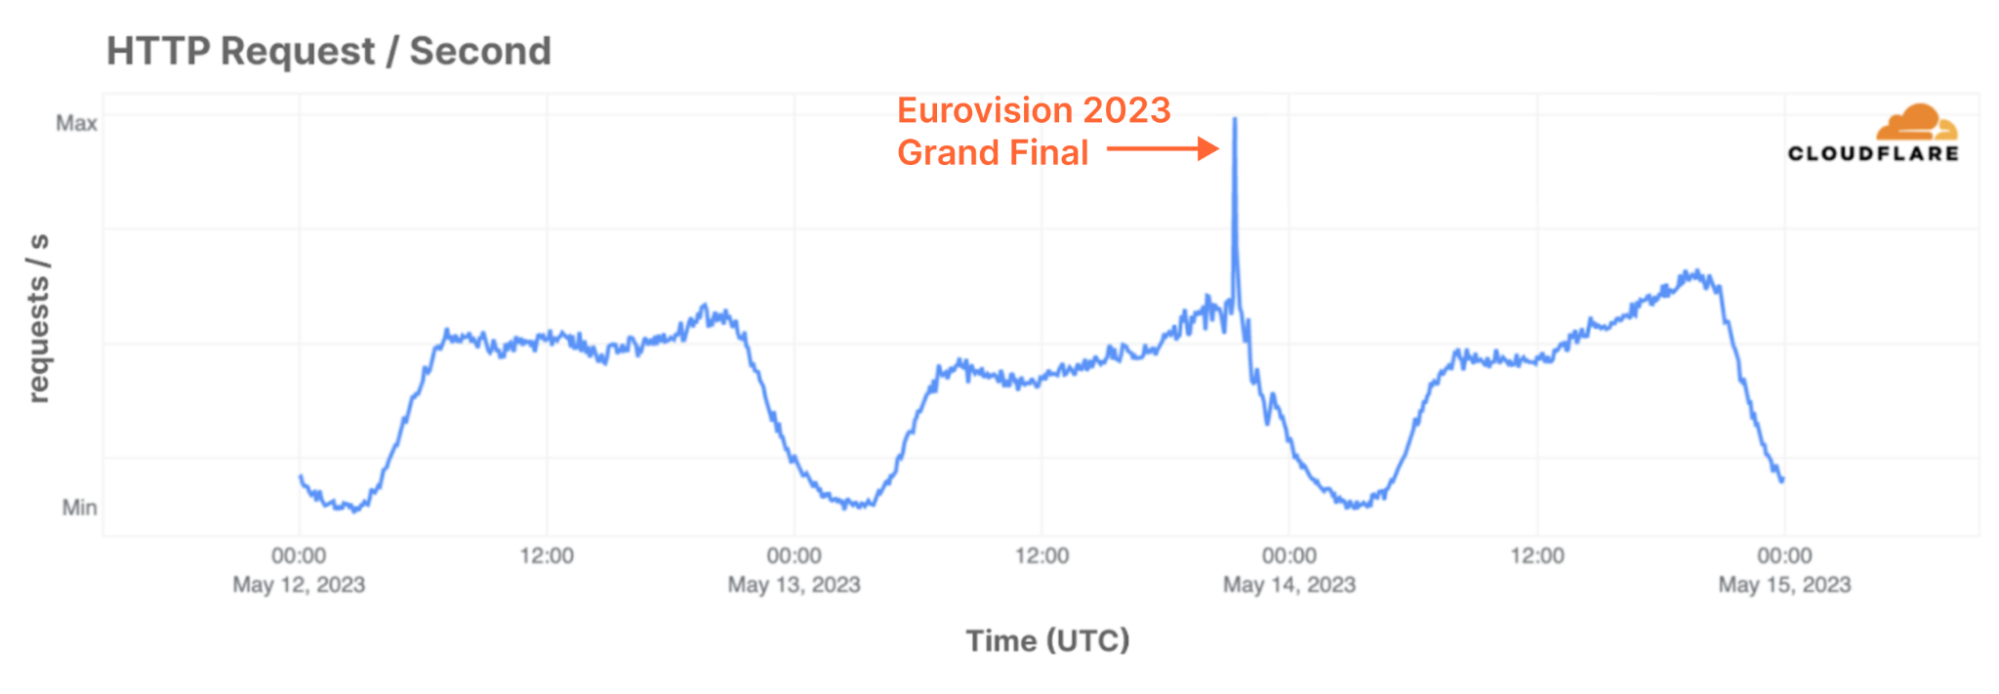
No joke – Cloudflare’s 1.1.1.1 resolver was launched on April Fool’s Day in 2018. Over the last seven years, this highly performant and privacy–conscious service has grown to handle an average of 1.9 Trillion queries per day from approximately 250 locations (countries/regions) around the world. Aggregated analysis of this traffic provides us with unique insight into Internet activity that goes beyond simple Web traffic trends, and we currently use analysis of 1.1.1.1 data to power Radar’s Domains page, as well as the Radar Domain Rankings.
In December 2022, Cloudflare joined the AS112 Project, which helps the Internet deal with misdirected DNS queries. In March 2023, we launched an AS112 statistics page on Radar, providing insight into traffic trends and query types for this misdirected traffic. Extending the basic analysis presented on that page, and building on the analysis of resolver data used for the Domains page, today we are excited to launch a dedicated DNS page on Cloudflare Radar to provide increased visibility into aggregate traffic and usage trends seen across 1.1.1.1 resolver traffic. In addition to looking at global, location, and autonomous system (ASN) traffic trends, we are also providing perspectives on protocol usage, query and response characteristics, and DNSSEC usage.
The traffic analyzed for this new page may come from users that have manually configured their devices or local routers to use 1.1.1.1 as a resolver, ISPs that set 1.1.1.1 as the default resolver for their subscribers, ISPs that use 1.1.1.1 as a resolver upstream from their own, or users that have installed Cloudflare’s 1.1.1.1/WARP app on their device. The traffic analysis is based on anonymised DNS query logs, in accordance with Cloudflare’s Privacy Policy, as well as our 1.1.1.1 Public DNS Resolver privacy commitments.
Below, we walk through the sections of Radar’s new DNS page, reviewing the included graphs and the importance of the metrics they present. The data and trends shown within these graphs will vary based on the location or network that the aggregated queries originate from, as well as on the selected time frame.
Traffic trends
As with many Radar metrics, the DNS page leads with traffic trends, showing normalized query volume at a worldwide level (default), or from the selected location or autonomous system (ASN). Similar to other Radar traffic-based graphs, the time period shown can be adjusted using the date picker, and for the default selections (last 24 hours, last 7 days, etc.), a comparison with traffic seen over the previous period is also plotted.
For location-level views (such as Latvia, in the example below), a table showing the top five ASNs by query volume is displayed alongside the graph. Showing the network’s share of queries from the selected location, the table provides insights into the providers whose users are generating the most traffic to 1.1.1.1.
When a country/region is selected, in addition to showing an aggregate traffic graph for that location, we also show query volumes for the country code top level domain (ccTLD) associated with that country. The graph includes a line showing worldwide query volume for that ccTLD, as well as a line showing the query volume based on queries from the associated location. Anguilla’s ccTLD is .ai, and is a popular choice among the growing universe of AI-focused companies. While most locations see a gap between the worldwide and “local” query volume for their ccTLD, Anguilla’s is rather significant — as the graph below illustrates, this size of the gap is driven by both the popularity of the ccTLD and Anguilla’s comparatively small user base. (Traffic for .ai domains from Anguilla is shown by the dark blue line at the bottom of the graph.) Similarly, sizable gaps are seen with other “popular” ccTLDs as well, such as .io (British Indian Ocean Territory), .fm (Federated States of Micronesia), and .co (Colombia). A higher “local” ccTLD query volume in other locations results in smaller gaps when compared to the worldwide query volume.
Depending on the strength of the signal (that is, the volume of traffic) from a given location or ASN, this data can also be used to corroborate reported Internet outages or shutdowns, or reported blocking of 1.1.1.1. For example, the graph below illustrates the result of Venezuelan provider CANTV reportedly blocking access to 1.1.1.1 for its subscribers. A comparable drop is visible for Supercable, another Venezuelan provider that also reportedly blocked access to Cloudflare’s resolver around the same time.
Individual domain pages (like the one for cloudflare.com, for example) have long had a choropleth map and accompanying table showing the popularity of the domain by location, based on the share of DNS queries for that domain from each location. A similar view is included at the bottom of the worldwide overview page, based on the share of total global queries to 1.1.1.1 from each location.
Query and response characteristics
While traffic trends are always interesting and important to track, analysis of the characteristics of queries to 1.1.1.1 and the associated responses can provide insights into the adoption of underlying transport protocols, record type popularity, cacheability, and security.
Published in November 1987, RFC 1035 notes that “The Internet supports name server access using TCP [RFC-793] on server port 53 (decimal) as well as datagram access using UDP [RFC-768] on UDP port 53 (decimal).” Over the subsequent three-plus decades, UDP has been the primary transport protocol for DNS queries, falling back to TCP for a limited number of use cases, such as when the response is too big to fit in a single UDP packet. However, as privacy has become a significantly greater concern, encrypted queries have been made possible through the specification of DNS over TLS (DoT) in 2016 and DNS over HTTPS (DoH) in 2018. Cloudflare’s 1.1.1.1 resolver has supported both of these privacy-preserving protocols since launch. The DNS transport protocol graph shows the distribution of queries to 1.1.1.1 over these four protocols. (Setting up 1.1.1.1 on your device or router uses DNS over UDP by default, although recent versions of Android support DoT and DoH. The 1.1.1.1 app uses DNS over HTTPS by default, and users can also configure their browsers to use DNS over HTTPS.)
Note that Cloudflare’s resolver also services queries over DoH and Oblivious DoH (ODoH) for Mozilla and other large platforms, but this traffic is not currently included in our analysis. As such, DoH adoption is under-represented in this graph.
Aggregated worldwide between February 19 – February 26, distribution of transport protocols was 86.6% for UDP, 9.6% for DoT, 2.0% for TCP, and 1.7% for DoH. However, in some locations, these ratios may shift if users are more privacy conscious. For example, the graph below shows the distribution for Egypt over the same time period. In that country, the UDP and TCP shares are significantly lower than the global level, while the DoT and DoH shares are significantly higher, suggesting that users there may be more concerned about the privacy of their DNS queries than the global average, or that there is a larger concentration of 1.1.1.1 users on Android devices who have set up 1.1.1.1 using DoT manually. (The 2024 Cloudflare Radar Year in Review found that Android had an 85% mobile device traffic share in Egypt, so mobile device usage in the country leans very heavily toward Android.)
RFC 1035 also defined a number of standard and Internet specific resource record types that return the associated information about the submitted query name. The most common record types are A and AAAA, which return the hostname’s IPv4 and IPv6 addresses respectively (assuming they exist). The DNS query type graph below shows that globally, these two record types comprise on the order of 80% of the queries received by 1.1.1.1. Among the others shown in the graph, HTTPS records can be used to signal HTTP/3 and HTTP/2 support, PTR records are used in reverse DNS records to look up a domain name based on a given IP address, and NS records indicate authoritative nameservers for a domain.
A response code is sent with each response from 1.1.1.1 to the client. Six possible values were originally defined in RFC 1035, with the list further extended in RFC 2136 and RFC 2671. NOERROR, as the name suggests, means that no error condition was encountered with the query. Others, such as NXDOMAIN, SERVFAIL, REFUSED, and NOTIMP define specific error conditions encountered when trying to resolve the requested query name. The response codes may be generated by 1.1.1.1 itself (like REFUSED) or may come from an upstream authoritative nameserver (like NXDOMAIN).
The DNS response code graph shown below highlights that the vast majority of queries seen globally do not encounter an error during the resolution process (NOERROR), and that when errors are encountered, most are NXDOMAIN (no such record). It is worth noting that NOERROR also includes empty responses, which occur when there are no records for the query name and query type, but there are records for the query name and some other query type.
With DNS being a first-step dependency for many other protocols, the amount of queries of particular types can be used to indirectly measure the adoption of those protocols. But to effectively measure adoption, we should also consider the fraction of those queries that are met with useful responses, which are represented with the DNS record adoption graphs.
The example below shows that queries for A records are met with a useful response nearly 88% of the time. As IPv4 is an established protocol, the remaining 12% are likely to be queries for valid hostnames that have no A records (e.g. email domains that only have MX records). But the same graph also shows that there’s still a significant adoption gap where IPv6 is concerned.
When Cloudflare’s DNS resolver gets a response back from an upstream authoritative nameserver, it caches it for a specified amount of time — more on that below. By caching these responses, it can more efficiently serve subsequent queries for the same name. The DNS cache hit ratio graph provides insight into how frequently responses are served from cache. At a global level, as seen below, over 80% of queries have a response that is already cached. These ratios will vary by location or ASN, as the query patterns differ across geographies and networks.
As noted in the preceding paragraph, when an authoritative nameserver sends a response back to 1.1.1.1, each record inside it includes information about how long it should be cached/considered valid for. This piece of information is known as the Time-To-Live (TTL) and, as a response may contain multiple records, the smallest of these TTLs (the “minimum” TTL) defines how long 1.1.1.1 can cache the entire response for. The TTLs on each response served from 1.1.1.1’s cache decrease towards zero as time passes, at which point 1.1.1.1 needs to go back to the authoritative nameserver. Hostnames with relatively low TTL values suggest that the records may be somewhat dynamic, possibly due to traffic management of the associated resources; longer TTL values suggest that the associated resources are more stable and expected to change infrequently.
The DNS minimum TTL graphs show the aggregate distribution of TTL values for five popular DNS record types, broken out across seven buckets ranging from under one minute to over one week. During the third week of February, for example, A and AAAA responses had a concentration of low TTLs, with over 80% below five minutes. In contrast, NS and MX responses were more concentrated across 15 minutes to one hour and one hour to one day. Because MX and NS records change infrequently, they are generally configured with higher TTLs. This allows them to be cached for longer periods in order to achieve faster DNS resolution.
DNS security
DNS Security Extensions (DNSSEC) add an extra layer of authentication to DNS establishing the integrity and authenticity of a DNS response. This ensures subsequent HTTPS requests are not routed to a spoofed domain. When sending a query to 1.1.1.1, a DNS client can indicate that it is DNSSEC-aware by setting a specific flag (the “DO” bit) in the query, which lets our resolver know that it is OK to return DNSSEC data in the response. The DNSSEC client awareness graph breaks down the share of queries that 1.1.1.1 sees from clients that understand DNSSEC and can require validation of responses vs. those that don’t. (Note that by default, 1.1.1.1 tries to protect clients by always validating DNSSEC responses from authoritative nameservers and not forwarding invalid responses to clients, unless the client has explicitly told it not to by setting the “CD” (checking-disabled) bit in the query.)
Unfortunately, as the graph below shows, nearly 90% of the queries seen by Cloudflare’s resolver are made by clients that are not DNSSEC-aware. This broad lack of client awareness may be due to several factors. On the client side, DNSSEC is not enabled by default for most users, and enabling DNSSEC requires extra work, even for technically savvy and security conscious users. On the authoritative side, for domain owners, supporting DNSSEC requires extra operational maintenance and knowledge, and a mistake can cost your domain to disappear from the Internet, causing significant (including financial) issues.
The companion End-to-end security graph represents the fraction of DNS interactions that were protected from tampering, when considering the client’s DNSSEC capabilities and use of encryption (use of DoT or DoH). This shows an even greater imbalance at a global level, and highlights the importance of further adoption of encryption and DNSSEC.
For DNSSEC validation to occur, the query name being requested must be part of a DNSSEC-enabled domain, and the DNSSEC validation status graph represents the share of queries where that was the case under the Secure and Invalid labels. Queries for domains without DNSSEC are labeled as Insecure, and queries where DNSSEC validation was not applicable (such as various kinds of errors) fall under the Other label. Although nearly 93% of generic Top Level Domains (TLDs) and 65% of country code Top Level Domains (ccTLDs) are signed with DNSSEC (as of February 2025), the adoption rate across individual (child) domains lags significantly, as the graph below shows that over 80% of queries were labeled as Insecure.
Conclusion
DNS is a fundamental, foundational part of the Internet. While most Internet users don’t think of DNS beyond its role in translating easy-to-remember hostnames to IP addresses, there’s a lot going on to make even that happen, from privacy to performance to security. The new DNS page on Cloudflare Radar endeavors to provide visibility into what’s going on behind the scenes, at a global, national, and network level.
While the graphs shown above are taken from the DNS page, all the underlying data is available via the API and can be interactively explored in more detail across locations, networks, and time periods using Radar’s Data Explorer and AI Assistant. And as always, Radar and Data Assistant charts and graphs are downloadable for sharing, and embeddable for use in your own blog posts, websites, or dashboards.
Over the last year, Cloudflare has begun formally verifying the correctness of our internal DNS addressing behavior — the logic that determines which IP address a DNS query receives when it hits our authoritative nameserver. This means that for every possible DNS query for a proxied domain we could receive, we try to mathematically prove properties about our DNS addressing behavior, even when different systems (owned by different teams) at Cloudflare have contradictory views on which IP addresses should be returned.
To achieve this, we formally verify the programs — written in a custom Lisp-like programming language — that our nameserver executes when it receives a DNS query. These programs determine which IP addresses to return. Whenever an engineer changes one of these programs, we run all the programs through our custom model checker (written in Racket + Rosette) to check for certain bugs (e.g., one program overshadowing another) before the programs are deployed.
Our formal verifier runs in production today, and is part of a larger addressing system called Topaz. In fact, it’s likely you’ve made a DNS query today that triggered a formally verified Topaz program.
This post is a technical description of how Topaz’s formal verification works. Besides being a valuable tool for Cloudflare engineers, Topaz is a real-world example of formal verification applied to networked systems. We hope it inspires other network operators to incorporate formal methods, where appropriate, to help make the Internet more reliable for all.
Topaz’s full technical details have been peer-reviewed and published in ACM SIGCOMM 2024, with both a paper and short video available online.
Addressing: how IP addresses are chosen
When a DNS query for a customer’s proxied domain hits Cloudflare’s nameserver, the nameserver returns an IP address — but how does it decide which address to return?
Let’s make this more concrete. When a customer, say example.com, signs up for Cloudflare and proxies their traffic through Cloudflare, it makes Cloudflare’s nameserver authoritative for their domain, which means our nameserver has the authority to respond to DNS queries for example.com. Later, when a client makes a DNS query for example.com, the client’s recursive DNS resolver (for example, 1.1.1.1) queries our nameserver for the authoritative response. Our nameserver returns someCloudflare IP address (of our choosing) to the resolver, which forwards that address to the client. The client then uses the IP address to connect to Cloudflare’s network, which is a global anycast network — every data center advertises all of our addresses.
Clients query Cloudflare’s nameserver (via their resolver) for customer domains. The nameserver returns Cloudflare IP addresses, advertised by our entire global network, which the client uses to connect to the customer domain. Cloudflare may then connect to the origin server to fulfill the user’s HTTPS request.
When the customer has configured a static IP address for their domain, our nameserver’s choice of IP address is simple: it simply returns that static address in response to queries made for that domain.
But for all other customer domains, our nameserver could respond with virtually any IP address that we own and operate. We may return the same address in response to queries for different domains, or different addresses in response to different queries for the same domain. We do this for resilience, but also because decoupling names and IP addresses improves flexibility.
With all that in mind, let’s return to our initial question: given a query for a proxied domain without a static IP, which IP address should be returned? The answer: Cloudflare chooses IP addresses to meet various business objectives. For instance, we may choose IPs to:
Change the IP address of a domain that is under attack.
Direct fractions of traffic to specific IP addresses to test new features or services.
To change authoritative nameserver behavior — how we choose IPs — a Cloudflare engineer encodes their desired DNS business objective as a declarative Topaz program. Our nameserver stores the list of all such programs such that when it receives a DNS query for a proxied domain, it executes the list of programs in sequence until one returns an IP address. It then returns that IP to the resolver.
Topaz receives DNS queries (metadata included) for proxied domains from Cloudflare’s nameserver. It executes a list of policies in sequence until a match is found. It returns the resulting IP address to the nameserver, which forwards it to the resolver.
What do these programs look like?
Each Topaz program has three primary components:
Match function: A program’s match function specifies under which circumstances the program should execute. It takes as input DNS query metadata (e.g., datacenter information, account information) and outputs a boolean. If, given a DNS query, the match function returns true, the program’s response function is executed.
Response function: A program’s response function specifies which IP addresses should be chosen. It also takes as input all the DNS query metadata, but outputs a 3-tuple (IPv4 addresses, IPv6 addresses, and TTL). When a program’s match function returns true, its corresponding response function is executed. The resulting IP addresses and TTL are returned to the resolver that made the query.
Configuration: A program’s configuration is a set of variables that parameterize that program’s match and response function. The match and response functions reference variables in the corresponding configuration, thereby separating the macro-level behavior of a program (match/response functions) from its nitty-gritty details (specific IP addresses, names, etc.). This separation makes it easier to understand how a Topaz program behaves at a glance, without getting bogged down by specific function parameters.
Let’s walk through an example Topaz program. The goal of this program is to give all queried domains whose metadata field “tag1” is equal to “orange” a particular IP address. The program looks like this:
Before we walk through the program, note that the program’s configuration, match, and response function are YAML strings, but more specifically they are topaz-lang expressions. Topaz-lang is the domain-specific language (DSL) we created specifically for expressing Topaz programs. It is based on Scheme, but is much simpler. It is dynamically typed, it is not Turing complete, and every expression evaluates to exactly one value (though functions can throw errors). Operators cannot define functions within topaz-lang, they can only add new DSL functions by writing functions in the host language (Go). The DSL provides basic types (numbers, lists, maps) but also Topaz-specific types, like IPv4/IPv6 addresses and TTLs.
Let’s now examine this program in detail.
The config is a set of four bindings from name to value. The first binds the string ”orange” to the name desired_tag1. The second binds the IPv4 address 192.0.2.3 to the name ipv4. The third binds the IPv6 address 2001:DB8:1:3 to the name ipv6. And the fourth binds the TTL (for which we added a topaz-lang type) 300 (seconds) to the name t.
The match function is an expression that must evaluate to a boolean. It can reference configuration values (e.g., desired_tag1), and can also reference DNS query fields. All DNS query fields use the prefix query_ and are brought into scope at evaluation time. This program’s match function checks whether deired_tag1 is equal to the tag attached to the queried domain, query_domain_tag1.
The response function is an expression that evaluates to the special response type, which is really just a 3-tuple consisting of: a list of IPv4 addresses, a list of IPv6 addresses, and a TTL. This program’s response function simply returns the configured IPv4 address, IPv6 address, and TTL (seconds).
Critically, all Topaz programs are encoded as YAML and live in the same version-controlled file. Imagine this program file contained only the orange program above, but now, a new team wants to add a new program, which checks whether the queried domain’s “tag1” field is equal to “orange” AND that the domain’s “tag2” field is equal to true:
This new team must place their new orange_and_true program either below or above the orange program in the file containing the list of Topaz programs. For instance, they could place orange_and_true after orange, like so:
Now let’s add a third, more interesting Topaz program. Say a Cloudflare team wants to test a modified version of our CDN’s HTTP server on a small percentage of domains, and only in a subset of Cloudflare’s data centers. Furthermore, they want to distribute these queries across a specific IP prefix such that queries for the same domain get the same IP. They write the following:
This Topaz program is significantly more complicated, so let’s walk through it.
Starting with configuration:
The first configuration value, purple_datacenters, is bound to the expression (fetch_datacenters “purple”), which is a function that retrieves all Cloudflare data centers tagged “purple” via an internal HTTP API. The result of this function call is a list of data centers.
The second configuration value, percentage, is a number representing the fraction of traffic we would like our program to act upon.
The third and fourth names are bound to IP prefixes, v4 and v6 respectively (note the built-in ipv4_prefix and ipv6_prefix types).
The match function is also more complicated. First, note the let form — this lets operators define local variables. We define one local variable, a random number generator called rand seeded with the hash of the queried domain name. The match expression itself is a conjunction that checks two things.
First, it checks whether the query landed in a data center tagged “purple”.
Second, it checks whether a random number between 0 and 99 (produced by a generator seeded by the domain name) is less than the configured percentage. By seeding the random number generator with the domain, the program ensures that 10% of domains trigger a match. If we had seeded the RNG with, say, the query ID, then queries for the same domain would behave differently.
Together, the conjuncts guarantee that the match expression evaluates to true for 10% of domains queried in “purple” data centers.
Now let’s look at the response function. We define three local variables. The first is a hash of the domain. The second is an IPv4 address selected from the configured IPv4 prefix. select_from always chooses the same IP address given the same prefix and hash — this ensures that queries for a given domain always receive the same IP address (which makes it easier to correlate queries for a single domain), but that queries for different domains can receive different IP addresses within the configured prefix. The third local variable is an IPv6 address selected similarly. The response function returns these IP addresses and a TTL of value 1 (second).
Topaz programs are executed on the hot path
Topaz’s control plane validates the list of programs and distributes them to our global nameserver instances. As we’ve seen, the list of programs reside in a single, version-controlled YAML file. When an operator changes this file (i.e., adds a program, removes a program, or modifies an existing program), Topaz’s control plane does the following things in order:
First, it validates the programs, making sure there are no syntax errors.
Second, it “finalizes” each program’s configuration by evaluating every configuration binding and storing the result. (For instance, to finalize the purple program, it evaluates fetch_datacenters, storing the resulting list. This way our authoritative nameservers never need to retrieve external data.)
Third, it verifies the finalized programs, which we will explain below.
Finally, it distributes the finalized programs across our network.
Topaz’s control plane distributes the programs to all servers globally by writing the list of programs to QuickSilver, our edge key-value store. The Topaz service on each server detects changes in Quicksilver and updates its program list.
When our nameserver service receives a DNS query, it augments the query with additional metadata (e.g., tags) and then forwards the query to the Topaz service (both services run on every Cloudflare server) via Inter-Process Communication (IPC). Topaz, upon receiving a DNS query from the nameserver, walks through its program list, executing each program’s match function (using the topaz-lang interpreter) with the DNS query in scope (with values prefixed with query_). It walks the list until a match function returns true. It then executes that program’s response function, and returns the resulting IP addresses and TTL to our nameserver. The nameserver packages these addresses and TTL in valid DNS format, and then returns them to the resolver.
Topaz programs are formally verified
Before programs are distributed to our global network, they are formally verified. Each program is passed through our formal verification tool which throws an error if a program has a bug, or if two programs (e.g., the orange_and_true and orange programs) conflict with one another.
The Topaz formal verifier (model-checker) checks three properties.
First, it checks that each program is satisfiable — that there exists some DNS query that causes each program’s match function to return true. This property is useful for detecting internally-inconsistent programs that will simply never match. For instance, if a program’s match expression was (and true false), there exists no query that will cause this to evaluate to true, so the verifier throws an error.
Second, it checks that each program is reachable — that there exists some DNS query that causes each program’s match function to return truegiven all preceding programs. This property is useful for detecting “dead” programs that are completely overshadowed by higher-priority programs. For instance, recall the ordering of the orange and orange_and_true programs:
The verifier would throw an error because the orange_and_true program is unreachable. For all DNS queries for which query_domain_tag1 is ”orange”, regardless of metadata2, the orange program will always match, which means the orange_and_true program will never match. To resolve this error, we’d need to swap these two programs like we did above.
Finally, and most importantly, the verifier checks for program conflicts: queries that cause any two programs to both match. If such a query exists, it throws an error (and prints the relevant query), and the operators are forced to resolve the conflict by changing their programs. However, it only checks whether specific programs conflict — those that are explicitly marked exclusive. Operators mark their program as exclusive if they want to be sure that no other exclusive program could match on the same queries.
To see what conflict detection looks like, consider the corrected ordering of the orange_and_true and orange programs, but note that the two programs have now been marked exclusive:
After marking these two programs exclusive, the verifier will throw an error. Not only will it say that these two programs can contradict one another, but it will provide a sample query as proof:
Checking: no exclusive programs match the same queries: check FAILED!
Intersecting programs found:
programs "orange_and_true" and "orange" both match any query...
  to any domain...
    with tag1: "orange"
    with tag2: true
The teams behind the orange and orange_and_true programs respectively must resolve this conflict before these programs are deployed, and can use the above query to help them do so. To resolve the conflict, the teams have a few options. The simplest option is to remove the exclusive setting from one program, and acknowledge that it is simply not possible for these programs to be exclusive. In that case, the order of the two programs matters (one must have higher priority). This is fine! Topaz allows developers to write certain programs that absolutely cannot overlap with other programs (using exclusive), but sometimes that is just not possible. And when it’s not, at least program priority is explicit.
Note: in practice, we place all exclusive programs at the top of the program file. This makes it easier to reason about interactions between exclusive and non-exclusive programs.
In short, verification is powerful not only because it catches bugs (e.g., satisfiability and reachability), but it also highlights the consequences of program changes. It helps operators understand the impact of their changes by providing immediate feedback. If two programs conflict, operators are forced to resolve it before deployment, rather than after an incident.
Bonus: verification-powered diffs. One of the newest features we’ve added to the verifier is one we call semantic diffs. It’s in early stages, but the key insight is that operators often just want to understand the impact of changes, even if these changes are deemed safe. To help operators, the verifier compares the old and new versions of the program file. Specifically, it looks for any query that matched program X in the old version, but matches a different program Y in the new version (or vice versa). For instance, if we changed orange_and_true thus:
Generating a report to help you understand your changes...
NOTE: the queries below (if any) are just examples. Other such queries may exist.

* program "orange_and_true" now MATCHES any query...
  to any domain...
    with tag1: "orange"
    with tag2: false
While not exhaustive, this information helps operators understand whether their changes are doing what they intend or not, before deployment. We look forward to expanding our verifier’s diff capabilities going forward.
How Topaz’s verifier works, and its tradeoffs
How does the verifier work? At a high-level, the verifier checks that, for all possible DNS queries, the three properties outlined above are satisfied. A Satisfiability Modulo Theories (SMT) solver — which we explain below — makes this seemingly impossible operation feasible. (It doesn’t literally loop over all DNS queries, but it is equivalent to doing so — it provides exhaustive proof.)
We implemented our formal verifier in Rosette, a solver-enhanced domain-specific language written in the Racket programming language. Rosette makes writing a verifier more of an engineering exercise, rather than a formal logic test: if you can express the interpreter for your language in Racket/Rosette, you get verification “for free”, in some sense. We wrote a topaz-lang interpreter in Racket, then crafted our three properties using the Rosette DSL.
How does Rosette work? Rosette translates our desired properties into formulae in first-order logic. At a high level, these formulae are like equations from algebra class in school, with “unknowns” or variables. For instance, when checking whether the orange program is reachable (with the orange_and_true program ordered before it), Rosette produces the formula ((NOT orange_and_true.match) AND orange.match). The “unknowns” here are the DNS query parameters that these match functions operate over, e.g., query_domain_tag1. To solve this formula, Rosette interfaces with an SMT solver (like Z3), which is specifically designed to solve these types of formulae by efficiently finding values to assign to the DNS query parameters that make the formulae true. Once the SMT solver finds satisfying values, Rosette translates them into a Racket data structure: in our case, a sample DNS query. In this example, once it finds a satisfying DNS query, it would report that the orange program is indeed reachable.
However, verification is not free. The primary cost is maintenance. The model checker’s interpreter (Racket) must be kept in lockstep with the main interpreter (Go). If they fall out-of-sync, the verifier loses the ability to accurately detect bugs. Furthermore, functions added to topaz-lang must be compatible with formal verification.
Also, not all functions are easily verifiable, which means we must restrict the kinds of functions that program authors can write. Rosette can only verify functions that operate over integers and bit-vectors. This means we only permit functions whose operations can be converted into operations over integers and bit-vectors. While this seems restrictive, it actually gets us pretty far. The main challenge is strings: Topaz does not support programs that, for example, manipulate or work with substrings of the queried domain name. However, it does support simple operations on closed-set strings. For instance, it supports checking if two domain names are equal, because we can convert all strings to a small set of values representable using integers (which are easily verifiable).
Fortunately, thanks to our design of Topaz programs, the verifier need not be compatible with all Topaz program code. The verifier only ever examines Topaz match functions, so only the functions specified in match functions need to be verification-compatible. We encountered other challenges when working to make our model accurate, like modeling randomness — if you are interested in the details, we encourage you to read the paper.
Another potential cost is verification speed. We find that the verifier can ensure our existing seven programs satisfy all three properties within about six seconds, which is acceptable because verification happens only at build time. We verify programs centrally, before programs are deployed, and only when programs change.
We also ran microbenchmarks to determine how fast the verifier can check more programs — we found that, for instance, it would take the verifier about 300 seconds to verify 50 programs. While 300 seconds is still acceptable, we are looking into verifier optimizations that will reduce the time further.
Bringing formal verification from research to production
Topaz’s verifier began as a research project, and has since been deployed to production. It formally verifies all changes made to the authoritative DNS behavior specified in Topaz.
For more in-depth information on Topaz, see both our research paper published at SIGCOMM 2024 and the recording of the talk.
We thank our former intern, Tim Alberdingk-Thijm, for his invaluable work on Topaz’s verifier.
According to a survey done by W3Techs, as of October 2024, Cloudflare is used as an authoritative DNS provider by 14.5% of all websites. As an authoritative DNS provider, we are responsible for managing and serving all the DNS records for our clients’ domains. This means we have an enormous responsibility to provide the best service possible, starting at the data plane. As such, we are constantly investing in our infrastructure to ensure the reliability and performance of our systems.
DNS is often referred to as the phone book of the Internet, and is a key component of the Internet. If you have ever used a phone book, you know that they can become extremely large depending on the size of the physical area it covers. A zone file in DNS is no different from a phone book. It has a list of records that provide details about a domain, usually including critical information like what IP address(es) each hostname is associated with. For example:
example.com      59 IN A 198.51.100.0
blog.example.com 59 IN A 198.51.100.1
ask.example.com  59 IN A 198.51.100.2
It is not unusual for these zone files to reach millions of records in size, just for a single domain. The biggest single zone on Cloudflare holds roughly 4 million DNS records, but the vast majority of zones hold fewer than 100 DNS records. Given our scale according to W3Techs, you can imagine how much DNS data alone Cloudflare is responsible for. Given this volume of data, and all the complexities that come at that scale, there needs to be a very good reason to move it from one database cluster to another.
Why migrate
When initially measured in 2022, DNS data took up approximately 40% of the storage capacity in Cloudflare’s main database cluster (cfdb). This database cluster, consisting of a primary system and multiple replicas, is responsible for storing DNS zones, propagated to our data centers in over 330 cities via our distributed KV store Quicksilver. cfdb is accessed by most of Cloudflare’s APIs, including the DNS Records API. Today, the DNS Records API is the API most used by our customers, with each request resulting in a query to the database. As such, it’s always been important to optimize the DNS Records API and its surrounding infrastructure to ensure we can successfully serve every request that comes in.
As Cloudflare scaled, cfdb was becoming increasingly strained under the pressures of several services, many unrelated to DNS. During spikes of requests to our DNS systems, other Cloudflare services experienced degradation in the database performance. It was understood that in order to properly scale, we needed to optimize our database access and improve the systems that interact with it. However, it was evident that system level improvements could only be just so useful, and the growing pains were becoming unbearable. In late 2022, the DNS team decided, along with the help of 25 other teams, to detach itself from cfdb and move our DNS records data to another database cluster.
Pre-migration
From a DNS perspective, this migration to an improved database cluster was in the works for several years. Cloudflare initially relied on a single Postgres database cluster, cfdb. At Cloudflare’s inception, cfdb was responsible for storing information about zones and accounts and the majority of services on the Cloudflare control plane depended on it. Since around 2017, as Cloudflare grew, many services moved their data out of cfdb to be served by a microservice. Unfortunately, the difficulty of these migrations are directly proportional to the amount of services that depend on the data being migrated, and in this case, most services require knowledge of both zones and DNS records.
Although the term “zone” was born from the DNS point of view, it has since evolved into something more. Today, zones on Cloudflare store many different types of non-DNS related settings and help link several non-DNS related products to customers’ websites. Therefore, it didn’t make sense to move both zone data and DNS record data together. This separation of two historically tightly coupled DNS concepts proved to be an incredibly challenging problem, involving many engineers and systems. In addition, it was clear that if we were going to dedicate the resources to solving this problem, we should also remove some of the legacy issues that came along with the original solution.
One of the main issues with the legacy database was that the DNS team had little control over which systems accessed exactly what data and at what rate. Moving to a new database gave us the opportunity to create a more tightly controlled interface to the DNS data. This was manifested as an internal DNS Records gRPC API which allows us to make sweeping changes to our data while only requiring a single change to the API, rather than coordinating with other systems. For example, the DNS team can alter access logic and auditing procedures under the hood. In addition, it allows us to appropriately rate-limit and cache data depending on our needs. The move to this new API itself was no small feat, and with the help of several teams, we managed to migrate over 20 services, using 5 different programming languages, from direct database access to using our managed gRPC API. Many of these services touch very important areas such as DNSSEC, TLS, Email, Tunnels, Workers, Spectrum, and R2 storage. Therefore, it was important to get it right.
One of the last issues to tackle was the logical decoupling of common DNS database functions from zone data. Many of these functions expect to be able to access both DNS record data and DNS zone data at the same time. For example, at record creation time, our API needs to check that the zone is not over its maximum record allowance. Originally this check occurred at the SQL level by verifying that the record count was lower than the record limit for the zone. However, once you remove access to the zone itself, you are no longer able to confirm this. Our DNS Records API also made use of SQL functions to audit record changes, which requires access to both DNS record and zone data. Luckily, over the past several years, we have migrated this functionality out of our monolithic API and into separate microservices. This allowed us to move the auditing and zone setting logic to the application level rather than the database level. Ultimately, we are still taking advantage of SQL functions in the new database cluster, but they are fully independent of any other legacy systems, and are able to take advantage of the latest Postgres version.
Now that Cloudflare DNS was mostly decoupled from the zones database, it was time to proceed with the data migration. For this, we built what would become our Change Data Capture and Transfer Service (CDCTS).
Requirements for the Change Data Capture and Transfer Service
The Database team is responsible for all Postgres clusters within Cloudflare, and were tasked with executing the data migration of two tables that store DNS data: cf_rec and cf_archived_rec, from the original cfdb cluster to a new cluster we called dnsdb. We had several key requirements that drove our design:
Don’t lose data. This is the number one priority when handling any sort of data. Losing data means losing trust, and it is incredibly difficult to regain that trust once it’s lost. Important in this is the ability to prove no data had been lost. The migration process would, ideally, be easily auditable.
Minimize downtime. We wanted a solution with less than a minute of downtime during the migration, and ideally with just a few seconds of delay.
These two requirements meant that we had to be able to migrate data changes in near real-time, meaning we either needed to implement logical replication, or some custom method to capture changes, migrate them, and apply them in a table in a separate Postgres cluster.
We first looked at using Postgres logical replication using pgLogical, but had concerns about its performance and our ability to audit its correctness. Then some additional requirements emerged that made a pgLogical implementation of logical replication impossible:
The ability to move data must be bidirectional. We had to have the ability to switch back to cfdb without significant downtime in case of unforeseen problems with the new implementation.
Partition the cf_rec table in the new database. This was a long-desired improvement and since most access to cf_rec is by zone_id, it was decided that mod(zone_id, num_partitions) would be the partition key.
Transferred data accessible from original database. In case we had functionality that still needed access to data, a foreign table pointing to dnsdb would be available in cfdb. This could be used as emergency access to avoid needing to roll back the entire migration for a single missed process.
Only allow writes in one database. Applications should know where the primary database is, and should be blocked from writing to both databases at the same time.
Details about the tables being migrated
The primary table, cf_rec, stores DNS record information, and its rows are regularly inserted, updated, and deleted. At the time of the migration, this table had 1.7 billion records, and with several indexes took up 1.5 TB of disk. Typical daily usage would observe 3-5 million inserts, 1 million updates, and 3-5 million deletes.
The second table, cf_archived_rec, stores copies of cf_rec that are obsolete — this table generally only has records inserted and is never updated or deleted. As such, it would see roughly 3-5 million inserts per day, corresponding to the records deleted from cf_rec. At the time of the migration, this table had roughly 4.3 billion records.
Fortunately, neither table made use of database triggers or foreign keys, which meant that we could insert/update/delete records in this table without triggering changes or worrying about dependencies on other tables.
Ultimately, both of these tables are highly active and are the source of truth for many highly critical systems at Cloudflare.
Designing the Change Data Capture and Transfer Service
There were two main parts to this database migration:
Initial copy: Take all the data from cfdb and put it in dnsdb.
Change copy: Take all the changes in cfdb since the initial copy and update dnsdb to reflect them. This is the more involved part of the process.
Normally, logical replication replays every insert, update, and delete on a copy of the data in the same transaction order, making a single-threaded pipeline. We considered using a queue-based system but again, speed and auditability were both concerns as any queue would typically replay one change at a time. We wanted to be able to apply large sets of changes, so that after an initial dump and restore, we could quickly catch up with the changed data. For the rest of the blog, we will only speak about cf_rec for simplicity, but the process for cf_archived_rec is the same.
What we decided on was a simple change capture table. Rows from this capture table would be loaded in real-time by a database trigger, with a transfer service that could migrate and apply thousands of changed records to dnsdb in each batch. Lastly, we added some auditing logic on top to ensure that we could easily verify that all data was safely transferred without downtime.
Basic model of change data capture
For cf_rec to be migrated, we would create a change logging table, along with a trigger function and a table trigger to capture the new state of the record after any insert/update/delete.
The change logging table named log_cf_rec had the same columns as cf_rec, as well as four new columns:
change_id: a sequence generated unique identifier of the record
action: a single character indicating whether this record represents an [i]nsert, [u]pdate, or [d]elete
change_timestamp: the date/time when the change record was created
change_user: the database user that made the change.
A trigger was placed on the cf_rec table so that each insert/update would copy the new values of the record into the change table, and for deletes, create a ‘D’ record with the primary key value.
Here is an example of the change logging where we delete, re-insert, update, and finally select from the log_cf_rectable. Note that the actual cf_rec and log_cf_rec tables have many more columns, but have been edited for simplicity.
dns_records=# DELETE FROM  cf_rec WHERE rec_id = 13;

dns_records=# SELECT * from log_cf_rec;
Change_id | action | rec_id | zone_id | name
----------------------------------------------
1         | D      | 13     |         |

dns_records=# INSERT INTO cf_rec VALUES(13,299,'cloudflare.example.com');

dns_records=# UPDATE cf_rec SET name = 'test.example.com' WHERE rec_id = 13;

dns_records=# SELECT * from log_cf_rec;
Change_id | action | rec_id | zone_id | name
----------------------------------------------
1         | D      | 13     |         |
2         | I      | 13     | 299     | cloudflare.example.com
3         | U      | 13     | 299     | test.example.com
In addition to log_cf_rec, we also introduced 2 more tables in cfdb and 3 more tables in dnsdb:
cfdb
transferred_log_cf_rec: Responsible for auditing the batches transferred to dnsdb.
log_change_action:Responsible for summarizing the transfer size in order to compare with the log_change_action in dnsdb.
dnsdb
migrate_log_cf_rec:Responsible for collecting batch changes in dnsdb, which would later be applied to cf_rec in dnsdb.
applied_migrate_log_cf_rec:Responsible for auditing the batches that had been successfully applied to cf_rec in dnsdb.
log_change_action:Responsible for summarizing the transfer size in order to compare with the log_change_action in cfdb.
Initial copy
With change logging in place, we were now ready to do the initial copy of the tables from cfdb to dnsdb. Because we were changing the structure of the tables in the destination database and because of network timeouts, we wanted to bring the data over in small pieces and validate that it was brought over accurately, rather than doing a single multi-hour copy or pg_dump. We also wanted to ensure a long-running read could not impact production and that the process could be paused and resumed at any time. The basic model to transfer data was done with a simple psql copy statement piped into another psql copy statement. No intermediate files were used.
psql_cfdb -c "COPY (SELECT * FROM cf_rec WHERE id BETWEEN n and n+1000000 TO STDOUT)" |
psql_dnsdb -c "COPY cf_rec FROM STDIN"
Prior to a batch being moved, the count of records to be moved was recorded in cfdb, and after each batch was moved, a count was recorded in dnsdb and compared to the count in cfdb to ensure that a network interruption or other unforeseen error did not cause data to be lost. The bash script to copy data looked like this, where we included files that could be touched to pause or end the copy (if they cause load on production or there was an incident). Once again, this code below has been heavily simplified.
#!/bin/bash
for i in "$@"; do
   # Allow user to control whether this is paused or not via pause_copy file
   while [ -f pause_copy ]; do
      sleep 1
   done
   # Allow user to end migration by creating end_copy file
   if [ ! -f end_copy ]; then
      # Copy a batch of records from cfdb to dnsdb
      # Get count of records from cfdb
	# Get count of records from dnsdb
 	# Compare cfdb count with dnsdb count and alert if different
   fi
done
Bash copy script
Change copy
Once the initial copy was completed, we needed to update dnsdb with any changes that had occurred in cfdb since the start of the initial copy. To implement this change copy, we created a function fn_log_change_transfer_log_cf_rec that could be passed a batch_id and batch_size, and did 5 things, all of which were executed in a single database transaction:
Select a batch_size of records from log_cf_rec in cfdb.
Copy the batch to transferred_log_cf_rec in cfdb to mark it as transferred.
Delete the batch from log_cf_rec.
Write a summary of the action to log_change_action table. This will later be used to compare transferred records with cfdb.
Return the batch of records.
We then took the returned batch of records and copied them to migrate_log_cf_rec in dnsdb. We used the same bash script as above, except this time, the copy command looked like this:
psql_cfdb -c "COPY (SELECT * FROM fn_log_change_transfer_log_cf_rec(<batch_id>,<batch_size>) TO STDOUT" |
psql_dnsdb -c "COPY migrate_log_cf_rec FROM STDIN"
Applying changes in the destination database
Now, with a batch of data in the migrate_log_cf_rec table, we called a newly created function log_change_apply to apply and audit the changes. Once again, this was all executed within a single database transaction. The function did the following:
Move a batch from the migrate_log_cf_rec table to a new temporary table.
Write the counts for the batch_id to the log_change_action table.
Delete from the temporary table all but the latest record for a unique id (last action). For example, an insert followed by 30 updates would have a single record left, the final update. There is no need to apply all the intermediate updates.
Delete any record from cf_rec that has any corresponding changes.
Insert any [i]nsert or [u]pdate records in cf_rec.
Copy the batch to applied_migrate_log_cf_rec for a full audit trail.
Putting it all together
There were 4 distinct phases, each of which was part of a different database transaction:
Call fn_log_change_transfer_log_cf_rec in cfdb to get a batch of records.
Copy the batch of records to dnsdb.
Call log_change_apply in dnsdb to apply the batch of records.
Compare the log_change_action table in each respective database to ensure counts match.
This process was run every 3 seconds for several weeks before the migration to ensure that we could keep dnsdb in sync with cfdb.
Managing which database is live
The last major pre-migration task was the construction of the request locking system that would be used throughout the actual migration. The aim was to create a system that would allow the database to communicate with the DNS Records API, to allow the DNS Records API to handle HTTP connections more gracefully. If done correctly, this could reduce downtime for DNS Record API users to nearly zero.
In order to facilitate this, a new table called cf_migration_manager was created. The table would be periodically polled by the DNS Records API, communicating two critical pieces of information:
Which database was active. Here we just used a simple A or B naming convention.
If the database was locked for writing. In the event the database was locked for writing, the DNS Records API would hold HTTP requests until the lock was released by the database.
Both pieces of information would be controlled within a migration manager script.
The benefit of migrating the 20+ internal services from direct database access to using our internal DNS Records gRPC API is that we were able to control access to the database to ensure that no one else would be writing without going through the cf_migration_manager.
During the migration
Although we aimed to complete this migration in a matter of seconds, we announced a DNS maintenance window that could last a couple of hours just to be safe. Now that everything was set up, and both cfdb and dnsdb were roughly in sync, it was time to proceed with the migration. The steps were as follows:
Lower the time between copies from 3s to 0.5s.
Lock cfdb for writes via cf_migration_manager. This would tell the DNS Records API to hold write connections.
Make cfdb read-only and migrate the last logged changes to dnsdb.
Enable writes to dnsdb.
Tell DNS Records API that dnsdb is the new primary database and that write connections can proceed via the cf_migration_manager.
Since we needed to ensure that the last changes were copied to dnsdb before enabling writing, this entire process took no more than 2 seconds. During the migration we saw a spike of API latency as a result of the migration manager locking writes, and then dealing with a backlog of queries. However, we recovered back to normal latencies after several minutes.
DNS Records API Latency and Requests during migration
Unfortunately, due to the far-reaching impact that DNS has at Cloudflare, this was not the end of the migration. There were 3 lesser-used services that had slipped by in our scan of services accessing DNS records via cfdb. Fortunately, the setup of the foreign table meant that we could very quickly fix any residual issues by simply changing the table name.
Post-migration
Almost immediately, as expected, we saw a steep drop in usage across cfdb. This freed up a lot of resources for other services to take advantage of.
cfdb usage dropped significantly after the migration period.
Since the migration, the average requests per second to the DNS Records API has more than doubled. At the same time, our CPU usage across both cfdb and dnsdb has settled at below 10% as seen below, giving us room for spikes and future growth.
cfdb and dnsdb CPU usage now
As a result of this improved capacity, our database-related incident rate dropped dramatically.
As for query latencies, our latency post-migration is slightly lower on average, with fewer sustained spikes above 500ms. However, the performance improvement is largely noticed during high load periods, when our database handles spikes without significant issues. Many of these spikes come as a result of clients making calls to collect a large amount of DNS records or making several changes to their zone in short bursts. Both of these actions are common use cases for large customers onboarding zones.
In addition to these improvements, the DNS team also has more granular control over dnsdb cluster-specific settings that can be tweaked for our needs rather than catering to all the other services. For example, we were able to make custom changes to replication lag limits to ensure that services using replicas were able to read with some amount of certainty that the data would exist in a consistent form. Measures like this reduce overall load on the primary because almost all read queries can now go to the replicas.
Although this migration was a resounding success, we are always working to improve our systems. As we grow, so do our customers, which means the need to scale never really ends. We have more exciting improvements on the roadmap, and we are looking forward to sharing more details in the future.
The DNS team at Cloudflare isn’t the only team solving challenging problems like the one above. If this sounds interesting to you, we have many more tech deep dives on our blog, and we are always looking for curious engineers to join our team — see open opportunities here.
In 2018, Cloudflare announced 1.1.1.1, one of the fastest, privacy-first consumer DNS services. 1.1.1.1 was the first consumer product Cloudflare ever launched, focused on reaching a wider audience. This service was designed to be fast and private, and does not retain information that would identify who is making a request.
In 2020, Cloudflare announced 1.1.1.1 for Families, designed to add a layer of protection to our existing 1.1.1.1 public resolver. The intent behind this product was to provide consumers, namely families, the ability to add a security and adult content filter to block unsuspecting users from accessing specific sites when browsing the Internet.
Today, we are officially announcing that any ISP and equipment manufacturer can use our DNS resolvers for free. Internet service, network, and hardware equipment providers can sign up and join this program to partner with Cloudflare to deliver a safer browsing experience that is easy to use, industry leading, and at no cost to anyone.
Leading companies have already partnered with Cloudflare to deliver superior and customized offerings to protect their customers. By delivering this service in a place where the customer is familiar, you can help us make the Internet a safe place for all.
A need to intentionally focus on families
COVID-19 presented new challenges beginning in 2020 as kids’ online activity increased and the reliance on home networks was more present than ever before. Research shows around 67% of adolescents have access to a tablet, with ages as low as two years old accessing media content. While it is often impressive to watch the ease with which a young child can navigate a smartphone or tablet handed to them and pull up their favorite YouTube show, it becomes increasingly concerning that kids may unintentionally stumble onto harmful content in the process.
Our launch of 1.1.1.1 for Families in 2020 provided that peace of mind to users around the globe, and it continues to deliver those protections. Today, households can set up this service using our guide. They can select the DNS resolver they want to use, focusing on just privacy, or include blocking security threats and adult content across their entire home network.
Although this service is available and free for anyone to use, there are still many users who browse online daily without protections in place. Setting up protection like this can feel daunting, and many users are at a loss on where to begin and/or how to configure this on their devices or home network. Today we are announcing a partnership that will make setup and configuration much easier for users.
Partnering to extend security even further
ISPs and network providers can use Cloudflare’s different resolver services to provide various offerings to their customers. Our existing partners have taken these offerings and built them into their platforms as an extension of the services that they are already providing to their customers. This built-in model allows for easy adoption and a consistent and comprehensive end customer journey. Each service is designed with a specific purpose in mind, outlined below:
Our core privacy resolver (1.1.1.1) is designed for speed and privacy. Additionally, DNS requests to our public resolver can be sent over a secure channel using DNS over HTTPS (DoH) or DNS over TLS (DoT), significantly decreasing the odds of any unwanted spying or monster-in-the-middle attacks.
Our security resolver (1.1.1.2) has all the benefits of 1.1.1.1, with the additional benefit of protecting users from sites that contain malware, spam, botnet command and control attacks, or phishing threats.
Our family resolver (1.1.1.3) provides all the benefits of 1.1.1.2, with the additional benefit of blocking unwanted adult content from both direct site navigation, as well as locking public search engines to Safe Search only. This prevents anyone from unknowingly searching for something that might return an unwanted result.
Premium Safety & Customizations
If users want even more flexibility than what our public DNS resolvers provide, Cloudflare also offers a Gateway product that allows customized filtering, reporting, logging, analytics, and scheduling. This advanced Gateway offering includes over 114 categories ranging from social media, online messaging platforms, gaming, and “safe search” results, all the way to “home & garden”.
The additional filters and scheduling functionality empowers users to exercise more nuanced and time-based controls, such as limiting social media during school hours or dinner time.
If you are an ISP or equipment manufacturer looking to provide easily customizable options for your customers, this is also an available option. We have a multi-tenant environment available for our Gateway offering that enables our customers to empower their individual subscribers to configure their own individual filters for their users and homes. If you are a device manufacturer or ISP looking to offer customizable protections for your individual subscribers, this may be a good option for you.
Our continued commitment to privacy, security, and safety
An easy choice
Simply put, Cloudflare is an easy and obvious choice for protecting individuals and families. This is why leading companies have all chosen to partner with Cloudflare to help protect customers and their families. In 2020, after launching 1.1.1.1 for Families, we were serving 200+ billion DNS queries per day for 1.1.1.1. Today, we serve 1.7 trillion queries per day for 1.1.1.1 and our network presence spans over 330 cities and interconnects with over 12,500+ other networks. It is this network that puts us within a blink of an eye for 95% of the world’s Internet-connected population (your customers), ensuring they receive lightning fast speed while browsing.
Join us in making a safe browsing experience easy for everyone
Cloudflare began with a singular goal of helping build a better Internet, and our annual Birthday Week is a catalyst for many developments that have shaped a better Internet for everyone.
We remain committed to helping to protect and build a better Internet for every user, and to do so, we need to meet them where they are. Our partnerships are critical in making this a reality, and we want you to be a part of the solution with us.
Whether you are interested in our public DNS resolvers or our more advanced Gateway options, Cloudflare has easy and scalable options for everyone. You can sign up to join this program as a partner today by submitting this form, and we will be in touch to understand your needs and bring you on board.
Customers that use Cloudflare to manage their DNS often need to create a whole batch of records, enable proxying on many records, update many records to point to a new target at the same time, or even delete all of their records. Historically, customers had to resort to bespoke scripts to make these changes, which came with their own set of issues. In response to customer demand, we are excited to announce support for batched API calls to the DNS records API starting today. This lets customers make large changes to their zones much more efficiently than before. Whether sending a POST, PUT, PATCH or DELETE, users can now execute these four different HTTP methods, and multiple HTTP requests all at the same time.
Efficient zone management matters
DNS records are an essential part of most web applications and websites, and they serve many different purposes. The most common use case for a DNS record is to have a hostname point to an IPv4 address, this is called an A record:
example.com 59 IN A 198.51.100.0
blog.example.com 59 IN A 198.51.100.1
ask.example.com 59 IN A 198.51.100.2
In its most simple form, this enables Internet users to connect to websites without needing to memorize their IP address.
Often, our customers need to be able to do things like create a whole batch of records, or enable proxying on many records, or update many records to point to a new target at the same time, or even delete all of their records. Unfortunately, for most of these cases, we were asking customers to write their own custom scripts or programs to do these tasks for them, a number of which are open sourced and whose content has not been checked by us. These scripts are often used to avoid needing to repeatedly make the same API calls manually. This takes time, not only for the development of the scripts, but also to simply execute all the API calls, not to mention it can leave the zone in a bad state if some changes fail while others succeed.
Introducing /batch
Starting today, everyone with a Cloudflare zone will have access to this endpoint, with free tier customers getting access to 200 changes in one batch, and paid plans getting access to 3,500 changes in one batch. We have successfully tested up to 100,000 changes in one call. The API is simple, expecting a POST request to be made to the new API endpoint /dns_records/batch, which passes in a JSON object in the body in the format:
Each list of records []Record will follow the same requirements as the regular API, except that the record ID on deletes, patches, and puts will be required within the Record object itself. Here is a simple example:
Our API will then parse this and execute these calls in the following order:
deletes
patches
puts
posts
Each of these respective lists will be executed in the order given. This ordering system is important because it removes the need for our clients to worry about conflicts, such as if they need to create a CNAME on the same hostname as a to-be-deleted A record, which is not allowed in RFC 1912. In the event that any of these individual actions fail, the entire API call will fail and return the first error it sees. The batch request will also be executed inside a single database transaction, which will roll back in the event of failure.
After the batch request has been successfully executed in our database, we then propagate the changes to our edge via Quicksilver, our distributed KV store. Each of the individual record changes inside the batch request is treated as a single key-value pair, and database transactions are not supported. As such, we cannot guarantee that the propagation to our edge servers will be atomic. For example, if replacing a delegation with an A record, some resolvers may see the NS record removed before the A record is added.
The response will follow the same format as the request. Patches and puts that result in no changes will be placed at the end of their respective lists.
We are also introducing some new changes to the Cloudflare dashboard, allowing users to select multiple records and subsequently:
Delete all selected records
Change the proxy status of all selected records
We plan to continue improving the dashboard to support more batch actions based on your feedback.
The journey
Although at the surface, this batch endpoint may seem like a fairly simple change, behind the scenes it is the culmination of a multi-year, multi-team effort. Over the past several years, we have been working hard to improve the DNS pipeline that takes our customers’ records and pushes them to Quicksilver, our distributed database. As part of this effort, we have been improving our DNS Records API to reduce the overall latency. The DNS Records API is Cloudflare’s most used API externally, serving twice as many requests as any other API at peak. In addition, the DNS Records API supports over 20 internal services, many of which touch very important areas such as DNSSEC, TLS, Email, Tunnels, Workers, Spectrum, and R2 storage. Therefore, it was important to build something that scales.
To improve API performance, we first needed to understand the complexities of the entire stack. At Cloudflare, we use Jaeger tracing to debug our systems. It gives us granular insights into a sample of requests that are coming into our APIs. When looking at API request latency, the span that stood out was the time spent on each individual database lookup. The latency here can vary anywhere from ~1ms to ~5ms.
Jaeger trace showing variable database latency
Given this variability in database query latency, we wanted to understand exactly what was going on within each DNS Records API request. When we first started on this journey, the breakdown of database lookups for each action was as follows:
Action
Database Queries
Reason
POST
2
One to write and one to read the new record.
PUT
3
One to collect, one to write, and one to read back the new record.
PATCH
3
One to collect, one to write, and one to read back the new record.
DELETE
2
One to read and one to delete.
The reason we needed to read the newly created records on POST, PUT, and PATCH was because the record contains information filled in by the database which we cannot infer in the API.
Let’s imagine that a customer needed to edit 1,000 records. If each database lookup took 3ms to complete, that was 3ms * 3 lookups * 1,000 records = 9 seconds spent on database queries alone, not taking into account the round trip time to and from our API or any other processing latency. It’s clear that we needed to reduce the number of overall queries and ideally minimize per query latency variation. Let’s tackle the variation in latency first.
Each of these calls is not a simple INSERT, UPDATE, or DELETE, because we have functions wrapping these database calls for sanitization purposes. In order to understand the variable latency, we enlisted the help of PostgreSQL’s “auto_explain”. This module gives a breakdown of execution times for each statement without needing to EXPLAIN each one by hand. We used the following settings:
A handful of queries showed durations like the one below, which took an order of magnitude longer than other queries.
We noticed that in several locations we were doing queries like:
IF (EXISTS (SELECT id FROM table WHERE row_hash = __new_row_hash))
If you are trying to insert into very large zones, such queries could mean even longer database query times, potentially explaining the discrepancy between 1ms and 5ms in our tracing images above. Upon further investigation, we already had a unique index on that exact hash. Unique indexes in PostgreSQL enforce the uniqueness of one or more column values, which means we can safely remove those existence checks without risk of inserting duplicate rows.
The next task was to introduce database batching into our DNS Records API. In any API, external calls such as SQL queries are going to add substantial latency to the request. Database batching allows the DNS Records API to execute multiple SQL queries within one single network call, subsequently lowering the number of database round trips our system needs to make.
According to the table above, each database write also corresponded to a read after it had completed the query. This was needed to collect information like creation/modification timestamps and new IDs. To improve this, we tweaked our database functions to now return the newly created DNS record itself, removing a full round trip to the database. Here is the updated table:
Action
Database Queries
Reason
POST
1
One to write
PUT
2
One to read, one to write.
PATCH
2
One to read, one to write.
DELETE
2
One to read, one to delete.
We have room for improvement here, however we cannot easily reduce this further due to some restrictions around auditing and other sanitization logic.
Results:
Action
Average database time before
Average database time after
Percentage Decrease
POST
3.38ms
0.967ms
71.4%
PUT
4.47ms
2.31ms
48.4%
PATCH
4.41ms
2.24ms
49.3%
DELETE
1.21ms
1.21ms
0%
These are some pretty good improvements! Not only did we reduce the API latency, we also reduced the database query load, benefiting other systems as well.
Weren’t we talking about batching?
I previously mentioned that the /batch endpoint is fully atomic, making use of a single database transaction. However, a single transaction may still require multiple database network calls, and from the table above, that can add up to a significant amount of time when dealing with large batches. To optimize this, we are making use of pgx/batch, a Golang object that allows us to write and subsequently read multiple queries in a single network call. Here is a high level of how the batch endpoint works:
Collect all the records for the PUTs, PATCHes and DELETEs.
Apply any per record differences as requested by the PATCHes and PUTs.
Format the batch SQL query to include each of the actions.
Execute the batch SQL query in the database.
Parse each database response and return any errors if needed.
Audit each change.
This takes at most only two database calls per batch. One to fetch, and one to write/delete. If the batch contains only POSTs, this will be further reduced to a single database call. Given all of this, we should expect to see a significant improvement in latency when making multiple changes, which we do when observing how these various endpoints perform:
Note: Each of these queries was run from multiple locations around the world and the median of the response times are shown here. The server responding to queries is located in Portland, Oregon, United States. Latencies are subject to change depending on geographical location.
Create only:
10 Records
100 Records
1,000 Records
10,000 Records
Regular API
7.55s
74.23s
757.32s
7,877.14s
Batch API – Without database batching
0.85s
1.47s
4.32s
16.58s
Batch API – with database batching
0.67s
1.21s
3.09s
10.33s
Delete only:
10 Records
100 Records
1,000 Records
10,000 Records
Regular API
7.28s
67.35s
658.11s
7,471.30s
Batch API – without database batching
0.79s
1.32s
3.18s
17.49s
Batch API – with database batching
0.66s
0.78s
1.68s
7.73s
Create/Update/Delete:
10 Records
100 Records
1,000 Records
10,000 Records
Regular API
7.11s
72.41s
715.36s
7,298.17s
Batch API – without database batching
0.79s
1.36s
3.05s
18.27s
Batch API – with database batching
0.74s
1.06s
2.17s
8.48s
Overall Average:
10 Records
100 Records
1,000 Records
10,000 Records
Regular API
7.31s
71.33s
710.26s
7,548.87s
Batch API – without database batching
0.81s
1.38s
3.51s
17.44s
Batch API – with database batching
0.69s
1.02s
2.31s
8.85s
We can see that on average, the new batching API is significantly faster than the regular API trying to do the same actions, and it’s also nearly twice as fast as the batching API without batched database calls. We can see that at 10,000 records, the batching API is a staggering 850x faster than the regular API. As mentioned above, these numbers are likely to change for a number of different reasons, but it’s clear that making several round trips to and from the API adds substantial latency, regardless of the region.
Batch overload
Making our API faster is awesome, but we don’t operate in an isolated environment. Each of these records needs to be processed and pushed to Quicksilver, our distributed database. If we have customers creating tens of thousands of records every 10 seconds, we need to be able to handle this downstream so that we don’t overwhelm our system. In a May 2022 blog post titled How we improved DNS record build speed by more than 4,000x, I notedthat:
We plan to introduce a batching system that will collect record changes into groups to minimize the number of queries we make to our database and Quicksilver.
This task has since been completed, and our propagation pipeline is now able to batch thousands of record changes into a single database query which can then be published to Quicksilver in order to be propagated to our global network.
Next steps
We have a couple more improvements we may want to bring into the API. We also intend to improve the UI to bring more usability improvements to the dashboard to more easily manage zones. We would love to hear your feedback, so please let us know what you think and if you have any suggestions for improvements.
Microsoft is working on a promising-looking protocol to lock down DNS.
ZTDNS aims to solve this decades-old problem by integrating the Windows DNS engine with the Windows Filtering Platform—the core component of the Windows Firewall—directly into client devices.
Jake Williams, VP of research and development at consultancy Hunter Strategy, said the union of these previously disparate engines would allow updates to be made to the Windows firewall on a per-domain name basis. The result, he said, is a mechanism that allows organizations to, in essence, tell clients “only use our DNS server, that uses TLS, and will only resolve certain domains.” Microsoft calls this DNS server or servers the “protective DNS server.”
By default, the firewall will deny resolutions to all domains except those enumerated in allow lists. A separate allow list will contain IP address subnets that clients need to run authorized software. Key to making this work at scale inside an organization with rapidly changing needs. Networking security expert Royce Williams (no relation to Jake Williams) called this a “sort of a bidirectional API for the firewall layer, so you can both trigger firewall actions (by input *to* the firewall), and trigger external actions based on firewall state (output *from* the firewall). So instead of having to reinvent the firewall wheel if you are an AV vendor or whatever, you just hook into WFP.”
We are very excited to announce the official release of Foundation DNS, with new advanced nameservers, even more resilience, and advanced analytics to meet the complex requirements of our enterprise customers. Foundation DNS is one of Cloudflare’s largest leaps forward in our authoritative DNS offering since its launch in 2010, and we know our customers are interested in an enterprise-ready authoritative DNS service with the highest level of performance, reliability, security, flexibility, and advanced analytics.
Starting today, every new enterprise contract that includes authoritative DNS will have access to the Foundation DNS feature set and existing enterprise customers will have Foundation DNS features made available to them over the course of this year. If you are an existing enterprise customer already using our authoritative DNS services, and you’re interested in getting your hands on Foundation DNS earlier, just reach out to your account team, and they can enable it for you. Let’s get started…
Why is DNS so important?
From an end user perspective, DNS makes the Internet usable. DNS is the phone book of the Internet which translates hostnames like www.cloudflare.com into IP addresses that our browsers, applications, and devices use to connect to services. Without DNS, users would have to remember IP addresses like 108.162.193.147 or 2606:4700:58::adf5:3b93 every time they wanted to visit a website on their mobile device or desktop – imagine having to remember something like that instead of just www.cloudflare.com. DNS is used in every end user application on the Internet, from social media to banking to healthcare portals. People’s usage of the Internet is entirely reliant on DNS.
From a business perspective, DNS is the very first step in reaching websites and connecting to applications. Devices need to know where to connect in order to reach services, authenticate users, and provide the information being requested. Resolving DNS queries quickly can be the difference between a website or application being perceived as responsive or not and can have a real impact on user experience.
When DNS outages occur, the impacts are obvious. Imagine your go-to ecommerce site not loading, just like what happened with the outage Dyn experienced in 2016, which took down multiple popular ecommerce sites among others. Or, if you are part of a company, and customers aren’t able to reach your website to purchase the goods or services you are selling, a DNS outage will literally lose you money. DNS is often taken for granted, but make no mistake, you’ll notice it when it’s not working properly. Thankfully, if you use Cloudflare Authoritative DNS, these are problems you don’t worry about very much.
There is always room for improvement
Cloudflare has been providing authoritative DNS services for over a decade. Our authoritative DNS service hosts millions of domains across many different top level domains (TLDs). We have customers of all sizes, from single domains with just a few records to customers with tens of millions of records spread across multiple domains. Our enterprise customers, rightfully, demand the highest level of performance, reliability, security, and flexibility from our DNS service, along with detailed analytics. While our customers love our authoritative DNS, we recognize there is always room for improvement in some of those categories. To that end, we set off to make some major improvements to our DNS architecture, with new features as well as structural changes. We are proudly calling this improved offering Foundation DNS.
Meet Foundation DNS
As our new enterprise authoritative DNS offering, Foundation DNS was designed to enhance the reliability, security, flexibility, and analytics of our existing authoritative DNS service. Before we dive into all the specifics of Foundation DNS, here is a quick summary of what Foundation DNS brings to our authoritative DNS offering:
Advanced nameservers bring DNS reliability to the next level.
New zone-level DNS settings provide more flexible configuration of DNS specific settings.
Unique DNSSEC keys per account and zone provide additional security and flexibility for DNSSEC.
GraphQL-based DNS analytics provide even more insights into your DNS queries.
A new release process ensures enterprise customers have the utmost stability and reliability.
Simpler DNS pricing with more generous quotas for DNS-only zones and DNS records.
Now, let’s dive deeper into each of these new Foundation DNS features:
Advanced nameservers
With Foundation DNS, we’re introducing advanced nameservers with a specific focus on enhancing reliability for your enterprise. You might be familiar with our standard authoritative nameservers which come as a pair per zone and use names within the cloudflare.com domain. Here’s an example:
$ dig mycoolwebpage.xyz ns +noall +answer
mycoolwebpage.xyz.	86400	IN	NS	kelly.ns.cloudflare.com.
mycoolwebpage.xyz.	86400	IN	NS	christian.ns.cloudflare.com.
Now, let’s look at the same zone using Foundation DNS advanced nameservers:
$ dig mycoolwebpage.xyz ns +noall +answer
mycoolwebpage.xyz.	86400	IN	NS	blue.foundationdns.com.
mycoolwebpage.xyz.	86400	IN	NS	blue.foundationdns.net.
mycoolwebpage.xyz.	86400	IN	NS	blue.foundationdns.org.
Advanced nameservers improve reliability in a few different ways. The first improvement comes from the Foundation DNS authoritative servers being spread across multiple TLDs. This provides protection from larger scale DNS outages and DDoS attacks that could potentially affect DNS infrastructure further up the tree, including TLD name servers. Foundation DNS authoritative nameservers are now located across multiple branches of the global DNS tree structure, further insulating our customers from these potential outages and attacks.
You might also have noticed that there is an additional nameserver listed with Foundation DNS. While this is an improvement, it’s not for the reason you might think it is. If we resolve each one of these nameservers to their respective IP addresses, we can make this a little easier to understand. Let’s do that here starting with our standard nameservers:
$ dig kelly.ns.cloudflare.com. +noall +answer
kelly.ns.cloudflare.com. 86353  IN      A       108.162.194.91
kelly.ns.cloudflare.com. 86353  IN      A       162.159.38.91
kelly.ns.cloudflare.com. 86353  IN      A       172.64.34.91

$ dig christian.ns.cloudflare.com. +noall +answer
christian.ns.cloudflare.com. 86353 IN   A       108.162.195.247
christian.ns.cloudflare.com. 86353 IN   A       162.159.44.247
christian.ns.cloudflare.com. 86353 IN   A       172.64.35.247
There are six total IP addresses for the two nameservers. As it turns out, this is all DNS resolvers actually care about when querying authoritative nameservers. DNS resolvers usually don’t track the actual domain names of authoritative servers; they simply maintain an unordered list of IP addresses that they can use to resolve queries for a given domain. So with our standard authoritative nameservers, we give resolvers six IP addresses to use to resolve DNS queries. Now, let’s look at the IP addresses for our Foundation DNS advanced nameservers:
$ dig blue.foundationdns.com. +noall +answer
blue.foundationdns.com. 300     IN      A       108.162.198.1
blue.foundationdns.com. 300     IN      A       162.159.60.1
blue.foundationdns.com. 300     IN      A       172.64.40.1

$ dig blue.foundationdns.net. +noall +answer
blue.foundationdns.net. 300     IN      A       108.162.198.1
blue.foundationdns.net. 300     IN      A       162.159.60.1
blue.foundationdns.net. 300     IN      A       172.64.40.1

$ dig blue.foundationdns.org. +noall +answer
blue.foundationdns.org. 300     IN      A       108.162.198.1
blue.foundationdns.org. 300     IN      A       162.159.60.1
blue.foundationdns.org. 300     IN      A       172.64.40.1
Would you look at that! Foundation DNS provides the same IP addresses for each of the authoritative nameservers that we provide to a zone. So in this case, we have only provided three IP addresses for resolvers to use to resolve DNS queries. And you might be wondering,“isn’t six better than three? Isn’t this a downgrade?” It turns out more isn’t always better. Let’s talk about why.
You are probably aware of Cloudflare’s use of Anycast and, as you might assume, our DNS services leverage Anycast to ensure that our authoritative DNS servers are available globally and as close as possible to users and resolvers across the Internet. Our standard nameservers are all advertised out of every Cloudflare data center by a single Anycast group. If we zoom in on Europe, you can see that in a standard nameserver deployment, both nameservers are advertised from every data center.
We can take those six IP addresses from our standard nameservers above and perform a lookup for their “hostname.bind” TXT record which will show us the airport code or physical location of the closest data center where our DNS queries are being resolved from. This output helps explain the reason why more isn’t always better.
As you can see, when queried from near London, all six of those IP addresses route to the same London (LHR) data center. Meaning that when a resolver in London is resolving DNS queries for a domain using Cloudflare’s standard authoritative DNS, no matter which nameserver IP address is being queried, they are always connecting to the same physical location.
You might be asking, “So what? What does that mean to me?” Let’s look at an example. If you wanted to resolve a domain using Cloudflare standard nameservers from London, and I am using a public resolver that is also located in London, the resolver will always connect to the Cloudflare LHR data center regardless of which nameserver it’s trying to reach. It doesn’t have any other option, because of Anycast.
Because of Anycast, should the LHR data center go offline completely, all the traffic intended for LHR would be routed to other nearby data centers and resolvers would continue to function normally. However, in the unlikely scenario where the LHR data center was online, but our DNS services aren’t able to respond to DNS queries, the resolver would have no way to resolve these DNS queries since they can’t reach out to any other data center. We could have 100 IP addresses, and it would not help us in this scenario. Eventually, cached responses will expire, and the domain will eventually stop being resolved.
Foundation DNS advanced nameservers are changing the way we use Anycast by leveraging two Anycast groups, which breaks the previous paradigm of every authoritative nameserver IP being advertised from every data center. Using two Anycast groups means that Foundation DNS authoritative nameservers actually have different physical locations from one another, rather than all being advertised from each data center. Here is how that same region would look using two Anycast groups:
Let’s go back and finish our comparison of six authoritative IP addresses for standard authoritative DNS vs three IP addresses for Foundation DNS now that it’s understood that Foundation DNS is using two Anycast groups for advertising nameservers. Let’s see where Foundation DNS servers are being advertised from for our example:
Look at that! One of our three nameserver IP addresses is being advertised out of a different data center, Manchester (MAN), making Foundation DNS more reliable and resilient for the previously mentioned outage scenario. It’s worth mentioning that in some cities, Cloudflare operates out of multiple data centers which will result in all three queries returning the same airport code. While we guarantee that at least one of those IP addresses is being advertised out of a different data center, we understand some customers may want to test for themselves. In those cases, an additional query can show that IP addresses are being advertised out of different data centers.
In the “94m30” returned in the response, the number before the “m” represents the data center that answered the query. As long as that number is different in one of the three responses, you know that one of your Foundation DNS authoritative nameservers is being advertised out of a different physical location.
With Foundation DNS leveraging two Anycast groups, the previous outage scenario is handled seamlessly. DNS resolvers monitor requests to all the authoritative nameservers returned for a given domain, but primarily use the nameserver that is providing the fastest responses.
With this configuration, DNS resolvers are able to send requests to two different Cloudflare data centers, so, should a failure happen at one physical location, queries are then automatically sent to the second data center where they can be properly resolved.
Foundation DNS advanced nameservers are a big step forward in reliability for our enterprise customers. We welcome our enterprise customers to enable advanced nameservers for existing zones today. Migrating to Foundation DNS won’t involve any downtime either because even after Foundation DNS advanced nameservers are enabled for a zone, the previous standard authoritative DNS nameservers will continue to function and respond to queries for the zone. Customers don’t need to plan for a cutover or other service-impacting event to migrate to Foundation DNS advanced nameservers.
New zone-level DNS settings
Historically, we have received regular requests from our enterprise customers to adjust specific DNS settings that were not exposed via our API or dashboard, such as enabling secondary DNS overrides. When customers wanted these settings adjusted, they had to reach out to their account teams, who would change the configurations. With Foundation DNS, we are exposing the most commonly requested settings via the API and dashboard to give our customers increased flexibility with their Cloudflare authoritative DNS solution.
Enterprise customers can now configure the following DNS settings on their zones:
Allows you to have multiple authoritative DNS providers while using Cloudflare as a primary nameserver.
Unique DNSSEC keys per account and zone
DNSSEC, which stands for Domain Name System Security Extensions, adds security to a domain or zone by providing a way to check that the response you receive for a DNS query is authentic and hasn’t been modified. DNSSEC prevents DNS cache poisoning (DNS spoofing) which helps ensure that DNS resolvers are responding to DNS queries with the correct IP addresses.
Since we launched Universal DNSSEC in 2015, we’ve made quite a few improvements, like adding support for pre-signed DNSSEC for secondary zones and multi-signer DNSSEC. By default, Cloudflare signs DNS records on the fly (live signing) as we respond to DNS queries. This allows Cloudflare to host a DNSSEC-secured domain while dynamically allocating IP addresses for the proxied origins. It also enables certain load balancing use cases since the IP addresses served in the DNS response in these cases change based on steering.
Cloudflare uses the Elliptic Curve algorithm ECDSA P-256, which is stronger than most RSA keys used today. It uses less CPU to generate signatures, making them more efficient to generate on the fly. Usually two keys are used as part of DNSSEC, the Zone Signing Key (ZSK) and the Key Signing Key (KSK). At the simplest level, the ZSK is used for signing the DNS records that are served in response to queries and the KSK is used to sign the DNSKEYs, including the ZSK to ensure its authenticity.
Today, Cloudflare uses a shared ZSK and KSK globally for all DNSSEC signing, and since we use such a strong cryptographic algorithm, we know how secure this key set is and as such, do not believe there is a need to regularly rotate the ZSK or KSK – at least for security reasons. There are customers, however, that have policies that require the rotation of these keys at certain intervals. Because of this, we’ve added the ability for our new Foundation DNS advanced nameservers to rotate both their ZSK and KSK as needed per account or per zone. This will first be available via the API and subsequently through the Cloudflare dashboard. So now, customers with strict policy requirements around their DNSSEC key rotation can meet those requirements with Cloudflare Foundation DNS.
GraphQL-based DNS analytics
For those who are not familiar with it, GraphQL is a query language for APIs and a runtime for executing those queries. It allows clients to request exactly what they need, no more, no less, enabling them to aggregate data from multiple sources through a single API call, and supports real-time updates through subscriptions.
As you might know, Cloudflare has had a GraphQL API for a while now, but as part of Foundation DNS we are adding a new DNS dataset to that API that is only available with our new Foundation DNS advanced nameservers.
The new DNS dataset in our GraphQL API can be used to fetch information about the DNS queries a zone has received. This faster and more powerful alternative to our current DNS Analytics API allows you to query data from large time periods quickly and efficiently without running into limits or timeouts. The GraphQL API is more flexible with regard to which queries it accepts, and exposes more information than the DNS Analytics API.
For example, you can run this query to fetch the mean and 90th percentile processing time of your queries, grouped by source IP address, in 15 minute buckets. A query like this would be useful to see which IPs are querying your records most often for a given time range:
Previously, a query like this wouldn’t have been possible for several reasons. The first is that we have added new fields like sourceIP,which allows us to filter data based on which client IP addresses (usually resolvers) are making DNS queries. The second is that the GraphQL API query is able to process and return data from much larger time ranges. A DNS zone with sufficiently large amounts of queries was previously only able to query across a few days of traffic, while the new GraphQL API can provide data for a period of up to 31 days. We are planning further enhancements to that range, as well as how far back historical data can be stored and queried.
The GraphQL API also allows us to add a new DNS analytics section to the Cloudflare dashboard. Customers will be able to track the most queried records, see which data centers are answering those queries, see how many queries are being made, and much more.
The new DNS dataset in our GraphQL API and the new DNS analytics page work together to help our DNS customers to monitor, analyze, and troubleshoot their Foundation DNS deployments.
New release process
Cloudflare’s Authoritative DNS product receives software updates roughly once a week. Cloudflare has a sophisticated release process that helps prevent regressions from affecting production traffic. While uncommon, it’s possible to have issues only surface once the new release is subject to the volume and uniqueness of production traffic.
Because our enterprise customers desire stability even more than new features, new releases will be subject to a two-week soak time with our standard nameservers before our Foundation DNS advanced nameservers are upgraded. After two weeks with no issues, the Foundation DNS advanced nameservers will be upgraded as well.
Zones using Foundation DNS advanced nameservers will see increased reliability as they are better protected against regressions in new software releases.
Simpler DNS pricing
Historically, Cloudflare has charged for Authoritative DNS based on monthly DNS queries and the number of domains in the account. Our enterprise DNS customers are often interested in DNS-only zones, which are DNS zones hosted in Cloudflare that do not use our reverse proxy (layer 7) services such as our CDN, WAF, or Bot Management. With Foundation DNS, we’re making pricing simpler for the vast majority of those customers by including 10,000 DNS only domains by default. This change means most customers will only pay for the number of DNS queries they consume.
We’re also including 1 million DNS records across all domains in an account. But that doesn’t mean we can’t support more. In fact, the biggest single zone on our platform has over 3.9 million records, while our largest DNS account is just shy of 30 million DNS records spread across multiple zones. With Cloudflare DNS, there is no trouble handling even the largest deployments.
There is more to come
We are just getting started. In the future, we will add more exclusive features to Foundation DNS. One example is a highly requested feature: per-record scoped API tokens and user permissions. This will allow you to configure permissions on an even more granular level. For example, you could specify that a particular member of your account is only allowed to create and manage records of the type TXT and MX, so they don’t accidentally delete or edit address records impacting web traffic to your domain. Another example would be to specify permissions based on subdomain to further restrict the scope of specific users.
If you’re an existing enterprise customer and want to use Foundation DNS, get in touch with your account team to provision Foundation DNS on your account.
We’re proud to introduce the Advanced DNS Protection system, a robust defense mechanism designed to protect against the most sophisticated DNS-based DDoS attacks. This system is engineered to provide top-tier security, ensuring your digital infrastructure remains resilient in the face of evolving threats.
Our existing systems have been successfully detecting and mitigating ‘simpler’ DDoS attacks against DNS, but they’ve struggled with the more complex ones. The Advanced DNS Protection system is able to bridge that gap by leveraging new techniques that we will showcase in this blog post.
Advanced DNS Protection is currently in beta and available for all Magic Transit customers at no additional cost. Read on to learn more about DNS DDoS attacks, how the new system works, and what new functionality is expected down the road.
Register your interest to learn more about how we can help keep your DNS servers protected, available, and performant.
A third of all DDoS attacks target DNS servers
Distributed Denial of Service (DDoS) attacks are a type of cyber attack that aim to disrupt and take down websites and other online services. When DDoS attacks succeed and websites are taken offline, it can lead to significant revenue loss and damage to reputation.
Distribution of DDoS attack types for 2023
One common way to disrupt and take down a website is to flood its servers with more traffic than it can handle. This is known as an HTTP flood attack. It is a type of DDoS attack that targets the website directly with a lot of HTTP requests. According to our last DDoS trends report, in 2023 our systems automatically mitigated 5.2 million HTTP DDoS attacks — accounting for 37% of all DDoS attacks.
Diagram of an HTTP flood attack
However, there is another way to take down websites: by targeting them indirectly. Instead of flooding the website servers, the threat actor floods the DNS servers. If the DNS servers are overwhelmed with more queries than their capacity, hostname to IP address translation fails and the website experiences an indirectly inflicted outage because the DNS server cannot respond to legitimate queries.
One notable example is the attack that targeted Dyn, a DNS provider, in October 2016. It was a devastating DDoS attack launched by the infamous Mirai botnet. It caused disruptions for major sites like Airbnb, Netflix, and Amazon, and it took Dyn an entire day to restore services. That’s a long time for service disruptions that can lead to significant reputation and revenue impact.
Over seven years later, Mirai attacks and DNS attacks are still incredibly common. In 2023, DNS attacks were the second most common attack type — with a 33% share of all DDoS attacks (4.6 million attacks). Attacks launched by Mirai-variant botnets were the fifth most common type of network-layer DDoS attack, accounting for 3% of all network-layer DDoS attacks.
Diagram of a DNS query flood attack
What are sophisticated DNS-based DDoS attacks?
DNS-based DDoS attacks can be easier to mitigate when there is a recurring pattern in each query. This is what’s called the “attack fingerprint”. Fingerprint-based mitigation systems can identify those patterns and then deploy a mitigation rule that surgically filters the attack traffic without impacting legitimate traffic.
For example, let’s take a scenario where an attacker sends a flood of DNS queries to their target. In this example, the attacker only randomized the source IP address. All other query fields remained consistent. The mitigation system detected the pattern (source port is 1024 and the queried domain is example.com) and will generate an ephemeral mitigation rule to filter those queries.
A simplified diagram of the attack fingerprinting concept
However, there are DNS-based DDoS attacks that are much more sophisticated and randomized, lacking an apparent attack pattern. Without a consistent pattern to lock on to, it becomes virtually impossible to mitigate the attack using a fingerprint-based mitigation system. Moreover, even if an attack pattern is detected in a highly randomized attack, the pattern would probably be so generic that it would mistakenly mitigate legitimate user traffic and/or not catch the entire attack.
In this example, the attacker also randomized the queried domain in their DNS query flood attack. Simultaneously, a legitimate client (or server) is also querying example.com. They were assigned a random port number which happened to be 1024. The mitigation system detected a pattern (source port is 1024 and the queried domain is example.com) that caught only the part of the attack that matched the fingerprint. The mitigation system missed the part of the attack that queried other hostnames. Lastly, the mitigation system mistakenly caught legitimate traffic that happened to appear similar to the attack traffic.
A simplified diagram of a randomized DNS flood attack
This is just one very simple example of how fingerprinting can fail in stopping randomized DDoS attacks. This challenge is amplified when attackers “launder” their attack traffic through reputable public DNS resolvers (a DNS resolver, also known as a recursive DNS server, is a type of DNS server that is responsible for tracking down the IP address of a website from various other DNS servers). This is known as a DNS laundering attack.
Diagram of the DNS resolution process
During a DNS laundering attack, the attacker queries subdomains of a real domain that is managed by the victim’s authoritative DNS server. The prefix that defines the subdomain is randomized and is never used more than once. Due to the randomization element, recursive DNS servers will never have a cached response and will need to forward the query to the victim’s authoritative DNS server. The authoritative DNS server is then bombarded by so many queries until it cannot serve legitimate queries or even crashes altogether.
Diagram of a DNS Laundering attack
The complexity of sophisticated DNS DDoS attacks lies in their paradoxical nature: while they are relatively easy to detect, effectively mitigating them is significantly more difficult. This difficulty stems from the fact that authoritative DNS servers cannot simply block queries from recursive DNS servers, as these servers also make legitimate requests. Moreover, the authoritative DNS server is unable to filter queries aimed at the targeted domain because it is a genuine domain that needs to remain accessible.
Mitigating sophisticated DNS-based DDoS attacks with the Advanced DNS Protection system
The rise in these types of sophisticated DNS-based DDoS attacks motivated us to develop a new solution — a solution that would better protect our customers and bridge the gap of more traditional fingerprinting approaches. This solution came to be the Advanced DNS Protection system. Similar to the Advanced TCP Protection system, it is a software-defined system that we built, and it is powered by our stateful mitigation platform, flowtrackd (flow tracking daemon).
The Advanced DNS Protection system complements our existing suite of DDoS defense systems. Following the same approach as our other DDoS defense systems, the Advanced DNS Protection system is also a distributed system, and an instance of it runs on every Cloudflare server around the world. Once the system has been initiated, each instance can detect and mitigate attacks autonomously without requiring any centralized regulation. Detection and mitigation is instantaneous (zero seconds). Each instance also communicates with other instances on other servers in a data center. They gossip and share threat intelligence to deliver a comprehensive mitigation within each data center.
Screenshots from the Cloudflare dashboard showcasing a DNS-based DDoS attack that was mitigated by the Advanced DNS Protection system
Together, our fingerprinting-based systems (the DDoS protection managed rulesets) and our stateful mitigation systems provide a robust multi-layered defense strategy to defend against the most sophisticated and randomized DNS-based DDoS attacks. The system is also customizable, allowing Cloudflare customers to tailor it for their needs. Review our documentation for more information on configuration options.
Diagram of Cloudflare’s DDoS protection systems
We’ve also added new DNS-centric data points to help customers better understand their DNS traffic patterns and attacks. These new data points are available in a new “DNS Protection” tab within the Cloudflare Network Analytics dashboard. The new tab provides insights about which DNS queries are passed and dropped, as well as the characteristics of those queries, including the queried domain name and the record type. The analytics can also be fetched by using the Cloudflare GraphQL API and by exporting logs into your own monitoring dashboards via Logpush.
DNS queries: discerning good from bad
To protect against sophisticated and highly randomized DNS-based DDoS attacks, we needed to get better at deciding which DNS queries are likely to be legitimate for our customers. However, it’s not easy to infer what’s legitimate and what’s likely to be a part of an attack just based on the query name. We can’t rely solely on fingerprint-based detection mechanisms, since sometimes seemingly random queries, like abc123.example.com, can be legitimate. The opposite is true as well: a query for mailserver.example.com might look legitimate, but can end up not being a real subdomain for a customer.
To make matters worse, our Layer 3 packet routing-based mitigation service, Magic Transit, uses direct server return (DSR), meaning we can not see the DNS origin server’s responses to give us feedback about which queries are ultimately legitimate.
Diagram of Magic Transit with Direct Server Return (DSR)
We decided that the best way to combat these attacks is to build a data model of each customer’s expected DNS queries, based on a historical record that we build. With this model in hand, we can decide with higher confidence which queries are likely to be legitimate, and drop the ones that we think are not, shielding our customer’s DNS servers.
This is the basis of Advanced DNS Protection. It inspects every DNS query sent to our Magic Transit customers, and passes or drops them based on the data model and each customer’s individual settings.
To do so, each server at our global network continually sends certain DNS-related data such as query type (for example, A record) and the queried domains (but not the source of the query) to our core data centers, where we periodically compute DNS query traffic profiles for each customer. Those profiles are distributed across our global network, where they are consulted to help us more confidently and accurately decide which queries are good and which are bad. We drop the bad queries and pass on the good ones, taking into account a customer’s tolerance for unexpected DNS queries based on their configurations.
Solving the technical challenges that emerged when designing the Advanced DNS Protection system
In building this system, we faced several specific technical challenges:
Data processing
We process tens of millions of DNS queries per day across our global network for our Magic Transit customers, not counting Cloudflare’s suite of other DNS products, and use the DNS-related data mentioned above to build custom query traffic profiles. Analyzing this type of data requires careful treatment of our data pipelines. When building these traffic profiles, we use sample-on-write and adaptive bitrate technologies when writing and reading the necessary data, respectively, to ensure that we capture the data with a fine granularity while protecting our data infrastructure, and we drop information that might impact the privacy of end users.
Compact representation of query data
Some of our customers see tens of millions of DNS queries per day alone. This amount of data would be prohibitively expensive to store and distribute in an uncompressed format. To solve this challenge, we decided to use a counting Bloom filter for each customer’s traffic profile. This is a probabilistic data structure that allows us to succinctly store and distribute each customer’s DNS profile, and then efficiently query it at packet processing time.
Data distribution
We periodically need to recompute and redistribute every customer’s DNS traffic profile between our data centers to each server in our fleet. We used our very own R2 storage service to greatly simplify this task. With regional hints and custom domains enabled, we enabled caching and used only a handful of R2 buckets. Each time we need to update the global view of the customer data models across our edge fleet, 98% of the bits transferred are served from cache.
Built-in tolerance
When new domain names are put into service, our data models will not immediately be aware of them because queries with these names have never been seen before. This and other reasons for potential false positives mandate that we need to build a certain amount of tolerance into the system to allow through potentially legitimate queries. We do so by leveraging token bucket algorithms. Customers can configure the size of the token buckets by changing the sensitivity levels of the Advanced DNS Protection system. The lower the sensitivity, the larger the token bucket — and vice versa. A larger token bucket provides more tolerance for unexpected DNS queries and expected DNS queries that deviate from the profile. A high sensitivity level translates to a smaller token bucket and a stricter approach.
Leveraging Cloudflare’s global software-defined network
At the end of the day, these are the types of challenges that Cloudflare is excellent at solving. Our customers trust us with handling their traffic, and ensuring their Internet properties are protected, available and performant. We take that trust extremely seriously.
The Advanced DNS Protection system leverages our global infrastructure and data processing capabilities alongside intelligent algorithms and data structures to protect our customers.
If you are not yet a Cloudflare customer, let us know if you’d like to protect your DNS servers. Existing Cloudflare customers can enable the new systems by contacting their account team or Cloudflare Support.
Cloudflare has been part of a multivendor, industry-wide effort to mitigate two critical DNSSEC vulnerabilities. These vulnerabilities exposed significant risks to critical infrastructures that provide DNS resolution services. Cloudflare provides DNS resolution for anyone to use for free with our public resolver 1.1.1.1 service. Mitigations for Cloudflare’s public resolver 1.1.1.1 service were applied before these vulnerabilities were disclosed publicly. Internal resolvers using unbound (open source software) were upgraded promptly after a new software version fixing these vulnerabilities was released.
All Cloudflare DNS infrastructure was protected from both of these vulnerabilities before they were disclosed and is safe today. These vulnerabilities do not affect our Authoritative DNS or DNS firewall products.
All major DNS software vendors have released new versions of their software. All other major DNS resolver providers have also applied appropriate mitigations. Please update your DNS resolver software immediately, if you haven’t done so already.
Background
Domain name system (DNS) security extensions, commonly known as DNSSEC, are extensions to the DNS protocol that add authentication and integrity capabilities. DNSSEC uses cryptographic keys and signatures that allow DNS responses to be validated as authentic. DNSSEC protocol specifications have certain requirements that prioritize availability at the cost of increased complexity and computational cost for the validating DNS resolvers. The mitigations for the vulnerabilities discussed in this blog require local policies to be applied that relax these requirements in order to avoid exhausting the resources of validators.
The design of the DNS and DNSSEC protocols follows the Robustness principle: “be conservative in what you do, be liberal in what you accept from others”. There have been many vulnerabilities in the past that have taken advantage of protocol requirements following this principle. Malicious actors can exploit these vulnerabilities to attack DNS infrastructure, in this case by causing additional work for DNS resolvers by crafting DNSSEC responses with complex configurations. As is often the case, we find ourselves having to create a pragmatic balance between the flexibility that allows a protocol to adapt and evolve and the need to safeguard the stability and security of the services we operate.
Cloudflare’s public resolver 1.1.1.1 is a privacy-centric public resolver service. We have been using stricter validations and limits aimed at protecting our own infrastructure in addition to shielding authoritative DNS servers operated outside our network. As a result, we often receive complaints about resolution failures. Experience shows us that strict validations and limits can impact availability in some edge cases, especially when DNS domains are improperly configured. However, these strict validations and limits are necessary to improve the overall reliability and resilience of the DNS infrastructure.
The vulnerabilities and how we mitigated them are described below.
A DNSSEC signed zone can contain multiple keys (DNSKEY) to sign the contents of a DNS zone and a Resource Record Set (RRSET) in a DNS response can have multiple signatures (RRSIG). Multiple keys and signatures are required to support things like key rollover, algorithm rollover, and multi-signer DNSSEC. DNSSEC protocol specifications require a validating DNS resolver to try every possible combination of keys and signatures when validating a DNS response.
During validation, a resolver looks at the key tag of every signature and tries to find the associated key that was used to sign it. A key tag is an unsigned 16-bit number calculated as a checksum over the key’s resource data (RDATA). Key tags are intended to allow efficient pairing of a signature with the key which has supposedly created it. However, key tags are not unique, and it is possible that multiple keys can have the same key tag. A malicious actor can easily craft a DNS response with multiple keys having the same key tag together with multiple signatures, none of which might validate. A validating resolver would have to try every combination (number of keys multiplied by number of signatures) when trying to validate this response. This increases the computational cost of the validating resolver many-fold, degrading performance for all its users. This is known as the Keytrap vulnerability.
Variations of this vulnerability include using multiple signatures with one key, using one signature with multiple keys having colliding key tags, and using multiple keys with corresponding hashes added to the parent delegation signer record.
Mitigation
We have limited the maximum number of keys we will accept at a zone cut. A zone cut is where a parent zone delegates to a child zone, e.g. where the .com zone delegates cloudflare.com to Cloudflare nameservers. Even with this limit already in place and various other protections built for our platform, we realized that it would still be computationally costly to process a malicious DNS answer from an authoritative DNS server.
To address and further mitigate this vulnerability, we added a signature validations limit per RRSET and a total signature validations limit per resolution task. One resolution task might include multiple recursive queries to external authoritative DNS servers in order to answer a single DNS question. Clients queries exceeding these limits will fail to resolve and will receive a response with an Extended DNS Error (EDE) code 0. Furthermore, we added metrics which will allow us to detect attacks attempting to exploit this vulnerability.
NSEC3 iteration and closest encloser proof vulnerability (CVE-2023-50868)
Introduction
NSEC3 is an alternative approach for authenticated denial of existence. You can learn more about authenticated denial of existence here. NSEC3 uses a hash derived from DNS names instead of the DNS names directly in an attempt to prevent zone enumeration and the standard supports multiple iterations for hash calculations. However, because the full DNS name is used as input to the hash calculation, increasing hashing iterations beyond the initial doesn’t provide any additional value and is not recommended in RFC9276. This complication is further inflated while finding the closest enclosure proof. A malicious DNS response from an authoritative DNS server can set a high NSEC3 iteration count and long DNS names with multiple DNS labels to exhaust the computing resources of a validating resolver by making it do unnecessary hash computations.
Mitigation
For this vulnerability, we applied a similar mitigation technique as we did for Keytrap. We added a limit for total hash calculations per resolution task to answer a single DNS question. Similarly, clients queries exceeding this limit will fail to resolve and will receive a response with an EDE code 27. We also added metrics to track hash calculations allowing early detection of attacks attempting to exploit this vulnerability.
Timeline
Date and time in UTC
Event
2023-11-03 16:05
John Todd from Quad9 invites Cloudflare to participate in a joint task force to discuss a new DNS vulnerability.
2023-11-07 14:30
A group of DNS vendors and service providers meet to discuss the vulnerability during IETF 118. Discussions and collaboration continues in a closed chat group hosted at DNS-OARC
2023-12-08 20:20
Cloudflare public resolver 1.1.1.1 is fully patched to mitigate Keytrap vulnerability (CVE-2023-50387)
2024-01-17 22:39
Cloudflare public resolver 1.1.1.1 is fully patched to mitigate NSEC3 iteration count and closest encloser vulnerability (CVE-2023-50868)
We would like to thank Elias Heftrig, Haya Schulmann, Niklas Vogel, Michael Waidner from the German National Research Center for Applied Cybersecurity ATHENE, for discovering the Keytrap vulnerability and doing a responsible disclosure.
We would like to thank John Todd from Quad9 and the DNS Operations Analysis and Research Center (DNS-OARC) for facilitating coordination amongst various stakeholders.
And finally, we would like to thank the DNS-OARC community members, representing various DNS vendors and service providers, who all came together and worked tirelessly to fix these vulnerabilities, working towards a common goal of making the internet resilient and secure.
Welcome to the sixteenth edition of Cloudflare’s DDoS Threat Report. This edition covers DDoS trends and key findings for the fourth and final quarter of the year 2023, complete with a review of major trends throughout the year.
What are DDoS attacks?
DDoS attacks, or distributed denial-of-service attacks, are a type of cyber attack that aims to disrupt websites and online services for users, making them unavailable by overwhelming them with more traffic than they can handle. They are similar to car gridlocks that jam roads, preventing drivers from getting to their destination.
There are three main types of DDoS attacks that we will cover in this report. The first is an HTTP request intensive DDoS attack that aims to overwhelm HTTP servers with more requests than they can handle to cause a denial of service event. The second is an IP packet intensive DDoS attack that aims to overwhelm in-line appliances such as routers, firewalls, and servers with more packets than they can handle. The third is a bit-intensive attack that aims to saturate and clog the Internet link causing that ‘gridlock’ that we discussed. In this report, we will highlight various techniques and insights on all three types of attacks.
Previous editions of the report can be found here, and are also available on our interactive hub, Cloudflare Radar. Cloudflare Radar showcases global Internet traffic, attacks, and technology trends and insights, with drill-down and filtering capabilities for zooming in on insights of specific countries, industries, and service providers. Cloudflare Radar also offers a free API allowing academics, data sleuths, and other web enthusiasts to investigate Internet usage across the globe.
To learn how we prepare this report, refer to our Methodologies.
Key findings
In Q4, we observed a 117% year-over-year increase in network-layer DDoS attacks, and overall increased DDoS activity targeting retail, shipment and public relations websites during and around Black Friday and the holiday season.
In Q4, DDoS attack traffic targeting Taiwan registered a 3,370% growth, compared to the previous year, amidst the upcoming general election and reported tensions with China. The percentage of DDoS attack traffic targeting Israeli websites grew by 27% quarter-over-quarter, and the percentage of DDoS attack traffic targeting Palestinian websites grew by 1,126% quarter-over-quarter — as the military conflict between Israel and Hamas continues.
In Q4, there was a staggering 61,839% surge in DDoS attack traffic targeting Environmental Services websites compared to the previous year, coinciding with the 28th United Nations Climate Change Conference (COP 28).
For an in-depth analysis of these key findings and additional insights that could redefine your understanding of current cybersecurity challenges, read on!
Illustration of a DDoS attack
Hyper-volumetric HTTP DDoS attacks
2023 was the year of uncharted territories. DDoS attacks reached new heights — in size and sophistication. The wider Internet community, including Cloudflare, faced a persistent and deliberately engineered campaign of thousands of hyper-volumetric DDoS attacks at never before seen rates.
These attacks were highly complex and exploited an HTTP/2 vulnerability. Cloudflare developed purpose-built technology to mitigate the vulnerability’s effect and worked with others in the industry to responsibly disclose it.
As part of this DDoS campaign, in Q3 our systems mitigated the largest attack we’ve ever seen — 201 million requests per second (rps). That’s almost 8 times larger than our previous 2022 record of 26 million rps.
Largest HTTP DDoS attacks as seen by Cloudflare, by year
Growth in network-layer DDoS attacks
After the hyper-volumetric campaign subsided, we saw an unexpected drop in HTTP DDoS attacks. Overall in 2023, our automated defenses mitigated over 5.2 million HTTP DDoS attacks consisting of over 26 trillion requests. That averages at 594 HTTP DDoS attacks and 3 billion mitigated requests every hour.
Despite these astronomical figures, the amount of HTTP DDoS attack requests actually declined by 20% compared to 2022. This decline was not just annual but was also observed in 2023 Q4 where the number of HTTP DDoS attack requests decreased by 7% YoY and 18% QoQ.
On the network-layer, we saw a completely different trend. Our automated defenses mitigated 8.7 million network-layer DDoS attacks in 2023. This represents an 85% increase compared to 2022.
In 2023 Q4, Cloudflare’s automated defenses mitigated over 80 petabytes of network-layer attacks. On average, our systems auto-mitigated 996 network-layer DDoS attacks and 27 terabytes every hour. The number of network-layer DDoS attacks in 2023 Q4 increased by 175% YoY and 25% QoQ.
HTTP and Network-layer DDoS attacks by quarter
DDoS attacks increase during and around COP 28
In the final quarter of 2023, the landscape of cyber threats witnessed a significant shift. While the Cryptocurrency sector was initially leading in terms of the volume of HTTP DDoS attack requests, a new target emerged as a primary victim. The Environmental Services industry experienced an unprecedented surge in HTTP DDoS attacks, with these attacks constituting half of all its HTTP traffic. This marked a staggering 618-fold increase compared to the previous year, highlighting a disturbing trend in the cyber threat landscape.
This surge in cyber attacks coincided with COP 28, which ran from November 30th to December 12th, 2023. The conference was a pivotal event, signaling what many considered the ‘beginning of the end’ for the fossil fuel era. It was observed that in the period leading up to COP 28, there was a noticeable spike in HTTP attacks targeting Environmental Services websites. This pattern wasn’t isolated to this event alone.
Looking back at historical data, particularly during COP 26 and COP 27, as well as other UN environment-related resolutions or announcements, a similar pattern emerges. Each of these events was accompanied by a corresponding increase in cyber attacks aimed at Environmental Services websites.
In February and March 2023, significant environmental events like the UN’s resolution on climate justice and the launch of United Nations Environment Programme’s Freshwater Challenge potentially heightened the profile of environmental websites, possibly correlating with an increase in attacks on these sites.
This recurring pattern underscores the growing intersection between environmental issues and cyber security, a nexus that is increasingly becoming a focal point for attackers in the digital age.
DDoS attacks and Iron Swords
It’s not just UN resolutions that trigger DDoS attacks. Cyber attacks, and particularly DDoS attacks, have long been a tool of war and disruption. We witnessed an increase in DDoS attack activity in the Ukraine-Russia war, and now we’re also witnessing it in the Israel-Hamas war. We first reported the cyber activity in our report Cyber attacks in the Israel-Hamas war, and we continued to monitor the activity throughout Q4.
DDoS attacks targeting Israeli and Palestinian websites, by industry
Relative to each region’s traffic, the Palestinian territories was the second most attacked region by HTTP DDoS attacks in Q4. Over 10% of all HTTP requests towards Palestinian websites were DDoS attacks, a total of 1.3 billion DDoS requests — representing a 1,126% increase in QoQ. 90% of these DDoS attacks targeted Palestinian Banking websites. Another 8% targeted Information Technology and Internet platforms.
Top attacked Palestinian industries
Similarly, our systems automatically mitigated over 2.2 billion HTTP DDoS requests targeting Israeli websites. While 2.2 billion represents a decrease compared to the previous quarter and year, it did amount to a larger percentage out of the total Israel-bound traffic. This normalized figure represents a 27% increase QoQ but a 92% decrease YoY. Notwithstanding the larger amount of attack traffic, Israel was the 77th most attacked region relative to its own traffic. It was also the 33rd most attacked by total volume of attacks, whereas the Palestinian territories was 42nd.
Of those Israeli websites attacked, Newspaper & Media were the main target — receiving almost 40% of all Israel-bound HTTP DDoS attacks. The second most attacked industry was the Computer Software industry. The Banking, Financial Institutions, and Insurance (BFSI) industry came in third.
Top attacked Israeli industries
On the network layer, we see the same trend. Palestinian networks were targeted by 470 terabytes of attack traffic — accounting for over 68% of all traffic towards Palestinian networks. Surpassed only by China, this figure placed the Palestinian territories as the second most attacked region in the world, by network-layer DDoS attack, relative to all Palestinian territories-bound traffic. By absolute volume of traffic, it came in third. Those 470 terabytes accounted for approximately 1% of all DDoS traffic that Cloudflare mitigated.
Israeli networks, though, were targeted by only 2.4 terabytes of attack traffic, placing it as the 8th most attacked country by network-layer DDoS attacks (normalized). Those 2.4 terabytes accounted for almost 10% of all traffic towards Israeli networks.
Top attacked countries
When we turned the picture around, we saw that 3% of all bytes that were ingested in our Israeli-based data centers were network-layer DDoS attacks. In our Palestinian-based data centers, that figure was significantly higher — approximately 17% of all bytes.
On the application layer, we saw that 4% of HTTP requests originating from Palestinian IP addresses were DDoS attacks, and almost 2% of HTTP requests originating from Israeli IP addresses were DDoS attacks as well.
Main sources of DDoS attacks
In the third quarter of 2022, China was the largest source of HTTP DDoS attack traffic. However, since the fourth quarter of 2022, the US took the first place as the largest source of HTTP DDoS attacks and has maintained that undesirable position for five consecutive quarters. Similarly, our data centers in the US are the ones ingesting the most network-layer DDoS attack traffic — over 38% of all attack bytes.
HTTP DDoS attacks originating from China and the US by quarter
Together, China and the US account for a little over a quarter of all HTTP DDoS attack traffic in the world. Brazil, Germany, Indonesia, and Argentina account for the next twenty-five percent.
Top source of HTTP DDoS attacks
These large figures usually correspond to large markets. For this reason, we also normalize the attack traffic originating from each country by comparing their outbound traffic. When we do this, we often get small island nations or smaller market countries that a disproportionate amount of attack traffic originates from. In Q4, 40% of Saint Helena’s outbound traffic were HTTP DDoS attacks — placing it at the top. Following the ‘remote volcanic tropical island’, Libya came in second, Swaziland (also known as Eswatini) in third. Argentina and Egypt follow in fourth and fifth place.
Top source of HTTP DDoS attacks with respect to each country’s traffic
On the network layer, Zimbabwe came in first place. Almost 80% of all traffic we ingested in our Zimbabwe-based data center was malicious. In second place, Paraguay, and Madagascar in third.
Top source of Network-layer DDoS attacks with respect to each country’s traffic
Most attacked industries
By volume of attack traffic, Cryptocurrency was the most attacked industry in Q4. Over 330 billion HTTP requests targeted it. This figure accounts for over 4% of all HTTP DDoS traffic for the quarter. The second most attacked industry was Gaming & Gambling. These industries are known for being coveted targets and attract a lot of traffic and attacks.
Top industries targeted by HTTP DDoS attacks
On the network layer, the Information Technology and Internet industry was the most attacked — over 45% of all network-layer DDoS attack traffic was aimed at it. Following far behind were the Banking, Financial Services and Insurance (BFSI), Gaming & Gambling, and Telecommunications industries.
Top industries targeted by Network-layer DDoS attacks
To change perspectives, here too, we normalized the attack traffic by the total traffic for a specific industry. When we do that, we get a different picture.
Top attacked industries by HTTP DDoS attacks, by region
We already mentioned in the beginning of this report that the Environmental Services industry was the most attacked relative to its own traffic. In second place was the Packaging and Freight Delivery industry, which is interesting because of its timely correlation with online shopping during Black Friday and the winter holiday season. Purchased gifts and goods need to get to their destination somehow, and it seems as though attackers tried to interfere with that. On a similar note, DDoS attacks on retail companies increased by 23% compared to the previous year.
Top industries targeted by HTTP DDoS attacks with respect to each industry’s traffic
On the network layer, Public Relations and Communications was the most targeted industry — 36% of its traffic was malicious. This too is very interesting given its timing. Public Relations and Communications companies are usually linked to managing public perception and communication. Disrupting their operations can have immediate and widespread reputational impacts which becomes even more critical during the Q4 holiday season. This quarter often sees increased PR and communication activities due to holidays, end-of-year summaries, and preparation for the new year, making it a critical operational period — one that some may want to disrupt.
Top industries targeted by Network-layer DDoS attacks with respect to each industry’s traffic
Most attacked countries and regions
Singapore was the main target of HTTP DDoS attacks in Q4. Over 317 billion HTTP requests, 4% of all global DDoS traffic, were aimed at Singaporean websites. The US followed closely in second and Canada in third. Taiwan came in as the fourth most attacked region — amidst the upcoming general elections and the tensions with China. Taiwan-bound attacks in Q4 traffic increased by 847% compared to the previous year, and 2,858% compared to the previous quarter. This increase is not limited to the absolute values. When normalized, the percentage of HTTP DDoS attack traffic targeting Taiwan relative to all Taiwan-bound traffic also significantly increased. It increased by 624% quarter-over-quarter and 3,370% year-over-year.
Top targeted countries by HTTP DDoS attacks
While China came in as the ninth most attacked country by HTTP DDoS attacks, it’s the number one most attacked country by network-layer attacks. 45% of all network-layer DDoS traffic that Cloudflare mitigated globally was China-bound. The rest of the countries were so far behind that it is almost negligible.
Top targeted countries by Network-layer DDoS attacks
When normalizing the data, Iraq, Palestinian territories, and Morocco take the lead as the most attacked regions with respect to their total inbound traffic. What’s interesting is that Singapore comes up as fourth. So not only did Singapore face the largest amount of HTTP DDoS attack traffic, but that traffic also made up a significant amount of the total Singapore-bound traffic. By contrast, the US was second most attacked by volume (per the application-layer graph above), but came in the fiftieth place with respect to the total US-bound traffic.
Top targeted countries by HTTP DDoS attacks with respect to each country’s traffic
Similar to Singapore, but arguably more dramatic, China is both the number one most attacked country by network-layer DDoS attack traffic, and also with respect to all China-bound traffic. Almost 86% of all China-bound traffic was mitigated by Cloudflare as network-layer DDoS attacks. The Palestinian territories, Brazil, Norway, and again Singapore followed with large percentages of attack traffic.
Top targeted countries by Network-layer DDoS attacks with respect to each country’s traffic
Attack vectors and attributes
The majority of DDoS attacks are short and small relative to Cloudflare’s scale. However, unprotected websites and networks can still suffer disruption from short and small attacks without proper inline automated protection — underscoring the need for organizations to be proactive in adopting a robust security posture.
In 2023 Q4, 91% of attacks ended within 10 minutes, 97% peaked below 500 megabits per second (mbps), and 88% never exceeded 50 thousand packets per second (pps).
Two out of every 100 network-layer DDoS attacks lasted more than an hour, and exceeded 1 gigabit per second (gbps). One out of every 100 attacks exceeded 1 million packets per second. Furthermore, the amount of network-layer DDoS attacks exceeding 100 million packets per second increased by 15% quarter-over-quarter.
DDoS attack stats you should know
One of those large attacks was a Mirai-botnet attack that peaked at 160 million packets per second. The packet per second rate was not the largest we’ve ever seen. The largest we’ve ever seen was 754 million packets per second. That attack occurred in 2020, and we have yet to see anything larger.
This more recent attack, though, was unique in its bits per second rate. This was the largest network-layer DDoS attack we’ve seen in Q4. It peaked at 1.9 terabits per second and originated from a Mirai botnet. It was a multi-vector attack, meaning it combined multiple attack methods. Some of those methods included UDP fragments flood, UDP/Echo flood, SYN Flood, ACK Flood, and TCP malformed flags.
This attack targeted a known European Cloud Provider and originated from over 18 thousand unique IP addresses that are assumed to be spoofed. It was automatically detected and mitigated by Cloudflare’s defenses.
This goes to show that even the largest attacks end very quickly. Previous large attacks we’ve seen ended within seconds — underlining the need for an in-line automated defense system. Though still rare, attacks in the terabit range are becoming more and more prominent.
1.9 Terabit per second Mirai DDoS attacks
The use of Mirai-variant botnets is still very common. In Q4, almost 3% of all attacks originate from Mirai. Though, of all attack methods, DNS-based attacks remain the attackers’ favorite. Together, DNS Floods and DNS Amplification attacks account for almost 53% of all attacks in Q4. SYN Flood follows in second and UDP floods in third. We’ll cover the two DNS attack types here, and you can visit the hyperlinks to learn more about UDP and SYN floods in our Learning Center.
DNS floods and amplification attacks
DNS floods and DNS amplification attacks both exploit the Domain Name System (DNS), but they operate differently. DNS is like a phone book for the Internet, translating human-friendly domain names like “www.cloudfare.com” into numerical IP addresses that computers use to identify each other on the network.
Simply put, DNS-based DDoS attacks comprise the method computers and servers used to identify one another to cause an outage or disruption, without actually ‘taking down’ a server. For example, a server may be up and running, but the DNS server is down. So clients won’t be able to connect to it and will experience it as an outage.
A DNS flood attack bombards a DNS server with an overwhelming number of DNS queries. This is usually done using a DDoS botnet. The sheer volume of queries can overwhelm the DNS server, making it difficult or impossible for it to respond to legitimate queries. This can result in the aforementioned service disruptions, delays or even an outage for those trying to access the websites or services that rely on the targeted DNS server.
On the other hand, a DNS amplification attack involves sending a small query with a spoofed IP address (the address of the victim) to a DNS server. The trick here is that the DNS response is significantly larger than the request. The server then sends this large response to the victim’s IP address. By exploiting open DNS resolvers, the attacker can amplify the volume of traffic sent to the victim, leading to a much more significant impact. This type of attack not only disrupts the victim but also can congest entire networks.
In both cases, the attacks exploit the critical role of DNS in network operations. Mitigation strategies typically include securing DNS servers against misuse, implementing rate limiting to manage traffic, and filtering DNS traffic to identify and block malicious requests.
Top attack vectors
Amongst the emerging threats we track, we recorded a 1,161% increase in ACK-RST Floods as well as a 515% increase in CLDAP floods, and a 243% increase in SPSS floods, in each case as compared to last quarter. Let’s walk through some of these attacks and how they’re meant to cause disruption.
Top emerging attack vectors
ACK-RST floods
An ACK-RST Flood exploits the Transmission Control Protocol (TCP) by sending numerous ACK and RST packets to the victim. This overwhelms the victim’s ability to process and respond to these packets, leading to service disruption. The attack is effective because each ACK or RST packet prompts a response from the victim’s system, consuming its resources. ACK-RST Floods are often difficult to filter since they mimic legitimate traffic, making detection and mitigation challenging.
CLDAP floods
CLDAP (Connectionless Lightweight Directory Access Protocol) is a variant of LDAP (Lightweight Directory Access Protocol). It’s used for querying and modifying directory services running over IP networks. CLDAP is connectionless, using UDP instead of TCP, making it faster but less reliable. Because it uses UDP, there’s no handshake requirement which allows attackers to spoof the IP address thus allowing attackers to exploit it as a reflection vector. In these attacks, small queries are sent with a spoofed source IP address (the victim’s IP), causing servers to send large responses to the victim, overwhelming it. Mitigation involves filtering and monitoring unusual CLDAP traffic.
SPSS floods
Floods abusing the SPSS (Source Port Service Sweep) protocol is a network attack method that involves sending packets from numerous random or spoofed source ports to various destination ports on a targeted system or network. The aim of this attack is two-fold: first, to overwhelm the victim’s processing capabilities, causing service disruptions or network outages, and second, it can be used to scan for open ports and identify vulnerable services. The flood is achieved by sending a large volume of packets, which can saturate the victim’s network resources and exhaust the capacities of its firewalls and intrusion detection systems. To mitigate such attacks, it’s essential to leverage in-line automated detection capabilities.
Cloudflare is here to help – no matter the attack type, size, or duration
Cloudflare’s mission is to help build a better Internet, and we believe that a better Internet is one that is secure, performant, and available to all. No matter the attack type, the attack size, the attack duration or the motivation behind the attack, Cloudflare’s defenses stand strong. Since we pioneered unmetered DDoS Protection in 2017, we’ve made and kept our commitment to make enterprise-grade DDoS protection free for all organizations alike — and of course, without compromising performance. This is made possible by our unique technology and robust network architecture.
It’s important to remember that security is a process, not a single product or flip of a switch. Atop of our automated DDoS protection systems, we offer comprehensive bundled features such as firewall, bot detection, API protection, and caching to bolster your defenses. Our multi-layered approach optimizes your security posture and minimizes potential impact. We’ve also put together a list of recommendations to help you optimize your defenses against DDoS attacks, and you can follow our step-by-step wizards to secure your applications and prevent DDoS attacks. And, if you’d like to benefit from our easy to use, best-in-class protection against DDoS and other attacks on the Internet, you can sign up — for free! — at cloudflare.com. If you’re under attack, register or call the cyber emergency hotline number shown here for a rapid response.
In order for one device to talk to other devices on the Internet using the aptly named Internet Protocol (IP), it must first be assigned a unique numerical address. What this address looks like depends on the version of IP being used: IPv4 or IPv6.
IPv4 was first deployed in 1983. It’s the IP version that gave birth to the modern Internet and still remains dominant today. IPv6 can be traced back to as early as 1998, but only in the last decade did it start to gain significant traction — rising from less than 1% to somewhere between 30 and 40%, depending on who’s reporting and what and how they’re measuring.
With the growth in connected devices far exceeding the number of IPv4 addresses available, and its costs rising, the much larger address space provided by IPv6 should have made it the dominant protocol by now. However, as we’ll see, this is not the case.
Cloudflare has been a strong advocate of IPv6 for many years and, through Cloudflare Radar, we’ve been closely following IPv6 adoption across the Internet. At three years old, Radar is still a relatively recent platform. To go further back in time, we can briefly turn to our friends at APNIC1 — one of the five Regional Internet Registries (RIRs). Through their data, going back to 2012, we can see that IPv6 experienced a period of seemingly exponential growth until mid-2017, after which it entered a period of linear growth that’s still ongoing:
IPv6 adoption is slowed down by the lack of compatibility between both protocols — devices must be assigned both an IPv4 and an IPv6 address — along with the fact that virtually all devices on the Internet still support IPv4. Nevertheless, IPv6 is critical for the future of the Internet, and continued effort is required to increase its deployment.
Cloudflare Radar, like APNIC and most other sources today, publishes numbers that primarily reflect the extent to which Internet Service Providers (ISPs) have deployed IPv6: the client side. It’s a very important angle, and one that directly impacts end users, but there’s also the other end of the equation: the server side.
With this in mind, we invite you to follow us on a quick experiment where we aim for a glimpse of server side IPv6 adoption, and how often clients are actually (or likely) able to talk to servers over IPv6. We’ll rely on DNS for this exploration and, as they say, the results may surprise you.
IPv6 Adoption on the Client Side (from HTTP)
By the end of October 2023, from Cloudflare’s perspective, IPv6 adoption across the Internet was at roughly 36% of all traffic, with slight variations depending on the time of day and day of week. When excluding bots the estimate goes up to just over 46%, while excluding humans pushes it down close to 24%. These numbers refer to the share of HTTP requests served over IPv6 across all IPv6-enabled content (the default setting).
For this exercise, what matters most is the number for both humans and bots. There are many reasons for the adoption gap between both kinds of traffic — from varying levels of IPv6 support in the plethora of client software used, to varying levels of IPv6 deployment inside the many networks where traffic comes from, to the varying size of such networks, etc. — but that’s a rabbit hole for another day. If you’re curious about the numbers for a particular country or network, you can find them on Cloudflare Radar and in our Year in Review report for 2023.
It Takes Two to Dance
You, the reader, might point out that measuring the client side of the client-server equation only tells half the story: for an IPv6-capable client to establish a connection with a server via IPv6, the server must also be IPv6-capable.
This raises two questions:
What’s the extent of IPv6 adoption on the server side?
How well does IPv6 adoption on the client side align with adoption on the server side?
There are several possible answers, depending on whether we’re talking about users, devices, bytes transferred, and so on. We’ll focus on connections (it will become clear why in a moment), and the combined question we’re asking is:
How often can an IPv6-capable client use IPv6 when connecting to servers on the Internet, under typical usage patterns?
Typical usage patterns include people going about their day visiting some websites more often than others or automated clients calling APIs. We’ll turn to DNS to get this perspective.
Enter DNS
Before a client can attempt to establish a connection with a server by name, using either the classic IPv4 protocol or the more modern IPv6, it must look up the server’s IP address in the phonebook of the Internet, the Domain Name System (DNS).
Looking up a hostname in DNS is a recursive process. To find the IP address of a server, the domain hierarchy (the dot-separated components of a server’s name) must be followed across several DNS authoritative servers until one of them returns the desired response2. Most clients, however, don’t do this directly and instead ask an intermediary server called a recursive resolver to do it for them. Cloudflare operates one such recursive resolver that anyone can use: 1.1.1.1.
As a simplified example, when a client asks 1.1.1.1 for the IP address where “www.example.com” lives, 1.1.1.1 will go out and ask the DNS root servers3 about “.com”, then ask the .com DNS servers about “example.com”, and finally ask the example.com DNS servers about “www.example.com”, which has direct knowledge of it and answers with an IP address. To make things faster for the next client asking a similar question, 1.1.1.1 caches (remembers for a while) both the final answer and the steps in between.
This means 1.1.1.1 is in a very good position to count how often clients try to look up IPv4 addresses (A-type queries) vs. how often they try to look up IPv6 addresses (AAAA-type queries), covering most of the observable Internet.
But how does a client know when to ask for a server’s IPv4 address or its IPv6 address?
The short answer is that clients with IPv6 available to them just ask for both — doing separate A and AAAA lookups for every server they wish to connect to. These IPv6-capable clients will prioritize connecting over IPv6 when they get a non-empty AAAA answer, whether they also get a non-empty A answer (which they almost always get, as we’ll see). The algorithm driving this preference for modernity is called Happy Eyeballs, if you’re interested in the details.
We’re now ready to start looking at some actual data…
IPv6 Adoption on the Client Side (from DNS)
The first step is establishing a baseline by measuring client IPv6 deployment from 1.1.1.1’s perspective and comparing it with the numbers from HTTP requests that we started with.
It’s tempting to count how often clients connect to 1.1.1.1 using IPv6, but the results are misleading for a couple of reasons, the strongest one being hidden in plain sight: 1.1.1.1 is the most memorable address of the set of IPv4 and IPv6 addresses that clients can use to perform DNS lookups through the 1.1.1.1 service. Ideally, IPv6-capable clients using 1.1.1.1 as their recursive resolver should have all four of the following IP addresses configured, not just the first two:
1.1.1.1 (IPv4)
1.0.0.1 (IPv4)
2606:4700:4700::1111 (IPv6)
2606:4700:4700::1001 (IPv6)
But, when manual configuration is involved4, humans find IPv6 addresses less memorable than IPv4 addresses and are less likely to configure them, viewing the IPv4 addresses as enough.
A related, but less obvious, confounding factor is that many IPv6-capable clients will still perform DNS lookups over IPv4 even when they have 1.1.1.1’s IPv6 addresses configured, as spreading lookups over the available addresses is a popular default option.
A more sensible approach to assess IPv6 adoption from DNS client activity is calculating the percentage of AAAA-type queries over the total amount of A-type queries, assuming IPv6-clients always perform both5, as mentioned earlier.
Then, from 1.1.1.1’s perspective, IPv6 adoption on the client side is estimated at 30.5% by query volume. This is a bit under what we observed from HTTP traffic over the same time period (35.9%) but such a difference between two different perspectives is not unexpected.
A Note on TTLs
It’s not only recursive resolvers that cache DNS responses, most DNS clients have their own local caches as well. Your web browser, operating system, and even your home router, keep answers around hoping to speed up subsequent queries.
How long each answer remains in cache depends on the time-to-live (TTL) field sent back with DNS records. If you’re familiar with DNS, you might be wondering if A and AAAA records have similar TTLs. If they don’t, we may be getting fewer queries for just one of these two types (because it gets cached for longer at the client level), biasing the resulting adoption figures.
The pie charts here break down the minimum TTLs sent back by 1.1.1.1 in response to A and AAAA queries6. There is some difference between both types, but the difference is very small.
IPv6 Adoption on the Server Side
The following graph shows how often A and AAAA-type queries get non-empty responses, shedding light on server side IPv6 adoption and getting us closer to the answer we’re after:
IPv6 adoption by servers is estimated at 43.3% by query volume, noticeably higher than what was observed for clients.
How Often Both Sides Swipe Right
If 30.5% of IP address lookups handled by 1.1.1.1 could make use of an IPv6 address to connect to their intended destinations, but only 43.3% of those lookups get a non-empty response, that can give us a pretty good basis for how often IPv6 connections are made between client and server — roughly 13.2% of the time.
The Potential Impact of Popular Domains
IPv6 server side adoption measured by query volume for the domains in Radar’s Top 100 list is 60.8%. If we exclude these domains from our overall calculations, the previous 13.2% figure drops to 8%. This is a significant difference, but not unexpected, as the Top 100 domains make up over 55% of all A and AAAA queries to 1.1.1.1.
If just a few more of these highly popular domains were to deploy IPv6 today, observed adoption would noticeably increase and, with it, the chance of IPv6-capable clients establishing connections using IPv6.
Closing Thoughts
Observing the extent of IPv6 adoption across the Internet can mean different things:
Counting users with IPv6-capable Internet access;
Counting IPv6-capable devices or software on those devices (clients and/or servers);
Calculating the amount of traffic flowing through IPv6 connections, measured in bytes;
Counting the fraction of connections (or individual requests) over IPv6.
In this exercise we chose to look at connections and requests. Keeping in mind that the underlying reality can only be truly understood by considering several different perspectives, we saw three different IPv6 adoption figures:
35.9% (client side) when counting HTTP requests served from Cloudflare’s CDN;
30.5% (client side) when counting A and AAAA-type DNS queries handled by 1.1.1.1;
43.3% (server side) of positive responses to AAAA-type DNS queries, also from 1.1.1.1.
We combined the client side and server side figures from the DNS perspective to estimate how often connections to third-party servers are likely to be established over IPv6 rather than IPv4: just 13.2% of the time.
To improve on these numbers, ISPs, cloud and hosting providers, and corporations alike must increase the rate at which they make IPv6 available for devices in their networks. But large websites and content sources also have a critical role to play in enabling IPv6-capable clients to use IPv6 more often, as 39.2% of queries for domains in the Radar Top 100 (representing over half of all A and AAAA queries to 1.1.1.1) are still limited to IPv4-only responses.
On the road to full IPv6 adoption, the Internet isn’t quite there yet. But continued effort from all those involved can help it to continue to move forward, and perhaps even accelerate progress.
On the server side, Cloudflare has been helping with this worldwide effort for many years by providing free IPv6 support for all domains. On the client side, the 1.1.1.1 app automatically enables your device for IPv6 even if your ISP doesn’t provide any IPv6 support. And, if you happen to manage an IPv6-only network, 1.1.1.1’s DNS64 support also has you covered.
*** 1Cloudflare’s public DNS resolver (1.1.1.1) is operated in partnership with APNIC. You can read more about it in the original announcement blog post and in 1.1.1.1’s privacy policy. 2There’s more information on how DNS works in the “What is DNS?” section of our website. If you’re a hands-on learner, we suggest you take a look at Julia Evans’ “mess with dns”. 3Any recursive resolver will already know the IP addresses of the 13 root servers beforehand. Cloudflare also participates at the topmost level of DNS by providing anycast service to the E and F-Root instances, which means 1.1.1.1 doesn’t need to go far for that first lookup step. 4When using the 1.1.1.1 app, all four IP addresses are configured automatically. 5For simplification, we assume the amount of IPv6-only clients is still negligibly small. It’s a reasonable assumption in general, and other datasets available to us confirm it. 61.1.1.1, like other recursive resolvers, returns adjusted TTLs: the record’s original TTL minus the number of seconds since the record was last cached. Empty A and AAAA answers get cached for the amount of time defined in the domain’s Start of Authority (SOA) record, as specified by RFC 2308.
Amazon SES: Email Authentication and Getting Value out of Your DMARC Policy
Introduction
For enterprises of all sizes, email is a critical piece of infrastructure that supports large volumes of communication. To enhance the security and trustworthiness of email communication, many organizations turn to email sending providers (ESPs) like Amazon Simple Email Service (Amazon SES). These ESPs allow users to send authenticated emails from their domains, employing industry-standard protocols such as the Sender Policy Framework (SPF) and DomainKeys Identified Mail (DKIM). Messages authenticated with SPF or DKIM will successfully pass your domain’s Domain-based Message Authentication, Reporting, and Conformance (DMARC) policy. This blog post will focus on the DMARC policy enforcement mechanism. The blog will explore some of the reasons why email may fail DMARC policy evaluation and propose solutions to fix any failures that you identify. For an introduction to DMARC and how to carefully choose your email sending domain identity, you can refer to Choosing the Right Domain for Optimal Deliverability with Amazon SES The relationship between DMARC compliance and email deliverability rates is crucial for organizations aiming to maintain a positive sender reputation and ensure successful email delivery. There are many advantages when organizations have this correctly setup, these include:
Improved Email Deliverability
Reduction in Email Spoofing and Phishing
Positive Sender Reputation
Reduced Risk of Email Marked as Spam
Better Email Engagement Metrics
Enhanced Brand Reputation
With this foundation, let’s explore the intricacies of DMARC and how it can benefit your organization’s email communication.
What is DMARC?
DMARC is a mechanism for domain owners to advertise SPF and DKIM protection and to tell receivers how to act if those authentication methods fail. The domain’s DMARC policy protects your domain from third parties attempting to spoof the domain in the “From” header of emails. Malicious email messages that aim to send phishing attempts using your domain will be subject to DMARC policy evaluation, which may result in their quarantine or rejection by the email receiving organization. This stringent policy ensures that emails received by email recipients are genuinely from the claimed sending domain, thereby minimizing the risk of people falling victim to email-based scams. Domain owners publish DMARC policies as a TXT record in the domain’s _dmarc.<domain> DNS record. For example, if the domain used in the “From” header is example.com, then the domain’s DMARC policy would be located in a DNS TXT record named _dmarc.example.com. The DMARC policy can have one of three policy modes:
A typical DMARC deployment of an existing domain will start with publishing "p=none". A none policy means that the domain owner is in a monitoring phase; the domain owner is monitoring for messages that aren’t authenticated with SPF and DKIM and seeks to ensure all email is properly authenticated
When the domain owner is comfortable that all legitimate use cases are properly authenticated with SPF and/or DKIM, they may change the DMARC policy to "p=quarantine". A quarantine policy means that messages which fail to produce a domain-aligned authenticated identifier via SPF or DKIM will be quarantined by the mail receiving organization. The mail receiving organization may filter these messages into Junk folders, or take another action that they feel best protects their recipients.
Finally, domain owners who are confident that all of the legitimate messages using their domain are authenticated with SPF or DKIM, may change the DMARC policy to "p=reject". A reject policy means that messages which fail to produce a domain-aligned authenticated identifier via SPF or DKIM will be rejected by the mail receiving organization.
The following are examples of a TXT record that contains a DMARC policy, depending on the desired policy (the ‘p’ tag):
This policy tells email providers to apply the DMARC policy to messages that fail to produce a DKIM or SPF authenticated identifier that is aligned to the domain in the “From” header. Alignment means that one or both of the following occurs:
The messages pass the SPF policy for the MAIL FROM domain and the MAIL FROM domain is the same as the domain in the “From” header, or a subdomain. Reference Using a custom MAIL FROM domain to learn more about how to send SPF aligned messages with SES.
The messages have a DKIM signature signed by a public key in DNS at a location within the domain of the “From” header. Reference Authenticating Email with DKIM in Amazon SES to learn more about how to send DKIM aligned messages with SES.
DMARC reporting
The rua tag in the domain’s DMARC policy indicates the location to which mail receiving organizations should send aggregate reports about messages that pass or fail SPF and DKIM alignment. Domain owners analyze these reports to discover messages which are using the domain in the “From” header but are not properly authenticated with SPF or DKIM. The domain owner will attempt to ensure that all legitimate messages are authenticated through analysis of the DMARC aggregate reports over time. Mail receiving organizations which support sending DMARC reports typically send these aggregated reports once per day, although these practices differ from provider to provider.
What does a typical DMARC deployment look like?
A DMARC deployment is the process of:
Ensuring that all emails using the domain in the “From” header are authenticated with DKIM and SPF domain-aligned identifiers. Focus on DKIM as the primary means of authentication.
Publishing a DMARC policy (none, quarantine, or reject) for the domain that reflects how the domain owner would like mail receiving organizations to handle unauthenticated email claiming to be from their domain.
New domains and subdomains
Deploying a DMARC policy is easy for organizations that have created a new domain or subdomain for the purpose of a new email sending use case on SES; for example email marketing, transaction emails, or one-time pass codes (OTP). These domains can start with the "p=reject" DMARC enforcement policy because the policy will not affect existing email sending programs. This strict enforcement is to ensure that there is no unauthenticated use of the domain and its subdomains.
Existing domains
For existing domains, a DMARC deployment is an iterative process because the domain may have a history of email sending by one or multiple email sending programs. It is important to gain a complete understanding of how the domain and its subdomains are being used for email sending before publishing a restrictive DMARC policy (p=quarantine or p=reject) because doing so would affect any unauthenticated email sending programs using the domain in the “From” header of messages. To get started with the DMARC implementation, these are a few actions to take:
Publish a p=none DMARC policy (sometimes referred to as monitoring mode), and set the rua tag to the location in which you would like to receive aggregate reports.
Analyze the aggregate reports. Mail receiving organizations will send reports which contain information to determine if the domain, and its subdomains, are being used for sending email, and how the messages are (or are not) being authenticated with a DKIM or SPF domain-aligned identifier. An easy to use analysis tool is the Dmarcian XML to Human Converter.
Avoid prematurely publishing a “p=quarantine” or “p=reject” policy. Doing so may result in blocked or reduced delivery of legitimate messages of existing email sending programs.
The image below illustrates how DMARC will be applied to an email received by the email receiving server and actions taken based on the enforcement policy:
Figure 1 – DMARC Flow
How do SPF and DKIM cause DMARC policies to pass
When you start sending emails using Amazon SES, messages that you send through Amazon SES automatically use a subdomain of amazonses.com as the default MAIL FROM domain. SPF evaluators will see that these messages pass the SPF policy evaluation because the default MAIL FROM domain has a SPF policy which includes the IP addresses of the SES infrastructure that sent the message. SPF authentication will result in an “SPF=PASS” and the authenticated identifier is the domain of the MAIL FROM address. The published SPF record applies to every message that is sent using SES regardless of whether you are using a shared or dedicated IP address. The amazonses.com SPF record lists all shared and dedicated IP addresses, so it is inclusive of all potential IP addresses that may be involved with sending email as the MAIL FROM domain. You can use ‘dig’ to look up the IP addresses that SES will use to send email:
It is best practice for customers to configure a custom MAIL FROM domain, and not use the default amazonses.com MAIL FROM domain. The custom MAIL FROM domain will always be a subdomain of the customer’s verified domain identity. Once you configure the MAIL FROM domain, messages sent using SES will continue to result in an “SPF=PASS” as it does with the default MAIL FROM domain. Additionally, DMARC authentication will result in “DMARC=PASS” because the MAIL FROM domain and the domain in the “From” header are in alignment. It’s important to understand that customers must use a custom MAIL FROM domain if they want “SPF=PASS” to result in a “DMARC=PASS”.
For example, an Amazon SES-verified example.com domain will have the custom MAIL FROM domain “bounce.example.com”. The configured SPF record will be:
Note: The chosen MAIL FROM domain could be any sub-domain of your choice. If you have the same domain identity configured in multiple regions, then you should create region-specific custom MAIL FROM domains for each region. e.g. bounce-us-east-1.example.com and bounce-eu-west-2.example.com so that asynchronously bounced messages are delivered directly to the region from which the messages were sent.
DKIM results in DMARC pass
For customers that establish Amazon SES Domain verification using DKIM signatures, DKIM authentication will result in a DKIM=PASS, and DMARC authentication will result in “DMARC=PASS” because the domain that publishes the DKIM signature is aligned to the domain in the “From” header (the SES domain identity).
DKIM and SPF together
Email messages are fully authenticated when the messages pass both DKIM and SPF, and both DKIM and SPF authenticated identifiers are domain-aligned. If only DKIM is domain-aligned, then the messages will still pass the DMARC policy, even if the SPF “pass” is unaligned. Mail receivers will consider the full context of SPF and DKIM when determining how they will handle the disposition of the messages you send, so it is best to fully authenticate your messages whenever possible. Amazon SES has taken care of the heavy lifting of the email authentication process away from our customers, and so, establishing SPF, DKIM and DMARC authentication has been reduced to a few clicks which allows SES customers to get started easily and scale fast.
Why is DMARC failing?
There are scenarios when you may notice that messages fail DMARC, whether your messages are fully authenticated, or partially authenticated. The following are things that you should look out for:
Email Content Modification
Sometimes email content is modified during the delivery to the recipients’ mail servers. This modification could be as a result of a security device or anti-spam agent along the delivery path (for example: the message Subject may be modified with an “[EXTERNAL]” warning to recipients). The modified message invalidates the DKIM signature which causes a DKIM failure. Remember, the purpose of DKIM is to ensure that the content of an email has not been tampered with during the delivery process. If this happens, the DKIM authentication will fail with an authentication error similar to “DKIM-signature body hash not verified“.
Solutions:
If you control the full path that the email message will traverse from sender to recipient, ensure that no intermediary mail servers modify the email content in transit.
Ensure that you configure a custom MAIL FROM domain so that the messages have a domain-aligned SPF identifier.
Keep the DMARC policy in monitoring mode (p=none) until these issues are identified/solved.
Email Forwarding
Email Forwarding There are multiple scenarios in which a message may be forwarded, and they may result in both/either SPF and DKIM failing to produce a domain-aligned authenticated identifier. For SPF, it means that the forwarding mail server is not listed in the MAIL FROM domain’s SPF policy. It is best practice for a forwarding mail server to avoid SPF failures and assume responsibility of mail handling for the messages it forwards by rewriting the MAIL FROM address to be in the domain controlled by the forwarding server. Forwarding servers that do not rewrite the MAIL FROM address pose a risk of impersonation attacks and phishing. Do not add the IP addresses of forwarding servers to your MAIL FROM domain’s SPF policy unless you are in complete control of all sources of mail being forwarded through this infrastructure. For DKIM, it means that the messages are being modified in some way that causes DKIM signature validation failure (see Email Content Modification section above). A responsible forwarding server will rewrite the MAIL FROM domain so that the messages pass SPF with a non-aligned authenticated identifier. These servers will attempt to forward the message without alteration in order to preserve DKIM signatures, but that is sometimes challenging to do in practice. In this scenario, since the messages carry no domain-aligned authenticated identifier, the messages will fail the DMARC policy.
Solution:
Email forwarding is an expected type of failure of which you will see in the DMARC aggregate reports. The domain owner must weigh the risk of causing forwarded messages to be rejected against the risk of not publishing a reject DMARC policy. Reference 8.6. Interoperability Considerations. Forwarding servers that wish to forward messages that they know will result in a DMARC failure will commonly rewrite the “From” header address of messages it forwards so that the messages pass a DMARC policy for a domain that the forwarding server is responsible for. The way to identify forwarding servers that rewrite the “From” header in this situation is to publish “p=quarantine pct=0 t=y” in your domain’s DMARC policy before publishing “p=reject”.
Multiple email sending providers are sending using the same domain
Multiple email sending providers: There are situations where an organization will have multiple business units sending email using the same domain, and these business units may be using an email sending provider other than SES. If neither SPF nor DKIM is configured with domain-alignment for these email sending providers, you will see DMARC failures in the DMARC aggregate report.
Solution:
Analyze the DMARC aggregate reports to identify other email sending providers, track down the business units responsible for each email sending program, and follow the instructions offered by the email sending provider about how to configure SPF and DKIM to produce a domain-aligned authenticated identifier.
What does a DMARC aggregate report look like?
The following XML example shows the general format of a DMARC aggregate report that you will receive from participating email service providers.
How to address DMARC deployment for domains confirmed to be unused for email (dangling or otherwise)
Deploying DMARC for unused or dangling domains is a proactive step to prevent abuse or unauthorized use of your domain. Once you have confirmed that all subdomains being used for sending email have the desired DMARC policies, you can publish a ‘p=reject’ tag on the organizational domain, which will prevent unauthorized usage of unused subdomains without the need to publish DMARC policies for every conceivable subdomain. For more advanced subdomain policy scenarios, read the “tree walk” definitions in https://datatracker.ietf.org/doc/draft-ietf-dmarc-dmarcbis/
Conclusion:
In conclusion, DMARC is not only a technology but also a commitment to email security, integrity, and trust. By embracing DMARC best practices, organizations can protect their users, maintain a positive brand reputation, and ensure seamless email deliverability. Every message from SES passes SPF and DKIM for “amazonses.com”, but the authenticated identifiers are not always in alignment with the domain in the “From” header which carries the DMARC policy. If email authentication is not fully configured, your messages are susceptible to delivery issues like spam filtering, or being rejected or blocked by the recipient ESP. As a best practice, you can configure both DKIM and SPF to attain optimum deliverability while sending email with SES.
About the Authors
Bruno Giorgini is a Senior Solutions Architect specializing in Pinpoint and SES. With over two decades of experience in the IT industry, Bruno has been dedicated to assisting customers of all sizes in achieving their objectives. When he is not crafting innovative solutions for clients, Bruno enjoys spending quality time with his wife and son, exploring the scenic hiking trails around the SF Bay Area.
Jesse Thompson is an Email Deliverability Manager with the Amazon Simple Email Service team. His background is in enterprise IT development and operations, with a focus on email abuse mitigation and encouragement of authenticity practices with open standard protocols. Jesse’s favorite activity outside of technology is recreational curling.
Sesan Komaiya is a Solutions Architect at Amazon Web Services. He works with a variety of customers, helping them with cloud adoption, cost optimization and emerging technologies. Sesan has over 15 year’s experience in Enterprise IT and has been at AWS for 5 years. In his free time, Sesan enjoys watching various sporting activities like Soccer, Tennis and Moto sport. He has 2 kids that also keeps him busy at home.
Mudassar Bashir is a Solutions Architect at Amazon Web Services. He has over ten years of experience in enterprise software engineering. His interests include web applications, containerization, and serverless technologies. He works with different customers, helping them with cloud adoption strategies.
Priya Singh is a Cloud Support Engineer at AWS and subject matter expert in Amazon Simple Email Service. She has a 6 years of diverse experience in supporting enterprise customers across different industries. Along with Amazon SES, she is a Cloudfront enthusiast. She loves helping customers in solving issues related to Cloudfront and SES in their environment.
This blog reports and summarizes the contents of a Cloudflare research paper which appeared at the ACM Internet Measurement Conference, that measures and prototypes connection coalescing with ORIGIN Frames.
Some readers might be surprised to hear that a single visit to a web page can cause a browser to make tens, sometimes even hundreds, of web connections. Take this very blog as an example. If it is your first visit to the Cloudflare blog, or it has been a while since your last visit, your browser will make multiple connections to render the page. The browser will make DNS queries to find IP addresses corresponding to blog.cloudflare.com and then subsequent requests to retrieve any necessary subresources on the web page needed to successfully render the complete page. How many? Looking below, at the time of writing, there are 32 different hostnames used to load the Cloudflare Blog. That means 32 DNS queries and at least 32 TCP (or QUIC) connections, unless the client is able to reuse (or coalesce) some of those connections.
Each new web connection not only introduces additional load on a server's processing capabilities – potentially leading to scalability challenges during peak usage hours – but also exposes client metadata to the network, such as the plaintext hostnames being accessed by an individual. Such meta information can potentially reveal a user’s online activities and browsing behaviors to on-path network adversaries and eavesdroppers!
In this blog we’re going to take a closer look at “connection coalescing”. Since our initial look at IP-based coalescing in 2021, we have done further large-scale measurements and modeling across the Internet, to understand and predict if and where coalescing would work best. Since IP coalescing is difficult to manage at large scale, last year we implemented and experimented with a promising standard called the HTTP/2 ORIGIN Frame extension that we leveraged to coalesce connections to our edge without worrying about managing IP addresses.
All told, there are opportunities being missed by many large providers. We hope that this blog (and our publication at ACM IMC 2022 with full details) offers a first step that helps servers and clients take advantage of the ORIGIN Frame standard.
Setting the stage
At a high level, as a user navigates the web, the browser renders web pages by retrieving dependent subresources to construct the complete web page. This process bears a striking resemblance to the way physical products are assembled in a factory. In this sense, a modern web page can be considered like an assembly plant. It relies on a ‘supply chain’ of resources that are needed to produce the final product.
An assembly plant in the physical world can place a single order for different parts and get a single shipment from the supplier (similar to the kitting process for maximizing value and minimizing response time); no matter the manufacturer of those parts or where they are made — one ‘connection’ to the supplier is all that is needed. Any single truck from a supplier to an assembly plant can be filled with parts from multiple manufacturers.
The design of the web causes browsers to typically do the opposite in nature. To retrieve the images, JavaScript, and other resources on a web page (the parts), web clients (assembly plants) have to make at least one connection to every hostname (the manufacturers) defined in the HTML that is returned by the server (the supplier). It makes no difference if the connections to those hostnames go to the same server or not, for example they could go to a reverse proxy like Cloudflare. For each manufacturer a ‘new’ truck would be needed to transfer the materials to the assembly plant from the same supplier, or more formally, a new connection would need to be made to request a subresource from a hostname on the same web page.
Without connection coalescing
The number of connections used to load a web page can be surprisingly high. It is also common for the subresources to need yet other sub-subresources, and so new connections emerge as a result of earlier ones. Remember, too, that HTTP connections to hostnames are often preceded by DNS queries! Connection coalescing allows us to use fewer connections, or ‘reuse’ the same set of trucks to carry parts from multiple manufacturers from a single supplier.
With connection coalescing
Connection coalescing in principle
Connection coalescing was introduced in HTTP/2, and carried over into HTTP/3. We’ve blogged about connection coalescing previously (for a detailed primer we encourage going over that blog). While the idea is simple, implementing it can present a number of engineering challenges. For example, recall from above that there are 32 hostnames (at the time of writing) to load the web page you are reading right now. Among the 32 hostnames are 16 unique domains (defined as “Effective TLD+1”). Can we create fewer connections or ‘coalesce’ existing connections for each unique domain? The answer is ‘Yes, but it depends’.
The exact number of connections to load the blog page is not at all obvious, and hard to know. There may be 32 hostnames attached to 16 domains but, counter-intuitively, this does not mean the answer to “how many unique connections?” is 16. The true answer could be as few as one connection if all the hostnames are reachable at a single server; or as many as 32 independent connections if a different and distinct server is needed to access each individual hostname.
Connection reuse comes in many forms, so it’s important to define “connection coalescing” in the HTTP space. For example, the reuse of an existing TCP or TLS connection to a hostname to make multiple requests for subresources from that same hostname is connection reuse, but not coalescing.
Coalescing occurs when an existing TLS channel for some hostname can be repurposed or used for connecting to a different hostname. For example, upon visiting blog.cloudflare.com, the HTML points to subresources at cdnjs.cloudflare.com. To reuse the same TLS connection for the subresources, it is necessary for both hostnames to appear together in the TLS certificate's “Server Alternative Name (SAN)” list, but this step alone is not sufficient to convince browsers to coalesce. After all, the cdnjs.cloudflare.com service may or may not be reachable at the same server as blog.cloudflare.com, despite being on the same certificate. So how can the browser know? Coalescing only works if servers set up the right conditions, but clients have to decide whether to coalesce or not – thus, browsers require a signal to coalesce beyond the SANs list on the certificate. Revisiting our analogy, the assembly plant may order a part from a manufacturer directly, not knowing that the supplier already has the same part in its warehouse.
There are two explicit signals a browser can use to decide whether connections can be coalesced: one is IP-based, the other ORIGIN Frame-based. The former requires the server operators to tightly bind DNS records to the HTTP resources available on the server. This is difficult to manage and deploy, and actually creates a risky dependency, because you have to place all the resources behind a specific set or a single IP address. The way IP addresses influence coalescing decisions varies among browsers, with some choosing to be more conservative and others more permissive. Alternatively, the HTTP ORIGIN Frame is an easier signal for the servers to orchestrate; it’s also flexible and has graceful failure with no interruption to service (for a specification compliant implementation).
A foundational difference between both these coalescing signals is: IP-based coalescing signals are implicit, even accidental, and force clients to infer coalescing possibilities that may exist, or not. None of this is surprising since IP addresses are designed to have no real relationship with names! In contrast, ORIGIN Frame is an explicit signal from servers to clients that coalescing is available no matter what DNS says for any particular hostname.
We have experimented with IP-based coalescing previously; for the purpose of this blog we will take a deeper look at ORIGIN Frame-based coalescing.
What is the ORIGIN Frame standard?
The ORIGIN Frame is an extension to the HTTP/2 and HTTP/3 specification, a special Frame sent on stream 0 or the control stream of the connection respectively. The Frame allows the servers to send an ‘origin-set’ to the clients on an existing established TLS connection, which includes hostnames that it is authorized for and will not incur any HTTP 421 errors. Hostnames in the origin-set MUST also appear in the certificate SAN list for the server, even if those hostnames are announced on different IP addresses via DNS.
Specifically, two different steps are required:
Web servers must send a list enumerating the Origin Set (the hostnames that a given connection might be used for) in the ORIGIN Frame extension.
The TLS certificate returned by the web server must cover the additional hostnames being returned in the ORIGIN Frame in the DNS names SAN entries.
At a high-level ORIGIN Frames are a supplement to the TLS certificate that operators can attach to say, “Psst! Hey, client, here are the names in the SANs that are available on this connection — you can coalesce!” Since the ORIGIN Frame is not part of the certificate itself, its contents can be made to change independently. No new certificate is required. There is also no dependency on IP addresses. For a coalesceable hostname, existing TCP/QUIC+TLS connections can be reused without requiring new connections or DNS queries.
Many websites today rely on content which is served by CDNs, like Cloudflare CDN service. The practice of using external CDN services offers websites the advantages of speed, reliability, and reduces the load of content served by their origin servers. When both the website, and the resources are served by the same CDN, despite being different hostnames, owned by different entities, it opens up some very interesting opportunities for CDN operators to allow connections to be reused and coalesced since they can control both the certificate management and connection requests for sending ORIGIN frames on behalf of the real origin server.
Unfortunately, there has been no way to turn the possibilities enabled by ORIGIN Frame into practice. To the best of our knowledge, until today, there has been no server implementation that supports ORIGIN Frames. Among browsers, only Firefox supports ORIGIN Frames. Since IP coalescing is challenging and ORIGIN Frame has no deployed support, is the engineering time and energy to better support coalescing worth the investment? We decided to find out with a large-scale Internet-wide measurement to understand the opportunities and predict the possibilities, and then implemented the ORIGIN Frame to experiment on production traffic.
Experiment #1: What is the scale of required changes?
In February 2021, we collected data for 500K of the most popular websites on the Internet, using a modified Web Page Test on 100 virtual machines. An automated Chrome (v88) browser instance was launched for every visit to a web page to eliminate caching effects (because we wanted to understand coalescing, not caching). On successful completion of each session, Chrome developer tools were used to retrieve and write the page load data as an HTTP Archive format (HAR) file with a full timeline of events, as well as additional information about certificates and their validation. Additionally, we parsed the certificate chains for the root web page and new TLS connections triggered by subresource requests to (i) identify certificate issuers for the hostnames, (ii) inspect the presence of the Subject Alternative Name (SAN) extension, and (iii) validate that DNS names resolve to the IP address used. Further details about our methodology and results can be found in the technical paper.
The first step was to understand what resources are requested by web pages to successfully render the page contents, and where these resources were present on the Internet. Connection coalescing becomes possible when subresource domains are ideally co-located. We approximated the location of a domain by finding its corresponding autonomous system (AS). For example, the domain attached to cdnjs is reachable via AS 13335 in the BGP routing table, and that AS number belongs to Cloudflare. The figure below describes the percentage of web pages and the number of unique ASes needed to fully load a web page.
Around 14% of the web pages need two ASes to fully load i.e. pages that have a dependency on one additional AS for subresources. More than 50% of the web pages need to contact no more than six ASes to obtain all the necessary subresources. This finding as shown in the plot above implies that a relatively small number of operators serve the sub-resource content necessary for a majority (~50%) of the websites, and any usage of ORIGIN Frames would need only a few changes to have its intended impact. The potential for connection coalescing can therefore be optimistically approximated to the number of unique ASes needed to retrieve all subresources in a web page. In practice however, this may be superseded by operational factors such as SLAs or helped by flexible mappings between sockets, names, and IP addresses which we worked on previously at Cloudflare.
We then tried to understand the impact of coalescing on connection metrics. The measured and ideal number of DNS queries and TLS connections needed to load a web page are summarized by their CDFs in the figure below.
Through modeling and extensive analysis, we identify that connection coalescing through ORIGIN Frames could reduce the number of DNS and TLS connections made by browsers by over 60% at the median. We performed this modeling by identifying the number of times the clients requested DNS records, and combined them with the ideal ORIGIN Frames to serve.
Many multi-origin servers such as those operated by CDNs tend to reuse certificates and serve the same certificate with multiple DNS SAN entries. This allows the operators to manage fewer certificates through their creation and renewal cycles. While theoretically one can have millions of names in the certificate, creating such certificates is unreasonable and a challenge to manage effectively. By continuing to rely on existing certificates, our modeling measurements bring to light the volume of changes required to enable perfect coalescing, while presenting information about the scale of changes needed, as highlighted in the figure below.
We identify that over 60% of the certificates served by websites do not need any modifications and could benefit from ORIGIN Frames, while with no more than 10 additions to the DNS SAN names in certificates we’re able to successfully coalesce connections to over 92% of the websites in our measurement. The most effective changes could be made by CDN providers by adding three or four of their most popular requested hostnames into each certificate.
Experiment #2: ORIGIN Frames in action
In order to validate our modeling expectations, we then took a more active approach in early 2022. Our next experiment focused on 5,000 websites that make extensive use of cdnjs.cloudflare.com as a subresource. By modifying our experimental TLS termination endpoint we deployed HTTP/2 ORIGIN Frame support as defined in the RFC standard. This involved changing the internal fork of net and http dependency modules of Golang which we have open sourced (see here, and here).
During the experiments, connecting to a website in the experiment set would return cdnjs.cloudflare.com in the ORIGIN frame, while the control set returned an arbitrary (unused) hostname. All existing edge certificates for the 5000 websites were also modified. For the experimental group, the corresponding certificates were renewed with cdnjs.cloudflare.com added to the SAN. To ensure integrity between control and experimental sets, control group domains certificates were also renewed with a valid and identical size third party domain used by none of the control domains. This is done to ensure that the relative size changes to the certificates is kept constant avoiding potential biases due to different certificate sizes. Our results were striking!
Sampling 1% of the requests we received from Firefox to the websites in the experiment, we identified over 50% reduction in new TLS connections per second indicating a lesser number of cryptographic verification operations done by both the client and reduced server compute overheads. As expected there were no differences in the control set indicating the effectiveness of connection re-use as seen by the CDN or server operators.
Discussion and insights
While our modeling measurements indicated that we could anticipate some performance improvements, in practice it was not significantly better suggesting that ‘no-worse’ is the appropriate mental model regarding performance. The subtle interplay between resource object sizes, competing connections, and congestion control is subject to network conditions. Bottleneck-share capacity, for example, diminishes as fewer connections compete for bottleneck resources on network links. It would be interesting to revisit these measurements as more operators deploy support on their servers for ORIGIN Frames.
Apart from performance, one major benefit of ORIGIN frames is in terms of privacy. How? Well, each coalesced connection hides client metadata that is otherwise leaked from non-coalesced connections. Certain resources on a web page are loaded depending on how one is interacting with the website. This means for every new connection for retrieving some resource from the server, TLS plaintext metadata like SNI (in the absence of Encrypted Client Hello) and at least one plaintext DNS query, if transmitted over UDP or TCP on port 53, is exposed to the network. Coalescing connections helps remove the need for browsers to open new TLS connections, and the need to do extra DNS queries. This prevents metadata leakage from anyone listening on the network. ORIGIN Frames help minimize those signals from the network path, improving privacy by reducing the amount of cleartext information leaked on path to network eavesdroppers.
While the browsers benefit from reduced cryptographic computations needed to verify multiple certificates, a major advantage comes from the fact that it opens up very interesting future opportunities for resource scheduling at the endpoints (the browsers, and the origin servers) such as prioritization, or recent proposals like HTTP early hints to provide clients experiences where connections are not overloaded or competing for those resources. When coupled with CERTIFICATE Frames IETF draft, we can further eliminate the need for manual certificate modifications as a server can prove its authority of hostnames after connection establishment without any additional SAN entries on the website’s TLS certificate.
Conclusion and call to action
In summary, the current Internet ecosystem has a lot of opportunities for connection coalescing with only a few changes to certificates and their server infrastructure. Servers can significantly reduce the number of TLS handshakes by roughly 50%, while reducing the number of render blocking DNS queries by over 60%. Clients additionally reap these benefits in privacy by reducing cleartext DNS exposure to network on-lookers.
To help make this a reality we are currently planning to add support for both HTTP/2 and HTTP/3 ORIGIN Frames for our customers. We also encourage other operators that manage third party resources to adopt support of ORIGIN Frame to improve the Internet ecosystem. Our paper submission was accepted to the ACM Internet Measurement Conference 2022 and is available for download. If you’d like to work on projects like this, where you get to see the rubber meet the road for new standards, visit our careers page!
On Sunday, July 9, 2023, early morning UTC time, we observed a high number of DNS resolution failures — up to 7% of all DNS queries across the Asia Pacific region — caused by invalid DNSSEC signatures from Verisign .com and .net Top Level Domain (TLD) nameservers. This resulted in connection errors for visitors of Internet properties on Cloudflare in the region.
The local instances of Verisign’s nameservers started to respond with expired DNSSEC signatures in the Asia Pacific region. In order to remediate the impact, we have rerouted upstream DNS queries towards Verisign to locations on the US west coast which are returning valid signatures.
We have already reached out to Verisign to get more information on the root cause. Until their issues have been resolved, we will keep our DNS traffic to .com and .net TLD nameservers rerouted, which might cause slightly increased latency for the first visitor to domains under .com and .net in the region.
Background
In order to proxy a domain’s traffic through Cloudflare’s network, there are two components involved with respect to the Domain Name System (DNS) from the perspective of a Cloudflare data center: external DNS resolution, and upstream or origin DNS resolution.
To understand this, let’s look at the domain name blog.cloudflare.com — which is proxied through Cloudflare’s network — and let’s assume it is configured to use origin.example as the origin server:
Here, the external DNS resolution is the part where DNS queries to blog.cloudflare.com sent by public resolvers like 1.1.1.1 or 8.8.8.8 on behalf of a visitor return a set of Cloudflare Anycast IP addresses. This ensures that the visitor’s browser knows where to send an HTTPS request to load the website. Under the hood your browser performs a DNS query that looks something like this (the trailing dot indicates the DNS root zone):
(Your computer doesn’t actually use the dig command internally; we’ve used it to illustrate the process) Then when the next closest Cloudflare data center receives the HTTPS request for blog.cloudflare.com, it needs to fetch the content from the origin server (assuming it is not cached).
There are two ways Cloudflare can reach the origin server. If the DNS settings in Cloudflare contain IP addresses then we can connect directly to the origin. In some cases, our customers use a CNAME which means Cloudflare has to perform another DNS query to get the IP addresses associated with the CNAME. In the example above, blog.cloudflare.com has a CNAME record instructing us to look at origin.example for IP addresses. During the incident, only customers with CNAME records like this going to .com and .net domain names may have been affected.
The domain origin.example needs to be resolved by Cloudflare as part of the upstream or origin DNS resolution. This time, the Cloudflare data center needs to perform an outbound DNS query that looks like this:
$ dig origin.example. +short
192.0.2.1
DNS is a hierarchical protocol, so the recursive DNS resolver, which usually handles DNS resolution for whoever wants to resolve a domain name, needs to talk to several involved nameservers until it finally gets an answer from the authoritative nameservers of the domain (assuming no DNS responses are cached). This is the same process during the external DNS resolution and the origin DNS resolution. Here is an example for the origin DNS resolution:
Inherently, DNS is a public system that was initially published without any means to validate the integrity of the DNS traffic. So in order to prevent someone from spoofing DNS responses, DNS Security Extensions (DNSSEC) were introduced as a means to authenticate that DNS responses really come from who they claim to come from. This is achieved by generating cryptographic signatures alongside existing DNS records like A, AAAA, MX, CNAME, etc. By validating a DNS record’s associated signature, it is possible to verify that a requested DNS record really comes from its authoritative nameserver and wasn’t altered en-route. If a signature cannot be validated successfully, recursive resolvers usually return an error indicating the invalid signature. This is exactly what happened on Sunday.
Incident timeline and impact
On Saturday, July 8, 2023, at 21:10 UTC our logs show the first instances of DNSSEC validation errors that happened during upstream DNS resolution from multiple Cloudflare data centers in the Asia Pacific region. It appeared DNS responses from the TLD nameservers of .com and .net of the type NSEC3 (a DNSSEC mechanism to prove non-existing DNS records) did not include signatures. About an hour later at 22:16 UTC, the first internal alerts went off (since it required issues to be consistent over a certain period of time), but error rates were still at a level at around 0.5% of all upstream DNS queries.
After several hours, the error rate had increased to a point in which ~13% of our upstream DNS queries in affected locations were failing. This percentage continued to fluctuate over the duration of the incident between the ranges of 10-15% of upstream DNS queries, and roughly 5-7% of all DNS queries (external & upstream resolution) to affected Cloudflare data centers in the Asia Pacific region.
Initially it appeared as though only a single upstream nameserver was having issues with DNS resolution, however upon further investigation it was discovered that the issue was more widespread. Ultimately, we were able to verify that the Verisign nameservers for .com and .net were returning expired DNSSEC signatures on a portion of DNS queries in the Asia Pacific region. Based on our tests, other nameserver locations were correctly returning valid DNSSEC signatures.
In response, we rerouted our DNS traffic to the .com and .net TLD nameserver IP addresses to Verisign’s US west locations. After this change was propagated, the issue very quickly subsided and origin resolution error rates returned to normal levels.
All times are in UTC:
2023-07-08 21:10 First instances of DNSSEC validation errors appear in our logs for origin DNS resolution.
2023-07-08 22:16 First internal alerts for Asia Pacific data centers go off indicating origin DNS resolution error on our test domain. Very few errors for other domains at this point.
2023-07-09 02:58 Error rates have increased substantially since the first instance. An incident is declared.
2023-07-09 03:28 DNSSEC validation issues seem to be isolated to a single upstream provider. It is not abnormal that a single upstream has issues that propagate back to us, and in this case our logs were predominantly showing errors from domains that resolve to this specific upstream.
2023-07-09 04:52 We realize that DNSSEC validation issues are more widespread and affect multiple .com and .net domains. Validation issues continue to be isolated to the Asia Pacific region only, and appear to be intermittent.
2023-07-09 05:15 DNS queries via popular recursive resolvers like 8.8.8.8 and 1.1.1.1 do not return invalid DNSSEC signatures at this point. DNS queries using the local stub resolver continue to return DNSSEC errors.
2023-07-09 06:24 Responses from .com and .net Verisign nameservers in Singapore contain expired DNSSEC signatures, but responses from Verisign TLD nameservers in other locations are fine.
2023-07-09 06:41 We contact Verisign and notify them about expired DNSSEC signatures.
2023-07-09 06:50 In order to remediate the impact, we reroute DNS traffic via IPv4 for the .com and .net Verisign nameserver IPs to US west IPs instead. This immediately leads to a substantial drop in the error rate.
2023-07-09 07:06 We also reroute DNS traffic via IPv6 for the .com and .net Verisign nameserver IPs to US west IPs. This leads to the error rate going down to zero.
2023-07-10 09:23 The rerouting is still in place, but the underlying issue with expired signatures in the Asia Pacific region has still not been resolved.
2023-07-10 18:23 Versign gets back to us confirming that they “were serving stale data” at their local site and have resolved the issues.
Technical description of the error and how it happened
As mentioned in the introduction, the underlying cause for this incident was expired DNSSEC signatures for .net and .com zones. Expired DNSSEC signatures will cause a DNS response to be interpreted as invalid. There are two main scenarios in which this error was observed by a user:
CNAME flattening for external DNS resolution. This is when our authoritative nameservers attempt to return the IP address(es) that a CNAME record target resolves to rather than the CNAME record itself.
CNAME target lookup for origin DNS resolution. This is most commonly used when an HTTPS request is sent to a Cloudflare anycast IP address, and we need to determine what IP address to forward the request to. See How Cloudflare works for more details.
In both cases, behind the scenes the DNS query goes through an in-house recursive DNS resolver in order to lookup what a hostname resolves to. The purpose of this resolver is to cache queries, optimize future queries and provide DNSSEC validation. If the query from this resolver fails for whatever reason, our authoritative DNS system will not be able to perform the two scenarios outlined above.
During the incident, the recursive resolver was failing to validate the DNSSEC signatures in DNS responses for domains ending in .com and .net. These signatures are sent in the form of an RRSIG record alongside the other DNS records they cover. Together they form a Resource Record set (RRset). Each RRSIG has the corresponding fields:
As you can see, the main part of the payload is associated with the signature and its corresponding metadata. Each recursive resolver is responsible for not only checking the signature but also the expiration time of the signature. It is important to obey the expiration time in order to avoid returning responses for RRsets that have been signed by old keys, which could have potentially been compromised by that time.
During this incident, Verisign, the authoritative operator for the .com and .net TLD zones, was occasionally returning expired signatures in its DNS responses in the Asia Pacific region. As a result our recursive resolver was not able to validate the corresponding RRset. Ultimately this meant that a percentage of DNS queries would return SERVFAIL as response code to our authoritative nameserver. This in turn caused connection issues for users trying to connect to a domain on Cloudflare, because we weren't able to resolve the upstream target of affected domain names and thus didn’t know where to send proxied HTTPS requests to upstream servers.
Remediation and follow-up steps
Once we had identified the root cause we started to look at different ways to remedy the issue. We came to the conclusion that the fastest way to work around this very regionalized issue was to stop using the local route to Verisign's nameservers. This means that, at the time of writing this, our outgoing DNS traffic towards Verisign's nameservers in the Asia Pacific region now traverses the Pacific and ends up at the US west coast, rather than being served by closer nameservers. Due to the nature of DNS and the important role of DNS caching, this has less impact than you might initially expect. Frequently looked up names will be cached after the first request, and this only needs to happen once per data center, as we share and pool the local DNS recursor caches to maximize their efficiency.
Ideally, we would have been able to fix the issue right away as it potentially affected others in the region too, not just our customers. We will therefore work diligently to improve our incident communications channels with other providers in order to ensure that the DNS ecosystem remains robust against issues such as this. Being able to quickly get hold of other providers that can take action is vital when urgent issues like these arise.
Conclusion
This incident once again shows how impactful DNS failures are and how crucial this technology is for the Internet. We will investigate how we can improve our systems to detect and resolve issues like this more efficiently and quickly if they occur again in the future.
While Cloudflare was not the cause of this issue, and we are certain that we were not the only ones affected by this, we are still sorry for the disruption to our customers and to all the users who were unable to access Internet properties during this incident.
2023 was the first year that non-participating countries could vote for their favorites during the Eurovision Song Contest, adding millions of additional viewers and voters to an already impressive 162 million tuning in from the participating countries. It became a truly global event with a potential for disruption from multiple sources. To prepare for anything, Cloudflare helped scale and protect the voting application, used by millions of dedicated fans around the world to choose the winner.
In this blog we will cover how once.net built their platform based.io to monitor, manage and scale the Eurovision voting application to handle all traffic using many Cloudflare services. The speed with which DNS changes made through the Cloudflare API propagate globally allowed them to scale their backend within seconds. At the same time, Cloudflare Pages was ready to serve any amount of traffic to the voting landing page so fans didn’t miss a beat. And to cap it off, by combining Cloudflare CDN, DDoS protection, WAF, and Turnstile, they made sure that attackers didn’t steal any of the limelight.
The unsung heroes
Based.iois a resilient live data platform built by the once.net team, with the capability to scale up to 400 million concurrent connected users. It’s built from the ground up for speed and performance, consisting of an observable real time graph database, networking layer, cloud functions, analytics and infrastructure orchestration. Since all system information, traffic analysis and disruptions are monitored in real time, it makes the platform instantly responsive to variable demand, which enables real time scaling of your infrastructure during spikes, outages and attacks.
Although the based.io platform on its own is currently in closed beta, it is already serving a few flagship customers in production assisted by the software and services of the once.net team. One such customer is Tally, a platform used by multiple broadcasters in Europe to add live interaction to traditional television. Over 100 live shows have been performed using the platform. Another is Airhub, a startup that handles and logs automatic drone flights. And of course the star of this blog post, the Eurovision Song Contest.
Setting the stage
The Eurovision Song Contest is one of the world’s most popular broadcasted contests, and this year it reached 162 million people across 38 broadcasting countries. In addition, on TikTok the three live shows were viewed 4.8 million times, while 7.6 million people watched the Grand Final live on YouTube. With such an audience, it is no surprise that Cloudflare sees the impact of it on the Internet. Last year, we wrote a blog post where we showed lower than average traffic during, and higher than average traffic after the grand final. This year, the traffic from participating countries showed an even more remarkable surge:
HTTP Requests per Second from Norway, with a similar pattern visible in countries such as the UK, Sweden and France. Internet traffic spiked at 21:20 UTC, when voting started.
Such large amounts of traffic are nothing new to the Eurovision Song Contest. Eurovision has relied on Cloudflare’s services for over a decade now and Cloudflare has helped to protect Eurovision.tv and improve its performance through noticeable faster load time to visitors from all corners of the world. Year after year, the team of Eurovision continued to use our services more, discovering additional features to improve performance and reliability further, with increasingly fine-grained control over their traffic flows. Eurovision.tv uses Page Rules to cache additional content on Cloudflare’s edge, speeding up delivery without sacrificing up-to-the-minute updates during the global event. Finally, to protect their backend and content management system, the team has placed their admin portals behind Cloudflare Zero Trust to delegate responsibilities down to individual levels.
Since then the contest itself has also evolved – sometimes by choice, sometimes by force. During the COVID-19 pandemic in-person cheering became impossible for many people due to a reduced live audience, resulting in the Eurovision Song Contest asking once.net to build a new iOS and Android application in which fans could cheer virtually. The feature was an instant hit, and it was clear that it would become part of this year’s contest as well.
A screenshot of the official Eurovision Song Contest application showing the real-time number of connected fans (1) and allowing them to cheer (2) for their favorites.
In 2023, once.net was also asked to handle the paid voting from the regions where phone and SMS voting was not possible. It was the first time that Eurovision allowed voting online. The challenge that had to be overcome was the extreme peak demand on the platform when the show was live, and especially when the voting window started.
Complicating it further, was the fact that during last year’s show, there had been a large number of targeted and coordinated attacks.
To prepare for these spikes in demand and determined adversaries, once.net needed a platform that isn’t only resilient and highly scalable, but could also act as a mitigation layer in front of it. once.net selected Cloudflare for this functionality and integrated Cloudflare deeply with its real-time monitoring and management platform. To understand how and why, it’s essential to understand based.io underlying architecture.
The based.io platform
Instead of relying on network or HTTP load balancers, based.io uses a client-side service discovery pattern, selecting the most suitable server to connect to and leveraging Cloudflare's fast cache propagation infrastructure to handle spikes in traffic (both malicious and benign).
First, each server continuously registers a unique access key that has an expiration of 15 seconds, which must be used when a client connects to the server. In addition, the backend servers register their health (such as active connections, CPU, memory usage, requests per second, etc.) to the service registry every 300 milliseconds. Clients then request the optimal server URL and associated access key from a central discovery registry and proceed to establish a long lived connection with that server. When a server gets overloaded it will disconnect a certain amount of clients and those clients will go through the discovery process again.
The central discovery registry would normally be a huge bottleneck and attack target. based.io resolves this by putting the registry behind Cloudflare's global network with a cache time of three seconds. Since the system relies on real-time stats to distribute load and uses short lived access keys, it is crucial that the cache updates fast and reliably. This is where Cloudflare’s infrastructure proved its worth, both due to the fast updating cache and reducing load with Tiered Caching.
Not using load balancers means the based.io system allows clients to connect to the backend servers through Cloudflare, resulting in better performance and a more resilient infrastructure by eliminating the load balancers as potential attack surface. It also results in a better distribution of connections, using the real-time information of server health, amount of active connections, active subscriptions.
Scaling up the platform happens automatically under load by deploying additional machines that can each handle 40,000 connected users. These are spun up in batches of a couple of hundred and as each machine spins up, it reaches out directly to the Cloudflare API to configure its own DNS record and proxy status. Thanks to Cloudflare’s high speed DNS system, these changes are then propagated globally within seconds, resulting in a total machine turn-up time of around three seconds. This means faster discovery of new servers and faster dynamic rebalancing from the clients. And since the voting window of the Eurovision Song Contest is only 45 minutes, with the main peak within minutes after the window opens, every second counts!
High level architecture of the based.io platform used for the 2023 Eurovision Song Contest
To vote, users of the mobile app and viewers globally were pointed to the voting landing page, esc.vote. Building a frontend web application able to handle this kind of an audience is a challenge in itself. Although hosting it yourself and putting a CDN in front seems straightforward, this still requires you to own, configure and manage your origin infrastructure. once.net decided to leverage Cloudflare’s infrastructure directly by hosting the voting landing page on Cloudflare Pages. Deploying was as quick as a commit to their Git repository, and they never had to worry about reachability or scaling of the webpage.
once.net also used Cloudflare Turnstile to protect their payment API endpoints that were used to validate online votes. They used the invisible Turnstile widget to make sure the request was not coming from emulated browsers (e.g. Selenium). And best of all, using the invisible Turnstile widget the user did not have to go through extra steps, which allowed for a better user experience and better conversion.
Cloudflare Pages stealing the show!
After the two semi-finals went according to plan with approximately 200,000 concurrent users during each,May 13 brought the Grand Final. The once.net team made sure that there were enough machines ready to take the initial load, jumped on a call with Cloudflare to monitor and started looking at the number of concurrent users slowly increasing. During the event, there were a few attempts to DDoS the site, which were automatically and instantaneously mitigated without any noticeable impact to any visitors.
The based.io discovery registry server also got some attention. Since the cache TTL was set quite low at five seconds, a high rate of distributed traffic to it could still result in a significant load. Luckily, on its own, the highly optimized based.io server can already handle around 300,000 requests per second. Still, it was great to see that during the event the cache hit ratio for normal traffic was 20%, and during one significant attack the cache hit ratio peaked towards 80%. This showed how easy it is to leverage a combination of Cloudflare CDN and DDoS protection to mitigate such attacks, while still being able to serve dynamic and real time content.
When the curtains finally closed, 1.3 million concurrent users connected to the based.io platform at peak. The based.io platform handled a total of 350 million events and served seven million unique users in three hours. The voting landing page hosted by Cloudflare Pages served 2.3 million requests per second at peak, and made sure that the voting payments were by real human fans using Turnstile. Although the Cloudflare platform didn’t blink for such a flood of traffic, it is no surprise that it shows up as a short crescendo in our traffic statistics:
Get in touch with us
If you’re also working on or with an application that would benefit from Cloudflare’s speed and security, but don’t know where to start, reach out and we’ll work together.
On April 1, 2018, Cloudflare announced the 1.1.1.1 public DNS resolver. Over the years, we added the debug page for troubleshooting, global cache purge, 0 TTL for zones on Cloudflare, Upstream TLS, and 1.1.1.1 for families to the platform. In this post, we would like to share some behind the scenes details and changes.
When the project started, Knot Resolver was chosen as the DNS resolver. We started building a whole system on top of it, so that it could fit Cloudflare’s use case. Having a battle tested DNS recursive resolver, as well as a DNSSEC validator, was fantastic because we could spend our energy elsewhere, instead of worrying about the DNS protocol implementation.
Knot Resolver is quite flexible in terms of its Lua-based plugin system. It allowed us to quickly extend the core functionality to support various product features, like DoH/DoT, logging, BPF-based attack mitigation, cache sharing, and iteration logic override. As the traffic grew, we reached certain limitations.
Lessons we learned
Before going any deeper, let’s first have a bird’s-eye view of a simplified Cloudflare data center setup, which could help us understand what we are going to talk about later. At Cloudflare, every server is identical: the software stack running on one server is exactly the same as on another server, only the configuration may be different. This setup greatly reduces the complexity of fleet maintenance.
Figure 1 Data center layout
The resolver runs as a daemon process, kresd, and it doesn’t work alone. Requests, specifically DNS requests, are load-balanced to the servers inside a data center by Unimog. DoH requests are terminated at our TLS terminator. Configs and other small pieces of data can be delivered worldwide by Quicksilver in seconds. With all the help, the resolver can concentrate on its own goal – resolving DNS queries, and not worrying about transport protocol details. Now let’s talk about 3 key areas we wanted to improve here – blocking I/O in plugins, a more efficient use of cache space, and plugin isolation.
Callbacks blocking the event loop
Knot Resolver has a very flexible plugin system for extending its core functionality. The plugins are called modules, and they are based on callbacks. At certain points during request processing, these callbacks will be invoked with current query context. This gives a module the ability to inspect, modify, and even produce requests / responses. By design, these callbacks are supposed to be simple, in order to avoid blocking the underlying event loop. This matters because the service is single threaded, and the event loop is in charge of serving many requests at the same time. So even just one request being held up in a callback means that no other concurrent requests can be progressed until the callback finishes.
The setup worked well enough for us until we needed to do blocking operations, for example, to pull data from Quicksilver before responding to the client.
Cache efficiency
As requests for a domain could land on any node inside a data center, it would be wasteful to repetitively resolve a query when another node already has the answer. By intuition, the latency could be improved if the cache could be shared among the servers, and so we created a cache module which multicasted the newly added cache entries. Nodes inside the same data center could then subscribe to the events and update their local cache.
The default cache implementation in Knot Resolver is LMDB. It is fast and reliable for small to medium deployments. But in our case, cache eviction shortly became a problem. The cache itself doesn’t track for any TTL, popularity, etc. When it’s full, it just clears all the entries and starts over. Scenarios like zone enumeration could fill the cache with data that is unlikely to be retrieved later.
Furthermore, our multicast cache module made it worse by amplifying the less useful data to all the nodes, and led them to the cache high watermark at the same time. Then we saw a latency spike because all the nodes dropped the cache and started over around the same time.
Module isolation
With the list of Lua modules increasing, debugging issues became increasingly difficult. This is because a single Lua state is shared among all the modules, so one misbehaving module could affect another. For example, when something went wrong inside the Lua state, like having too many coroutines, or being out of memory, we got lucky if the program just crashed, but the resulting stack traces were hard to read. It is also difficult to forcibly tear down, or upgrade, a running module as it not only has state in the Lua runtime, but also FFI, so memory safety is not guaranteed.
Hello BigPineapple
We didn’t find any existing software that would meet our somewhat niche requirements, so eventually we started building something ourselves. The first attempt was to wrap Knot Resolver’s core with a thin service written in Rust (modified edgedns).
This proved to be difficult due to having to constantly convert between the storage, and C/FFI types, and some other quirks (for example, the ABI for looking up records from cache expects the returned records to be immutable until the next call, or the end of the read transaction). But we learned a lot from trying to implement this sort of split functionality where the host (the service) provides some resources to the guest (resolver core library), and how we would make that interface better.
In the later iterations, we replaced the entire recursive library with a new one based around an async runtime; and a redesigned module system was added to it, sneakily rewriting the service into Rust over time as we swapped out more and more components. That async runtime was tokio, which offered a neat thread pool interface for running both non-blocking and blocking tasks, as well as a good ecosystem for working with other crates (Rust libraries).
After that, as the futures combinators became tedious, we started converting everything to async/await. This was before the async/await feature that landed in Rust 1.39, which led us to use nightly (Rust beta) for a while and had some hiccups. When the async/await stabilized, it enabled us to write our request processing routine ergonomically, similar to Go.
All the tasks can be run concurrently, and certain I/O heavy ones can be broken down into smaller pieces, to benefit from a more granular scheduling. As the runtime executes tasks on a threadpool, instead of a single thread, it also benefits from work stealing. This avoids a problem we previously had, where a single request taking a lot of time to process, that blocks all the other requests on the event loop.
Figure 2 Components overview
Finally, we forged a platform that we are happy with, and we call it BigPineapple. The figure above shows an overview of its main components and the data flow between them. Inside BigPineapple, the server module gets inbound requests from the client, validates and transforms them into unified frame streams, which can then be processed by the worker module. The worker module has a set of workers, whose task is to figure out the answer to the question in the request. Each worker interacts with the cache module to check if the answer is there and still valid, otherwise it drives the recursor module to recursively iterate the query. The recursor doesn’t do any I/O, when it needs anything, it delegates the sub-task to the conductor module. The conductor then uses outbound queries to get the information from upstream nameservers. Through the whole process, some modules can interact with the Sandbox module, to extend its functionality by running the plugins inside.
Let’s look at some of them in more detail, and see how they helped us overcome the problems we had before.
Updated I/O architecture
A DNS resolver can be seen as an agent between a client and several authoritative nameservers: it receives requests from the client, recursively fetches data from the upstream nameservers, then composes the responses and sends them back to the client. So it has both inbound and outbound traffic, which are handled by the server and the conductor component respectively.
The server listens on a list of interfaces using different transport protocols. These are later abstracted into streams of “frames”. Each frame is a high level representation of a DNS message, with some extra metadata. Underneath, it can be a UDP packet, a segment of TCP stream, or the payload of a HTTP request, but they are all processed the same way. The frame is then converted into an asynchronous task, which in turn is picked up by a set of workers in charge of resolving these tasks. The finished tasks are converted back into responses, and sent back to the client.
This “frame” abstraction over the protocols and their encodings simplified the logic used to regulate the frame sources, such as enforcing fairness to prevent starving and controlling pacing to protect the server from being overwhelmed. One of the things we’ve learned with the previous implementations is that, for a service open to the public, a peak performance of the I/O matters less than the ability to pace clients fairly. This is mainly because the time and computational cost of each recursive request is vastly different (for example a cache hit from a cache miss), and it’s difficult to guess it beforehand. The cache misses in recursive service not only consume Cloudflare’s resources, but also the resources of the authoritative nameservers being queried, so we need to be mindful of that.
On the other side of the server is the conductor, which manages all the outbound connections. It helps to answer some questions before reaching out to the upstream: Which is the fastest nameserver to connect to in terms of latency? What to do if all the nameservers are not reachable? What protocol to use for the connection, and are there any better options? The conductor is able to make these decisions by tracking the upstream server’s metrics, such as RTT, QoS, etc. With that knowledge, it can also guess for things like upstream capacity, UDP packet loss, and take necessary actions, e.g. retry when it thinks the previous UDP packet didn’t reach the upstream.
Figure 3 I/O conductor
Figure 3 shows a simplified data flow about the conductor. It is called by the exchanger mentioned above, with upstream requests as input. The requests will be deduplicated first: meaning in a small window, if a lot of requests come to the conductor and ask for the same question, only one of them will pass, the others are put into a waiting queue. This is common when a cache entry expires, and can reduce unnecessary network traffic. Then based on the request and upstream metrics, the connection instructor either picks an open connection if available, or generates a set of parameters. With these parameters, the I/O executor is able to connect to the upstream directly, or even take a route via another Cloudflare data center using our Argo Smart Routing technology!
The cache
Caching in a recursive service is critical as a server can return a cached response in under one millisecond, while it will be hundreds of milliseconds to respond on a cache miss. As the memory is a finite resource (and also a shared resource in Cloudflare’s architecture), more efficient use of space for cache was one of the key areas we wanted to improve. The new cache is implemented with a cache replacement data structure (ARC), instead of a KV store. This makes good use of the space on a single node, as less popular entries are progressively evicted, and the data structure is resistant to scans.
Moreover, instead of duplicating the cache across the whole data center with multicast, as we did before, BigPineapple is aware of its peer nodes in the same data center, and relays queries from one node to another if it cannot find an entry in its own cache. This is done by consistent hashing the queries onto the healthy nodes in each data center. So, for example, queries for the same registered domain go through the same subset of nodes, which not only increases the cache hit ratio, but also helps the infrastructure cache, which stores information about performance and features of nameservers.
Figure 4 Updated data center layout
Async recursive library
The recursive library is the DNS brain of BigPineapple, as it knows how to find the answer to the question in the query. Starting from the root, it breaks down the client query into subqueries, and uses them to collect knowledge recursively from various authoritative nameservers on the internet. The product of this process is the answer. Thanks to the async/await it can be abstracted as a function like such:
The function contains all the logic necessary to generate a response to a given request, but it doesn’t do any I/O on its own. Instead, we pass an Exchanger trait(Rust interface) that knows how to exchange DNS messages with upstream authoritative nameservers asynchronously. The exchanger is usually called at various await points – for example, when a recursion starts, one of the first things it does is that it looks up the closest cached delegation for the domain. If it doesn’t have the final delegation in cache, it needs to ask what nameservers are responsible for this domain and wait for the response, before it can proceed any further.
Thanks to this design, which decouples the “waiting for some responses” part from the recursive DNS logic, it is much easier to test by providing a mock implementation of the exchanger. In addition, it makes the recursive iteration code (and DNSSEC validation logic in particular) much more readable, as it’s written sequentially instead of being scattered across many callbacks.
Fun fact: writing a DNS recursive resolver from scratch is not fun at all!
Not only because of the complexity of DNSSEC validation, but also because of the necessary “workarounds” needed for various RFC incompatible servers, forwarders, firewalls, etc. So we ported deckard into Rust to help test it. Additionally, when we started migrating over to this new async recursive library, we first ran it in “shadow” mode: processing real world query samples from the production service, and comparing differences. We’ve done this in the past on Cloudflare’s authoritative DNS service as well. It is slightly more difficult for a recursive service due to the fact that a recursive service has to look up all the data over the Internet, and authoritative nameservers often give different answers for the same query due to localization, load balancing and such, leading to many false positives.
In December 2019, we finally enabled the new service on a public test endpoint (see the announcement) to iron out remaining issues before slowly migrating the production endpoints to the new service. Even after all that, we continued to find edge cases with the DNS recursion (and DNSSEC validation in particular), but fixing and reproducing these issues has become much easier due to the new architecture of the library.
Sandboxed plugins
Having the ability to extend the core DNS functionality on the fly is important for us, thus BigPineapple has its redesigned plugin system. Before, the Lua plugins run in the same memory space as the service itself, and are generally free to do what they want. This is convenient, as we can freely pass memory references between the service and modules using C/FFI. For example, to read a response directly from cache without having to copy to a buffer first. But it is also dangerous, as the module can read uninitialized memory, call a host ABI using a wrong function signature, block on a local socket, or do other undesirable things, in addition the service doesn’t have a way to restrict these behaviors.
So we looked at replacing the embedded Lua runtime with JavaScript, or native modules, but around the same time, embedded runtimes for WebAssembly (Wasm for short) started to appear. Two nice properties of WebAssembly programs are that it allows us to write them in the same language as the rest of the service, and that they run in an isolated memory space. So we started modeling the guest/host interface around the limitations of WebAssembly modules, to see how that would work.
BigPineapple’s Wasm runtime is currently powered by Wasmer. We tried several runtimes over time like Wasmtime, WAVM in the beginning, and found Wasmer was simpler to use in our case. The runtime allows each module to run in its own instance, with an isolated memory and a signal trap, which naturally solved the module isolation problem we described before. In addition to this, we can have multiple instances of the same module running at the same time. Being controlled carefully, the apps can be hot swapped from one instance to another without missing a single request! This is great because the apps can be upgraded on the fly without a server restart. Given that the Wasm programs are distributed via Quicksilver, BigPineapple’s functionality can be safely changed worldwide within a few seconds!
To better understand the WebAssembly sandbox, several terms need to be introduced first:
Host: the program which runs the Wasm runtime. Similar to a kernel, it has full control through the runtime over the guest applications.
Guest application: the Wasm program inside the sandbox. Within a restricted environment, it can only access its own memory space, which is provided by the runtime, and call the imported Host calls. We call it an app for short.
Host call: the functions defined in the host that can be imported by the guest. Comparable to syscall, it’s the only way guest apps can access the resources outside the sandbox.
Guest runtime: a library for guest applications to easily interact with the host. It implements some common interfaces, so an app can just use async, socket, log and tracing without knowing the underlying details.
Now it’s time to dive into the sandbox, so stay awhile and listen. First let’s start from the guest side, and see what a common app lifespan looks like. With the help of the guest runtime, guest apps can be written similar to regular programs. So like other executables, an app begins with a start function as an entrypoint, which is called by the host upon loading. It is also provided with arguments as from the command line. At this point, the instance normally does some initialization, and more importantly, registers callback functions for different query phases. This is because in a recursive resolver, a query has to go through several phases before it gathers enough information to produce a response, for example a cache lookup, or making subrequests to resolve a delegation chain for the domain, so being able to tie into these phases is necessary for the apps to be useful for different use cases. The start function can also run some background tasks to supplement the phase callbacks, and store global state. For example – report metrics, or pre-fetch shared data from external sources, etc. Again, just like how we write a normal program.
But where do the program arguments come from? How could a guest app send log and metrics? The answer is, external functions.
Figure 5 Wasm based Sandbox
In figure 5, we can see a barrier in the middle, which is the sandbox boundary, that separates the guest from the host. The only way one side can reach out to the other, is via a set of functions exported by the peer beforehand. As in the picture, the “hostcalls” are exported by the host, imported and called by the guest; while the “trampoline” are guest functions that the host has knowledge of.
It is called trampoline because it is used to invoke a function or a closure inside a guest instance that’s not exported. The phase callbacks are one example of why we need a trampoline function: each callback returns a closure, and therefore can’t be exported on instantiation. So a guest app wants to register a callback, it calls a host call with the callback address “hostcall_register_callback(pre_cache, #30987)”, when the callback needs to be invoked, the host cannot just call that pointer as it’s pointing to the guest’s memory space. What it can do instead is, to leverage one of the aforementioned trampolines, and give it the address of the callback closure: “trampoline_call(#30987)”.
Isolation overhead Like a coin that has two sides, the new sandbox does come with some additional overhead. The portability and isolation that WebAssembly offers bring extra cost. Here, we’ll list two examples.
Firstly, guest apps are not allowed to read host memory. The way it works is the guest provides a memory region via a host call, then the host writes the data into the guest memory space. This introduces a memory copy that would not be needed if we were outside the sandbox. The bad news is, in our use case, the guest apps are supposed to do something on the query and/or the response, so they almost always need to read data from the host on every single request. The good news, on the other hand, is that during a request life cycle, the data won’t change. So we pre-allocate a bulk of memory in the guest memory space right after the guest app instantiates. The allocated memory is not going to be used, but instead serves to occupy a hole in the address space. Once the host gets the address details, it maps a shared memory region with the common data needed by the guest into the guest’s space. When the guest code starts to execute, it can just access the data in the shared memory overlay, and no copy is needed.
Another issue we ran into was when we wanted to add support for a modern protocol, oDoH, into BigPineapple. The main job of it is to decrypt the client query, resolve it, then encrypt the answers before sending it back. By design, this doesn’t belong to core DNS, and should instead be extended with a Wasm app. However, the WebAssembly instruction set doesn’t provide some crypto primitives, such as AES and SHA-2, which prevents it from getting the benefit of host hardware. There is ongoing work to bring this functionality to Wasm with WASI-crypto. Until then, our solution for this is to simply delegate the HPKE to the host via host calls, and we already saw 4x performance improvements, compared to doing it inside Wasm.
Async in Wasm Remember the problem we talked about before that the callbacks could block the event loop? Essentially, the problem is how to run the sandboxed code asynchronously. Because no matter how complex the request processing callback is, if it can yield, we can put an upper bound on how long it is allowed to block. Luckily, Rust’s async framework is both elegant and lightweight. It gives us the opportunity to use a set of guest calls to implement the “Future”s.
In Rust, a Future is a building block for asynchronous computations. From the user’s perspective, in order to make an asynchronous program, one has to take care of two things: implement a pollable function that drives the state transition, and place a waker as a callback to wake itself up, when the pollable function should be called again due to some external event (e.g. time passes, socket becomes readable, and so on). The former is to be able to progress the program gradually, e.g. read buffered data from I/O and return a new state indicating the status of the task: either finished, or yielded. The latter is useful in case of task yielding, as it will trigger the Future to be polled when the conditions that the task was waiting for are fulfilled, instead of busy looping until it’s complete.
Let’s see how this is implemented in our sandbox. For a scenario when the guest needs to do some I/O, it has to do so via the host calls, as it is inside a restricted environment. Assuming the host provides a set of simplified host calls which mirror the basic socket operations: open, read, write, and close, the guest can have its pseudo poller defined as below:
Here the host call reads data from a socket into a buffer, depending on its return value, the function can move itself to one of the states we mentioned above: finished(Ready), or yielded(Pending). The magic happens inside the host call. Remember in figure 5, that it is the only way to access resources? The guest app doesn’t own the socket, but it can acquire a “handle” via “hostcall_socket_open”, which will in turn create a socket on the host side, and return a handle. The handle can be anything in theory, but in practice using integer socket handles map well to file descriptors on the host side, or indices in a vector or slab. By referencing the returned handle, the guest app is able to remotely control the real socket. As the host side is fully asynchronous, it can simply relay the socket state to the guest. If you noticed that the waker function isn’t used above, well done! That’s because when the host call is called, it not only starts opening a socket, but also registers the current waker to be called then the socket is opened (or fails to do so). So when the socket becomes ready, the host task will be woken up, it will find the corresponding guest task from its context, and wakes it up using the trampoline function as shown in figure 5. There are other cases where a guest task needs to wait for another guest task, an async mutex for example. The mechanism here is similar: using host calls to register wakers.
All of these complicated things are encapsulated in our guest async runtime, with easy to use API, so the guest apps get access to regular async functions without having to worry about the underlying details.
(Not) The End
Hopefully, this blog post gave you a general idea of the innovative platform that powers 1.1.1.1. It is still evolving. As of today, several of our products, such as 1.1.1.1 for Families, AS112, and Gateway DNS, are supported by guest apps running on BigPineapple. We are looking forward to bringing new technologies into it. If you have any ideas, please let us know in the community or via email.
Starting today, we’re adding support on all zone plans to add custom comments on your DNS records. Users on the Pro, Business and Enterprise plan will also be able to tag DNS records.
DNS records are important
DNS records play an essential role when it comes to operating a website or a web application. In general, they are used to mapping human-readable hostnames to machine-readable information, most commonly IP addresses. Besides mapping hostnames to IP addresses they also fulfill many other use cases like:
Ensuring emails can reach your inbox, by setting up MX records.
Validating a TLS certificate by adding a TXT (or CNAME) record.
Specifying allowed certificate authorities that can issue certificates on behalf of your domain by creating a CAA record.
Validating ownership of your domain for other web services (website hosting, email hosting, web storage, etc.) – usually by creating a TXT record.
And many more.
With all these different use cases, it is easy to forget what a particular DNS record is for and it is not always possible to derive the purpose from the name, type and content of a record. Validation TXT records tend to be on seemingly arbitrary names with rather cryptic content. When you then also throw multiple people or teams into the mix who have access to the same domain, all creating and updating DNS records, it can quickly happen that someone modifies or even deletes a record causing the on-call person to get paged in the middle of the night.
Enter: DNS record comments & tags 📝
Starting today, everyone with a zone on Cloudflare can add custom comments on each of their DNS records via the API and through the Cloudflare dashboard.
To add a comment, just click on the Edit action of the respective DNS record and fill out the Comment field. Once you hit Save, a small icon will appear next to the record name to remind you that this record has a comment. Hovering over the icon will allow you to take a quick glance at it without having to open the edit panel.
What you also can see in the screenshot above is the new Tags field. All users on the Pro, Business, or Enterprise plans now have the option to add custom tags to their records. These tags can be just a key like “important” or a key-value pair like “team:DNS” which is separated by a colon. Neither comments nor tags have any impact on the resolution or propagation of the particular DNS record, and they’re only visible to people with access to the zone.
Now we know that some of our users love automation by using our API. So if you want to create a number of zones and populate all their DNS records by uploading a zone file as part of your script, you can also directly include the DNS record comments and tags in that zone file. And when you export a zone file, either to back up all records of your zone or to easily move your zone to another account on Cloudflare, it will also contain comments and tags. Learn more about importing and exporting comments and tags on our developer documentation.
;; A Records
*.mycoolwebpage.xyz.     1      IN  A    192.0.2.3
mycoolwebpage.xyz.       1      IN  A    203.0.113.1 ; Contact Hannes for details.
sub1.mycoolwebpage.xyz.  1      IN  A    192.0.2.2 ; Test origin server. Can be deleted eventually. cf_tags=testing
sub1.mycoolwebpage.xyz.  1      IN  A    192.0.2.1 ; Production origin server. cf_tags=important,prod,team:DNS

;; MX Records
mycoolwebpage.xyz.       1      IN  MX   1 mailserver1.example.
mycoolwebpage.xyz.       1      IN  MX   2 mailserver2.example.

;; TXT Records
mycoolwebpage.xyz.       86400	IN  TXT  "v=spf1 ip4:192.0.2.0/24 -all" ; cf_tags=important,team:EMAIL
sub1.mycoolwebpage.xyz.  86400  IN  TXT  "hBeFxN3qZT40" ; Verification record for service XYZ. cf_tags=team:API
New filters
It might be that your zone has hundreds or thousands of DNS records, so how on earth would you find all the records that belong to the same team or that are needed for one particular application?
For this we created a new filter option in the dashboard. This allows you to not only filter for comments or tags but also for other record data like name, type, content, or proxy status. The general search bar for a quick and broader search will still be available, but it cannot (yet) be used in conjunction with the new filters.
By clicking on the “Add filter” button, you can select individual filters that are connected with a logical AND. So if I wanted to only look at TXT records that are tagged as important, I would add these filters:
One more thing (or two)
Another change we made is to replace the Advanced button with two individual actions: Import and Export, and Dashboard Display Settings.
You can find them in the top right corner under DNS management. When you click on Import and Export you have the option to either export all existing DNS records (including their comments and tags) into a zone file or import new DNS records to your zone by uploading a zone file.
The action Dashboard Display Settings allows you to select which special record types are shown in the UI. And there is an option to toggle showing the record tags inline under the respective DNS record or just showing an icon if there are tags present on the record.
And last but not least, we increased the width of the DNS record table as part of this release. The new table makes better use of the existing horizontal space and allows you to see more details of your DNS records, especially if you have longer subdomain names or content.
Try it now
DNS record comments and tags are available today. Just navigate to the DNS tab of your zone in the Cloudflare dashboard and create your first comment or tag. If you are not yet using Cloudflare DNS, sign up for free in just a few minutes.
Today, we’re excited to announce that Cloudflare is participating in the AS112 project, becoming an operator of this community-operated, loosely-coordinated anycast deployment of DNS servers that primarily answer reverse DNS lookup queries that are misdirected and create significant, unwanted load on the Internet.
With the addition of Cloudflare global network, we can make huge improvements to the stability, reliability and performance of this distributed public service.
What is AS112 project
The AS112 project is a community effort to run an important network service intended to handle reverse DNS lookup queries for private-only use addresses that should never appear in the public DNS system. In the seven days leading up to publication of this blog post, for example, Cloudflare’s 1.1.1.1 resolver received more than 98 billion of these queries — all of which have no useful answer in the Domain Name System.
Some history is useful for context. Internet Protocol (IP) addresses are essential to network communication. Many networks make use of IPv4 addresses that are reserved for private use, and devices in the network are able to connect to the Internet with the use of network address translation (NAT), a process that maps one or more local private addresses to one or more global IP addresses and vice versa before transferring the information.
Your home Internet router most likely does this for you. You will likely find that, when at home, your computer has an IP address like 192.168.1.42. That’s an example of a private use address that is fine to use at home, but can’t be used on the public Internet. Your home router translates it, through NAT, to an address your ISP assigned to your home and that can be used on the Internet.
Here are the reserved “private use” addresses designated in RFC 1918.
Address block
Address range
Number of addresses
10.0.0.0/8
10.0.0.0 – 10.255.255.255
16,777,216
172.16.0.0/12
172.16.0.0 – 172.31.255.255
1,048,576
192.168.0.0/16
192.168.0.0 – 192.168.255.255
65,536
(Reserved private IPv4 network ranges)
Although the reserved addresses themselves are blocked from ever appearing on the public Internet, devices and programs in private environments may occasionally originate DNS queries corresponding to those addresses. These are called “reverse lookups” because they ask the DNS if there is a name associated with an address.
Reverse DNS lookup
A reverse DNS lookup is an opposite process of the more commonly used DNS lookup (which is used every day to translate a name like www.cloudflare.com to its corresponding IP address). It is a query to look up the domain name associated with a given IP address, in particular those addresses associated with routers and switches. For example, network administrators and researchers use reverse lookups to help understand paths being taken by data packets in the network, and it’s much easier to understand meaningful names than a meaningless number.
A reverse lookup is accomplished by querying DNS servers for a pointer record (PTR). PTR records store IP addresses with their segments reversed, and by appending “.in-addr.arpa” to the end. For example, the IP address 192.0.2.1 will have the PTR record stored as 1.2.0.192.in-addr.arpa. In IPv6, PTR records are stored within the “.ip6.arpa” domain instead of “.in-addr.arpa.”. Below are some query examples using the dig command line tool.
# Lookup the domain name associated with IPv4 address 172.64.35.46
# “+short” option make it output the short form of answers only
$ dig @1.1.1.1 PTR 46.35.64.172.in-addr.arpa +short
hunts.ns.cloudflare.com.

# Or use the shortcut “-x” for reverse lookups
$ dig @1.1.1.1 -x 172.64.35.46 +short
hunts.ns.cloudflare.com.

# Lookup the domain name associated with IPv6 address 2606:4700:58::a29f:2c2e
$ dig @1.1.1.1 PTR e.2.c.2.f.9.2.a.0.0.0.0.0.0.0.0.0.0.0.0.8.5.0.0.0.0.7.4.6.0.6.2.ip6.arpa. +short
hunts.ns.cloudflare.com.

# Or use the shortcut “-x” for reverse lookups
$ dig @1.1.1.1 -x 2606:4700:58::a29f:2c2e +short
hunts.ns.cloudflare.com.
The problem that private use addresses cause for DNS
The private use addresses concerned have only local significance and cannot be resolved by the public DNS. In other words, there is no way for the public DNS to provide a useful answer to a question that has no global meaning. It is therefore a good practice for network administrators to ensure that queries for private use addresses are answered locally. However, it is not uncommon for such queries to follow the normal delegation path in the public DNS instead of being answered within the network. That creates unnecessary load.
By definition of being private use, they have no ownership in the public sphere, so there are no authoritative DNS servers to answer the queries. At the very beginning, root servers respond to all these types of queries since they serve the IN-ADDR.ARPA zone.
Over time, due to the wide deployment of private use addresses and the continuing growth of the Internet, traffic on the IN-ADDR.ARPA DNS infrastructure grew and the load due to these junk queries started to cause some concern. Therefore, the idea of offloading IN-ADDR.ARPA queries related to private use addresses was proposed. Following that, the use of anycast for distributing authoritative DNS service for that idea was subsequently proposed at a private meeting of root server operators. And eventually the AS112 service was launched to provide an alternative target for the junk.
The AS112 project is born
To deal with this problem, the Internet community set up special DNS servers called “blackhole servers” as the authoritative name servers that respond to the reverse lookup of the private use address blocks 10.0.0.0/8, 172.16.0.0/12, 192.168.0.0/16 and the link-local address block 169.254.0.0/16 (which also has only local significance). Since the relevant zones are directly delegated to the blackhole servers, this approach has come to be known as Direct Delegation.
The first two blackhole servers set up by the project are: blackhole-1.iana.org and blackhole-2.iana.org.
Any server, including DNS name server, needs an IP address to be reachable. The IP address must also be associated with an Autonomous System Number (ASN) so that networks can recognize other networks and route data packets to the IP address destination. To solve this problem, a new authoritative DNS service would be created but, to make it work, the community would have to designate IP addresses for the servers and, to facilitate their availability, an AS number that network operators could use to reach (or provide) the new service.
The selected AS number (provided by American Registry for Internet Numbers) and namesake of the project, was 112. It was started by a small subset of root server operators, later grown to a group of volunteer name server operators that include many other organizations. They run anycasted instances of the blackhole servers that, together, form a distributed sink for the reverse DNS lookups for private network and link-local addresses sent to the public Internet.
A reverse DNS lookup for a private use address would see responses like in the example below, where the name server blackhole-1.iana.org is authoritative for it and says the name does not exist, represented in DNS responses by NXDOMAIN.
At the beginning of the project, node operators set up the service in the direct delegation fashion (RFC 7534). However, adding delegations to this service requires all AS112 servers to be updated, which is difficult to ensure in a system that is only loosely-coordinated. An alternative approach using DNAME redirection was subsequently introduced by RFC 7535 to allow new zones to be added to the system without reconfiguring the blackhole servers.
Direct delegation
DNS zones are directly delegated to the blackhole servers in this approach.
RFC 7534 defines the static set of reverse lookup zones for which AS112 name servers should answer authoritatively. They are as follows:
10.in-addr-arpa
16.172.in-addr.arpa
17.172.in-addr.arpa
18.172.in-addr.arpa
19.172.in-addr.arpa
20.172.in-addr.arpa
21.172.in-addr.arpa
22.172.in-addr.arpa
23.172.in-addr.arpa
24.172.in-addr.arpa
25.172.in-addr.arpa
26.172.in-addr.arpa
27.172.in-addr.arpa
28.172.in-addr.arpa
29.172.in-addr.arpa
30.172.in-addr.arpa
31.172.in-addr.arpa
168.192.in-addr.arpa
254.169.in-addr.arpa (corresponding to the IPv4 link-local address block)
Zone files for these zones are quite simple because essentially they are empty apart from the required SOA and NS records. A template of the zone file is defined as:
  ; db.dd-empty
   ;
   ; Empty zone for direct delegation AS112 service.
   ;
   $TTL    1W
   @  IN  SOA  prisoner.iana.org. hostmaster.root-servers.org. (
                                  1         ; serial number
                                  1W      ; refresh
                                  1M      ; retry
                                  1W      ; expire
                                  1W )    ; negative caching TTL
   ;
          NS     blackhole-1.iana.org.
          NS     blackhole-2.iana.org.
IP addresses of the direct delegation name servers are covered by the single IPv4 prefix 192.175.48.0/24 and the IPv6 prefix 2620:4f:8000::/48.
Name server
IPv4 address
IPv6 address
blackhole-1.iana.org
192.175.48.6
2620:4f:8000::6
blackhole-2.iana.org
192.175.48.42
2620:4f:8000::42
DNAME redirection
Firstly, what is DNAME? Introduced by RFC 6672, a DNAME record or Delegation Name Record creates an alias for an entire subtree of the domain name tree. In contrast, the CNAME record creates an alias for a single name and not its subdomains. For a received DNS query, the DNAME record instructs the name server to substitute all those appearing in the left hand (owner name) with the right hand (alias name). The substituted query name, like the CNAME, may live within the zone or may live outside the zone.
Like the CNAME record, the DNS lookup will continue by retrying the lookup with the substituted name. For example, if there are two DNS zone as follows:
# zone: example.com
www.example.com.	A		203.0.113.1
foo.example.com.	DNAME	example.net.

# zone: example.net
example.net.		A		203.0.113.2
bar.example.net.	A		203.0.113.3
The query resolution scenarios would look like this:
Query (Type + Name)
Substitution
Final result
A www.example.com
(no DNAME, don’t apply)
203.0.113.1
DNAME foo.example.com
(don’t apply to the owner name itself)
example.net
A foo.example.com
(don’t apply to the owner name itself)
<NXDOMAIN>
A bar.foo.example.com
bar.example.net
203.0.113.2
RFC 7535 specifies adding another special zone, empty.as112.arpa, to support DNAME redirection for AS112 nodes. When there are new zones to be added, there is no need for AS112 node operators to update their configuration: instead, the zones’ parents will set up DNAME records for the new domains with the target domain empty.as112.arpa. The redirection (which can be cached and reused) causes clients to send future queries to the blackhole server that is authoritative for the target zone.
Note that blackhole servers do not have to support DNAME records themselves, but they do need to configure the new zone to which root servers will redirect queries at. Considering there may be existing node operators that do not update their name server configuration for some reasons and in order to not cause interruption to the service, the zone was delegated to a new blackhole server instead – blackhole.as112.arpa.
This name server uses a new pair of IPv4 and IPv6 addresses, 192.31.196.1 and 2001:4:112::1, so queries involving DNAME redirection will only land on those nodes operated by entities that also set up the new name server. Since it is not necessary for all AS112 participants to reconfigure their servers to serve empty.as112.arpa from this new server for this system to work, it is compatible with the loose coordination of the system as a whole.
The zone file for empty.as112.arpa is defined as:
   ; db.dr-empty
   ;
   ; Empty zone for DNAME redirection AS112 service.
   ;
   $TTL    1W
   @  IN  SOA  blackhole.as112.arpa. noc.dns.icann.org. (
                                  1         ; serial number
                                  1W      ; refresh
                                  1M      ; retry
                                  1W      ; expire
                                  1W )    ; negative caching TTL
   ;
          NS     blackhole.as112.arpa.
The addresses of the new DNAME redirection name server are covered by the single IPv4 prefix 192.31.196.0/24 and the IPv6 prefix 2001:4:112::/48.
Name server
IPv4 address
IPv6 address
blackhole.as112.arpa
192.31.196.1
2001:4:112::1
Node identification
RFC 7534 recommends every AS112 node also to host the following metadata zones as well: hostname.as112.net and hostname.as112.arpa.
These zones only host TXT records and serve as identifiers for querying metadata information about an AS112 node. At Cloudflare nodes, the zone files look like this:
$ORIGIN hostname.as112.net.
;
$TTL    604800
;
@       IN  SOA     ns3.cloudflare.com. dns.cloudflare.com. (
                       1                ; serial number
                       604800           ; refresh
                       60               ; retry
                       604800           ; expire
                       604800 )         ; negative caching TTL
;
            NS      blackhole-1.iana.org.
            NS      blackhole-2.iana.org.
;
            TXT     "Cloudflare DNS, <DATA_CENTER_AIRPORT_CODE>"
            TXT     "See http://www.as112.net/ for more information."
;

$ORIGIN hostname.as112.arpa.
;
$TTL    604800
;
@       IN  SOA     ns3.cloudflare.com. dns.cloudflare.com. (
                       1                ; serial number
                       604800           ; refresh
                       60               ; retry
                       604800           ; expire
                       604800 )         ; negative caching TTL
;
            NS      blackhole.as112.arpa.
;
            TXT     "Cloudflare DNS, <DATA_CENTER_AIRPORT_CODE>"
            TXT     "See http://www.as112.net/ for more information."
;
Helping AS112 helps the Internet
As the AS112 project helps reduce the load on public DNS infrastructure, it plays a vital role in maintaining the stability and efficiency of the Internet. Being a part of this project aligns with Cloudflare’s mission to help build a better Internet.
Cloudflare is one of the fastest global anycast networks on the planet, and operates one of the largest, highly performant and reliable DNS services. We run authoritative DNS for millions of Internet properties globally. We also operate the privacy- and performance-focused public DNS resolver 1.1.1.1 service. Given our network presence and scale of operations, we believe we can make a meaningful contribution to the AS112 project.
How we built it
We’ve publicly talked about the Cloudflare in-house built authoritative DNS server software, rrDNS, several times in the past, but haven’t talked much about the software we built to power the Cloudflare public resolver – 1.1.1.1. This is an opportunity to shed some light on the technology we used to build 1.1.1.1, because this AS112 service is built on top of the same platform.
A platform for DNS workloads
We’ve created a platform to run DNS workloads. Today, it powers 1.1.1.1, 1.1.1.1 for Families, Oblivious DNS over HTTPS (ODoH), Cloudflare WARP and Cloudflare Gateway.
The core part of the platform is a non-traditional DNS server, which has a built-in DNS recursive resolver and a forwarder to forward queries to other servers. It consists of four key modules:
A highly efficient listener module that accepts connections for incoming requests.
A query router module that decides how a query should be resolved.
A conductor module that figures out the best way of exchanging DNS messages with upstream servers.
A sandbox environment to host guest applications.
The DNS server itself doesn’t include any business logic, instead the guest applications run in the sandbox environment can implement concrete business logic such as request filtering, query processing, logging, attack mitigation, cache purging, etc.
The server is written in Rust and the sandbox environment is built on top of a WebAssembly runtime. The combination of Rust and WebAssembly allow us to implement high efficient connection handling, request filtering and query dispatching modules, while having the flexibility of implementing custom business logic in a safe and efficient manner.
The host exposes a set of APIs, called hostcalls, for the guest applications to accomplish a variety of tasks. You can think of them like syscalls on Linux. Here are few examples functions provided by the hostcalls:
Obtain the current UNIX timestamp
Lookup geolocation data of IP addresses
Spawn async tasks
Create local sockets
Forward DNS queries to designated servers
Register callback functions of the sandbox hooks
Read current request information, and write responses
Emit application logs, metric data points and tracing spans/events
The DNS request lifecycle is broken down into phases. A request phase is a point in processing at which sandboxed apps can be called to change the course of request resolution. And each guest application can register callbacks for each phase.
AS112 guest application
The AS112 service is built as a guest application written in Rust and compiled to WebAssembly. The zones listed in RFC 7534 and RFC 7535 are loaded as static zones in memory and indexed as a tree data structure. Incoming queries are answered locally by looking up entries in the zone tree.
A router setting in the app manifest is added to tell the host what kind of DNS queries should be processed by the guest application, and a fallback_action setting is added to declare the expected fallback behavior.
# Declare what kind of queries the app handles.
router = [
    # The app is responsible for all the AS112 IP prefixes.
    "dst in { 192.31.196.0/24 192.175.48.0/24 2001:4:112::/48 2620:4f:8000::/48 }",
]

# If the app fails to handle the query, servfail should be returned.
fallback_action = "fail"
The guest application, along with its manifest, is then compiled and deployed through a deployment pipeline that leverages Quicksilver to store and replicate the assets worldwide.
The guest application is now up and running, but how does the DNS query traffic destined to the new IP prefixes reach the DNS server? Do we have to restart the DNS server every time we add a new guest application? Of course there is no need. We use software we developed and deployed earlier, called Tubular. It allows us to change the addresses of a service on the fly. With the help of Tubular, incoming packets destined to the AS112 service IP prefixes are dispatched to the right DNS server process without the need to make any change or release of the DNS server itself.
Meanwhile, in order to make the misdirected DNS queries land on the Cloudflare network in the first place, we use BYOIP (Bringing Your Own IPs to Cloudflare), a Cloudflare product that can announce customer’s own IP prefixes in all our locations. The four AS112 IP prefixes are boarded onto the BYOIP system, and will be announced by it globally.
Testing
How can we ensure the service we set up does the right thing before we announce it to the public Internet? 1.1.1.1 processes more than 13 billion of these misdirected queries every day, and it has logic in place to directly return NXDOMAIN for them locally, which is a recommended practice per RFC 7534.
However, we are able to use a dynamic rule to change how the misdirected queries are handled in Cloudflare testing locations. For example, a rule like following:
phase = post-cache and qtype in { PTR } and colo in { test1 test2 } and qname-suffix in { 10.in-addr.arpa 16.172.in-addr.arpa 17.172.in-addr.arpa 18.172.in-addr.arpa 19.172.in-addr.arpa 20.172.in-addr.arpa 21.172.in-addr.arpa 22.172.in-addr.arpa 23.172.in-addr.arpa 24.172.in-addr.arpa 25.172.in-addr.arpa 26.172.in-addr.arpa 27.172.in-addr.arpa 28.172.in-addr.arpa 29.172.in-addr.arpa 30.172.in-addr.arpa 31.172.in-addr.arpa 168.192.in-addr.arpa 254.169.in-addr.arpa } forward 192.175.48.6:53
The rule instructs that in data center test1 and test2, when the DNS query type is PTR, and the query name ends with those in the list, forward the query to server 192.175.48.6 (one of the AS112 service IPs) on port 53.
Because we’ve provisioned the AS112 IP prefixes in the same node, the new AS112 service will receive the queries and respond to the resolver.
It’s worth mentioning that the above-mentioned dynamic rule that intercepts a query at the post-cache phase, and changes how the query gets processed, is executed by a guest application too, which is named override. This app loads all dynamic rules, parses the DSL texts and registers callback functions at phases declared by each rule. And when an incoming query matches the expressions, it executes the designated actions.
Public reports
We collect the following metrics to generate the public statistics that an AS112 operator is expected to share to the operator community:
Number of queries by query type
Number of queries by response code
Number of queries by protocol
Number of queries by IP versions
Number of queries with EDNS support
Number of queries with DNSSEC support
Number of queries by ASN/Data center
We’ll serve the public statistics page on the Cloudflare Radar website. We are still working on implementing the required backend API and frontend of the page – we’ll share the link to this page once it is available.
What’s next?
We are going to announce the AS112 prefixes starting December 15, 2022.
After the service is launched, you can run a dig command to check if you are hitting an AS112 node operated by Cloudflare, like:
$ dig @blackhole-1.iana.org TXT hostname.as112.arpa +short

"Cloudflare DNS, SFO"
"See http://www.as112.net/ for more information."
The collective thoughts of the interwebz
Manage Consent
To provide the best experiences, we use technologies like cookies to store and/or access device information. Consenting to these technologies will allow us to process data such as browsing behavior or unique IDs on this site. Not consenting or withdrawing consent, may adversely affect certain features and functions.
Functional
Always active
The technical storage or access is strictly necessary for the legitimate purpose of enabling the use of a specific service explicitly requested by the subscriber or user, or for the sole purpose of carrying out the transmission of a communication over an electronic communications network.
Preferences
The technical storage or access is necessary for the legitimate purpose of storing preferences that are not requested by the subscriber or user.
Statistics
The technical storage or access that is used exclusively for statistical purposes.The technical storage or access that is used exclusively for anonymous statistical purposes. Without a subpoena, voluntary compliance on the part of your Internet Service Provider, or additional records from a third party, information stored or retrieved for this purpose alone cannot usually be used to identify you.
Marketing
The technical storage or access is required to create user profiles to send advertising, or to track the user on a website or across several websites for similar marketing purposes.


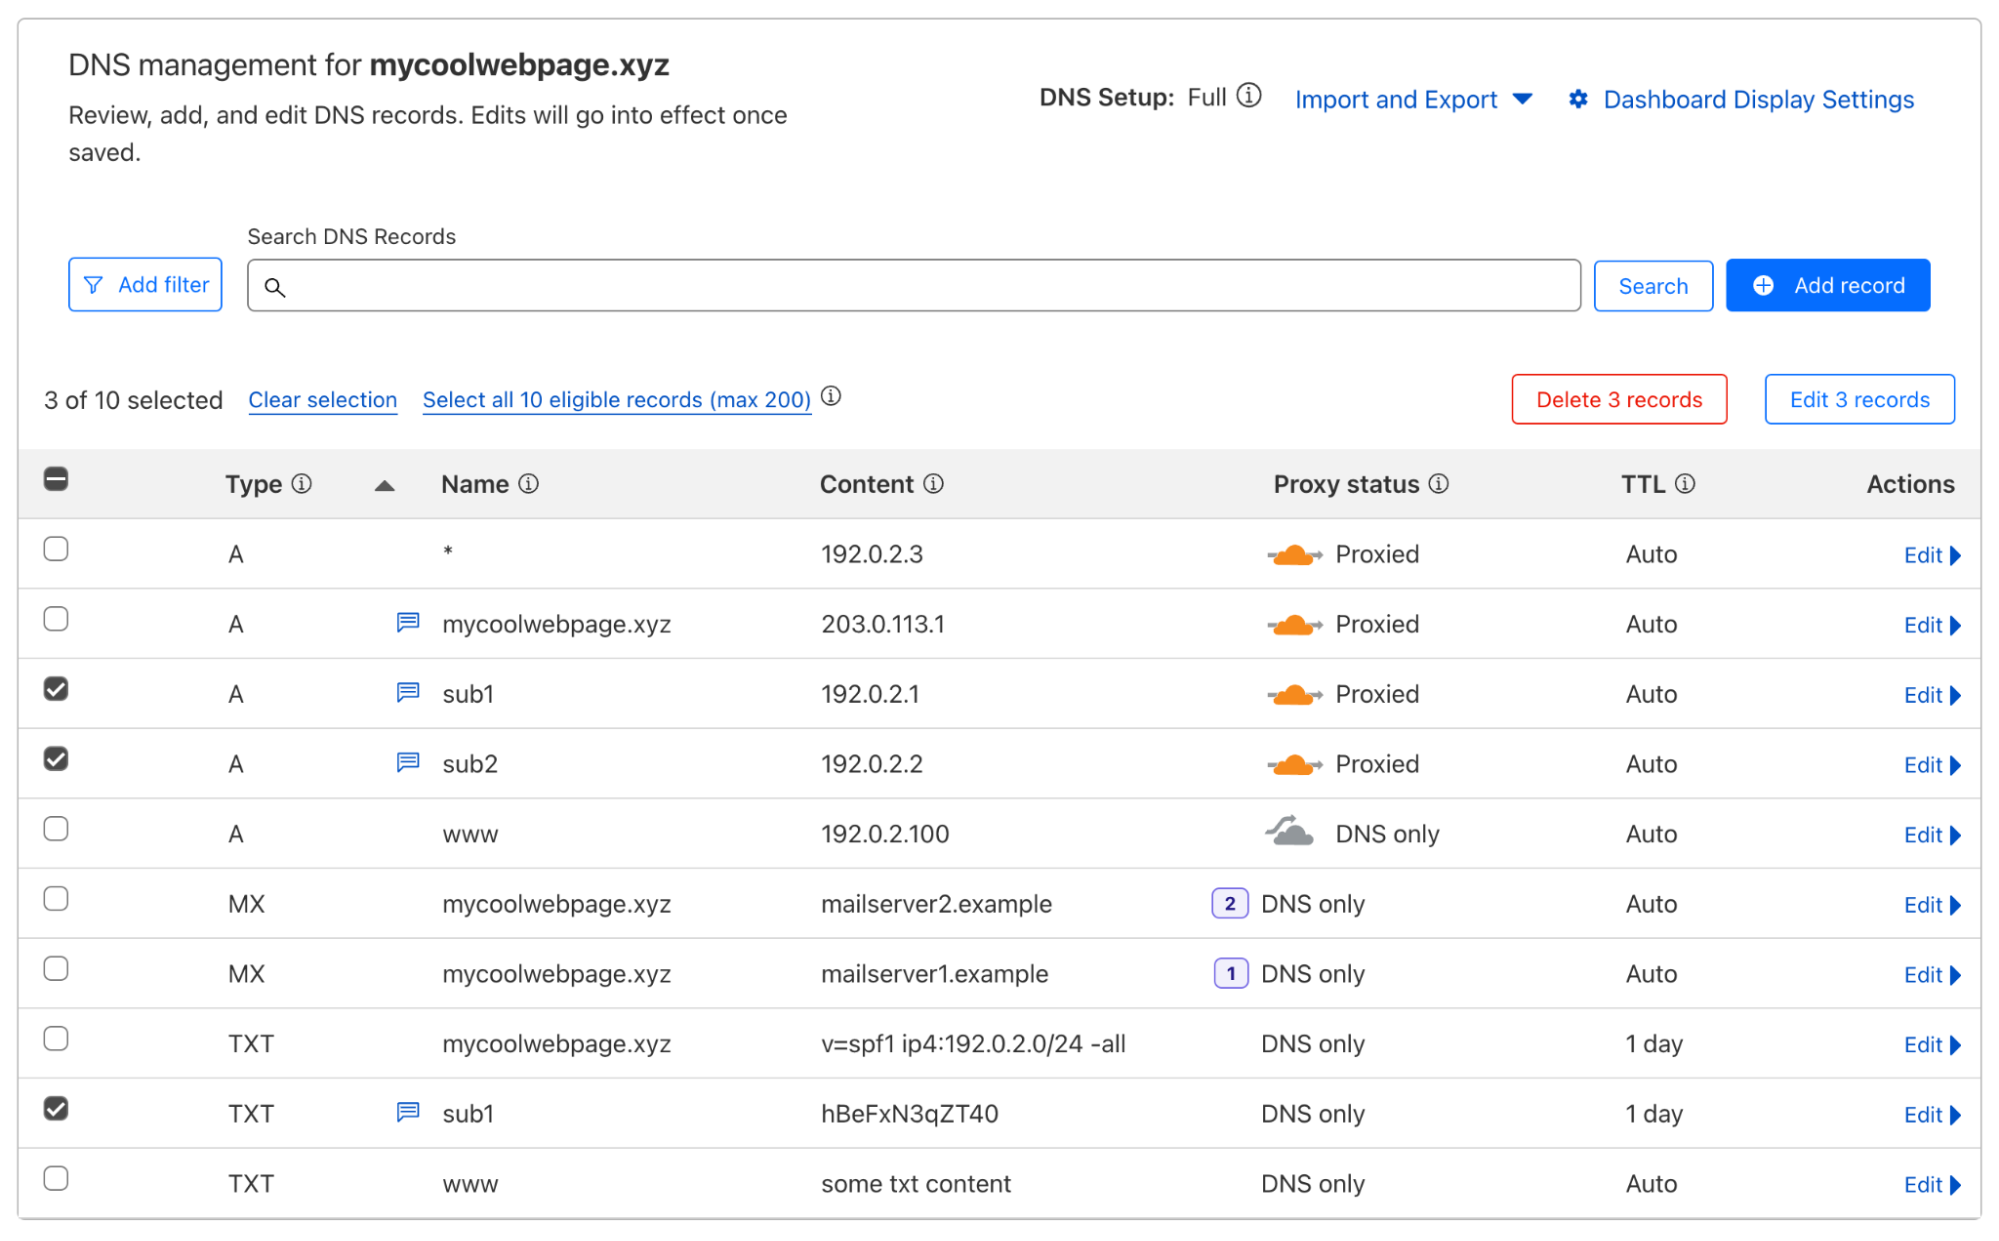


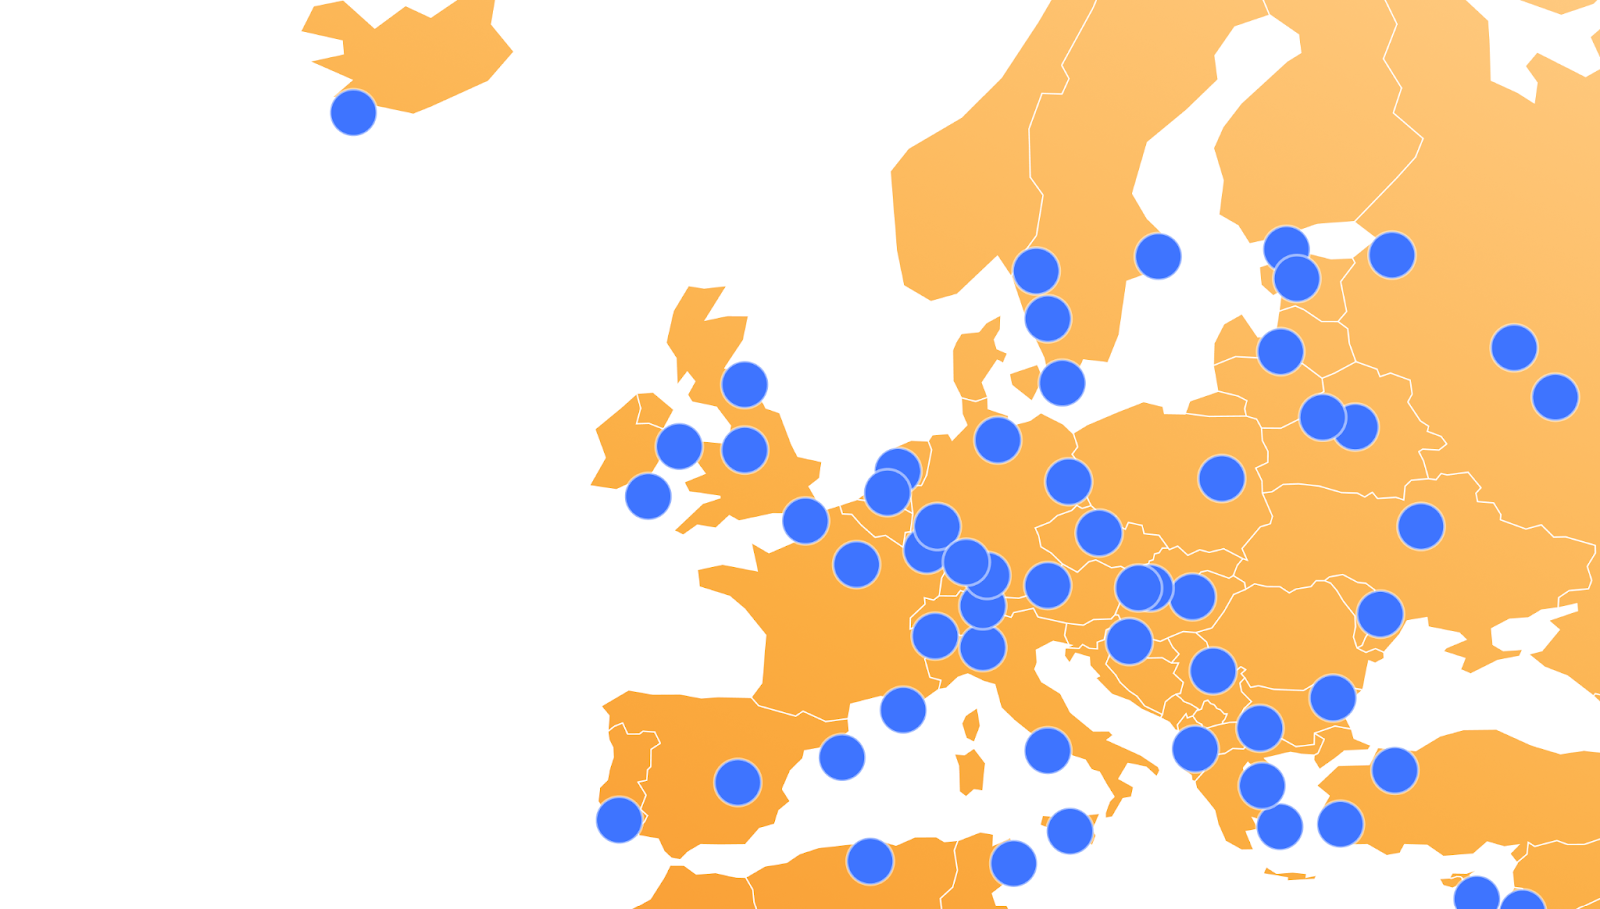
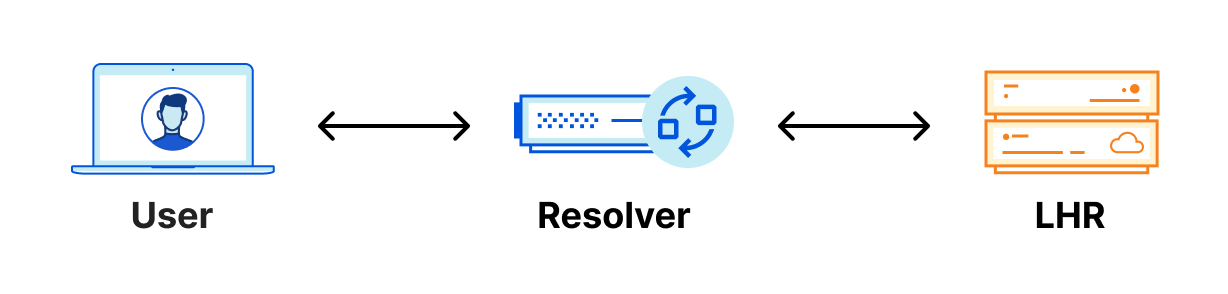
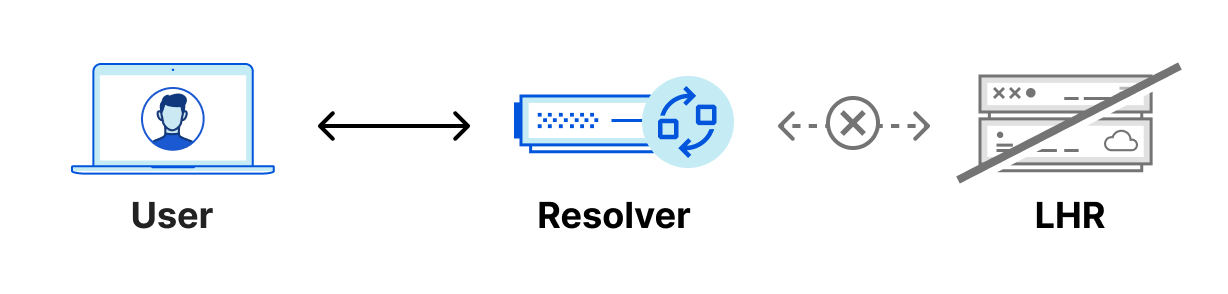

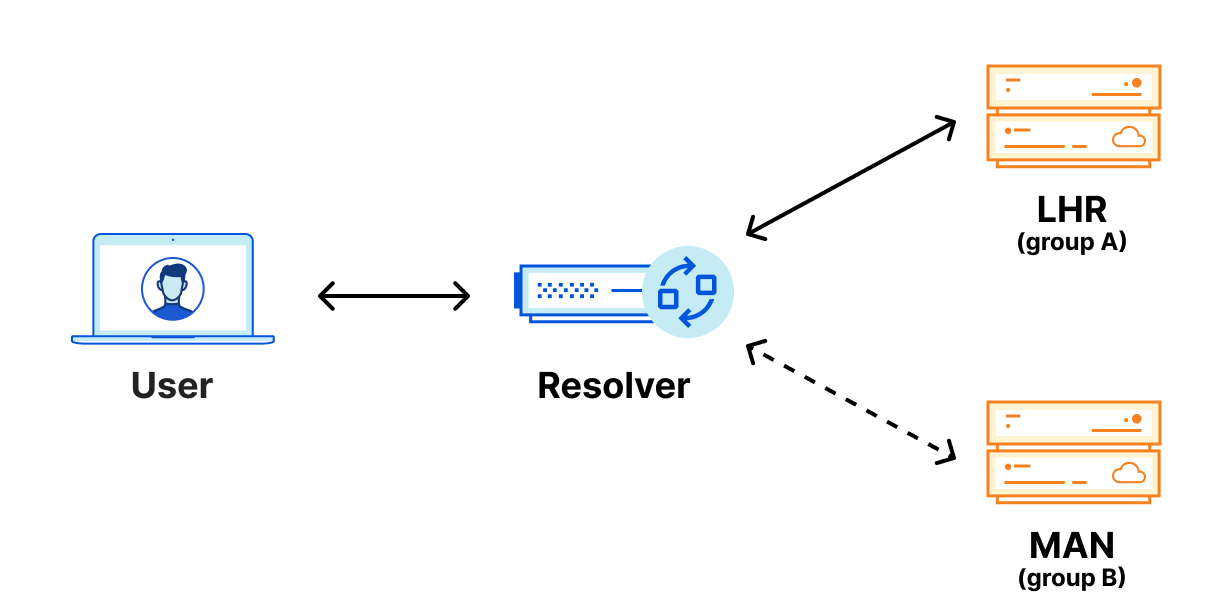
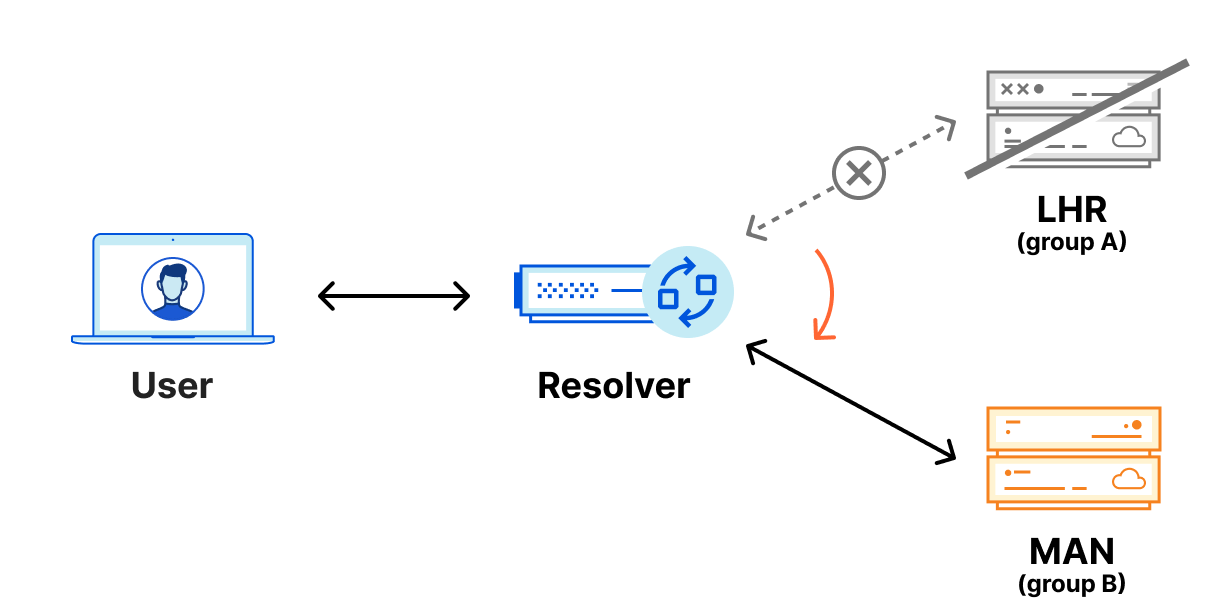
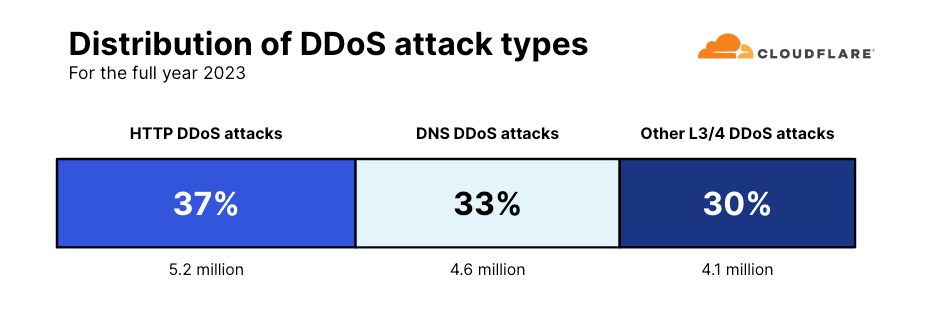
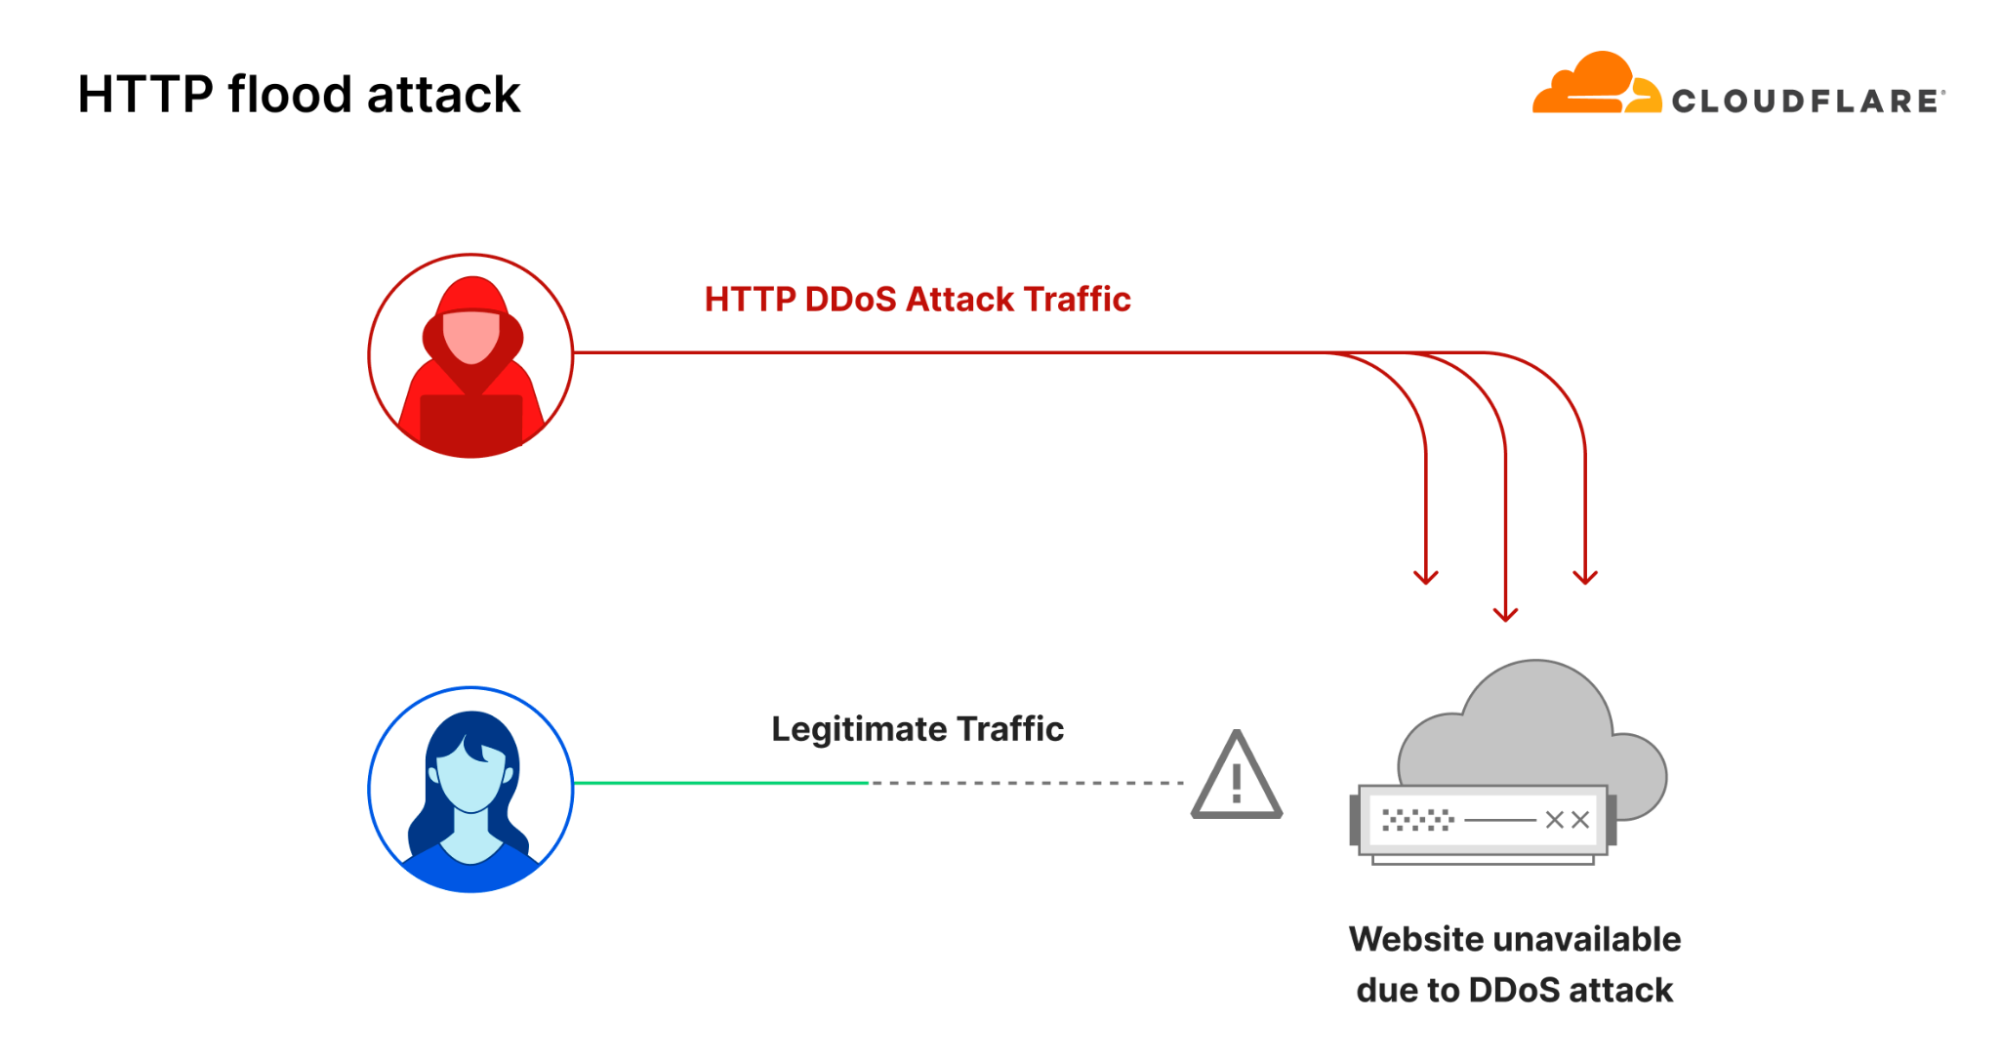
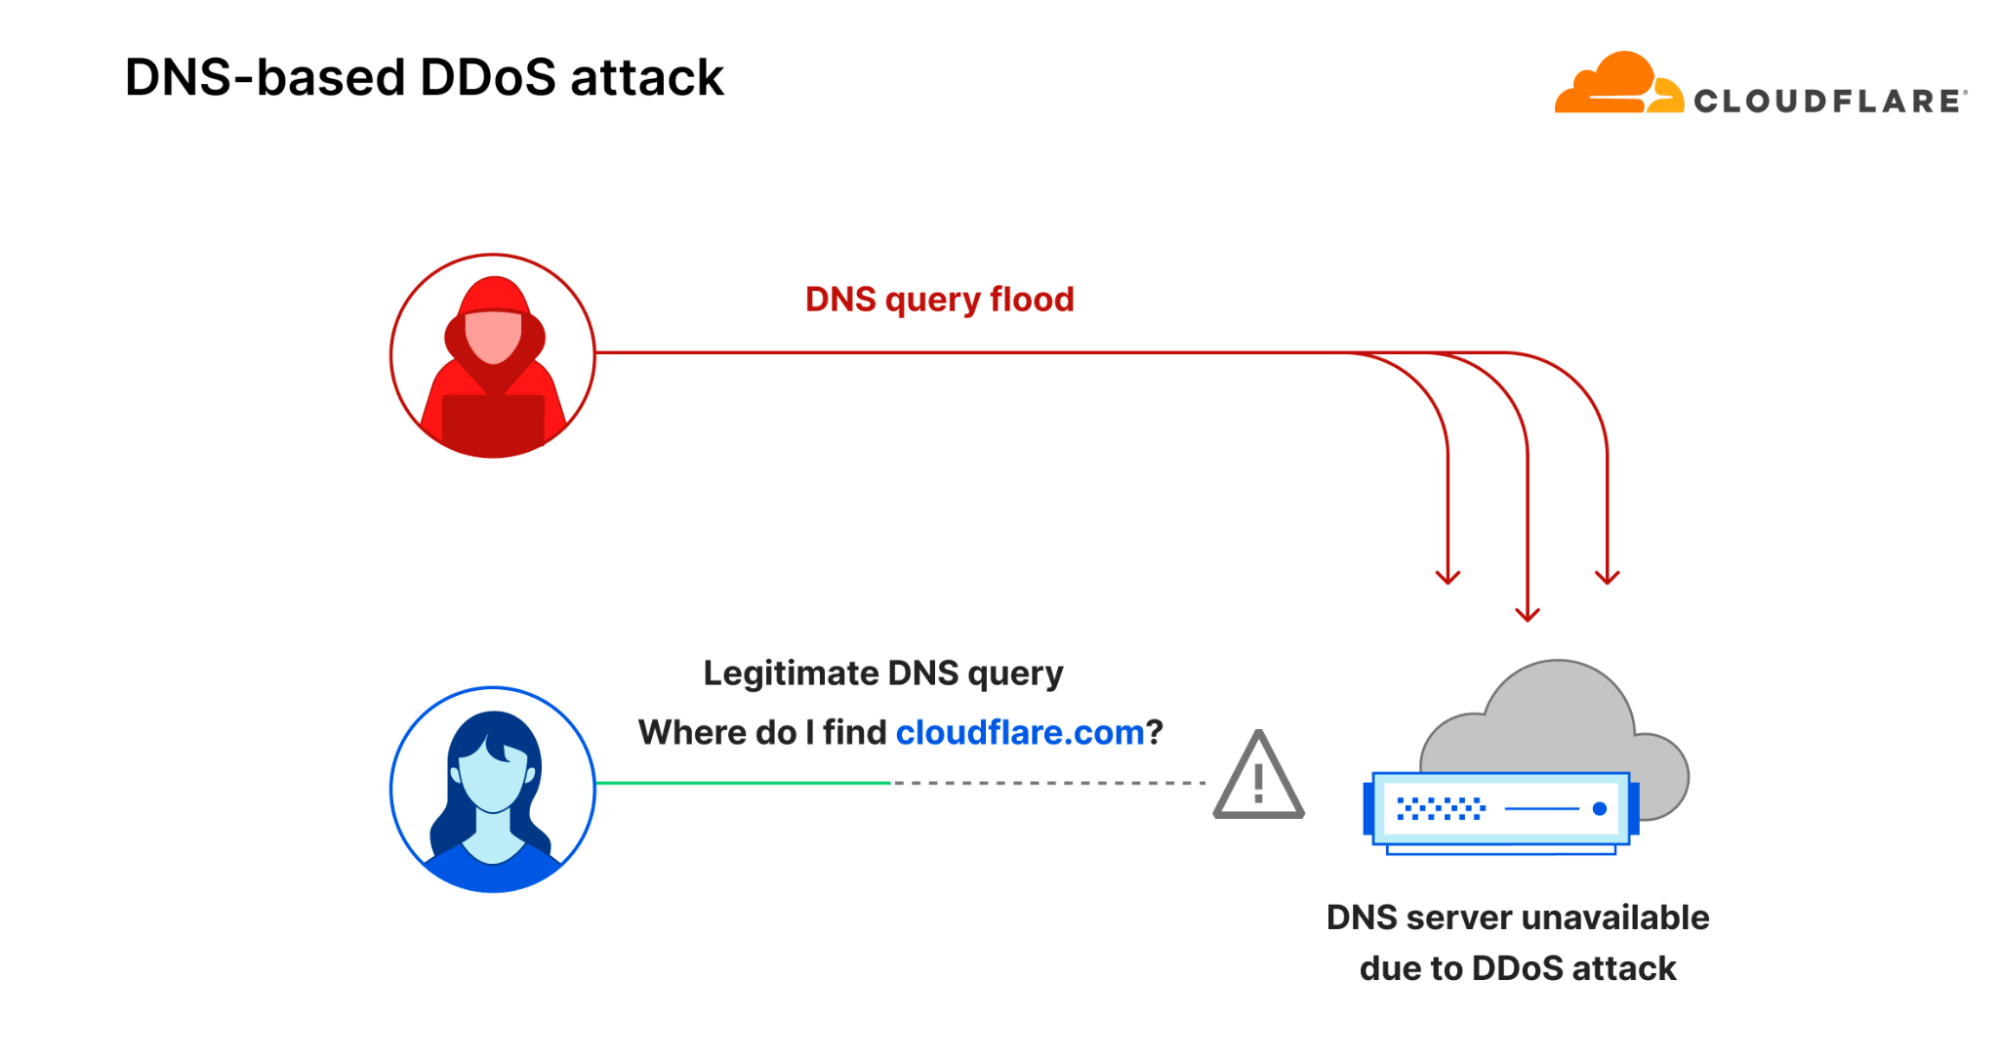
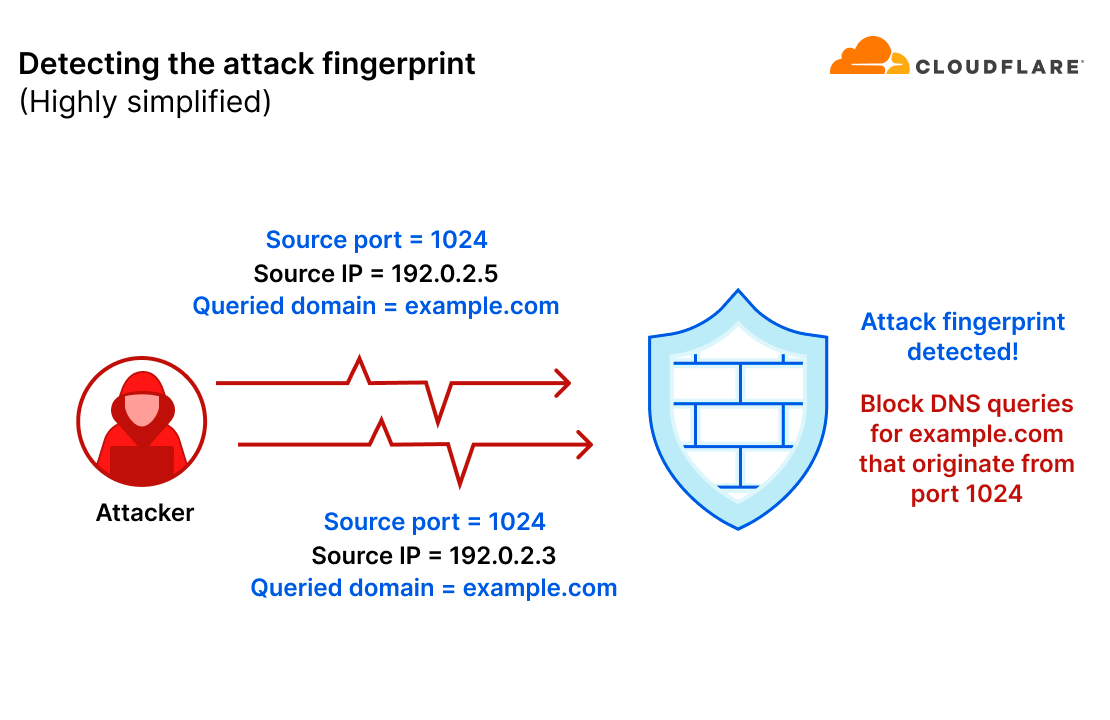
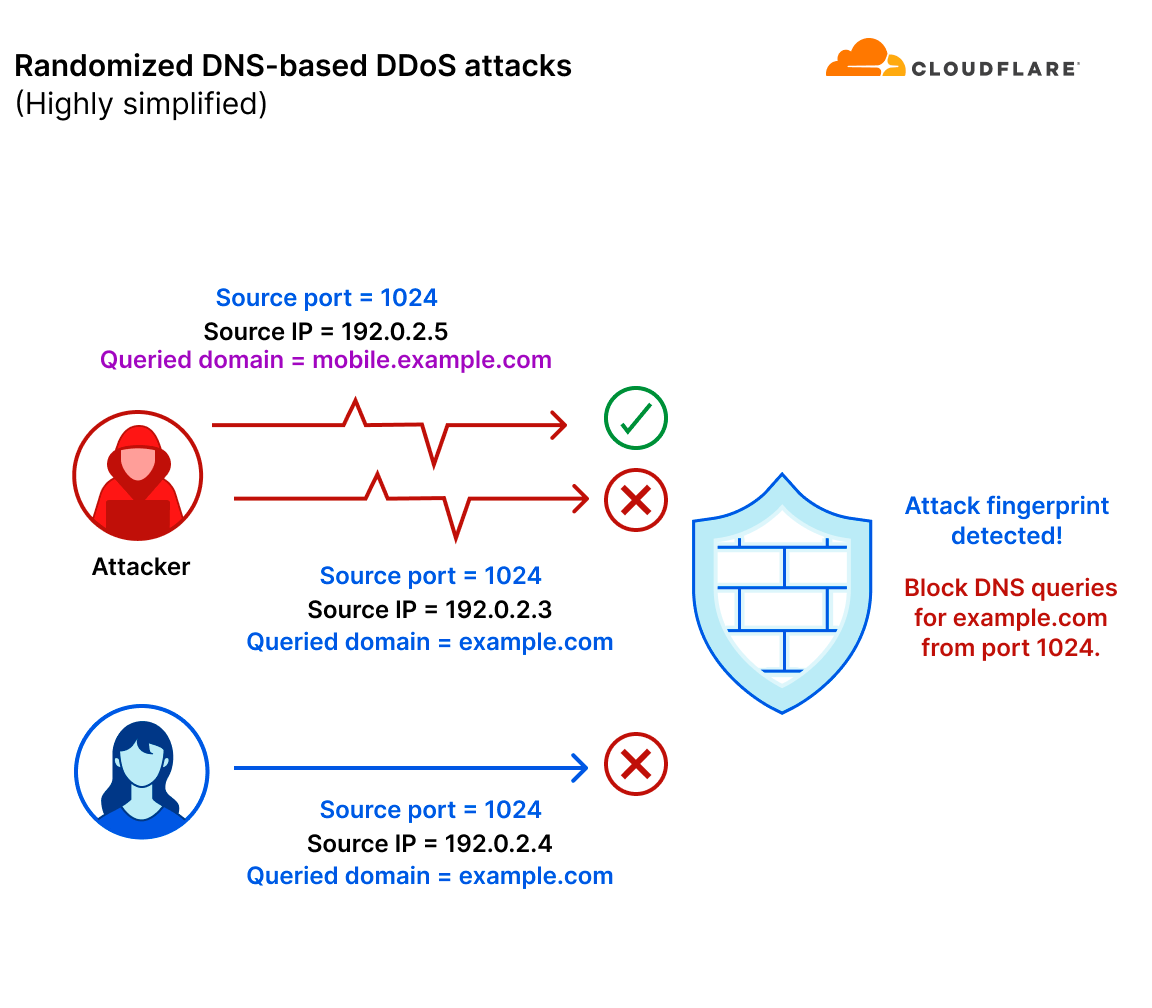
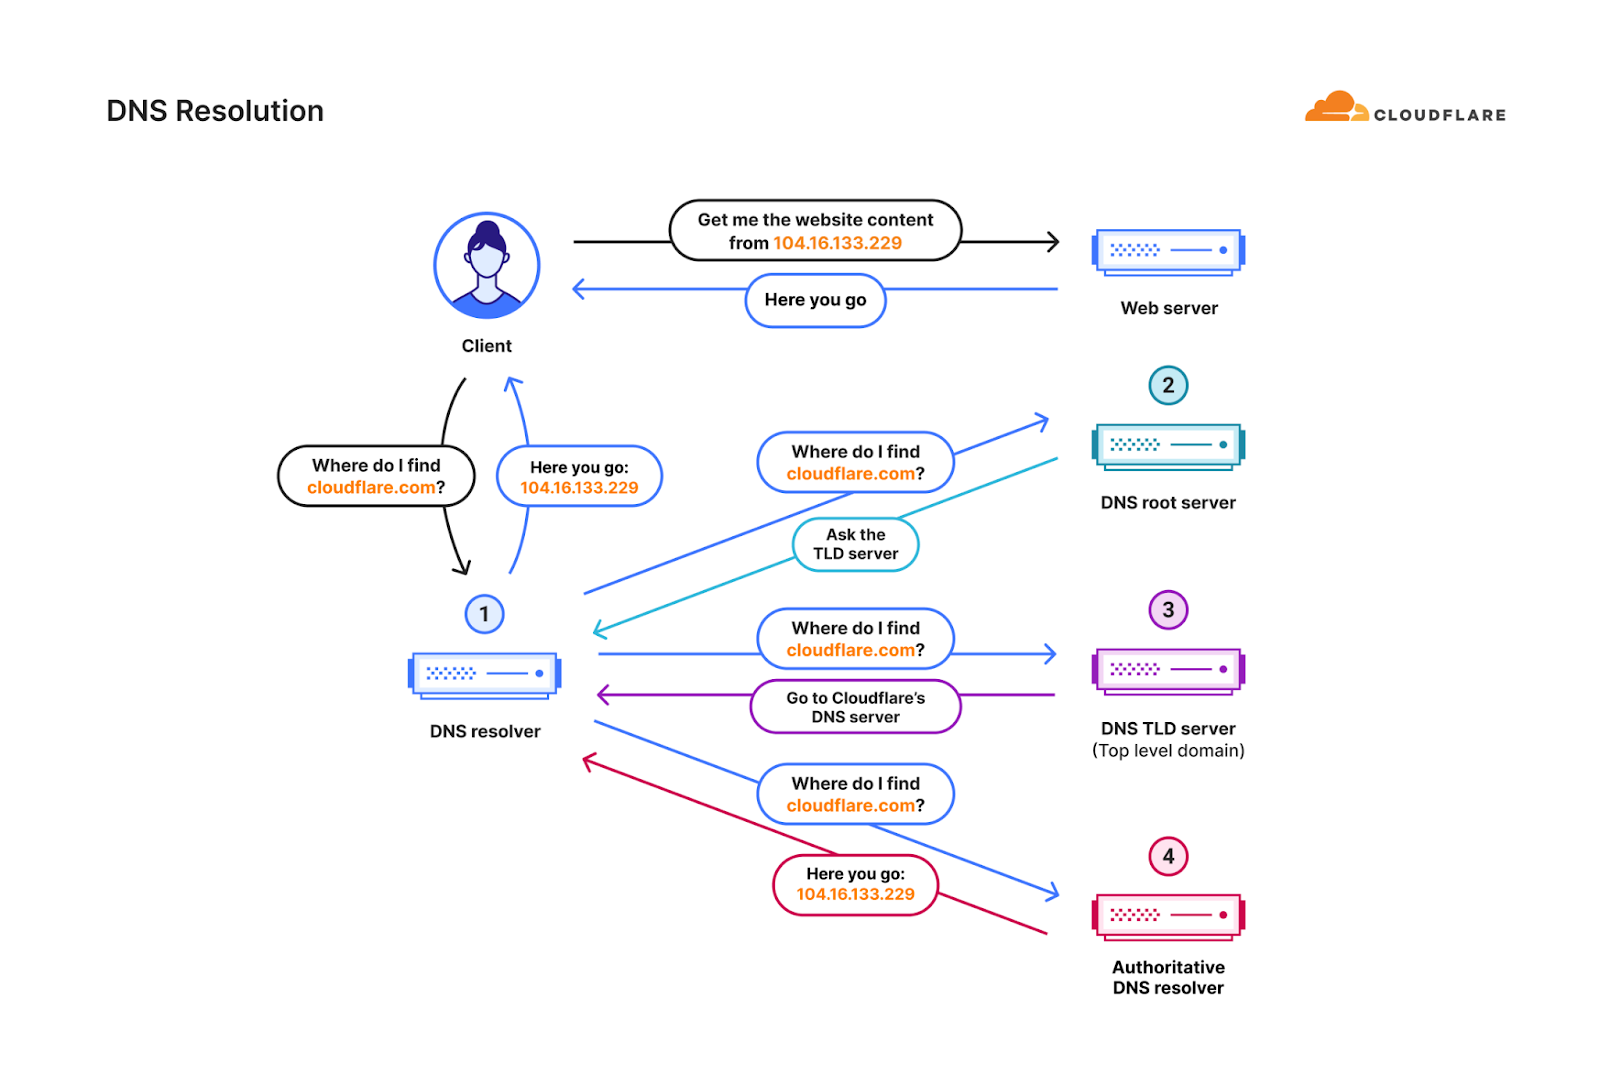
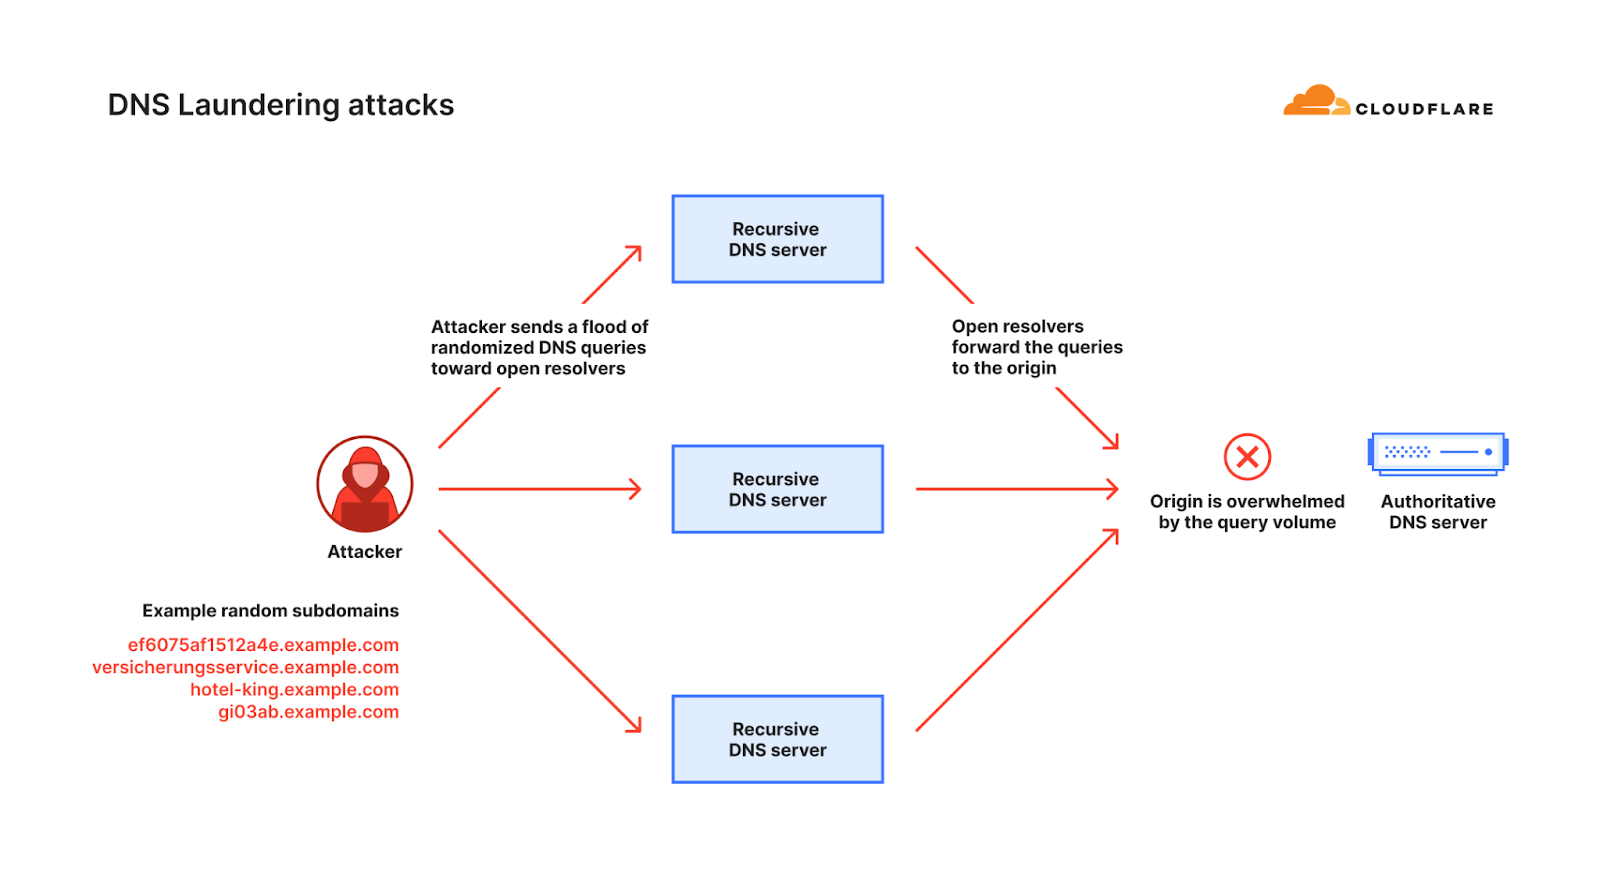
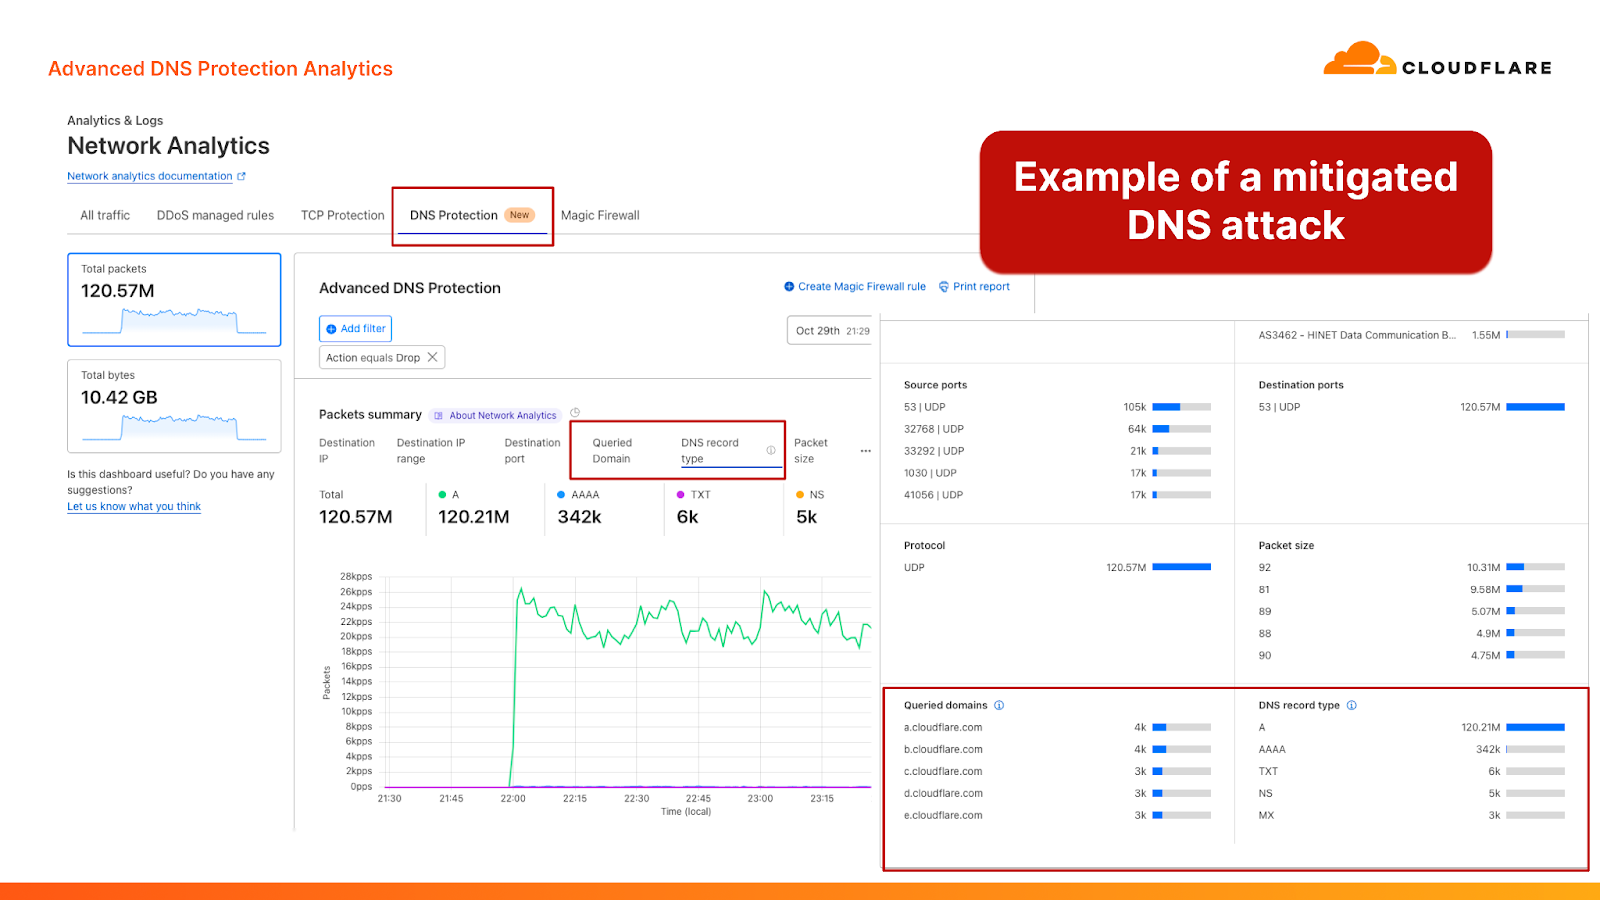
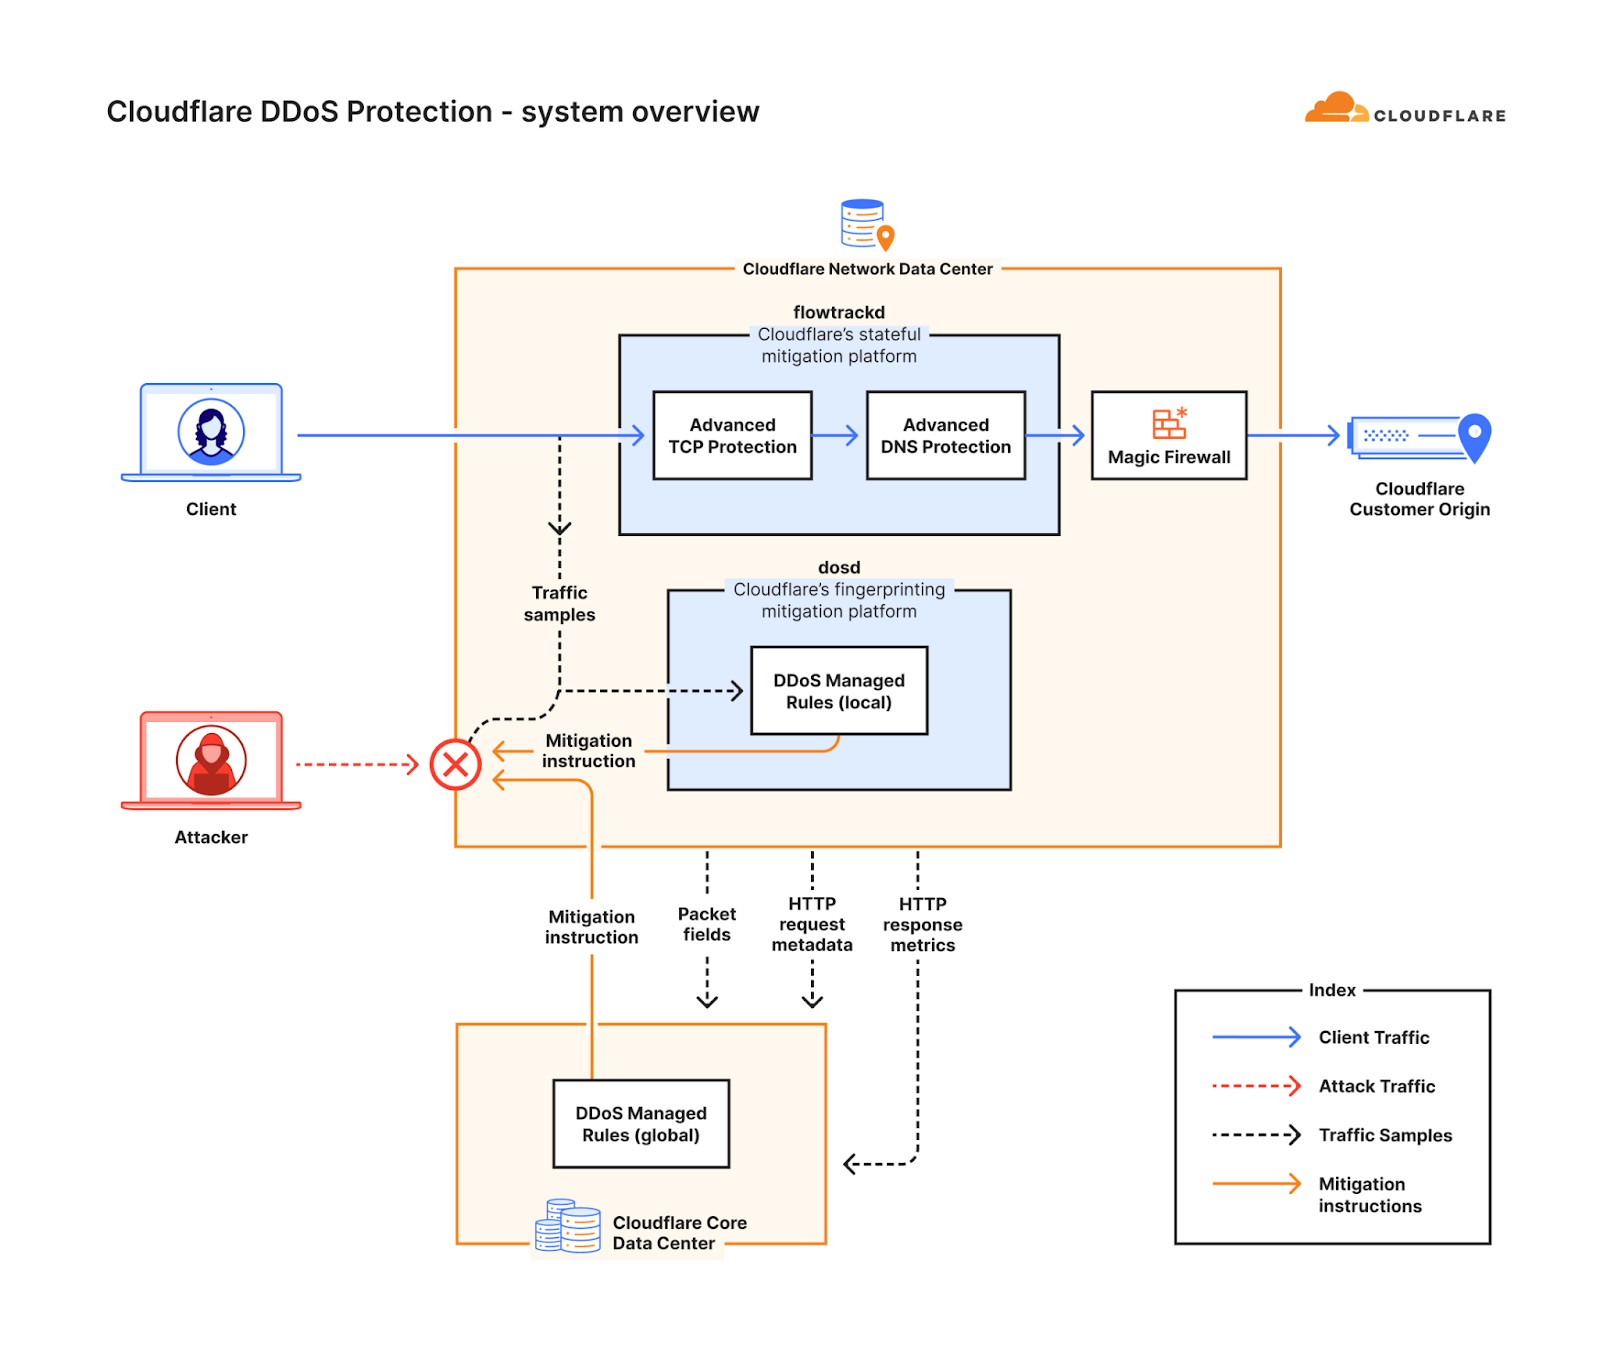
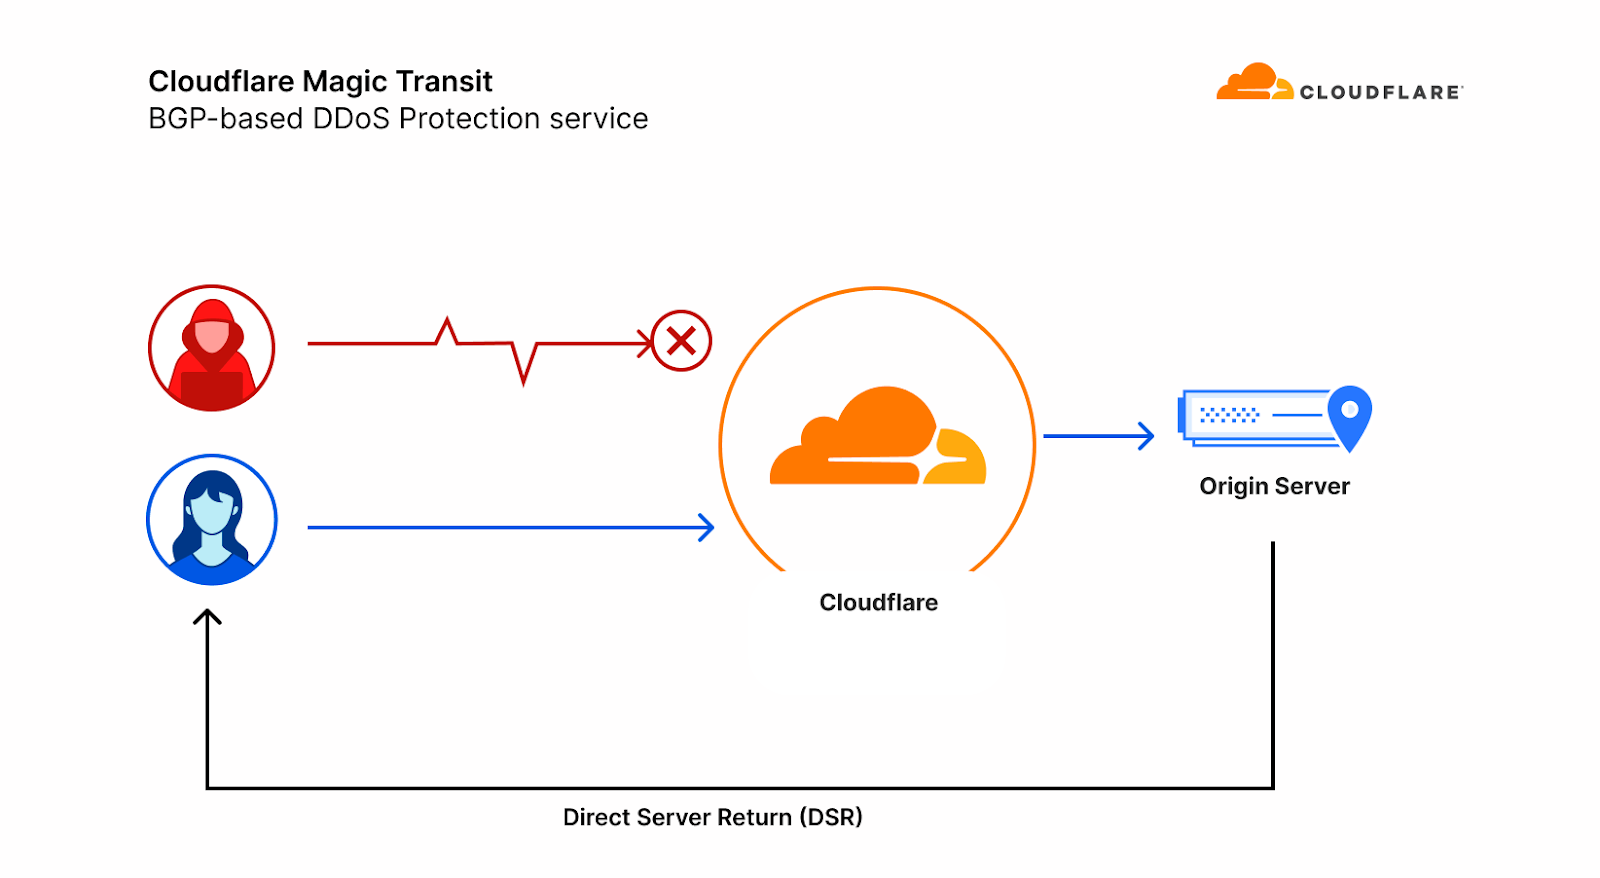
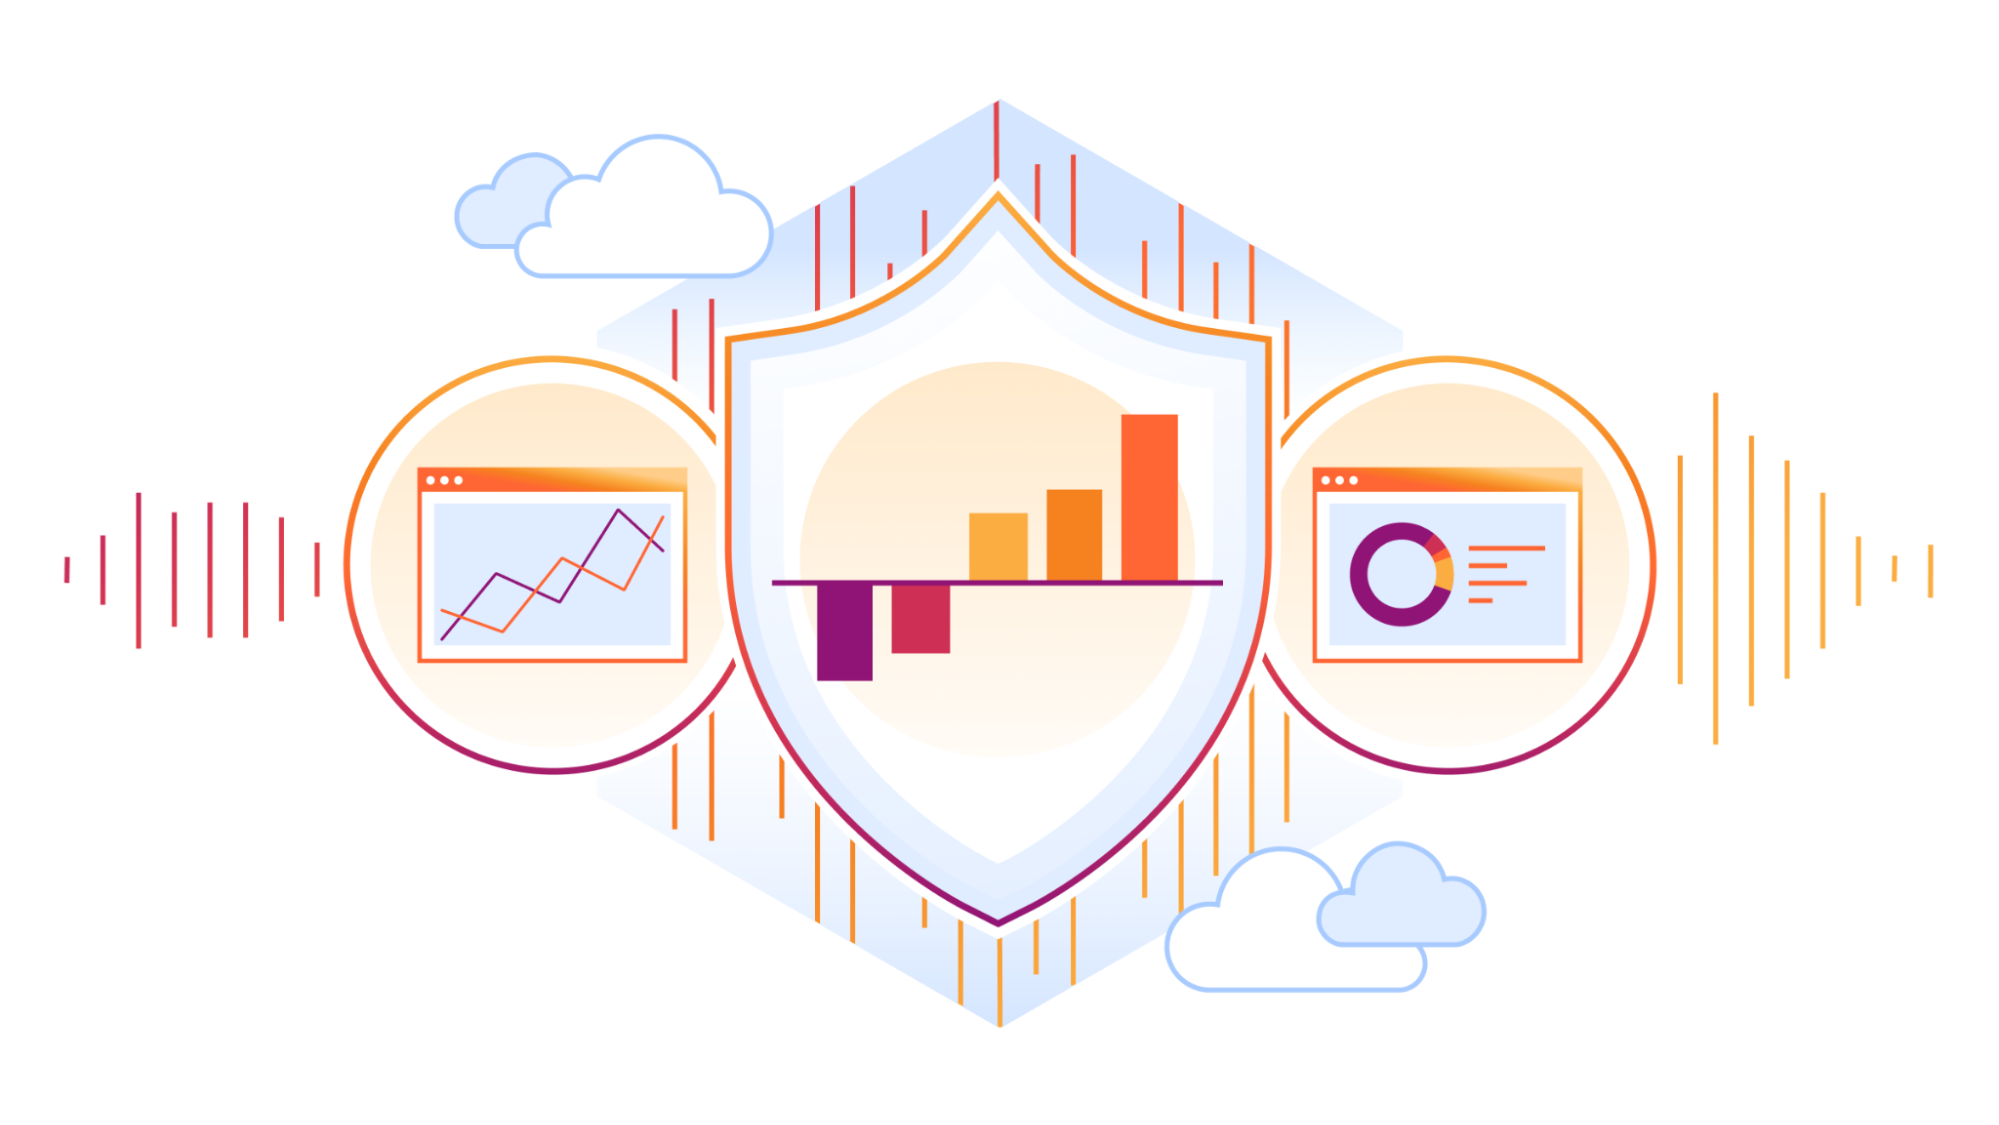
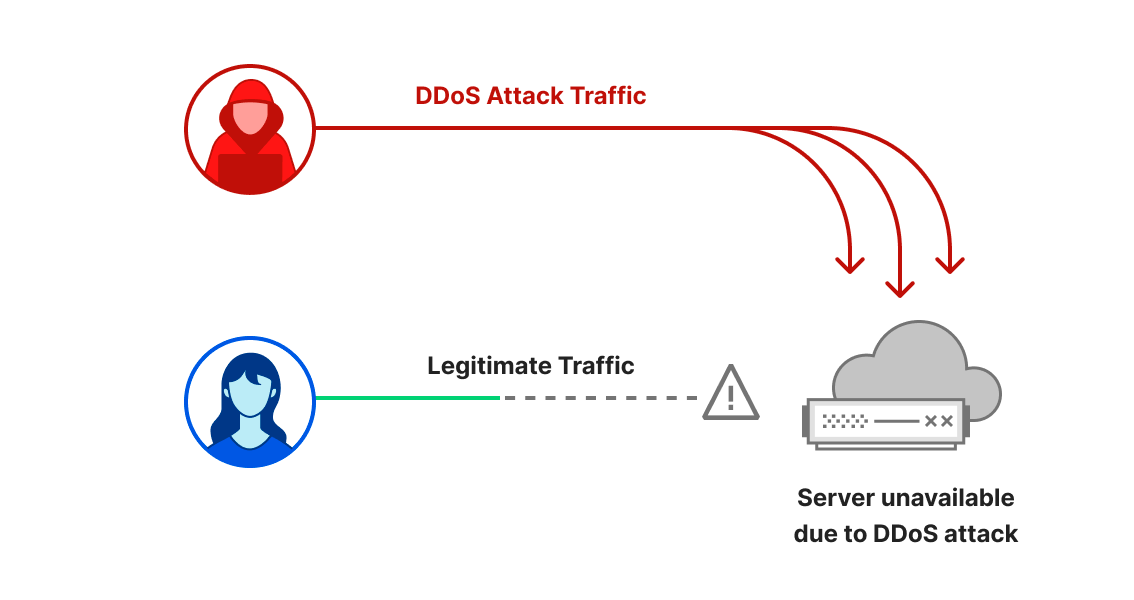
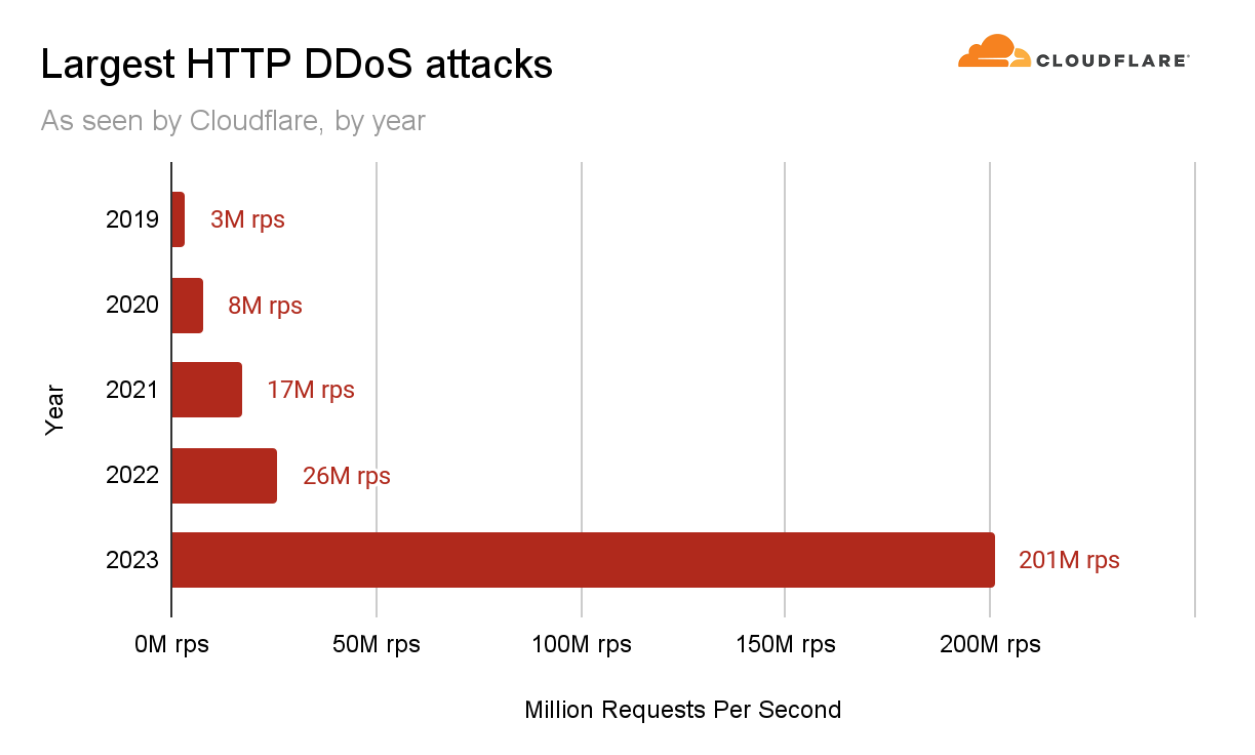
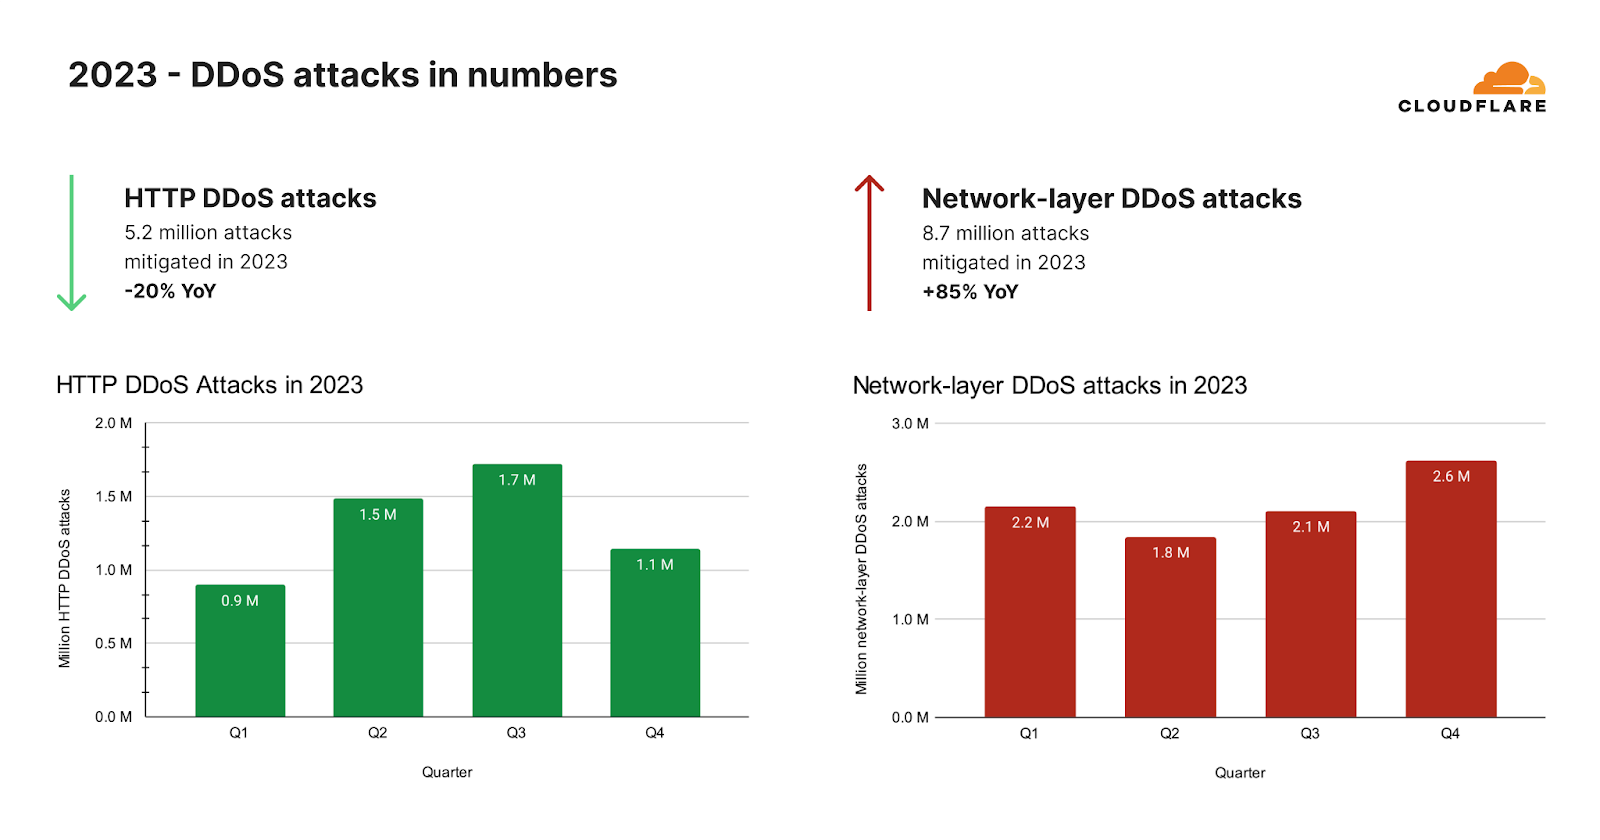
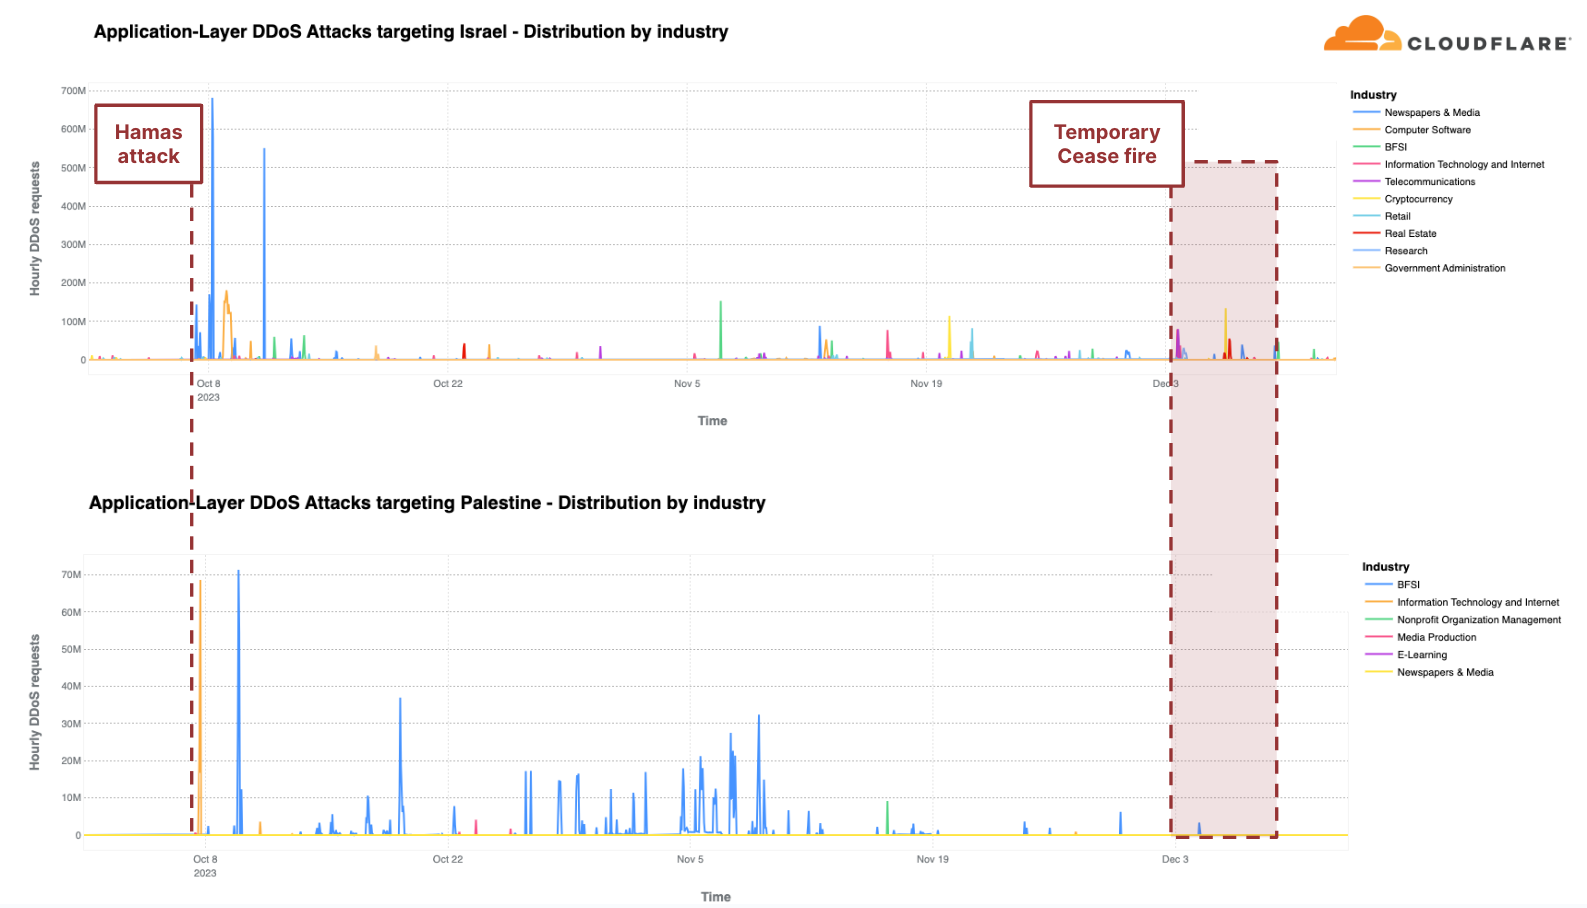
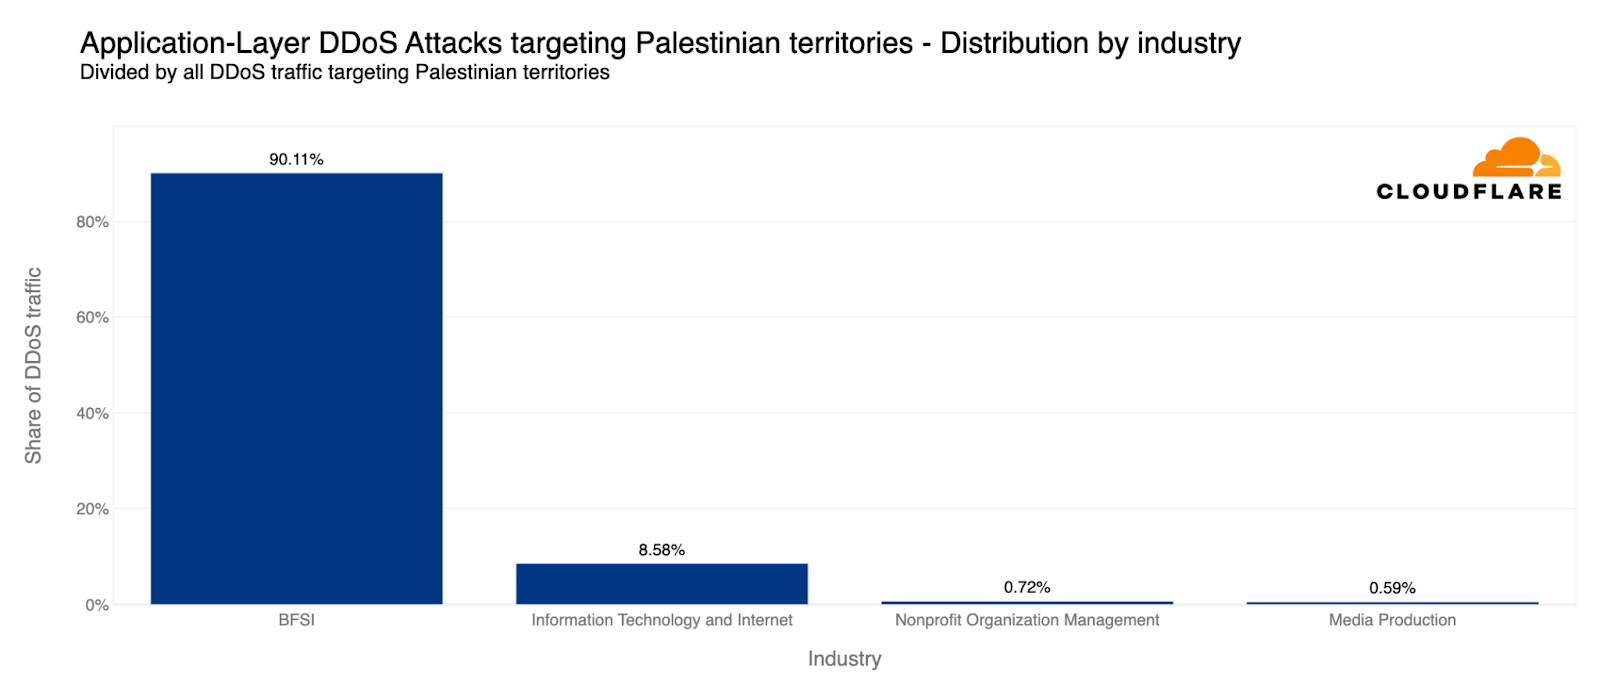
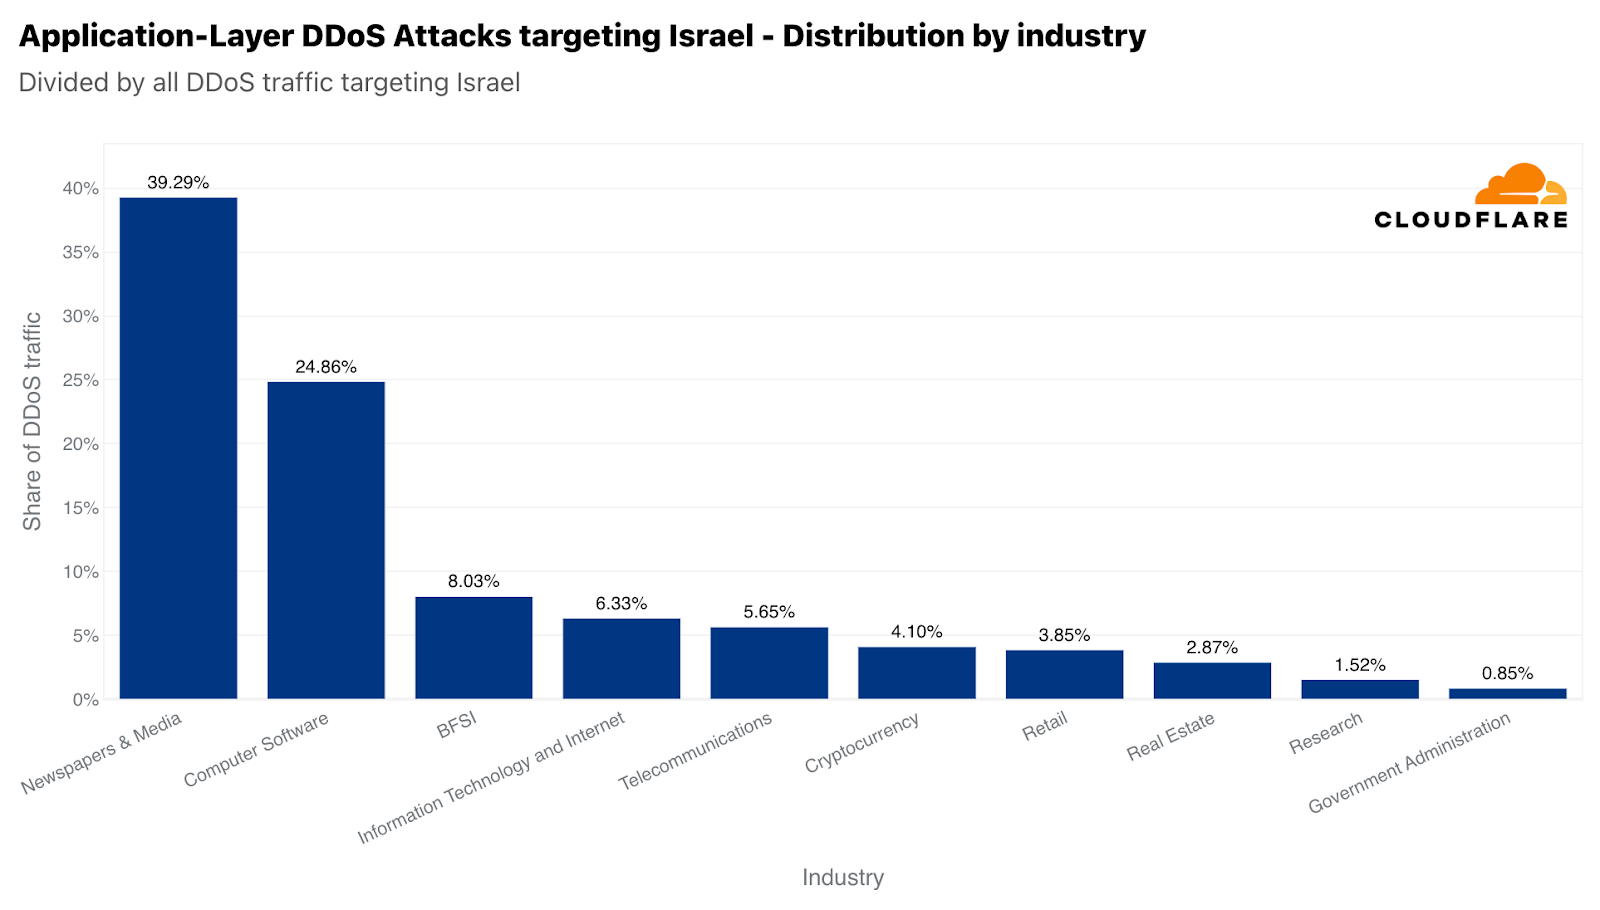
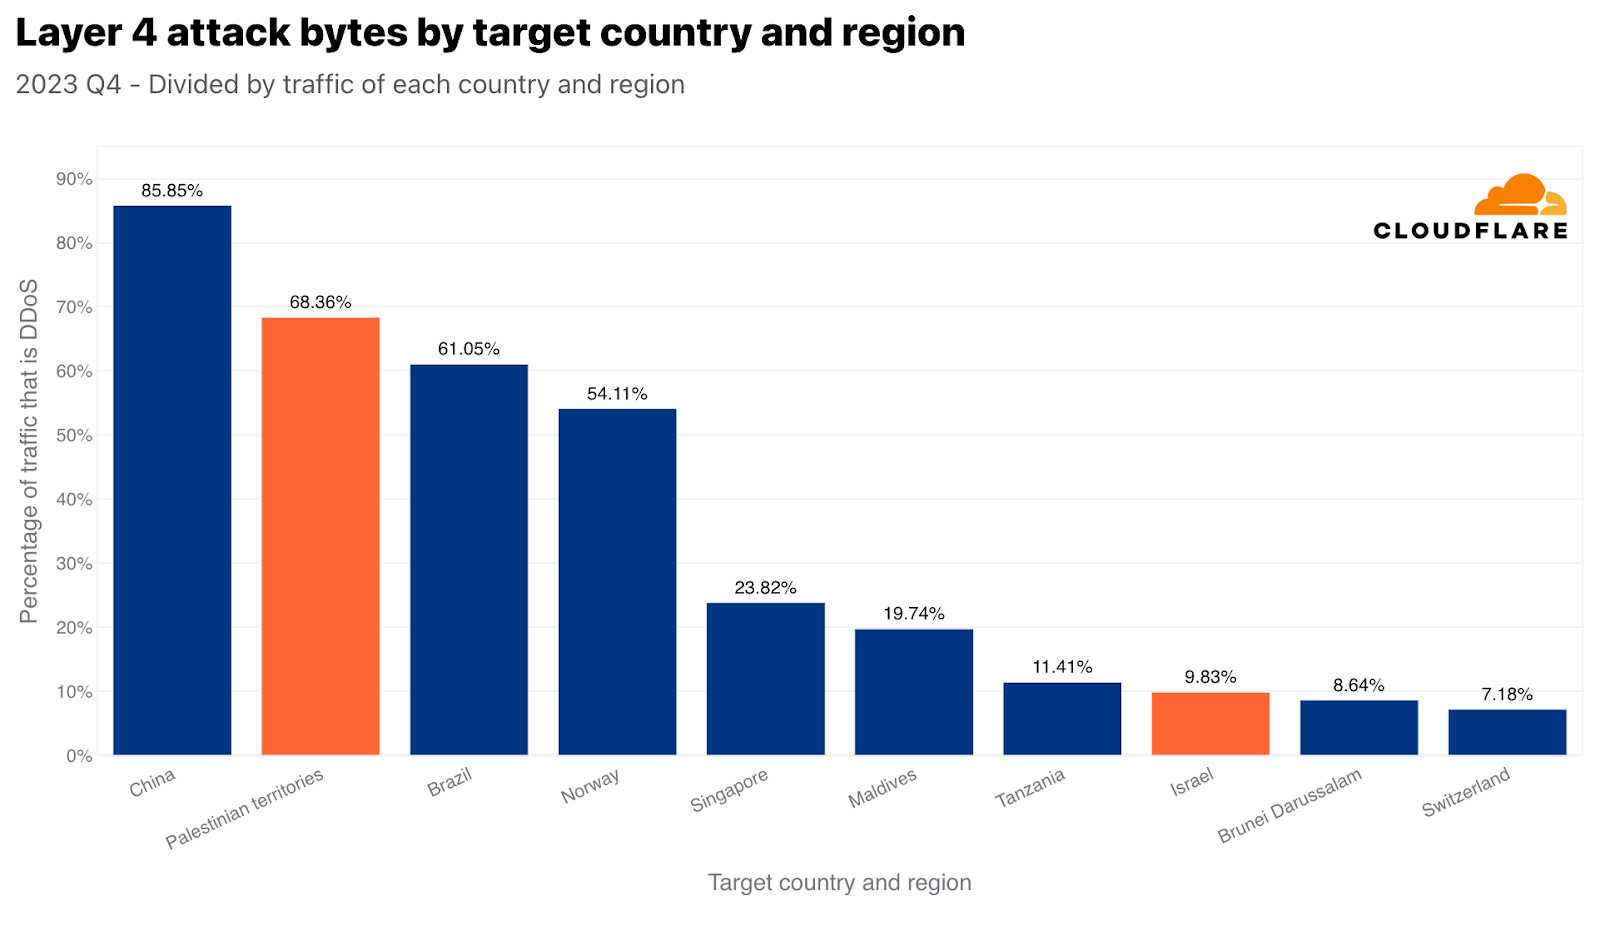
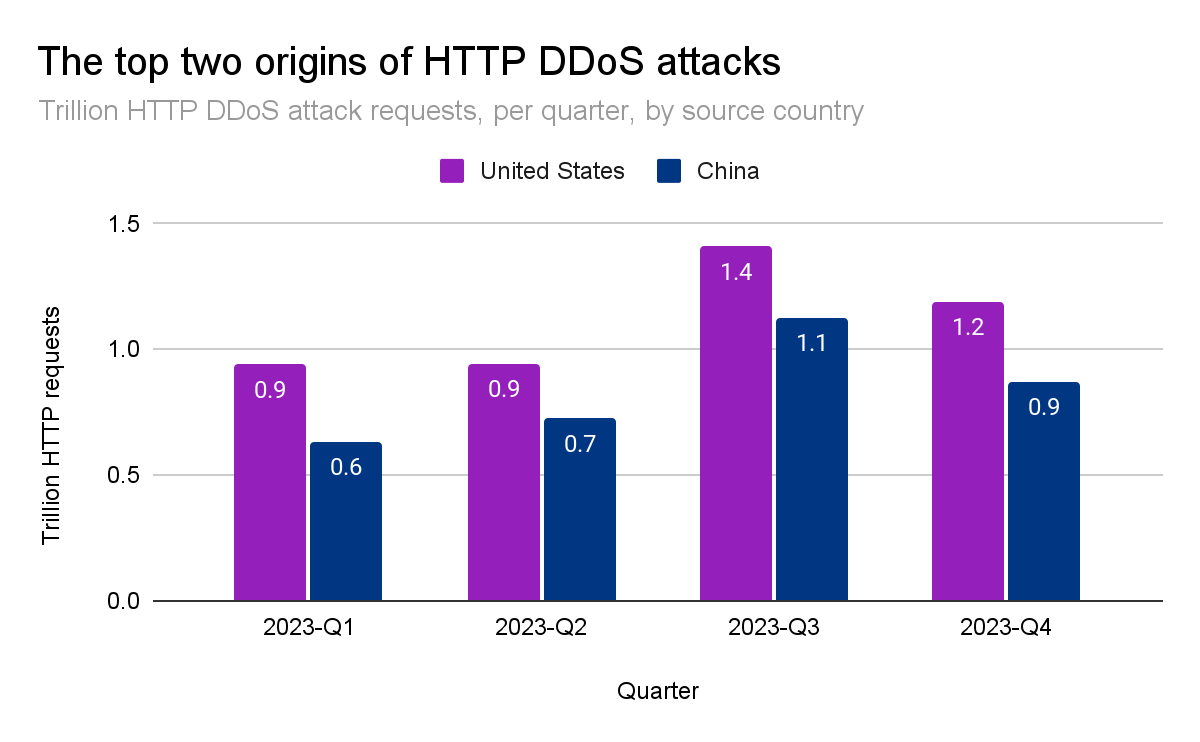
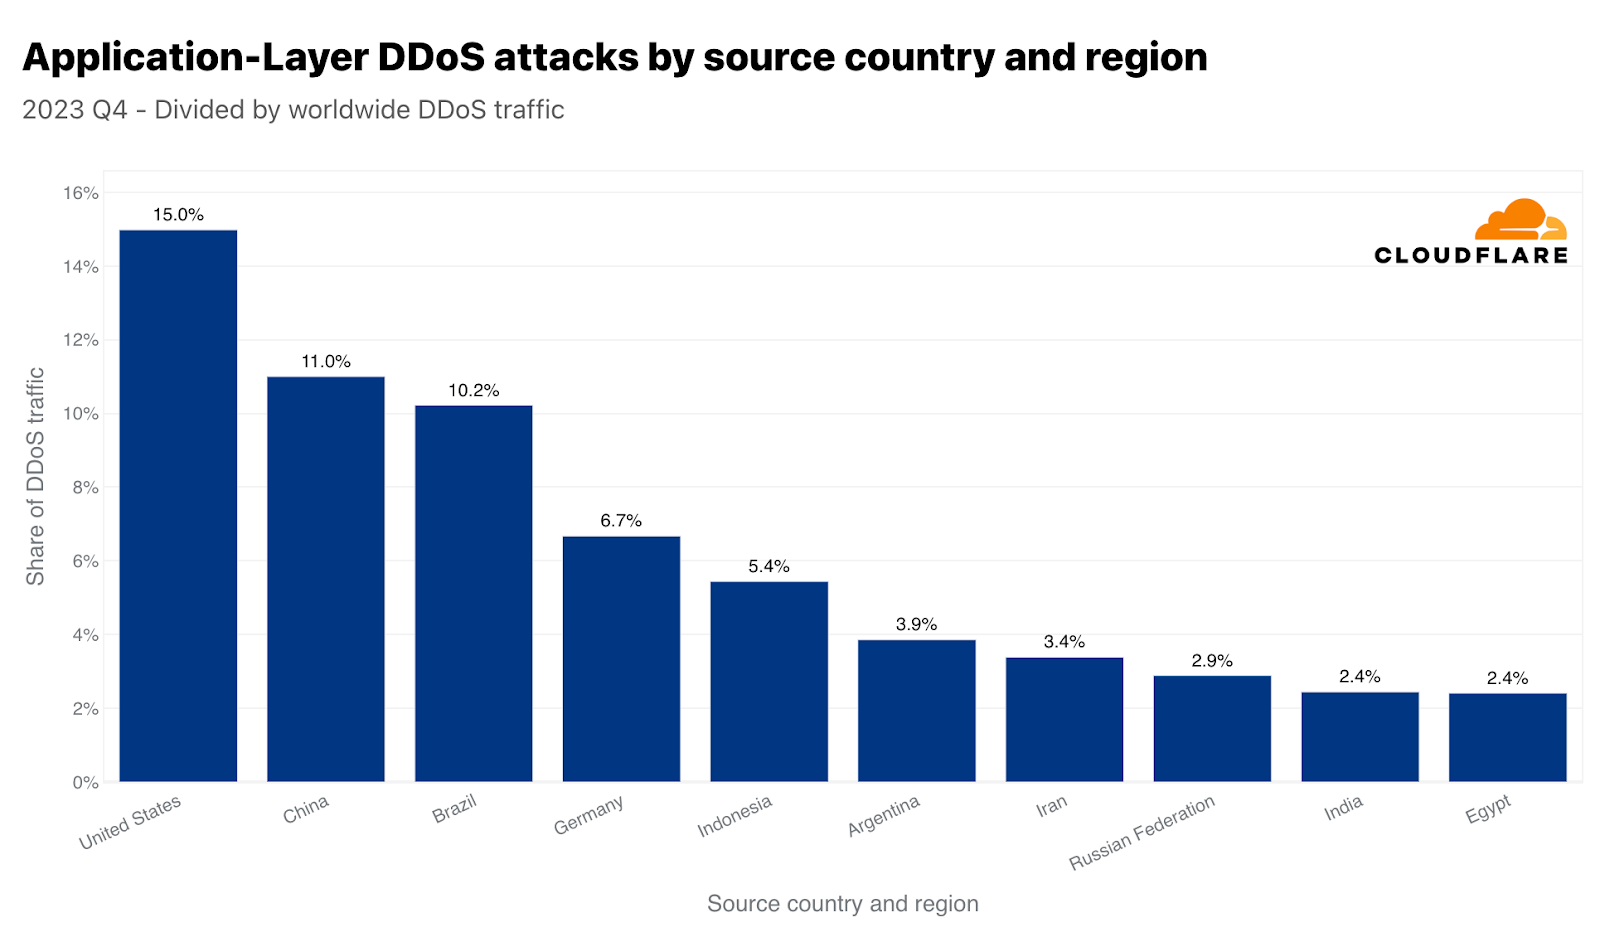
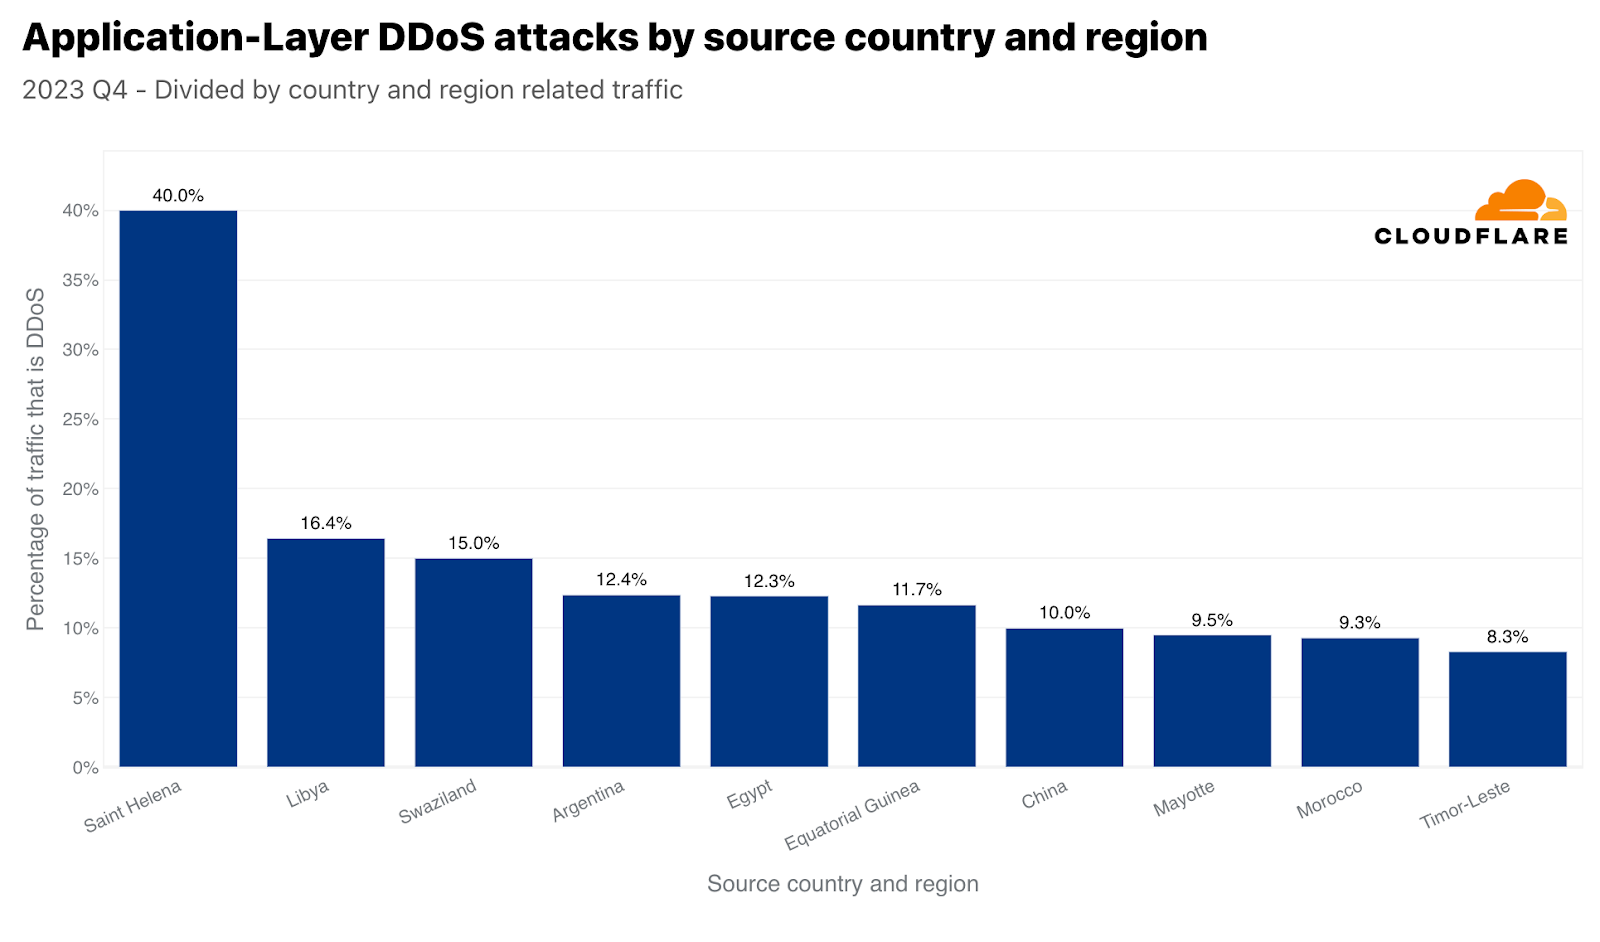


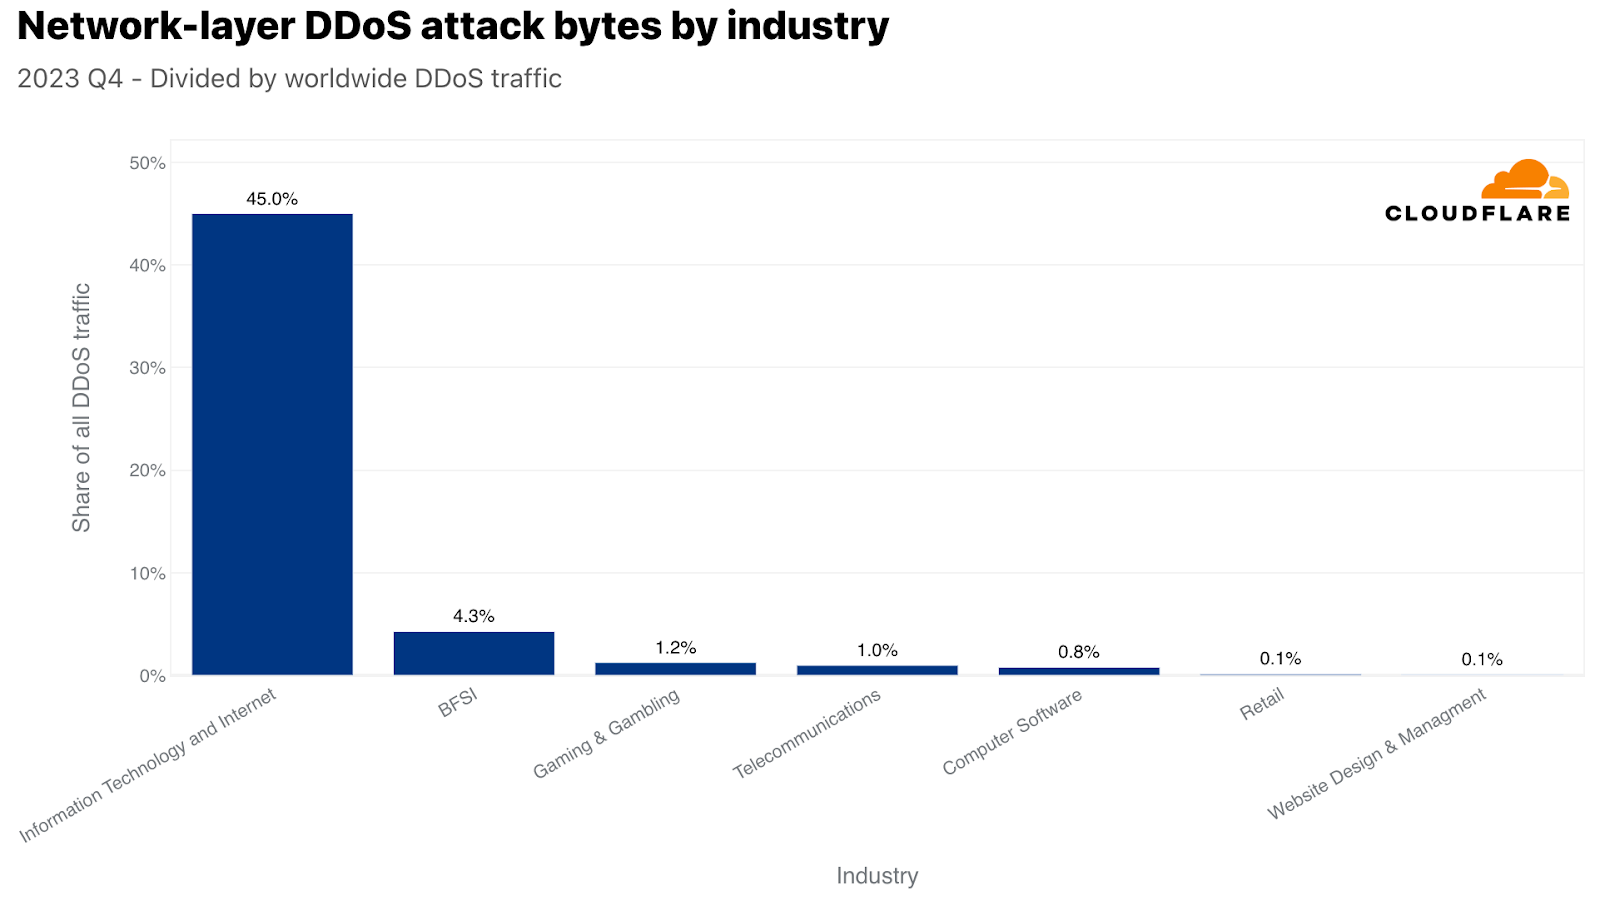
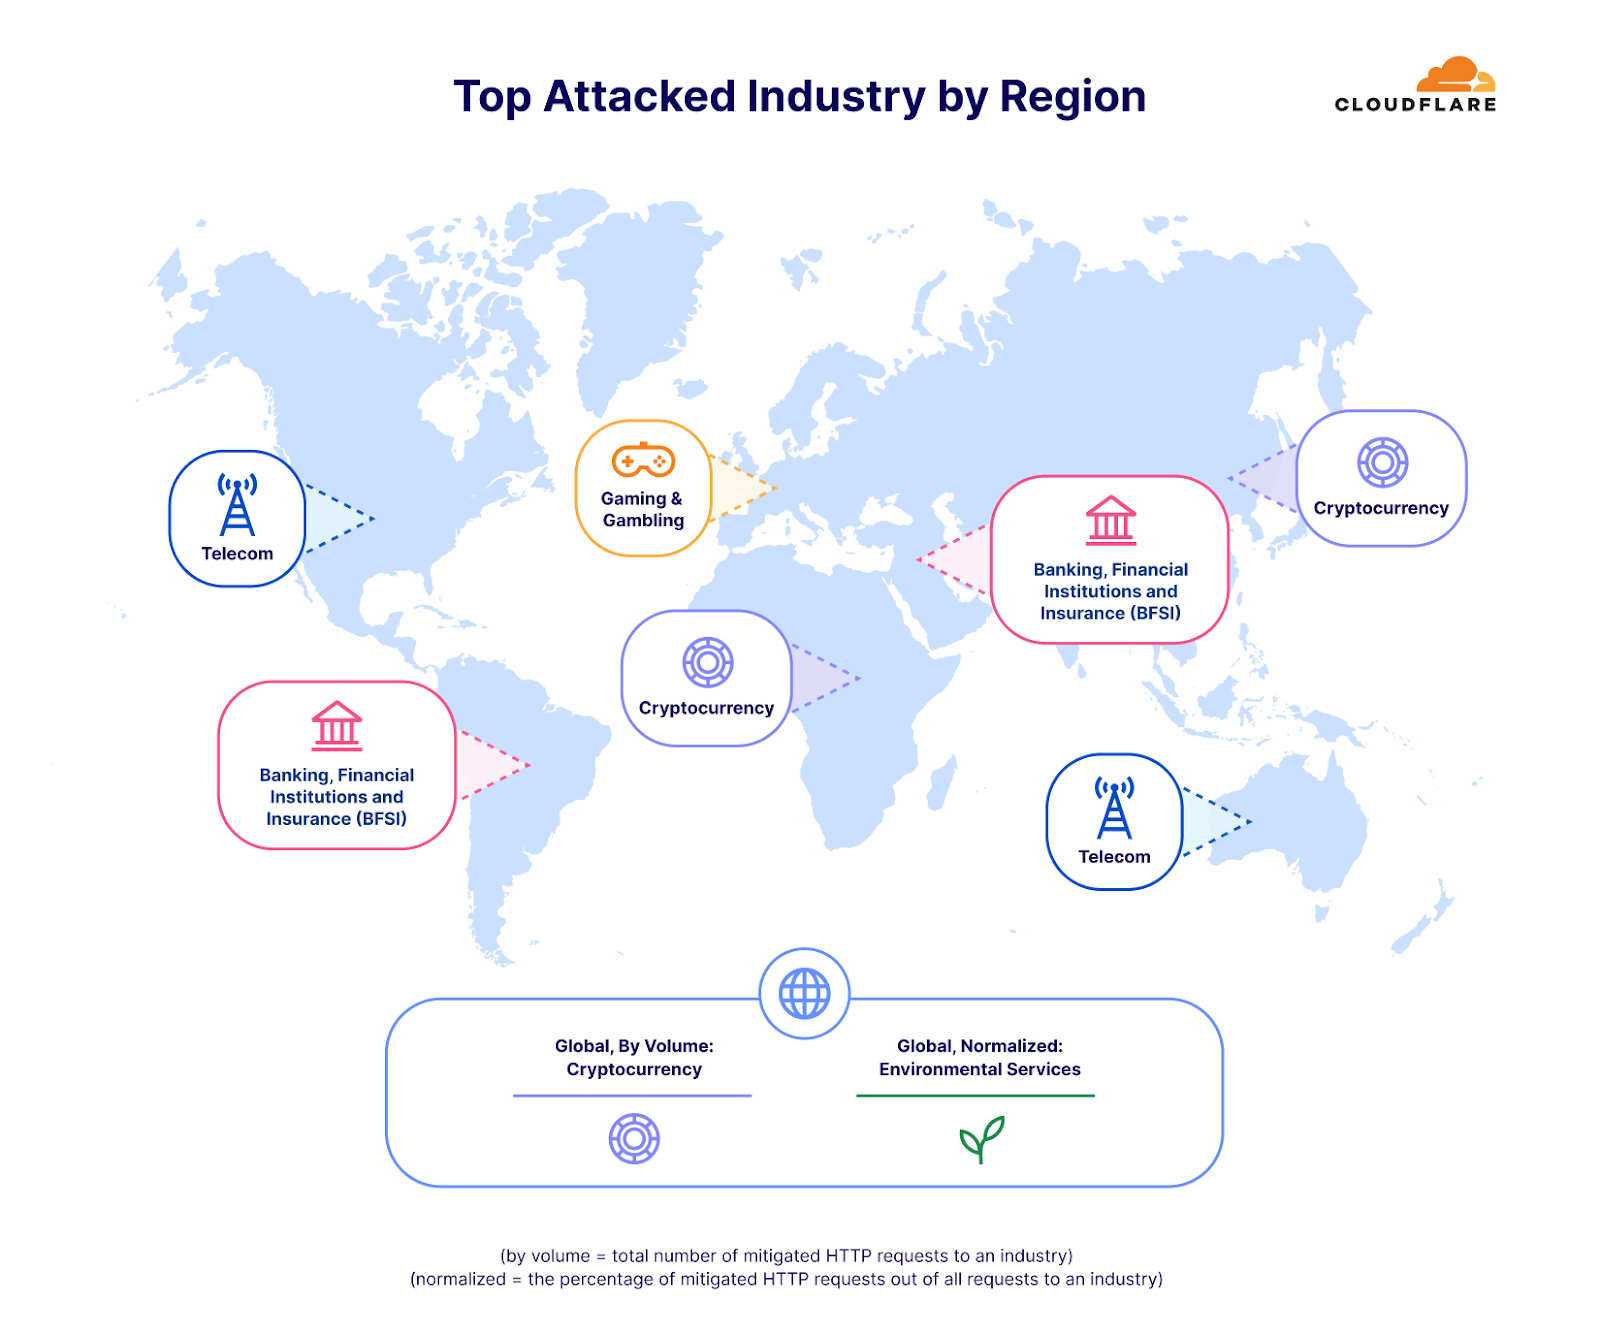
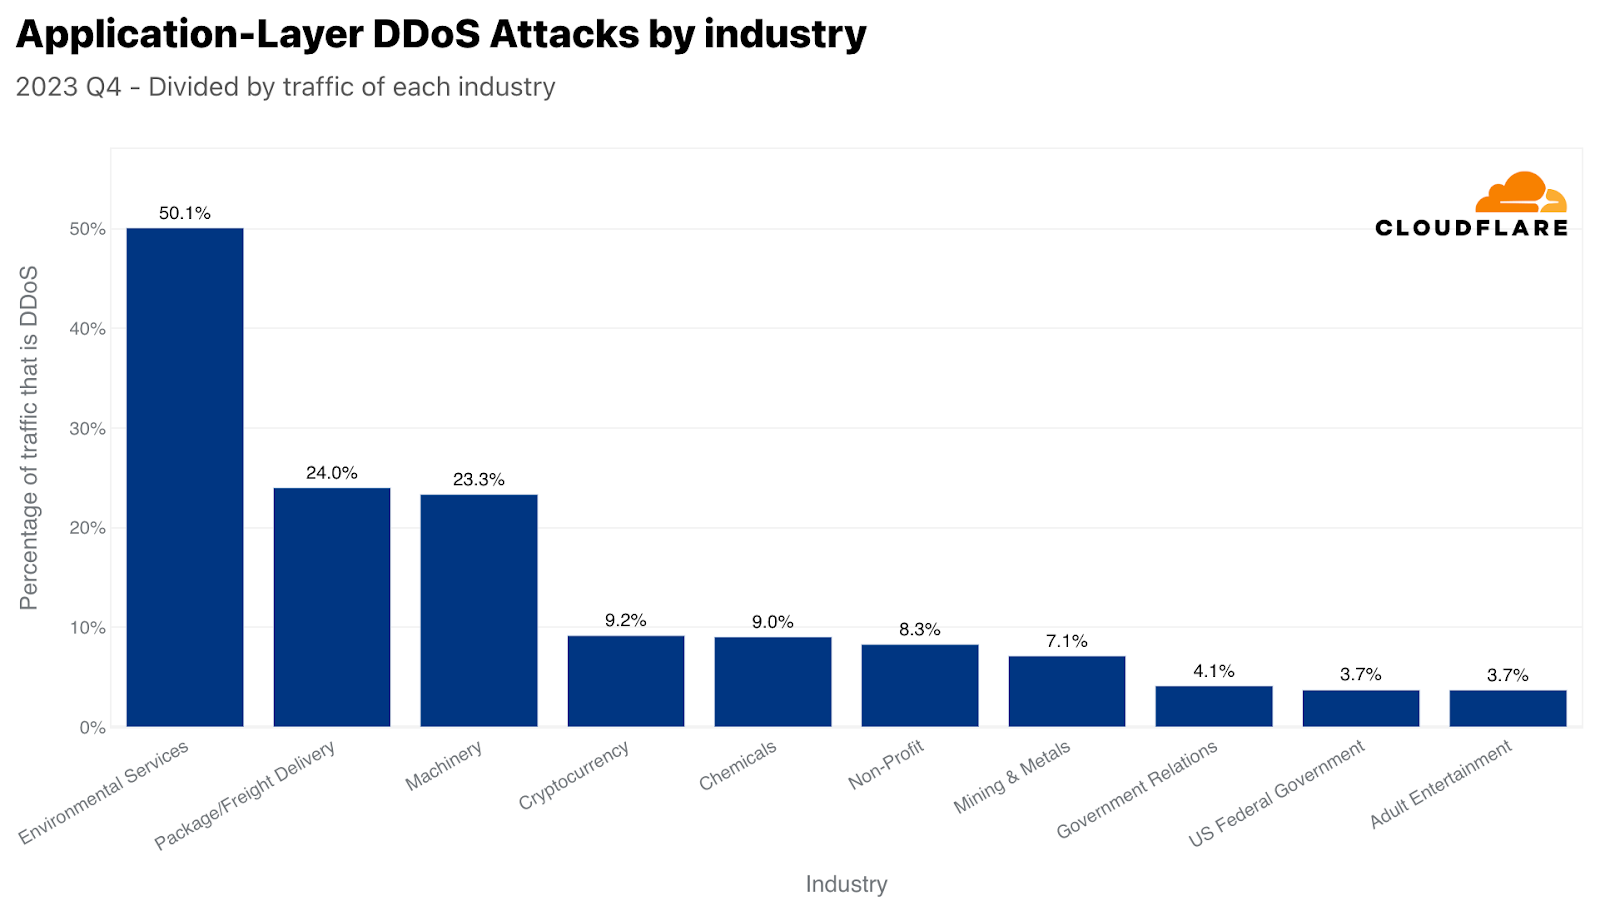
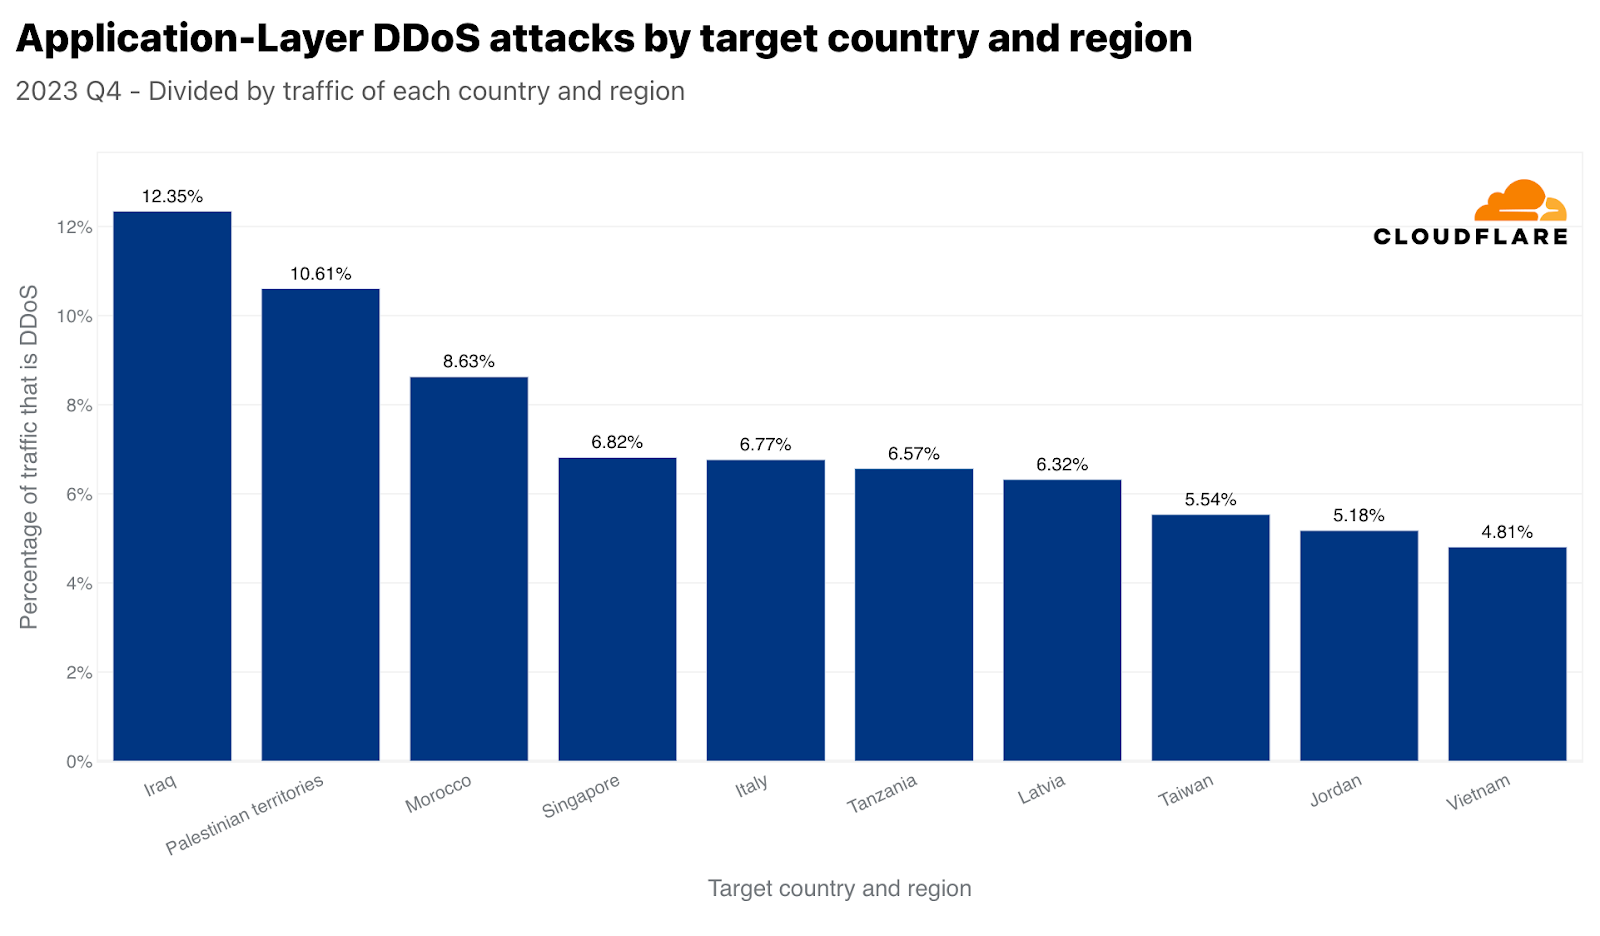
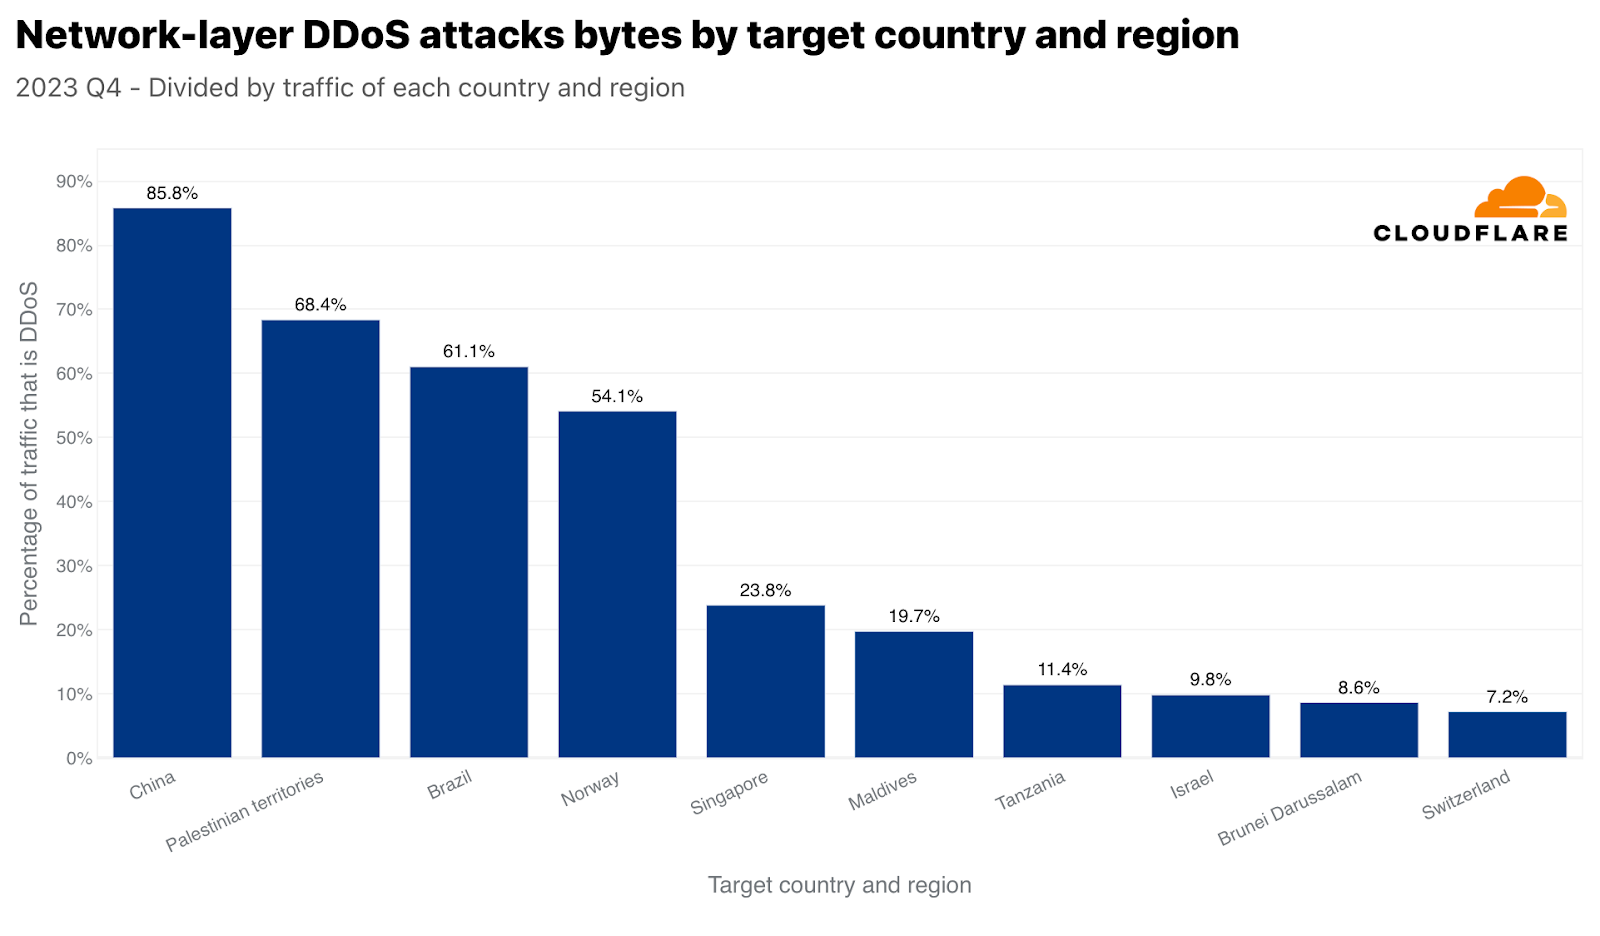
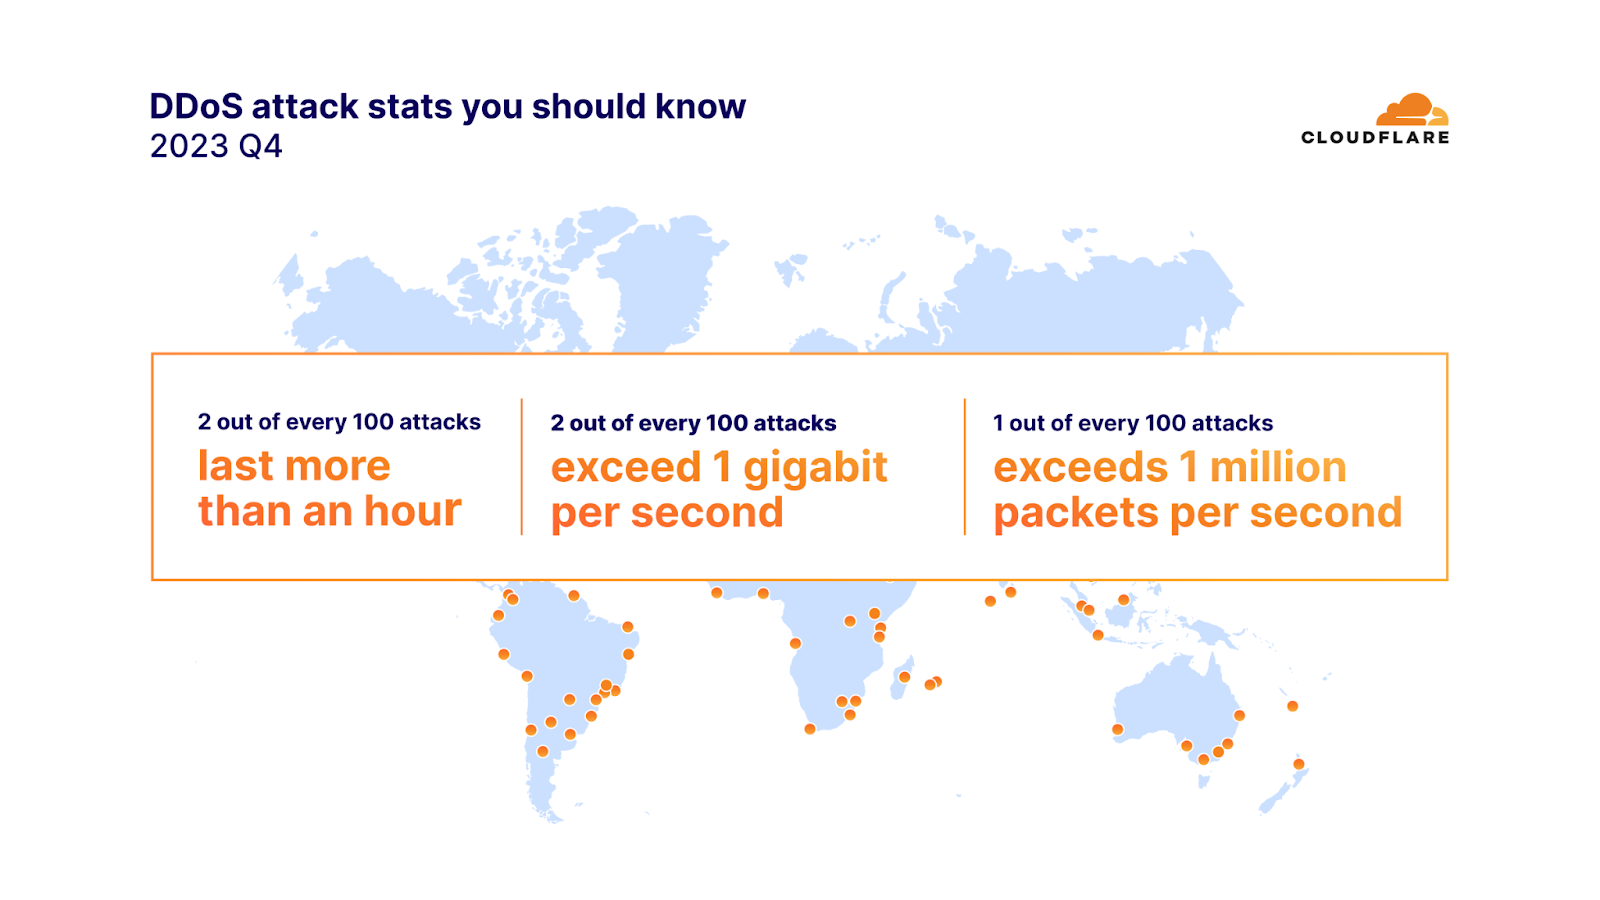
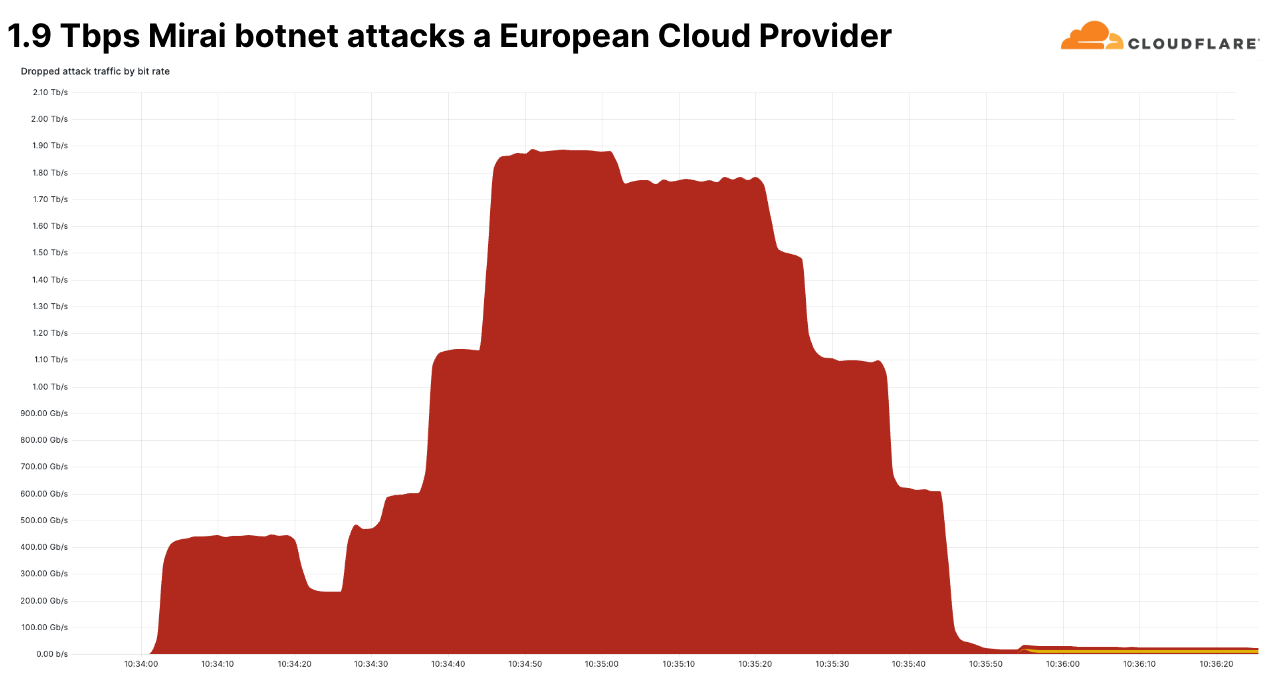
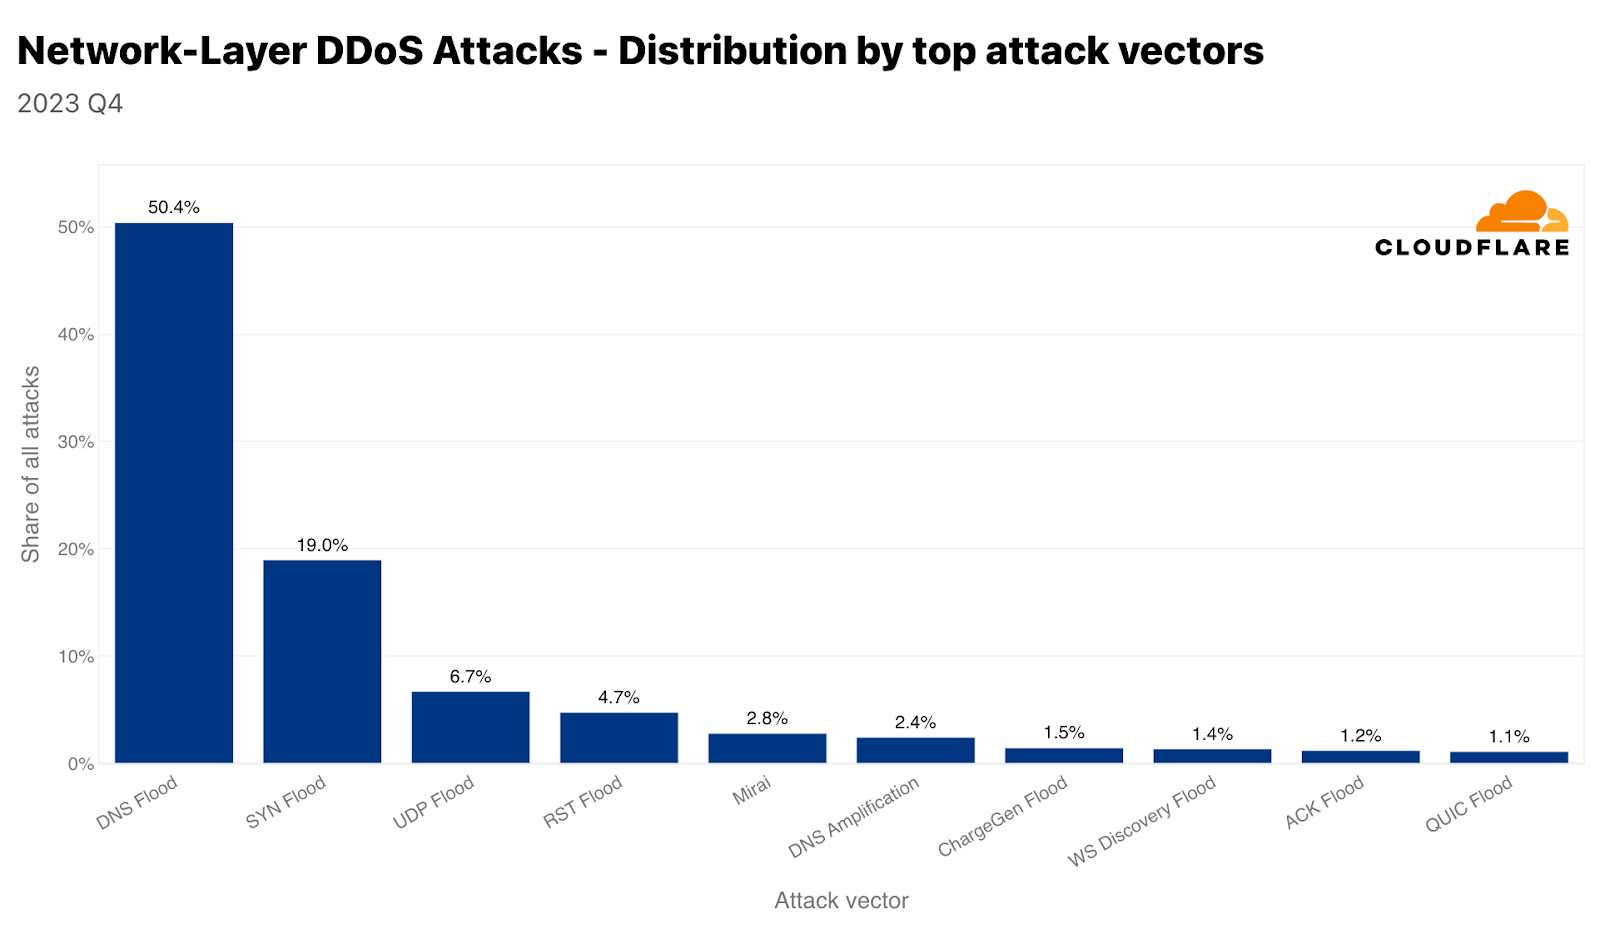
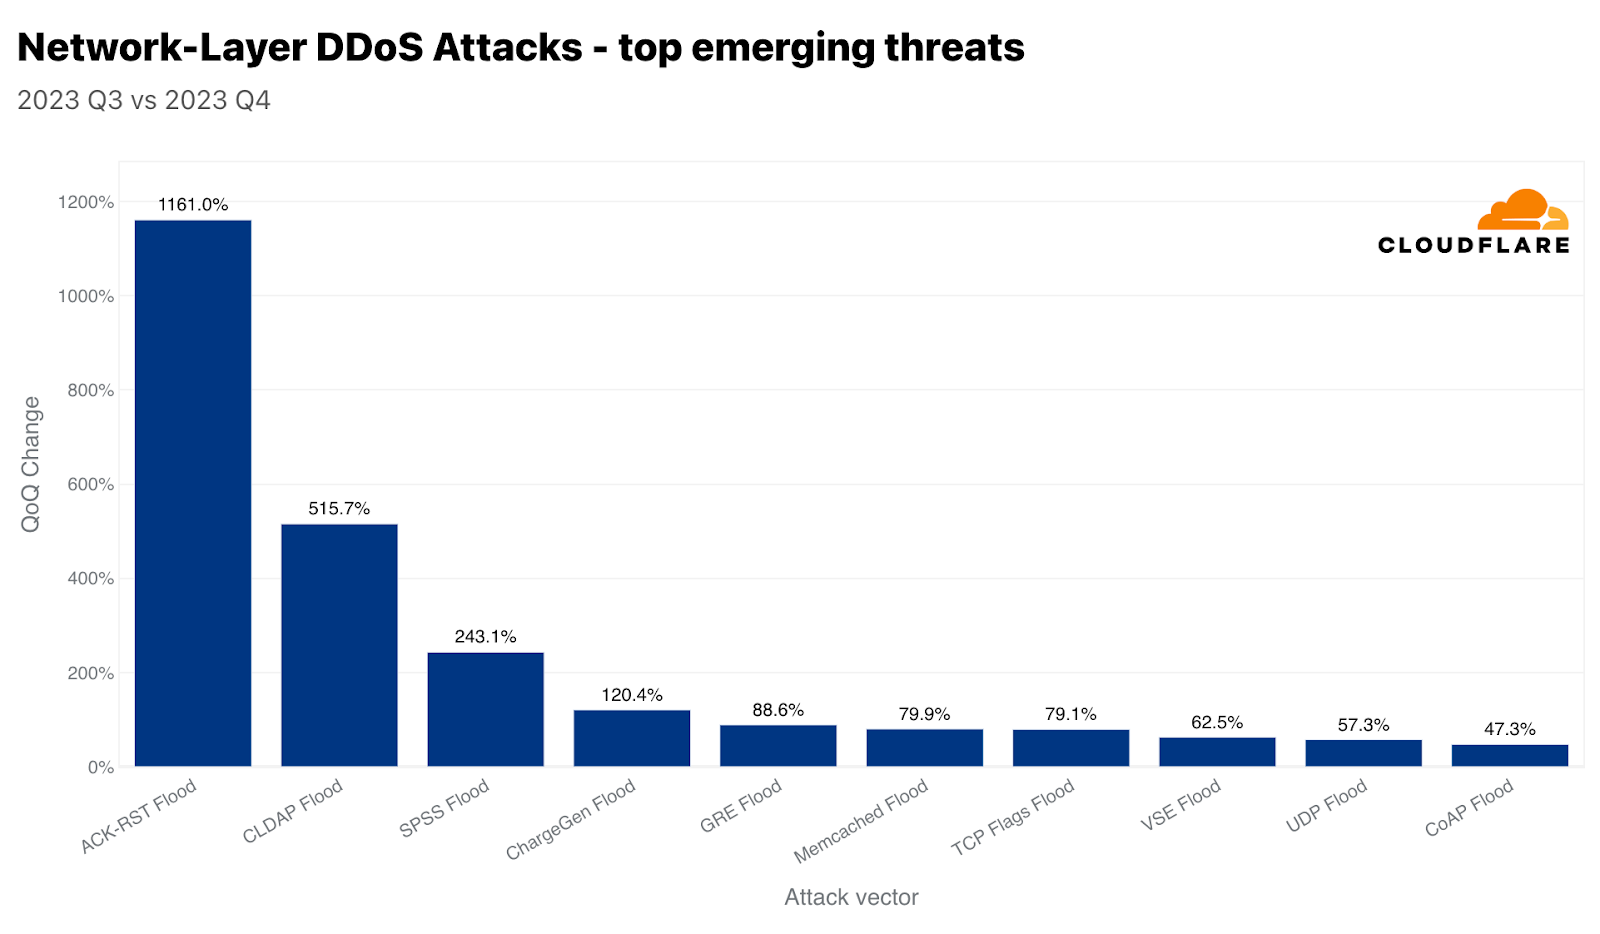

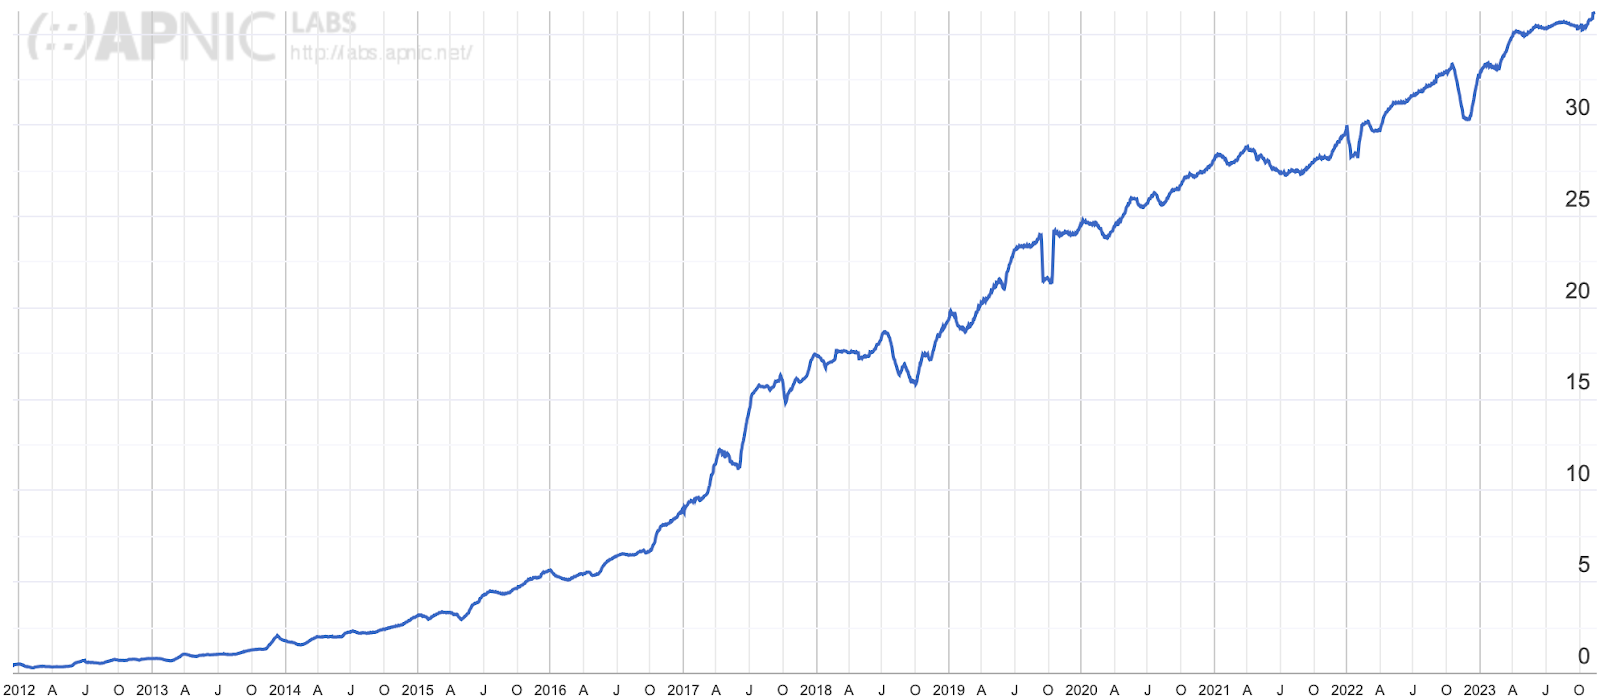
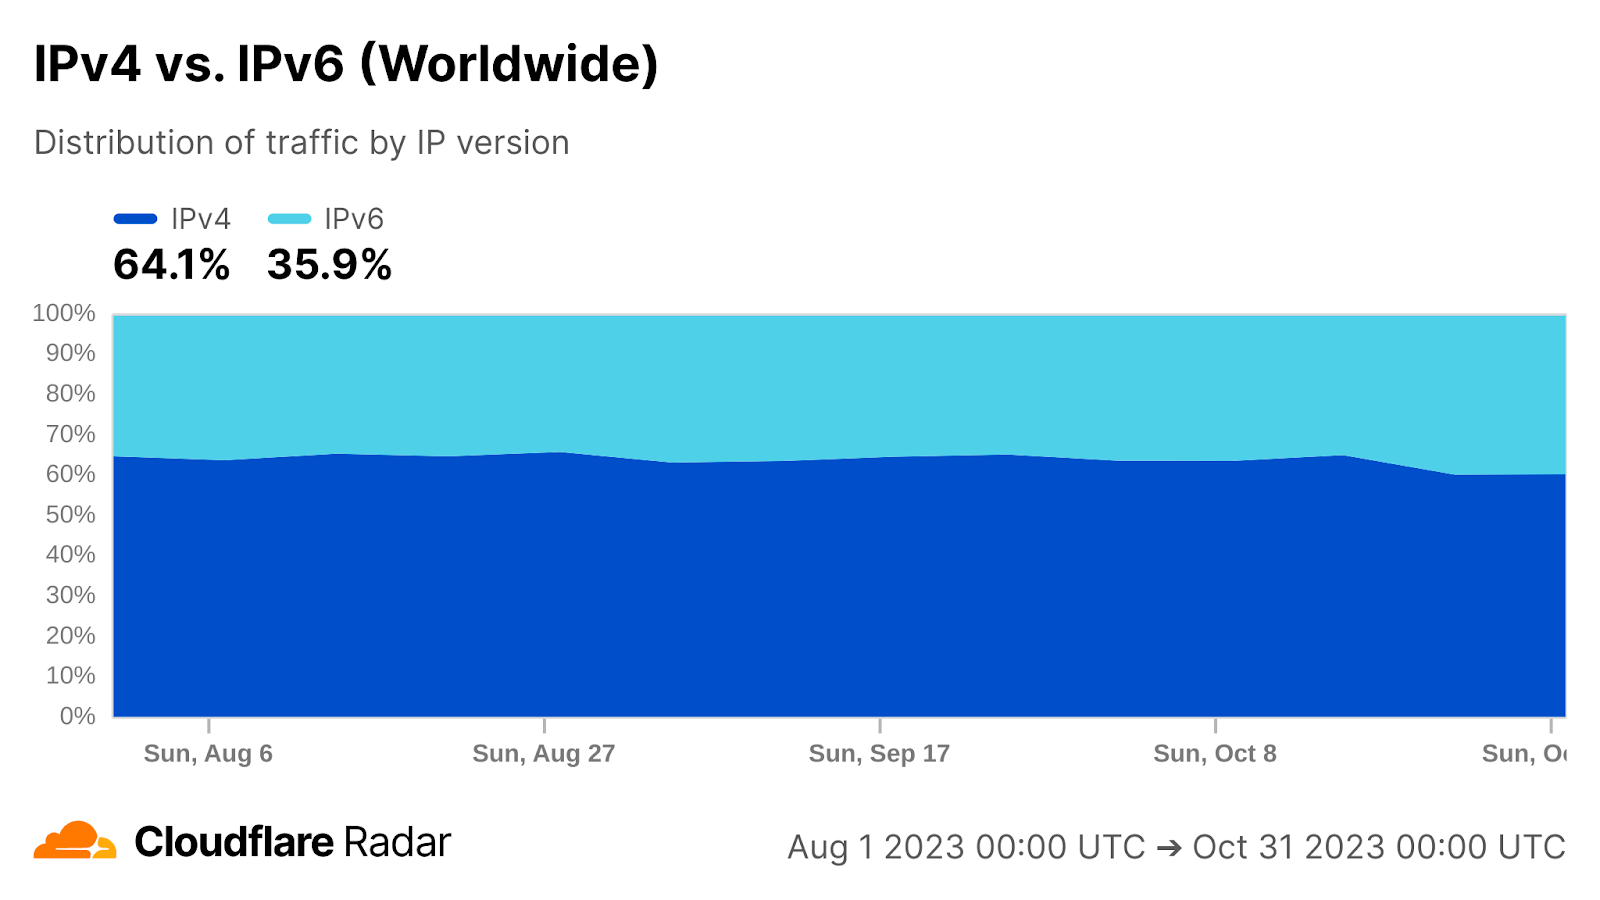
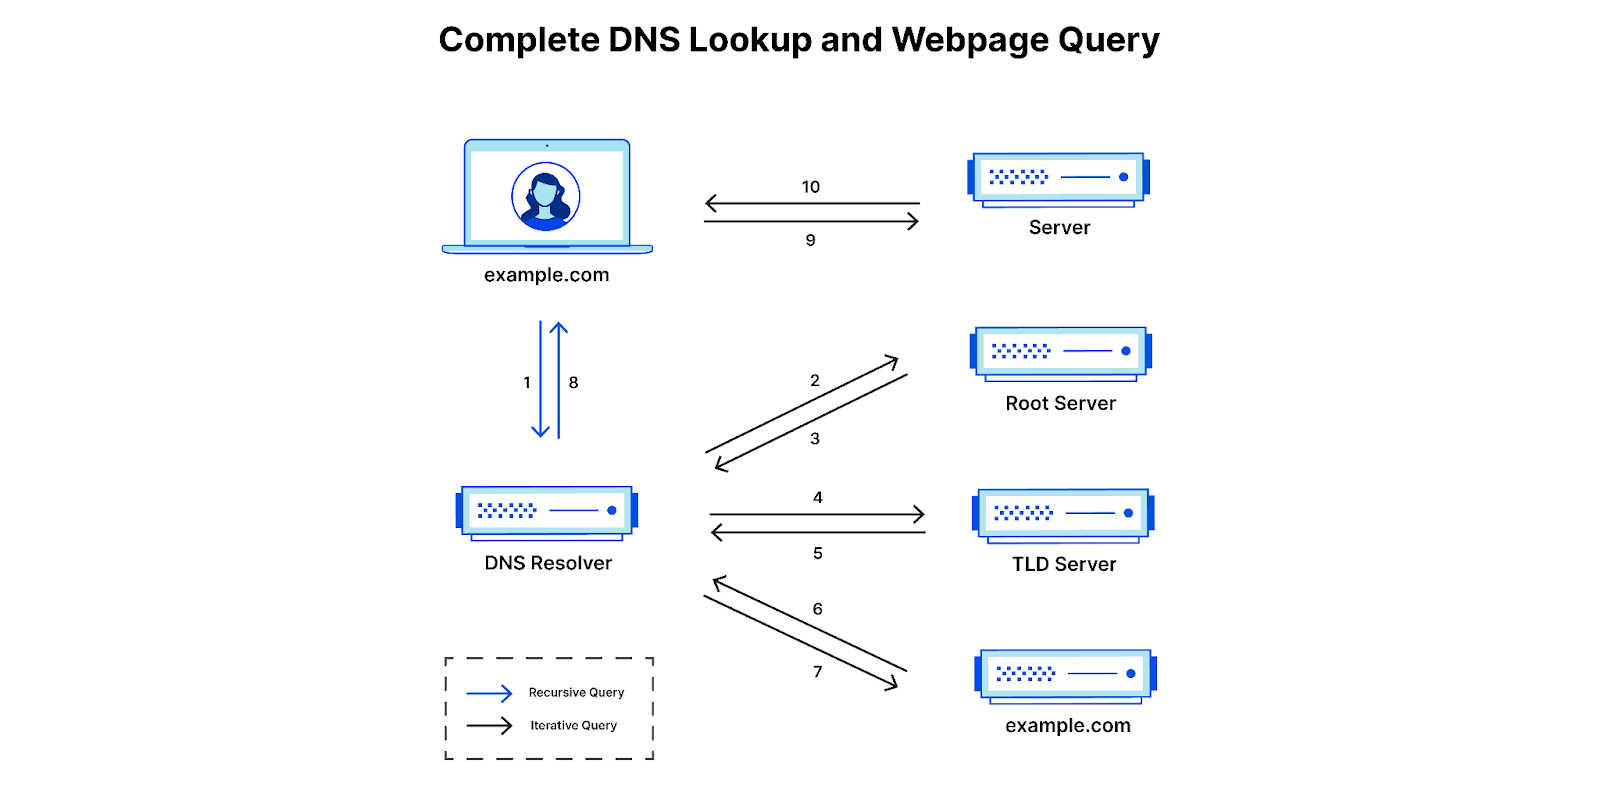
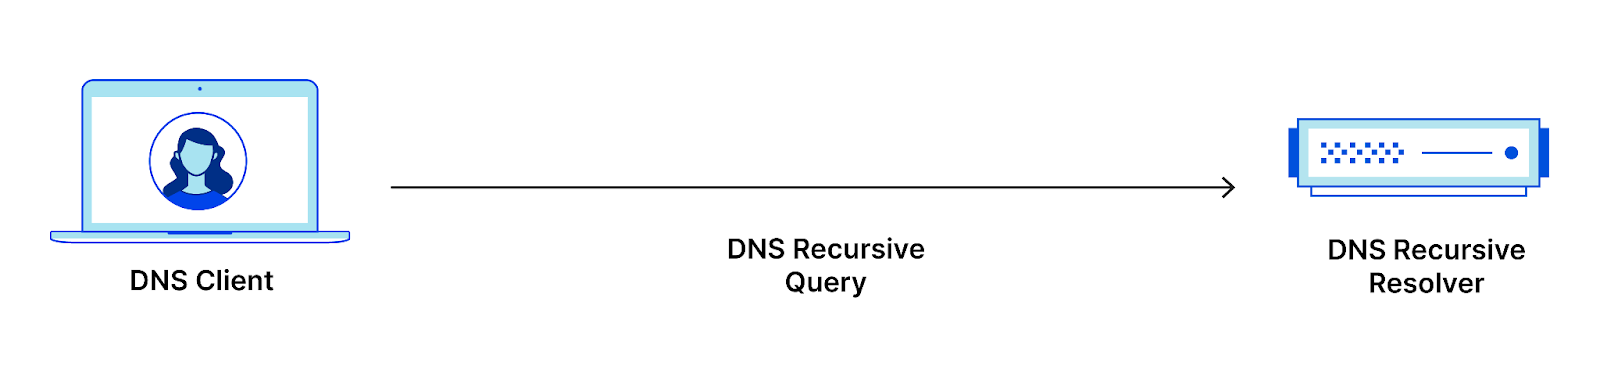
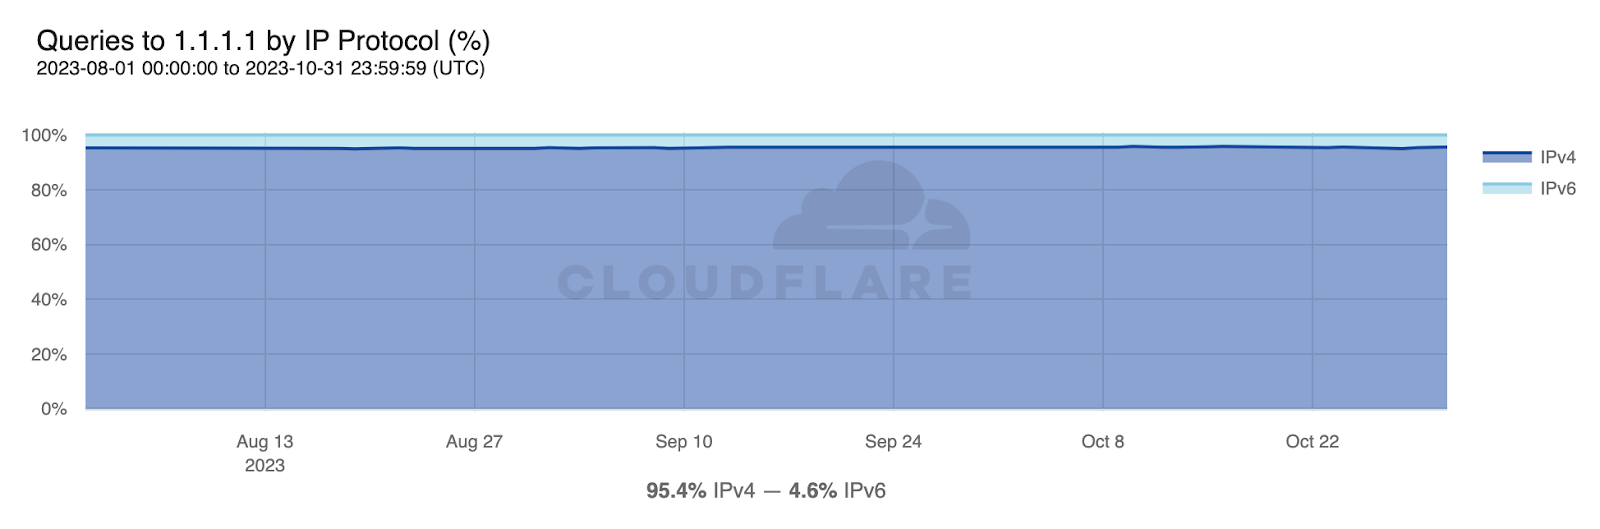

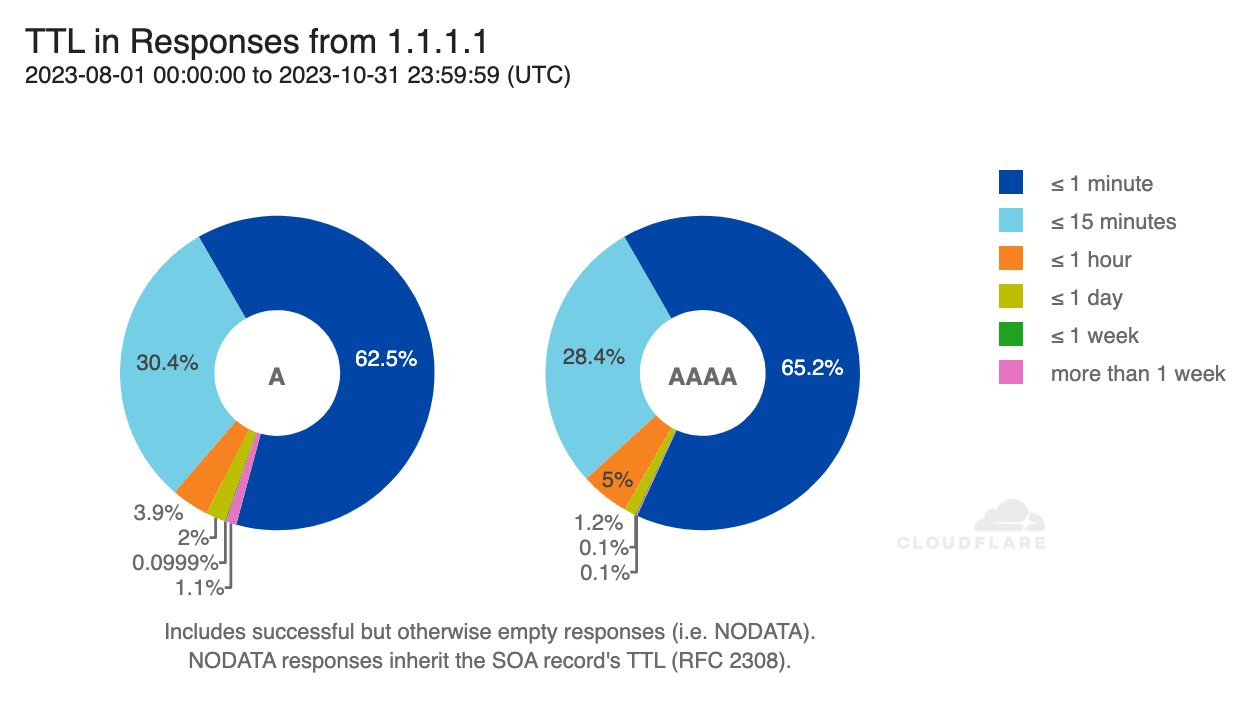
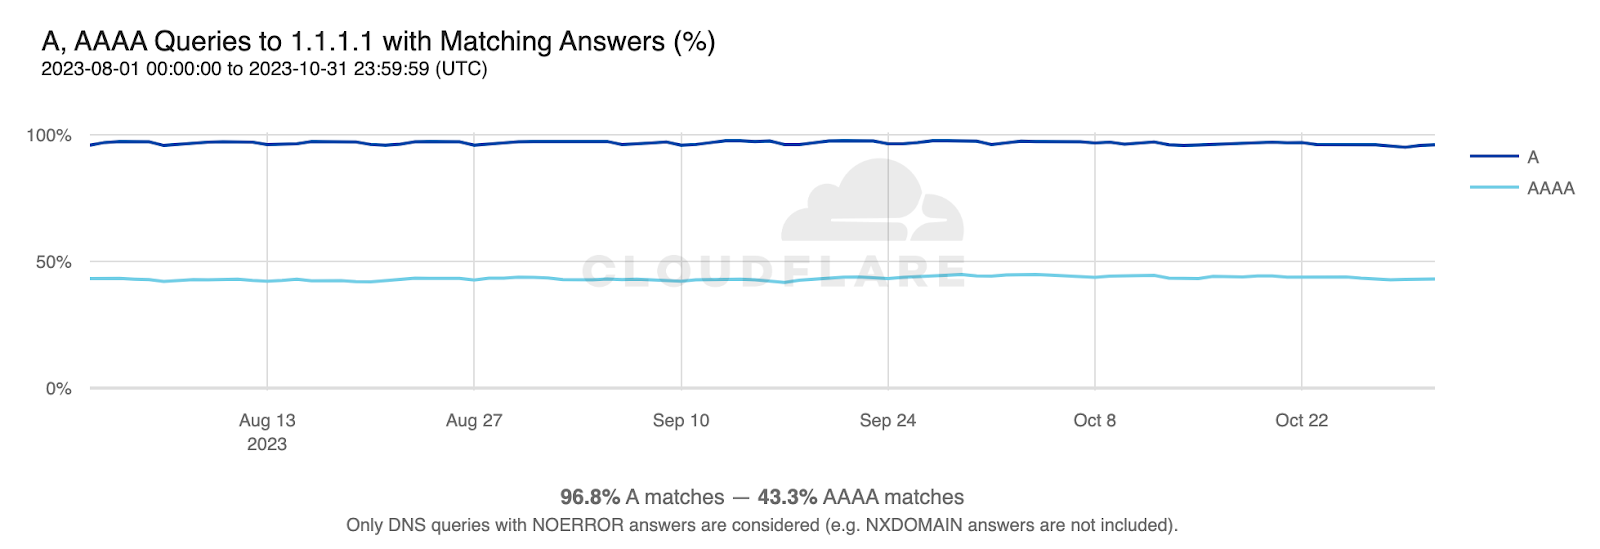
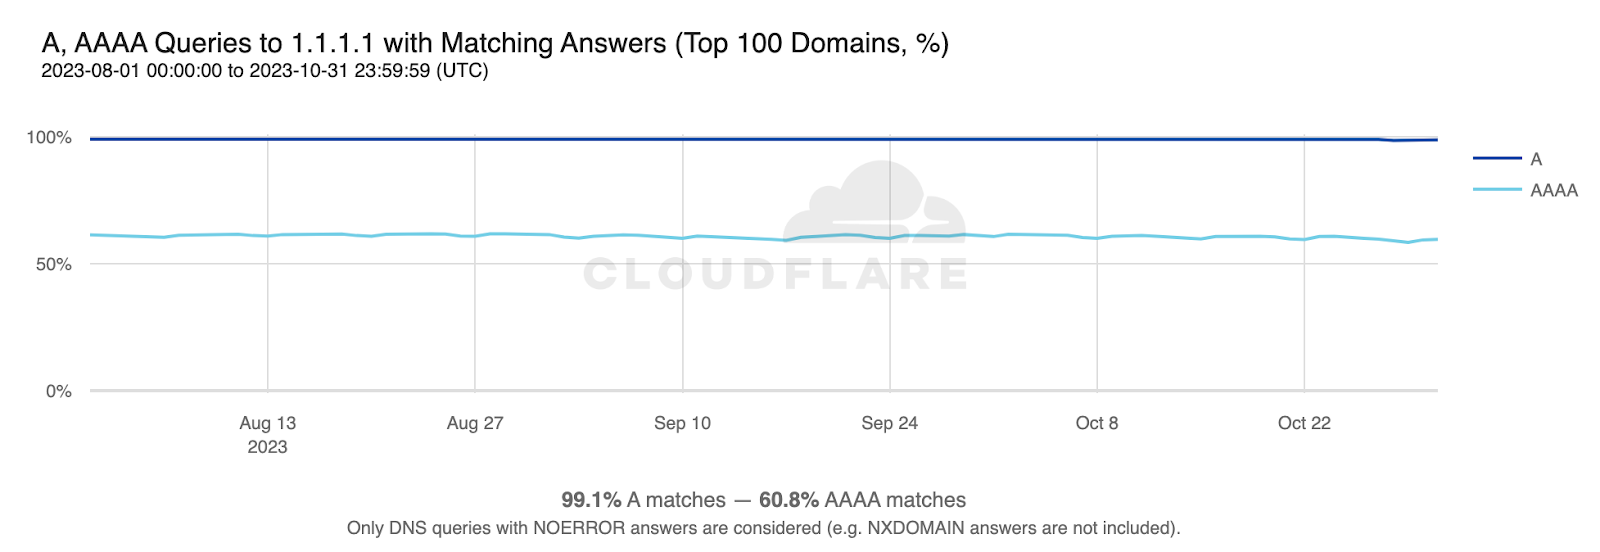
 Figure 1 – DMARC Flow