Tag Archives: AWS Threat Research Team

How to customize behavior of AWS Managed Rules for AWS WAF

Post Syndicated from Madhu Kondur original https://aws.amazon.com/blogs/security/how-to-customize-behavior-of-aws-managed-rules-for-aws-waf/

AWS Managed Rules for AWS WAF provides a group of rules created by AWS that can be used help protect you against common application vulnerabilities and other unwanted access to your systems without having to write your own rules. AWS Threat Research Team updates AWS Managed Rules to respond to an ever-changing threat landscape in order to protect your applications.

Recently, AWS WAF launched four new features that are centered on rule customization:

  • Labels – Metadata that can be added to web requests when a rule is matched. Labels can be used to alter the behavior or default action of managed rules.
  • Version management – You can select a specific version of a managed rule group. Versioning can be used to return to previously tested versions.
  • Scope-down statements – Use to narrow the scope of the requests that a rule group evaluates.
  • Custom responses – Send a custom HTTP response back to the client from AWS WAF when a rule blocks a connection request.

In this blog, we go through four use cases to demonstrate how you can use these features to improve your security posture by customizing managed rules.

Case 1: Control automatic updates for a managed rule group by selecting a specific version

By default, managed rule groups are updated automatically as updates become available. This ensures you have the latest protection as soon as it’s available. With the version management feature, you can choose to stay on a specific version, meaning that it won’t update until you explicitly move to a newer version. This allows you to test a new version and promote it to your web ACL when you’re ready, and to return to a previously tested version if necessary.

Note: It’s recommended that you use a version as close as possible to the latest.

To select a managed rule group version

  1. In your AWS WAF console, navigate to the web ACL where you’ve added a managed rule group.
  2. Select the managed rule group whose version you want to set, and choose Edit.
  3. In the Version selection drop down, select the version you want to use. You’ll remain on this version until the version expires or you select another version—you’ll learn how to manage version expiration later in this post.

Note: If you want to receive updates automatically, select Default as the version.

  1. Choose Save Rule to save the configuration.

Figure 1: Console screenshot showing the AWS Managed Rules version drop downFigure 1: Console screenshot showing the AWS Managed Rules version drop down

Set up notifications

You can use Amazon Simple Notification Service (Amazon SNS) to get notifications of updates to a managed rule group. You can subscribe to the SNS topic using the ARN of the managed rule group. Every SNS notification for AWS Managed Rules updates uses the same message format, which enables you to consume these updates programmatically. For more details on the SNS notification message format, see Getting notified of new versions and updates to a managed rule group.

To set up email notifications on new rule updates through Amazon SNS

  1. In your AWS WAF console, navigate to the web ACL where you added the managed rule group.
  2. Select the managed rule group that you want to receive notifications for, and choose Edit.
  3. On the Core rule set page, look for the Amazon SNS topic ARN. Select the link to go to the Amazon SNS console. Make a note of the topic ARN to use in step 4.

Figure 2: Console screenshot highlighting the SNS topic ARNFigure 2: Console screenshot highlighting the SNS topic ARN

  1. On the Create subscription page, enter the following information:
    Topic ARN: Enter the SNS topic ARN from step 3.
    Protocol: Select Email.
    Endpoint: Enter the email address where you want notifications sent.

Figure 3: SNS Create subscription console screenshotFigure 3: SNS Create subscription console screenshot

  1. Choose Create subscription.
  2. Watch for a confirmation email from Amazon SNS. Choose the confirm subscription link in the email to complete the subscription.

Set up a version expiration alert using a CloudWatch alarm

When you stay on a specific version of managed rule group for a long time, there is a risk that you may miss important updates. To ensure you do not stay on a stale version for long time, you should set up an alarm to alert you when a version is close to expiring. When a version expires, the managed rule group automatically switches to the default version. To be notified when a version is about to expire, set up an alert using an Amazon CloudWatch alarm based on DaysToExpiry. You can use the following procedure to set up a notification 60 days before a specific version of the rule set you’re using expires.

To set up a CloudWatch alarm

This will notify you 60 days before a specific version of a rule set expires

  1. Navigate to the CloudWatch console.
  2. Select All metrics from the left navigation pane, and then select WAFV2 from the list of namespaces.
  3. Choose ManagedRuleGroup, Region, Vendor, Version.
  4. Select the managed rule group whose expiration you want to monitor. This example uses AWSManagedRulesCommonRuleSet and Version_1.0.
  5. Select Graphed metric and select the bell alarm icon on the lower right, under Actions. Selecting this icon will take you to the CloudWatch alarms console.

Figure 4: CloudWatch Graphed metrics tabFigure 4: CloudWatch Graphed metrics tab

  1. Configure the CloudWatch alarm with the following details, and then choose Next:
    Statistic: Select Minimum
    Period: Select 5 minutes
    Threshold Type: Select Static
    Operator: Select Lower/Equal (<=threshold)
    Threshold: Enter the value as 60
    Datapoints to alarm: Enter the lower value as 1 and higher value as 1
    Missing data treatment: Select Treat missing data as good (not breaching threshold)
  2. Select the SNS topic that you want to be launched when the configured alarm goes to ALARM state and choose Next.
  3. Enter a name and description for the Alarm. Choose Next to preview the configuration and choose Create Alarm to complete the CloudWatch alarm creation process.

Additional tips

  • If the version of a managed rule group that you’re using has expired, AWS WAF will prevent any configuration change to the web ACL until you select a valid version. You should move onto the newest version as soon as possible so you are covered against the latest threats.
  • You will only receive the DaysToExpiry metric when there is traffic flowing through your web ACL.
  • You can use two different versions of a managed rule group in a web ACL. This can be useful if you want to test two different versions simultaneously to see how they will affect your traffic once deployed—for example, have one version in count mode and the other in block mode.

Note: This workflow is supported through the JSON rule editor and API, but not through the console.

Case 2: Use labels to mitigate false positives caused by a rule in a managed rule group

A label is metadata that a rule can add to matching web requests, regardless of the action associated with the rule. The latest version of AWS Managed Rules supports labels. By creating custom rules that match requests that have labels, you can change the behavior or default action of rules inside a managed rule group.

For example, if you have a rule that’s causing a false positive in a managed rule group, you can mitigate it by overriding the managed rule to Count and writing a custom rule with logic similar to the following:

IF (Statement 1) AND NOT (Statement 2) THEN Block
Statement 1 matches on the label generated from the rule causing a false positive.
Statement 2 contains exception conditions for when you don’t want the rule to evaluate because it’s causing false positives.

Consider a scenario where redirection requests to your application are blocked due to the rule GenericRFI_QUERYARGUMENTS in the managed rule group you’re using. This rule inspects the value of all query parameters and blocks requests that attempt to exploit remote file inclusion (RFI) in web applications, such as :// embedded midway through a URL. An example of a legitimate redirection request that could be blocked due to the characters :// present in the query argument scope could be as follows:

https://ourdomain.com/sso/complete?scope=email profile https://www.redirect-domain.com/auth/email https://www.redirect-domain.com/auth/profile

To prevent similar legitimate requests from being blocked, you can write a custom rule to match based on the label.

Step 1: Set the specific managed rule group to count mode

The first step is to set the specific managed rule to count mode, so that labels are added to the matching requests. Next, the priority of the managed rule must be set higher than the priority of the custom rule.

To set the specific managed rule group to count mode

  1. In your AWS WAF console, navigate to your web ACL and select the Rules tab. Choose Add Rule, and then select Add managed rule groups.
  2. Select AWS managed rule groups.
  3. Under Free rule groups, look for Core rule set and add it to your web ACL by selecting the toggle Add to web ACL.
  4. Choose Edit.
  5. From the list of rules, set the rule generating false positives to the Count action, by selecting the Count toggle beside the rule. This example changes the action for the rule GenericRFI_QUERYARGUMENTS to Count. This ensures that all the matching requests are sent to the subsequent WAF rules in order of priority and adds the label awswaf:managed:aws:commonruleset:GenericRFI_QueryArguments whenever there’s a matching request.
  6. Choose on Save rule.
  7. Choose Add rules again to go to the next window where you can set the rule priority. The managed rule must have a higher priority than the custom rule that you will create in the next steps.
  8. Choose Save to save the configuration.

Step 2: Add a custom rule to the web ACL with lower priority than the managed rule

Create a custom rule in the web ACL that blocks requests if it has the label that you are looking for and doesn’t have the exception condition that caused the false positive. The priority of this custom rule should be set lower than the managed rule.

To add a custom rule with lower priority than the managed rule

  1. In your AWS WAF console, navigate to your web ACL Rules tab and choose Add Rule and select Add my own rules and rule groups.
  2. Select Rule Builder for the rule type.
  3. Enter a Rule Name and select Regular Rule as the Type.
  4. Use the If a request drop down to select matches all the statements (AND).
  5. Statement 1 checks if the request has the label that you’re looking for. In this example it is configured with the following details:
    Inspect: Select Has a label
    Labels: Select Label
    Match key: Select awswaf:managed:aws:commonruleset:GenericRFI_QueryArguments
  6. All subsequent statements must be negated so that the requests don’t match the statement criteria and will be treated as legitimate requests. In this example, we set NOT Statement 2, that checks if the request contains https://www.redirect-domain.com/ in its query string:
    Enable: Select Negate statement results
    Inspect: Select All query parameters
    Match type: Select Contains string
    String to Match: Enter https://www.redirect-domain.com/
    Text transformation: Select None
  7. Under Action, select Block and choose Add rule.
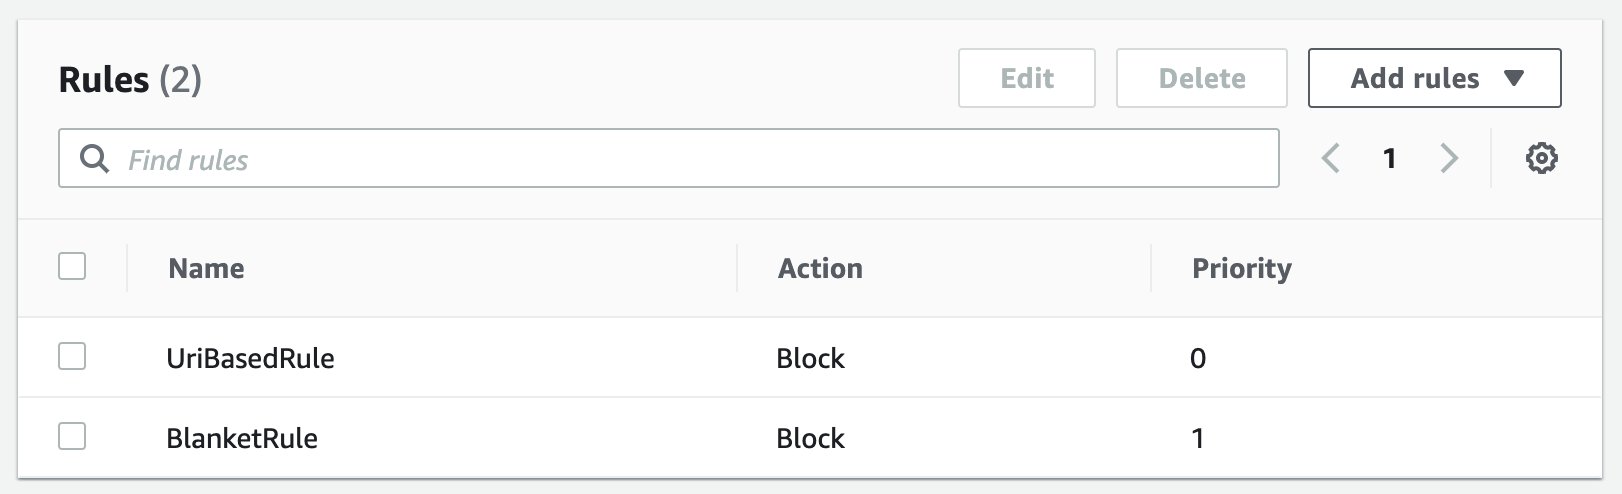
  8. In the Set rule Priority window, set the rule priority of your custom rule to lower than the AWS Managed Rules rule.
  9. Choose Save.

Case 3: Use a scope-down statement to narrow the scope of traffic matching a managed rule group

A scope-down statement can be added to any rule group to narrow the scope of the requests that a rule group evaluates. This allows you to either filter in the requests that you want the rule group to inspect or filter out any requests that doesn’t meet the criteria.

Consider a case where you have a list of trusted IP address that you don’t want to be evaluated against AmazonIPReputationList. You can avoid blocking these trusted IP addresses by using a scope-down statement to exclude the traffic from evaluation.

Step 1: Create the IP set for allowed list of IPs

The first step is to create an IP set that contains the allowed list of IPs. The IP set can be created for a particular AWS Region, or can be global if the web ACL is associated with an Amazon CloudFront distribution.

To create an IP set

  1. Choose IP sets in the AWS WAF console and then choose Create IP set.
  2. In IP set name enter Allowed IPs. Enter the IPs that you want to allow in IP addresses. Choose Create IP set when done.

Figure 5: Console screenshot creating an IP setFigure 5: Console screenshot creating an IP set

Step 2: Add a scope-down statement to the managed rule group

Once you have created the IP set, you can add a scope down statement in your managed rule group so that traffic originating from the IPs in the IP set aren’t evaluated against the rules in the managed rule group.

To add a scope-down statement

  1. On the Rules tab of you your web ACL, choose Add Rule and select Add managed rule groups.
  2. Select AWS managed rule groups.
  3. Under Free rule groups, turn on Amazon IP reputation list to add it to the web ACL and choose Edit.
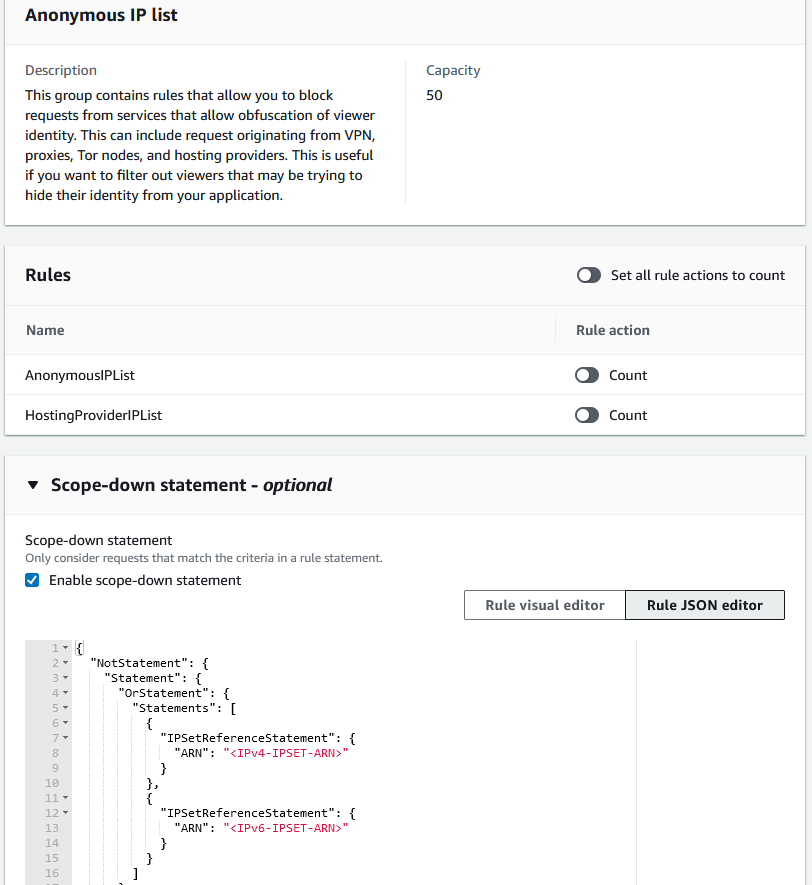
  4. Select Enable scope-down statement.

Figure 6: Console screenshot showing enabling the scope-down statementFigure 6: Console screenshot showing enabling the scope-down statement

  1. Add the condition so that only the requests that don’t originate from the allowed IPs list created earlier are evaluated for this rule group. Use the If a request drop down to select doesn’t match the statements (NOT).
    Inspect: Select Originates from an IP address in
    IP set: Select Allowed-IPs
    IP address to use as the originating address: Select Source IP address

Figure 7: Scope down statement configuration console screenshotFigure 7: Scope down statement configuration console screenshot

  1. Choose Save rule to add this rule to your web ACL.

Case 4: Use custom responses to change the default block action for a managed rule group

AWS WAF sends back response code 403 (forbidden) when it blocks an incoming request. You can use the custom response feature to instead send a custom HTTP response back to the client when the rule blocks access. Using the custom response, you can customize the status code, response headers, and response body.

Let’s say you want to respond back to a client who might be connecting to your application over VPN. You want to use a custom response to inform the user that this behavior is discouraged, by sending error code 400 (Bad Request) and a static body message (“Please don’t try to connect over a VPN”). To do this, you can use the AWS Managed Rule group AWSManagedRulesAnonymousIpList and then set up custom rules using the label awswaf:managed:aws:anonymous-ip-list:AnonymousIPList.

Step 1: Create a custom response body

The first step in creating a custom response is to create a custom response body. This is the message that will be shown when the custom response is sent.

To create a custom response body

  1. In the AWS WAF console, open your web ACL and select the Custom response bodies tab.
  2. Choose Create custom response body.
  3. In Response body object name, enter a name for this response—for example, Custom-body-IP-list.
  4. Choose a Content type for the response body.
  5. In Response body, enter the response that you want to send back to the client.
  6. Choose Save.

Figure 8: Custom response body creation on the AWS WAF consoleFigure 8: Custom response body creation on the AWS WAF console

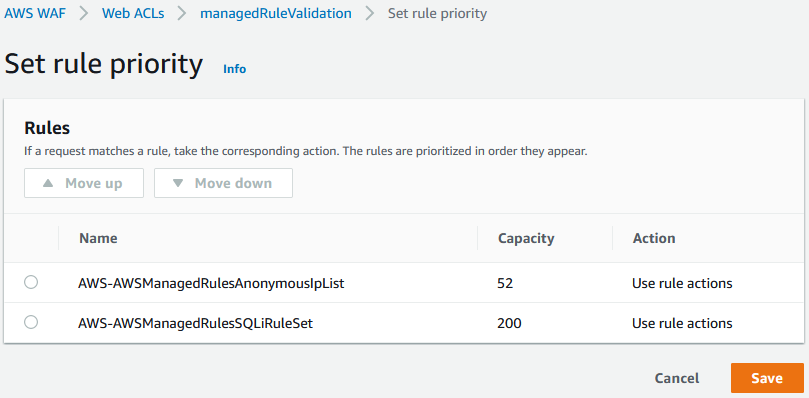
Step 2: Override the actions of the managed rule group

The rule you use to send your custom response should be in count mode. This will ensure that all the matching requests are sent to the subsequent WAF rules in priority order. In the following example, the rule AnonymousIPList in the managed rule group AWSManagedRulesAnonymousIpList is set to count mode. For more details on how to override the action of a managed rule group, see Overriding the actions of a rule group or its rules.

Figure 9: console screenshot overriding an AWS Managed Rules ruleFigure 9: console screenshot overriding an AWS Managed Rules rule

Step 3: Create a rule to block the request and send a custom response back to the client

You’ll use the AWS WAF labels feature for this step. As explained in Case 2 above, you need to create a custom rule that matches the label generated by the managed rule. In this case the, custom rule should be configured to send your custom response.

To create a custom rule

  1. Expand the Custom response section and select Enable.
  2. Under Response code, enter the custom HTTP status code you want to send back to the client.
  3. (Optional) Use the Response headers section if you wish to add a custom response header
  4. Under Choose how you would like to specify the response body, select the custom response body you created in Step 1.
  5. (Optional) If you wish to generate additional labels to track activity in logs, you can use Add label.
  6. Choose Add rule.
  7. Set the rule priority of your custom rule to lower than the AWS Managed Rules rule.
  8. Choose Save.

Figure 10: Console screenshot configuring a custom response body for a ruleFigure 10: Console screenshot configuring a custom response body for a rule

Summary

In this post, we demonstrated how the new AWS WAF features such as labels, version management, scope-down statements, and custom responses can help you customize the behavior of AWS Managed Rules to protect your web applications and minimize risk. You can use these features in various ways, such as customizing AWS Managed Rules by combining labels and request properties to allow or block requests, and using labels to help filter logs.

You can learn more about AWS WAF in other AWS WAF–related Security Blog posts.

 
If you have feedback about this post, submit comments in the Comments section below.

Want more AWS Security news? Follow us on Twitter.

Madhu Kondur

Madhu Kondur

Madhu is a cloud support engineer at AWS. He’s passionate about helping customers solve their AWS issues. He specializes in network security and enjoys helping customers get the best cloud experience possible through AWS.

Venugopal Pai

Venugopal Pai

Venugopal is a solutions architect at AWS. He lives in Bengaluru, India, and helps customers scale and optimize their applications in AWS.

The three most important AWS WAF rate-based rules

Post Syndicated from Artem Lovan original https://aws.amazon.com/blogs/security/three-most-important-aws-waf-rate-based-rules/

In this post, we explain what the three most important AWS WAF rate-based rules are for proactively protecting your web applications against common HTTP flood events, and how to implement these rules. We share what the Shield Response Team (SRT) has learned from helping customers respond to HTTP floods and show how all AWS WAF customers can benefit from these learnings.

When you have business-critical applications that are internet-facing, you need to protect them from risks such as distributed denial of service (DDoS) attacks. AWS Shield Advanced is a managed DDoS protection service that safeguards applications that are running behind Amazon Web Services (AWS) internet-facing resources. The backend origin of your application can exist anywhere, including on premises, and Shield Advanced can protect it. Shield Advanced provides DDoS protection for Layers 3–7. It also includes 24/7 access to the SRT to help you quickly respond to sophisticated unauthorized activity scenarios that might be unique to your application. To learn more about what resource types are supported to associate AWS WAF, see AWS WAF.

Increasingly, the SRT has been assisting customers in protecting against Layer 7 HTTP flood occurrences that negatively impact application availability or performance by overloading the application with an unusually high number of HTTP requests. In many cases, these malicious events can be automatically mitigated by using AWS WAF. In addition, AWS WAF has an easy-to-configure native rate-based rule capability, which detects source IP addresses that make large numbers of HTTP requests within a 5-minute time span, and automatically blocks requests from the offending source IP until the rate of requests falls below a set threshold. In this post, we show how you can pull insights from the AWS WAF logs to determine what your rate-based rule threshold should be.

The top three most important AWS WAF rate-based rules are:

  • A blanket rate-based rule to protect your application from large HTTP floods.
  • A rate-based rule to protect specific URIs at more restrictive rates than the blanket rate-based rule.
  • A rate-based rule to protect your application against known malicious source IPs.

Solution overview

AWS WAF is a web application firewall that helps protect your web applications against common web exploits that might affect availability, compromise security, or consume excessive resources. AWS WAF gives you control over which web traffic reaches your applications. If you already know the request rates for your application, you have all the necessary information to start creating your AWS WAF rate-based rules. To learn more about how to create rules, see Creating a rule and adding conditions. However, if you don’t have this data and want to learn how to get started, this solution helps you determine appropriate rates for your applications, and how to create AWS WAF rate-based rules.

Figure 1 shows how incoming request information is captured so that the operations team can use it to determine rate-based rules.

Figure 1: The workflow to collect and query logs and apply rate-based rules

Figure 1: The workflow to collect and query logs and apply rate-based rules

Let’s go through the flow to better understand what’s happening at each step:

  1. An application user makes requests to the application.
  2. AWS WAF captures information about the incoming requests and sends this to Amazon Kinesis Data Firehose.
  3. Kinesis Data Firehose delivers the logs to an Amazon Simple Storage Service (Amazon S3) bucket, where they will be stored.
  4. The operations team uses Amazon Athena to analyze the logs with SQL queries.
  5. Athena queries the logs in the S3 bucket and shows the query results.
  6. The operations team uses the query results to determine the appropriate AWS WAF rate-based rule.

The three rate-based rules in detail

Each of the rules helps to protect web applications from unauthorized activity. Each of the rules focuses on a specific aspect of protection. The rules complement each other, and so when they’re combined, they can offer greater help in protecting your web application. We’ll look at each of the rules to understand what they do.

Blanket rate-based rule

A blanket rate-based rule is designed to prevent any single source IP address from negatively impacting the availability of a website. For example, if the threshold for the rate-based rule is set to 2,000, the rule will block all IPs that are making more than 2,000 requests in a rolling 5-minute period. This is the most basic rate-based rule, and one of the most valuable for AWS WAF customers to implement. The SRT often helps customers who are actively under a DDoS attack to quickly implement this rule. In past experiences with HTTP flood cases, if this rule were proactively in place, the customer would have been protected and wouldn’t have needed to reach out to the SRT for assistance. The blanket rate-based rule would have automatically blocked the attempt without any human intervention.

URI-specific rate-based rule

Some application URI endpoints typically receive a high request volume, but for others it would be unusual and suspicious to see a high request count. For example, multiple requests in a 5-minute period to an application’s login page is suspicious and indicates a potential brute force or credential-stuffing attack against the application. A URI-specific rule can prevent a single source IP address from connecting to the login page as few as 100 times per 5-minute period, while still allowing a much higher request volume to the rest of the application. Some applications naturally have computationally expensive URIs that, when called, require considerably more resources to process the request. An example of this could be a database query or search function. If a bad actor targets these computationally expensive URIs, this can quickly lead to application performance or availability issues. If you assign a URI-specific rate-based rule to these portions of your site, you can configure a much lower threshold than the blanket rate-based rule. It’s beyond the scope of this blog post, but some customers use Application Load Balancer access logs and the target_processing_time information to determine precisely which portions of the site are the slowest to respond and might represent a computationally expensive call. These customers then put additional rate-based rule protections on calls that are made to these URIs.

IP reputation rate-based rule

Many of the DDoS events the SRT assists customers with include HTTP floods that originate from known malicious source IPs. The AWS WAF Security Automations solution provides AWS WAF customers with a subscription to four open-source threat intelligence lists. Rate-based rules with low thresholds can be applied to requests coming from these suspect sources. Some customers feel comfortable completely blocking web requests from these IPs, but at the very least, requests from these IPs should be rate-limited to protect the application from these well-known malicious sources.

It’s also common to see HTTP floods originate from IP addresses within certain countries. You can use AWS WAF geographical matching rules to assign lower rate-based rule thresholds to requests that originate from certain countries, or countries that don’t contain your web application’s primary user base. For example, suppose your application primarily serves users in the United States. In that case, it could be beneficial to create a rate-based rule with a low threshold for requests that come from any country other than the United States. HTTP floods are also commonly seen originating from IP addresses classified as cloud hosting provider IPs. You can use AWS WAF’s “HostingProviderIPList” Managed Rule to label these requests and then assign a lower rate-based rule threshold to them as well.

Prerequisites

Before you implement the solution, verify that:

  • AWS WAF is deployed in your AWS account and is associated with an Amazon CloudFront distribution or an Application Load Balancer.
  • Your AWS WAF default action is set to Block. When you create and configure a web ACL, you set the web ACL default action, which determines how AWS WAF handles web requests that don’t match any rules in the web ACL. To learn more about default action for a web ACL, see Deciding on the default action for a web ACL.
  • AWS WAF logging is configured and logs are being stored in an S3 bucket.

    Note: You can follow these instructions to configure delivery of AWS WAF logs to your S3 bucket, and you can also use AWS Firewall Manager to configure centralized AWS WAF logging in a multi-account environment.

Set up Athena to analyze AWS WAF logs

Amazon Athena is an interactive query service that you can use to analyze data in Amazon S3 by using standard SQL. For this solution, you’ll use Athena to connect to the S3 bucket where AWS WAF logs are stored and query the AWS WAF logs. The first step is to open the Athena console and create a database.

Note: The Athena database and table creation is a once-off configuration process. You can then come back and run the queries and see the query results based on your latest AWS WAF log data.

To create an Athena database, you’ll use a data definition language (DDL) statement. Paste the following query in the Athena query editor, replacing values as described here:

  • Replace <your-bucket-name> with the S3 bucket name that holds your AWS WAF logs.
  • For <bucket-prefix-if-exist>, if AWS WAF logs are stored in an S3 bucket prefix, replace with your prefix name. Otherwise, remove this part from the query, including the slash “/” at the end.
CREATE DATABASE IF NOT EXISTS wafrulesdb
  COMMENT 'AWS WAF logs'
  LOCATION 's3://<your-bucket-name>/<bucket-prefix-if-exist>/';

Choose Run query to run the query and create the database. Successful completion will be indicated by the query result, as shown below.

Results
Query successful. 

Next, you’ll create a table inside the database. Paste the following query in the Athena query editor, replacing values as described here:

  • Replace <your-bucket-name> with the S3 bucket name that holds your AWS WAF logs.
  • For <bucket-prefix-if-exist>, if AWS WAF logs are stored in an S3 bucket prefix, replace with your prefix name. Otherwise, you can remove this part from the query, including the slash “/” at the end.
  • For has_encrypted_data, if your AWS WAF log data is encrypted at rest, change the value to true, otherwise false is the correct value.
CREATE EXTERNAL TABLE IF NOT EXISTS wafrulesdb.waftable (
  `terminatingRuleId` string,
  `httpSourceName` string,
  `action` string,
  `httpSourceId` string,
  `terminatingRuleType` string,
  `webaclId` string,
  `timestamp` float,
  `formatVersion` int,
  `ruleGroupList` array<string>,
  `httpRequest` struct<`headers`:array<struct<name:string,value:string>>,clientIp:string,args:string,requestId:string,httpVersion:string,httpMethod:string,country:string,uri:string>,
  `rateBasedRuleList` string,
  `nonTerminatingMatchingRules` string,
  `terminatingRuleMatchDetails` string 
)
ROW FORMAT SERDE 'org.openx.data.jsonserde.JsonSerDe'
WITH SERDEPROPERTIES (
  'serialization.format' = '1'
) LOCATION 's3://<your-bucket-name>/<bucket-prefix-if-exist>/'
TBLPROPERTIES ('has_encrypted_data'='false');

Run the query in the Athena console. After the query completes, Athena registers the waftable table, which makes the data in it available for queries.

Run SQL queries to identify rate-based rule thresholds

Now that you have a table in Athena, know where the data is located, and have the correct schema, you can run SQL queries for each of the rate-based rules and see the query results.

Blanket rate-based rule for all application endpoints

You’ll start with a SQL query that identifies the blanket rule. The critical factor in determining the blanket rule is to run the query against AWS WAF logs data that represents a healthy high request volume. The following query defines a time window of 6 hours in the evening, expressed as 2020-12-01 16:00:00 and 2020-12-01 22:00:00. Time windows can span a few hours or several days; however, this time window must be a good representation of your traffic volume, which you will use as the basis to identify the threshold. For example, if your application is busier during certain periods, you should evaluate the log data for that time. In the example shown here, we limit the query results to the top 100 IPs in our SQL queries. You can adjust the limit to your needs by updating the LIMIT value.

SELECT
  httprequest.clientip,
  COUNT(*) AS "count"
FROM wafrulesdb.waftable
WHERE from_unixtime(timestamp/1000) BETWEEN TIMESTAMP '2020-12-01 16:00:00' AND TIMESTAMP '2020-12-01 22:00:00'
GROUP BY httprequest.clientip, FLOOR("timestamp"/(1000*60*5))
ORDER BY count DESC
LIMIT 100; 

Update the time window to your needs and run the query in the Athena console. The results will show the top requesting IPs in any 5-minute period between two dates, as illustrated in Figure 2.

Figure 2: The top requesting IP in any 5-minute period between dates

Figure 2: The top requesting IP in any 5-minute period between dates

You can visualize the results data to see a holistic view of the request count per IP. The chart in Figure 3 illustrates the SQL query results.

Figure 3: Chart: Top requesting IP in any 5-minute period between dates

Figure 3: Chart: Top requesting IP in any 5-minute period between dates

The results are sorted by showing the IPs with the highest request volume for every 5-minute period. This means that the same IP could appear multiple times, if most of the requests were made within that 5-minute interval. In our example, looking at the result, an excellent first blanket rule would limit the request volume to about 7,000 requests within a 5-minute time period. You can either create the AWS WAF rule by using the following JSON and the JSON rule editor, or by using the AWS WAF visual rule editor and following these instructions. If you’re using the following JSON, make sure to replace the Limit value with the value that you identified by running the SQL query earlier.

{
  "Name": "BlanketRule",
  "Priority": 2,
  "Action": {
    "Block": {}
  },
  "VisibilityConfig": {
    "SampledRequestsEnabled": true,
    "CloudWatchMetricsEnabled": true,
    "MetricName": "BlanketRule"
  },
  "Statement": {
    "RateBasedStatement": {
      "Limit": 7000,
      "AggregateKeyType": "IP"
    }
  }
}

Sometimes a client connects to an application through an HTTP proxy or a content delivery network (CDN), which obscures the client origin IP. It’s important to identify the client IP instead of the one from the proxy or CDN, because blocking source IPs can cause a wider unwanted impact. You can use many tools to help you identify whether the source IP might be a CDN. In this case, you would need to query and filter on the X-Forwarded-For, True-Client-IP, or other custom headers. CDN providers typically publish which headers they add to the requests, but X-Forwarded-For and True-Client-IP are common. The following query shows how you can reference these headers, illustrating with the X-Forwarded-For header, to write rate-based rules. You can replace X-Forwarded-For with the header you expect to hold the client IP.

SELECT
  header.value,
  COUNT(*) AS "count"
FROM wafrulesdb.waftable, UNNEST(httprequest.headers) as t(header)
WHERE
    from_unixtime(timestamp/1000) BETWEEN TIMESTAMP '2020-12-01 16:00:00' AND TIMESTAMP '2020-12-01 22:00:00'
  AND
    header.name = 'X-Forwarded-For'
GROUP BY header.value, FLOOR("timestamp"/(1000*60*5))
ORDER BY count DESC
LIMIT 100;

URI-based rule for specific application endpoints

Suppose that you want to further limit requests to the login page on your website. To do this, you could add the following string match condition to a rate-based rule:

  • The part of the request to filter on is URI
  • The Match Type is Starts with
  • A Value to match is /login (this needs to be whatever identifies the login page in the URI portion of the web request)

Next you have to identify what is a typical request volume to the /login URI for the application. The following SQL query does exactly that.

SELECT
  httprequest.clientip,
  httprequest.uri,
  COUNT(*) AS "count"
FROM wafrulesdb.waftable
WHERE 
  from_unixtime(timestamp/1000) BETWEEN TIMESTAMP '2020-12-01 16:00:00' AND TIMESTAMP '2020-12-01 22:00:00'
AND
  httprequest.uri = '/login'
GROUP BY httprequest.clientip, httprequest.uri, FLOOR("timestamp"/(1000*60*5))
ORDER BY count DESC
LIMIT 100;

Replace the time window 2020-12-01 16:00:00 and 2020-12-01 22:00:00 and the httprequest.uri value, if applicable, and run the query in the Athena console. The results show the highest requesting IP and /login URI for every 5-minute period between dates, as illustrated in Figure 4.

Figure 4: The highest requesting IP and /login URI for every 5-minute period between dates

Figure 4: The highest requesting IP and /login URI for every 5-minute period between dates

Figure 5 illustrates a chart based on the query results for the highest requesting IP and /login URI for every 5-minute period between dates.

Figure 5: Chart: The highest requesting IP and /login URI for every 5-minute period between dates

Figure 5: Chart: The highest requesting IP and /login URI for every 5-minute period between dates

Based on the SQL query results, you would specify a rate limit of 150 requests per 5 minutes. Adding this rate-based rule to a web ACL will limit requests to your login page per IP address without affecting the rest of your site. Once again, you can either create the AWS WAF rule by using the following JSON and the JSON rule editor, or by using the AWS WAF visual rule editor and following these instructions. If you’re using the following JSON, make sure to replace the Limit value with the value that you identified by running the SQL query earlier.

{
  "Name": "UriBasedRule",
  "Priority": 1,
  "Action": {
    "Block": {}
  },
  "VisibilityConfig": {
    "SampledRequestsEnabled": true,
    "CloudWatchMetricsEnabled": true,
    "MetricName": "UriBasedRule"
  },
  "Statement": {
    "RateBasedStatement": {
      "Limit": 150,
      "AggregateKeyType": "IP",
      "ScopeDownStatement": {
        "ByteMatchStatement": {
          "FieldToMatch": {
            "UriPath": {}
          },
          "PositionalConstraint": "STARTS_WITH",
          "SearchString": "/login",
          "TextTransformations": [
            {
              "Type": "NONE",
              "Priority": 0
            }
          ]
        }
      }
    }
  }
}

AWS WAF rules with a lower value for Priority are evaluated before rules with a higher value. For the AWS WAF rules to work as expected (first evaluating the more specific rule—the URI-based rule, and only after that, the more general blanket rule) you have to set the AWS WAF rule priority. You can do that by updating the JSON and setting the Priority value to 1 for the blanket rule and 0 for the URI-based rule, or by using the AWS WAF visual rule editor. The expected AWS WAF rule priority should be as illustrated in Figure 6.

Figure 6: AWS WAF rules with priority for UriBasedRule

Figure 6: AWS WAF rules with priority for UriBasedRule

If you want to know the request volume across all application URIs, the following SQL will accomplish that.

SELECT
  httprequest.clientip,
  httprequest.uri,
  COUNT(*) AS "count"
FROM wafrulesdb.waftable
WHERE from_unixtime(timestamp/1000) BETWEEN TIMESTAMP '2020-12-01 16:00:00' AND TIMESTAMP '2020-12-01 22:00:00'
GROUP BY httprequest.clientip, httprequest.uri, FLOOR("timestamp"/(1000*60*5))
ORDER BY count DESC
LIMIT 100;

Figure 7 shows a chart of what the SQL query results might look like.

Figure 7: The highest requesting IP and URI for every 5-minute period between dates

Figure 7: The highest requesting IP and URI for every 5-minute period between dates

IP reputation rule groups to block bots or other threats

You can use IP reputation rules to block requests based on their source. AWS WAF offers a wide selection of managed rule groups, and Amazon IP reputation list is the one that will help to reduce your exposure to bot traffic or exploitation attempts.

To add the Amazon IP reputation list rule to your web ACL

  1. Open the AWS WAF console and navigate to the managed rule groups view.

    Figure 8: The managed rule group view in AWS WAF

    Figure 8: The managed rule group view in AWS WAF

  2. Expand AWS managed rule groups, and for Amazon IP reputation list, choose Add to web ACL.

    Figure 9: Add the Amazon IP reputation list to the web ACL

    Figure 9: Add the Amazon IP reputation list to the web ACL

  3. Scroll to the bottom of the page and choose Add rule.
  4. At this point, you should see the Set rule priority view. Move up the Amazon managed rule so that it has the highest priority. If a request originates from a bot, you want to deny the request as early as possible, and you achieve exactly that by assigning the highest priority to the Amazon IP reputation list rule. Your final AWS WAF rules order should be as shown in Figure 10.

    Figure 10: Final AWS WAF rules ordered by priority

    Figure 10: Final AWS WAF rules ordered by priority

Considerations for rate-based rules

It’s important to note that the more specific AWS WAF rules should have a higher priority, because you want these rules to limit the request volume first. In our example, the rules strategy is first based on a specific URI, and then on a blanket rule that limits requests across the whole application.

The rate-based rules that we discussed here provide a solid foundation to help you protect your internet-facing applications from common basic HTTP request floods. However, the solution in this blog post shouldn’t be seen as a one-time setup but rather as an iterative activity.

You should determine a healthy time frame to rerun Amazon Athena queries to identify a new rate-based rule that aligns with the application’s growth and increasing request volume. Reviewing the rate-based rules on an iterative basis and incorporating it into your existing processes, such as software development life cycle, is a great way to schedule in the review process. Each AWS WAF rule can publish Amazon CloudWatch metrics, which can be used to trigger alerts before thresholds are crossed. You can use alerts to create tickets to operations teams based on thresholds you set. This alerts your operations teams to review the situation to see if it’s a DDoS attack being thwarted versus legitimate traffic being dropped.

After you define your request, add a buffer to allow for growth. Rate-based rules should have a reasonable buffer to account for near-future application growth. For instance, when an Athena query result shows a request volume of 500 requests, a rate-based rule with a limit of 1,000 requests gives a buffer for an additional 500 requests to account for application growth.

Summary

In this post, we introduced you to the top three most important AWS WAF rate-based rules to protect your web applications from common HTTP flood events. We also covered how to implement these rate-based rules and determined an appropriate request threshold for your application by using AWS WAF logs and Amazon Athena queries. To learn more about best practices that help you protect your websites and web applications against various attack vectors by using AWS WAF, see our whitepaper, Guidelines for Implementing AWS WAF.

You can learn more about AWS WAF in other AWS WAF–related Security Blog posts.

If you have feedback about this post, submit comments in the Comments section below. If you have questions about this post, start a new thread on the AWS WAF forum or contact AWS Support.

Want more AWS Security how-to content, news, and feature announcements? Follow us on Twitter.

Author

Artem Lovan

Artem is a Senior Solutions Architect based in New York. He helps customers architect and optimize applications on AWS. He has been involved in IT at many levels, including infrastructure, networking, security, DevOps, and software development.

Author

Jesse Lepich

Jesse is a Senior Security Solutions Architect at AWS based in Lake St. Louis, Missouri, focused on helping customers implement native AWS security services. Outside of cloud security, his interests include relaxing with family, barefoot waterskiing, snowboarding/snow skiing, surfing, boating/sailing, and mountain climbing.

Automatically update AWS WAF IP sets with AWS IP ranges

Post Syndicated from Fola Bolodeoku original https://aws.amazon.com/blogs/security/automatically-update-aws-waf-ip-sets-with-aws-ip-ranges/

Note: This blog post describes how to automatically update AWS WAF IP sets with the most recent AWS IP ranges for AWS services. This related blog post describes how to perform a similar update for Amazon CloudFront IP ranges that are used in VPC Security Groups.

You can use AWS Managed Rules for AWS WAF to quickly create baseline protections for your web applications, including setting up lists of IP addresses to be blocked. In some cases, you might need to create an IP set in AWS WAF with the IP address ranges of Amazon Web Services (AWS) services that you use, so that traffic from these services is allowed. In this blog post, we provide a solution that automatically updates an AWS WAF IP set with the IP address ranges of the AWS services Amazon CloudFront, Amazon Route 53 health checks, and Amazon EC2 (and also the services that share the same IP address ranges, such as AWS Lambda, Amazon CloudWatch, and so on). These services are present in the AWS Managed Rules Anonymous IP list, and blocking them may cause inadvertent service impairment for applications that expect traffic from the services.

As an application owner, you can improve your security posture by using the Anonymous IP list in your AWS WAF web access control lists (web ACLs) to block source IP addresses from specific hosting providers and anonymization services, such as VPNs, proxies, and Tor nodes. Due to the generic nature of these rules, when you use the Anonymous IP list, you might want to exclude certain IPs from the list of IPs to be blocked, in order to allow web traffic from those sources. For example, you can allow traffic that originates from the AWS network.

Alternatively, you might want to permit only IP addresses from certain AWS services in a web ACL. This is a common requirement when you protect an Application Load Balancer by restricting all incoming traffic to CloudFront IP ranges. Creating your own custom list to allow expected traffic from the AWS network requires some effort, because you need to periodically update the list by using the IP ranges that we provide. With the solution we present here, you don’t have to manually manage the exclusion list. When the new AWS IP ranges are published, this solution will automatically fetch and update the list.

Note: This solution only works with AWS WAF, and will not work with AWS WAF Classic.

Solution overview

Figure 1 shows the solution architecture.

Figure 1: Automatic update process for service IPs

Figure 1: Automatic update process for service IPs

AWS sends Amazon Simple Notification Service (Amazon SNS) notifications to subscribers of the AmazonIPSpaceChanged SNS topic when updates are made to the public IP addresses for AWS services. This solution uses an AWS CloudFormation template to deploy an AWS Lambda function that is triggered by these SNS notifications. The function creates AWS WAF IP sets for IPv4 and IPv6 address ranges in your web ACL.

The solution workflow is as follows:

  1. In the CloudFormation template, you select the services that you want the AWS WAF IP set to be updated with.
  2. The template deploys the required AWS resources with the configuration that specifies what services to fetch from an AWS public IP address update.
  3. AWS Lambda function is manually invoked one first time to populate AWS WAF IP sets with selected IPs from AWS IP range.
  4. Once AWS IP range is updated, an Amazon SNS notification is sent to subscribers of the SNS topic.
  5. SNS notification triggers the AWS Lambda function.
  6. The Lambda function fetches the selected IP ranges and updates IP sets for IPv4 addresses and IPv6 addresses.
  7. The application owner adds a custom AWS WAF web ACL rule that uses the IP sets to allow traffic from the AWS services that you’ve selected. This way, the web ACL makes reference to always updated AWS WAF IP sets with no further action required from your side.

Solution prerequisites

The solution is automatically created when you deploy the AWS CloudFormation template that is available on the solution’s GitHub page. There are three resources that you must have in place before you deploy the template:

  • The Python code that will be used as the Lambda function.
    • Download the update_aws_waf_ipset.py Python code from the project’s AWS Lambda directory in GitHub. This function is responsible for constantly checking AWS IPs and making sure that your AWS WAF IP sets are always updated with the most recent set of IPs in use by the AWS service of choice.
  • An Amazon Simple Storage Service (Amazon S3) bucket that you will use to store the compressed Python code.
    • Compress the file to a .zip file and upload it to an Amazon Simple Storage Service (Amazon S3) bucket in the same AWS Region where you will deploy the template. For instructions on how to create an S3 bucket, see Creating a bucket.
  • An AWS WAF web ACL to filter requests that come in from trusted sources. The web ACL uses the IP sets that the solution creates and updates with the necessary IP addresses.

Deploy the AWS CloudFormation template

The CloudFormation template deploys the required resources for this solution in your account. The following resources are deployed:

  • Two AWS WAF IP sets, IPv4Set and IPv6Set that are used to store IPv4 and IPv6 IP addresses from the services you’re interested in allowing. Those IP sets are visible in the AWS WAF console under the same Region where the template is deployed.
    • Note: The IP address 192.0.2.0/24 that appears in the template is a placeholder for the IP addresses that will be populated by the solution, and it is used for documentation purposes only.
  • The update_aws_waf_ipset.py Python code is used in an AWS Lambda function called UpdateWAFIPSet. This is the function that will read which services the solution should collects IPs from, and which IP sets should be populated. If you don’t change those parameters, the function will use default IP set suffixes. By default, the solution will select ROUTE53_HEALTHCHECKS and CLOUDFRONT as the services for which to download IPs. You can update the list of IP addresses as needed, by referring to the AWS IP JSON document for a list of service names and IP ranges.
  • A Lambda execution role with permissions restricted to least privilege required.
  • The Lambda function is automatically subscribed to the AmazonIPSpaceChanged SNS topic, which is responsible for monitoring changes in the list of AWS IPs.
  • A Lambda permission resource to allow the previously created SNS topic to invoke the template’s Lambda function.

Solution deployment through the console

You can download the AWS CloudFormation template, called template.yml, from the solution’s GitHub page.

After you’ve downloaded the template, access the CloudFormation console to create the stack. See the CloudFormation User Guide for instructions on selecting a downloaded template in the CloudFormation console to deploy a stack.

Note: The Region that you use when you deploy the template is where resources will be created.

On the Specify stack details page, you can enter the stack name, which will be the name used as a reference for resources created by the template, as well as six other stack parameters, shown in Figure 2.

Figure 2: Template parameters

Figure 2: Template parameters

The parameters are as follows:

  • EC2REGIONS – This is the Region that the solution will use as a reference when it updates its list of IPs. Select all for all Regions, but you can also specify a Region of interest.
  • IPV4SetNameSuffix – The solution will create an AWS WAF IPv4 IP set with the stack name as its name, but you can also add a suffix of your choice to the name.
  • IPV6SetNameSuffix – Like the AWS WAF IPv4 IP set, the IPv6 IP set can also have a suffix of your choice.
  • LambdaCodeS3Bucket – As mentioned in the Prerequisites section, you need to have previously uploaded the Lambda function Python code to an Amazon S3 bucket in the same Region where you’re deploying the stack. Enter the bucket name here, for example, mybucket.
  • LambdaCodeS3Object – Enter the name of the .zip file of the compressed Lambda function in the S3 bucket, for example, myfunction.zip.
  • SERVICES – Enter the list of AWS services for which you want the IP addresses populated in the AWS WAF IP sets. By default, this solution uses ROUTE53_HEALTHCHECKS and CLOUDFRONT, but you can change this parameter and add any service name, according to the list in the AWS IP ranges JSON.

After you deploy the template, its status will change to CREATE_COMPLETE.

Solution deployment through the AWS CLI

You can also deploy the solution template through the AWS Command Line Interface (AWS CLI). On the solution’s GitHub page, in the Setup section, follow the instructions for deploying the solution by using AWS CLI commands.

Note: To use the AWS CLI, you must have set it up in your environment. To set up the AWS CLI, follow the instructions in the AWS CLI installation documentation.

Invoke the Lambda function for the first time

After you successfully deploy the CloudFormation stack, it’s required that you run an initial Lambda invocation so that the AWS WAF IP sets are updated with AWS services IPs. This Lambda invocation is only required once, and after this initial call, the solution will handle future updates on your behalf.

To invoke this Lambda call through the AWS Management Console, open the Lambda console, select the Lambda function that was created by the template, and use the following event to create a test event. See Invoke the Lambda function in the AWS Lambda Developer Guide for step-by-step guidance on how to run a test event.

{
  "Records": [
    {
      "EventVersion": "1.0",
      "EventSubscriptionArn": "arn:aws:sns:EXAMPLE",
      "EventSource": "aws:sns",
      "Sns": {
        "SignatureVersion": "1",
        "Timestamp": "1970-01-01T00:00:00.000Z",
        "Signature": "EXAMPLE",
        "SigningCertUrl": "EXAMPLE",
        "MessageId": "12345678-1234-1234-1234-123456789012",
        "Message": "{\"create-time\": \"yyyy-mm-ddThh:mm:ss+00:00\", \"synctoken\": \"0123456789\", \"md5\": \"test-hash\", \"url\": \"https://ip-ranges.amazonaws.com/ip-ranges.json\"}",
        "Type": "Notification",
        "UnsubscribeUrl": "EXAMPLE",
        "TopicArn": "arn:aws:sns:EXAMPLE",
        "Subject": "TestInvoke"
      }
    }
  ]
}

The success of the event will mean that the newly created AWS WAF IP sets now have the updated list of IPs from the services you’re working with.

You can also achieve Lambda function invocation through the AWS CLI by using the following command, where test_event.json is the test event I mentioned earlier.

aws lambda invoke \
  --function-name $CFN_STACK_NAME-UpdateWAFIPSets \
  --region $REGION \
  --payload file://lambda/test_event.json lambda_return.json

You can use the documentation for invoking a Lambda function in the AWS CLI to explore this command and its parameters.

After successful invocation, status code 200 is returned on the AWS CLI to illustrate that invocation happened as expected. At this point, the AWS WAF IP sets are updated.

Use the solution IP sets in your AWS WAF web ACL

Now the AWS WAF IPv4 and IPv6 IP sets are populated, and you can obtain the IP lists either by using the AWS WAF console, or by calling the GetIPSet API through the AWS CLI command get-ip-set.

To use AWS WAF IP sets in your web ACL, see Creating and managing an IP set in the AWS WAF Developer Guide. You can use these IP sets in the same web ACL or rule group that contains the AWS Managed Rules Anonymous IP list and is associated to the AWS resource that AWS WAF is protecting. AWS WAF evaluation order and solution positioning within WebACL will be discussed in later section.

To associate your web ACL with an AWS resource, see Associating or disassociating a web ACL with an AWS resource.

Validate the solution

To validate the solution, let’s consider a scenario where you would like to allow requests from CloudFront to come through, while blocking any other anonymous and hosting provider sources. In this scenario, consider the following requests that are filtered by AWS WAF.

In the first one, a customer has the AWSManagedRulesAnonymousIpList rule group, and a request coming from an Amazon EC2 instance IP is blocked.

{
    "timestamp": 1619175030566,
    "formatVersion": 1,
    "webaclId": "arn:aws:wafv2:eu-west-1:111122223333:regional/webacl/managedRuleValidation/11fd1e32-ae25-45f8-811f-3c1485f76ceb",
    "terminatingRuleId": "AWS-AWSManagedRulesAnonymousIpList",
    "terminatingRuleType": "MANAGED_RULE_GROUP",
    "action": "BLOCK",
    (...)
    "ruleGroupList": [
        {
            "ruleGroupId": "AWS#AWSManagedRulesAnonymousIpList",
            "terminatingRule": {
                "ruleId": "HostingProviderIPList",
                "action": "BLOCK",
                "ruleMatchDetails": null
            },
            (...)
    ],
    (...)
    "httpRequest": {
        "clientIp": "203.0.113.176",
        (...)
    }
}

In the second request, this time coming in from CloudFront, you can see that AWS WAF didn’t block the request.

{
    "timestamp": 1619175149405,
    "formatVersion": 1,
    "webaclId": "arn:aws:wafv2:eu-west-1:111122223333:regional/webacl/managedRuleValidation/11fd1e32-ae25-45f8-811f-3c1485f76ceb",
    "terminatingRuleId": "Default_Action",
    "terminatingRuleType": "REGULAR",
    "action": "ALLOW",
    "terminatingRuleMatchDetails": [],
    (...)
    "httpRequest": {
       "clientIp": "130.176.96.86",
       (...)
    }
}

To achieve this result, you need to edit AWSManagedRulesAnonymousIpList and add a scope-down statement so that the rule set only blocks requests that aren’t sent from sources within this solution’s IPv4 and IPv6 IP sets.

To create a scope-down statement for AWSManagedRulesAnonymousIpList

  1. In the AWS WAF console, access your web ACL.
  2. Open the Rules tab.
  3. Select AWSManagedRulesAnonymousIpList rule set, and then choose Edit.
  4. Choose the arrow next to Scope-down statement – optional. You will see two options, Rule visual editor and Rule JSON editor.
  5. Choose Rule JSON editor and enter the following JSON. Replacing <IPv4-IPSET-ARN> and <IPv6-IPSET-ARN> with respective IP sets’ Amazon Resource Numbers (ARNs).

Note: You can use the AWS WAF ListIPSets action or the list-ip-sets CLI command to obtain the IP set Amazon Resource Numbers (ARNs) and enter that information in the provided JSON.

{
  "NotStatement": {
    "Statement": {
      "OrStatement": {
        "Statements": [
          {
            "IPSetReferenceStatement": {
              "ARN": "<IPv4-IPSET-ARN>"
            }
          },
          {
            "IPSetReferenceStatement": {
              "ARN": "<IPv6-IPSET-ARN>"
            }
          }
        ]
      }
    }
  }
}

After making this change, your rule editing page will look like the following.

Figure 3: AWSManagedRulesAnonymousIpList scope-down statement

Figure 3: AWSManagedRulesAnonymousIpList scope-down statement

When you set the rule priority, consider using the AWSManagedRulesAnonymousIpList rule group with a lower priority than other rules within the web ACL. This causes that rule group to be evaluated prior to rules that are configured with terminating actions (that is, Allow and Block actions). The scope-down statement will match the request and allow traffic from the IP addresses within the IP set, and pass every other IP on to the next rule for further evaluation. Figure 4 shows an example of the suggested priority.

Figure 4: Example with suggested use of AWS WAF web ACL priority

Figure 4: Example with suggested use of AWS WAF web ACL priority

Summary

This blog post provides you with a solution that is capable of automatically updating AWS WAF IP sets with the list of current IP ranges for one or more AWS services. You can use this solution in various ways, such as to allow requests from Amazon CloudFront when you’re using the AWS Managed Rules Anonymous IP List.

For best practices on AWS WAF implementation, see Guidelines for Implementing AWS WAF. For further reading on AWS WAF, see the AWS WAF Developer Guide.

If you have feedback about this post, submit comments in the Comments section below.

Want more AWS Security how-to content, news, and feature announcements? Follow us on Twitter.

Author

Fola Bolodeoku

Fola is a Security Engineer on the AWS Shield Team, where he focuses on helping customers improve their application security posture against DDoS, and other application threats. When he is not working, he enjoys spending time on road trips in the Western Cape, and beyond.

Author

Mario Pinho

Mário is a Security Engineer at AWS. He has a background in network engineering and consulting, and feels at his best when breaking apart complex topics and processes into their simpler components. In his free time, he pretends to be an artist by playing piano and doing landscape photography.

Author

Davidson Junior

Davidson is a Cloud Support Engineer at AWS in Cape Town, South Africa. He is a subject matter expert in AWS WAF, and is focused on helping customers troubleshoot and protect their network in the cloud. Outside of work, he enjoys listening to music, outdoor photography, and hiking the Western Cape.

AWS Shield threat landscape review: 2020 year-in-review

Post Syndicated from Mario Pinho original https://aws.amazon.com/blogs/security/aws-shield-threat-landscape-review-2020-year-in-review/

AWS Shield is a managed service that protects applications that are running on Amazon Web Services (AWS) against external threats, such as bots and distributed denial of service (DDoS) attacks. Shield detects network and web application-layer volumetric events that may indicate a DDoS attack, web content scraping, or other unauthorized non-human traffic that is interacting with AWS resources.

In this blog post, I’ll show you some of the volumetric event trends from network traffic and web request patterns that we observed in 2020 as more workloads moved to the cloud. It includes insights that are broadly applicable to cloud applications and insights that are specific to gaming applications. I will also share tips and best practices that you can follow to protect the availability of the applications that you run on AWS.

DDoS trends as more developers rely on the cloud

In 2020, we saw an increase in developers building applications on AWS and protecting their availability with AWS Shield Advanced, which includes AWS WAF at no additional cost. The DDoS threat vectors we observed were similar to the ones that were observed in 2019, but they occurred with greater frequency. Between February 2020 and April 2020, we observed a 72% increase in the monthly number of events that were detected by Shield.

TCP SYN floods and UDP reflection attacks, which attempt to reflect and amplify packets off legitimate services running on the internet, were among the most common infrastructure-layer events detected by AWS Shield in 2020. (In this blog post, we’ll use the term infrastructure layer to refer to Layers 3 and 4 of the OSI model.) These tactics attempt to affect the availability of an application by overwhelming its ability to process packets or establish new connections on behalf of legitimate users. One of the oldest UDP reflection vectors, DNS reflection, remains the most common, at 15.5% of all infrastructure-layer events detected by Shield. TCP SYN floods were the second most common at 13.8%. This is unsurprising, because web applications commonly rely upon both DNS and TCP traffic. Bad actors can find a consistent supply of systems on the internet that can be used as reflectors, due to the properties of these protocols, or system misconfiguration.

Bad actors may use application-layer requests, in isolation or together with infrastructure-layer attacks, in their attempt to affect the availability of an application. The most common application-layer attack observed by Shield in 2020 was the web request flood, an observation that is consistent with prior years. This vector gives a bad actor more leverage, meaning that they can have a greater effect with less traffic and effort. Instead of having to exhaust the capacity of a network path, device, or other lower-level component, they only need to send more web requests than the application is able to handle. This attack vector was a significant cause of increased volumetric events detected by Shield in the first half of 2020. For more information about events detected by Shield during 2020, see Figure 1.
 

Figure 1: Monthly number of volumetric events detected by AWS Shield in 2020

Figure 1: Monthly number of volumetric events detected by AWS Shield in 2020

A closer look at web application-layer attacks

The request volume of web application-layer events that are detected by AWS Shield has increased, an indication that bad actors are making greater investments in tactics that are more challenging to detect and mitigate than infrastructure-layer events. Shield continuously monitors DDoS activity and alerts customers if there is an elevated threat at any point in time. In 2020, Shield reported elevated threats on 53 days, 33 of which were caused by high-volume web request floods. There were 55 events with a volume of greater than 500,000 requests per second (RPS), some of which reached millions of RPS. The RPS of the 99th percentile (P99) of the volume of web request floods detected by Shield nearly doubled between the first and second halves of the year. (The 99th percentile is the request volume in RPS, below which 99% of request floods were observed.). For more information about the volume of web request floods detected by Shield in 2020, see Figure 2.
 

Figure 2: Quarterly P90 and P99 volume of web request floods detected by AWS Shield in 2020

Figure 2: Quarterly P90 and P99 volume of web request floods detected by AWS Shield in 2020

It’s important to protect web applications against DDoS attacks of any size. The more common request floods are relatively small, but smaller attacks can affect an application if it isn’t architected for DDoS resiliency. You can follow these best practices to help protect your web application against request floods and other DDoS attacks:

  • Protect internet-facing resources with AWS Shield Advanced. You can use AWS Shield Advanced to protect your applications that are running on AWS against most common, frequently occurring network and transport layer DDoS attacks. When you add protected resources in AWS Shield Advanced, network volumetric attacks against those resources are detected and mitigated more quickly. You also receive visibility into security events by using the AWS Shield console, API, or Amazon CloudWatch metrics. If you need assistance during an active event, you can quickly engage with AWS Shield experts or escalate to the AWS Shield Response Team (SRT).
  • Access greater network and request capacity with Amazon CloudFront and Amazon Route 53. You can use these services to serve static and dynamic web content, as well as DNS answers, by using the global network of AWS edge locations. This provides you with greater capacity to help mitigate large volumetric attacks. Applications that are fronted by Amazon CloudFront and Amazon Route 53 also benefit from inline mitigation that continually inspects all traffic and mitigates most infrastructure-layer DDoS attempts in less than one second. CloudFront and the AWS Shield DDoS mitigation systems use SYN cookies to verify new connections, which protects against SYN floods and other traffic floods that aren’t valid for the application. (A SYN cookie is a technique by which the Shield infrastructure encodes connection setup information into the SYN response (SYN-ACK packet) in such a way that the TCP connection resources are only consumed for legitimate clients who complete the TCP handshake.)
  • Use AWS WAF and rate-based rules to mitigate application-layer attacks. AWS Shield Advanced provides you with protection against infrastructure-layer attacks that can be mitigated with network-based DDoS mitigation systems. When you add Shield Advanced protection to CloudFront or Application Load Balancer (ALB) for serving web content, you receive AWS WAF at no additional cost. AWS Managed Rules for AWS WAF makes it easy to select and apply pre-configured rules, depending on your specific requirements. You also receive web request flood detection and can mitigate security events by configuring rate-based rules to match and temporarily block IP addresses that are sending traffic above a rate that you define. For larger applications, or applications that span multiple AWS accounts, you can use AWS Firewall Manager to deploy and manage rules across all of your resources.

Considerations unique to gaming use cases

On AWS, you can build and protect any kind of application. Internet-facing applications are more likely to receive DDoS attacks, particularly if a bad actor is motivated to disrupt the normal function of the application. We looked across AWS Shield data and found that one type of application stood out as the most likely to be targeted by DDoS attacks: gaming servers. Gaming servers host matches between players on their personal computers or gaming consoles. 16% of infrastructure-layer events detected by Shield in 2020 targeted gaming applications. The application might be targeted simply out of malice, or to gain an advantage in the game. Between Q1 2020 and Q2 2020, we observed a 46% increase in the frequency of events that were detected on behalf of gaming applications. This increase aligns with the increased use of residential internet networks during the same time.

There are unique considerations for protecting a gaming application against DDoS attacks. Many gaming applications rely upon UDP traffic, which makes it infeasible to block UDP as a countermeasure against the most common DDoS attacks, like UDP reflection attacks or UDP floods. You can nevertheless protect your gaming application and the experience of your players by using Elastic IP addresses and protecting these resources with AWS Shield Advanced. Shield Advanced has the ability to perform deep packet inspection of all traffic, even at extremely high PPS rates. Using that powerful tool, the AWS Shield Response Team (SRT) can work with you to understand your application and build a custom mitigation that allows only valid player traffic.

Reacting to extortion attempts

From August 2020 through November 2020, we saw a revival of DDoS extortion attempts, a tactic that is now more than six years old. Each extortion attempt reported by customers to the AWS SRT had familiar characteristics. A malicious actor would target an application that wasn’t running on AWS as a proof of concept and then threaten a larger, follow-on attack if a ransom wasn’t paid. Although it’s very uncommon for the follow-on attack to actually occur, application owners take these threats seriously and use the opportunity to assess their own protection and operational readiness. In approximately 90% of AWS support cases related to these attempts, the SRT assisted the application owners directly with their preparation. We also assisted Shield Advanced customers who weren’t directly targeted by extortion attempts but were aware of other extortion campaigns.

One question that we frequently hear is how AWS can help developers monitor their applications and take quick action if a possible DDoS attack is detected. When you protect your resources with AWS Shield Advanced, you have the option to associate an Amazon Route 53 health check. The status of the health check is used to improve the decisions that are made by the Shield detection system. If you have Shield Advanced proactive engagement enabled, the SRT is automatically engaged any time a Shield event corresponds to an unhealthy Route 53 health check that is associated to your protected resource. Based on the contact information provided in the Shield console, an SRT engineer will contact you to coordinate a response to the detected event. If you’re running a web application, you can choose to delegate access to your Shield Advanced and AWS WAF APIs to the SRT and provide the team with copies of your AWS WAF logs. During an escalation, an SRT engineer will evaluate your logs for DDoS signatures and robotic patterns and assist in building effective mitigations.

Summary

In this blog post, I shared some of the trends that were observed by AWS Shield in 2020, as well as steps that you can take to protect the availability of your applications against DDoS attacks. If you’d like to learn more about DDoS protection on AWS and configuring AWS Shield Advanced, check out the following resources:

If you have feedback about this post, submit comments in the Comments section below. If you have questions about this post, start a new thread on the AWS Shield forum or contact AWS Support.

Want more AWS Security how-to content, news, and feature announcements? Follow us on Twitter.

Author

Mário Pinho

Mário is a Security Engineer at AWS. He has a background in network engineering and consulting, and feels at his best when breaking apart complex topics and processes into their simpler components. In his free time, he pretends to be an artist by playing piano and doing landscape photography.

How to protect a self-managed DNS service against DDoS attacks using AWS Global Accelerator and AWS Shield Advanced

Post Syndicated from Chido Chemambo original https://aws.amazon.com/blogs/security/how-to-protect-a-self-managed-dns-service-against-ddos-attacks-using-aws-global-accelerator-and-aws-shield-advanced/

In this blog post, I show you how to improve the distributed denial of service (DDoS) resilience of your self-managed Domain Name System (DNS) service by using AWS Global Accelerator and AWS Shield Advanced. You can use those services to incorporate some of the techniques used by Amazon Route 53 to protect against DDoS attacks.

DNS routes users to your application by quickly translating a human-readable domain name to a machine-readable IP address. When protecting the availability of your application against DDoS attacks, it’s important to consider every part of the stack, including domain name resolution. The recommended best practice is to create hosted zones on Route 53, a scalable, highly available DNS service that’s protected against large DDoS attacks and query floods. Route 53 uses anycast routing to serve DNS queries from more than 150 edge locations around the globe. With anycast routing, DNS queries are served from locations that are closer to your users and the globally distributed DDoS mitigation capacity of Amazon Web Services (AWS) reduces the impact of attacks.

Optionally, you can also build your own DNS service on Amazon Elastic Compute Cloud (Amazon EC2). For example, you can run your own proprietary DNS server to take advantage of custom features that you wrote to integrate with an existing DNS service that isn’t running on AWS. When you register a domain name, you’re usually required to provide at least two name servers that can respond to queries from your users. It’s possible to build a DNS service on only two instances, but that provides limited DDoS resilience.

Solution overview

To protect your self-managed DNS service using this solution, you need a strong understanding of DNS and how to operate a distributed, self-managed DNS service on Amazon EC2. This solution improves upon an existing self-managed DNS service by significantly enhancing its ability to withstand DDoS attacks. There are two components that you add to your application:

  • You use Global Accelerator to provide your application with two static IP addresses that act as a fixed entry point to Amazon EC2 instances in multiple AWS Regions. Global Accelerator uses anycast to route your traffic to a point of entry close to the source of the traffic. In addition to providing availability and performance benefits, this gives you access to global DDoS mitigation capacity through AWS.
  • You use Shield Advanced to monitor the availability of your application and automatically engage the AWS Shield Response Team (SRT) if its availability is affected by a DDoS attack. When you associate a Route 53 health check to your protected resources, Shield Advanced uses the health of the application as an input for detection and as a signal to SRT to contact your operations center when needed. You can also engage with SRT to write custom mitigations for your application. For your self-managed DNS service use case, this can include mitigations like DNS packet validation and suspicion scoring that gives a higher priority to queries that are more likely to be legitimate traffic for your application.

As part of this solution, you will build a DNS canary that uses Amazon CloudWatch to update the status of a Route 53 health check if your self-managed DNS service stops responding to queries. An example architecture using Amazon EC2 based DNS behind Global Accelerator and Shield is shown in figure 1.

Figure 1: Amazon EC2 based DNS behind Global Accelerator and Shield

Figure 1: Amazon EC2 based DNS behind Global Accelerator and Shield

Create and configure an accelerator

To begin, create an accelerator and add your existing DNS servers as endpoints. The newly created accelerator will receive queries and forward them to your DNS service.

To create and configure an accelerator

Step 1: Create an accelerator

  1. Navigate to the AWS Global Accelerator dashboard.
  2. Choose Create accelerator.
  3. Enter a name for your accelerator.
  4. Choose Next.

Step 2: Add listeners

Since DNS uses both TCP and UDP protocols, you must create separate listeners to handle requests for each protocol.

At the Add Listeners step, enter the following:

  1. Ports: 53
  2. Protocol: TCP
  3. Client affinity: None

Choose Add listener again to add the UDP listener. Enter the following:

  1. Ports: 53
  2. Protocol: UDP
  3. Client affinity: None
  4. Choose Next

To learn more about the different options available in this step, see To create a listener in Getting started with AWS Global Accelerator.

Step 3: Add endpoint groups

Starting with the TCP listener, enter the following settings:

  1. Region: Choose a Region that your DNS instances are located in, for example, us-east-1.
  2. Traffic dial: 100
  3. If you have additional DNS instances in another AWS Region, choose Add endpoint group and repeat steps a) and b), entering the appropriate Region.
  4. Repeat steps a) through c) to add endpoint groups for the UDP listener, and then choose Next.

To learn more about the different options available in this step, for example, Traffic dial, see the Add endpoint groups in Getting started with AWS Global Accelerator.

Step 4: Add endpoints

Starting with the TCP listener, enter the following in the form boxes for each Region specified in the previous step:

  1. Endpoint type: Select EC2 instance from the drop-down list.
  2. Endpoint: Select a DNS instance from the drop-down list.
  3. Weight: 128

If you have additional DNS instances in the Region, choose Add endpoint and repeat the preceding steps, but select a DNS instance that hasn’t been added as an endpoint.

Repeat all of the preceding steps for the UDP listener, then choose Create accelerator.

To learn more about the different options available in this step, see the Add endpoints in Getting started with AWS Global Accelerator.

Step 5: Verification

When you choose the Create accelerator button, you’re redirected to a Global Accelerator console page that lists all the accelerators in your account. On this page, you can view the global IPs and DNS name allocated to your newly created accelerator, in addition to the current status.

Wait until the status of the accelerators changes to Deployed before proceeding with any tests.

Configure Shield Advanced and Shield Advanced proactive engagement

Protect your accelerator with Shield Advanced, monitor the health of your application, and configure proactive engagement. When you turn on proactive engagement, the SRT will directly contact you if an Amazon Route 53 health check associated with your protected resource becomes unhealthy during an event that’s detected by Shield Advanced.

To configure proactive engagement

Step 1: Create a Route 53 health check

If you already have a Route 53 health check that monitors the health of your DNS service, you can proceed to step 2 of this section. If you don’t yet have a health check, you can use this AWS CloudFormation template to create one. The template will:

  1. Create a Lambda function that queries your DNS server through the accelerator global IPs. This function posts metrics to CloudWatch to indicate whether the query was successful or not.
  2. Create a CloudWatch alarm that will detect when DNS queries fail.
  3. Create a Route 53 health check that tracks the CloudWatch alarm and changes status to unhealthy when the alarm changes to the Alarm state.

Step 2: Subscribe to Shield Advanced

Please note that with AWS Shield Advanced, you pay a monthly fee of $3,000 per month per organization. In addition, you also pay for AWS Shield Advanced Data Transfer usage fees for AWS resources enabled for advanced protection.

  1. Navigate to the AWS Shield console.
  2. In the AWS Shield navigation bar, choose Getting started, and then choose Subscribe to Shield Advanced.
  3. On the Subscribe to Shield Advanced page, read the terms of agreement, and then select all of the check boxes to indicate that you accept the terms.
  4. Choose Subscribe to Shield Advanced.

Step 3: Add resources to protect

  1. Do one of the following, depending on if you were already subscribed to Shield Advanced.
    • If you just subscribed to Shield Advanced by completing Step 2 above, choose Add resources to protect.
    • If you were already subscribed to Shield Advanced, open the Shield console and choose Protected Resources, and then choose Add resources to protect.
  2. In the Choose resources to protect with Shield Advanced page, select the Regions and resource types that you want to protect, then choose Load resources.
  3. Select the resources that you want to protect, and then choose Protect with Shield Advanced.
  4. In the Configure health check based DDoS detection page, under the Protected resources section, select a Route 53 health check to add—either one that you created previously, or a health check created by the AWS CloudFormation template—as the Associated Health Check.
  5. Choose Next until you reach the Review and configure DDoS mitigation and visibility page, and then review the settings and choose Finish configuration.

Step 4: Add contacts

  1. Navigate to the Overview tab of the AWS Shield console.
  2. In the Proactive engagements and contacts section, choose Edit under the Contacts heading.
  3. In the Add contact form, add the contact’s Email, Phone number, and Notes.
  4. Choose Save.

Step 5: Request proactive engagement

  1. Choose Edit proactive engagement feature.
  2. Select Enable.
  3. Choose Save.

Step 6: Configuration review with the SRT

After you enable proactive engagement, the state will be Proactive engagement requested and pending.

SRT will contact you to schedule a configuration review. The review will include a review of your Route 53 health check configuration and a consultation about custom mitigations that can be configured to support your DNS use case. Following this review, SRT will complete your request to enable proactive engagement.

Summary

DNS is a foundational part of the user experience for any application that is accessed via a human readable domain name. Your DNS service should be highly available, DDoS resilient, and accessible to your users with minimal latency. If you run your own DNS service on Amazon EC2, you can improve the DDoS resiliency using Global Accelerator and Shield Advanced. This solution provides your users with a low latency path to your DNS service and provides you with some of the DDoS mitigation that protects Route 53. To learn more about DDoS best practices, see AWS Best Practices for DDoS Resiliency.

If you have feedback about this post, submit comments in the Comments section below. If you have questions about this post, start a new thread on the AWS Shield forum or contact AWS Support.

Want more AWS Security how-to content, news, and feature announcements? Follow us on Twitter.

Author

Chido Chemambo

Chido is a Security Engineer on the AWS Shield Team with 12 years of experience in the telecommunications industry. He specializes in network security and enjoys working with colleagues to improve AWS Shield, and with customers to improve their cloud architectures. Outside of work, Chido enjoys jumping rope, improving his development skills, and watching English Premier League soccer and Formula 1.

Set up centralized monitoring for DDoS events and auto-remediate noncompliant resources

Post Syndicated from Fola Bolodeoku original https://aws.amazon.com/blogs/security/set-up-centralized-monitoring-for-ddos-events-and-auto-remediate-noncompliant-resources/

When you build applications on Amazon Web Services (AWS), it’s a common security practice to isolate production resources from non-production resources by logically grouping them into functional units or organizational units. There are many benefits to this approach, such as making it easier to implement the principal of least privilege, or reducing the scope of adversely impactful activities that may occur in non-production environments. After building these applications, setting up monitoring for resource compliance and security risks, such as distributed denial of service (DDoS) attacks across your AWS accounts, is just as important. The recommended best practice to perform this type of monitoring involves using AWS Shield Advanced with AWS Firewall Manager, and integrating these with AWS Security Hub.

In this blog post, I show you how to set up centralized monitoring for Shield Advanced–protected resources across multiple AWS accounts by using Firewall Manager and Security Hub. This enables you to easily manage resources that are out of compliance from your security policy and to view DDoS events that are detected across multiple accounts in a single view.

Shield Advanced is a managed application security service that provides DDoS protection for your workloads against infrastructure layer (Layer 3–4) attacks, as well as application layer (Layer 7) attacks, by using AWS WAF. Firewall Manager is a security management service that enables you to centrally configure and manage firewall rules across your accounts and applications in an organization in AWS. Security Hub consumes, analyzes, and aggregates security events produced by your application running on AWS by consuming security findings. Security Hub integrates with Firewall Manager without the need for any action to be taken by you.

I’m going to cover two different scenarios that show you how to use Firewall Manager for:

  1. Centralized visibility into Shield Advanced DDoS events
  2. Automatic remediation of noncompliant resources

Scenario 1: Centralized visibility of DDoS detected events

This scenario represents a fully native and automated integration, where Shield Advanced DDoSDetected events (indicates whether a DDoS event is underway for a particular Amazon Resource Name (ARN)) are made visible as a security finding in Security Hub, through Firewall Manager.

Solution overview

Figure 1 shows the solution architecture for scenario 1.
 

Figure 1: Scenario 1 – Shield Advanced DDoS detected events visible in Security Hub

Figure 1: Scenario 1 – Shield Advanced DDoS detected events visible in Security Hub

The diagram illustrates a customer using AWS Organizations to isolate their production resources into the Production Organizational Unit (OU), with further separation into multiple accounts for each of the mission-critical applications. The resources in Account 1 are protected by Shield Advanced. The Security OU was created to centralize security functions across all AWS accounts and OUs, obscuring the visibility of the production environment resources from the Security Operations Center (SOC) engineers and other security staff. The Security OU is home to the designated administrator account for Firewall Manager and the Security Hub dashboard.

Scenario 1 implementation

You will be setting up Security Hub in an account that has the prerequisite services configured in it as explained below. Before you proceed, see the architecture requirements in the next section. Once Security Hub is enabled for your organization, you can simulate a DDoS event in strict accordance with the AWS DDoS Simulation Testing Policy or use one of AWS DDoS Test Partners.

Architecture requirements

In order to implement these steps, you must have the following:

Once you have all these requirements completed, you can move on to enable Security Hub.

Enable Security Hub

Note: If you plan to protect resources with Shield Advanced across multiple accounts and in multiple Regions, we recommend that you use the AWS Security Hub Multiaccount Scripts from AWS Labs. Security Hub needs to be enabled in all the Regions and all the accounts where you have Shield protected resources. For global resources, like Amazon CloudFront, you should enable Security Hub in the us-east-1 Region.

To enable Security Hub

  1. In the AWS Security Hub console, switch to the account you want to use as the designated Security Hub administrator account.
  2. Select the security standard or standards that are applicable to your application’s use-case, and choose Enable Security Hub.
     
    Figure 2: Enabling Security Hub

    Figure 2: Enabling Security Hub

  3. From the designated Security Hub administrator account, go to the Settings – Account tab, and add accounts by sending invites to all the accounts you want added as member accounts. The invited accounts become associated as member accounts once the owner of the invited account has accepted the invite and Security Hub has been enabled. It’s possible to upload a comma-separated list of accounts you want to send to invites to.
     
    Figure 3: Designating a Security Hub administrator account by adding member accounts

    Figure 3: Designating a Security Hub administrator account by adding member accounts

View detected events in Shield and Security Hub

When Shield Advanced detects signs of DDoS traffic that is destined for a protected resource, the Events tab in the Shield console displays information about the event detected and provides a status on the mitigation that has been performed. Following is an example of how this looks in the Shield console.
 

Figure 4: Scenario 1 - The Events tab on the Shield console showing a Shield event in progress

Figure 4: Scenario 1 – The Events tab on the Shield console showing a Shield event in progress

If you’re managing multiple accounts, switching between these accounts to view the Shield console to keep track of DDoS incidents can be cumbersome. Using the Amazon CloudWatch metrics that Shield Advanced reports for Shield events, visibility across multiple accounts and Regions is easier through a custom CloudWatch dashboard or by consuming these metrics in a third-party tool. For example, the DDoSDetected CloudWatch metric has a binary value, where a value of 1 indicates that an event that might be a DDoS has been detected. This metric is automatically updated by Shield when the DDoS event starts and ends. You only need permissions to access the Security Hub dashboard in order to monitor all events on production resources. Following is an example of what you see in the Security Hub console.
 

Figure 5: Scenario 1 - Shield Advanced DDoS alarm showing in Security Hub

Figure 5: Scenario 1 – Shield Advanced DDoS alarm showing in Security Hub

Configure Shield event notification in Firewall Manager

In order to increase your visibility into possible Shield events across your accounts, you must configure Firewall Manager to monitor your protected resources by using Amazon Simple Notification Service (Amazon SNS). With this configuration, Firewall Manager sends you notifications of possible attacks by creating an Amazon SNS topic in Regions where you might have protected resources.

To configure SNS topics in Firewall Manager

  1. In the Firewall Manager console, go to the Settings page.
  2. Under Amazon SNS Topic Configuration, select a Region.
  3. Choose Configure SNS Topic.
     
    Figure 6: The Firewall Manager Settings page for configuring SNS topics

    Figure 6: The Firewall Manager Settings page for configuring SNS topics

  4. Select an existing topic or create a new topic, and then choose Configure SNS Topic.
     
    Figure 7: Configure an SNS topic in a Region

    Figure 7: Configure an SNS topic in a Region

Scenario 2: Automatic remediation of noncompliant resources

The second scenario is an example in which a new production resource is created, and Security Hub has full visibility of the compliance state of the resource.

Solution overview

Figure 8 shows the solution architecture for scenario 2.
 

Figure 8: Scenario 2 – Visibility of Shield Advanced noncompliant resources in Security Hub

Figure 8: Scenario 2 – Visibility of Shield Advanced noncompliant resources in Security Hub

Firewall Manager identifies that the resource is out of compliance with the defined policy for Shield Advanced and posts a finding to Security Hub, notifying your operations team that a manual action is required to bring the resource into compliance. If configured, Firewall Manager can automatically bring the resource into compliance by creating it as a Shield Advanced–protected resource, and then update Security Hub when the resource is in a compliant state.

Scenario 2 implementation

The following steps describe how to use Firewall Manager to enforce Shield Advanced protection compliance of an application that is deployed to a member account within AWS Organizations. This implementation assumes that you set up Security Hub as described for scenario 1.

Create a Firewall Manager security policy for Shield Advanced protected resources

In this step, you create a Shield Advanced security policy that will be enforced by Firewall Manager. For the purposes of this walkthrough, you’ll choose to automatically remediate noncompliant resources and apply the policy to Application Load Balancer (ALB) resources.

To create the Shield Advanced policy

  1. Open the Firewall Manager console in the designated Firewall Manager administrator account.
  2. In the left navigation pane, choose Security policies, and then choose Create a security policy.
  3. Select AWS Shield Advanced as the policy type, and select the Region where your protected resources are. Choose Next.

    Note: You will need to create a security policy for each Region where you have regional resources, such as Elastic Load Balancers and Elastic IP addresses, and a security policy for global resources such as CloudFront distributions.

    Figure 9: Select the policy type and Region

    Figure 9: Select the policy type and Region

  4. On the Describe policy page, for Policy name, enter a name for your policy.
  5. For Policy action, you have the option to configure automatic remediation of noncompliant resources or to only send alerts when resources are noncompliant. You can change this setting after the policy has been created. For the purposes of this blog post, I’m selecting Auto remediate any noncompliant resources. Select your option, and then choose Next.

    Important: It’s a best practice to first identify and review noncompliant resources before you enable automatic remediation.

  6. On the Define policy scope page, define the scope of the policy by choosing which AWS accounts, resource type, or resource tags the policy should be applied to. For the purposes of this blog post, I’m selecting to manage Application Load Balancer (ALB) resources across all accounts in my organization, with no preference for resource tags. When you’re finished defining the policy scope, choose Next.
     
    Figure 10: Define the policy scope

    Figure 10: Define the policy scope

  7. Review and create the policy. Once you’ve reviewed and created the policy in the Firewall Manager designated administrator account, the policy will be pushed to all the Firewall Manager member accounts for enforcement. The new policy could take up to 5 minutes to appear in the console. Figure 11 shows a successful security policy propagation across accounts.
     
    Figure 11: View security policies in an account

    Figure 11: View security policies in an account

Test the Firewall Manager and Security Hub integration

You’ve now defined a policy to cover only ALB resources, so the best way to test this configuration is to create an ALB in one of the Firewall Manager member accounts. This policy causes resources within the policy scope to be added as protected resources.

To test the policy

  1. Switch to the Security Hub administrator account and open the Security Hub console in the same Region where you created the ALB. On the Findings page, set the Title filter to Resource lacks Shield Advanced protection and set the Product name filter to Firewall Manager.
     
    Figure 12: Security Hub findings filter

    Figure 12: Security Hub findings filter

    You should see a new security finding flagging the ALB as a noncompliant resource, according to the Shield Advanced policy defined in Firewall Manager. This confirms that Security Hub and Firewall Manager have been enabled correctly.
     

    Figure 13: Security Hub with a noncompliant resource finding

    Figure 13: Security Hub with a noncompliant resource finding

  2. With the automatic remediation feature enabled, you should see the “Updated at” time reflect exactly when the automatic remediation actions were completed. The completion of the automatic remediation actions can take up to 5 minutes to be reflected in Security Hub.
     
    Figure 14: Security Hub with an auto-remediated compliance finding

    Figure 14: Security Hub with an auto-remediated compliance finding

  3. Go back to the account where you created the ALB, and in the Shield Protected Resources console, navigate to the Protected Resources page, where you should see the ALB listed as a protected resource.
     
    Figure 15: Shield console in the member account shows that the new ALB is a protected resource

    Figure 15: Shield console in the member account shows that the new ALB is a protected resource

    Confirming that the ALB has been added automatically as a Shield Advanced–protected resource means that you have successfully configured the Firewall Manager and Security Hub integration.

(Optional): Send a custom action to a third-party provider

You can send all regional Security Hub findings to a ticketing system, Slack, AWS Chatbot, a Security Information and Event Management (SIEM) tool, a Security Orchestration Automation and Response (SOAR), incident management tools, or to custom remediation playbooks by using Security Hub Custom Actions.

Conclusion

In this blog post I showed you how to set up a Firewall Manager security policy for Shield Advanced so that you can monitor your applications for DDoS events, and their compliance to DDoS protection policies in your multi-account environment from the Security Hub findings console. In line with best practices for account governance, organizations should have a centralized security account that performs monitoring for multiple accounts. Security Hub and Firewall Manager provide a centralized solution to help you achieve your compliance and monitoring goals for DDoS protection.

If you’re interested in exploring how Shield Advanced and AWS WAF help to improve the security posture of your application, have a look at the following resources:

If you have feedback about this post, submit comments in the Comments section below. If you have questions about this post, start a new thread on the AWS Security Hub forum or contact AWS Support.

Want more AWS Security how-to content, news, and feature announcements? Follow us on Twitter.

Author

Fola Bolodeoku

Fola is a Security Engineer on the AWS Threat Research Team, where he focuses on helping customers improve their application security posture against DDoS and other application threats. When he is not working, he enjoys spending time exploring the natural beauty of the Western Cape.

Deploying defense in depth using AWS Managed Rules for AWS WAF (part 2)

Post Syndicated from Daniel Swart original https://aws.amazon.com/blogs/security/deploying-defense-in-depth-using-aws-managed-rules-for-aws-waf-part-2/

In this post, I show you how to use recent enhancements in AWS WAF to manage a multi-layer web application security enforcement policy. These enhancements will help you to maintain and deploy web application firewall configurations across deployment stages and across different types of applications.

In part 1 of this post I describe the technologies and methods that you can use to build and manage defense in depth for your network. In part 2, I will show you how to use those tools to build your defense in depth using AWS Managed Rules as the starting point and how it can be used for optimal effectiveness

Managing policies for multiple environments can be done with minimal administrative overhead and can now be part of a deployment pipeline where you programmatically enforce policies for broad edge network policy enforcements and protect production workloads without compromising on development speed or safety.

Building robust security policy enforcement relies on a layered approach and the same applies to securing your web applications. Having edge policies, application policies, and even private or internal policy enforcement layers adds to the visibility of communication requests as well as unified policy enforcement.

Using a layered AWS WAF deployment, such as is deployed by the procedure that follows, gives you greater flexibility in the amount of rules you can use and the option to standardize edge policies and production policies. This lets you test and develop new applications without comprising the production environments.

In the following example, the application load balancer is in us-east-1. To create a web ACL for Amazon CloudFront you need to deploy the stack in us-east-1. The Amazon-CloudFront-Application-Load-Balancer-AMR.yml template can create both web ACLs in this scenario.

Note: If you’re using CloudFront and hosting the origin in us-east-1, you only need to maintain one stack. If your origin is in another region, you need to deploy a stack in us-east-1 for CloudFront web ACLs and another in the region where your application load balancer is. That scenario isn’t covered in the following procedure. None of the underlying infrastructure would be deployed with the example AWS CloudFromation templates provided. Only the AWS WAF configurations would be deployed using the example templates.

Solution overview

The following diagram illustrates the traffic flow where traffic comes in via CloudFront and serves the traffic to the backend load balancers. Both CloudFront and the load balancers support AWS WAF. This is where dedicated web security policies can be enforced to build out a defense-in-depth, multi layered policy enforcement.
 

Figure 1: Defense in depth deployment on AWS WAF

Figure 1: Defense in depth deployment on AWS WAF

Creating AWS Managed Rule web ACLs

During this process we create two web ACLs that are designed for policy enforcement for two dedicated layers. The process won’t deploy the required infrastructure, such as the CloudFront distribution or application load balancers. This example template deploys a single stack in us-east-1 where the CloudFront origin load balancer is located.

To create AWS Managed Rule web ACLs

  1. Download the Amazon-CloudFront-Application-Load-Balancer-AMR.yml template.
  2. Open the AWS Management Console and select the region where the origin application load balancer is deployed. The Amazon-CloudFront-Application-Load-Balancer-AMR.yml template that you downloaded deploys both web ACLs for CloudFront and the application load balancer.
     
    Figure 2: Select a region from the console

    Figure 2: Select a region from the console

  3. Under Find Services enter AWS CloudFormation and select Enter.
     
    Figure 3: Find and select AWS CloudFormation

    Figure 3: Find and select AWS CloudFormation

  4. Select Create stack.
     
    Figure 4: Create stack

    Figure 4: Create stack

  5. Select a template file for the stack.
    1. In the Create stack window, select Template is ready and Upload a template file.
    2. Under Upload a template file, select Choose file and select the Amazon-CloudFront-Application-Load-Balancer-AMR.yml example AWS CloudFormation template you downloaded earlier.
    3. Choose Next.
    Figure 5: Prepare and choose a template

    Figure 5: Prepare and choose a template

  6. Add stack details.
    1. Enter a name for the stack in Stack name.
    2. Enter a name for the Edge Network AWS WAF WebACL and for the Public Layer AWS WAF WebACL.
    3. Set a rate-limit for HTTP GET requests in HTTP Get Flood Protection (this rate is applied per IP address over a 5 minute period).
    4. Set a rate limit for HTTP POST requests in HTTP Post Flood Protection.
    5. Use the Login URL to apply the limit to a targeted login page. If you want to rate-limit all HTTP POST requests, leave the login URL section blank.
    Figure 6: Set stack details

    Figure 6: Set stack details

  7. By default, all the rules within the rule-sets are in action override (count mode). This does not include the rate based rules. If you want to deploy selected rules in a block, remove them from the pre-populated list by highlighting and deleting them. It’s best practice to evaluate firewall rules before changing them from count to block mode. Choose Next to move to the next step.
     
    Figure 7: Default managed rules options

    Figure 7: Default managed rules options

  8. Here you can add tags to apply to the resources in the stack that these rules will be deployed to. Tagging is a recommended best practice as it enables you to add metadata information to resources during the creation. For more information on tagging please see the Tagging AWS resources documentation. Then choose Next. On the following page choose Create stack.
     
    Figure 8: Add tags

    Figure 8: Add tags

  9. Wait until the stack has been deployed. When deployment is complete, the status of the stack will change to CREATE_COMPLETE.
     
    Figure 9: Stack deployment status

    Figure 9: Stack deployment status

Associating the web ACLs to resources

During this process we associate the two newly created web ACLs to the corresponding infrastructure resources. In this example, it would be the CloudFront distribution and its origin load balancer which should have been created prior.

To associate the web ACLs to resources

  1. In the console search for and select WAF & Shield.
     
    Figure 10: Select WAF & Shield

    Figure 10: Select WAF & Shield

  2. Select Web ACLs from the list on the left.
     
    Figure 11: Select Web ACLs

    Figure 11: Select Web ACLs

  3. Select Global (CloudFront) from the drop down list at the top of the page. Choose the Edge-Network-Layer-WebACL name that you created in step 6 of the previous procedure (Creating AWS Managed Rule web ACLs).
     
    Figure 12: Select the web ACL

    Figure 12: Select the web ACL

  4. Next select Associated AWS and then choose Add AWS resources.
     
    Figure 13: Add AWS resources

    Figure 13: Add AWS resources

  5. Select the CloudFront distribution you want to protect. Choose Add.
     
    Figure 14: Select the CloudFront distribution to protect

    Figure 14: Select the CloudFront distribution to protect

  6. Select the region the application load balancer is deployed in—this example is us-east-1—and then repeat the same association process as in steps by selecting Web ACLs and now associating the Application Load Balancer similar to steps 3 and 4 above. However, this time, select the application load balancer that serves as the CloudFront Distribution origin. Select US East (N. Virginia) from the drop-down list at the top of the page. Choose the Public-Application-Layer-WebACL name that you created in step 6 of the previous procedure (Creating AWS Managed Rule web ACLs).
     
    Figure 15: Application layer Web ACL association

    Figure 15: Application layer Web ACL association

Conclusion

Using AWS WAF to manage a multi-layer web application security enforcement policy you are able to build defense in depth stack for each specific web application. The configuration will help you to maintain and deploy web application firewall configurations across deployment stages and across different types of applications. Now with AWS Managed Rules this has enabled customers to make use of prebuild rule sets that can easily be deployed to create a layered defense that will fit into customers web application deployment pipelines. For customers that would like to centrally manage and control WAF in their AWS Organization, consider AWS Firewall Manager.

The AWS CloudFormation templates used in this procedure are in this GitHub repository.

If you have feedback about this post, submit comments in the Comments section below. If you have questions about this post, start a new thread on the AWS WAF forum or contact AWS Support.

Want more AWS Security how-to content, news, and feature announcements? Follow us on Twitter.

Author

Daniel Cisco Swart

The AWS Managed Rules was something Daniel worked on personally over a number of years during his time with the AWS Threat Research Team. Currently Daniel is working with Security competency technology partners from the AWS Partner Network as a Partner Solutions Architect enabling customer success through technical collaboration with AWS’s top security partners.

Defense in depth using AWS Managed Rules for AWS WAF (part 1)

Post Syndicated from Daniel Swart original https://aws.amazon.com/blogs/security/defense-in-depth-using-aws-managed-rules-for-aws-waf-part-1/

In this post, I discuss how you can use recent enhancements in AWS WAF to manage a multi-layer web application security enforcement policy. These enhancements will help you to maintain and deploy web application firewall configurations across deployment stages and across different types of applications.

The post is in two parts. This first part describes AWS Managed Rules for AWS WAF and how it can be used to provide defense in depth. The second part shows how to apply AWS Managed Rules for WAF.

AWS Managed Rules for AWS WAF is a service that provides groups of rules created by Amazon Web Services (AWS) or by an AWS technology partner. By using AWS Managed Rules, you can reduce the administrative overhead of configuring rules for AWS WAF. You still need a comprehensive strategy for web application policy enforcement to help you make the best use of AWS Managed Rules for your web applications.

By using a layered policy enforcement strategy, you can create policy enforcement that’s specific to each part of your applications. This helps you avoid having to maintain and manage monolithic AWS WAF configurations for each of your applications. When you can separate policies for the edge network and for the application layer network, replicating separate policies across larger workloads becomes modular. This makes your application security more agile and lets you protect public-facing web applications without writing new rules or including rules that aren’t relevant to your web application.

Policy enforcement becomes even less of an administrative burden when you use AWS Firewall Manager to enforce policies across all accounts. This helps ensure organizations have robust policy enforcement measures across multiple accounts, with increased application layer visibility.

The new AWS WAF JSON document-style configuration enables traditional code review processes. You can now easily manage AWS WAF configurations on multiple layers of your web applications. This has also enabled partners to create more dynamic and robust rules that they can deliver on AWS WAF, which ultimately helps those customers manage their web application security policies.

AWS WAF enhancements

AWS WAF uses web ACL capacity units (WCU) to calculate and control the operating resources that are used to run your rules, rule groups, and web ACLs.

You can use JSON key-value pair document-based configuration to more easily integrate AWS WAF into the development practices of your organization. As noted in the prior paragraph, using document-style configuration removes the need to use multiple API calls to create objects in the correct order before you can create and deploy a web ACL to protect your web applications.

Using this method lets firewall changes be implemented with normal development and operations best practices because it will be infrastructure as code. This enables version control and code review before deploying updates to your production environment.

Solution overview

The following diagram illustrates the layers and functions of a defense-in-depth solution. The text that follows describes each layer.
 

Figure 1: Solution overview diagram

Figure 1: Solution overview diagram

Edge network layer policy enforcement

The edge network is the first layer of policy enforcement and should be used for broad security policy enforcement. This is the ideal place for rules such as AWS Managed Rules Core rule set (CRS), geographical location blocks, IP reputational lists, anonymous IP lists, and basic rate limits enforcement. By limiting known bad traffic at the edge network, the CRS limits the exposure of the application layer to known bad IP address ranges, malicious requests, bad bots, and request floods. This provides broad protection to the inner application layer against malicious activity, which can be applied regardless of the web application being served at the application layer.

Combining Amazon CloudFront with the distributed denial of service (DDoS) mitigation capabilities of AWS Shield is supported by AWS WAF for your outer layer of web application security enforcement.

It’s a common misconception that CloudFront is only a content delivery platform, but it also has robust transparent reverse proxy capabilities. CloudFront can help protect your environment from a broad range of web application risks. For example, you can use CloudFront to ensure that HTTP requests conform to standards on the far outer layer of your web application environment while serving content closer to the user.

Application layer policy enforcement

The next level of enforcement should be an application load balancer in a public subnet with another web ACL at the CloudFront origin. This policy enforcement layer is where you create a regional web ACL for the CloudFront origin. In addition, this layer is where you apply application-specific rules. For example, if you have a web application that uses a LAMP stack, it would be best to use AWS Managed Rules for SQL Injection, Linux, and PHP as an enforcement layer.

Note: IP-based enforcement is not effective on this part of the environment. Consider making use of an origin custom header on the CloudFront distribution. Then using this custom header to create a BLOCK rule within this web ACL to deny any request without the origin custom header as the first rule in your web ACL list. This rule needs to be created manually and will not be configured by the supplied templates.

(Optional) Third-party web application firewall layer policy enforcement

AWS WAF enforces policies on inbound requests and doesn’t have outbound inspection capabilities. If you need to enforce policies based on outbound responses, you can use Amazon Machine Image (AMI) based web application firewalls, which are available via the AWS Marketplace.

Using an instance-based web application firewall is used here because most of the heavy lifting of computational expenditure is done on the AWS WAF enforcement layers. The third-party layer is where you can enforce policies that require requests to be stateful.

Using an AMI from AWS Marketplace also gives you access to capabilities such as higher visibility, threat intelligence, and robust firewall rules. This adds an additional layer of security enhancement to your environment.

(Optional) Private layer policy enforcement

When working with a traditional three-tier web architecture, you can add an additional layer of enforcement on the private layer, which can be used for the web front ends. This stage is where you would deploy an application load balancer in a private subnet serving your web front ends. This load balancer is there for any computational expensive regex-based rule enforcement that you don’t want to enforce on the instances-based WAF. This also gives you another layer of visibility before requests reaches the web front ends themselves. This example can be seen in Figure 2 below as a reference.

Use case examples

The AWS CloudFormation templates supplied can be deployed in a modular fashion. If the application load balancer is located in the us-east-1 region, you can deploy a single template called Amazon-CloudFront-Application-Load-Balancer-AMR.yml.

If the application load balancer isn’t located in us-east-1, you can use the Amazon-CloudFront-EdgeLayer-AMR.yml template to deploy the stack in us-east-1 to support the web ACL on CloudFront and then deploy ApplicationLayer-Load-Balancer-AMR.yml in the region the original application load balancer was deployed for its web ACL.

All CloudFormation templates are available on the Github project page and a summary of each can be found in the main readme.md file.

Note: All the individual rules in each rule set is set to ACTION OVERRIDE for initial deployment. If any of the rule actions in the group are set to block or allow, this override changes the behavior so that matching rules are only counted. You may change the setting to NO ACTION OVERRIDE after a period of evaluation to avoid disrupting production workloads with potential false positives.

Edge network and application load balancer origin using AWS Managed Rules for AWS WAF

When considering some of the web application best practices on AWS for resiliency and security, the recommendation is to use CloudFront where possible, because it can terminate TLS/SSL connections and serve cached content close to the end user. CloudFront has advanced mitigation capabilities such as SYN cookies and a massively distributed network separate from the traditional Amazon Elastic Compute Cloud (Amazon EC2) networking space. CloudFront also supports AWS WAF rate limits, IP blacklists, and broad security policies, which can be enforced at the edge network layer.

In the example Amazon-CloudFront-Application-Load-Balancer-AMR.yml template, we place a rate-limit for HTTP GET and HTTP POST methods. This is dependent upon expected traffic request rates. You can review Amazon CloudWatch metrics for your CloudFront distribution or application load balancer to determine the baseline for your rate limit based on the maximum expected requests per minute.

The rate limit is adjustable within the parameter options at deployment of the AWS CloudFormation template Amazon-CloudFront-Application-Load-Balancer-AMR.yml. The HTTP POST rate limit also helps to slow down credential stuffing attacks—a form of brute force attack—on login pages. The ApplicationLayer-Load-Balancer-AMR.yml template used in part 2 of this post also deploys the Amazon IP reputation list to drop IP addresses based on Amazon internal threat intelligence.

We also use the AWS Managed Rules CommonRuleSet that blocks cross-site scripting (XSS) attacks, request with no user-agents, requests with known bad user-agents, large queries, posts, cookies, and URLs, and known LFI/RFI attacks.

Note: The size constraint rules aren’t recommended for protecting APIs or web applications with large HTTP POSTs or long cookies. Evaluate the possible effects of size constraint rules thoroughly before setting them to block requests.

There is also an AWS Managed Rule for known bad inputs which is based on threat intelligence gathered by the AWS Threat Research Team. Finally, there is an admin protection rule set that drops requests to known management login pages. It’s not advised that web applications have front door access to admin controls.

At the origin, it’s a good idea to use an application load balancer that also supports AWS WAF. This is where you want to apply application-specific web policies. For example, this is where you would apply rules to protect against a SQL injection attack if your web application uses a SQL database.

In the example AWS CloudFormation template Amazon-CloudFront-Application-Load-Balancer-AMR.yml, for the origin application load balancer, we use AWS Managed Rules for SQL injections, Linux rule set, Unix rule set, PHP rule set, and the WordPress rule set to cover most eventualities customers could be using on their web applications.

For the example solution in part 2 of this post, if the origin application load balancer is in us-east-1, you can use Amazon-CloudFront-Application-Load-Balancer-AMR.yml, which will deploy both web ACLs.

If the origin is not in us-east-1, you can use two example templates which are Amazon-CloudFront-EdgeLayer-AMR.yml for the edge network and ApplicationLayer-Load-Balancer-AMR.yml in the origin region.

Using AWS Managed WAF Rules on public and private application load balancers

Some customers have reasons to not use CloudFront and will use two application load balancers. One load balancer for the public facing environment for web front ends and an internal load balancer for the application backends.

The following figure shows a deployment that uses two load balancers. A public load balancer works with the edge network WAF to connect to a web front end in a private subnet and an internal load balancer connects to the backend application.
 

Figure 2: Diagram of stacked load balancers

Figure 2: Diagram of stacked load balancers

In this use case, we can still use the same structure of edge network and application layer network, now only using load balancers. Using a three-tier web application approach to deploy web applications there will be an external facing and an internal application load balancer where you can deploy the same style of policy enforcement, but only on load balancers.

Note: To deploy something similar to this example, you can use the template EdgeLayerALB-PrivateLayerALB-AMR.yml in the relevant regions where the load balancers have been deployed.

Alarms and logging

After deploying these AWS CloudFormation templates you should consider setting CloudWatch alarms on certain metrics for the HTTP GET and HTTP POST flood rules as well as the reputation and anonymous IP lists. Customers that are familiar with developing may also opt to use Lambda responders to use CloudWatch Events to trigger and update to the rule change from COUNT to BLOCK. Also enabling full logging for each web ACL will give you higher visibility into each request and will make potential investigations easier.

Conclusion

Using the new enhancements of AWS WAF makes it easier to manage a multi-layer web application security enforcement policy by using AWS WAF to maintain and deploy web application firewall configurations across their different deployment stages, as well as across different types of applications. By making use of partner or AWS Managed Rules, administrative overhead can be significantly reduced, and with AWS Firewall Manager, customers can enforce these policies across all of an organization’s accounts. Part 2 of this post will show you one example of how this can be done.

If you have feedback about this post, submit comments in the Comments section below. If you have questions about this post, start a new thread on the AWS WAF forum or contact AWS Support.

Want more AWS Security how-to content, news, and feature announcements? Follow us on Twitter.

Author

Daniel Cisco Swart

The AWS Managed Rules was something Daniel worked on personally over a number of years during his time with the AWS Threat Research Team. Currently Daniel is working with Security competency technology partners from the AWS Partner Network as a Partner Solutions Architect enabling customer success through technical collaboration with AWS’s top security partners.