Post Syndicated from Cole MacKenzie original https://blog.cloudflare.com/r2-rayid-retrieval/

Our customers rely on their Cloudflare logs to troubleshoot problems and debug issues. One of the biggest challenges with logs is the cost of managing them, so earlier this year, we launched the ability to store and retrieve Cloudflare logs using R2.
In this post, I’ll explain how we built the R2 Log Retrieval API using Cloudflare Workers with a focus on Durable Objects and the Streams API. Using these, allows a customer to index and query millions of their Cloudflare logs stored in batches on R2.
Before we dive into the internals you might be wondering why one doesn’t just use a traditional database to index these logs? After all, databases are a well proven technology. Well, the reason is that individual developers or companies, both large and small, often don’t have the resources necessary to maintain such a database and the surrounding infrastructure to create this kind of setup.
Our approach instead relies on Durable Objects to maintain indexes of the data stored in R2, removing the complexity of managing and maintaining your own database. It was also super easy to add Durable Objects to our existing Workers code with just a few lines of config and some code. And R2 is very economical.
Indexing
Indexing data is often used to reduce the lookup time for a query by first pre-processing the data and computing an index – usually a file (or set of files) that have a known structure which can be used to perform lookups on the underlying data. This approach makes lookups quick as indexes typically contain the answer for a given query, or at the very least, tells you how to find it. For this project we are going to index records by the unique identifier called a RayID which our customers use to identify an HTTP request in their logs, but this solution can be modified to index any many other types of data.
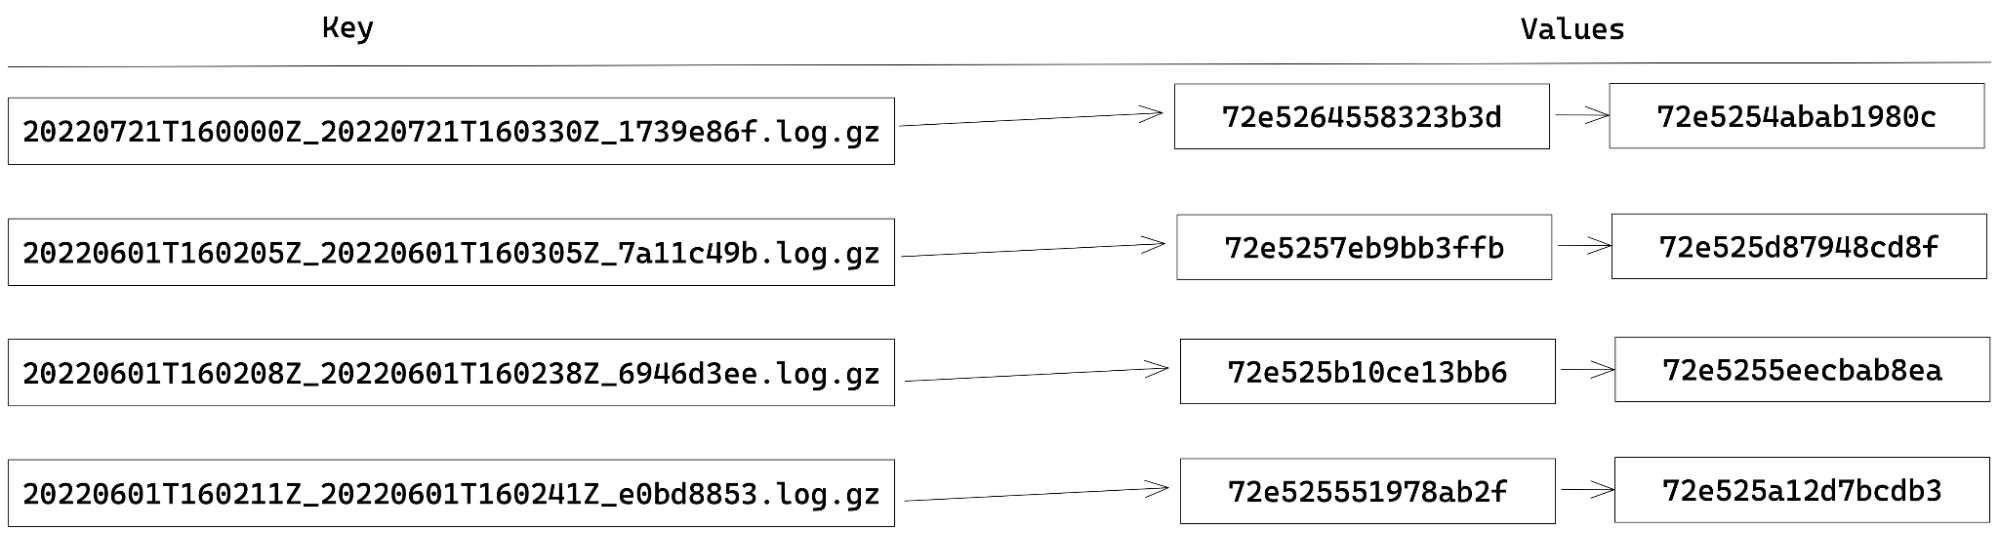
When indexing RayIDs for logs stored in R2, we choose an index structure that is fairly straightforward and is commonly known as a forward-index. This type of index consists of a key-value mapping between a document’s name and a list of words contained in that document. The terms “document” and “words” are meant to be generic, and you get to define what a document and a word is.
In our case, a document is a batch of logs stored in R2 and the words are RayIDs contained within that document. For example, our index currently looks like this:
Building an index using Durable Objects and the Streams API
In order to maintain the state of our index, we chose to use Durable Objects. Each Durable Object has its own transactional key-value storage. Therefore, to store our index, we assign each key to be the document (batch) name and the value being a JSON-array of RayIDs within that document. When extracting the RayIDs for a given batch, updating the index becomes as simple as storage.put(batchName, rayIds). Likewise, getting all the RayIDs for a document is just a call to storage.get(batchName).
When performing indexing, since the batches are stored using compression and often with a 30-100x compression ratio, reading an entire batch into memory can lead to out-of-memory (OOM) errors in our Worker. To get around this, we use the Streams API to avoid the OOM errors by processing the data in smaller chunks. There are two types of streams available: byte-oriented and value-oriented. Byte-oriented streams operate at the byte-level for things such as compressing and decompressing data, while the value-orientated streams work on first class values in JavaScript. Numbers, strings, undefined, null, objects, you name it. If it’s a valid JavaScript value, you can process it using a value-oriented stream. The Streams API also allows us to define our own JavaScript transformations for both byte- and value-oriented streams.
So, when our API receives a request to index a batch, our Worker streams the contents from R2 into a pipeline of TransformationStreams to decompress the data, decode the bytes into strings, split the data into records based on the newlines, and finally collect all the RayIDs. Once we’ve collected all the RayIDs, the data is then persisted in the index by making calls to the Durable Object, which in turn calls the aforementioned storage.put method to persist the data to the index. To illustrate what I mean, I include some code detailing the steps described above.
async function index(r2, bucket, key, storage) {
  const obj = await getObject(r2, bucket, key);

  const rawStream = obj.Body as ReadableStream;
  const index: Record<string, string[]> = {};

  const rayIdIndexingStream = new TransformStream({
    transform(chunk: string) {
      for (const match of chunk.matchAll(RAYID_FIELD_REGEX)) {
        const { rayid } = match.groups!;
        if (key in index) {
          index[key].push(rayid);
        } else {
          index[key] = [rayid];
        }
      }
    }
  });

  await collectStream(rawStream.pipeThrough(new DecompressionStream('gzip')).pipeThrough(textDecoderStream()).pipeThrough(readlineStream()).pipeThrough(rayIdIndexingStream));
  storage.put(index);
}
Searching for a RayID
Once a batch has been indexed, and the index is persisted to our Durable Object, we can then query it using a combination of the RayID and a batch name to check the presence of a RayID in that given batch. Assuming that a zone is producing a batch of logs at the rate of one batch per second this means that over 86,400 batches would be produced in a day! Over the course of a week, there would be far too many keys in our index for us to be able to iterate through them all in a timely manner. This is where the encoding of a RayID and the naming of each batch comes into play.
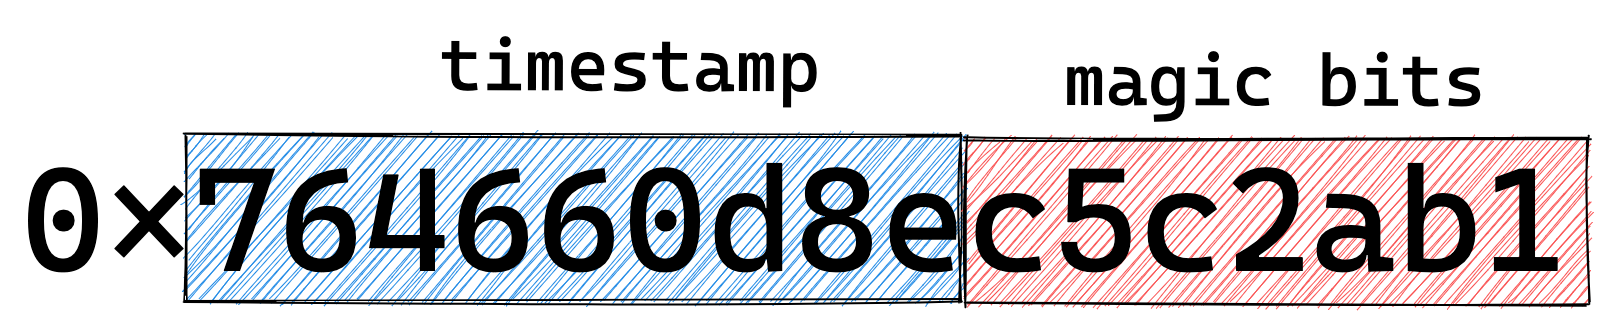
A RayID is currently, and I emphasize currently because this can change and has over time, a 16-byte hex encoded value where the first 36-bits encode a timestamp, and it looks something like: 764660d8ec5c2ab1. Note that the format of the RayID is likely to evolve in the near future, but for now we can use it to optimize retrieval.
Each batch produced by Logpush also happens to encode the time the batch was started and completed. Last but not least, upon analysis of our logging pipeline we found that 95% of RayIDs can be found in a batch produced within five minutes of the request completing. (Note that the encoded time sets a lower bound of the batch time we need to search).

For example: say we have a request that was made on November 3 at 16:00:00 UTC. We only need to check the batches under the prefix 20221103 and those batches that contain the time range of 16:00:00 to 16:05:00 UTC.

By reducing the number of batches to just a small handful of possibilities for a given RayID, we can simply ask our index if any of those batches contains the RayID by iterating through all the batch names (keys).
async function lookup(r2, bucket, prefix, start, end, rayid, storage) {
  const keys = await listObjects(r2, bucket, prefix, start, end);
  for (const key of keys) {
    const haystack: string[] | undefined = await storage.get(key);
    if (haystack && haystack.includes(rayid)) {
      return key
    }
  }
  return undefined
}
If the RayID is found in a batch, we then stream the corresponding batch back from R2 using another TransformationStream pipeline to filter out any non-matching records from the final response. If no result was found, we return an error message saying we were unable to find the RayID.
Summary
To recap, we showed how we can use Durable Objects and their underlying storage to create and manage forward-indexes for performing efficient lookup on the RayID for potentially millions of records. All without needing to manage your own database or logging infrastructure or doing a full-scan of the data.
While this is just one possible use case for Durable Objects, we are just getting started. If you haven’t read it before, checkout How we built Instant Logs to see another application of Durable Objects to stream millions of logs in real-time to your Cloudflare Dashboard!
What’s next
We currently offer RayID lookups for the HTTP Requests, Firewall Events, and soon support for Workers Trace Events. This is just the beginning for our Log Retrieval API, and we are already looking to add the ability to index and query on more types of fields such as status codes and host names. We also plan to integrate this into the dashboard so that developers can quickly retrieve the logs they need without needing to craft the necessary API calls by hand.
Last but not least, we want to make our retrieval functionality even more powerful and are looking at adding more complex types of filters and queries that you can run against your logs.
As always, stay tuned to the blog for more updates to our developer documentation for instructions on how to get started with log retrieval. If you’re interested in joining the beta, please email [email protected].