Tag Archives: Cloudflare R2

How Prisma saved 98% on distribution costs with Cloudflare R2

Post Syndicated from Pierre-Antoine Mills (Guest Author) original http://blog.cloudflare.com/how-prisma-saved-98-percent-on-distribution-costs-with-cloudflare-r2/

How Prisma saved 98% on distribution costs with Cloudflare R2

How Prisma saved 98% on distribution costs with Cloudflare R2

The following is a guest post written by Pierre-Antoine Mills, Miguel Fernández, and Petra Donka of Prisma. Prisma provides a server-side library that helps developers read and write data to the database in an intuitive, efficient and safe way.

Prisma’s mission is to redefine how developers build data-driven applications. At its core, Prisma provides an open-source, next-generation TypeScript Object-Relational Mapping (ORM) library that unlocks a new level of developer experience thanks to its intuitive data model, migrations, type-safety, and auto-completion.

Prisma ORM has experienced remarkable growth, engaging a vibrant community of developers. And while it was a great problem to have, this growth was causing an explosion in our AWS infrastructure costs. After investigating a wide range of alternatives, we went with Cloudflare’s R2 storage — and as a result are thrilled that our engine distribution costs have decreased by 98%, while delivering top-notch performance.

It was a natural fit: Prisma is already a proud technology partner of Cloudflare’s, offering deep database integration with Cloudflare Workers. And Cloudflare products provide much of the underlying infrastructure for Prisma Accelerate and Prisma Pulse, empowering user-focused product development. In this post, we’ll dig into how we decided to extend our ongoing collaboration with Cloudflare to the Prisma ORM, and how we migrated from AWS S3 + CloudFront to Cloudflare R2, with zero downtime.

Distributing the Prisma ORM and its engines

Prisma ORM simplifies data access thanks to its type-safe Prisma Client, and enables efficient database management via the Prisma CLI, so that developers can focus on product development.

Both the Prisma Client and the Prisma CLI rely on the Prisma Engines, which are implemented in Rust and distributed as platform-specific compiled binaries. The Prisma Engines perform a variety of tasks ranging from providing information about the schema for type generation, or migrating the database, to transforming Prisma queries into SQL, and executing those queries against the database. Think of the engines as the layer in the Prisma ORM that talks to the database.

How Prisma saved 98% on distribution costs with Cloudflare R2

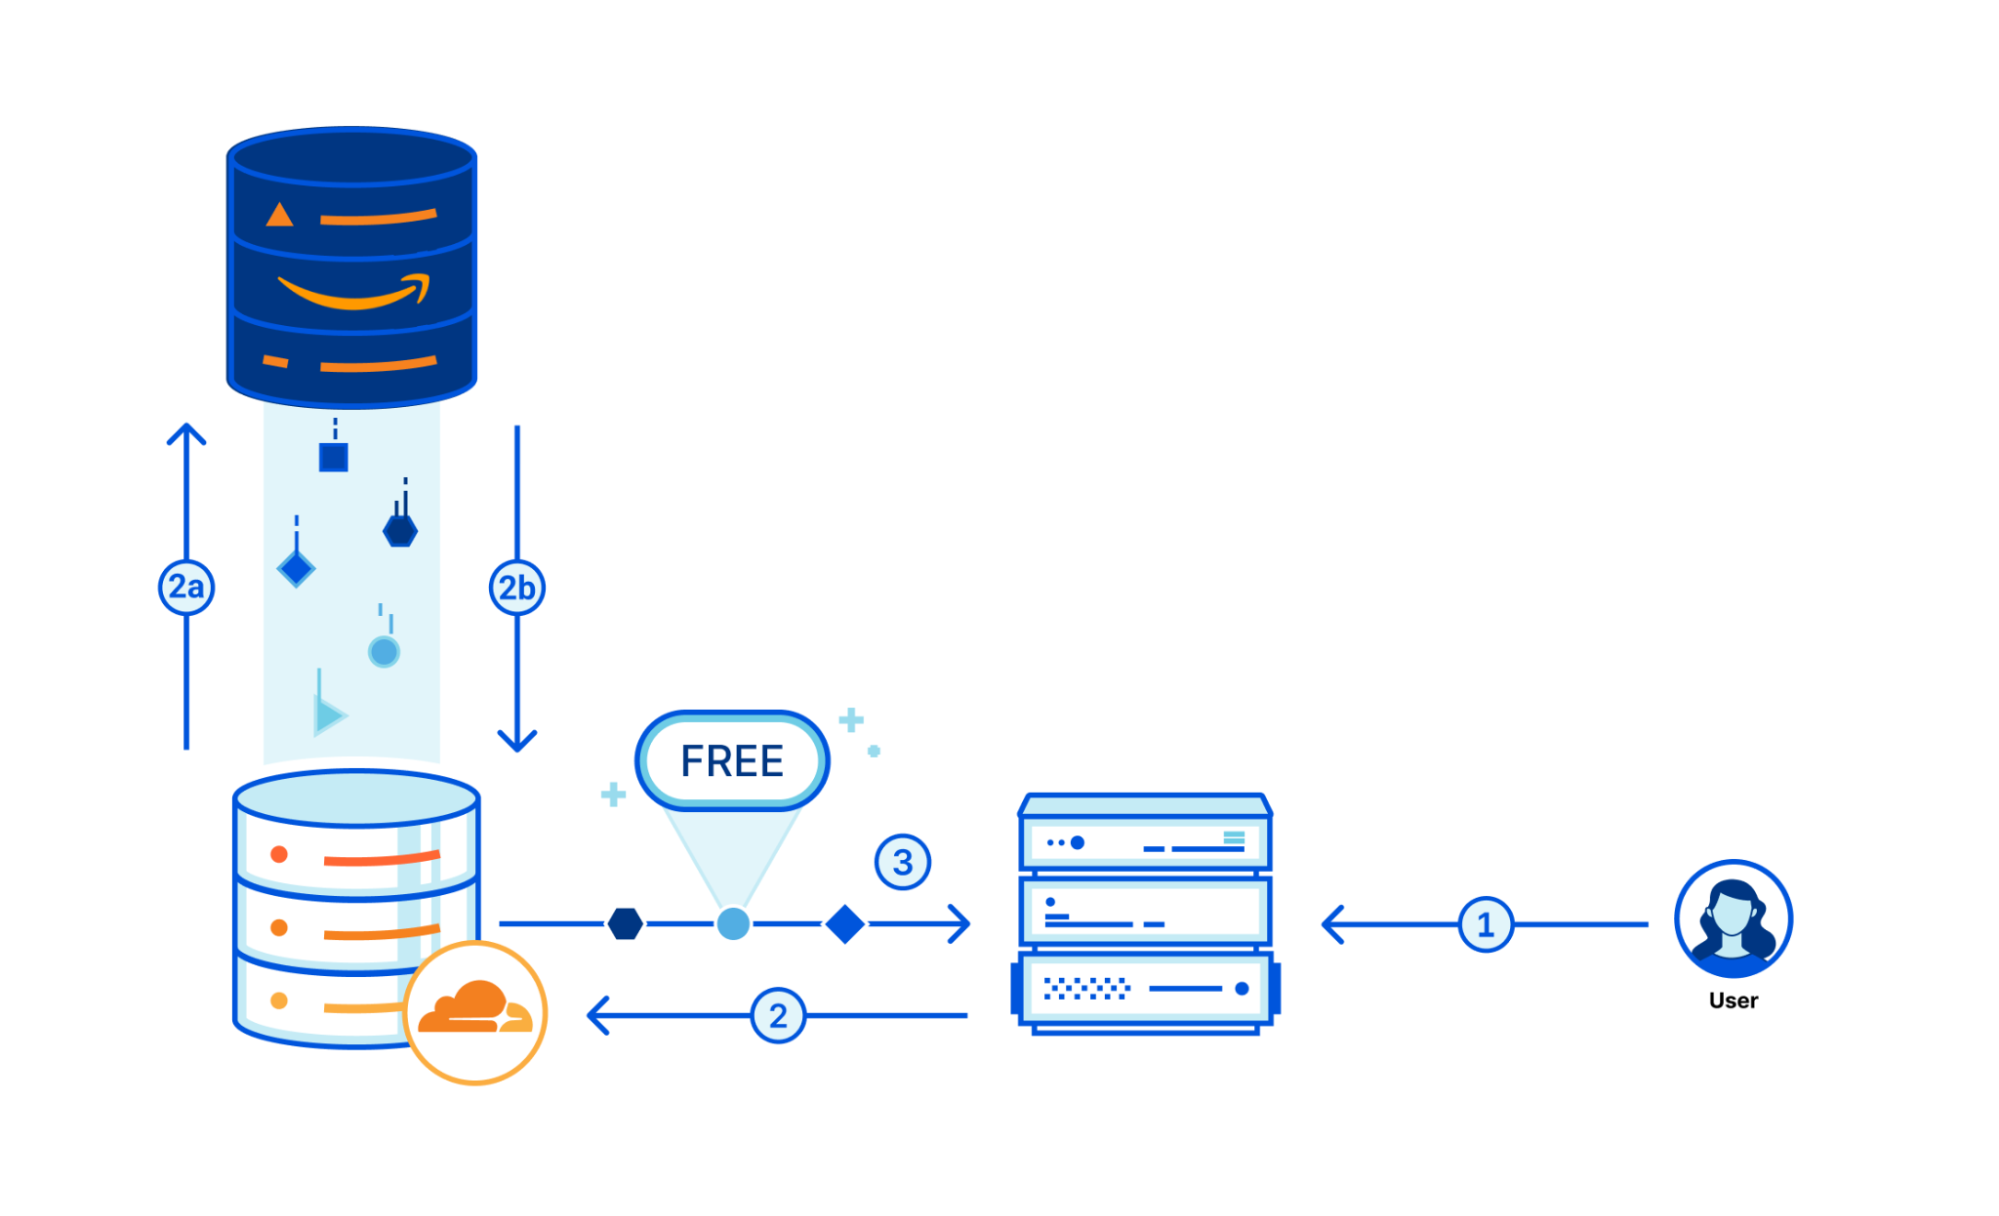
As a developer, one of the first steps to get started with Prisma is to install Prisma Client and the Prisma CLI from npm. Once installed, these packages need the Prisma Engines to be able to function. These engines have complex target-platform rules and were originally envisioned to be distributed separately from the npm package, so they can be used outside of the Node.js ecosystem. As a result, they are downloaded on demand by the Prisma CLI, only downloading what is strictly required for a given project.

As of mid-2023, the engines account for 100 million downloads a month and 250 terabytes of egress data transfer, with a continuous month-over-month increase as our user base grows. This highlights the importance of a highly available, global, and scalable infrastructure that provides low latency engine downloads to Prisma users all around the world.

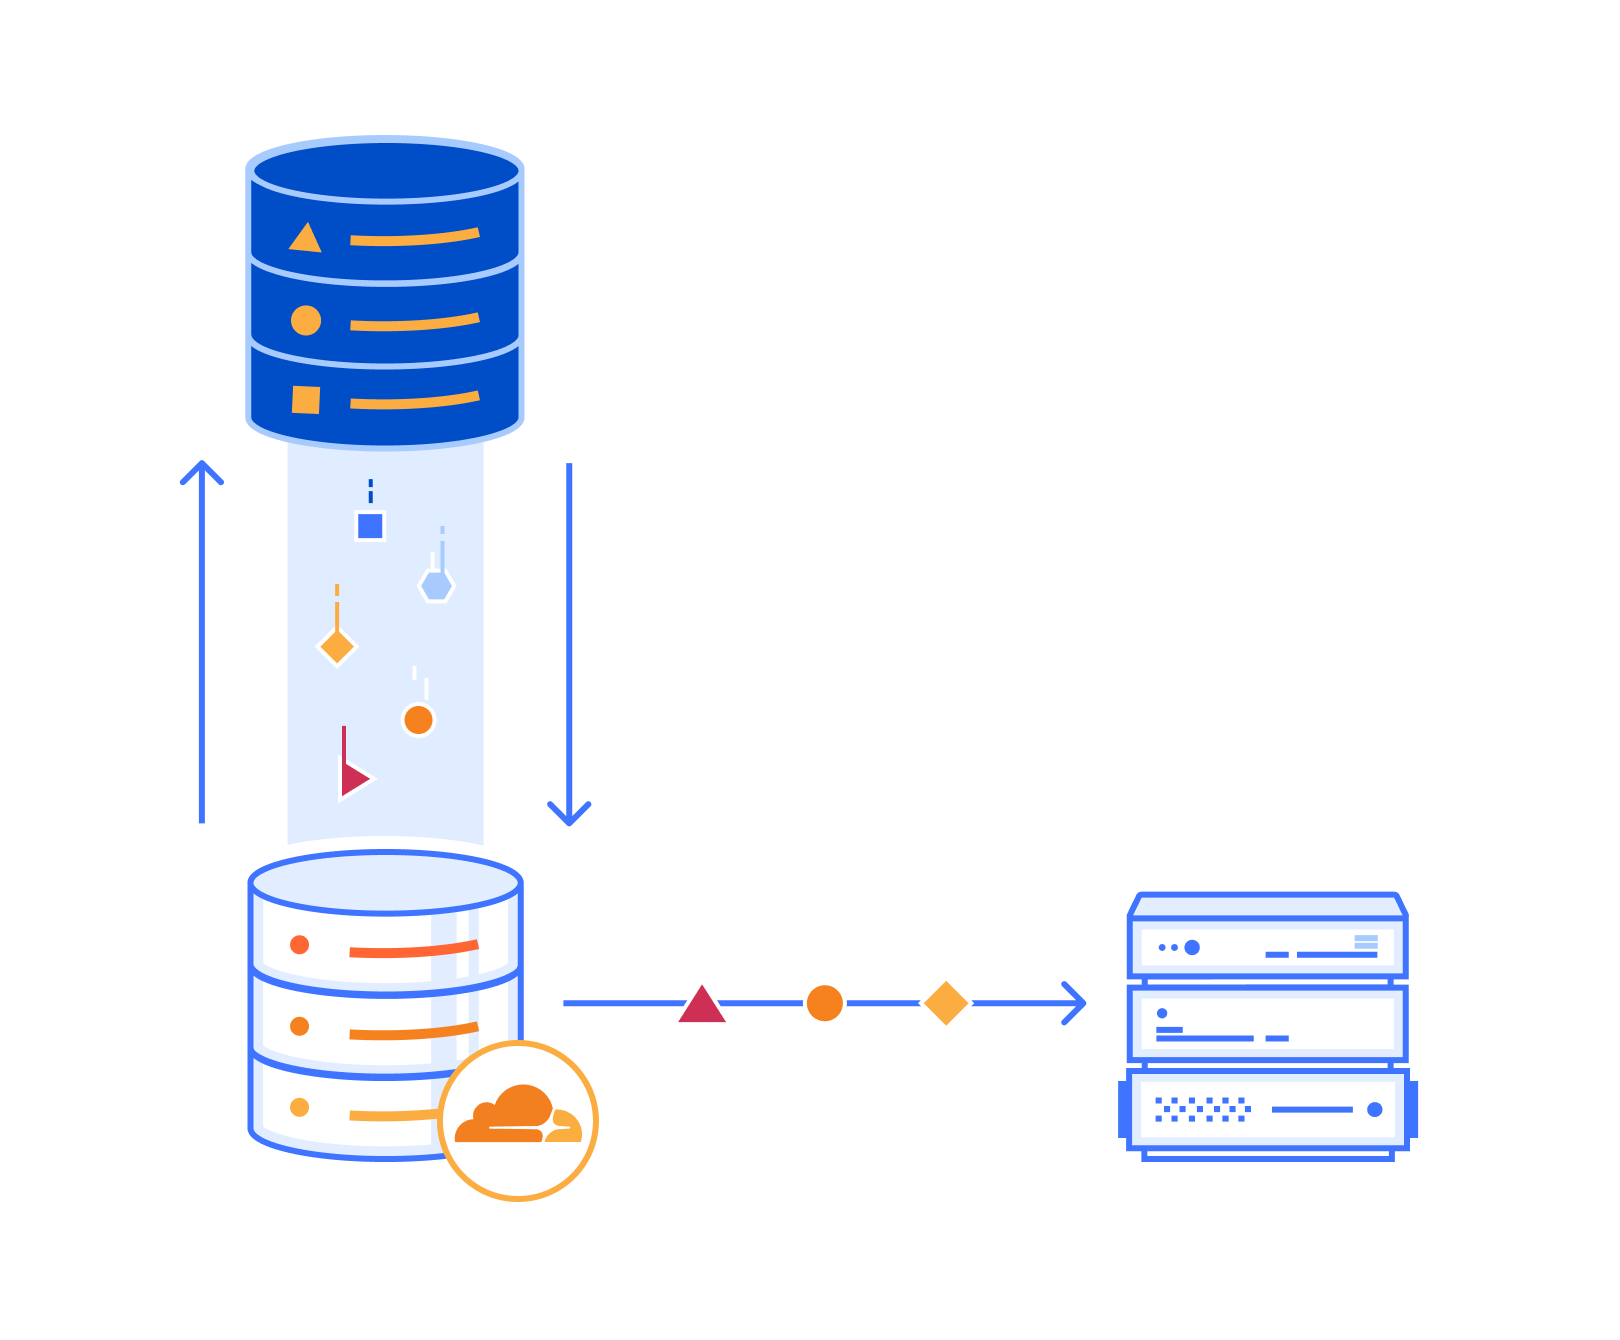
Our original solution: AWS S3 & CloudFront

During the early development of the Prisma ORM, our engineering team looked for tools to build the CDN for engine distribution. With extensive AWS experience, we went with the obvious: S3 blob storage for the engine files and CloudFront to cache contents closer to the user.

How Prisma saved 98% on distribution costs with Cloudflare R2
A simplified representation of how the Prisma Engines flow from our CI where they are built and uploaded, to the Prisma CLI downloading the correct engine for a given environment when installing Prisma, all the way to the user being able to use it.

We were happy with AWS for the most part, and it was able to scale with our demands. However, as our user base continued to grow, so did the costs. At our scale of traffic, data transfer became a considerable cost item that we knew would only continue to grow.

The continuously increasing cost of these services prompted us to explore alternative options that could better accommodate our needs while at least maintaining the same level of performance and reliability. Prisma is committed to providing the best products and solutions to our users, and an essential part of that commitment is being intentional about the allocation of our resources, including sensible spending to enable us to serve our growing user base in the best way possible.

Exploring distribution options

We extensively explored different technologies and services that provided both reliable and fast engine distribution, while being cost-effective.

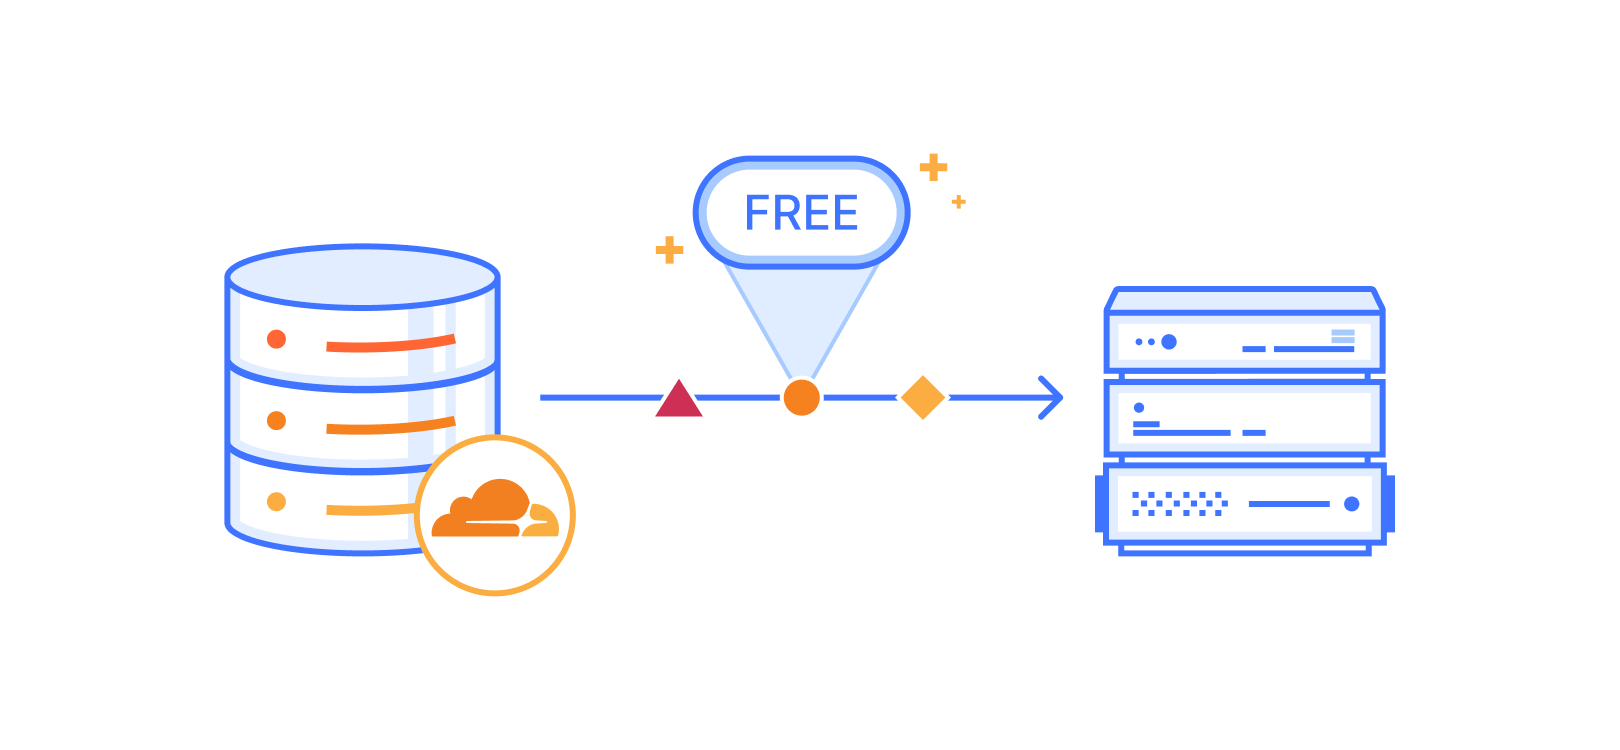
Free solutions: GitHub & npm

Because Prisma ORM is an open-source solution, we have explored various ways to distribute the engines through our existing distribution channels, at no cost. In this area, we had both GitHub Releases and npm as candidates to host and distribute our engine files. We dismissed GitHub Releases early on as the quality of service was not guaranteed, which was a requirement for us towards our users, so we can be sure to provide a good developer experience under all circumstances.

We also looked at npm, and confirmed that hosting the engine files would be in agreement with their Terms of Service. This made npm a viable option, but also meant we would have to change our engine download and upload logic to accommodate a different system. Additionally, this implied that we would have to update many past Prisma CLI versions, requiring our users to upgrade to take advantage of the new solution.

We then considered only replacing CloudFront, which accounted for 97% of our distribution costs, while retaining S3 as the origin. When we evaluated different CDNs, we found that alternatives could lead to an estimated 70% cost reduction.

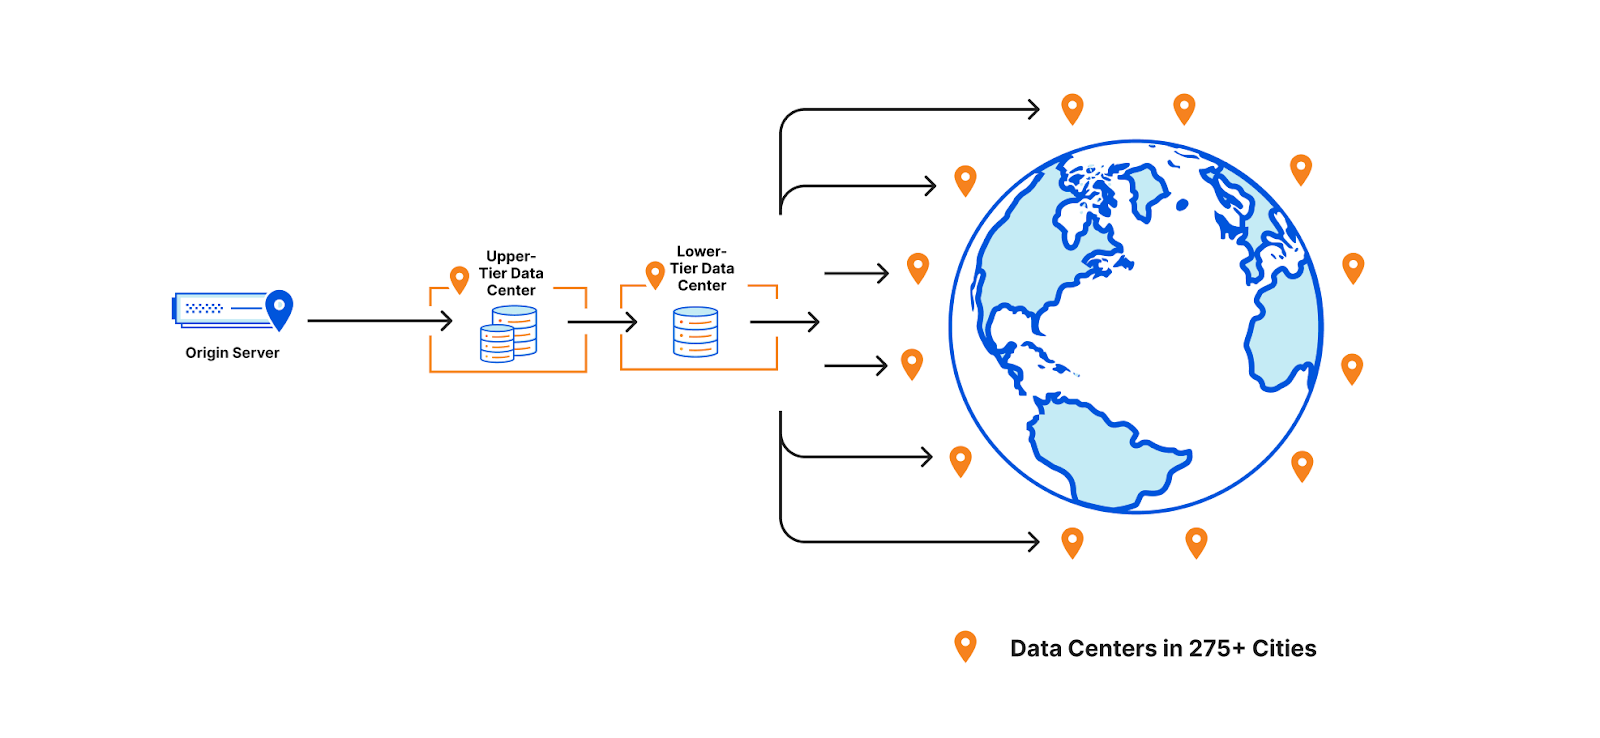
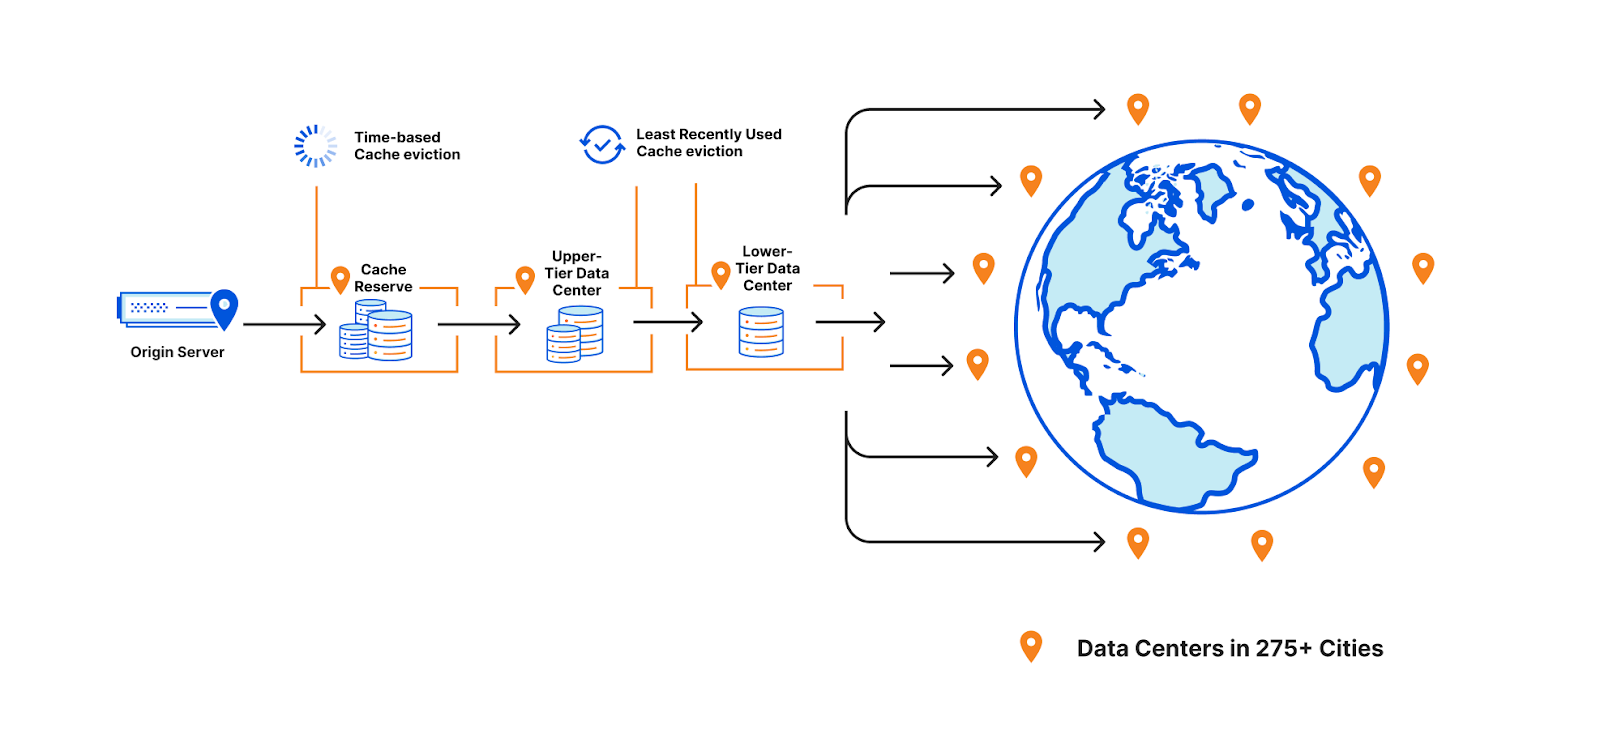
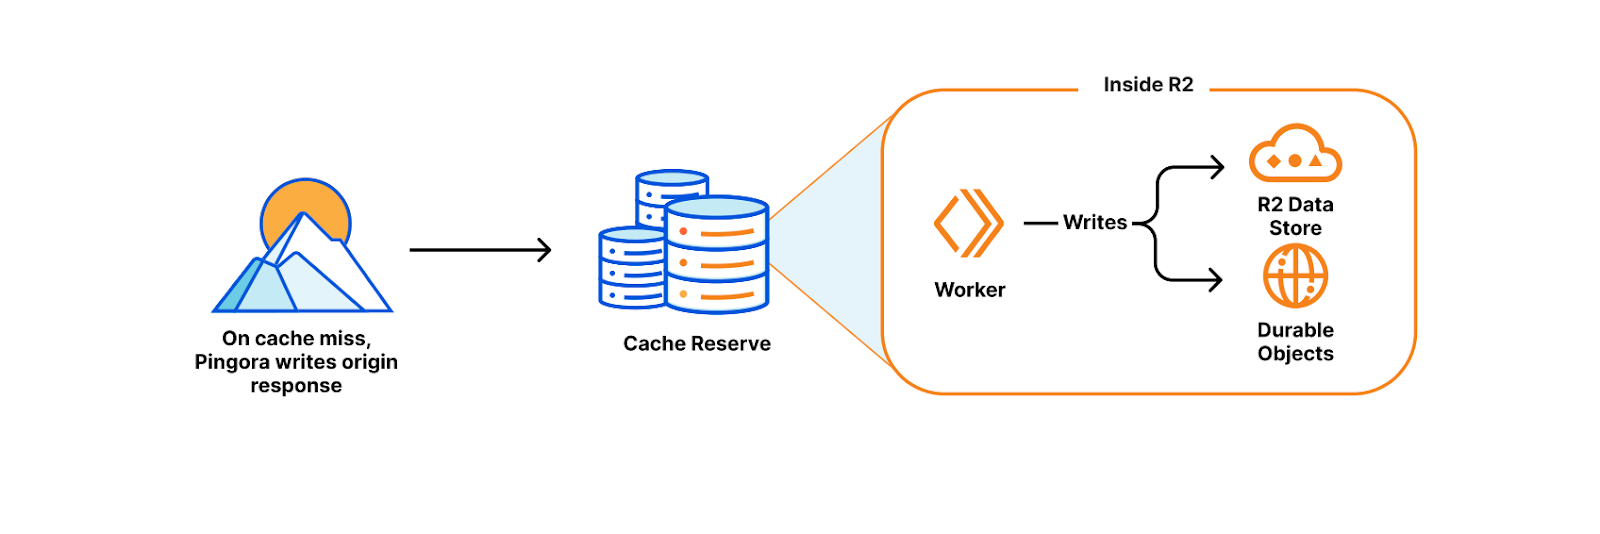
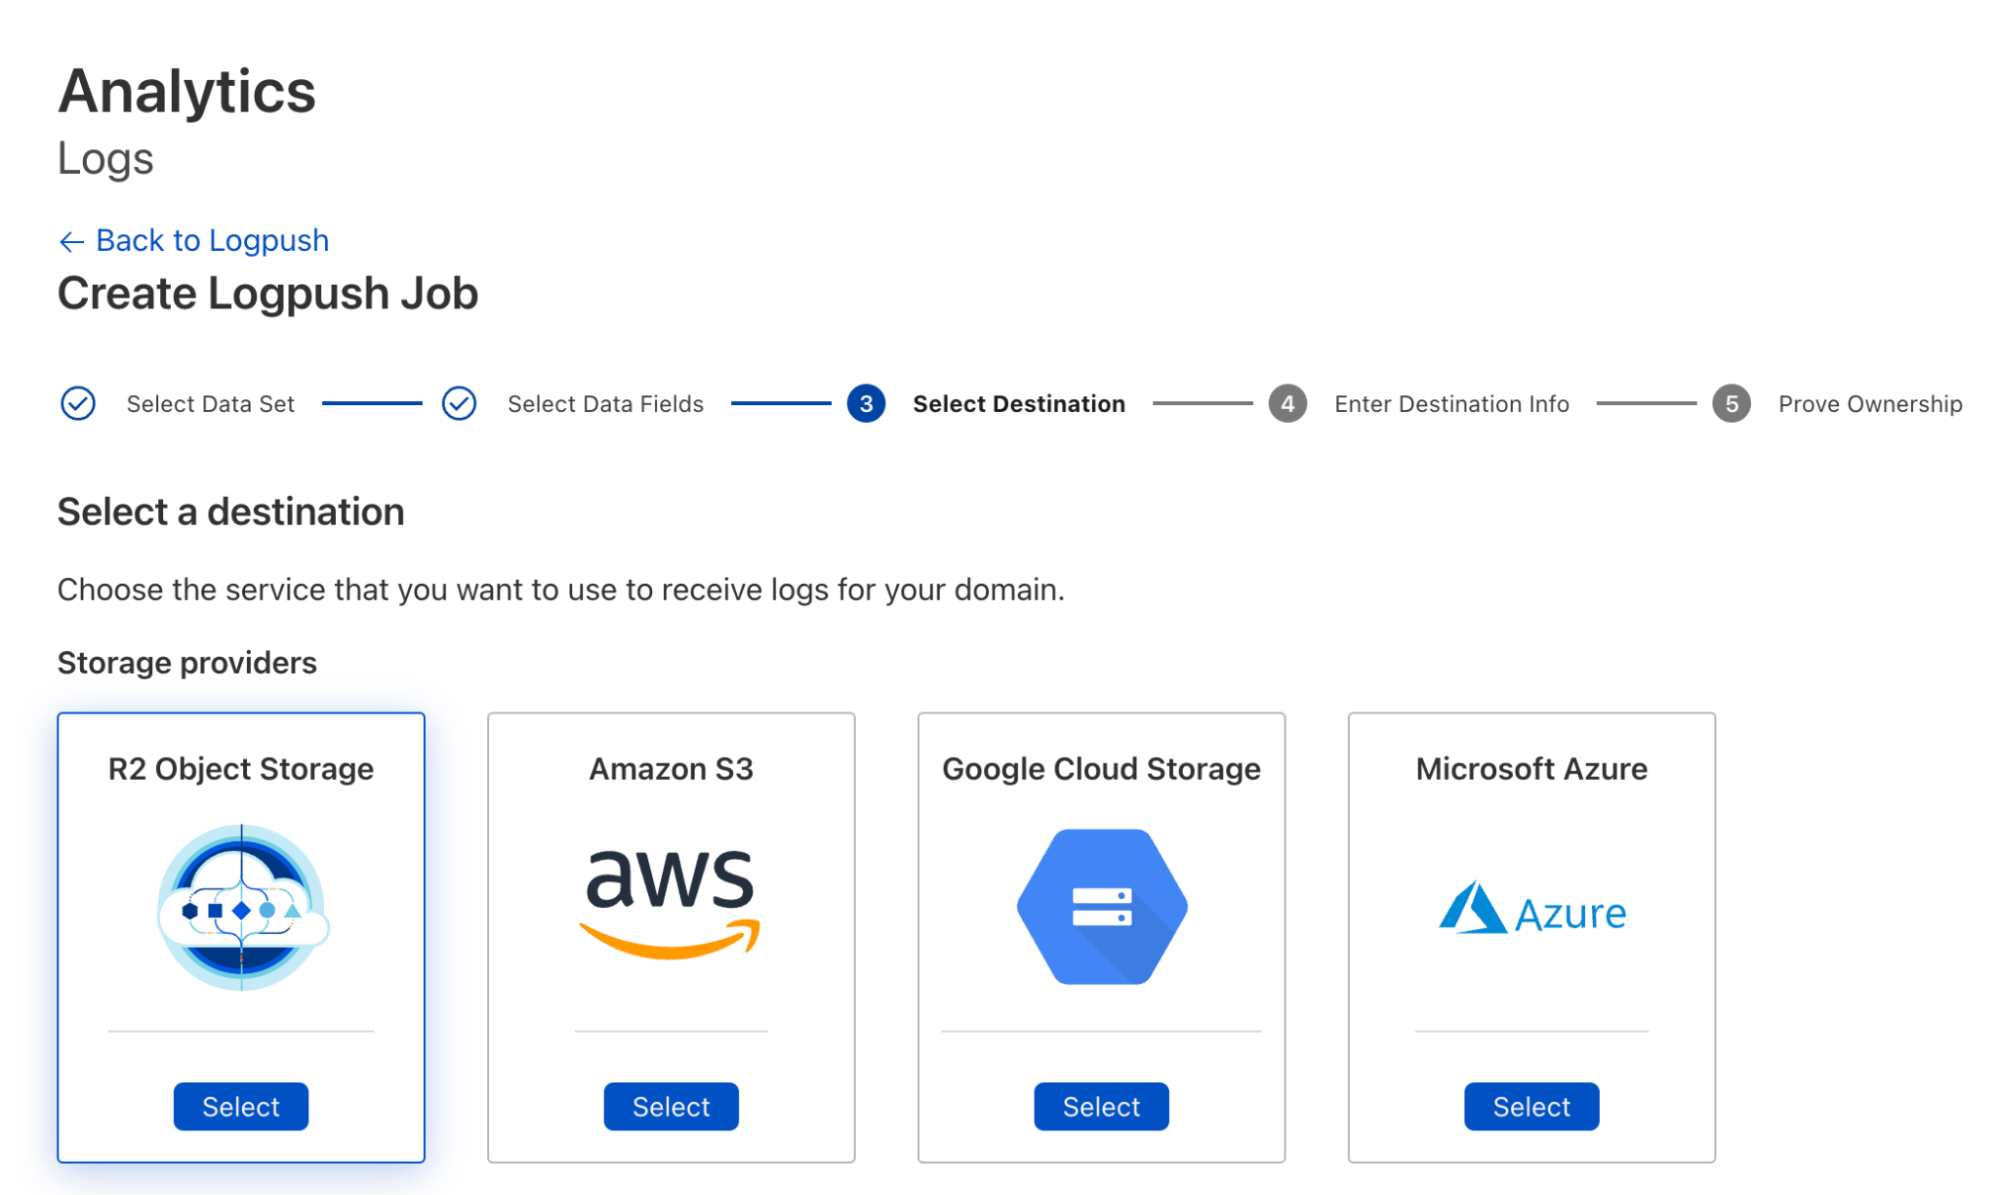
We also explored Cloudflare’s offerings and were impressed by Cloudflare R2, an alternative to AWS S3 + CloudFront. It offers robust blob storage compatible with S3 and leverages Cloudflare’s network for global low-latency distribution. Additionally, it has no egress costs, and is solely priced based on the total volume of data stored and operations on that data. Given our reliance on Cloudflare’s product portfolio for our Data Platform, and extensive experience with their Workers platform, we already had high trust in the quality of Cloudflare’s products.

To finalize our decision, we implemented a test to confirm our intuitions about Cloudflare’s quality of service. We deployed a script to 50 cities across the globe, representative of our incoming traffic, to measure download latencies for our engine files (~15MB). The test was run multiple times, with latencies for the different cache statuses recorded and compared against our previous AWS-based solution. The results confirmed that Cloudflare R2's reliability and performance were at least on par with AWS S3 + CloudFront. And because R2 is compatible with S3, we wouldn’t need to make substantial changes to our software in order to move over to Cloudflare. These were great results, and we couldn’t wait to switch!

Our solution: moving to Cloudflare’s R2

In order to move our engine file distribution to Cloudflare, we needed to ensure we could make the switch without any disruption or impact to our users.

While R2 URLs match S3's format, Prisma CLI uses a fixed domain to point to the engine file distribution. This fixed domain enabled us to transition without making any changes to the code of older Prisma versions, and simply point the existing URLs to R2. However, to make the transition, we needed to change our DNS configuration to point to Cloudflare. While this seems trivial, potential issues like unexpected DNS propagation challenges, or certificate validation problems when connecting via TLS, required us to plan ahead in order to proceed confidently and safely.

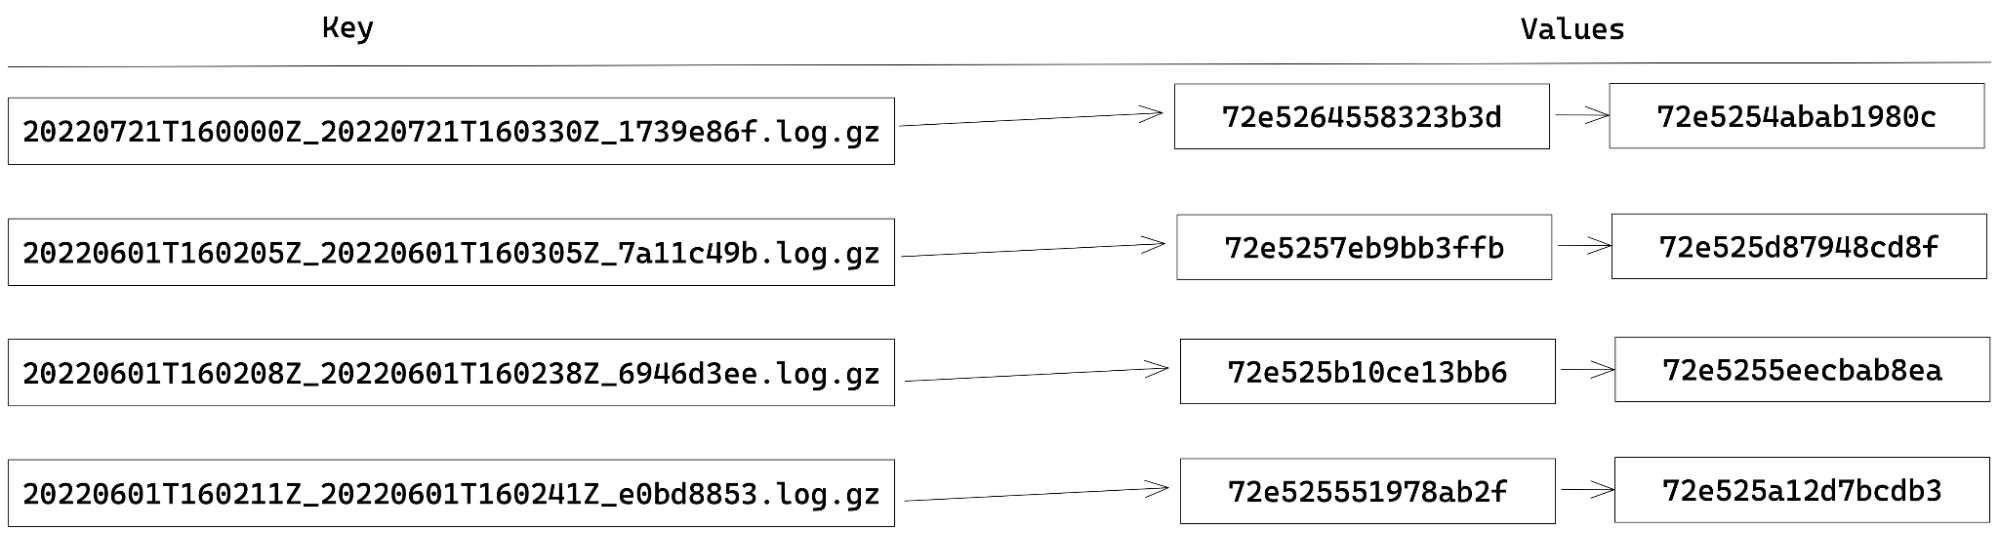
We modified the Prisma ORM release pipeline to upload assets to both S3 and R2, and used the R2 Super Slurper for migrating past engine versions to R2. This ensured all Prisma releases, past and future, existed in both places. We also established Grafana monitoring checks to pull engine files from R2, using a DNS and TLS configuration similar to our desired production setup, but via an experimental domain. Those monitoring checks were later reused during the final traffic cutover to ensure that there was no service disruption.

As ensuring no impact or disruption to our users was of utmost importance, we proceeded with a gradual rollout of the DNS changes using DNS load balancing, a method where a group of alias records assigned to a domain are weighted differently. This meant that the DNS resolver directed more traffic to heavier-weighted records. We began with a load balancing configuration simulating our old setup, with one record (the control) pointing to AWS CloudFront, and the other (the candidate) pointing to R2. Initially, all weight was on the control, effectively preserving the old routing to CloudFront. We also set the lowest TTL possible, so changes in the record weights took effect as soon as possible, creating more control over DNS propagation. Additionally, we implemented a health check that would redirect all traffic to the control if download latencies were significantly higher, or if errors were detected, ensuring a stable fallback.

At this point, everything was in place and we could start the rollout.

How Prisma saved 98% on distribution costs with Cloudflare R2
Our DNS load balancing setup during the rollout. We assigned increasing weights to route traffic to Cloudflare R2. The health check that would fail over to AWS CloudFront never fired.

The rollout began with a gradual increase in R2's DNS weight, and our monitoring dashboards showed that Cloudflare downloads were proportional to the weight assigned to R2. With as little as 5% traffic routed to Cloudflare, cache hit ratios neared 100%, as expected. Latencies matched the control, so the health checks were all good, and our fallback never activated. Over the duration of an hour, we gradually increased R2's DNS weight to manage 25%, 50%, and finally 100% of traffic, without any issues. The cutover could not have gone any smoother.

After monitoring for an additional two days, we simplified the DNS topology and routed to Cloudflare exclusively. We were extremely satisfied with the change, and started seeing our infrastructure costs drop considerably, as expected, not to mention the zero downtime and zero reported issues from users.

A success

Transitioning to Cloudflare R2 was easy thanks to their great product and tooling, intuitive platform and supportive team. We've had an excellent experience with their service, with consistently great uptime, performance and latency. Cloudflare proved once again to be a valuable partner to help us scale.

We are thrilled that our engine distribution costs have decreased by 98%. Cloudflare's cost-effective solution has not only delivered top-notch performance but has also brought significant savings to our operations. An all around success!

To learn more about how Prisma is building Data DX solutions with Cloudflare, take a look at Developer Experience Redefined: Prisma & Cloudflare Lead the Way to Data DX.

And if you want to see Prisma in action, get started with the Quickstart guide.

Birthday Week recap: everything we announced — plus an AI-powered opportunity for startups

Post Syndicated from Dina Kozlov original http://blog.cloudflare.com/birthday-week-2023-wrap-up/

Birthday Week recap: everything we announced — plus an AI-powered opportunity for startups

Birthday Week recap: everything we announced — plus an AI-powered opportunity for startups

This year, Cloudflare officially became a teenager, turning 13 years old. We celebrated this milestone with a series of announcements that benefit both our customers and the Internet community.

From developing applications in the age of AI to securing against the most advanced attacks that are yet to come, Cloudflare is proud to provide the tools that help our customers stay one step ahead.

We hope you’ve had a great time following along and for anyone looking for a recap of everything we launched this week, here it is:

Monday

What

In a sentence…

Switching to Cloudflare can cut emissions by up to 96%

Switching enterprise network services from on-prem to Cloudflare can cut related carbon emissions by up to 96%. 

Cloudflare Trace

Use Cloudflare Trace to see which rules and settings are invoked when an HTTP request for your site goes through our network. 

Cloudflare Fonts

Introducing Cloudflare Fonts. Enhance privacy and performance for websites using Google Fonts by loading fonts directly from the Cloudflare network. 

How Cloudflare intelligently routes traffic

Technical deep dive that explains how Cloudflare uses machine learning to intelligently route traffic through our vast network. 

Low Latency Live Streaming

Cloudflare Stream’s LL-HLS support is now in open beta. You can deliver video to your audience faster, reducing the latency a viewer may experience on their player to as little as 3 seconds. 

Account permissions for all

Cloudflare account permissions are now available to all customers, not just Enterprise. In addition, we’ll show you how you can use them and best practices. 

Incident Alerts

Customers can subscribe to Cloudflare Incident Alerts and choose when to get notified based on affected products and level of impact. 

Tuesday

What

In a sentence…

Welcome to the connectivity cloud

Cloudflare is the world’s first connectivity cloud — the modern way to connect and protect your cloud, networks, applications and users. 

Amazon’s $2bn IPv4 tax — and how you can avoid paying it 

Amazon will begin taxing their customers $43 for IPv4 addresses, so Cloudflare will give those \$43 back in the form of credits to bypass that tax. 

Sippy

Minimize egress fees by using Sippy to incrementally migrate your data from AWS to R2. 

Cloudflare Images

All Image Resizing features will be available under Cloudflare Images and we’re simplifying pricing to make it more predictable and reliable.  

Traffic anomalies and notifications with Cloudflare Radar

Cloudflare Radar will be publishing anomalous traffic events for countries and Autonomous Systems (ASes).

Detecting Internet outages

Deep dive into how Cloudflare detects Internet outages, the challenges that come with it, and our approach to overcome these problems. 

Wednesday

What

In a sentence…

The best place on Region: Earth for inference

Now available: Workers AI, a serverless GPU cloud for AI, Vectorize so you can build your own vector databases, and AI Gateway to help manage costs and observability of your AI applications. 

Cloudflare delivers the best infrastructure for next-gen AI applications, supported by partnerships with NVIDIA, Microsoft, Hugging Face, Databricks, and Meta.

Workers AI 

Launching Workers AI — AI inference as a service platform, empowering developers to run AI models with just a few lines of code, all powered by our global network of GPUs. 

Partnering with Hugging Face 

Cloudflare is partnering with Hugging Face to make AI models more accessible and affordable to users. 

Vectorize

Cloudflare’s vector database, designed to allow engineers to build full-stack, AI-powered applications entirely on Cloudflare's global network — available in Beta. 

AI Gateway

AI Gateway helps developers have greater control and visibility in their AI apps, so that you can focus on building without worrying about observability, reliability, and scaling. AI Gateway handles the things that nearly all AI applications need, saving you engineering time so you can focus on what you're building.


You can now use WebGPU in Cloudflare Workers

Developers can now use WebGPU in Cloudflare Workers. Learn more about why WebGPUs are important, why we’re offering them to customers, and what’s next. 

What AI companies are building with Cloudflare

Many AI companies are using Cloudflare to build next generation applications. Learn more about what they’re building and how Cloudflare is helping them on their journey. 

Writing poems using LLama 2 on Workers AI

Want to write a poem using AI? Learn how to run your own AI chatbot in 14 lines of code, running on Cloudflare’s global network. 

Thursday

What

In a sentence…

Hyperdrive

Cloudflare launches a new product, Hyperdrive, that makes existing regional databases much faster by dramatically speeding up queries that are made from Cloudflare Workers.

D1 Open Beta

D1 is now in open beta, and the theme is “scale”: with higher per-database storage limits and the ability to create more databases, we’re unlocking the ability for developers to build production-scale applications on D1.

Pages Build Caching

Build cache is a feature designed to reduce your build times by caching and reusing previously computed project components — now available in Beta. 

Running serverless Puppeteer with Workers and Durable Objects

Introducing the Browser Rendering API, which enables developers to utilize the Puppeteer browser automation library within Workers, eliminating the need for serverless browser automation system setup and maintenance

Cloudflare partners with Microsoft to power their Edge Secure Network

We partnered with Microsoft Edge to provide a fast and secure VPN, right in the browser. Users don’t have to install anything new or understand complex concepts to get the latest in network-level privacy: Edge Secure Network VPN is available on the latest consumer version of Microsoft Edge in most markets, and automatically comes with 5GB of data. 

Re-introducing the Cloudflare Workers playground

We are revamping the playground that demonstrates the power of Workers, along with new development tooling, and the ability to share your playground code and deploy instantly to Cloudflare’s global network

Cloudflare integrations marketplace expands

Introducing the newest additions to Cloudflare’s Integration Marketplace. Now available: Sentry, Momento and Turso. 

A Socket API that works across Javascript runtimes — announcing WinterCG spec and polyfill for connect()

Engineers from Cloudflare and Vercel have published a draft specification of the connect() sockets API for review by the community, along with a Node.js compatible polyfill for the connect() API that developers can start using.

New Workers pricing

Announcing new pricing for Cloudflare Workers, where you are billed based on CPU time, and never for the idle time that your Worker spends waiting on network requests and other I/O.

Friday

What

In a sentence…

Post Quantum Cryptography goes GA 

Cloudflare is rolling out post-quantum cryptography support to customers, services, and internal systems to proactively protect against advanced attacks. 

Encrypted Client Hello

Announcing a contribution that helps improve privacy for everyone on the Internet. Encrypted Client Hello, a new standard that prevents networks from snooping on which websites a user is visiting, is now available on all Cloudflare plans. 

Email Retro Scan 

Cloudflare customers can now scan messages within their Office 365 Inboxes for threats. The Retro Scan will let you look back seven days to see what threats your current email security tool has missed. 

Turnstile is Generally Available

Turnstile, Cloudflare’s CAPTCHA replacement, is now generally available and available for free to everyone and includes unlimited use. 

AI crawler bots

Any Cloudflare user, on any plan, can choose specific categories of bots that they want to allow or block, including AI crawlers. We are also recommending a new standard to robots.txt that will make it easier for websites to clearly direct how AI bots can and can’t crawl.

Detecting zero-days before zero-day

Deep dive into Cloudflare’s approach and ongoing research into detecting novel web attack vectors in our WAF before they are seen by a security researcher. 

Privacy Preserving Metrics

Deep dive into the fundamental concepts behind the Distributed Aggregation Protocol (DAP) protocol with examples on how we’ve implemented it into Daphne, our open source aggregator server. 

Post-quantum cryptography to origin

We are rolling out post-quantum cryptography support for outbound connections to origins and Cloudflare Workers fetch() calls. Learn more about what we enabled, how we rolled it out in a safe manner, and how you can add support to your origin server today. 

Network performance update

Cloudflare’s updated benchmark results regarding network performance plus a dive into the tools and processes that we use to monitor and improve our network performance. 

One More Thing

Birthday Week recap: everything we announced — plus an AI-powered opportunity for startups

When Cloudflare turned 12 last year, we announced the Workers Launchpad Funding Program – you can think of it like a startup accelerator program for companies building on Cloudlare’s Developer Platform, with no restrictions on your size, stage, or geography.

A refresher on how the Launchpad works: Each quarter, we admit a group of startups who then get access to a wide range of technical advice, mentorship, and fundraising opportunities. That includes our Founders Bootcamp, Open Office Hours with our Solution Architects, and Demo Day. Those who are ready to fundraise will also be connected to our community of 40+ leading global Venture Capital firms.

In exchange, we just ask for your honest feedback. We want to know what works, what doesn’t and what you need us to build for you. We don’t ask for a stake in your company, and we don’t ask you to pay to be a part of the program.


Over the past year, we’ve received applications from nearly 60 different countries. We’ve had a chance to work closely with 50 amazing early and growth-stage startups admitted into the first two cohorts, and have grown our VC partner community to 40+ firms and more than $2 billion in potential investments in startups building on Cloudflare.

Next up: Cohort #3! Between recently wrapping up Cohort #2 (check out their Demo Day!), celebrating the Launchpad’s 1st birthday, and the heaps of announcements we made last week, we thought that everyone could use a little extra time to catch up on all the news – which is why we are extending the deadline for Cohort #3 a few weeks to October 13, 2023. AND we’re reserving 5 spots in the class for those who are already using any of last Wednesday’s AI announcements. Just be sure to mention what you’re using in your application.

So once you’ve had a chance to check out the announcements and pour yourself a cup of coffee, check out the Workers Launchpad. Applying is a breeze — you’ll be done long before your coffee gets cold.

Until next time

That’s all for Birthday Week 2023. We hope you enjoyed the ride, and we’ll see you at our next innovation week!


Sippy helps you avoid egress fees while incrementally migrating data from S3 to R2

Post Syndicated from Phillip Jones original http://blog.cloudflare.com/sippy-incremental-migration-s3-r2/

Sippy helps you avoid egress fees while incrementally migrating data from S3 to R2

Sippy helps you avoid egress fees while incrementally migrating data from S3 to R2

Earlier in 2023, we announced Super Slurper, a data migration tool that makes it easy to copy large amounts of data to R2 from other cloud object storage providers. Since the announcement, developers have used Super Slurper to run thousands of successful migrations to R2!

While Super Slurper is perfect for cases where you want to move all of your data to R2 at once, there are scenarios where you may want to migrate your data incrementally over time. Maybe you want to avoid the one time upfront AWS data transfer bill? Or perhaps you have legacy data that may never be accessed, and you only want to migrate what’s required?

Today, we’re announcing the open beta of Sippy, an incremental migration service that copies data from S3 (other cloud providers coming soon!) to R2 as it’s requested, without paying unnecessary cloud egress fees typically associated with moving large amounts of data. On top of addressing vendor lock-in, Sippy makes stressful, time-consuming migrations a thing of the past. All you need to do is replace the S3 endpoint in your application or attach your domain to your new R2 bucket and data will start getting copied over.

How does it work?

Sippy is an incremental migration service built directly into your R2 bucket. Migration-specific egress fees are reduced by leveraging requests within the flow of your application where you’d already be paying egress fees to simultaneously copy objects to R2. Here is how it works:

When an object is requested from Workers, S3 API, or public bucket, it is served from your R2 bucket if it is found.

Sippy helps you avoid egress fees while incrementally migrating data from S3 to R2

If the object is not found in R2, it will simultaneously be returned from your S3 bucket and copied to R2.

Note: Some large objects may take multiple requests to copy.

Sippy helps you avoid egress fees while incrementally migrating data from S3 to R2

That means after objects are copied, subsequent requests will be served from R2, and you’ll begin saving on egress fees immediately.

Start incrementally migrating data from S3 to R2

Create an R2 bucket

To get started with incremental migration, you’ll first need to create an R2 bucket if you don’t already have one. To create a new R2 bucket from the Cloudflare dashboard:

  1. Log in to the Cloudflare dashboard and select R2.
  2. Select Create bucket.
  3. Give your bucket a name and select Create bucket.

​​To learn more about other ways to create R2 buckets refer to the documentation on creating buckets.

Enable Sippy on your R2 bucket

Next, you’ll enable Sippy for the R2 bucket you created. During the beta, you can do this by using the API. Here’s an example of how to enable Sippy for an R2 bucket with cURL:

curl -X PUT https://api.cloudflare.com/client/v4/accounts/{account_id}/r2/buckets/{bucket_name}/sippy \
--header "Authorization: Bearer <API_TOKEN>" \
--data '{"provider": "AWS", "bucket": "<AWS_BUCKET_NAME>", "zone": "<AWS_REGION>","key_id": "<AWS_ACCESS_KEY_ID>", "access_key":"<AWS_SECRET_ACCESS_KEY>", "r2_key_id": "<R2_ACCESS_KEY_ID>", "r2_access_key": "<R2_SECRET_ACCESS_KEY>"}'

For more information on getting started, please refer to the documentation. Once enabled, requests to your bucket will now start copying data over from S3 if it’s not already present in your R2 bucket.

Finish your migration with Super Slurper

You can run your incremental migration for as long as you want, but eventually you may want to complete the migration to R2. To do this, you can pair Sippy with Super Slurper to easily migrate your remaining data that hasn’t been accessed to R2.

What’s next?

We’re excited about open beta, but it’s only the starting point. Next, we plan on making incremental migration configurable from the Cloudflare dashboard, complete with analytics that show you the progress of your migration and how much you are saving by not paying egress fees for objects that have been copied over so far.

If you are looking to start incrementally migrating your data to R2 and have any questions or feedback on what we should build next, we encourage you to join our Discord community to share!

Sippy helps you avoid egress fees while incrementally migrating data from S3 to R2

Introducing Object Lifecycle Management for Cloudflare R2

Post Syndicated from Harshal Brahmbhatt original http://blog.cloudflare.com/introducing-object-lifecycle-management-for-cloudflare-r2/

Introducing Object Lifecycle Management for Cloudflare R2

Introducing Object Lifecycle Management for Cloudflare R2

Last year, R2 made its debut, providing developers with object storage while eliminating the burden of egress fees. (For many, egress costs account for over half of their object storage bills!) Since R2’s launch, tens of thousands of developers have chosen it to store data for many different types of applications.

But for some applications, data stored in R2 doesn’t need to be retained forever. Over time, as this data grows, it can unnecessarily lead to higher storage costs. Today, we’re excited to announce that Object Lifecycle Management for R2 is generally available, allowing you to effectively manage object expiration, all from the R2 dashboard or via our API.

Object Lifecycle Management

Object lifecycles give you the ability to define rules (up to 1,000) that determine how long objects uploaded to your bucket are kept. For example, by implementing an object lifecycle rule that deletes objects after 30 days, you could automatically delete outdated logs or temporary files. You can also define rules to abort unfinished multipart uploads that are sitting around and contributing to storage costs.

Getting started with object lifecycles in R2

Cloudflare dashboard

Introducing Object Lifecycle Management for Cloudflare R2
  1. From the Cloudflare dashboard, select R2.
  2. Select your R2 bucket.
  3. Navigate to the Settings tab and find the Object lifecycle rules section.
  4. Select Add rule to define the name, relevant prefix, and lifecycle actions: delete uploaded objects or abort incomplete multipart uploads.
  5. Select Add rule to complete the process.

S3 Compatible API

With R2’s S3-compatible API, it’s easy to apply any existing object lifecycle rules to your R2 buckets.

Here’s an example of how to configure your R2 bucket’s lifecycle policy using the AWS SDK for JavaScript. To try this out, you’ll need to generate an Access Key.

import S3 from "aws-sdk/clients/s3.js";

const client = new S3({
  endpoint: `https://${ACCOUNT_ID}.r2.cloudflarestorage.com`,
  credentials: {
    accessKeyId: ACCESS_KEY_ID, //  fill in your own
    secretAccessKey: SECRET_ACCESS_KEY, // fill in your own
  },
  region: "auto",
});

await client
  .putBucketLifecycleConfiguration({
    LifecycleConfiguration: {
      Bucket: "testBucket",
      Rules: [
        // Example: deleting objects by age
        // Delete logs older than 90 days
        {
          ID: "Delete logs after 90 days",
          Filter: {
            Prefix: "logs/",
          },
          Expiration: {
            Days: 90,
          },
        },
        // Example: abort all incomplete multipart uploads after a week
        {
          ID: "Abort incomplete multipart uploads",
          AbortIncompleteMultipartUpload: {
            DaysAfterInitiation: 7,
          },
        },
      ],
    },
  })
  .promise();

For more information on how object lifecycle policies work and how to configure them in the dashboard or API, see the documentation here.

Speaking of documentation, if you’d like to provide feedback for R2’s documentation, fill out our documentation survey!

What’s next?

Creating object lifecycle rules to delete ephemeral objects is a great way to reduce storage costs, but what if you need to keep objects around to access in the future? We’re working on new, lower cost ways to store objects in R2 that aren’t frequently accessed, like long tail user-generated content, archive data, and more. If you’re interested in providing feedback and gaining early access, let us know by joining the waitlist here.

Join the conversation: share your feedback and experiences

If you have any questions or feedback relating to R2, we encourage you to join our Discord community to share! Stay tuned for more exciting R2 updates in the future.

ICYMI: Developer Week 2022 announcements

Post Syndicated from Dawn Parzych original https://blog.cloudflare.com/icymi-developer-week-2022-announcements/

ICYMI: Developer Week 2022 announcements

ICYMI: Developer Week 2022 announcements

Developer Week 2022 has come to a close. Over the last week we’ve shared with you 31 posts on what you can build on Cloudflare and our vision and roadmap on where we’re headed. We shared product announcements, customer and partner stories, and provided technical deep dives. In case you missed any of the posts here’s a handy recap.

Product and feature announcements

Announcement Summary
Welcome to the Supercloud (and Developer Week 2022) Our vision of the cloud — a model of cloud computing that promises to make developers highly productive at scaling from one to Internet-scale in the most flexible, efficient, and economical way.
Build applications of any size on Cloudflare with the Queues open beta Build performant and resilient distributed applications with Queues. Available to all developers with a paid Workers plan.
Migrate from S3 easily with the R2 Super Slurper A tool to easily and efficiently move objects from your existing storage provider to R2.
Get started with Cloudflare Workers with ready-made templates See what’s possible with Workers and get building faster with these starter templates.
Reduce origin load, save on cloud egress fees, and maximize cache hits with Cache Reserve Cache Reserve is graduating to open beta – users can now test and integrate it into their content delivery strategy without any additional waiting.
Store and process your Cloudflare Logs… with Cloudflare Query Cloudflare logs stored on R2.
UPDATE Supercloud SET status = ‘open alpha’ WHERE product = ‘D1’ D1, our first global relational database, is in open alpha. Start building and share your feedback with us.
Automate an isolated browser instance with just a few lines of code The Browser Rendering API is an out of the box solution to run browser automation tasks with Puppeteer in Workers.
Bringing authentication and identification to Workers through Mutual TLS Send outbound requests with Workers through a mutually authenticated channel.
Spice up your sites on Cloudflare Pages with Pages Functions General Availability Easily add dynamic content to your Pages projects with Functions.
Announcing the first Workers Launchpad cohort and growth of the program to $2 billion We were blown away by the interest in the Workers Launchpad Funding Program and are proud to introduce the first cohort.
The most programmable Supercloud with Cloudflare Snippets Modify traffic routed through the Cloudflare CDN without having to write a Worker.
Keep track of Workers’ code and configuration changes with Deployments Track your changes to a Worker configuration, binding, and code.
Send Cloudflare Workers logs to a destination of your choice with Workers Trace Events Logpush Gain visibility into your Workers when logs are sent to your analytics platform or object storage. Available to all users on a Workers paid plan.
Improved Workers TypeScript support Based on feedback from users we’ve improved our types and are open-sourcing the automatic generation scripts.

Technical deep dives

Announcement Summary
The road to a more standards-compliant Workers API An update on the work the WinterCG is doing on the creation of common API standards in JavaScript runtimes and how Workers is implementing them.
Indexing millions of HTTP requests using Durable Objects
Indexing and querying millions of logs stored in R2 using Workers, Durable Objects, and the Streams API.
Iteration isn’t just for code: here are our latest API docs We’ve revamped our API reference documentation to standardize our API content and improve the overall developer experience when using the Cloudflare APIs.
Making static sites dynamic with D1 A template to build a D1-based comments APi.
The Cloudflare API now uses OpenAPI schemas OpenAPI schemas are now available for the Cloudflare API.
Server-side render full stack applications with Pages Functions Run server-side rendering in a Function using a variety of frameworks including Qwik, Astro, and SolidStart.
Incremental adoption of micro-frontends with Cloudflare Workers How to replace selected elements of a legacy client-side rendered application with server-side rendered fragments using Workers.
How we built it: the technology behind Cloudflare Radar 2.0 Details on how we rebuilt Radar using Pages, Remix, Workers, and R2.
How Cloudflare uses Terraform to manage Cloudflare How we made it easier for our developers to make changes with the Cloudflare Terraform provider.
Network performance Update: Developer Week 2022 See how fast Cloudflare Workers are compared to other solutions.
How Cloudflare instruments services using Workers Analytics Engine Instrumentation with Analytics Engine provides data to find bugs and helps us prioritize new features.
Doubling down on local development with Workers:Miniflare meets workerd Improving local development using Miniflare3, now powered by workerd.

Customer and partner stories

Announcement Summary
Cloudflare Workers scale too well and broke our infrastructure, so we are rebuilding it on Workers How DevCycle re-architected their feature management tool using Workers.
Easy Postgres integration with Workers and Neon.tech Neon.tech solves the challenges of connecting to Postgres from Workers
Xata Workers: client-side database access without client-side secrets Xata uses Workers for Platform to reduce security risks of running untrusted code.
Twilio Segment Edge SDK powered by Cloudflare Workers The Segment Edge SDK, built on Workers, helps applications collect and track events from the client, and get access to realtime user state to personalize experiences.

Next

And that’s it for Developer Week 2022. But you can keep the conversation going by joining our Discord Community.

Indexing millions of HTTP requests using Durable Objects

Post Syndicated from Cole MacKenzie original https://blog.cloudflare.com/r2-rayid-retrieval/

Indexing millions of HTTP requests using Durable Objects

Indexing millions of HTTP requests using Durable Objects

Our customers rely on their Cloudflare logs to troubleshoot problems and debug issues. One of the biggest challenges with logs is the cost of managing them, so earlier this year, we launched the ability to store and retrieve Cloudflare logs using R2.

In this post, I’ll explain how we built the R2 Log Retrieval API using Cloudflare Workers with a focus on Durable Objects and the Streams API. Using these, allows a customer to index and query millions of their Cloudflare logs stored in batches on R2.

Before we dive into the internals you might be wondering why one doesn’t just use a traditional database to index these logs? After all, databases are a well proven technology. Well, the reason is that individual developers or companies, both large and small, often don’t have the resources necessary to maintain such a database and the surrounding infrastructure to create this kind of setup.

Our approach instead relies on Durable Objects to maintain indexes of the data stored in R2, removing the complexity of managing and maintaining your own database. It was also super easy to add Durable Objects to our existing Workers code with just a few lines of config and some code. And R2 is very economical.

Indexing

Indexing data is often used to reduce the lookup time for a query by first pre-processing the data and computing an index – usually a file (or set of files) that have a known structure which can be used to perform lookups on the underlying data. This approach makes lookups quick as indexes typically contain the answer for a given query, or at the very least, tells you how to find it. For this project we are going to index records by the unique identifier called a RayID which our customers use to identify an HTTP request in their logs, but this solution can be modified to index any many other types of data.

When indexing RayIDs for logs stored in R2, we choose an index structure that is fairly straightforward and is commonly known as a forward-index. This type of index consists of a key-value mapping between a document’s name and a list of words contained in that document. The terms “document” and “words” are meant to be generic, and you get to define what a document and a word is.

In our case, a document is a batch of logs stored in R2 and the words are RayIDs contained within that document. For example, our index currently looks like this:

Indexing millions of HTTP requests using Durable Objects

Building an index using Durable Objects and the Streams API

In order to maintain the state of our index, we chose to use Durable Objects. Each Durable Object has its own transactional key-value storage. Therefore, to store our index, we assign each key to be the document (batch) name and the value being a JSON-array of RayIDs within that document. When extracting the RayIDs for a given batch, updating the index becomes as simple as storage.put(batchName, rayIds). Likewise, getting all the RayIDs for a document is just a call to storage.get(batchName).

When performing indexing, since the batches are stored using compression and often with a 30-100x compression ratio, reading an entire batch into memory can lead to out-of-memory (OOM) errors in our Worker. To get around this, we use the Streams API to avoid the OOM errors by processing the data in smaller chunks. There are two types of streams available: byte-oriented and value-oriented. Byte-oriented streams operate at the byte-level for things such as compressing and decompressing data, while the value-orientated streams work on first class values in JavaScript. Numbers, strings, undefined, null, objects, you name it. If it’s a valid JavaScript value, you can process it using a value-oriented stream. The Streams API also allows us to define our own JavaScript transformations for both byte- and value-oriented streams.

So, when our API receives a request to index a batch, our Worker streams the contents from R2 into a pipeline of TransformationStreams to decompress the data, decode the bytes into strings, split the data into records based on the newlines, and finally collect all the RayIDs. Once we’ve collected all the RayIDs, the data is then persisted in the index by making calls to the Durable Object, which in turn calls the aforementioned storage.put method to persist the data to the index. To illustrate what I mean, I include some code detailing the steps described above.

async function index(r2, bucket, key, storage) {
  const obj = await getObject(r2, bucket, key);

  const rawStream = obj.Body as ReadableStream;
  const index: Record<string, string[]> = {};

  const rayIdIndexingStream = new TransformStream({
    transform(chunk: string) {
      for (const match of chunk.matchAll(RAYID_FIELD_REGEX)) {
        const { rayid } = match.groups!;
        if (key in index) {
          index[key].push(rayid);
        } else {
          index[key] = [rayid];
        }
      }
    }
  });

  await collectStream(rawStream.pipeThrough(new DecompressionStream('gzip')).pipeThrough(textDecoderStream()).pipeThrough(readlineStream()).pipeThrough(rayIdIndexingStream));
  storage.put(index);
}

Searching for a RayID

Once a batch has been indexed, and the index is persisted to our Durable Object, we can then query it using a combination of the RayID and a batch name to check the presence of a RayID in that given batch. Assuming that a zone is producing a batch of logs at the rate of one batch per second this means that over 86,400 batches would be produced in a day! Over the course of a week, there would be far too many keys in our index for us to be able to iterate through them all in a timely manner. This is where the encoding of a RayID and the naming of each batch comes into play.

A RayID is currently, and I emphasize currently because this can change and has over time, a 16-byte hex encoded value where the first 36-bits encode a timestamp, and it looks something like: 764660d8ec5c2ab1. Note that the format of the RayID is likely to evolve in the near future, but for now we can use it to optimize retrieval.

Each batch produced by Logpush also happens to encode the time the batch was started and completed. Last but not least, upon analysis of our logging pipeline we found that 95% of RayIDs can be found in a batch produced within five minutes of the request completing. (Note that the encoded time sets a lower bound of the batch time we need to search).

Indexing millions of HTTP requests using Durable Objects
Encoding of a RayID
Indexing millions of HTTP requests using Durable Objects
Encoding of a batch name

For example: say we have a request that was made on November 3 at 16:00:00 UTC. We only need to check the batches under the prefix 20221103 and those batches that contain the time range of 16:00:00 to 16:05:00 UTC.

Indexing millions of HTTP requests using Durable Objects

By reducing the number of batches to just a small handful of possibilities for a given RayID, we can simply ask our index if any of those batches contains the RayID by iterating through all the batch names (keys).

async function lookup(r2, bucket, prefix, start, end, rayid, storage) {
  const keys = await listObjects(r2, bucket, prefix, start, end);
  for (const key of keys) {
    const haystack: string[] | undefined = await storage.get(key);
    if (haystack && haystack.includes(rayid)) {
      return key
    }
  }
  return undefined
}

If the RayID is found in a batch, we then stream the corresponding batch back from R2 using another TransformationStream pipeline to filter out any non-matching records from the final response. If no result was found, we return an error message saying we were unable to find the RayID.

Summary

To recap, we showed how we can use Durable Objects and their underlying storage to create and manage forward-indexes for performing efficient lookup on the RayID for potentially millions of records. All without needing to manage your own database or logging infrastructure or doing a full-scan of the data.

While this is just one possible use case for Durable Objects, we are just getting started. If you haven’t read it before, checkout How we built Instant Logs to see another application of Durable Objects to stream millions of logs in real-time to your Cloudflare Dashboard!

What’s next

We currently offer RayID lookups for the HTTP Requests, Firewall Events, and soon support for Workers Trace Events. This is just the beginning for our Log Retrieval API, and we are already looking to add the ability to index and query on more types of fields such as status codes and host names. We also plan to integrate this into the dashboard so that developers can quickly retrieve the logs they need without needing to craft the necessary API calls by hand.

Last but not least, we want to make our retrieval functionality even more powerful and are looking at adding more complex types of filters and queries that you can run against your logs.

As always, stay tuned to the blog for more updates to our developer documentation for instructions on how to get started with log retrieval. If you’re interested in joining the beta, please email [email protected].

Reduce origin load, save on cloud egress fees, and maximize cache hits with Cache Reserve

Post Syndicated from Alex Krivit original https://blog.cloudflare.com/cache-reserve-open-beta/

Reduce origin load, save on cloud egress fees, and maximize cache hits with Cache Reserve

Reduce origin load, save on cloud egress fees, and maximize cache hits with Cache Reserve

Earlier this year, we introduced Cache Reserve. Cache Reserve helps users serve content from Cloudflare’s cache for longer by using R2’s persistent data storage. Serving content from Cloudflare’s cache benefits website operators by reducing their bills for egress fees from origins, while also benefiting website visitors by having content load faster.

Cache Reserve has been in closed beta for a few months while we’ve collected feedback from our initial users and continued to develop the product. After several rounds of iterating on this feedback, today we’re extremely excited to announce that Cache Reserve is graduating to open beta – users will now be able to test it and integrate it into their content delivery strategy without any additional waiting.

If you want to see the benefits of Cache Reserve for yourself and give us some feedback– you can go to the Cloudflare dashboard, navigate to the Caching section and enable Cache Reserve by pushing one button.

How does Cache Reserve fit into the larger picture?

Content served from Cloudflare’s cache begins its journey at an origin server, where the content is hosted. When a request reaches the origin, the origin compiles the content needed for the response and sends it back to the visitor.

The distance between the visitor and the origin can affect the performance of the asset as it may travel a long distance for the response. This is also where the user is charged a fee to move the content from where it’s stored on the origin to the visitor requesting the content. These fees, known as “bandwidth” or “egress” fees, are familiar monthly line items on the invoices for users that host their content on cloud providers.

Reduce origin load, save on cloud egress fees, and maximize cache hits with Cache Reserve

Cloudflare’s CDN sits between the origin and visitor and evaluates the origin’s response to see if it can be cached. If it can be added to Cloudflare’s cache, then the next time a request comes in for that content, Cloudflare can respond with the cached asset, which means there’s no need to send the request to the origin– reducing egress fees for our customers. We also cache content in data centers close to the visitor to improve the performance and cut down on the transit time for a response.

To help assets remain cached for longer, a few years ago we introduced Tiered Cache which organizes all of our 250+ global data centers into a hierarchy of lower-tiers (generally closer to visitors) and upper-tiers (generally closer to origins). When a request for content cannot be served from a lower-tier’s cache, the upper-tier is checked before going to the origin for a fresh copy of the content. Organizing our data centers into tiers helps us cache content in the right places for longer by putting multiple caches between the visitor’s request and the origin.

Why do cache misses occur?
Misses occur when Cloudflare cannot serve the content from cache and must go back to the origin to retrieve a fresh copy. This can happen when a customer sets the cache-control time to signify when the content is out of date (stale) and needs to be revalidated. The other element at play – how long the network wants content to remain cached – is a bit more complicated and can fluctuate depending on eviction criteria.

CDNs must consider whether they need to evict content early to optimize storage of other assets when cache space is full. At Cloudflare, we prioritize eviction based on how recently a piece of cached content was requested by using an algorithm called “least recently used” or LRU. This means that even if cache-control signifies that a piece of content should be cached for many days, we may still need to evict it earlier (if it is least-requested in that cache) to cache more popular content.

This works well for most customers and website visitors, but is often a point of confusion for people wondering why content is unexpectedly displaying a miss. If eviction did not happen then content would need to be cached in data centers that were further away from visitors requesting that data, harming the performance of the asset and injecting inefficiencies into how Cloudflare’s network operates.

Some customers, however, have large libraries of content that may not be requested for long periods of time. Using the traditional cache, these assets would likely be evicted and, if requested again, served from the origin. Keeping assets in cache requires that they remain popular on the Internet which is hard given what’s popular or current is constantly changing. Evicting content that becomes cold means additional origin egress for the customer if that content needs to be pulled repeatedly from the origin.

Reduce origin load, save on cloud egress fees, and maximize cache hits with Cache Reserve

Enter Cache Reserve
This is where Cache Reserve shines. Cache Reserve serves as the ultimate upper-tier data center for content that might otherwise be evicted from cache. Once admitted to Cache Reserve, content can be stored for a much longer period of time– 30 days by default. If another request comes in during that period, it can be extended for another 30 days (and so on) or until cache-control signifies that we should no longer serve that content from cache. Cache Reserve serves as a safety net to backstop all cacheable content, so customers don’t have to worry about unwanted cache eviction and origin egress fees.

How does Cache Reserve save egress?

The promise of Cache Reserve is that hit ratios will increase and egress fees from origins will decrease for long tail content that is rarely requested and may be evicted from cache.

However, there are additional egress savings built into the product. For example, objects are written to Cache Reserve on misses. This means that when fetching the content from the origin on a cache miss, we both use that to respond to a request while also writing the asset to Cache Reserve, so customers won’t experience egress from serving that asset for a long time.

Cache Reserve is designed to be used with tiered cache enabled for maximum origin shielding. When there is a cache miss in both the lower and upper tiers, Cache Reserve is checked and if there is a hit, the response will be cached in both the lower and upper tier on its way back to the visitor without the origin needing to see the request or serve any additional data.

Cache Reserve accomplishes these origin egress savings for a low price, based on R2 costs. For more information on Cache Reserve prices and operations, please see the documentation here.

Scaling Cache Reserve on Cloudflare’s developer platform

When we first announced Cache Reserve, the response was overwhelming. Over 20,000 users wanted access to the beta, and we quickly made several interesting discoveries about how people wanted to use Cache Reserve.

The first big challenge we found was that users hated egress fees as much as we do and wanted to make sure that as much content as possible was in Cache Reserve. During the closed beta we saw usage above 8,000 PUT operations per second sustained, and objects served at a rate of over 3,000 GETs per second. We were also caching around 600Tb for some of our large customers. We knew that we wanted to open the product up to anyone that wanted to use it and in order to scale to meet this demand, we needed to make several changes quickly. So we turned to Cloudflare’s developer platform.

Cache Reserve stores data on R2 using its S3-compatible API. Under the hood, R2 handles all the complexity of an object storage system using our performant and scalable developer primitives: Workers and Durable Objects. We decided to use developer platform tools because it would allow us to implement different scaling strategies quickly. The advantage of building on the Cloudflare developer platform is that Cache Reserve was easily able to experiment to see how we could best distribute the high load we were seeing, all while shielding the complexity of how Cache Reserve works from users.  

With the single press of a button, Cache Reserve performs these functions:

  • On a cache miss, Pingora (our new L7 proxy) reaches out to the origin for the content and writes the response to R2. This happens while the content continues its trip back to the visitor (thereby avoiding needless latency).
  • Inside R2, a Worker writes the content to R2’s persistent data storage while also keeping track of the important metadata that Pingora sends about the object (like origin headers, freshness values, and retention information) using Durable Objects storage.
  • When the content is next requested, Pingora looks up where the data is stored in R2 by computing the cache key. The cache key’s hash determines both the object name in R2 and which bucket it was written to, as each zone’s assets are sharded across multiple buckets to distribute load.
  • Once found, Pingora attaches the relevant metadata and sends the content from R2 to the nearest upper-tier to be cached, then to the lower-tier and finally back to the visitor.
Reduce origin load, save on cloud egress fees, and maximize cache hits with Cache Reserve

This is magic! None of the above needs to be managed by the user. By bringing together R2, Workers, Durable Objects, Pingora, and Tiered Cache we were able to quickly build and make changes to Cache Reserve to scale as needed…

What’s next for Cache Reserve

In addition to the work we’ve done to scale Cache Reserve, opening the product up also opens the door to more features and integrations across Cloudflare. We plan on putting additional analytics and metrics in the hands of Cache Reserve users, so they know precisely what’s in Cache Reserve and how much egress it’s saving them. We also plan on building out more complex integrations with R2 so if customers want to begin managing their storage, they are able to easily make that transition. Finally, we’re going to be looking into providing more options for customers to control precisely what is eligible for Cache Reserve. These features represent just the beginning for how customers will control and customize their cache on Cloudflare.

What’s some of the feedback been so far?

As a long time Cloudflare customer, we were eager to deploy Cache Reserve to provide cost savings and improved performance for our end users. Ensuring our application always performs optimally for our global partners and delivery riders is a primary focus of Delivery Hero. With Cache Reserve our cache hit ratio improved by 5% enabling us to scale back our infrastructure and simplify what is needed to operate our global site and provide additional cost savings.
Wai Hang Tang, Director of Engineering at Delivery Hero

Anthology uses Cloudflare’s global cache to drastically improve the performance of content for our end users at schools and universities. By pushing a single button to enable Cache Reserve, we were able to provide a great experience for teachers and students and reduce two-thirds of our daily egress traffic.
Paul Pearcy, Senior Staff Engineer at Anthology

At Enjoei we’re always looking for ways to help make our end-user sites faster and more efficient. By using Cloudflare Cache Reserve, we were able to drastically improve our cache hit ratio by more than 10% which reduced our origin egress costs. Cache Reserve also improved the performance for many of our merchants’ sites in South America, which improved their SEO and discoverability across the Internet (Google, Criteo, Facebook, Tiktok)– and it took no time to set it up.
Elomar Correia, Head of DevOps SRE | Enterprise Solutions Architect at Enjoei

In the live events industry, the size and demand for our cacheable content can be extremely volatile, which causes unpredictable swings in our egress fees. Additionally, keeping data as close to our users as possible is critical for customer experience in the high traffic and low bandwidth scenarios our products are used in, such as conventions and music festivals. Cache Reserve helps us mitigate both of these problems with minimal impact on our engineering teams, giving us more predictable costs and lower latency than existing solutions.
Jarrett Hawrylak, VP of Engineering | Enterprise Ticketing at Patron Technology

How can I use it today?

As of today, Cache Reserve is in open beta, meaning that it’s available to anyone who wants to use it.

To use the Cache Reserve:

  • Simply go to the Caching tile in the dashboard.
  • Navigate to the Cache Reserve page and push the enable data sync button (or purchase button).

Enterprise Customers can work with their Cloudflare Account team to access Cache Reserve.

Customers can ensure Cache Reserve is working by looking at the baseline metrics regarding how much data is cached and how many operations we’ve seen in the Cache Reserve section of the dashboard. Specific requests served by Cache Reserve are available by using Logpush v2 and finding HTTP requests with the field “CacheReserveUsed.”

We will continue to make sure that we are quickly triaging the feedback you give us and making improvements to help ensure Cache Reserve is easy to use, massively beneficial, and your choice for reducing egress fees for cached content.

Reduce origin load, save on cloud egress fees, and maximize cache hits with Cache Reserve

Try it out

We’ve been so excited to get Cache Reserve in more people’s hands. There will be more exciting developments to Cache Reserve as we continue to invest in giving you all the tools you need to build your perfect cache.

Try Cache Reserve today and let us know what you think.

Migrate from S3 easily with the R2 Super Slurper

Post Syndicated from Aly Cabral original https://blog.cloudflare.com/cloudflare-r2-super-slurper/

Migrate from S3 easily with the R2 Super Slurper

Migrate from S3 easily with the R2 Super Slurper

R2 is an S3-compatible, globally distributed object storage, allowing developers to store large amounts of unstructured data without the costly egress bandwidth fees you commonly find with other providers.

To enjoy this egress freedom, you’ll have to start planning to send all that data you have somewhere else into R2. You might want to do it all at once, moving as much data as quickly as possible while ensuring data consistency. Or do you prefer moving the data to R2 slowly and gradually shifting your reads from your old provider to R2? And only then decide whether to cut off your old storage or keep it as a backup for new objects in R2?

There are multiple options for architecture and implementations for this movement, but taking terabytes of data from one cloud storage provider to another is always problematic, always involves planning, and likely requires staffing.

And that was hard. But not anymore.

Today we’re announcing the R2 Super Slurper, the feature that will enable you to move all your data to R2 in one giant slurp or sip by sip — all in a friendly, intuitive UI and API.

Migrate from S3 easily with the R2 Super Slurper

The first step: R2 Super Slurper Private Beta

One giant slurp

The very first iteration of the R2 Super Slurper allows you to target an S3 bucket and import the objects you have stored there into your R2 bucket. It’s a simple, one-time import that covers the most common scenarios. Point to your existing S3 source, grant the R2 Super Slurper permissions to read the objects you want to migrate, and an asynchronous job will take care of the rest.

Migrate from S3 easily with the R2 Super Slurper

You’ll also be able to save the definitions and credentials to access your source bucket, so you can migrate different folders from within the bucket, in new operations, without having to define URLs and credentials all over again. This operation alone will save you from scripting your way through buckets with many paths you’d like to validate for consistency.  During the beta stages — with your feedback — we will evolve the R2 Super Slurper to the point where anyone can achieve an entirely consistent, super slurp, all with the click of just a few buttons.

Automatic sip by sip migration

Other future development includes automatic sip by sip migration, which provides a way to incrementally copy objects to R2 as they get requested from an end-user. It allows you to start serving objects from R2 as they migrate, saving you money immediately.

Migrate from S3 easily with the R2 Super Slurper

The flow of the requests and object migration will look like this:

  • Check for Object — A request arrives at Cloudflare (1), and we check the R2 bucket for the requested object (2). If the object exists, R2 serves it (3).
  • Copy the Object — If the object does not exist in R2, a request for the object flows to the origin bucket (2a). Once there’s an answer with an object, we serve it and copy it into R2 (2b).
  • Serve the Object — R2 serves all future requests for the object (3).

With this capability you can copy your objects, previously scattered through one or even multiple buckets from other vendors, while ensuring that everything requested from the end-user side gets served from R2. And because you will only need to use the R2 Super Slurper to sip the object from elsewhere on the first request, you will start saving on those egress fees for any subsequent ones.

We are currently targeting S3-compatible buckets for now, but you can expect other sources to become available during 2023.

Join the waitlist for the R2 Super Slurper private beta

To access the R2 Super Slurper, you must be an R2 user first and sign up for the R2 Super Slurper waitlist here.

We will collaborate closely with many early users in the private beta stage to refine and test the service . Soon, we’ll announce an open beta where users can sign up for the service.

Make sure to join our Discord server and get in touch with a fantastic community of users and Cloudflare staff for all R2-related topics!

Store and retrieve your logs on R2

Post Syndicated from Shelley Jones original https://blog.cloudflare.com/store-and-retrieve-logs-on-r2/

Store and retrieve your logs on R2

Store and retrieve your logs on R2

Following today’s announcement of General Availability of Cloudflare R2 object storage, we’re excited to announce that customers can also store and retrieve their logs on R2.

Cloudflare’s Logging and Analytics products provide vital insights into customers’ applications. Though we have a breadth of capabilities, logs in particular play a pivotal role in understanding what occurs at a granular level; we produce detailed logs containing metadata generated by Cloudflare products via events flowing through our network, and they are depended upon to illustrate or investigate anything (and everything) from the general performance or health of applications to closely examining security incidents.

Until today, we have only provided customers with the ability to export logs to 3rd-party destinations – to both store and perform analysis. However, with Log Storage on R2 we are able to offer customers a cost-effective solution to store event logs for any of our products.

The cost conundrum

We’ve unpacked the commercial impact in a previous blog post, but to recap, the cost of storage can vary broadly depending on the volume of requests Internet properties receive. On top of that – and specifically pertaining to logs – there’s usually more expensive fees to access that data whenever the need arises. This can be incredibly problematic, especially when customers are having to balance their budget with the need to access their logs – whether it’s to mitigate a potential catastrophe or just out of curiosity.

With R2, not only do we not charge customers egress costs, but we also provide the opportunity to make further operational savings by centralizing storage and retrieval. Though, most of all, we just want to make it easy and convenient for customers to access their logs via our Retrieval API – all you need to do is provide a time range!

Logs on R2: get started!

Why would you want to store your logs on Cloudflare R2? First, R2 is S3 API compatible, so your existing tooling will continue to work as is. Second, not only is R2 cost-effective for storage, we also do not charge any egress fees if you want to get your logs out of Cloudflare to be ingested into your own systems. You can store logs for any Cloudflare product, and you can also store what you need for as long as you need; retention is completely within your control.

Storing Logs on R2

To create Logpush jobs pushing to R2, you can use either the dashboard or Cloudflare API. Using the dashboard, you can create a job and select R2 as the destination during configuration:

Store and retrieve your logs on R2

To use the Cloudflare API to create the job, do something like:

curl -s -X POST 'https://api.cloudflare.com/client/v4/zones/<ZONE_ID>/logpush/jobs' \
-H "X-Auth-Email: <EMAIL>" \
-H "X-Auth-Key: <API_KEY>" \
-d '{
 "name":"<DOMAIN_NAME>",
"destination_conf":"r2://<BUCKET_PATH>/{DATE}?account-id=<ACCOUNT_ID>&access-key-id=<R2_ACCESS_KEY_ID>&secret-access-key=<R2_SECRET_ACCESS_KEY>",
 "dataset": "http_requests",
"logpull_options":"fields=ClientIP,ClientRequestHost,ClientRequestMethod,ClientRequestURI,EdgeEndTimestamp,EdgeResponseBytes,EdgeResponseStatus,EdgeStartTimestamp,RayID&timestamps=rfc3339",
 "kind":"edge"
}' | jq .

Please see Logpush over R2 docs for more information.

Log Retrieval on R2

If you have your logs pushed to R2, you could use the Cloudflare API to retrieve logs in specific time ranges like the following:

curl -s -g -X GET 'https://api.cloudflare.com/client/v4/accounts/<ACCOUNT_ID>/logs/retrieve?start=2022-09-25T16:00:00Z&end=2022-09-25T16:05:00Z&bucket=<YOUR_BUCKET>&prefix=<YOUR_FILE_PREFIX>/{DATE}' \
-H "X-Auth-Email: <EMAIL>" \
-H "X-Auth-Key: <API_KEY>" \ 
-H "R2-Access-Key-Id: R2_ACCESS_KEY_ID" \
-H "R2-Secret-Access-Key: R2_SECRET_ACCESS_KEY" | jq .

See Log Retrieval API for more details.

Now that you have critical logging infrastructure on Cloudflare, you probably want to be able to monitor the health of these Logpush jobs as well as get relevant alerts when something needs your attention.

Looking forward

While we have a vision to build out log analysis and forensics capabilities on top of R2 – and a roadmap to get us there – we’d still love to hear your thoughts on any improvements we can make, particularly to our retrieval options.

Get setup on R2 to start pushing logs today! If your current plan doesn’t include Logpush, storing logs on R2 is another great reason to upgrade!

R2 is now Generally Available

Post Syndicated from Aly Cabral original https://blog.cloudflare.com/r2-ga/

R2 is now Generally Available

R2 is now Generally Available

R2 gives developers object storage, without the egress fees. Before R2, cloud providers taught us to expect a data transfer tax every time we actually used the data we stored with them. Who stores data with the goal of never reading it? No one. Yet, every time you read data, the egress tax is applied. R2 gives developers the ability to access data freely, breaking the ecosystem lock-in that has long tied the hands of application builders.

In May 2022, we launched R2 into open beta. In just four short months we’ve been overwhelmed with over 12k developers (and rapidly growing) getting started with R2. Those developers came to us with a wide range of use cases from podcast applications to video platforms to ecommerce websites, and users like Vecteezy who was spending six figures in egress fees. We’ve learned quickly, gotten great feedback, and today we’re excited to announce R2 is now generally available.

We wouldn’t ask you to bet on tech we weren’t willing to bet on ourselves. While in open beta, we spent time moving our own products to R2. One such example, Cloudflare Images, proudly serving thousands of customers in production, is now powered by R2.

What can you expect from R2?

S3 Compatibility

R2 gives developers a familiar interface for object storage, the S3 API. WIth S3 Compatibility, you can easily migrate your applications and start taking advantage of what R2 has to offer right out of the gate.

Let’s take a look at some basic data operations in javascript. To try this out on your own, you’ll need to generate an Access Key.

// First we import our bindings as usual
import {
  S3Client,
  ListBucketsCommand,
} from "@aws-sdk/client-s3";

// Then we create a new client. Note that while R2 requires a region for S3 compatibility, only “auto” is supported
const S3 = new S3Client({
  region: "auto",
  endpoint: `https://${ACCOUNT_ID}.r2.cloudflarestorage.com`,
  credentials: {
    accessKeyId: ACCESS_KEY_ID, //  fill in your own
    secretAccessKey: SECRET_ACCESS_KEY, // fill in your own
  },
});

// And now we can use our client to list associated buckets just like we would with any other S3 compatible object storage
console.log(
  await S3.send(
    new ListBucketsCommand('')
  )
);

Regardless of the language, the S3 API offers familiarity. We have examples in Go, Java, PHP, and Ruby.

Region: Automatic

We don’t want to live in a world where developers are spending time looking into a crystal ball and predicting where application traffic might come from. Choosing a region as the first step in application development forces optimization decisions long before the first users show up.

While S3 compatibility requires you to specify a region, the only region we support is ‘auto’. Today, R2 automatically selects a bucket location in the closest available region to the create bucket request. If I create a bucket from my home in Austin, that bucket will live in the closest available R2 region to Austin.

In the future, R2 will use data access patterns to automatically optimize where data is stored for the best user experience.

Cloudflare Workers Integration

The Workers platform offers developers powerful compute across Cloudflare’s network. When you deploy on Workers, your code is deployed to Cloudflare’s 280+ locations across the globe, automatically. When paired with R2, Workers allows developers to add custom logic around their data without any performance overhead. Workers is built on isolates and not containers, and as a result you don’t have to deal with lengthy cold starts.

Let’s try creating a simple REST API for an R2 bucket! First, create your bucket and then add an R2 binding to your worker.

export default {
  async fetch(request, env) {
    const url = new URL(request.url);
    const key = url.pathname.slice(1); // we’ll derive a key from the url path

    switch (request.method) {
      // For writes, we capture the request body and write that out to our bucket under the associated key
      case 'PUT':
        await env.MY_BUCKET.put(key, request.body);
        return new Response(`Put ${key} successfully!`);

      // For reads, we’ll use our key to perform a lookup
      case 'GET':
        const object = await env.MY_BUCKET.get(key);

        // if we don’t find the given key we’ll return a 404 error
        if (object === null) {
          return new Response('Object Not Found', { status: 404 });
        }

        const headers = new Headers();
        object.writeHttpMetadata(headers);
        headers.set('etag', object.httpEtag);

        return new Response(object.body, {
          headers,
        });
    }
  },
};

Through this Workers API, we can add all sorts of useful logic to the hot path of a R2 request.

Presigned URLs

Sometimes you’ll want to give your users permissions to specific objects in R2 without requiring them to jump through hoops. Through pre-signed URLs you can delegate your permissions to your users for any unique combination of object and action. Mint a pre-signed URL to let a user upload a file or share a file without giving access to the entire bucket.

import {
  S3Client,
  PutObjectCommand
} from "@aws-sdk/client-s3";

import { getSignedUrl } from "@aws-sdk/s3-request-presigner";

const S3 = new S3Client({
  region: "auto",
  endpoint: `https://${ACCOUNT_ID}.r2.cloudflarestorage.com`,
  credentials: {
    accessKeyId: ACCESS_KEY_ID,
    secretAccessKey: SECRET_ACCESS_KEY,
  },
});

// With getSignedUrl we can produce a custom url with a one hour expiration which will allow our end user to upload their dog pic
console.log(
  await getSignedUrl(S3, new PutObjectCommand({Bucket: 'my-bucket-name', Key: 'dog.png'}), { expiresIn: 3600 })
)

Presigned URLs make it easy for developers to build applications that let end users safely access R2 directly.

Public buckets

Enabling public access for a R2 bucket allows you to expose that bucket to unauthenticated requests. While doing so on its own is of limited use, when those buckets are linked to a domain under your account on Cloudflare you can enable other Cloudflare features such as Access, Cache and bot management seamlessly on top of your data in R2.

Bottom line: public buckets help to bridge the gap between domain oriented Cloudflare features and the buckets you have in R2.

Transparent Pricing

R2 will never charge for egress. The pricing model depends on three factors alone: storage volume, Class A operations (writes, lists) and Class B operations (reads).

  • Storage is priced at $0.015 / GB, per month.
  • Class A operations cost $4.50 / million.
  • Class B operations cost $0.36 / million.

But before you’re ready to start paying for R2, we allow you to get up and running at absolutely no cost. The included usage is as follows:

  • 10 GB-months of stored data
  • 1,000,000 Class A operations, per month
  • 10,000,000 Class B operations, per month

What’s next?

Making R2 generally available is just the beginning of our object storage journey. We’re excited to share what we plan to build next.

Object Lifecycles

In the future R2 will allow developers to set policies on objects. For example, setting a policy that deletes an object 60 days after it was last accessed. Object Lifecycles pushes object management down to the object store.

Jurisdictional Restrictions

While we don’t have plans to support regions explicitly, we know that data locality is important for a good deal of compliance use cases. Jurisdictional restrictions will allow developers to set a jurisdiction like the ‘EU’ that would prevent guarantee data from leavingwould not leave the jurisdiction.

Live Migration without Downtime

For large datasets, migrations are live and ongoing, as it takes time to move data over. Cache reserve is an easy way to quickly migrate your assets into a managed R2 instance to reduce your egress costs at the touch of a button. In the future, we’ll be extending this mechanism so that you can migrate any of your existing S3 object storage buckets to R2.

We invite everyone to sign up and get started with R2 today. Join the growing community of developers building on Cloudflare. If you have any feedback or questions, find us on our Discord server here! We can’t wait to see what you build.

Using Cloudflare R2 as an apt/yum repository

Post Syndicated from Sudarsan Reddy original https://blog.cloudflare.com/using-cloudflare-r2-as-an-apt-yum-repository/

Using Cloudflare R2 as an apt/yum repository

Using Cloudflare R2 as an apt/yum repository

In this blog post, we’re going to talk about how we use Cloudflare R2 as an apt/yum repository to bring cloudflared (the Cloudflare Tunnel daemon) to your Debian/Ubuntu and CentOS/RHEL systems and how you can do it for your own distributable in a few easy steps!

I work on Cloudflare Tunnel, a product which enables customers to quickly connect their private networks and services through the Cloudflare global network without needing to expose any public IPs or ports through their firewall. Cloudflare Tunnel is managed for users by cloudflared, a tool that runs on the same network as the private services. It proxies traffic for these services via Cloudflare, and users can then access these services securely through the Cloudflare network.

Our connector, cloudflared, was designed to be lightweight and flexible enough to be effectively deployed on a Raspberry Pi, a router, your laptop, or a server running on a data center with applications ranging from IoT control to private networking. Naturally, this means cloudflared comes built for a myriad of operating systems, architectures and package distributions: You could download the appropriate package from our GitHub releases, brew install it or apt/yum install it (https://pkg.cloudflare.com).

In the rest of this blog post, I’ll use cloudflared as an example of how to create an apt/yum repository backed by Cloudflare’s object storage service R2. Note that this can be any binary/distributable. I simply use cloudflared as an example because this is something we recently did and actually use in production.

How apt-get works

Let’s see what happens when you run something like this on your terminal.

$ apt-get install cloudflared

Let’s also assume that apt sources were already added like so:

  $ echo 'deb [signed-by=/usr/share/keyrings/cloudflare-main.gpg] https://pkg.cloudflare.com/cloudflared buster main' | sudo tee /etc/apt/sources.list.d/cloudflared.list


$ apt-get update

From the source.list above, apt first looks up the Release file (or InRelease if it’s a signed package like cloudflared, but we will ignore this for the sake of simplicity).

A Release file contains a list of supported architectures and their md5, sha1 and sha256 checksums. It looks something like this:

$ curl https://pkg.cloudflare.com/cloudflared/dists/buster/Release
Origin: cloudflared
Label: cloudflared
Codename: buster
Date: Thu, 11 Aug 2022 08:40:18 UTC
Architectures: amd64 386 arm64 arm armhf
Components: main
Description: apt repository for cloudflared - buster
MD5Sum:
 c14a4a1cbe9437d6575ae788008a1ef4 549 main/binary-amd64/Packages
 6165bff172dd91fa658ca17a9556f3c8 374 main/binary-amd64/Packages.gz
 9cd622402eabed0b1b83f086976a8e01 128 main/binary-amd64/Release
 5d2929c46648ea8dbeb1c5f695d2ef6b 545 main/binary-386/Packages
 7419d40e4c22feb19937dce49b0b5a3d 371 main/binary-386/Packages.gz
 1770db5634dddaea0a5fedb4b078e7ef 126 main/binary-386/Release
 b0f5ccfe3c3acee38ba058d9d78a8f5f 549 main/binary-arm64/Packages
 48ba719b3b7127de21807f0dfc02cc19 376 main/binary-arm64/Packages.gz
 4f95fe1d9afd0124a32923ddb9187104 128 main/binary-arm64/Release
 8c50559a267962a7da631f000afc6e20 545 main/binary-arm/Packages
 4baed71e49ae3a5d895822837bead606 372 main/binary-arm/Packages.gz
 e472c3517a0091b30ab27926587c92f9 126 main/binary-arm/Release
 bb6d18be81e52e57bc3b729cbc80c1b5 549 main/binary-armhf/Packages
 31fd71fec8acc969a6128ac1489bd8ee 371 main/binary-armhf/Packages.gz
 8fbe2ff17eb40eacd64a82c46114d9e4 128 main/binary-armhf/Release
SHA1:
…
SHA256:
…

Depending on your system’s architecture, Debian picks the appropriate Packages location. A Packages file contains metadata about the binary apt wants to install, including location and its checksum. Let’s say it’s an amd64 machine. This means we’ll go here next:

$ curl https://pkg.cloudflare.com/cloudflared/dists/buster/main/binary-amd64/Packages
Package: cloudflared
Version: 2022.8.0
License: Apache License Version 2.0
Vendor: Cloudflare
Architecture: amd64
Maintainer: Cloudflare <[email protected]>
Installed-Size: 30736
Homepage: https://github.com/cloudflare/cloudflared
Priority: extra
Section: default
Filename: pool/main/c/cloudflared/cloudflared_2022.8.0_amd64.deb
Size: 15286808
SHA256: c47ca10a3c60ccbc34aa5750ad49f9207f855032eb1034a4de2d26916258ccc3
SHA1: 1655dd22fb069b8438b88b24cb2a80d03e31baea
MD5sum: 3aca53ccf2f9b2f584f066080557c01e
Description: Cloudflare Tunnel daemon

Notice the Filename field. This is where apt gets the deb from before running a dpkg command on it. What all of this means is the apt repository (and the yum repositories too) is basically a structured file system of mostly plaintext files and a deb.

The deb file is a Debian software package that contains two things: installable data (in our case, the cloudflared binary) and metadata about the installable.

Building our own apt repository

Now that we know what happens when an apt-get install runs, let’s work our way backwards to construct the repository.

Create a deb file out of the binary

Note: It is optional but recommended one signs the packages. See the section about how apt verifies packages here.

Debian files can be built by the dpkg-buildpackage tool in a linux or Debian environment. We use a handy command line tool called fpm (https://fpm.readthedocs.io/en/v1.13.1/) to do this because it works for both rpm and deb.

$ fpm -s <dir> -t deb -C /path/to/project -name <project_name> –version <version>

This yields a .deb file.

Create plaintext files needed by apt to lookup downloads

Again, these files can be built by hand, but there are multiple tools available to generate this:

We use reprepro.

Using it is as simple as

$ reprepro buster includedeb <path/to/the/deb>

reprepro neatly creates a bunch of folders in the structure we looked into above.

Upload them to Cloudflare R2

We use Cloudflare R2 to now be the host for this structured file system. R2 lets us upload and serve objects in this structured format. This means, we just need to upload the files in the same structure reprepro created them.

Here is a copyable example of how we do it for cloudflared.

Serve them from an R2 worker

For fine-grained control, we’ll write a very lightweight Cloudflare Worker to be the service we talk to and serve as the front-end API for apt to talk to. For an apt repository, we only need it to perform the GET function.

Here’s an example on how-to do this: https://developers.cloudflare.com/r2/examples/demo-worker/

Putting it all together

Here is a handy script we use to push cloudflared to R2 ready for apt/yum downloads and includes signing and publishing the pubkey.

And that’s it! You now have your own apt/yum repo without needing a server that needs to be maintained, there are no egress fees for downloads, and it is on the Cloudflare global network, protecting it against high request volumes. You can automate many of these steps to make it part of a release process.

Today, this is how cloudflared is distributed on the apt and yum repositories: https://pkg.cloudflare.com/

Logs on R2: slash your logging costs

Post Syndicated from Tanushree Sharma original https://blog.cloudflare.com/logs-r2/

Logs on R2: slash your logging costs

Logs on R2: slash your logging costs

Hot on the heels of the R2 open beta announcement, we’re excited that Cloudflare enterprise customers can now use Logpush to store logs on R2!

Raw logs from our products are used by our customers for debugging performance issues, to investigate security incidents, to keep up security standards for compliance and much more. You shouldn’t have to make tradeoffs between keeping logs that you need and managing tight budgets. With R2’s low costs, we’re making this decision easier for our customers!

Getting into the numbers

Cloudflare helps customers at different levels of scale — from a few requests per day, up to a million requests per second. Because of this, the cost of log storage also varies widely. For customers with higher-traffic websites, log storage costs can grow large, quickly.

As an example, imagine a website that gets 100,000 requests per second. This site would generate about 9.2 TB of HTTP request logs per day, or 850 GB/day after gzip compression. Over a month, you’ll be storing about 26 TB (compressed) of HTTP logs.

For a typical use case, imagine that you write and read the data exactly once – for example, you might write the data to object storage before ingesting it into an alerting system. Compare the costs of R2 and S3 (note that this excludes costs per operation to read/write data).

Provider Storage price Data transfer price Total cost assuming data is read once
R2 $0.015/GB $0 $390/month
S3 (Standard, US East $0.023/GB $0.09/GB for first 10 TB; then $0.085/GB $2,858/month

In this example, R2 leads to 86% savings! It’s worth noting that querying logs is where another hefty price tag comes in because Amazon Athena charges based on the amount of data scanned. If your team is looking back through historical data, each query can be hundreds of dollars.

Many of our customers have tens to hundreds of domains behind Cloudflare and the majority of our Enterprise customers also use multiple Cloudflare products. Imagine how costs will scale if you need to store HTTP, WAF and Spectrum logs for all of your Internet properties behind Cloudflare.

For SaaS customers that are building the next big thing on Cloudflare, logs are important to get visibility into customer usage and performance. Your customer’s developers may also want access to raw logs to understand errors during development and to troubleshoot production issues. Costs for storing logs multiply and add up quickly!

The flip side: log retrieval

When designing products, one of Cloudflare’s core principles is ease of use. We take on the complexity, so you don’t have to. Storing logs is only half the battle, you also need to be able to access relevant logs when you need them – in the heat of an incident or when doing an in depth analysis.

Our product, Logpull, offers seven days of log retention and an easy to use API to access. Our customers love that Logpull doesn’t need any setup on third parties since it’s completely managed by Cloudflare. However, Logpull is limited in the retention of logs, the type of logs that we store (only HTTP request logs) and the amount of data that can be queried at one time.

We’re building tools for log retrieval that make it super easy to get your data out of R2 from any of our datasets. Similar to Logpull, we’ll start by supporting lookups by time period and rayId. From there, we’ll tackle more complex functions like returning logs within time X and Y that have 500 errors or where WAF action = block.

We’re looking for customers to join a closed beta for our Log Retrieval API. If you’re interested in testing it out, giving feedback and ultimately helping us shape the product sign up here.

Logs on R2: How to get started

Enterprise customers first need to get R2 added to their contract. Reach out to your account team if this is something you’re interested in! Once enabled, create an R2 bucket for your logs and follow the Logpush setup flow to create your job.

Logs on R2: slash your logging costs

It’s that simple! If you have questions, our Logpush to R2 developer docs go into more detail.

More to come

We’re continuing to build out more advanced Logpush features with a focus on customization. Here’s a preview of what’s next on the roadmap:

  • New datasets: Network Analytics Logs, Workers Invocation Logs
  • Log filtering
  • Custom log formatting

We also have exciting plans to build out log analysis and forensics capabilities on top of R2. We want to make log storage tightly coupled to the Cloudflare dash so you can see high level analytics and drill down into individual log lines all in one view. Stay tuned to the blog for more!

A New Hope for Object Storage: R2 enters open beta

Post Syndicated from Greg McKeon original https://blog.cloudflare.com/r2-open-beta/

A New Hope for Object Storage: R2 enters open beta

A New Hope for Object Storage: R2 enters open beta

In September, we announced that we were building our own object storage solution: Cloudflare R2. R2 is our answer to egregious egress charges from incumbent cloud providers, letting developers store as much data as they want without worrying about the cost of accessing that data.

The response has been overwhelming.

  • Independent developers had bills too small for cloud providers to negotiate fair egress rates with them. Egress charges were the largest line-item on their cloud bills, strangling side projects and the new businesses they were building.
  • Large corporations had written off multi-cloud storage – and thus multi-cloud itself – as a pipe dream. They came to us with excitement, pitching new products that integrated data with partner companies.
  • Non-profit research organizations were paying massive egress fees just to share experiment data with one another. Egress fees were having a real impact on their ability to collaborate, driving silos between organizations and restricting the experiments and analyses they could run.

Cloudflare exists to help build a better Internet. Today, the Internet gets what it deserves: R2 is now in open beta.

Self-serve customers can enable R2 in the Cloudflare dashboard. Enterprise accounts can reach out to their CSM for onboarding.

Internal and external APIs

R2 has two APIs: an API accessible only from within Workers, which we call the In-Worker API, and an S3-compatible API, which exposes your bucket on a URL of the form bucket.account.r2storage.com. Before you can make requests to R2, you’ll need to be authenticated — R2 buckets are private by default.

In-Worker API

With the in-Worker API, a bucket is “bound” to a specific Worker, which can then perform PUT, GET, DELETE and LIST operations against the bucket.

S3-compatible API

For the S3-compatible API, authentication is done the same way as on S3: SigV4 against an R2 URL. SigV4 signs requests using a secret key to authenticate them to R2. This means public access to R2 over the Internet is only possible today by hosting a Worker, connecting it to R2, and routing requests through it.

The easiest way to test the S3-compatible API is to use an S3 client. One of the most popular S3 clients is the boto3 SDK.

In Python, copy the following script and fill in the account_id, access_key, and secret_access_key fields with your R2 account credentials.

#!/usr/bin/env python
import boto3
import pprint
from botocore.client import Config
 
account_id = ''
access_key_id = ''
secret_access_key = ''
endpoint = f'https://{account_id}.r2.cloudflarestorage.com'
 
cl = boto3.client(
    's3',
    aws_access_key_id=access_key_id,
    aws_secret_access_key=secret_access_key,
    endpoint_url=endpoint,
    config=Config(
        region_name = endpoints[endpoint_name].get('region', 'auto'),
        s3={'addressing_style': 'path'},
        retries=dict( max_attempts=0 ),
    ),
)
 
printer = pprint.PrettyPrinter().pprint
 
printer(cl.head_bucket(Bucket='some bucket'))
printer(cl.create_bucket(Bucket='some other bucket'))
printer(cl.put_object(Bucket='some bucket', Key='my object', Body='some payload'))

Features

R2 comes with support for all basic create/read/update/delete S3 features through both of its APIs.

During the open beta period, we’re targeting R2 to sustain 1,000 GET operations per second and 100 PUT operations per second, per bucket. R2 supports objects up to approximately 5 TB in size, with individual parts limited to 5 GB of data.

R2 provides strongly consistent access to data. Once a PUT is confirmed by R2, future GET operations will always reflect the new key/value pair. The only exception to this is when deleting a bucket. For a short period of time following deletion, the bucket may still exist and continue to allow reads/writes.

Pricing

When we initially announced R2, we included preliminary pricing numbers. One of our main goals with R2 has been to serve the developers who can’t negotiate large discounts with cloud vendors. To that end, we’re also announcing a forever-free tier that lets developers start building on R2 with no charges at all.

R2 charges depend on the total volume of data stored and the type of operation performed on the data:

  • Storage is priced at \$0.015 / GB, per month.
  • Class A operations (including writes and lists) cost \$4.50 / million.
  • Class B operations cost \$0.36 / million.

Class A operations tend to mutate state, such as creating a bucket, listing objects in a bucket, or writing an object. Class B operations tend to read existing state, for example reading an object from a bucket. You can find more information on pricing and a full list of operation types in the docs.

Of course, there is no charge for egress bandwidth from R2. You can access your bucket to your heart’s content.

R2’s forever-free tier includes:

  • 10 GB-months of stored data
  • 1,000,000 Class A operations, per month
  • 10,000,000 Class B operations, per month

Free usage resets each month. While in the open beta phase, R2 usage over the free tier will be billed.

Future plans

We’ve spent the past six months in closed beta with a number of design partners, building out our storage solution. Backed by Durable Objects, R2’s novel architecture delivers both high availability and consistent performance.

While we’ve made great progress on R2, we still have plenty left to build in the coming months.

Improving performance

Our first priority is to improve performance and reliability. While we’ve thrown internal usage and our design partner’s demands at R2, there’s no substitute for live production traffic.

During the open beta period, R2 can sustain a maximum of 1,000 GET operations per second and 100 PUT operations per second, per bucket. We’ll look to raise these limits as we get comfortable operating the system. If you have higher needs, reach out to us!

When you create a bucket, you won’t see a region selector. Our vision for R2 includes automatically globally distributed storage, where R2 seamlessly places each object into the storage region closest to where the request comes from. Today, R2 primarily stores data in North America, which can lead to higher latencies when accessing content from other regions. We’ll first look to address this by adding additional regions where objects can be created, before adding automatic migration of existing objects across regions. Similar to what we’ve built with jurisdictional restrictions for Durable Objects, we’ll also enable restricting where an R2 bucket places data to comply with privacy regulations.

Expanding R2’s feature set

We’ll then focus on expanding R2 capabilities beyond the basic S3 API. In the near term, we’re focused on delivering:

  • Support for TTLs, so data can automatically be deleted from buckets over time.
  • Public buckets, so a bucket can be exposed to the internet without writing a Worker
  • Pre-signed URL support, which delegates read and write access for a specific key to a token.
  • Integration with Cloudflare’s cache, to scale read requests and provide global distribution of data.

If you have additional feature requests that aren’t listed above, we want to hear from you! Reach out and let us know what you need to make R2 your new, zero-cost egress object store.