Post Syndicated from Evgeny Yurchenko original https://blog.zabbix.com/deep-dive-into-zabbix-frontend-modules/24863/
Zabbix gives every community member the ability to extend their frontend functionality by writing their own frontend modules. In this video, we will go through the steps required to write a Zabbix frontend module and look at multiple code examples that will explain the steps behind successfully implementing a custom frontend module. The article is based on a Zabbix Summit 2022 speech by Evgeny Yurchenko.
Why?
Zabbix 5.0 introduced a pretty cool feature called “Frontend Modules” (or WEB modules) that lets anybody extend Zabbix WebUI (add new menu items, modify current menu element behavior or even delete some menu items completely). We see a constant growth of the number of Modules created, but there is not too much written on how to efficiently write your own Modules. This article tries to give you as much detail as possible on how the Modules subsystem is implemented in Zabbix which obviously should help you understand how Modules function thus easing the process of writing your own Modules.
Disclaimer
- Information in this presentation is a result of Zabbix source code analysis and in no way a replacement but rather an addition to the official documentation:
https://www.zabbix.com/documentation/current/en/manual/modules
- Modules can be harmful as they work in Zabbix WebUI process space and have the same level of access to the Zabbix database as Zabbix web UI itself. People will have to trust the modules you are developing so be careful.
- Errors in your module code may crash the frontend. Currently, there is no version compatibility check during module installation; keep that in mind and implement strict versioning of these modules, clearly stating what version of the module works with what version of Zabbix.
- All the references to code in this article assume Zabbix 6.0.
MVC framework
Zabbix WebUI is built based on so-called “Model-Controller-View” (MVC) framework. The concept is quite old and you can find a lot of information about MVC on the Internet. The following picture depicts every Zabbix WebUI application execution flow (every user’s click on a menu item, a button like “Apply” or “Filter” etc.) HTTP request from the user’s browser is accepted by the Controller component and analyzed. Based on the action parameter received Controller makes a decision on how to serve this request. Controller (optionally) “talks” to Model component to get needed data (usually) from Zabbix Database, then massages data to ultimately create a set of data to be returned to end user. Then (again if needed) Controller “talks” to the View component asking to prepare the data for the user’s consumption (in essence make it look nice and clean in Browser thus View component, in most cases generates HTML/CSS/Javascript). And once the controller has everything to send back to the user it returns HTTP response to the end user’s browser. I prefer to think that Zabbix Frontend Modules cover Controller and View components functionality as it’s a good idea to consume data available in Zabbix by re-using what’s already implemented in Zabbix WebUI code (huge amount of classes with their methods delivering any data you want) though strictly speaking, you can implement your own data feed in your Module.
Fronted module example
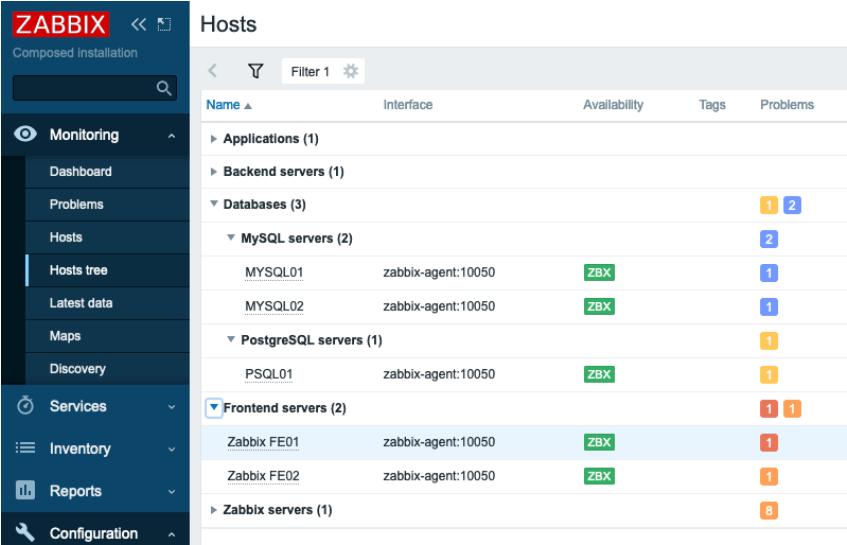
In this blog post, I’ll be using https://github.com/BGmot/zabbix-module-hosts-tree as an example which brings a brand new main menu element Monitoring -> Hosts tree showing the end-user a hierarchy of host groups instead of a flat list of hosts that comes with default Zabbix installation in Monitoring -> Hosts.
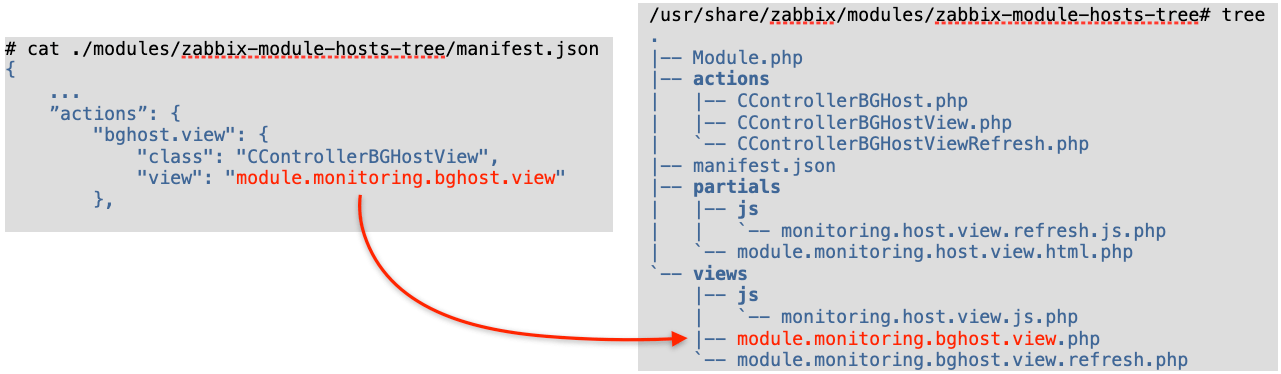
Refer to Zabbix official documentation on how to install modules and I won’t waste any time here on what is perfectly well documented. After this module is installed we’ll have the following files:
/usr/share/zabbix/modules/zabbix-module-hosts-tree# tree
.
|-- Module.php
|-- actions
| |-- CControllerBGHost.php
| |-- CControllerBGHostView.php
| `-- CControllerBGHostViewRefresh.php
|-- manifest.json
|-- partials
| |-- js
| | `-- monitoring.host.view.refresh.js.php
| `-- module.monitoring.host.view.html.php
`-- views
|-- js
| `-- monitoring.host.view.js.php
|-- module.monitoring.bghost.view.php
`-- module.monitoring.bghost.view.refresh.php
WebUI application
As mentioned earlier Zabbix WebUI is just a PHP application, yes, sophisticated, very complex but still it is a PHP application which means after every user click (and upon some timeouts), it initializes, executes and terminates producing some output (in most cases) which is passed to the user’s browser.
Top-level of this application is an object of class APP which inherits ZBase adding literally nothing, declared in file ./include/classes/core/APP.php:
class APP extends ZBase {
}
Application starts with ZBase::run() method, file ./include/config.inc.php:
APP::getInstance()->run(APP::EXEC_MODE_DEFAULT);
Method run() does many things, but in the light of this blog post it is important to mention these two:
- router initialization
- modules initialization
Router initialization
The so-called “Router” is a crucial part of the Controller component of MVC that drives a decision on how to handle a user’s request. The Router works based on an associative array $routes which is defined in ./include/classes/mvc/CRouter.php. Here is a code snippet illustrating how this array is organized:
private $routes = [
// action                   controller                        layout             view
‘action.operation.get'  => [‘CControllerActionOperationGet',  ‘layout.json',     null],
‘audit.settings.update' => [‘CControllerAuditSettingsUpdate',  null,             null],
‘dashboard.view'        => [‘CControllerDashboardView', ‘layout.htmlpage',   'monitoring.dashboard.view'],
As you can see in this array for every action three elements are defined:
- controller (a class that will be used to prepare data)
- layout (in which form to present data generated by the controller)
- view (how to present/show the data to end-user/requestor)
We will talk about each of these components later. For now – just remember that the controller here is a class name while layout and view is a name of a .php file that is included (i.e. executed) at a certain point of webUI application execution. So Router Initialization is basically the class CRouter instantiation making $routes array available to other classes via CRouter‘s methods.
Modules initialization
This is the moment the web UI application goes through all enabled Modules in the system calling their init() method. Here in ZBase::run() methods init() are called and all the actions from enabled modules are added to the Router, file ./include/classes/core/ZBase.php:
$this->initModuleManager();
$router = $this->component_registry->get('router');
$router->addActions($this->module_manager->getActions());
$router->setAction($action_name);
Your module must be a child of Core\CModule class defined in ./include/classes/core/CModule.php. You can redefine init() method to fit your needs. Since init() method of all enabled Modules is called, this makes it a perfect place to have new menu items added to Zabbix WebUI main menu here.
We talked about Router in the previous clause and your module’s manifest.json file defines what needs to be added to this Router for your Module to function properly. If you defined an action in your Module that already exists in out-of-the-box Zabbix then the Module’s action overwrites the “default” entry in $router array thus, you can re-define the behavior of any menu item.
Overall what happens during the module initialization is easier to describe by following this picture:

So we added a new menu item “Hosts tree” under “Hosts” in the main menu. When a user clicks on this menu item a request will be generated with the parameter “action” set to “bghost.view” and now the Router “knows” that to serve this action it needs to use CControllerBGHostView class as a Controller and module.monitoring.bghost.view.php file (with default layout.html.php layout) to generate HTML code.
Processing request
After initialization is done the ZBase::processRequest() method is called, file ./include/classes/core/ZBase.php, passing initialized Router (let’s assume user selected Monitoring -> Hosts tree menu item implemented in my module):
$this->processRequest($router);
...
private function processRequest(CRouter $router): void {
  $action_name = $router->getAction();        // returns “bghost.view”
  $action_class = $router->getController();   // “Modules\BGmotHosts\Actions\CControllerBGHostView”
  ...
  $action = new $action_class();              // Controller defined for this action is instantiated
  ...
  register_shutdown_function(function() use ($action) {
    $this->module_manager->publishEvent($action, 'onTerminate');
  });
As we can see it gets the action name and action class name from the Router and then instantiates in variable $action a Controller class that will handle the requested action.
Then it registers all enabled modules onTerminate() methods – it means that before PHP execution exits all these functions will be executed regardless of what menu item a user selected. One important caveat: if a user selected an action covered by your module then your module’s onTerminate() method will be executed the last (later than all other modules’ onTerminate() methods) right when WebUI PHP application is about to finish its execution (i.e. exit). onTerminate() method of base class Core/CModule is empty and you can redefine it in your module, e.g., here is how I am adding my JavaScript to every page that generates HTML, ./modules/zabbix-module-menu/Module.php:
public function onTerminate(CAction $action): void {
  $action_page = $action->getAction();
  $router = clone APP::Component()->get('router');
  $layout = $router->getLayout();
  if ($action_page) {
    if ($action_page != 'jsrpc.php' &&
        $layout != 'layout.widget' &&
        $layout != 'layout.json') {
      echo '<script type="text/javascript">';
      echo file_get_contents(__DIR__.'/js/bg_menu.js');
      echo '</script>';
    }
  }
}
This approach works well only with layout.htmlpage layout as it just adds whatever you output here right before closing </body> tag in the final HTML page returned to browser.
Keep in mind we are still in ZBase::processRequest() method and now it executes all enabled modules’ onBeforeAction() methods:
$this->module_manager->publishEvent($action, 'onBeforeAction');
Again if a user selected an action covered by your module then your module’s onBeforeAction() method will be executed last. You can define onBeforeAction() method in your module this way:
public function onBeforeAction(CAction $action): void {
...
}
Processing request – Controller
Now ZBase::processRequest() passes execution to our Controller (remember $action was instantiated with our Controller class):
$action->run();
All controllers have CController as a parent class. Method run() is defined in ./include/classes/mvc/CController.php and you cannot re-define it in your controller; it does some standards checks, validates input and if everything is ok passes control directly to your controller’s doAction() method and returns the result:
final public function run(): ?CControllerResponse {
  if ($this->checkInput()) {
    $this->doAction();
  return $this->getResponse();
Use your Controller’s checkInput() method to check whether all the parameters passed in the HTTP request are valid. You can implement it like this (see ./modules/zabbix-module-hosts-tree/actions/CControllerBGHostView.php):
 class CControllerBGHostView extends CControllerBGHost {
        protected function checkInput(): bool {
                $fields = [
                       'name' =>       'string',
                       'groupids' =>   'array_id',
                       'status' =>     'in -1,’.HOST_STATUS_MONITORED.','.HOST_STATUS_NOT_MONITORED,
                ...
                $ret = $this->validateInput($fields);
                return $ret;
All possible validation rules are defined in ./include/classes/validators/CNewValidator.php Just take a peek and select proper validation:
 # grep "case ‘" ./include/classes/validators/CNewValidator.php
                                case ‘not_empty':
                                case 'json':
                                case ‘in':
                                ...
                                case 'array_id':
                                ...
If checkInput() method returns true (input is valid) then doAction() of your Controller is called. You can go as fancy as you want preparing data: executing internal Zabbix functions (The Model component of MVC), performing selects/updates in the database directly from your code, talk to other APIs, etc. At the end you need to prepare one massive associative array (usually it is named $data) and return it as shown here (./modules/zabbix-module-hosts-tree/actions/CControllerBGHostView.php):
 protected function doAction(): void {
     ...
     $data = [ ... ];
     $response = new CControllerResponseData($data);
     $response->setTitle(_('Hosts'));
     $this->setResponse($response);
 }
Whatever you place into the associative array $data will be available later in your View code.
Processing request – View
The final step in ZBase::processRequest() is calling one more method that in fact handles the layout and view you defined in the Router for this action:
$this->processResponseFinal($router, $action);
The name of your view file is what you put into the view field for your action in manifest.json + .php extension and must be in the views/ folder.

First, it fills in the layout data with defaults and if a view is defined for given action then it constructs an instance of CView class (defined in ./include/classes/mvc/CView.php) passing data you prepared in Controller to CView constructor:
private function processResponseFinal(CRouter $router, CAction $action): void {
  ...
  if ($router->getView() !== null && $response->isViewEnabled()) {
    $view = new CView($router->getView(), $response->getData());
CView constructor just tries to find a file with the name of your View + .php extension, e.g. module.monitoring.bghost.view.php and, if found, initializes two member variables $name and $data.
public function __construct($name, array $data = []) {
Everything you implement in your View .php file will feed the $layout_data variable.
$layout_data = array_replace($layout_data_defaults, [
  'main_block' => $view->getOutput(),
  'javascript' => [ 'files' => $view->getJsFiles() ],
  'stylesheet' => [ 'files' => $view->getCssFiles() ],
  'web_layout_mode' => $view->getLayoutMode()
]);
CView::getOutput() simply performs PHP include of your view .php file, so whatever you “print” in your view will be assigned to $layout_data[‘main_block’], file ./include/classes/mvc/CView.php:
public function getOutput() {
  $file_path = $this->directory.’/'.$this->name.'.php';
  ob_start();
  if ((include $file_path) === false) {
    ...
  return ob_get_clean();
If you have a lot of time and want to produce a real “piece of art” web page then you can print pure HTML/CSS in your view .php file, but it will most probably not look like the “Zabbix native style”. For example:

Fortunately, there is an easy solution to make your web pages look elegant and totally “Zabbix’ish”: it is very easy to use Zabbix classes, e.g., to add a table to your page use CTableInfo class, then prepare an array with CColHeader elements and add them with CTableInfo::setHeader(), then construct rows with CRow class and add them via CTableInfo::addRow(), etc.

Look at the Zabbix source code for an example of how to use them.
See the list of all out-of-the-box classes here:
# ls -1 ./include/classes/html/
CActionButtonList.php
CBarGauge.php
CButton.php
...
Since we passed all the data generated by your Controller to your View object, it is very easy to use the data in your View code, e.g., in Controller you do the following:
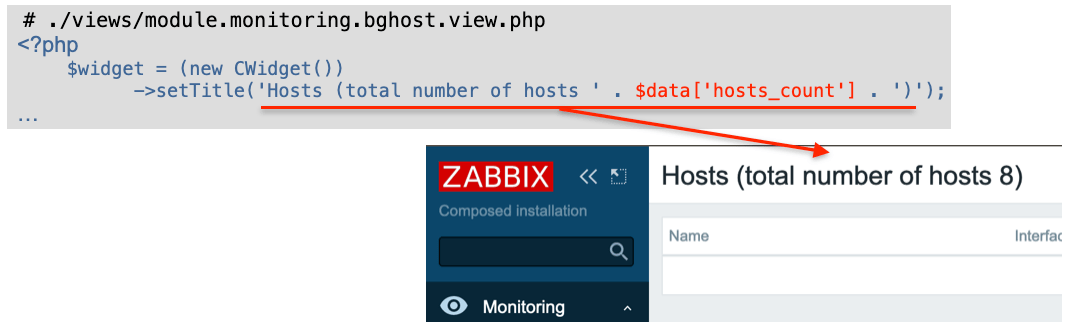
 # ./modules/zabbix-module-hosts-tree/actions/CControllerBGHostView.php
 protected function doAction(): void {
     $data = [ 'hosts_count' => API::Host()->get(['countOutput' => true]) ];
     $response = new CControllerResponseData($data);
     $this->setResponse($response);
 }
And in View you use this data:

If you want to add some CSS files to the page, do it in your View code this way:
 # ./views/module.monitoring.bghost.view.php
 $this->addCssFile('modules/zabbix-module-hosts-tree/views/css/mycool.css');
Your CSS file should not contain <style> tags, just pure CSS:
 # ./views/css/mycool.css
 .list-table thead th {color: #ff0000;}
Interestingly enough you cannot add JavaScript files from your module folder using a similar addJsFile() method. You can use this method only to use the JS files that come with Zabbix and are located in the root /js folder, e.g.:
 # ./views/module.monitoring.bghost.view.php
 $this->addJsFile('multiselect.js');
To include your JavaScript code use this function. Note this .php file that must have PHP code that by “printing” generates JavaScript code, not .js (containing pure JavaScript code).
 # ./views/module.monitoring.bghost.view.php
 $this->includeJsFile('monitoring.host.view.js.php', $data);
– Again: this .php file must “print” JavaScript code and will be searched in the ./js
subfolder of the view file this function is invoked from.
– A copy of $data variable will be available for use within the file!
So all the HTML code you generated went into $layout_data[‘main_block’], all JavaScript files that need to be included went into $layout_data[‘javascript’] and all CSS files that need to be included went into $layout_data[‘stylesheet’] (see $layout_data variable initialization above in this article).
The last thing ZBase::processResponseFinal() does is instantiate the new CView class with a layout .php file (you define the layout for every action in Router, remember?) and “printing” everything according to the selected layout, file ./include/classes/core/ZBase.php:
echo (new CView($router->getLayout(), $layout_data))->getOutput();
That is it! At this point, everything you “printed” (don’t forget the onTerminate() function) is returned as an HTTP response to the user’s browser.
Wrapping up this article I must tell you about one more thing – module configuration. In your modules’ manifest.json file you can have a “config” section – below you can see how it is reflected in the Zabbix database:

I would not mention this, but there is one interesting caveat: the “config” section of manifest.json file is copied into the database only when the module is discovered for the first time during modules directory scanning. Changing the manifest.json file later has no effect; module’s config is always taken from the database so if you want to change something you either need to first wipe the module or make changes directly in the database.
Access this config data in your code with $this->getConfig();
Good luck developing Web Modules!
Your BGmot.
 Obvious problem here is that a User must be pre-created in Zabbix to be able to log in using LDAP. The database user records do not have any fields noticing that the user will be authenticated via LDAP, it’s just users’ passwords stored in the database are ignored, instead, Zabbix goes to an LDAP server to verify whether:
 Now when Zabbix gets a username and password from the Login form it goes to the LDAP server and gets all the information available for this user including his/her LDAP groups membership and e-mail address. Obviously, it gets all that only if the correct (from LDAP server perspective) username and password were provided. Then Zabbix goes through pre-configured mapping that defines users from which LDAP group goes to which Zabbix user group. If at least one match is found then a user is created in the Zabbix database belonging to a Zabbix user group and having a Zabbix user role according to configured “match”. So far sounds pretty simple, right? Now let’s go into detail about how all this should be configured.
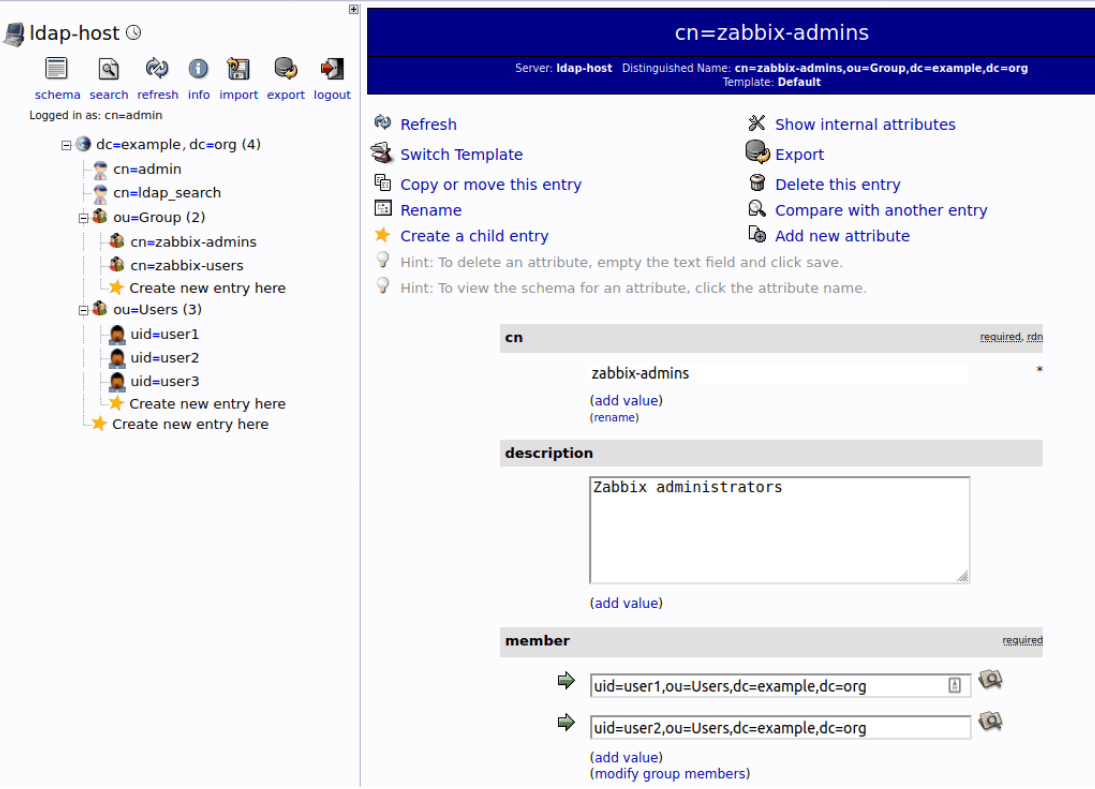 All users in this container for convenience are configured with “password” word as their passwords.
 “Special” Distinguished Name (DN) cn=ldap_search,dc=example,dc=org is used for searching, i.e. Zabbix uses this DN to connect to LDAP server and of course when you connect to LDAP server you need to be authenticated – this is why you need to provide Bind password. This DN should have access to a sub-tree in LDAP data hierarchy where all your users are configured. In our case all the users configured “under” ou-Users,dc=example,dc=org, this DN is called base DN and used by Zabbix as so to say “starting point” to start searching.
 In the picture above we are telling Zabbix to use memberOf attribute to extract DN defining user’s group membership (in this case it is cn=zabbix-admins,out=Group,dc=example,dc=org) and take only cn attribute from that DN (in this case it is zabbix-admins) to use in searching for a match in User group mapping rules. Then we define as many mapping rules as we want. In the picture above we have two rules: