Tag Archives: LDAP

Use SAML with Amazon Cognito to support a multi-tenant application with a single user pool

Post Syndicated from Neela Kulkarni original https://aws.amazon.com/blogs/security/use-saml-with-amazon-cognito-to-support-a-multi-tenant-application-with-a-single-user-pool/

Amazon Cognito is a customer identity and access management solution that scales to millions of users. With Cognito, you have four ways to secure multi-tenant applications: user pools, application clients, groups, or custom attributes. In an earlier blog post titled Role-based access control using Amazon Cognito and an external identity provider, you learned how to configure Cognito authentication and authorization with a single tenant. In this post, you will learn to configure Cognito with a single user pool for multiple tenants to securely access a business-to-business application by using SAML custom attributes. With custom-attribute–based multi-tenancy, you can store tenant identification data like tenantName as a custom attribute in a user’s profile and pass it to your application. You can then handle multi-tenancy logic in your application and backend services. With this approach, you can use a unified sign-up and sign-in experience for your users. To identify the user’s tenant, your application can use the tenantName custom attribute.

One Cognito user pool for multiple customers

Customers like the simplicity of using a single Cognito user pool for their multi-customer application. With this approach, your customers will use the same URL to access the application. You will set up each new customer by configuring SAML 2.0 integration with the customer’s external identity provider (IdP). Your customers can control access to your application by using an external identity store, such as Google Workspace, Okta, or Active Directory Federation Service (AD FS), in which they can create, manage, and revoke access for their users.

After SAML integration is configured, Cognito returns a JSON web token (JWT) to the frontend during the user authentication process. This JWT contains attributes your application can use for authorization and access control. The token contains claims about the identity of the authenticated user, such as name and email. You can use this identity information inside your application. You can also configure Cognito to add custom attributes to the JWT, such as tenantName.

In this post, we demonstrate the approach of keeping a mapping between a user’s email domain and tenant name in an Amazon DynamoDB table. The DynamoDB table will have an emailDomain field as a key and a corresponding tenantName field.

Cognito architecture

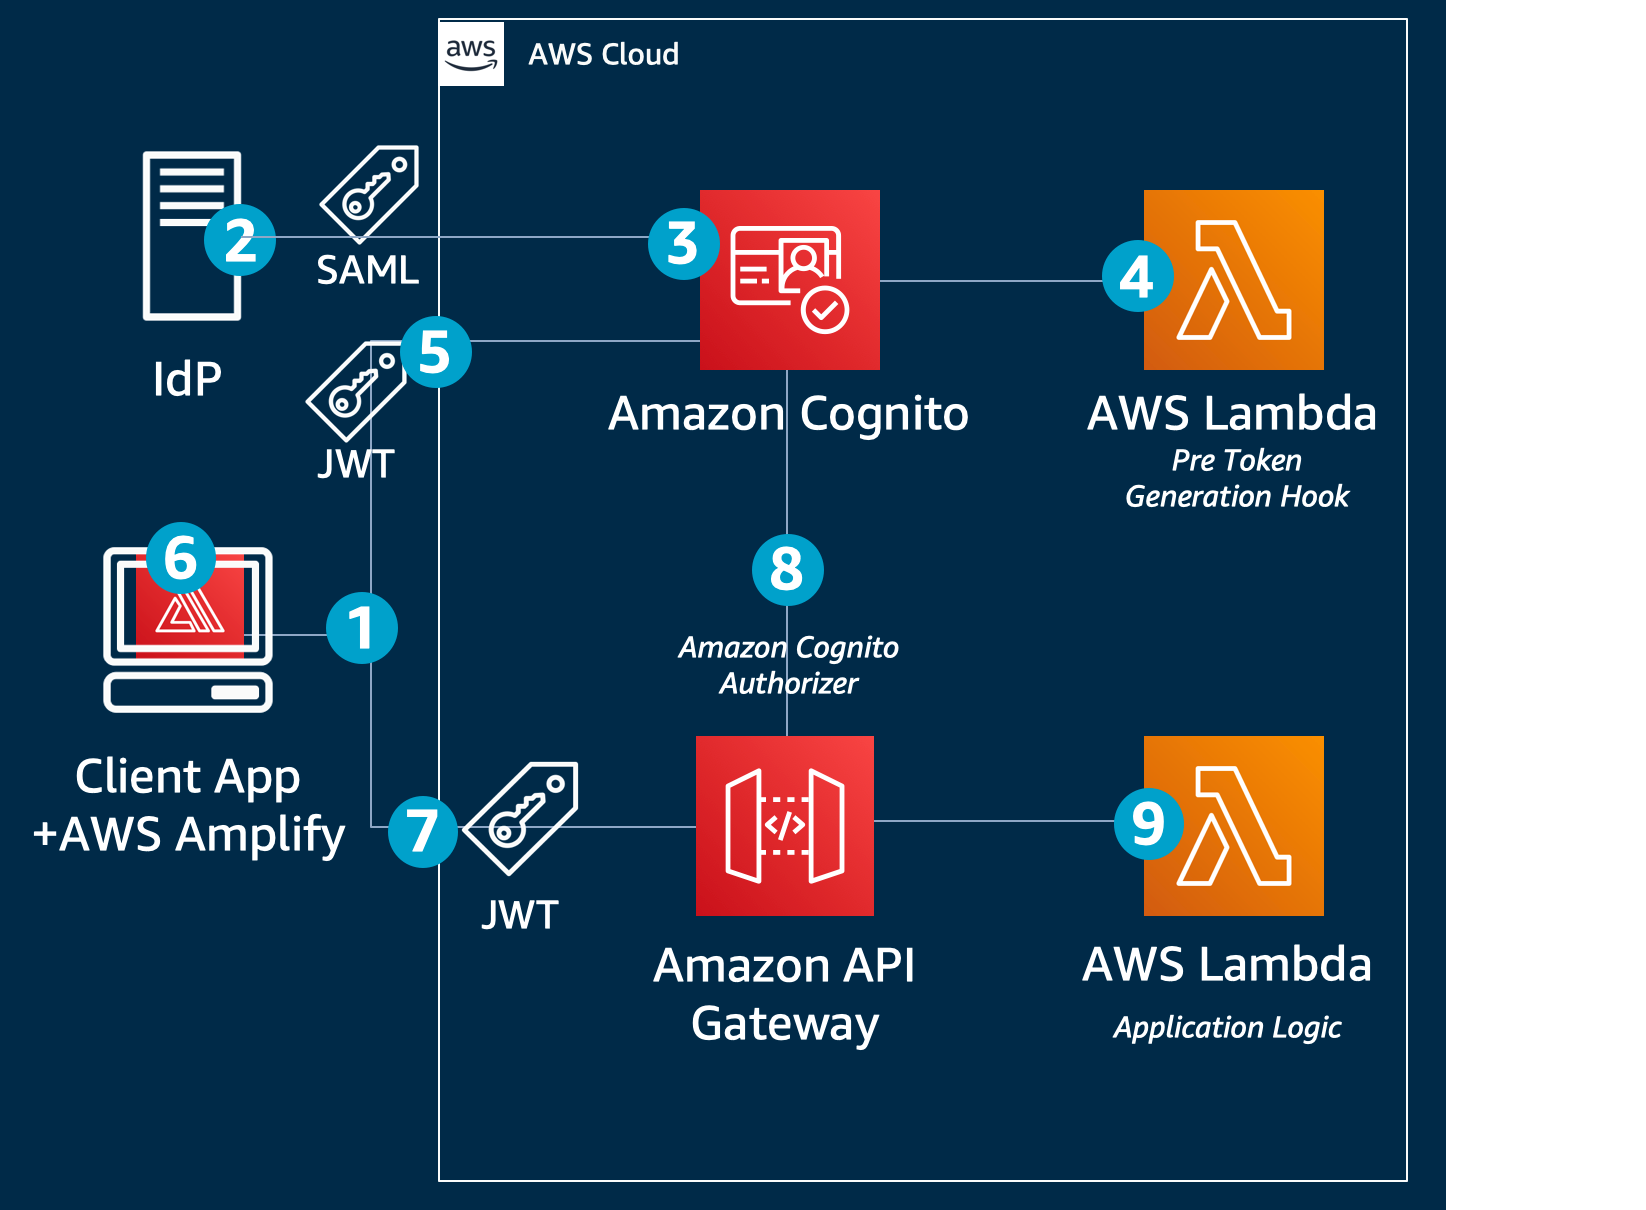
To illustrate how this works, we’ll start with a demo application that was introduced in the earlier blog post. The demo application is implemented by using Amazon Cognito, AWS Amplify, Amazon API Gateway, AWS Lambda, Amazon DynamoDB, Amazon Simple Storage Service (Amazon S3), and Amazon CloudFront to achieve a serverless architecture. This architecture is shown in Figure 1.

Figure 1: Demo application architecture

Figure 1: Demo application architecture

The workflow that happens when you access the web application for the first time using your browser is as follows (the numbered steps correspond to the numbered labels in the diagram):

  1. The client-side/frontend of the application prompts you to enter the email that you want to use to sign in to the application.
  2. The application invokes the Tenant Match API action through API Gateway, which, in turn, calls the Lambda function that takes the email address as an input and queries it against the DynamoDB table with the email domain. Figure 2 shows the data stored in DynamoDB, which includes the tenant name and IdP ID. You can add additional flexibility to this solution by adding web client IDs or custom redirect URLs. For the purpose of this example, we are using the same redirect URL for all tenants (the client application).
    Figure 2: DynamoDB tenant table

    Figure 2: DynamoDB tenant table

  3. If a matching record is found, the Lambda function returns the record to the AWS Amplify frontend application.
  4. The client application uses the IdP ID from the response and passes it to Cognito for federated login. Cognito then reroutes the login request to the corresponding IdP. The AWS Amplify frontend application then redirects the browser to the IdP.
  5. At the IdP sign-in page, you sign in with a valid user account (for example, [email protected] or [email protected]). After you sign in successfully, a SAML response is sent back from the IdP to Cognito.

    You can review the SAML content by using the instructions in How to view a SAML response in your browser for troubleshooting, as shown in Figure 3.

    Figure 3: SAML content

    Figure 3: SAML content

  6. Cognito handles the SAML response and maps the SAML attributes to a just-in-time user profile. The SAML groups attributes is mapped to a custom user pool attribute named custom:groups.
  7. To identify the tenant, additional attributes are populated in the JWT. After successful authentication, a PreTokenGeneration Lambda function is invoked, which reads the mapped custom:groups attribute value from SAML, parses it, and converts it to an array. After that, the function parses the email address and captures the domain name. It then queries the DynamoDB table for the tenantName name by using the email domain name. Finally, the function sets the custom:domainName and custom:tenantName attributes in the JWT, as shown following.
    "email": "[email protected]" ( Standard existing profile attribute )
    New attributes:
    "cognito:groups": [.                           
    "pet-app-users",
    "pet-app-admin"
    ],
    "custom:tenantName": "AnyCompany"
    "custom:domainName": "anycompany.com"

    This attribute conversion is optional and demonstrates how you can use a PreTokenGeneration Lambda invocation to customize your JWT token claims, mapping the IdP groups to the attributes your application recognizes. You can also use this invocation to make additional authorization decisions. For example, if user is a member of multiple groups, you may choose to map only one of them.

  8. Amazon Cognito returns the JWT tokens to the AWS Amplify frontend application. The Amplify client library stores the tokens and handles refreshes. This token is used to make calls to protected APIs in Amazon API Gateway.
  9. API Gateway uses a Cognito user pools authorizer to validate the JWT’s signature and expiration. If this is successful, API Gateway passes the JWT to the application’s Lambda function (also referred to as the backend).
  10. The backend application code reads the cognito:groups claim from the JWT and decides if the action is allowed. If the user is a member of the right group, then the action is allowed; otherwise the action is denied.

Implement the solution

You can implement this example application by using an AWS CloudFormation template to provision your cloud application and AWS resources.

To deploy the demo application described in this post, you need the following prerequisites:

  1. An AWS account.
  2. Familiarity with navigating the AWS Management Console or AWS CLI.
  3. Familiarity with deploying CloudFormation templates.

To deploy the template

  • Choose the following Launch Stack button to launch a CloudFormation stack in your account.

    Select this image to open a link that starts building the CloudFormation stack

    Note: The stack will launch in the N. Virginia (us-east-1) Region. To deploy this solution into other AWS Regions, download the solution’s CloudFormation template from GitHub, modify it, and deploy it to the selected Region.

The stack creates a Cognito user pool called ExternalIdPDemoPoolXXXX in the AWS Region that you have specified. The CloudFormation Outputs field contains a list of values that you will need for further configuration.

IdP configuration

The next step is to configure your IdP. Each IdP has its own procedure for configuration, but there are some common steps you need to follow.

To configure your IdP

  1. Provide the IdP with the values for the following two properties:
    • Single sign on URL / Assertion Consumer Service URL / ACS URL (for this example, https://<CognitoDomainURL>/saml2/idpresponse)
    • Audience URI / SP Entity ID / Entity ID: (For this example, urn:amazon:cognito:sp:<yourUserPoolID>)
  2. Configure the field mapping for the SAML response in the IdP. Map the first name, last name, email, and groups (as a multi-value attribute) into SAML response attributes with the names firstName, lastName, email, and groups, respectively.
    • Recommended: Filter the mapped groups to only those that are relevant to the application (for example, by a prefix filter). There is a 2,048-character limit on the custom attribute, so filtering helps avoid exceeding the character limit, and also helps avoid passing irrelevant information to the application.
  3. In each IdP, create two demo groups called pet-app-users and pet-app-admins, and create two demo users, for example, [email protected] and [email protected], and then assign one to each group, respectively.

To illustrate, we set up three different IdPs to represent three different tenants. Use the following links for instructions on how to configure each IdP:

You will need the metadata URL or file from each IdP, because you will use this to configure your user pool integration. For more information, see Integrating third-party SAML identity providers with Amazon Cognito user pools.

Cognito configuration

After your IdPs are configured and your CloudFormation stack is deployed, you can configure Cognito.

To configure Cognito

  1. Use your browser to navigate to the Cognito console, and for User pool name, select the Cognito user pool.
    Figure 4: Select the Cognito user pool

    Figure 4: Select the Cognito user pool

  2. On the Sign-in experience screen, on the Federated identity provider sign-in tab, choose Add identity provider.
  3. Choose SAML for the sign-in option, and then enter the values for your IdP. You can either upload the metadata XML file or provide the metadata endpoint URL. Add mapping for the attributes as shown in Figure 5.
    Figure 5: Attribute mappings for the IdP

    Figure 5: Attribute mappings for the IdP

    Upon completion you will see the new IdP displayed as shown in Figure 6.

    Figure 6: List of federated IdPs

    Figure 6: List of federated IdPs

  4. On the App integration tab, select the app client that was created by the CloudFormation template.
    Figure 7: Select the app client

    Figure 7: Select the app client

  5. Under Hosted UI, choose Edit. Under Identity providers, select the Identity Providers that you want to set up for federated login, and save the change.
    Figure 8: Select identity providers

    Figure 8: Select identity providers

API gateway

The example application uses a serverless backend. There are two API operations defined in this example, as shown in Figure 9. One operation gets tenant details and the other is the /pets API operation, which fetches information on pets based on user identity. The TenantMatch API operation will be run when you sign in with your email address. The operation passes your email address to the backend Lambda function.

Figure 9: Example APIs

Figure 9: Example APIs

Lambda functions

You will see three Lambda functions deployed in the example application, as shown in Figure 10.

Figure 10: Lambda functions

Figure 10: Lambda functions

The first one is GetTenantInfo, which is used for the TenantMatch API operation. It reads the data from the TenantTable based on the email domain and passes the record back to the application. The second function is PreTokenGeneration, which reads the mapped custom:groups attribute value, parses it, converts it to an array, and then stores it in the cognito:groups claim. The second Lambda function is invoked by the Cognito user pool after sign-in is successful. In order to customize the mapping, you can edit the Lambda function’s code in the index.js file and redeploy. The third Lambda function is added to support the Pets API operation.

DynamoDB tables

You will see three DynamoDB tables deployed in the example application, as shown in Figure 11.

Figure 11: DynamoDB tables

Figure 11: DynamoDB tables

The TenantTable table holds the tenant details where you must add the mapping between the customer domain and the IdP ID setup in Cognito. This approach can be expanded to add more flexibility in case you want to add custom redirect URLs or Cognito app IDs for each tenant. You must create entries to correspond to the IdPs you have configured, as shown in Figure 12.

Figure 12: Tenant IdP mappings table

Figure 12: Tenant IdP mappings table

In addition to TenantTable, there is the ExternalIdPDemo-ItemsTable table, which holds the data related to the Pets application, based on user identity. There is also ExternalIdPDemo-UsersTable, which holds user details like the username, last forced sign-out time, and TTL required for the application to manage the user session.

You can now sign in to the example application through each IdP by navigating to the application URL found in the CloudFormation Outputs section, as shown in Figure 13.

Figure 13: Cognito sign-in screen

Figure 13: Cognito sign-in screen

You will be redirected to the IdP, as shown in Figure 14.

Figure 14: Google Workspace sign-in screen

Figure 14: Google Workspace sign-in screen

The AWS Amplify frontend application parses the JWT to identify the tenant name and provide authorization based on group membership, as shown in Figure 15.

Figure 15: Application home screen upon successful sign-in

Figure 15: Application home screen upon successful sign-in

If a different user logs in with a different role, the AWS Amplify frontend application provides authorization based on specific content of the JWT.

Conclusion

You can integrate your application with your customer’s IdP of choice for authentication and authorization and map information from the IdP to the application. By using Amazon Cognito, you can normalize the structure of the JWT token that is used for this process, so that you can add multiple IdPs, each for a different tenant, through a single Cognito user pool. You can do all this without changing application code. The native integration of Amazon API Gateway with the Cognito user pools authorizer streamlines your validation of the JWT integrity, and after the JWT has been validated, you can use it to make authorization decisions in your application’s backend. By following the example in this post, you can focus on what differentiates your application, and let AWS do the undifferentiated heavy lifting of identity management for your customer-facing applications.

For the code examples described in this post, see the amazon-cognito-example-for-multi-tenant code repository on GitHub. To learn more about using Cognito with external IdPs, see the Amazon Cognito documentation. You can also learn to build software as a service (SaaS) application architectures on AWS. If you have any questions about Cognito or any other AWS services, you may post them to AWS re:Post.

If you have feedback about this post, submit comments in the Comments section below. If you have questions about this post, start a new thread on the AWS Security, Identity, & Compliance re:Post or contact AWS Support.

Want more AWS Security news? Follow us on Twitter.

Ray Zaman

Ray Zaman

A Principal Solutions Architect with AWS, Ray has over 30 years of experience helping customers in finance, healthcare, insurance, manufacturing, media, petrochemical, pharmaceutical, public utility, retail, semiconductor, telecommunications, and waste management industries build technology solutions.

Neela Kulkarni

Neela Kulkarni

Neela is a Solutions Architect with Amazon Web Services. She primarily serves independent software vendors in the Northeast US, providing architectural guidance and best practice recommendations for new and existing workloads. Outside of work, she enjoys traveling, swimming, and spending time with her family.

Yuri Duchovny

Yuri Duchovny

Yuri is a New York–based Solutions Architect specializing in cloud security, identity, and compliance. He supports cloud transformations at large enterprises, helping them make optimal technology and organizational decisions. Prior to his AWS role, Yuri’s areas of focus included application and networking security, DoS, and fraud protection. Outside of work, he enjoys skiing, sailing, and traveling the world.

Abdul Qadir

Abdul Qadir

Abdul is an AWS Solutions Architect based in New Jersey. He works with independent software vendors in the Northeast US and helps customers build well-architected solutions on the AWS Cloud platform.

Just-in-Time user provisioning explained

Post Syndicated from Evgeny Yurchenko original https://blog.zabbix.com/just-in-time-user-provisioning-explained/25515/

Zabbix 6.4 finally brings a very much waited feature called “Just-In-Time user provisioning”. Zabbix “What’s new in 6.4” LDAP/SAML user provisioning paragraph is very brief and can not (not that I am saying it should) deliver any excitement about this new really game changing feature. This blog post was born to address two points:

  • explain in more details why it is “game changing” feature
  • configuration of this feature is very flexible and as it often happens flexibility brings complexity and sometimes confusion about how to actually not only get it working but also to get the most of this feature

NOTE: I am talking about LDAP in this blog post but SAML works exactly the same way so you can easily apply this article to SAML JIT user provisioning configuration.

Old times (before 6.4)

Let’s do a quick reminder how it worked before Zabbix 6.4:Obvious problem here is that a User must be pre-created in Zabbix to be able to log in using LDAP. The database user records do not have any fields noticing that the user will be authenticated via LDAP, it’s just users’ passwords stored in the database are ignored, instead, Zabbix goes to an LDAP server to verify whether:

  • a user with a given username exists
  • user provided the correct password

no other attributes configured for the user on the LDAP server side are taken into account.

So when Zabbix is used by many users and groups, user management becomes not a very trivial task as new people join different teams (or leave).

Zabbix 6.4 with JIT user provisioning enabled

Now let’s take a look at what is happening in Zabbix 6.4 (very simplified picture). The picture depicts what happens when memberOf method is selected for Group Configuration (more on that later):Now when Zabbix gets a username and password from the Login form it goes to the LDAP server and gets all the information available for this user including his/her LDAP groups membership and e-mail address. Obviously, it gets all that only if the correct (from LDAP server perspective) username and password were provided. Then Zabbix goes through pre-configured mapping that defines users from which LDAP group goes to which Zabbix user group. If at least one match is found then a user is created in the Zabbix database belonging to a Zabbix user group and having a Zabbix user role according to configured “match”. So far sounds pretty simple, right? Now let’s go into detail about how all this should be configured.

LDAP server data

To experiment with the feature I built a Docker container which is a fully functional LDAP server with some pre-configured data, you can easily spin it up using this image. Start the container this way:

docker run -p 3389:389 -p 6636:636 --name openldap-server --detach bgmot42/openldap-server:0.1.1

To visually see LDAP server data (and add your own configuration like users and groups) you can start this standard container

docker run -p 8081:80 -p 4443:443 --name phpldapadmin --hostname phpldapadmin --link openldap-server:ldap-host --env PHPLDAPADMIN_LDAP_HOSTS=ldap-host --detach osixia/phpldapadmin:0.9.0

Now you can access this LDAP server via https://<ip_address>:4443 (or any other port you configure to access this Docker container), click Login, enter “cn=admin,dc=example,dc=org” in Login DN field and “password” in Password field, click Authenticate. You should see the following structure of the LDAP server (picture shows ‘zabbix-admins’ group configuration):All users in this container for convenience are configured with “password” word as their passwords.

General LDAP authentication configuration in Zabbix

No surprises here, you need to enable LDAP authentication, just a couple of additions here:

  • You must provide Deprovisioned users group. This group must be literally “disabled” otherwise you won’t be able to select it here. This is the Zabbix user group where all “de-provisioned” users will be put into so effectively will get disabled from accessing Zabbix.
  • Enable JIT provisioing check-box which obviously needs to be checked for this feature to work.

And again already familiar interface to configure a LDAP server and search parameters, however, this picture depicts how we actually fill in these parameters according to data in our LDAP server:

“Special” Distinguished Name (DN) cn=ldap_search,dc=example,dc=org is used for searching, i.e. Zabbix uses this DN to connect to LDAP server and of course when you connect to LDAP server you need to be authenticated – this is why you need to provide Bind password. This DN should have access to a sub-tree in LDAP data hierarchy where all your users are configured. In our case all the users configured “under” ou-Users,dc=example,dc=org, this DN is called base DN and used by Zabbix as so to say “starting point” to start searching.
Note: technically it is possible to bind to LDAP server anonymously, without providing a password but this is a huge breach in security as the whole users sub-tree becomes available for anonymous (unauthenticated) search, i.e. effectively exposed to any LDAP client that can connect to LDAP server over TCP. The LDAP server we deployed previously in Docker container does not provide this functionality.

Group configuration method “memberOf”

All users in our LDAP server have memberOf attribute which defines what LDAP groups every user belongs to, e.g. if you perform a LDAP query for user1 user you’ll get that its memberOf attribute has this value:
memberOf: cn=zabbix-admins,ou=Group,dc=example,dc=org
Note, that your real LDAP server can have totally different LDAP attribute that provides users’ group membership, and of course, you can easily configure what attribute to use when searching for user’s LDAP groups by putting it into User group membership attribute field:

In the picture above we are telling Zabbix to use memberOf attribute to extract DN defining user’s group membership (in this case it is cn=zabbix-admins,out=Group,dc=example,dc=org) and take only cn attribute from that DN (in this case it is zabbix-admins) to use in searching for a match in User group mapping rules. Then we define as many mapping rules as we want. In the picture above we have two rules:

  • All users belonging to zabbix-users LDAP group will be created in Zabbix as members of Zabbix users group with User role
  • All users belonging to zabbix-admins LDAP group will be created in Zabbix as members of Zabbix administrators group with Super admin role

Group configuration method “groupOfNames”

There is another method of finding users’ group membership called “groupOfNames” it is not as efficient as “memberOf” method but can provide much more flexibility if needed. Here Zabbix is not querying LDAP server for a user instead it is searching for LDAP groups based on a given criterion (filter). It’s easier to explain with pictures depicting an example:

Firstly we define LDAP “sub-tree” where Zabbix will be searching for LDAP groups – note ou=Group,dc=example,dc=org in Group base DN field. Then in the field Group name attribute field we what attribute to use when we search in mapping rules (in this case we take cn, i.e. only zabbix-admins from full DN cn=zabbix-admins,ou=Group,dc=example,dc=org). Each LDAP group in our LDAP server has member attribute that has all users that belong to this LDAP group (look at the right picture) so we put member in Group member attribute field. Each user’s DN will help us construct Group filter field. Now pay attention: Reference attribute field defines what LDAP user’s attribute Zabbix will use in the Group filter, i.e. %{ref} will be replaced with the value of this attribute (here we are talking about the user’s attributes – we already authenticated this user, i.e. got all its attributes from LDAP server). To sum up what I’ve said above Zabbix

  1. Authenticate the user with entered Username and Password against LDAP server getting all user’s LDAP attributes
  2. Uses Reference attribute and Group filter fields to construct a filter (when user1 logs in the filter will be (member=uid=user1,ou=Users,dc=example,dc=org)
  3. Performs LDAP query to get all LDAP groups with member attribute (configured in Group member attribute field) containing constructed in step 2 filter
  4. Goes through all LDAP groups received in step 3 and picks cn attribute (configured in Group name attribute field) and finds a match in User group mapping rules

Looks a bit complicated but all you really need to know is the structure of your LDAP data.

Demo time

Finally let’s see what happens when user1 belonging to zabbix-admins LDAP group and user3 belonging to zabbix-users LDAP group log in:

That’s it. Happy JIT user provisioning!

Zabbix 6.4 is out now!

Post Syndicated from Arturs Lontons original https://blog.zabbix.com/zabbix-6-4-is-out-now/25444/

Zabbix team is pleased to announce the release of the latest Zabbix major version – Zabbix 6.4. The release delivers many long-awaited improvements, such as Just-in-time LDAP and SAML user provisioning; support of older Zabbix proxy versions for simplified proxy management and zerodowntime Zabbix upgrades; near-instant configuration sync across Zabbix agents and proxies, and much more! 

New features and improvements

Just-in-time (JIT) user provisioning 

Zabbix 6.4 adds support of JIT user provisioning for LDAP and SAML authentication.

JIT user provisioning can be enabled in LDAP/SAML authentication settings

Zabbix administrators can now configure user provisioning by selecting the LDAP group pattern for matching and automatically assign User groups and User roles to the discovered users. Media types can also be mapped based on LDAP/SAML attributes.

A media can be assigned to the provisioned users based on their LDAP/SAML attributes
A group and role is assigned to the provisioned users

Cause and symptom events 

Zabbix 6.4 adds the ability to mark events as Cause or Symptom events. This allows us to filter events in a way, where we can see only root cause problems instead of being overwhelmed by symptom events. It is also possible to pause action operations for symptom events as to avoid unnecessary noise.

Multiple symptom events can be linked to a single cause event
Any event can be marked as a symptom or converted to a cause event
Action operations can be paused for symptom problems

Instant propagation of configuration changes 

Continuing to build on changes introduced in Zabbix 6.2 (Collecting only configuration change deltas), Zabbix 6.4 introduces instant configuration synchronization across passive and active agents and proxies.

  • Instead of receiving the full configuration copy every 2 minutes (old behavior), in Zabbix 6.4 active agent receives the configuration copy only when changes have been performed
  • RefreshActiveChecks parameter now supports a range 1-86400 (old range: 60-3600)
  • The ProxyConfigFrequency parameter is now used in both Zabbix server (for passive mode) and Zabbix proxy (for active mode) configuration files
  • ConfigFrequency parameter in Zabbix proxy configuration is now deprecated
  • Default ProxyConfigFrequency parameter is 10 seconds (down from 1 hour)

This also improves the performance of Zabbix servers and proxies, since only configuration deltas are synced. As for active agents – the active agent receives a full configuration copy only when any changes are detected in the configuration instead of receiving it every RefreshActiveChecks interval (old behavior)

New SNMP walk item for bulk collection and discovery of SNMP metrics 

A new SNMP agent walk item has been introduced. The item looks at a specified OID or OIDs and polls their indexes by suing the SNMP GetBulk requests. An SNMP GetBulk request can provide better performance and more rapid metric collection and discovery from enterprise-tier SNMP devices.

For example:

walk[1.3.6.1.1,1.3.6.2]

Result:

1.3.6.1.2.1.1 = STRING: "<value1>"
1.3.6.1.2.1.2 = STRING: "<value2>"
1.3.6.1.2.1.3 = STRING: "<value3>"
1.3.6.2.1 = INTEGER: 10
1.3.6.2.2 = INTEGER: 20

Textual values can then be transformed to JSON, which can serve as a master item for low-level discovery rules:

SNMP walk to JSON transforms the obtained data to JSON

Resulting values:

[
{"{#SNMPINDEX}":"7","{#IFALIAS}":"Uplink PT","{#IFTYPE}":"6"},
{"{#SNMPINDEX}": "8","{#IFALIAS}": "Uplink FB","{#IFTYPE}":"6"},
{"{#SNMPINDEX}": "473","{#IFALIAS}":"lag","{#IFTYPE}":"161"}
]

Once the data is converted to JSON, we can use SNMP walk value preprocessing step together with LLD macros, to create dependent item prototypes:

SNMP walk value preprocessing step can be used to specify value for extraction in item prototypes

Support of data collection for outdated proxies

To improve the Zabbix component upgrade workflows (especially for large environments), outdated proxies can still perform data collection with a newer Zabbix server version:

  • Proxy is fully supported if it has the same major version as the Zabbix server
  • Proxy is marked as outdated if its major version is older than the Zabbix server but not older than the previous LTS release
  • Outdated proxies still support data collection and remote command execution
  • In other scenarios, the proxy becomes not supported
Deployed proxy compatibility can be seen in Zabbix frontend
Server version Current proxy version Outdated proxy version Unsupported proxy version
6.4 6.4 6.0, 6.2 Older than 6.0; newer than 6.4
7.0 7.0 6.0, 6.2, 6.4 Older than 6.0; newer than 7.0
7.2 7.2 7.0 Older than 7.0; newer than 7.2

New menu layout 

Zabbix menu layout has been redesigned. The goal of the new menu layout is to provide logical and consistent access to main Zabbix features.

The new menu provides a more consistent and logical layout to Zabbix features

Real-time streaming of metrics and events over HTTP

In addition to streaming collected metrics and events to files, Zabbix 6.4 adds the option to stream metrics and events over HTTP. Zabbix administrators have the option to filter the data for streaming by using tag filters. A new Connectors section has been introduced under Administration – General. Here Zabbix administrators can define an external system where item values and events should be pushed to.

Define a new connector to stream metrics and events over HTTP

Zabbix 6.4 can be used as a source of information for other applications, analytics reports, and AI engines by streaming metrics and events over HTTP in real time. Metrics and events can be streamed to message brokers like Kafka, RabbitMQ, or Amazon Kinesis to adapt the behavior of external systems in real time. 

Template versioning 

Template versioning has been introduced to improve template management and ease of use. Templates are now marked with vendor ar version fields, which are visible in Zabbix frontend; these fields can also be added when writing a custom template.

Template version and vendor fields are visible in the frontend

Development framework for Zabbix widget creation 

Zabbix has a large developer community creating their own custom frontend modules, widgets and Go plugins. In Zabbix 6.4, our goal was to streamline this process by creating a development framework for widget creation. To achieve this, the following changes have been introduced:

  • Widgets have been converted to modules
  • Modules are now fully self-contained and modular
  • Built-in widgets reside in ui/widgets
  • Custom widgets reside in ui/modules/<widget>
  • Adding new widgets is as simple as adding new files without changing the existing files

In addition to these changes, we have also added a new Developer Center section to our documentation. The section contains guides, tutorials and code examples to guide our community in developing Frontend modules and widgets, as well as help with Zabbix agent 2 custom Go plugin development.

The Developer Center section contains guides, tutorials, and code examples for extending Zabbix

Other features and improvements 

The release includes many other changes:

  • Simple check, External check, SSH agent, Telnet agent item types now do not require an interface to be present on the host 
  • Pre-configured email media type settings for Gmail and O365 email providers 
  • Dynamic item value widget thresholds
  • Option to define custom labeled links for hosts and events
  • Ability to label trigger URLs
  • Improved preprocessing performance and thread-based preprocessing workers
  • Ability to label aggregated datasets in Graph widget
  • SQLite3 Zabbix proxies now automatically recreate the SQLite3 database file during an upgrade
  • A host status filter (enabled/disabled) has been added under Data collection – Hosts
  • Additional filtering options have been added to the Action log
  • Action log now supports import to CSV
  • Multiple context menu improvements to Host, Item and Event context menus
  • Old password verification is now required when changing your internal Zabbix user password
  • Value cache performance improvements when working with metrics that get updated less frequently than once per day
  • Added commands to enable profiling of rwlocks/mutexes (for debugging)

The full list of changes, bug fixes, and new features can be found in the Zabbix 6.4 release notes

New templates and integrations

Zabbix 6.4 comes pre-packaged with many new templates and integrations for the most popular vendors and cloud providers. Multiple existing templates have also received improvements:

  • Microsoft Azure MySQL servers 
  • Microsoft Azure PostgreSQL servers 
  • Microsoft Azure virtual machines 
  • Low-level discovery improvements in AWS by HTTP template 
  • Veeam Backup Enterprise Manager 
  • Veeam Backup and Replication 
  • Cisco Nexus 9000 Series 
  • BMC Control-M 
  • Cisco Meraki dashboard 
  • OS processes by Zabbix agent 
  • Improvements to filesystem discovery in official Zabbix OS templates 

Zabbix 6.4 introduces a webhook integration for the Line messaging app, allowing Zabbix events to be forwarded to the Line messenger. 

Zabbix 6.4 adds a variety of new templates and integrations

Zabbix 6.4 packages and images

Official Zabbix packages and images are available for: 

  • Linux distributions for different hardware platforms on RHEL, CentOS, Oracle Linux, Debian, SUSE, Ubuntu, Raspbian 
  • Virtualization platforms based on VMWare, VirtualBox, Hyper-V, XEN 
  • Docker 
  • Packages and pre-compiled agents for the most popular platforms, including macOS and MSI packages for Microsoft Windows 

You can find the download instructions and download the new version on the Download page.

One-click deployments for the following cloud platforms are coming soon: 

  • AWS, Azure, Google Cloud Platform, Digital Ocean 

Upgrading to Zabbix 6.4

In order to upgrade to Zabbix 6.4 you need to upgrade your repository package and download and install the new Zabbix component packages (Zabbix server, proxy, frontend, and other Zabbix components). When you start the Zabbix server, an automatic database schema upgrade will be performed. Zabbix agents are backward compatible; therefore, it is not required to install the new agent versions. You can perform the agent upgrade at a later time. 

If you’re using the official Docker container images – simply deploy a new set of containers for your Zabbix components. Once the Zabbix server container connects to the backend database, the database upgrade will be performed automatically.

You can find detailed step-by-step upgrade instructions on our Upgrade procedure page. 

Join the webinar

If you wish to learn more about the Zabbix 6.4 features and improvements, we invite you to join our What’s new in Zabbix 6.4 public webinar.

During the webinar, you will get the opportunity to:

  • Learn about Zabbix 6.4 features and improvements
  • See the latest Zabbix templates and integrations
  • Participate in a Q&A session with Zabbix founder and CEO Alexei Vladishev
  • Discuss the latest Zabbix version with Zabbix community and Zabbix team members

This is a public webinar – anyone can sign up, attend and have their questions answered by the Zabbix team!

How to automate AWS Managed Microsoft AD scaling based on utilization metrics

Post Syndicated from Dennis Rothmel original https://aws.amazon.com/blogs/security/how-to-automate-aws-managed-microsoft-ad-scaling-based-on-utilization-metrics/

AWS Directory Service for Microsoft Active Directory (AWS Managed Microsoft AD), provides a fully managed service for Microsoft Active Directory (AD) in the AWS cloud. When you create your directory, AWS deploys two domain controllers in separate Availability Zones that are exclusively yours for high availability. For use cases requiring even higher resilience and performance, in a specific Region or during specific hours, AWS Managed Microsoft AD allows you to scale by deploying additional domain controllers to meet your needs. These domain controllers can help load-balance, increase overall performance, or simply provide additional nodes to protect against temporary availability issues. AWS Managed Microsoft AD allows you to define the correct number of domain controllers for your directory based on your individual use case.

This post will walk you through how to automate scaling in AWS Managed Microsoft AD using utilization metrics from your directory. You’ll do this using Amazon CloudWatch Alarms, SNS notifications, and a Lambda function to increase the number of domain controllers in your directory based on utilization peaks.

Simplified directory scaling

AWS Managed Microsoft AD has now simplified this directory scaling process by integrating with Amazon CloudWatch metrics. This new integration enables you to:

  1. Analyze your directory to identify expected average and peak directory utilization
  2. Scale your directory based on utilization data to adequately address the expected load
  3. Automate the addition of domain controllers to handle unexpected load.

Integration is available for both domain controller utilization metrics such as CPU, Memory, Disk and Network, and for AD-specific metrics, such as LDAP searches, binds, DNS queries, and Directory reads/writes. Analyzing this data over time to identify expected average and peak utilization on your directory can help you deploy additional domain controllers in Regions that need them. Once you’ve established this utilization baseline, you can deploy additional domain controllers to service this load, and configure alarms for anything exceeding this baseline.

Solution overview

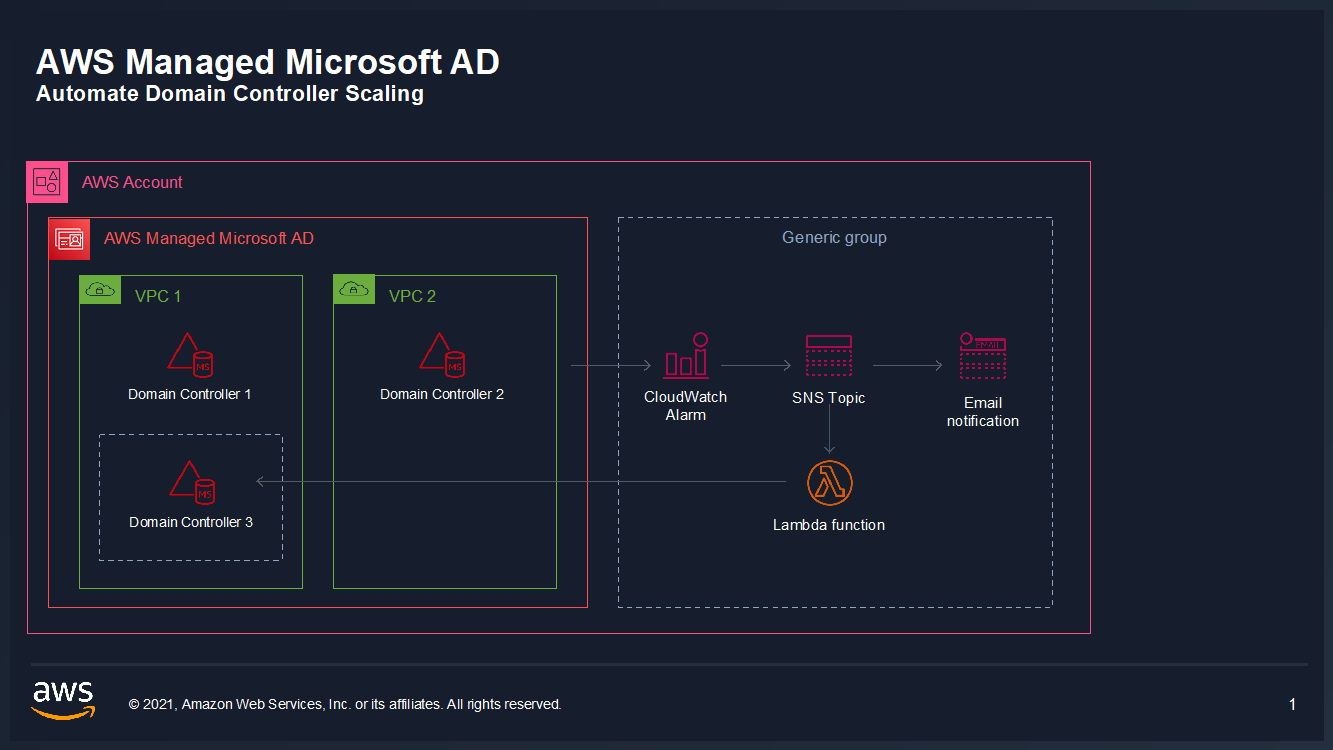
In this example, our AWS Managed Microsoft AD has the default two domain controllers; once your utilization threshold is reached, you’ll add one additional domain controller (domain controller 3 in the diagram) to cover this additional load. 

Figure 1: Solution overview

Figure 1: Solution overview

To create a CloudWatch Alarm with SNS topic notifications

  1. In the AWS Console, navigate to CloudWatch
  2. Choose Metrics to see the Browse Metrics panel
  3. Choose the Directory Service namespace, then choose AWS Managed Microsoft AD.
  4. In the Directory ID column, select your directory and check search for this only.
  5. From the Metric Category column, select Processor from Metric Category and check add to search. This view will show the processor utilization for your directory.
  6.  

    Figure 2. Processor utilization metrics

    Figure 2. Processor utilization metrics

  7. To see the average utilization across all domain controllers, choose Add Math, then All Functions, then AVG to create a metric math expression for average CPU utilization across all domain controllers.
  8.  

    Figure 3. Adding a math function to compute average

    Figure 3. Adding a math function to compute average

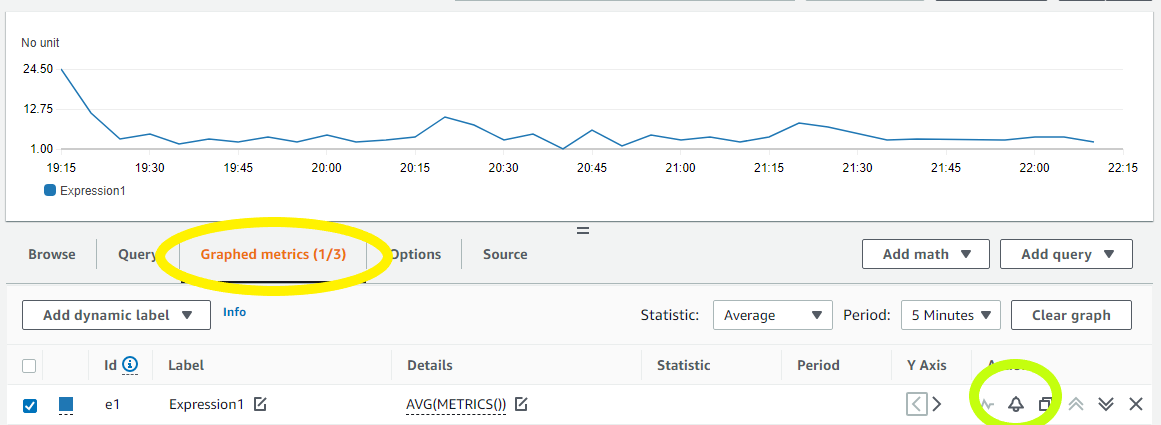
  9. Next, choose the Graphed Metrics tab in the CloudWatch metrics console, select the newly created expression, then select the bell icon from the Actions column to create a CloudWatch alarm based on this metric.
  10. Figure 4. Create a CloudWatch Alarm using Metric Math Expression

    Figure 4. Create a CloudWatch Alarm using Metric Math Expression

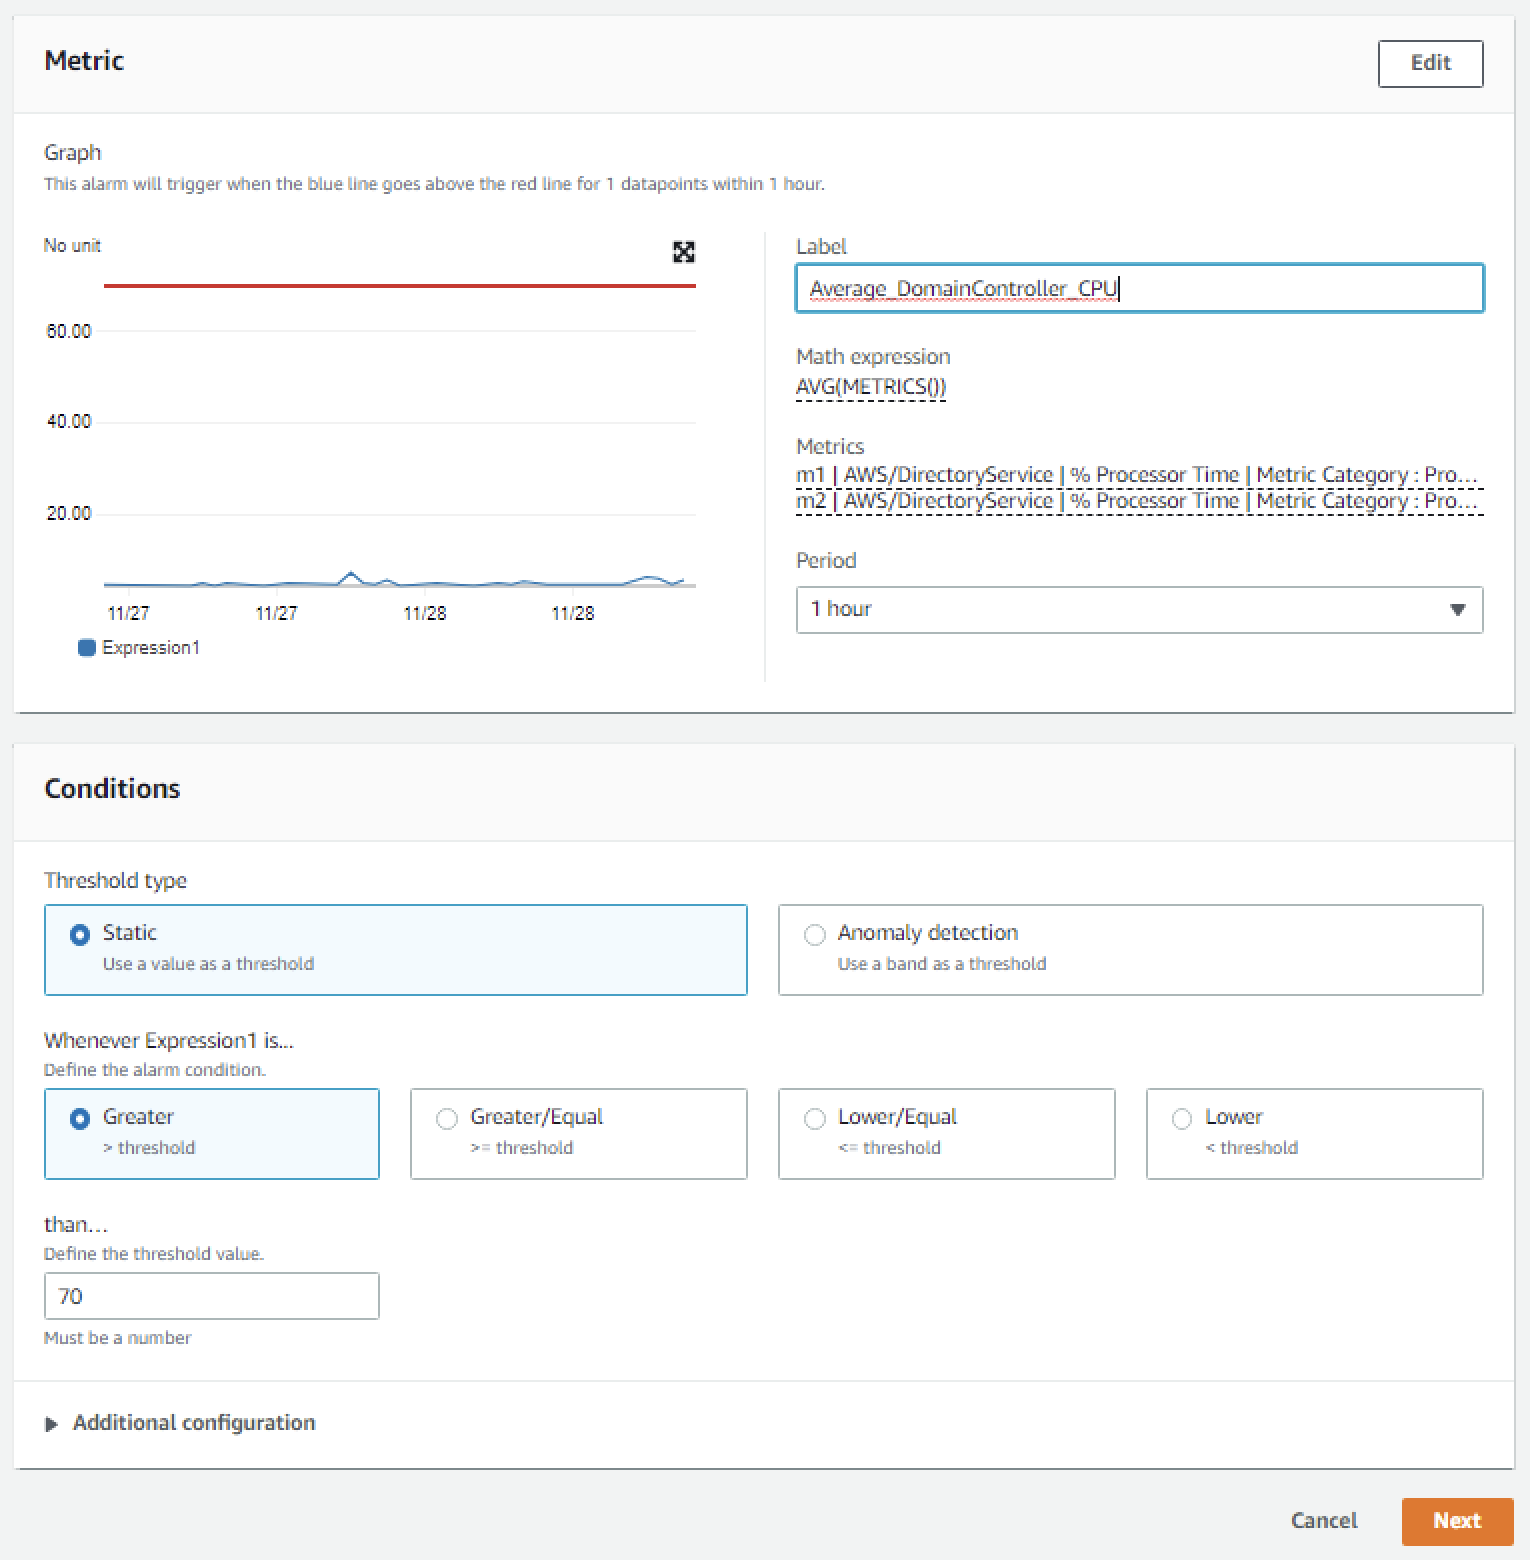
  11. Configure the threshold alarm to trigger when CPU utilization exceeds 70%.
  12.  In the Metrics section, under Period, choose 1 Hour.
     In the Conditions section, under Threshold Type, choose Static. Under Define the alarm condition, choose Greater than threshold. Under Define the threshold value, enter 70. See Figure 5 for an image of how alarm parameters should look on your screen. Choose Next to Configure actions

    Figure 5. Configure the alarm parameters

    Figure 5. Configure the alarm parameters

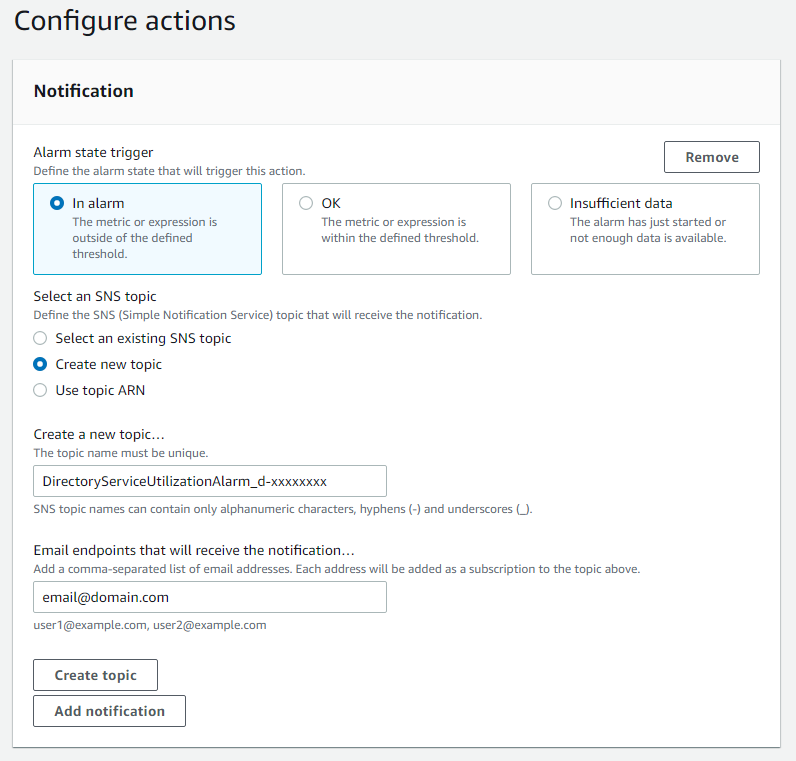
  13. On the Configure actions screen, configure the actions using the parameters listed below to send an email notification when the alarm state is triggered. See Figure 6 for an image of how email notifications are configured.
  14.   In the Notification section, set Alarm state trigger to In alarm.   Set Select an SNS topic to Create topic.  Fill in the name of the alarm in the Create a new topic field, and add the email where notifications should be sent to the Email endpoints that will receive notification field. An email address is required to create the SNS topic and you should use an email address that’s accessible by your operations team. This SNS topic will be used to trigger the Lambda automation described in a later section. Note: make a note of the SNS topic name you chose; you will use it later when creating the Lambda function in the To create an AWS Lambda function to automate scale out procedure below. 

    Figure 6. Create SNS topic and email notification

    Figure 6. Create SNS topic and email notification

  15. In the Alarm name field, provide a name for the alarm. You can optionally also add an Alarm description. Choose Next.
  16. Review your configuration, and choose Create alarm to create the alarm.

Once you’ve completed these steps, you will now have an alarm implemented for when domain controller CPU utilization exceeds an average of 70% across both domain controllers. This will trigger an SNS topic when your directory is experiencing a heavy load, which will be used to start the Lambda automation and will send an informational email notification. In the next section, we’ll configure an AWS Lambda function to automate the addition of a domain controller based on this SNS topic.

For additional details on CloudWatch Alarms, please see the Amazon CloudWatch documentation.

To create an AWS Lambda function to automate scale out

The sample Lambda function shown below checks the number of domain controllers in this Region, and increases that by adding one additional domain controller. This procedure describes how to configure the IAM role required for this Lambda function, then how to deploy the Lambda function to execute when the alarm is triggered to automatically add a domain controller when your load exceeds your typical usage baseline.

Note: For additional details on Lambda creation, please see the AWS Lambda documentation.

To automate scale-out using AWS Lambda

  1. In the AWS Console, navigate to IAM and choose Policies, then choose Create Policy.
  2. Choose the JSON tab, and create a new IAM role using the policy provided in JSON below.
  3. For more details on this configuration, see the AWS Directory Service documentation.

    Sample policy


    {
    	"Version":"2012-10-17",
    	"Statement":[
    	{
    		"Effect":"Allow",
    		"Action":[
    			"ds:DescribeDomainControllers",
    			"ds:UpdateNumberOfDomainControllers",
    			"ec2:DescribeSubnets",
    			"ec2:DescribeVpcs",
    			"ec2:CreateNetworkInterface",
    			"ec2:DescribeNetworkInterfaces",
    			"ec2:DeleteNetworkInterface"
    		],
    		"Resource":"*"
    	}
    	]
    }
    

  4. Choose Next:Tags to add tags (optional) before choosing Next:Review.
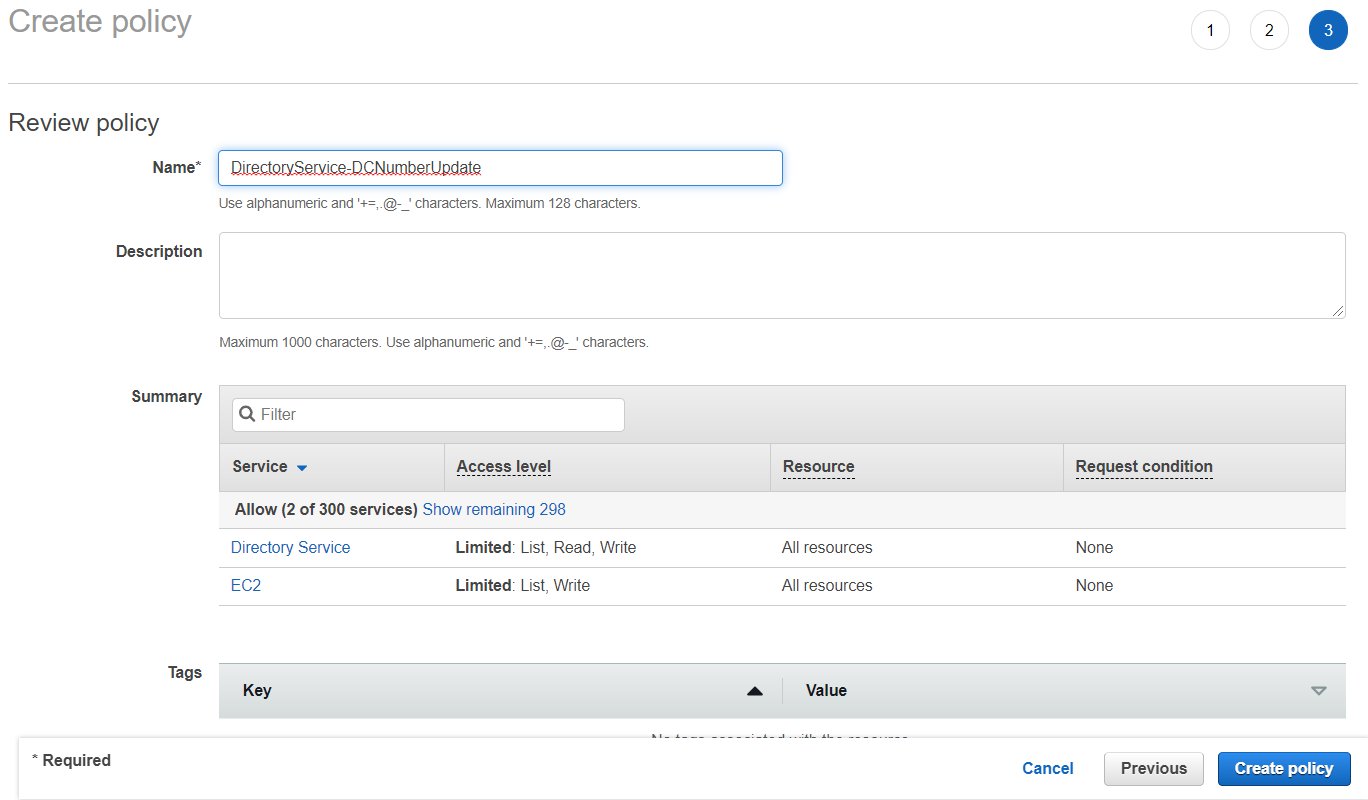
  5. On the Create Policy screen, provide a name in the Name field. You can optionally also add a description. Choose Create policy to complete creating the new policy.
  6.  
    Note: make a note of the policy name you chose; you will use it later when updating the execution role for the Lambda function.  

    Figure 7. Provide a name to create the IAM policy

    Figure 7. Provide a name to create the IAM policy

  7. In the AWS Console, navigate to Lambda and choose Create Function
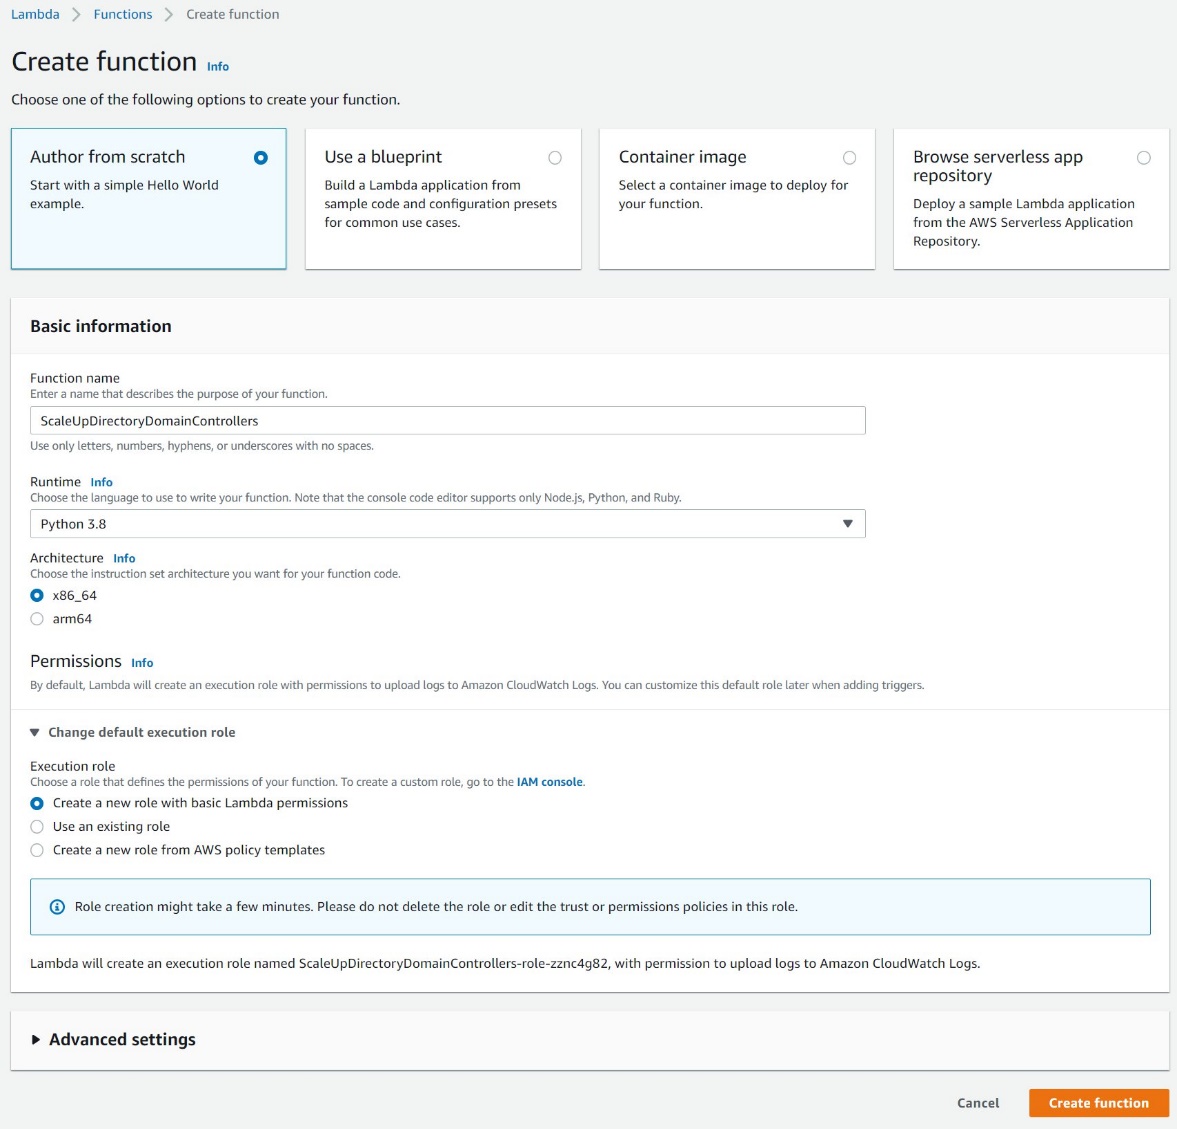
  8. On the Create Function screen, select Author from Scratch and provide a Name, then choose Create Function.
  9. Figure 8. Create a Lambda function

    Figure 8. Create a Lambda function

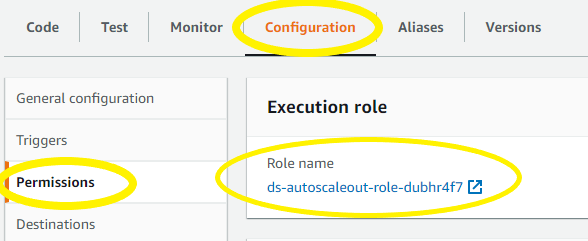
  10. Once created, on the Lambda function’s page, choose the Configuration tab, then choose Permissions from the sidebar and choose the execution role name linked under Role name. This will open the IAM console in another tab, preloaded to your Lambda execution role.
  11.  

    Figure 9: Select the Execution Role

    Figure 9: Select the Execution Role

  12. On the execution role screen, choose Attach policies and select the IAM policy you’ve just created (e.g. DirectoryService-DCNumber Update). On the Attach Permissions screen, choose Attach policy to complete updating the execution role. Once completed this step, you may close this tab and return the previous browser tab.
  13.  

    Figure 10. Select and attach the IAM policy

    Figure 10. Select and attach the IAM policy

  14. On the Lambda function screen, choose the Configuration tab, then choose Triggers from the sidebar.
  15. On the Add Trigger screen, choose the pulldown under Trigger configuration and select SNS. On the SNS topic box, select the SNS topic you created in Step 9 of the To create a CloudWatch Alarm with SNS topic notifications procedure above. Then choose Add to complete the trigger configuration.
  16. On the Lambda function screen, choose the Configuration tab, then choose Environment variables from the sidebar.
  17. On the Environment variables card, click Edit.
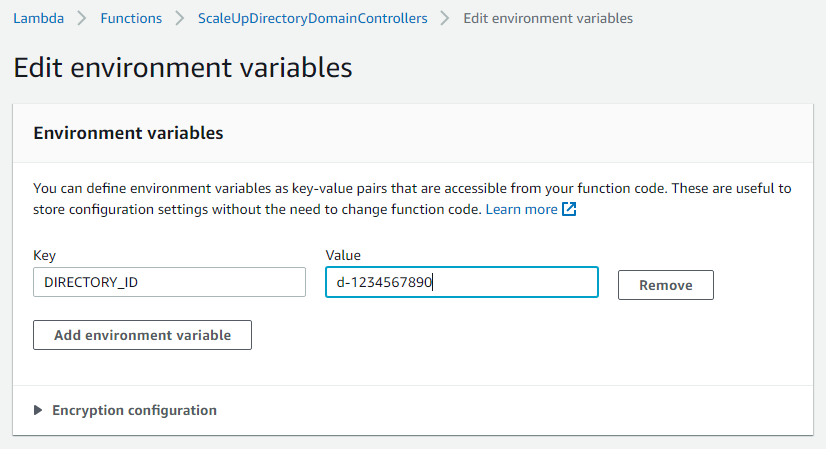
  18. On the Edit environment variables screen, choose Add environment variables and use the Key “DIRECTORY_ID” and the Value will be the directory ID for you AWS Managed Microsoft AD.
  19.  

    Figure 11. The "Edit environment variables" screen

    Figure 11. The “Edit environment variables” screen

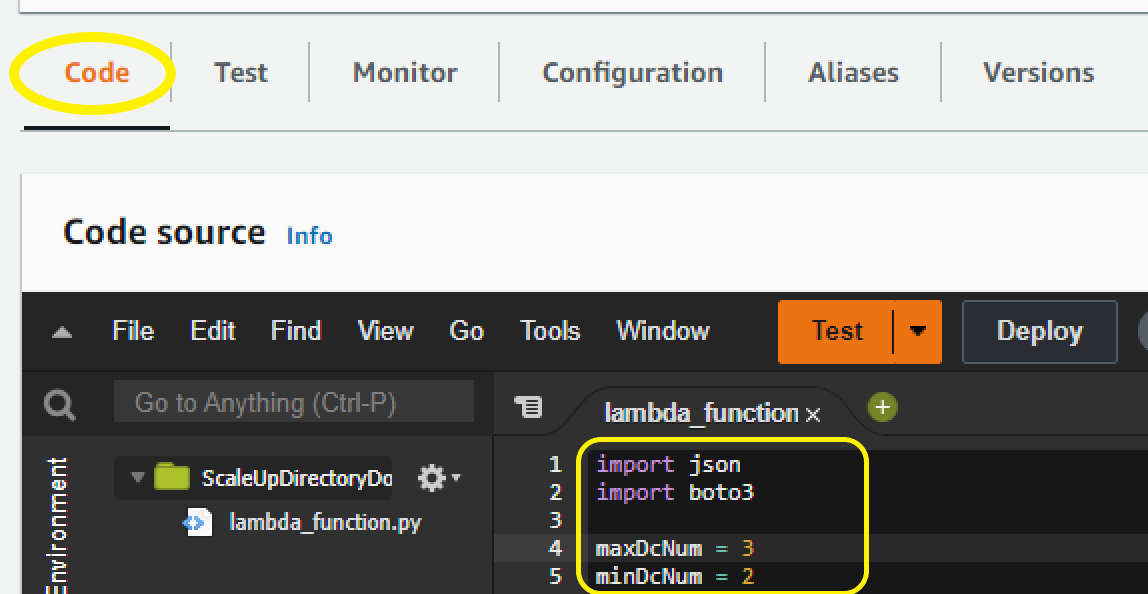
  20. On the Lambda function screen, choose the Code tab to open the in-browser code editor experience inside the Code source card. Paste in the sample Lambda function code given below to complete the implementation.
  21.  

    Figure 12. Paste sample code to complete the Lambda function setup

    Figure 12. Paste sample code to complete the Lambda function setup

Sample Lambda function code

The sample Lambda function given below automates adding another domain controller to your directory. When your CloudWatch alarm triggers, you will receive a notification email, and an additional domain controller will be deployed to provide the added capacity to support the increase in directory usage.

Note: The example code contains a variable for the maximum number of domain controllers (maxDcNum), to prevent you from over provisioning in the event of a missed configuration. This value is set to 3 for this blog post’s example and can be increased to suit your use case. 

import json
import boto3

maxDcNum = 10
minDcNum = 2
region   = "us-east-1"
dsId = "d-906752246f"

ds = boto3.client('ds', region_name=region)

def lambda_handler(event, context):
    
    ## get the current number of domain controllers
    dcs = ds.describe_domain_controllers(DirectoryId = dsId)

    DomainControllers = dcs["DomainControllers"]
    
    DCcount = len(DomainControllers)
    print(">>> Current number of DCs:" + str(DCcount))

    #increase the number of DCs
    if DCcount < maxDcNum:
        NewDCnumber = DCcount + 1 
        response = ds.update_number_of_domain_controllers(DirectoryId = dsId, DesiredNumber =  NewDCnumber);    

        return {
            'statusCode': 200,
            'body': json.dumps("New DC number will be " + str(NewDCnumber))
        }
    else:
        return {
            'statusCode': 200,
            'body': json.dumps("Max number of DCs reached. The number of DCs is" + str(DCcount))
        }

Note: When testing this Lambda function, remember that this will increase the number of domain controllers for your directory in that Region. If the additional domain controller is not needed, please reduce the count after the test to avoid costs for an additional domain controller. The same principles used in this article to automate the addition of domain controllers can be applied to automate the reduction of domain controllers and you should consider automating the reduction to optimize for resilience, performance and cost.

Conclusion

In this post, you’ve implemented alarms based on thresholds in Domain Controller utilization using AWS CloudWatch and automation to increase the number of domain controllers using AWS Lambda functions. This solution helps to cost-effectively improve resilience and performance of your directory, by scaling your directory based on historical load patterns.

To learn more about using AWS Managed Microsoft AD, visit the AWS Directory Service documentation. For general information and pricing, see the AWS Directory Service home page. If you have comments about this blog post, submit a comment in the Comments section below. If you have implementation or troubleshooting questions, start a new thread on the Directory Service forum or contact AWS Support.

Want more AWS Security news? Follow us on Twitter.

Author

Dennis Rothmel

Dennis is a Sr. Product Manager from AWS Identity with a passion for modernization and automation. He has worked globally across Asia Pacific, Europe, and America, and enjoys the travel, languages, cultures and foods that come with global working.

Author

Vladimir Provorov

Vladimir is a Product Solutions Architect from AWS Identity focused on Workforce Identity and Directory Service. He works on developing new features to make Enterprise Identity simpler and more scalable. He is excited to travel and explore the world with his family.

Role-based access control using Amazon Cognito and an external identity provider

Post Syndicated from Eran Medan original https://aws.amazon.com/blogs/security/role-based-access-control-using-amazon-cognito-and-an-external-identity-provider/

Amazon Cognito simplifies the development process by helping you manage identities for your customer-facing applications. As your application grows, some of your enterprise customers may ask you to integrate with their own Identity Provider (IdP) so that their users can sign-on to your app using their company’s identity, and have role-based access-control (RBAC) based on their company’s directory group membership.

For your own workforce identities, you can use AWS Single Sign-On (SSO) to enable single sign-on to your cloud applications or AWS resources.

For your customers who would like to integrate your application with their own IdP, you can use Amazon Cognito user pools’ external identity provider integration.

In this post, you’ll learn how to integrate Amazon Cognito with an external IdP by deploying a demo web application that integrates with an external IdP via SAML 2.0. You will use directory groups (for example, Active Directory or LDAP) for authorization by mapping them to Amazon Cognito user pool groups that your application can read to make access decisions.

Architecture

The demo application is implemented using Amazon Cognito, AWS Amplify, Amazon API Gateway, AWS Lambda, Amazon DynamoDB, Amazon Simple Storage Service (S3), and Amazon CloudFront to achieve a serverless architecture. You will make use of infrastructure-as-code by using AWS CloudFormation and the AWS Cloud Development Kit (CDK) to model and provision your cloud application resources, using familiar programming languages.

The following diagram shows an overview of this architecture and the steps in the login flow, which should help clarify what you are going to deploy.
 

Figure 1: Architecture Diagram

Figure 1: Architecture Diagram

First visit

When a user visits the web application at the first time, the flow is as follows:

  1. The client side of the application (also referred to as the front end) uses the AWS Amplify JavaScript library (Amplify.js) to simplify authentication and authorization. Using Amplify, the application detects that the user is unauthenticated and redirects to Amazon Cognito, which then sends a SAML request to the IdP.
  2. The IdP authenticates the user and sends a SAML response back to Amazon Cognito. The SAML response includes common attributes and a multi-value attribute for group membership.
  3. Amazon Cognito handles the SAML response, and maps the SAML attributes to a just-in-time user profile. The SAML groups attribute is mapped to a custom user pool attribute named custom:groups.
  4. An AWS Lambda function named PreTokenGeneration reads the custom:groups custom attribute and converts it to a JSON Web Token (JWT) claim named cognito:groups. This associates the user to a group, without creating a group.

    This attribute conversion is optional and implemented to demo how you can use Pre Token Generation Lambda trigger to customize your JWT token claims, mapping the IdP groups to the attributes your application recognizes. You can also use this trigger to make additional authorization decisions. For example, if user is a member of multiple groups, you may choose to map only one of them.

  5. Amazon Cognito returns the JWT tokens to the front end.
  6. The Amplify client library stores the tokens and handles refreshes.
  7. The front end makes a call to a protected API in Amazon API Gateway.
  8. API Gateway uses an Amazon Cognito user pools authorizer to validate the JWT’s signature and expiration. If this is successful, API Gateway passes the JWT to the application’s Lambda function (also referred to as the backend).
  9. The backend application code reads the cognito:groups claim from the JWT and decides if the action is allowed. If the user is a member of the right group then the action is allowed, otherwise the action is denied.

We will go into more detail about these steps after describing a bit more about the implementation details.

For more information about JWT tokens and claims, see Introduction to JSON Web Tokens.

Prerequisites

The following are the prerequisites for the solution described in this post:

Cost estimate

For an account under the 12-month Free Tier period, there should be no cost associated with running this example. However, to avoid any unexpected costs you should terminate the example stack after it’s no longer needed. For more information, see AWS Free Tier and AWS Pricing.

Running the demo application

In this part, you will go over the steps to setup and run the demo application. All the example code in this solution can be found on the amazon-cognito-example-for-external-idp code repository on GitHub.

To deploy the application without an IdP integration

  1. Open a bash-compatible command-line terminal and navigate to a directory of your choice. For Windows users: install Git for Windows and open Git BASH from the start menu.
  2. To get the code from the GitHub repository, enter the following:
    git clone https://github.com/aws-samples/amazon-cognito-example-for-external-idp 
    cd amazon-cognito-example-for-external-idp
    

  3. The template env.sh.template contains configuration settings for the application that you will modify later when you configure the IdP. To copy env.sh.template to env.sh, enter the following:
    cp env.sh.template env.sh

    Figure 2: Cloning the example repository and copying the template configuration file

    Figure 2: Cloning the example repository and copying the template configuration file

  4. The install.sh script will install the AWS CDK toolkit with the dependencies and will configure and bootstrap your environment:
    ./install.sh
    

    Figure 3: Installing dependencies

    Figure 3: Installing dependencies

    You may get prompted to agree to sending Angular analytics. You will also get notified if there are package vulnerabilities. If this is the case run npm audit –fix –prod in all subdirectories to resolve them.

  5. Once the environment has been successfully bootstrapped you need to deploy the CloudFormation stack:
    ./deploy.sh 
    

    Figure 4: Deploying the CloudFormation stack

    Figure 4: Deploying the CloudFormation stack

  6. You will be prompted to accept the IAM changes. These changes will allow API gateway service to call the demo application lambda function (APIFunction), Amazon Cognito to invoke Pre-Token Generation lambda function, demo application lambda function to access DynamoDB user’s table (used to implement user’s global sign out), and more. You’ll need to review these changes according to your current security approval level and confirm them to continue.

    Under Do you wish to deploy these changes (y/n)?, type y and press Enter.

    Figure 5: Reviewing and confirming changes

    Figure 5: Reviewing and confirming changes

  7. A few moments after deploying the application’s CloudFormation stack, the terminal displays the IdP settings, which should look like the following:
     
    Figure 6: IdP settings

    Figure 6: IdP settings

    Make a note of these values; you will use them later to configure the IdP.

Configure the IdP

Every IdP is different, but there are some common steps you will need to follow. To configure the IdP, do the following:

  1. Provide the IdP with the values for the following two properties, which you made note of in the previous section:
    • Single sign on URL / Assertion Consumer Service URL / ACS URL:
      https://<domainPrefix>.auth.<region>.amazoncognito.com/saml2/idpresponse
      

    • Audience URI / SP Entity ID / Entity ID:
      urn:amazon:cognito:sp:<yourUserPoolID>
      

  2. Configure the field mapping for the SAML response in the IdP. Map the first name, last name, email, and groups (as a multivalue attribute) into SAML response attributes with the names firstName, lastName, email, and groups, respectively.

    Recommended: Filter the mapped groups to only those that are relevant to the application (for example, by a prefix filter). There is a 2,048-character limit on the custom attribute, so filtering avoids exceeding the character limit, and also avoids passing irrelevant information to the application.

  3. In the IdP, create two demo groups called pet-app-users and pet-app-admins, and create two demo users, for example, [email protected] and [email protected], and then assign one to each group, respectively.

See the following specific instructions for some popular IdPs, or see the documentation for your customer’s specific IdP:

Get the IdP SAML metadata URL or file

Get the metadata URL or file from the IdP: you will use this later to configure your Cognito user pool integration with the IdP. For more information, see Integrating Third-Party SAML Identity Providers with Amazon Cognito User Pools.

To update the application with the SAML metadata URL or file

The following will configure the SAML IdP in the Amazon Cognito User Pool using the IdP metadata above:

  1. Using your favorite text editor, open the env.sh file.
  2. Uncomment the line starting with # export IDENTITY_PROVIDER_NAME (remove the # sign).
  3. Uncomment the line starting with # export IDENTITY_PROVIDER_METADATA.
  4. If you have a metadata URL from the IdP, enter it following the = sign:
    export IDENTITY_PROVIDER_METADATA=REPLACE_WITH_URL
    

    Or, if you downloaded the metadata as a file, enter $(cat path/to/downloaded-metadata.xml):

    export IDENTITY_PROVIDER_METADATA=$(cat REPLACE_WITH_PATH)
    

    Figure 7: Editing the identity provider metadata in the env.sh configuration file

    Figure 7: Editing the identity provider metadata in the env.sh configuration file

To re-deploy the application

  1. Run ./diff.sh to see the changes to the CloudFormation stack (added metadata URL).
     
    Figure 8: Run ./diff.sh

    Figure 8: Run ./diff.sh

  2. Run ./deploy.sh to deploy the update.

To launch the UI

There is both an Angular version and a React version of the same UI, both have the same functionality. You can use either version depending on your preference.

  1. Start the front end application with your chosen version of the UI with one of the following:
    • React: cd ui-react && npm start
    • Angular: cd ui-angular && npm start
  2. To simulate a new session, in your web browser, open a new window in private browsing or incognito mode, then for the URL, enter http://localhost:3000. You should see a screen similar to the following:
     
    Figure 9: Private browsing sign-in screen

    Figure 9: Private browsing sign-in screen

  3. Choose Single Sign On to be taken to the IdP’s sign-in page, where you will sign in if needed. After you are authenticated by the IdP, you’ll be redirected back to the application.

    If you have multiple IdPs, or if you have both internal and external users that will authenticate directly with the user pool, you can choose the Sign In / Sign Up button instead. This redirects you to the Amazon Cognito hosted UI sign in page, rather than taking you directly to the IdP. For more information, see Using the Amazon Cognito Hosted UI for Sign-Up and Sign-In.

  4. Using a new private browsing session (to clear any state), sign in with the user associated with the group pet-app-users and create some sample entries. Then, sign out. Open another private browsing session, and sign in with the user associated with the pet-app-admins group. Notice that you can see the other user’s entries. Now, create a few entries as an admin, then sign out. Open another new private browsing session, sign in again as the pet-app-users user, and notice that you can’t see the entries created by the admin user.
     
    Figure 10: Example view for a user who is only a member of the pet-app-users group

    Figure 10: Example view for a user who is only a member of the pet-app-users group


    Figure 11: Example view for a user who is also a member of the pet-app-admins group

    Figure 11: Example view for a user who is also a member of the pet-app-admins group

Implementation

Next, review the details of what each part of the demo application does, so that you can modify it and use it as a starting point for your own application.

Infrastructure

Take a look at the code in the cdk.ts file—a sample CDK file that creates the infrastructure. You can find it in the amazon-cognito-example-for-external-idp/cdk/src directory in the cloned GitHub repo. The key resources it creates are the following:

  1. A Cognito user pool (new cognito.UserPool…). This is where the just-in-time provisioning created users who federate in from the IdP. It also creates a custom attribute named groups, which you can see as custom:groups in the console.
     
    Figure 12: Custom attribute named groups

    Figure 12: Custom attribute named groups

  2. IdP integration which provides the mapping between the attributes in the SAML assertion from the IdP and Amazon Cognito attributes. For more information, see Specifying Identity Provider Attribute Mappings for Your User Pool.
    (new cognito.CfnUserPoolIdentityProvider…).
  3. An authorizer (new apigateway.CfnAuthorizer…). The authorizer is linked to an API resource method (authorizer: {authorizerId: cfnAuthorizer.ref}).

    It ensures that the user must be authenticated and must have a valid JWT token to make API calls to this resource. It uses Lambda proxy integration to intercept requests.

  4. The PreTokenGeneration Lambda trigger, which is used for the mapping between a user’s Active Directory or LDAP groups (passed on the SAML response from the IdP) to user pool groups (const preTokenGeneration = new lambda.Function…). For the PreTokenGeneration Lambda trigger code used in this solution, see the index.ts file on GitHub.

The application

Backend

The example application in this solution uses a serverless backend, but you can modify it to use Amazon Elastic Compute Cloud (Amazon EC2), Amazon Elastic Container Service (Amazon ECS), Amazon Elastic Kubernetes Service (Amazon EKS), AWS Fargate, AWS Elastic Beanstalk, or even an on-premises server as the backend. To configure your API gateway to point to a server-based application, see Set up HTTP Integrations in API Gateway or Set up API Gateway Private Integrations.

Middleware

Take a look at the code in the express.js sample in the app.ts file on GitHub. You’ll notice some statements starting with app.use. These are interceptors that are invoked for all requests.

app.use(eventContext());

app.use(authorizationMiddleware({
  authorizationHeaderName: authorizationHeaderName,
  supportedGroups: [adminsGroupName, usersGroupName],
  forceSignOutHandler: forceSignOutHandler,
  allowedPaths: ["/"],
}));

Some explanation:

  1. eventContext: the example application in this solution uses AWS Serverless Express which allows you to run the Express framework for Node.js directly on AWS Lambda.
  2. authorizationMiddleware is a helper middleware that does the following:
    1. It enriches the express.js request object with several syntactic sugars such as req.groups and req.username (a shortcut to get the respective claims from the JWT token).
    2. It ensures that the currently logged in user is a member of at least one of the supportedGroups provided. If not, it will return a 403 response.

Endpoints

Still in the Express.js app.ts file on GitHub, take a closer look at one of the API’s endpoints (GET /pets).

app.get("/pets", async (req: Request, res: Response) => {

  if (req.groups.has(adminsGroupName)) {
    // if the user has the admin group, we return all pets
    res.json(await storageService.getAllPets());
  } else {
    // else, just owned pets (middleware ensure that the user has at least one group)
    res.json(await storageService.getAllPetsByOwner(req.username));
  }
});

With the groups claim information, your application can now make authorization decisions based on the user’s role (show all items if they are an admin, otherwise just items they own). Having this logic as part of the application also allows you to unit test your authorization logic, and run it locally, or offline, before deploying it.

Front end

The front end can be built in your framework of choice. You can start with the sample UIs provided for either React or Angular. In both, the AWS Amplify client library handles the integration with Amazon Cognito and API Gateway for you. For more information about AWS Amplify, see the Amplify Framework page on GitHub.

Note: You can use AWS Amplify to create the infrastructure in a wizard-like way, without writing CloudFormation. In our example, because we used the AWS CDK for the infrastructure, we needed a configuration file to point Amplify to the created infrastructure.

The following are some notable files, and explanations of what they do:

  • generateConfig.ts reads the CloudFormation stack output parameters, and creates a file named autoGenConfig.js, which looks like the following:
    // this file is auto generated, do not edit it directly
    export default {
      cognitoDomain: "youruniquecognitodomain.auth.region.amazoncognito.com",
      region: "region",
      cognitoUserPoolId: "youruserpoolid",
      cognitoUserPoolAppClientId: "yourusepoolclientid",
      apiUrl: "https://yourapigwapiid.execute-api.region.amazonaws.com/prod/",
    };
    

    The file generateConfig.ts is triggered after calling ./deploy.sh, or ./config-ui.sh.

  • APIService.ts: calls the backend API, passing the user’s token. For example, calling the GET/pets API:
    public async getAllPets(): Promise<Pet[]> {
      const authorizationHeader = await this.getAuthorizationHeader();
      return await this.api.get(REST_API_NAME, '/pets', {headers: authorizationHeader});
    }
    

Step-by-step example

Now that you have an understanding of the solution, we will take you through a step-by-step example. You can see how everything works together in sequence, and how the tokens are passing between Cognito, your demo application, and the API gateway.

  1. Create a new browser session by starting a private/incognito session.
  2. Launch the UI by using the Angular example from the To launch the UI section:
    cd ui-angular && npm start
    

  3. Open the developer tools in your browser. In most browsers, you can do this by pressing F12 (in Chrome and FireFox in Windows), or Option+Command+i (Chrome, Firefox, or Safari on a Mac).
  4. In the developer tools panel, navigate to the Network tab, and ensure that it is in recording mode and logs are persisting. For more details for various browsers, see How to View a SAML Response in Your Browser for Troubleshooting.
  5. When the page loads, the following happens behind the scenes in the front end (example code available for either Angular or React):
    1. Using Amplify.js, AWS Amplify checks if the user is currently logged in
      let cognitoUser = await Auth.currentAuthenticatedUser();
      

      Because this is a new browsing session, the user is not logged in, and the Sign In / Sign Up and Single Sign On buttons will appear.

    2. Choose Single Sign On, and AWS Amplify will redirect the browser to the IdP.
      Auth.federatedSignIn(idpName)
      

  6. In the IdP sign-in page, sign in as one of the users created earlier (e.g. [email protected] or [email protected]).
  7. In the Network tab of your browser’s developer tools panel, locate the request to Amazon Cognito’s /saml2/idresponse endpoint.
  8. The following is an example using Chrome, but you can do it similarly using other browsers. In the Form Data section, you can see the SAMLResponse field that was sent back from the IdP after you authenticated.
     
    Figure 13: Inspecting the SAML response

    Figure 13: Inspecting the SAML response

  9. Copy the SAMLResponse value (drag to select the area marked in green above, and make sure you don’t include the RelayState field).
  10. At the command line, use the following example to decode the SAMLResponse value. Be sure to replace SAMLResponse by pasting the text copied in the previous step:
    echo "SAMLResponse" | base64 --decode > saml_response.xml 
    

  11. Open the saml_response.xml file, and look at the part that starts with <saml2:Attribute Name="groups". This is the attribute that contains the groups that your user belongs to, according to the IdP. For more ways to inspect and troubleshoot the SAML response, see How to View a SAML Response in Your Browser for Troubleshooting.
  12. Amazon Cognito applies the mapping defined in the CloudFormation stack to these attributes. For example, the IdP SAML response attribute named groups is mapped to the user pool custom attribute named custom:groups.
    • In order to modify the mapping, edit your local copy of the cdk.ts file.
    • In order to view the mapped attribute for a user, do the following:
      1. Sign into the AWS Management Console using the same account you used for the demo setup.
      2. Select Manage User Pools.
      3. Select the pool you created for this demo and choose Users and groups.
      4. Search for the user account you just signed in with, and choose its username.

        As you can see in the following example, the custom:groups claim is set automatically. (the custom: prefix is added to all custom attributes automatically):

    Figure 14: Mapped user attributes

    Figure 14: Mapped user attributes

  13. The PreTokenGeneration Lambda function then reads the mapped custom:groups attribute value, parses it, and converts it to an array; and then stores it in the cognito:groups claim. In order to customize the mapping, edit the Lambda function’s code in your local copy of the index.ts file and run ./deploy.sh to redeploy your application.
  14. Now that the front end has the JWT token, when the page loads, it will request to load all the items (a call to a protected API, passing the token in the form of an authorization header).
  15. Look at the Network tab again, under the GET request that starts with pets.

    Under Request Headers, look at the authorization header. The long value you see is the encoded token passed as part of the request. The following is an example of how the decoded JWT will look:

    {
      "cognito:groups": [
        "pet-app-users",
        "pet-app-admins"
      ], // <- this is what the PreTokenGeneration lambda added
      
      "cognito:username": "IdP_Alice",
      "custom:groups": "[pet-app-users, pet-app-admins]", //what we got via SAML
      "email": "[email protected]"
      …
    
    }
    

  16. Optionally, if you’d like to modify or add new requests to a new API paths, edit your local copy of the APIService.ts file by using one of the following examples.
    • Sending the request with the authorization header:
      public async getAllPets(): Promise<Pet[]> {
        const authorizationHeader = await this.getAuthorizationHeader();
        return await this.api.get(REST_API_NAME, '/pets', 
          {headers: authorizationHeader});
      }
      

    • The authorization header is obtained using this helper function:
      private async getAuthorizationHeader() {
        const session = await this.auth.currentSession();
        const idToken = session.getIdToken().getJwtToken();
        return {Authorization: idToken}
      }
      

  17. After the previous request is sent to Amazon API Gateway, the Amazon Cognito user pool authorizer validated the JWT token based on the token signature, to ensure that it was not tampered with, and that it was still valid. You can see the way the authorizer is setup in the cdk.ts file on GitHub.
  18. Based on which user you signed-in with previously, you’ll either see all items, or only items you own. How does it work? As mentioned earlier, the backend application code reads the groups claim from the validated token and decides if the action is allowed. If the user is a member of a specific group or has a specific attribute, allow; else, deny. The relevant code that makes that decision can be seen in the Express.js example app file in the app.ts file on GitHub.

Customizing the application

The following are some important issues to consider when customizing the app to your needs:

  • If you modify the app client, do not add the aws.cognito.signin.user.admin scope to it. The aws.cognito.signin.user.admin scope grants access to Amazon Cognito User Pool API operations that require access tokens, such as UpdateUserAttributes and VerifyUserAttribute. The demo application makes authorization decisions based on the custom:group attribute populated from the IdP. Because the IdP is the single source of truth for its users, they should not be able to modify any attribute, particularly the custom:groups attribute.
  • We recommend that you do not change the mapped attribute after the stack is deployed. The reason is that the attribute gets persisted in the user profile after it is mapped. For example, if you first map groups to custom:groups, and a user signs in, then later you change the mapping of groups to custom:groups2, the next time the user signs in, their profile will have both attributes: custom:groups (with the last value it was mapped to it) as well as custom:groups2 (with the current value). To avoid having to clear old mapped attributes, we recommend not changing the mapping after it is created.
  • This solution utilizes Amazon Cognito’s OAuth 2.0 flows to provide federated sign-in from an external IdP (and optionally also sign-in directly with the user pool via the hosted UI in case you would like to support both use cases). It is not applicable for non OAuth 2.0 flows (e.g. the custom UI), for example, using InititateAuth/SRP.

Conclusion

You can integrate your application with your customer’s IdP of choice for authentication and authorization for your application, without integrating with LDAP, or Active Directory directly. Instead, you can map read-only, need-to-know information from the IdP to the application. By using Amazon Cognito, you can normalize the structure of the JWT token, so that you can add multiple IdPs, social login providers, and even regular username and password-based users (stored in user pools). And you can do all this without changing any application code. Amazon API Gateway’s native integration with Amazon Cognito user pools authorizer streamlines your validation of the JWT integrity, and after it has been validated, you can use it to make authorization decisions in your application’s backend. Using this example, you can focus on what differentiates your application, and let AWS do the undifferentiated heavy lifting of identity management for your customer-facing applications.

For all the code examples described in this post, see the amazon-cognito-example-for-external-idp code repository on GitHub.

If you have feedback about this post, submit comments in the Comments section below. If you have questions about this post, start a new thread on the Amazon Cognito forum or contact AWS Support.

Want more AWS Security how-to content, news, and feature announcements? Follow us on Twitter.

Author

Eran Medan

Eran is a Software Development Manager based in Atlanta and leads the AWS Jam team, which uses Amazon Cognito and other services mentioned in this post to run their service. Other than jamming on AWS, Eran likes to jam on his guitar or fly airplanes in virtual reality.
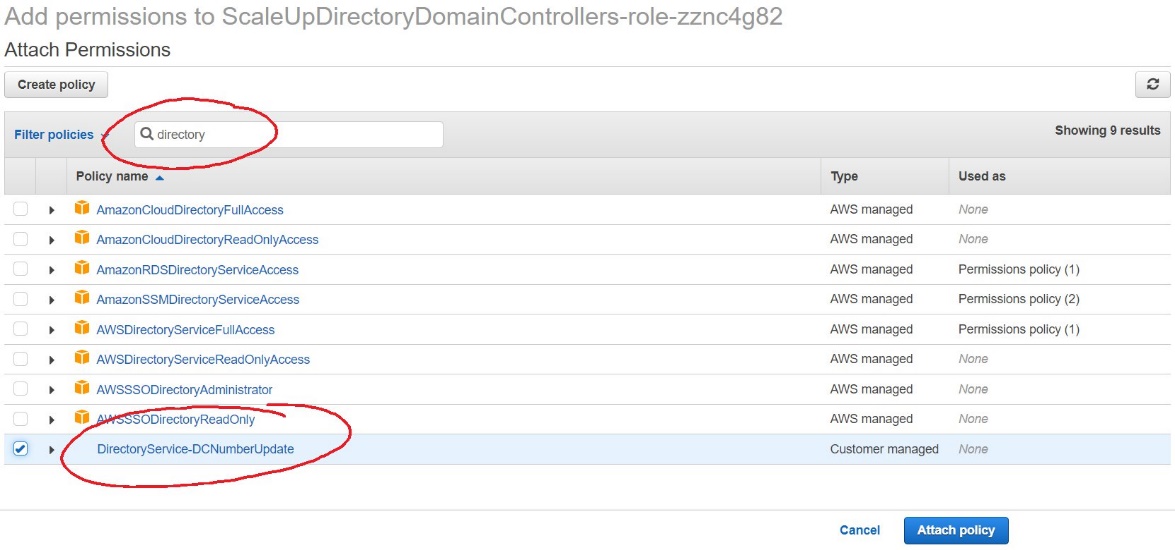
Yuri Duchovny

Yuri is a New York-based Solutions Architect specializing in cloud security, identity, and compliance. He supports cloud transformations at large enterprises, helping them make optimal technology and organizational decisions. Prior to his AWS role, Yuri’s areas of focus included application and networking security, DoS, and fraud protection. Outside of work, he enjoys skiing, sailing, and traveling the world.