Tag Archives: SAML

How to monitor the expiration of SAML identity provider certificates in an Amazon Cognito user pool

Post Syndicated from Karthik Nagarajan original https://aws.amazon.com/blogs/security/how-to-monitor-the-expiration-of-saml-identity-provider-certificates-in-an-amazon-cognito-user-pool/

With Amazon Cognito user pools, you can configure third-party SAML identity providers (IdPs) so that users can log in by using the IdP credentials. The Amazon Cognito user pool manages the federation and handling of tokens returned by a configured SAML IdP. It uses the public certificate of the SAML IdP to verify the signature in the SAML assertion returned by the IdP. Public certificates have an expiry date, and an expired public certificate will result in a SAML user federation failing because it can no longer be used for signature verification. To avoid user authentication failures, you must monitor and rotate SAML public certificates before expiration.

You can configure SAML IdPs in an Amazon Cognito user pool by using a SAML metadata document or a URL that points to the metadata document. If you use the SAML metadata document option, you must manually upload the SAML metadata. If you use the URL option, Amazon Cognito downloads the metadata from the URL and automatically configures the SAML IdP. In either scenario, if you don’t rotate the SAML certificate before expiration, users can’t log in using that SAML IdP.

In this blog post, I will show you how to monitor SAML certificates that are about to expire or already expired in an Amazon Cognito user pool by using an AWS Lambda function initiated by an Amazon EventBridge rule.

Solution overview

In this section, you will learn how to configure a Lambda function that checks the validity period of the SAML IdP certificates in an Amazon Cognito user pool, logs the findings to AWS Security Hub, and sends out an Amazon Simple Notification Service (Amazon SNS) notification with the list of certificates that are about to expire or have already expired. This Lambda function is invoked by an EventBridge rule that uses a rate or cron expression and runs on a defined schedule. For example, if the rate expression is defined as 1 day, the EventBridge rule initiates the Lambda function once each day. Figure 1 shows an overview of this process.
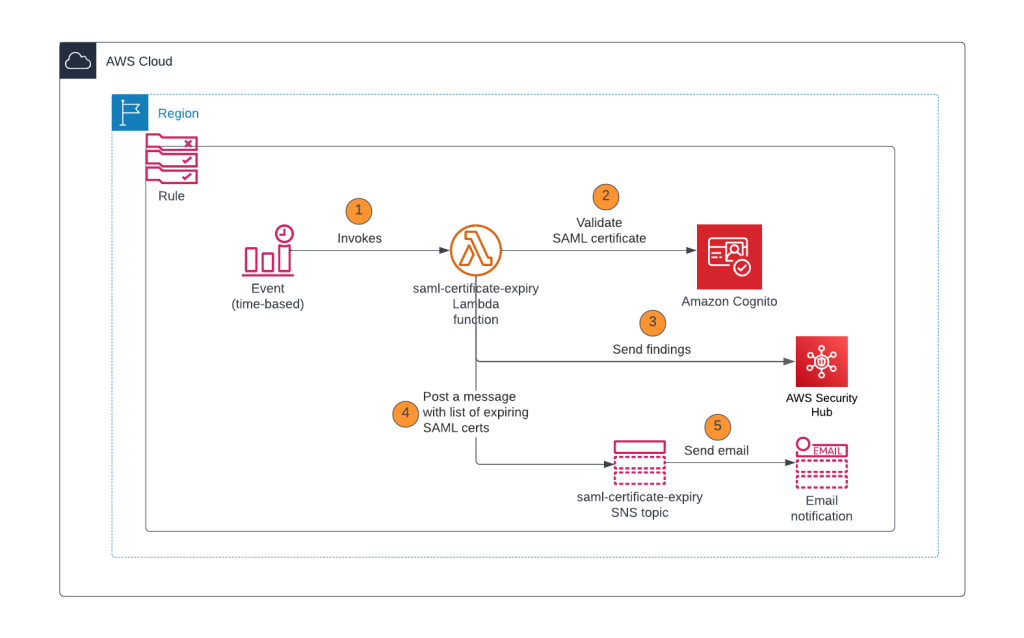
Figure 1: Lambda function initiated by EventBridge rule

Figure 1: Lambda function initiated by EventBridge rule

As shown in Figure 1, this process involves the following steps:

  1. EventBridge runs a rule using a rate expression or cron expression and invokes the Lambda function.
  2. The Lambda function performs the following tasks:
    1. Gets the list of SAML IdPs and corresponding X509 certificates.
    2. Verifies if the X509 certificates are about to expire or already expired based on the dates in the certificate.
  3. Based on the results of step 2, the Lambda function logs the findings in AWS Security Hub. Each finding shows the SAML certificate that is about to expire or is already expired.
  4. Based on the results of step 2, the Lambda function publishes a notification to the Amazon SNS topic with the certificate expiration details. For example, if CERT_EXPIRY_DAYS=60, the details of SAML certificates that are going to expire within 60 days or are already expired are published in the SNS notification.
  5. Amazon SNS sends messages to the subscribers of the topic, such as an email address.

Prerequisites

For this setup, you will need to have the following in place:

Implementation details

In this section, we will walk you through how to deploy the Lambda function and configure an EventBridge rule that invokes the Lambda function.

Step 1: Create the Node.js Lambda package

  1. Open a command line terminal or shell.
  2. Create a folder named saml-certificate-expiration-monitoring.
  3. Install the fast-xml-parser module by running the following command:
    cd saml-certificate-expiration-monitoring
    npm install fast-xml-parser
  4. Create a file named index.js and paste the following content in the file.
    const AWS = require('aws-sdk');
    const { X509Certificate } = require('crypto');
    const { XMLParser} = require("fast-xml-parser");
    const https = require('https');
    
    exports.handler = async function(event, context, callback) {
      
        const cognitoUPID = process.env.COGNITO_UPID;
        const expiryDays = process.env.CERT_EXPIRY_DAYS;
        const snsTopic = process.env.SNS_TOPIC_ARN;
        const postToSh = process.env.ENABLE_SH_MONITORING; //Enable security hub monitoring
        var securityhub = new AWS.SecurityHub({apiVersion: '2018-10-26'});
        
        var shParams = {
          Findings: []
        };
    
        AWS.config.apiVersions = {
          cognitoidentityserviceprovider: '2016-04-18',
        };
    
        // Initialize CognitoIdentityServiceProvider.
        const cognitoidentityserviceprovider = new AWS.CognitoIdentityServiceProvider();
    
        let listProvidersParams = {
          UserPoolId: cognitoUPID /* required */
        };
        
        let hasNext = true;
        const providerNames = [];
        
        while (hasNext) {
          const listProvidersResp = await cognitoidentityserviceprovider.listIdentityProviders(listProvidersParams).promise();
          listProvidersResp['Providers'].forEach(function(provider) {
                if(provider.ProviderType == 'SAML') {
                  providerNames.push(provider.ProviderName);
                }
            });
          
          listProvidersParams.NextToken = listProvidersResp.NextToken;
          hasNext = !!listProvidersResp.NextToken; //Keep iterating if there are more pages
        }
     
        let describeIdentityProviderParams = {
          UserPoolId: cognitoUPID /* required */
        };
        
        //Initialize the options for fast-xml-parser  
        //Parse KeyDescriptor as an array
        const alwaysArray = [
          "EntityDescriptor.IDPSSODescriptor.KeyDescriptor"
        ];
        const options = {
          removeNSPrefix: true,
          isArray: (name, jpath, isLeafNode, isAttribute) => { 
            if( alwaysArray.indexOf(jpath) !== -1) return true;
          },
          ignoreDeclaration: true
        };
        const parser = new XMLParser(options);
        
        let certExpMessage = '';
        const today = new Date();
        
        if(providerNames.length == 0) {
          console.log("There are no SAML providers in this Cognito user pool. ID : " + cognitoUPID);
        }
        
        for (let provider of providerNames) {
          describeIdentityProviderParams.ProviderName = provider;
          const descProviderResp = await cognitoidentityserviceprovider.describeIdentityProvider(describeIdentityProviderParams).promise();
          let xml = '';
          //Read SAML metadata from Cognito if the file is available. Else, read the SAML metadata from URL
          if('MetadataFile' in descProviderResp.IdentityProvider.ProviderDetails) {
            xml = descProviderResp.IdentityProvider.ProviderDetails.MetadataFile;
          } else {
            let metadata_promise = getMetadata(descProviderResp.IdentityProvider.ProviderDetails.MetadataURL);
    		    xml = await metadata_promise;
          }
          let jObj = parser.parse(xml);
          if('EntityDescriptor' in jObj) {
            //SAML metadata can have multiple certificates for signature verification. 
            for (let cert of jObj['EntityDescriptor']['IDPSSODescriptor']['KeyDescriptor']) {
              let certificate = '-----BEGIN CERTIFICATE-----\n' 
              + cert['KeyInfo']['X509Data']['X509Certificate'] 
              + '\n-----END CERTIFICATE-----';
              let x509cert = new X509Certificate(certificate);
              console.log("------ Provider : " + provider + "-------");
              console.log("Cert Expiry: " + x509cert.validTo);
              const diffTime = Math.abs(new Date(x509cert.validTo) - today);
              const diffDays = Math.ceil(diffTime / (1000 * 60 * 60 * 24));
              console.log("Days Remaining: " + diffDays);
              if(diffDays <= expiryDays) {
                
                certExpMessage += 'Provider name: ' + provider + ' SAML certificate (serialnumber : '+ x509cert.serialNumber + ') expiring in ' + diffDays + ' days \n';
                
                if(postToSh === 'true') {
                  //Log finding for security hub
                  logFindingToSh(context, shParams,
                  'Provider name: ' + provider + ' SAML certificate is expiring in ' + diffDays + ' days. Please contact the Identity provider to rotate the certificate.',
                  x509cert.fingerprint, cognitoUPID, provider); 
                }
              }
            }
          }
        }
        //Send a SNS message if a certificate is about to expire or already expired
        if(certExpMessage) {
          console.log("SAML certificates expiring within next " + expiryDays + " days :\n");
          console.log(certExpMessage);
          certExpMessage = "SAML certificates expiring within next " + expiryDays + " days :\n" + certExpMessage;
          // Create publish parameters
          let snsParams = {
            Message: certExpMessage, /* required */
            TopicArn: snsTopic
          };
          // Create promise and SNS service object
          let publishTextPromise = await new AWS.SNS({apiVersion: '2010-03-31'}).publish(snsParams).promise();
          console.log(publishTextPromise);
          
          if(postToSh === 'true') {
            console.log("Posting the finding to SecurityHub");
            let shPromise = await securityhub.batchImportFindings(shParams).promise();
            console.log("shPromise : " + JSON.stringify(shPromise));
          }
          
        } else {
          console.log("No certificates are expiring within " + expiryDays + " days");
        }
    };
    
    function getMetadata(url) {
    	return new Promise((resolve, reject) => {
    		https.get(url, (response) => {
    			let chunks_of_data = [];
    
    			response.on('data', (fragments) => {
    				chunks_of_data.push(fragments);
    			});
    
    			response.on('end', () => {
    				let response_body = Buffer.concat(chunks_of_data);
    				resolve(response_body.toString());
    			});
    
    			response.on('error', (error) => {
    				reject(error);
    			});
    		});
    	});
    }
    
    function logFindingToSh(context, shParams, remediationMsg, certFp, cognitoUPID, provider) {
      const accountID = context.invokedFunctionArn.split(':')[4];
      const region = process.env.AWS_REGION;
      const sh_product_arn = `arn:aws:securityhub:${region}:${accountID}:product/${accountID}/default`;
      const today = new Date().toISOString();
      
      shParams.Findings.push(
            {
          SchemaVersion: "2018-10-08",
          AwsAccountId: `${accountID}`, /* required */
          CreatedAt: `${today}`, /* required */
          UpdatedAt: `${today}`,
          Title: 'SAML Certificate expiration',
          Description: 'SAML certificate expiry', /* required */
          GeneratorId: `${context.invokedFunctionArn}`, /* required */
          Id: `${cognitoUPID}:${provider}:${certFp}`, /* required */
          ProductArn: `${sh_product_arn}`, /* required */
          Severity: {
              Original: '89.0',
              Label: 'HIGH'
          },
          Types: [
                    "Software and Configuration Checks/AWS Config Analysis"
          ],
          Compliance: {Status: 'WARNING'},
          Resources: [ /* required */
            {
              Id: `${cognitoUPID}`, /* required */
              Type: 'AWSCognitoUserPool', /* required */
              Region: `${region}`,
              Details : {
                Other: { 
                           "IdPIdentifier" : `${provider}` 
                }
              }
            }
          ],
          Remediation: {
                    Recommendation: {
                        Text: `${remediationMsg}`,
                        Url: `https://console.aws.amazon.com/cognito/v2/idp/user-pools/${cognitoUPID}/sign-in/identity-providers/details/${provider}`
                    }
          }
        }
      );
    }
  5. To create the deployment package for a .zip file archive, you can use a built-in .zip file archive utility or other third-party zip file utility. If you are using Linux or Mac OS, run the following command.
    zip -r saml-certificate-expiration-monitoring.zip .

Step 2: Create an Amazon SNS topic

  1. Create a standard Amazon SNS topic named saml-certificate-expiration-monitoring-topic for the Lambda function to use to send out notifications, as described in Creating an Amazon SNS topic.
  2. Copy the Amazon Resource Name (ARN) for Amazon SNS. Later in this post, you will use this ARN in the AWS Identity and Access Management (IAM) policy and Lambda environment variable configuration.
  3. After you create the Amazon SNS topic, create email subscribers to this topic.

Step 3: Configure the IAM role and policies and deploy the Lambda function

  1. In the IAM documentation, review the section Creating policies on the JSON tab. Then, using those instructions, use the following template to create an IAM policy named lambda-saml-certificate-expiration-monitoring-function-policy for the Lambda role to use. Replace <REGION> with your Region, <AWS-ACCT-NUMBER> with your AWS account ID, <SNS-ARN> with the Amazon SNS ARN from Step 2: Create an Amazon SNS topic, and <USER_POOL_ID> with your Amazon Cognito user pool ID that you want to monitor.
    {
        "Version": "2012-10-17",
        "Statement": [
            {
                "Sid": "AllowLambdaToCreateGroup",
                "Effect": "Allow",
                "Action": "logs:CreateLogGroup",
                "Resource": "arn:aws:logs:<REGION>:<AWS-ACCT-NUMBER>:*"
            },
            {
                "Sid": "AllowLambdaToPutLogs",
                "Effect": "Allow",
                "Action": [
                    "logs:CreateLogStream",
                    "logs:PutLogEvents"
                ],
                "Resource": [
                    "arn:aws:logs:<REGION>:<AWS-ACCT-NUMBER>:log-group:/aws/lambda/saml-certificate-expiration-monitoring:*"
                ]
            },
            {
                "Sid": "AllowLambdaToGetCognitoIDPDetails",
                "Effect": "Allow",
                "Action": [
                    "cognito-idp:DescribeIdentityProvider",
                    "cognito-idp:ListIdentityProviders",
                    "cognito-idp:GetIdentityProviderByIdentifier"
                ],
                "Resource": "arn:aws:cognito-idp:<REGION>:<AWS-ACCT-NUMBER>:userpool/<USER_POOL_ID>"
            },
            {
                "Sid": "AllowLambdaToPublishToSNS",
                "Effect": "Allow",
                "Action": "SNS:Publish",
                "Resource": "<SNS-ARN>"
            } ,
            {
                "Sid": "AllowLambdaToPublishToSecurityHub",
                "Effect": "Allow",
                "Action": [
                    "SecurityHub:BatchImportFindings"
                ],
                "Resource": "arn:aws:securityhub:<REGION>:<AWS-ACCT-NUMBER>:product/<AWS-ACCT-NUMBER>/default"
            }
        ]
    }

  2. After the policy is created, create a role for the Lambda function to use the policy, by following the instructions in Creating a role to delegate permissions to an AWS service. Choose Lambda as the service to assume the role and attach the policy lambda-saml-certificate-expiration-monitoring-function-policy that you created in step 1 of this section. Specify a role named lambda-saml-certificate-expiration-monitoring-function-role, and then create the role.
  3. Review the topic Create a Lambda function with the console within the Lambda documentation. Then create the Lambda function, choosing the following options:
    1. Under Create function, choose Author from scratch to create the function.
    2. For the function name, enter saml-certificate-expiration-monitoring, and for Runtime, choose Node.js 16.x.
    3. For Execution role, expand Change default execution role, select Use an existing role, and select the role created in step 2 of this section.
    4. Choose Create function to open the Designer, and upload the zip file that was created in Step 1: Create the Node.js Lambda package.
    5. You should see the index.js code in the Lambda console.
  4. After the Lambda function is created, you will need to adjust the timeout duration. Set the Lambda timeout to 10 seconds. For more information, see the timeout entry in Configuring functions in the console. If you receive a timeout error, see How do I troubleshoot Lambda function invocation timeout errors?
  5. If you make code changes after uploading, deploy the Lambda function.

Step 4: Create an EventBridge rule

  1. Follow the instructions in creating an Amazon EventBridge rule that runs on a schedule to create a rule named saml-certificate-expiration-monitoring-rule. You can use a rate expression of 24 hours to initiate the event. This rule will invoke the Lambda function once per day.
  2. For Select a target, choose AWS Lambda service.
  3. For Lambda function, select the saml-certificate-expiration-monitoring function that you deployed in Step 3: Configure the IAM role and policies and deploy the Lambda function.

Step 5: Test the Lambda function

  1. Open the Lambda console, select the function that you created earlier, and configure the following environment variables:
    1. Create an environment variable called CERT_EXPIRY_DAYS. This specifies how much lead time, in days, you want to have before the certificate expiration notification is sent.
    2. Create an environment variable called COGNITO_UPID. This identifies the Amazon Cognito user pool ID that needs to be monitored.
    3. Create an environment variable called SNS_TOPIC_ARN and set it to the Amazon SNS topic ARN from Step 2: Create an Amazon SNS topic.
    4. Create an environment variable called ENABLE_SH_MONITORING and set it to true or false. If you set it to true, the Lambda function will log the findings in AWS Security Hub.
  2. Configure a test event for the Lambda function by using the default template and name it TC1, as shown in Figure 2.
    Figure 2: Create a Lambda test case

    Figure 2: Create a Lambda test case

  3. Run the TC1 test case to test the Lambda function. To make sure that the Lambda function ran successfully, check the Amazon CloudWatch logs. You should see the console log messages from the Lambda function. If ENABLE_SH_MONITORING is set to true in the Lambda environment variables, you will see a list of findings in AWS Security Hub for certificates with an expiry of less than or equal to the value of the CERT_EXPIRY_DAYS environment variable. Also, an email will be sent to each subscriber of the Amazon SNS topic.

Cleanup

To avoid future charges, delete the following resources used in this post (if you don’t need them) and disable AWS Security Hub.

  • Lambda function
  • EventBridge rule
  • CloudWatch logs associated with the Lambda function
  • Amazon SNS topic
  • IAM role and policy that you created for the Lambda function

Conclusion

An Amazon Cognito user pool with hundreds of SAML IdPs can be challenging to monitor. If a SAML IdP certificate expires, users can’t log in using that SAML IdP. This post provides the steps to monitor your SAML IdP certificates and send an alert to Amazon Cognito user pool administrators when a certificate is about to expire so that you can proactively work with your SAML IdP administrator to rotate the certificate. Now that you’ve learned the benefits of monitoring your IdP certificates for expiration, I recommend that you implement these, or similar, controls to make sure that you’re notified of these events before they occur.

If you have feedback about this post, submit comments in the Comments section below. If you have questions about this post, start a new thread on the Amazon Cognito re:Post or contact AWS Support.

Want more AWS Security news? Follow us on Twitter.

Karthik Nagarajan

Karthik Nagarajan

Karthik is Security Engineer with AWS Identity Security Team. He helps the Amazon Cognito team to build a secure product for the customers.

Just-in-Time user provisioning explained

Post Syndicated from Evgeny Yurchenko original https://blog.zabbix.com/just-in-time-user-provisioning-explained/25515/

Zabbix 6.4 finally brings a very much waited feature called “Just-In-Time user provisioning”. Zabbix “What’s new in 6.4” LDAP/SAML user provisioning paragraph is very brief and can not (not that I am saying it should) deliver any excitement about this new really game changing feature. This blog post was born to address two points:

  • explain in more details why it is “game changing” feature
  • configuration of this feature is very flexible and as it often happens flexibility brings complexity and sometimes confusion about how to actually not only get it working but also to get the most of this feature

NOTE: I am talking about LDAP in this blog post but SAML works exactly the same way so you can easily apply this article to SAML JIT user provisioning configuration.

Old times (before 6.4)

Let’s do a quick reminder how it worked before Zabbix 6.4:Obvious problem here is that a User must be pre-created in Zabbix to be able to log in using LDAP. The database user records do not have any fields noticing that the user will be authenticated via LDAP, it’s just users’ passwords stored in the database are ignored, instead, Zabbix goes to an LDAP server to verify whether:

  • a user with a given username exists
  • user provided the correct password

no other attributes configured for the user on the LDAP server side are taken into account.

So when Zabbix is used by many users and groups, user management becomes not a very trivial task as new people join different teams (or leave).

Zabbix 6.4 with JIT user provisioning enabled

Now let’s take a look at what is happening in Zabbix 6.4 (very simplified picture). The picture depicts what happens when memberOf method is selected for Group Configuration (more on that later):Now when Zabbix gets a username and password from the Login form it goes to the LDAP server and gets all the information available for this user including his/her LDAP groups membership and e-mail address. Obviously, it gets all that only if the correct (from LDAP server perspective) username and password were provided. Then Zabbix goes through pre-configured mapping that defines users from which LDAP group goes to which Zabbix user group. If at least one match is found then a user is created in the Zabbix database belonging to a Zabbix user group and having a Zabbix user role according to configured “match”. So far sounds pretty simple, right? Now let’s go into detail about how all this should be configured.

LDAP server data

To experiment with the feature I built a Docker container which is a fully functional LDAP server with some pre-configured data, you can easily spin it up using this image. Start the container this way:

docker run -p 3389:389 -p 6636:636 --name openldap-server --detach bgmot42/openldap-server:0.1.1

To visually see LDAP server data (and add your own configuration like users and groups) you can start this standard container

docker run -p 8081:80 -p 4443:443 --name phpldapadmin --hostname phpldapadmin --link openldap-server:ldap-host --env PHPLDAPADMIN_LDAP_HOSTS=ldap-host --detach osixia/phpldapadmin:0.9.0

Now you can access this LDAP server via https://<ip_address>:4443 (or any other port you configure to access this Docker container), click Login, enter “cn=admin,dc=example,dc=org” in Login DN field and “password” in Password field, click Authenticate. You should see the following structure of the LDAP server (picture shows ‘zabbix-admins’ group configuration):All users in this container for convenience are configured with “password” word as their passwords.

General LDAP authentication configuration in Zabbix

No surprises here, you need to enable LDAP authentication, just a couple of additions here:

  • You must provide Deprovisioned users group. This group must be literally “disabled” otherwise you won’t be able to select it here. This is the Zabbix user group where all “de-provisioned” users will be put into so effectively will get disabled from accessing Zabbix.
  • Enable JIT provisioing check-box which obviously needs to be checked for this feature to work.

And again already familiar interface to configure a LDAP server and search parameters, however, this picture depicts how we actually fill in these parameters according to data in our LDAP server:

“Special” Distinguished Name (DN) cn=ldap_search,dc=example,dc=org is used for searching, i.e. Zabbix uses this DN to connect to LDAP server and of course when you connect to LDAP server you need to be authenticated – this is why you need to provide Bind password. This DN should have access to a sub-tree in LDAP data hierarchy where all your users are configured. In our case all the users configured “under” ou-Users,dc=example,dc=org, this DN is called base DN and used by Zabbix as so to say “starting point” to start searching.
Note: technically it is possible to bind to LDAP server anonymously, without providing a password but this is a huge breach in security as the whole users sub-tree becomes available for anonymous (unauthenticated) search, i.e. effectively exposed to any LDAP client that can connect to LDAP server over TCP. The LDAP server we deployed previously in Docker container does not provide this functionality.

Group configuration method “memberOf”

All users in our LDAP server have memberOf attribute which defines what LDAP groups every user belongs to, e.g. if you perform a LDAP query for user1 user you’ll get that its memberOf attribute has this value:
memberOf: cn=zabbix-admins,ou=Group,dc=example,dc=org
Note, that your real LDAP server can have totally different LDAP attribute that provides users’ group membership, and of course, you can easily configure what attribute to use when searching for user’s LDAP groups by putting it into User group membership attribute field:

In the picture above we are telling Zabbix to use memberOf attribute to extract DN defining user’s group membership (in this case it is cn=zabbix-admins,out=Group,dc=example,dc=org) and take only cn attribute from that DN (in this case it is zabbix-admins) to use in searching for a match in User group mapping rules. Then we define as many mapping rules as we want. In the picture above we have two rules:

  • All users belonging to zabbix-users LDAP group will be created in Zabbix as members of Zabbix users group with User role
  • All users belonging to zabbix-admins LDAP group will be created in Zabbix as members of Zabbix administrators group with Super admin role

Group configuration method “groupOfNames”

There is another method of finding users’ group membership called “groupOfNames” it is not as efficient as “memberOf” method but can provide much more flexibility if needed. Here Zabbix is not querying LDAP server for a user instead it is searching for LDAP groups based on a given criterion (filter). It’s easier to explain with pictures depicting an example:

Firstly we define LDAP “sub-tree” where Zabbix will be searching for LDAP groups – note ou=Group,dc=example,dc=org in Group base DN field. Then in the field Group name attribute field we what attribute to use when we search in mapping rules (in this case we take cn, i.e. only zabbix-admins from full DN cn=zabbix-admins,ou=Group,dc=example,dc=org). Each LDAP group in our LDAP server has member attribute that has all users that belong to this LDAP group (look at the right picture) so we put member in Group member attribute field. Each user’s DN will help us construct Group filter field. Now pay attention: Reference attribute field defines what LDAP user’s attribute Zabbix will use in the Group filter, i.e. %{ref} will be replaced with the value of this attribute (here we are talking about the user’s attributes – we already authenticated this user, i.e. got all its attributes from LDAP server). To sum up what I’ve said above Zabbix

  1. Authenticate the user with entered Username and Password against LDAP server getting all user’s LDAP attributes
  2. Uses Reference attribute and Group filter fields to construct a filter (when user1 logs in the filter will be (member=uid=user1,ou=Users,dc=example,dc=org)
  3. Performs LDAP query to get all LDAP groups with member attribute (configured in Group member attribute field) containing constructed in step 2 filter
  4. Goes through all LDAP groups received in step 3 and picks cn attribute (configured in Group name attribute field) and finds a match in User group mapping rules

Looks a bit complicated but all you really need to know is the structure of your LDAP data.

Demo time

Finally let’s see what happens when user1 belonging to zabbix-admins LDAP group and user3 belonging to zabbix-users LDAP group log in:

That’s it. Happy JIT user provisioning!

Zabbix 6.4 is out now!

Post Syndicated from Arturs Lontons original https://blog.zabbix.com/zabbix-6-4-is-out-now/25444/

Zabbix team is pleased to announce the release of the latest Zabbix major version – Zabbix 6.4. The release delivers many long-awaited improvements, such as Just-in-time LDAP and SAML user provisioning; support of older Zabbix proxy versions for simplified proxy management and zerodowntime Zabbix upgrades; near-instant configuration sync across Zabbix agents and proxies, and much more! 

New features and improvements

Just-in-time (JIT) user provisioning 

Zabbix 6.4 adds support of JIT user provisioning for LDAP and SAML authentication.

JIT user provisioning can be enabled in LDAP/SAML authentication settings

Zabbix administrators can now configure user provisioning by selecting the LDAP group pattern for matching and automatically assign User groups and User roles to the discovered users. Media types can also be mapped based on LDAP/SAML attributes.

A media can be assigned to the provisioned users based on their LDAP/SAML attributes
A group and role is assigned to the provisioned users

Cause and symptom events 

Zabbix 6.4 adds the ability to mark events as Cause or Symptom events. This allows us to filter events in a way, where we can see only root cause problems instead of being overwhelmed by symptom events. It is also possible to pause action operations for symptom events as to avoid unnecessary noise.

Multiple symptom events can be linked to a single cause event
Any event can be marked as a symptom or converted to a cause event
Action operations can be paused for symptom problems

Instant propagation of configuration changes 

Continuing to build on changes introduced in Zabbix 6.2 (Collecting only configuration change deltas), Zabbix 6.4 introduces instant configuration synchronization across passive and active agents and proxies.

  • Instead of receiving the full configuration copy every 2 minutes (old behavior), in Zabbix 6.4 active agent receives the configuration copy only when changes have been performed
  • RefreshActiveChecks parameter now supports a range 1-86400 (old range: 60-3600)
  • The ProxyConfigFrequency parameter is now used in both Zabbix server (for passive mode) and Zabbix proxy (for active mode) configuration files
  • ConfigFrequency parameter in Zabbix proxy configuration is now deprecated
  • Default ProxyConfigFrequency parameter is 10 seconds (down from 1 hour)

This also improves the performance of Zabbix servers and proxies, since only configuration deltas are synced. As for active agents – the active agent receives a full configuration copy only when any changes are detected in the configuration instead of receiving it every RefreshActiveChecks interval (old behavior)

New SNMP walk item for bulk collection and discovery of SNMP metrics 

A new SNMP agent walk item has been introduced. The item looks at a specified OID or OIDs and polls their indexes by suing the SNMP GetBulk requests. An SNMP GetBulk request can provide better performance and more rapid metric collection and discovery from enterprise-tier SNMP devices.

For example:

walk[1.3.6.1.1,1.3.6.2]

Result:

1.3.6.1.2.1.1 = STRING: "<value1>"
1.3.6.1.2.1.2 = STRING: "<value2>"
1.3.6.1.2.1.3 = STRING: "<value3>"
1.3.6.2.1 = INTEGER: 10
1.3.6.2.2 = INTEGER: 20

Textual values can then be transformed to JSON, which can serve as a master item for low-level discovery rules:

SNMP walk to JSON transforms the obtained data to JSON

Resulting values:

[
{"{#SNMPINDEX}":"7","{#IFALIAS}":"Uplink PT","{#IFTYPE}":"6"},
{"{#SNMPINDEX}": "8","{#IFALIAS}": "Uplink FB","{#IFTYPE}":"6"},
{"{#SNMPINDEX}": "473","{#IFALIAS}":"lag","{#IFTYPE}":"161"}
]

Once the data is converted to JSON, we can use SNMP walk value preprocessing step together with LLD macros, to create dependent item prototypes:

SNMP walk value preprocessing step can be used to specify value for extraction in item prototypes

Support of data collection for outdated proxies

To improve the Zabbix component upgrade workflows (especially for large environments), outdated proxies can still perform data collection with a newer Zabbix server version:

  • Proxy is fully supported if it has the same major version as the Zabbix server
  • Proxy is marked as outdated if its major version is older than the Zabbix server but not older than the previous LTS release
  • Outdated proxies still support data collection and remote command execution
  • In other scenarios, the proxy becomes not supported
Deployed proxy compatibility can be seen in Zabbix frontend
Server version Current proxy version Outdated proxy version Unsupported proxy version
6.4 6.4 6.0, 6.2 Older than 6.0; newer than 6.4
7.0 7.0 6.0, 6.2, 6.4 Older than 6.0; newer than 7.0
7.2 7.2 7.0 Older than 7.0; newer than 7.2

New menu layout 

Zabbix menu layout has been redesigned. The goal of the new menu layout is to provide logical and consistent access to main Zabbix features.

The new menu provides a more consistent and logical layout to Zabbix features

Real-time streaming of metrics and events over HTTP

In addition to streaming collected metrics and events to files, Zabbix 6.4 adds the option to stream metrics and events over HTTP. Zabbix administrators have the option to filter the data for streaming by using tag filters. A new Connectors section has been introduced under Administration – General. Here Zabbix administrators can define an external system where item values and events should be pushed to.

Define a new connector to stream metrics and events over HTTP

Zabbix 6.4 can be used as a source of information for other applications, analytics reports, and AI engines by streaming metrics and events over HTTP in real time. Metrics and events can be streamed to message brokers like Kafka, RabbitMQ, or Amazon Kinesis to adapt the behavior of external systems in real time. 

Template versioning 

Template versioning has been introduced to improve template management and ease of use. Templates are now marked with vendor ar version fields, which are visible in Zabbix frontend; these fields can also be added when writing a custom template.

Template version and vendor fields are visible in the frontend

Development framework for Zabbix widget creation 

Zabbix has a large developer community creating their own custom frontend modules, widgets and Go plugins. In Zabbix 6.4, our goal was to streamline this process by creating a development framework for widget creation. To achieve this, the following changes have been introduced:

  • Widgets have been converted to modules
  • Modules are now fully self-contained and modular
  • Built-in widgets reside in ui/widgets
  • Custom widgets reside in ui/modules/<widget>
  • Adding new widgets is as simple as adding new files without changing the existing files

In addition to these changes, we have also added a new Developer Center section to our documentation. The section contains guides, tutorials and code examples to guide our community in developing Frontend modules and widgets, as well as help with Zabbix agent 2 custom Go plugin development.

The Developer Center section contains guides, tutorials, and code examples for extending Zabbix

Other features and improvements 

The release includes many other changes:

  • Simple check, External check, SSH agent, Telnet agent item types now do not require an interface to be present on the host 
  • Pre-configured email media type settings for Gmail and O365 email providers 
  • Dynamic item value widget thresholds
  • Option to define custom labeled links for hosts and events
  • Ability to label trigger URLs
  • Improved preprocessing performance and thread-based preprocessing workers
  • Ability to label aggregated datasets in Graph widget
  • SQLite3 Zabbix proxies now automatically recreate the SQLite3 database file during an upgrade
  • A host status filter (enabled/disabled) has been added under Data collection – Hosts
  • Additional filtering options have been added to the Action log
  • Action log now supports import to CSV
  • Multiple context menu improvements to Host, Item and Event context menus
  • Old password verification is now required when changing your internal Zabbix user password
  • Value cache performance improvements when working with metrics that get updated less frequently than once per day
  • Added commands to enable profiling of rwlocks/mutexes (for debugging)

The full list of changes, bug fixes, and new features can be found in the Zabbix 6.4 release notes

New templates and integrations

Zabbix 6.4 comes pre-packaged with many new templates and integrations for the most popular vendors and cloud providers. Multiple existing templates have also received improvements:

  • Microsoft Azure MySQL servers 
  • Microsoft Azure PostgreSQL servers 
  • Microsoft Azure virtual machines 
  • Low-level discovery improvements in AWS by HTTP template 
  • Veeam Backup Enterprise Manager 
  • Veeam Backup and Replication 
  • Cisco Nexus 9000 Series 
  • BMC Control-M 
  • Cisco Meraki dashboard 
  • OS processes by Zabbix agent 
  • Improvements to filesystem discovery in official Zabbix OS templates 

Zabbix 6.4 introduces a webhook integration for the Line messaging app, allowing Zabbix events to be forwarded to the Line messenger. 

Zabbix 6.4 adds a variety of new templates and integrations

Zabbix 6.4 packages and images

Official Zabbix packages and images are available for: 

  • Linux distributions for different hardware platforms on RHEL, CentOS, Oracle Linux, Debian, SUSE, Ubuntu, Raspbian 
  • Virtualization platforms based on VMWare, VirtualBox, Hyper-V, XEN 
  • Docker 
  • Packages and pre-compiled agents for the most popular platforms, including macOS and MSI packages for Microsoft Windows 

You can find the download instructions and download the new version on the Download page.

One-click deployments for the following cloud platforms are coming soon: 

  • AWS, Azure, Google Cloud Platform, Digital Ocean 

Upgrading to Zabbix 6.4

In order to upgrade to Zabbix 6.4 you need to upgrade your repository package and download and install the new Zabbix component packages (Zabbix server, proxy, frontend, and other Zabbix components). When you start the Zabbix server, an automatic database schema upgrade will be performed. Zabbix agents are backward compatible; therefore, it is not required to install the new agent versions. You can perform the agent upgrade at a later time. 

If you’re using the official Docker container images – simply deploy a new set of containers for your Zabbix components. Once the Zabbix server container connects to the backend database, the database upgrade will be performed automatically.

You can find detailed step-by-step upgrade instructions on our Upgrade procedure page. 

Join the webinar

If you wish to learn more about the Zabbix 6.4 features and improvements, we invite you to join our What’s new in Zabbix 6.4 public webinar.

During the webinar, you will get the opportunity to:

  • Learn about Zabbix 6.4 features and improvements
  • See the latest Zabbix templates and integrations
  • Participate in a Q&A session with Zabbix founder and CEO Alexei Vladishev
  • Discuss the latest Zabbix version with Zabbix community and Zabbix team members

This is a public webinar – anyone can sign up, attend and have their questions answered by the Zabbix team!

How to use customer managed policies in AWS IAM Identity Center for advanced use cases

Post Syndicated from Ron Cully original https://aws.amazon.com/blogs/security/how-to-use-customer-managed-policies-in-aws-single-sign-on-for-advanced-use-cases/

Are you looking for a simpler way to manage permissions across all your AWS accounts? Perhaps you federate your identity provider (IdP) to each account and divide permissions and authorization between cloud and identity teams, but want a simpler administrative model. Maybe you use AWS IAM Identity Center (successor to AWS Single Sign-On) but are running out of room in your permission set policies; or need a way to keep the role models you have while tailoring the policies in each account to reference their specific resources. Or perhaps you are considering IAM Identity Center as an alternative to per-account federation, but need a way to reuse the customer managed policies that you have already created. Great news! Now you can use customer managed policies (CMPs) and permissions boundaries (PBs) to help with these more advanced situations.

In this blog post, we explain how you can use CMPS and PBs with IAM Identity Center to address these considerations. We describe how IAM Identity Center works, how these types of policies work with IAM Identity Center, and how to best use CMPs and PBs with IAM Identity Center. We also show you how to configure and use CMPs in your IAM Identity Center deployment.

IAM Identity Center background

With IAM Identity Center, you can centrally manage access to multiple AWS accounts and business applications, while providing your workplace users a single sign-on experience with your choice of identity system. Rather than manage identity in each account individually, IAM Identity Center provides one place to connect an existing IdP, Microsoft Active Directory Domain Services (AD DS), or workforce users that you create directly in AWS. Because IAM Identity Center integrates with AWS Organizations, it also provides a central place to define your roles, assign them to your users and groups, and give your users a portal where they can access their assigned accounts.

With AWS Identity Center, you manage access to accounts by creating and assigning permission sets. These are AWS Identity and Access Management (IAM) role templates that define (among other things) which policies to include in a role. If you’re just getting started, you can attach AWS managed policies to the permission set. These policies, created by AWS service teams, enable you to get started without having to learn how to author IAM policies in JSON.

For more advanced cases, where you are unable to express policies sufficiently using inline policies, you can create a custom policy in the permission set. When you assign a permission set to users or groups in a specified account, IAM Identity Center creates a role from the template and then controls single sign-on access to the role. During role creation, IAM Identity Center attaches any specified AWS managed policies, and adds any custom policy to the role as an inline policy. These custom policies must be within the 10,240 character IAM quota of inline policies.

IAM provides two other types of custom policies that increase flexibility when managing access in AWS accounts. Customer managed policies (CMPs) are standalone policies that you create and can attach to roles in your AWS accounts to grant or deny access to AWS resources. Permissions boundaries (PBs) provide an advanced feature that specifies the maximum permissions that a role can have. For both CMPs and PBs, you create the custom policy in your account and then attach it to roles. IAM Identity Center now supports attaching both of these to permission sets so you can handle cases where AWS Managed Policies and inline policies may not be enough.

How CMPs and PBs work with IAM Identity Center

Although you can create IAM users to manage access to AWS accounts and resources, AWS recommends that you use roles instead of IAM users for this purpose. Roles act as an identity (sometimes called an IAM principal), and you assign permissions (identity-based policies) to the role. If you use the AWS Management Console or the AWS Command Line Interface to assume a role, you get the permissions of the role that you assumed. With its simpler way to maintain your users and groups in one AWS location and its ability to centrally manage and assign roles, AWS recommends that you use IAM Identity Center to manage access to your AWS accounts.

With this new IAM Identity Center release, you have the option to specify the names of CMPs and one PB in your permission set (role definition). Doing so modifies how IAM Identity Center provisions roles into accounts. When you assign a user or group to a permission set, IAM Identity Center checks the target account to verify that all specified CMPs and the PB are present. If they are all present, IAM Identity Center creates the role in the account and attaches the specified policies. If any of the specified CMPs or the PB are missing, IAM Identity Center fails the role creation.

This all sounds simple enough, but there are important implications to consider.

If you modify the permission set, IAM Identity Center updates the corresponding roles in all accounts to which you assigned the permission set. What is different when using CMPs and PBs is that IAM Identity Center is uninvolved in the creation or maintenance of the CMPs or PBs. It’s your responsibility to make sure that the CMPs and PBs are created and managed in all of the accounts to which you assign permission sets that use the CMPs and PBs. This means that you must be careful in how you name, create, and maintain these policies in your accounts, to avoid unintended consequences. For example, if you do not apply changes to CMPs consistently across all your accounts, the behavior of an IAM Identity Center created role will vary between accounts.

What CMPs do for you

By using CMPs with permission sets, you gain four main benefits:

  1. If you federate to your accounts directly and have CMPs already, you can reuse your CMPs with permission sets in IAM Identity Center. We describe exceptions later in this post.
  2. If you are running out of space in your permission set inline policies, you can add permission sets to increase the aggregate size of your policies.
  3. Policies often need to refer to account-specific resources by Amazon Resource Name (ARN). Designing an inline policy that does this correctly across all your accounts can be challenging and, in some cases, may not be possible. By specifying a CMP in a permission set, you can tailor the CMPs in each of your accounts to reference the resources of the account. When IAM Identity Center creates the role and attaches the CMPs of the account, the policies used by the IAM Identity Center–generated role are now specific to the account. We highlight this example later in this post.
  4. You get the benefit of a central location to define your roles, which gives you visibility of all the policies that are in use across the accounts where you assigned permission sets. This enables you to have a list of CMP and PB names that you should monitor for change across your accounts. This helps you ensure that you are maintaining your policies correctly.

Considerations and best practices

Start simple, avoid complex – If you’re just starting out, try using AWS managed policies first. With managed policies, you don’t need to know JSON policy to get started. If you need more advanced policies, start by creating identity-based inline custom policies in the permission set. These policies are provisioned as inline policies, and they will be identical in all your accounts. If you need larger policies or more advanced capabilities, use CMPs as your next option. In most cases, you can accomplish what you need with inline and customer managed policies. When you can’t achieve your objective using CMPs, use PBs. For information about intended use cases for PBs, see the blog post When and where to use IAM permissions boundaries.

Permissions boundaries don’t constrain IAM Identity Center admins who create permission sets – IAM Identity Center administrators (your staff) that you authorize to create permission sets can create inline policies and attach CMPs and PBs to permission sets, without restrictions. Permissions boundary policies set the maximum permissions of a role and the maximum permissions that the role can grant within an account through IAM only. For example, PBs can set the maximum permissions of a role that uses IAM to create other roles for use by code or services. However, a PB doesn’t set maximum permissions of the IAM Identity Center permission set creator. What does that mean? Suppose you created an IAM Identity Center Admin permission set that has a PB attached, and you assigned it to John Doe. John Doe can then sign in to IAM Identity Center and modify permission sets with any policy, regardless of what you put in the PB. The PB doesn’t restrict the policies that John Doe can put into a permission set.

In short, use PBs only for roles that need to create IAM roles for use by code or services. Don’t use PBs for permission sets that authorize IAM Identity Center admins who create permission sets.

Create and use a policy naming plan – IAM Identity Center doesn’t consider the content of a named policy that you attach to a permission set. If you assign a permission set in multiple accounts, make sure that all referenced policies have the same intent. Failure to do this will result in unexpected and inconsistent role behavior between different accounts. Imagine a CMP named “S3” that grants S3 read access in account A, and another CMP named “S3” that grants S3 administrative permissions over all S3 buckets in account B. A permission set that attaches the S3 policy and is assigned in accounts A and B will be confusing at best, because the level access is quite different in each of the accounts. It’s better to have more specific names, such as “S3Reader” and “S3Admin,” for your policies and ensure they are identical except for the account-specific resource ARNs.

Use automation to provision policies in accounts – Using tools such as AWS CloudFormation stacksets, or other infrastructure-as-code tools, can help ensure that naming and policies are consistent across your accounts. It also helps reduce the potential for administrators to modify policies in undesirable ways.

Policies must match the capabilities of IAM Identity Center – Although IAM Identity Center supports most IAM semantics, there are exceptions:

  1. If you use an identity provider as your identity source, IAM Identity Center passes only PrincipalTag attributes that come through SAML assertions to IAM. IAM Identity Center doesn’t process or forward other SAML assertions to IAM. If you have CMPs or PBs that rely on other information from SAML assertions, they won’t work. For example, IAM Identity Center doesn’t provide multi-factor authentication (MFA) context keys or SourceIdentity.
  2. Resource policies that reference role names or tags as part of trust policies don’t work with IAM Identity Center. You can use resource policies that use attribute-based access control (ABAC). IAM Identity Center role names are not static, and you can’t tag the roles that IAM Identity Center creates from its permission sets.

How to use CMPs with permission sets

Now that you understand permission sets and how they work with CMPs and PBs, let’s take a look at how you can configure a permission set to use CMPs.

In this example, we show you how to use one or more permission sets that attach a CMP that enables Amazon CloudWatch operations to the log group of specified accounts. Specifically, the AllowCloudWatch_permission set attaches a CMP named AllowCloudWatchForOperations. When we assign the permission set in two separate accounts, the assigned users can perform CloudWatch operations against the log groups of the assigned account only. Because the CloudWatch operations policies are in CMPs rather than inline policies, the log groups can be account specific, and you can reuse the CMPs in other permission sets if you want to have CloudWatch operations available through multiple permission sets.

Note: For this blog post, we demonstrate using CMPs by utilizing the IAM Management Console to create policies and assignments. We recommend that after you learn how to do this, you create your policies through automation for production environments. For example, use AWS CloudFormation. The intent of this example is to demonstrate how you can have a policy in two separate accounts that refer to different resources; something that is harder to accomplish using inline policies. The use case itself is not that advanced, but the use of CMPs to have different resources referenced in each account is a more advanced idea. We kept this simple to make it easier to focus on the feature than the use case.

Prerequisites

In this example, we assume that you know how to use the AWS Management Console, create accounts, navigate between accounts, and create customer managed policies. You also need administrative privileges to enable IAM Identity Center and to create policies in your accounts.

Before you begin, enable IAM Identity Center in your AWS Organizations management account in an AWS Region of your choice. You need to create at least two accounts within your AWS Organization. In this example, the account names are member-account and member-account-1. After you set up the accounts, you can optionally configure IAM Identity Center for administration in a delegated member account.

Configure an IAM Identity Center permission set to use a CMP

Follow these four procedures to use a CMP with a permission set:

  1. Create CMPs with consistent names in your target accounts
  2. Create a permission set that references the CMP that you created
  3. Assign groups or users to the permission set in accounts where you created CMPs
  4. Test your assignments

Step 1: Create CMPs with consistent names in your target accounts

In this step, you create a customer managed policy named AllowCloudWatchForOperations in two member accounts. The policy allows your cloud operations users to access a predefined CloudWatch log group in the account.

To create CMPs in your target accounts

  1. Sign into AWS.

    Note: You can sign in to IAM Identity Center if you have existing permission sets that enable you to create policies in member accounts. Alternatively, you can sign in using IAM federation or as an IAM user that has access to roles that enable you to navigate to other accounts where you can create policies. Your sign-in should also give you access to a role that can administer IAM Identity Center permission sets.

  2. Navigate to an AWS Organizations member account.

    Note: If you signed in through IAM Identity Center, use the user portal page to navigate to the account and role. If you signed in by using IAM federation or as an IAM user, choose your sign-in name that is displayed in the upper right corner of the AWS Management Console and then choose switch role, as shown in Figure 1.

    Figure 1: Switch role for IAM user or IAM federation

    Figure 1: Switch role for IAM user or IAM federation

  3. Open the IAM console.
  4. In the navigation pane, choose Policies.
  5. In the upper right of the page, choose Create policy.
  6. On the Create Policy page, choose the JSON tab.
  7. Paste the following policy into the JSON text box. Replace <account-id> with the ID of the account in which the policy is created.

    Tip: To copy your account number, choose your sign-in name that is displayed in the upper right corner of the AWS Management Console, and then choose the copy icon next to the account ID, as shown in Figure 2.

    Figure 2: Copy account number

    Figure 2: Copy account number

    {
        "Version": "2012-10-17",
        "Statement": [
            {
                "Action": [
                    "logs:CreateLogStream",
                    "logs:DescribeLogStreams",
                    "logs:PutLogEvents",
                    "logs:GetLogEvents"
                ],
                "Effect": "Allow",
                "Resource": "arn:aws:logs:us-east-1:<account-id>:log-group:OperationsLogGroup:*"
            },
            {
                "Action": [
                    "logs:DescribeLogGroups"
                ],
                "Effect": "Allow",
                "Resource": "arn:aws:logs:us-east-1:<account-id>:log-group::log-stream:*"
            }
        ]
    }

  8. Choose Next:Tags, and then choose Next:Review.
  9. On the Create Policy/Review Policy page, in the Name field, enter AllowCloudWatchForOperations. This is the name that you will use when you attach the CMP to the permission set in the next procedure (Step 2).
  10. Repeat steps 1 through 7 in at least one other member account. Be sure to replace the <account-id> element in the policy with the account ID of each account where you create the policy. The only difference between the policies in each account is the <account-id> in the policy.

Step 2: Create a permission set that references the CMP that you created

At this point, you have at least two member accounts containing the same policy with the same policy name. However, the ResourceARN in each policy refers to log groups that belong to the respective accounts. In this step, you create a permission set and attach the policy to the permission set. Importantly, you attach only the name of the policy to the permission set. The actual attachment of the policy to the role that IAM Identity Center creates, happens when you assign the permission set to a user or group in Step 3.

To create a permission set that references the CMP

  1. Sign in to the Organizations management account or the IAM Identity Center delegated administration account.
  2. Open the IAM Identity Center console.
  3. In the navigation pane, choose Permission Sets.
  4. On the Select Permission set type screen, select Custom permission Set and choose Next.
    Figure 3: Select custom permission set

    Figure 3: Select custom permission set

  5. On the Specify policies and permissions boundary page, expand the Customer managed policies option, and choose Attach policies.
    Figure 4: Specify policies and permissions boundary

    Figure 4: Specify policies and permissions boundary

  6. For Policy names, enter the name of the policy. This name must match the name of the policy that you created in Step 1. In our example, the name is AllowCloudWatchForOperations. Choose Next.
  7. On the Permission set details page, enter a name for your permission set. In this example, use AllowCloudWatch_PermissionSet. You can alspecify additional details for your permission sets, such as session duration and relay state (these are a link to a specific AWS Management Console page of your choice).
    Figure 5: Permission set details

    Figure 5: Permission set details

  8. Choose Next, and then choose Create.

Step 3: Assign groups or users to the permission set in accounts where you created your CMPs

In the preceding steps, you created a customer managed policy in two or more member accounts, and a permission set with the customer managed policy attached. In this step, you assign users to the permission set in your accounts.

To assign groups or users to the permission set

  1. Sign in to the Organizations management account or the IAM Identity Center delegated administration account.
  2. Open the IAM Identity Center console.
  3. In the navigation pane, choose AWS accounts.
    Figure 6: AWS account

    Figure 6: AWS account

  4. For testing purposes, in the AWS Organization section, select all the accounts where you created the customer managed policy. This means that any users or groups that you assign during the process will have access to the AllowCloudWatch_PermissionSet role in each account. Then, on the top right, choose Assign users or groups.
  5. Choose the Users or Groups tab and then select the users or groups that you want to assign to the permission set. You can select multiple users and multiple groups in this step. For this example, we recommend that you select a single user for which you have credentials, so that you can sign in as that user to test the setup later. After selecting the users or groups that you want to assign, choose Next.
    Figure 7: Assign users and groups to AWS accounts

    Figure 7: Assign users and groups to AWS accounts

  6. Select the permission set that you created in Step 2 and choose Next.
  7. Review the users and groups that you are assigning and choose Submit.
  8. You will see a message that IAM Identity Center is configuring the accounts. In this step, IAM Identity Center creates roles in each of the accounts that you selected. It does this for each account, so it looks in the account for the CMP that you specified in the permission set. If the name of the CMP that you specified in the permission set matches the name that you provided when creating the CMP, IAM Identity Center creates a role from the permission set. If the names don’t match or if the CMP isn’t present in the account to which you assigned the permission set, you see an error message associated with that account. After successful submission, you will see the following message: We reprovisioned your AWS accounts successfully and applied the updated permission set to the accounts.

Step 4: Test your assignments

Congratulations! You have successfully created CMPs in multiple AWS accounts, created a permission set and attached the CMPs by name, and assigned the permission set to users and groups in the accounts. Now it’s time to test the results.

To test your assignments

  1. Go to the IAM Identity Center console.
  2. Navigate to the Settings page.
  3. Copy the user portal URL, and then paste the user portal URL into your browser.
  4. At the sign-in prompt, sign in as one of the users that you assigned to the permission set.
  5. The IAM Identity Center user portal shows the accounts and roles that you can access. In the example shown in Figure 8, the user has access to the AllowCloudWatch_PermissionSet created in two accounts.
    Figure 8: User portal

    Figure 8: User portal

    If you choose AllowCloudWatch_PermissionSet in the member-account, you will have access to the CloudWatch log group in the member-account account. If you choose the role in member-account-1, you will have access to CloudWatch Log group in member-account-1.

  6. Test the access by choosing Management Console for the AllowCloudWatch_PermissionSet in the member-account.
  7. Open the CloudWatch console.
  8. In the navigation pane, choose Log groups. You should be able to access log groups, as shown in Figure 9.
    Figure 9: CloudWatch log groups

    Figure 9: CloudWatch log groups

  9. Open the IAM console. You shouldn’t have permissions to see the details on this console, as shown in figure 10. This is because AllowCloudWatch_PermissionSet only provided CloudWatch log access.
    Figure 10: Blocked access to the IAM console

    Figure 10: Blocked access to the IAM console

  10. Return to the IAM Identity Center user portal.
  11. Repeat steps 4 through 8 using member-account-1.

Answers to key questions

What happens if I delete a CMP or PB that is attached to a role that IAM Identity Center created?
IAM prevents you from deleting policies that are attached to IAM roles.

How can I delete a CMP or PB that is attached to a role that IAM Identity Center created?
Remove the CMP or PB reference from all your permission sets. Then re-provision the roles in your accounts. This detaches the CMP or PB from IAM Identity Center–created roles. If the policies are unused by other IAM roles in your account or by IAM users, you can delete the policy.

What happens if I modify a CMP or PB that is attached to an IAM Identity Center provisioned role?
The IAM Identity Center role picks up the policy change the next time that someone assumes the role.

Conclusion

In this post, you learned how IAM Identity Center works with customer managed policies and permissions boundaries that you create in your AWS accounts. You learned different ways that this capability can help you, and some of the key considerations and best practices to succeed in your deployments. That includes the principle of starting simple and avoiding unnecessarily complex configurations. Remember these four principles:

  1. In most cases, you can accomplish everything you need by starting with custom (inline) policies.
  2. Use customer managed policies for more advanced cases.
  3. Use permissions boundary policies only when necessary.
  4. Use CloudFormation to manage your customer managed policies and permissions boundaries rather than having administrators deploy them manually in accounts.

To learn more about this capability, see the IAM Identity Center User Guide. If you have feedback about this post, submit comments in the Comments section below. If you have questions about this post, start a new thread on the AWS IAM re:Post or contact AWS Support.

Want more AWS Security news? Follow us on Twitter.

Ron Cully

Ron s a Principal Product Manager at AWS where he leads feature and roadmap planning for workforce identity products at AWS. Ron has over 20 years of industry experience in product and program management of networking and directory related products. He is passionate about delivering secure, reliable solutions that help make it easier for customers to migrate directory aware applications and workloads to the cloud.

Nitin Kulkarni

Nitin Kulkarni

Nitin is a Solutions Architect on the AWS Identity Solutions team. He helps customers build secure and scalable solutions on the AWS platform. He also enjoys hiking, baseball and linguistics.

How to automate AWS account creation with SSO user assignment

Post Syndicated from Rafael Koike original https://aws.amazon.com/blogs/security/how-to-automate-aws-account-creation-with-sso-user-assignment/

Background

AWS Control Tower offers a straightforward way to set up and govern an Amazon Web Services (AWS) multi-account environment, following prescriptive best practices. AWS Control Tower orchestrates the capabilities of several other AWS services, including AWS Organizations, AWS Service Catalog, and AWS Single Sign-On (AWS SSO), to build a landing zone very quickly. AWS SSO is a cloud-based service that simplifies how you manage SSO access to AWS accounts and business applications using Security Assertion Markup Language (SAML) 2.0. You can use AWS Control Tower to create and provision new AWS accounts and use AWS SSO to assign user access to those newly-created accounts.

Some customers need to provision tens, if not hundreds, of new AWS accounts at one time and assign access to many users. If you are using AWS Control Tower, doing this requires that you provision an AWS account in AWS Control Tower, and then assign the user access to the AWS account in AWS SSO before moving to the next AWS account. This process adds complexity and time for administrators who manage the AWS environment while delaying users’ access to their AWS accounts.

In this blog post, we’ll show you how to automate creating multiple AWS accounts in AWS Control Tower, and how to automate assigning user access to the AWS accounts in AWS SSO, with the ability to repeat the process easily for subsequent batches of accounts. This solution simplifies the provisioning and assignment processes, while enabling automation for your AWS environment, and allows your builders to start using and experimenting on AWS more quickly.

Services used

This solution uses the following AWS services:

High level solution overview

Figure 1 shows the architecture and workflow of the batch AWS account creation and SSO assignment processes.

Figure 1: Batch AWS account creation and SSO assignment automation architecture and workflow

Figure 1: Batch AWS account creation and SSO assignment automation architecture and workflow

Before starting

This solution is configured to be deployed in the North Virginia Region (us-east-1). But you can change the CloudFormation template to run in any Region that supports all the services required in the solution.

AWS Control Tower Account Factory can take up to 25 minutes to create and provision a new account. During this time, you will be unable to use AWS Control Tower to perform actions such as creating an organizational unit (OU) or enabling a guardrail on an OU. As a recommendation, running this solution during a time period when you do not anticipate using AWS Control Tower’s features is best practice.

Collect needed information

Note: You must have already configured AWS Control Tower, AWS Organizations, and AWS SSO to use this solution.

Before deploying the solution, you need to first collect some information for AWS CloudFormation.

The required information you’ll need to gather in these steps is:

  • AWS SSO instance ARN
  • AWS SSO Identity Store ID
  • Admin email address
  • Amazon S3 bucket
  • AWS SSO user group ARN

Prerequisite information: AWS SSO instance ARN

From the web console

You can find this information under Settings in the AWS SSO web console as shown in Figure 2.

Figure 2: AWS SSO instance ARN

Figure 2: AWS SSO instance ARN

From the CLI

You can also get this information by running the following CLI command using AWS Command Line Interface (AWS CLI):

aws sso-admin list-instances

The output is similar to the following:

{
    "Instances": [
        {
        "InstanceArn": "arn:aws:sso:::instance/ssoins-abc1234567",
        "IdentityStoreId": "d-123456abcd"
        }
    ]
}

Make a note of the InstanceArn value from the output, as this will be used in the AWS SSO instance ARN.

Prerequisite information: AWS SSO Identity Store ID

This is available from either the web console or the CLI.

From the web console

You can find this information in the same screen as the AWS SSO Instance ARN, as shown in Figure 3.

Figure 3: AWS SSO identity store ID

Figure 3: AWS SSO identity store ID

From the CLI

To find this from the AWS CLI command aws sso-admin list-instances, use the IdentityStoreId from the second key-value pair returned.

Prerequisite information: Admin email address

The admin email address notified when a new AWS account is created.

This email address is used to receive notifications when a new AWS account is created.

Prerequisite information: S3 bucket

The name of the Amazon S3 bucket where the AWS account list CSV files will be uploaded to automate AWS account creation.

This globally unique bucket name will be used to create a new Amazon S3 Bucket, and the automation script will receive events from new objects uploaded to this bucket.

Prerequisite information: AWS SSO user group ARN

Go to AWS SSO > Groups and select the user group whose permission set you would like to assign to the new AWS account. Copy the Group ID from the selected user group. This can be a local AWS SSO user group, or a third-party identity provider-synced user group.

Note: For the AWS SSO user group, there is no AWS CLI equivalent; you need to use the AWS web console to collect this information.

Figure 4: AWS SSO user group ARN

Figure 4: AWS SSO user group ARN

Prerequisite information: AWS SSO permission set

The ARN of the AWS SSO permission set to be assigned to the user group.

From the web console

To view existing permission sets using the AWS SSO web console, go to AWS accounts > Permission sets. From there, you can see a list of permission sets and their respective ARNs.

Figure 5: AWS SSO permission sets list

Figure 5: AWS SSO permission sets list

You can also select the permission set name and from the detailed permission set window, copy the ARN of the chosen permission set. Alternatively, create your own unique permission set to be assigned to the intended user group.

Figure 6: AWS SSO permission set ARN

Figure 6: AWS SSO permission set ARN

From the CLI

To get permission set information from the CLI, run the following AWS CLI command:

aws sso-admin list-permission-sets --instance-arn <SSO Instance ARN>

This command will return an output similar to this:

{
    "PermissionSets": [
    "arn:aws:sso:::permissionSet/ssoins-abc1234567/ps-1234567890abcdef",
    "arn:aws:sso:::permissionSet/ssoins-abc1234567/ps-abcdef1234567890"
    ]
}

If you can’t determine the details for your permission set from the output of the CLI shown above, you can get the details of each permission set by running the following AWS CLI command:

aws sso-admin describe-permission-set --instance-arn <SSO Instance ARN> --permission-set-arn <PermissionSet ARN>

The output will be similar to this:

{
    "PermissionSet": {
    "Name": "AWSPowerUserAccess",
    "PermissionSetArn": "arn:aws:sso:::permissionSet/ssoins-abc1234567/ps-abc123def4567890",
    "Description": "Provides full access to AWS services and resources, but does not allow management of Users and groups",
    "CreatedDate": "2020-08-28T11:20:34.242000-04:00",
    "SessionDuration": "PT1H"
    }
}

The output above lists the name and description of each permission set, which can help you identify which permission set ARN you will use.

Solution initiation

The solution steps are in two parts: the initiation, and the batch account creation and SSO assignment processes.

To initiate the solution

  1. Log in to the management account as the AWS Control Tower administrator, and deploy the provided AWS CloudFormation stack with the required parameters filled out.

    Note: To fill out the required parameters of the solution, refer to steps 1 to 6 of the To launch the AWS CloudFormation stack procedure below.

  2. When the stack is successfully deployed, it performs the following actions to set up the batch process. It creates:
    • The S3 bucket where you will upload the AWS account list CSV file.
    • A DynamoDB table. This table tracks the AWS account creation status.
    • A Lambda function, NewAccountHandler.
    • A Lambda function, CreateManagedAccount. This function is triggered by the entries in the Amazon DynamoDB table and initiates the batch account creation process.
    • An Amazon CloudWatch Events rule to detect the AWS Control Tower CreateManagedAccount lifecycle event.
    • Another Lambda function, CreateAccountAssignment. This function is triggered by AWS Control Tower Lifecycle Events via Amazon CloudWatch Events to assign the AWS SSO Permission Set to the specified User Group and AWS account

To create the AWS Account list CSV file

After you deploy the solution stack, you need to create a CSV file based on this sample.csv and upload it to the Amazon S3 bucket created in this solution. This CSV file will be used to automate the new account creation process.

CSV file format

The CSV file must follow the following format:

AccountName,SSOUserEmail,AccountEmail,SSOUserFirstName,SSOUserLastName,OrgUnit,Status,AccountId,ErrorMsg
Test-account-1,[email protected],[email protected],Fname-1,Lname-1,Test-OU-1,,,
Test-account-2,[email protected],[email protected],Fname-2,Lname-2,Test-OU-2,,,
Test-account-3,[email protected],[email protected],Fname-3,Lname-3,Test-OU-1,,,

Where the first line is the column names, and each subsequent line contains the new AWS accounts that you want to create and automatically assign that SSO user group to the permission set.

CSV fields

AccountName: String between 1 and 50 characters [a-zA-Z0-9_-]
SSOUserEmail: String with more than seven characters and be a valid email address for the primary AWS Administrator of the new AWS account
AccountEmail: String with more than seven characters and be a valid email address not used by other AWS accounts
SSOUserFirstName: String with the first name of the primary AWS Administrator of the new AWS account
SSOUserLastName: String with the last name of the primary AWS Administrator of the new AWS account
OrgUnit: String and must be an existing AWS Organizations OrgUnit
Status: String, for future use
AccountId: String, for future use
ErrorMsg: String, for future use

Figure 7 shows the details that are included in our example for the two new AWS accounts that will be created.

Figure 7: Sample AWS account list CSV

Figure 7: Sample AWS account list CSV

  1. The NewAccountHandler function is triggered from an object upload into the Amazon S3 bucket, validates the input file entries, and uploads the validated input file entries to the Amazon DynamoDB table.
  2. The CreateManagedAccount function queries the DynamoDB table to get the details of the next account to be created. If there is another account to be created, then the batch account creation process moves on to Step 4, otherwise it completes.
  3. The CreateManagedAccount function launches the AWS Control Tower Account Factory product in AWS Service Catalog to create and provision a new account.
  4. After Account Factory has completed the account creation workflow, it generates the CreateManagedAccount lifecycle event, and the event log states if the workflow SUCCEEDED or FAILED.
  5. The CloudWatch Events rule detects the CreateManagedAccount AWS Control Tower Lifecycle Event, and triggers the CreateManagedAccount and CreateAccountAssignment functions, and sends email notification to the administrator via AWS SNS.
  6. The CreateManagedAccount function updates the Amazon DynamoDB table with the results of the AWS account creation workflow. If the account was successfully created, it updates the input file entry in the Amazon DynamoDB table with the account ID; otherwise, it updates the entry in the table with the appropriate failure or error reason.
  7. The CreateAccountAssignment function assigns the AWS SSO Permission Set with the appropriate AWS IAM policies to the User Group specified in the Parameters when launching the AWS CloudFormation stack.
  8. When the Amazon DynamoDB table is updated, the Amazon DynamoDB stream triggers the CreateManagedAccount function for subsequent AWS accounts or when new AWS account list CSV files are updated, then steps 1-9 are repeated.

Upload the CSV file

Once the AWS account list CSV file has been created, upload it into the Amazon S3 bucket created by the stack.

Deploying the solution

To launch the AWS CloudFormation stack

Now that all the requirements and the specifications to run the solution are ready, you can launch the AWS CloudFormation stack:

  1. Open the AWS CloudFormation launch wizard in the console.
  2. In the Create stack page, choose Next.

    Figure 8: Create stack in CloudFormation

    Figure 8: Create stack in CloudFormation

  3. On the Specify stack details page, update the default parameters to use the information you captured in the prerequisites as shown in Figure 9, and choose Next.

    Figure 9: Input parameters into AWS CloudFormation

    Figure 9: Input parameters into AWS CloudFormation

  4. On the Configure stack option page, choose Next.
  5. On the Review page, check the box “I acknowledge that AWS CloudFormation might create IAM resources.” and choose Create Stack.
  6. Once the AWS CloudFormation stack has completed, go to the Amazon S3 web console and select the Amazon S3 bucket that you defined in the AWS CloudFormation stack.
  7. Upload the AWS account list CSV file with the information to create new AWS accounts. See To create the AWS Account list CSV file above for details on creating the CSV file.

Workflow and solution details

When a new file is uploaded to the Amazon S3 bucket, the following actions occur:

  1. When you upload the AWS account list CSV file to the Amazon S3 bucket, the Amazon S3 service triggers an event for newly uploaded objects that invokes the Lambda function NewAccountHandler.
  2. This Lambda function executes the following steps:
    • Checks whether the Lambda function was invoked by an Amazon S3 event, or the CloudFormation CREATE event.
    • If the event is a new object uploaded from Amazon S3, read the object.
    • Validate the content of the CSV file for the required columns and values.
    • If the data has a valid format, insert a new item with the data into the Amazon DynamoDB table, as shown in Figure 10 below.

      Figure 10: DynamoDB table items with AWS accounts details

      Figure 10: DynamoDB table items with AWS accounts details

    • Amazon DynamoDB is configured to initiate the Lambda function CreateManagedAccount when insert, update, or delete items are initiated.
    • The Lambda function CreateManagedAccount checks for update event type. When an item is updated in the table, this item is checked by the Lambda function, and if the AWS account is not created, the Lambda function invokes the AWS Control Tower Account Factory from the AWS Service Catalog to create a new AWS account with the details stored in the Amazon DynamoDB item.
    • AWS Control Tower Account Factory starts the AWS account creation process. When the account creation process completes, the status of Account Factory will show as Available in Provisioned products, as shown in Figure 11.

      Figure 11: AWS Service Catalog provisioned products for AWS account creation

      Figure 11: AWS Service Catalog provisioned products for AWS account creation

    • Based on the Control Tower lifecycle events, the CreateAccountAssignment Lambda function will be invoked when the CreateManagedAccount event is sent to CloudWatch Events. An AWS SNS topic is also triggered to send an email notification to the administrator email address as shown in Figure 12 below.

      Figure 12: AWS email notification when account creation completes

      Figure 12: AWS email notification when account creation completes

    • When invoked, the Lambda function CreateAccountAssignment assigns the AWS SSO user group to the new AWS account with the permission set defined in the AWS CloudFormation stack.

      Figure 13: New AWS account showing user groups with permission sets assigned

      Figure 13: New AWS account showing user groups with permission sets assigned

Figure 13 above shows the new AWS account with the user groups and the assigned permission sets. This completes the automation process. The AWS SSO users that are part of the user group will automatically be allowed to access the new AWS account with the defined permission set.

Handling common sources of error

This solution connects multiple components to facilitate the new AWS account creation and AWS SSO permission set assignment. The correctness of the parameters in the AWS CloudFormation stack is important to make sure that when AWS Control Tower creates a new AWS account, it is accessible.

To verify that this solution works, make sure that the email address is a valid email address, you have access to that email, and it is not being used for any existing AWS account. After a new account is created, it is not possible to change its root account email address, so if you input an invalid or inaccessible email, you will need to create a new AWS account and remove the invalid account.

You can view common errors by going to AWS Service Catalog web console. Under Provisioned products, you can see all of your AWS Control Tower Account Factory-launched AWS accounts.

Figure 14: AWS Service Catalog provisioned product with error

Figure 14: AWS Service Catalog provisioned product with error

Selecting Error under the Status column shows you the source of the error. Figure 15 below is an example of the source of the error:

Figure 15: AWS account creation error explanation

Figure 15: AWS account creation error explanation

Conclusion

In this post, we’ve shown you how to automate batch creation of AWS accounts in AWS Control Tower and batch assignment of user access to AWS accounts in AWS SSO. When the batch AWS accounts creation and AWS SSO user access assignment processes are complete, the administrator will be notified by emails from AWS SNS. We’ve also explained how to handle some common sources of errors and how to avoid them.

As you automate the batch AWS account creation and user access assignment, you can reduce the time you spend on the undifferentiated heavy lifting work, and onboard your users in your organization much more quickly, so they can start using and experimenting on AWS right away.

To learn more about the best practices of setting up an AWS multi-account environment, check out this documentation for more information.

If you have feedback about this post, submit comments in the Comments section below.

Want more AWS Security news? Follow us on Twitter.

Rafael Koike

Rafael is a Principal Solutions Architect supporting Enterprise customers in SouthEast and part of the Storage TFC. Rafael has a passion to build and his expertise in security, storage, networking and application development have been instrumental to help customers move to the cloud secure and fast. When he is not building he like to do Crossfit and target shooting.

Eugene Toh

Eugene Toh is a Solutions Architect supporting Enterprise customers in the Georgia and Alabama areas. He is passionate in helping customers to transform their businesses and take them to the next level. His area of expertise is in cloud migrations and disaster recovery and he enjoys giving public talks on the latest cloud technologies. Outside of work, he loves trying great food and traveling all over the world.

Configure AWS SSO ABAC for EC2 instances and Systems Manager Session Manager

Post Syndicated from Rodrigo Ferroni original https://aws.amazon.com/blogs/security/configure-aws-sso-abac-for-ec2-instances-and-systems-manager-session-manager/

In this blog post, I show you how to configure AWS Single Sign-On to define attribute-based access control (ABAC) permissions to manage Amazon Elastic Compute Cloud (Amazon EC2) instances and AWS Systems Manager Session Manager for federated users. This combination allows you to control access to specific Amazon EC2 instances based on users’ attributes. I show you how defined AWS SSO identity source attributes like login and department can be used, and how custom attributes like SSMSessionRunAs can be used to pass these attributes into Amazon Web Services (AWS) from an external identity provider (IdP) using  SAML 2.0 assertion.

AWS SSO added support for ABAC to enable you to create fine-grained permissions for your workforce in AWS using user attributes. Using user attributes as tags in AWS helps you simplify the process of creating fine-grained permissions in AWS and enables you to ensure that your workforce has access only to the AWS resources with matching tags.

The new feature works with any supported AWS SSO identity source. This post walks you through the steps to enable attributes for access control, create permission sets and manage assignments when using a supported external IdP as your identity source.

Solution overview

The following architecture diagram—Figure 1—presents an overview of the solution.

Figure 1: Solution architecture diagram

Figure 1: Solution architecture diagram

In the example in Figure 1, Alice and Bob are users who each have the attributes
login
, department, and SSMSessionRunAs. These attributes are created and updated in the external directory—Okta in this example—under those users’ profiles. The first two attributes are automatically synchronized by using System for Cross-domain Identity Management (SCIM) protocol between AWS SSO and Okta and configured within AWS SSO settings. The third custom attribute is passed directly from Okta into the AWS accounts as a new SAML assertion.

Both users are using the same AWS SSO custom permission set that allows them to launch a new Amazon EC2 instance with proper tags enforcement. Based on those tags, they can start, stop, and restart the EC2 instance if they are in the same department, and to terminate it if they are the owner. Also, they can connect using Session Manager if they’re in the same department. Users can sign in to those instances using the Linux OS user defined in the attribute SSMSessionRunAs.

Prerequisites

To perform the steps to use AWS SSO attributes for ABAC, you must already have deployed AWS SSO for your AWS Organizations and have connected with an external identity source using SAML and SCIM protocols. For more information, see Checklist: Configuring ABAC in AWS using AWS SSO.

You need two test users for implementing and testing the solution. You can use two existing users, or create new users named Alice and Bob to match the solution and testing described in the following sections.

Implement the solution

The basic steps to implement the solution are:

  1. Confirm in AWS SSO settings that you have defined an external IdP, authentication via SAML 2.0, and provisioning via SCIM protocol.
  2. Enable attributes for access control and define the two supported attributes: login and department.
  3. Create a new user attribute in the Okta Directory.
  4. Edit and confirm the users’ attributes defined in the Okta Directory profile.
  5. Configure the SAML attribute statement in the Okta AWS SSO application.
  6. Create a new permission set using an ABAC policy.
  7. Create an AWS account assignment to the users using the permission set created in the previous step.

Confirm AWS SSO configuration

In this first step, you confirm that AWS SSO has been properly configured. Go to AWS SSO console SSO settings to check that the configuration of your identity source, authentication, and provisioning is as follows:

Identity source: External Identity Provider
Authentication: SAML 2.0
Provisioning: SCIM

  1. Confirm authentication is working as expected, by going to your user portal URL in a new browser instance (to ensure your user authentication doesn’t overwrite your existing authentication). The user portal offers a single place to access all the assigned AWS accounts, roles, and applications. For example, it should look like https://exampledomain.awsapps.com/start. Once you access it, the process automatically redirects the request to your external provider for authentication, and then returns the user to the AWS SSO user portal.
  2. To confirm provisioning, go to the AWS SSO console and choose Users from the right panel. You should see your Okta users assigned to the AWS SSO application being synchronized by SCIM protocol. Select any user to see the Created by SCIM and Updated by SCIM information for that user.

Enable AWS SSO attributes for access control

In this step, you enable ABAC and then configure AWS SSO attributes. This solution uses the Attributes for access control page in the AWS Management Console to enter the key and value pairs.

To enable attributes for access control

  1. Open the AWS SSO console.
  2. Choose Settings.
  3. On the Settings page, under Identity source, next to Attributes for access control, select Enable. As shown in Figure 2.
Figure 2: Attributes for access control settings (enable ABAC)

Figure 2: Attributes for access control settings (enable ABAC)

Once ABAC is enabled, you can select the attributes to be synchronized. For this use case, select login and department.

To select your attributes using the AWS SSO console

  1. Open the AWS SSO console.
  2. Choose Settings.
  3. On the Settings page, under Identity source, next to Attributes for access control, choose View details.
  4. On the Attributes for access control page, notice the Key and Value columns. This is where you will be mapping the attribute from your identity source to an attribute that AWS SSO passes as a session tag. Set the first key and value pair by entering login as the key and ${path:userName} as the value. Set the second key and value pair to department and ${path:enterprise.department}. The settings are shown in Figure 3 below.

    Figure 3: Map attributes using the Attributes for access control page

    Figure 3: Map attributes using the Attributes for access control page

  5. Choose Save changes.

Create a new attribute in Okta Directory

In this third step, you create the new custom attribute SSMSessionRunAs.

To create a new user attribute

  1. Open the Okta console.
  2. Under Directory, choose Profile Editor.
  3. Choose Edit Profile for Okta User (default).
  4. Under Attributes, choose Add Attribute as follows:
    Data type: Select String
    Display Name: Enter SSMSessionRunAs
    Variable Name: Enter SSMSessionRunAs
    Attribute Length: Select Less than and enter 10 (max).
  5. Choose Save.

Edit and confirm users’ attributes defined in Okta Directory profile

Now that you have the new attribute SSMSessionRunAs created, go to the users’ profiles to enter the Department and SSMSessionRunAs values for both users.

To edit and confirm users’ attributes

  1. Open the Okta console.
  2. Under Directory, choose People.
  3. Select user Bob.
  4. Under Profile tab choose Edit as follows:

    For the key Department, enter blue as the value.

    For the key SSMSessionRunAs, enter bob as the value.

  5. Choose Save.
  6. Repeat steps 1 through 5 for Alice. For the key Department, enter amber as the value and for SSMSessionRunAs, enter alice as the value.
  7. Confirm that the attributes of both users are defined in the external directory as follows:Username (login): [email protected]
    First name (firstName): Bob
    Last name (lastName): Rodriguez
    Display name (displayName): Bob
    Department (department): blue
    SSMSessionRunAs (SSMSessionRunAs): bob

    Username (login): [email protected]
    First name (firstName): Alice
    Last name (lastName): Rosalez
    Display name (displayName): Alice
    Department (department): amber
    SSMSessionRunAs (SSMSessionRunAs): alice

Configure SAML attribute statement in Okta AWS SSO application

The attribute SSMSessionRunAs isn’t available as an attribute within AWS SSO. However, you can include it by defining SAML attribute statements, which are inserted into the SAML assertions.

To create a new SAML attribute

  1. Open the Okta Application console.
  2. Choose AWS Single Sign-on application.
  3. On the Sign On tab, choose Edit Settings.
  4. Under SAML 2.0 Attributes Statements enter the following:
    • For Name, enter https://aws.amazon.com/SAML/Attributes/AccessControl:SSMSessionRunAs
    • For Name format, select URI Reference
    • For Value, enter user.SSMSessionRunAs
  5. Choose Save.

Create a new permission set using an ABAC policy

In this step, you create a permissions policy that determines who can access your AWS resources based on the configured attribute value. When you enable ABAC and specify attributes, AWS SSO passes the attribute value of the authenticated user into AWS Identity and Access Management (IAM) for use in policy evaluation.

To create a permission set

  1. Open the AWS SSO console.
  2. Choose AWS accounts.
  3. Select the Permission sets tab.
  4. Choose Create permission set.
  5. On the Create new permission set page, choose Create a custom permission set.
    1. Choose Next: Details.
    2. Under Create a custom permission set, enter a name that will identify this permission set in AWS SSO. This name will also appear as an IAM role in the user portal for any users who have access to it. For this solution, name it myCustomPermissionSetEC2SSM.
    3. Choose Create a custom permissions policy and paste in the following ABAC policy document:
      {
        "Version": "2012-10-17",
        "Statement": [
          {
            "Sid": "AllowDescribeList",
            "Action": [
              "ec2:Describe*",
              "ssm:Describe*",
              "ssm:Get*",
              "ssm:List*",
              "iam:ListInstanceProfiles",
              "cloudwatch:DescribeAlarms"
            ],
            "Effect": "Allow",
            "Resource": "*"
          },
          {
            "Sid": "AllowRunInstancesResources",
            "Effect": "Allow",
            "Action": "ec2:RunInstances",
            "Resource": [
              "arn:aws:ec2:*::image/*",
              "arn:aws:ec2:*::snapshot/*",
              "arn:aws:ec2:*:*:subnet/*",
              "arn:aws:ec2:*:*:key-pair/*",
              "arn:aws:ec2:*:*:security-group/*",
              "arn:aws:ec2:*:*:network-interface/*"
            ]
          },
          {
            "Sid": "AllowRunInstancesConditions",
            "Effect": "Allow",
            "Action": "ec2:RunInstances",
            "Resource": [
              "arn:aws:ec2:*:*:instance/*",
              "arn:aws:ec2:*:*:volume/*",
              "arn:aws:ec2:*:*:network-interface/*"
            ],
            "Condition": {
              "StringLike": {
                "aws:RequestTag/Name": "*"
              },
              "StringEquals": {
                "aws:RequestTag/Owner": "${aws:PrincipalTag/login}",
                "aws:RequestTag/Department": "${aws:PrincipalTag/department}"
              },
              "ForAllValues:StringEquals": {
                "aws:TagKeys": [
                  "Name",
                  "Owner",
                  "Department"
                ]
              }
            }
          },
          {
            "Sid": "AllowCreateTagsOnRunInstance",
            "Effect": "Allow",
            "Action": "ec2:CreateTags",
            "Resource": [
              "arn:aws:ec2:*:*:volume/*",
              "arn:aws:ec2:*:*:instance/*",
              "arn:aws:ec2:*:*:network-interface/*"
            ],
            "Condition": {
              "StringEquals": {
                "ec2:CreateAction": "RunInstances"
              }
            }
          },
          {
            "Sid": "AllowPassRoleSpecificRole",
            "Effect": "Allow",
            "Action": "iam:PassRole",
            "Resource": "arn:aws:iam::*:role/EC2UbuntuSSMRole"
          },
          {
            "Sid": "AllowEC2ActionsConditions",
            "Effect": "Allow",
            "Action": [
              "ec2:StartInstances",
              "ec2:StopInstances",
              "ec2:RebootInstances"
            ],
            "Resource": "*",
            "Condition": {
              "StringEquals": {
                "ec2:ResourceTag/Department": "${aws:PrincipalTag/department}"
              }
            }
          },
          {
            "Sid": "AllowTerminateConditions",
            "Effect": "Allow",
            "Action": [
              "ec2:TerminateInstances"
            ],
            "Resource": "*",
            "Condition": {
              "StringEquals": {
                "ec2:ResourceTag/Owner": "${aws:PrincipalTag/login}"
              }
            }
          },
          {
            "Sid": "AllowStartSessionConditions",
            "Effect": "Allow",
            "Action": [
              "ssm:StartSession"
            ],
            "Resource": "*",
            "Condition": {
              "StringEquals": {
                "ssm:resourceTag/Department": "${aws:PrincipalTag/department}"
              }
            }
          },
          {
            "Sid": "AllowTerminateSessionConditions",
            "Effect": "Allow",
            "Action": [
              "ssm:TerminateSession"
            ],
            "Resource": [
              "arn:aws:ssm:*:*:session/${aws:PrincipalTag/login}-*"
            ]
          }
        ]
      }
      

    4. Choose Next: Tags.
    5. Review the selections you made, and then choose Create.

The policy described above uses SAML session tags for the ABAC to define permissions based on attributes. These attributes are the tags passed in the AssumeRoleWithSAML operation when the SAML-based federation occurs.

A combination of global (aws:TagKeys, aws:PrincipalTag, aws:RequestTag) and service (ec2:ResourceTag, ec2:CreateAction, ssm:resourceTag) condition keys is used to assign the permissions.

To learn more about AWS global and service conditions keys, see AWS global condition context keys and The condition keys table for AWS services.

Assign users to an AWS account

In this step, you use the permission set created in the previous step to assign access to the users for a specified AWS account.

To assign access to users

  1. Open the AWS SSO console.
  2. Choose AWS accounts.
  3. Under the AWS organization tab, in the list of AWS accounts, select one or more accounts to which you want to assign access.
  4. Choose Assign users.
  5. On the Select users or groups page, select both test users from the list of users as shown in Figure 4.

    Note: You can use the search box to look for specific users.

    Figure 4: Select users to assign to AWS accounts

    Figure 4: Select users to assign to AWS accounts

  6. Choose Next: Permission sets.
  7. On the Select permission sets page, select the permission sets that you created in step 5 to apply to the users from the table as shown in Figure 5.

    Figure 5: Select permissions sets

    Figure 5: Select permissions sets

  8. Choose Finish to start the configuration of your AWS account. When configuration is complete, a message is displayed stating that you have successfully configured your AWS account as shown in Figure 6.

    Figure 6: Confirmation that configuration is complete

    Figure 6: Confirmation that configuration is complete

Test the solution

Now that you have everything in place, let’s test the solution. To test the solution, you’ll log in to AWS SSO, access the AWS account and check the event logs, and test the Amazon EC2 operations.

Log in to AWS SSO as Bob through your external IdP

Enter the user portal URL in a browser window and log in to AWS SSO as Bob. AWS SSO redirects to the external provider for the log in process. After successful authentication, the external provider redirects to the AWS SSO portal, which shows you a list of the AWS accounts that you have access to. In this case, Bob has access to one AWS account as shown in Figure 7.

Figure 7: AWS SSO showing AWS accounts that the user has access to

Figure 7: AWS SSO showing AWS accounts that the user has access to

Access the AWS account using the permission set and confirm the event logs

Select the Management console link for the AWS account that has the myCustomPermissionSetEC2SSM permission set that you created earlier. This action federates into the AWS account and is logged in to AWS CloudTrail with the API AssumeRoleWithSAML. To confirm that the SAML session tags are being passed in the session, look at the API event log in the CloudTrail Event history console. In the following example, you can check the principalTags keys and their values under requestParameters.

{
     "eventVersion": "1.08",
     "userIdentity": {
          "type": "SAMLUser",
          "principalId": "d/UbWH0ijLBmlakaboZwi5CA/30=:[email protected]",
          "userName": "[email protected]",
          "identityProvider": "d/UbWH0ijLBmlakaboZwi5CA/30="
},
     "eventTime": "2021-05-13T16:08:48Z",
     "eventSource": "sts.amazonaws.com",
     "eventName": "AssumeRoleWithSAML",
     ...
     "requestParameters": {
        "sAMLAssertionID": "_5072d119-64f5-4341-aeed-30d9b7c24b5b",
        "roleSessionName": "[email protected]",
        "principalTags": {
            "SSMSessionRunAs": "bob",
            "department": "blue",
            "login": "[email protected]"
        },
        "durationSeconds": 3600,
        "roleArn": "arn:aws:iam::555555555555:role/aws-reserved/sso.amazonaws.com/AWSReservedSSO_myCustomPermissionSetEC2SSM_9e80ec498218bbea",
        "principalArn": "arn:aws:iam::555555555555:saml-provider/AWSSSO_5f872b6782a0507a_DO_NOT_DELETE"
    },
     "responseElements": {
     ...

Test EC2 operations

  1. Open the Amazon EC2 console:
    For this example, when opening the Amazon EC2 console there are already three running EC2 instances to test the ABAC policy that have been created with proper tags explained in the following step. From the top menu, you can also confirm the federated login AWSReservedSSO_myCustomPermissionSetEC2SSM_9e80ec498218bbea/[email protected] that represents the AWS SSO managed role and the user as shown in Figure 8.

    Figure 8: EC2 instances and user information

    Figure 8: EC2 instances and user information

  2. Launch a new EC2 instance:
    Start testing the ABAC policy by launching a new EC2 instance. This action is authorized only when you fill in the three required tags: Name, Owner, and Department.

    1. From the Amazon EC2 console, choose Launch Instances.
    2. Set the AMI, for this example select an Ubuntu-based OS.
    3. Set the Instance Type, a t2.micro will work.
    4. Configure the EC2 instance. Choose an IAM role to allow Systems Manager to manage the new EC2 instance. In this case, you have to create the IAM role EC2UbuntuSSMRole with the AWS managed policy AmazonEC2RoleforSSM attached in advanced with proper IAM permissions since the user Bob is not allow to do so. Then, you must use the user data to create the OS Ubuntu user—Bob—that you need to log in to the EC2 instance by using Session Manager. You can copy and paste the following to create the user “Bob”:#!/bin/bash
      sudo useradd -m bob
    5. Add storage using the default settings.
    6. Add tags. From the ABAC policy previously created, you can confirm that tag key Name can be anything as the condition StringLike is indicated with a wildcard (*). The tag keys Owner and Department have to match the principal session tags passed through federation. In this case, enter [email protected] as the key Owner, and enter blue as the Department, as shown in Figure 9.

      Figure 9: EC2 tags describing key value pairs

      Figure 9: EC2 tags describing key value pairs

    7. Configure security groups. When configuring security groups, you can choose an existing security group that doesn’t allow any inbound traffic to the SSH port. Since when using Session Manager you connect to the EC2 instance through an API that is going to be an outbound connection. This way you can safely leave the security group inbound rules close.
    8. Review and launch. It will ask you about selecting or creating a key pair. You don’t need one, because you’re using Session Manager. Proceed without selecting or creating a new SSH key pair. When launching the EC2 instance with the correct tag keys and values, you get the success message shown in Figure 10.
      Figure 10: EC2 success message launching an instance with the correct tags

      Figure 10: EC2 success message launching an instance with the correct tags

      If there are any missing tag keys or the values aren’t correct, the action will be denied as shown in Figure 11. For more information, you can decode the authorization error message using the API DecodeAuthorizationMessage.

      Figure 11: EC2 failed message launching an instance with incorrect tags

      Figure 11: EC2 failed message launching an instance with incorrect tags

  3. Stop, reboot, and terminate EC2 instances.
    The next tests are to be stop, reboot, and terminate the EC2 instances. In the ABAC policy you defined that only users who have the same department value as the resource can perform the first two actions. You can terminate and EC2 instance only if you are an owner. To stop, reboot, and terminate instances, open the EC2 Console, choose Instances, and select the instance you want to affect. Choose Instance state and choose the action you want to test: Stop instance, Reboot instance or Terminate instance.

    Trying to stop the EC2 instance amber-instance where Department is amber is shown in Figure 12.

    Figure 12: EC2 console showing how to stop an instance

    Figure 12: EC2 console showing how to stop an instance

    The action should fail as shown in Figure 13.

    Figure 13: EC2 instance failure message stopping an instance with wrong tags

    Figure 13: EC2 instance failure message stopping an instance with wrong tags

    Only when the department value of the EC2 instance is blue is it possible to stop or reboot the instance as shown in Figure 14.

    Figure 14: EC2 success message stopping an instance with correct tags

    Figure 14: EC2 success message stopping an instance with correct tags

    Only when the owner who launched the EC2 instance matches with the federated login is it possible to terminate the instance. Trying to terminate an EC2 instance that was launched by anyone other than the owner will lead to a failed action as shown in Figure 15.

    Figure 15: EC2 failed message terminating an instance with incorrect tags

    Figure 15: EC2 failed message terminating an instance with incorrect tags

  4. Try to modify tags. Because ABAC policies rely on tags, you cannot modify tags after the resources have been created. This is set in the ABAC policy statement AllowCreateTagsOnRunInstance in Create a new permission set using an ABAC policy. If you try to modify any tag keys or values on existing resources, the changes will be denied. For example, if you try to modify the owner of a tag on an existing EC2 instance, you get the “Failed to update tags” error message as shown in Figure 16.

    Figure 16: Failed message when attempting to modify tags

    Figure 16: Failed message when attempting to modify tags

  5. Connect to the EC2 instance using Session Manager.
    1. Test logging in to the EC2 instance by choosing the new instance and choosing Connect as shown in Figure 17.

      Figure 17: EC2 console selecting an instance to connect

      Figure 17: EC2 console selecting an instance to connect

    2.  Then choose the Session Manager tab and choose Connect as shown in Figure 18.
      Figure 18: EC2 console selecting Session Manager to connect

      Figure 18: EC2 console selecting Session Manager to connect

      This will open a new tab in the browser redirecting to a Systems Manager session where you can confirm that the Ubuntu OS user is Bob as shown in Figure 19.

      Figure 19: Systems Manager session started confirming Ubunto OS user

      Figure 19: Systems Manager session started confirming Ubunto OS user

      Note: By default, sessions are launched using the credentials of a system-generated account named ssm-user that is created on a managed instance. However, you can instead launch sessions using any OS user by enabling the run as feature in SSM. To learn more about this, see Enable run as support for Linux and macOS instances in the Systems Manager Session Manager user guide.

    3. Performing the same action in an EC2 instance with a different Department tag will lead to a denied action as shown in Figure 20. This is because the ABAC policy allows the StartSession action only when the Department key matches the Department value in the EC2 instance.

      Figure 20: Systems Manager StartSession failed message

      Figure 20: Systems Manager StartSession failed message

Conclusion

In this blog post, you learned how to use AWS SSO with the two methods of passing attributes to AWS account using session tags for ABAC. You also learned how to build policies with tags as conditions to simplify and reuse custom permission sets. You have seen working examples with services like EC2, and Systems Manager Session Manager. To learn more about ABAC policies, SAML session tags, and how to pass session tags in federation, see IAM tutorial: Use SAML session tags for ABAC and Passing session tags using AssumeRoleWithSAML.

If you have feedback about this post, submit comments in the Comments section below.

Want more AWS Security news? Follow us on Twitter.

Author

Rodrigo Ferroni

Rodrigo Ferroni is a senior Security Specialist at AWS Enterprise Support. He is certified in CISSP, AWS Security Specialist, and AWS Solutions Architect Associate. He enjoys helping customers to continue adopting AWS security services to improve their security posture in the cloud. Outside of work, he loves to travel as much as he can. In every winter he enjoys snowboarding with his friends.

Authenticate AWS Client VPN users with AWS Single Sign-On

Post Syndicated from Sylvia Qi original https://aws.amazon.com/blogs/security/authenticate-aws-client-vpn-users-with-aws-single-sign-on/

AWS Client VPN is a managed client-based VPN service that enables users to use an OpenVPN-based client to securely access their resources in Amazon Web Services (AWS) and in their on-premises network from any location. In this blog post, we show you how you can integrate Client VPN with your existing AWS Single Sign-On via a custom SAML 2.0 application to authenticate and authorize your Client VPN connections and traffic.

Maintaining a separate set of credentials to authenticate users and authorize access for each resource is not only tedious, it’s not scalable. A common way to solve this challenge is to use a central identity store such as AWS SSO, which functions as your identity provider (IdP). You can then use Security Assertion Markup Language 2.0 (SAML 2.0) to integrate AWS SSO with each of your resources or applications, also known as service providers (SPs). The IdP authenticates users and passes their identity and security information to the SP via SAML. With SAML, you can enable a single sign-on experience for your users across many SAML-enabled applications and services. Users authenticate with the IdP once using a single set of credentials, and then have access to multiple applications and services without additional sign-ins.

Client VPN supports identity federation with SAML 2.0 for Client VPN endpoints. Deploying custom SAML applications can present some challenges, specifically around the mapping of attributes between what the SP expects to receive and what the IdP can provide. We’ve taken the guesswork out of the process and show you the exact mappings needed for the Client VPN to AWS SSO integration. The integration lets you use AWS SSO groups to not only grant access to create a Client VPN connection, but also to allow access to specific network ranges based upon group membership. We walk you through setting up all of the components required to implement the authentication workflow described in Figure 1. This consists of creating the custom SAML applications and tying them into AWS Identity and Access Management (IAM), creating and configuring the Client VPN endpoint, creating a Client VPN connection with an AWS SSO user, and testing your connectivity.
 

Figure 1: Authentication workflow

Figure 1: Authentication workflow

The steps illustrated in Figure 1 are:

  1. The user opens the AWS-provided VPN client on their device and initiates a connection to the Client VPN endpoint.
  2. The Client VPN endpoint sends an IdP URL and authentication request back to the client, based on the information that was provided in the IAM SAML provider.
  3. The AWS provided VPN client opens a new browser window on the user’s device. The browser makes a request to the IdP and displays a sign-in page. This is the same sign-in experience as the AWS SSO user portal, as the IdP URL points to a custom SAML application created within AWS SSO.
  4. The user enters their credentials on the sign-in page, and the IdP sends a signed SAML assertion back to the client in the form of an HTTP POST to the AWS provided VPN client.
  5. The SAML assertion is passed from the AWS provided VPN client to the Client VPN endpoint.
  6. The endpoint validates the assertion and either allows or denies access to the user.

Prerequisites

Here are the requirements to complete the VPN and SSO setup:

  • AWS SSO is configured to use the internal AWS SSO identity store. Refer to the AWS Single Sign-On Getting Started guide for help configuring AWS SSO. AWS SSO can exist in a different AWS account than the account where you deploy Client VPN endpoints. The steps outlined in this blog post are specific to the internal AWS SSO identity store, however they could be adapted to support other identity stores that support SAML 2.0.
  • Two AWS SSO users and two AWS SSO groups for testing. Each user should be a member of only one of the SSO groups. The purpose of this configuration is to demonstrate how access can be allowed or denied based upon group membership.
  • An Amazon Virtual Private Cloud (Amazon VPC) with an Amazon Elastic Compute Cloud (Amazon EC2) instance for connectivity testing.
  • An x.509 certificate imported into AWS Certificate Manager (ACM). You can generate a self-signed certificate for this walkthrough, however you should review the prerequisites for importing certificates into ACM. This certificate will be used for encrypted communication between the client VPN software and the client VPN endpoint.
  • Administrative access to your AWS environment, or at least sufficient access to create AWS SSO applications, ACM certificates, EC2 Instances, and Client VPN endpoints.
  • A client device running Windows or macOS with the latest version of Client VPN software installed. You can download it from the AWS Client VPN download.

Solution walkthrough

For this solution, you’ll complete the following steps:

  1. Establish trust with your IdP
  2. Create and configure Client VPN SAML applications in AWS SSO.
  3. Integrate the Client VPN SAML applications with IAM.
  4. Create and configure the Client VPN endpoint.
  5. Test the solution.
  6. Cleanup the test environment.

Establish trust with your IdP

In this walkthrough, Client VPN is the SAML SP and AWS SSO is the SAML IdP. One of the key steps to deploying this solution is to establish trust between the SP and IdP. This one-time configuration is done by creating custom SAML applications within AWS SSO and exporting application-specific metadata information from the applications. This metadata is then uploaded—in the form of IAM IdPs—into your AWS account where the Client VPN endpoint is created. IAM IdPs let you manage your user identities in a centralized identity store, such as AWS SSO, and grant those user identities permissions to AWS resources within your account. For organizations with multiple AWS accounts, the use of IAM IdPs resolves the management, scalability, and security issues associated with creating IAM users directly within each account.

Create and configure the Client VPN SAML applications in AWS SSO

Create two custom SAML 2.0 applications in AWS SSO. One will be the IdP for the Client VPN software, the other will be a self-service portal that allows users to download their Client VPN software and client configuration file.

To create the VPN client SAML application:

  1. In the AWS SSO console, select Applications from the left pane and select Add a new application.
  2. Select Add a custom SAML 2.0 application to use as the IdP for the Client VPN software.
     
    Figure 2: Add a SAML application

    Figure 2: Add a SAML application

  3. In the Details section, set Display name to VPN Client.
  4. In the Application Metadata section, select If you don’t have a metadata file, you can manually type your metadata values and enter the following values:
    • Application ACS URL: http://127.0.0.1:35001
    • Application SAML audience: urn:amazon:webservices:clientvpn
  5. Accept the default values for all other fields.
  6. Choose Save Changes.
  7. Select the Attribute mappings tab and configure the mappings as shown in the table and Figure 3 below.

    Note: For production environments, you should grant access to these applications via an AWS SSO group instead of individual users as shown in this walkthrough.

    User attribute in the application Maps to this string value or user attribute in AWS SSO Format
    Subject ${user:email} emailAddress
    Name ${user:email} unspecified
    FirstName ${user:givenName} unspecified
    LastName ${user:familyName} unspecified
    memberOf ${user:groups} unspecified
    Figure 3: VPN client attribute mappings

    Figure 3: VPN client attribute mappings

  8. On the Assign users tab, add your two test user accounts.
  9. On the application configuration page, choose the download link for AWS SSO SAML metadata. Save the file to use in a later step.

To create the VPN client self-service SAML application

  1. In the AWS SSO console, select Applications from the left pane and select Add a new application.
  2. Select Add a custom SAML 2.0 application to use as the application that will serve as the IdP for the Client VPN software.
     
    Figure 4: Add a SAML application

    Figure 4: Add a SAML application

  3. In the Details section, set Display name to VPN Client Self Service.
  4. In the Application Metadata section, select If you don’t have a metadata file, you can manually type your metadata values and enter the following values:
    • Application ACS URL: https://self-service.clientvpn.amazonaws.com/api/auth/sso/saml
    • Application SAML audience: urn:amazon:webservices:clientvpn
  5. Accept the default values for all other fields.
  6. Choose Save Changes.
  7. Choose the Attribute mappings tab and configure the mappings as shown in the following table and in Figure 5.

    Note: For production environments you should grant access to these applications via an AWS SSO group instead of individual users as shown in this walkthrough. For the purposes of this walkthrough, you grant individual users access to the SAML applications but grant network access via group membership. This is done to allow easier demonstration of the ability to grant or deny network specific access via groups when testing the solution.

    User attribute in the application Maps to this string value or user attribute in AWS SSO Format
    Subject ${user:email} emailAddress
    Name ${user:email} unspecified
    FirstName ${user:givenName} unspecified
    LastName ${user:familyName} unspecified
    memberOf ${user:groups} unspecified
    Figure 5: VPN Client self-service attribute mappings

    Figure 5: VPN Client self-service attribute mappings

  8. On the Assign users tab, add your two test user accounts.
  9. On the application’s Configuration page, choose the download link for AWS SSO SAML metadata. Save the file to use in a later step.

Integrate the Client VPN SAML applications with IAM

Client VPN requires a unique IdP definition in IAM. You must set up the IdP in the same AWS account where the Client VPN endpoint will be created.

To create the IAM IdP:

  1. In the IAM console, select Identity providers and Add provider. Name the provider aws-client-vpn and upload the metadata document that you downloaded from the VPN Client SAML application.
  2. Add a second provider, name the provider aws-client-vpn-self-service and upload the metadata document that you downloaded from the VPN Client Self Service SAML application.

Create and configure the Client VPN endpoint

All Client VPN sessions end at the Client VPN endpoint. You configure the Client VPN endpoint to manage and control all Client VPN sessions. In the following steps, you create a Client VPN endpoint and configure it to use the newly added IAM IdPs. You then associate the endpoint with a VPC and configure authorization rules to allow traffic into the VPC, then set up the Client VPN self-service portal.

To create the Client VPN endpoint

  1. Open the AWS VPC console and select Client VPN Endpoints and then select Create Client VPN endpoint.
  2. Enter a Name Tag and Description for the endpoint.
  3. Enter 172.16.0.0/22 for the Client IPv4 CIDR. This is the IP range that will be allocated to your VPN clients. It shouldn’t overlap the CIDR of your AWS VPCs or of the network that your client device is connected to and must be at least a /22 bitmask. You can adjust this value as needed for your specific network requirements. The Client IPv4 CIDR value can only be set during endpoint creation.

    Note: For production environments you should review the Client VPN documentation for scaling considerations before you create the endpoint.

  4. In the Server certificate ARN drop down menu, select the ACM certificate that you created for your VPN clients.
  5. Set the Authentication Options to Use user-based authentication with Federated authentication. Select the aws-client-vpn IAM IdP for the SAML provider ARN, and select the aws-client-vpn-self-service IAM IdP as the Self-service SAML provider ARN.
     
    Figure 6: Authentication settings

    Figure 6: Authentication settings

  6. For this walkthrough, set Connection Logging to No. Connection logging is a feature of Client VPN that enables you to capture connection logs for your Client VPN endpoint. Those logs are published to an Amazon CloudWatch Logs log group in your account. For production environments or for troubleshooting purposes, you can enable connection logging while or after you create the endpoint.
  7. Select the VPC ID to associate with the endpoint. This should be the VPC with an EC2 instance deployed that can be used to test connectivity. You can select an existing security group, or create a new one for the VPN endpoint. The only requirement for this walkthrough is that it has outbound rules that allow access to your test EC2 instance. For additional flexibility, you can create and apply multiple security groups that use different rulesets to the endpoint to provide fine-grained control of which resources can be accessed within the VPC.
  8. Select Enable self-service portal and—if desired—select Enable split-tunnel. Split tunneling is designed to ensure that only client traffic destined for the IP ranges configured on the Client VPN endpoint is routed to your VPC. By default, all traffic, including internet bound traffic, is routed through your VPC.
  9. Choose Create Client VPN endpoint.

To configure the Client VPN endpoint

  1. On the Client VPN endpoint Associations tab, select Associate. Select the same VPC that you chose when you set up the endpoint and select a subnet to associate. This creates an elastic network interface (ENI) in the selected subnet that will be the ingress point from VPN clients into your AWS VPC. For production environments, you should select at least two subnets based upon your redundancy requirements.
  2. Authorizing VPN ingress traffic from your users can be done either globally for all users or via group membership. When granting access via an AWS SSO group, you must use the group ID of the AWS SSO group, not the friendly name of the group. After selecting a group in the AWS SSO management console, you can find group ID in the Details section. You can also obtain the group ID by using AWS Command Line Interface (AWS CLI) to issue the following command, replacing the <AWSRegion>, <Identity Store ID>, and <AWS SSO Group Display Name> variables with your information. This command should be issued within the same AWS account where AWS SSO is configured. The identity store ID can be found in the AWS SSO console under Settings.
    aws identitystore list-groups --region <AWSRegion> --identity-store-id <Identity Store ID> --filter AttributePath=DisplayName,AttributeValue=<AWS SSO Group Display Name>
    

  3. Create an ingress authorization rule by selecting Authorize Ingress on the Authorization tab. Configure the destination network to enable as 0.0.0.0/0, set Grant access to: Allow access to users in a specific access group and enter the access group ID that you discovered in the previous step. This should be the group that contains one of your test user accounts. For production environments, you should follow the principle of least privilege and narrow the destination network range to only what is required. Ingress authorization rules can be used to restrict network access to specific network ranges based upon IdP group membership. You can use a client connection handler to enforce additional security policies on Client VPN connections. Refer to the Client VPN documentation for additional details.
    Figure 7: Add authorization rule

    Figure 7: Add authorization rule

  4. From the Client VPN Endpoint Summary tab, copy the Self-service portal URL to use in the next step.

To set up the Client VPN self-service portal

  1. Open the Client VPN self-service SAML application in the AWS SSO management console to edit the configuration.
  2. In the Application start URL textbox, paste the Client VPN endpoint self-service portal URL that you copied in the previous section. This ties the Client VPN self-service SAML application to the self-service portal URL for the specific Client VPN endpoint that you created, allowing users to download their AWS VPN Client configuration file.
     
    Figure 8: Client VPN self-service portal

    Figure 8: Client VPN self-service portal

Test the solution

During the testing phase, you download the VPN client configuration file and configure the VPN client application. You then create a Client VPN connection and validate that you have access to your target VPC. You also test the Client VPN connection with multiple user accounts in order to confirm that the ingress authorization rules are functioning as expected.

To test the Client VPN solution:

  1. Open an internet browser and sign in to your AWS SSO user portal as a user who has access to the VPN Client SAML applications and is a member of the AWS SSO group defined in the VPN endpoint ingress authorization rule. You should see two new SAML applications. Select the VPN client self-service application.
  2. In the VPN Client Self Service portal, you can download the AWS VPN Client software if you haven’t already done so. Select Download client configuration and save the file on your local device. Close the browser window that you used to sign in to the AWS SSO user portal.
  3. Open the AWS VPN Client application and configure a new profile, selecting the client configuration file that you downloaded in the previous step. Once your client profile has been created, select Connect.
     
    Figure 9: VPN Client ready to connect

    Figure 9: VPN Client ready to connect

  4. A new browser window should open automatically to an AWS SSO sign-in page. Enter the credentials of your test user who is a member of the AWS SSO group defined in your ingress authorization rule.
  5. Upon a successful connection through the VPN client, you can make a management connection (RDP, SSH, HTTP, or other) to one of the EC2 instances within your VPC. Connect to the private IPv4 address of your EC2 instance (rfc1918)—you should not attempt to connect to your EC2 instance through an EIP. You might need to adjust the security group rules on your EC2 instance to allow traffic from the subnets that you selected when you created the VPN endpoint associations.
  6. Once you have a successful connection to your test EC2 instance and you know that your Client VPN connectivity is working, you should also validate that access is denied for users who aren’t a member of the group specified in your ingress authorization rule.
    1. Disconnect from your Client VPN connection and close all browser windows.
    2. Depending upon your internet browser and its configuration, you might need to delete any cookies associated with your AWS SSO user portal in order to sign in as a different AWS SSO user.
    3. Initiate a new Client VPN connection and sign in as the test user account that is not a member of the AWS SSO group specified in the ingress authorization rule.
    4. You should be able to successfully establish the Client VPN connection, but not to access your test EC2 instance. This validates that the ingress authorization rule isn’t allowing Client VPN traffic from users who aren’t a member of the AWS SSO group to enter your VPC.

Troubleshooting

If you have any issues completing the walkthrough and testing, here are some things that you can check:

  • In the AWS VPC management console, review the Connections tab to verify that you see a connection from your test user account and that it’s active.
  • Confirm that your test user account is in the group that was defined in your ingress authorization rule.
  • Confirm that the access group ID specified in the ingress authorization rule is for the AWS SSO group that your test user is a member of.
  • Confirm that the AWS SSO group still exists and hasn’t been deleted. You might encounter an error message similar to the one shown in Figure 10 if you attempt a Client VPN connection but the AWS SSO group no longer exists.
     
    Figure 10: Error message

    Figure 10: Error message

  • If you receive a credential error when attempting to sign in to the AWS SSO browser window that’s launched by the VPN Client application, you might have an issue with the ACM certificate that you’re using. There can be authentication related issues if the root CA certificates aren’t correct or if any part of the certificate chain is missing.
  • Validate your EC2 instance security group rules and VPC route table configuration. From a routing perspective, your test EC2 instance must be accessible from the subnet that you selected when you created the Client VPN endpoint association.
  • If you want to see the SAML assertion that’s being sent to the AWS VPN client application. Sign in to the AWS SSO user portal, and hold down the Shift key while selecting the VPN client SAML application. A new browser tab will open with the SAML assertion visible. The SAML assertion contains the access group IDs of all groups that your test user is a member of. You can use this information to validate that the correct group memberships and group IDs are defined in your ingress authorization rules.
  • Make sure that TCP port 35001 is available on your client device. It shouldn’t be used by any other process or blocked by a firewall. Port 35001 only needs to be open on your localhost interface. The SAML assertion is sent to localhost on port 35001 as an HTTP POST from the browser window opened by the AWS VPN client application after a successful sign-in.

Clean up the test environment

To avoid charges for the use of AWS EC2, Client VPN, SSO, or ACM services, remove any components that were created as part of this walkthrough. Components that can be deleted if applicable are:

  1. The Client VPN endpoint. You must first remove all associations that were created for the endpoint.
  2. The EC2 instance and VPC.
  3. The test IdPs from IAM.
  4. The VPN client custom SAML applications from AWS SSO.
  5. AWS SSO users and groups.
  6. The ACM certificate.

Conclusion

In this blog post, we’ve shown how you can integrate Client VPN and AWS SSO to provide a familiar and seamless VPN connection experience to your users. By adding the Client VPN self-service portal, you can reduce the effort needed to deploy the solution by allowing users to perform their own VPN client application installation and configuration. We demonstrated the creation of IdPs using AWS SSO custom applications and then showed you how to configure a Client VPN endpoint to use SAML-based federated authentication and associate it with the IdPs. Client VPN users can then use their centralized credentials to connect to the Client VPN endpoint and access specific network ranges based upon their group membership or further refined through a client connection handler.

If you have feedback about this post, submit comments in the Comments section below.

Want more AWS Security how-to content, news, and feature announcements? Follow us on Twitter.

Author

Drew Marumoto

Drew is a DevOps Consultant with Aws Professional Service. A long time system administrator with a passion for automation and orchestration, he enjoys solving difficult problems for customers and helping them achieve their business goals.

Author

Sylvia Qi

Sylvia is a DevOps Consultant focusing on architecting and automating DevOps processes, helping customers through their DevOps transformation journey, and achieving their goals. In her spare time, she enjoyes biking, swimming, painting, and photograhy.

Configure SAML single sign-on for Kibana with AD FS on Amazon Elasticsearch Service

Post Syndicated from Sajeev Attiyil Bhaskaran original https://aws.amazon.com/blogs/security/configure-saml-single-sign-on-for-kibana-with-ad-fs-on-amazon-elasticsearch-service/

It’s a common use case for customers to integrate identity providers (IdPs) with Amazon Elasticsearch Service (Amazon ES) to achieve single sign-on (SSO) with Kibana. This integration makes it possible for users to leverage their existing identity credentials and offers administrators a single source of truth for user and permissions management. In this blog post, we’ll discuss how you can configure Security Assertion Markup Language (SAML) authentication for Kibana by using Amazon ES and Microsoft Active Directory Federation Services (AD FS).

Amazon ES now natively supports SSO authentication that uses the SAML protocol. With SAML authentication for Kibana, users can integrate directly with their existing third-party IdPs, such as Okta, Ping Identity, OneLogin, Auth0, AD FS, AWS Single Sign-on, and Azure Active Directory. SAML authentication for Kibana is powered by Open Distro for Elasticsearch, an Apache 2.0-licensed distribution of Elasticsearch, and is available to all Amazon ES customers who have enabled fine-grained access controls.

When you set up SAML authentication with Kibana, you can configure authentication that uses either service provider (SP)-initiated SSO or IdP-initiated SSO. The SP-initiated SSO flow occurs when a user directly accesses any SAML-configured Kibana endpoint, at which time Amazon ES redirects the user to their IdP for authentication, followed by a redirect back to Amazon ES after successful authentication. An IdP-initiated SSO flow typically occurs when a user chooses a link that first initiates the sign-in flow at the IdP, skipping the redirect between Amazon ES and the IdP. This blog post will focus on the SAML SP-initiated SSO flow.

Prerequisites

To complete this walkthrough, you must have the following:

Solution overview

For the solution presented in this post, you use your existing AD FS as an IdP for the user’s authentication. The SAML federation uses a claim-based authentication model in which user attributes (in this case stored in Active Directory) are passed from the IdP (AD FS) to the SP (Kibana).

Let’s walk through how a user would use the SAML protocol to access Amazon ES Kibana (the SP) while using AD FS as the IdP. In Figure 1, the user authentication request comes from an on-premises network, which is connected to Amazon VPC through a VPN connection—in this case, this could also be over AWS Direct Connect. The Amazon ES domain and AD FS are created in the same VPC.

Figure 1: A high-level view of a SAML transaction between Amazon ES and AD FS

Figure 1: A high-level view of a SAML transaction between Amazon ES and AD FS

The initial sign-in flow is as follows:

  1. Open a browser on the on-premises computer and navigate to the Kibana endpoint for your Amazon ES domain in the VPC.
  2. Amazon ES generates a SAML authentication request for the user and redirects it back to the browser.
  3. The browser redirects the SAML authentication request to AD FS.
  4. AD FS parses the SAML request and prompts user to enter credentials.
    1. User enters credentials and AD FS authenticates the user with Active Directory.
    2. After successful authentication, AD FS generates a SAML response and returns the encoded SAML response to the browser. The SAML response contains the destination (the Assertion Consumer Service (ACS) URL), the authentication response issuer (the AD FS entity ID URL), the digital signature, and the claim (which user is authenticated with AD FS, the user’s NameID, the group, the attribute used in SAML assertions, and so on).
  5. The browser sends the SAML response to the Kibana ACS URL, and then Kibana redirects to Amazon ES.
  6. Amazon ES validates the SAML response. If all the validations pass, you are redirected to the Kibana front page. Authorization is performed by Kibana based on the role mapped to the user. The role mapping is performed based on attributes of the SAML assertion being consumed by Kibana and Amazon ES.

Deploy the solution

Now let’s walk through the steps to set up SAML authentication for Kibana single sign-on by using Amazon ES and Microsoft AD FS.

Enable SAML for Amazon Elasticsearch Service

The first step in the configuration setup process is to enable SAML authentication in the Amazon ES domain.

To enable SAML for Amazon ES

  1. Sign in to the Amazon ES console and choose any existing Amazon ES domain that meets the criteria described in the Prerequisites section of this post.
  2. Under Actions, select Modify Authentication.
  3. Select the Enable SAML authentication check box.
    Figure 2: Enable SAML authentication

    Figure 2: Enable SAML authentication

    When you enable SAML, it automatically creates and displays the different URLs that are required to configure SAML support in your IdP.

    Figure 3: URLs for configuring the IdP

    Figure 3: URLs for configuring the IdP

  4. Look under Configure your Identity Provider (IdP), and note down the URL values for Service provider entity ID and SP-initiated SSO URL.

Set up and configure AD FS

During the SAML authentication process, the browser receives the SAML assertion token from AD FS and forwards it to the SP. In order to pass the claims to the Amazon ES domain, AD FS (the claims provider) and the Amazon ES domain (the relying party) have to establish a trust between them. Then you define the rules for what type of claims AD FS needs to send to the Amazon ES domain. The Amazon ES domain authorizes the user with internal security roles or backend roles, according to the claims in the token.

To configure Amazon ES as a relying party in AD FS

  1. Sign in to the AD FS server. In Server Manager, choose Tools, and then choose AD FS Management.
  2. In the AD FS management console, open the context (right-click) menu for Relying Party Trust, and then choose Add Relying Party Trust.

    Figure 4: Set up a relying party trust

    Figure 4: Set up a relying party trust

  3. In the Add Relying Party Trust Wizard, select Claims aware, and then choose Start.

    Figure 5: Create a claims aware application

    Figure 5: Create a claims aware application

  4. On the Select Data Source page, choose Enter data about the relying party manually, and then choose Next.

    Figure 6: Enter data about the relying party manually

    Figure 6: Enter data about the relying party manually

  5. On the Specify Display Name page, type in the display name of your choice for the relying party, and then choose Next. Choose Next again to move past the Configure Certificate screen. (Configuring a token encryption certificate is optional and at the time of writing, Amazon ES doesn’t support SAML token encryption.)

    Figure 7: Provide a display name for the relying party

    Figure 7: Provide a display name for the relying party

  6. On the Configure URL page, do the following steps.
    1. Choose the Enable support for the SAML 2.0 WebSSO protocol check box.
    2. In the URL field, add the SP-initiated SSO URL that you noted when you enabled SAML authentication in Amazon ES earlier.
    3. Choose Next.

      Figure 8: Enable SAML support and provide the SP-initiated SSO URL

      Figure 8: Enable SAML support and provide the SP-initiated SSO URL

  7. On the Configure Identifiers page, do the following:
      1. For Relying party trust identifier, provide the service provider entity ID that you noted when you enabled SAML authentication in Amazon ES.
      2. Choose Add, and then choose Next.


    Figure 9: Provide the service provider entity ID

    Figure 9: Provide the service provider entity ID

  8. On the Choose Access Control Policy page, choose the appropriate access for your domain. Depending on your requirements, choose one of these options:
    • Choose Permit Specific Group to restrict access to one or more groups in your Active Directory domain based on the Active Directory group.
    • Choose Permit Everyone to allow all Active Directory domain users to access Kibana.

    Note: This step only provides access for the users to authenticate into Kibana. You have not yet set up Open Distro security roles and permissions.


    Figure 10: Choose an access control policy

    Figure 10: Choose an access control policy

  9. On the Ready to Add Trust page, choose Next, and then choose Close.

Now you’ve finished adding Amazon ES as a relying party trust.

To configure claim issuance rules for the relying party during the authentication process, AD FS sends user attributes—claims—to the relying party. With claim rules, you define what claims AD FS can send to the Amazon ES domain. In the following procedure, you create two claim rules: one is to send the incoming Windows account name as the Name ID and the other is to send Active Directory groups as roles.

To configure claim issuance rules

  1. On the Relying Party Trusts page, right-click the relying party trust (in this case, AWS_ES_Kibana) and choose Edit Claim Issuance Policy.

    Figure 11: Edit the claim issuance policy

    Figure 11: Edit the claim issuance policy

  2. Configure the claim rule to send the Windows account name as the Name ID, using these steps.
    1. In the Edit Claim Issuance Policy dialog box, choose Add Rule. The Add Transform Claim Rule Wizard opens.
    2. For Rule Type, choose Transform an Incoming Claim, and then choose Next.
    3. On the Configure Rule page, enter the following information:
      • Claim rule name: NameId
      • Incoming claim type: Windows account name
      • Outgoing claim type: Name ID
      • Outgoing name ID format: Unspecified
      • Pass through all claim values: Select this option
    4. Choose Finish.


    Figure 12: Set the claim rule for Name ID

    Figure 12: Set the claim rule for Name ID

  3. Configure Active Directory groups to send as roles, using the following steps.
    1. In the Edit Claim Issuance Policy dialog box, choose Add Rule. The Add Transform Claim Rule Wizard opens.
    2. For Rule Type, choose Send LDAP Attributes as Claims, and then choose Next.
    3. On the Configure Rule page, enter or choose the following settings:
      • Claim rule name: Send-Groups-as-Roles
      • Attribute store: Active Directory
      • LDAP attribute: Token-Groups – Unqualified Names (to select the group name)
      • Outgoing claim type: Roles (the value for Roles should match the Roles Key that you will set in the Configure SAML in the Amazon ES domain step later in this process)
    4. Choose Finish

      Figure 13: Set claim rule for Active Directory groups as Roles

      Figure 13: Set claim rule for Active Directory groups as Roles

The configuration of AD FS is now complete and you can download the SAML metadata file from AD FS. The SAML metadata is in XML format and is needed to configure SAML in the Amazon ES domain. The AD FS metadata file (the IdP metadata) can be accessed from the following link (replace <AD FS FQDN> with the domain name of your AD FS server). Copy the XML and note down the value of entityID from the XML, as shown in Figure 14. You will need this information in the next steps.

https://<AD FS FQDN>/FederationMetadata/2007-06/FederationMetadata.xml


Figure 14: The value of entityID in the XML file

Figure 14: The value of entityID in the XML file

Configure SAML in the Amazon ES domain

Next, you configure SAML settings in the Amazon Elasticsearch Service console. You need to import the IdP metadata, configure the IdP entity ID, configure the backend role, and set up the Roles key.

To configure SAML setting in the Amazon ES domain

    1. Sign in to the Amazon Elasticsearch Service console. On the Actions menu, choose Modify authentication.
    2. Import the IdP metadata, using the following steps.
      1. Choose Import IdP metadata, and then choose Metadata from IdP.
      2. Paste the contents of the FederationMetadata XML file (the IdP metadata) that you copied earlier in the Add or edit metadata field. You can also choose the Import from XML file button if you have the metadata file on the local disk.

        Figure 15: The imported identity provider metadata

        Figure 15: The imported identity provider metadata

    3. Copy and paste the value of entityID from the XML file to the IdP entity ID field, if that field isn’t autofilled.
    4. For SAML manager backend role (the console may refer to this as master backend role), enter the name of the group you created in AD FS as part of the prerequisites for this post. In this walkthrough, we set the name of the group as admins, and therefore the backend role is admins.

Optionally, you can also provide the user name instead of the backend role.

  1. Set up the Roles key, using the following steps.
    1. Under Optional SAML settings, for Roles key, enter Roles. This value must match the value for Outgoing claim type, which you set when you configured claims rules earlier.

      Figure 16: Set the Roles key

      Figure 16: Set the Roles key

    2. Leave the Subject key field empty to use the NameID element of the SAML assertion for the user name. Keep the defaults for everything else, and then choose Submit.

It can take few minutes to update the SAML settings and for the domain to come back to the active state.

Congratulations! You’ve completed all the SP and IdP configurations.

Sign in to Kibana

When the domain comes back to the active state, choose the Kibana URL in the Amazon ES console. You will be redirected to the AD FS sign-in page for authentication. Provide the user name and password for any of the users in the admins group. The example in Figure 17 uses the credentials for the user [email protected], who is a member of the admins group.

Figure 17: The AD FS sign-in screen with user credentials

Figure 17: The AD FS sign-in screen with user credentials

AD FS authenticates the user and redirect the page to Kibana. If the user has at least one role mapped, you go to the Kibana home page, as shown in Figure 18. In this walkthrough, you mapped the AD FS group admins as a backend role to the manager user. Internally, the Open Distro security plugin maps the backend role admins to the security roles all_access and security_manager. Therefore, the Active Directory user in the admins group is authorized with the privileges of the manager user in the domain. For more granular access, you can create different AD FS groups and map the group names (backend roles) to internal security roles by using Role Mappings in Kibana.

Figure 18: The AD FS user user1@example.com is successfully logged in to Kibana

Figure 18: The AD FS user [email protected] is successfully logged in to Kibana

Note: At the time of writing for this blog post, if you specify the <SingleLogoutService /> details in the AD FS metadata XML, when you sign out from Kibana, Kibana will call AD FS directly and try to sign the user out. This doesn’t work currently, because AD FS expects the sign-out request to be signed with a certificate that Amazon ES doesn’t currently support. If you remove <SingleLogoutService /> from the metadata XML file, Amazon ES will use its own internal sign-out mechanism and sign the user out on the Amazon ES side. No calls will be made to AD FS for signing out.

Conclusion

In this post, we covered setting up SAML authentication for Kibana single sign-on by using Amazon ES and Microsoft AD FS. The integration of IdPs with your Amazon ES domain provides a powerful way to control fine-grained access to your Kibana endpoint and integrate with existing identity lifecycle processes for create/update/delete operations, which reduces the operational overhead required to manage users.

If you have feedback about this post, submit comments in the Comments section below. If you have questions about this post, start a new thread on the Amazon Elasticsearch Service forum or contact AWS Support.

Want more AWS Security how-to content, news, and feature announcements? Follow us on Twitter.

Author

Sajeev Attiyil Bhaskaran

Sajeev works closely with AWS customers to provide them architectural and engineering assistance and guidance. He dives deep into big data technologies and streaming solutions and leads onsite and online sessions for customers to design best solutions for their use cases. Outside of work, he enjoys spending time with his wife and daughter.

Author

Jagadeesh Pusapadi

Jagadeesh is a Senior Solutions Architect with AWS working with customers on their strategic initiatives. He helps customers build innovative solutions on the AWS Cloud by providing architectural guidance to achieve desired business outcomes.

Build an end-to-end attribute-based access control strategy with AWS SSO and Okta

Post Syndicated from Louay Shaat original https://aws.amazon.com/blogs/security/build-an-end-to-end-attribute-based-access-control-strategy-with-aws-sso-and-okta/

This blog post discusses the benefits of using an attribute-based access control (ABAC) strategy and also describes how to use ABAC with AWS Single Sign-On (AWS SSO) when you’re using Okta as an identity provider (IdP).

Over the past two years, Amazon Web Services (AWS) has invested heavily in making ABAC available across the majority of our services. With ABAC, you can simplify your access control strategy by granting access to groups of resources, which are specified by tags, instead of managing long lists of individual resources. Each tag is a label that consists of a user-defined key and value, and you can use these to assign metadata to your AWS resources. Tags can help you manage, identify, organize, search for, and filter resources. You can create tags to categorize resources by purpose, owner, environment, or other criteria. To learn more about tags and AWS best practices for tagging, see Tagging AWS resources.

The ability to include tags in sessions—combined with the ability to tag AWS Identity and Access Management (IAM) users and roles—means that you can now incorporate user attributes from your identity provider as part of your tagging and authorization strategy. Additionally, user attributes help organizations to make permissions more intuitive, because the attributes are easier to relate to teams and functions. A tag that represents a team or a job function is easier to audit and understand.

For more information on ABAC in AWS, see our ABAC documentation.

Why use ABAC?

ABAC is a strategy that that can help organizations to innovate faster. Implementing a purely role-based access control (RBAC) strategy requires identity and security teams to define a large number of RBAC policies, which can lead to complexity and time delays. With ABAC, you can make use of attributes to build more dynamic policies that provide access based on matching the attribute conditions. AWS supports both RBAC and ABAC as co-existing strategies, so you can use ABAC alongside your existing RBAC strategy.

A good example that uses ABAC is the scenario where you have two teams that require similar access to their secrets in AWS Secrets Manager. By using ABAC, you can build a single role or policy with a condition based on the Department attribute from your IdP. When the user is authenticated, you can pass the Department attribute value and use a condition to provide access to resources that have the identical tag, as shown in the following code snippet. In this post, I show how to use ABAC for this example scenario.

"Condition": {
                "StringEquals": {
                    "secretsmanager:ResourceTag/Department": "${aws:PrincipalTag/Department}"

ABAC provides organizations with a more dynamic way of working with permissions. There are four main benefits for organizations that use ABAC:

  • Scale your permissions as you innovate: As developers create new project resources, administrators can require specific attributes to be applied when resources are created. This can include applying tags with attributes that give developers immediate access to the new resources they create, without requiring an update to their own permissions.
  • Help your teams to change and grow quickly: Because permissions are based on user attributes from a corporate identity source such as an IdP, changing user attributes in the IdP that you use for access control in AWS automatically updates your permissions in AWS.
  • Create fewer AWS SSO permission sets and IAM roles: With ABAC, multiple users who are using the same AWS SSO permission set and IAM role can still get unique permissions, because permissions are now based on user attributes. Administrators can author IAM policies that grant users access only to AWS resources that have matching attributes. This helps to reduce the number of IAM roles you need to create for various use cases in a single AWS account.
  • Efficiently audit who performed an action: By using attributes that are logged in AWS CloudTrail next to every action that is performed in AWS by using an IAM role, you can make it easier for security administrators to determine the identity that takes actions in a role session.

Prerequisites

In this section, I describe some higher-level prerequisites for using ABAC effectively. ABAC in AWS relies on the use of tags for access-control decisions, so it’s important to have in place a tagging strategy for your resources. To help you develop an effective strategy, see the AWS Tagging Strategies whitepaper.

Organizations that implement ABAC can enhance the use of tags across their resources for the purpose of identity access. Making sure that tagging is enforced and secure is essential to an enterprise-wide strategy. For more information about enforcing a tagging policy, see the blog post Enforce Centralized Tag Compliance Using AWS Service Catalog, DynamoDB, Lambda, and CloudWatch Events.

You can use the service AWS Resource Groups to identify untagged resources and to find resources to tag. You can also use Resource Groups to remediate untagged resources.

Use AWS SSO with Okta as an IdP

AWS SSO gives you an efficient way to centrally manage access to multiple AWS accounts and business applications, and to provide users with single sign-on access to all their assigned accounts and applications from one place. With AWS SSO, you can manage access and user permissions to all of your accounts in AWS Organizations centrally. AWS SSO configures and maintains all the necessary permissions for your accounts automatically, without requiring any additional setup in the individual accounts.

AWS SSO supports access control attributes from any IdP. This blog post focuses on how you can use ABAC attributes with AWS SSO when you’re using Okta as an external IdP.

Use other single sign-on services with ABAC

This post describes how to turn on ABAC in AWS SSO. To turn on ABAC with other federation services, see these links:

Implement the solution

Follow these steps to set up Okta as an IdP in AWS SSO and turn on ABAC.

To set up Okta and turn on ABAC

  1. Set up Okta as an IdP for AWS SSO. To do so, follow the instructions in the blog post Single Sign-On Between Okta Universal Directory and AWS. For more information on the supported actions in AWS SSO with Okta, see our documentation.
  2. Enable attributes for access control (in other words, turn on ABAC) in AWS SSO by using these steps:
    1. In the AWS Management Console, navigate to AWS SSO in the AWS Region you selected for your implementation.
    2. On the Dashboard tab, select Choose your identity source.
    3. Next to Attributes for access control, choose Enable.

      Figure 1: Turn on ABAC in AWS SSO

      Figure 1: Turn on ABAC in AWS SSO

    You should see the message “Attributes for access control has been successfully enabled.”

  3. Enable updates for user attributes in Okta provisioning. Now that you’ve turned on ABAC in AWS SSO, you need to verify that automatic provisioning for Okta has attribute updates enabled.Log in to Okta as an administrator and locate the application you created for AWS SSO. Navigate to the Provisioning tab, choose Edit, and verify that Update User Attributes is enabled.

    Figure 2: Enable automatic provisioning for ABAC updates

    Figure 2: Enable automatic provisioning for ABAC updates

  4. Configure user attributes in Okta for use in AWS SSO by following these steps:
    1. From the same application that you created earlier, navigate to the Sign On tab.
    2. Choose Edit, and then expand the Attributes (optional) section.
    3. In the Attribute Statements (optional) section, for each attribute that you will use for access control in AWS SSO, do the following:
      1. For Name, enter https://aws.amazon.com/SAML/Attributes/AccessControl:<AttributeName>. Replace <AttributeName> with the name of the attribute you’re expecting in AWS SSO, for example https://aws.amazon.com/SAML/Attributes/AccessControl:Department.
      2. For Name Format, choose URI reference.
      3. For Value, enter user.<AttributeName>. Replace <AttributeName> with the Okta default user profile variable name, for example user.department. To view the Okta default user profile, see these instructions.


    Figure 3: Configure two attributes for users in Okta

    Figure 3: Configure two attributes for users in Okta

    In the example shown here, I added two attributes, Department and Division. The result should be similar to the configuration shown in Figure 3.

  5. Add attributes to your users by using these steps:
    1. In your Okta portal, log in as administrator. Navigate to Directory, and then choose People.
    2. Locate a user, navigate to the Profile tab, and then choose Edit.
    3. Add values to the attributes you selected.
    Figure 4: Addition of user attributes in Okta

    Figure 4: Addition of user attributes in Okta

  6. Confirm that attributes are mapped. Because you’ve enabled automatic provisioning updates from Okta, you should be able to see the attributes for your user immediately in AWS SSO. To confirm this:
    1. In the console, navigate to AWS SSO in the Region you selected for your implementation.
    2. On the Users tab, select a user that has attributes from Okta, and select the user. You should be able to see the attributes that you mapped from Okta.
    Figure 5: User attributes in Okta

    Figure 5: User attributes in Okta

Now that you have ABAC attributes for your users in AWS SSO, you can now create permission sets based on those attributes.

Note: Step 4 ensures that users will not be successfully authenticated unless the attributes configured are present. If you don’t want this enforcement, do not perform step 4.

Build an ABAC permission set in AWS SSO

For demonstration purposes, I’ll show how you can build a permission set that is based on ABAC attributes for AWS Secrets Manager. The permission set will match resource tags to user tags, in order to control which resources can be managed by Secrets Manager administrators. You can apply this single permission set to multiple teams.

To build the ABAC permission set

  1. In the console, navigate to AWS SSO, and choose AWS Accounts.
  2. Choose the Permission sets tab.
  3. Choose Create permission set, and then choose Create a custom permission set.
  4. Fill in the fields as follows.
    1. For Name, enter a name for your permission set that will be visible to your users, for example, SecretsManager-Profile.
    2. For Description, enter ABAC SecretsManager Profile.
    3. Select the appropriate session duration.
    4. For Relay State, for my example I will enter the URL for Secrets Manager: https://console.aws.amazon.com/secretsmanager/home. This will give a better user experience when the user signs in to AWS SSO, with an automatic redirect to the Secrets Manager console.
    5. For the field What policies do you want to include in your permission set?, choose Create a custom permissions policy.
    6. Under Create a custom permissions policy, paste the following policy.
      {
          "Version": "2012-10-17",
          "Statement": [
              {
                  "Sid": "SecretsManagerABAC",
                  "Effect": "Allow",
                  "Action": [
                      "secretsmanager:DescribeSecret",
                      "secretsmanager:PutSecretValue",
                      "secretsmanager:CreateSecret",
                      "secretsmanager:ListSecretVersionIds",
                      "secretsmanager:UpdateSecret",
                      "secretsmanager:GetResourcePolicy",
                      "secretsmanager:GetSecretValue",
                      "secretsmanager:ListSecrets",
                      "secretsmanager:TagResource"
                  ],
                  "Resource": "*",
                  "Condition": {
                      "StringEquals": {
                          "secretsmanager:ResourceTag/Department": "${aws:PrincipalTag/Department}"
                      }
                  }
              },
              {
                  "Sid": "NeededPermissions",
                  "Effect": "Allow",
                  "Action": [
             "kms:ListKeys",
             "kms:ListAliases",
                      "rds:DescribeDBInstances",
                      "redshift:DescribeClusters",
                      "rds:DescribeDBClusters",
                      "secretsmanager:ListSecrets",
                      "tag:GetResources",
                      "lambda:ListFunctions"
                  ],
                  "Resource": "*"
              }
          ]
      }
      

    This policy grants users the ability to create and list secrets that belong to their department. The policy is configured to allow Secrets Manager users to manage only the resources that belong to their department. You can modify this policy to perform matching on more attributes, in order to have more granular permissions.

    Note: The RDS permissions in the policy enable users to select an RDS instance for the secret and the Lambda Permissions are to enable custom key rotation.

    If you look closely at the condition

    “secretsmanager:ResourceTag/Department”: “${aws:PrincipalTag/Department}”

    …the condition states that the user can only access Secrets Manager resources that have a Department tag, where the value of that tag is identical to the value of the Department tag from the user.

  5. Choose Next: Tags.
  6. Tag your permission set. For my example, I’ll add Key: Service and Value: SecretsManager.
  7. Choose Next: Review and create.
  8. Assign the permission set to a user or group and to the appropriate accounts that you have in AWS Organizations.

Test an ABAC permission set

Now you can test the ABAC permission set that you just created for Secrets Manager.

To test the ABAC permission set

  1. In the AWS SSO console, on the Dashboard page, navigate to the User Portal URL.
  2. Sign in as a user who has the attributes that you configured earlier in AWS SSO. You will assume the permission set that you just created.
  3. Choose Management console. This will take you to the console that you specified in the Relay State setting for the permission set, which in my example is the Secrets Manager console.

    Figure 6: AWS SSO ABAC profile access

    Figure 6: AWS SSO ABAC profile access

  4. Try to create a secret with no tags:
    1. Choose Store a new secret.
    2. Choose Other type of secrets.
    3. You can add any values you like for the other options, and then choose Next.
    4. Give your secret a name, but don’t add any tags. Choose Next.
    5. On the Configure automatic rotation page, choose Next, and then choose Store.

    You should receive an error stating that the user failed to create the secret, because the user is not authorized to perform the secretsmanager:CreateSecret action.

    Figure 7: Failure to create a secret (no attributes)

    Figure 7: Failure to create a secret (no attributes)

  5. Choose Previous twice, and then add the appropriate tag. For my example, I’ll add a tag with the key Department and the value Serverless.

    Figure 8: Adding tags for a secret

    Figure 8: Adding tags for a secret

  6. Choose Next twice, and then choose Store. You should see a message that your secret creation was successful.

    Figure 9: Successful secret creation

    Figure 9: Successful secret creation

Now administrators who assume this permission set can view, create, and manage only the secrets that belong to their team or department, based on the tags that you defined. You can reuse this permission set across a large number of teams, which can reduce the number of permission sets you need to create and manage.

Summary

In this post, I’ve talked about the benefits organizations can gain from embracing an ABAC strategy, and walked through how to turn on ABAC attributes in Okta and AWS SSO. I’ve also shown how you can create ABAC-driven permission sets to simplify your permission set management. For more information on AWS services that support ABAC—in other words, authorization based on tags—see our updated AWS services that work with IAM page.

If you have feedback about this blog post, submit comments in the Comments section below. If you have questions about this post, start a new thread on the AWS Single Sign-On forum.

Want more AWS Security how-to content, news, and feature announcements? Follow us on Twitter.

Author

Louay Shaat

Louay is a Security Solutions Architect with AWS. He spends his days working with customers, from startups to the largest of enterprises helping them build cool new capabilities and accelerating their cloud journey. He has a strong focus on security and automation helping customers improve their security, risk, and compliance in the cloud.

Building fine-grained authorization using Amazon Cognito, API Gateway, and IAM

Post Syndicated from Artem Lovan original https://aws.amazon.com/blogs/security/building-fine-grained-authorization-using-amazon-cognito-api-gateway-and-iam/

June 5, 2021: We’ve updated Figure 1: User request flow.


Authorizing functionality of an application based on group membership is a best practice. If you’re building APIs with Amazon API Gateway and you need fine-grained access control for your users, you can use Amazon Cognito. Amazon Cognito allows you to use groups to create a collection of users, which is often done to set the permissions for those users. In this post, I show you how to build fine-grained authorization to protect your APIs using Amazon Cognito, API Gateway, and AWS Identity and Access Management (IAM).

As a developer, you’re building a customer-facing application where your users are going to log into your web or mobile application, and as such you will be exposing your APIs through API Gateway with upstream services. The APIs could be deployed on Amazon Elastic Container Service (Amazon ECS), Amazon Elastic Kubernetes Service (Amazon EKS), AWS Lambda, or Elastic Load Balancing where each of these options will forward the request to your Amazon Elastic Compute Cloud (Amazon EC2) instances. Additionally, you can use on-premises services that are connected to your Amazon Web Services (AWS) environment over an AWS VPN or AWS Direct Connect. It’s important to have fine-grained controls for each API endpoint and HTTP method. For instance, the user should be allowed to make a GET request to an endpoint, but should not be allowed to make a POST request to the same endpoint. As a best practice, you should assign users to groups and use group membership to allow or deny access to your API services.

Solution overview

In this blog post, you learn how to use an Amazon Cognito user pool as a user directory and let users authenticate and acquire the JSON Web Token (JWT) to pass to the API Gateway. The JWT is used to identify what group the user belongs to, as mapping a group to an IAM policy will display the access rights the group is granted.

Note: The solution works similarly if Amazon Cognito would be federating users with an external identity provider (IdP)—such as Ping, Active Directory, or Okta—instead of being an IdP itself. To learn more, see Adding User Pool Sign-in Through a Third Party. Additionally, if you want to use groups from an external IdP to grant access, Role-based access control using Amazon Cognito and an external identity provider outlines how to do so.

The following figure shows the basic architecture and information flow for user requests.

Figure 1: User request flow

Figure 1: User request flow

Let’s go through the request flow to understand what happens at each step, as shown in Figure 1:

  1. A user logs in and acquires an Amazon Cognito JWT ID token, access token, and refresh token. To learn more about each token, see using tokens with user pools.
  2. A RestAPI request is made and a bearer token—in this solution, an access token—is passed in the headers.
  3. API Gateway forwards the request to a Lambda authorizer—also known as a custom authorizer.
  4. The Lambda authorizer verifies the Amazon Cognito JWT using the Amazon Cognito public key. On initial Lambda invocation, the public key is downloaded from Amazon Cognito and cached. Subsequent invocations will use the public key from the cache.
  5. The Lambda authorizer looks up the Amazon Cognito group that the user belongs to in the JWT and does a lookup in Amazon DynamoDB to get the policy that’s mapped to the group.
  6. Lambda returns the policy and—optionally—context to API Gateway. The context is a map containing key-value pairs that you can pass to the upstream service. It can be additional information about the user, the service, or anything that provides additional information to the upstream service.
  7. The API Gateway policy engine evaluates the policy.

    Note: Lambda isn’t responsible for understanding and evaluating the policy. That responsibility falls on the native capabilities of API Gateway.

  8. The request is forwarded to the service.

Note: To further optimize Lambda authorizer, the authorization policy can be cached or disabled, depending on your needs. By enabling cache, you could improve the performance as the authorization policy will be returned from the cache whenever there is a cache key match. To learn more, see Configure a Lambda authorizer using the API Gateway console.

Let’s have a closer look at the following example policy that is stored as part of an item in DynamoDB.

{
   "Version":"2012-10-17",
   "Statement":[
      {
         "Sid":"PetStore-API",
         "Effect":"Allow",
         "Action":"execute-api:Invoke",
         "Resource":[
            "arn:aws:execute-api:*:*:*/*/*/petstore/v1/*",
            "arn:aws:execute-api:*:*:*/*/GET/petstore/v2/status"
         ],
         "Condition":{
            "IpAddress":{
               "aws:SourceIp":[
                  "192.0.2.0/24",
                  "198.51.100.0/24"
               ]
            }
         }
      }
   ]
}

Based on this example policy, the user is allowed to make calls to the petstore API. For version v1, the user can make requests to any verb and any path, which is expressed by an asterisk (*). For v2, the user is only allowed to make a GET request for path /status. To learn more about how the policies work, see Output from an Amazon API Gateway Lambda authorizer.

Getting started

For this solution, you need the following prerequisites:

  • The AWS Command Line Interface (CLI) installed and configured for use.
  • Python 3.6 or later, to package Python code for Lambda

    Note: We recommend that you use a virtual environment or virtualenvwrapper to isolate the solution from the rest of your Python environment.

  • An IAM role or user with enough permissions to create Amazon Cognito User Pool, IAM Role, Lambda, IAM Policy, API Gateway and DynamoDB table.
  • The GitHub repository for the solution. You can download it, or you can use the following Git command to download it from your terminal.

    Note: This sample code should be used to test out the solution and is not intended to be used in production account.

     $ git clone https://github.com/aws-samples/amazon-cognito-api-gateway.git
     $ cd amazon-cognito-api-gateway
    

    Use the following command to package the Python code for deployment to Lambda.

     $ bash ./helper.sh package-lambda-functions
     …
     Successfully completed packaging files.
    

To implement this reference architecture, you will be utilizing the following services:

Note: This solution was tested in the us-east-1, us-east-2, us-west-2, ap-southeast-1, and ap-southeast-2 Regions. Before selecting a Region, verify that the necessary services—Amazon Cognito, API Gateway, and Lambda—are available in those Regions.

Let’s review each service, and how those will be used, before creating the resources for this solution.

Amazon Cognito user pool

A user pool is a user directory in Amazon Cognito. With a user pool, your users can log in to your web or mobile app through Amazon Cognito. You use the Amazon Cognito user directory directly, as this sample solution creates an Amazon Cognito user. However, your users can also log in through social IdPs, OpenID Connect (OIDC), and SAML IdPs.

Lambda as backing API service

Initially, you create a Lambda function that serves your APIs. API Gateway forwards all requests to the Lambda function to serve up the requests.

An API Gateway instance and integration with Lambda

Next, you create an API Gateway instance and integrate it with the Lambda function you created. This API Gateway instance serves as an entry point for the upstream service. The following bash command below creates an Amazon Cognito user pool, a Lambda function, and an API Gateway instance. The command then configures proxy integration with Lambda and deploys an API Gateway stage.

Deploy the sample solution

From within the directory where you downloaded the sample code from GitHub, run the following command to generate a random Amazon Cognito user password and create the resources described in the previous section.

 $ bash ./helper.sh cf-create-stack-gen-password
 ...
 Successfully created CloudFormation stack.

When the command is complete, it returns a message confirming successful stack creation.

Validate Amazon Cognito user creation

To validate that an Amazon Cognito user has been created successfully, run the following command to open the Amazon Cognito UI in your browser and then log in with your credentials.

Note: When you run this command, it returns the user name and password that you should use to log in.

 $ bash ./helper.sh open-cognito-ui
  Opening Cognito UI. Please use following credentials to login:
  Username: cognitouser
  Password: xxxxxxxx

Alternatively, you can open the CloudFormation stack and get the Amazon Cognito hosted UI URL from the stack outputs. The URL is the value assigned to the CognitoHostedUiUrl variable.

Figure 2: CloudFormation Outputs - CognitoHostedUiUrl

Figure 2: CloudFormation Outputs – CognitoHostedUiUrl

Validate Amazon Cognito JWT upon login

Since we haven’t installed a web application that would respond to the redirect request, Amazon Cognito will redirect to localhost, which might look like an error. The key aspect is that after a successful log in, there is a URL similar to the following in the navigation bar of your browser:

http://localhost/#id_token=eyJraWQiOiJicVhMYWFlaTl4aUhzTnY3W...

Test the API configuration

Before you protect the API with Amazon Cognito so that only authorized users can access it, let’s verify that the configuration is correct and the API is served by API Gateway. The following command makes a curl request to API Gateway to retrieve data from the API service.

 $ bash ./helper.sh curl-api
{"pets":[{"id":1,"name":"Birds"},{"id":2,"name":"Cats"},{"id":3,"name":"Dogs"},{"id":4,"name":"Fish"}]}

The expected result is that the response will be a list of pets. In this case, the setup is correct: API Gateway is serving the API.

Protect the API

To protect your API, the following is required:

  1. DynamoDB to store the policy that will be evaluated by the API Gateway to make an authorization decision.
  2. A Lambda function to verify the user’s access token and look up the policy in DynamoDB.

Let’s review all the services before creating the resources.

Lambda authorizer

A Lambda authorizer is an API Gateway feature that uses a Lambda function to control access to an API. You use a Lambda authorizer to implement a custom authorization scheme that uses a bearer token authentication strategy. When a client makes a request to one of the API operations, the API Gateway calls the Lambda authorizer. The Lambda authorizer takes the identity of the caller as input and returns an IAM policy as the output. The output is the policy that is returned in DynamoDB and evaluated by the API Gateway. If there is no policy mapped to the caller identity, Lambda will generate a deny policy and request will be denied.

DynamoDB table

DynamoDB is a key-value and document database that delivers single-digit millisecond performance at any scale. This is ideal for this use case to ensure that the Lambda authorizer can quickly process the bearer token, look up the policy, and return it to API Gateway. To learn more, see Control access for invoking an API.

The final step is to create the DynamoDB table for the Lambda authorizer to look up the policy, which is mapped to an Amazon Cognito group.

Figure 3 illustrates an item in DynamoDB. Key attributes are:

  • Group, which is used to look up the policy.
  • Policy, which is returned to API Gateway to evaluate the policy.


Figure 3: DynamoDB item

Figure 3: DynamoDB item

Based on this policy, the user that is part of the Amazon Cognito group pet-veterinarian is allowed to make API requests to endpoints https://<domain>/<api-gateway-stage>/petstore/v1/* and https://<domain>/<api-gateway-stage>/petstore/v2/status for GET requests only.

Update and create resources

Run the following command to update existing resources and create a Lambda authorizer and DynamoDB table.

 $ bash ./helper.sh cf-update-stack
Successfully updated CloudFormation stack.

Test the custom authorizer setup

Begin your testing with the following request, which doesn’t include an access token.

$ bash ./helper.sh curl-api
{"message":"Unauthorized"}

The request is denied with the message Unauthorized. At this point, the Amazon API Gateway expects a header named Authorization (case sensitive) in the request. If there’s no authorization header, the request is denied before it reaches the lambda authorizer. This is a way to filter out requests that don’t include required information.

Use the following command for the next test. In this test, you pass the required header but the token is invalid because it wasn’t issued by Amazon Cognito but is a simple JWT-format token stored in ./helper.sh. To learn more about how to decode and validate a JWT, see decode and verify an Amazon Cognito JSON token.

$ bash ./helper.sh curl-api-invalid-token
{"Message":"User is not authorized to access this resource"}

This time the message is different. The Lambda authorizer received the request and identified the token as invalid and responded with the message User is not authorized to access this resource.

To make a successful request to the protected API, your code will need to perform the following steps:

  1. Use a user name and password to authenticate against your Amazon Cognito user pool.
  2. Acquire the tokens (id token, access token, and refresh token).
  3. Make an HTTPS (TLS) request to API Gateway and pass the access token in the headers.

Before the request is forwarded to the API service, API Gateway receives the request and passes it to the Lambda authorizer. The authorizer performs the following steps. If any of the steps fail, the request is denied.

  1. Retrieve the public keys from Amazon Cognito.
  2. Cache the public keys so the Lambda authorizer doesn’t have to make additional calls to Amazon Cognito as long as the Lambda execution environment isn’t shut down.
  3. Use public keys to verify the access token.
  4. Look up the policy in DynamoDB.
  5. Return the policy to API Gateway.

The access token has claims such as Amazon Cognito assigned groups, user name, token use, and others, as shown in the following example (some fields removed).

{
    "sub": "00000000-0000-0000-0000-0000000000000000",
    "cognito:groups": [
        "pet-veterinarian"
    ],
...
    "token_use": "access",
    "scope": "openid email",
    "username": "cognitouser"
}

Finally, let’s programmatically log in to Amazon Cognito UI, acquire a valid access token, and make a request to API Gateway. Run the following command to call the protected API.

$ bash ./helper.sh curl-protected-api
{"pets":[{"id":1,"name":"Birds"},{"id":2,"name":"Cats"},{"id":3,"name":"Dogs"},{"id":4,"name":"Fish"}]}

This time, you receive a response with data from the API service. Let’s examine the steps that the example code performed:

  1. Lambda authorizer validates the access token.
  2. Lambda authorizer looks up the policy in DynamoDB based on the group name that was retrieved from the access token.
  3. Lambda authorizer passes the IAM policy back to API Gateway.
  4. API Gateway evaluates the IAM policy and the final effect is an allow.
  5. API Gateway forwards the request to Lambda.
  6. Lambda returns the response.

Let’s continue to test our policy from Figure 3. In the policy document, arn:aws:execute-api:*:*:*/*/GET/petstore/v2/status is the only endpoint for version V2, which means requests to endpoint /GET/petstore/v2/pets should be denied. Run the following command to test this.

 $ bash ./helper.sh curl-protected-api-not-allowed-endpoint
{"Message":"User is not authorized to access this resource"}

Note: Now that you understand fine grained access control using Cognito user pool, API Gateway and lambda function, and you have finished testing it out, you can run the following command to clean up all the resources associated with this solution:

 $ bash ./helper.sh cf-delete-stack

Advanced IAM policies to further control your API

With IAM, you can create advanced policies to further refine access to your APIs. You can learn more about condition keys that can be used in API Gateway, their use in an IAM policy with conditions, and how policy evaluation logic determines whether to allow or deny a request.

Summary

In this post, you learned how IAM and Amazon Cognito can be used to provide fine-grained access control for your API behind API Gateway. You can use this approach to transparently apply fine-grained control to your API, without having to modify the code in your API, and create advanced policies by using IAM condition keys.

If you have feedback about this post, submit comments in the Comments section below. If you have questions about this post, start a new thread on the Amazon Cognito forum or contact AWS Support.

Want more AWS Security how-to content, news, and feature announcements? Follow us on Twitter.

Author

Artem Lovan

Artem is a Senior Solutions Architect based in New York. He helps customers architect and optimize applications on AWS. He has been involved in IT at many levels, including infrastructure, networking, security, DevOps, and software development.

How to delegate management of identity in AWS Single Sign-On

Post Syndicated from Louay Shaat original https://aws.amazon.com/blogs/security/how-to-delegate-management-of-identity-in-aws-single-sign-on/

In this blog post, I show how you can use AWS Single Sign-On (AWS SSO) to delegate administration of user identities. Delegation is the process of providing your teams permissions to manage accounts and identities associated with their teams. You can achieve this by using the existing integration that AWS SSO has with AWS Organizations, and by using tags and conditions in AWS Identity and Access Management (IAM).

AWS SSO makes it easy to centrally manage access to multiple Amazon Web Services (AWS) accounts and business applications, and to provide users with single sign-on access to all their assigned accounts and applications from one place.

AWS SSO uses permission sets—a collection of administrator-defined policies—to determine a user’s effective permissions to access a given AWS account. Permission sets can contain either AWS managed policies or custom policies that are stored in AWS SSO. Policies are documents that act as containers for one or more permission statements. These statements represent individual access controls (allow or deny) for various tasks, which determine what tasks users can or cannot perform within the AWS account. Permission sets are provisioned as IAM roles in your organizational accounts, and are managed centrally using AWS SSO.

AWS SSO is tightly integrated with AWS Organizations, and runs in your AWS Organizations management account. This integration enables AWS SSO to retrieve and manage permission sets across your AWS Organizations configuration.

As you continue to build more of your workloads on AWS, managing access to AWS accounts and services becomes more time consuming for team members that manage identities. With a centralized identity approach that uses AWS SSO, there’s an increased need to delegate control of permission sets and accounts to domain and application owners. Although this is a valid use case, access to the management account in Organizations should be tightly guarded as a security best practice. As an administrator in the management account of an organization, you can control how teams and users access your AWS accounts and applications.

This post shows how you can build comprehensive delegation models in AWS SSO to securely and effectively delegate control of identities to various teams.

Solution overview

Suppose you’ve implemented AWS SSO in Organizations to manage identity across your entire AWS environment. Your organization is growing and the number of accounts and teams that need access to your AWS environment is also growing. You have a small Identity team that is constantly adding, updating, or deleting users or groups and permission sets to enable your teams to gain access to their required services and accounts.

Note: You can learn how to enable AWS SSO from the Introducing AWS Single Sign-On blog post.

As the number of teams grows, you want to start using a delegation model to enable account and application owners to manage access to their resources, in order to reduce the heavy lifting that is done by teams that manage identities.

Figure 1 shows a simple organizational structure that your organization implemented.
 

Figure 1: AWS SSO with AWS Organizations

Figure 1: AWS SSO with AWS Organizations

In this scenario, you’ve already built a collection of organizational-approved permission sets that are used across your organization. You have a tagging strategy for permission sets, and you’ve implemented two tags across all your permission sets:

  • Environment: The values for this tag are Production or Development. You only apply Production permission sets to Production accounts.
  • OU: This tag identifies the organizational unit (OU) that the permission set belongs to.

A value of All can be assigned to either tag to identify organization-wide use of the permission set.

You identified three models of delegation that you want to enable based on the setup just described, and your Identity team has identified three use cases that they want to implement:

  • A simple delegation model for a team to manage all permission sets for a set of accounts.
  • A delegation model for support teams to apply read-only permission sets to all accounts.
  • A delegation model based on AWS Organizations, where a team can manage only the permission sets intended for a specific OU.

The AWS SSO delegation model enables three key conditions for restricting user access:

  • Permission sets.
  • Accounts
  • Tags that use the condition aws:ResourceTag, to ensure that tags are present on your permission sets as part of your delegation model.

In the rest of this blog post, I show you how AWS SSO administrators can use these conditions to implement the use cases highlighted here to build a delegation model.

See Delegating permission set administration and Actions, resources, and condition keys for AWS SSO for more information.

Important: The use cases that follow are examples that can be adopted by your organization. The permission sets in these use cases show only what is needed to delegate the components discussed. You need to add additional policies to give users and groups access to AWS SSO.

Some examples:

Identify your permission set and AWS SSO instance IDs

You can use either the AWS Command Line Interface (AWS CLI) v2 or the AWS Management Console to identify your permission set and AWS SSO instance IDs.

Use the AWS CLI

To use the AWS CLI to identify the Amazon resource names (ARNs) of the AWS SSO instance and permission set, make sure you have AWS CLI v2 installed.

To list the AWS SSO instance ID ARN

Run the following command:

aws sso-admin list-instances

To list the permission set ARN

Run the following command:

aws sso-admin list-permission-sets --instance-arn <instance arn from above>

Use the console

You can also use the console to identify your permission sets and AWS SSO instance IDs.

To list the AWS SSO Instance ID ARN

  1. Navigate to the AWS SSO in your Region. Choose the Dashboard and then choose Choose your identity source.
  2. Copy the AWS SSO ARN ID.
Figure 2: AWS SSO ID ARN

Figure 2: AWS SSO ID ARN

To list the permission set ARN

  1. Navigate to the AWS SSO Service in your Region. Choose AWS Accounts and then Permission Sets.
  2. Select the permission set you want to use.
  3. Copy the ARN of the permission set.
Figure 3: Permission set ARN

Figure 3: Permission set ARN

Use case 1: Accounts-based delegation model

In this use case, you create a single policy to allow administrators to assign any permission set to a specific set of accounts.

First, you need to create a custom permission set to use with the following example policy.

The example policy is as follows.

            "Sid": "DelegatedAdminsAccounts",
            "Effect": "Allow",
            "Action": [
                "sso:ProvisionPermissionSet",
                "sso:CreateAccountAssignment",
                "sso:DeleteInlinePolicyFromPermissionSet",
                "sso:UpdateInstanceAccessControlAttributeConfiguration",
                "sso:PutInlinePolicyToPermissionSet",
                "sso:DeleteAccountAssignment",
                "sso:DetachManagedPolicyFromPermissionSet",
                "sso:DeletePermissionSet",
                "sso:AttachManagedPolicyToPermissionSet",
                "sso:CreatePermissionSet",
                "sso:UpdatePermissionSet",
                "sso:CreateInstanceAccessControlAttributeConfiguration",
                "sso:DeleteInstanceAccessControlAttributeConfiguration"
            ],
            "Resource": [
                "arn:aws:sso:::account/112233445566",
                "arn:aws:sso:::account/223344556677",
                "arn:aws:sso:::account/334455667788"
            ]
        }

This policy specifies that delegated admins are allowed to provision any permission set to the three accounts listed in the policy.

Note: To apply this permission set to your environment, replace the account numbers following Resource with your account numbers.

Use case 2: Permission-based delegation model

In this use case, you create a single policy to allow administrators to assign a specific permission set to any account. The policy is as follows.

{
                    "Sid": "DelegatedPermissionsAdmin",
                    "Effect": "Allow",
                    "Action": [
                        "sso:ProvisionPermissionSet",
                        "sso:CreateAccountAssignment",
                        "sso:DeleteInlinePolicyFromPermissionSet",
                        "sso:UpdateInstanceAccessControlAttributeConfiguration",
                        "sso:PutInlinePolicyToPermissionSet",
                        "sso:DeleteAccountAssignment",
                        "sso:DetachManagedPolicyFromPermissionSet",
                        "sso:DeletePermissionSet",
                        "sso:AttachManagedPolicyToPermissionSet",
                        "sso:CreatePermissionSet",
                        "sso:UpdatePermissionSet",
                        "sso:CreateInstanceAccessControlAttributeConfiguration",
                        "sso:DeleteInstanceAccessControlAttributeConfiguration",
                        "sso:ProvisionApplicationInstanceForAWSAccount"
                    ],
                    "Resource": [
                        "arn:aws:sso:::instance/ssoins-1111111111",
                        "arn:aws:sso:::account/*",
                        "arn:aws:sso:::permissionSet/ssoins-1111111111/ps-112233abcdef123"

            ]


        },          

This policy specifies that delegated admins are allowed to provision only the specific permission set listed in the policy to any account.

Note:

Use case 3: OU-based delegation model

In this use case, the Identity team wants to delegate the management of the Development permission sets (identified by the tag key Environment) to the Test OU (identified by the tag key OU). You use the Environment and OU tags on permission sets to restrict access to only the permission sets that contain both tags.

To build this permission set for delegation, you need to create two policies in the same permission set:

  • A policy that filters the permission sets based on both tags—Environment and OU.
  • A policy that filters the accounts belonging to the Development OU.

The policies are as follows.

{
                    "Sid": "DelegatedOUAdmin",
                    "Effect": "Allow",
                    "Action": [
                        "sso:ProvisionPermissionSet",
                        "sso:CreateAccountAssignment",
                        "sso:DeleteInlinePolicyFromPermissionSet",
                        "sso:UpdateInstanceAccessControlAttributeConfiguration",
                        "sso:PutInlinePolicyToPermissionSet",
                        "sso:DeleteAccountAssignment",
                        "sso:DetachManagedPolicyFromPermissionSet",
                        "sso:DeletePermissionSet",
                        "sso:AttachManagedPolicyToPermissionSet",
                        "sso:CreatePermissionSet",
                        "sso:UpdatePermissionSet",
                        "sso:CreateInstanceAccessControlAttributeConfiguration",
                        "sso:DeleteInstanceAccessControlAttributeConfiguration",
                        "sso:ProvisionApplicationInstanceForAWSAccount"
                    ],
                    "Resource": "arn:aws:sso:::permissionSet/*/*",
                    "Condition": {
                        "StringEquals": {
                            "aws:ResourceTag/Environment": "Development",
                            "aws:ResourceTag/OU": "Test"
                        }
                    }
        },
        {
            "Sid": "Instance",
            "Effect": "Allow",
            "Action": [
                "sso:ProvisionPermissionSet",
                "sso:CreateAccountAssignment",
                "sso:DeleteInlinePolicyFromPermissionSet",
                "sso:UpdateInstanceAccessControlAttributeConfiguration",
                "sso:PutInlinePolicyToPermissionSet",
                "sso:DeleteAccountAssignment",
                "sso:DetachManagedPolicyFromPermissionSet",
                "sso:DeletePermissionSet",
                "sso:AttachManagedPolicyToPermissionSet",
                "sso:CreatePermissionSet",
                "sso:UpdatePermissionSet",
                "sso:CreateInstanceAccessControlAttributeConfiguration",
                "sso:DeleteInstanceAccessControlAttributeConfiguration",
                "sso:ProvisionApplicationInstanceForAWSAccount"
            ],
            "Resource": [
                "arn:aws:sso:::instance/ssoins-82593a6ed92c8920",
                "arn:aws:sso:::account/112233445566",
                "arn:aws:sso:::account/223344556677",
                "arn:aws:sso:::account/334455667788"

            ]
        }

In the delegated policy, the user or group is only allowed to provision permission sets that have both tags, OU and Environment, set to “Development” and only to accounts in the Development OU.

Note: In the example above arn:aws:sso:::instance/ssoins-11112222233333 is the ARN for the AWS SSO Instance ID. To get your AWS SSO Instance ID, refer to Identify your permission set and AWS SSO Instance IDs.

Create a delegated admin profile in AWS SSO

Now that you know what’s required to delegate permissions, you can create a delegated profile and deploy that to your users and groups.

To create a delegated AWS SSO profile

  1. In the AWS SSO console, sign in to your management account and browse to the Region where AWS SSO is provisioned.
  2. Navigate to AWS Accounts and choose Permission sets, and then choose Create permission set.
     
    Figure 4: AWS SSO permission sets menu

    Figure 4: AWS SSO permission sets menu

  3. Choose Create a custom permission set.
     
    Figure 5: Create a new permission set

    Figure 5: Create a new permission set

  4. Give a name to your permission set based on your naming standards and select a session duration from your organizational policies.
  5. For Relay state, enter the following URL:
    https://<region>.console.aws.amazon.com/singlesignon/home?region=<region>#/accounts/organization 
    

    where <region> is the AWS Region in which you deployed AWS SSO.

    The relay state will automatically redirect the user to the Accounts section in the AWS SSO console, for simplicity.
     

    Figure 6: Custom permission set

    Figure 6: Custom permission set

  6. Choose Create new permission set. Here is where you can decide the level of delegation required for your application or domain administrators.
     
    Figure 7: Assign users

    Figure 7: Assign users

    See some of the examples in the earlier sections of this post for the permission set.

  7. If you’re using AWS SSO with AWS Directory Service for Microsoft Active Directory, you’ll need to provide access to AWS Directory Service in order for your administrator to assign permission sets to users and groups.

    To provide this access, navigate to the AWS Accounts screen in the AWS SSO console, and select your management account. Assign the required users or groups, and select the permission set that you created earlier. Then choose Finish.

  8. To test this delegation, sign in to AWS SSO. You’ll see the newly created permission set.
     
    Figure 8: AWS SSO sign-on page

    Figure 8: AWS SSO sign-on page

  9. Next to developer-delegated-admin, choose Management console. This should automatically redirect you to AWS SSO in the AWS Accounts submenu.

If you try to provision access by assigning or creating new permission sets to accounts or permission sets you are not explicitly allowed, according to the policies you specified earlier, you will receive the following error.
 

Figure 9: Error based on lack of permissions

Figure 9: Error based on lack of permissions

Otherwise, the provisioning will be successful.

Summary

You’ve seen that by using conditions and tags on permission sets, application and account owners can use delegation models to manage the deployment of permission sets across the accounts they manage, providing them and their teams with secure access to AWS accounts and services.

Additionally, because AWS SSO supports attribute-based access control (ABAC), you can create a more dynamic delegation model based on attributes from your identity provider, to match the tags on the permission set.

If you have feedback about this blog post, submit comments in the Comments section below. If you have questions about this post, start a new thread on the AWS Single Sign-On forum.

Want more AWS Security how-to content, news, and feature announcements? Follow us on Twitter.

Author

Louay Shaat

Louay is a Security Solutions Architect with AWS. He spends his days working with customers, from startups to the largest of enterprises, helping them build cool new capabilities and accelerating their cloud journey. He has a strong focus on security and automation to help customers improve their security, risk, and compliance in the cloud.