All posts by Jianwei Li

Build a data lake with Apache Flink on Amazon EMR

Post Syndicated from Jianwei Li original https://aws.amazon.com/blogs/big-data/build-a-unified-data-lake-with-apache-flink-on-amazon-emr/

To build a data-driven business, it is important to democratize enterprise data assets in a data catalog. With a unified data catalog, you can quickly search datasets and figure out data schema, data format, and location. The AWS Glue Data Catalog provides a uniform repository where disparate systems can store and find metadata to keep track of data in data silos.

Apache Flink is a widely used data processing engine for scalable streaming ETL, analytics, and event-driven applications. It provides precise time and state management with fault tolerance. Flink can process bounded stream (batch) and unbounded stream (stream) with a unified API or application. After data is processed with Apache Flink, downstream applications can access the curated data with a unified data catalog. With unified metadata, both data processing and data consuming applications can access the tables using the same metadata.

This post shows you how to integrate Apache Flink in Amazon EMR with the AWS Glue Data Catalog so that you can ingest streaming data in real time and access the data in near-real time for business analysis.

Apache Flink connector and catalog architecture

Apache Flink uses a connector and catalog to interact with data and metadata. The following diagram shows the architecture of the Apache Flink connector for data read/write, and catalog for metadata read/write.

Flink Glue Architecture

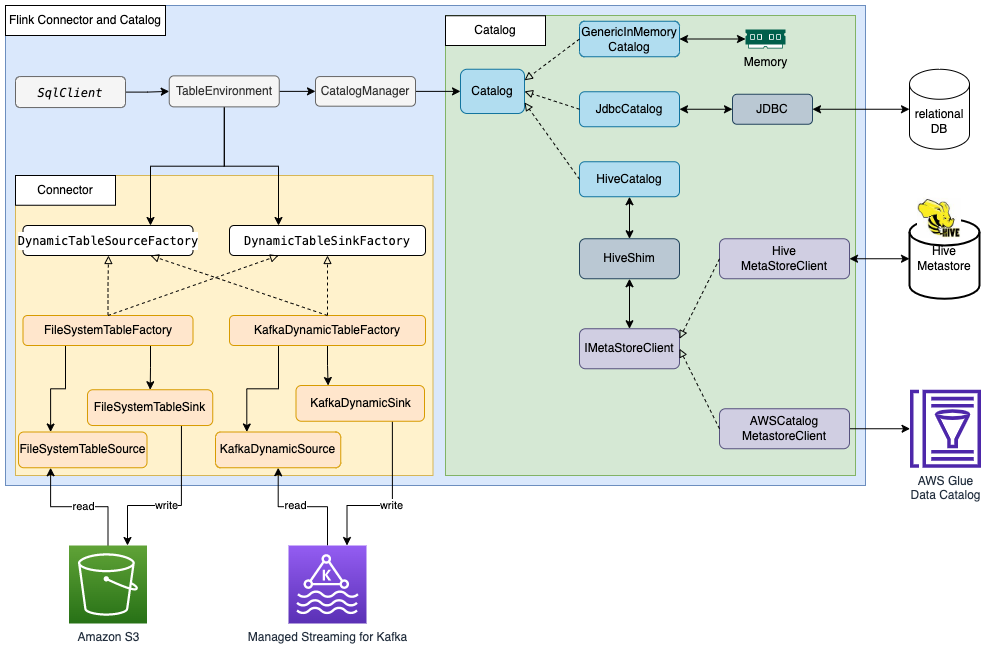
For data read/write, Flink has the interface DynamicTableSourceFactory for read and DynamicTableSinkFactory for write. A different Flink connector implements two interfaces to access data in different storage. For example, the Flink FileSystem connector has FileSystemTableFactory to read/write data in Hadoop Distributed File System (HDFS) or Amazon Simple Storage Service (Amazon S3), the Flink HBase connector has HBase2DynamicTableFactory to read/write data in HBase, and the Flink Kafka connector has KafkaDynamicTableFactory to read/write data in Kafka. You can refer to Table & SQL Connectors for more information.

For metadata read/write, Flink has the catalog interface. Flink has three built-in implementations for the catalog. GenericInMemoryCatalog stores the catalog data in memory. JdbcCatalog stores the catalog data in a JDBC-supported relational database. As of this writing, MySQL and PostgreSQL databases are supported in the JDBC catalog. HiveCatalog stores the catalog data in Hive Metastore. HiveCatalog uses HiveShim to provide different Hive version compatibility. We can configure different metastore clients to use Hive Metastore or the AWS Glue Data Catalog. In this post, we configure the Amazon EMR property hive.metastore.client.factory.class to com.amazonaws.glue.catalog.metastore.AWSGlueDataCatalogHiveClientFactory (see Using the AWS Glue Data Catalog as the metastore for Hive) so that we can use the AWS Glue Data Catalog to store Flink catalog data. Refer to Catalogs for more information.

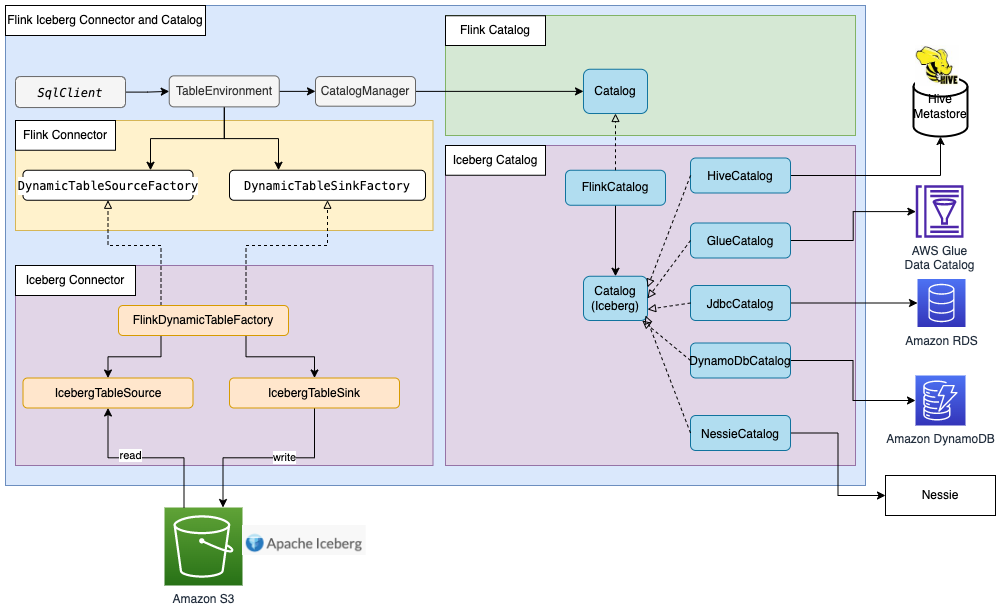
Most Flink built-in connectors, such as for Kafka, Amazon Kinesis, Amazon DynamoDB, Elasticsearch, or FileSystem, can use Flink HiveCatalog to store metadata in the AWS Glue Data Catalog. However, some connector implementations such as Apache Iceberg have their own catalog management mechanism. FlinkCatalog in Iceberg implements the catalog interface in Flink. FlinkCatalog in Iceberg has a wrapper to its own catalog implementation. The following diagram shows the relationship between Apache Flink, the Iceberg connector, and the catalog. For more information, refer to Creating catalogs and using catalogs and Catalogs.

Flink Iceberg Glue Architecture

Apache Hudi also has its own catalog management. Both HoodieCatalog and HoodieHiveCatalog implements a catalog interface in Flink. HoodieCatalog stores metadata in a file system such as HDFS. HoodieHiveCatalog stores metadata in Hive Metastore or the AWS Glue Data Catalog, depending on whether you configure hive.metastore.client.factory.class to use com.amazonaws.glue.catalog.metastore.AWSGlueDataCatalogHiveClientFactory. The following diagram shows relationship between Apache Flink, the Hudi connector, and the catalog. For more information, refer to Create Catalog.

Flink Hudi Glue Architecture

Because Iceberg and Hudi have different catalog management mechanisms, we show three scenarios of Flink integration with the AWS Glue Data Catalog in this post:

  • Read/Write to Iceberg tables in Flink with metadata in Glue Data Catalog
  • Read/Write to Hudi tables in Flink with metadata in Glue Data Catalog
  • Read/Write to other storage format in Flink with metadata in Glue Data Catalog

Solution overview

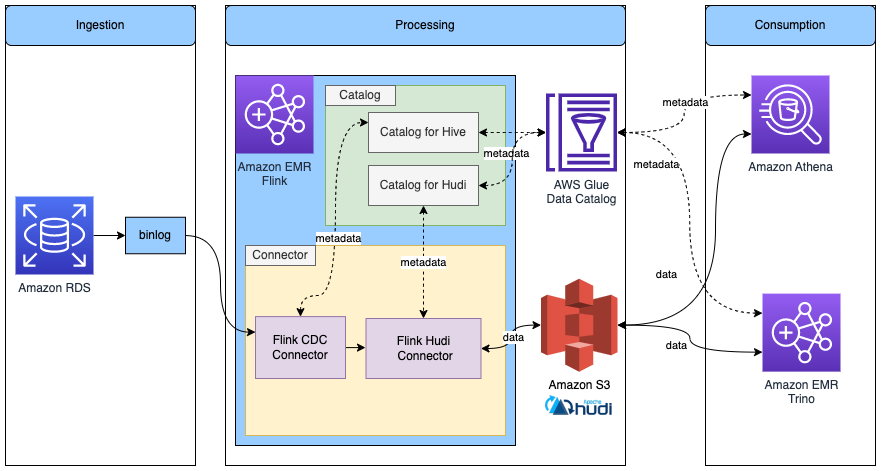
The following diagram shows the overall architecture of the solution described in this post.

Flink Glue Integration

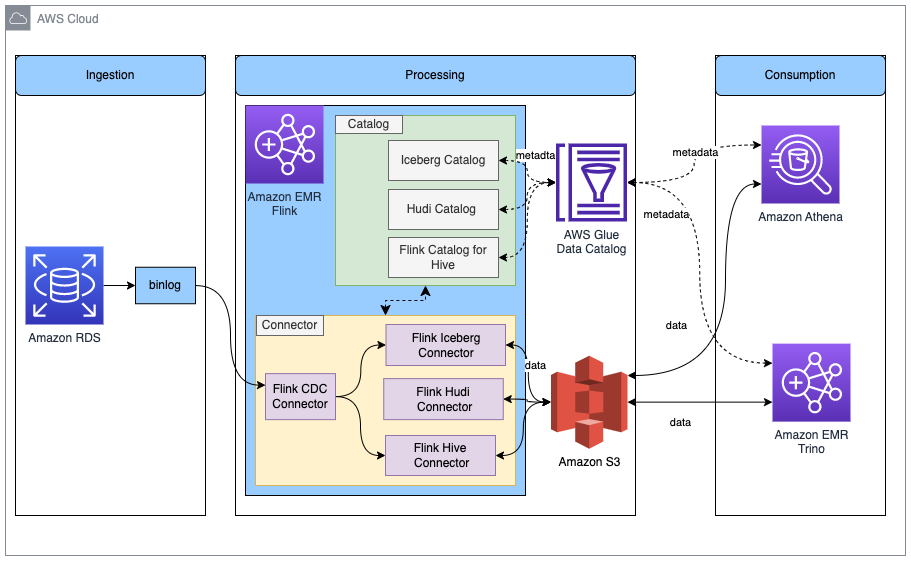
In this solution, we enable an Amazon RDS for MySQL binlog to extract transaction changes in real time. The Amazon EMR Flink CDC connector reads the binlog data and processes the data. Transformed data can be stored in Amazon S3. We use the AWS Glue Data Catalog to store the metadata such as table schema and table location. Downstream data consumer applications such as Amazon Athena or Amazon EMR Trino access the data for business analysis.

The following are the high-level steps to set up this solution:

  1. Enable binlog for Amazon RDS for MySQL and initialize the database.
  2. Create an EMR cluster with the AWS Glue Data Catalog.
  3. Ingest change data capture (CDC) data with Apache Flink CDC in Amazon EMR.
  4. Store the processed data in Amazon S3 with metadata in the AWS Glue Data Catalog.
  5. Verify all table metadata is stored in the AWS Glue Data Catalog.
  6. Consume data with Athena or Amazon EMR Trino for business analysis.
  7. Update and delete source records in Amazon RDS for MySQL and validate the reflection of the data lake tables.

Prerequisites

This post uses an AWS Identity and Access Management (IAM) role with permissions for the following services:

  • Amazon RDS for MySQL (5.7.40)
  • Amazon EMR (6.9.0)
  • Amazon Athena
  • AWS Glue Data Catalog
  • Amazon S3

Enable binlog for Amazon RDS for MySQL and initialize the database

To enable CDC in Amazon RDS for MySQL, we need to configure binary logging for Amazon RDS for MySQL. Refer to Configuring MySQL binary logging for more information. We also create the database salesdb in MySQL and create the tables customer, order, and others to set up the data source.

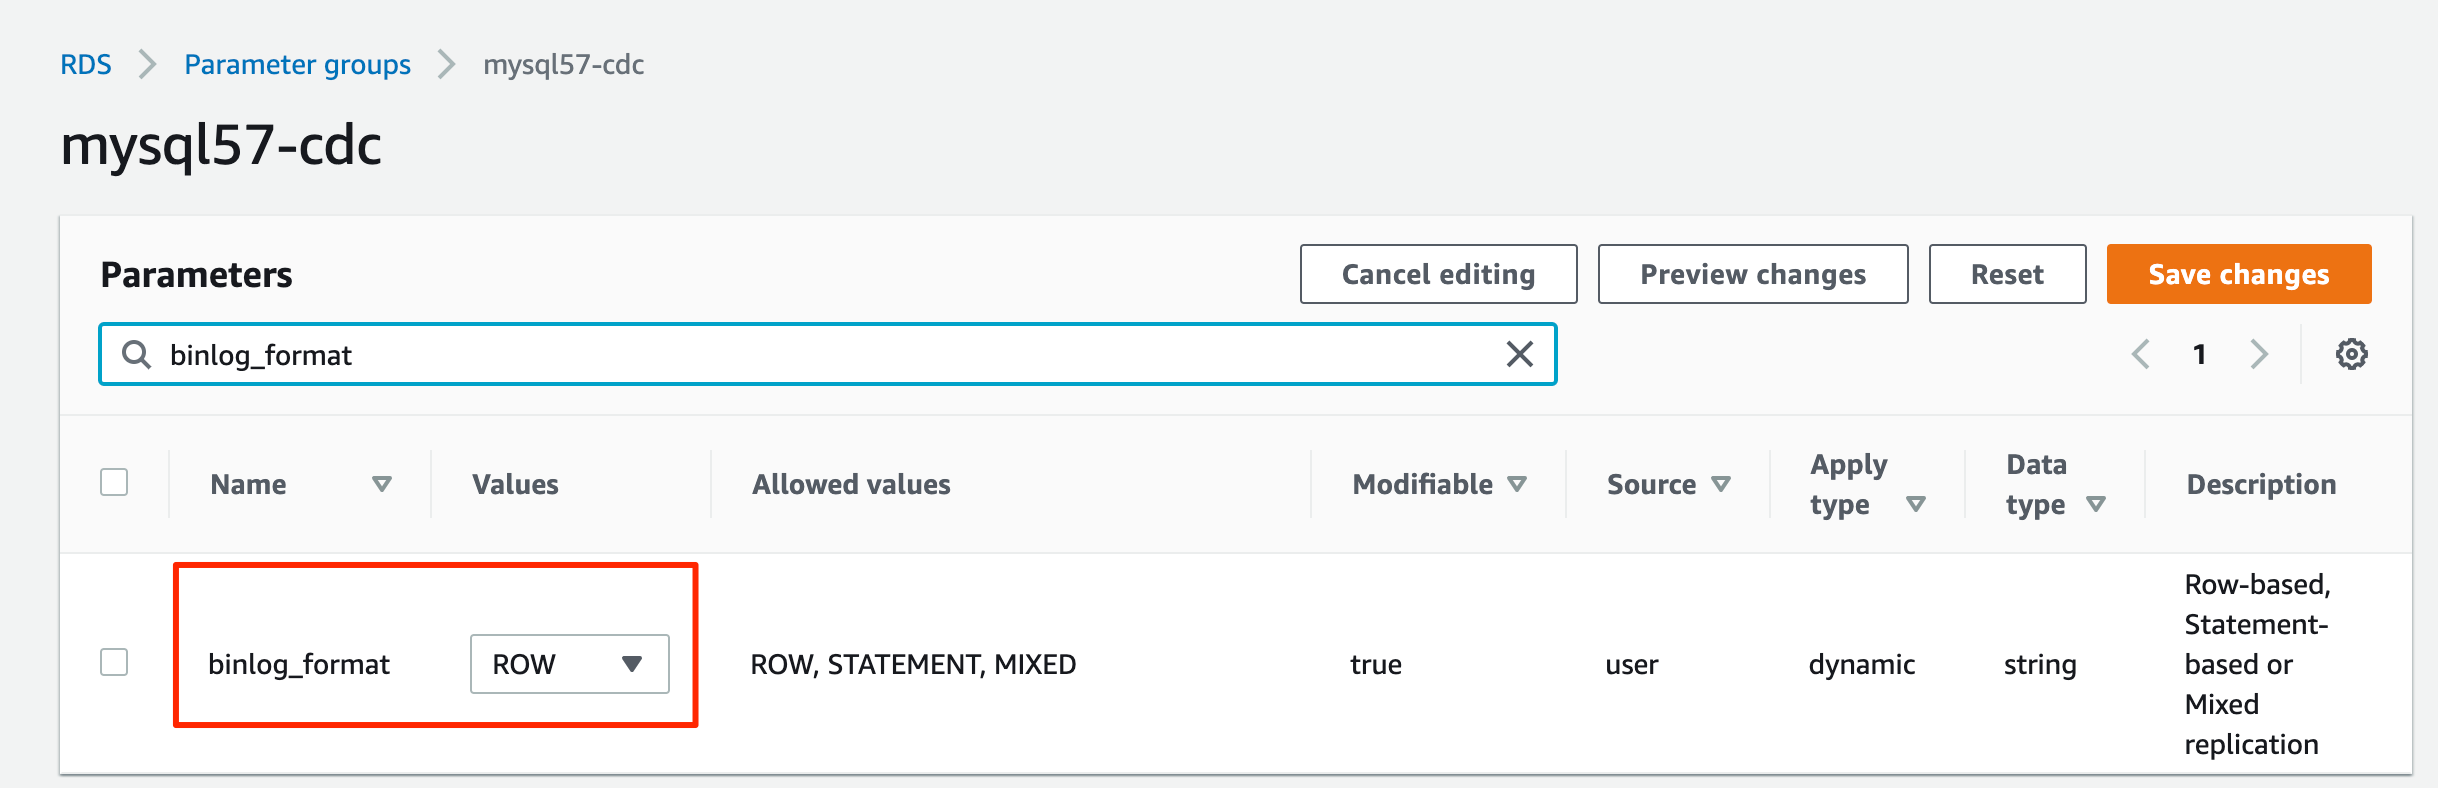
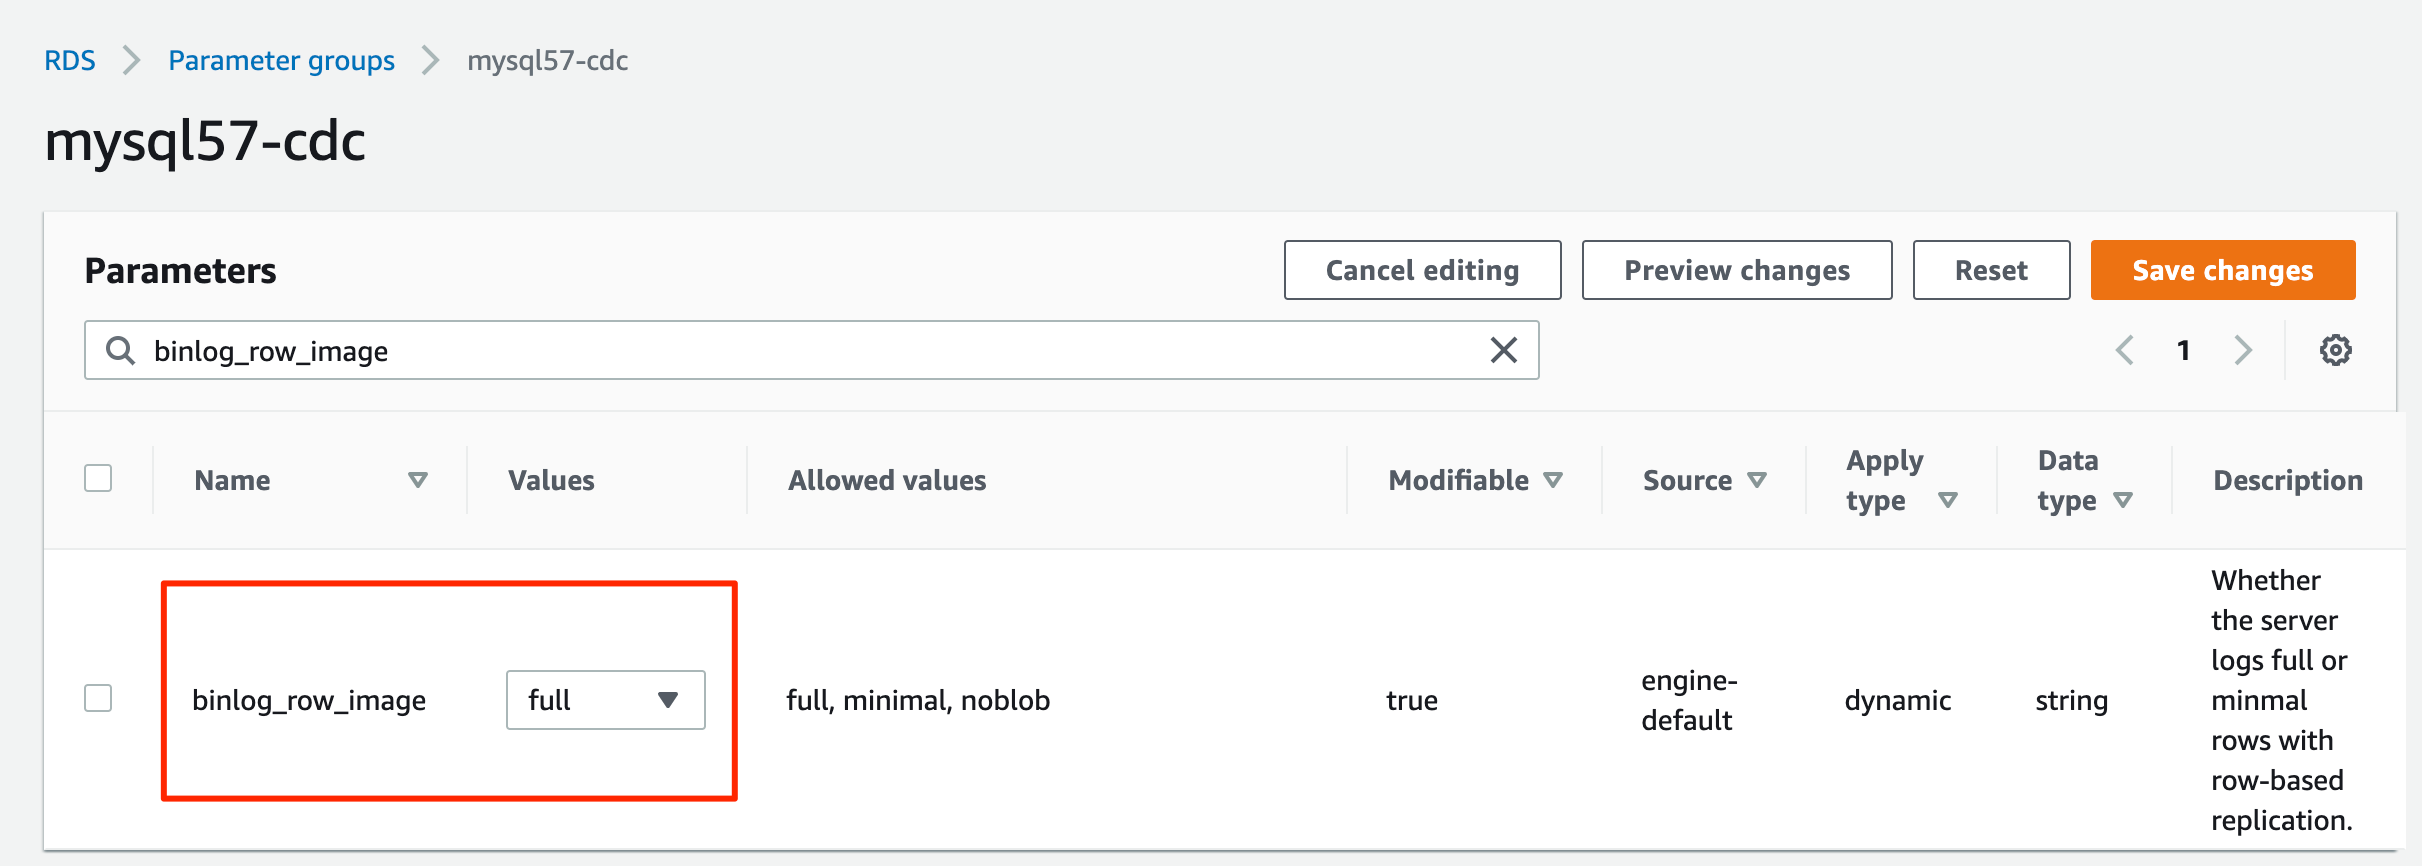
  1. On the Amazon RDS console, choose Parameter groups in the navigation pane.
  2. Create a new parameter group for MySQL.
  3. Edit the parameter group you just created to set binlog_format=ROW.

RDS-Binlog-Format

  1. Edit the parameter group you just created to set binlog_row_image=full.

RDS-Binlog-Row-Image

  1. Create an RDS for MySQL DB instance with the parameter group.
  2. Note down the values for hostname, username, and password, which we use later.
  3. Download the MySQL database initialization script from Amazon S3 by running the following command:
aws s3 cp s3://emr-workshops-us-west-2/glue_immersion_day/scripts/salesdb.sql ./salesdb.sql
  1. Connect to the RDS for MySQL database and run the salesdb.sql command to initialize the database, providing the host name and user name according to your RDS for MySQL database configuration:
mysql -h <hostname> -u <username> -p
mysql> source salesdb.sql

Create an EMR cluster with the AWS Glue Data Catalog

From Amazon EMR 6.9.0, the Flink table API/SQL can integrate with the AWS Glue Data Catalog. To use the Flink and AWS Glue integration, you must create an Amazon EMR 6.9.0 or later version.

  1. Create the file iceberg.properties for the Amazon EMR Trino integration with the Data Catalog. When the table format is Iceberg, your file should have following content:
iceberg.catalog.type=glue
connector.name=iceberg
  1. Upload iceberg.properties to an S3 bucket, for example DOC-EXAMPLE-BUCKET.

For more information on how to integrate Amazon EMR Trino with Iceberg, refer to Use an Iceberg cluster with Trino.

  1. Create the file trino-glue-catalog-setup.sh to configure the Trino integration with the Data Catalog. Use trino-glue-catalog-setup.sh as the bootstrap script. Your file should have the following content (replace DOC-EXAMPLE-BUCKET with your S3 bucket name):
set -ex 
sudo aws s3 cp s3://DOC-EXAMPLE-BUCKET/iceberg.properties /etc/trino/conf/catalog/iceberg.properties

  1. Upload trino-glue-catalog-setup.sh to your S3 bucket (DOC-EXAMPLE-BUCKET).

Refer to Create bootstrap actions to install additional software to run a bootstrap script.

  1. Create the file flink-glue-catalog-setup.sh to configure the Flink integration with the Data Catalog.
  2. Use a script runner and run the flink-glue-catalog-setup.sh script as a step function.

Your file should have the following content (the JAR file name here is using Amazon EMR 6.9.0; a later version JAR name may change, so make sure to update according to your Amazon EMR version).

Note that here we use an Amazon EMR step, not a bootstrap, to run this script. An Amazon EMR step script is run after Amazon EMR Flink is provisioned.

set -ex

sudo cp /usr/lib/hive/auxlib/aws-glue-datacatalog-hive3-client.jar /usr/lib/flink/lib
sudo cp /usr/lib/hive/lib/antlr-runtime-3.5.2.jar /usr/lib/flink/lib
sudo cp /usr/lib/hive/lib/hive-exec.jar /lib/flink/lib
sudo cp /usr/lib/hive/lib/libfb303-0.9.3.jar /lib/flink/lib
sudo cp /usr/lib/flink/opt/flink-connector-hive_2.12-1.15.2.jar /lib/flink/lib
sudo chmod 755 /usr/lib/flink/lib/aws-glue-datacatalog-hive3-client.jar
sudo chmod 755 /usr/lib/flink/lib/antlr-runtime-3.5.2.jar
sudo chmod 755 /usr/lib/flink/lib/hive-exec.jar
sudo chmod 755 /usr/lib/flink/lib/libfb303-0.9.3.jar
sudo chmod 755 /usr/lib/flink/lib/flink-connector-hive_2.12-1.15.2.jar

sudo wget https://repo1.maven.org/maven2/com/ververica/flink-sql-connector-mysql-cdc/2.2.1/flink-sql-connector-mysql-cdc-2.2.1.jar -O /lib/flink/lib/flink-sql-connector-mysql-cdc-2.2.1.jar
sudo chmod 755 /lib/flink/lib/flink-sql-connector-mysql-cdc-2.2.1.jar

sudo ln -s /usr/share/aws/iceberg/lib/iceberg-flink-runtime.jar /usr/lib/flink/lib/
sudo ln -s /usr/lib/hudi/hudi-flink-bundle.jar /usr/lib/flink/lib/

sudo mv /usr/lib/flink/opt/flink-table-planner_2.12-1.15.2.jar /usr/lib/flink/lib/
sudo mv /usr/lib/flink/lib/flink-table-planner-loader-1.15.2.jar /usr/lib/flink/opt/
  1. Upload flink-glue-catalog-setup.sh to your S3 bucket (DOC-EXAMPLE-BUCKET).

Refer to Configuring Flink to Hive Metastore in Amazon EMR for more information on how to configure Flink and Hive Metastore. Refer to Run commands and scripts on an Amazon EMR cluster for more details on running the Amazon EMR step script.

  1. Create an EMR 6.9.0 cluster with the applications Hive, Flink, and Trino.

You can create an EMR cluster with the AWS Command Line Interface (AWS CLI) or the AWS Management Console. Refer to the appropriate subsection for instructions.

Create an EMR cluster with the AWS CLI

To use the AWS CLI, complete the following steps:

  1. Create the file emr-flink-trino-glue.json to configure Amazon EMR to use the Data Catalog. Your file should have the following content:
[
{
"Classification": "hive-site",
"Properties": {
"hive.metastore.client.factory.class": "com.amazonaws.glue.catalog.metastore.AWSGlueDataCatalogHiveClientFactory"
}
},
{
"Classification": "trino-connector-hive",
"Properties": {
"hive.metastore": "glue"
}
}
]
  1. Run the following command to create the EMR cluster. Provide your local emr-flink-trino-glue.json parent folder path, S3 bucket, EMR cluster Region, EC2 key name, and S3 bucket for EMR logs.
aws emr create-cluster --release-label emr-6.9.0 \
--applications Name=Hive Name=Flink Name=Spark Name=Trino \
--region us-west-2 \
--name flink-trino-glue-emr69 \
--configurations "file:///<your configuration path>/emr-flink-trino-glue.json" \
--bootstrap-actions '[{"Path":"s3://DOC-EXAMPLE-BUCKET/trino-glue-catalog-setup.sh","Name":"Add iceberg.properties for Trino"}]' \
--steps '[{"Args":["s3://DOC-EXAMPLE-BUCKET/flink-glue-catalog-setup.sh"],"Type":"CUSTOM_JAR","ActionOnFailure":"CONTINUE","Jar":"s3://<region>.elasticmapreduce/libs/script-runner/script-runner.jar","Properties":"","Name":"Flink-glue-integration"}]' \
--instance-groups \
InstanceGroupType=MASTER,InstanceType=m6g.2xlarge,InstanceCount=1 \
InstanceGroupType=CORE,InstanceType=m6g.2xlarge,InstanceCount=2 \
--use-default-roles \
--ebs-root-volume-size 30 \
--ec2-attributes KeyName=<keyname> \
--log-uri s3://<s3-bucket-for-emr>/elasticmapreduce/

Create an EMR cluster on the console

To use the console, complete the following steps:

  1. On the Amazon EMR console, create an EMR cluster and select Use for Hive table metadata for AWS Glue Data Catalog settings.
  2. Add configuration settings with the following code:
[
{
"Classification": "trino-connector-hive",
"Properties": {
"hive.metastore": "glue"
}
}
]

EMR-6.9-Flink-Hive-Glue-1

  1. In the Steps section, add a step called Custom JAR.
  2. Set JAR location to s3://<region>.elasticmapreduce/libs/script-runner/script-runner.jar, where <region> is the region in which your EMR cluster resides.
  3. Set Arguments to the S3 path you uploaded earlier.

EMR-6.9-Flink-Hive-Glue-2

  1. In the Bootstrap Actions section, choose Custom Action.
  2. Set Script location to the S3 path you uploaded.

EMR-6.9-Flink-Hive-Glue-3

  1. Continue the subsequent steps to complete your EMR cluster creation.

Ingest CDC data with Apache Flink CDC in Amazon EMR

The Flink CDC connector supports reading database snapshots and captures updates in the configured tables. We have deployed the Flink CDC connector for MySQL by downloading flink-sql-connector-mysql-cdc-2.2.1.jar and putting it into the Flink library when we create our EMR cluster. The Flink CDC connector can use the Flink Hive catalog to store Flink CDC table schema into Hive Metastore or the AWS Glue Data Catalog. In this post, we use the Data Catalog to store our Flink CDC table.

Complete the following steps to ingest RDS for MySQL databases and tables with Flink CDC and store metadata in the Data Catalog:

  1. SSH to the EMR primary node.
  2. Start Flink on a YARN session by running the following command, providing your S3 bucket name:
flink-yarn-session -d -jm 2048 -tm 4096 -s 2 \
-D state.backend=rocksdb \
-D state.backend.incremental=true \
-D state.checkpoint-storage=filesystem \
-D state.checkpoints.dir=s3://<flink-glue-integration-bucket>/flink-checkponts/ \
-D state.checkpoints.num-retained=10 \
-D execution.checkpointing.interval=10s \
-D execution.checkpointing.mode=EXACTLY_ONCE \
-D execution.checkpointing.externalized-checkpoint-retention=RETAIN_ON_CANCELLATION \
-D execution.checkpointing.max-concurrent-checkpoints=1
  1. Start the Flink SQL client CLI by running the following command:
/usr/lib/flink/bin/sql-client.sh embedded
  1. Create the Flink Hive catalog by specifying the catalog type as hive and providing your S3 bucket name:
CREATE CATALOG glue_catalog WITH (
'type' = 'hive',
'default-database' = 'default',
'hive-conf-dir' = '/etc/hive/conf.dist'
);
USE CATALOG glue_catalog;
CREATE DATABASE IF NOT EXISTS flink_cdc_db WITH ('hive.database.location-uri'= 's3://<flink-glue-integration-bucket>/flink-glue-for-hive/warehouse/')
use flink_cdc_db;

Because we’re configuring the EMR Hive catalog use the AWS Glue Data Catalog, all the databases and tables created in the Flink Hive catalog are stored in the Data Catalog.

  1. Create the Flink CDC table, providing the host name, user name, and password for the RDS for MySQL instance you created earlier.

Note that because the RDS for MySQL user name and password will be stored in the Data Catalog as table properties, you should be enable AWS Glue database/table authorization with AWS Lake Formation to protect your sensitive data.

CREATE TABLE `glue_catalog`.`flink_cdc_db`.`customer_cdc` (
`CUST_ID` double NOT NULL,
`NAME` STRING NOT NULL,
`MKTSEGMENT` STRING NOT NULL,
PRIMARY KEY (`CUST_ID`) NOT ENFORCED
) WITH (
'connector' = 'mysql-cdc',
'hostname' = '<hostname>',
'port' = '3306',
'username' = '<username>',
'password' = '<password>',
'database-name' = 'salesdb',
'table-name' = 'CUSTOMER'
);

CREATE TABLE `glue_catalog`.`flink_cdc_db`.`customer_site_cdc` (
`SITE_ID` double NOT NULL,
`CUST_ID` double NOT NULL,
`ADDRESS` STRING NOT NULL,
`CITY` STRING NOT NULL,
`STATE` STRING NOT NULL,
`COUNTRY` STRING NOT NULL,
`PHONE` STRING NOT NULL,
PRIMARY KEY (`SITE_ID`) NOT ENFORCED
) WITH (
'connector' = 'mysql-cdc',
'hostname' = '<hostname>',
'port' = '3306',
'username' = '<username>',
'password' = '<password>',
'database-name' = 'salesdb',
'table-name' = 'CUSTOMER_SITE'
);

CREATE TABLE `glue_catalog`.`flink_cdc_db`.`sales_order_all_cdc` (
`ORDER_ID` int NOT NULL,
`SITE_ID` double NOT NULL,
`ORDER_DATE` TIMESTAMP NOT NULL,
`SHIP_MODE` STRING NOT NULL
) WITH (
'connector' = 'mysql-cdc',
'hostname' = '<hostname>',
'port' = '3306',
'username' = '<username>',
'password' = '<password>',
'database-name' = 'salesdb',
'table-name' = 'SALES_ORDER_ALL',
'scan.incremental.snapshot.enabled' = 'FALSE'
);
  1. Query the table you just created:
SELECT count(O.ORDER_ID) AS ORDER_COUNT,
C.CUST_ID,
C.NAME,
C.MKTSEGMENT
FROM   customer_cdc C
JOIN customer_site_cdc CS
ON C.CUST_ID = CS.CUST_ID
JOIN sales_order_all_cdc O
ON O.SITE_ID = CS.SITE_ID
GROUP  BY C.CUST_ID,
C.NAME,
C.MKTSEGMENT;

You will get a query result like following screenshot.

Flink-SQL-CDC-Test

Store processed data in Amazon S3 with metadata in the Data Catalog

As we’re ingesting the relational database data in Amazon RDS for MySQL, raw data may be updated or deleted. To support data update and delete, we can choose data lake technologies such as Apache Iceberg or Apache Hudi to store the processed data. As we mentioned earlier, Iceberg and Hudi have different catalog management. We show both scenarios to use Flink to read/write the Iceberg and Hudi tables with metadata in the AWS Glue Data Catalog.

For non-Iceberg and non-Hudi, we use a FileSystem Parquet file to show how the Flink built-in connector uses the Data Catalog.

Read/Write to Iceberg tables in Flink with metadata in Glue Data Catalog

The following diagram shows the architecture for this configuration.

Flink Glue Integration for Iceberg

  1. Create a Flink Iceberg catalog using the Data Catalog by specifying catalog-impl as org.apache.iceberg.aws.glue.GlueCatalog.

For more information about Flink and Data Catalog integration for Iceberg, refer to Glue Catalog.

  1. In the Flink SQL client CLI, run the following command, providing your S3 bucket name:
CREATE CATALOG glue_catalog_for_iceberg WITH (
'type'='iceberg',
'warehouse'='s3://<flink-glue-integration-bucket>/flink-glue-for-iceberg/warehouse/',
'catalog-impl'='org.apache.iceberg.aws.glue.GlueCatalog',
'io-impl'='org.apache.iceberg.aws.s3.S3FileIO',
'lock-impl'='org.apache.iceberg.aws.glue.DynamoLockManager',
'lock.table'='FlinkGlue4IcebergLockTable' );
  1. Create an Iceberg table to store processed data:
USE CATALOG glue_catalog_for_iceberg;
CREATE DATABASE IF NOT EXISTS flink_glue_iceberg_db;
USE flink_glue_iceberg_db;
CREATE TABLE `glue_catalog_for_iceberg`.`flink_glue_iceberg_db`.`customer_summary` (
`CUSTOMER_ID` bigint,
`NAME` STRING,
`MKTSEGMENT` STRING,
`COUNTRY` STRING,
`ORDER_COUNT` BIGINT,
PRIMARY KEY (`CUSTOMER_ID`) NOT Enforced
)
WITH (
'format-version'='2',
'write.upsert.enabled'='true');
  1. Insert the processed data into Iceberg:
INSERT INTO `glue_catalog_for_iceberg`.`flink_glue_iceberg_db`.`customer_summary`
SELECT CAST(C.CUST_ID AS BIGINT) CUST_ID,
C.NAME,
C.MKTSEGMENT,
CS.COUNTRY,
count(O.ORDER_ID) AS ORDER_COUNT
FROM   `glue_catalog`.`flink_cdc_db`.`customer_cdc` C
JOIN `glue_catalog`.`flink_cdc_db`.`customer_site_cdc` CS
ON C.CUST_ID = CS.CUST_ID
JOIN `glue_catalog`.`flink_cdc_db`.`sales_order_all_cdc` O
ON O.SITE_ID = CS.SITE_ID
GROUP  BY C.CUST_ID,
C.NAME,
C.MKTSEGMENT,
CS.COUNTRY;

Read/Write to Hudi tables in Flink with metadata in Glue Data Catalog

The following diagram shows the architecture for this configuration.

Flink Glue Integration for Hudi

Complete the following steps:

  1. Create a catalog for Hudi to use the Hive catalog by specifying mode as hms.

Because we already configured Amazon EMR to use the Data Catalog when we created the EMR cluster, this Hudi Hive catalog uses the Data Catalog under the hood. For more information about Flink and Data Catalog integration for Hudi, refer to Create Catalog.

  1. In the Flink SQL client CLI, run the following command, providing your S3 bucket name:
CREATE CATALOG glue_catalog_for_hudi WITH (
'type' = 'hudi',
'mode' = 'hms',
'table.external' = 'true',
'default-database' = 'default',
'hive.conf.dir' = '/etc/hive/conf.dist',
'catalog.path' = 's3://<flink-glue-integration-bucket>/flink-glue-for-hudi/warehouse/'
);
  1. Create a Hudi table using the Data Catalog, and provide your S3 bucket name:
USE CATALOG glue_catalog_for_hudi;
CREATE DATABASE IF NOT EXISTS flink_glue_hudi_db;
use flink_glue_hudi_db;
CREATE TABLE `glue_catalog_for_hudi`.`flink_glue_hudi_db`.`customer_summary` (
`CUSTOMER_ID` bigint,
`NAME` STRING,
`MKTSEGMENT` STRING,
`COUNTRY` STRING,
`ORDER_COUNT` BIGINT,
PRIMARY KEY (`CUSTOMER_ID`) NOT Enforced
)
WITH (
'connector' = 'hudi',
'write.tasks' = '4',
'path' = 's3://<flink-glue-integration-bucket>/flink-glue-for-hudi/warehouse/customer_summary',
'table.type' = 'COPY_ON_WRITE',
'read.streaming.enabled' = 'true',
'read.streaming.check-interval' = '1'
);
  1. Insert the processed data into Hudi:
INSERT INTO `glue_catalog_for_hudi`.`flink_glue_hudi_db`.`customer_summary`
SELECT CAST(C.CUST_ID AS BIGINT) CUST_ID,
C.NAME,
C.MKTSEGMENT,
CS.COUNTRY,
count(O.ORDER_ID) AS ORDER_COUNT
FROM   `glue_catalog`.`flink_cdc_db`.`customer_cdc` C
JOIN `glue_catalog`.`flink_cdc_db`.`customer_site_cdc` CS
ON C.CUST_ID = CS.CUST_ID
JOIN `glue_catalog`.`flink_cdc_db`.`sales_order_all_cdc` O
ON O.SITE_ID = CS.SITE_ID
GROUP  BY C.CUST_ID,
C.NAME,
C.MKTSEGMENT,
CS.COUNTRY;

Read/Write to other storage format in Flink with metadata in Glue Data Catalog

The following diagram shows the architecture for this configuration.

Flink Glue Integration for Parquet

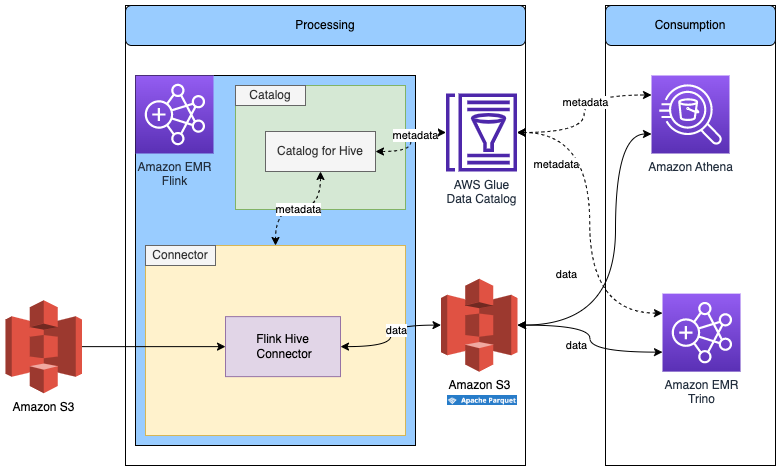
We already created the Flink Hive catalog in the previous step, so we’ll reuse that catalog.

  1. In the Flink SQL client CLI, run the following command:
USE CATALOG glue_catalog;
CREATE DATABASE IF NOT EXISTS flink_hive_parquet_db;
use flink_hive_parquet_db;

We change the SQL dialect to Hive to create a table with Hive syntax.

  1. Create a table with the following SQL, and provide your S3 bucket name:
SET table.sql-dialect=hive;

CREATE TABLE `customer_summary` (
`CUSTOMER_ID` bigint,
`NAME` STRING,
`MKTSEGMENT` STRING,
`COUNTRY` STRING,
`ORDER_COUNT` BIGINT
)
STORED AS parquet
LOCATION 's3://<flink-glue-integration-bucket>/flink-glue-for-hive-parquet/warehouse/customer_summary';

Because Parquet files don’t support updated rows, we can’t consume data from CDC data. However, we can consume data from Iceberg or Hudi.

  1. Use the following code to query the Iceberg table and insert data into the Parquet table:
SET table.sql-dialect=default;
SET execution.runtime-mode = batch;
INSERT INTO `glue_catalog`.`flink_hive_parquet_db`.`customer_summary`
SELECT * from `glue_catalog_for_iceberg`.`flink_glue_iceberg_db`.`customer_summary`;

Verify all table metadata is stored in the Data Catalog

You can navigate to the AWS Glue console to verify all the tables are stored in the Data Catalog.

  1. On the AWS Glue console, choose Databases in the navigation pane to list all the databases we created.

Glue-Databases

  1. Open a database and verify that all the tables are in that database.

Glue-Tables

Consume data with Athena or Amazon EMR Trino for business analysis

You can use Athena or Amazon EMR Trino to access the result data.

Query the data with Athena

To access the data with Athena, complete the following steps:

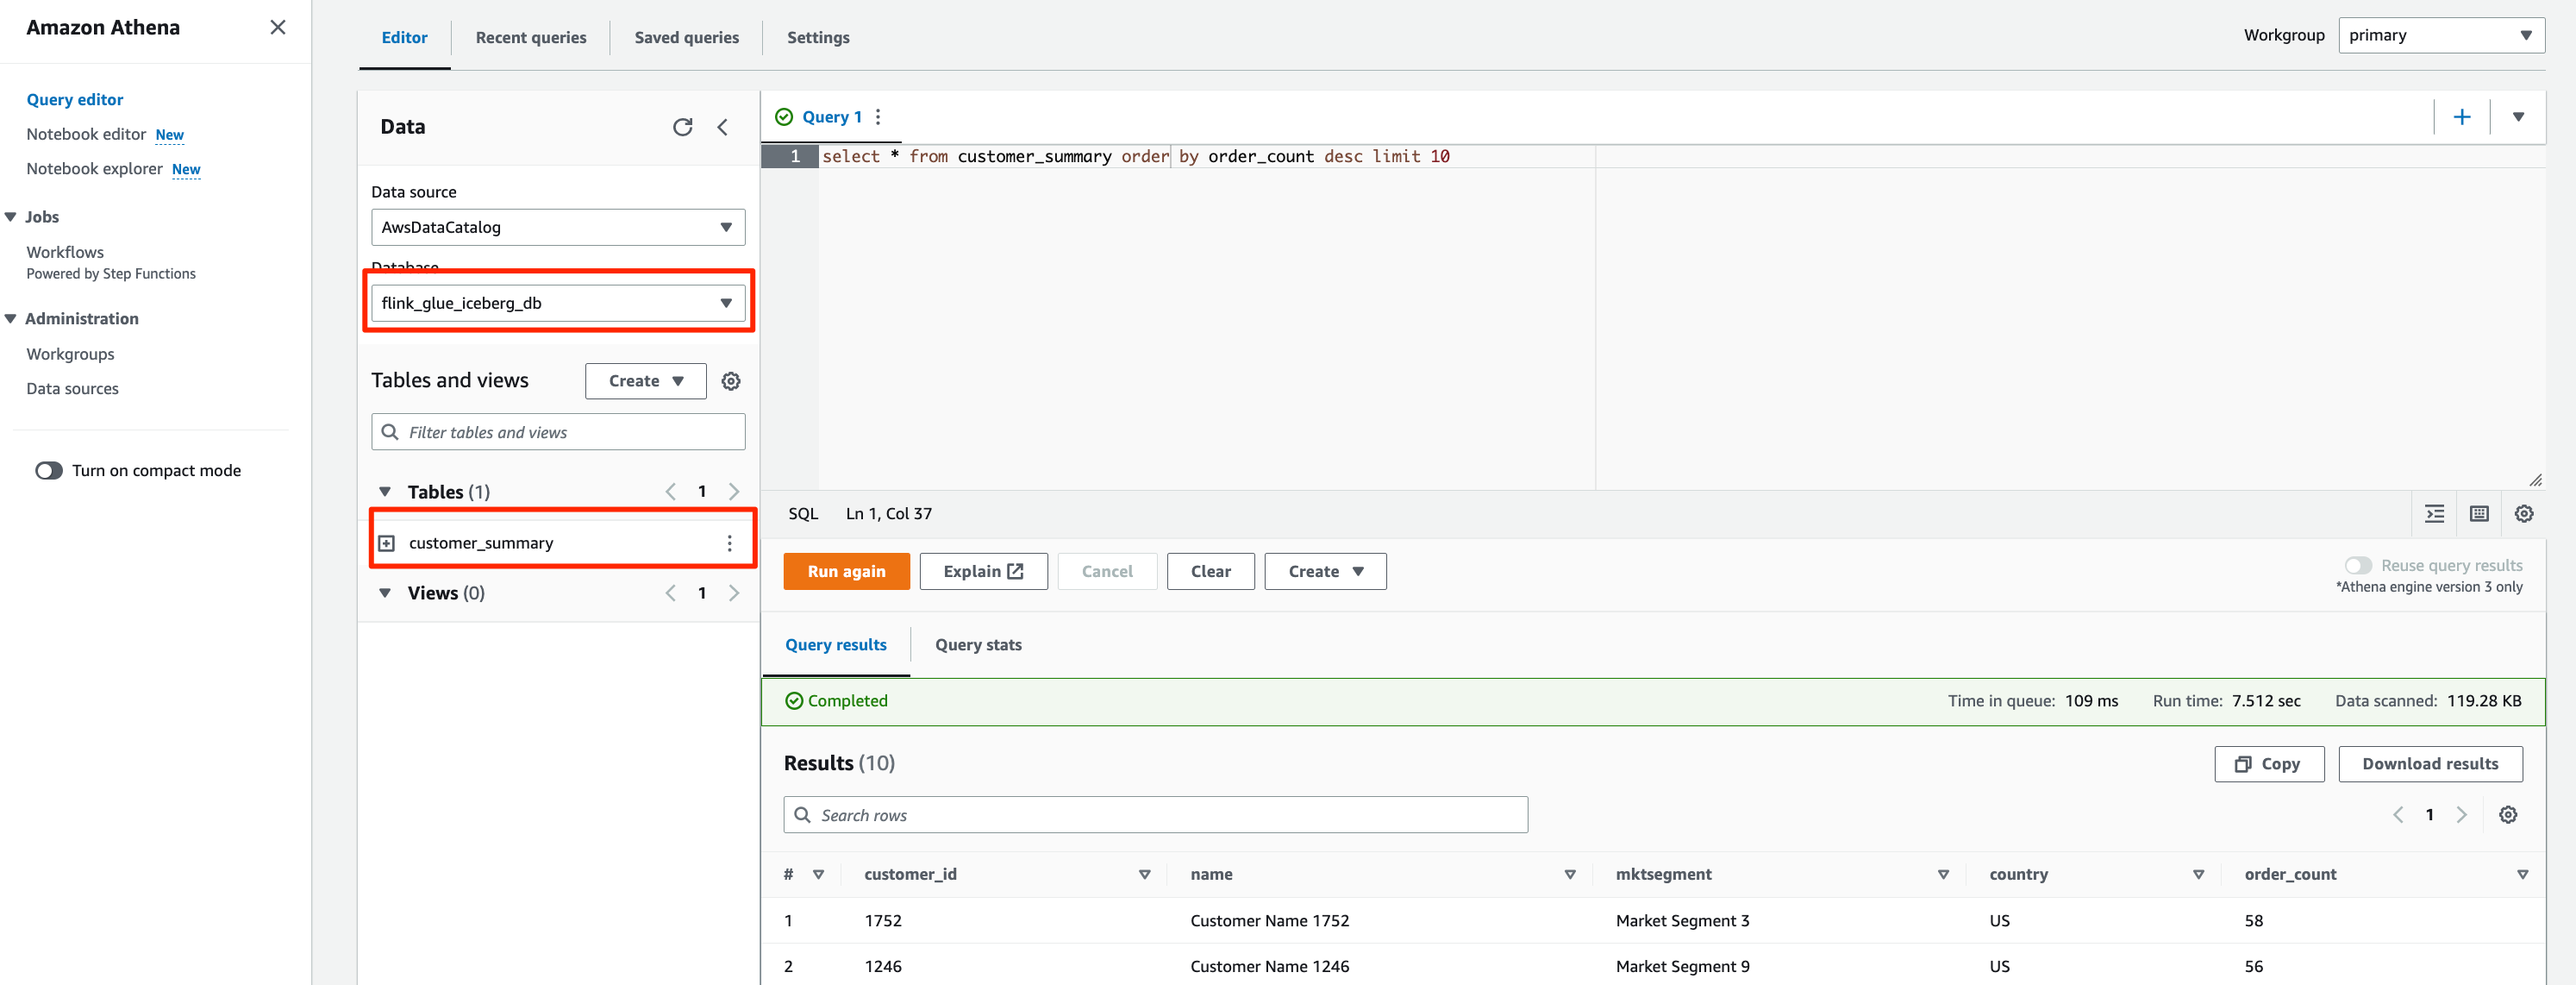
  1. Open the Athena query editor.
  2. Choose flink_glue_iceberg_db for Database.

You should see the customer_summary table listed.

  1. Run the following SQL script to query the Iceberg result table:
select * from customer_summary order by order_count desc limit 10

The query result will look like the following screenshot.

Athena-Iceberg-Query

  1. For the Hudi table, change Database to flink_glue_hudi_db and run the same SQL query.

Athena-Hudi-Query

  1. For the Parquet table, change Database to flink_hive_parquet_db and run the same SQL query.

Athena-Parquet-Query

Query the data with Amazon EMR Trino

To access Iceberg with Amazon EMR Trino, SSH to the EMR primary node.

  1. Run the following command to start the Trino CLI:
trino-cli --catalog iceberg

Amazon EMR Trino can now query the tables in the AWS Glue Data Catalog.

  1. Run the following command to query the result table:
show schemas;
use flink_glue_iceberg_db;
show tables;
select * from customer_summary order by order_count desc limit 10;

The query result looks like the following screenshot.

EMR-Trino-Iceberg-Query

  1. Exit the Trino CLI.
  2. Start the Trino CLI with the hive catalog to query the Hudi table:
trino-cli --catalog hive
  1. Run the following command to query the Hudi table:
show schemas;
use flink_glue_hudi_db;
show tables;
select * from customer_summary order by order_count desc limit 10;

Update and delete source records in Amazon RDS for MySQL and validate the reflection of the data lake tables

We can update and delete some records in the RDS for MySQL database and then validate that the changes are reflected in the Iceberg and Hudi tables.

  1. Connect to the RDS for MySQL database and run the following SQL:
update CUSTOMER set NAME = 'updated_name' where CUST_ID=7;

delete from CUSTOMER where CUST_ID=11;
  1. Query the customer_summary table with Athena or Amazon EMR Trino.

The updated and deleted records are reflected in the Iceberg and Hudi tables.

Athena-Iceberg-Query-Updated

Clean up

When you’re done with this exercise, complete the following steps to delete your resources and stop incurring costs:

  1. Delete the RDS for MySQL database.
  2. Delete the EMR cluster.
  3. Drop the databases and tables created in the Data Catalog.
  4. Remove files in Amazon S3.

Conclusion

This post showed you how to integrate Apache Flink in Amazon EMR with the AWS Glue Data Catalog. You can use a Flink SQL connector to read/write data in a different store, such as Kafka, CDC, HBase, Amazon S3, Iceberg, or Hudi. You can also store the metadata in the Data Catalog. The Flink table API has the same connector and catalog implementation mechanism. In a single session, we can use multiple catalog instances pointing to different types, like IcebergCatalog and HiveCatalog, and use then interchangeably in your query. You can also write code with the Flink table API to develop the same solution to integrate Flink and the Data Catalog.

In our solution, we consumed the RDS for MySQL binary log directly with Flink CDC. You can also use Amazon MSK Connect to consume the binary log with MySQL Debezim and store the data in Amazon Managed Streaming for Apache Kafka (Amazon MSK). Refer to Create a low-latency source-to-data lake pipeline using Amazon MSK Connect, Apache Flink, and Apache Hudi for more information.

With the Amazon EMR Flink unified batch and streaming data processing function, you can ingest and process data with one computing engine. With Apache Iceberg and Hudi integrated in Amazon EMR, you can build an evolvable and scalable data lake. With the AWS Glue Data Catalog, you can manage all enterprise data catalogs in a unified manner and consume data easily.

Follow the steps in this post to build your unified batch and streaming solution with Amazon EMR Flink and the AWS Glue Data Catalog. Please leave a comment if you have any questions.


About the Authors

Jianwei Li is Senior Analytics Specialist TAM. He provides consultant service for AWS enterprise support customers to design and build modern data platform.


Samrat Deb is Software Development Engineer at Amazon EMR. In his spare time, he love exploring new places, different culture and food.


Prabhu Josephraj is a Senior Software Development Engineer working for Amazon EMR. He is focused on leading the team that builds solutions in Apache Hadoop and Apache Flink. In his spare time, Prabhu enjoys spending time with his family.

Upgrade Amazon EMR Hive Metastore from 5.X to 6.X

Post Syndicated from Jianwei Li original https://aws.amazon.com/blogs/big-data/upgrade-amazon-emr-hive-metastore-from-5-x-to-6-x/

If you are currently running Amazon EMR 5.X clusters, consider moving to Amazon EMR 6.X as  it includes new features that helps you improve performance and optimize on cost. For instance, Apache Hive is two times faster with LLAP on Amazon EMR 6.X, and Spark 3 reduces costs by 40%. Additionally, Amazon EMR 6.x releases include Trino, a fast distributed SQL engine and Iceberg, high-performance open data format for petabyte scale tables.

To upgrade Amazon EMR clusters from 5.X to 6.X release, a Hive Metastore upgrade is the first step before applications such as Hive and Spark can be migrated. This post provides guidance on how to upgrade Amazon EMR Hive Metastore from 5.X to 6.X as well as migration of Hive Metastore to the AWS Glue Data Catalog. As Hive 3 Metastore is compatible with Hive 2 applications, you can continue to use Amazon EMR 5.X with the upgraded Hive Metastore.

Solution overview

In the following section, we provide steps to upgrade the Hive Metastore schema using MySQL as the backend.. For any other backends (such as MariaDB, Oracle, or SQL Server), update the commands accordingly.

There are two options to upgrade the Amazon EMR Hive Metastore:

  • Upgrade the Hive Metastore schema from 2.X to 3.X by using the Hive Schema Tool
  • Migrate the Hive Metastore to the AWS Glue Data Catalog

We walk through the steps for both options.

Pre-upgrade prerequisites

Before upgrading the Hive Metastore, you must complete the following prerequisites steps:

  1. Verify the Hive Metastore database is running and accessible.
    You should be able to run Hive DDL and DML queries successfully. Any errors or issues must be fixed before proceeding with upgrade process. Use the following sample queries to test the database:

    create table testtable1 (id int, name string);)
    insert into testtable1 values (1001, "user1");
    select * from testtable1;

  2. To get the Metastore schema version in the current EMR 5.X cluster, run the following command in the primary node:
    sudo hive —service schematool -dbType mysql -info

    The following code shows our sample output:

    $ sudo hive --service schematool -dbType mysql -info
    Metastore connection URL: jdbc:mysql://xxxxxxx.us-east-1.rds.amazonaws.com:3306/hive?createDatabaseIfNotExist=true
    Metastore Connection Driver : org.mariadb.jdbc.Driver
    Metastore connection User: admin
    Hive distribution version: 2.3.0
    Metastore schema version:  2.3.0

  3. Stop the Metastore service and restrict access to the Metastore MySQL database.
    It’s very important that no one else accesses or modifies the contents of the Metastore database while you’re performing the schema upgrade.To stop the Metastore, use the following commands:

    $ sudo stop hive-server2
    $ sudo stop hive-hcatalog-server

    For Amazon EMR release 5.30 and 6.0 onwards (Amazon Linux 2 is the operating system for the Amazon EMR 5.30+ and 6.x release series), use the following commands:

    $ sudo systemctl stop hive-server2.service
    $ sudo systemctl stop hive-hcatalog-server.service

    You can also note the total number of databases and tables present in the Hive Metastore before the upgrade, and verify the number of databases and tables after the upgrade.

  4. To get the total number of tables and databases before the upgrade, run the following commands after connecting to the external Metastore database (assuming the Hive Metadata DB name is hive):
    $mysql -u <username> -h <mysqlhost> --password;
    $use hive;
    $select count(*) from DBS;
    $select count(*) from TBLS;

  5. Take a backup or snapshot of the Hive database.
    This allows you to revert any changes made during the upgrade process if something goes wrong. If you’re using Amazon Relational Database Service (Amazon RDS), refer to Backing up and restoring an Amazon RDS instance for instructions.
  6. Take note of the Hive table storage location if data is stored in HDFS.

If all the table data is on Amazon Simple Storage Service (Amazon S3), then no action is needed. If HDFS is used as the storage layer for Hive databases and tables, then take a note of them. You will need to copy the files on HDFS to a similar path on the new cluster, and then verify or update the location attribute for databases and tables on the new cluster accordingly.

Upgrade the Amazon EMR Hive Metastore schema with the Hive Schema Tool

In this approach, you use the persistent Hive Metastore on a remote database (Amazon RDS for MySQL or Amazon Aurora MySQL-Compatible Edition). The following diagram shows the upgrade procedure.

EMR Hive Metastore Upgrade

To upgrade the Amazon EMR Hive Metastore from 5.X (Hive version 2.X) to 6.X (Hive version 3.X), we can use the Hive Schema Tool. The Hive Schema Tool is an offline tool for Metastore schema manipulation. You can use it to initialize, upgrade, and validate the Metastore schema. Run the following command to show the available options for the Hive Schema Tool:

sudo hive --service schematool -help

Be sure to complete the prerequisites mentioned earlier, including taking a backup or snapshot, before proceeding with the next steps.

  1. Note down the details of the existing Hive external Metastore to be upgraded.
    This includes the RDS for MySQL endpoint host name, database name (for this post, hive), user name, and password. You can do this through one of the following options:

    • Get the Hive Metastore DB information from the Hive configuration file – Log in to the EMR 5.X primary node, open the file /etc/hive/conf/hive-site.xml, and note the four properties:
      <property>
      	  <name>javax.jdo.option.ConnectionURL</name>
      	  <value>jdbc:mysql://{hostname}:3306/{dbname}?createDatabaseIfNotExist=true</value>
      	  <description>username to use against metastore database</description>
      	</property>
      	<property>
      	  <name>javax.jdo.option.ConnectionDriverName</name>
      	  <value>org.mariadb.jdbc.Driver</value>
      	  <description>username to use against metastore database</description>
      	</property>
      	<property>
      	  <name>javax.jdo.option.ConnectionUserName</name>
      	  <value>{username}</value>
      	  <description>username to use against metastore database</description>
      	</property>
      	<property>
      	  <name>javax.jdo.option.ConnectionPassword</name>
      	  <value>{password}</value>
      	  <description>password to use against metastore database</description>
      	</property>

    • Get the Hive Metastore DB information from the Amazon EMR console – Navigate to the EMR 5.X cluster, choose the Configurations tab, and note down the Metastore DB information.
      EMR Cosole for Configuration
  1. Create a new EMR 6.X cluster.
    To use the Hive Schema Tool, we need to create an EMR 6.X cluster. You can create a new EMR 6.X cluster via the Hive console or the AWS Command Line Interface (AWS CLI), without specifying external hive Metastore details. This lets the EMR 6.X cluster launch successfully using the default Hive Metastore. For more information about EMR cluster management, refer to Plan and configure clusters.
  2. After your new EMR 6.X cluster is launched successfully and is in the waiting state, SSH to the EMR 6.X primary node and take a backup of /etc/hive/conf/hive-site.xml:
    sudo cp /etc/hive/conf/hive-site.xml /etc/hive/conf/hive-site.xml.bak

  3. Stop Hive services:
    sudo systemctl stop hive-hcatalog-server.service
    sudo systemctl stop hive-server2.service

    Now you update the Hive configuration and point it to the old hive Metastore database.

  4. Modify /etc/hive/conf/hive-site.xml and update the properties with the values you collected earlier:
    <property>
      <name>javax.jdo.option.ConnectionURL</name>
      <value>jdbc:mysql://{hostname}:3306/{dbname}?createDatabaseIfNotExist=true</value>
      <description>username to use against metastore database</description>
    </property>
    <property>
      <name>javax.jdo.option.ConnectionDriverName</name>
      <value>org.mariadb.jdbc.Driver</value>
      <description>username to use against metastore database</description>
    </property>
    <property>
      <name>javax.jdo.option.ConnectionUserName</name>
      <value>{username}</value>
      <description>username to use against metastore database</description>
    </property>
    <property>
      <name>javax.jdo.option.ConnectionPassword</name>
      <value>{password}</value>
      <description>password to use against metastore database</description>
    </property>

  5. On the same or new SSH session, run the Hive Schema Tool to check that the Metastore is pointing to the old Metastore database:
    sudo hive --service schemaTool -dbType mysql -info

    The output should look as follows (old-hostname, old-dbname, and old-username are the values you changed):

    Metastore connection URL:     jdbc:mysql://{old-hostname}:3306/{old-dbname}?createDatabaseIfNotExist=true
    Metastore Connection Driver :     org.mariadb.jdbc.Driver
    Metastore connection User:     {old-username}
    Hive distribution version:     3.1.0
    Metastore schema version:      2.3.0
    schemaTool completed

    You can upgrade the Hive Metastore by passing the -upgradeSchema option to the Hive Schema Tool. The tool figures out the SQL scripts required to initialize or upgrade the schema and then runs those scripts against the backend database.

  6. Run the upgradeSchema command with -dryRun, which only lists the SQL scripts needed during the actual run:
    sudo hive --service schematool -dbType mysql -upgradeSchema -dryRun

    The output should look like the following code. It shows the Metastore upgrade path from the old version to the new version. You can find the upgrade order on the GitHub repo. In case of failure during the upgrade process, these scripts can be run manually in the same order.

    Metastore connection URL:     jdbc:mysql://{old-hostname}:3306/{old-dbname}?createDatabaseIfNotExist=true
    Metastore Connection Driver :     org.mariadb.jdbc.Driver
    Metastore connection User:     {old-username}
    Hive distribution version:     3.1.0
    Metastore schema version:      2.3.0
    schemaTool completed

  7. To upgrade the Hive Metastore schema, run the Hive Schema Tool with -upgradeSchema:
    sudo hive --service schematool -dbType mysql -upgradeSchema

    The output should look like the following code:

    Starting upgrade metastore schema from version 2.3.0 to 3.1.0
    Upgrade script upgrade-2.3.0-to-3.0.0.mysql.sql
    ...
    Completed upgrade-2.3.0-to-3.0.0.mysql.sql
    Upgrade script upgrade-3.0.0-to-3.1.0.mysql.sql
    ...
    Completed upgrade-3.0.0-to-3.1.0.mysql.sql
    schemaTool completed

    In case of any issues or failures, you can run the preceding command with verbose. This prints all the queries getting run in order and their output.

    sudo hive --service schemaTool -verbose -dbType mysql -upgradeSchema

    If you encounter any failures during this process and you want to upgrade your Hive Metastore by running the SQL yourself, refer to Upgrading Hive Metastore.

    If HDFS was used as storage for the Hive warehouse or any Hive DB location, you need to update the NameNode alias or URI with the new cluster’s HDFS alias.

  8. Use the following commands to update the HDFS NameNode alias (replace <new-loc> <old-loc> with the HDFS root location of the new and old clusters, respectively):
    hive —service metatool -updateLocation <new-loc> <old-loc>

    You can run the following command on any EMR cluster node to get the HDFS NameNode alias:

    hdfs getconf -confKey dfs.namenode.rpc-address

    At first you can run with the dryRun option, which displays all the changes but aren’t persisted. For example:

    [hadoop@ip-172-31-87-188 ~]$ hive --service metatool -updateLocation hdfs://ip-172-31-50-80.ec2.internal:8020 hdfs://ip-172-31-87-188.ec2.internal:8020 -dryRun
    Initializing HiveMetaTool..
    Looking for LOCATION_URI field in DBS table to update..
    Dry Run of updateLocation on table DBS..
    old location: hdfs://ip-172-31-87-188.ec2.internal:8020/user/hive/warehouse/testdb.db new location: hdfs://ip-172-31-50-80.ec2.internal:8020/user/hive/warehouse/testdb.db
    old location: hdfs://ip-172-31-87-188.ec2.internal:8020/user/hive/warehouse/testdb_2.db new location: hdfs://ip-172-31-50-80.ec2.internal:8020/user/hive/warehouse/testdb_2.db
    old location: hdfs://ip-172-31-87-188.ec2.internal:8020/user/hive/warehouse new location: hdfs://ip-172-31-50-80.ec2.internal:8020/user/hive/warehouse
    Found 3 records in DBS table to update
    Looking for LOCATION field in SDS table to update..
    Dry Run of updateLocation on table SDS..
    old location: hdfs://ip-172-31-87-188.ec2.internal:8020/user/hive/warehouse/testtable1 new location: hdfs://ip-172-31-50-80.ec2.internal:8020/user/hive/warehouse/testtable1
    Found 1 records in SDS table to update

    However, if the new location needs to be changed to a different HDFS or S3 path, then use the following approach.

    First connect to the remote Hive Metastore database and run the following query to pull all the tables for a specific database and list the locations. Replace HiveMetastore_DB with the database name used for the Hive Metastore in the external database (for this post, hive) and the Hive database name (default):

    mysql> SELECT d.NAME as DB_NAME, t.TBL_NAME, t.TBL_TYPE, s.LOCATION FROM <HiveMetastore_DB>.TBLS t 
    JOIN <HiveMetastore_DB>.DBS d ON t.DB_ID = d.DB_ID JOIN <HiveMetastore_DB>.SDS s 
    ON t.SD_ID = s.SD_ID AND d.NAME='default';

    Identify the table for which location needs to be updated. Then run the Alter table command to update the table locations. You can prepare a script or chain of Alter table commands to update the locations for multiple tables.

    ALTER TABLE <table_name> SET LOCATION "<new_location>";

  9. Start and check the status of Hive Metastore and HiveServer2:
    sudo systemctl start hive-hcatalog-server.service
    sudo systemctl start hive-server2.service
    sudo systemctl status hive-hcatalog-server.service
    sudo systemctl status hive-server2.service

Post-upgrade validation

Perform the following post-upgrade steps:

  1. Confirm the Hive Metastore schema is upgraded to the new version:
    sudo hive --service schemaTool -dbType mysql -validate

    The output should look like the following code:

    Starting metastore validation
    
    Validating schema version
    Succeeded in schema version validation.
    [SUCCESS]
    Validating sequence number for SEQUENCE_TABLE
    Succeeded in sequence number validation for SEQUENCE_TABLE.
    [SUCCESS]
    Validating metastore schema tables
    Succeeded in schema table validation.
    [SUCCESS]
    Validating DFS locations
    Succeeded in DFS location validation.
    [SUCCESS]
    Validating columns for incorrect NULL values.
    Succeeded in column validation for incorrect NULL values.
    [SUCCESS]
    Done with metastore validation: [SUCCESS]
    schemaTool completed

  2. Run the following Hive Schema Tool command to query the Hive schema version and verify that it’s upgraded:
    $ sudo hive --service schemaTool -dbType mysql -info
    Metastore connection URL:        jdbc:mysql://<host>:3306/<hivemetastore-dbname>?createDatabaseIfNotExist=true
    Metastore Connection Driver :    org.mariadb.jdbc.Driver
    Metastore connection User:       <username>
    Hive distribution version:       3.1.0
    Metastore schema version:        3.1.0

  3. Run some DML queries against old tables and ensure they are running successfully.
  4. Verify the table and database counts using the same commands mentioned in the prerequisites section, and compare the counts.

The Hive Metastore schema migration process is complete, and you can start working on your new EMR cluster. If for some reason you want to relaunch the EMR cluster, then you just need to provide the Hive Metastore remote database that we upgraded in the previous steps using the options on the Amazon EMR Configurations tab.

Migrate the Amazon EMR Hive Metastore to the AWS Glue Data Catalog

The AWS Glue Data Catalog is flexible and reliable, and can reduce your operation cost. Moreover, the Data Catalog supports different versions of EMR clusters. Therefore, when you migrate your Amazon EMR 5.X Hive Metastore to the Data Catalog, you can use the same Data Catalog with any new EMR 5.8+ cluster, including Amazon EMR 6.x. There are some factors you should consider when using this approach; refer to Considerations when using AWS Glue Data Catalog for more information. The following diagram shows the upgrade procedure.
EMR Hive Metastore Migrate to Glue Data Catalog
To migrate your Hive Metastore to the Data Catalog, you can use the Hive Metastore migration script from GitHub. The following are the major steps for a direct migration.

Make sure all the table data is stored in Amazon S3 and not HDFS. Otherwise, tables migrated to the Data Catalog will have the table location pointing to HDFS, and you can’t query the table. You can check your table data location by connecting to the MySQL database and running the following SQL:

select SD_ID, LOCATION from SDS where LOCATION like 'hdfs%';

Make sure to complete the prerequisite steps mentioned earlier before proceeding with the migration. Ensure the EMR 5.X cluster is in a waiting state and all the components’ status are in service.

  1. Note down the details of the existing EMR 5.X cluster Hive Metastore database to be upgraded.
    As mentioned before, this includes the endpoint host name, database name, user name, and password. You can do this through one of the following options:

    • Get the Hive Metastore DB information from the Hive configuration file – Log in to the Amazon EMR 5.X primary node, open the file /etc/hive/conf/hive-site.xml, and note the four properties:
    <property>
      <name>javax.jdo.option.ConnectionURL</name>
      <value>jdbc:mysql://{hostname}:3306/{dbname}?createDatabaseIfNotExist=true</value>
      <description>username to use against metastore database</description>
    </property>
    <property>
      <name>javax.jdo.option.ConnectionUserName</name>
      <value>{username}</value>
      <description>username to use against metastore database</description>
    </property>
    <property>
      <name>javax.jdo.option.ConnectionPassword</name>
      <value>{password}</value>
      <description>password to use against metastore database</description>
    </property>

    • Get the Hive Metastore DB information from the Amazon EMR console – Navigate to the Amazon EMR 5.X cluster, choose the Configurations tab, and note down the Metastore DB information.

    EMR Cosole for Configuration

  2. On the AWS Glue console, create a connection to the Hive Metastore as a JDBC data source.
    Use the connection JDBC URL, user name, and password you gathered in the previous step. Specify the VPC, subnet, and security group associated with your Hive Metastore. You can find these on the Amazon EMR console if the Hive Metastore is on the EMR primary node, or on the Amazon RDS console if the Metastore is an RDS instance.
  3. Download two extract, transform, and load (ETL) job scripts from GitHub and upload them to an S3 bucket:
    wget https://raw.githubusercontent.com/aws-samples/aws-glue-samples/master/utilities/Hive_metastore_migration/src/hive_metastore_migration.py
    wget https://raw.githubusercontent.com/aws-samples/aws-glue-samples/master/utilities/Hive_metastore_migration/src/import_into_datacatalog.py

    If you configured AWS Glue to access Amazon S3 from a VPC endpoint, you must upload the script to a bucket in the same AWS Region where your job runs.

    Now you must create a job on the AWS Glue console to extract metadata from your Hive Metastore to migrate it to the Data Catalog.

  4. On the AWS Glue console, choose Jobs in the navigation pane.
  5. Choose Create job.
  6. Select Spark script editor.
  7. For Options¸ select Upload and edit an existing script.
  8. Choose Choose file and upload the import_into_datacatalog.py script you downloaded earlier.
  9. Choose Create.
    Glue Job script editor
  10. On the Job details tab, enter a job name (for example, Import-Hive-Metastore-To-Glue).
  11. For IAM Role, choose a role.
  12. For Type, choose Spark.
    Glue ETL Job details
  13. For Glue version¸ choose Glue 3.0.
  14. For Language, choose Python 3.
  15. For Worker type, choose G1.X.
  16. For Requested number of workers, enter 2.
    Glue ETL Job details
  17. In the Advanced properties section, for Script filename, enter import_into_datacatalog.py.
  18. For Script path, enter the S3 path you used earlier (just the parent folder).
    Glue ETL Job details
  19. Under Connections, choose the connection you created earlier.
    Glue ETL Job details
  20. For Python library path, enter the S3 path you used earlier for the file hive_metastore_migration.py.
  21. Under Job parameters, enter the following key-pair values:
    • --mode: from-jdbc
    • --connection-name: EMR-Hive-Metastore
    • --region: us-west-2

    Glue ETL Job details

  22. Choose Save to save the job.
  23. Run the job on demand on the AWS Glue console.

If the job runs successfully, Run status should show as Succeeded. When the job is finished, the metadata from the Hive Metastore is visible on the AWS Glue console. Check the databases and tables listed to verify that they were migrated correctly.

Known issues

In some cases where the Hive Metastore schema version is on a very old release or if some required metadata tables are missing, the upgrade process may fail. In this case, you can use the following steps to identify and fix the issue. Run the schemaTool upgradeSchema command with verbose as follows:

sudo hive --service schemaTool -verbose -dbType mysql -upgradeSchema

This prints all the queries being run in order and their output:

jdbc:mysql://metastore.xxxx.us-west-1> CREATE INDEX PCS_STATS_IDX ON PAR T_COL_STATS (DB_NAME,TABLE_NAME,COLUMN_NAME,PARTITION_NAME) USING BTREE
Error: (conn=6831922) Duplicate key name 'PCS_STATS_IDX' (state=42000,code=1061)
Closing: 0: jdbc:mysql://metastore.xxxx.us-west-1.rds.amazonaws.com:3306/hive?createDatabaseIfNotExist=true
org.apache.hadoop.hive.metastore.HiveMetaException: Schema initialization FAILED! Metastore state would be inconsistent !!
Underlying cause: java.io.IOException : Schema script failed, errorcode 2

Note down the query and the error message, then take the required steps to address the issue. For example, depending on the error message, you may have to create the missing table or alter an existing table. Then you can either rerun the schemaTool upgradeSchema command, or you can manually run the remaining queries required for upgrade. You can get the complete script that schemaTool runs from the following path on the primary node /usr/lib/hive/scripts/metastore/upgrade/mysql/ or from GitHub.

Clean up

Running additional EMR clusters to perform the upgrade activity in your AWS account may incur additional charges. When you complete the Hive Metastore upgrade successfully, we recommend deleting the additional EMR clusters to save cost.

Conclusion

To upgrade Amazon EMR from 5.X to 6.X and take advantage of some features from Hive 3.X or Spark SQL 3.X, you have to upgrade the Hive Metastore first. If you’re using the AWS Glue Data Catalog as your Hive Metastore, you don’t need to do anything because the Data Catalog supports both Amazon EMR versions. If you’re using a MySQL database as the external Hive Metastore, you can upgrade by following the steps outlined in this post, or you can migrate your Hive Metastore to the Data Catalog.

There are some functional differences between the different versions of Hive, Spark, and Flink. If you have some applications running on Amazon EMR 5.X, make sure test your applications in Amazon EMR 6.X and validate the function compatibility. We will cover application upgrades for Amazon EMR components in a future post.


About the authors

Jianwei Li is Senior Analytics Specialist TAM. He provides consultant service for AWS enterprise support customers to design and build modern data platform. He has more than 10 years experience in big data and analytics domain. In his spare time, he like running and hiking.

Narayanan Venkateswaran is an Engineer in the AWS EMR group. He works on developing Hive in EMR. He has over 17 years of work experience in the industry across several companies including Sun Microsystems, Microsoft, Amazon and Oracle. Narayanan also holds a PhD in databases with focus on horizontal scalability in relational stores.

Partha Sarathi is an Analytics Specialist TAM – at AWS based in Sydney, Australia. He brings 15+ years of technology expertise and helps Enterprise customers optimize Analytics workloads. He has extensively worked on both on-premise and cloud Bigdata workloads along with various ETL platform in his previous roles. He also actively works on conducting proactive operational reviews around the Analytics services like Amazon EMR, Redshift, and OpenSearch.

Krish is an Enterprise Support Manager responsible for leading a team of specialists in EMEA focused on BigData & Analytics, Databases, Networking and Security. He is also an expert in helping enterprise customers modernize their data platforms and inspire them to implement operational best practices. In his spare time, he enjoys spending time with his family, travelling, and video games.