Post Syndicated from Manash Deb original https://aws.amazon.com/blogs/big-data/compare-different-node-types-for-your-workload-using-amazon-redshift/
Amazon Redshift is a fast, fully managed, widely popular cloud data warehouse that offers different node types to meet the flexible workload patterns of our customers. Amazon Redshift RA3 with managed storage is the newest instance type in Amazon Redshift, which allows you to scale and pay for compute and storage independently, and also allows advanced features like AQUA (Advanced Query Accelerator), cross-cluster data sharing, and cross-Availability Zone cluster relocation.
Many customers start their workload on Amazon Redshift with RA3 instances as their default choice, which currently offers three node sizes.
| Node size |
vCPU |
RAM (GiB) |
Managed storage quota per node |
| ra3.xlplus |
4 |
32 |
32 TB |
| ra3.4xlarge |
12 |
96 |
128 TB |
| ra3.16xlarge |
48 |
384 |
128 TB |
A very common question we get from customers is “Which RA3 instance type and number of nodes should we choose for our workload?” In this post, we answer that question with the following two-step process:
- Use the Amazon Redshift sizing calculator on the Amazon Redshift console, which estimates your cluster configuration based on data size and data access frequency.
- Use the Amazon Redshift Node Configuration Comparison utility to find the right configuration for your cluster based on your query performance expectation for sequential or concurrently running queries. If you’re already using Amazon Redshift and want to migrate from your existing DC2 or DS2 instances to RA3, you may follow our recommendations on node count and type when upgrading. Before doing that, you can use the utility to evaluate the new cluster’s performance by replaying your past workloads too, which integrates with the Amazon Redshift Simple Replay utility to evaluate performance metrics for different Amazon Redshift configurations to meet your needs. We describe this utility in detail later in this post.
Amazon Redshift sizing calculator
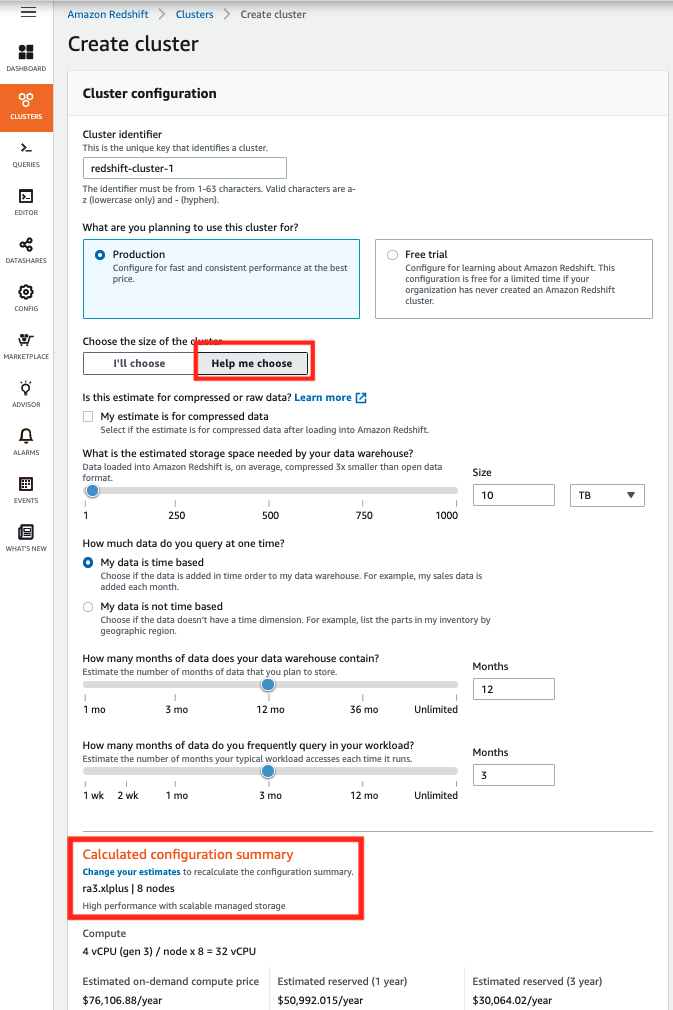
The Amazon Redshift console provides the Help me choose option when you create a new Amazon Redshift cluster. This option allows you to get an estimate of your cluster configuration based on your data size and data access frequency. In this wizard, you need to provide the following information:
- The compressed or uncompressed size of your total dataset
- Whether your data is time-based:
- If your data is time based, how many months of data does the data warehouse contain and how many months are frequently queried on that data
- If your data is not time based, what percentage of data do your queries access frequently
Based on your response, you receive a recommended node configuration, as shown in the following screenshot.

You can use this recommendation to create your Amazon Redshift cluster and quickly get started with your workload to gain insights from your data in the Amazon Redshift data warehouse.
Amazon Redshift Node Configuration Comparison utility
If you have stringent service level agreements (SLAs) for query performance in your Amazon Redshift cluster or you want to explore different Amazon Redshift configurations based on the price/performance of your workload, you can use the Amazon Redshift Node Configuration Comparison utility. This utility helps evaluate performance of your queries using different Amazon Redshift cluster configurations in parallel and compares the end results to find the best cluster configuration that meets your need.
To perform this comparison, you can use the Amazon Redshift sizing calculator recommendations in the previous step as a benchmark and test other configurations with it in parallel to compare performance. If you’re migrating from DC2 or DS2 node types to RA3, you can use our recommendations on node count and type as a benchmark.
Solution overview
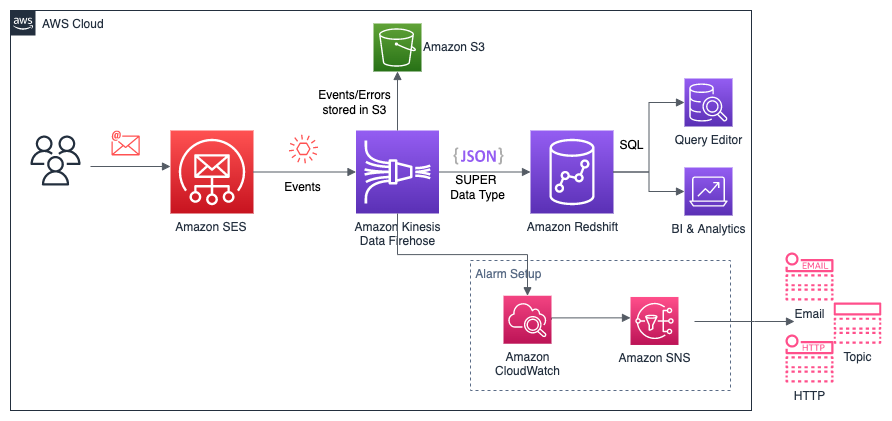
The solution uses AWS Step Functions, AWS Lambda, and AWS Batch to run an end-to-end automated orchestration to find the best Amazon Redshift configuration based on your price/performance requirements. We use an AWS CloudFormation template to deploy and run this solution in your AWS account. Along with other resources, this template creates an Amazon Simple Storage Service (Amazon S3) bucket to store all data and metadata related to this process. The following diagram shows the solution architecture.

You need to create a JSON file to provide the following input configurations for your test:
- Amazon Redshift cluster configurations
- DDL and load script (optional)
- Amazon Redshift snapshot identifier (optional)
- SQL script to conduct sequential and concurrency test (optional)
- Amazon Redshift audit log location and simple replay time window (optional)
You need to store this file in an existing S3 bucket and then use the following CloudFormation template to deploy this solution. This solution uses AWS CloudFormation to automatically provision all the required resources in your AWS accounts. For more information, see Getting started with AWS CloudFormation.
Deploying the solution also initiates an iteration of this test by invoking a Step Functions state machine in your AWS account.
Prerequisites
If you’re already running an Amazon Redshift workload in production, you can use this solution to replay your past workload using the Amazon Redshift Simple Replay utility. This helps you conduct what-if analysis on Amazon Redshift and evaluate how your workload performs with different configurations. For example, you can use the tool to benchmark your actual workload on a new instance type like RA3, evaluate a new feature like AQUA, or assess different cluster configurations. It replays your workload with the same time interval between connections, transactions, and queries as the source. It also supports extract, transform, and load (ETL) workloads including COPY and UNLOAD statements. The Amazon Redshift Node Configuration Comparison utility uses Simple Replay to automate all these configuration tests. As a prerequisite to use Simple Replay, you need to enable audit logging and user-activity logging in your Amazon Redshift cluster.
Example use case
As an example, assume you have an existing Amazon Redshift cluster with two nodes of DC2.8XLarge instances. You want to evaluate migrating this cluster to RA3 node types. You used the Amazon Redshift sizing calculator in the previous step, which recommends using four nodes of RA3.4XL, but you also want to evaluate the performance with five nodes of RA3.4XL to meet your future growth demands. For that, you want to run five test queries sequentially as well as in 5 and 10 parallel sessions in all these clusters. You also want to replay the workload in the past hour on these clusters and compare their performance.
You also want to test your workload performance with concurrency scaling enabled in that clusters, which helps improve concurrent workloads with consistently fast query performance.
The following table summarizes the five cluster configurations that are evaluated as part of this test.
| Node Type |
Number of Nodes |
Option |
| dc2.8xlarge |
2 |
concurrency scaling – off |
| ra3.4xlarge |
4 |
concurrency scaling – off |
| ra3.4xlarge |
4 |
concurrency scaling – on |
| ra3.4xlarge |
5 |
concurrency scaling – off |
| ra3.4xlarge |
5 |
concurrency scaling – on |
To perform this test using the Amazon Redshift Node Configuration Comparison utility, you provide these configurations in a JSON file and store it in an S3 bucket. You then use the provided CloudFormation template to deploy this utility, which performs the end-to-end performance testing in all the clusters in parallel and produces a performance evaluation summary, which can help you decide which configuration works best for you.
JSON file parameters
You need to provide a configuration JSON file to use this solution. The following table explains the input parameters for this JSON file.
| JSON Parameter |
Allowed Values |
Description |
SNAPSHOT_ID |
N/A,
Amazon Redshift snapshot identifier
|
Enter the snapshot identifier if you want to create new Amazon Redshift clusters by restoring from a snapshot.
Snapshot identifier is mandatory if you’re using Simple Replay in this test to replay your past workload.
If you’re using this solution in a different AWS account, make sure to share your Amazon Redshift cluster snapshot with this account. For more information, see How do I copy an Amazon Redshift cluster to a different AWS account. Enter N/A if not applicable. |
SNAPSHOT_ACCOUNT_ID |
N/A,
AWS Account ID
|
The AWS account ID where the snapshot was created. Enter N/A if not applicable. |
PARAMETER_GROUP_CONFIG_S3_PATH |
N/A,
Amazon S3 URI
|
If you use a custom parameter group for this test, provide its Amazon S3 URI. You can get this JSON by running the following command in the AWS Command Line Interface (AWS CLI):
aws redshift describe-cluster-parameters --parameter-group-name your-custom-param-group --output json
Enter N/A if not applicable.
|
DDL_AND_COPY_SCRIPT_S3_PATH |
N/A,
Amazon S3 URI
|
If you create tables and load data on them before performing the test, provide its Amazon S3 URI. Enter N/A if not applicable. |
SQL_SCRIPT_S3_PATH |
N/A,
Amazon S3 URI
|
If you run performance testing of your queries, provide the Amazon S3 URI of your script consisting of all your SQL commands. These commands should be deliminated by a semicolon (;). Enter N/A if not applicable. We recommend keeping only SELECT statements in this script path. |
NUMBER_OF_PARALLEL_SESSIONS_LIST |
N/A, comma-separated numbers |
Enter comma-separated numbers to denote the number of parallel sessions in which you want to run the preceding script. Enter N/A if not applicable. |
SIMPLE_REPLAY_LOG_LOCATION |
N/A,
Amazon S3 URI
|
If you’re already running an Amazon Redshift workload and your cluster has audit logging enabled, provide the Amazon S3 URI of your Amazon Redshift audit logging location. If you’re using this solution in a different AWS account, copy these logs from your source clusters’ audit logging bucket to the S3 bucket in this account. Enter N/A if not applicable. |
SIMPLE_REPLAY_EXTRACT_START_TIME |
N/A, time in ISO-8601 format |
If you’re using Simple Replay in this test to replay your past workload, provide the start time of that workload in ISO-8601 format (for example, 2021-01-26T21:41:16+00:00). Enter N/A if not applicable. |
SIMPLE_REPLAY_EXTRACT_END_TIME |
N/A, time in ISO-8601 format |
If you’re using Simple Replay in this test to replay your past workload, provide the end time of that workload in ISO-8601 format (for example, 2021-01-26T21:41:16+00:00). Enter N/A if not applicable. |
SIMPLE_REPLAY_EXTRACT_OVERWRITE_S3_PATH |
N/A,
Amazon S3 URI
|
If you’re using Simple Replay and you want to use a custom extract.yaml file, provide its Amazon S3 URI. Enter N/A if not applicable. |
SIMPLE_REPLAY_OVERWRITE_S3_PATH |
N/A,
Amazon S3 URI
|
If you’re using Simple Replay and you want to use a custom replay.yaml file, provide its Amazon S3 URI. Enter N/A if not applicable. |
AUTO_PAUSE |
true,
false
|
Enter true if you want to automatically pause all except the first Amazon Redshift clusters created for this test, otherwise enter false. |
CONFIGURATIONS |
JSON array with parameters NODE_TYPE, NUMBER_OF_NODES, WLM_CONFIG_S3_PATH |
Enter a JSON array mentioning your Amazon Redshift cluster configurations for which you want to perform this test. We explain the parameters in the three rows. |
NODE_TYPE |
ra3.xlplus, ra3.4xlarge, ra3.16xlarge, dc2.large, dc2.8xlarge, ds2.xlarge, ds2.8xlarge |
The Amazon Redshift cluster node type that you want to run for this test. |
NUMBER_OF_NODES |
a number between 1–128 |
The number of nodes for your Amazon Redshift cluster. |
WLM_CONFIG_S3_PATH |
N/A,
Amazon S3 URI
|
If you want to use custom workload management settings if you have different Amazon Redshift clusters, provide the Amazon S3 URI for that. Enter N/A if not applicable. |
The following code is a sample configuration JSON file used to implement this example use case:
{
"SNAPSHOT_ID": "redshift-cluster-manual-snapshot",
"SNAPSHOT_ACCOUNT_ID": "123456789012",

"PARAMETER_GROUP_CONFIG_S3_PATH": "s3://node-config-compare-bucket/pg_config.json",

"DDL_AND_COPY_SCRIPT_S3_PATH": "s3://node-config-compare-bucket/ddl.sql",
"SQL_SCRIPT_S3_PATH":"s3://node-config-compare-bucket/test_queries.sql",
"NUMBER_OF_PARALLEL_SESSIONS_LIST": "1,5,10",

"SIMPLE_REPLAY_LOG_LOCATION":"s3://redshift-logging-xxxxxxxx/RSLogs/",
"SIMPLE_REPLAY_EXTRACT_START_TIME":"2021-08-28T11:15:00+00:00",
"SIMPLE_REPLAY_EXTRACT_END_TIME":"2021-08-28T12:00:00+00:00",

"SIMPLE_REPLAY_EXTRACT_OVERWRITE_S3_PATH":"N/A",
"SIMPLE_REPLAY_OVERWRITE_S3_PATH":"N/A",

"AUTO_PAUSE": true,

"CONFIGURATIONS": [
	{
	"NODE_TYPE": "dc2.8xlarge",
	"NUMBER_OF_NODES": "2",
	"WLM_CONFIG_S3_PATH": "s3://node-config-compare-bucket/source-wlm.json"
	},
	{
	"NODE_TYPE": "ra3.4xlarge",
	"NUMBER_OF_NODES": "4",
	"WLM_CONFIG_S3_PATH": "s3://node-config-compare-bucket/source-wlm.json"
	},
	{
	"NODE_TYPE": "ra3.4xlarge",
	"NUMBER_OF_NODES": "4",
	"WLM_CONFIG_S3_PATH": "s3://node-config-compare-bucket/wlm-concurrency-scaling.json"
	},
{
	"NODE_TYPE": "ra3.4xlarge",
	"NUMBER_OF_NODES": "5",
	"WLM_CONFIG_S3_PATH": "s3://node-config-compare-bucket/source-wlm.json"
	},
{
	"NODE_TYPE": "ra3.4xlarge",
	"NUMBER_OF_NODES": "5",
	"WLM_CONFIG_S3_PATH": "s3://node-config-compare-bucket/ wlm-concurrency-scaling.json"
	}
]
}
Make sure to use same S3 bucket to store all your configurations for this test. For example, we use the S3 bucket node-config-compare-bucket to store all configuration scripts in the preceding JSON configuration. After you populate all the parameters in this JSON file, save the file in the same S3 bucket in your AWS account.
Deploy the solution using AWS CloudFormation
After you save the configuration JSON file in an S3 bucket, you can use the provided CloudFormation template to deploy this solution, which also initiates an iteration of this test. This template provisions the required AWS resources except for the Amazon Redshift clusters, which are created in the subsequent step by a Step Functions state machine. The following table lists the required parameters in the template.
| CloudFormation Template Parameter |
Allowed Values |
Description |
ConfigJsonS3Path |
Amazon S3 URI |
Enter the Amazon S3 URI where you stored your JSON configuration file from the previous step. The template grants access on this S3 bucket to the appropriate AWS resources created by this solution. |
ClusterIdentifierPrefix |
Prefix of Amazon Redshift cluster identifiers |
Enter a valid string like rs to be used as the prefix of your Amazon Redshift cluster identifiers created by this solution. |
PreExistingS3BucketToGrantRedshiftAccess |
N/A,
Amazon S3 Bucket name
|
If you’re using Simple Replay, provide the Amazon Redshift audit logging bucket name so it can grant appropriate permissions to the AWS resources. You can also add an existing S3 bucket in same AWS Region, which can be accessed by Amazon Redshift. Enter N/A if not applicable. |
GrantS3ReadOnlyAccessToRedshift |
Yes,
No
|
If you’re using Simple Replay in the same AWS account as the source Amazon Redshift cluster, enter Yes for this parameter, which grants AmazonS3ReadOnlyAccess to the new Amazon Redshift clusters to replay copy statements within the account. Otherwise, enter No so you can’t replay copy statements if running on a different AWS account without manually configuring it. |
SourceRedshiftClusterKMSKeyARN |
N/A, AWS KMS Key ARN |
Provide the AWS Key Management Service (AWS KMS) Key ARN (Amazon Resource Name) if your source Amazon Redshift cluster is encrypted (available on the stack Outputs tab). If using Simple Replay, you need to run extract and replay in the same AWS account if your source cluster is encrypted. |
OnPremisesCIDR |
CIDR notation |
The IP range (CIDR notation) for your existing infrastructure to access the target and replica clusters from a SQL client. If unsure, enter your corporate desktop’s CIDR address. For instance, if your desktop’s IP address is 10.156.87.45, enter 10.156.87.45/32. |
VPC |
VPC ID |
An existing Amazon Virtual Private Cloud (Amazon VPC) where you want to deploy the clusters and Amazon Elastic Compute Cloud (Amazon EC2) instances. |
SubnetId |
Subnet ID |
An existing subnet within the VPC in which you deploy the Amazon Redshift clusters and AWS Batch compute environment. |
Performance evaluation
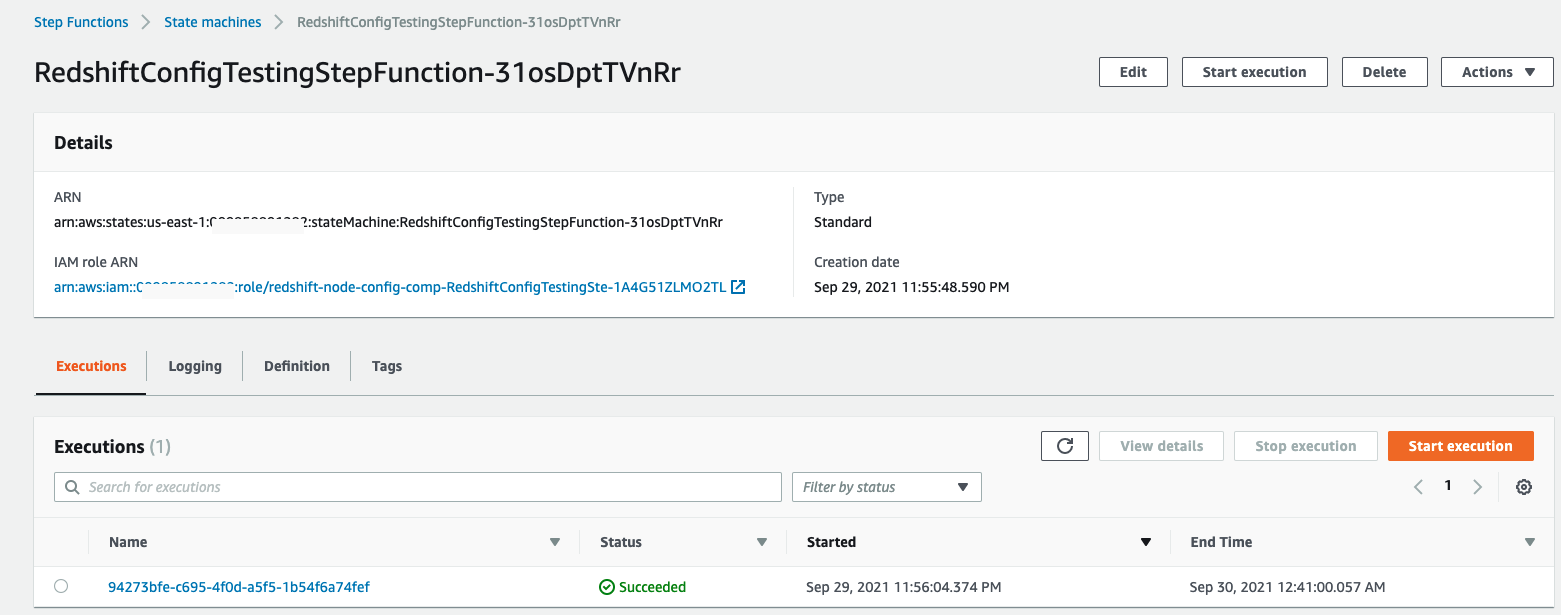
The CloudFormation stack deployed in above step runs a Step Functions state machine to orchestrate the end-to-end workflow. Navigate to Step Functions in AWS Management Console to view the state machine deployed by this solution as shown in the following screenshot.

This state machine creates the Amazon Redshift clusters you defined in the configuration JSON file. Then, it runs the performance evaluation tests on these clusters. If you provided the value true for parameter AUTO_PAUSE in the input JSON file, it also pauses the Amazon Redshift clusters except for the first cluster. At the end, it unloads the performance comparison results to your Amazon S3 bucket.
The following screenshot shows the clusters that were created as part of this state machine run for our use case. The state machine automatically paused all clusters except the first one.

This state machine creates an external schema redshift_config_comparison and creates three external tables (comparison_stats, cluster_config, and pricing) in that schema to read the raw data created by this solution in an S3 bucket. Based on these external tables, it creates the views redshift_config_comparison_results and redshift_config_comparison_raw in the public schema of your Amazon Redshift clusters to compare their performance metrics. These objects can be accessed from any of the Amazon Redshift clusters created by this solution.
REDSHIFT_CONFIG_COMPARISON_RESULTS
This view provides the aggregated comparison summary of your Amazon Redshift clusters.
It provides the raw value and a percentage number for KPIs like total, mean, median, max query times, percentile-75, and percentile-90 to help you compare and find the most performant cluster based on the different cluster configurations. The test_type column in this view indicates if the test type was to replay your past workload using the Simple Replay utility or a concurrency test to run your queries in parallel with different concurrency numbers. We use the following query to view our outcome:
select * from public.redshift_config_comparison_results;
The following table summarizes the performance comparison results:
| Test Type |
Cluster Identifier |
Total Query Time in Seconds |
Improved Total Query Time |
Mean Query Time in Seconds |
Improved Mean Query Time |
Median Query Time in Seconds |
Improved Median Query Time |
| simple-replay |
rs-dc2-8xlarge-2 |
98.75 |
0% |
4.94 |
0% |
5.11 |
0% |
| simple-replay |
rs-ra3-4xlarge-4 |
94.16 |
5% |
4.71 |
5% |
4.08 |
25% |
| simple-replay |
rs-ra3-4xlarge-4-cs |
19.36 |
410% |
0.97 |
409% |
0.68 |
651% |
| simple-replay |
rs-ra3-4xlarge-5 |
16.21 |
509% |
0.85 |
481% |
0.65 |
686% |
| simple-replay |
rs-ra3-4xlarge-5-cs |
14.66 |
574% |
0.73 |
577% |
0.6 |
752% |
| concurrency-1 |
rs-dc2-8xlarge-2 |
49.6 |
0% |
9.92 |
0% |
10.67 |
0% |
| concurrency-1 |
rs-ra3-4xlarge-4 |
45.2 |
10% |
9.51 |
4% |
10.3 |
4% |
| concurrency-1 |
rs-ra3-4xlarge-4-cs |
45.2 |
10% |
9.51 |
4% |
10.4 |
3% |
| concurrency-1 |
rs-ra3-4xlarge-5 |
43.93 |
13% |
8.79 |
13% |
7.7 |
39% |
| concurrency-1 |
rs-ra3-4xlarge-5-cs |
43.94 |
13% |
8.78 |
13% |
7.78 |
37% |
| concurrency-5 |
rs-dc2-8xlarge-2 |
24.8 |
0% |
0.99 |
0% |
0.79 |
8% |
| concurrency-5 |
rs-ra3-4xlarge-4 |
21.24 |
17% |
0.85 |
16% |
0.7 |
22% |
| concurrency-5 |
rs-ra3-4xlarge-4-cs |
22.49 |
10% |
0.9 |
10% |
0.85 |
0% |
| concurrency-5 |
rs-ra3-4xlarge-5 |
19.73 |
26% |
0.79 |
25% |
0.72 |
19% |
| concurrency-5 |
rs-ra3-4xlarge-5-cs |
18.73 |
32% |
0.75 |
32% |
0.72 |
18% |
| concurrency-10 |
rs-dc2-8xlarge-2 |
98.2 |
0% |
1.96 |
0% |
1.63 |
0% |
| concurrency-10 |
rs-ra3-4xlarge-4 |
85.46 |
15% |
1.71 |
15% |
1.58 |
3% |
| concurrency-10 |
rs-ra3-4xlarge-4-cs |
88.09 |
11% |
1.76 |
11% |
1.59 |
2% |
| concurrency-10 |
rs-ra3-4xlarge-5 |
77.54 |
27% |
1.55 |
26% |
1.36 |
20% |
| concurrency-10 |
rs-ra3-4xlarge-5-cs |
74.68 |
31% |
1.49 |
32% |
1.31 |
24% |
Table 1: Summary of Performance Comparison Results
Based on these results, we can conclude that five nodes of RA3.4XLarge with concurrency scaling enabled was the best-performing configuration.
REDSHIFT_CONFIG_COMPARISON_RAW
This view provides the query-level comparison summary of your Amazon Redshift clusters. We use the following query:
select * from public.redshift_config_comparison_raw;
The following table shows the performance comparison results per query:
| Query Hash |
Cluster Identifier |
Execution Time in Seconds |
Total Query Time in Seconds |
Compile Time in Seconds |
Queue Time in Seconds |
Username |
Query |
| 0531f3b54885afb |
rs-dc2-8xlarge-2 |
2 |
7 |
5 |
0 |
awsuser |
599 |
| 0531f3b54885afb |
rs-ra3-4xlarge-4 |
2 |
5 |
3 |
0 |
awsuser |
510 |
| 0531f3b54885afb |
rs-ra3-4xlarge-4-cs |
2 |
2 |
0 |
0 |
awsuser |
499 |
| 0531f3b54885afb |
rs-ra3-4xlarge-5 |
1 |
6 |
4 |
0 |
awsuser |
498 |
| 0531f3b54885afb |
rs-ra3-4xlarge-5-cs |
1 |
1 |
0 |
0 |
awsuser |
457 |
| 10ef3990f05c9f8 |
rs-dc2-8xlarge-2 |
0 |
0 |
0 |
0 |
awsuser |
516 |
| 10ef3990f05c9f8 |
rs-ra3-4xlarge-4 |
0 |
0 |
0 |
0 |
awsuser |
427 |
| 10ef3990f05c9f8 |
rs-ra3-4xlarge-4-cs |
0 |
0 |
0 |
0 |
awsuser |
423 |
| 10ef3990f05c9f8 |
rs-ra3-4xlarge-5 |
0 |
0 |
0 |
0 |
awsuser |
412 |
| 10ef3990f05c9f8 |
rs-ra3-4xlarge-5-cs |
0 |
0 |
0 |
0 |
awsuser |
390 |
Table 2: Performance Comparison Per Query
Access permissions and security
To deploy this solution, you need administrator access on the AWS accounts where you plan to deploy the AWS CloudFormation resources for this solution.
The CloudFormation template provisions all the required resources using security best practices based on the principle of least privileges and hosts all resources within your account VPC. Access to the Amazon Redshift clusters is controlled with the CloudFormation template parameter OnPremisesCIDR, which you need to provide to allow on-premises users to connect to the new clusters using their SQL clients on the Amazon Redshift port.
Access permissions for all the resources are controlled using AWS Identity and Access Management (IAM) roles granting appropriate permissions to Amazon Redshift, AWS Lambda, AWS Step Functions, AWS Glue, and AWS Batch. Read and write access privileges are granted to the Amazon Redshift clusters and AWS Batch jobs on the S3 bucket created by the CloudFormation template so that it can read and update data and metadata configurations from that bucket. Read and write access privileges are also granted on the S3 bucket where the user configuration JSON file is uploaded.
Troubleshooting
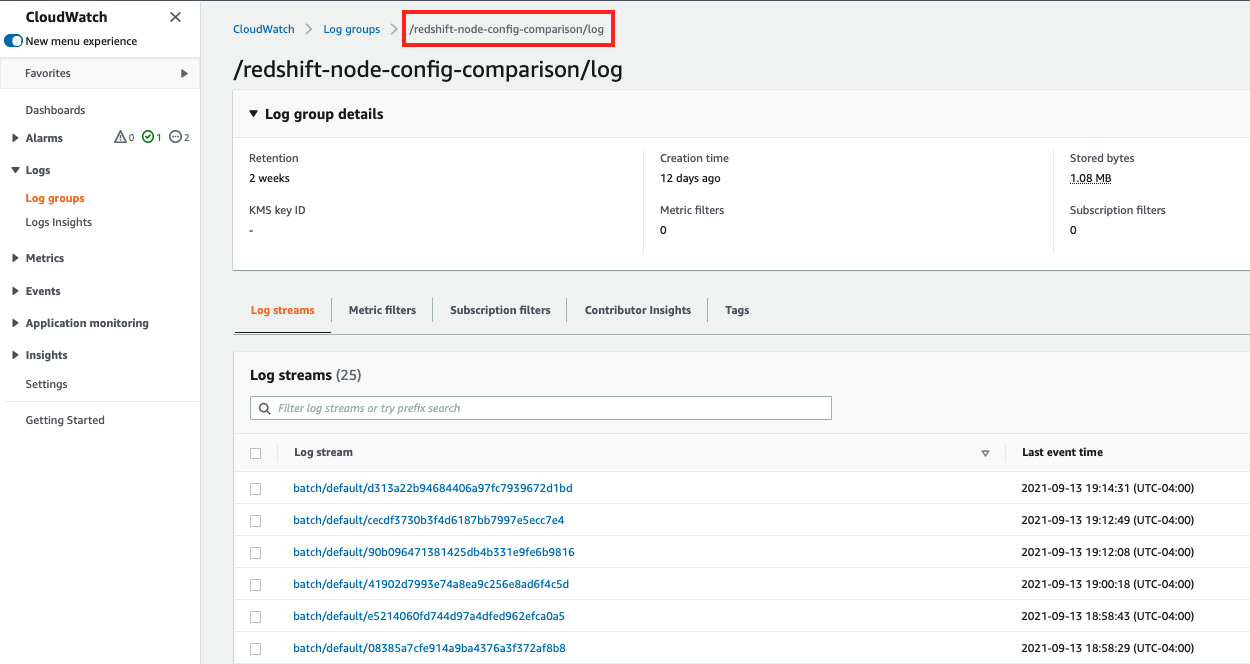
There might be some rare instances in which failures occur in the state machine running this solution. To troubleshoot, refer to its logs, along with logs from the AWS Batch jobs in Amazon CloudWatch Logs. To view the AWS Batch logs, navigate to the Amazon CloudWatch console and choose Logs in the navigation pane. Find the log group with name <Your CloudFormation Stack Name>/log and choose the latest log streams.

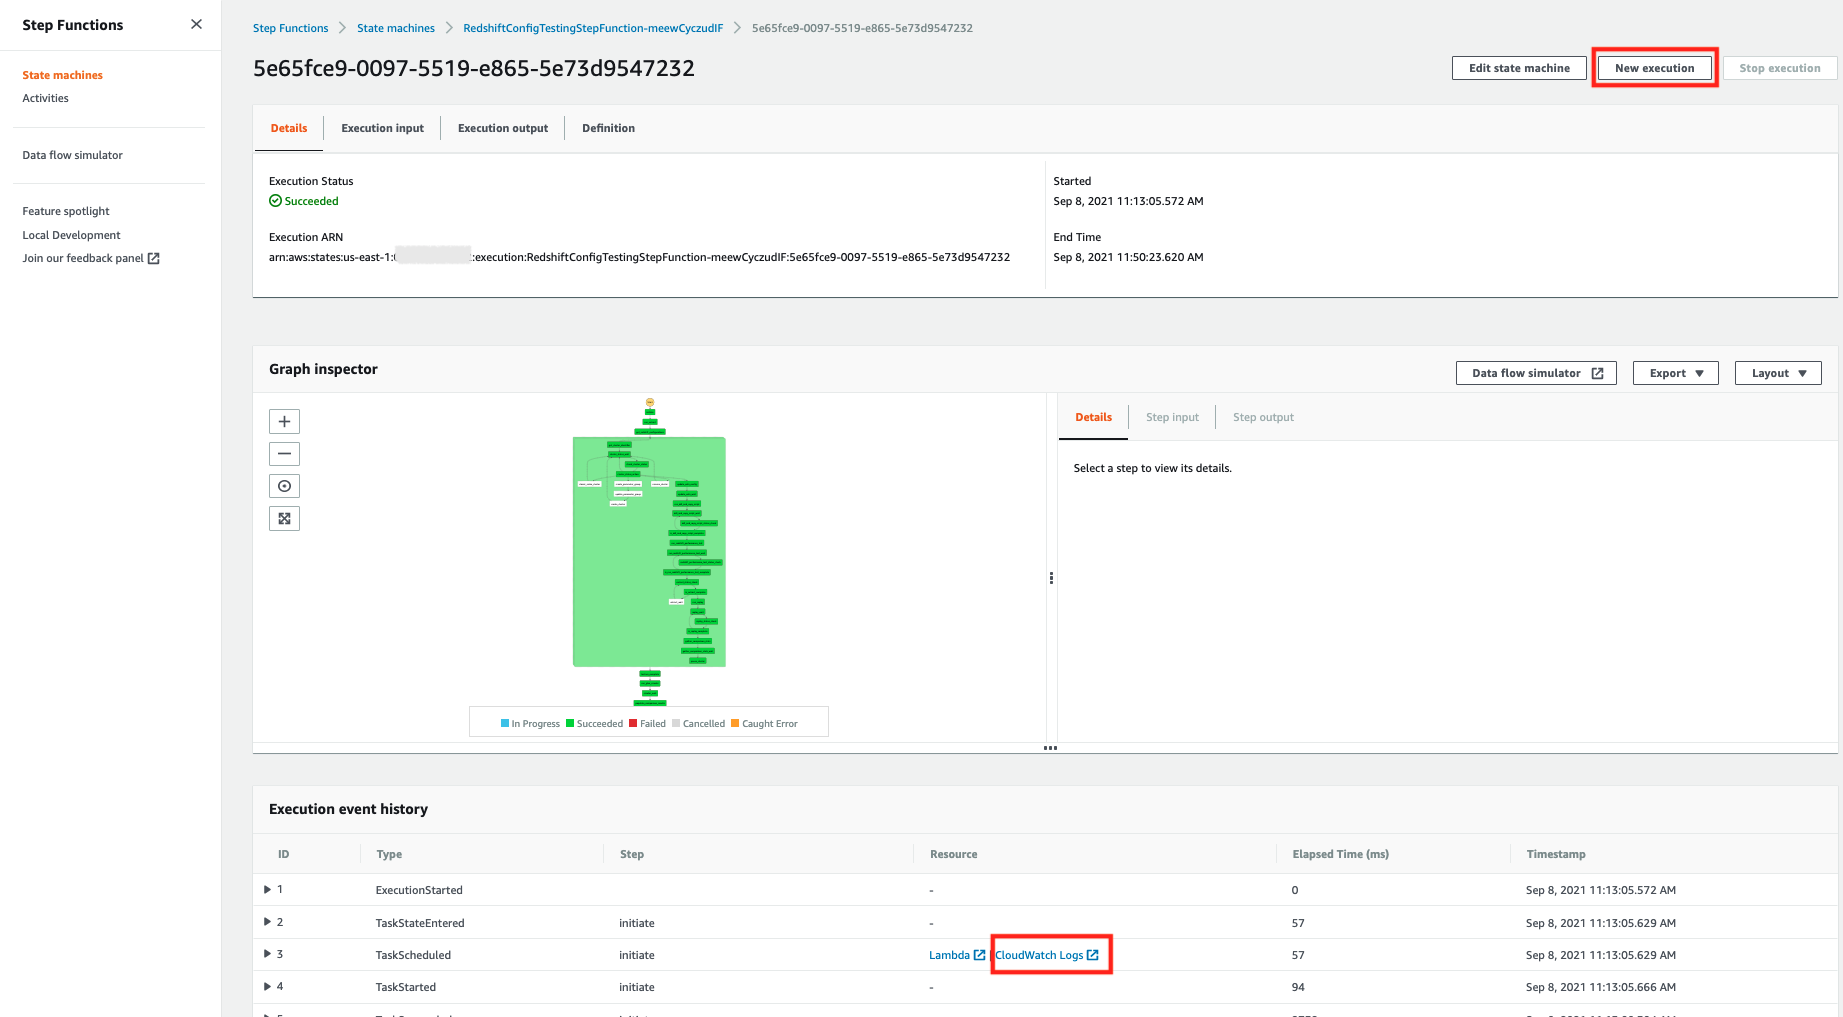
To view the Step Functions logs, navigate to the state machine’s latest run on the Step Functions console and choose CloudWatch Logs for the failed Step Functions step.

After you fix the issue, you can restart the state machine by choosing New execution.
Clean up
Running this template in your AWS account may have some cost implications because it provisions new Amazon Redshift clusters, which may be charged as on-demand instances if you don’t have Reserved Instances. When you complete your evaluations, we recommend deleting the Amazon Redshift clusters to save cost. We also recommend pausing your clusters when not in use. If you don’t plan to run this test in future, you should also delete the CloudFormation stack, which deletes all the resources it created.
Conclusion
In this post, we walked you through the process to find the correct size of your Amazon Redshift cluster based on your performance requirements. You can start with our easy-to-use, out-of-the-box Amazon Redshift sizing calculator, or you can use the Amazon Redshift Node Configuration Comparison tool to evaluate the performance of your workload and find the best cluster configuration that meets your need.
About the Authors
 Manash Deb is a Software Development Engineer in the AWS Directory Service team. He has worked on building end-to-end applications in different database and technologies for over 15 years. He loves to learn new technologies and solving, automating, and simplifying customer problems on AWS.
 Ranjan Burman is a Analytics Specialist Solutions Architect at AWS. He specializes in Amazon Redshift and helps customers to build scalable analytical solutions. He has more than 13 years of experience in different database and data warehousing technologies. He is passionate about automating and solving customer problems with the use of cloud solutions.


 Manash Deb is a Software Development Engineer in the AWS Directory Service team. He has worked on building end-to-end applications in different database and technologies for over 15 years. He loves to learn new technologies and solving, automating, and simplifying customer problems on AWS.
 Arnab Ghosh is a Solutions Architect for AWS in North America helping enterprise customers build resilient and cost-efficient architectures. He has over 13 years of experience in architecting, designing, and developing enterprise applications solving complex business problems.
 Sanjoy Thanneer is a Sr. Technical Account Manager with AWS based out of New York. He has over 20 years of experience working in Database and Analytics Domains. He is passionate about helping enterprise customers build scalable , resilient and cost efficient Applications.
 Justin Morris is a Email Deliverability Manager for the Simple Email Service team. With over 10 years of experience in the IT industry, he has developed a natural talent for diagnosing and resolving customer issues and continuously looks for growth opportunities to learn new technologies and services.
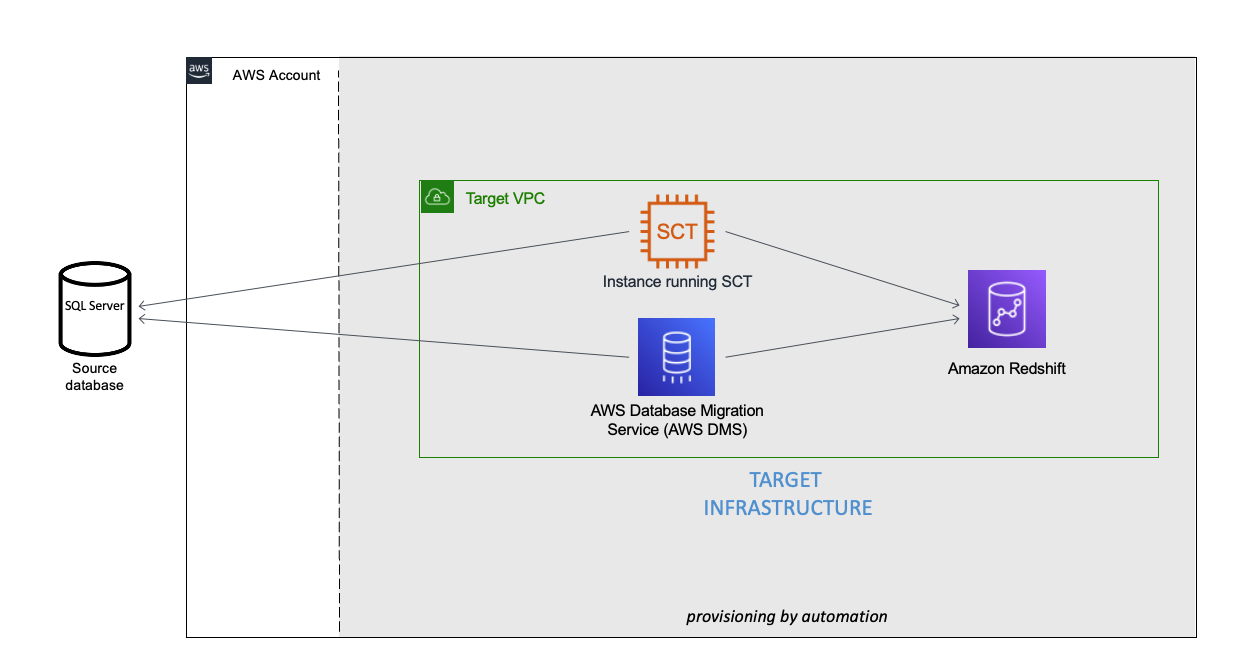


 Debu Panda, a senior product manager at AWS, is an industry leader in analytics, application platform, and database technologies. He has more than 20 years of experience in the IT industry and has published numerous articles on analytics, enterprise Java, and databases and has presented at multiple conferences. He is lead author of the EJB 3 in Action (Manning Publications 2007, 2014) and Middleware Management (Packt).
 Fei Peng is a Software Dev Engineer working in the Amazon Redshift team.