Post Syndicated from Mani Manasa Mylavarapu original https://aws.amazon.com/blogs/security/how-to-migrate-asymmetric-keys-from-cloudhsm-to-aws-kms/
In June 2023, Amazon Web Services (AWS) introduced a new capability to AWS Key Management Service (AWS KMS): you can now import asymmetric key materials such as RSA or elliptic-curve cryptography (ECC) private keys for your signing workflow into AWS KMS. This means that you can move your asymmetric keys that are managed outside of AWS KMS—such as a hybrid (on-premises) environment, multi-cloud environment, and even AWS CloudHSM—and make them available through AWS KMS. Combined with the announcement on AWS KMS HSMs achieving FIPS 140-2 Security Level 3, you can make sure that your keys are secured and used in a manner that aligns to the cryptographic standards laid out by the U.S. National Institute of Standards and Technology (NIST).
In this post, we will show you how to migrate your asymmetric keys from CloudHSM to AWS KMS. This can help you simplify your key management strategy and take advantage of the robust authorization control of AWS KMS key policies.
Benefits of importing key materials into AWS KMS
In general, we recommend that you use a native KMS key because it provides the best security, durability, and availability compared to other key store options. AWS KMS FIPS-validated hardware security modules (HSMs) generate the key materials for KMS keys, and these key materials never leave the HSMs unencrypted. Operations that require use of your KMS key (for example, decryption of a data key or digital signature signing) must occur within the HSM.
However, depending on your organization’s requirements, you might need to bring your own key (BYOK) from outside. Importing your own key gives you direct control over the generation, lifecycle management, and durability of your keys. In addition, you have full control over the availability of your imported keys because you can set an expiration period or delete and reimport the keys at any time. You have greater control over the durability of your imported keys because you can maintain the original version of the keys elsewhere. If you need to generate and store copies of keys outside of AWS, these additional controls can help you meet your compliance requirements.
Solution overview
At a high level, our solution involves downloading the wrapping key from AWS KMS, using the CloudHSM Command Line Interface (CLI) to import a wrapping key to CloudHSM, wrapping the private key by using the wrapping key in CloudHSM, and uploading the wrapped private key to AWS KMS by using an import token. You can perform the same procedures by using other supported libraries, such as the PKCS #11 library or a JCE provider.
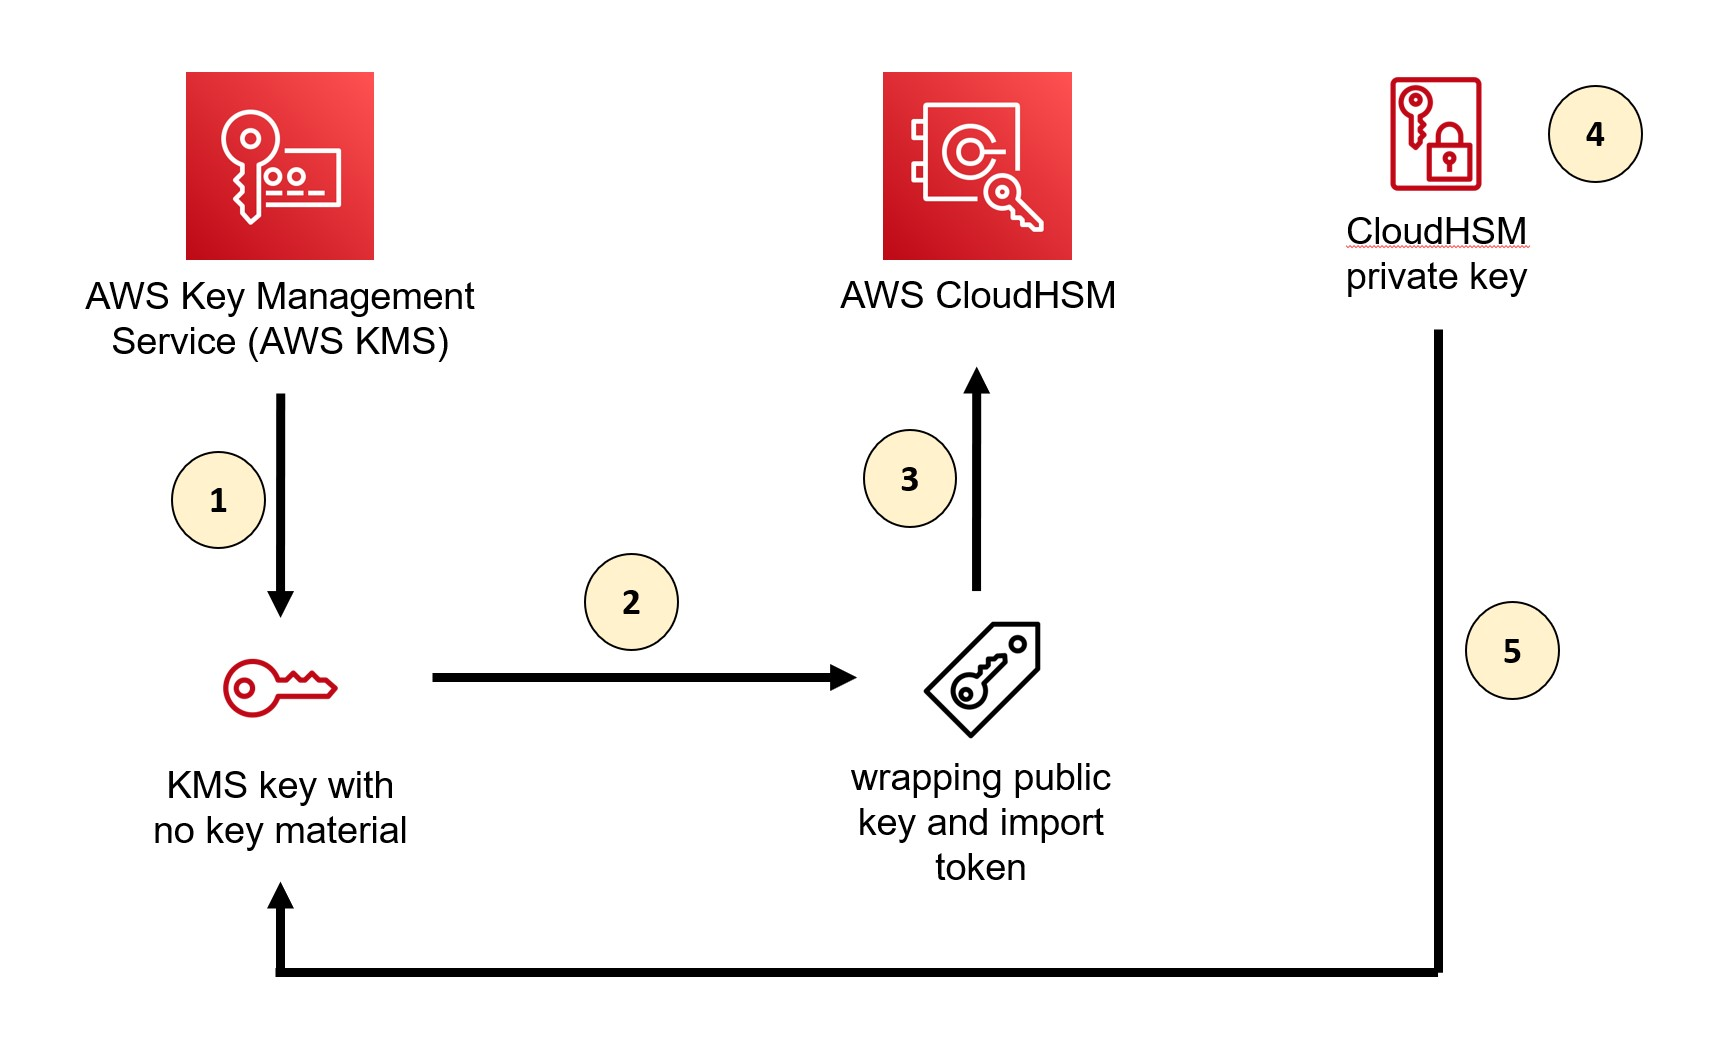
Figure 1: Overall architecture of the solution
As shown in Figure 1, the solution involves the following steps:
- Create a KMS key without key material in AWS KMS
- Download the wrapping public key and import token from AWS KMS
- Import the wrapping key provided by AWS KMS into CloudHSM
- Wrap the private key inside CloudHSM with the imported wrapping public key from AWS KMS
- Import the wrapped private key to AWS KMS
For the walkthrough in this post, you will import into AWS KMS an ECC 256-bit private key (NIST P-256) that’s used for signing purpose from a CloudHSM cluster. When you import an asymmetric key into AWS KMS, you only need to import a private key. You don’t need to import a public key because AWS KMS can generate and retrieve a public key from the private key after the private key is imported.
Prerequisites
To follow along with this walkthrough, make sure that you have the following prerequisites in place:
- An active CloudHSM cluster with at least one active HSM and a valid crypto user credential.
- An Amazon Elastic Compute Cloud (Amazon EC2) instance with the CloudHSM Client SDK 5 installed and configured to connect to the CloudHSM cluster. For instructions on how to configure and connect the client instance, see Getting started with AWS CloudHSM.
- OpenSSL installed on your EC2 instance (we recommend version 3.0.0 or newer).
Step 1: Create a KMS key without key material in AWS KMS
The first step is to create a new KMS key. You can do this through the AWS KMS console or the AWS CLI, or by running the CreateKey API operation.
When you create your key, keep the following guidance in mind:
- Set the key material origin to External so that no key material is created for this new key.
- According to NIST SP 800-57 guidance and cryptography best practice, in general, you should use a single key for only one purpose (for example, if you use an RSA key for encryption, you shouldn’t also use that key for signing). Select the key usage that best suits your use case.
- Make sure that the key spec match the algorithm specification of the key that you are trying to import from CloudHSM.
- If you want to use the key in multiple AWS Regions (for example, to avoid the need for a cross-Region call to access the key), consider using a multi-Region key.
To create a KMS key using the AWS CLI
- Run the following command:
Step 2: Download the wrapping public key and import token from AWS KMS
After you create the key, download the wrapping key and import token.
The wrapping key spec and the wrapping algorithm that you select depend on the key that you’re trying to import. AWS KMS supports several standard RSA wrapping algorithms and a two-step hybrid wrapping algorithm. CloudHSM supports both wrapping algorithms as well.
In general, an RSA wrapping algorithm (RSAES_OAEP_SHA_*) with a key spec of RSA_4096 should be sufficient for wrapping ECC private keys because it can wrap the key material completely. However, when importing RSA private keys, you will need to use the two-step hybrid wrapping algorithm (RSA_AES_KEY_WRAP_SHA_*) due to their large key size. The overall process is the same as what’s shown here, but the two-step hybrid wrapping algorithm requires that you encrypt your key material with an Advanced Encryption Standard (AES) symmetric key that you generate, and then encrypt the AES symmetric key with the RSA public wrapping key. Additionally, when you select the wrapping algorithm, you also have a choice between the SHA-1 or SHA-256 hashing algorithm. We recommend that you use the SHA-256 hashing algorithm whenever possible.
Note that each wrapping public key and import token set is valid for 24 hours. If you don’t use the set to import key material within 24 hours of downloading it, you must download a new set.
To download the wrapping public key and import token from AWS KMS
- Run the following command. Make sure to replace <KMS KeyID> with the key ID of the KMS key that you created in the previous step. The key ID is the last part of the key ARN after :key/ (for example, arn:aws:kms:us-east-1:<AWS Account ID>:key/<Key ID>). “ImportToken.b64” represents the wrapping token, and “WrappingPublicKey.b64” represents the import token.
- Decode the base64 encoding.
To convert the wrapping public key from DER to PEM format
- The key import pem command in CloudHSM CLI requires that the public key is in PEM format. AWS KMS outputs public keys in the DER format, so you must convert the wrapping public key to PEM format. To convert the public key to PEM format, run the following command:
Step 3: Import the wrapping key provided by AWS KMS into CloudHSM
Now that you have created the KMS key and made the necessary preparations to import it, switch to CloudHSM to import the key.
To import the wrapping key
- Log in to your EC2 instance that has the CloudHSM CLI installed and run the following command to use it in an interactive mode:
- Log in with your crypto user credential. Make sure to replace <YourUserName> with your own information and supply your password when prompted.
- Import the wrapping key and set the attribute allowing this key to be used for wrapping other keys.
You should see an output similar to the following:
- From the output, note the value for the key label (<kms-wrapping-key> in this example) because you will need it for the next step.
Step 4: Wrap the private key inside CloudHSM with the imported wrapping public key from AWS KMS
Now that you have imported the wrapping key into CloudHSM, you can wrap the private key that you want to import to AWS KMS by using the wrapping key.
Important: Only the owner of a key—the crypto user who created the key—can wrap the key. In addition, the key that you want to wrap must have the extractable
attributeset totrue.
To wrap the private key
- Use the key wrap command in the CloudHSM CLI to wrap the private key that’s stored in CloudHSM. Make sure to replace the following placeholder values with your own information:
rsa-oaepspecifies the wrapping algorithm.--payload-filteris used to define the key that you want to wrap out of the HSM. You can use the key reference (for example, key-reference=0x00000000002800c2) or reference key attributes, such as the key label. In our example, we used the key label ec-priv-import-to-kms.--wrapping-filteris used to define the key that you will use to wrap out the payload key. This should be the wrapping key that you imported previously from AWS KMS, which was labeled kms-wrapping-key in Step 3.3.--hash-functiondefines the hash function used as part of the OAEP encryption. This should match the wrapping algorithm that you specified when you got the import parameters from AWS KMS. In our example, it should be SHA-256 because we selected RSAES_OAEP_SHA_256 as the wrapping algorithm previously.--mgfdefines the mask generation function used as part of the OAEP encryption. The mask hash function must match the signing mechanism hash function, which is SHA-256 in this example.--pathdefines the path to the binary file where the wrapped key data will be saved. In this example, we name the file EncryptedECC_P256KeyMaterial.bin but you can specify a different name.
(Optional) To export the public key
- You can also use the CloudHSM CLI to export the public key of your private key. You will use this key for testing later. Make sure to replace the placeholder values <ec-priv-import-to-kms> and <KeyName.pem> with your own information.
Step 5: Import the wrapped private key to AWS KMS
Now that you’ve wrapped the private key from CloudHSM, you can import it into AWS KMS.
Note that you have the option to set an expiration time for your imported key. After the expiration time passes, AWS KMS deletes your imported key automatically.
To import the wrapped private key to AWS KMS
- If you have been using the CLI or API, the import token is base64 encoded. You must decode the token from base64 to binary format before it can be used. You can use OpenSSL to do this.
- Run the following command to import the wrapped private key. Make sure to replace <KMS KeyID> with the key ID of the KMS key that you created in Step 1.
Test whether your private key was imported successfully
The nature of asymmetric cryptography means that a digital signature produced by your private key should produce the same signature on the same message, regardless of the tool that you used to perform the signing operation. To verify that your imported private key functions the same in both CloudHSM and AWS KMS, you can perform a signing operation and compare the signature on CloudHSM and AWS KMS to make sure that they are the same.
Another way to check that your imported private key functions are the same in AWS KMS is to perform a signing operation and then verify the signature by using the corresponding public key that you exported from CloudHSM in Step 4. We will show you how to use this method to check that your private key was imported successfully.
To test that your private key was imported
- Create a simple message in a text file and encode it in base64.
- Perform the signing operation by using AWS KMS. Make sure to replace <YourImported KMS KeyID> with your own information.
The following shows the output of the signing operation.
- Save the signature in a separate file called signature.sig and decode it from base64 to binary.
- Verify the signature by using the public key that you exported from CloudHSM in Step 4.
If successful, you should see a message that says Verified OK.
Conclusion
In this post, you learned how to import an asymmetric key into AWS KMS from CloudHSM by using the CloudHSM CLI.
Although this post focused on migrating keys from CloudHSM, you can also follow the general directions to import your asymmetric key from elsewhere. When you import a private key, make sure that the imported key matches the key spec and the wrapping algorithm that you choose in AWS KMS.
If you have feedback about this post, submit comments in the Comments section below. If you have questions about this post, contact AWS Support.