As outlined in the AWS post-quantum cryptography migration plan, establishing quantum-resistant roots of trust is critical for systems that need to maintain security for extended periods of time. ML-DSA, a signature scheme standardized in FIPS 204, provides quantum resistance while maintaining the performance characteristics needed for deployments at scale.
Previously, we shared how to use AWS Private CA and AWS KMS for code signing. In this post, we show you how to combine the post-quantum signing capability provided by AWS KMS with post-quantum code-signing PKI from AWS Private CA. Consumers of signed code that have been pre-provisioned with the post-quantum PKI roots can rest assured that the software could not have been forged by an adversary with a cryptographically relevant quantum computer (CRQC). For demonstration purposes, we use the diy-code-signing-kms-private-ca sample program, which uses the AWS SDK for Java. This code creates a PKI infrastructure, generates a code-signing certificate, signs binary code, and verifies the signature. Although we break down the steps to demonstrate the functionality in this post, you can run the Runner as-is to see it in action with commands found in the README file.
This post uses the Cryptographic Message Syntax (CMS) standard for encapsulating the signatures generated for input binary data. It stores the signature, X.509 certificate, and chain used to establish trust. The signature, known as a detached signature, doesn’t contain the original data. The detached signature can be used together with the original file, which was signed with standard tools such as OpenSSL natively to validate the authenticity of the file.
Create a post-quantum PKI hierarchy
For this post, we will use AWS Private CA to introduce a code-signing PKI. It will consist of a root CA to sign a subordinate CA, and a code-signing certificate signed by the subordinate CA. The whole chain will consist of quantum-resistant ML-DSA certificates.
CA hierarchy creation
First, the post-quantum CA hierarchy must be created with ML-DSA. In this example, we use the ML-DSA-65 variant of the post-quantum signature algorithm. You can do this with the AWS Java SDK as shown in the Runner.java file:
For code signing, you need an asymmetric key pair and a code-signing certificate. The asymmetric ML-DSA key pair is generated in AWS KMS and the code-signing certificate is issued by AWS Private CA.
Create an ML-DSA key pair in AWS KMS
First, you must create an asymmetric key pair for code signing operations. Similar to the creation of the hierarchy, the AWS Java SDK can be used to create that AWS KMS key (key pair). Signing will be taking place with the key pair’s private key in AWS KMS. The corresponding public key will be in the code-signing leaf certificate signed by the subordinate CA. These calls are performed as part of the main method within the Runner.java file:
Creating a certificate signing request (CSR) using AWS Private CA is a two-step process. First, you must create a CSR that contains both an identity (Subject) and the previously created AWS KMS public key. The following code snippet in Runner.java accomplishes this:
You can see that the CSR contains an ML-DSA-65 public key. Its corresponding private key will be used to sign code.
The CSR is used by the subordinate CA to issue the code-signing certificate. Note that the code-signing template is used in the templateArn of the IssueCertificate request in the relevant PrivateCA.java file. The inclusion of this template helps ensure that AWS Private CA will issue a certificate with the correct Key Usage (KU) and Extended Key Usage (EKU) extension values, regardless of the values presented in the CSR.
The response includes the ML-DSA-65 code-signing certificate. You can use OpenSSL 3.5 or later to inspect the contents of the certificate after you save it to a file named code-signing-cert.pem:
You can see that the certificate includes the ML-DSA-65 public key of the code-signing key pair and the ML-DSA-65 signature from the subordinate CA. You also see the KU and the EKU values, which represent a code-signing certificate from the AWS Private CA template.
Sign code
At this point, you have set up the code-signing PKI, have a code-signing certificate issued by AWS Private CA and a corresponding ML-DSA key pair residing in KMS.
The Java SDK can be used to generate a CMS signature for a code binary file. In the background, this is accomplished by calling the AWS KMS Sign API with the ML-DSA key pair as shown in Runner.java. The following is part of the Java code. This first snippet involves building a certificate chain and then using it along with the code-signing AWS KMS key, the signer’s certificate, and <DATA_TO_SIGN>, the byte array representation of the code file, to generate the detached signature in a CMS structure.
The CMS signature object directly encapsulates both the code-signing certificate and the subordinate CA certificate. It’s expected that the root certificate will reside in a customer-managed trust store. In addition to these certificates, the CMS object also contains the digest of the input data within the signedAttrs of the signerInfos in the ASN.1 structure. The digest algorithm is SHAKE256 and the OCTET STRING represents the binary digest itself. The use of ML-DSA in CMS is specified in RFC9882.
Note: Although this example uses one ML-DSA signature, some use cases might include dual signatures, a traditional and a quantum-resistant one. Such signed artifacts can be backwards compatible with legacy verifiers that support and can only verify the traditional signature. Upgraded verifiers can verify both signatures.
Verify signed code
Before loading a signed code artifact, its signature needs to be verified. That includes verifying the signature of the code and validating the certificate chain to the trusted root CA. The following code snippet from the main method within the file Runner.java is used for the certificate chain validation and the signature in the code object:
The preceding code retrieves the ML-DSA public key from the code-signing certificate; AWS access or credentials aren’t needed to validate the signature. Entities that have the root CA certificate loaded in their trust store can verify it without needing access to the AWS KMS verify API.
Note: The Runner.java implementation doesn’t use a certificate trust store that’s either part of a browser or part of a file system within the resident operating system of a device or a server. The trust store is placed in an instance of a Java class object for the purpose of this post. If you’re planning to use this code-signing example in a production system, you must change the implementation to use a trust store on the host. To do so, you can build and distribute a secure trust store that includes the root CA certificate.
Alternatively, OpenSSL 3.5 or later can be used to validate the detached signature of the provided input data file with root-ca-MLDSA65.pem, the provided root CA certificate from AWS Private CA.
Note: Although this post focused on code-signing, AWS Private CA can enable post-quantum ML-DSA authentication for other private PKI use cases. In one scenario, applications outside of AWS can access AWS resources by temporarily using certificate-based authentication and swapping it with AWS credentials with AWS IAM Roles Anywhere. AWS IAM Roles Anywhere now supports ML-DSA PKIs like the one created in this post. In another scenario, an mTLS client or IKEv2/IPsec peer could use an ML-DSA certificate issued by AWS Private CA to be authenticated by a server or peer respectively who has been pre-provisioned with the post-quantum PKI root certificate.
Conclusion
This announcement marks an important milestone for post-quantum authentication. With the introduction of ML-DSA X.509 certificates in AWS Private CA, customers can bring quantum resistance to their private PKI use cases. These use cases include client authentication for mTLS or IKEv2/IPsec tunnels, IAM Roles Anywhere, or applications that use private PKI authentication. ML-DSA certificates with AWS Private CA and signing with AWS KMS also enable post-quantum code-singing and establishing post-quantum long-lived roots of trust for devices designed to operate for a long time even after CRQCs became available. Learn more about post-quantum cryptography in general and the overall AWS plan to migrate to post-quantum cryptography.
If you have feedback about this post, submit comments in the Comments section below. If you have questions about this post, start a new thread on the AWS Security, Identity, & Compliance re:Post or contact AWS Support. For more details regarding AWS PQC efforts, refer to our PQC page.
As the capabilities of quantum computing evolve, AWS is committed to helping our customers stay ahead of emerging threats to public-key cryptography. Today, we’re announcing the integration of FIPS 204: Module-Lattice-Based Digital Signature Standard (ML-DSA) into AWS Key Management Service (AWS KMS). Customers can now create and use ML-DSA keys through the same familiar AWS KMS APIs they use today for digital signatures, including CreateKey, Sign, and Verify operations. This new feature is generally available and you can use ML-DSA in the following AWS Regions: US West (N. California), and Europe (Milan) with the remaining commercial Regions to follow in the coming days. This launch is part of our broader AWS post-quantum cryptography migration plan, which we covered in our recent blog post. In this post, we guide you through creating ML-DSA keys and post-quantum signatures with AWS KMS.
Many organizations use AWS KMS to cryptographically sign firmware, operating systems, applications, or other artifacts. With ML-DSA support in AWS KMS, you can now generate and use post-quantum keys for signing operations within FIPS-140-3 Level 3 certified HSMs. By implementing ML-DSA signatures now, you can help make sure that your systems remain secure throughout their operational lifetime, even if cryptographically relevant quantum computers become available. This is especially important for manufacturers who install long-lived roots of trust during production—whether embedded directly in hardware or in devices that might remain offline for extended periods. In both cases, cryptographic signatures cannot be easily updated after deployment, making post-quantum readiness critical for the entire operational lifetime of these systems.
What’s new
AWS KMS offers three new AWS KMS key specs: ML_DSA_44, ML_DSA_65, and ML_DSA_87, which you can use with the new post-quantum SigningAlgorithmML_DSA_SHAKE_256. Like our other signing algorithms, this name includes the hash function that’s used within the signature scheme to digest messages before signing or verification. In this case, the hash function used is SHAKE256—part of the SHA-3 family of hash functions standardized by NIST in FIPS 202.
Table 1 shows the details for each key spec, including their NIST security categories and corresponding key sizes in bytes. Each ML-DSA key spec represents a balance between security strength and resource requirements. ML-DSA-44 is suitable for applications requiring security comparable to classical 128-bit encryption, while ML-DSA-65 and ML-DSA-87 provide progressively stronger security levels equivalent to classical 192-bit and 256-bit encryption, respectively. As you move up in security levels, you’ll notice corresponding increases in key and signature sizes, enabling you to choose the key spec that best matches your security needs and engineering constraints.
Key spec
NIST security Level
Public key (B)
Private key (B)
Signature (B)
ML_DSA_44
1 (equivalent to 128-bit security)
1312
2560
2420
ML_DSA_65
3 (equivalent to 192-bit security)
1952
4032
3309
ML_DSA_87
5 (equivalent to 256-bit security)
2592
4896
4627
When using the AWS KMS Sign API with a RAW MessageType, the message to be signed is limited to 4096 bytes. For messages larger than 4096 bytes, pre-processing the message outside of AWS KMS to create what’s known as µ (mu) is required to generate a smaller-sized message input to the KMS Sign API. This external mu process pre-digests the message using the public key of the ML-DSA signing key pair to create a message size of 64 bytes. To support this launch, we’ve added a new message type in the KMS Sign API—EXTERNAL_MU—that can be used with ML-DSA signing or verification calls to indicate when a message has been pre-processed using µ (mu) before submitted to AWS KMS.
In the following sections, we include more information about constructing external mu and demonstrate basic AWS KMS operations with ML-DSA. We cover key creation, signature generation and verification, and both RAW and EXTERNAL_MU signing modes. Note that the produced RAW or EXTERNAL_MU ML-DSA signatures are identical when the same message and signing key are used.
Make note of the KeyId or Arn value from the response; you’ll need this to reference your key in subsequent signing operations. The response confirms that the creation of an ML_DSA_65 key configured for SIGN_VERIFY operations, which will use the ML_DSA_SHAKE_256 signing algorithm for signature operations.
Signing
In this section, we include some examples of ML-DSA signing and verifying a JSON Web Token (JWT) commonly used to transfer claims between parties for web authorization. In 2021, we described how to sign and verify JWTs with Elliptic Curve Digital Signature Algorithm (ECDSA), a classic asymmetric cryptographic algorithm (see How to verify AWS KMS signatures in decoupled architectures at scale). In the following examples, the token is instead signed with an ML-DSA private key managed by AWS KMS and verified either within AWS KMS or externally using OpenSSL.
The JWT content to be signed is from section 3.1 of RFC7519. More specifically, the JWT header is:
Note that the following examples output the ML-DSA signature produced on the message by using the ML-DSA private key managed by AWS KMS in a binary format. You need to convert them to Base64URL to use them in JWT, but various data encryption and signing formats can use these signatures. These include Cryptographic Message Syntax (CMS), CBOR Object Signing and Encryption (COSE), or image signing encodings for UEFI and Open Titan. While converting between binary and these formats is straightforward, support for the new algorithms might not be available in common cryptographic implementations of these signing formats at the time of this writing.
RAW ML-DSA signing (no external mu)
To sign a message of less than 4096 bytes in AWS KMS with ML-DSA, you can use the AWS CLI:aws kms sign \
Make sure to replace the target-key-id value of <1234abcd-12ab-34cd-56ef-1234567890ab> with your KeyId. This command will produce a signature and write it to disk as ExampleSignature.bin.
After producing the signature, you can create the complete JWT (consisting of header, payload, and signature) with a single command:
This command will output a ready-to-use JWT in the format required by RFC 7519 and signed using AWS KMS:
eyJ0eXAiOiJKV1QiLA0KICJhbGciOiJNTC1EU0EtNjUifQ.eyJpc3MiOiJqb2UiLA0KICJleHAiOjE3NDg5NTIwMDAsDQogImh0dHA6Ly9leGFtcGxlLmNvbS9pc19yb290Ijp0cnVlfQ.<base64url of the signature as per RFC7519>
External mu ML-DSA signing
Note that AWS KMS imposes a 4096-byte limit on the size of the raw message when using the Sign API to minimize the latency of the response. In cases where the message to be signed is larger than 4096 bytes or if pre-digesting the external mu has performance advantages you need, you must use the EXTERNAL_MU message type instead of RAW in AWS KMS.
Before using the EXTERNAL_MU message type with the AWS KMS Sign API, you must locally perform a pre-hash calculation on your message. So, first, retrieve the public key from AWS KMS, and convert it to DER format using the following command (replace the example key ID with a valid key ID from your AWS account):
In this example, set the domain separator value and context length as zero; this sets the context used in the signature as the empty string, which is the default.
Hash the public key then prepend it to the message prefix: (SHAKE256(pk) || M’).
Hash to produce a 64-byte mu: Mu = SHAKE256(SHAKE256(pk) || M’)
You can use a single OpenSSL 3.5 command to construct the digest:
Now you can call AWS KMS to sign the 64-byte digest to produce the ML-DSA signature in file ExampleSignature.bin, making sure to set the MessageType to EXTERNAL_MU:
The final signed JWT token is identical to the one produced previously in RAW mode.
Signature verification using AWS KMS
In this section, we show you how to verify ML-DSA signatures using AWS KMS or locally in your own environment. We assume that you have an ML-DSA signature in ExampleSignature.bin, produced on the JWT content with the private key in AWS KMS and identified with KEY_ARN.
Note that, although the following examples demonstrate signature verification using public keys directly from AWS KMS, these same principles extend to certificate-based systems, such as a private PKI, in which public keys are embedded in end-entity certificates (of the signer). In such scenarios, verifiers would first verify the identity of the signer by validating the certificate chain ties to a trusted root, then use the public key of the end-entity certificate to verify the ML-DSA signature of the content. The IETF is standardizing ML-DSA for use in X.509 certificates through RFC draft draft-ietf-lamps-dilithium-certificates.
RAW ML-DSA verification
To verify the signature using AWS KMS, you can call the following command, replacing the example key-id with the same one you used to sign.
The verification result is stored in the SignatureValid field.
External mu ML-DSA verification
If you have the external mu digest of the JWT content in mu.bin along with the signature and the corresponding keypair in AWS KMS, you can use the digest without having access to the entire message or calculating the digest again.
If you want to reduce AWS KMS API consumption costs and better control the use of API quotas while keeping the security of AWS KMS-generated and stored keys for ML-DSA signature generation, you can verify ML-DSA signatures locally, outside of AWS KMS.
In this example, you use OpenSSL 3.5 to verify the signature in ExampleSignature.bin. You first must fetch the DER-encoded public key from AWS KMS in file public_key.der as shown in the External mu ML DSA signing section. OpenSSL 3.5 can then verify the signature on the message by using the public key.
Today’s launch of ML-DSA support in AWS KMS marks an important milestone in our commitment to post-quantum cryptography. With three different security levels of ML-DSA in both raw and external digest modes, you have flexible options to meet your security requirements while preparing for the quantum computing era. The seamless integration with existing AWS KMS APIs makes it straightforward to incorporate quantum-resistant signatures into your applications today. This implementation is particularly valuable if you need to:
Meet FIPS 140-3 compliance requirements when using post-quantum cryptography.
Sign code, artifacts, documents or other data that need to remain trusted and verifiable for many years into the future, including the period after cryptographically relevant quantum computers exist.
Start post-quantum cryptography testing as part of your application development process using a cryptographic service such as AWS KMS that has previously been approved for use.
Today, we’re announcing support for on-demand rotation of symmetric encryption AWS Key Management Service (AWS KMS) keys with imported key material (EXTERNAL origin). This new capability enables you to rotate the cryptographic key material of these keys without changing the key identifier (key ID or Amazon Resource Name (ARN)). Rotating keys helps you meet compliance requirements and security best practices that mandate periodic key rotation.
AWS KMS has long supported automatic key rotation for AWS KMS keys whose key material is generated by AWS KMS (AWS_KMS origin). Until now, AWS KMS customers who imported their own key material could not rotate that material without creating a new KMS key. This process called manual rotation required updating references to the older key identifiers. With today’s launch, the key ID of the imported key remains unchanged after rotation, so existing workloads are not disrupted. In this post, we tell you how the new capability works, look at key material expiry and deletion features unique to imported keys, and review pricing for this new feature.
How it works
When you create an AWS KMS key with EXTERNAL origin, AWS KMS assigns a fixed identifier to the key called the key ID. However, AWS KMS doesn’t generate key material for the cryptographic operations. You must import your own key material using the ImportKeyMaterial operation.
When you import key material, AWS KMS computes a unique key material identifier based on the key ID and the key material. Even if you import the same key material in different keys, AWS KMS will assign distinct key material identifiers. This computation uses a cryptographic hash so the key material identifier doesn’t reveal information about the key material itself. AWS KMS embeds this key material identifier in the ciphertext blob produced by symmetric encryption.
Until now, after you imported key material into an AWS KMS key, you could not import additional key material into that key to rotate the key. With this new feature launch, you can associate multiple imported key materials with a single, symmetric-encryption key. You can use the RotateKeyOnDemand operation to make the most recently imported key material the current key material. AWS KMS uses the current key material to generate new ciphertext. Unless deleted or expired, the other key materials remain available for decryption. When you present ciphertext for decryption, AWS KMS automatically selects the correct key material using the key material identifier embedded in the ciphertext.
To help improve the auditability that keys have rotated, we’ve added new identifiers in KMS API responses for the specific key material used. The KeyMaterialId is a new field that AWS KMS will return in addition to the KeyId. Similarly, the DescribeKey response for these keys now displays the identifier of the current key material as CurrentKeyMaterialId. The inclusion of the KeyMaterialId and CurrentKeyMaterialId in API responses makes key rotation more transparent.
Before we dive into the details, the following is an outline of the overall process to rotate an imported key:
Create a symmetric encryption KMS key with EXTERNAL origin
Import key material into the key using GetParametersForImport and ImportKeyMaterial APIs. The first key material becomes usable immediately. This part is unchanged and maintains backwards compatibility with the current behavior of AWS KMS.
Use the key to create ciphertext and decrypt it. You’ll notice the key material ID matches the CurrentKeyMaterialId displayed in the DescribeKey response.
When you want to rotate this key, import a second key material into the key. The ImportKeyMaterial API now has a new ImportType input parameter which lets you inform AWS KMS whether you are associating new key material with a key (--import-type NEW_KEY_MATERIAL) or re-importing previously associated key material (--import-type EXISTING_KEY_MATERIAL).
Use ListKeyRotations with --include-key-material ALL_KEY_MATERIAL to view both key materials. The key material state of the second key material will be PENDING_ROTATION.
Use the RotateKeyOnDemand operation to initiate on-demand key rotation.
Optionally, you can use the GetKeyRotationStatus operation to monitor the in-progress rotation. The response will contain OnDemandRotationStartDate only while the rotation is in progress.
Use ListKeyRotations with --include-key-material ALL_KEY_MATERIAL after rotation completes to view key materials associated with this key. The KeyMaterialState of the new key material you imported will change from PENDING_ROTATION to CURRENT. The key material state of the first key material will change from CURRENT to NON_CURRENT.
Use the key to create ciphertext and decrypt it. You’ll notice the CurrentKeyMaterialId is used for creating ciphertext, but the key material used for decryption is automatically determined by AWS KMS.
Using the AWS CLI for rotating an imported key
The following is a sample sequence of AWS KMS commands to exercise the import key rotation functionality using the AWS Command Line Interface (AWS CLI). The specific commands that follow work in Linux or MacOS environments and might need to be modified for use in a Windows environment. This functionality can also be exercised through the AWS SDKs. These operations, except for wrapping a key material for import, generate-data-key, and decrypt can be initiated in the AWS Management Console.
Step 1: Create a key and import key material
This section should be familiar to anyone who has used the existing import key functionality in AWS KMS.
Create a symmetric encryption key with EXTERNAL origin and save the key ARN. The initial state of this key is PendingImport.
Generate a 256-bit (32-byte) key material to be imported. In the following command, we use OpenSSL to generate the imported key material.
openssl rand 32 > "KeyMaterial1.bin"
Use the get-parameters-for-import command to create the wrapping key and import token and save them to files. AWS KMS supports multiple wrapping algorithms; we use RSAES_OAEP_SHA_256 with a 4096-bit RSA key in the following example. The value of the ImportToken and PublicKey fields in the response has been trimmed for brevity.
Wrap the key material using the wrapping key. We use OpenSSL, a popular open source cryptographic library to illustrate this step. For a detailed explanation of this step, see the AWS KMS Developer Guide.
Import the key material. Optionally, you can assign a key material description. The description can be used to keep track of where the key material is durably maintained outside AWS KMS. This key material description is displayed alongside other information for this key material in the console and the ListKeyRotations API response. We also capture the key material ID from the response. In this example, the key material doesn’t expire. Optionally, you can set an expiration time.
The key is now be enabled for use in cryptographic operations and the CurrentKeyMaterialId in the DescribeKey response should match ${KEY_MATERIAL1_ID}
Use ListKeyRotations to view key materials associated with the key. There should only be one key material with the same ID as in ${KEY_MATERIAL1_ID} and with a key material state of CURRENT.
Step 2: Use the first key material to create and decrypt ciphertext
This step demonstrates how to verify the key material ID of your imported key in cryptographic operations.
Use the GenerateDataKey operation and capture the ciphertext. This operation returns a data key in both plaintext and ciphertext form. The KeyMaterialId in the response matches the identifier for the first key material.
Decrypt the ciphertext and compare it to the plaintext key. The KeyMaterialId in the response matches the identifier for the first key material. The plaintext in decrypt response matches the plaintext data key in the GenerateDataKey response.
Step 3: Import a second key material into the key for on-demand rotation
Import key rotations start with importing new key material into this key.
Generate a second key material (also 256 bits in length).
openssl rand 32 > "KeyMaterial2.bin"
Use the get-parameters-for-import command to create the wrapping key and import token for the second key material to be imported. The value of the ImportToken and PublicKey fields in the response has been trimmed for brevity.
Import the second key material. Optionally, you can assign a key material description. We also capture the key material ID from the response. In this example, the key material doesn’t expire. Optionally, you can set an expiration time.
Note: This call will fail if you omit the import-type parameter or set it to EXISTING_KEY_MATERIAL. Specifying import-type as NEW_KEY_MATERIAL allows the API caller to associate additional key material with the imported key.
Use ListKeyRotations to view key materials associated with the key. There should now be two key materials. The key material state of the second key material should be PENDING_ROTATION.
Step 4: Use on-demand rotation to update the current key material
This step moves the current key material for this key to the newly imported key material.
Use the RotateKeyOnDemand operation to initiate an on-demand key rotation. If the key material in PENDING_ROTATION state is deleted or expires before initiating on-demand rotation, this operation will fail.
AWS KMS uses a background worker to perform the rotation, so there’s a delay between initiating the on-demand key rotation and its completion. Use the GetKeyRotationStatus command to monitor the rotation status. Until the rotation is completed, the GetKeyRotationStatus response will include the OnDemandRotationStartDate field. When this field disappears, the on-demand key rotation is complete.
Rotation changes the current key material, which is reflected in the CurrentKeymaterialId field in the DescribeKey response. It should now match ${KEY_MATERIAL2_ID}.
Step 5: Use the second key material to create and decrypt ciphertext
Similar to Step 2, this step demonstrates how to verify that the key material ID of your imported key in cryptographic operations has been rotated.
Use the GenerateDataKey operation and capture the ciphertext. This operation returns a data key in both plaintext and ciphertext forms. Note that the KeyMaterialId returned in the response matches the identifier of the second key material.
Decrypt the ciphertext and compare it to the plaintext key. The KeyMaterialId returned in the response matches the identifier of the second key material. The plaintext in decrypt response matches the plaintext data key in the previous GenerateDataKey response.
AWS KMS automatically uses the correct key material based on the ciphertext. When you decrypt the ciphertext produced in Step 2, AWS KMS uses the first key material.
Step 6: Delete key material, make the key unusable
With the launch of this feature, the DeleteImportedKeyMaterial operation takes an optional KeyMaterialId parameter. If no KeyMaterialId is specified, AWS KMS deletes the current key material. This maintains backwards compatibility with existing behavior.
Delete the first imported key material by specifying its identifier.
Cryptographic operations fail with a KMSInvalidStateException when a key is in PendingImport state even though the key material required to decrypt the specific ciphertext blob is imported into AWS KMS.
aws kms decrypt --ciphertext-blob "${KEY1_CIPHERTEXT_BLOB2}"

An error occurred (KMSInvalidStateException) when calling the Decrypt operation: arn:aws:kms:us-east-1:111122223333:key/97c8e55d-5b04-45a1-8a01-1febde0dd041 is pending import.
Step 7: Reimport key material to enable the key
You need to re-import all expired or deleted key materials associated with a key for the key to become usable again.
Re-import the missing key material. For this example, we reused the wrapped key and import token we already have. This is an optimization. Optionally, you can get new parameters for wrapping and importing the key material.
AWS CloudTrail now includes the key material ID in the additionalEventData field for operations using symmetric-encryption keys (both AWS_KMS and EXTERNAL origin). The following is a sample CloudTrail event for the AWS KMS decrypt operation:
Key expiry and key deletion capabilities unique to imported keys
Unlike standard KMS keys that you create within AWS KMS, imported keys offer two unique capabilities for enhanced controls over key material within AWS.
When importing key material into a KMS key, you can optionally set an expiration date and time, up to 365 days from the import date. If you don’t specify an expiration, the key material doesn’t expire. When the expiration time is reached, AWS KMS immediately deletes the key material and the KMS key becomes unusable. This is in contrast to the 7–30 day waiting period required for KMS keys whose key material is generated by AWS KMS. To re-enable the key, you must reimport the key material. With key rotation, you can continue to set expiration periods for new key material that you import.
Unique to KMS imported keys, you can also delete specific key material without deleting the entire KMS key. Deleting the key material of a KMS imported key is temporary and reversible. To restore the key, reimport its key material.
Key expiry and import key material deletion can be useful if you need to demonstrate immediate key suspension in the cloud or when you want to temporarily seed AWS KMS with key material that can be inserted and repeatedly removed from cloud access (hydration and re-hydration of keys for improved digital sovereignty).
Special considerations
AWS KMS is designed to keep imported key material highly available. But AWS KMS doesn’t maintain the durability of imported key material at the same level as key material that AWS KMS generates. You must retain a copy of the imported key material outside of AWS KMS in a system that you control. We recommend that you store an exportable copy of the imported key material in a key management system, such as an HSM. As a best practice, you should store a reference to the KMS key ARN and key material description alongside the exportable copy of the key material.
The deletion or expiration of any key material associated with a KMS key makes that key unusable. You must re-import all the key materials associated with a key before it can be used for cryptographic operations.
The following types of KMS keys with imported key material do not support on-demand key rotation, but you can continue to use manual rotation with these keys.
Asymmetric keys
HMAC keys
Multi-AWS Region keys
Features and benefits
This new capability includes several important features:
Maintain key identifiers: Rotate key material while keeping the same AWS KMS key ID and ARN.
Flexible rotation: Rotate keys on-demand to meet your security requirements or use an external key manager to set a rotation schedule that can drive new key rotations into AWS KMS.
Audit trail: Track key material usage through CloudTrail logs.
Metadata management: Add unique descriptions to each key material version.
Retains support for key expiry and import key deletion (features unique to KMS imported keys)
Pricing
For AWS KMS keys that rotate automatically or on-demand, each key incurs a base cost, and the first two rotations add $1 per month (prorated hourly) in additional charges. The pricing is capped after the second rotation, meaning subsequent rotations beyond the second one aren’t billed. This simplified pricing provides you with more predictable costs while maintaining the flexibility to rotate keys frequently to meet your compliance and security audit requirements.
Getting started
You can start using this feature today in all AWS Regions where AWS KMS is available. To learn more, visit the AWS KMS Developer Guide.
We’re excited to see how you use this new capability to enhance your key management practices. Leave a comment below or on the AWS re:Post community forum to let us know what you think.
February 12, 2025: This post was republished to include new services and features that have launched since the original publication date of June 11, 2020.
Encryption is a critical component of a defense-in-depth security strategy that uses multiple defensive mechanisms to protect workloads, data, and assets. As organizations look to innovate while building trust with customers, they need to meet critical compliance requirements and improve data security. Encryption, when used correctly, adds a layer of protection against unauthorized access that can help you strengthen data protection, adhere to regulations and standards, and enhance the security of communications.
How and why does encryption work?
Encryption works by using an algorithm with a key to convert data into unreadable data (ciphertext) that can only become readable again with the right key. For example, a simple phrase like “Hello World!” may look like “1c28df2b595b4e30b7b07500963dc7c” when encrypted. There are several different types of encryption algorithms, all using different types of keys. A strong encryption algorithm relies on mathematical properties to produce ciphertext that can’t be decrypted using any practically available amount of computing power without also having the necessary key. Therefore, protecting and managing the keys becomes a critical part of any encryption solution.
Encryption as part of your security strategy
An effective security strategy begins with stringent access control and continuous work to define the least privilege necessary for persons or systems accessing data. When using the AWS Cloud, you adopt the model of shared responsibility. You are responsible for managing your own access control policies. Encryption is a critical component of a defense-in-depth strategy because it can mitigate weaknesses in your primary access control mechanism. What if an access control mechanism fails and allows access to the raw data on disk or traveling along a network link? If the data is encrypted using a strong key, as long as the decryption key is not on the same system as your data, it is computationally infeasible for a bad actor to decrypt your data.
To show how infeasible this is, let’s consider the Advanced Encryption Standard (AES) with 256-bit keys (AES-256). It’s the strongest industry-adopted and government-approved algorithm for encrypting data. AES-256 is the technology we use to encrypt data in AWS, including Amazon Simple Storage Service (S3) server-side encryption. It would take at least a trillion years to break using current (and foreseeable future) computing technology. Current research suggests that even the future availability of quantum-based computing won’t sufficiently reduce the time it would take to break AES-256 encryption.
But what if you mistakenly create overly permissive access policies on your data? A well-designed encryption and key management system can also help prevent this from becoming an issue, because it separates access to the decryption key from access to your data.
Requirements for an encryption solution
To get the most from an encryption solution, you need to think about two things:
Protecting keys at rest: Are the systems using encryption keys secured so the keys can never be used outside the system? In addition, do these systems implement encryption algorithms correctly to produce strong ciphertexts that cannot be decrypted without access to the right keys?
Independent key management: Is the authorization to use encryption independent from how access to the underlying data is controlled?
There are third-party solutions that you can bring to AWS to help meet these requirements. However, these systems can be difficult and expensive to operate at scale. AWS offers a range of options to simplify encryption and key management.
Protecting keys at rest
When you use third-party key management solutions, it can be difficult to gauge the risk of your plaintext keys leaking and being used outside the solution. The keys have to be stored somewhere, and you can’t always know or audit all the ways those storage systems are secured from unauthorized access. The combination of technical complexity and the necessity of making the encryption usable without degrading performance or availability means that choosing and operating a key management solution can present difficult tradeoffs. The best practice to maximize key security is using a hardware security module (HSM). This is a specialized computing device that has several security controls built into it to help prevent encryption keys from leaving the device in a way that could allow an adversary to access and use those keys.
One such control in modern HSMs is tamper response, in which the device detects physical or logical attempts to access plaintext keys without authorization, and destroys the keys before the attack succeeds. Because you can’t install and operate your own hardware in AWS datacenters, AWS offers two services using HSMs with tamper response to protect customers’ keys: AWS Key Management Service (AWS KMS), which manages a fleet of HSMs on the customer’s behalf, and AWS CloudHSM, which gives customers the ability to manage their own HSMs. Each service can create keys on your behalf, or you can import keys from your on-premises systems to be used by each service.
The keys in AWS KMS or AWS CloudHSM can be used to encrypt data directly, or to protect other keys that are distributed to applications that directly encrypt data. The technique of encrypting encryption keys is called envelope encryption, and it enables encryption and decryption to happen on the computer where the plaintext customer data exists, rather than sending the data to the HSM each time. For very large data sets (e.g., a database), it’s not practical to move gigabytes of data between the data set and the HSM for every read/write operation. Instead, envelope encryption allows a data encryption key to be distributed to the application when it’s needed. The “master” keys in the HSM are used to encrypt a copy of the data key so the application can store the encrypted key alongside the data encrypted under that key. Once the application encrypts the data, the plaintext copy of data key can be deleted from its memory. The only way for the data to be decrypted is if the encrypted data key, which is only a few hundred bytes in size, is sent back to the HSM and decrypted.
The process of envelope encryption is used in AWS services in which data is encrypted on a customer’s behalf (which is known as server-side encryption) to minimize performance degradation. If you want to encrypt data in your own applications (client-side encryption), you’re encouraged to use envelope encryption with AWS KMS or AWS CloudHSM. Both services offer client libraries and SDKs to add encryption functionality to their application code and use the cryptographic functionality of each service. The AWS Encryption SDK is an example of a tool that can be used anywhere, not just in applications running in AWS. To make it easier for customers to encrypt data in databases like Amazon DynamoDB, we built the AWS Database Encryption SDK. The AWS Database Encryption SDK is a set of software libraries that enable you to use client-side encryption in your database design, including record-level encryption of database items. Today, the AWS Database Encryption SDK supports Amazon DynamoDB with attribute-level encryption.
Because implementing encryption algorithms and HSMs is critical to get right, all vendors of HSMs should have their products validated by a trusted third party. HSMs in both AWS KMS and AWS CloudHSM are validated under the National Institute of Standards and Technology’s FIPS 140 program, the standard for evaluating cryptographic modules. This validates the secure design and implementation of cryptographic modules, including functions related to ports and interfaces, authentication mechanisms, physical security and tamper response, operational environments, cryptographic key management, and electromagnetic interference/electromagnetic compatibility (EMI/EMC). Encryption using a FIPS 140 level 3 validated cryptographic module is often a requirement for other security-related compliance schemes like FedRamp and HIPAA-HITECH in the U.S., or the international payment card industry standard (PCI-DSS).
Independent key management
While AWS KMS and AWS CloudHSM can protect plaintext master keys on your behalf, you are still responsible for managing access controls to determine who can cause which encryption keys to be used under which conditions. One advantage of using AWS KMS is that the policy language you use to define access controls on keys is the same one you use to define access to all other AWS resources. Note that the language is the same, not the actual authorization controls. You need a mechanism for managing access to keys that is different from the one you use for managing access to your data. AWS KMS provides that mechanism by allowing you to assign one set of administrators who can only manage keys and a different set of administrators who can only manage access to the underlying encrypted data. Configuring your key management process in this way helps provide separation of duties you need to avoid accidentally escalating privilege to decrypt data to unauthorized users. For even further separation of control, AWS CloudHSM offers an independent policy mechanism to define access to keys.
In 2022, AWS KMS launched support for external key stores (XKS), a feature that allows you to store AWS KMS customer managed keys on an HSM that you operate on premises or at a location of your choice. At a high level, AWS KMS forwards requests for encryption and decryption to your HSM. Your key material never leaves your HSM. This can help you unblock use cases for a small portion of highly regulated workloads where encryption keys should be stored and used outside of an AWS data center. However, XKS forces a significant shift in the shared responsibility model—you now have responsibility for the durability, throughput, latency, and availability of your KMS key. If that key is lost or destroyed, you could permanently lose access to data, and if an XKS key becomes unavailable, all workloads in AWS that are dependent on that XKS key will be inaccessible.
Even with the ability to separate key management from data management, you can still verify that you have configured access to encryption keys correctly. AWS KMS is integrated with AWS CloudTrail so you can audit who used which keys, for which resources, and when. This provides granular vision into your encryption management processes, which is typically much more in-depth than on-premises audit mechanisms. Audit events from AWS CloudHSM can be sent to Amazon CloudWatch, the AWS service for monitoring and alarming third-party solutions you operate in AWS.
Encrypting data at rest and in transit
AWS services that handle customer data, encrypt data that is sent from one system to another—known as data in transit—provide options to encrypt data at rest. AWS services that offer encryption at rest using AWS KMS or AWS CloudHSM use AES-256. None of these services store plaintext encryption keys at rest—that’s a function that only AWS KMS and AWS CloudHSM may perform using their FIPS 140 level 3 validated HSMs. This architecture helps minimize the unauthorized use of keys.
When encrypting data in transit, AWS services use the Transport Layer Security (TLS) protocol to provide encryption between your application and the AWS service. Most commercial solutions use an open source project called OpenSSL for their TLS needs. OpenSSL has roughly 500,000 lines of code with at least 70,000 of those implementing TLS. The code base is large, complex, and difficult to audit. Moreover, when OpenSSL has bugs, the global developer community is challenged to not only fix and test the changes, but also to make sure that the resulting fixes themselves do not introduce new flaws.
AWS’s response to challenges with the TLS implementation in OpenSSL was to develop our own implementation of TLS, known as s2n, or signal to noise. We released s2n in June 2015, which we designed to be small and fast. The goal of s2n is to provide you with network encryption that is easier to understand and that is fully auditable. We released and licensed it under the Apache 2.0 license and hosted it on GitHub.
We also designed s2n to be analyzed using automated reasoning to test for safety and correctness using mathematical logic. Through this process, known as formal methods, we verify the correctness of the s2n code base every time we change the code. We also automated these mathematical proofs, which we regularly re-run to ensure the desired security properties are unchanged with new releases of the code. Automated mathematical proofs of correctness are an emerging trend in the security industry, and AWS uses this approach for a wide variety of our mission-critical software.
Similarly, in 2022, we released s2n-quic, an open-source Rust implementation of the QUIC protocol that was added to our set of AWS encryption open source libraries. QUIC is an encrypted transport protocol designed for performance and is the foundation of HTTP/3. It is specified in a set of IETF standards that were ratified in May 2021. Amazon CloudFront HTTP/3 support is built on top of s2n-quic, due to its emphasis on performance and efficiency. You can learn more about s2n-quic in this Security Blog post.
Implementing TLS requires using encryption keys and digital certificates that assert the ownership of those keys. AWS Certificate Manager and AWS Private Certificate Authority are two services that can simplify the issuance and rotation of digital certificates across your infrastructure that needs to offer TLS endpoints. Both services use a combination of AWS KMS and AWS CloudHSM to generate and/or protect the keys used in the digital certificates they issue.
Encrypting data in use
You might also have use cases for protecting data that is actively being used by federated learning models or other applications. Cryptographic computing—a set of technologies that allow computations to be performed on encrypted data, so that sensitive data is not exposed—is a methodology for protecting data in use.
Consider the example of an insurance company that works with other companies to develop machine learning models for insurance fraud detection. You might need to use sensitive data about your customers as training data for your models, but you don’t want to share your customer data in plaintext form with the other companies. Cryptographic computing gives organizations a way to train models collaboratively without exposing plaintext data about their customers to each other, or to a cloud provider like AWS. You can read more about cryptographic computing in this AWS Security Blog post.
Today, you can see cryptographic computing at work in AWS Clean Rooms, a service that helps companies and their partners more easily and securely analyze and collaborate on their collective datasets—all without sharing or copying one another’s underlying data. AWS Clean Rooms has a feature called Cryptographic Computing for AWS Clean Rooms (C3R) that cryptographically protects your data even while it is being processed by an AWS Clean Rooms collaboration.
The role of end-to-end encryption in secure communications
End-to-end encryption (E2EE) is a method of secure communication between two or more parties that combines encryption in transit and encryption at rest to protect data from unauthorized access, interception, or tampering. Decryption happens only on the parties you intend to communicate with, and no service providers in between. Every call, message, and file is encrypted with a unique private key and remains protected in transit. Unauthorized parties can’t access communication content, because they don’t have the private key required to decrypt the data.
AWS Wickr is an end-to-end encrypted messaging and collaboration service that protects one-to-one and group messaging, voice and video calling, file sharing, screen sharing, and location sharing with 256-bit encryption. With Wickr, each message gets a unique AES private encryption key and a unique Elliptic-curve Diffie–Hellman (ECDH) public key to negotiate the key exchange with recipients. Message content—including text, files, audio, or video—is encrypted on the sending device (your iPhone, for example) by using the message-specific AES key. This key is then exchanged by using the ECDH key exchange mechanism, so that only intended recipients can decrypt the message.
Quantum computing and post-quantum cryptography
Quantum computing is a field of technology that uses quantum mechanics to solve complex problems faster than on classical computers. Quantum computers are able to solve certain types of problems faster by taking advantage of quantum mechanical effects, such as superposition and quantum interference. For cryptography, this has implications that affect traditional encryption mechanisms such as asymmetric key encryption, which is often used for protecting data in transit (TLS) or creating hash-based signatures to verify the integrity and authenticity of a message or file. Quantum computers, if they are performant and stable enough, could theoretically compromise the security of asymmetric key algorithms like RSA, Elliptic Curve Cryptography (ECC), or Diffie-Hellman key agreement schemes. Based on current research, symmetric key algorithms like AES are not considered to be at risk from a quantum computer, because the key length of 256 bits is already sufficient to compensate for a decrease in cryptographic key strength posed by quantum algorithms.
AWS gives customers the option of evaluating post-quantum algorithms alongside traditional algorithms, using hybrid schemes that make use of both classic cryptography and newer post-quantum cryptographic (PQC) algorithms that are designed to be resistant to quantum computer threats. AWS has taken the first step in deploying PQC by implementing ML-KEM, a module lattice-based key encapsulation mechanism, within AWS-LC, our open source FIPS-140-3 validated cryptographic library. AWS-LC is the core cryptographic library used throughout AWS. Specifically, AWS-LC is used in s2n-tls, our open source TLS implementation used across AWS services with HTTPS-based endpoints.
AWS provides customers the ability to encrypt everything, everywhere. Customers can encrypt data at rest, in transit, and in memory, with a few clicks in the AWS Management Console, or an AWS API call. Services like Amazon Simple Storage Service (Amazon S3) encrypt new objects by default, and also support the use of customer managed AWS KMS keys to give customers more control over their encryption keys. Importantly, AWS KMS uses techniques like envelope encryption and highly scalable key management infrastructure to enable AWS services like Amazon S3 or Amazon Elastic Block Store (Amazon EBS) to encrypt data with minimal performance impact to customer applications.
AWS is also consistently working to improve the performance and security of our customers’ data as it moves between networks or devices. As of June 2024, all AWS API endpoints support TLS 1.3 and require at least TLS 1.2 or higher. By using TLS 1.3, you can decrease your connection time by removing one network round trip for every connection request, and can benefit from some of the most modern and secure cryptographic cipher suites available today.
Customers who require memory encryption can use AWS Graviton, our custom-built family of processors based on ARM. AWS Graviton2, AWS Graviton3, and AWS Graviton3E support always-on memory encryption. The encryption keys are securely generated within the host system, do not leave the host system, and are destroyed when the host is rebooted or powered down. Memory encryption is also supported for other instance types; see the EC2 documentation for more details.
As part of our AWS Digital Sovereignty Pledge, we commit to continue to innovate and invest in additional controls for encryption features so that our customers can encrypt everything, everywhere with encryption keys managed inside or outside the AWS Cloud.
Summary
At AWS, security is our top priority. We are committed to helping you control how your data is used, who has access to it, and how it is protected. By building and supporting encryption tools that work both on and off the cloud, we help you secure your data and enable compliance across your environment. We put security at the center of everything we do to make sure that you can protect your data using best-of-breed security technology in a cost-effective way.
If you have feedback about this post, submit comments in the Comments section below. If you have questions about this post, start a new thread on the AWS KMS forum or the AWS CloudHSM forum, or contact AWS Support.
When using cryptography to protect data, protocol designers often prefer symmetric keys and algorithms for their speed and efficiency. However, when data is exchanged across an untrusted network such as the internet, it becomes difficult to ensure that only the exchanging parties can know the same key. Asymmetric key pairs and algorithms help to solve this problem by allowing a public key to be shared over an untrusted network. And by using a key agreement scheme, two parties can use each other’s public key in combination with their own private key to each derive the same shared secret.
In this blog post we provide an overview of the new API action and explain how it can help you establish secure communications by exchanging only public keys to obtain a derived shared secret. We then show example commands to demonstrate how AWS KMS and OpenSSL can be used by two parties to derive a shared secret.
With this new DeriveSharedSecret API action, customers can take an external party’s public key and, in combination with a private key that resides within AWS KMS, derive a shared secret which can be used to derive a symmetric encryption key with a key derivation function (KDF). Customers can then use this symmetric encryption key to encrypt data locally within their application.
The same external party can combine their own related private key with the customer’s corresponding public key from AWS KMS to derive the same shared secret.
Now that both parties have the same shared secret, they can generate a symmetric encryption key that can be used to encrypt and decrypt the data they exchange.
DeriveSharedSecret offers a simple and secure way for customers to use their private key from within their application, enabling new asymmetric cryptography use cases for keys protected by AWS KMS, such as elliptic curve integrated encryption scheme (ECIES) or end-to-end encryption (E2EE) schemes.
AWS KMS DeriveSharedSecret overview
The AWS KMS API Reference documentation covers the DeriveSharedSecret API action in more detail than we include in this post. We broadly describe how to interact with the API action, using the following steps:
Create an elliptic curve (ECC) KMS key, selecting that the key be used for KEY_AGREEMENT and choosing one of the supported key specs. You will not be able to modify existing ECC keys to be used for key agreement.
Have another party create an elliptic curve key that matches the key spec you defined for your KMS key.
Retrieve the public key associated with your KMS key by using the existing GetPublicKey API action.
Exchange public keys through a trusted means of exchange with the other party. Note that DeriveSharedSecret expects a base64-encoded DER-formatted public key.
Use the other party’s public key as an input, along with your specified KEY_AGREEMENT key. The only key agreement algorithm supported by AWS KMS at launch is ECDH.
The other party should use the public key retrieved from AWS KMS and the private key associated with their generated ECC key pair to derive a shared secret.
The result of the preceding steps is that both parties have the same output without exchanging secret information. Only public keys were exchanged between the two parties. The output of DeriveSharedSecret is the raw shared secret. This shared secret is the multiplication of points on the elliptic curves and can result in many more bytes than are needed for an encryption key. We recommend that customers use a KDF, following the National Institute of Standards and Technology (NIST) SP800-56A Rev. 3 section 5.8 guidance, to derive encryption keys from this shared secret.
For the purposes of this post, we will demonstrate the steps by using the AWS CLI and OpenSSL command line. AWS has incorporated best practices for customers within the AWS Encryption SDK. You can find more details at AWS KMS ECDH keyrings.
Example use case
An example use case where you might wish to use ECDH key agreement is for end-to-end encryption. Although protocols exist that provide a secure framework for secure communications (for example, within AWS Wickr), we will highlight the simplified high-level steps behind some of these protocols. In our example use case, Alice and Bob are both part of a messaging network. This network is managed by a centralized service, and this service must not be able to access Alice or Bob’s unencrypted messages.
Figure 1: High-level architecture for the service described in the example use case
As shown in Figure 1, Alice and Bob each have an ECC key pair and participate in the secret derivation by using ECDH, through the following steps:
Alice registers her public key in the centralized key storage service. A detailed discussion of the key storage service is beyond the scope of this post.
Bob, an AWS KMS user, calls the AWS KMS GetPublicKey action to obtain the public key for the ECC KMS key pair.
Bob registers his public key in the same centralized key storage service.
Alice, who wants to exchange encrypted messages with Bob, retrieves Bob’s public key from the centralized key storage service.
Bob gets a notification that Alice wants to communicate with him, and he retrieves Alice’s public key from the centralized key storage service.
Using Bob’s public key and her private key, Alice derives a shared secret by using her cryptography provider.
Using Alice’s public key and his private key, Bob derives a shared secret by using DeriveSharedSecret.
Alice and Bob now have an identical shared secret. From this shared secret, she can create a symmetric encryption key by using a suitable KDF. The symmetric encryption key can be used to create ciphertext that can be sent to Bob.
Example use case walkthrough
You can use the following steps to create a KMS key for ECDH use and derive a shared secret by using AWS KMS. For our demonstration purposes, the user Alice (from our example use case) is using OpenSSL as the cryptography tool. We will show how the AWS KMS user Bob and OpenSSL user Alice can derive a shared secret by using each other’s public key.
General prerequisites
You must have the following prerequisites in place in order to implement the solution:
AWS CLI — The latest version is recommended. The example here uses aws-cli/2.15.40 and aws-cli/1.32.110.
Both parties (Alice and Bob, from our example use case) have an ECC key on the same curve. The steps in the next section, Key creation prerequisite, explain how these keys can be created.
Key creation prerequisite
Alice and Bob must use the same ECC curve during key creation. The DeriveSharedSecret API action supports curves ECC_NIST_P256, ECC_NIST_P384, and ECC_NIST_P521, which map to P-256, P-384, and P-521 respectively in OpenSSL. The curves that AWS KMS supports are the curves approved by the U.S. National Institute of Standards and Technology (NIST). Additionally, AWS KMS supports the SM2 key spec only in Amazon Web Services China Regions.
Bob creates an asymmetric KMS key for key agreement purposes
Bob creates a key pair in AWS KMS by using the CreateKey API action. In the following example, Bob creates an ECC key pair with ECC_NIST_P256 for the KeySpec parameter and KEY_AGREEMENT for the KeyUsage parameter.
You can follow the Creating asymmetric KMS keys documentation to see how to use the AWS Management Console to create a KMS key pair with the same properties as shown here. This example creates a KMS key with a default KMS key policy. You should review and configure your key policy according to the principle of least privilege, as appropriate for your environment.
Note: When a KMS key is created, it will be logged by AWS CloudTrail, a service that monitors and records activity within your account. API calls to the AWS KMS service are logged in CloudTrail, which you can use to audit access to KMS keys.
To allow your KMS key to be identified by a human-readable string rather than by the KeyId value, you can create an alias for the KMS key (replace the target-key-id value of a1b2c3d4-5678-90ab-cdef-EXAMPLE11111 with your KeyId value). This makes it easier to use and manage your KMS keys.
Bob creates an alias for his KMS key by using the CLI with the following command:
The following sections outline the steps that Alice and Bob will follow to share their public keys, retrieve one another’s public key, and then derive the same shared secret using AWS KMS and OpenSSL. The shared secrets derived by Alice and Bob respectively are then compared to show that they both derived the same shared secret.
Step 1: Alice generates and registers her OpenSSL public key with a central service
AWS KMS expects the public key in DER format. Therefore, in this example Alice creates a DER-format public key by using her ECC private key. Alice runs the following command to produce a DER-format file that contains her public key:
The file openssl_ecc_public_key.bin.der will have the public key in DER format, which Alice can store in the centralized key storage service (or send to anyone she would like to communicate with). Details about the centralized key storage service are beyond the scope of this post.
Step 2: Bob obtains the public key for his ECC KMS Key
To retrieve a copy of the public key for his ECC KMS key, Bob uses the GetPublicKey API action. Bob calls this API by using the AWS CLI command get-public-key, as follows:
The returned PublicKey value is a DER-encoded X.509 public key. Because the AWS CLI is being used, the public key output is base64-encoded for readability purposes. This base64-encoded value is decoded by using the base64 command, and the decoded value is stored in the output file. The file kms_ecdh_public_key.der contains the DER-encoded public key.
Note: If you call this API by using one of the AWS SDKs, such as Boto3, then the returned PublicKey value is not base64-encoded.
In our example use case, Alice is using OpenSSL, which expects the public key in PEM format. Bob converts his DER-format public key into PEM format by using the following command:
The file kms_ecdh_public_key.pem contains the public key in PEM format.
Step 3: Bob registers his public key with the centralized key storage service
Bob saves his public key in PEM format, obtained in Step 2, in the centralized key storage service.
Step 4: Alice retrieves Bob’s public key to derive a shared secret
To perform ECDH key agreement, the two parties involved (Alice and Bob, in our example use case) need to exchange their public key with each other. Alice, who wants to send encrypted messages to Bob, retrieves Bob’s public key from the centralized key storage service.
Bob’s public key, kms_ecdh_public_key.pem, is already in PEM format as expected by OpenSSL.
Step 5: Bob retrieves Alice’s public key to derive a shared secret
To perform ECDH key agreement, the two parties involved, Alice and Bob, need to exchange their public key with each other. Bob gets a notification that Alice wants to communicate with him, and he retrieves Alice’s public key from the centralized key storage service.
Alice’s public key, openssl_ecc_public_key.bin.der, is already in DER format as expected by AWS KMS.
Step 6: Alice uses OpenSSL to derive the shared secret
Alice, using her private key and Bob’s public key, can derive the shared secret by using OpenSSL. Alice derives the shared secret by using the OpenSSL pkeyutl command with the derive option, as follows:
The file openssl.ss will have the shared secret in binary format.
Step 7: Bob uses AWS KMS to derive the shared secret
Bob, using his private key (which remains securely within AWS KMS) and Alice’s public key, can derive the shared secret by using AWS KMS. The following example shows how Bob uses the DeriveSharedSecret API action with the AWS CLI command derive-shared-secret. At launch, the only supported key agreement algorithm is ECDH. Bob passes Alice’s public key for the PublicKey parameter.
Because the AWS CLI is being used, the returned SharedSecret value is base64-encoded for readability purposes. Using the base64 --decode command, the decoded binary format is stored to the file.
Note: If you call this API by using one of the AWS SDKs, such as Boto3, then the returned SharedSecret value is not base64-encoded.
The file kms.ss will have the shared secret in binary format.
Step 8: Using the shared secret and a suitable KDF, Alice derives an encryption key to encrypt her communication to Bob
You can use the following command to compare the two files containing the derived shared secrets that were obtained in Steps 6 and 7 and verify that they are identical:
diff -qs openssl.ss kms.ss
Because these files are identical, we can see that the same secret was derived using both AWS KMS and OpenSSL.
Using the shared secret, Alice should then derive a symmetric encryption key by using a suitable KDF. She can use this symmetric encryption key to encrypt data and send the ciphertext to Bob.
This blog post does not cover the steps to derive that symmetric encryption key, because that can be a complex topic depending on your use case. However, we note that you should not use the raw shared secret as an encryption key because it is not uniform. In other words, the shared secret has a lot of entropy, but the byte string itself is not random.
NIST recommends that you use a KDF function over the raw shared secret (value Z as described in section 5.8 of NIST SP800-56A Rev. 3). The KDFs that are recommended are described in more detail in NIST SP800-56C Rev. 2. One such example is OpenSSL Single Step KDF (SSKDF) EVP_KDF-SS, but using this KDF involves choosing the other values, such as FixedInfo, carefully.
To help customers make the right choice for the resulting KDF to use on the shared secret, the AWS Encryption SDK now includes AWS KMS ECDH keyrings. The keyring is a construct within the AWS Encryption SDK that you implement within your code. The keyring handles the management of encryption keys while applying best practices to protect your data. You can use the keyring to reference your KMS keys for key agreement, and then call a function to encrypt data. Data will be encrypted by using a derived shared wrapping key following NIST recommendations, and the Encryption SDK applies key commitment to the ciphertext.
Summary
In this blog post, we highlighted how you can use the recently launched DeriveSharedSecret API action to securely derive a shared secret. You’ve seen how ECDH can be used between two parties without having to share secret information across untrusted networks. We explained how you can audit your AWS KMS key usage through AWS CloudTrail logs. We highlighted that you would need to use a KDF to generate a symmetric encryption key from the shared secret. We strongly recommend that you use the AWS Encryption SDK to encrypt your data, which helps make sure that the recommended NIST key derivation functions are used for generating symmetric encryption keys.
If you have feedback about this post, submit comments in the Comments section below. If you have questions about this post, contact AWS Support.
While traditional channels like email and SMS remain important, businesses are increasingly exploring alternative messaging services to reach their customers more effectively. In recent years, WhatsApp has emerged as a simple and effective way to engage with users. According to statista, as of 2024, WhatsApp is the most popular mobile messenger app worldwide and has reached over two billion monthly active users in January 2024.
Amazon Cognito lets you add user sign-up and authentication to your mobile and web applications. Among many other features, Cognito provides a custom SMS sender AWS Lambda trigger for using third-party providers to send notifications. In this post, we’ll be using WhatsApp as the third-party provider to send verification codes or multi-factor authentication (MFA) codes instead of SMS during Cognito user pool sign up.
Note: WhatsApp is a third-party service subject to additional terms and charges. Amazon Web Services (AWS) isn’t responsible for third-party services that you use to send messages with a custom SMS sender in Amazon Cognito.
Overview
By default, Amazon Cognito uses Amazon Simple Notification Service (Amazon SNS) for delivery of SMS text messages. Cognito also supports custom triggers that will allow you to invoke an AWS Lambda function to support additional providers such as WhatsApp.
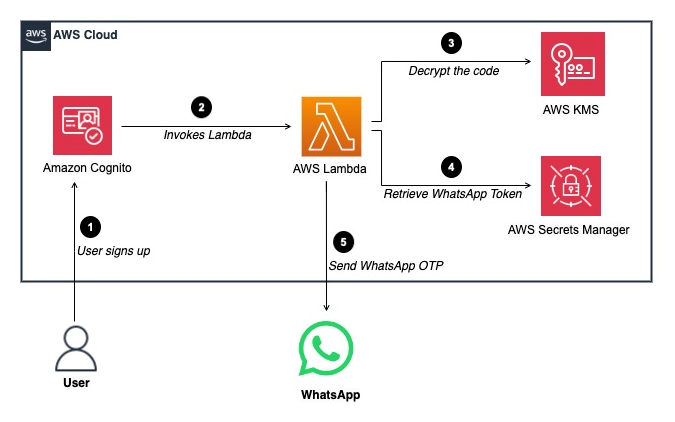
The architecture shown in Figure 1 depicts how to use a custom SMS sender trigger and WhatsApp to send notifications. The steps are as follows:
A user signs up to an Amazon Cognito user pool.
Cognito invokes the custom SMS sender Lambda function and sends the user’s attributes, including the phone number and a one-time code to the Lambda function. This one-time code is encrypted using a custom symmetric encryption AWS Key Management Service (AWS KMS) key that you create.
The Lambda function decrypts the one-time code using a Decrypt API call to your AWS KMS key.
The Lambda function then obtains the WhatsApp access token from AWS Secrets Manager. The WhatsApp access token needs to be generated through Meta Business Settings (which are covered in the next section) and added to Secrets Manager. Lambda also parses the phone number, user attributes, and encrypted secrets.
Lambda sends a POST API call to the WhatsApp API and WhatsApp delivers the verification code to the user as a message. The user can then use the verification code to verify their contact information and confirm the sign-up.
Figure 1: Custom SMS sender trigger flow
Prerequisites
Create an AWS account if you don’t already have one and sign in. The AWS Identity and Access Management (IAM) role that you use must have sufficient permissions to make the necessary AWS service calls and manage AWS resources such as creating and updating Lambda functions, Amazon Cognito user pools, Secrets Manager, AWS KMS keys, and IAM roles.
In the next steps, we look at how to create a Meta app, create a new system user, get the WhatsApp access token and create the template to send the WhatsApp token.
Create and configure an app for WhatsApp communication
To get started, create a Meta app with WhatsApp added to it, along with the customer phone number that will be used to test.
To create and configure an app
Open the Meta for Developers console, choose My Apps and then choose Create App (or choose an existing Business type app and skip to step 4).
Select Other choose Next and then select Business as the app type and choose Next.
Enter an App name, App contact email, choose whether or not to attach a Business portfolio and choose Create app.
Open the app Dashboard and in the Add product to your app section, under WhatsApp, choose Set up.
Create or select an existing Meta business portfolio and choose Continue.
In the left navigation pane, under WhatsApp,choose API Setup.
Under Send and receive messages, take a note of the Phone number ID, which will be needed in the AWS CDK template later.
Under To, add the customer phone number you want to use for testing. Follow the instructions to add and verify the phone number.
Note: You must have WhatsApp registered with the number and the WhatsApp client installed on your mobile device.
Create a user for accessing WhatsApp
Create a system user in Meta’s Business Manager and assign it to the app created in the previous step. The access tokens generated for this user will be used to make the WhatsApp API calls.
To create a user
Open Meta’s Business Manager and select the business you created or associated your application with earlier from the dropdown menu under Business settings.
Under Users, select System users and then choose Add to create a new system user.
Enter a name for the System Username and set their role as Admin and choose Create system user.
Choose Assign assets.
From the Select asset type list, select Apps. Under Select assets, select your WhatsApp application’s name. Under Partial access, turn on the Test app option for the user. Choose Save Changes and then choose Done.
Choose Generate New Token, select the WhatsApp application created earlier, and leave the default 60 days as the token expiration. Under Permissions select WhatsApp_business_messaging and WhatsApp_business_management and choose Generate Token at the bottom.
Use the Secrets Manager console to create a Secrets Manager secret and set the secret to the WhatsApp access token.
To create a secret
Open the AWS Management Console and go to Secrets Manager.
Figure 2: Open the Secrets Manager console
Choose Store a new secret.
Figure 3: Store a new secret
Under Choose a secret type, choose Other type of secret and under Key/value pairs, select the Plaintext tab and enter Bearer followed by the WhatsApp access token (Bearer<WhatsApp access token>).
Figure 4: Add the secret
For the encryption key, you can use either the AWS KMS key that Secrets Manager creates or a customer managed AWS KMS key that you create and then choose Next.
Provide the secret name as the WhatsAppAccessToken, choose Next, and then choose Store to create the secret.
Note the secret Amazon Resource Name (ARN) to use in later steps.
Deploy the solution
In this section, you clone the GitHub repository and deploy the stack to create the resources in your account.
To clone the repository
Create a new directory, navigate to that directory in a terminal and use the following command to clone the GitHub repository that has the Lambda and AWS CDK code:
Open the lib/constants.ts file and edit the fields. The SELF_SIGNUP value must be set to true for the purpose of this proof of concept. The SELF_SIGNUP value represents the Boolean value for the Amazon Cognito user pool sign-up option, which when set to true allows public users to sign up.
Warning: If you activate user sign-up (enable self-registration) in your user pool, anyone on the internet can sign up for an account and sign in to your applications.
Install the AWS CDK required dependencies by running the following command:
npm install
This project uses typescript as the client language for AWS CDK. Run the following command to compile typescript to JavaScript:
npm run build
From the command line, configure AWS CDK (if you have not already done so):
cdk bootstrap <account number>/<AWS Region>
Install and run Docker. We’re using the aws-lambda-python-alpha package in the AWS CDK code to build the Lambda deployment package. The deployment package installs the required modules in a Lambda compatible Docker container.
Deploy the stack:
cdk synth
cdk deploy --all
Test the solution
Now that you’ve completed implementation, it’s time to test the solution by signing up a user on Amazon Cognito and confirming that the Lambda function is invoked and sends the verification code.
Select the WhatsappOtpStack that was deployed through AWS CDK.
On the Outputs tab, copy the value of cognitocustomotpsenderclientappid.
Run the following AWS Command Line Interface (AWS CLI) command, replacing the client ID with the output of cognitocustomotpsenderclientappid, username, password, email address, name, phone number, and AWS Region to sign up a new Amazon Cognito user.
Note: Password requirements are a minimum length of eight characters with at least one number, one lowercase letter, and one special character.
The new user should receive a message on WhatsApp with a verification code that they can use to complete their sign-up.
Cleanup
Run the following command to delete the resources that were created. It might take a few minutes for the CloudFormation stack to be deleted.
cdk destroy --all
Delete the secret WhatsAppAccessToken that was created from the Secrets Manager console.
Conclusion
In this post, we showed you how to use an alternative messaging platform such as WhatsApp to send notification messages from Amazon Cognito. This functionality is enabled through the Amazon Cognito custom SMS sender trigger, which invokes a Lambda function that has the custom code to send messages through the WhatsApp API. You can use the same method to use other third-party providers to send messages.
If you have feedback about this post, submit comments in the Comments section below. If you have questions about this post, start a new thread on the Amazon Cognito re:Post or contact AWS Support.
In June 2023, Amazon Web Services (AWS) introduced a new capability to AWS Key Management Service (AWS KMS): you can now import asymmetric key materials such as RSA or elliptic-curve cryptography (ECC) private keys for your signing workflow into AWS KMS. This means that you can move your asymmetric keys that are managed outside of AWS KMS—such as a hybrid (on-premises) environment, multi-cloud environment, and even AWS CloudHSM—and make them available through AWS KMS. Combined with the announcement on AWS KMS HSMs achieving FIPS 140-2 Security Level 3, you can make sure that your keys are secured and used in a manner that aligns to the cryptographic standards laid out by the U.S. National Institute of Standards and Technology (NIST).
In this post, we will show you how to migrate your asymmetric keys from CloudHSM to AWS KMS. This can help you simplify your key management strategy and take advantage of the robust authorization control of AWS KMS key policies.
Benefits of importing key materials into AWS KMS
In general, we recommend that you use a native KMS key because it provides the best security, durability, and availability compared to other key store options. AWS KMS FIPS-validated hardware security modules (HSMs) generate the key materials for KMS keys, and these key materials never leave the HSMs unencrypted. Operations that require use of your KMS key (for example, decryption of a data key or digital signature signing) must occur within the HSM.
However, depending on your organization’s requirements, you might need to bring your own key (BYOK) from outside. Importing your own key gives you direct control over the generation, lifecycle management, and durability of your keys. In addition, you have full control over the availability of your imported keys because you can set an expiration period or delete and reimport the keys at any time. You have greater control over the durability of your imported keys because you can maintain the original version of the keys elsewhere. If you need to generate and store copies of keys outside of AWS, these additional controls can help you meet your compliance requirements.
Solution overview
At a high level, our solution involves downloading the wrapping key from AWS KMS, using the CloudHSM Command Line Interface (CLI) to import a wrapping key to CloudHSM, wrapping the private key by using the wrapping key in CloudHSM, and uploading the wrapped private key to AWS KMS by using an import token. You can perform the same procedures by using other supported libraries, such as the PKCS #11 library or a JCE provider.
Figure 1: Overall architecture of the solution
As shown in Figure 1, the solution involves the following steps:
Create a KMS key without key material in AWS KMS
Download the wrapping public key and import token from AWS KMS
Import the wrapping key provided by AWS KMS into CloudHSM
Wrap the private key inside CloudHSM with the imported wrapping public key from AWS KMS
Import the wrapped private key to AWS KMS
For the walkthrough in this post, you will import into AWS KMS an ECC 256-bit private key (NIST P-256) that’s used for signing purpose from a CloudHSM cluster. When you import an asymmetric key into AWS KMS, you only need to import a private key. You don’t need to import a public key because AWS KMS can generate and retrieve a public key from the private key after the private key is imported.
Prerequisites
To follow along with this walkthrough, make sure that you have the following prerequisites in place:
An active CloudHSM cluster with at least one active HSM and a valid crypto user credential.
OpenSSL installed on your EC2 instance (we recommend version 3.0.0 or newer).
Step 1: Create a KMS key without key material in AWS KMS
The first step is to create a new KMS key. You can do this through the AWS KMS console or the AWS CLI, or by running the CreateKey API operation.
When you create your key, keep the following guidance in mind:
Set the key material origin to External so that no key material is created for this new key.
According to NIST SP 800-57 guidance and cryptography best practice, in general, you should use a single key for only one purpose (for example, if you use an RSA key for encryption, you shouldn’t also use that key for signing). Select the key usage that best suits your use case.
Make sure that the key spec match the algorithm specification of the key that you are trying to import from CloudHSM.
If you want to use the key in multiple AWS Regions (for example, to avoid the need for a cross-Region call to access the key), consider using a multi-Region key.
In general, an RSA wrapping algorithm (RSAES_OAEP_SHA_*) with a key spec of RSA_4096 should be sufficient for wrapping ECC private keys because it can wrap the key material completely. However, when importing RSA private keys, you will need to use the two-step hybrid wrapping algorithm (RSA_AES_KEY_WRAP_SHA_*) due to their large key size. The overall process is the same as what’s shown here, but the two-step hybrid wrapping algorithm requires that you encrypt your key material with an Advanced Encryption Standard (AES) symmetric key that you generate, and then encrypt the AES symmetric key with the RSA public wrapping key. Additionally, when you select the wrapping algorithm, you also have a choice between the SHA-1 or SHA-256 hashing algorithm. We recommend that you use the SHA-256 hashing algorithm whenever possible.
Note that each wrapping public key and import token set is valid for 24 hours. If you don’t use the set to import key material within 24 hours of downloading it, you must download a new set.
To download the wrapping public key and import token from AWS KMS
Run the following command. Make sure to replace <KMS KeyID> with the key ID of the KMS key that you created in the previous step. The key ID is the last part of the key ARN after :key/ (for example, arn:aws:kms:us-east-1:<AWS Account ID>:key/<Key ID>). “ImportToken.b64” represents the wrapping token, and “WrappingPublicKey.b64” represents the import token.
openssl enc -d -base64 -A -in WrappingPublicKey.b64 -out WrappingPublicKey.bin
To convert the wrapping public key from DER to PEM format
The key import pem command in CloudHSM CLI requires that the public key is in PEM format. AWS KMS outputs public keys in the DER format, so you must convert the wrapping public key to PEM format. To convert the public key to PEM format, run the following command:
From the output, note the value for the key label (<kms-wrapping-key> in this example) because you will need it for the next step.
Step 4: Wrap the private key inside CloudHSM with the imported wrapping public key from AWS KMS
Now that you have imported the wrapping key into CloudHSM, you can wrap the private key that you want to import to AWS KMS by using the wrapping key.
Important: Only the owner of a key—the crypto user who created the key—can wrap the key. In addition, the key that you want to wrap must have the extractable attribute set to true.
To wrap the private key
Use the key wrap command in the CloudHSM CLI to wrap the private key that’s stored in CloudHSM. Make sure to replace the following placeholder values with your own information:
rsa-oaep specifies the wrapping algorithm.
--payload-filter is used to define the key that you want to wrap out of the HSM. You can use the key reference (for example, key-reference=0x00000000002800c2) or reference key attributes, such as the key label. In our example, we used the key label ec-priv-import-to-kms.
--wrapping-filter is used to define the key that you will use to wrap out the payload key. This should be the wrapping key that you imported previously from AWS KMS, which was labeled kms-wrapping-key in Step 3.3.
--hash-function defines the hash function used as part of the OAEP encryption. This should match the wrapping algorithm that you specified when you got the import parameters from AWS KMS. In our example, it should be SHA-256 because we selected RSAES_OAEP_SHA_256 as the wrapping algorithm previously.
--mgf defines the mask generation function used as part of the OAEP encryption. The mask hash function must match the signing mechanism hash function, which is SHA-256 in this example.
--path defines the path to the binary file where the wrapped key data will be saved. In this example, we name the file EncryptedECC_P256KeyMaterial.bin but you can specify a different name.
You can also use the CloudHSM CLI to export the public key of your private key. You will use this key for testing later. Make sure to replace the placeholder values <ec-priv-import-to-kms> and <KeyName.pem> with your own information.
Now that you’ve wrapped the private key from CloudHSM, you can import it into AWS KMS.
Note that you have the option to set an expiration time for your imported key. After the expiration time passes, AWS KMS deletes your imported key automatically.
To import the wrapped private key to AWS KMS
If you have been using the CLI or API, the import token is base64 encoded. You must decode the token from base64 to binary format before it can be used. You can use OpenSSL to do this.
openssl enc -d -base64 -A -in ImportToken.b64 -out ImportToken.bin
Run the following command to import the wrapped private key. Make sure to replace <KMS KeyID> with the key ID of the KMS key that you created in Step 1.
Test whether your private key was imported successfully
The nature of asymmetric cryptography means that a digital signature produced by your private key should produce the same signature on the same message, regardless of the tool that you used to perform the signing operation. To verify that your imported private key functions the same in both CloudHSM and AWS KMS, you can perform a signing operation and compare the signature on CloudHSM and AWS KMS to make sure that they are the same.
Another way to check that your imported private key functions are the same in AWS KMS is to perform a signing operation and then verify the signature by using the corresponding public key that you exported from CloudHSM in Step 4. We will show you how to use this method to check that your private key was imported successfully.
To test that your private key was imported
Create a simple message in a text file and encode it in base64.
If successful, you should see a message that says Verified OK.
Conclusion
In this post, you learned how to import an asymmetric key into AWS KMS from CloudHSM by using the CloudHSM CLI.
Although this post focused on migrating keys from CloudHSM, you can also follow the general directions to import your asymmetric key from elsewhere. When you import a private key, make sure that the imported key matches the key spec and the wrapping algorithm that you choose in AWS KMS.
If you have feedback about this post, submit comments in the Comments section below. If you have questions about this post, contact AWS Support.
In this blog post, we delve into using Amazon Web Services (AWS) data protection services such as Amazon Secrets Manager,AWS Key Management Service (AWS KMS), and AWS Certificate Manager (ACM) to help fortify both the security of the pipeline and security in the pipeline. We explore how these services contribute to the overall security of the DevOps pipeline infrastructure while enabling seamless integration of data protection measures. We also provide practical insights by demonstrating the implementation of these services within a DevOps pipeline for a three-tier WordPress web application deployed using Amazon Elastic Kubernetes Service (Amazon EKS).
DevOps pipelines involve the continuous integration, delivery, and deployment of cloud infrastructure and applications, which can store and process sensitive data. The increasing adoption of DevOps pipelines for cloud infrastructure and application deployments has made the protection of sensitive data a critical priority for organizations.
Some examples of the types of sensitive data that must be protected in DevOps pipelines are:
Credentials: Usernames and passwords used to access cloud resources, databases, and applications.
Configuration files: Files that contain settings and configuration data for applications, databases, and other systems.
Certificates: TLS certificates used to encrypt communication between systems.
Secrets: Any other sensitive data used to access or authenticate with cloud resources, such as private keys, security tokens, or passwords for third-party services.
Unintended access or data disclosure can have serious consequences such as loss of productivity, legal liabilities, financial losses, and reputational damage. It’s crucial to prioritize data protection to help mitigate these risks effectively.
The concept of security of the pipeline encompasses implementing security measures to protect the entire DevOps pipeline—the infrastructure, tools, and processes—from potential security issues. While the concept of security in the pipeline focuses on incorporating security practices and controls directly into the development and deployment processes within the pipeline.
By using Secrets Manager, AWS KMS, and ACM, you can strengthen the security of your DevOps pipelines, safeguard sensitive data, and facilitate secure and compliant application deployments. Our goal is to equip you with the knowledge and tools to establish a secure DevOps environment, providing the integrity of your pipeline infrastructure and protecting your organization’s sensitive data throughout the software delivery process.
Sample application architecture overview
WordPress was chosen as the use case for this DevOps pipeline implementation due to its popularity, open source nature, containerization support, and integration with AWS services. The sample architecture for the WordPress application in the AWS cloud uses the following services:
Amazon Route 53: A DNS web service that routes traffic to the correct AWS resource.
Amazon CloudFront: A global content delivery network (CDN) service that securely delivers data and videos to users with low latency and high transfer speeds.
AWS WAF: A web application firewall that protects web applications from common web exploits.
AWS Key Management Service (AWS KMS): A key management service that allows you to create and manage the encryption keys used to protect your data at rest.
AWS Secrets Manager: A service that provides the ability to rotate, manage, and retrieve database credentials.
AWS CodePipeline: A fully managed continuous delivery service that helps to automate release pipelines for fast and reliable application and infrastructure updates.
AWS CodeBuild: A fully managed continuous integration service that compiles source code, runs tests, and produces ready-to-deploy software packages.
AWS CodeCommit: A secure, highly scalable, fully managed source-control service that hosts private Git repositories.
Before we explore the specifics of the sample application architecture in Figure 1, it’s important to clarify a few aspects of the diagram. While it displays only a single Availability Zone (AZ), please note that the application and infrastructure can be developed to be highly available across multiple AZs to improve fault tolerance. This means that even if one AZ is unavailable, the application remains operational in other AZs, providing uninterrupted service to users.
Figure 1: Sample application architecture
The flow of the data protection services in the post and depicted in Figure 1 can be summarized as follows:
First, we discuss securing your pipeline. You can use Secrets Manager to securely store sensitive information such as Amazon RDS credentials. We show you how to retrieve these secrets from Secrets Manager in your DevOps pipeline to access the database. By using Secrets Manager, you can protect critical credentials and help prevent unauthorized access, strengthening the security of your pipeline.
Next, we cover data encryption. With AWS KMS, you can encrypt sensitive data at rest. We explain how to encrypt data stored in Amazon RDS using AWS KMS encryption, making sure that it remains secure and protected from unauthorized access. By implementing KMS encryption, you add an extra layer of protection to your data and bolster the overall security of your pipeline.
Lastly, we discuss securing connections (data in transit) in your WordPress application. ACM is used to manage SSL/TLS certificates. We show you how to provision and manage SSL/TLS certificates using ACM and configure your Amazon EKS cluster to use these certificates for secure communication between users and the WordPress application. By using ACM, you can establish secure communication channels, providing data privacy and enhancing the security of your pipeline.
Note: The code samples in this post are only to demonstrate the key concepts. The actual code can be found on GitHub.
Securing sensitive data with Secrets Manager
In this sample application architecture, Secrets Manager is used to store and manage sensitive data. The AWS CloudFormation template provided sets up an Amazon RDS for MySQL instance and securely sets the master user password by retrieving it from Secrets Manager using KMS encryption.
Here’s how Secrets Manager is implemented in this sample application architecture:
Creating a Secrets Manager secret.
Create a Secrets Manager secret that includes the Amazon RDS database credentials using CloudFormation.
The secret is encrypted using an AWS KMS customer managed key.
The ManageMasterUserPassword: true line in the CloudFormation template indicates that the stack will manage the master user password for the Amazon RDS instance. To securely retrieve the password for the master user, the CloudFormation template uses the MasterUserSecret parameter, which retrieves the password from Secrets Manager. The KmsKeyId: !Ref RDSMySqlSecretEncryption line specifies the KMS key ID that will be used to encrypt the secret in Secrets Manager.
By setting the MasterUserSecret parameter to retrieve the password from Secrets Manager, the CloudFormation stack can securely retrieve and set the master user password for the Amazon RDS MySQL instance without exposing it in plain text. Additionally, specifying the KMS key ID for encryption adds another layer of security to the secret stored in Secrets Manager.
Retrieving secrets from Secrets Manager.
The secrets store CSI driver is a Kubernetes-native driver that provides a common interface for Secrets Store integration with Amazon EKS. The secrets-store-csi-driver-provider-aws is a specific provider that provides integration with the Secrets Manager.
To set up Amazon EKS, the first step is to create a SecretProviderClass, which specifies the secret ID of the Amazon RDS database. This SecretProviderClass is then used in the Kubernetes deployment object to deploy the WordPress application and dynamically retrieve the secrets from the secret manager during deployment. This process is entirely dynamic and verifies that no secrets are recorded anywhere. The SecretProviderClass is created on a specific app namespace, such as the wp namespace.
When using Secrets manager, be aware of the following best practices for managing and securing Secrets Manager secrets:
Use AWS Identity and Access Management (IAM) identity policies to define who can perform specific actions on Secrets Manager secrets, such as reading, writing, or deleting them.
Secrets Manager resource policies can be used to manage access to secrets at a more granular level. This includes defining who has access to specific secrets based on attributes such as IP address, time of day, or authentication status.
Encrypt the Secrets Manager secret using an AWS KMS key.
Using CloudFormation templates to automate the creation and management of Secrets Manager secrets including rotation.
Use AWS CloudTrail to monitor access and changes to Secrets Manager secrets.
Use CloudFormation hooks to validate the Secrets Manager secret before and after deployment. If the secret fails validation, the deployment is rolled back.
Encrypting data with AWS KMS
Data encryption involves converting sensitive information into a coded form that can only be accessed with the appropriate decryption key. By implementing encryption measures throughout your pipeline, you make sure that even if unauthorized individuals gain access to the data, they won’t be able to understand its contents.
Here’s how data at rest encryption using AWS KMS is implemented in this sample application architecture:
Amazon RDS secret encryption
Encrypting secrets: An AWS KMS customer managed key is used to encrypt the secrets stored in Secrets Manager to ensure their confidentiality during the DevOps build process.
Enable encryption for an Amazon RDS instance using CloudFormation. Specify the KMS key ARN in the CloudFormation stack and RDS will use the specified KMS key to encrypt data at rest.
Sample code:
RDSMySQL:
Type: AWS::RDS::DBInstanceProperties:
KmsKeyId: !Ref RDSMySqlDataEncryptionStorageEncrypted: trueRDSMySqlDataEncryption:Type: "AWS::KMS::Key"Properties:KeyPolicy:Id: rds-mysql-data-encryptionStatement:- Sid: Allow administration of the keyEffect: Allow"Action": ["kms:Create*","kms:Describe*","kms:Enable*","kms:List*","kms:Put*",...]- Sid: Allow use of the keyEffect: Allow"Action": ["kms:Decrypt","kms:GenerateDataKey","kms:DescribeKey"]
Kubernetes Pods storage
Use encrypted Amazon Elastic Block Store (Amazon EBS) volumes to store configuration data. Create a managed encrypted Amazon EBS volume using the following code snippet, and then deploy a Kubernetes pod with the persistent volume claim (PVC) mounted as a volume.
Create a KMS key for Amazon ECR and use that key to encrypt the data at rest.
Automate the creation of encrypted ECR repositories and enable encryption at rest using a DevOps pipeline, use CodePipeline to automate the deployment of the CloudFormation stack.
Define the creation of encrypted Amazon ECR repositories as part of the pipeline.
AWS best practices for managing encryption keys in an AWS environment
To effectively manage encryption keys and verify the security of data at rest in an AWS environment, we recommend the following best practices:
Use separate AWS KMS customer managed KMS keys for data classifications to provide better control and management of keys.
Enforce separation of duties by assigning different roles and responsibilities for key management tasks, such as creating and rotating keys, setting key policies, or granting permissions. By segregating key management duties, you can reduce the risk of accidental or intentional key compromise and improve overall security.
Use CloudTrail to monitor AWS KMS API activity and detect potential security incidents.
Rotate KMS keys as required by your regulatory requirements.
Use CloudFormation hooks to validate KMS key policies to verify that they align with organizational and regulatory requirements.
Following these best practices and implementing encryption at rest for different services such as Amazon RDS, Kubernetes Pods storage, and Amazon ECR, will help ensure that data is encrypted at rest.
Securing communication with ACM
Secure communication is a critical requirement for modern environments and implementing it in a DevOps pipeline is crucial for verifying that the infrastructure is secure, consistent, and repeatable across different environments. In this WordPress application running on Amazon EKS, ACM is used to secure communication end-to-end. Here’s how to achieve this:
Provision TLS certificates with ACM using a DevOps pipeline
To provision TLS certificates with ACM in a DevOps pipeline, automate the creation and deployment of TLS certificates using ACM. Use AWS CloudFormation templates to create the certificates and deploy them as part of infrastructure as code. This verifies that the certificates are created and deployed consistently and securely across multiple environments.
Provisioning of ALB and integration of TLS certificate using AWS ALB Ingress Controller for Kubernetes
Use a DevOps pipeline to create and configure the TLS certificates and ALB. This verifies that the infrastructure is created consistently and securely across multiple environments.
To secure communication between CloudFront and the ALB, verify that the traffic from the client to CloudFront and from CloudFront to the ALB is encrypted using the TLS certificate.
To secure communication between the ALB and the Kubernetes Pods, use the Kubernetes ingress resource to terminate SSL/TLS connections at the ALB. The ALB sends the PROTO metadata http connection header to the WordPress web server. The web server checks the incoming traffic type (http or https) and enables the HTTPS connection only hereafter. This verifies that pod responses are sent back to ALB only over HTTPS.
Additionally, using the X-Forwarded-Proto header can help pass the original protocol information and help avoid issues with the $_SERVER[‘HTTPS’] variable in WordPress.
To secure communication between the Kubernetes Pods in Amazon EKS and the Amazon RDS database, use SSL/TLS encryption on the database connection.
Configure an Amazon RDS MySQL instance with enhanced security settings to verify that only TLS-encrypted connections are allowed to the database. This is achieved by creating a DB parameter group with a parameter called require_secure_transport set to ‘1‘. The WordPress configuration file is also updated to enable SSL/TLS communication with the MySQL database. Then enable the TLS flag on the MySQL client and the Amazon RDS public certificate is passed to ensure that the connection is encrypted using the TLS_AES_256_GCM_SHA384 protocol. The sample code that follows focuses on enhancing the security of the RDS MySQL instance by enforcing encrypted connections and configuring WordPress to use SSL/TLS for communication with the database.
Sample code:
RDSDBParameterGroup:
Type: 'AWS::RDS::DBParameterGroup'Properties:
DBParameterGroupName: 'rds-tls-custom-mysql'Parameters:
require_secure_transport: '1'RDSMySQL:
Type: AWS::RDS::DBInstanceProperties:
DBName: 'wordpress'DBParameterGroupName: !Ref RDSDBParameterGroupwp-config-docker.php:
// Enable SSL/TLS between WordPress and MYSQL databasedefine('MYSQL_CLIENT_FLAGS', MYSQLI_CLIENT_SSL);//This activates SSL modedefine('MYSQL_SSL_CA', '/usr/src/wordpress/amazon-global-bundle-rds.pem');
In this architecture, AWS WAF is enabled at CloudFront to protect the WordPress application from common web exploits. AWS WAF for CloudFront is recommended and use AWS managed WAF rules to verify that web applications are protected from common and the latest threats.
Here are some AWS best practices for securing communication with ACM:
Use SSL/TLS certificates: Encrypt data in transit between clients and servers. ACM makes it simple to create, manage, and deploy SSL/TLS certificates across your infrastructure.
Use ACM-issued certificates: This verifies that your certificates are trusted by major browsers and that they are regularly renewed and replaced as needed.
Implement certificate revocation: Implement certificate revocation for SSL/TLS certificates that have been compromised or are no longer in use.
Implement strict transport security (HSTS): This helps protect against protocol downgrade attacks and verifies that SSL/TLS is used consistently across sessions.
Configure proper cipher suites: Configure your SSL/TLS connections to use only the strongest and most secure cipher suites.
Monitoring and auditing with CloudTrail
In this section, we discuss the significance of monitoring and auditing actions in your AWS account using CloudTrail. CloudTrail is a logging and tracking service that records the API activity in your AWS account, which is crucial for troubleshooting, compliance, and security purposes. Enabling CloudTrail in your AWS account and securely storing the logs in a durable location such as Amazon Simple Storage Service (Amazon S3) with encryption is highly recommended to help prevent unauthorized access. Monitoring and analyzing CloudTrail logs in real-time using CloudWatch Logs can help you quickly detect and respond to security incidents.
In a DevOps pipeline, you can use infrastructure-as-code tools such as CloudFormation, CodePipeline, and CodeBuild to create and manage CloudTrail consistently across different environments. You can create a CloudFormation stack with the CloudTrail configuration and use CodePipeline and CodeBuild to build and deploy the stack to different environments. CloudFormation hooks can validate the CloudTrail configuration to verify it aligns with your security requirements and policies.
It’s worth noting that the aspects discussed in the preceding paragraph might not apply if you’re using AWS Organizations and the CloudTrail Organization Trail feature. When using those services, the management of CloudTrail configurations across multiple accounts and environments is streamlined. This centralized approach simplifies the process of enforcing security policies and standards uniformly throughout the organization.
By following these best practices, you can effectively audit actions in your AWS environment, troubleshoot issues, and detect and respond to security incidents proactively.
Complete code for sample architecture for deployment
The complete code repository for the sample WordPress application architecture demonstrates how to implement data protection in a DevOps pipeline using various AWS services. The repository includes both infrastructure code and application code that covers all aspects of the sample architecture and implementation steps.
The infrastructure code consists of a set of CloudFormation templates that define the resources required to deploy the WordPress application in an AWS environment. This includes the Amazon Virtual Private Cloud (Amazon VPC), subnets, security groups, Amazon EKS cluster, Amazon RDS instance, AWS KMS key, and Secrets Manager secret. It also defines the necessary security configurations such as encryption at rest for the RDS instance and encryption in transit for the EKS cluster.
The application code is a sample WordPress application that is containerized using Docker and deployed to the Amazon EKS cluster. It shows how to use the Application Load Balancer (ALB) to route traffic to the appropriate container in the EKS cluster, and how to use the Amazon RDS instance to store the application data. The code also demonstrates how to use AWS KMS to encrypt and decrypt data in the application, and how to use Secrets Manager to store and retrieve secrets. Additionally, the code showcases the use of ACM to provision SSL/TLS certificates for secure communication between the CloudFront and the ALB, thereby ensuring data in transit is encrypted, which is critical for data protection in a DevOps pipeline.
Conclusion
Strengthening the security and compliance of your application in the cloud environment requires automating data protection measures in your DevOps pipeline. This involves using AWS services such as Secrets Manager, AWS KMS, ACM, and AWS CloudFormation, along with following best practices.
By automating data protection mechanisms with AWS CloudFormation, you can efficiently create a secure pipeline that is reproducible, controlled, and audited. This helps maintain a consistent and reliable infrastructure.
Monitoring and auditing your DevOps pipeline with AWS CloudTrail is crucial for maintaining compliance and security. It allows you to track and analyze API activity, detect any potential security incidents, and respond promptly.
By implementing these best practices and using data protection mechanisms, you can establish a secure pipeline in the AWS cloud environment. This enhances the overall security and compliance of your application, providing a reliable and protected environment for your deployments.
If you have feedback about this post, submit comments in the Comments section below. If you have questions about this post, contact AWS Support.
Want more AWS Security news? Follow us on Twitter.
AWS Key Management Service (AWS KMS) recently announced that its hardware security modules (HSMs) were given Federal Information Processing Standards (FIPS) 140-2 Security Level 3 certification from the U.S. National Institute of Standards and Technology (NIST). For organizations that rely on AWS cryptographic services, this higher security level validation has several benefits, including simpler set up and operation. In this post, we will share more details about the recent change in FIPS validation status for AWS KMS and explain the benefits to customers using AWS cryptographic services as a result of this change.
Background on NIST FIPS 140
The FIPS 140 framework provides guidelines and requirements for cryptographic modules that protect sensitive information. FIPS 140 is the industry standard in the US and Canada and is recognized around the world as providing authoritative certification and validation for the way that cryptographic modules are designed, implemented, and tested against NIST cryptographic security guidelines.
Organizations follow FIPS 140 to help ensure that their cryptographic security is aligned with government standards. FIPS 140 validation is also required in certain fields such as manufacturing, healthcare, and finance and is included in several industry and regulatory compliance frameworks, such as the Payment Card Industry Data Security Standard (PCI DSS), the Federal Risk and Authorization Management Program (FedRAMP), and the Health Information Trust Alliance (HITRUST) framework. FIPS 140 validation is recognized in many jurisdictions around the world, so organizations that operate globally can use FIPS 140 certification internationally.
What FIPS 140-2 Security Level 3 means for AWS KMS and you
Until recently, AWS KMS had been validated at Security Level 2 overall and at Security Level 3 in the following four sub-categories:
Cryptographic module specification
Roles, services, and authentication
Physical security
Design assurance
The latest certification from NIST means that AWS KMS is now validated at Security Level 3 overall in each sub-category. As a result, AWS assumes more of the shared responsibility model, which will benefit customers for certain use cases. Security Level 3 certification can assist organizations seeking compliance with several industry and regulatory standards. Even though FIPS 140 validation is not expressly required in a number of regulatory regimes, maintaining stronger, easier-to-use encryption can be a powerful tool for complying with FedRAMP, U.S. Department of Defense (DOD) Approved Product List (APL), HIPAA, PCI, the European Union’s General Data Protection Regulation (GDPR), and the ISO 27001 standard for security management best practices and comprehensive security controls.
Customers who previously needed to meet compliance requirements for FIPS 140-2 Level 3 on AWS were required to use AWS CloudHSM, a single-tenant HSM solution that provides dedicated HSMs instead of managed service HSMs. Now, customers who were using CloudHSM to help meet their compliance obligations for Level 3 validation can use AWS KMS by itself for key generation and usage. Compared to CloudHSM, AWS KMS is typically lower cost and easier to set up and operate as a managed service, and using AWS KMS shifts the responsibility for creating and controlling encryption keys and operating HSMs from the customer to AWS. This allows you to focus resources on your core business instead of on undifferentiated HSM infrastructure management tasks.
AWS KMS uses FIPS 140-2 Level 3 validated HSMs to help protect your keys when you request the service to create keys on your behalf or when you import them. The HSMs in AWS KMS are designed so that no one, not even AWS employees, can retrieve your plaintext keys. Your plaintext keys are never written to disk and are only used in volatile memory of the HSMs while performing your requested cryptographic operation.
The FIPS 140-2 Level 3 certified HSMs in AWS KMS are deployed in all AWS Regions, including the AWS GovCloud (US) Regions. The China (Beijing) and China (Ningxia) Regions do not support the FIPS 140-2 Cryptographic Module Validation Program. AWS KMS uses Office of the State Commercial Cryptography Administration (OSCCA) certified HSMs to protect KMS keys in China Regions. The certificate for the AWS KMS FIPS 140-2 Security Level 3 validation is available on the NIST Cryptographic Module Validation Program website.
As with many industry and regulatory frameworks, FIPS 140 is evolving. NIST approved and published a new updated version of the 140 standard, FIPS 140-3, which supersedes FIPS 140-2. The U.S. government has begun transitioning to the FIPS 140-3 cryptography standard, with NIST announcing that they will retire all FIPS 140-2 certificates on September 22, 2026. NIST recently validated AWS-LC under FIPS 140-3 and is currently in the process of evaluating AWS KMS and certain instance types of AWS CloudHSM under the FIPS 140-3 standard. To check the status of these evaluations, see the NIST Modules In Process List.
This document is provided for the purposes of information only; it is not legal advice, and should not be relied on as legal advice. Customers are responsible for making their own independent assessment of the information in this document. This document: (a) is for informational purposes only, (b) represents current AWS product offerings and practices, which are subject to change without notice, and (c) does not create any commitments or assurances from AWS and its affiliates, suppliers or licensors. AWS products or services are provided “as is” without warranties, representations, or conditions of any kind, whether express or implied. The responsibilities and liabilities of AWS to its customers are controlled by AWS agreements, and this document is not part of, nor does it modify, any agreement between AWS and its customers.
AWS encourages its customers to obtain appropriate advice on their implementation of privacy and data protection environments, and more generally, applicable laws and other obligations relevant to their business.
AWS encourages its customers to obtain appropriate advice on their implementation of privacy and data protection environments, and more generally, applicable laws and other obligations relevant to their business.
If you have feedback about this post, submit comments in the Comments section below. If you have questions about this post, contact AWS Support.
Want more AWS Security news? Follow us on Twitter.
Given the pace of Amazon Web Services (AWS) innovation, it can be challenging to stay up to date on the latest AWS service and feature launches. AWS provides services and tools to help you protect your data, accounts, and workloads from unauthorized access. AWS data protection services provide encryption capabilities, key management, and sensitive data discovery. Last year, we saw growth and evolution in AWS data protection services as we continue to give customers features and controls to help meet their needs. Protecting data in the AWS Cloud is a top priority because we know you trust us to help protect your most critical and sensitive asset: your data. This post will highlight some of the key AWS data protection launches in the last year that security professionals should be aware of.
AWS Key Management Service Create and control keys to encrypt or digitally sign your data
In April, AWS Key Management Service (AWS KMS) launched hash-based message authentication code (HMAC) APIs. This feature introduced the ability to create AWS KMS keys that can be used to generate and verify HMACs. HMACs are a powerful cryptographic building block that incorporate symmetric key material within a hash function to create a unique keyed message authentication code. HMACs provide a fast way to tokenize or sign data such as web API requests, credit card numbers, bank routing information, or personally identifiable information (PII). This technology is used to verify the integrity and authenticity of data and communications. HMACs are often a higher performing alternative to asymmetric cryptographic methods like RSA or elliptic curve cryptography (ECC) and should be used when both message senders and recipients can use AWS KMS.
At AWS re:Invent in November, AWS KMS introduced the External Key Store (XKS), a new feature for customers who want to protect their data with encryption keys that are stored in an external key management system under their control. This capability brings new flexibility for customers to encrypt or decrypt data with cryptographic keys, independent authorization, and audit in an external key management system outside of AWS. XKS can help you address your compliance needs where encryption keys for regulated workloads must be outside AWS and solely under your control. To provide customers with a broad range of external key manager options, AWS KMS developed the XKS specification with feedback from leading key management and hardware security module (HSM) manufacturers as well as service providers that can help customers deploy and integrate XKS into their AWS projects.
AWS Nitro System A combination of dedicated hardware and a lightweight hypervisor enabling faster innovation and enhanced security
In November, we published The Security Design of the AWS Nitro System whitepaper. The AWS Nitro System is a combination of purpose-built server designs, data processors, system management components, and specialized firmware that serves as the underlying virtualization technology that powers all Amazon Elastic Compute Cloud (Amazon EC2) instances launched since early 2018. This new whitepaper provides you with a detailed design document that covers the inner workings of the AWS Nitro System and how it is used to help secure your most critical workloads. The whitepaper discusses the security properties of the Nitro System, provides a deeper look into how it is designed to eliminate the possibility of AWS operator access to a customer’s EC2 instances, and describes its passive communications design and its change management process. Finally, the paper surveys important aspects of the overall system design of Amazon EC2 that provide mitigations against potential side-channel vulnerabilities that can exist in generic compute environments.
AWS Secrets Manager Centrally manage the lifecycle of secrets
In February, AWS Secrets Manager added the ability to schedule secret rotations within specific time windows. Previously, Secrets Manager supported automated rotation of secrets within the last 24 hours of a specified rotation interval. This new feature added the ability to limit a given secret rotation to specific hours on specific days of a rotation interval. This helps you avoid having to choose between the convenience of managed rotations and the operational safety of application maintenance windows. In November, Secrets Manager also added the capability to rotate secrets as often as every four hours, while providing the same managed rotation experience.
In May, Secrets Manager started publishing secrets usage metrics to Amazon CloudWatch. With this feature, you have a streamlined way to view how many secrets you are using in Secrets Manager over time. You can also set alarms for an unexpected increase or decrease in number of secrets.
At the end of December, Secrets Manager added support for managed credential rotation for service-linked secrets. This feature helps eliminate the need for you to manage rotation Lambda functions and enables you to set up rotation without additional configuration. Amazon Relational Database Service (Amazon RDS) has integrated with this feature to streamline how you manage your master user password for your RDS database instances. Using this feature can improve your database’s security by preventing the RDS master user password from being visible during the database creation workflow. Amazon RDS fully manages the master user password’s lifecycle and stores it in Secrets Manager whenever your RDS database instances are created, modified, or restored. To learn more about how to use this feature, see Improve security of Amazon RDS master database credentials using AWS Secrets Manager.
AWS Private Certificate Authority Create private certificates to identify resources and protect data
In September, AWS Private Certificate Authority (AWS Private CA) launched as a standalone service. AWS Private CA was previously a feature of AWS Certificate Manager (ACM). One goal of this launch was to help customers differentiate between ACM and AWS Private CA. ACM and AWS Private CA have distinct roles in the process of creating and managing the digital certificates used to identify resources and secure network communications over the internet, in the cloud, and on private networks. This launch coincided with the launch of an updated console for AWS Private CA, which includes accessibility improvements to enhance screen reader support and additional tab key navigation for people with motor impairment.
In October, AWS Private CA introduced a short-lived certificate mode, a lower-cost mode of AWS Private CA that is designed for issuing short-lived certificates. With this new mode, public key infrastructure (PKI) administrators, builders, and developers can save money when issuing certificates where a validity period of 7 days or fewer is desired. To learn more about how to use this feature, see How to use AWS Private Certificate Authority short-lived certificate mode.
Additionally, AWS Private CA supported the launches of certificate-based authentication with Amazon AppStream 2.0 and Amazon WorkSpaces to remove the logon prompt for the Active Directory domain password. AppStream 2.0 and WorkSpaces certificate-based authentication integrates with AWS Private CA to automatically issue short-lived certificates when users sign in to their sessions. When you configure your private CA as a third-party root CA in Active Directory or as a subordinate to your Active Directory Certificate Services enterprise CA, AppStream 2.0 or WorkSpaces with AWS Private CA can enable rapid deployment of end-user certificates to seamlessly authenticate users. To learn more about how to use this feature, see How to use AWS Private Certificate Authority short-lived certificate mode.
AWS Certificate Manager Provision and manage SSL/TLS certificates with AWS services and connected resources
In early November, ACM launched the ability to request and use Elliptic Curve Digital Signature Algorithm (ECDSA) P-256 and P-384 TLS certificates to help secure your network traffic. You can use ACM to request ECDSA certificates and associate the certificates with AWS services like Application Load Balancer or Amazon CloudFront. Previously, you could only request certificates with an RSA 2048 key algorithm from ACM. Now, AWS customers who need to use TLS certificates with at least 120-bit security strength can use these ECDSA certificates to help meet their compliance needs. The ECDSA certificates have a higher security strength—128 bits for P-256 certificates and 192 bits for P-384 certificates—when compared to 112-bit RSA 2048 certificates that you can also issue from ACM. The smaller file footprint of ECDSA certificates makes them ideal for use cases with limited processing capacity, such as small Internet of Things (IoT) devices.
Amazon Macie Discover and protect your sensitive data at scale
Amazon Macie introduced two major features at AWS re:Invent. The first is a new capability that allows for one-click, temporary retrieval of up to 10 samples of sensitive data found in Amazon Simple Storage Service (Amazon S3). With this new capability, you can more readily view and understand which contents of an S3 object were identified as sensitive, so you can review, validate, and quickly take action as needed without having to review every object that a Macie job returned. Sensitive data samples captured with this new capability are encrypted by using customer-managed AWS KMS keys and are temporarily viewable within the Amazon Macie console after retrieval.
Additionally, Amazon Macie introduced automated sensitive data discovery, a new feature that provides continual, cost-efficient, organization-wide visibility into where sensitive data resides across your Amazon S3 estate. With this capability, Macie automatically samples and analyzes objects across your S3 buckets, inspecting them for sensitive data such as personally identifiable information (PII) and financial data; builds an interactive data map of where your sensitive data in S3 resides across accounts; and provides a sensitivity score for each bucket. Macie uses multiple automated techniques, including resource clustering by attributes such as bucket name, file types, and prefixes, to minimize the data scanning needed to uncover sensitive data in your S3 buckets. This helps you continuously identify and remediate data security risks without manual configuration and lowers the cost to monitor for and respond to data security risks.
Support for new open source encryption libraries
In February, we announced the availability of s2n-quic, an open source Rust implementation of the QUIC protocol, in our AWS encryption open source libraries. QUIC is a transport layer network protocol used by many web services to provide lower latencies than classic TCP. AWS has long supported open source encryption libraries for network protocols; in 2015 we introduced s2n-tls as a library for implementing TLS over HTTP. The name s2n is short for signal to noise and is a nod to the act of encryption—disguising meaningful signals, like your critical data, as seemingly random noise. Similar to s2n-tls, s2n-quic is designed to be small and fast, with simplicity as a priority. It is written in Rust, so it has some of the benefits of that programming language, such as performance, threads, and memory safety.
Cryptographic computing for AWS Clean Rooms (preview)
At re:Invent, we also announced AWS Clean Rooms, currently in preview, which includes a cryptographic computing feature that allows you to run a subset of queries on encrypted data. Clean rooms help customers and their partners to match, analyze, and collaborate on their combined datasets—without sharing or revealing underlying data. If you have data handling policies that require encryption of sensitive data, you can pre-encrypt your data by using a common collaboration-specific encryption key so that data is encrypted even when queries are run. With cryptographic computing, data that is used in collaborative computations remains encrypted at rest, in transit, and in use (while being processed).
With AWS, you control your data by using powerful AWS services and tools to determine where your data is stored, how it is secured, and who has access to it. In 2023, we will further the AWS Digital Sovereignty Pledge, our commitment to offering AWS customers the most advanced set of sovereignty controls and features available in the cloud.
You can join us at our security learning conference, AWS re:Inforce 2023, in Anaheim, CA, June 13–14, for the latest advancements in AWS security, compliance, identity, and privacy solutions.
Secrets managers are a great tool to securely store your secrets and provide access to secret material to a set of individuals, applications, or systems that you trust. Across your environments, you might have multiple secrets managers hosted on different providers, which can increase the complexity of maintaining a consistent operating model for your secrets. In these situations, centralizing your secrets in a single source of truth, and replicating subsets of secrets across your other secrets managers, can simplify your operating model.
This blog post explains how you can use your third-party secrets manager as the source of truth for your secrets, while replicating a subset of these secrets to AWS Secrets Manager. By doing this, you will be able to use secrets that originate and are managed from your third-party secrets manager in Amazon Web Services (AWS) applications or in AWS services that use Secrets Manager secrets.
I’ll demonstrate this approach in this post by setting up a sample open-source HashiCorp Vault to create and maintain secrets and create a replication mechanism that enables you to use these secrets in AWS by using AWS Secrets Manager. Although this post uses HashiCorp Vault as an example, you can also modify the replication mechanism to use secrets managers from other providers.
Important: This blog post is intended to provide guidance that you can use when planning and implementing a secrets replication mechanism. The examples in this post are not intended to be run directly in production, and you will need to take security hardening requirements into consideration before deploying this solution. As an example, HashiCorp provides tutorials on hardening production vaults.
You can use these links to navigate through this post:
The primary use case for this post is for customers who are running applications on AWS and are currently using a third-party secrets manager to manage their secrets, hosted on-premises, in the AWS Cloud, or with a third-party provider. These customers typically have existing secrets vending processes, deployment pipelines, and procedures and processes around the management of these secrets. Customers with such a setup might want to keep their existing third-party secrets manager and have a set of secrets that are accessible to workloads running outside of AWS, as well as workloads running within AWS, by using AWS Secrets Manager.
Another use case is for customers who are in the process of migrating workloads to the AWS Cloud and want to maintain a (temporary) hybrid form of secrets management. By replicating secrets from an existing third-party secrets manager, customers can migrate their secrets to the AWS Cloud one-by-one, test that they work, integrate the secrets with the intended applications and systems, and once the migration is complete, remove the third-party secrets manager.
Additionally, some AWS services, such as Amazon Relational Database Service (Amazon RDS) Proxy, AWS Direct Connect MACsec, and AD Connector seamless join (Linux), only support secrets from AWS Secrets Manager. Customers can use secret replication if they have a third-party secrets manager and want to be able to use third-party secrets in services that require integration with AWS Secrets Manager. That way, customers don’t have to manage secrets in two places.
Two approaches to secrets replication
In this post, I’ll discuss two main models to replicate secrets from an external third-party secrets manager to AWS Secrets Manager: a pull model and a push model.
Pull model In a pull model, you can use AWS services such as Amazon EventBridge and AWS Lambda to periodically call your external secrets manager to fetch secrets and updates to those secrets. The main benefit of this model is that it doesn’t require any major configuration to your third-party secrets manager. The AWS resources and mechanism used for pulling secrets must have appropriate permissions and network access to those secrets. However, there could be a delay between the time a secret is created and updated and when it’s picked up for replication, depending on the time interval configured between pulls from AWS to the external secrets manager.
Push model In this model, rather than periodically polling for updates, the external secrets manager pushes updates to AWS Secrets Manager as soon as a secret is added or changed. The main benefit of this is that there is minimal delay between secret creation, or secret updating, and when that data is available in AWS Secrets Manager. The push model also minimizes the network traffic required for replication since it’s a unidirectional flow. However, this model adds a layer of complexity to the replication, because it requires additional configuration in the third-party secrets manager. More specifically, the push model is dependent on the third-party secrets manager’s ability to run event-based push integrations with AWS resources. This will require a custom integration to be developed and managed on the third-party secrets manager’s side.
This blog post focuses on the pull model to provide an example integration that requires no additional configuration on the third-party secrets manager.
Replicate secrets to AWS Secrets Manager with the pull model
In this section, I’ll walk through an example of how to use the pull model to replicate your secrets from an external secrets manager to AWS Secrets Manager.
Solution overview
Figure 1: Secret replication architecture diagram
The architecture shown in Figure 1 consists of the following main steps, numbered in the diagram:
A Cron expression in Amazon EventBridge invokes an AWS Lambda function every 30 minutes.
To connect to the third-party secrets manager, the Lambda function, written in NodeJS, fetches a set of user-defined API keys belonging to the secrets manager from AWS Secrets Manager. These API keys have been scoped down to give read-only access to secrets that should be replicated, to adhere to the principle of least privilege. There is more information on this in Step 3: Update the Vault connection secret.
The third step has two variants depending on where your third-party secrets manager is hosted:
The Lambda function is configured to fetch secrets from a third-party secrets manager that is hosted outside AWS. This requires sufficient networking and routing to allow communication from the Lambda function.
Note: Depending on the location of your third-party secrets manager, you might have to consider different networking topologies. For example, you might need to set up hybrid connectivity between your external environment and the AWS Cloud by using AWS Site-to-Site VPN or AWS Direct Connect, or both.
Important: To simplify the deployment of this example integration, I’ll use a secrets manager hosted on a publicly available Amazon EC2 instance within the same VPC as the Lambda function (3b). This minimizes the additional networking components required to interact with the secrets manager. More specifically, the EC2 instance runs an open-source HashiCorp Vault. In the rest of this post, I’ll refer to the HashiCorp Vault’s API keys as Vault tokens.
The Lambda function compares the version of the secret that it just fetched from the third-party secrets manager against the version of the secret that it has in AWS Secrets Manager (by tag). The function will create a new secret in AWS Secrets Manager if the secret does not exist yet, and will update it if there is a new version. The Lambda function will only consider secrets from the third-party secrets manager for replication if they match a specified prefix. For example, hybrid-aws-secrets/.
In case there is an error synchronizing the secret, an email notification is sent to the email addresses which are subscribed to the Amazon Simple Notification Service (Amazon SNS) Topic deployed. This sample application uses email notifications with Amazon SNS as an example, but you could also integrate with services like ServiceNow, Jira, Slack, or PagerDuty. Learn more about how to use webhooks to publish Amazon SNS messages to external services.
Step 1: Deploy the solution by using the AWS CDK toolkit
For this blog post, I’ve created an AWS Cloud Development Kit (AWS CDK) script, which can be found in this AWS GitHub repository. Using the AWS CDK, I’ve defined the infrastructure depicted in Figure 1 as Infrastructure as Code (IaC), written in TypeScript, ready for you to deploy and try out. The AWS CDK is an open-source software development framework that allows you to write your cloud application infrastructure as code using common programming languages such as TypeScript, Python, Java, Go, and so on.
Prerequisites:
To deploy the solution, the following should be in place on your system:
AWS CDK Toolkit. Install using npm (included in Node setup) by running npm install -g aws-cdk in a local terminal.
An AWS access key ID and secret access key configured as this setup will interact with your AWS account. See Configuration basics in the AWS Command Line Interface User Guide for more details.
Clone the CDK script for secret replication. git clone https://github.com/aws-samples/aws-secrets-manager-hybrid-secret-replication-from-hashicorp-vault.git SecretReplication
Use the cloned project as the working directory. cd SecretReplication
Install the required dependencies to deploy the application. npm install
Adjust any configuration values for your setup in the cdk.json file. For example, you can adjust the secretsPrefix value to change which prefix is used by the Lambda function to determine the subset of secrets that should be replicated from the third-party secrets manager.
Bootstrap your AWS environments with some resources that are required to deploy the solution. With correctly configured AWS credentials, run the following command. cdk bootstrap
This command deploys the infrastructure shown in Figure 1 for you by using AWS CloudFormation. For a full list of resources, you can view the SecretsManagerReplicationStack in AWS CloudFormation after the deployment has completed.
Note: If your local environment does not have a terminal that allows you to run these commands, consider using AWS Cloud9 or AWS CloudShell.
After the deployment has finished, you should see an output in your terminal that looks like the one shown in Figure 2. If successful, the output provides the IP address of the sample HashiCorp Vault and its web interface.
Figure 2: AWS CDK deployment output
Step 2: Initialize the HashiCorp Vault
As part of the output of the deployment script, you will be given a URL to access the user interface of the open-source HashiCorp Vault. To simplify accessibility, the URL points to a publicly available Amazon EC2 instance running the HashiCorp Vault user interface as shown in step 3b in Figure 1.
Let’s look at the HashiCorp Vault that was just created. Go to the URL in your browser, and you should see the Raft Storage initialize page, as shown in Figure 3.
The vault requires an initial configuration to set up storage and get the initial set of root keys. You can go through the steps manually in the HashiCorp Vault’s user interface, but I recommend that you use the initialise_vault.sh script that is included as part of the SecretsManagerReplication project instead.
Using the HashiCorp Vault API, the initialization script will automatically do the following:
Initialize the Raft storage to allow the Vault to store secrets locally on the instance.
Create an initial set of unseal keys for the Vault. Importantly, for demo purposes, the script uses a single key share. For production environments, it’s recommended to use multiple key shares so that multiple shares are needed to reconstruct the root key, in case of an emergency.
Store the unseal keys in init/vault_init_output.json in your project.
Unseals the HashiCorp Vault by using the unseal keys generated earlier.
Enables two key-value secrets engines:
An engine named after the prefix that you’re using for replication, defined in the cdk.json file. In this example, this is hybrid-aws-secrets. We’re going to use the secrets in this engine for replication to AWS Secrets Manager.
An engine called super-secret-engine, which you’re going to use to show that your replication mechanism does not have access to secrets outside the engine used for replication.
Creates three example secrets, two in hybrid-aws-secrets, and one in super-secret-engine.
Creates a read-only policy, which you can see in the init/replication-policy-payload.json file after the script has finished running, that allows read-only access to only the secrets that should be replicated.
Creates a new vault token that has the read-only policy attached so that it can be used by the AWS Lambda function later on to fetch secrets for replication.
To run the initialization script, go back to your terminal, and run the following command. ./initialise_vault.sh
The script will then ask you for the IP address of your HashiCorp Vault. Provide the IP address (excluding the port) and choose Enter. Input y so that the script creates a couple of sample secrets.
If everything is successful, you should see an output that includes tokens to access your HashiCorp Vault, similar to that shown in Figure 4.
The setup script has outputted two tokens: one root token that you will use for administrator tasks, and a read-only token that will be used to read secret information for replication. Make sure that you can access these tokens while you’re following the rest of the steps in this post.
Note: The root token is only used for demonstration purposes in this post. In your production environments, you should not use root tokens for regular administrator actions. Instead, you should use scoped down roles depending on your organizational needs. In this case, the root token is used to highlight that there are secrets under super-secret-engine/ which are not meant for replication. These secrets cannot be seen, or accessed, by the read-only token.
Go back to your browser and refresh your HashiCorp Vault UI. You should now see the Sign in to Vault page. Sign in using the Token method, and use the root token. If you don’t have the root token in your terminal anymore, you can find it in the init/vault_init_output.json file.
After you sign in, you should see the overview page with three secrets engines enabled for you, as shown in Figure 5.
If you explore hybrid-aws-secrets and super-secret-engine, you can see the secrets that were automatically created by the initialization script. For example, first-secret-for-replication, which contains a sample key-value secret with the key secrets and value manager.
If you navigate to Policies in the top navigation bar, you can also see the aws-replication-read-only policy, as shown in Figure 6. This policy provides read-only access to only the hybrid-aws-secrets path.
Figure 6: Read-only HashiCorp Vault token policy
The read-only policy is attached to the read-only token that we’re going to use in the secret replication Lambda function. This policy is important because it scopes down the access that the Lambda function obtains by using the token to a specific prefix meant for replication. For secret replication we only need to perform read operations. This policy ensures that we can read, but cannot add, alter, or delete any secrets in HashiCorp Vault using the token.
You can verify the read-only token permissions by signing into the HashiCorp Vault user interface using the read-only token rather than the root token. Now, you should only see hybrid-aws-secrets. You no longer have access to super-secret-engine, which you saw in Figure 5. If you try to create or update a secret, you will get a permission denied error.
Great! Your HashiCorp Vault is now ready to have its secrets replicated from hybrid-aws-secrets to AWS Secrets Manager. The next section describes a final configuration that you need to do to allow access to the secrets in HashiCorp Vault by the replication mechanism in AWS.
Step 3: Update the Vault connection secret
To allow secret replication, you must give the AWS Lambda function access to the HashiCorp Vault read-only token that was created by the initialization script. To do that, you need to update the vault-connection-secret that was initialized in AWS Secrets Manager as part of your AWS CDK deployment.
For demonstration purposes, I’ll show you how to do that by using the AWS Management Console, but you can also do it programmatically by using the AWS Command Line Interface (AWS CLI) or AWS SDK with the update-secret command.
To update the Vault connection secret (console)
In the AWS Management Console, go to AWS Secrets Manager > Secrets > hybrid-aws-secrets/vault-connection-secret.
Under Secret Value, choose Retrieve Secret Value, and then choose Edit.
Update the vaultToken value to contain the read-only token that was generated by the initialization script.
Step 4: (Optional) Set up email notifications for replication failures
As highlighted in Figure 1, the Lambda function will send an email by using Amazon SNS to a designated email address whenever one or more secrets fails to be replicated. You will need to configure the solution to use the correct email address. To do this, go to the cdk.json file at the root of the SecretReplication folder and adjust the notificationEmail parameter to an email address that you own. Once done, deploy the changes using the cdk deploy command. Within a few minutes, you’ll get an email requesting you to confirm the subscription. Going forward, you will receive an email notification if one or more secrets fails to replicate.
Test your secret replication
You can either wait up to 30 minutes for the Lambda function to be invoked automatically to replicate the secrets, or you can manually invoke the function.
To test your secret replication
Open the AWS Lambda console and find the Secret Replication function (the name starts with SecretsManagerReplication-SecretReplication).
Navigate to the Test tab.
For the text event action, select Create new event, create an event using the default parameters, and then choose the Test button on the right-hand side, as shown in Figure 8.
Figure 8: AWS Lambda – Test page to manually invoke the function
This will run the function. You should see a success message, as shown in Figure 9. If this is the first time the Lambda function has been invoked, you will see in the results that two secrets have been created.
Figure 9: AWS Lambda function output
You can find the corresponding logs for the Lambda function invocation in a Log group in AWS CloudWatch matching the name /aws/lambda/SecretsManagerReplication-SecretReplicationLambdaF-XXXX.
To verify that the secrets were added, navigate to AWS Secrets Manager in the console, and in addition to the vault-connection-secret that you edited before, you should now also see the two new secrets with the same hybrid-aws-secrets prefix, as shown in Figure 10.
Figure 10: AWS Secrets Manager overview – New replicated secrets
For example, if you look at first-secret-for-replication, you can see the first version of the secret, with the secret key secrets and secret value manager, as shown in Figure 11.
Figure 11: AWS Secrets Manager – New secret overview showing values and version number
Success! You now have access to the secret values that originate from HashiCorp Vault in AWS Secrets Manager. Also, notice how there is a version tag attached to the secret. This is something that is necessary to update the secret, which you will learn more about in the next two sections.
Update a secret
It’s a recommended security practice to rotate secrets frequently. The Lambda function in this solution not only replicates secrets when they are created — it also periodically checks if existing secrets in AWS Secrets Manager should be updated when the third-party secrets manager (HashiCorp Vault in this case) has a new version of the secret. To validate that this works, you can manually update a secret in your HashiCorp Vault and observe its replication in AWS Secrets Manager in the same way as described in the previous section. You will notice that the version tag of your secret gets updated automatically when there is a new secret replication from the third-party secrets manager to AWS Secrets Manager.
Secret replication logic
This section will explain in more detail the logic behind the secret replication. Consider the following sequence diagram, which explains the overall logic implemented in the Lambda function.
Figure 12: State diagram for secret replication logic
This diagram highlights that the Lambda function will first fetch a list of secret names from the HashiCorp Vault. Then, the function will get a list of secrets from AWS Secrets Manager, matching the prefix that was configured for replication. AWS Secrets Manager will return a list of the secrets that match this prefix and will also return their metadata and tags. Note that the function has not fetched any secret material yet.
Next, the function will loop through each secret name that HashiCorp Vault gave and will check if the secret exists in AWS Secrets Manager:
If there is no secret that matches that name, the function will fetch the secret material from HashiCorp Vault, including the version number, and create a new secret in AWS Secrets Manager. It will also add a version tag to the secret to match the version.
If there is a secret matching that name in AWS Secrets Manager already, the Lambda function will first fetch the metadata from that secret in HashiCorp Vault. This is required to get the version number of the secret, because the version number was not exposed when the function got the list of secrets from HashiCorp Vault initially. If the secret version from HashiCorp Vault does not match the version value of the secret in AWS Secrets Manager (for example, the version in HashiCorp vault is 2, and the version in AWS Secrets manager is 1), an update is required to get the values synchronized again. Only now will the Lambda function fetch the actual secret material from HashiCorp Vault and update the secret in AWS Secrets Manager, including the version number in the tag.
The Lambda function fetches metadata about the secrets, rather than just fetching the secret material from HashiCorp Vault straight away. Typically, secrets don’t update very often. If this Lambda function is called every 30 minutes, then it should not have to add or update any secrets in the majority of invocations. By using metadata to determine whether you need the secret material to create or update secrets, you minimize the number of times secret material is fetched both from HashiCorp Vault and AWS Secrets Manager.
Note: The AWS Lambda function has permissions to pull certain secrets from HashiCorp Vault. It is important to thoroughly review the Lambda code and any subsequent changes to it to prevent leakage of secrets. For example, you should ensure that the Lambda function does not get updated with code that unintentionally logs secret material outside the Lambda function.
Use your secret
Now that you have created and replicated your secrets, you can use them in your AWS applications or AWS services that are integrated with Secrets Manager. For example, you can use the secrets when you set up connectivity for a proxy in Amazon RDS, as follows.
To use a secret when creating a proxy in Amazon RDS
Go to the Amazon RDS service in the console.
In the left navigation pane, choose Proxies, and then choose Create Proxy.
On the Connectivity tab, you can now select first-secret-for-replicationorsecond-secret-for-replication, which were created by the Lambda function after replicating them from the HashiCorp Vault.
Figure 13: Amazon RDS Proxy – Example of using replicated AWS Secrets Manager secrets
Due to the sensitive nature of the secrets, it is important that you scope down the permissions to the least amount required to prevent inadvertent access to your secrets. The setup adopts a least-privilege permission strategy, where only the necessary actions are explicitly allowed on the resources that are required for replication. However, the permissions should be reviewed in accordance to your security standards.
In the architecture of this solution, there are two main places where you control access to the management of your secrets in Secrets Manager.
Lambda execution IAM role: The IAM role assumed by the Lambda function during execution contains the appropriate permissions for secret replication. There is an additional safety measure, which explicitly denies any action to a resource that is not required for the replication. For example, the Lambda function only has permission to publish to the Amazon SNS topic that is created for the failed replications, and will explicitly deny a publish action to any other topic. Even if someone accidentally adds an allow to the policy for a different topic, the explicit deny will still block this action.
AWS KMS key policy: When other services need to access the replicated secret in AWS Secrets Manager, they need permission to use the hybrid-aws-secrets-encryption-key AWS KMS key. You need to allow the principal these permissions through the AWS KMS key policy. Additionally, you can manage permissions to the AWS KMS key for the principal through an identity policy. For example, this is required when accessing AWS KMS keys across AWS accounts. See Permissions for AWS services in key policies and Specifying KMS keys in IAM policy statements in the AWS KMS Developer Guide.
Options for customizing the sample solution
The solution that was covered in this post provides an example for replication of secrets from HashiCorp Vault to AWS Secrets Manager using the pull model. This section contains additional customization options that you can consider when setting up the solution, or your own variation of it.
Depending on the solution that you’re using, you might have access to different metadata attached to the secrets, which you can use to determine if a secret should be updated. For example, if you have access to data that represents a last_updated_datetime property, you could use this to infer whether or not a secret ought to be updated.
It is a recommended practice to not use long-lived tokens wherever possible. In this sample, I used a static vault token to give the Lambda function access to the HashiCorp Vault. Depending on the solution that you’re using, you might be able to implement better authentication and authorization mechanisms. For example, HashiCorp Vault allows you to use IAM auth by using AWS IAM, rather than a static token.
This post addressed the creation of secrets and updating of secrets, but for your production setup, you should also consider deletion of secrets. Depending on your requirements, you can choose to implement a strategy that works best for you to handle secrets in AWS Secrets Manager once the original secret in HashiCorp Vault has been deleted. In the pull model, you could consider removing a secret in AWS Secrets Manager if the corresponding secret in your external secrets manager is no longer present.
In the sample setup, the same AWS KMS key is used to encrypt both the environment variables of the Lambda function, and the secrets in AWS Secrets Manager. You could choose to add an additional AWS KMS key (which would incur additional cost), to have two separate keys for these tasks. This would allow you to apply more granular permissions for the two keys in the corresponding KMS key policies or IAM identity policies that use the keys.
Conclusion
In this blog post, you’ve seen how you can approach replicating your secrets from an external secrets manager to AWS Secrets Manager. This post focused on a pull model, where the solution periodically fetched secrets from an external HashiCorp Vault and automatically created or updated the corresponding secret in AWS Secrets Manager. By using this model, you can now use your external secrets in your AWS Cloud applications or services that have an integration with AWS Secrets Manager.
If you have feedback about this post, submit comments in the Comments section below. If you have questions about this post, start a new thread on the AWS Secrets Manager re:Post or contact AWS Support.
Want more AWS Security news? Follow us on Twitter.
After five years of intensive research and cryptanalysis among partners from academia, the cryptographic community, and the National Institute of Standards and Technology (NIST), NIST has selected Kyber for post-quantum key encapsulation mechanism (KEM) standardization. This marks the beginning of the next generation of public key encryption. In time, the classical key establishment algorithms we use today, like RSA and elliptic curve cryptography (ECC), will be replaced by quantum-secure alternatives. At AWS Cryptography, we’ve been researching and analyzing the candidate KEMs through each round of the NIST selection process. We began supporting Kyber in round 2 and continue that support today.
A cryptographically relevant quantum computer that is capable of breaking RSA and ECC does not yet exist. However, we are offering hybrid post-quantum TLS with Kyber today so that customers can see how the performance differences of PQC affect their workloads. We also believe that the use of PQC raises the already-high security bar for connecting to AWS KMS and ACM, making this feature attractive for customers with long-term confidentiality needs.
Performance of hybrid post-quantum TLS with Kyber
Hybrid post-quantum TLS incurs a latency and bandwidth overhead compared to classical crypto alone. To quantify this overhead, we measured how long S2N-TLS takes to negotiate hybrid post-quantum (ECDHE + Kyber) key establishment compared to ECDHE alone. We performed the tests with the Linux perf subsystem on an Amazon Elastic Compute Cloud (Amazon EC2) c6i.4xlarge instance in the US East (Northern Virginia) AWS Region, and we initiated 2,000 TLS connections to a test server running in the US West (Oregon) Region, to include typical internet latencies.
Figure 1 shows the latencies of a TLS handshake that uses classical ECDHE and hybrid post-quantum (ECDHE + Kyber) key establishment. The columns are separated to illustrate the CPU time spent by the client and server compared to the time spent sending data over the network.
Figure 1: Latency of classical compared to hybrid post-quantum TLS handshake
Figure 2 shows the bytes sent and received during the TLS handshake, as measured by the client, for both classical ECDHE and hybrid post-quantum (ECDHE + Kyber) key establishment.
Figure 2: Bandwidth of classical compared to hybrid post-quantum TLS handshake
This data shows that the overhead for using hybrid post-quantum key establishment is 0.25 ms on the client, 0.23 ms on the server, and an additional 2,356 bytes on the wire. Intra-Region tests would result in lower network latency. Your latencies also might vary depending on network conditions, CPU performance, server load, and other variables.
The results show that the performance of Kyber is strong; the additional latency is one of the top contenders among the NIST PQC candidates that we analyzed in a previous blog post. In fact, the performance of these ciphers has improved during our latest test, because x86-64 assembly-optimized versions of these ciphers are now available for use.
Configure a Maven project for hybrid post-quantum TLS
In this section, we provide a Maven configuration and code example that will show you how to get started using our assembly-optimized, hybrid post-quantum TLS configuration with Kyber.
To configure a Maven project for hybrid post-quantum TLS
Configure the desired cipher suite in your code’s initialization. The following code sample configures an AWS KMS client to use the latest hybrid post-quantum cipher suite.
// Check platform support
if(!TLS_CIPHER_PREF_PQ_TLSv1_0_2021_05.isSupported()){
    throw new RuntimeException(“Hybrid post-quantum cipher suites are not supported.”);
}

// Configure HTTP client
SdkAsyncHttpClient awsCrtHttpClient = AwsCrtAsyncHttpClient.builder()
          .tlsCipherPreference(TLS_CIPHER_PREF_PQ_TLSv1_0_2021_05)
          .build();

// Create the AWS KMS async client
KmsAsyncClient kmsAsync = KmsAsyncClient.builder()
         .httpClient(awsCrtHttpClient)
         .build();
With that, all calls made with your AWS KMS client will use hybrid post-quantum TLS. You can use the latest hybrid post-quantum cipher suite with ACM by following the preceding example but using an AcmAsyncClient instead.
Tune connection settings for hybrid post-quantum TLS
Although hybrid post-quantum TLS has some latency and bandwidth overhead on the initial handshake, that cost is amortized over the duration of the TLS session, and you can fine-tune your connection settings to help further reduce the cost. In this section, you learn three ways to reduce the impact of hybrid PQC on your TLS connections: connection pooling, connection timeouts, and TLS session resumption.
Connection pooling
Connection pools manage the number of active connections to a server. They allow a connection to be reused without closing and reopening it, which amortizes the cost of connection establishment over time. Part of a connection’s setup time is the TLS handshake, so you can use connection pools to help reduce the impact of an increase in handshake latency.
To illustrate this, we wrote a test application that generates approximately 200 transactions per second to a test server. We varied the maximum concurrency setting of the HTTP client and measured the latency of the test request. In the AWS CRT HTTP client, this is the maxConcurrency setting. If the connection pool doesn’t have an idle connection available, the request latency includes establishing a new connection. Using Wireshark, we captured the network traffic to observe the number of TLS handshakes that took place over the duration of the application. Figure 3 shows the request latency and number of TLS handshakes as the maxConcurrency setting is increased.
Figure 3: Median request latency and number of TLS handshakes as concurrency pool size increases
The biggest latency benefit occurred with a maxConcurrency value greater than 1. Beyond that, the latencies were past the point of diminishing returns. For all maxConcurrency values of 10 and below, additional TLS handshakes took place within the connections, but they didn’t have much impact on median latency. These inflection points will depend on your application’s request volume. The takeaway is that connection pooling allows connections to be reused, thereby spreading the cost of any increased TLS negotiation time over many requests.
Connection timeouts work in conjunction with connection pooling. Even if you use a connection pool, there is a limit to how long idle connections stay open before the pool closes them. You can adjust this time limit to save on connection establishment overhead.
A nice way to visualize this setting is to imagine bursty traffic patterns. Despite tuning the connection pool concurrency, your connections keep closing because the burst period is longer than the idle time limit. By increasing the maximum idle time, you can reuse these connections despite bursty behavior.
To simulate the impact of connection timeouts, we wrote a test application that starts 10 threads, each of which activate at the same time on a periodic schedule every 5 seconds for a minute. We set maxConcurrency to 10 to allow each thread to have its own connection. We set connectionMaxIdleTime of the AWS CRT HTTP client to 1 second for the first test; and to 10 seconds for the second test.
When the maximum idle time was 1 second, the connections for all 10 threads closed during the time between each burst. As a result, 100 total connections were formed over the life of the test, causing a median request latency of 20.3 ms. When we changed the maximum idle time to 10 seconds, the 10 initial connections were reused by each subsequent burst, reducing the median request latency to 5.9 ms.
By setting the connectionMaxIdleTime appropriately for your application, you can reduce connection establishment overhead, including TLS negotiation time, to help achieve time savings throughout the life of your application.
TLS session resumption allows a client and server to bypass the key agreement that is normally performed to arrive at a new shared secret. Instead, communication quickly resumes by using a shared secret that was previously negotiated, or one that was derived from a previous secret (the implementation details depend on the version of TLS in use). This feature requires that both the client and server support it, but if available, TLS session resumption allows the TLS handshake time and bandwidth increases associated with hybrid PQ to be amortized over the life of multiple connections.
Conclusion
As you learned in this post, hybrid post-quantum TLS with Kyber is available for AWS KMS and ACM. This new cipher suite raises the security bar and allows you to prepare your workloads for post-quantum cryptography. Hybrid key agreement has some additional overhead compared to classical ECDHE, but you can mitigate these increases by tuning your connection settings, including connection pooling, connection timeouts, and TLS session resumption. Begin using hybrid key agreement today with AWS KMS and ACM.
If you have feedback about this post, submit comments in the Comments section below.
Want more AWS Security news? Follow us on Twitter.
This blog post discusses how you can use AWS Key Management Service (AWS KMS) RSA public keys on end clients or devices and encrypt data, then subsequently decrypt data by using private keys that are secured in AWS KMS.
Asymmetric cryptography is a cryptographic system that uses key pairs. Each pair consists of a public key, which can be seen or accessed by anyone, and a private key, which can be accessed only by authorized people. This system has a useful property, which is that anything encrypted with a public key can only be decrypted by the corresponding private key. A popular method for generating key pairs and encrypting data is the RSA algorithm and cryptosystem.
For RSA key pairs, calculating the private key from the public key is seen as computationally infeasible, and therefore RSA key pairs can be used for both authentication and encryption. The features of asymmetric encryption allow separated parties to share information across an untrusted domain, such as the internet, without having to pre-share any other secrets. However, this type of encryption poses an issue of keeping the private key secure, because the private key has the power to decrypt all messages that are transmitted by a large number of end users.
AWS KMS provides simple APIs that you can use to securely generate, store, and manage keys, including RSA key pairs inside hardware security modules (HSMs). Key pairs are generated within FIPS 140-2 validated HSMs that are managed by AWS. You can then use these private keys through APIs to do actions such as decrypt ciphertexts, meaning that plaintext private keys never leave the HSM, which provides assurances of privacy for the private key. Additional APIs allow a customer to retrieve a plaintext copy of the corresponding public key, which allows disconnected or offline uses of RSA public keys.
Limits of asymmetric cryptography
A key drawback to asymmetric cryptography is the fact that you cannot encrypt large pieces of data. When you have a 2048-bit RSA key pair and encrypt something by using the cipher RSAES_OASEP_SHA_256, the largest amount of data that you can encrypt is 190 bytes.
In contrast, symmetric encryption ciphers that use a chained or counter-mode operation don’t have this limit, and they make it possible for you to encrypt data in the tens-of-gigabytes. Symmetric encryption algorithms such as the Advanced Encryption Standard (AES) also benefit from faster data encryption speeds due to smaller key sizes and less complex operations that can be built into hardware.
By combining these two algorithms in a hybrid cryptosystem, you give end clients with a public key the ability to encrypt large pieces of information. A client generates a random 256-bit AES key, which should be from a secure source such as /dev/urandom or a dedicated embedded chip. The client then encrypts its large payload by using a mode of operation such as AES-GCM or AES-CBC by using that 256-bit AES key. Next, the client encrypts that 256-bit AES key by using the RSA public key (see step 5 in Figure 1). End clients then transmit only encrypted data across insecure channels, maintaining privacy of the payload data.
A challenge that customers often face is that they want to use AWS KMS for its security properties, but also want to access their KMS keys from devices that don’t have AWS credentials embedded within them. Without AWS credentials, a device can’t call AWS APIs. This blog post shows how you can use a hybrid cryptosystem where RSA public keys can be downloaded or embedded into devices to overcome this challenge.
Prerequisites and initial considerations
This walkthrough assumes that you have some understanding of RSA ciphers and symmetric encryption schemes such as AES. The walkthrough uses OpenSSL for demonstration of the encryption process, but similar libraries can be used on a client-side device.
When you create a KMS key, you will also generate a key policy that defines access to it. The default key policy allows all users in your account with AWS KMS actions in their IAM policies to access the KMS key. The key policy for a given KMS key is the primary method for determining access.
Important: You will incur charges for the services used in this example. You can find the cost of each service on the corresponding service pricing page. For more information, see AWS KMS Pricing.
Architectural overview
This post contains procedures for completing the following operations, which are also shown in Figure 1:
Create an RSA key pair in AWS KMS.
Download or pre-install the AWS KMS public key to an end-client device.
Generate an AES 256-bit key on an end client.
Encrypt a large payload of data on the end client by using the AES 256-bit key.
Encrypt the AES 256-bit key with the AWS KMS public key.
Transfer the encrypted payload and key.
Decrypt the AES 256-bit key by using AWS KMS.
Decrypt the payload data by using the now-shared AES 256-bit key.
Figure 1: The steps for hybrid encryption
This diagram shows an end client device, an untrusted network such as a cellular network, and the AWS Cloud. An RSA key pair is generated in AWS KMS, and then the public key can either be embedded in the end client, or pulled by the end client through HTTP(S) or other remote means. In all circumstances, only the public key persists on the end client, which means that no secrets are stored on the device.
How you host the public key on your end clients depends on what network access they have. For example, an embedded Internet of Things (IoT) device for mining vehicles might never connect to the internet, but could communicate with a central system through a private 5G network. In this circumstance, you would host this public key within that network for retrieval. For other disconnected IoT devices that can connect to the internet, such as smart-home appliances, you might want to host the public key on a web server at a predefined URL or through an API.
Note: Whenever you vend public keys over an untrusted channel, such as when you vend the public key through an API, you should make sure that the key can be verified in some way to confirm that it hasn’t been tampered with. This is typically done by vending keys over an HTTPS connection, where the integrity of the keys is provided by the X.509 certificate that was used in the TLS connection. The X.509 certificate also verifies an association with the key-pair owner, typically by domain name.
Implement the solution
The following steps can be used as a proof-of-concept to guide you through implementing a hybrid-cryptosystem by using a KMS public key on an example device.
Create keys in AWS KMS
In the first step of this solution, you create an RSA asymmetric key pair in AWS KMS (step 1 in the architectural overview). With AWS KMS, you can create key pairs in a variety of dimensions according to your security requirements or standards. For more information, see Choosing a KMS key type in the AWS KMS documentation.
To create a key pair in AWS KMS, use the CreateKey API. For this example, you will create an RSA key pair with RSA_2048 for the CustomerMasterKeySpec parameter and ENCRYPT_DECRYPT for the KeyUsage parameter in the AWS CLI. This post uses 2048-bit keys, but note that AWS KMS allows larger key sizes. The CLI will return a KeyId value that uniquely identifies the KMS key in your account, which you should take note of.
Note: When a KMS key is created, it will be logged by AWS CloudTrail, a service that monitors and records activity within your account. All API calls to the AWS KMS service are logged in CloudTrail, which you can use to audit access to KMS keys.
To allow your KMS key to be identified by a human-readable string rather than KeyId, you can assign an alias for the KMS key (replace the target-key-id value of <1234abcd-12ab-34cd-56ef-1234567890ab> with your KeyId). This makes it easier to use and manage.
To create a KMS key alias for your key by using the CLI
A benefit of asymmetric encryption is that you can distribute a public key to a large, untrusted network, and the public key can only be used for encryption. Decryption of those messages can only be conducted by the corresponding private key. You can use the AWS KMS Encrypt API to encrypt data with a KMS key pair (specifically the public key). However, because the AWS APIs are authenticated by using a signature, you must have access to AWS credentials to use these APIs, which you might not want to do on untrusted devices. Additionally, in a private 5G network, you might not have the capability to call the AWS KMS API endpoints from the end clients. Instead, you can download the public key from a local source or embed that into the end client at the time of manufacture.
To retrieve a copy of the public key from your AWS KMS key pair, you can use the GetPublicKey API. The following example shows how to use this with the AWS CLI command get-public-key and reference the key alias you set earlier.
To view the public key for your KMS key pair by using the CLI
The return value from this API will contain several elements, including the PublicKey. The returned PublicKey value is the DER-encoded X.509, and because you’re using the AWS CLI, it is base64-encoded for readability purposes. By using the AWS CLI, you can query just the PublicKey return value, base64-decode it, and then save the key to a file on disk, as follows.
To use the AWS CLI to query only the public key, then base64 decode it and output it to a file
In this example, the local machine where you saved the public_key.der file will now represent the end-client device.
Note: If you call this API by using one of the AWS SDKs, such as boto3, then the PublicKey value is not base64-encoded.
Create an AES 256-bit symmetric key on the end client
Although the end client now has a copy of the public key from the associated KMS private key, the public key can’t be used for encrypting data that you plan on transmitting, due to the size limits on data that can be encrypted. Instead, you can use symmetric encryption. Typically, symmetric keys are smaller than asymmetric keys, the ciphers are faster when encrypting data, and the resulting ciphertext is similar in size to the original data.
To generate a symmetric key, you should use a source of random entropy. Some operating systems offer block access to hardware-based sources of random numbers, such as /dev/hwrng. To provide an example process in this blog post, you will use the OpenSSL rand utility, which uses a cryptographically secure pseudo random generator (CSPRNG) seeded by /dev/urandom. In production systems, you might have stronger sources of entropy to rely on, or compliance requirements for random number generation. In hardware-constrained environments, you should take extra care to make sure that sources of entropy are cryptographically secure. The following command uses OpenSSL to create an AES 256-bit (32 bytes) key and base64-encode it, then save it to disk in plaintext as key.b64.
Note: Anyone with access to this file system will have access to this key.
To use the OpenSSL rand command to create a symmetric key and output it to a file
Enter the following command.
openssl rand -base64 32 > key.b64
Encrypt the data to be sent from the end client
Now that you have two different key types on the end client, you can use a hybrid cryptosystem to encrypt a large text file. First, you will generate a sample file to encrypt on your system. By outputting some bytes from /dev/urandom, you can create this file to the size you want. The following command outputs 200 random bytes, base64-encodes the file, and writes that to disk in a file called encrypt.me.
To generate a sample file from random data, which will be encrypted later
Enter the following command.
head -c 200 /dev/urandom | base64 –-wrap=0 > encrypt.me
Next, you will encrypt the newly created file with the AES 256-bit key that you created earlier (which is base64-encoded). By using the OpenSSL command line, you will encrypt the file on disk and create a new file called encrypt.me.enc.
Note: For demonstration purposes, this solution uses OpenSSL to complete the encryption process. However, the command line OpenSSL enc utility doesn’t allow the cipher aes-256-gcm. Galois Counter Mode (GCM) is recommended when encrypting and sending data, because it includes authentication, so that that the ciphertext can’t be tampered with in transit. Instead, for this demonstration, you will use aes-256-cbc, which is not authenticated.
To use the OpenSSL enc command to encrypt your sample file with a symmetric key
So that the data can be decrypted again, you will need to share the same AES 256-bit key with the recipient. To share that with only the person who can use the KMS private key that you created earlier, you can encrypt the symmetric key (key.b64) with the RSA public key that you retrieved earlier (public_key.der).
Again, you will use OpenSSL to see how this works and the required cipher options. When encrypting or decrypting with a KMS RSA key pair, you can use one of two encryption algorithms, either RSAES_OAEP_SHA_1 or RSAES_OAEP_SHA_256. These identify the cipher suites used in encryption that are currently supported by AWS KMS for encryption.
To use the OpenSSL pkeyutl command to encrypt your symmetric key with your local copy of your KMS public key
This command creates a new file on disk called key.b64.enc. This file is the encrypted AES 256-bit key, which can now be transported securely across an insecure network, such as the internet. The last two options in the command define the padding mode used (OAEP) and the length of the message digest (SHA-256), which align with the options available to decrypt when you use the AWS KMS APIs.
Note: You should securely delete both the original payload file (encrypt.me) and the plaintext AES 256-bit key (key.b64) if you want to prevent anyone else from accessing these files. At this point, you will have three files on disk: public_key.der, encrypt.me.enc, and key.b64.enc. If you want to verify the decryption process later in this example, keep these files.
In production, you might never write any of these values to disk. Instead, you can keep all values in memory and only write the encrypted data (ciphertext) to disk, clearing memory after that process has completed.
You can now use the method of your choice to transfer the encrypted files across an unsecured network without compromising the privacy of those files. For smart-home appliance use cases, you can upload the encrypted files in Amazon Simple Storage Service (Amazon S3), a highly durable storage system that can be accessed from the internet, keeping in mind the preventative security practices that AWS recommends. Later, another service can pull these files from S3, and with the correct permissions for the KMS key, can decrypt the files by using the AWS KMS Decrypt API.
Decrypt the files
With access to the decrypt operation for the KMS key and the encrypted files, you can now retrieve the plaintext data file again. To do this, you will replicate the preceding steps, but in reverse. This involves decrypting the AWS 256-bit key by using the AWS KMS API, and then using that result to decrypt the encrypted data. You will need access to the AWS KMS API to complete these actions, because the private key exists in plaintext only within the AWS KMS HSMs.
To decrypt the files
The first step is to decrypt the AWS 256-bit key. You will need to use the AWS CLI to submit the key.b64.enc file to the AWS KMS API, and specify the algorithm you used to encrypt the file (RSAES_OAEP_SHA_256). Use the following command to retrieve the AES 256-bit key in plaintext. Again, you’re using the –query selector to output only the plaintext, and then decode the base64 value.
The final step in decrypting the data is to reverse the CBC encryption process you used in OpenSSL. If another mode of symmetric encryption was used, such as AES-GCM, then you would need to decrypt by using that algorithm and the input AES 256-bit key. Use the following OpenSSL command to retrieve the original plaintext payload.
In this post, you learned how to combine AWS KMS asymmetric key pairs with locally created symmetric keys to encrypt and share data that exceeds 190 bytes, without storing a secret on a client device. By taking advantage of the RSA cryptosystem for offline encryption, you can reduce the exposure of plaintext data or secrets to devices outside of your control, and without having to complete complex key exchanges. By using the steps in this solution, you can more securely share large amounts of data, such as update files or configuration settings. To learn more about the asymmetric keys feature of AWS KMS, refer to the AWS KMS Developer Guide. If you have questions about the asymmetric keys feature, interact with us through AWS re:Post.
If you have feedback about this post, submit comments in the Comments section below. If you have questions about this post, contact AWS Support.
Want more AWS Security news? Follow us on Twitter.
Today AWS Key Management Service (AWS KMS) is introducing new APIs to generate and verify hash-based message authentication codes (HMACs) using the Federal Information Processing Standard (FIPS) 140-2 validated hardware security modules (HSMs) in AWS KMS. HMACs are a powerful cryptographic building block that incorporate secret key material in a hash function to create a unique, keyed message authentication code.
In this post, you will learn the basics of the HMAC algorithm as a cryptographic building block, including how HMACs are used. In the second part of this post, you will see a few real-world use cases that show an application builder’s perspective on using the AWS KMS HMAC APIs.
HMACs provide a fast way to tokenize or sign data such as web API requests, credit cards, bank routing information, or personally identifiable information (PII).They are commonly used in several internet standards and communication protocols such as JSON Web Tokens (JWT), and are even an important security component for how you sign AWS API requests.
HMAC as a cryptographic building block
You can consider an HMAC, sometimes referred to as a keyed hash, to be a combination function that fuses the following elements:
A standard hash function such as SHA-256 to produce a message authentication code (MAC).
A secret key that binds this MAC to that key’s unique value.
Combining these two elements creates a unique, authenticated version of the digest of a message. Because the HMAC construction allows interchangeable hash functions as well as different secret key sizes, one of the benefits of HMACs is the easy replaceability of the underlying hash function (in case faster or more secure hash functions are required), as well as the ability to add more security by lengthening the size of the secret key used in the HMAC over time. The AWS KMS HMAC API is launching with support for SHA-224, SHA-256, SHA-384, and SHA-512 algorithms to provide a good balance of key sizes and performance trade-offs in the implementation. For more information about HMAC algorithms supported by AWS KMS, see HMAC keys in AWS KMS in the AWS KMS Developer Guide.
HMACs offer two distinct benefits:
Message integrity: As with all hash functions, the output of an HMAC will result in precisely one unique digest of the message’s content. If there is any change to the data object (for example you modify the purchase price in a contract by just one digit: from “$350,000” to “$950,000”), then the verification of the original digest will fail.
Message authenticity: What distinguishes HMAC from other hash methods is the use of a secret key to provide message authenticity. Only message hashes that were created with the specific secret key material will produce the same HMAC output. This dependence on secret key material ensures that no third party can substitute their own message content and create a valid HMAC without the intended verifier detecting the change.
HMAC in the real world
HMACs have widespread applications and industry adoption because they are fast, high performance, and simple to use. HMACs are particularly popular in the JSON Web Token (JWT) open standard as a means of securing web applications, and have replaced older technologies such as cookies and sessions. In fact, Amazon implements a custom authentication scheme, Signature Version 4 (SigV4), to sign AWS API requests based on a keyed-HMAC. To authenticate a request, you first concatenate selected elements of the request to form a string. You then use your AWS secret key material to calculate the HMAC of that string. Informally, this process is called signing the request, and the output of the HMAC algorithm is informally known as the signature, because it simulates the security properties of a real signature in that it represents your identity and your intent.
Advantages of using HMACs in AWS KMS
AWS KMS HMAC APIs provide several advantages over implementing HMACs in application software because the key material for the HMACs is generated in AWS KMS hardware security modules (HSMs) that are certified under the FIPS 140-2 program and never leave AWS KMS unencrypted. In addition, the HMAC keys in AWS KMS can be managed with the same access control mechanisms and auditing features that AWS KMS provides on all AWS KMS keys. These security controls ensure that any HMAC created in AWS KMS can only ever be verified in AWS KMS using the same KMS key. Lastly, the HMAC keys and the HMAC algorithms that AWS KMS uses conform to industry standards defined in RFC 2104 HMAC: Keyed-Hashing for Message Authentication.
Use HMAC keys in AWS KMS to create JSON Web Tokens
The JSON Web Token (JWT) open standard is a common use of HMAC. The standard defines a portable and secure means to communicate a set of statements, known as claims, between parties. HMAC is useful for applications that need an authorization mechanism, in which claims are validated to determine whether an identity has permission to perform some action. Such an application can only work if a validator can trust the integrity of claims in a JWT. Signing JWTs with an HMAC is one way to assert their integrity. Verifiers with access to an HMAC key can cryptographically assert that the claims and signature of a JWT were produced by an issuer using the same key.
This section will walk you through an example of how you can use HMAC keys from AWS KMS to sign JWTs. The example uses the AWS SDK for Python (Boto3) and implements simple JWT encoding and decoding operations. This example shows the ease with which you can integrate HMAC keys in AWS KMS into your JWT application, even if your application is in another language or uses a more formal JWT library.
Create an HMAC key in AWS KMS
Begin by creating an HMAC key in AWS KMS. You can use the AWS KMS console or call the CreateKey API action. The following example shows creation of a 256-bit HMAC key:
import boto3

kms = boto3.client('kms')

# Use CreateKey API to create a 256-bit key for HMAC
key_id = kms.create_key(
	KeySpec='HMAC_256',
	KeyUsage='GENERATE_VERIFY_MAC'
)['KeyMetadata']['KeyId']
Use the HMAC key to encode a signed JWT
Next, you use the HMAC key to encode a signed JWT. There are three components to a JWT token: the set of claims, header, and signature. The claims are the very application-specific statements to be authenticated. The header describes how the JWT is signed. Lastly, the MAC (signature) is the output of applying the header’s described operation to the message (the combination of the claims and header). All these are packed into a URL-safe string according to the JWT standard.
The following example uses the previously created HMAC key in AWS KMS within the construction of a JWT. The example’s claims simply consist of a small claim and an issuance timestamp. The header contains key ID of the HMAC key and the name of the HMAC algorithm used. Note that HS256 is the JWT convention used to represent HMAC with SHA-256 digest. You can generate the MAC using the new GenerateMac API action in AWS KMS.
import base64
import json
import time

def base64_url_encode(data):
	return base64.b64encode(data, b'-_').rstrip(b'=')

# Payload contains simple claim and an issuance timestamp
payload = json.dumps({
	"does_kms_support_hmac": "yes",
	"iat": int(time.time())
}).encode("utf8")

# Header describes the algorithm and AWS KMS key ID to be used for signing
header = json.dumps({
	"typ": "JWT",
	"alg": "HS256",
	"kid": key_id #This key_id is from the “Create an HMAC key in AWS KMS” #example. The “Verify the signed JWT” example will later #assert that the input header has the same value of the #key_id
}).encode("utf8")

# Message to sign is of form <header_b64>.<payload_b64>
message = base64_url_encode(header) + b'.' + base64_url_encode(payload)

# Generate MAC using GenerateMac API of AWS KMS
MAC = kms.generate_mac(
	KeyId=key_id, #This key_id is from the “Create an HMAC key in AWS KMS”
				 #example
	MacAlgorithm='HMAC_SHA_256',
	Message=message
)['Mac']

# Form JWT token of form <header_b64>.<payload_b64>.<mac_b64>
jwt_token = message + b'.' + base64_url_encode(mac)
Verify the signed JWT
Now that you have a signed JWT, you can verify it using the same KMS HMAC key. The example below uses the new VerifyMac API action to validate the MAC (signature) of the JWT. If the MAC is invalid, AWS KMS returns an error response and the AWS SDK throws an exception. If the MAC is valid, the request succeeds and the application can continue to do further processing on the token and its claims.
def base64_url_decode(data):
	return base64.b64decode(data + b'=' * (4 - len(data) % 4), b'-_')

# Parse out encoded header, payload, and MAC from the token
message, mac_b64 = jwt_token.rsplit(b'.', 1)
header_b64, payload_b64 = message.rsplit(b'.', 1)

# Decode header and verify its contents match expectations
header_map = json.loads(base64_url_decode(header_b64).decode("utf8"))
assert header_map == {
	"typ": "JWT",
	"alg": "HS256",
	"kid": key_id #This key_id is from the “Create an HMAC key in AWS KMS”
				 #example
}

# Verify the MAC using VerifyMac API of AWS KMS. # If the verification fails, this will throw an error.
kms.verify_mac(
	KeyId=key_id, #This key_id is from the “Create an HMAC key in AWS KMS”
				 #example
	MacAlgorithm='HMAC_SHA_256',
	Message=message,
	Mac=base64_url_decode(mac_b64)
)

# Decode payload for use application-specific validation/processing
payload_map = json.loads(base64_url_decode(payload_b64).decode("utf8"))
Create separate roles to control who has access to generate HMACs and who has access to validate HMACs
It’s often helpful to have separate JWT creators and validators so that you can distinguish between the roles that are allowed to create tokens and the roles that are allowed to verify tokens. HMAC signatures performed outside of AWS-KMS don’t work well for this because you can’t isolate creators and verifiers if they both must have a copy of the same key. However, this is not an issue for HMAC keys in AWS KMS. You can use key policies to separate out who has permission to ask AWS KMS to generate HMACs and who has permission to ask AWS KMS to validate. Each party uses their own unique access keys to access the HMAC key in AWS KMS. Only HSMs in AWS KMS will ever have access to the actual key material. See the following example key policy statements that separate out GenerateMac and VerifyMac permissions:
{
	"Id": "example-jwt-policy",
	"Version": "2012-10-17",
	"Statement": [
		{
			"Sid": "Allow use of the key for creating JWTs",
			"Effect": "Allow",
			"Principal": {
				"AWS": "arn:aws:iam::111122223333:role/JwtProducer"
			},
			"Action": [
				"kms:GenerateMac"
			],
			"Resource": "*"
		},
		{
			"Sid": "Allow use of the key for validating JWTs",
			"Effect": "Allow",
			"Principal": {
				"AWS": "arn:aws:iam::111122223333:role/JwtConsumer"
			},
			"Action": [
				"kms:VerifyMac"
			],
			"Resource": "*"
		}
	]
}
Conclusion
In this post, you learned about the new HMAC APIs in AWS KMS (GenerateMac and VerifyMac). These APIs complement existing AWS KMS cryptographic operations: symmetric key encryption, asymmetric key encryption and signing, and data key creation and key enveloping. You can use HMACs for JWTs, tokenization, URL and API signing, as a key derivation function (KDF), as well as in new designs that we haven’t even thought of yet. To learn more about HMAC functionality and design, see HMAC keys in AWS KMS in the AWS KMS Developer Guide.
If you have feedback about this post, submit comments in the Comments section below. If you have questions about this post, start a new thread on the KMS re:Post or contact AWS Support. Want more AWS Security news? Follow us on Twitter.
Location data is subjected to heavy scrutiny by security experts. Knowing the current position of a person, vehicle, or asset can provide industries with many benefits, whether to understand where a current delivery is, how many people are inside a venue, or to optimize routing for a fleet of vehicles. This blog post explains how Amazon Web Services (AWS) helps keep location data secured in transit and at rest, and how you can leverage additional security features to help keep information safe and compliant.
The General Data Protection Regulation (GDPR) defines personal data as “any information relating to an identified or identifiable natural person (…) such as a name, an identification number, location data, an online identifier or to one or more factors specific to the physical, physiological, genetic, mental, economic, cultural or social identity of that natural person.” Also, many companies wish to improve transparency to users, making it explicit when a particular application wants to not only track their position and data, but also to share that information with other apps and websites. Your organization needs to adapt to these changes quickly to maintain a secure stance in a competitive environment.
On June 1, 2021, AWS made Amazon Location Service generally available to customers. With Amazon Location, you can build applications that provide maps and points of interest, convert street addresses into geographic coordinates, calculate routes, track resources, and invoke actions based on location. The service enables you to access location data with developer tools and to move your applications to production faster with monitoring and management capabilities.
In this blog post, we will show you the features that Amazon Location provides out of the box to keep your data safe, along with best practices that you can follow to reach the level of security that your organization strives to accomplish.
Data control and data rights
Amazon Location relies on global trusted providers Esri and HERE Technologies to provide high-quality location data to customers. Features like maps, places, and routes are provided by these AWS Partners so solutions can have data that is not only accurate but constantly updated.
AWS anonymizes and encrypts location data at rest and during its transmission to partner systems. In parallel, third parties cannot sell your data or use it for advertising purposes, following our service terms. This helps you shield sensitive information, protect user privacy, and reduce organizational compliance risks. To learn more, see the Amazon Location Data Security and Control documentation.
Integrations
Operationalizing location-based solutions can be daunting. It’s not just necessary to build the solution, but also to integrate it with the rest of your applications that are built in AWS. Amazon Location facilitates this process from a security perspective by integrating with services that expedite the development process, enhancing the security aspects of the solution.
Encryption
Amazon Location uses AWS owned keys by default to automatically encrypt personally identifiable data. AWS owned keys are a collection of AWS Key Management Service (AWS KMS) keys that an AWS service owns and manages for use in multiple AWS accounts. Although AWS owned keys are not in your AWS account, Amazon Location can use the associated AWS owned keys to protect the resources in your account.
If customers choose to use their own keys, they can benefit from AWS KMS to store their own encryption keys and use them to add a second layer of encryption to geofencing and tracking data.
Authentication and authorization
Amazon Location also integrates with AWS Identity and Access Management (IAM), so that you can use its identity-based policies to specify allowed or denied actions and resources, as well as the conditions under which actions are allowed or denied on Amazon Location. Also, for actions that require unauthenticated access, you can use unauthenticated IAM roles.
As an extension to IAM, Amazon Cognito can be an option if you need to integrate your solution with a front-end client that authenticates users with its own process. In this case, you can use Cognito to handle the authentication, authorization, and user management for you. You can use Cognito unauthenticated identity pools with Amazon Location as a way for applications to retrieve temporary, scoped-down AWS credentials. To learn more about setting up Cognito with Amazon Location, see the blog post Add a map to your webpage with Amazon Location Service.
Limit the scope of your unauthenticated roles to a domain
When you are building an application that allows users to perform actions such as retrieving map tiles, searching for points of interest, updating device positions, and calculating routes without needing them to be authenticated, you can make use of unauthenticated roles.
When using unauthenticated roles to access Amazon Location resources, you can add an extra condition to limit resource access to an HTTP referer that you specify in the policy. The aws:referer request context value is provided by the caller in an HTTP header, and it is included in a web browser request.
The following is an example of a policy that allows access to a Map resource by using the aws:referer condition, but only if the request comes from the domain example.com.
Encrypt tracker and geofence information using customer managed keys with AWS KMS
When you create your tracker and geofence collection resources, you have the option to use a symmetric customer managed key to add a second layer of encryption to geofencing and tracking data. Because you have full control of this key, you can establish and maintain your own IAM policies, manage key rotation, and schedule keys for deletion.
After you create your resources with customer managed keys, the geometry of your geofences and all positions associated to a tracked device will have two layers of encryption. In the next sections, you will see how to create a key and use it to encrypt your own data.
Create an AWS KMS symmetric key
First, you need to create a key policy that will limit the AWS KMS key to allow access to principals authorized to use Amazon Location and to principals authorized to manage the key. For more information about specifying permissions in a policy, see the AWS KMS Developer Guide.
To create the key policy
Create a JSON policy file by using the following policy as a reference. This key policy allows Amazon Location to grant access to your KMS key only when it is called from your AWS account. This works by combining the kms:ViaService and kms:CallerAccount conditions. In the following policy, replace us-west-2 with your AWS Region of choice, and the kms:CallerAccount value with your AWS account ID. Adjust the KMS Key Administrators statement to reflect your actual key administrators’ principals, including yourself. For details on how to use the Principal element, see the AWS JSON policy elements documentation.
Tip: AWS CLI will consider the Region you defined as the default during the configuration steps, but you can override this configuration by adding –region<your region> at the end of each command line in the following command. Also, make sure that your user has the appropriate permissions to perform those actions.
To create the symmetric key
Now, create a symmetric key on AWS KMS by running the create-key command and passing the policy file that you created in the previous step.
Create an Amazon Location tracker and geofence collection resources
To create an Amazon Location tracker resource that uses AWS KMS for a second layer of encryption, run the following command, passing the key ID from the previous step.
By following these steps, you have added a second layer of encryption to your geofence collection and tracker.
Data retention best practices
Trackers and geofence collections are stored and never leave your AWS account without your permission, but they have different lifecycles on Amazon Location.
Trackers store the positions of devices and assets that are tracked in a longitude/latitude format. These positions are stored for 30 days by the service before being automatically deleted. If needed for historical purposes, you can transfer this data to another data storage layer and apply the proper security measures based on the shared responsibility model.
Geofence collections store the geometries you provide until you explicitly choose to delete them, so you can use encryption with AWS managed keys or your own keys to keep them for as long as needed.
Asset tracking and location storage best practices
After a tracker is created, you can start sending location updates by using the Amazon Location front-end SDKs or by calling the BatchUpdateDevicePosition API. In both cases, at a minimum, you need to provide the latitude and longitude, the time when the device was in that position, and a device-unique identifier that represents the asset being tracked.
Protecting device IDs
This device ID can be any string of your choice, so you should apply measures to prevent certain IDs from being used. Some examples of what to avoid include:
First and last names
Facility names
Documents, such as driver’s licenses or social security numbers
Emails
Addresses
Telephone numbers
Latitude and longitude precision
Latitude and longitude coordinates convey precision in degrees, presented as decimals, with each decimal place representing a different measure of distance (when measured at the equator).
Amazon Location supports up to six decimal places of precision (0.000001), which is equal to approximately 11 cm or 4.4 inches at the equator. You can limit the number of decimal places in the latitude and longitude pair that is sent to the tracker based on the precision required, increasing the location range and providing extra privacy to users.
Figure 1 shows a latitude and longitude pair, with the level of detail associated to decimals places.
Figure 1: Geolocation decimal precision details
Position filtering
Amazon Location introduced position filtering as an option to trackers that enables cost reduction and reduces jitter from inaccurate device location updates.
DistanceBased filtering ignores location updates wherein devices have moved less than 30 meters (98.4 ft).
TimeBased filtering evaluates every location update against linked geofence collections, but not every location update is stored. If your update frequency is more often than 30 seconds, then only one update per 30 seconds is stored for each unique device ID.
AccuracyBased filtering ignores location updates if the distance moved was less than the measured accuracy provided by the device.
By using filtering options, you can reduce the number of location updates that are sent and stored, thus reducing the level of location detail provided and increasing the level of privacy.
Logging and monitoring
Amazon Location integrates with AWS services that provide the observability needed to help you comply with your organization’s security standards.
To record all actions that were taken by users, roles, or AWS services that access Amazon Location, consider using AWS CloudTrail. CloudTrail provides information on who is accessing your resources, detailing the account ID, principal ID, source IP address, timestamp, and more. Moreover, Amazon CloudWatch helps you collect and analyze metrics related to your Amazon Location resources. CloudWatch also allows you to create alarms based on pre-defined thresholds of call counts. These alarms can create notifications through Amazon Simple Notification Service (Amazon SNS) to automatically alert teams responsible for investigating abnormalities.
Conclusion
At AWS, security is our top priority. Here, security and compliance is a shared responsibility between AWS and the customer, where AWS is responsible for protecting the infrastructure that runs all of the services offered in the AWS Cloud. The customer assumes the responsibility to perform all of the necessary security configurations to the solutions they are building on top of our infrastructure.
In this blog post, you’ve learned the controls and guardrails that Amazon Location provides out of the box to help provide data privacy and data protection to our customers. You also learned about the other mechanisms you can use to enhance your security posture.
Start building your own secure geolocation solutions by following the Amazon Location Developer Guide and learn more about how the service handles security by reading the security topics in the guide.
If you have feedback about this post, submit comments in the Comments section below. If you have questions about this blog post, start a new thread on Amazon Location Service forum or contact AWS Support.
Want more AWS Security news? Follow us on Twitter.
Given the speed of Amazon Web Services (AWS) innovation, it can sometimes be challenging to keep up with AWS Security service and feature launches. To help you stay current, here’s an overview of some of the most important 2021 AWS Security launches that security professionals should be aware of. This is the first of two related posts; Part 2 will highlight some of the important 2021 launches that security professionals should be aware of across all AWS services.
Amazon GuardDuty
In 2021, the threat detection service Amazon GuardDuty expanded the internal AWS security intelligence it consumes to use more of the intel that AWS internal threat detection teams collect, including additional nation-state threat intelligence. Sharing more of the important intel that internal AWS teams collect lets you quickly improve your protection. GuardDuty also launched domain reputation modeling. These machine learning models take all the domain requests from across all of AWS, and feed them into a model that allows AWS to categorize previously unseen domains as highly likely to be malicious or benign based on their behavioral characteristics. In practice, AWS is seeing that these models often deliver high-fidelity threat detections, identifying malicious domains 7–14 days before they are identified and available on commercial threat feeds.
AWS also launched second generation anomaly detection for GuardDuty. Shortly after the original GuardDuty launch in 2017, AWS added additional anomaly detection for user behavior analytics and monitoring for unusual activity of AWS Identity and Access Management (IAM) users. After receiving customer feedback that the original feature was a little too noisy, and that it was difficult to understand why some findings were generated, the GuardDuty analytics team rebuilt this functionality on an entirely new machine learning model, considerably reducing the number of detections and generating a more accurate positive-detection rate. The new model also added additional context that security professionals (such as analysts) can use to understand why the model shows findings as suspicious or unusual.
Since its introduction, GuardDuty has detected when AWS EC2 Role credentials are used to call AWS APIs from IP addresses outside of AWS. Beginning in early 2022, GuardDuty now supports detection when credentials are used from other AWS accounts, inside the AWS network. This is a complex problem for customers to solve on their own, which is why the GuardDuty team added this enhancement. The solution considers that there are legitimate reasons why a source IP address that is communicating with AWS services APIs might be different than the Amazon Elastic Compute Cloud (Amazon EC2) instance IP address, or a NAT gateway associated with the instance’s VPC. The enhancement also considers complex network topologies that route traffic to one or multiple VPCs—for example, AWS Transit Gateway or AWS Direct Connect.
Our customers are increasingly running container workloads in production; helping to raise the security posture of these workloads became an AWS development priority in 2021. GuardDuty for EKS Protection is one recent feature that has resulted from this investment. This new GuardDuty feature monitors Amazon Elastic Kubernetes Service (Amazon EKS) cluster control plane activity by analyzing Kubernetes audit logs. GuardDuty is integrated with Amazon EKS, giving it direct access to the Kubernetes audit logs without requiring you to turn on or store these logs. Once a threat is detected, GuardDuty generates a security finding that includes container details such as pod ID, container image ID, and associated tags. See below for details on how the new Amazon Inspector is also helping to protect containers.
Amazon Inspector
At AWS re:Invent 2021, we launched the new Amazon Inspector, a vulnerability management service that continually scans AWS workloads for software vulnerabilities and unintended network exposure. The original Amazon Inspector was completely re-architected in this release to automate vulnerability management and to deliver near real-time findings to minimize the time needed to discover new vulnerabilities. This new Amazon Inspector has simple one-click enablement and multi-account support using AWS Organizations, similar to our other AWS Security services. This launch also introduces a more accurate vulnerability risk score, called the Inspector score. The Inspector score is a highly contextualized risk score that is generated for each finding by correlating Common Vulnerability and Exposures (CVE) metadata with environmental factors for resources such as network accessibility. This makes it easier for you to identify and prioritize your most critical vulnerabilities for immediate remediation. One of the most important new capabilities is that Amazon Inspector automatically discovers running EC2 instances and container images residing in Amazon Elastic Container Registry (Amazon ECR), at any scale, and immediately starts assessing them for known vulnerabilities. Now you can consolidate your vulnerability management solutions for both Amazon EC2 and Amazon ECR into one fully managed service.
AWS Security Hub
In addition to a significant number of smaller enhancements throughout 2021, in October AWS Security Hub, an AWS cloud security posture management service, addressed a top customer enhancement request by adding support for cross-Region finding aggregation. You can now view all your findings from all accounts and all selected Regions in a single console view, and act on them from an Amazon EventBridge feed in a single account and Region. Looking back at 2021, Security Hub added 72 additional best practice checks, four new AWS service integrations, and 13 new external partner integrations. A few of these integrations are Atlassian Jira Service Management, Forcepoint Cloud Security Gateway (CSG), and Amazon Macie. Security Hub also achieved FedRAMP High authorization to enable security posture management for high-impact workloads.
Amazon Macie
Based on customer feedback, data discovery tool Amazon Macie launched a number of enhancements in 2021. One new feature, which made it easier to manage Amazon Simple Storage Service (Amazon S3) buckets for sensitive data, was criteria-based bucket selection. This Macie feature allows you to define runtime criteria to determine which S3 buckets should be included in a sensitive data-discovery job. When a job runs, Macie identifies the S3 buckets that match your criteria, and automatically adds or removes them from the job’s scope. Before this feature, once a job was configured, it was immutable. Now, for example, you can create a policy where if a bucket becomes public in the future, it’s automatically added to the scan, and similarly, if a bucket is no longer public, it will no longer be included in the daily scan.
Originally Macie included all managed data identifiers available for all scans. However, customers wanted more surgical search criteria. For example, they didn’t want to be informed if there were exposed data types in a particular environment. In September 2021, Macie launched the ability to enable/disable managed data identifiers. This allows you to customize the data types you deem sensitive and would like Macie to alert on, in accordance with your organization’s data governance and privacy needs.
Amazon Detective
Amazon Detective is a service to analyze and visualize security findings and related data to rapidly get to the root cause of potential security issues. In January 2021, Amazon Detective added a convenient, time-saving integration that allows you to start security incident investigation workflows directly from the GuardDuty console. This new hyperlink pivot in the GuardDuty console takes findings directly from the GuardDuty console into the Detective console. Another time-saving capability added was the IP address drill down functionality. This new capability can be useful to security forensic teams performing incident investigations, because it helps quickly determine the communications that took place from an EC2 instance under investigation before, during, and after an event.
In December 2021, Detective added support for AWS Organizations to simplify management for security operations and investigations across all existing and future accounts in an organization. This launch allows new and existing Detective customers to onboard and centrally manage the Detective graph database for up to 1,200 AWS accounts.
AWS Key Management Service
In June 2021, AWS Key Management Service (AWS KMS) introduced multi-Region keys, a capability that lets you replicate keys from one AWS Region into another. With multi-Region keys, you can more easily move encrypted data between Regions without having to decrypt and re-encrypt with different keys for each Region. Multi-Region keys are supported for client-side encryption using direct AWS KMS API calls, or in a simplified manner with the AWS Encryption SDK and Amazon DynamoDB Encryption Client.
AWS Secrets Manager
Last year was a busy year for AWS Secrets Manager, with four feature launches to make it easier to manage secrets at scale, not just for client applications, but also for platforms. In March 2021, Secrets Manager launched multi-Region secrets to automatically replicate secrets for multi-Region workloads. Also in March, Secrets Manager added three new rules to AWS Config, to help administrators verify that secrets in Secrets Manager are configured according to organizational requirements. Then in April 2021, Secrets Manager added a CSI driver plug-in, to make it easy to consume secrets from Amazon EKS by using Kubernetes’s standard Secrets Store interface. In November, Secrets Manager introduced a higher secret limit of 500,000 per account to simplify secrets management for independent software vendors (ISVs) that rely on unique secrets for a large number of end customers. Although launched in January 2022, it’s also worth mentioning Secrets Manager’s release of rotation windows to align automatic rotation of secrets with application maintenance windows.
Amazon CodeGuru and Secrets Manager
In November 2021, AWS announced a new secrets detector feature in Amazon CodeGuru that searches your codebase for hardcoded secrets. Amazon CodeGuru is a developer tool powered by machine learning that provides intelligent recommendations to detect security vulnerabilities, improve code quality, and identify an application’s most expensive lines of code.
This new feature can pinpoint locations in your code with usernames and passwords; database connection strings, tokens, and API keys from AWS; and other service providers. When a secret is found in your code, CodeGuru Reviewer provides an actionable recommendation that links to AWS Secrets Manager, where developers can secure the secret with a point-and-click experience.
Looking ahead for 2022
AWS will continue to deliver experiences in 2022 that meet administrators where they govern, developers where they code, and applications where they run. A lot of customers are moving to container and serverless workloads; you can expect to see more work on this in 2022. You can also expect to see more work around integrations, like CodeGuru Secrets Detector identifying plaintext secrets in code (as noted previously).
To stay up-to-date in the year ahead on the latest product and feature launches and security use cases, be sure to read the Security service launch announcements. Additionally, stay tuned to the AWS Security Blog for Part 2 of this blog series, which will provide an overview of some of the important 2021 launches that security professionals should be aware of across all AWS services.
If you’re looking for more opportunities to learn about AWS security services, check out AWS re:Inforce, the AWS conference focused on cloud security, identity, privacy, and compliance, which will take place June 28-29 in Houston, Texas.
If you have feedback about this post, submit comments in the Comments section below. If you have questions about this post, contact AWS Support.
Want more AWS Security news? Follow us on Twitter.
Tokenization of sensitive data elements is a hot topic, but you may not know what to tokenize, or even how to determine if tokenization is right for your organization’s business needs. Industries subject to financial, data security, regulatory, or privacy compliance standards are increasingly looking for tokenization solutions to minimize distribution of sensitive data, reduce risk of exposure, improve security posture, and alleviate compliance obligations. This post provides guidance to determine your requirements for tokenization, with an emphasis on the compliance lens given our experience as PCI Qualified Security Assessors (PCI QSA).
What is tokenization?
Tokenization is the process of replacing actual sensitive data elements with non-sensitive data elements that have no exploitable value for data security purposes. Security-sensitive applications use tokenization to replace sensitive data, such as personally identifiable information (PII) or protected health information (PHI), with tokens to reduce security risks.
De-tokenization returns the original data element for a provided token. Applications may require access to the original data, or an element of the original data, for decisions, analysis, or personalized messaging. To minimize the need to de-tokenize data and to reduce security exposure, tokens can retain attributes of the original data to enable processing and analysis using token values instead of the original data. Common characteristics tokens may retain from the original data are:
Format attributes
Length
for compatibility with storage and reports of applications written for the original data
Character set
for compatibility with display and data validation of existing applications
Preserved character positions
such as first 6 and last 4 for credit card PAN
Analytics attributes
Mapping consistency
where the same data always results in the same token
Sort order
Retaining functional attributes in tokens must be implemented in ways that do not defeat the security of the tokenization process. Using attribute preservation functions can possibly reduce the security of a specific tokenization implementation. Limiting the scope and access to tokens addresses limitations introduced when using attribute retention.
Why tokenize? Common use cases
I need to reduce my compliance scope
Tokens are generally not subject to compliance requirements if there is sufficient separation of the tokenization implementation and the applications using the tokens. Encrypted sensitive data may not reduce compliance obligations or scope. Such industry regulatory standards as PCI DSS 3.2.1 still consider systems that store, process, or transmit encrypted cardholder data as in-scope for assessment; whereas tokenized data may remove those systems from assessment scope. A common use case for PCI DSS compliance is replacing PAN with tokens in data sent to a service provider, which keeps the service provider from being subject to PCI DSS.
I need to restrict sensitive data to only those with a “need-to-know”
Tokenization can be used to add a layer of explicit access controls to de-tokenization of individual data items, which can be used to implement and demonstrate least-privileged access to sensitive data. For instances where data may be co-mingled in a common repository such as a data lake, tokenization can help ensure that only those with the appropriate access can perform the de-tokenization process and reveal sensitive data.
I need to avoid sharing sensitive data with my service providers
Replacing sensitive data with tokens before providing it to service providers who have no access to de-tokenize data can eliminate the risk of having sensitive data within service providers’ control, and avoid having compliance requirements apply to their environments. This is common for customers involved in the payment process, which provides tokenization services to merchants that tokenize the card holder data, and return back to their customers a token they can use to complete card purchase transactions.
I need to simplify data lake security and compliance
A data lake centralized repository allows you to store all your structured and unstructured data at any scale, to be used later for not-yet-determined analysis. Having multiple sources and data stored in multiple structured and unstructured formats creates complications for demonstrating data protection controls for regulatory compliance. Ideally, sensitive data should not be ingested at all; however, that is not always feasible. Where ingestion of such data is necessary, tokenization at each data source can keep compliance-subject data out of data lakes, and help avoid compliance implications. Using tokens that retain data attributes, such as data-to-token consistency (idempotence) can support many of the analytical capabilities that make it useful to store data in the data lake.
I want to allow sensitive data to be used for other purposes, such as analytics
Your organization may want to perform analytics on the sensitive data for other business purposes, such as marketing metrics, and reporting. By tokenizing the data, you can minimize the locations where sensitive data is allowed, and provide tokens to users and applications needing to conduct data analysis. This allows numerous applications and processes to access the token data and maintain security of the original sensitive data.
I want to use tokenization for threat mitigation
Using tokenization can help you mitigate threats identified in your workload threat model, depending on where and how tokenization is implemented. At the point where the sensitive data is tokenized, the sensitive data element is replaced with a non-sensitive equivalent throughout the data lifecycle, and across the data flow. Some important questions to ask are:
What are the in-scope compliance, regulatory, privacy, or security requirements for the data that will be tokenized?
When does the sensitive data need to be tokenized in order to meet security and scope reduction objectives?
What attack vector is being addressed for the sensitive data by tokenizing it?
Where is the tokenized data being hosted? Is it in a trusted environment or an untrusted environment?
Tokens can provide the ability to retain processing value of the data while still managing the data exposure risk and compliance scope. Encryption is the foundational mechanism for providing data confidentiality.
Encryption rarely results in cipher text with a similar format to the original data, and may prevent data analysis, or require consuming applications to adapt.
Your decision to use tokenization instead of encryption should be based on the following:
Reduction of compliance scope
As discussed above, by properly utilizing tokenization to obfuscate sensitive data you may be able to reduce the scope of certain framework assessments such as PCI DSS 3.2.1.
Format attributes
Used for compatibility with existing software and processes.
Analytics attributes
Used to support planned data analysis and reporting.
Elimination of encryption key management
A tokenization solution has one essential API—create token—and one optional API—retrieve value from token. Managing access controls can be simpler than some non-AWS native general purpose cryptographic key use policies. In addition, the compromise of the encryption key compromises all data encrypted by that key, both past and future. The compromise of the token database compromises only existing tokens.
Where encryption may make more sense
Although scope reduction, data analytics, threat mitigation, and data masking for the protection of sensitive data make very powerful arguments for tokenization, we acknowledge there may be instances where encryption is the more appropriate solution. Ask yourself these questions to gain better clarity on which solution is right for your company’s use case.
Scalability
If you require a solution that scales to large data volumes, and have the availability to leverage encryption solutions that require minimal key management overhead, such as AWS Key Management Services (AWS KMS), then encryption may be right for you.
Data format
If you need to secure data that is unstructured, then encryption may be the better option given the flexibility of encryption at various layers and formats.
Data sharing with 3rd parties
If you need to share sensitive data in its original format and value with a 3rd party, then encryption may be the appropriate solution to minimize external access to your token vault for de-tokenization processes.
What type of tokenization solution is right for your business?
When trying to decide which tokenization solution to use, your organization should first define your business requirements and use cases.
What are your own specific use cases for tokenized data, and what is your business goal? Identifying which use cases apply to your business and what the end state should be is important when determining the correct solution for your needs.
What type of data does your organization want to tokenize? Understanding what data elements you want to tokenize, and what that tokenized data will be used for may impact your decision about which type of solution to use.
Do the tokens need to be deterministic, the same data always producing the same token? Knowing how the data will be ingested or used by other applications and processes may rule out certain tokenization solutions.
Will tokens be used internally only, or will the tokens be shared across other business units and applications? Identifying a need for shared tokens may increase the risk of token exposure and, therefore, impact your decisions about which tokenization solution to use.
How long does a token need to be valid? You will need to identify a solution that can meet your use cases, internal security policies, and regulatory framework requirements.
Choosing between self-managed tokenization or tokenization as a service
Do you want to manage the tokenization within your organization, or use Tokenization as a Service (TaaS) offered by a third-party service provider? Some advantages to managing the tokenization solution with your company employees and resources are the ability to direct and prioritize the work needed to implement and maintain the solution, customizing the solution to the application’s exact needs, and building the subject matter expertise to remove a dependency on a third party. The primary advantages of a TaaS solution are that it is already complete, and the security of both tokenization and access controls are well tested. Additionally, TaaS inherently demonstrates separation of duties, because privileged access to the tokenization environment is owned by the tokenization provider.
Choosing a reversible tokenization solution
Do you have a business need to retrieve the original data from the token value? Reversible tokens can be valuable to avoid sharing sensitive data with internal or third-party service providers in payments and other financial services. Because the service providers are passed only tokens, they can avoid accepting additional security risk and compliance scope. If your company implements or allows de-tokenization, you will need to be able to demonstrate strict controls on the management and use of de-tokenization privilege. Eliminating the implementation of de-tokenization is the clearest way to demonstrate that downstream applications cannot have sensitive data. Given the security and compliance risks of converting tokenized data back into its original data format, this process should be highly monitored, and you should have appropriate alerting in place to detect each time this activity is performed.
Operational considerations when deciding on a tokenization solution
While operational considerations are outside the scope of this post, they are important factors for choosing a solution. Throughput, latency, deployment architecture, resiliency, batch capability, and multi-regional support can impact the tokenization solution of choice. Integration mechanisms with identity and access control and logging architectures, for example, are important for compliance controls and evidence creation.
No matter which deployment model you choose, the tokenization solution needs to meet security standards, similar to encryption standards, and must prevent determining what the original data is from the token values.
Conclusion
Using tokenization solutions to replace sensitive data offers many security and compliance benefits. These benefits include lowered security risk and smaller audit scope, resulting in lower compliance costs and a reduction in regulatory data handling requirements.
Your company may want to use sensitive data in new and innovative ways, such as developing personalized offerings that use predictive analysis and consumer usage trends and patterns, fraud monitoring and minimizing financial risk based on suspicious activity analysis, or developing business intelligence to improve strategic planning and business performance. If you implement a tokenization solution, your organization can alleviate some of the regulatory burden of protecting sensitive data while implementing solutions that use obfuscated data for analytics.
On the other hand, tokenization may also add complexity to your systems and applications, as well as adding additional costs to maintain those systems and applications. If you use a third-party tokenization solution, there is a possibility of being locked into that service provider due to the specific token schema they may use, and switching between providers may be costly. It can also be challenging to integrate tokenization into all applications that use the subject data.
In this post, we have described some considerations to help you determine if tokenization is right for you, what to consider when deciding which type of tokenization solution to use, and the benefits. disadvantages, and comparison of tokenization and encryption. When choosing a tokenization solution, it’s important for you to identify and understand all of your organizational requirements. This post is intended to generate questions your organization should answer to make the right decisions concerning tokenization.
You have many options available to tokenize your AWS workloads. After your organization has determined the type of tokenization solution to implement based on your own business requirements, explore the tokenization solution options available in AWS Marketplace. You can also build your own solution using AWS guides and blog posts. For further reading, see this blog post: Building a serverless tokenization solution to mask sensitive data.
If you have feedback about this post, submit comments in the Comments section below. If you have questions about this post, start a new thread on the Amazon Security Assurance Services or contact AWS Support.
Want more AWS Security news? Follow us on Twitter.
If you’re considering delegating encryption to an AWS service to use a key under your control when it encrypts your data in that service, you might wonder how to ensure the AWS service can only use your key when you want it to and not have full access to decrypt any of your resources at any time. The answer is to use scoped-down dynamic permissions in AWS KMS. Specifically, a combination of permissions that you define in the KMS key policy document along with additional permissions that are created dynamically using KMS grants define the conditions under which one or more AWS services can use your KMS keys to encrypt and decrypt your data.
In this blog post, I discuss:
An example of how an AWS service uses your KMS key policy and grants to securely manage access to your encryption keys. The example uses Amazon RDS and demonstrates how the block storage volume behind your database instance is encrypted.
Best practices for using grants from AWS KMS in your own workloads.
Recent performance improvements when using grants in AWS KMS.
Case study: How RDS uses grants from AWS KMS to encrypt your database volume
Many Amazon RDS instance types are hosted on an Amazon Elastic Compute Cloud (Amazon EC2) instance where the underlying storage layer is an Amazon Elastic Block Store (Amazon EBS) volume. The blocks of the EBS volume that stores the database content are encrypted under a randomly generated 256-bit symmetric data key that is itself encrypted under a KMS key that you configure RDS to use when you create your database instance. Let’s look at how RDS interacts with EBS, EC2, and AWS KMS to securely create an RDS instance using an KMS key.
When you send a request to RDS to create your database, there are several asynchronous requests being made among the RDS, EC2, EBS, and KMS services to:
Create the underlying storage volume with a unique encryption key.
Create the compute instance in EC2.
Load the database engine into the EC2 instance.
Give the EC2 instance permissions to use the encryption key to read and write data to the database storage volume.
The initial authenticated request that you make to RDS to create a new database is made by an AWS Identity and Access Management (IAM) principal in your account (e.g. a user or role). Once the request is received, a series of things has to happen:
RDS needs to request EBS to create an encrypted volume to store your future data.
EBS needs to request AWS KMS generate a unique 256-bit data key for the volume and encrypt it under the KMS key you told RDS to use.
RDS then needs to request that EC2 launch an instance, attach that encrypted volume, and make the data key available to EC2 for use in reads and writes to the volume.
From your perspective, the IAM principal used to create the database also must have permissions in the KMS key policy for the GenerateDataKeyWithoutPlaintext and Decrypt actions. This enables the unique 256-bit data key to be created and encrypted under the desired KMS key as well as allowing the user or role to have the data key decrypted and provisioned to the Nitro card managing your EC2 instance so that reads/writes can happen from/to the database. Given the asynchronous nature of the process of creating the database vs. launching the database volume in the future, how do the RDS, EBS, and EC2 services all get the necessary least privileged permissions to create and provision the data key for use with your database? The answer starts with your IAM principal having permission for the AWS KMS CreateGrant action in the key policy.
RDS uses the identity from your IAM principal to create a grant in AWS KMS that allows it to create other grants for EC2 and EBS with very limited permissions that are further scoped down compared to the original permissions your IAM principal has on the AWS KMS key. A total of three grants are created:
The initial RDS grant.
A subsequent EBS grant that allows EBS to call AWS KMS and generate a 256-bit data key that is encrypted under the KMS key you defined when creating your database.
The attachment grant, which allows the specific EC2 instance hosting your database volume to decrypt the encrypted data key for and provision it for use during I/O between the instance and the EBS volume.
RDS grant
In this example, let’s say you’ve created an RDS instance with an ID of db-1234 and specified a KMS key for encryption. The following grant is created on the KMS key, allowing RDS to create more grants for EC2 and EBS to use in the asynchronous processes required to launch your database instance. The RDS grant is as follows:
In plain English, this grant gives RDS permissions to use the KMS key for three specific operations (API actions) only when the call specifies the RDS instance ID db-1234 in the Encryption Context parameter. The grant provides access for the the grantee principal, which in this case is the value shown for the <Regional RDS service account>. This grant is created in AWS KMS and associated with your KMS key. Because the EC2 instance hasn’t yet been created and launched, the grantee principal cannot include the EC2 instance ID and must instead be the regional RDS service account.
EBS grant
With the RDS instance and initial AWS KMS grant created, RDS requests EC2 to launch an instance for the RDS database. EC2 creates an instance with a unique ID (e.g. i-1234567890abcdefg) using EC2 permissions you gave to the original IAM principal. In addition to the EC2 instance being created, RDS requests that Amazon EBS create an encrypted volume dedicated to the database. As a part of volume creation, EBS needs permission to call AWS KMS to generate a unique 256-bit data key for the volume and encrypt that data key under the KMS key you defined.
The EC2 instance ID is used as the name of the identity for future calls to AWS KMS, so RDS inserts it as the grantee principal in the EBS grant it creates. The EBS grant is as follows:
You’ll notice that this grant uses the same encryption context as the initial RDS grant. However, now that we have the EC2 instance ID associated with the database ID, the permissions that EBS gets to use your key as the grantee principal can be scoped down to require both values. Once this grant is created, EBS can create the EBS volume (e.g. vol-0987654321gfedcba) and call AWS KMS to generate and encrypt a 256-bit data key that can only be used for that volume. This encrypted data key is stored by EBS in preparation for the volume attachment process.
Attachment grant
The final step in creating the RDS instance is to attach the EBS volume to the EC2 instance hosting your database. EC2 now uses the previously created EBS grant to create the attachment grant with the i-1234567890abcdefg instance identity. This grant allows EC2 to decrypt the encrypted data key, provision it to the Nitro card that manages the instance, and begin encrypting I/O to the EBS volume of the RDS database. The attachment grant in this example will be as follows:
The attachment grant is the most restrictive of the three grants. It requires the caller to know the IDs of all the AWS entities involved: EC2 instance ID, EBS volume ID, and RDS database ID. This design ensures that your KMS key can only be used for decryption by these AWS services in order to launch the specific RDS database you want.
The encrypted EBS volume is now active and attached to the EC2 instance. Should you terminate the RDS instance, the services retire all the relevant KMS grants so they no longer have any permission to use your KMS key to decrypt the 256-bit data key required to decrypt data in your database. If you need to launch your encrypted database again, a similar set of three grants will be dynamically created with the RDS database, EC2 instance, and EBS volume IDs used to scope down permissions on the AWS KMS key.
The process described in the previous paragraphs is graphically shown in Figure 1:
Considering all the AWS KMS key permissions that are added and removed as a part of launching a database, you might ask why not just use the key policy document to make these changes? A KMS key allows only one key policy with a maximum document size of 32 KB. Because one key could be used to encrypt any number of AWS resources, trying to dynamically add and remove scoped-down permissions related to each resource to the key policy document creates two risks. First, the maximum allowable size of the key policy document (32KB) might be exceeded. Second, depending on how many resources are being accessed concurrently, you may exceed the request rate quota for the PutKeyPolicy API action in AWS KMS.
In contrast, there can be any number of grants on a given AWS KMS key, each grant specifying a scoped-down permission for the use of a KMS key with any AWS service that integrated with AWS KMS. Grant creation and deletion is also designed for much higher-volume request rates than modifications to the key policy document. Finally, permission to call PutKeyPolicy is a highly privileged permission, as it lets the caller make unrestricted changes to the permissions on the key, including changes to administrative permissions to disable or schedule the key for deletion. Grants on a key can only allow permissions to use the key, not administer the key. Also, grants that allow the creation of other grants by other IAM principals prohibit the escalation of privilege. In the RDS example above, the permissions RDS receives from the IAM principal in your account during the first CreateGrant request cannot be more permissive than what you defined for the IAM principal in the KMS key policy. The permissions RDS gives to EC2 and EBS during the database creation process cannot be more permissive than the original permission RDS has from the initial grant. This design ensures that AWS services cannot escalate their privileges and use your KMS key for purposes different than what you intend.
Best practices for using AWS KMS grants
AWS KMS grants are a powerful tool to dynamically define permissions to use keys. They are automatically created when you use server-side encryption features in various AWS services. You can also use grants to control permission in your own applications that perform client-side encryption. Here are some best practices to consider:
Design the permissions to be as scoped down as possible. Use a specific grantee principal, such as an IAM role, and give the principal access only to the AWS KMS API actions that are needed. You can further limit the scope of grants with the Encryption Context parameter by using any element you want to ensure callers are using the AWS KMS key only for the intended purpose. Below is a specific example that grants AWS account 123456789012 permission to call the GenerateDataKey or Decrypt APIs, but only if the supplied encryption context for customerID is 5678.
This grant could prevent your application from decrypting data belonging to customer “5678” without explicitly passing the expected customerID in the request to AWS KMS. This may be a useful defense-in-depth mechanism to prevent unauthorized access to your customers’ data if your application’s AWS credentials were compromised and used from a different caller who doesn’t know that encryption context is a required parameter for all reads and writes in order to encrypt and decrypt data.
Remember that grants don’t automatically expire. Your code needs to retire or revoke them once you know the permission is no longer needed on the KMS key. Grants that aren’t retired are leftover permissions that might create a security risk for encrypted resources. See retiring and revoking grants in the AWS KMS developer guide for more detail.
Avoid creating duplicate grants. A duplicate grant is a grant that shares the same AWS KMS key ID, API actions, grantee principal, encryption context, and name. If you retire the original grant after use and not the duplicates, then the leftover duplicate grants can lead to unintended access to encrypt or decrypt data.
Recent performance improvements to AWS KMS grants: Removing a resource quota
For customers who use AWS KMS to encrypt resources in AWS services that use grants, there used to be cases where AWS KMS had to enforce a quota on the number of concurrently active resources that could be encrypted under the same KMS key. For example, customers of Amazon RDS, Amazon WorkSpaces, or Amazon EBS would run into this quota at very large scale. This was the Grants for a given principal per key quota and was previously set to 500. You might have seen the error message “Keys only support 500 grants per grantee principal in this region” when trying to create a resource in one of these services.
We recently made a change to AWS KMS to remove this quota entirely and this error message no longer exists. With this quota removed, you can now attach unlimited grants to any KMS key when using any AWS service.
Summary
In this blog post, you’ve seen how services such as Amazon RDS use AWS KMS grants to pass scoped-down permissions through the Amazon EC2 and Amazon EBS instances. You also saw some best practices for using AWS KMS grants in your own applications. Finally, you learned about how AWS KMS has improved grants by removing one of the resource quotas.
Below are some additional resources for AWS KMS and grants.
This post is part of a series about how Amazon Web Services (AWS) can help your US federal agency meet the requirements of the President’s Executive Order on Improving the Nation’s Cybersecurity. You will learn how you can use AWS information security practices to meet the requirement to encrypt your data at rest and in transit, to the maximum extent possible.
Encrypt your data at rest in AWS
Data at rest represents any data that you persist in non-volatile storage for any duration in your workload. This includes block storage, object storage, databases, archives, IoT devices, and any other storage medium on which data is persisted. Protecting your data at rest reduces the risk of unauthorized access when encryption and appropriate access controls are implemented.
AWS KMS provides a streamlined way to manage keys used for at-rest encryption. It integrates with AWS services to simplify using your keys to encrypt data across your AWS workloads. It uses hardware security modules that have been validated under FIPS 140-2 to protect your keys. You choose the level of access control that you need, including the ability to share encrypted resources between accounts and services. AWS KMS logs key usage to AWS CloudTrail to provide an independent view of who accessed encrypted data, including AWS services that are using keys on your behalf. As of this writing, AWS KMS integrates with 81 different AWS services. Here are details on recommended encryption for workloads using some key services:
Encrypt an instance store root volume for an Amazon EC2 instance for added protection of configuration files and data stored with the operating system
You can use AWS KMS to encrypt other data types including application data with client-side encryption. A client-side application or JavaScript encrypts data before uploading it to S3 or other storage resources. As a result, uploaded data is protected in transit and at rest. Customer options for client-side encryption include the AWS SDK for KMS, the AWS Encryption SDK, and use of third-party encryption tools.
You can also use AWS Secrets Manager to encrypt application passwords, connection strings, and other secrets. Database credentials, resource names, and other sensitive data used in AWS Lambda functions can be encrypted and accessed at run time. This increases the security of these secrets and allows for easier credential rotation.
KMS HSMs are FIPS 140-2 validated and accessible using FIPS validated endpoints. Agencies with additional requirements that require a FIPS 140-3 validated hardware security module (HSM) (for example, for securing third-party secrets managers) can use AWS CloudHSM.
For more information about AWS KMS and key management best practices, visit these resources:
In addition to encrypting data at rest, agencies must also encrypt data in transit. AWS provides a variety of solutions to help agencies encrypt data in transit and enforce this requirement.
First, all network traffic between AWS data centers is transparently encrypted at the physical layer. This data-link layer encryption includes traffic within an AWS Region as well as between Regions. Additionally, all traffic within a virtual private cloud (VPC) and between peered VPCs is transparently encrypted at the network layer when you are using supported Amazon EC2 instance types. Customers can choose to enable Transport Layer Security (TLS) for the applications they build on AWS using a variety of services. All AWS service endpoints support TLS to create a secure HTTPS connection to make API requests.
AWS offers several options for agency-managed infrastructure within the AWS Cloud that needs to terminate TLS. These options include load balancing services (for example, Elastic Load Balancing, Network Load Balancer, and Application Load Balancer), Amazon CloudFront (a content delivery network), and Amazon API Gateway. Each of these endpoint services enable customers to upload their digital certificates for the TLS connection. Digital certificates then need to be managed appropriately to account for expiration and rotation requirements. AWS Certificate Manager (ACM) simplifies generating, distributing, and rotating digital certificates. ACM offers publicly trusted certificates that can be used in AWS services that require certificates to terminate TLS connections to the internet. ACM also provides the ability to create a private certificate authority (CA) hierarchy that can integrate with existing on-premises CAs to automatically generate, distribute, and rotate certificates to secure internal communication among customer-managed infrastructure.
This post has reviewed services that are used to encrypt data at rest and in transit, following the Executive Order on Improving the Nation’s Cybersecurity. I discussed the use of AWS KMS to manage encryption keys that handle the management of keys for at-rest encryption, as well as the use of ACM to manage certificates that protect data in transit.
Next steps
To learn more about how AWS can help you meet the requirements of the executive order, see the other posts in this series:
Today, AWS Key Management Service (AWS KMS) is introducing multi-Region keys, a new capability that lets you replicate keys from one Amazon Web Services (AWS) Region into another. Multi-Region keys are designed to simplify management of client-side encryption when your encrypted data has to be copied into other Regions for disaster recovery or is replicated in Amazon DynamoDB global tables.
In this blog post, we give an overview of how we got here and how to get started using multi-Region keys. We include a code example for multi-Region encryption of data in DynamoDB global tables.
How we got here
From its inception, AWS KMS has been strictly isolated to a single AWS Region for each implementation, with no sharing of keys, policies, or audit information across Regions. Region isolation can help you comply with security standards and data residency requirements. However, not sharing keys across Regions creates challenges when you need to move data that depends on those keys across Regions. AWS services that use your KMS keys for server-side encryption address this challenge by transparently re-encrypting data on your behalf using the KMS keys you designate in the destination Region. If you use client-side encryption, this work adds extra complexity and latency of re-encrypting between regionally isolated KMS keys.
Multi-Region keys are a new feature from AWS KMS for client-side applications that makes KMS-encrypted ciphertext portable across Regions. Multi-Region keys are a set of interoperable KMS keys that have the same key ID and key material, and that you can replicate to different Regions within the same partition. With symmetric multi-Region keys, you can encrypt data in one Region and decrypt it in a different Region. With asymmetric multi-Region keys, you encrypt, decrypt, sign, and verify messages in multiple Regions.
To use multi-Region keys, you create a primary multi-Region key with a new key ID and key material. Then, you use the primary key to create a related multi-Region replica key in a different Region of the same AWS partition. Replica keys are KMS keys that can be used independently; they aren’t a pointer to the primary key. The primary and replica keys share only certain properties, including their key ID, key rotation, and key origin. In all other aspects, every multi-Region key, whether primary or replica, is a fully functional, independent KMS key resource with its own key policy, aliases, grants, key description, lifecycle, and other attributes. The key Amazon Resource Names (ARN) of related multi-Region keys differ only in the Region portion, as shown in the following figure (Figure 1).
Figure 1: Multi-Region keys have unique ARNs but identical key IDs
You cannot convert an existing single-Region key to a multi-Region key. This design ensures that all data protected with existing single-Region keys maintain the same data residency and data sovereignty properties.
When to use multi-Region keys
You can use multi-Region keys in any client-side application. Since multi-Region keys avoid cross-Region calls, they’re especially useful for scenarios where you don’t want to depend on another Region or incur the latency of a cross-Region call. For example, disaster recovery, global data management, distributed signing applications, and active-active applications that span multiple Regions can all benefit from using multi-Region keys. You can also create and use multi-Region keys in a single Region and choose to replicate those keys at some later date when you need to move protected data to additional Regions.
Note: If your application will run in only one Region, you should continue to use single-Region keys to benefit from their data isolation properties.
One significant benefit of multi-Region keys is using them with DynamoDB global tables. Let’s explore that interaction in detail.
Using multi-Region keys with DynamoDB global tables
AWS KMS multi-Region keys (MRKs) can be used with the DynamoDB Encryption Client to protect data in DynamoDB global tables. You can configure the DynamoDB Encryption Client to call AWS KMS for decryption in a different Region than the one in which the data was encrypted, as shown in the following figure (Figure 2). This is useful for disaster recovery, or simply to improve performance when using DynamoDB in a globally distributed application.
Figure 2: Using multi-Region keys with DynamoDB global tables
Configure the DynamoDB Encryption Client to encrypt records
To use AWS KMS multi-Region keys, you need to configure the DynamoDB Encryption Client with the Region you want to call, which is typically the Region where the application is running. Then, you need to configure the ARN of the KMS key you want to use in that Region.
This example encrypts records in us-east-1 (US East (N. Virginia)) and decrypts records in us-west-2 (US West (Oregon)). If you use the following example configuration code, be sure to replace the example key ARNs with valid key ARNs for your multi-Region keys.
// Specify the multi-Region key in the us-east-1 Region
String encryptRegion = "us-east-1";
String cmkArnEncrypt = "arn:aws:kms:us-east-1:<111122223333>:key/<mrk-1234abcd12ab34cd56ef12345678990ab>";

// Set up SDK clients for KMS and DDB in us-east-1
AWSKMS kmsEncrypt = AWSKMSClientBuilder.standard().withRegion(encryptRegion).build();
AmazonDynamoDB ddbEncrypt = AmazonDynamoDBClientBuilder.standard().withRegion(encryptRegion).build();

// Configure the example global table
String tableName = "global-table-example";
String employeeIdAttribute = "employeeId";
String nameAttribute = "name";

// Configure attribute actions for the Dynamo DB Encryption Client
//   Sign the employee ID field
//   Encrypt and sign the name field
Map<String, Set<EncryptionFlags>> actions = new HashMap<>();
actions.put(employeeIdAttribute, EnumSet.of(EncryptionFlags.SIGN));
actions.put(nameAttribute, EnumSet.of(EncryptionFlags.ENCRYPT, EncryptionFlags.SIGN));

// Set an encryption context. This is an optional best practice.
final EncryptionContext encryptionContext = new EncryptionContext.Builder()
        .withTableName(tableName)
        .withHashKeyName(employeeIdAttribute)
        .build();

// Use the Direct KMS materials provider and the DynamoDB encryptor
// Specify the key ARN of the multi-Region key in us-east-1
DirectKmsMaterialProvider cmpEncrypt = new DirectKmsMaterialProvider(kmsEncrypt, cmkArnEncrypt);
DynamoDBEncryptor encryptor = DynamoDBEncryptor.getInstance(cmpEncrypt);

// Create a record, encrypt it,
// and put it in the DynamoDB global table
Map<String, AttributeValue> rec = new HashMap<>();
rec.put(nameAttribute, new AttributeValue().withS("Andy"));
rec.put(employeeIdAttribute, new AttributeValue().withS("1234"));

final Map<String, AttributeValue> encryptedRecord = encryptor.encryptRecord(rec, actions, encryptionContext);
ddbEncrypt.putItem(tableName, encryptedRecord);
When you save the newly encrypted record, DynamoDB global tables automatically replicates this encrypted record to the replica tables in the us-west-2 Region.
Configure the DynamoDB Encryption Client to decrypt data
Now you’re ready to configure a DynamoDB client to decrypt the record in us-west-2 where both the replica table and the replica multi-Region key exist.
// Specify the Region and key ARN to use when decrypting
String decryptRegion = "us-west-2";
String cmkArnDecrypt = "arn:aws:kms:us-west-2:<111122223333>:key/<mrk-1234abcd12ab34cd56ef12345678990ab>";

// Set up SDK clients for KMS and DDB in us-west-2
AWSKMS kmsDecrypt = AWSKMSClientBuilder.standard()
    .withRegion(decryptRegion)
    .build();

AmazonDynamoDB ddbDecrypt = AmazonDynamoDBClientBuilder.standard()
    .withRegion(decryptRegion)
    .build();

// Configure the DynamoDB Encryption Client
// Use the Direct KMS materials provider and the DynamoDB encryptor
// Specify the key ARN of the multi-Region key in us-west-2
final DirectKmsMaterialProvider cmpDecrypt = new DirectKmsMaterialProvider(kmsDecrypt, cmkArnDecrypt);
final DynamoDBEncryptor decryptor = DynamoDBEncryptor.getInstance(cmpDecrypt);

// Set up your query
Map<String, AttributeValue> query = new HashMap<>();
query.put(employeeIdAttribute, new AttributeValue().withS("1234"));

// Get a record from DDB and decrypt it
final Map<String, AttributeValue> retrievedRecord = ddbDecrypt.getItem(tableName, query).getItem();
final Map<String, AttributeValue> decryptedRecord = decryptor.decryptRecord(retrievedRecord, actions, encryptionContext);
Note: This example encrypts with the primary multi-Region key and then decrypts with a replica multi-Region key. The process could also be reversed—every multi-Region key can be used in the encryption or decryption of data.
Summary
In this blog post, we showed you how to use AWS KMS multi-Region keys with client-side encryption to help secure data in global applications without sacrificing high availability or low latency. We also showed you how you can start working with a global application with a brief example of using multi-Region keys with the DynamoDB Encryption Client and DynamoDB global tables.
This blog post is a brief introduction to the ways you can use multi-Region keys. We encourage you to read through the Using multi-Region keys topic to learn more about their functionality and design. You’ll learn about:
If you have feedback about this post, submit comments in the Comments section below. If you have questions about this post, start a new thread on the AWS KMS forum.
Want more AWS Security how-to content, news, and feature announcements? Follow us on Twitter.
The collective thoughts of the interwebz
Manage Consent
To provide the best experiences, we use technologies like cookies to store and/or access device information. Consenting to these technologies will allow us to process data such as browsing behavior or unique IDs on this site. Not consenting or withdrawing consent, may adversely affect certain features and functions.
Functional
Always active
The technical storage or access is strictly necessary for the legitimate purpose of enabling the use of a specific service explicitly requested by the subscriber or user, or for the sole purpose of carrying out the transmission of a communication over an electronic communications network.
Preferences
The technical storage or access is necessary for the legitimate purpose of storing preferences that are not requested by the subscriber or user.
Statistics
The technical storage or access that is used exclusively for statistical purposes.The technical storage or access that is used exclusively for anonymous statistical purposes. Without a subpoena, voluntary compliance on the part of your Internet Service Provider, or additional records from a third party, information stored or retrieved for this purpose alone cannot usually be used to identify you.
Marketing
The technical storage or access is required to create user profiles to send advertising, or to track the user on a website or across several websites for similar marketing purposes.