Tag Archives: AWS CloudHSM

AWS CloudHSM architectural considerations for crypto user credential rotation

Post Syndicated from Shankar Rajagopalan original https://aws.amazon.com/blogs/security/aws-cloudhsm-architectural-considerations-for-crypto-user-credential-rotation/

This blog post provides architectural guidance on AWS CloudHSM crypto user credential rotation and is intended for those using or considering using CloudHSM. CloudHSM is a popular solution for secure cryptographic material management. By using this service, organizations can benefit from a robust mechanism to manage their own dedicated FIPS 140-2 level 3 hardware security module (HSM) cluster in the cloud and a client SDK that enables crypto users to perform cryptographic operations on deployed HSMs.

Credential rotation is an AWS Well-Architected best practice as it helps reduce the risks associated with the use of long-term credentials. Additionally, organizations are often required to rotate crypto user credentials for their HSM clusters to meet compliance, regulatory, or industry requirements. Unlike most AWS services that use AWS Identity and Access Management (IAM) users or IAM policies to access resources within your cluster, HSM users are directly created and maintained on the HSM cluster. As a result, how the credential rotation operation is performed might impact the workload’s availability. Thus, it’s important to understand the available options to perform crypto user credential rotation and the impact each option has in terms of ease of implementation and downtime.

In this post, we dive deep into the different options, steps to implement them, and their related pros and cons. We finish with a matrix of the relative downtime, complexity, and cost of each option so you can choose which best fits your use case.

Solution overview

In this document, we consider three approaches:

Approach 1 — For a workload with a defined maintenance window. You can shut down all client connections to CloudHSM, change the crypto user’s password, and subsequently re-establish connections to CloudHSM. This option is the most straightforward, but requires some application downtime.

Approach 2 — You create an additional crypto user (with access to all cryptographic materials) with a new password and from which new client instances are deployed. When the new user and instances are in place, traffic is rerouted to the new instances through a load balancer. This option involves no downtime but requires additional infrastructure (client instances) and a process to share cryptographic material between the crypto users.

Approach 3 — You run two separate and identical environments, directing traffic to a live (blue) environment while making and testing the changes on a secondary (green) environment before redirecting traffic to the green environment. This option involves no downtime, but requires additional infrastructure (client instances and an additional CloudHSM cluster) to support the blue/green deployment strategy.

Solution prerequisites

Approach 1

The first approach uses an application’s planned maintenance window to enact necessary crypto user password changes. It’s the most straightforward of the recommended options, with the least amount of complexity because no additional infrastructure is needed to support the password rotation activity. However, it requires downtime (preferably planned) to rotate the password and update the client application instances; depending on how you deploy a client application, you can shorten the downtime by automating the application deployment process. The main steps for this approach are shown in Figure 1:

Figure 1: Approach 1 to update crypto user password

Figure 1: Approach 1 to update crypto user password

To implement approach 1:

  1. Terminate all client connections to a CloudHSM cluster. This is necessary because you cannot change a password while a crypto user’s session is active.
    1. You can query an Amazon CloudWatch log group for your CloudHSM cluster to find out if any user session is active. Additionally, you can audit Amazon Virtual Private Cloud (Amazon VPC) Flow Logs by enabling them for the elastic network interfaces (ENIs) related to the CloudHSM cluster. See where the traffic is coming from and link that to the applications.
  2. Change the crypto user password
    1. Use the following command to start CloudHSM CLI interactive mode.
      1. Windows: C:\Program Files\Amazon\CloudHSM\bin\> .\cloudhsm-cli.exe interactive
      2. Linux: $ /opt/cloudhsm/bin/cloudhsm-cli interactive
    2. Use the login command and log in as the user with the password you want to change. aws-cloudhsm > login --username <USERNAME> --role <ROLE>
    3. Enter the user’s password.
    4. Enter the user change-password command. aws-cloudhsm > user change-password --username <USERNAME> --role <ROLE>
    5. Enter the new password.
    6. Re-enter the new password.
  3. Update the client connecting to CloudHSM to use the new credentials. Follow the SDK documentation for detailed steps if you are using PKCS # 11, OpenSSL Dynamic Engine, JCE provider or KSP and CNG provider.
  4. Resume all client connections to CloudHSM cluster

Approach 2

The second approach employs two crypto users and a blue/green deployment strategy, that is, a deployment strategy in which you create two separate but identical client environments. One environment (blue) runs the current application version with crypto user 1 (CU1) and handles live traffic, while the other environment (green) runs a new application version with the updated crypto user 2 (CU2) password. After testing is complete on the green environment, traffic is directed to the green environment and the blue environment is deprecated. In this approach, both crypto users have access to the required cryptographic material. When rotating the crypto user password, you spin up new client instances and swap connection credentials to use the second crypto user. Because the client application only uses one crypto user at a time, the second user can remain dormant and be reused in the future as well. When compared to the first approach, this approach adds complexity to your architecture so that you can redirect live application traffic to the new environment by deploying additional client instances without having to restart. You also need to be aware that a shared user can only perform sign, encrypt, decrypt, verify, and HMAC operations with the shared key. Currently, export, wrap, modify, delete, and derive operations aren’t allowed with a shared user. This approach has the advantages of a classic blue/green deployment (no downtime and low risk), in addition to adding redundancy at the user management level by having multiple crypto users with access to the required cryptographic material. Figure 2 depicts a possible architecture:

Figure 2: Approach 2 to update crypto user password

Figure 2: Approach 2 to update crypto user password

To implement Approach 2:

  1. Set up two crypto users on the CloudHSM cluster, for example CU1 and CU2.
  2. Create cryptographic material required by your application.
  3. Use the key share command to share the key with the other user so that both users have access to all the keys.
    1. Start by running the key list command with a filter to return a specific key.
    2. View the shared-users output to identify whom the key is currently shared with.
    3. To share this key with a crypto user, enter the following command: aws-cloudhsm > aws-cloudhsm > key share --filter attr.label="rsa_key_to_share" attr.class=private-key --username <USERNAME> --role crypto-user
  4. If CU1 is used to make client (that is, blue environment) connections to a CloudHSM cluster then change the password for CU2.
    1. Follow the instructions in To change HSM user passwords or step 2 of Approach 1 to change the password assigned to CU2.
  5. Spin up new client instances and use CU2 to configure the connection credentials (that is, green environment).
  6. Add the new client instances to a new target group for the existing Application Load Balancer (ALB).
  7. Next use the weighted target groups routing feature of ALB to route traffic to the newly configured environment.
    • You can use forward actions of the ALB listener rules setting to route requests to one or more target groups.
    • If you specify multiple target groups for a forward action, you must specify a weight for each target group. Each target group weight is a value from 0 to 999. Requests that match a listener rule with weighted target groups are distributed to these target groups based on their weights. For example, if you specify one with a weight of 10 and the other with a weight of 20, the target group with a weight of 20 receives twice as many requests as the other target group.
    • You can make these changes to the ALB setting using the AWS Command Line Interface (AWS CLI), AWS Management Console, or supported infrastructure as code (IaC) tools.
    • For more information, see Fine-tuning blue/green deployments on application load balancer.
  8. For the next password rotation iteration, you can switch back to using CU1 with updated credentials by updating your client instances and redeploying using steps 6 and 7.

Approach 3

The third approach is a variation of the previous approach as you build an identical environment (blue/green deployment) and change the crypto user password on the new environment to achieve zero downtime for the workload. You create two separate but identical CloudHSM clusters, with one serving as the live (blue) environment, and another as the test (green) environment in which changes are tested prior to deployment. After testing is complete in the green environment, production traffic is directed to the green environment and the blue environment is deprecated. Again, this approach adds complexity to your architecture so that you can redirect live application traffic to the new environment by deploying additional client instances and a CloudHSM cluster during the deployment and cutover window without having to restart. Additionally, changes made to the blue cluster after the green cluster was created won’t be available in the green cluster—something that can be mitigated by a brief embargo on changes while this cutover process is in progress. A key advantage to this approach is that it increases application availability without the need for a second crypto user, while still reducing deployment risk and simplifying the rollback process if a deployment fails. Such a deployment pattern is typically automated using continuous integration and continuous delivery (CI/CD) tools such as AWS CodeDeploy. For detailed deployment configuration options, see deployment configurations in CodeDeploy. Figure 3 depicts a possible architecture:

Figure 3: Approach 3 to update crypto user password

Figure 3: Approach 3 to update crypto user password

To implement approach 3:

  1. Create a cluster from backup. Make sure you restore the new cluster in the same Availability Zone as the existing CloudHSM cluster. This will be your green environment.
  2. Spin up new application instances (green environment) and configure them to connect to the new CloudHSM cluster.
  3. Take note of the new CloudHSM cluster security group and attach it to the new client instances.
  4. Follow the steps in To change HSM user passwords or Approach 1 step 2 to change the crypto user password on the new cluster.
  5. Update the client connecting to CloudHSM with the new password.
  6. Add the new client to the existing Application Load Balancer by following Approach 2 steps 6 and 7.
  7. After the deployment is complete, you can delete the old cluster and client instances (blue environment).
    • To delete the CloudHSM cluster using the console.
      1. Open the AWS CloudHSM console.
      2. Select the old cluster and then choose Delete cluster.
      3. Confirm that you want to delete the cluster, then choose Delete.
    • To delete the cluster using the AWS Command Line Interface (AWS CLI), use the following command: aws cloudhsmv2 delete-cluster --cluster-id <cluster ID>

How to choose an approach

To better understand which approach is the best fit for your use case, consider the following criteria:

  • Downtime: What is the acceptable amount of downtime for your workload?
  • Implementation complexity: Do you need to make architecture changes to your workload and how complex is the implementation effort?
  • Cost: Is the additional cost required for the approach acceptable to the business?
Downtime Relative Implementation complexity Relative infrastructure cost
Approach 1 Yes Low None
Approach 2 No Medium Medium
Approach 3 No Medium High

Approach 1 — especially when run within a scheduled maintenance window—is the most straightforward of the three approaches because there’s no additional infrastructure required, and workload downtime is the only tradeoff. This is best suited for applications where planned downtime is acceptable and you need to keep solution complexity low.

Approach 2 involves no downtime for the workload and the second crypto user serves as a backup for future password updates (such as if credentials are lost, or in case there are personnel changes). The downside is the initial planning required to set up the workload to handle multiple CUs, share all keys among the crypto users, and the additional cost. This is best suited for workloads that require zero downtime and an architecture that supports hot swapping of incoming traffic.

Approach 3 also supports zero downtime for the workload, with a complex implementation and some cost to set up additional infrastructure. This is best suited for workloads that have require zero downtime, have an architecture supports hot swapping of incoming traffic, and you don’t want to maintain a second crypto user that has shared access to all required cryptographic material.

Conclusion

In this post, we covered three approaches you can take to rotate the crypto user password on your CloudHSM cluster to align with AWS security best practices of the Well-Architected Framework and to meet your compliance, regulatory, or industry requirements. Each has considerations in terms of relative cost, complexity, and downtime. We recommend carefully considering mapping them to your workload and picking the approach best suited for your business and workload needs.

If you have feedback about this post, submit comments in the Comments section below. If you have questions about this post, start a new thread on the AWS CloudHSM re:Post or contact AWS Support.

Shankar Rajagopalan

Shankar Rajagopalan

Shankar is a Senior Solutions Architect at Amazon Web Services in Austin, Texas. With two decades of experience in technology consulting, he specializes in sectors such as Telecom and Engineering. His present focus revolves around Security, Compliance, and Privacy.

Abderrahmen Mahmoudi

Abderrahmen Mahmoudi

Abderrahmen is a Senior Partner Solutions Architect at Amazon Web Services supporting partners and public sector customers in the Benelux region (Belgium, Netherlands, and Luxembourg). With a strong background working on Hardware Security Modules management, cryptographic operations, and tooling, he focuses on supporting customers in building secure solutions that meet compliance requirements.

How to migrate asymmetric keys from CloudHSM to AWS KMS

Post Syndicated from Mani Manasa Mylavarapu original https://aws.amazon.com/blogs/security/how-to-migrate-asymmetric-keys-from-cloudhsm-to-aws-kms/

In June 2023, Amazon Web Services (AWS) introduced a new capability to AWS Key Management Service (AWS KMS): you can now import asymmetric key materials such as RSA or elliptic-curve cryptography (ECC) private keys for your signing workflow into AWS KMS. This means that you can move your asymmetric keys that are managed outside of AWS KMS—such as a hybrid (on-premises) environment, multi-cloud environment, and even AWS CloudHSM—and make them available through AWS KMS. Combined with the announcement on AWS KMS HSMs achieving FIPS 140-2 Security Level 3, you can make sure that your keys are secured and used in a manner that aligns to the cryptographic standards laid out by the U.S. National Institute of Standards and Technology (NIST).

In this post, we will show you how to migrate your asymmetric keys from CloudHSM to AWS KMS. This can help you simplify your key management strategy and take advantage of the robust authorization control of AWS KMS key policies.

Benefits of importing key materials into AWS KMS

In general, we recommend that you use a native KMS key because it provides the best security, durability, and availability compared to other key store options. AWS KMS FIPS-validated hardware security modules (HSMs) generate the key materials for KMS keys, and these key materials never leave the HSMs unencrypted. Operations that require use of your KMS key (for example, decryption of a data key or digital signature signing) must occur within the HSM.

However, depending on your organization’s requirements, you might need to bring your own key (BYOK) from outside. Importing your own key gives you direct control over the generation, lifecycle management, and durability of your keys. In addition, you have full control over the availability of your imported keys because you can set an expiration period or delete and reimport the keys at any time. You have greater control over the durability of your imported keys because you can maintain the original version of the keys elsewhere. If you need to generate and store copies of keys outside of AWS, these additional controls can help you meet your compliance requirements.

Solution overview

At a high level, our solution involves downloading the wrapping key from AWS KMS, using the CloudHSM Command Line Interface (CLI) to import a wrapping key to CloudHSM, wrapping the private key by using the wrapping key in CloudHSM, and uploading the wrapped private key to AWS KMS by using an import token. You can perform the same procedures by using other supported libraries, such as the PKCS #11 library or a JCE provider.

Figure 1: Overall architecture of the solution

Figure 1: Overall architecture of the solution

As shown in Figure 1, the solution involves the following steps:

  1. Create a KMS key without key material in AWS KMS
  2. Download the wrapping public key and import token from AWS KMS
  3. Import the wrapping key provided by AWS KMS into CloudHSM
  4. Wrap the private key inside CloudHSM with the imported wrapping public key from AWS KMS
  5. Import the wrapped private key to AWS KMS

For the walkthrough in this post, you will import into AWS KMS an ECC 256-bit private key (NIST P-256) that’s used for signing purpose from a CloudHSM cluster. When you import an asymmetric key into AWS KMS, you only need to import a private key. You don’t need to import a public key because AWS KMS can generate and retrieve a public key from the private key after the private key is imported.

Prerequisites

To follow along with this walkthrough, make sure that you have the following prerequisites in place:

  1. An active CloudHSM cluster with at least one active HSM and a valid crypto user credential.
  2. An Amazon Elastic Compute Cloud (Amazon EC2) instance with the CloudHSM Client SDK 5 installed and configured to connect to the CloudHSM cluster. For instructions on how to configure and connect the client instance, see Getting started with AWS CloudHSM.
  3. OpenSSL installed on your EC2 instance (we recommend version 3.0.0 or newer).

Step 1: Create a KMS key without key material in AWS KMS

The first step is to create a new KMS key. You can do this through the AWS KMS console or the AWS CLI, or by running the CreateKey API operation.

When you create your key, keep the following guidance in mind:

  • Set the key material origin to External so that no key material is created for this new key.
  • According to NIST SP 800-57 guidance and cryptography best practice, in general, you should use a single key for only one purpose (for example, if you use an RSA key for encryption, you shouldn’t also use that key for signing). Select the key usage that best suits your use case.
  • Make sure that the key spec match the algorithm specification of the key that you are trying to import from CloudHSM.
  • If you want to use the key in multiple AWS Regions (for example, to avoid the need for a cross-Region call to access the key), consider using a multi-Region key.

To create a KMS key using the AWS CLI

  • Run the following command:
    aws kms create-key --origin EXTERNAL --key-spec ECC_NIST_P256 --key-usage SIGN_VERIFY

Step 2: Download the wrapping public key and import token from AWS KMS

After you create the key, download the wrapping key and import token.

The wrapping key spec and the wrapping algorithm that you select depend on the key that you’re trying to import. AWS KMS supports several standard RSA wrapping algorithms and a two-step hybrid wrapping algorithm. CloudHSM supports both wrapping algorithms as well.

In general, an RSA wrapping algorithm (RSAES_OAEP_SHA_*) with a key spec of RSA_4096 should be sufficient for wrapping ECC private keys because it can wrap the key material completely. However, when importing RSA private keys, you will need to use the two-step hybrid wrapping algorithm (RSA_AES_KEY_WRAP_SHA_*) due to their large key size. The overall process is the same as what’s shown here, but the two-step hybrid wrapping algorithm requires that you encrypt your key material with an Advanced Encryption Standard (AES) symmetric key that you generate, and then encrypt the AES symmetric key with the RSA public wrapping key. Additionally, when you select the wrapping algorithm, you also have a choice between the SHA-1 or SHA-256 hashing algorithm. We recommend that you use the SHA-256 hashing algorithm whenever possible.

Note that each wrapping public key and import token set is valid for 24 hours. If you don’t use the set to import key material within 24 hours of downloading it, you must download a new set.

To download the wrapping public key and import token from AWS KMS

  1. Run the following command. Make sure to replace <KMS KeyID> with the key ID of the KMS key that you created in the previous step. The key ID is the last part of the key ARN after :key/ (for example, arn:aws:kms:us-east-1:<AWS Account ID>:key/<Key ID>). “ImportToken.b64” represents the wrapping token, and “WrappingPublicKey.b64” represents the import token.
    aws kms get-parameters-for-import \
    --key-id <KMS KeyID> \
    --wrapping-algorithm RSAES_OAEP_SHA_256 \
    --wrapping-key-spec RSA_4096 \
    --query "[ImportToken, PublicKey]" \
    --output text \
    | awk '{print $1 > "ImportToken.b64"; print $2 > "WrappingPublicKey.b64"}'

  2. Decode the base64 encoding.
    openssl enc -d -base64 -A -in WrappingPublicKey.b64 -out WrappingPublicKey.bin

To convert the wrapping public key from DER to PEM format

  • The key import pem command in CloudHSM CLI requires that the public key is in PEM format. AWS KMS outputs public keys in the DER format, so you must convert the wrapping public key to PEM format. To convert the public key to PEM format, run the following command:
    openssl rsa -pubin -in WrappingPublicKey.bin -inform DER -outform PEM -out WrappingPublicKey.pem

Step 3: Import the wrapping key provided by AWS KMS into CloudHSM

Now that you have created the KMS key and made the necessary preparations to import it, switch to CloudHSM to import the key.

To import the wrapping key

  1. Log in to your EC2 instance that has the CloudHSM CLI installed and run the following command to use it in an interactive mode:
    /opt/cloudhsm/bin/cloudhsm-cli interactive

  2. Log in with your crypto user credential. Make sure to replace <YourUserName> with your own information and supply your password when prompted.
    login --username <YourUserName> --role crypto-user

  3. Import the wrapping key and set the attribute allowing this key to be used for wrapping other keys.
    key import pem --path ./WrappingPublicKey.pem --label <kms-wrapping-key> --key-type-class rsa-public --attributes wrap=true

    You should see an output similar to the following:

    {
      "error_code": 0,
      "data": {
        "key": {
          "key-reference": "0x00000000002800c2",
          "key-info": {
            "key-owners": [
              {
                "username": "<YourUserName>",
                "key-coverage": "full"
              }
            ],
            "shared-users": [],
            "cluster-coverage": "full"
          },
          "attributes": {
            "key-type": "rsa",
            "label": "<kms-wrapping-key>",
            "id": "0x",
            "check-value": "0x5efd07",
            "class": "public-key",
            "encrypt": false,
            "decrypt": false,
            "token": true,
            "always-sensitive": false,
            "derive": false,
            "destroyable": true,
            "extractable": true,
            "local": false,
            "modifiable": true,
            "never-extractable": false,
            "private": true,
            "sensitive": false,
            "sign": false,
            "trusted": false,
            "unwrap": false,
            "verify": false,
            "wrap": true,
            "wrap-with-trusted": false,
            "key-length-bytes": 1024,
            "public-exponent": "0x010001",
            "modulus": "0xd7683010 … b6fc9df07",
            "modulus-size-bits": 4096
          }
        },
        "message": "Successfully imported key"
      }
    }

  4. From the output, note the value for the key label (<kms-wrapping-key> in this example) because you will need it for the next step.

Step 4: Wrap the private key inside CloudHSM with the imported wrapping public key from AWS KMS

Now that you have imported the wrapping key into CloudHSM, you can wrap the private key that you want to import to AWS KMS by using the wrapping key.

Important: Only the owner of a key—the crypto user who created the key—can wrap the key. In addition, the key that you want to wrap must have the extractable attribute set to true.

To wrap the private key

  1. Use the key wrap command in the CloudHSM CLI to wrap the private key that’s stored in CloudHSM. Make sure to replace the following placeholder values with your own information:
    • rsa-oaep specifies the wrapping algorithm.
    • --payload-filter is used to define the key that you want to wrap out of the HSM. You can use the key reference (for example, key-reference=0x00000000002800c2) or reference key attributes, such as the key label. In our example, we used the key label ec-priv-import-to-kms.
    • --wrapping-filter is used to define the key that you will use to wrap out the payload key. This should be the wrapping key that you imported previously from AWS KMS, which was labeled kms-wrapping-key in Step 3.3.
    • --hash-function defines the hash function used as part of the OAEP encryption. This should match the wrapping algorithm that you specified when you got the import parameters from AWS KMS. In our example, it should be SHA-256 because we selected RSAES_OAEP_SHA_256 as the wrapping algorithm previously.
    • --mgf defines the mask generation function used as part of the OAEP encryption. The mask hash function must match the signing mechanism hash function, which is SHA-256 in this example.
    • --path defines the path to the binary file where the wrapped key data will be saved. In this example, we name the file EncryptedECC_P256KeyMaterial.bin but you can specify a different name.
    key wrap rsa-oaep --payload-filter attr.label=ec-priv-import-to-kms --wrapping-filter attr.label=kms-wrapping-key --hash-function sha256 --mgf mgf1-sha256 --path EncryptedECC_P256KeyMaterial.bin

(Optional) To export the public key

  • You can also use the CloudHSM CLI to export the public key of your private key. You will use this key for testing later. Make sure to replace the placeholder values <ec-priv-import-to-kms> and <KeyName.pem> with your own information.
    key generate-file --encoding pem --path <KeyName.pem> --filter attr.label=<ec-priv-import-to-kms>

Step 5: Import the wrapped private key to AWS KMS

Now that you’ve wrapped the private key from CloudHSM, you can import it into AWS KMS.

Note that you have the option to set an expiration time for your imported key. After the expiration time passes, AWS KMS deletes your imported key automatically.

To import the wrapped private key to AWS KMS

  1. If you have been using the CLI or API, the import token is base64 encoded. You must decode the token from base64 to binary format before it can be used. You can use OpenSSL to do this.
    openssl enc -d -base64 -A -in ImportToken.b64 -out ImportToken.bin

  2. Run the following command to import the wrapped private key. Make sure to replace <KMS KeyID> with the key ID of the KMS key that you created in Step 1.
    aws kms import-key-material --key-id <KMS KeyID> \
    --encrypted-key-material fileb://EncryptedECC_P256KeyMaterial.bin \
    --import-token fileb://ImportToken.bin \
    --expiration-model KEY_MATERIAL_DOES_NOT_EXPIRE

Test whether your private key was imported successfully

The nature of asymmetric cryptography means that a digital signature produced by your private key should produce the same signature on the same message, regardless of the tool that you used to perform the signing operation. To verify that your imported private key functions the same in both CloudHSM and AWS KMS, you can perform a signing operation and compare the signature on CloudHSM and AWS KMS to make sure that they are the same.

Another way to check that your imported private key functions are the same in AWS KMS is to perform a signing operation and then verify the signature by using the corresponding public key that you exported from CloudHSM in Step 4. We will show you how to use this method to check that your private key was imported successfully.

To test that your private key was imported

  1. Create a simple message in a text file and encode it in base64.
    echo -n 'Testing My Imported Key!' | openssl base64 -out msg_base64.txt

  2. Perform the signing operation by using AWS KMS. Make sure to replace <YourImported KMS KeyID> with your own information.
    aws kms sign --key-id <YourImported KMS KeyID> --message fileb://msg_base64.txt --message-type RAW --signing-algorithm ECDSA_SHA_256

    The following shows the output of the signing operation.

    {
    "KeyId": "arn:aws:kms:us-east-1:111122223333:key/1234abcd-12ab-34cd-56ef-1234567890ab",
    "Signature": "EXAMPLEXsP11QVTkrSsab2CygcgtodDbSpd+j558B4qINpKIxwIhAMkKwd65mA3roo76ItuHiRsbwO9F0XMyuyKCKEXAMPLE",
    "SigningAlgorithm": "ECDSA_SHA_256"
    }

  3. Save the signature in a separate file called signature.sig and decode it from base64 to binary.
    openssl enc -d -base64 -in signature.sig -out signature.bin

  4. Verify the signature by using the public key that you exported from CloudHSM in Step 4.
    openssl dgst -sha256 -verify <KeyName.pem> -signature signature.bin msg_base64.txt

    If successful, you should see a message that says Verified OK.

Conclusion

In this post, you learned how to import an asymmetric key into AWS KMS from CloudHSM by using the CloudHSM CLI.

Although this post focused on migrating keys from CloudHSM, you can also follow the general directions to import your asymmetric key from elsewhere. When you import a private key, make sure that the imported key matches the key spec and the wrapping algorithm that you choose in AWS KMS.

 
If you have feedback about this post, submit comments in the Comments section below. If you have questions about this post, contact AWS Support.

Mani Manasa Mylavarapu

Mani Manasa Mylavarapu

Manasa is a Software Development Manager at AWS KMS. Manasa leads the development of custom key store features for both the CloudHSM Key Store and External Key Store. Beyond her professional role, Manasa enjoys playing board games and exploring the scenic hikes of Seattle.

Author

Kevin Lee

Kevin is a Senior Product Manager at AWS KMS. Kevin’s work interests include client-side encryption and key management strategy within a multi-tenant environment. Outside of work, Kevin enjoys occasional camping and snowboarding in the Pacific Northwest and playing video games.

Patrick Palmer

Patrick Palmer

Patrick is a Principal Security Specialist Solutions Architect. He helps customers around the world use AWS services in a secure manner, and specializes in cryptography. When not working, he enjoys spending time with his growing family and playing video games.

Automate the deployment of an NGINX web service using Amazon ECS with TLS offload in CloudHSM

Post Syndicated from Nikolas Nikravesh original https://aws.amazon.com/blogs/security/automate-the-deployment-of-an-nginx-web-service-using-amazon-ecs-with-tls-offload-in-cloudhsm/

Customers who require private keys for their TLS certificates to be stored in FIPS 140-2 Level 3 certified hardware security modules (HSMs) can use AWS CloudHSM to store their keys for websites hosted in the cloud. In this blog post, we will show you how to automate the deployment of a web application using NGINX in AWS Fargate, with full integration with CloudHSM. You will also use AWS CodeDeploy to manage the deployment of changes to your Amazon Elastic Container Service (Amazon ECS) service.

CloudHSM offers FIPS 140-2 Level 3 HSMs that you can integrate with NGINX or Apache HTTP Server through the OpenSSL Dynamic Engine. The CloudHSM Client SDK 5 includes the OpenSSL Dynamic Engine to allow your web server to use a private key stored in the HSM with TLS versions 1.2 and 1.3 to support applications that are required to use FIPS 140-2 Level 3 validated HSMs.

CloudHSM uses the private key in the HSM as part of the server verification step of the TLS handshake that occurs every time that a new HTTPS connection is established between the client and server. Using the exchanged symmetric key, OpenSSL software performs the key exchange and bulk encryption. For more information about this process and how CloudHSM fits in, see How SSL/TLS offload with AWS CloudHSM works.

Solution overview

This blog post uses the AWS Cloud Development Kit (AWS CDK) to deploy the solution infrastructure. The AWS CDK allows you to define your cloud application resources using familiar programming languages.

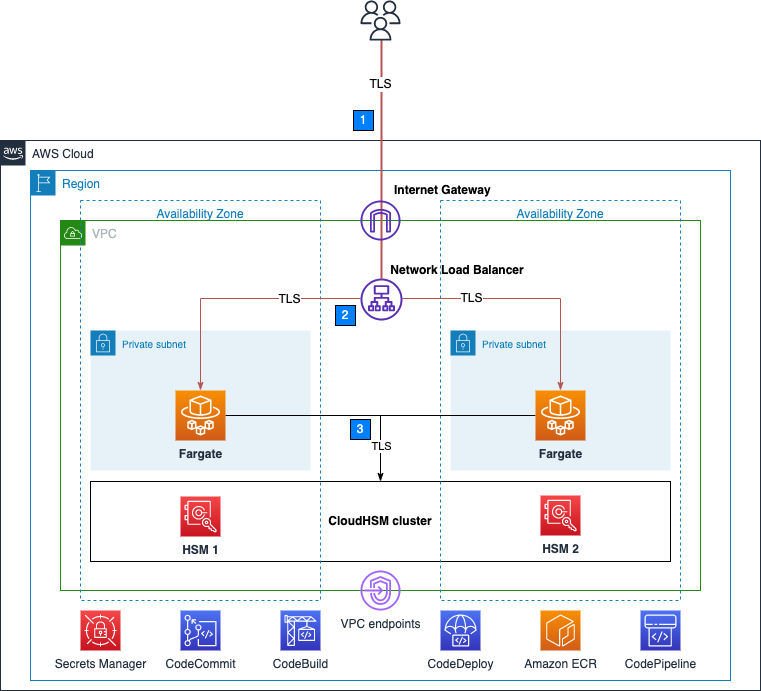
Figure 1 shows an overview of the overall architecture deployed in this blog. This solution contains three CDK stacks: The TlsOffloadContainerBuildStack CDK stack deploys the CodeCommit, CodeBuild, and AmazonECR resources. The TlsOffloadEcsServiceStack CDK stack deploys the ECS Fargate service along with the required VPC resources. The TlsOffloadPipelineStack CDK stack deploys the CodePipeline resources to automate deployments of changes to the service configuration.

Figure 1: Overall architecture

Figure 1: Overall architecture

At a high level, here’s how the solution in Figure 1 works:

  1. Clients make an HTTPS request to the public IP address exposed by Network Load Balancer to connect to the web server and establish a secure connection that uses TLS.
  2. Network Load Balancer routes the request to one of the ECS hosts running in private virtual private cloud (VPC) subnets, which are connected to the CloudHSM cluster.
  3. The NGINX web server that is running on ECS containers performs a TLS handshake by using the private key stored in the HSM to establish a secure connection with the requestor.

Note: Although we don’t focus on perimeter protection in this post, AWS has a number of services that help provide layered perimeter protection for your internet-facing applications, such as AWS Shield and AWS WAF.

Figure 2 shows an overview of the automation infrastructure that is deployed by the TlsOffloadContainerBuildStack and TlsOffloadPipelineStack CDK stacks.

Figure 2: Deployment pipeline

Figure 2: Deployment pipeline

At a high level, here’s how the solution in Figure 2 works:

  1. A developer makes changes to the service configuration and commits the changes to the AWS CodeCommit repository.
  2. AWS CodePipeline detects the changes and invokes AWS CodeBuild to build a new version of the Docker image that is used in Amazon ECS.
  3. CodeBuild builds a new Docker image and publishes it to the Amazon Elastic Container Registry (Amazon ECR) repository.
  4. AWS CodeDeploy creates a new revision of the ECS task definition for the Amazon ECS service and initiates a deployment of the new service.

Required services

To build this architecture in your account, you need to use a role within your account that can configure the following services and features:

Prerequisites

To follow this walkthrough, you need to have the following components in place:

Step 1: Store secrets in Secrets Manager

As with other container projects, you need to decide what to build statically into the container (for example, libraries, code, or packages) and what to set as runtime parameters, to be pulled from a parameter store. In this walkthrough, we use Secrets Manager to store sensitive parameters and use the integration of Amazon ECS with Secrets Manager to securely retrieve them when the container is launched.

Important: You need to store the following information in Secrets Manager as plaintext, not as key/value pairs.

To create a new secret

  1. Open the Secrets Manager console and choose Store a new secret.
  2. On the Choose secret type page, do the following:
    1. For Secret type, choose Other type of secret.
    2. In Key/value pairs, choose Plaintext and enter your secret just as you would need it in your application.

The following is a list of the required secrets for this solution and how they look in the Secrets Manager console.

  • Your cluster-issuing certificate – this is the certificate that corresponds to the private key that you used to sign the cluster’s certificate signing request. In this example, the name of the secret for the certificate is tls/clustercert.
    Figure 3: Store the cluster certificate

    Figure 3: Store the cluster certificate

  • The web server certificate – In this example, the name of the secret for the web server certificate is tls/servercert. It will look similar to the following:
    Figure 4: Store the web server certificate

    Figure 4: Store the web server certificate

  • The fake PEM file for the private key stored in the HSM that you generated in the Prerequisites section. In this example, the name of the secret for the fake PEM file is tls/fakepem.
    Figure 5: Store the fake PEM

    Figure 5: Store the fake PEM

  • The HSM pin used to authenticate with the HSMs in your cluster. In this example, the name of the secret for the HSM pin is tls/pin.
    Figure 6: Store the HSM pin

    Figure 6: Store the HSM pin

After you’ve stored your secrets, you should see output similar to the following:

Figure 7: List of required secrets

Figure 7: List of required secrets

Step 2: Download and configure the CDK app

This post uses the AWS CDK to deploy the solution infrastructure. In this section, you will download the CDK app and configure it.

To download and configure the CDK app

  1. In your CDK environment that you created in the Prerequisites section, check out the source code from the aws-cloudhsm-tls-offload-blog GitHub repository.
  2. Edit the app_config.json file and update the <placeholder values> with your target configuration:
    {
        "applicationAccount": "<AWS_ACCOUNT_ID>",
        "applicationRegion": "<REGION>",
        "networkConfig": {
            "vpcId": "<VPC_ID>",
            "publicSubnets": ["<PUBLIC_SUBNET_1>", "<PUBLIC_SUBNET_2>", ...],
            "privateSubnets": ["<PRIVATE_SUBNET_1>", "<PRIVATE_SUBNET_2>", ...]
        },
        "secrets": {
            "cloudHsmPin": "arn:aws:secretsmanager:<REGION>:<AWS_ACCOUNT_ID>:secret:<SECRET_ID>",
            "fakePem": "arn:aws:secretsmanager:<REGION>:<AWS_ACCOUNT_ID>:secret:<SECRET_ID>",
            "serverCert": "arn:aws:secretsmanager:<REGION>:<AWS_ACCOUNT_ID>:secret:<SECRET_ID>",
            "clusterCert": "arn:aws:secretsmanager:<REGION>:<AWS_ACCOUNT_ID>:secret:<SECRET_ID>"
        },
        "cloudhsm": {
            "clusterId": "<CLUSTER_ID>",
            "clusterSecurityGroup": "<CLUSTER_SECURITY_GROUP>"
        }
    }

  3. Run the following command to build the CDK stacks from the root of the project directory.
    npm run build

  4. To view the stacks that are available to deploy, run the following command from the root of the project directory.
    cdk ls

    You should see the following stacks available to deploy:

    • TlsOffloadContainerBuildStack — Deploys the CodeCommit, CodeBuild, and ECR repository that builds the ECS container image.
    • TlsOffloadEcsServiceStack — Deploys the ECS Fargate service along with the required VPC resources.
    • TlsOffloadPipelineStack — Deploys the CodePipeline that automates the deployment of updates to the service.

Step 3: Deploy the container build stack

In this step, you will deploy the container build stack, and then create a build and verify that the image was built successfully.

To deploy the container build stack

Deploy the TlsOffloadContainerBuildStack stack that we described in Figure 2 to your AWS account. In your CDK environment, run the following command:

cdk deploy TlsOffloadContainerBuildStack

The command line interface (CLI) will prompt you to approve the changes. After you approve them, you will see the following resources deployed to your newly created CodeCommit repository.

  • Dockerfile — This file provides a containerized environment for each of the Fargate containers to run. It downloads and installs necessary dependencies to run the NGINX web server with CloudHSM.
  • nginx.conf — This file provides NGINX with the configuration settings to run an HTTPS web server with CloudHSM configured as the SSL engine that performs the TLS handshake. The following nginx.conf values have already been configured in the file; if you want to make changes, update the file before deployment:
    • ssl_engine is set to cloudhsm
    • the environment variable is env CLOUDHSM_PIN
    • error_log is set to stderr so that the Fargate container can capture the logs in CloudWatch
    • the server section is set up to listen on port 443
    • ssl_ciphers are configured for a server with an RSA private key
  • run.sh — This script configures the CloudHSM OpenSSL Dynamic Engine on the Fargate task before the NGINX server is started.
  • nginx.service — This file specifies the configuration settings that systemd uses to run the NGINX service. Included in this file is a reference to the file that contains the environment variables for the NGINX service. This provides the HSM pin to the OpenSSL Engine.
  • index.html — This file is a sample HTML file that is displayed when you navigate to the HTTPS endpoint of the load balancer in your browser.
  • dhparam.pem — This file provides sample Diffie-Hellman parameters for demonstration purposes, but AWS recommends that you generate your own. You can generate your own Diffie-Hellman parameters by running the following command with the OpenSSL CLI. These parameters are not required for TLS but are recommended to provide perfect forward secrecy in your encrypted messages.
    openssl dhparam -out ./dhparam.pem 2048

Your repository should look like the following:

Figure 8: CodeCommit repository

Figure 8: CodeCommit repository

Before you deploy the Amazon ECS service, you need to build your first Docker image to populate the ECR repository. To successfully deploy the service, you need to have at least one image already present in the repository.

To create a build and verify the image was built successfully

  1. Open the AWS CodeBuild console.
  2. Find the CodeBuild project that was created by the CDK deployment and select it.
  3. Choose Start Build to initiate a new build.
  4. Wait for the build to complete successfully, and then open the Amazon ECR console.
  5. Select the repository that the CDK deployment created.

You should now see an image in your repository, similar to the following:

Figure 9: ECR repository

Figure 9: ECR repository

Step 4: Deploy the Amazon ECS service

Now that you have successfully built an ECR image, you can deploy the Amazon ECS service. This step deploys the following resources to your account:

  • VPC endpoints for the required AWS services that your ECS task needs to communicate with, including the following:
    • Amazon ECR
    • Secrets Manager
    • CloudWatch
    • CloudHSM
  • Network Load Balancer, which load balances HTTPS traffic to your ECS tasks.
  • A CloudWatch Logs log group to host the logs for the ECS tasks.
  • An ECS cluster with ECS tasks using your previously built Docker image that hosts the NGINX service.

To deploy the Amazon ECS service with the CDK

  • In your CDK environment, run the following command:
    cdk deploy TlsOffloadEcsServiceStack

The CLI will prompt you to approve the changes. After you approve them, you will see these resources deploy to your account.

Checkpoint

At this point, you should have a working service. To confirm that you do, in your browser, navigate using HTTPS to the public address associated with the Network Load Balancer. While not covered in this blog, you can additionally configure DNS routing using Amazon Route53 to setup a custom domain name for your web service. You should see a screen similar to the following.

Figure 10: The sample website

Figure 10: The sample website

Step 5: Use CodePipeline to automate the deployment of changes to the web server

Now that you have deployed a preliminary version of the application, you can take a few steps to automate further releases of the web server. As you maintain this application in production, you might need to update one or more of the following items:

  • Your website HTML source and other required libraries (for example, CSS or JavaScript)
  • Your Docker environment, such as the OpenSSL libraries, operating system and CloudHSM packages, and NGINX version.
  • Re-deploy the service after rotating your web server private key and certificate in Secrets Manager

Next, you will set up a CodePipeline project that orchestrates the end-to-end deployment of a change to the application—from an update to the code in our CodeCommit repo to the deployment of updated container images and the redirection of user traffic by the load balancer to the updated application.

This step deploys to your account a deployment pipeline that connects your CodeCommit, CodeBuild, and Amazon ECS services.

Deploy the CodePipeline stack with CDK

In your CDK environment, run the following command:

cdk deploy TlsOffloadPipelineStack

The CLI will prompt you to approve the changes. After you approve them, you will see the resources deploy to your account.

Start a deployment

To verify that your automation is working correctly, start a new deployment in your CodePipeline by making a change to your source repository. If everything works, the CodeBuild project will build the latest version of the Dockerfile located in your CodeCommit repository and push it to Amazon ECR. Then, the CodeDeploy application will create a new version of the ECS task definition and deploy new tasks while spinning down the existing tasks.

View your website

Now that the deployment is complete, you should again be able to view your website in your browser by navigating to the website for your application. If you made changes to the source code, such as changes to your index.html file, you should see these changes now.

Verify that the web server is properly configured by checking that the website’s certificate matches the one that you created in the Prerequisites section. Figure 11 shows an example of a certificate.

Figure 11: Certificate for the application

Figure 11: Certificate for the application

To verify that your NGINX service is using your CloudHSM cluster to offload the TLS handshake, you can view the CloudHSM client logs for this application in CloudWatch in the log group that you specified when you configured the ECS task definition.

To view your CloudHSM client logs in CloudWatch

  1. Open the CloudWatch console.
  2. In the navigation pane, select Log Groups.
  3. Select the log group that was created for you by the CDK deployment.
  4. Select a log stream entry. Each log stream corresponds to an ECS instance that is running the NGINX web server.
  5. You should see the client logs for this instance, which will look similar to the following:
    Figure 12: Fargate task logs

    Figure 12: Fargate task logs

You can also verify your HSM connectivity by viewing your HSM audit logs.

To view your HSM audit logs

  1. Open the CloudWatch console.
  2. In the navigation pane, select Log Groups.
  3. Select the log group corresponding to your CloudHSM cluster. The log group has the following format: /aws/cloudhsm/<cluster-id>.
  4. You can see entries similar to the following, which indicates that the NGINX application is connecting and logging in to the HSM to perform cryptographic operations.
    Time: 02/04/23 17:45:40.333033, usecs:1675532740333033
    Version No : 1.0
    Sequence No : 0x2
    Reboot counter : 0x8
    Opcode : CN_LOGIN (0xd)
    Command Type(hex) : CN_MGMT_CMD (0x0)
    User id : 3
    Session Handle : 0x15010002
    Response : 0x0:HSM Return: SUCCESS
    Log type : USER_AUTH_LOG (2)
    User Name : crypto_user
    User Type : CN_CRYPTO_USER (1) 

Conclusion

In this post, you learned how to set up a NGINX web server on Fargate in a secure, private subnet that offloads the TLS termination to a FIPS 140-2 Level 3 HSM environment that uses the CloudHSM OpenSSL Dynamic Engine. You also learned how to set up a deployment pipeline to automate the Fargate deployments when updates are made.

You can expand this solution to fit your individual use case. For example, you can use the NGINX web server as a reverse proxy for additional servers in your internal network, and set up mutual TLS between these internal servers.

Further reading

If you have feedback about this post, submit comments in the Comments section below. If you have questions about this post, start a new thread on the AWS CloudHSM re:Post or contact AWS Support.

Want more AWS Security news? Follow us on Twitter.

Alket Memushaj

Alket Memushaj

Alket Memushaj is a Principal Solutions Architect in the Market Development team for Capital Markets at AWS. In his role, Alket helps customers transform their business with the power of the AWS Cloud. His main focus is on helping customers deploy data and analytics, risk management, and electronic trading platforms in AWS. Alket previously led engineering teams at Morgan Stanley and consulted for global financial services at VMware.

Nikolas Nikravesh

Nikolas Nikravesh

Nikolas is a Software Development Engineer at AWS CloudHSM. He works with the SDK team to develop standards compliant SDKs and integrations to enable AWS customers to develop secure applications with CloudHSM.

Brad Woodward

Brad Woodward

Brad is a Senior Customer Delivery Architect with AWS Professional Services. Brad has presented at RSA and DefCon Skytalks, been an instructor at BlackHat and BlackHat Europe, presented tools at BlackHat Arsenal, and is the maintainer of several open source tools and platforms.

How to run AWS CloudHSM workloads in container environments

Post Syndicated from Derek Tumulak original https://aws.amazon.com/blogs/security/how-to-run-aws-cloudhsm-workloads-on-docker-containers/

January 25, 2023: We updated this post to reflect the fact that CloudHSM SDK3 does not support serverless environments and we strongly recommend deploying SDK5.


AWS CloudHSM provides hardware security modules (HSMs) in the AWS Cloud. With CloudHSM, you can generate and use your own encryption keys in the AWS Cloud, and manage your keys by using FIPS 140-2 Level 3 validated HSMs. Your HSMs are part of a CloudHSM cluster. CloudHSM automatically manages synchronization, high availability, and failover within a cluster.

CloudHSM is part of the AWS Cryptography suite of services, which also includes AWS Key Management Service (AWS KMS), AWS Secrets Manager, and AWS Private Certificate Authority (AWS Private CA). AWS KMS, Secrets Manager, and AWS Private CA are fully managed services that are convenient to use and integrate. You’ll generally use CloudHSM only if your workload requires single-tenant HSMs under your own control, or if you need cryptographic algorithms or interfaces that aren’t available in the fully managed alternatives.

CloudHSM offers several options for you to connect your application to your HSMs, including PKCS#11, Java Cryptography Extensions (JCE), OpenSSL Dynamic Engine, or Microsoft Cryptography API: Next Generation (CNG). Regardless of which library you choose, you’ll use the CloudHSM client to connect to HSMs in your cluster.

In this blog post, I’ll show you how to use Docker to develop, deploy, and run applications by using the CloudHSM SDK, and how to manage and orchestrate workloads by using tools and services like Amazon Elastic Container Service (Amazon ECS), Kubernetes, Amazon Elastic Kubernetes Service (Amazon EKS), and Jenkins.

Solution overview

This solution demonstrates how to create a Docker container that uses the CloudHSM JCE SDK to generate a key and use it to encrypt and decrypt data.

Note: In this example, you must manually enter the crypto user (CU) credentials as environment variables when you run the container. For production workloads, you’ll need to consider how to secure and automate the handling and distribution of these credentials. You should work with your security or compliance officer to ensure that you’re using an appropriate method of securing HSM login credentials. For more information on securing credentials, see AWS Secrets Manager.

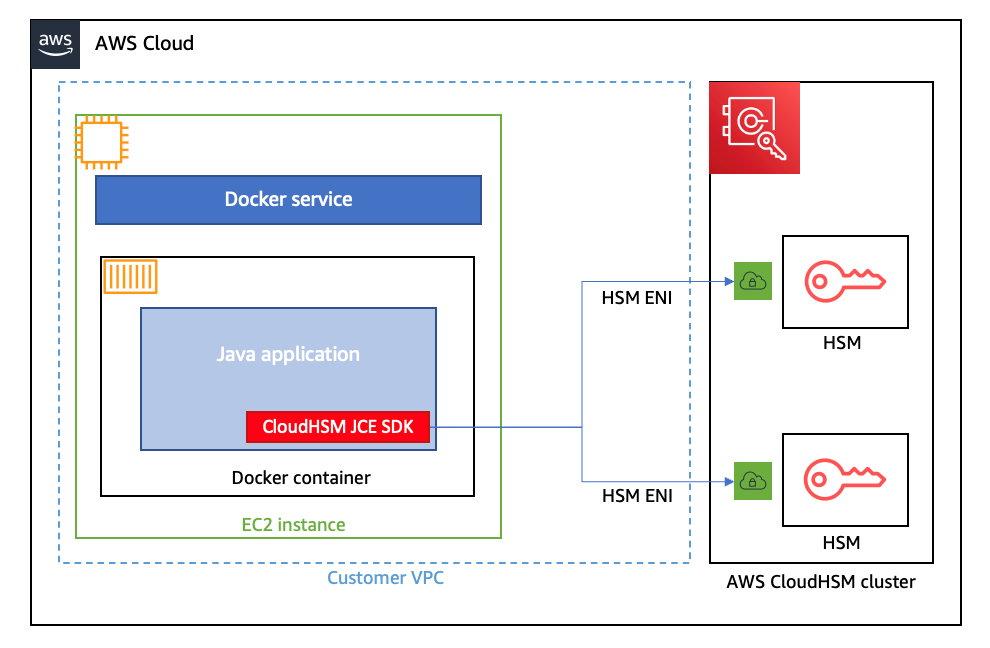
Figure 1 shows the solution architecture. The Java application, running in a Docker container, integrates with JCE and communicates with CloudHSM instances in a CloudHSM cluster through HSM elastic network interfaces (ENIs). The Docker container runs in an EC2 instance, and access to the HSM ENIs is controlled with a security group.

Figure 1: Architecture diagram

Figure 1: Architecture diagram

Prerequisites

To implement this solution, you need to have working knowledge of the following items:

  • CloudHSM
  • Docker 20.10.17 – used at the time of this post
  • Java 8 or Java 11 – supported at the time of this post
  • Maven 3.05 – used at the time of this post

Here’s what you’ll need to follow along with my example:

  1. An active CloudHSM cluster with at least one active HSM instance. You can follow the CloudHSM getting started guide to create, initialize, and activate a CloudHSM cluster.

    Note: For a production cluster, you should have at least two active HSM instances spread across Availability Zones in the Region.

  2. An Amazon Linux 2 EC2 instance in the same virtual private cloud (VPC) in which you created your CloudHSM cluster. The Amazon Elastic Compute Cloud (Amazon EC2) instance must have the CloudHSM cluster security group attached—this security group is automatically created during the cluster initialization and is used to control network access to the HSMs. To learn about attaching security groups to allow EC2 instances to connect to your HSMs, see Create a cluster in the AWS CloudHSM User Guide.
  3. A CloudHSM crypto user (CU) account. You can create a CU by following the steps in the topic Managing HSM users in AWS CloudHSM in the AWS CloudHSM User Guide.

Solution details

In this section, I’ll walk you through how to download, configure, compile, and run a solution in Docker.

To set up Docker and run the application that encrypts and decrypts data with a key in AWS CloudHSM

  1. On your Amazon Linux EC2 instance, install Docker by running the following command.

    # sudo yum -y install docker

  2. Start the docker service.

    # sudo service docker start

  3. Create a new directory and move to it. In my example, I use a directory named cloudhsm_container. You’ll use the new directory to configure the Docker image.

    # mkdir cloudhsm_container
    # cd cloudhsm_container

  4. Copy the CloudHSM cluster’s trust anchor certificate (customerCA.crt) to the directory that you just created. You can find the trust anchor certificate on a working CloudHSM client instance under the path /opt/cloudhsm/etc/customerCA.crt. The certificate is created during initialization of the CloudHSM cluster and is required to connect to the CloudHSM cluster. This enables our application to validate that the certificate presented by the CloudHSM cluster was signed by our trust anchor certificate.
  5. In your new directory (cloudhsm_container), create a new file with the name run_sample.sh that includes the following contents. The script runs the Java class that is used to generate an Advanced Encryption Standard (AES) key to encrypt and decrypt your data.
    #! /bin/bash
    
    # start application
    echo -e "\n* Entering AES GCM encrypt/decrypt sample in Docker ... \n"
    
    java -ea -jar target/assembly/aesgcm-runner.jar -method environment
    
    echo -e "\n* Exiting AES GCM encrypt/decrypt sample in Docker ... \n"

  6. In the new directory, create another new file and name it Dockerfile (with no extension). This file will specify that the Docker image is built with the following components:
    • The CloudHSM client package.
    • The CloudHSM Java JCE package.
    • OpenJDK 1.8 (Java 8). This is needed to compile and run the Java classes and JAR files.
    • Maven, a build automation tool that is needed to assist with building the Java classes and JAR files.
    • The AWS CloudHSM Java JCE samples that will be downloaded and built as part of the solution.
  7. Cut and paste the following contents into Dockerfile.

    Note: You will need to customize your Dockerfile, as follows:

    • Make sure to specify the SDK version to replace the one specified in the pom.xml file in the sample code. As of the writing of this post, the most current version is 5.7.0. To find the SDK version, follow the steps in the topic Check your client SDK version. For more information, see the Building section in the README file for the Cloud HSM JCE examples.
    • Make sure to update the HSM_IP line with the IP of an HSM in your CloudHSM cluster. You can get your HSM IPs from the CloudHSM console, or by running the describe-clusters AWS CLI command.
      	# Use the amazon linux image
      	FROM amazonlinux:2
      
      	# Pass HSM IP address as a build argument
      	ARG HSM_IP
      
      	# Install CloudHSM client
      	RUN yum install -y https://s3.amazonaws.com/cloudhsmv2-software/CloudHsmClient/EL7/cloudhsm-jce-latest.el7.x86_64.rpm
      
      	# Install Java, Maven, wget, unzip and ncurses-compat-libs
      	RUN yum install -y java maven wget unzip ncurses-compat-libs
              
      	# Create a work dir
      	WORKDIR /app
              
      	# Download sample code
      	RUN wget https://github.com/aws-samples/aws-cloudhsm-jce-examples/archive/refs/heads/sdk5.zip
              
      	# unzip sample code
      	RUN unzip sdk5.zip
             
      	# Change to the create directory
      	WORKDIR aws-cloudhsm-jce-examples-sdk5
      
      # Build JAR files using the installed CloudHSM JCE Provider version
      RUN export CLOUDHSM_CLIENT_VERSION=`rpm -qi cloudhsm-jce | awk -F': ' '/Version/ {print $2}'` \
              && mvn validate -DcloudhsmVersion=$CLOUDHSM_CLIENT_VERSION \
              && mvn clean package -DcloudhsmVersion=$CLOUDHSM_CLIENT_VERSION
              
        # Configure cloudhsm-client
        COPY customerCA.crt /opt/cloudhsm/etc/
        RUN /opt/cloudhsm/bin/configure-jce -a $HSM_IP
             
        # Copy the run_sample.sh script
        COPY run_sample.sh .
              
        # Run the script
        CMD ["bash","run_sample.sh"]

  8. Now you’re ready to build the Docker image. Run the following command, with the name jce_sample. This command will let you use the Dockerfile that you created in step 6 to create the image.

    # sudo docker build --build-arg HSM_IP=”<your HSM IP address>” -t jce_sample .

  9. To run a Docker container from the Docker image that you just created, run the following command. Make sure to replace the user and password with your actual CU username and password. (If you need help setting up your CU credentials, see prerequisite 3. For more information on how to provide CU credentials to the AWS CloudHSM Java JCE Library, see Providing credentials to the JCE provider in the CloudHSM User Guide).

    # sudo docker run --env HSM_USER=<user> --env HSM_PASSWORD=<password> jce_sample

    If successful, the output should look like this:

    	* Entering AES GCM encrypt/decrypt sample in Docker ... 
    
    	737F92D1B7346267D329C16E
    	Successful decryption
    
    	* Exiting AES GCM encrypt/decrypt sample in Docker ...

Conclusion

This solution provides an example of how to run CloudHSM client workloads in Docker containers. You can use the solution as a reference to implement your cryptographic application in a way that benefits from the high availability and load balancing built in to CloudHSM without compromising the flexibility that Docker provides for developing, deploying, and running applications.

If you have comments about this post, submit them in the Comments section below.

Want more AWS Security how-to content, news, and feature announcements? Follow us on Twitter.

Derek Tumulak

Derek Tumulak

Derek joined AWS in May 2021 as a Principal Product Manager. He is a data protection and cybersecurity expert who is enthusiastic about assisting customers with a wide range of sophisticated use cases.

Migrate and secure your Windows PKI to AWS with AWS CloudHSM

Post Syndicated from Govindarajan Varadan original https://aws.amazon.com/blogs/security/migrate-and-secure-your-windows-pki-to-aws-with-aws-cloudhsm/

AWS CloudHSM provides a cloud-based hardware security module (HSM) that enables you to easily generate and use your own encryption keys in AWS. Using CloudHSM as part of a Microsoft Active Directory Certificate Services (AD CS) public key infrastructure (PKI) fortifies the security of your certificate authority (CA) private key and ensures the security of the trust hierarchy. In this blog post, we walk you through how to migrate your existing Microsoft AD CS CA private key to the HSM in a CloudHSM cluster.

The challenge

Organizations implement public key infrastructure (PKI) as an application to provide integrity and confidentiality between internal and customer-facing applications. A PKI provides encryption/decryption, message hashing, digital certificates, and digital signatures to ensure these security objectives are met. Microsoft AD CS is a popular choice for creating and managing a CA for enterprise applications such as Active Directory, Exchange, and Systems Center Configuration Manager. Moving your Microsoft AD CS to AWS as part of your overall migration plan allows you to continue to use your existing investment in Windows certificate auto enrollment for users and devices without disrupting existing workflows or requiring new certificates to be issued. However, when you migrate an on-premises infrastructure to the cloud, your security team may determine that storing private keys on the AD CS server’s disk is insufficient for protecting the private key that signs the certificates issued by the CA. Moving from storing private keys on the AD CS server’s disk to a hardware security module (HSM) can provide the added security required to maintain trust of the private keys.

This walkthrough shows you how to migrate your existing AD CS CA private key to the HSM in your CloudHSM cluster. The resulting configuration avoids the security concerns of using keys stored on your AD CS server, and uses the HSM to perform the cryptographic signing operations.

Prerequisites

For this walkthrough, you should have the following in place:

Migrating a domain

In this section, you will walk through migrating your AD CS environment to AWS by using your existing CA certificate and private key that will be secured in CloudHSM. In order to securely migrate the private key into the HSM, you will install the CloudHSM client and import the keys directly from the existing CA server.

This walkthrough includes the following steps:

  1. Create a crypto user (CU) account
  2. Import the CA private key into CloudHSM
  3. Export the CA certificate and database
  4. Configure and import the certificate into the new Windows CA server
  5. Install AD CS on the new server

The operations you perform on the HSM require the credentials of an HSM user. Each HSM user has a type that determines the operations you can perform when authenticated as that user. Next, you will create a crypto user (CU) account to use with your CA servers, to manage keys and to perform cryptographic operations.

To create the CU account

  1. From the on-premises CA server, use the following command to log in with the crypto officer (CO) account that you created when you activated the cluster. Be sure to replace <co_password> with your CO password.
    loginHSM CO admin <co_password>
    

  2. Use the following command to create the CU account. Replace <cu_user> and <cu_password> with the username and password you want to use for the CU.
    createUser CU <cu_user> <cu_password>
    

  3. Use the following command to set the login credentials for the HSM on your system and enable the AWS CloudHSM client for Windows to use key storage providers (KSPs) and Cryptography API: Next Generation (CNG) providers. Replace <cu_user> and <cu_password> with the username and password of the CU.
    set_cloudhsm_credentials.exe --username <cu_user> password <cu_password>
    

Now that you have the CloudHSM client installed and configured on the on-premises CA server, you can import the CA private key from the local server into your CloudHSM cluster.

To import the CA private key into CloudHSM

  1. Open an administrative command prompt and navigate to C:\Program Files\Amazon\CloudHSM.
  2. To identify the unique container name for your CA’s private key, enter certutil -store my to list all certificates stored in the local machine store. The CA certificate will be shown as follows:
    ================ Certificate 0 ================
    Serial Number: <certificate_serial_number>
    Issuer: CN=example-CA, DC=example, DC=com
     NotBefore: 6/25/2021 5:04 PM
     NotAfter: 6/25/2022 5:14 PM
    Subject: CN=example-CA-test3, DC=example, DC=com
    Certificate Template Name (Certificate Type): CA
    CA Version: V0.0
    Signature matches Public Key
    Root Certificate: Subject matches Issuer
    Template: CA, Root Certification Authority
    Cert Hash(sha1): cb7c09cd6c76d69d9682a31fbdbbe01c29cebd82
      Key Container = example-CA-test3
      Unique container name: <unique_container_name>
      Provider = Microsoft Software Key Storage Provider
    Signature test passed
    

  3. Verify that the key is backed by the Microsoft Software Key Storage Provider and make note of the <unique_container_name> from the output, to use it in the following steps.
  4. Use the following command to set the environment variable n3fips_password. Replace <cu_user> and <cu_password> with the username and password for the CU you created earlier for the CloudHSM cluster. This variable will be used by the import_key command in the next step.
    set n3fips_password=<cu_user>:<cu_password>
    

  5. Use the following import_key command to import the private key into the HSM. Replace <unique_container_name> with the value you noted earlier.
    import_key.exe -RSA "<unique_container_name>

The import_key command will report that the import was successful. At this point, your private key has been imported into the HSM, but the on-premises CA server will continue to run using the key stored locally.

The Active Directory Certificate Services Migration Guide for Windows Server 2012 R2 uses the Certification Authority snap-in to migrate the CA database, as well as the certificate and private key. Because you have already imported your private key into the HSM, next you will need to make a slight modification to this process and export the certificate manually, without its private key.

To export the CA certificate and database

  1. To open the Microsoft Management Console (MMC), open the Start menu and in the search field, enter MMC, and choose Enter.
  2. From the File menu, select Add/Remove Snapin.
  3. Select Certificates and choose Add.
  4. You will be prompted to select which certificate store to manage. Select Computer account and choose Next.
  5. Select Local Computer, choose Finish, then choose OK.
  6. In the left pane, choose Personal, then choose Certificates. In the center pane, locate your CA certificate, as shown in Figure 1.
     
    The MMC Certificates snap-in displays the Certificates directories for the local computer. The Personal Certificates location is open displaying the example-CA-test3 certificate.

    Figure 1: Microsoft Management Console Certificates snap-in

  7. Open the context (right-click) menu for the certificate, choose All Tasks, then choose Export.
  8. In the Certificate Export Wizard, choose Next, then choose No, do not export the private key.
  9. Under Select the format you want to use, select Cryptographic Message Syntax Standard – PKCS #7 format file (.p7b) and select Include all certificates in the certification path if possible, as shown in Figure 2.
     
    The Certificate Export Wizard window is displayed.  This windows is prompting for the selection of an export format.  The toggle is selected for Cryptographic Message Syntax Standard – PKCS #7 Certificates (.P7B) and the check box is marked to Include all certificates in the certification path if possible.

    Figure 2: Certificate Export Wizard

  10. Save the file in a location where you’ll be able to locate it later, so you will be able to copy it to the new CA server.
  11. From the Start menu, browse to Administrative Tools, then choose Certificate Authority.
  12. Open the context (right-click) menu for your CA and choose All Tasks, then choose Back up CA.
  13. In the Certificate Authority Backup Wizard, choose Next. For items to back up, select only Certificate database and certificate database log. Leave all other options unselected.
  14. Under Back up to this location, choose Browse and select a new empty folder to hold the backup files, which you will move to the new CA later.
  15. After the backup is complete, in the MMC, open the context (right-click) menu for your CA, choose All Tasks, then choose Stop service.

At this point, until you complete the migration, your CA will no longer be issuing new certificates.

To configure and import the certificate into the new Windows CA server

  1. Open a Remote Desktop session to the EC2 instance that you created in the prerequisite steps, which will serve as your new AD CS certificate authority.
  2. Copy the certificate (.p7b file) backup from the on-premises CA server to the EC2 instance.
  3. On your EC2 instance, locate the certificate you just copied, as shown in Figure 3. Open the certificate to start the import process.
     
    The Certificate Manager tool window shows the Certificates directory for the p7b file that was opened. The main window for this location is displaying the example-CA-test3 certificate.

    Figure 3: Certificate Manager tool

  4. Select Install Certificate. For Store Location, select Local Machine.
  5. Select Place the Certificates in the following store. Allowing Windows to place the certificate automatically will install it as a trusted root certificate, rather than a server certificate.
  6. Select Browse, select the Personal store, and then choose OK.
  7. Choose Next, then choose Finish to complete the certificate installation.

At this point, you’ve installed the public key and certificate from the on-premises CA server to your EC2-based Windows CA server. Next, you need to link this installed certificate with the private key, which is now stored on the CloudHSM cluster, in order to make it functional for signing issued certificates and CRLs.

To link the certificate with the private key

  1. Open an administrative command prompt and navigate to C:\Program Files\Amazon\CloudHSM.
  2. Use the following command to set the environment variable n3fips_password. Replace <cu_user> and <cu_password> with the username and password for the CU that you created earlier for the CloudHSM cluster. This variable will be used by the import_key command in the next step.
    set n3fips_password=<cu_user>:<cu_password>
    

  3. Use the following import_key command to represent all keys stored on the HSM in a new key container in the key storage provider. This step is necessary to allow the cryptography tools to see the CA private key that is stored on the HSM.
    import_key -from HSM -all
    

  4. Use the following Windows certutil command to find your certificate’s unique serial number.
    certutil -store my
    

    Take note of the CA certificate’s serial number.

  5. Use the following Windows certutil command to link the installed certificate with the private key stored on the HSM. Replace <certificate_serial_number> with the value noted in the previous step.
    certutil -repairstore my <certificate_serial_number>
    

  6. Enter the command certutil -store my. The CA certificate will be shown as follows. Verify that the certificate is now linked with the HSM-backed private key. Note that the private key is using the Cavium Key Store Provider. Also note the message Encryption test passed, which means that the private key is usable for encryption.
    ================ Certificate 0 ================
    Serial Number: <certificate_serial_number>
    Issuer: CN=example-CA, DC=example, DC=com
     NotBefore: 6/25/2021 5:04 PM
     NotAfter: 6/25/2022 5:14 PM
    Subject: CN=example-CA, DC=example, DC=com
    Certificate Template Name (Certificate Type): CA
    CA Version: V0.0
    Signature matches Public Key
    Root Certificate: Subject matches Issuer
    Template: CA, Root Certification Authority
    Cert Hash(sha1): cb7c09cd6c76d69d9682a31fbdbbe01c29cebd82
      Key Container = PRV_KEY_IMPORT-6-9-7e5cde
      Provider = Cavium Key Storage Provider
    Private key is NOT exportable
    Encryption test passed
    

Now that your CA certificate and key materials are in place, you are ready to setup your EC2 instance as a CA server.

To install AD CS on the new server

  1. In Microsoft’s documentation to Install the Certificate Authority role on your new EC2 instance, follow steps 1-8. Do not complete the remaining steps, because you will be configuring the CA to use the existing HSM backed certificate and private-key instead of generating a new key.
  2. In Confirm installation selections, select Install.
  3. After your installation is complete, Server Manager will show a notification banner prompting you to configure AD CS. Select Configure Active Directory Certificate Services from this prompt.
  4. Select either Standalone or Enterprise CA installation, based upon the configuration of your on-premises CA.
  5. Select Use Existing Certificate and Private Key and browse to select the CA certificate imported from your on-premises CA server.
  6. Select Next and verify your location for the certificate database files.
  7. Select Finish to complete the wizard.
  8. To restore the CA database backup, from the Start menu, browse to Administrative Tools, then choose Certificate Authority.
  9. Open the context (right-click) menu for the certificate authority and choose All Tasks, then choose Restore CA. Browse to and select the database backup that you copied from the on-premises CA server.

Review the Active Directory Certificate Services Migration Guide for Windows Server 2012 R2 to complete migration of your remaining Microsoft Public Key Infrastructure (PKI) components. Depending on your existing CA environment, these steps may include establishing new CRL and AIA endpoints, configuring Windows Routing and Remote Access to use the new CA, or configuring certificate auto enrollment for Windows clients.

Conclusion

In this post, we walked you through migrating an on-premises Microsoft AD CS environment to an AWS environment that uses AWS CloudHSM to secure the CA private key. By migrating your existing Windows PKI backed by AWS CloudHSM, you can continue to use your Windows certificate auto enrollment for users and devices with your private key secured in a dedicated HSM.

For more information about setting up and managing CloudHSM, see Getting Started with AWS CloudHSM and the AWS Security Blog post CloudHSM best practices to maximize performance and avoid common configuration pitfalls.

If you have feedback about this blog post, submit comments in the Comments section below. You can also start a new thread on the AWS CloudHSM forum to get answers from the community.

Want more AWS Security how-to content, news, and feature announcements? Follow us on Twitter.

Author

Govindarajan Varadan

Govindarajan is a senior solutions architect at AWS based out of Silicon Valley in California. He works with AWS customers to help them achieve their business objectives by innovating at scale, modernizing their applications, and adopting game-changing technologies like AI/ML.

Author

Brian Benscoter

Brian is a senior solutions architect at AWS with a passion for governance at scale and is based in Charlotte, NC. Brian works with enterprise AWS customers to help them design, deploy, and scale applications to achieve their business goals.

Author

Axel Larsson

Axel is an enterprise solutions architect at AWS. He has helped several companies migrate to AWS and modernize their architecture. Axel is passionate about helping organizations establish a solid foundation in the cloud, enabled by security best practices.

Create a portable root CA using AWS CloudHSM and ACM Private CA

Post Syndicated from J.D. Bean original https://aws.amazon.com/blogs/security/create-a-portable-root-ca-using-aws-cloudhsm-and-acm-private-ca/

With AWS Certificate Manager Private Certificate Authority (ACM Private CA) you can create private certificate authority (CA) hierarchies, including root and subordinate CAs, without the investment and maintenance costs of operating an on-premises CA.

In this post, I will explain how you can use ACM Private CA with AWS CloudHSM to operate a hybrid public key infrastructure (PKI) in which the root CA is in CloudHSM, and the subordinate CAs are in ACM Private CA. In this configuration your root CA is portable, meaning that it can be securely moved outside of the AWS Region in which it was created.

Important: This post assumes that you are familiar with the ideas of CA trust and hierarchy. The example in this post uses an advanced hybrid configuration for operating PKI.

The Challenge

The root CA private key of your CA hierarchy represents the anchor of trust for all CAs and end entities that use certificates from that hierarchy. A root CA private key generated by ACM Private CA cannot be exported or transferred to another party. You may require the flexibility to move control of your root CA in the future. Situations where you may want to move control of a root CA include cases such as a divestiture of a corporate division or a major corporate reorganization. In this post, I will describe one solution for a hybrid PKI architecture that allows you to take advantage of the availability of ACM Private CA for certificate issuance, while maintaining the flexibility offered by having direct control and portability of your root CA key. The solution I detail in this post uses CloudHSM to create a root CA key that is predominantly kept inactive, along with a signed subordinate CA that is created and managed online in ACM Private CA that you can use for regular issuing of further subordinate or end-entity certificates. In the next section, I show you how you can achieve this.

The hybrid ACM Private CA and CloudHSM solution

With AWS CloudHSM, you can create and use your own encryption keys that use FIPS 140-2 Level 3 validated HSMs. CloudHSM offers you the flexibility to integrate with your applications by using standard APIs, such as PKCS#11. Most importantly for this solution is that CloudHSM offers a suite of standards-compliant SDKs for you to create, export, and import keys. This can make it easy for you to securely exchange your keys with other commercially-available HSMs, as long as your configurations allow it.”

By using AWS CloudHSM to store and perform cryptographic operations with root CA private key, and by using ACM Private CA to manage a first-level subordinate CA key, you maintain a fully cloud-based infrastructure while still retaining access to – and control over – your root CA key pairs. You can keep the key pair of the root in CloudHSM, where you have the ability to escrow the keys, and only generate and use subordinate CAs in ACM Private CA. Figure 1 shows the high-level architecture of this solution.
 

Figure 1: Architecture overview of portable root CA with AWS CloudHSM and ACM Private CA

Figure 1: Architecture overview of portable root CA with AWS CloudHSM and ACM Private CA

Note: The solution in this post creates the root CA and Subordinate CA 0a but does not demonstrate the steps to use Subordinate CA 0a to issue the remainder of the key hierarchy that is depicted in Figure 1.

This architecture relies on a root CA that you create and manage with AWS CloudHSM. The root CA is generally required for use in the following circumstances:

  1. When you create the PKI.
  2. When you need to replace a root CA.
  3. When you need to configure a certificate revocation list (CRL) or Online Certificate Status Protocol (OCSP).

A single direct subordinate intermediate CA is created and managed with AWS ACM Private CA, which I will refer to as the primary subordinate CA, (Subordinate CA 0a in Figure 1). A certificate signing request (CSR) for this primary subordinate CA is then provided to the CloudHSM root CA, and the signed certificate and certificate chain is then imported to ACM Private CA. The primary subordinate CA in ACM Private CA is issued with the same validity duration as the CloudHSM root CA and in day-to-day practice plays the role of a root CA, acting as the single issuer of additional subordinate CAs. These second-level subordinate CAs (Subordinate CA 0b, Subordinate CA 1b, and Subordinate CA 2b in Figure 1) must be issued with a shorter validity period than the root CA or the primary subordinate CA, and may be used as typical subordinate CAs issuing end-entity certificates or further subordinate CAs as appropriate.

The root CA private key that is stored in CloudHSM can be exported to other commercially-available HSMs through a secure key export process if required, or can be taken offline. The CloudHSM cluster can be shut down, and the root CA private key can be securely retained in a CloudHSM backup. In the event that the root CA must be used, a CloudHSM cluster can be provisioned on demand, and the backup restored temporarily.

Prerequisites

To follow this walkthrough, you need to have the following in place:

Process

In this post, you will create an ACM Private CA subordinate CA that is chained to a root CA that is created and managed with AWS CloudHSM. The high-level steps are as follows:

  1. Create a root CA with AWS CloudHSM
  2. Create a subordinate CA in ACM Private CA
  3. Sign your subordinate CA with your root CA
  4. Import the signed subordinate CA certificate in ACM Private CA
  5. Remove any unused CloudHSM resources to reduce cost

To create a root CA with AWS CloudHSM

  1. To install the AWS CloudHSM dynamic engine for OpenSSL on Amazon Linux 2, open a terminal on your Amazon Linux 2 EC2 instance and enter the following commands:
    wget https://s3.amazonaws.com/cloudhsmv2-software/CloudHsmClient/EL7/cloudhsm-client-dyn-latest.el7.x86_64.rpm
    
    sudo yum install -y ./cloudhsm-client-dyn-latest.el7.x86_64.rpm
    

  2. To set an environment variable that contains your CU credentials, enter the following command, replacing USER and PASSWORD with your own information:
    Export n3fips_password=USER:PASSWORD
    

  3. To generate a private key using the AWS CloudHSM dynamic engine for OpenSSL, enter the following command:
    openssl genrsa -engine cloudhsm -out Root_CA_FAKE_PEM.key
    

    Note: This process exports a fake PEM private key from the HSM and saves it to a file. This file contains a reference to the private key that is stored on the HSM; it doesn’t contain the actual private key. You can use this fake PEM private key file and the AWS CloudHSM engine for OpenSSL to perform CA operations using the referenced private key within the HSM.

  4. To generate a CSR for your certificate using the AWS CloudHSM dynamic engine for OpenSSL, enter the following command:
    openssl req -engine cloudhsm -new -key Root_CA_FAKE_PEM.key -out Root_CA.csr
    

  5. When prompted, enter your values for Country Name, State or Province Name, Locality Name, Organization Name, Organizational Unit Name, and Common Name. For the purposes of this walkthrough, you can leave the other fields blank.

    Figure 2 shows an example result of running the command.
     

     Figure 2: An example certificate signing request for your private key using AWS CloudHSM dynamic engine for OpenSSL

    Figure 2: An example certificate signing request for your private key using AWS CloudHSM dynamic engine for OpenSSL

  6. To sign your root CA with its own private key using the AWS CloudHSM dynamic engine for OpenSSL, enter the following command:
    openssl x509 -engine cloudhsm -req -days 3650 -in Root_CA.csr -signkey Root_CA_FAKE_PEM.key -out Root_CA.crt
    

To create a subordinate CA in ACM Private CA

  1. To create a CA configuration file for your subordinate CA, open a terminal on your Amazon Linux 2 EC2 instance and enter the following command. Replace each user input placeholder with your own information.
    cat ‘{
      "KeyAlgorithm":"RSA_2048",
      "SigningAlgorithm":"SHA256WITHRSA",
      "Subject":{
        "Country":"US"
        "Organization":"Example Corp",
        "OrganizastionalUnit":"Sales",
        "State":"WA",
        "Locality":"Seattle",
        "CommonName":"www.example.com"
      }
    }’ > ca_config.txt
    

  2. To create a sample subordinate CA, enter the following command:
    aws acm-pca create-certificate-authority --certificate-authority-configuration file://ca_config.txt --certificate-authority-type "SUBORDINATE" --tags Key=Name,Value=MyPrivateSubordinateCA
    

    Figure 3 shows a sample successful result of this command.
     

    Figure 3: A sample response from the acm-pca create-certificate-authority command.

    Figure 3: A sample response from the acm-pca create-certificate-authority command.

For more information about how to create a CA in ACM Private CA and additional configuration options, see Procedures for Creating a CA in the ACM Private CA User Guide, and the acm-pca create-certificate-authority command in the AWS CLI Command Reference.

To sign the subordinate CA with the root CA

  1. To retrieve the certificate signing request (CSR) for your subordinate CA, open a terminal on your Amazon Linux 2 EC2 instance and enter the following command. Replace each user input placeholder with your own information.
    aws acm-pca get-certificate-authority-csr --certificate-authority-arn arn:aws:acm-pca:region:account:certificate-authority/12345678-1234-1234-1234-123456789012 > IntermediateCA.csr
    

  2. For demonstration purposes, you can create a sample CA config file by entering the following command:
    cat > ext.conf << EOF
    subjectKeyIdentifier = hash
    authorityKeyIdentifier = keyid,issuer
    basicConstraints = critical, CA:true
    keyUsage = critical, digitalSignature, cRLSign, keyCertSign
    EOF
    

    When you are ready to implement the solution in this post, you will need to create a root CA configuration file for signing the CSR for your subordinate CA. Details of your X.509 infrastructure, and the CA hierarchy within it, are beyond the scope of this post.

  3. To sign the CSR for your subordinate CA using the sample minimalist CA application OpenSSL-CA, enter the following command:
    openssl x509 -engine cloudhsm -extfile ext.conf -req -in IntermediateCA.csr -CA Root_CA.crt -CAkey Root_CA_FAKE_PEM.key -CAcreateserial -days 3650 -sha256 -out IntermediateCA.crt
    

Importing your signed Subordinate CA Certificate

  1. To import the private CA certificate into ACM Private CA, open a terminal on your Amazon Linux 2 EC2 instance and enter the following command. Replace each user input placeholder with your own information.
    aws acm-pca import-certificate-authority-certificate --certificate-authority-arn arn:aws:acm-pca:region:account:certificate-authority/1234678-1234-1234-123456789012 --certificate file://IntermediateCA.crt --certificate-chain file://Root_CA.crt
    

Shutting down CloudHSM resources

After you import your subordinate CA, it is available for use in ACM Private CA. You can configure the subordinate CA with the same validity period as the root CA, so that you can automate CA certificate management using and renewals using ACM without requiring regular access to the root CA. Typically you will create one or more intermediate issuing CAs with a shorter lifetime that chain up to the subordinate CA.

If you have enabled OCSP or CRL for your CA, you will need to maintain your CloudHSM in an active state in order to access the root CA private key for these functions. However, if you have no immediate need to access the root CA you can safely remove the CloudHSM resources while preserving your AWS CloudHSM cluster’s users, policies, and keys in an CloudHSM cluster backup stored encrypted in Amazon Simple Storage Service (Amazon S3).

To remove the CloudHSM resources

  1. (Optional) If you don’t know the ID of the cluster that contains the HSM that you are deleting, or your HSM IP address, open a terminal on your Amazon Linux 2 EC2 instance and enter the describe-clusters command to find them.
  2. Enter the following command, replacing cluster ID with the ID of the cluster that contains the HSM that you are deleting, and replacing HSM IP address with your HSM IP address.
    aws cloudhsmv2 delete-hsm --cluster-id cluster ID --eni-ip HSM IP address
    

To disable expiration of your automatically generated CloudHSM backup

  1. (Optional) If you don’t know the value for your backup ID, open a terminal on your Amazon Linux 2 EC2 instance and enter the describe-backups command to find it.
  2. Enter the following command, replacing backup ID with the ID of the backup for your cluster.
    aws cloudhsmv2 modify-backup-attributes --backup-id backup ID --never-expires
    

Later, when you do need to access your root CA private key in a CloudHSM, create a new HSM in the same cluster, and this action will restore the backup you previously created with the delete HSM operation.

Depending on your particular needs, you may also want to securely export a copy of the root CA private key to an offsite HSM by using key wrapping. You may need to do this to meet your requirements for managing the CA using another HSM or you may want to copy a cluster backup to a different AWS Region for disaster recovery purposes.

Summary

In this post, I explained an approach to establishing a PKI infrastructure using Amazon Certificate Manager Private Certificate Authority (ACM Private CA) with portable root CA private keys created and managed with AWS CloudHSM. This approach allows you to meet specific requirements for root CA portability that cannot be met by ACM Private CA alone. Before adopting this approach in production, you should carefully consider whether a portable root CA is a requirement for your use case, and review the ACM Private CA guide for Planning a Private CA.

If you have feedback about this post, submit comments in the Comments section below. If you have questions about this post, start a new thread on the AWS Certificate Manager forum or contact AWS Support.

Want more AWS Security how-to content, news, and feature announcements? Follow us on Twitter.

Author

J.D. Bean

J.D. Bean is a Senior Security Specialist Solutions Architect for AWS Strategic Accounts based out of New York City. His interests include security, privacy, and compliance. He is passionate about his work enabling AWS customers’ successful cloud journeys. J.D. holds a Bachelor of Arts from The George Washington University and a Juris Doctor from New York University School of Law.

CloudHSM best practices to maximize performance and avoid common configuration pitfalls

Post Syndicated from Esteban Hernández original https://aws.amazon.com/blogs/security/cloudhsm-best-practices-to-maximize-performance-and-avoid-common-configuration-pitfalls/

AWS CloudHSM provides fully-managed hardware security modules (HSMs) in the AWS Cloud. CloudHSM automates day-to-day HSM management tasks including backups, high availability, provisioning, and maintenance. You’re still responsible for all user management and application integration.

In this post, you will learn best practices to help you maximize the performance of your workload and avoid common configuration pitfalls in the following areas:

Administration of CloudHSM

The administration of CloudHSM includes those tasks necessary to correctly set up your CloudHSM cluster, and to manage your users and keys in a secure and efficient manner.

Initialize your cluster with a customer key pair

To initialize a new CloudHSM cluster, you will first create a new RSA key pair, which we will call the customer key pair. First, generate a self-signed certificate using the customer key pair. Then, you sign the cluster’s certificate by using the customer public key as described in Initialize the Cluster section in the AWS CloudHSM User Guide. The resulting signed cluster certificate, as shown in Figure 1, identifies your CloudHSM cluster as yours.

Figure 1: CloudHSM key hierarchy and customer generated keys

Figure 1: CloudHSM key hierarchy and customer generated keys

It’s important to use best practices when you generate and store the customer private key. The private key is a binding secret between you and your cluster, and cannot be rotated. We therefore recommend that you create the customer private key in an offline HSM and store the HSM securely. Any entity (organization, person, system) that demonstrates possession of the customer private key will be considered an owner of the cluster and the data it contains. In this procedure, you are using the customer private key to claim a new cluster, but in the future you could also use it to demonstrate ownership of the cluster in scenarios such as cloning and migration.

Manage your keys with crypto user (CU) accounts

The HSMs provided by CloudHSM support different types of HSM users, each with specific entitlements. Crypto users (CUs) generate, manage, and use keys. If you’ve worked with HSMs in the past, you can think of CUs as similar to partitions. However, CU accounts are more flexible. The CU that creates a key owns the key, and can share it with other CUs. The shared key can be used for operations in accordance with the key’s attributes, but the CU that the key was shared with cannot manage it – that is, they cannot delete, wrap, or re-share the key.

From a security standpoint, it is a best practice for you to have multiple CUs with different scopes. For example, you can have different CUs for different classes of keys. As another example, you can have one CU account to create keys, and then share these keys with one or more CU accounts that your application leverages to utilize keys. You can also have multiple shared CU accounts, to simplify rotation of credentials in production applications.

Warning: You should be careful when deleting CU accounts. If the owner CU account for a key is deleted, the key can no longer be used. You can use the cloudhsm_mgmt_util tool command findAllKeys to identify which keys are owned by a specified CU. You should rotate these keys before deleting a CU. As part of your key generation and rotation scheme, consider using labels to identify current and legacy keys.

Manage your cluster by using crypto officer (CO) accounts

Crypto officers (COs) can perform user management operations including change password, create user, and delete user. COs can also set and modify cluster policies.

Important: When you add or remove a user, or change a password, it’s important to ensure that you connect to all the HSMs in a cluster, to keep them synchronized and avoid inconsistencies that can result in errors. It is a best practice to use the Configure tool with the –m option to refresh the cluster configuration file before making mutating changes to the cluster. This helps to ensure that all active HSMs in the cluster are properly updated, and prevents the cluster from becoming desynchronized. You can learn more about safe management of your cluster in the blog post Understanding AWS CloudHSM Cluster Synchronization. You can verify that all HSMs in the cluster have been added by checking the /opt/cloudhsm/etc/cloudhsm_mgmt_util.cfg file.

After a password has been set up or updated, we strongly recommend that you keep a record in a secure location. This will help you avoid lockouts due to erroneous passwords, because clients will fail to log in to HSM instances that do not have consistent credentials. Depending on your security policy, you can use AWS Secrets Manager, specifying a customer master key created in AWS Key Management Service (KMS), to encrypt and distribute your secrets – secrets in this case being the CU credentials used by your CloudHSM clients.

Use quorum authentication

To prevent a single CO from modifying critical cluster settings, a best practice is to use quorum authentication. Quorum authentication is a mechanism that requires any operation to be authorized by a minimum number (M) of a group of N users and is therefore also known as M of N access control.

To prevent lock-outs, it’s important that you have at least two more COs than the M value you define for the quorum minimum value. This ensures that if one CO gets locked out, the others can safely reset their password. Also be careful when deleting users, because if you fall under the threshold of M, you will be unable to create new users or authorize any other operations and will lose the ability to administer your cluster.

If you do fall below the minimum quorum required (M), or if all of your COs end up in a locked-out state, you can revert to a previously known good state by restoring from a backup to a new cluster. CloudHSM automatically creates at least one backup every 24 hours. Backups are event-driven. Adding or removing HSMs will trigger additional backups.

Configuration

CloudHSM is a fully managed service, but it is deployed within the context of an Amazon Virtual Private Cloud (Amazon VPC). This means there are aspects of the CloudHSM service configuration that are under your control, and your choices can positively impact the resilience of your solutions built using CloudHSM. The following sections describe the best practices that can make a difference when things don’t go as expected.

Use multiple HSMs and Availability Zones to optimize resilience

When you’re optimizing a cluster for high availability, one of the aspects you have control of is the number of HSMs in the cluster and the Availability Zones (AZs) where the HSMs get deployed. An AZ is one or more discrete data centers with redundant power, networking, and connectivity in an AWS Region, which can be formed of multiple physical buildings, and have different risk profiles between them. Most of the AWS Regions have three Availability Zones, and some have as many as six.

AWS recommends placing at least two HSMs in the cluster, deployed in different AZs, to optimize data loss resilience and improve the uptime in case an individual HSM fails. As your workloads grow, you may want to add extra capacity. In that case, it is a best practice to spread your new HSMs across different AZs to keep improving your resistance to failure. Figure 2 shows an example CloudHSM architecture using multiple AZs.

Figure 2: CloudHSM architecture using multiple AZs

Figure 2: CloudHSM architecture using multiple AZs

When you create a cluster in a Region, it’s a best practice to include subnets from every available AZ of that Region. This is important, because after the cluster is created, you cannot add additional subnets to it. In some Regions, such as Northern Virginia (us-east-1), CloudHSM is not yet available in all AZs at the time of writing. However, you should still include subnets from every AZ, even if CloudHSM is currently not available in that AZ, to allow your cluster to use those additional AZs if they become available.

Increase your resiliency with cross-Region backups

If your threat model involves a failure of the Region itself, there are steps you can take to prepare. First, periodically create copies of the cluster backup in the target Region. You can see the blog post How to clone an AWS CloudHSM cluster across regions to find an extensive description of how to create copies and deploy a clone of an active CloudHSM cluster.

As part of your change management process, you should keep copies of important files, such as the files stored in /opt/cloudhsm/etc/. If you customize the certificates that you use to establish communication with your HSM, you should back up those certificates as well. Additionally, you can use configuration scripts with the AWS Systems Manager Run Command to set up two or more client instances that use exactly the same configuration in different Regions.

The managed backup retention feature in CloudHSM automatically deletes out-of-date backups for an active cluster. However, because backups that you copy across Regions are not associated with an active cluster, they are not in scope of managed backup retention and you must delete out-of-date backups yourself. Backups are secure and contain all users, policies, passwords, certificates and keys for your HSM, so it’s important to delete older backups when you rotate passwords, delete a user, or retire keys. This ensures that you cannot accidentally bring older data back to life by creating a new cluster that uses outdated backups.

The following script shows you how to delete all backups older than a certain point in time. You can also download the script from S3.

#!/usr/bin/env python

#
# Copyright Amazon.com, Inc. or its affiliates. All Rights Reserved.
# SPDX-License-Identifier: MIT-0
#
# Reference Links:
# https://docs.python.org/3/library/datetime.html#strftime-and-strptime-behavior
# https://docs.python.org/3/library/re.html
# https://boto3.amazonaws.com/v1/documentation/api/latest/reference/services/cloudhsmv2.html#CloudHSMV2.Client.describe_backups
# https://docs.python.org/3/library/datetime.html#datetime-objects
# https://pypi.org/project/typedate/
# https://pypi.org/project/pytz/
#

import boto3, time, datetime, re, argparse, typedate, json

def main():
    bkparser = argparse.ArgumentParser(prog='backdel',
                                    usage='%(prog)s [-h] --region --clusterID [--timestamp] [--timezone] [--deleteall] [--dryrun]',
                                    description='Deletes CloudHSMv2 backups from a given point in time\n')
    bkparser.add_argument('--region',
                    metavar='-r',
                    dest='region',
                    type=str,
                    help='region where the backups are stored',
                    required=True)
    bkparser.add_argument('--clusterID',
                    metavar='-c',
                    dest='clusterID',
                    type=str,
                    help='CloudHSMv2 cluster_id for which you want to delete backups',
                    required=True)
    bkparser.add_argument('--timestamp',
                    metavar='-t',
                    dest='timestamp',
                    type=str,
                    help="Enter the timestamp to filter the backups that should be deleted:\n   Backups older than the timestamp will be deleted.\n  Timestamp ('MM/DD/YY', 'MM/DD/YYYY' or 'MM/DD/YYYY HH:mm')",
                    required=False)
    bkparser.add_argument('--timezone',
                    metavar='-tz',
                    dest='timezone',
                    type=typedate.TypeZone(),
                    help="Enter the timezone to adjust the timestamp.\n Example arguments:\n --timezone '-0200' , --timezone '05:00' , --timezone GMT #If the pytz module has been installed  ",
                    required=False)
    bkparser.add_argument('--dryrun',
                    dest='dryrun',
                    action='store_true',
                    help="Set this flag to simulate the deletion",
                    required=False)
    bkparser.add_argument('--deleteall',
                    dest='deleteall',
                    action='store_true',
                    help="Set this flag to delete all the back ups for the specified cluster",
                    required=False)
    args = bkparser.parse_args()
    client = boto3.client('cloudhsmv2', args.region)
    cluster_id = args.clusterID 
    timestamp_str = args.timestamp 
    timezone = args.timezone
    dry_true = args.dryrun
    delall_true = args.deleteall
    delete_all_backups_before(client, cluster_id, timestamp_str, timezone, dry_true, delall_true)

def delete_all_backups_before(client, cluster_id, timestamp_str, timezone, dry_true, delall_true, max_results=25):
    timestamp_datetime = None
    if delall_true == True and not timestamp_str:
        
        print("\nAll backups will be deleted...\n")
    
    elif delall_true == True and timestamp_str:
    
        print("\nUse of incompatible instructions: --timestamp  and --deleteall cannot be used in the same invocation\n")
        return
    
    elif not timestamp_str :
    
        print("\nParameter missing: --timestamp must be defined\n")
        return
    
    else :
        # Valid formats: 'MM/DD/YY', 'MM/DD/YYYY' or 'MM/DD/YYYY HH:mm'
        if re.match(r'^\d\d/\d\d/\d\d\d\d \d\d:\d\d$', timestamp_str):
            try:
                timestamp_datetime = datetime.datetime.strptime(timestamp_str, "%m/%d/%Y %H:%M")
            except Exception as e:
                print("Exception: %s" % str(e))
                return
        elif re.match(r'^\d\d/\d\d/\d\d\d\d$', timestamp_str):
            try:
                timestamp_datetime = datetime.datetime.strptime(timestamp_str, "%m/%d/%Y")
            except Exception as e:
                print("Exception: %s" % str(e))
                return
        elif re.match(r'^\d\d/\d\d/\d\d$', timestamp_str):
            try:
                timestamp_datetime = datetime.datetime.strptime(timestamp_str, "%m/%d/%y")
            except Exception as e:
                print("Exception: %s" % str(e))
                return
        else:
            print("The format of the specified timestamp is not supported by this script. Aborting...")
            return

        print("Backups older than %s will be deleted...\n" % timestamp_str)

    try:
        response = client.describe_backups(MaxResults=max_results, Filters={"clusterIds": [cluster_id]}, SortAscending=True)
    except Exception as e:
        print("DescribeBackups failed due to exception: %s" % str(e))
        return

    failed_deletions = []
    while True:
        if 'Backups' in response.keys() and len(response['Backups']) > 0:
            for backup in response['Backups']:
                if timestamp_str and not delall_true:
                    if timezone != None:
                        timestamp_datetime = timestamp_datetime.replace(tzinfo=timezone)
                    else:
                        timestamp_datetime = timestamp_datetime.replace(tzinfo=backup['CreateTimestamp'].tzinfo)

                    if backup['CreateTimestamp'] > timestamp_datetime:
                        break

                print("Deleting backup %s whose creation timestamp is %s:" % (backup['BackupId'], backup['CreateTimestamp']))
                try:
                    if not dry_true :
                        delete_backup_response = client.delete_backup(BackupId=backup['BackupId'])
                except Exception as e:
                    print("DeleteBackup failed due to exception: %s" % str(e))
                    failed_deletions.append(backup['BackupId'])
                print("Sleeping for 1 second to avoid throttling. \n")
                time.sleep(1)

        if 'NextToken' in response.keys():
            try:
                response = client.describe_backups(MaxResults=max_results, Filters={"clusterIds": [cluster_id]}, SortAscending=True, NextToken=response['NextToken'])
            except Exception as e:
                print("DescribeBackups failed due to exception: %s" % str(e))
        else:
            break

    if len(failed_deletions) > 0:
        print("FAILED backup deletions: " + failed_deletions)

if __name__== "__main__":
    main()

Use Amazon VPC security features to control access to your cluster

Because each cluster is deployed inside an Amazon VPC, you should use the familiar controls of Amazon VPC security groups and network access control lists (network ACLs) to limit what instances are allowed to communicate with your cluster. Even though the CloudHSM cluster itself is protected in depth by your login credentials, Amazon VPC offers a useful first line of defense. Because it’s unlikely that you need your communications ports to be reachable from the public internet, it’s a best practice to take advantage of the Amazon VPC security features.

Managing PKI root keys

A common use case for CloudHSM is setting up public key infrastructure (PKI). The root key for PKI is a long-lived key which forms the basis for certificate hierarchies and worker keys. The worker keys are the private portion of the end-entity certificates and are meant for routine rotation, while root PKI keys are generally fixed. As a characteristic, these keys are infrequently used, with very long validity periods that are often measured in decades. Because of this, it is a best practice to not rely solely on CloudHSM to generate and store your root private key. Instead, you should generate and store the root key in an offline HSM (this is frequently referred to as an offline root) and periodically generate intermediate signing key pairs on CloudHSM.

If you decide to store and use the root key pair with CloudHSM, you should take precautions. You can either create the key in an offline HSM and import it into CloudHSM for use, or generate the key in CloudHSM and wrap it out to an offline HSM. Either way, you should always have a copy of the key, usable independently of CloudHSM, in an offline vault. This helps to protect your trust infrastructure against forgotten CloudHSM credentials, lost application code, changing technology, and other such scenarios.

Optimize performance by managing your cluster size

It is important to size your cluster correctly, so that you can maintain its performance at the desired level. You should measure throughput rather than latency, and keep in mind that parallelizing transactions is the key to getting the most performance out of your HSM. You can maximize how efficiently you use your HSM by following these best practices:

  1. Use threading at 50-100 threads per application. The impact of network round-trip delays is magnified if you serialize each operation. The exception to this rule is generating persistent keys – these are serialized on the HSM to ensure consistent state, and so parallelizing these will yield limited benefit.
  2. Use sufficient resources for your CloudHSM client. The CloudHSM client handles all load balancing, failover, and high availability tasks as your application transacts with your HSM cluster. You should ensure that the CloudHSM client has enough computational resources so that the client itself doesn’t become your performance bottleneck. Specifically, do not use resource-limited instances such as t.nano or t.micro instances to run the client. To learn more, see the Amazon Elastic Compute Cloud (EC2) instance types online documentation.
  3. Use cryptographically accelerated commands. There are two types of HSM commands: management commands (such as looking up a key based on its attributes) and cryptographically accelerated commands (such as operating on a key with a known key handle). You should rely on cryptographically accelerated commands as much as possible for latency-sensitive operations. As one example, you can cache the key handles for frequently used keys or do it per application run, rather than looking up a key handle each time. As another example, you can leave frequently used keys on the HSM, rather than unwrapping or importing them prior to each use.
  4. Authenticate once per session. Pay close attention to session logins. Your individual CloudHSM client should create just one session per execution, which is authenticated using the credentials of one cryptographic user. There’s no need to reauthenticate the session for every cryptographic operation.
  5. Use the PKCS #11 library. If performance is critical for your application and you can choose from the multiple software libraries to integrate with your CloudHSM cluster, give preference to PKCS #11, as it tends to give an edge on speed.
  6. Use token keys. For workloads with a limited number of keys, and for which high throughput is required, use token keys. When you create or import a key as a token key, it is available in all the HSMs in the cluster. However, when it is created as a session key with the “-sess” option, it only exists in the context of a single HSM.

After you maximize throughput by using these best practices, you can add HSMs to your cluster for additional throughput. Other reasons to add HSMs to your cluster include if you hit audit log buffering limits while rapidly generating or importing and then deleting keys, or if you run out of capacity to create more session keys.

Error handling

Occasionally, an HSM may fail or lose connectivity during a cryptographic operation. The CloudHSM client does not automatically retry failed operations because it’s not state-aware. It’s a best practice for you to retry as needed by handling retries in your application code. Before retrying, you may want to ensure that your CloudHSM client is still running, that your instance has connectivity, and that your session is still logged in (if you are using explicit login). For an overview of the considerations for retries, see the Amazon Builders’ Library article Timeouts, retries, and backoff with jitter.

Summary

In this post, we’ve outlined a set of best practices for the use of CloudHSM, whether you want to improve the performance and durability of the solution, or implement robust access control.

To get started building and applying these best practices, a great way is to look at the AWS samples we have published on GitHub for the Java Cryptography Extension (JCE) and for the Public-Key Cryptography Standards number 11 (PKCS11).

If you have feedback about this blog post, submit comments in the Comments session below. You can also start a new thread on the AWS CloudHSM forum to get answers from the community.

Want more AWS Security how-to content, news, and feature announcements? Follow us on Twitter.

Author

Esteban Hernández

Esteban is a Specialist Solutions Architect for Security & Compliance at AWS where he works with customers to create secure and robust architectures that help to solve business problems. He is interested in topics like Identity and Cryptography. Outside of work, he enjoys science fiction and taking new challenges like learning to sail.

Author

Avni Rambhia

Avni is the product manager for AWS CloudHSM. As part of AWS Cryptography, she drives technologies and defines best practices that help customers build secure, reliable workloads in the AWS Cloud. Outside of work, she enjoys hiking, travel and philosophical debates with her children.

How to implement a hybrid PKI solution on AWS

Post Syndicated from Max Farnga original https://aws.amazon.com/blogs/security/how-to-implement-a-hybrid-pki-solution-on-aws/

As customers migrate workloads into Amazon Web Services (AWS) they may be running a combination of on-premises and cloud infrastructure. When certificates are issued to this infrastructure, having a common root of trust to the certificate hierarchy allows for consistency and interoperability of the Public Key Infrastructure (PKI) solution.

In this blog post, I am going to show how you can plan and deploy a PKI that enables certificates to be issued across a hybrid (cloud & on-premises) environment with a common root. This solution will use Windows Server Certificate Authority (Windows CA), also known as Active Directory Certificate Services (ADCS) to distribute and manage x.509 certificates for Active Directory users, domain controllers, routers, workstations, web servers, mobile and other devices. And an AWS Certificate Manager Private Certificate Authority (ACM PCA) to manage certificates for AWS services, including API Gateway, CloudFront, Elastic Load Balancers, and other workloads.

The Windows CA also integrates with AWS Cloud HSM to securely store the private keys that sign the certificates issued by your CAs, and use the HSM to perform the cryptographic signing operations. In Figure 1, the diagram below shows how ACM PCA and Windows CA can be used together to issue certificates across a hybrid environment.

Figure 1: Hybrid PKI hierarchy

Figure 1: Hybrid PKI hierarchy

PKI is a framework that enables a safe and trustworthy digital environment through the use of a public and private key encryption mechanism. PKI maintains secure electronic transactions on the internet and in private networks. It also governs the verification, issuance, revocation, and validation of individual systems in a network.

There are two types of PKI:

This blog post focuses on the implementation of a private PKI, to issue and manage private certificates.

When implementing a PKI, there can be challenges from security, infrastructure, and operations standpoints, especially when dealing with workloads across multiple platforms. These challenges include managing isolated PKIs for individual networks across on-premises and AWS cloud, managing PKI with no Hardware Security Module (HSM) or on-premises HSM, and lack of automation to rapidly scale the PKI servers to meet demand.

Figure 2 shows how an internal PKI can be limited to a single network. In the following example, the root CA, issuing CAs, and certificate revocation list (CRL) distribution point are all in the same network, and issue cryptographic certificates only to users and devices in the same private network.

Figure 2: On-premises PKI hierarchy in a single network

Figure 2: On-premises PKI hierarchy in a single network

Planning for your PKI system deployment

It’s important to carefully consider your business requirements, encryption use cases, corporate network architecture, and the capabilities of your internal teams. You must also plan for how to manage the confidentiality, integrity, and availability of the cryptographic keys. These considerations should guide the design and implementation of your new PKI system.

In the below section, we outline the key services and components used to design and implement this hybrid PKI solution.

Key services and components for this hybrid PKI solution

Solution overview

This hybrid PKI can be used if you need a new private PKI, or want to upgrade from an existing legacy PKI with a cryptographic service provider (CSP) to a secure PKI with Windows Cryptography Next Generation (CNG). The hybrid PKI design allows you to seamlessly manage cryptographic keys throughout the IT infrastructure of your organization, from on-premises to multiple AWS networks.

Figure 3: Hybrid PKI solution architecture

Figure 3: Hybrid PKI solution architecture

The solution architecture is depicted in the preceding figure—Figure 3. The solution uses an offline root CA that can be operated on-premises or in an Amazon VPC, while the subordinate Windows CAs run on EC2 instances and are integrated with CloudHSM for key management and storage. To insulate the PKI from external access, the CloudHSM cluster are deployed in protected subnets, the EC2 instances are deployed in private subnets, and the host VPC has site-to-site network connectivity to the on-premises network. The Amazon EC2 volumes are encrypted with AWS KMS customer managed keys. Users and devices connect and enroll to the PKI interface through a Network Load Balancer.

This solution also includes a subordinate ACM private CA to issue certificates that will be installed on AWS services that are integrated with ACM. For example, ELB, CloudFront, and API Gateway. This is so that the certificates users see are always presented from your organization’s internal PKI.

Prerequisites for deploying this hybrid internal PKI in AWS

  • Experience with AWS Cloud, Windows Server, and AD CS is necessary to deploy and configure this solution.
  • An AWS account to deploy the cloud resources.
  • An offline root CA, running on Windows 2016 or newer, to sign the CloudHSM and the issuing CAs, including the private CA and Windows CAs. Here is an AWS Quick-Start article to deploy your Root CA in a VPC. We recommend installing the Windows Root CA in its own AWS account.
  • A VPC with at least four subnets. Two or more public subnets and two or more private subnets, across two or more AZs, with secure firewall rules, such as HTTPS to communicate with your PKI web servers through a load balancer, along with DNS, RDP and other port to communicate within your organization network. You can use this CloudFormation sample VPC template to help you get started with your PKI VPC provisioning.
  • Site-to-site AWS Direct Connect or VPN connection from your VPC to the on-premises network and other VPCs to securely manage multiple networks.
  • Windows 2016 EC2 instances for the subordinate CAs.
  • An Active Directory environment that has access to the VPC that hosts the PKI servers. This is required for a Windows Enterprise CA implementation.

Deploy the solution

The below CloudFormation Code and instructions will help you deploy and configure all the AWS components shown in the above architecture diagram. To implement the solution, you’ll deploy a series of CloudFormation templates through the AWS Management Console.

If you’re not familiar with CloudFormation, you can learn about it from Getting started with AWS CloudFormation. The templates for this solution can be deployed with the CloudFormation console, AWS Service Catalog, or a code pipeline.

Download and review the template bundle

To make it easier to deploy the components of this internal PKI solution, you download and deploy a template bundle. The bundle includes a set of CloudFormation templates, and a PowerShell script to complete the integration between CloudHSM and the Windows CA servers.

To download the template bundle

  1. Download or clone the solution source code repository from AWS GitHub.
  2. Review the descriptions in each template for more instructions.

Deploy the CloudFormation templates

Now that you have the templates downloaded, use the CouldFormation console to deploy them.

To deploy the VPC modification template

Deploy this template into an existing VPC to create the protected subnets to deploy a CloudHSM cluster.

  1. Navigate to the CloudFormation console.
  2. Select the appropriate AWS Region, and then choose Create Stack.
  3. Choose Upload a template file.
  4. Select 01_PKI_Automated-VPC_Modifications.yaml as the CloudFormation stack file, and then choose Next.
  5. On the Specify stack details page, enter a stack name and the parameters. Some parameters have a dropdown list that you can use to select existing values.

    Figure 4: Example of a <strong>Specify stack details</strong> page

    Figure 4: Example of a Specify stack details page

  6. Choose Next, Next, and Create Stack.

To deploy the PKI CDP S3 bucket template

This template creates an S3 bucket for the CRL and AIA distribution point, with initial bucket policies that allow access from the PKI VPC, and PKI users and devices from your on-premises network, based on your input. To grant access to additional AWS accounts, VPCs, and on-premises networks, please refer to the instructions in the template.

  1. Navigate to the CloudFormation console.
  2. Choose Upload a template file.
  3. Select 02_PKI_Automated-Central-PKI_CDP-S3bucket.yaml as the CloudFormation stack file, and then choose Next.
  4. On the Specify stack details page, enter a stack name and the parameters.
  5. Choose Next, Next, and Create Stack

To deploy the ACM Private CA subordinate template

This step provisions the ACM private CA, which is signed by an existing Windows root CA. Provisioning your private CA with CloudFormation makes it possible to sign the CA with a Windows root CA.

  1. Navigate to the CloudFormation console.
  2. Choose Upload a template file.
  3. Select 03_PKI_Automated-ACMPrivateCA-Provisioning.yaml as the CloudFormation stack file, and then choose Next.
  4. On the Specify stack details page, enter a stack name and the parameters. Some parameters have a dropdown list that you can use to select existing values.
  5. Choose Next, Next, and Create Stack.

Assign and configure certificates

After deploying the preceding templates, use the console to assign certificate renewal permissions to ACM and configure your certificates.

To assign renewal permissions

  1. In the ACM Private CA console, choose Private CAs.
  2. Select your private CA from the list.
  3. Choose the Permissions tab.
  4. Select Authorize ACM to use this CA for renewals.
  5. Choose Save.

To sign private CA certificates with an external CA (console)

  1. In the ACM Private CA console, select your private CA from the list.
  2. From the Actions menu, choose Import CA certificate. The ACM Private CA console returns the certificate signing request (CSR).
  3. Choose Export CSR to a file and save it locally.
  4. Choose Next.
    1. Use your existing Windows root CA.
    2. Copy the CSR to the root CA and sign it.
    3. Export the signed CSR in base64 format.
    4. Export the <RootCA>.crt certificate in base64 format.
  5. On the Upload the certificates page, upload the signed CSR and the RootCA certificates.
  6. Choose Confirm and Import to import the private CA certificate.

To request a private certificate using the ACM console

Note: Make a note of IDs of the certificate you configure in this section to use when you deploy the HTTPS listener CloudFormation templates.

  1. Sign in to the console and open the ACM console.
  2. Choose Request a certificate.
  3. On the Request a certificate page, choose Request a private certificate and Request a certificate to continue.
  4. On the Select a certificate authority (CA) page, choose Select a CA to view the list of available private CAs.
  5. Choose Next.
  6. On the Add domain names page, enter your domain name. You can use a fully qualified domain name, such as www.example.com, or a bare—also called apex—domain name such as example.com. You can also use an asterisk (*) as a wild card in the leftmost position to include all subdomains in the same root domain. For example, you can use *.example.com to include all subdomains of the root domain example.com.
  7. To add another domain name, choose Add another name to this certificate and enter the name in the text box.
  8. (Optional) On the Add tags page, tag your certificate.
  9. When you finish adding tags, choose Review and request.
  10. If the Review and request page contains the correct information about your request, choose Confirm and request.

Note: You can learn more at Requesting a Private Certificate.

To share the private CA with other accounts or with your organization

You can use ACM Private CA to share a single private CA with multiple AWS accounts. To share your private CA with multiple accounts, follow the instructions in How to use AWS RAM to share your ACM Private CA cross-account.

Continue deploying the CloudFormation templates

With the certificates assigned and configured, you can complete the deployment of the CloudFormation templates for this solution.

To deploy the Network Load Balancer template

In this step, you provision a Network Load Balancer.

  1. Navigate to the CloudFormation console.
  2. Choose Upload a template file.
  3. Select 05_PKI_Automated-LoadBalancer-Provisioning.yaml as the CloudFormation stack file, and then choose Next.
  4. On the Specify stack details page, enter a stack name and the parameters. Some parameters are filled in automatically or have a dropdown list that you can use to select existing values.
  5. Choose Next, Next, and Create Stack.

To deploy the HTTPS listener configuration template

The following steps create the HTTPS listener with an initial configuration for the load balancer.

  1. Navigate to the CloudFormation console:
  2. Choose Upload a template file.
  3. Select 06_PKI_Automated-HTTPS-Listener.yaml as the CloudFormation stack file, and then choose Next.
  4. On the Specify stack details page, enter the stack name and the parameters. Some parameters are filled in automatically or have a dropdown list that you can use to select existing values.
  5. Choose Next, Next, and Create Stack.

To deploy the AWS KMS CMK template

In this step, you create an AWS KMS CMK to encrypt EC2 EBS volumes and other resources. This is required for the EC2 instances in this solution.

  1. Open the CloudFormation console.
  2. Choose Upload a template file.
  3. Select 04_PKI_Automated-KMS_CMK-Creation.yaml as the CloudFormation stack file, and then choose Next.
  4. On the Specify stack details page, enter a stack name and the parameters.
  5. Choose Next, Next, and Create Stack.

To deploy the Windows EC2 instances provisioning template

This template provisions a purpose-built Windows EC2 instance within an existing VPC. It will provision an EC2 instance for the Windows CA, with KMS to encrypt the EBS volume, an IAM instance profile and automatically installs SSM agent on your instance.

It also has optional features and flexibilities. For example, the template can automatically create new target group, or add instance to existing target group. It can also configure listener rules, create Route 53 records and automatically join an Active Directory domain.

Note: The AWS KMS CMK and the IAM role are required to provision the EC2, while the target group, listener rules, and domain join features are optional.

  1. Navigate to the CloudFormation console.
  2. Choose Upload a template file.
  3. Select 07_PKI_Automated-EC2-Servers-Provisioning.yaml as the CloudFormation stack file, and then choose Next.
  4. On the Specify stack details page, enter the stack name and the parameters. Some parameters are filled in automatically or have a dropdown list that you can use to select existing values.

    Note: The Optional properties section at the end of the parameters list isn’t required if you’re not joining the EC2 instance to an Active Directory domain.

  5. Choose Next, Next, and Create Stack.

Create and initialize a CloudHSM cluster

In this section, you create and configure CloudHSM within the VPC subnets provisioned in previous steps. After the CloudHSM cluster is completed and signed by the Windows root CA, it will be integrated with the EC2 Windows servers provisioned in previous sections.

To create a CloudHSM cluster

  1. Log in to the AWS account, open the console, and navigate to the CloudHSM.
  2. Choose Create cluster.
  3. In the Cluster configuration section:
    1. Select the VPC you created.
    2. Select the three private subnets you created across the Availability Zones in previous steps.
  4. Choose Next: Review.
  5. Review your cluster configuration, and then choose Create cluster.

To create an HSM

  1. Open the console and go to the CloudHSM cluster you created in the preceding step.
  2. Choose Initialize.
  3. Select an AZ for the HSM that you’re creating, and then choose Create.

To download and sign a CSR

Before you can initialize the cluster, you must download and sign a CSR generated by the first HSM of the cluster.

  1. Open the CloudHSM console.
  2. Choose Initialize next to the cluster that you created previously.
  3. When the CSR is ready, select Cluster CSR to download it.

    Figure 5: Download CSR

    Figure 5: Download CSR

To initialize the cluster

  1. Open the CloudHSM console.
  2. Choose Initialize next to the cluster that you created previously.
  3. On the Download certificate signing request page, choose Next. If Next is not available, choose one of the CSR or certificate links, and then choose Next.
  4. On the Sign certificate signing request (CSR) page, choose Next.
  5. Use your existing Windows root CA.
    1. Copy the CSR to the root CA and sign it.
    2. Export the signed CSR in base64 format.
    3. Also export the <RootCA>.crt certificate in base64 format.
  6. On the Upload the certificates page, upload the signed CSR and the root CA certificates.
  7. Choose Upload and initialize.

Integrate CloudHSM cluster to Windows Server AD CS

In this section you use a script that provides step-by-step instructions to help you successfully integrate your Windows Server CA with AWS CloudHSM.

To integrate CloudHSM cluster to Windows Server AD CS

Open the script 09_PKI_AWS_CloudHSM-Windows_CA-Integration-Playbook.txt and follow the instructions to complete the CloudHSM integration with the Windows servers.

Install and configure Windows CA with CloudHSM

When the CloudHSM integration is complete, install and configure your Windows Server CA with the CloudHSM key storage provider and select RSA#Cavium Key Storage Provider as your cryptographic provider.

Conclusion

By deploying the hybrid solution in this post, you’ve implemented a PKI to manage security across all workloads in your AWS accounts and in your on-premises network.

With this solution, you can use a private CA to issue Transport Layer Security (TLS) certificates to your Application Load Balancers, Network Load Balancers, CloudFront, and other AWS workloads across multiple accounts and VPCs. The Windows CA lets you enhance your internal security by binding your internal users, digital devices, and applications to appropriate private keys. You can use this solution with TLS, Internet Protocol Security (IPsec), digital signatures, VPNs, wireless network authentication, and more.

Additional resources

If you have feedback about this post, submit comments in the Comments section below. If you have questions about this post, start a new thread on the AWS Certificate Manager forum or CloudHSM forum or contact AWS Support.

Want more AWS Security how-to content, news, and feature announcements? Follow us on Twitter.

Author

Max Farnga

Max is a Security Transformation Consultant with AWS Professional Services – Security, Risk and Compliance team. He has a diverse technical background in infrastructure, security, and cloud computing. He helps AWS customers implement secure and innovative solutions on the AWS cloud.

Signing executables with HSM-backed certificates using multiple Windows instances

Post Syndicated from Karim Hamdy Abdelmonsif Ibrahim original https://aws.amazon.com/blogs/security/signing-executables-with-hsm-backed-certificates-using-multiple-windows-instances/

Customers use code signing certificates to digitally sign software, documents, and other certificates. Signing is a cryptographic tool that lets users verify that the code hasn’t been altered and that the software, documents or other certificates can be trusted.

This blog post shows you how to configure your applications so you can use a key pair already on your hardware security module (HSM) to generate signatures using any Windows instance. Many customers use multiple Amazon Elastic Compute Cloud (Amazon EC2) instances to sign workloads using the same key pair. You must configure these instances to use a pre-existing key pair from the HSM. In this blog post, I show you how to create a key container on a new Windows instance from an existing key pair in AWS CloudHSM, and then update the certificate store to associate the newly imported certificate with the new container. I also show you how to use a common application to sign executables with this key pair.

Every certificate is associated with a key pair, which includes a private key and a public key. You can only trust a signature if you can be sure that the private key has remained confidential and can be used only by the owner of the certificate. You achieve this goal by generating the key pair on an HSM and securely storing the private key on the HSM. Enterprise certificate authority (CA) or public key infrastructure (PKI) applications are configured to use this private key in the HSM whenever they need to use the corresponding certificate to sign. This configuration is generally handled transparently between the application and the HSM on the Windows instance your application is running on. The process gets tricky when you want to use multiple Windows instances to sign using the same key pair. This is especially true if your current EC2 instance that acts as a Windows Server CA, which you used to issue the HSM-backed certificate, is deleted and you have a backup of the HSM-backed certificate.

Before we get into the details, you need to know about a library called the key storage provider (KSP). Windows systems use KSP libraries to connect applications to an HSM. For each HSM brand, such as CloudHSM, you need a corresponding KSP to run operations that involve cryptographic keys stored on that HSM. From your application, select the KSP that corresponds with the HSM you want to use to store (or use) your keys. All KSPs associate keys on their HSM with metadata in the Microsoft ecosystem using key containers. Key containers map the metadata in certificates with metadata on the HSM, which allows the application to properly address keys. The list of certificates available for Microsoft utilities to sign with is contained in a trust store. To use the same key pair across multiple Windows instances, you must copy the key containers to each instance—or create a new key container from an existing key pair in each instance—and import the corresponding certificate into the trust store for each instance.

Prerequisites

The solution in this post assumes that you’ve completed the steps in Signing executables with Microsoft SignTool.exe using AWS CloudHSM-backed certificates. You should already have your HSM-backed certificate on one Windows instance.

Before you implement the solution, you must:

  1. Install the AWS CloudHSM client on the new instance and make sure that you can interact with HSM in your CloudHSM cluster.
  2. Verify the CloudHSM KSP and CNG providers installation on your new instance.
  3. Set the login credentials for the HSM on your system. Set credentials through Windows Credentials Manager. I recommend that you reboot your instance after setting up the credentials.

Note: The login credentials identify a crypto user (CU) in the HSM that has access to the key pair in CloudHSM.

Architectural overview


Figure 1: Architectural overview

Figure 1: Architectural overview

This diagram shows a virtual private cloud (VPC) that contains an EC2 instance running Windows Server 2016 that resides on private subnet 1. This instance will run the CloudHSM client software and will use your HSM-backed certificate with a key pair already on your HSM to sign executable files. The instance can be accessed through a VPN connection. It will also have security groups that enable RDP access for your on-premises network. Private subnet 2 hosts the elastic network interface for the CloudHSM cluster, which has a single HSM.

Out of scope

The focus of this blog post is how to use an HSM-backed certificate with a key pair already on your HSM to sign executable files from any Windows instance using Microsoft SignTool.exe. This post isn’t intended to represent any best practices for implementing code signing or Amazon EC2. For more information, see the NIST cybersecurity whitepaper Security Considerations for Code Signing and Best practices for Amazon EC2, respectively.

Deploy the solution

To deploy the solution, you use certutil, import_key, and SignTool. Certutil is a Microsoft tool that helps you examine your system for available certificates and key containers. Import_key—a tool provided by CloudHSM—generates a local key container for a key pair that’s on your HSM. To complete the process, use SignTool—a Microsoft tool that enables Windows users to digitally sign files, and verifies signatures in files and timestamps files.

You will need the following:

Certificates or key material Purpose
<my root certificate>.cer Root certificate
<my signed certificate>.cer HSM-backed signing certificate
<signed certificate in base64>.cer HSM-backed signing certificate in base64 format
<public key handle> Public key handle of the signing certificate
<private key handle> Private key handle of the signing certificate

Import the HSM-backed certificate and its RootCA chain certificate into the new instance

Before you can use third-party tools such as SignTool to generate signatures using the HSM-backed certificate, you must move the signing certificate file to the Personal certificate store in the new Windows instance.

To do that, you copy the HSM-backed certificate that your application uses for signing operations and its root certificate chain from the original instance to the new Windows instance.

If you issued your signing certificate through a private CA (like in my example), you must deploy a copy of the root CA certificate and any intermediate certificates from the private CA to any systems you want to use to verify the integrity of your signed file.

To import the HSM-backed certificate and root certificate

  1. Sign in to the Windows Server that has the private CA that you used to issue your signing certificate. Then, run the following certutil command to export the root CA to a new file. Replace <my root certificate> with a name that you can remember easily.
    C:\Users\Administrator\Desktop>certutil -ca.cert <my root certificate>.cer
    
    CA cert[0]: 3 -- Valid
    CA cert[0]:
    
    -----BEGIN CERTIFICATE-----
    MIICiTCCAfICCQD6m7oRw0uXOjANBgkqhkiG9w0BAQUFADCBiDELMAkGA1UEBhMC
    VVMxCzAJBgNVBAgTAldBMRAwDgYDVQQHEwdTZWF0dGxlMQ8wDQYDVQQKEwZBbWF6
    b24xFDASBgNVBAsTC0lBTSBDb25zb2xlMRIwEAYDVQQDEwlUZXN0Q2lsYWMxHzAd
    BgkqhkiG9w0BCQEWEG5vb25lQGFtYXpvbi5jb20wHhcNMTEwNDI1MjA0NTIxWhcN
    MTIwNDI0MjA0NTIxWjCBiDELMAkGA1UEBhMCVVMxCzAJBgNVBAgTAldBMRAwDgYD
    VQQHEwdTZWF0dGxlMQ8wDQYDVQQKEwZBbWF6b24xFDASBgNVBAsTC0lBTSBDb25z
    b2xlMRIwEAYDVQQDEwlUZXN0Q2lsYWMxHzAdBgkqhkiG9w0BCQEWEG5vb25lQGFt
    YXpvbi5jb20wgZ8wDQYJKoZIhvcNAQEBBQADgY0AMIGJAoGBAMaK0dn+a4GmWIWJ
    21uUSfwfEvySWtC2XADZ4nB+BLYgVIk60CpiwsZ3G93vUEIO3IyNoH/f0wYK8m9T
    rDHudUZg3qX4waLG5M43q7Wgc/MbQITxOUSQv7c7ugFFDzQGBzZswY6786m86gpE
    Ibb3OhjZnzcvQAaRHhdlQWIMm2nrAgMBAAEwDQYJKoZIhvcNAQEFBQADgYEAtCu4
    nUhVVxYUntneD9+h8Mg9q6q+auNKyExzyLwaxlAoo7TJHidbtS4J5iNmZgXL0Fkb
    FFBjvSfpJIlJ00zbhNYS5f6GuoEDmFJl0ZxBHjJnyp378OD8uTs7fLvjx79LjSTb
    NYiytVbZPQUQ5Yaxu2jXnimvw3rrszlaEXAMPLE=
    -----END CERTIFICATE-----
            
    CertUtil: -ca.cert command completed successfully.
    
    C:\Users\Administrator\Desktop>
    

  2. Copy the <my root certificate>.cer file to your new Windows instance and run the following certutil command. This moves the root certificate from the file into the Trusted Root Certification Authorities store in Windows. You can verify that it exists by running certlm.msc and viewing the Trusted Root Certification Authorities certificates.
    C:\Users\Administrator\Desktop>certutil -addstore "Root" <my root certificate>.cer
    
    Root "Trusted Root Certification Authorities"
    Signature matches Public Key
    Certificate "MYRootCA" added to store.
    CertUtil: -addstore command completed successfully.
    

  3. Copy the HSM-backed signing certificate from the original instance to the new one, and run the following certutil command. This moves the certificate from the file into the Personal certificate store in Windows.
    C:\Users\Administrator\Desktop>certutil -addstore "My" <my signed certificate>.cer
    
    My "Personal"
    Certificate "www.mydomain.com" added to store.
    CertUtil: -addstore command completed successfully.
    

  4. Verify that the certificate exists in your Personal certificate store by running the following certutil command. The following sample output from certutil shows the serial number. Take note of the certificate serial number to use later.
    C:\Users\Administrator\Desktop>certutil -store my
    
    my "Personal"
    ================ Certificate 0 ================
    Serial Number: <certificate serial number>
    Issuer: CN=MYRootCA
     NotBefore: 2/5/2020 1:38 PM
     NotAfter: 2/5/2021 1:48 PM
    Subject: CN=www.mydomain.com, OU=Certificate Management, O=Information Technology, L=Houston, S=Texas, C=US
    Non-root Certificate
    Cert Hash(sha1): 5aaef93e7e972b1187363d880cfa3f71507c2e24
    No key provider information
    Cannot find the certificate and private key for decryption.
    CertUtil: -store command completed successfully.
    

Retrieve the key handles of the RSA key pair on the HSM

In this step, you retrieve the key handles of the existing public and private key pair on your CloudHSM in order to use that key pair to create a key container on the new Windows instance.

One way to get the key handles of an existing key pair on the CloudHSM is to use the modulus value. Since the certificate and its public and private keys all must have the same modulus value and you have the signing certificate already, you view its modulus value using the OpenSSL tool. Then, you use the findKey command in key_mgmt_util to search for the public and private key handles on the HSM using the value of the certificate modulus.

To retrieve the key handles

  1. Download the OpenSSL for Windows installation package.

    Note: In my example, I downloaded Win64OpenSSL-1_1_1d.exe.

  2. Right-click on the downloaded file and choose Run as administrator.
  3. Follow the installation instructions, accepting all default settings. Then choose Install.
    1. If the error message “The Win64 Open SSL Installation Project setup has detected that the following critical component is missing…”—shown in Figure 2—appears, you need to install Microsoft Visual C++ Redistributables to complete this procedure.

      Figure 2: OpenSSL installation error message

      Figure 2: OpenSSL installation error message

    2. Choose Yes to download and install the required Microsoft Visual C++ package on your system.
    3. Run the OpenSSL installer again and follow the installation instructions, accepting all default settings. Then choose Install.
  4. Choose Finish when the installation is complete.

    With the installation complete, OpenSSL for Windows can be found as OpenSSL.exe in C:\Program Files\OpenSSL-Win64\bin. Always open the program as the administrator.

  5. On the new CloudHSM client instance, copy your certificate to C:\Program Files\OpenSSL-Win64\bin and run the command certutil -encode <my signed certificate>.cer <signed certificate in base64>.cer to export the certificate using base64 .cer format. This exports the certificate to a file with the name you enter in place of <signed certificate in base64>.
    C:\Program Files\OpenSSL-Win64\bin>certutil -encode <my signed certificate>.cer <signed certificate in base64>.cer
    
    Input Length = 1066
    Output Length = 1526
    CertUtil: -encode command completed successfully.
    

  6. Run the command openssl x509 -noout -modulus -in <signed certificate in base64>.cer to view the certificate modulus.
    C:\Program Files\OpenSSL-Win64\bin>openssl x509 -noout -modulus -in <signed certificate in base64>.cer
    
    Modulus=9D1D625C041F7FAF076780E486CA2DB2FB846982E88804030F9C84F6CF553925C287934C18B92606EE9A4438F80E47961D7B2CD28213EADE2078BE1A921E6D164CC07F99DA42CF6DD1767A6392FC4BC2B19592474782E1B8574F4A46A93626CD2A8D56405EA7DFCED8DA7042F6FC6D3716CC1649174E93C66F0A9EC7EEFEC9661D43FD2BC8E2E261C06A619E4AF3B5E13190215F72EE5BDE2090818031F8AAD0AA7E934894DC54DF5F1E7577645137637F400E10B9ECDC0870C78C99E8027A86807CD719AA05931D1A4326A5ED1C3687C8EA8E54DF62BFD1851A92473348C98973DEF850B8A88A443A56E93B997F3286A1DC274E6A8DD187D8C59BAB32A6919F
    

  7. Save the certificate modulus in a text file named modulus.txt.
  8. Run the key_mgmt_util command line tool, and log in as the CU, as described in Getting Started with key_mgmt_util. Replace <cu username> and <cu password> with the username and password of the CU.
    Command: loginHSM -u CU -s <CU username> -p <CU password>
    
         	Cfm3LoginHSM returned: 0x00 : HSM Return: SUCCESS
    
            Cluster Error Status
            Node id 13 and err state 0x00000000 : HSM Return: SUCCESS
            Node id 14 and err state 0x00000000 : HSM Return: SUCCESS
    

  9. Run the following findKey command to find the public key handle that has the same RSA modulus that you generated previously. Enter the path to the modulus.txt file that you created in step 7. Take note of the public key handle that’s returned so that you can use it in the following steps.
    Command: findKey -c 2 -m C:\\Users\\Administrator\\Desktop\\modulus.txt
    
            Total number of keys present: 1
    
            Number of matching keys from start index 0::0
    
            Handles of matching keys:
            <public key handle>
    
            Cluster Error Status
            Node id 13 and err state 0x00000000 : HSM Return: SUCCESS
            Node id 14 and err state 0x00000000 : HSM Return: SUCCESS
    
            Cfm3FindKey returned: 0x00 : HSM Return: SUCCESS
    

  10. Run the following findKey command to find the private key handle that has the same RSA modulus that you generated previously. Enter the path to the modulus.txt file that you created in step 7. Take note of the private key handle that’s returned so that you can use it in the following steps.
    Command: findKey -c 3 -m C:\\Users\\Administrator\\Desktop\\modulus.txt
    
            Total number of keys present: 1
    
            Number of matching keys from start index 0::0
    
            Handles of matching keys:
            <private key handle>
    
            Cluster Error Status
            Node id 13 and err state 0x00000000 : HSM Return: SUCCESS
            Node id 14 and err state 0x00000000 : HSM Return: SUCCESS
    
            Cfm3FindKey returned: 0x00 : HSM Return: SUCCESS
    

Create a new key container for the existing public and private key pair in the CloudHSM

To use the same key pair across new Windows instances, you must copy over the key containers to each instance, or create a new key container from an existing key pair in the key storage provider of each instance. In this step, you create a new key container to hold the public key of the certificate and its corresponding private key metadata. To create a new key container from an existing public and private key pair in the HSM, first make sure to start the CloudHSM client daemon. Then, use the import_key.exe utility, which is included in CloudHSM version 3.0 and later.

To create a new key container

  1. Run the following import_key.exe command, replacing <private key handle> and <public key handle> with the public and private key handles you created in the previous procedure. This creates the HSM key pair in a new key container in the key storage provider.
    C:\Program Files\Amazon\CloudHSM>import_key.exe -from HSM –privateKeyHandle <private key handle> -publicKeyHandle <public key handle>
    
    Represented 1 keypairs in Cavium Key Storage Provider.
    

    Note: If you get the error message n3fips_password is not set, make sure that you set the login credentials for the HSM on your system.

  2. You can verify the new key container by running the following certutil command to list the key containers in your key storage provider (KSP). Take note of the key container name to use in the following steps.
    C:\Program Files\Amazon\CloudHSM>certutil -key -csp "Cavium Key Storage provider"
    
    Cavium Key Storage provider:
      <key container name>
      RSA
    
    
    CertUtil: -key command completed successfully.
    

Update the certificate store

Now you have everything in place: the imported certificate in the Personal certificate store of the new Windows instance and the key container that represents the key pair in CloudHSM. In this step, you associate the certificate to the key container that you made a note of earlier.

To update the certificate store

  1. Create a file named repair.txt as shown following.

    Note: You must use the key container name of your certificate that you got in the previous step as the input for the repair.txt file.

    [Properties]
    11 = "" ; Add friendly name property
    2 = "{text}" ; Add Key Provider Information property
    _continue_="Container=<key container name>&"
    _continue_="Provider=Cavium Key Storage Provider&"
    _continue_="Flags=0&"
    _continue_="KeySpec=2"
    

  2. Make sure that the CloudHSM client daemon is still running. Then, use the certutil verb -repairstore to update the certificate serial number that you took note of earlier, as shown in the following command. The following sample shows the command and output. See the Microsoft documentation for information about the – repairstore verb.
    certutil -repairstore my <certificate serial number> repair.txt
    
    C:\Users\Administrator\Desktop>certutil -repairstore my <certificate serial number> repair.txt
    
    my "Personal"
    ================ Certificate 0 ================
    Serial Number: <certificate serial number>
    Issuer: CN=MYRootCA
     NotBefore: 2/5/2020 1:38 PM
     NotAfter: 2/5/2021 1:48 PM
    Subject: CN=www.mydomain.com, OU=Certificate Management, O=Information Technology, L=Houston, S=Texas, C=US
    Non-root Certificate
    Cert Hash(sha1): 5aaef93e7e972b1187363d880cfa3f71507c2e24
    CertUtil: -repairstore command completed successfully.
    

  3. Run the following certutil command to verify that your certificate has been associated with the new key container successfully.
    C:\Users\Administrator\Desktop>certutil -store my
    
    my "Personal"
    ================ Certificate 0 ================
    Serial Number: <certificate serial number>
    Issuer: CN=MYRootCA
     NotBefore: 2/5/2020 1:38 PM
     NotAfter: 2/5/2021 1:48 PM
    Subject: CN=www.mydomain.com, OU=Certificate Management, O=Information Technology, L=Houston, S=Texas, C=US
    Non-root Certificate
    Cert Hash(sha1): 5aaef93e7e972b1187363d880cfa3f71507c2e24
      Key Container = CNGRSAPriv-3145768-3407903-26dd1d
      Provider = Cavium Key Storage Provider
    Private key is NOT exportable
    Encryption test passed
    CertUtil: -store command completed successfully.
    

Now you can use this certificate and its corresponding private key with any third-party signing tool on Windows.

Use the certificate with Microsoft SignTool

Now that you have everything in place, you can use the certificate to sign a file using the Microsoft SignTool.

To use the certificate

  1. Get the thumbprint of your certificate. To do this, right-click PowerShell and choose Run as administrator. Enter the following command:
    PS C:\>Get-ChildItem -path cert:\LocalMachine\My
    

    If successful, you should see output similar to the following.

    PSParentPath: Microsoft.PowerShell.Security\Certificate::LocalMachine\My
    
    Thumbprint                                Subject
    ----------                                -------
    <thumbprint>   CN=www.mydomain.com, OU=Certificate Management, O=Information Technology, L=Ho...
    

  2. Copy the thumbprint. You need it to perform the actual signing operation on a file.
  3. Download and install one of the following versions of the Microsoft Windows SDK on your Windows EC2 instance:Microsoft Windows 10 SDK
    Microsoft Windows 8.1 SDK
    Microsoft Windows 7 SDK

    Install the latest applicable Windows SDK package for your operating system. For example, for Microsoft Windows 2012 R2 or later versions, you should install the Microsoft Windows 10 SDK.

  4. To open the SignTool application, navigate to the application directory within PowerShell. This is usually:
    C:\Program Files (x86)\Windows Kits\<SDK version>\bin\<version number>\<CPU architecture>\signtool.exe
    

  5. When you’ve located the directory, sign your file by running the following command. Remember to replace <thumbprint> and <test.exe> with your own values. <test.exe> can be any executable file in your directory.
    PS C:\>.\signtool.exe sign /v /fd sha256 /sha1 <thumbprint> /sm /as C:\Users\Administrator\Desktop\<test.exe>
    

    You should see a message like the following:

    Done Adding Additional Store
    Successfully signed: C:\Users\Administrator\Desktop\<test.exe>
    
    Number of files successfully Signed: 1
    Number of warnings: 0
    Number of errors: 0
    

  6. (Optional) To verify the signature on the file, you can use SignTool.exe with the verify option by using the following command.
    PS C:\>.\signtool.exe verify /v /pa C:\Users\Administrators\Desktop\<test.exe>
    

    If successful, you should see output similar to the following.

    Number of files successfully Verified: 1
    

Conclusion

In this post, I walked you through the process of using an HSM-backed certificate on a new Windows instance for signing operations. You used the import_key.exe utility to create a new key container from an existing private/public key pair in CloudHSM. Then, you updated the certificate store to associate your certificate with the key container. Finally, you saw how to use the HSM-backed certificate with the new key container to sign executable files. As you continue to use this solution, it’s important to keep Microsoft Windows SDK, CloudHSM client software, and any other installed software up-to-date.

If you have feedback about this post, submit comments in the Comments section below. If you have questions about this post, start a new thread on the AWS CloudHSM forum or contact AWS Support.

Want more AWS Security how-to content, news, and feature announcements? Follow us on Twitter.

Author

Karim Hamdy Abdelmonsif Ibrahim

Karim is a Cloud Support Engineer II at AWS and a subject matter expert for AWS Shield. He’s an avid pentester and security enthusiast who’s worked in IT for almost 11 years. He obtained OSCP, OSWP, CISSP, CEH, ECSA, CISM, and AWS Certified Security Specialist certifications. Outside of work, he enjoys jet skiing, hanging out with friends, and watching space documentaries.

Architecting for database encryption on AWS

Post Syndicated from Jonathan Jenkyn original https://aws.amazon.com/blogs/security/architecting-for-database-encryption-on-aws/

In this post, I review the options you have to protect your customer data when migrating or building new databases in Amazon Web Services (AWS). I focus on how you can support sensitive workloads in ways that help you maintain compliance and regulatory obligations, and meet security objectives.

Understanding transparent data encryption

I commonly see enterprise customers migrating existing databases straight from on-premises to AWS without reviewing their design. This might seem simpler and faster, but they miss the opportunity to review the scalability, cost-savings, and feature capability of native cloud services. A straight lift and shift migration can also create unnecessary operational overheads, carry-over unneeded complexity, and result in more time spent troubleshooting and responding to events over time.

One example is when enterprise customers who are using Transparent Data Encryption (TDE) or Extensible Key Management (EKM) technologies want to reuse the same technologies in their migration to AWS. TDE and EKM are database technologies that encrypt and decrypt database records as the records are written and read to the underlying storage medium. Customers use TDE features in Microsoft SQL Server, Oracle 10g and 11g, and Oracle Enterprise Edition to meet requirements for data-at-rest encryption. This shouldn’t mean that TDE is the requirement. It’s infrequent that an organizational policy or compliance framework specifies a technology such as TDE in the actual requirement. For example, the Payment Card Industry Data Security Standard (PCI-DSS) standard requires that sensitive data must be protected using “Strong cryptography with associated key-management processes and procedures.” Nowhere does PCI-DSS endorse or require the use of a specific technology.

Understanding risks

It’s important that you understand the risks that encryption-at-rest mitigates before selecting a technology to use. Encryption-at-rest, in the context of databases, generally manages the risk that one of the disks used to store database data is physically stolen and thus compromised. In on-premises scenarios, TDE is an effective technology used to manage this risk. All data from the database—up to and including the disk—is encrypted. The database manages all key management and cryptographic operations. You can also use TDE with a hardware security module (HSM) so that the keys and cryptography for the database are managed outside of the database itself. In TDE implementations, the HSM is used only to manage the key encryption keys (KEK), and not the data encryption keys (DEK) themselves. The DEKs are in volatile memory in the database at runtime, and so the cryptographic operations occur on the database itself.

You can also use native operating system encryption technologies such as dm-crypt or LUKS (Linux Unified Key Setup). Dm-crypt is a full disk encryption (FDE) subsystem in Linux kernel version 2.6 and beyond. Dm-crypt can be used on its own or with LUKS as an extension to add more features. When using dm-crypt, the operating system kernel is responsible for encrypting and decrypting data as it’s written and read from the attached volumes. This would achieve the same outcome as TDE—data written and read to the disk volume is encrypted, and the risk related to physical disk compromise is managed. DEKs are in runtime memory of the machine running the database.

With some TDE implementations, you can encrypt tables, rows, columns, and cells with different DEKs to achieve granular separation of duties between operators. Customers can then configure TDE to authorize access to each DEK based on database login credentials and job function, helping to manage risks associated with unauthorized access. However, the most common configuration I’ve seen is to rely on whole database encryption when using TDE. This configuration gives similar protection against the identified risks as dm-crypt with LUKS used without an HSM, since the DEKs and KEKs are stored within the instance in both cases and the result is that the database data on disk is encrypted.

Using encryption to manage data at rest risks in AWS

When you move to AWS, you gain additional security capabilities that can simplify your security implementations. Since the announcement of the AWS Key Management Service (AWS KMS) in 2014, it has been tightly integrated with Amazon Elastic Block Store (Amazon EBS), Amazon Simple Storage Service (Amazon S3), and dozens of other services on AWS. This means that data is encrypted on disk by checking a single check box. Furthermore, you get the benefits of AWS KMS for key management and cryptographic operations, while being transparent to the Amazon Elastic Compute Cloud (Amazon EC2) instance where the data is being encrypted and decrypted. For simplicity, the authorization for access to the data is managed entirely by AWS Identity and Access Management (IAM) and AWS KMS key resource policies.

If you need more granular access control to the data, you can use the AWS Encryption SDK to encrypt data at the application layer. That provides the same effect as TDE cell-level protection, with a FIPS140-2 Level 2 validated HSM, as might be required by a recognizing standard.

If you must use a FIPS140-2 Level 3 validated HSM to meet more stringent compliance standards or regulations, then you can use the Custom Key Store capability of AWS KMS to achieve that—again in a transparent way. This option has a trade-off, as there is additional operational overhead in terms of managing an AWS CloudHSM cluster.

Many customers choose to migrate their database into the managed Amazon Relational Database Service (Amazon RDS), rather than managing the database instance themselves. Like the Amazon EC2 service, RDS uses Amazon EBS volumes for its data storage, and so can seamlessly use AWS KMS for encryption at rest functionality. When you do so, your management overhead for the protection of data-at-rest reduces to almost zero. This lets you focus on business value while AWS is responsible for the management of your database and the protection of the underlying data. The next section reviews this option and others in more detail.

You can review the available Amazon RDS database engines and versions via the Amazon RDS User Guide documentation, or by running the following AWS Command Line Interface (AWS CLI) command:

aws rds describe-db-engine-versions --query "DBEngineVersions[].DBEngineVersionDescription" --region <regionIdentifier>

Recommended Solutions

If you’re moving an existing database to AWS, you have the following solutions for data at rest encryption. I go into more detail for each option below.

Table 1 – Encryption options

Option Database management Host Encryption Key management
1 Amazon managed Amazon RDS Amazon EBS AWS KMS
2 Amazon managed Amazon RDS Amazon EBS AWS KMS Custom Key Store
3 Customer managed Amazon EC2 Amazon EBS AWS KMS
4 Customer managed Amazon EC2 Amazon EBS AWS KMS Custom Key Store
5 Customer managed Amazon EC2 Amazon EBS LUKS
6 Customer managed Amazon EC2 Database Database TDE
7 Customer managed Amazon EC2 Database CloudHSM

Option 1 – Using Amazon RDS with Amazon EBS encryption and key management provided by AWS KMS

This approach uses the Amazon RDS service where AWS manages the operating system and database engine. You can configure this service to be a highly scalable resource spanning multiple Availability Zones within an AWS Region to provide resiliency. AWS KMS manages the keys that are used to encrypt the attached Amazon EBS volumes at rest.

Note: This configuration is recommended as your default database encryption approach.

Benefits

  • No key management requirement on host; key management is automated and performed by AWS KMS
  • Meets FIPS140-2 Level 2 validation requirements
  • Simple vertical and horizontal scalability
  • Snapshots for recovery are encrypted automatically
  • AWS manages the patching, maintenance, and configuration of the operating system and database engine
  • Well-recognized configuration, with support offered through AWS Support
  • AWS KMS costs are comparatively low

Challenges

  • Dependent on Amazon RDS supported engines and versions
  • Might require additional controls to manage unauthorized access at table, row, column, or cell level

Option 2 – Using Amazon RDS with Amazon EBS encryption and key management provided by AWS KMS custom key store

This approach uses the Amazon RDS service where AWS manages the operating system and database engine. You can configure this service to be a highly scalable resource spanning multiple Availability Zones within a Region to provide resiliency. CloudHSM keys are used via AWS KMS service integration to encrypt the Amazon EBS volumes at rest.

Note: This configuration is recommended where FIPS140-2 Level 3 validation is a specified compliance requirement.

Benefits

  • No key management requirement on host; key management is performed by AWS KMS
  • Meets FIPS140-2 Level 3 validation requirements
  • Simple vertical and horizontal scalability
  • Snapshots for recovery are encrypted automatically
  • AWS manages the patching, maintenance, and configuration of the database engine
  • Well-recognized configuration with support offered through AWS Support

Challenges

  • Dependent on Amazon RDS supported engines and versions
  • You are responsible for provisioning, configuration, scaling, maintenance, and costs of running CloudHSM cluster
  • Might require additional controls to manage unauthorized access at table, row, column or cell level

Option 3 – Customer-managed database platform hosted on Amazon EC2 with Amazon EBS encryption and key management provided by KMS

In this approach, the key difference is that you’re responsible for managing the EC2 instances, operating systems, and database engines. You can still configure your databases to be highly scalable resources spanning multiple Availability Zones within a Region to provide resiliency, but it takes more effort. AWS KMS manages the keys that are used to encrypt the attached Amazon EBS volumes at rest.

Note: This configuration is recommended when Amazon RDS doesn’t support the desired database engine type or version.

Benefits

  • A 1:1 relationship for migration of database engine configuration
  • Key rotation and management is handled transparently by AWS
  • Data encryption keys are managed by the hypervisor, not by your EC2 instance
  • AWS KMS costs are comparatively low

Challenges

  • You’re responsible for patching and updates of the database engine and OS
  • Might require additional controls to manage unauthorized access at table, row, column, or cell level

Option 4 – Customer-managed database platform hosted on Amazon EC2 with Amazon EBS encryption and key management provided by KMS custom key store

In this approach, you are again responsible for managing the EC2 instances, operating systems, and database engines. You can still configure your databases to be highly scalable resources spanning multiple Availability Zones within a Region to provide resiliency, but it takes more effort. And similar to Option 2, CloudHSM keys are used via AWS KMS service integration to encrypt the Amazon EBS volumes at rest.

Note: This configuration is recommended when Amazon RDS doesn’t support the desired database engine type or version and when FIPS140-2 Level 3 compliance is required.

Benefits

  • A 1:1 relationship for migration of database engine configuration
  • Data encryption keys managed by the hypervisor, not by your EC2 instance
  • Keys managed by FIPS140-2 Level 3 validated HSM

Challenges

  • You’re responsible for provisioning, configuration, scaling, maintenance, and costs of running CloudHSM cluster
  • You’re responsible for patching and updates of the database engine and OS
  • Might require additional controls to manage unauthorized access at table, row, column, or cell level

Option 5 – Customer-managed database platform hosted on Amazon EC2 with Amazon EBS encryption and key management provided by LUKS

In this approach, you’re still responsible for managing the EC2 instances, operating systems, and database engines. You also need to install LUKS onto the Linux instance to manage the encryption of data on Amazon EBS.

Benefits

  • A 1:1 relationship for migration of database engine configuration
  • Transparent encryption is managed by OS with LUKS

Challenges

  • You’re responsible for patching and updates of the database engine and OS
  • Data encryption keys are managed directly on the EC2 instance, and not a dedicated key management system
  • Scaling must be vertical, which is slow and costly
  • LUKS is supported through open-source licensing
  • Support for backup and recovery is LUKS specific, and require additional consideration
  • Might require additional controls to manage unauthorized access at table, row, column or cell level

Note: This approach limits you to only Linux instances and requires the most technical knowledge and effort on your part. Options, such as BitLocker and SQL Server Always Encrypted, exist for Windows hosts, and the complexity and challenges are similar to those of LUKS.

Option 6 – Customer-managed database platform hosted on Amazon EC2 with database encryption and key management provided by TDE

In this approach, you’re still responsible for managing the EC2 instances, operating systems, and database engines. However, instead of encrypting the Amazon EBS volume where the database is stored, you use TDE wallet keys managed by the database engine to encrypt and decrypt records as they are stored and retrieved.

Benefits

  • A 1:1 relationship for migration of database engine configuration
  • Table, row, column, and cell level encryption are managed by TDE, reducing end point risks relating to unauthorized access

Challenges

  • You’re responsible for patching and updates of the database engine and OS
  • Costly license for TDE feature
  • Data encryption keys are managed directly on the EC2 instance
  • Scaling is dependent on TDE functionality and Amazon EC2 scaling
  • Support is split between AWS and a third-party database vendor
  • Cannot share snapshots

Note: This approach is not available with Amazon RDS.

Option 7 – Customer-managed database platform hosted on Amazon EC2 with database encryption performed by TDE and key management provided by CloudHSM

In this approach, you’re still responsible for managing the EC2 instances, operating systems, and database engines. However, instead of encrypting the Amazon EBS volume where the database is stored, you use TDE wallet keys managed by a CloudHSM cluster to encrypt and decrypt records as they are stored and retrieved.

Benefits

  • A 1:1 relationship for migration of database engine configuration
  • Wallet keys (KEK) are managed by a FIPS140-2 Level 3 validated HSM
  • Table, row, column, and cell level encryption are managed by TDE, reducing end point risks relating to unauthorized access

Challenges

  • You’re responsible for patching and updates of the database engine and OS
  • Costly license for TDE feature
  • You are responsible for provisioning, configuration, scaling, maintenance, and costs of running CloudHSM cluster
  • Integration and support of CloudHSM with TDE might vary
  • Scaling is dependent on TDE functionality, Amazon EC2 scaling, and CloudHSM cluster.
  • Data encryption keys are managed on EC2 instance
  • Support is split between AWS and a third-party database vendor
  • Cannot share snapshots

Note: This approach is not available with Amazon RDS.

Summary

While you can operate in AWS similar to how you operate in your on-premises environment, the preceding configurations and recommendations show how you can significantly reduce your challenges and increase your benefits by using cloud-native security services like AWS KMS, Amazon RDS, and CloudHSM. Specifically, using Amazon RDS with Amazon EBS volumes encrypted by AWS KMS provides a highly scalable, resilient, and secure way to manage your keys in AWS.

While there might be some architectural redesign and configuration work needed to move an on-premises database into Amazon RDS, you can leverage AWS services to help you meet your compliance requirements with less effort. By offloading the OS and database maintenance responsibility to AWS, you simultaneously reduce operational friction and increase security. By migrating this way, you can benefit from the scalability and resilience of the AWS global infrastructure and expertise. Lastly, to get started with migrating your database to AWS, I encourage you to use the AWS Database Migration Service.

If you have feedback about this post, submit comments in the Comments section below.

Want more AWS Security how-to content, news, and feature announcements? Follow us on Twitter.

Author

Jonathan Jenkyn

Jonathan is a Senior Security Growth Strategies Consultant with AWS Professional Services. He’s an active member of the People with Disabilities affinity group, and has built several Amazon initiatives supporting charities and social responsibility causes. Since 1998, he has been involved in IT Security at many levels, from implementation of cryptographic primitives to managing enterprise security governance. Outside of work, he enjoys running, cycling, fund-raising for the BHF and Ipswich Hospital Charity, and spending time with his wife and 5 children.

Author

Scott Conklin

Scott is a Senior Security Consultant with AWS Professional Services (Global Specialty Practice). Based out of Chicago with 4 years tenure, he is an avid distance runner, crypto nerd, lover of unicorns, and enjoys camping, nature, playing Minecraft with his 3 kids, and binge watching Amazon Prime with his wife.