AWS Key Management Service (AWS KMS) is pleased to launch key-level filtering for AWS KMS API usage in Amazon CloudWatch metrics, providing enhanced visibility to help customers improve their operational efficiency and aid in security and compliance risk management.
AWS KMS currently publishes account-level AWS KMS API usage metrics to Amazon CloudWatch, enabling you to monitor and manage your API usage. However, if you’re using numerous KMS keys, pinpointing the ones with the highest request rate quota usage or significant API costs becomes challenging. For example, if you have more than 10 active KMS keys in your account, prior to this launch you would have needed to build a custom CloudTrail and Amazon Athena based solution to locate which specific keys are driving the majority of API usage and costs. With the new CloudWatch metrics, which are available under the AWS/KMS namespace in CloudWatch, you can track, understand, and set alerts on detailed API usage at the individual KMS key level without building a costly customized solution.
This blog post explores several use cases to help you better take advantage of these newly introduced CloudWatch metrics to manage your AWS KMS API usage and costs. The use cases cover viewing and understanding your API usage at the key level, and creating CloudWatch alerts to detect unintentional runaway usage.
Overview of new CloudWatch metrics for KMS keys
With CloudWatch metrics for KMS keys, you can now do the following:
View the API usage for a specific KMS key, filtered by individual API operations (for example, Encrypt, Decrypt, or GenerateDataKey).
See the aggregated usage across cryptographic operations for a given KMS key.
Set up an alarm if a specific KMS key exceeds a specified threshold on a single API operation, or a set of API operations.
This streamlined approach allows you to quickly monitor, understand, and troubleshoot the API usage patterns of your KMS keys, without the overhead of the previous multi-step process. Let’s detail how these key-level API usage metrics can be used in two real-world examples.
Example 1: How to locate the KMS keys that consume the most API usage quota or contribute the most API charges
When you surpass your AWS KMS API request rate quotas, you can view your AWS KMS API utilization within the Service Quotas console. However, you might still find it cumbersome to identify the KMS keys that consume the largest amount of your request quota. When you receive the AWS KMS API charges that exceed your expectation, you can check the detailed billing usage in each AWS Region in Cost Explorer, but you cannot easily locate the KMS keys with the most API charges. This process becomes even more challenging when you manage a large number of KMS keys.
With the key-level API usage CloudWatch metrics, you can use the advanced metric query option to query CloudWatch Metrics Insights data with a user-friendly dialect of SQL to locate the KMS keys that consume the largest portion of the API usage quota or contribute the most API charges.
Walkthrough
To use Amazon CloudWatch Metrics Insights to identify the top 20 KMS keys that have the most cryptographic API usage up to the last 3 hours, complete the following steps:
In the navigation pane, choose Metrics, and then choose All metrics.
Choose the Multi source query tab.
For the data source, choose CloudWatch Metrics Insights.
You can enter the following example query in Editor view:
Note: In Builder view, the metric namespace, metric name, filter by, group by, order by, and limit options are shown. In Editor view, the same options as in Builder view are shown in query format.
	SELECT SUM(SuccessfulRequest)
	FROM SCHEMA("AWS/KMS", KeyArn, Operation)
	GROUP BY KeyArn
	ORDER BY MAX () DESC
	LIMIT 20
Choose Run in the Editor view or Graph query in the Builder view.
Example 2: How to set a new detailed alarm on unintentional runaway AWS KMS API usage
Running big data processing workflows that read Amazon Simple Storage Service (Amazon S3) files encrypted by KMS keys is a common scenario for analytics, business reporting, or machine learning projects. Typically, these workflows read a limited number of files from S3 on each invocation. However, misconfigured workflows could unintentionally read a large number of S3 files, which could result in exceeding your AWS KMS API request rate quotas or incurring undesirable charges due to spiky AWS KMS API usage. Historically, to address this issue, you would have had to build a customized alarm system by following these steps: 1) send AWS CloudTrail events generated by AWS KMS to Amazon CloudWatch Logs; 2) write queries in Amazon CloudWatch Logs Insights to track your API request usage; and 3) enable anomaly detection on the corresponding CloudWatch Log Insights math expression.
Now, with key-level API usage CloudWatch metrics, you can directly enable anomaly detection on these metrics to set up alarms for anomalous AWS KMS API usage patterns. This provides a more streamlined and efficient way to monitor and detect potential runaway workflows. By using these CloudWatch metrics and anomaly detection capabilities, you can proactively identify and address unintended increases in AWS KMS API usage, helping to avoid unexpected charges or service disruptions in your analytics, reporting, or machine learning pipelines.
Walkthrough
Consider a scenario where you have an analytics workflow that runs frequently, which uses the Decrypt AWS KMS API operation on a KMS key to decrypt and read data from S3. You would like to enable anomaly detection on the KMS key to trigger an alarm when the Decrypt call volume to the specific KMS key sees a discernible trend or pattern. To do so, complete the following steps:
In the navigation pane, choose Metrics, and then choose All metrics.
Choose KMS, and then choose KeyArn, Operation.
In the search bar, enter the Amazon Resource Name (ARN) of the key, and then choose Search. Select the CloudWatch metric you would like to enable anomaly detection for.
Navigate to Graphed metrics, and using the Statistic and Period drop-down lists, choose the statistic and period that you would like to monitor. Then you can enable anomaly detection by selecting the Pulse icon.
Figure 1: How to enable anomaly detection on a SuccessfulRequest metric
Figure 2: Anomaly detection is enabled on the SuccessfulRequest metric. The gray band illustrates the expected range of values and the anomaly is in red
Conclusion
This blog post highlighted the newly introduced key-level filtering capability for the AWS KMS API usage in CloudWatch. We showed two real-world use cases to demonstrate how you can use the new CloudWatch metrics. These use cases include improving operational visibility, setting up proactive alarms on anomalies in KMS API usage patterns, and potentially tracking detailed key usage for compliance purposes.
If you have feedback about this blog post, submit comments in the Comments section below. If you have questions about this blog post, start a new thread in the AWS Key Management Service re:Post.
Today, AWS Key Management Service (AWS KMS) is introducing faster options for automatic symmetric key rotation. We’re also introducing rotate on-demand, rotation visibility improvements, and a new limit on the price of all symmetric keys that have had two or more rotations (including existing keys). In this post, I discuss all those capabilities and changes. I also present a broader overview of how symmetric cryptographic key rotation came to be, and cover our recommendations on when you might need rotation and how often to rotate your keys. If you’ve ever been curious about AWS KMS automatic key rotation—why it exists, when to enable it, and when to use it on-demand—read on.
How we got here
There are longstanding reasons for cryptographic key rotation. If you were Caesar in Roman times and you needed to send messages with sensitive information to your regional commanders, you might use keys and ciphers to encrypt and protect your communications. There are well-documented examples of using cryptography to protect communications during this time, so much so that the standard substitution cipher, where you swap each letter for a different letter that is a set number of letters away in the alphabet, is referred to as Caesar’s cipher. The cipher is the substitution mechanism, and the key is the number of letters away from the intended letter you go to find the substituted letter for the ciphertext.
The challenge for Caesar in relying on this kind of symmetric key cipher is that both sides (Caesar and his field generals) needed to share keys and keep those keys safe from prying eyes. What happens to Caesar’s secret invasion plans if the key used to encipher his attack plan was secretly intercepted in transmission down the Appian Way? Caesar had no way to know. But if he rotated keys, he could limit the scope of which messages could be read, thus limiting his risk. Messages sent under a key created in the year 52 BCE wouldn’t automatically work for messages sent the following year, provided that Caesar rotated his keys yearly and the newer keys weren’t accessible to the adversary. Key rotation can reduce the scope of data exposure (what a threat actor can see) when some but not all keys are compromised. Of course, every time the key changed, Caesar had to send messengers to his field generals to communicate the new key. Those messengers had to ensure that no enemies intercepted the new keys without their knowledge – a daunting task.
Figure 1: The state of the art for secure key rotation and key distribution in 52 BC.
Fast forward to the 1970s–2000s
In modern times, cryptographic algorithms designed for digital computer systems mean that keys no longer travel down the Appian Way. Instead, they move around digital systems, are stored in unprotected memory, and sometimes are printed for convenience. The risk of key leakage still exists, therefore there is a need for key rotation. During this period, more significant security protections were developed that use both software and hardware technology to protect digital cryptographic keys and reduce the need for rotation. The highest-level protections offered by these techniques can limit keys to specific devices where they can never leave as plaintext. In fact, the US National Institute of Standards and Technologies (NIST) has published a specific security standard, FIPS 140, that addresses the security requirements for these cryptographic modules.
Modern cryptography also has the risk of cryptographic key wear-out
Besides addressing risks from key leakage, key rotation has a second important benefit that becomes more pronounced in the digital era of modern cryptography—cryptographic key wear-out. A key can become weaker, or “wear out,” over time just by being used too many times. If you encrypt enough data under one symmetric key, and if a threat actor acquires enough of the resulting ciphertext, they can perform analysis against your ciphertext that will leak information about the key. Current cryptographic recommendations to protect against key wear-out can vary depending on how you’re encrypting data, the cipher used, and the size of your key. However, even a well-designed AES-GCM implementation with robust initialization vectors (IVs) and large key size (256 bits) should be limited to encrypting no more than 4.3 billion messages (232), where each message is limited to about 64 GiB under a single key.
Figure 2: Used enough times, keys can wear out.
During the early 2000s, to help federal agencies and commercial enterprises navigate key rotation best practices, NIST formalized several of the best practices for cryptographic key rotation in the NIST SP 800-57 Recommendation for Key Management standard. It’s an excellent read overall and I encourage you to examine Section 5.3 in particular, which outlines ways to determine the appropriate length of time (the cryptoperiod) that a specific key should be relied on for the protection of data in various environments. According to the guidelines, the following are some of the benefits of setting cryptoperiods (and rotating keys within these periods):
5.3 Cryptoperiods
A cryptoperiod is the time span during which a specific key is authorized for use by legitimate entities or the keys for a given system will remain in effect. A suitably defined cryptoperiod:
Limits the amount of information that is available for cryptanalysis to reveal the key (e.g. the number of plaintext and ciphertext pairs encrypted with the key);
Limits the amount of exposure if a single key is compromised;
Limits the use of a particular algorithm (e.g., to its estimated effective lifetime);
Limits the time available for attempts to penetrate physical, procedural, and logical access mechanisms that protect a key from unauthorized disclosure;
Limits the period within which information may be compromised by inadvertent disclosure of a cryptographic key to unauthorized entities; and
Limits the time available for computationally intensive cryptanalysis.
Sometimes, cryptoperiods are defined by an arbitrary time period or maximum amount of data protected by the key. However, trade-offs associated with the determination of cryptoperiods involve the risk and consequences of exposure, which should be carefully considered when selecting the cryptoperiod (see Section 5.6.4).
One of the challenges in applying this guidance to your own use of cryptographic keys is that you need to understand the likelihood of each risk occurring in your key management system. This can be even harder to evaluate when you’re using a managed service to protect and use your keys.
Fast forward to the 2010s: Envisioning a key management system where you might not need automatic key rotation
When we set out to build a managed service in AWS in 2014 for cryptographic key management and help customers protect their AWS encryption workloads, we were mindful that our keys needed to be as hardened, resilient, and protected against external and internal threat actors as possible. We were also mindful that our keys needed to have long-term viability and use built-in protections to prevent key wear-out. These two design constructs—that our keys are strongly protected to minimize the risk of leakage and that our keys are safe from wear out—are the primary reasons we recommend you limit key rotation or consider disabling rotation if you don’t have compliance requirements to do so. Scheduled key rotation in AWS KMS offers limited security benefits to your workloads.
Specific to key leakage, AWS KMS keys in their unencrypted, plaintext form cannot be accessed by anyone, even AWS operators. Unlike Caesar’s keys, or even cryptographic keys in modern software applications, keys generated by AWS KMS never exist in plaintext outside of the NIST FIPS 140-2 Security Level 3 fleet of hardware security modules (HSMs) in which they are used. See the related post AWS KMS is now FIPS 140-2 Security Level 3. What does this mean for you? for more information about how AWS KMS HSMs help you prevent unauthorized use of your keys. Unlike many commercial HSM solutions, AWS KMS doesn’t even allow keys to be exported from the service in encrypted form. Why? Because an external actor with the proper decryption key could then expose the KMS key in plaintext outside the service.
This hardened protection of your key material is salient to the principal security reason customers want key rotation. Customers typically envision rotation as a way to mitigate a key leaking outside the system in which it was intended to be used. However, since KMS keys can be used only in our HSMs and cannot be exported, the possibility of key exposure becomes harder to envision. This means that rotating a key as protection against key exposure is of limited security value. The HSMs are still the boundary that protects your keys from unauthorized access, no matter how many times the keys are rotated.
If we decide the risk of plaintext keys leaking from AWS KMS is sufficiently low, don’t we still need to be concerned with key wear-out? AWS KMS mitigates the risk of key wear-out by using a key derivation function (KDF) that generates a unique, derived AES 256-bit key for each individual request to encrypt or decrypt under a 256-bit symmetric KMS key. Those derived encryption keys are different every time, even if you make an identical call for encrypt with the same message data under the same KMS key. The cryptographic details for our key derivation method are provided in the AWS KMS Cryptographic Details documentation, and KDF operations use the KDF in counter mode, using HMAC with SHA256. These KDF operations make cryptographic wear-out substantially different for KMS keys than for keys you would call and use directly for encrypt operations. A detailed analysis of KMS key protections for cryptographic wear-out is provided in the Key Management at the Cloud Scale whitepaper, but the important take-away is that a single KMS key can be used for more than a quadrillion (250) encryption requests without wear-out risk.
In fact, within the NIST 800-57 guidelines is consideration that when the KMS key (key-wrapping key in NIST language) is used with unique data keys, KMS keys can have longer cryptoperiods:
“In the case of these very short-term key-wrapping keys, an appropriate cryptoperiod (i.e., which includes both the originator and recipient-usage periods) is a single communication session. It is assumed that the wrapped keys will not be retained in their wrapped form, so the originator-usage period and recipient-usage period of a key-wrapping key is the same. In other cases, a key-wrapping key may be retained so that the files or messages encrypted by the wrapped keys may be recovered later. In such cases, the recipient-usage period may be significantly longer than the originator-usage period of the key-wrapping key, and cryptoperiods lasting for years may be employed.”
Source: NIST 800-57 Recommendations for Key Management, section 5.3.6.7.
So why did we build key rotation in AWS KMS in the first place?
Although we advise that key rotation for KMS keys is generally not necessary to improve the security of your keys, you must consider that guidance in the context of your own unique circumstances. You might be required by internal auditors, external compliance assessors, or even your own customers to provide evidence of regular rotation of all keys. A short list of regulatory and standards groups that recommend key rotation includes the aforementioned NIST 800-57, Center for Internet Security (CIS) benchmarks, ISO 27001, System and Organization Controls (SOC) 2, the Payment Card Industry Data Security Standard (PCI DSS), COBIT 5, HIPAA, and the Federal Financial Institutions Examination Council (FFIEC) Handbook, just to name a few.
Customers in regulated industries must consider the entirety of all the cryptographic systems used across their organizations. Taking inventory of which systems incorporate HSM protections, which systems do or don’t provide additional security against cryptographic wear-out, or which programs implement encryption in a robust and reliable way can be difficult for any organization. If a customer doesn’t have sufficient cryptographic expertise in the design and operation of each system, it becomes a safer choice to mandate a uniform scheduled key rotation.
That is why we offer an automatic, convenient method to rotate symmetric KMS keys. Rotation allows customers to demonstrate this key management best practice to their stakeholders instead of having to explain why they chose not to.
Figure 3 details how KMS appends new key material within an existing KMS key during each key rotation.
Figure 3: KMS key rotation process
We designed the rotation of symmetric KMS keys to have low operational impact to both key administrators and builders using those keys. As shown in Figure 3, a keyID configured to rotate will append new key material on each rotation while still retaining and keeping the existing key material of previous versions. This append method achieves rotation without having to decrypt and re-encrypt existing data that used a previous version of a key. New encryption requests under a given keyID will use the latest key version, while decrypt requests under that keyID will use the appropriate version. Callers don’t have to name the version of the key they want to use for encrypt/decrypt, AWS KMS manages this transparently.
Some customers assume that a key rotation event should forcibly re-encrypt any data that was ever encrypted under the previous key version. This is not necessary when AWS KMS automatically rotates to use a new key version for encrypt operations. The previous versions of keys required for decrypt operations are still safe within the service.
We’ve offered the ability to automatically schedule an annual key rotation event for many years now. Lately, we’ve heard from some of our customers that they need to rotate keys more frequently than the fixed period of one year. We will address our newly launched capabilities to help meet these needs in the final section of this blog post.
More options for key rotation in AWS KMS (with a price reduction)
After learning how we think about key rotation in AWS KMS, let’s get to the new options we’ve launched in this space:
Configurable rotation periods: Previously, when using automatic key rotation, your only option was a fixed annual rotation period. You can now set a rotation period from 90 days to 2,560 days (just over seven years). You can adjust this period at any point to reset the time in the future when rotation will take effect. Existing keys set for rotation will continue to rotate every year.
On-demand rotation for KMS keys: In addition to more flexible automatic key rotation, you can now invoke on-demand rotation through the AWS Management Console for AWS KMS, the AWS Command Line Interface (AWS CLI), or the AWS KMS API using the new RotateKeyOnDemand API. You might occasionally need to use on-demand rotation to test workloads, or to verify and prove key rotation events to internal or external stakeholders. Invoking an on-demand rotation won’t affect the timeline of any upcoming rotation scheduled for this key.
Note: We’ve set a default quota of 10 on-demand rotations for a KMS key. Although the need for on-demand key rotation should be infrequent, you can ask to have this quota raised. If you have a repeated need for testing or validating instant key rotation, consider deleting the test keys and repeating this operation for RotateKeyOnDemand on new keys.
Improved visibility: You can now use the AWS KMS console or the new ListKeyRotations API to view previous key rotation events. One of the challenges in the past is that it’s been hard to validate that your KMS keys have rotated. Now, every previous rotation for a KMS key that has had a scheduled or on-demand rotation is listed in the console and available via API.
Figure 4: Key rotation history showing date and type of rotation
Price cap for keys with more than two rotations: We’re also introducing a price cap for automatic key rotation. Previously, each annual rotation of a KMS key added $1 per month to the price of the key. Now, for KMS keys that you rotate automatically or on-demand, the first and second rotation of the key adds $1 per month in cost (prorated hourly), but this price increase is capped at the second rotation. Rotations after your second rotation aren’t billed. Existing customers that have keys with three or more annual rotations will see a price reduction for those keys to $3 per month (prorated) per key starting in the month of May, 2024.
Summary
In this post, I highlighted the more flexible options that are now available for key rotation in AWS KMS and took a broader look into why key rotation exists. We know that many customers have compliance needs to demonstrate key rotation everywhere, and increasingly, to demonstrate faster or immediate key rotation. With the new reduced pricing and more convenient ways to verify key rotation events, we hope these new capabilities make your job easier.
Flexible key rotation capabilities are now available in all AWS Regions, including the AWS GovCloud (US) Regions. To learn more about this new capability, see the Rotating AWS KMS keys topic in the AWS KMS Developer Guide.
If you have feedback about this post, submit comments in the Comments section below. If you have questions about this post, contact AWS Support.
In June 2023, Amazon Web Services (AWS) introduced a new capability to AWS Key Management Service (AWS KMS): you can now import asymmetric key materials such as RSA or elliptic-curve cryptography (ECC) private keys for your signing workflow into AWS KMS. This means that you can move your asymmetric keys that are managed outside of AWS KMS—such as a hybrid (on-premises) environment, multi-cloud environment, and even AWS CloudHSM—and make them available through AWS KMS. Combined with the announcement on AWS KMS HSMs achieving FIPS 140-2 Security Level 3, you can make sure that your keys are secured and used in a manner that aligns to the cryptographic standards laid out by the U.S. National Institute of Standards and Technology (NIST).
In this post, we will show you how to migrate your asymmetric keys from CloudHSM to AWS KMS. This can help you simplify your key management strategy and take advantage of the robust authorization control of AWS KMS key policies.
Benefits of importing key materials into AWS KMS
In general, we recommend that you use a native KMS key because it provides the best security, durability, and availability compared to other key store options. AWS KMS FIPS-validated hardware security modules (HSMs) generate the key materials for KMS keys, and these key materials never leave the HSMs unencrypted. Operations that require use of your KMS key (for example, decryption of a data key or digital signature signing) must occur within the HSM.
However, depending on your organization’s requirements, you might need to bring your own key (BYOK) from outside. Importing your own key gives you direct control over the generation, lifecycle management, and durability of your keys. In addition, you have full control over the availability of your imported keys because you can set an expiration period or delete and reimport the keys at any time. You have greater control over the durability of your imported keys because you can maintain the original version of the keys elsewhere. If you need to generate and store copies of keys outside of AWS, these additional controls can help you meet your compliance requirements.
Solution overview
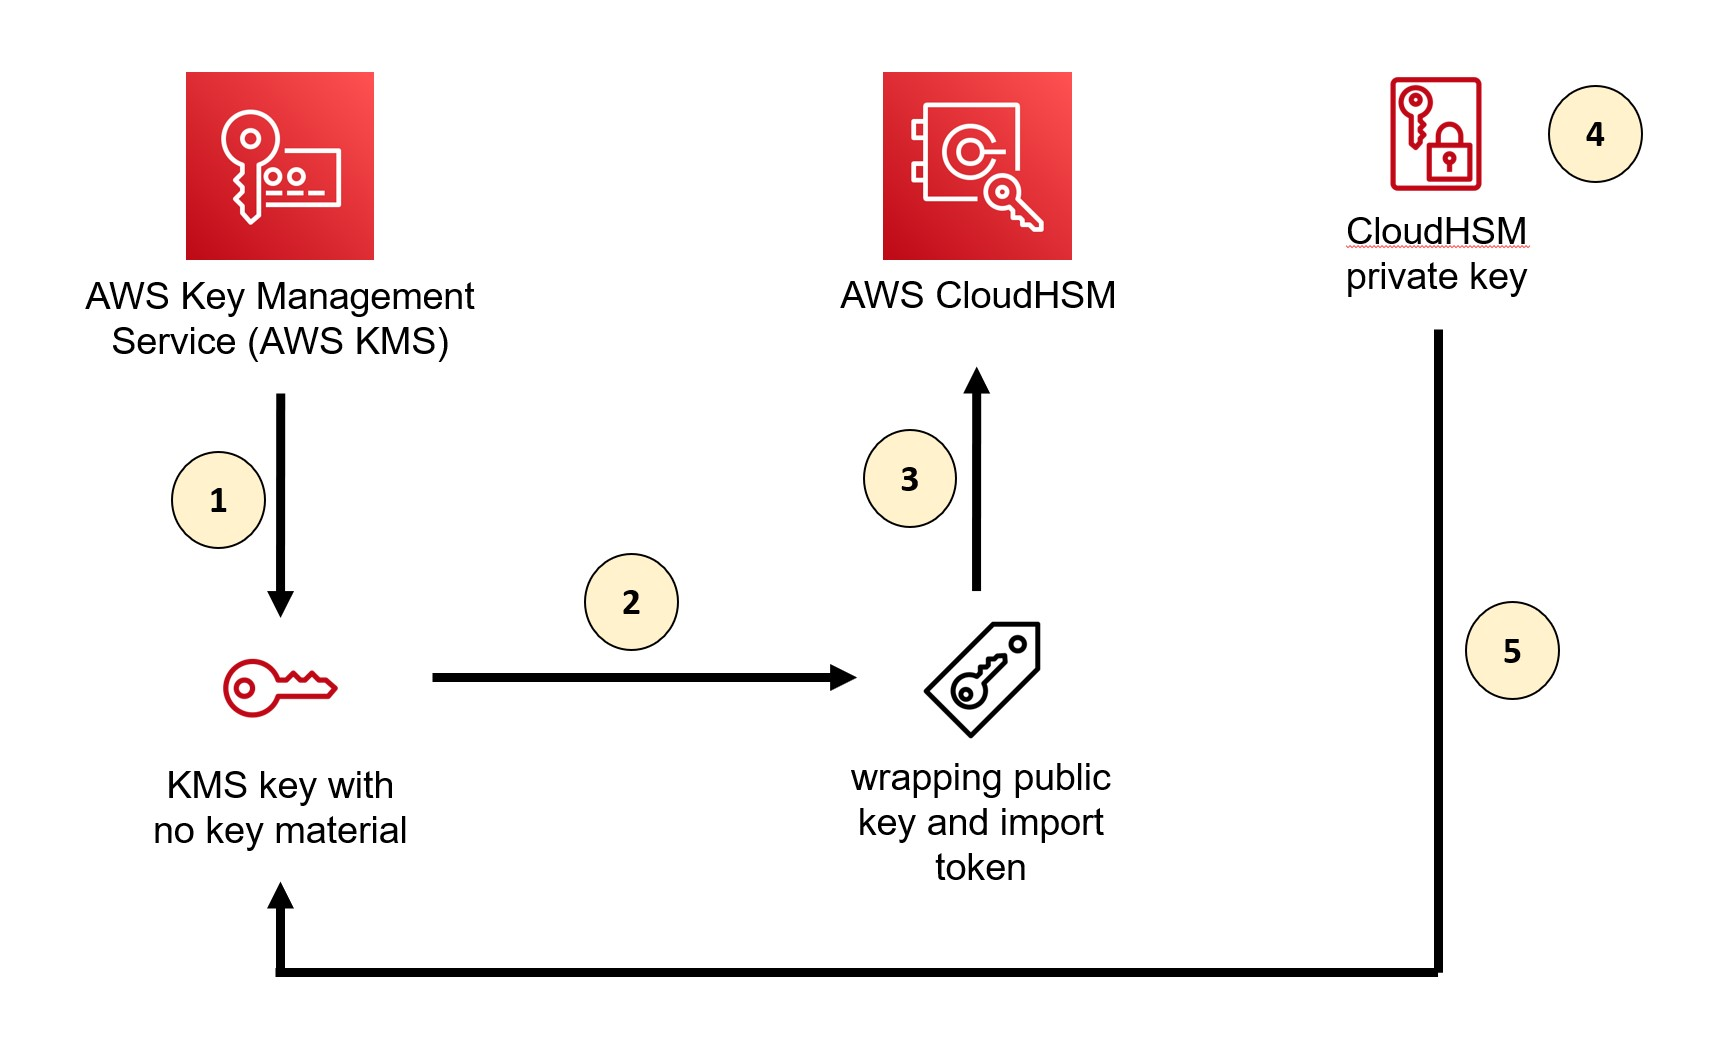
At a high level, our solution involves downloading the wrapping key from AWS KMS, using the CloudHSM Command Line Interface (CLI) to import a wrapping key to CloudHSM, wrapping the private key by using the wrapping key in CloudHSM, and uploading the wrapped private key to AWS KMS by using an import token. You can perform the same procedures by using other supported libraries, such as the PKCS #11 library or a JCE provider.
Figure 1: Overall architecture of the solution
As shown in Figure 1, the solution involves the following steps:
Create a KMS key without key material in AWS KMS
Download the wrapping public key and import token from AWS KMS
Import the wrapping key provided by AWS KMS into CloudHSM
Wrap the private key inside CloudHSM with the imported wrapping public key from AWS KMS
Import the wrapped private key to AWS KMS
For the walkthrough in this post, you will import into AWS KMS an ECC 256-bit private key (NIST P-256) that’s used for signing purpose from a CloudHSM cluster. When you import an asymmetric key into AWS KMS, you only need to import a private key. You don’t need to import a public key because AWS KMS can generate and retrieve a public key from the private key after the private key is imported.
Prerequisites
To follow along with this walkthrough, make sure that you have the following prerequisites in place:
An active CloudHSM cluster with at least one active HSM and a valid crypto user credential.
OpenSSL installed on your EC2 instance (we recommend version 3.0.0 or newer).
Step 1: Create a KMS key without key material in AWS KMS
The first step is to create a new KMS key. You can do this through the AWS KMS console or the AWS CLI, or by running the CreateKey API operation.
When you create your key, keep the following guidance in mind:
Set the key material origin to External so that no key material is created for this new key.
According to NIST SP 800-57 guidance and cryptography best practice, in general, you should use a single key for only one purpose (for example, if you use an RSA key for encryption, you shouldn’t also use that key for signing). Select the key usage that best suits your use case.
Make sure that the key spec match the algorithm specification of the key that you are trying to import from CloudHSM.
If you want to use the key in multiple AWS Regions (for example, to avoid the need for a cross-Region call to access the key), consider using a multi-Region key.
In general, an RSA wrapping algorithm (RSAES_OAEP_SHA_*) with a key spec of RSA_4096 should be sufficient for wrapping ECC private keys because it can wrap the key material completely. However, when importing RSA private keys, you will need to use the two-step hybrid wrapping algorithm (RSA_AES_KEY_WRAP_SHA_*) due to their large key size. The overall process is the same as what’s shown here, but the two-step hybrid wrapping algorithm requires that you encrypt your key material with an Advanced Encryption Standard (AES) symmetric key that you generate, and then encrypt the AES symmetric key with the RSA public wrapping key. Additionally, when you select the wrapping algorithm, you also have a choice between the SHA-1 or SHA-256 hashing algorithm. We recommend that you use the SHA-256 hashing algorithm whenever possible.
Note that each wrapping public key and import token set is valid for 24 hours. If you don’t use the set to import key material within 24 hours of downloading it, you must download a new set.
To download the wrapping public key and import token from AWS KMS
Run the following command. Make sure to replace <KMS KeyID> with the key ID of the KMS key that you created in the previous step. The key ID is the last part of the key ARN after :key/ (for example, arn:aws:kms:us-east-1:<AWS Account ID>:key/<Key ID>). “ImportToken.b64” represents the wrapping token, and “WrappingPublicKey.b64” represents the import token.
openssl enc -d -base64 -A -in WrappingPublicKey.b64 -out WrappingPublicKey.bin
To convert the wrapping public key from DER to PEM format
The key import pem command in CloudHSM CLI requires that the public key is in PEM format. AWS KMS outputs public keys in the DER format, so you must convert the wrapping public key to PEM format. To convert the public key to PEM format, run the following command:
From the output, note the value for the key label (<kms-wrapping-key> in this example) because you will need it for the next step.
Step 4: Wrap the private key inside CloudHSM with the imported wrapping public key from AWS KMS
Now that you have imported the wrapping key into CloudHSM, you can wrap the private key that you want to import to AWS KMS by using the wrapping key.
Important: Only the owner of a key—the crypto user who created the key—can wrap the key. In addition, the key that you want to wrap must have the extractable attribute set to true.
To wrap the private key
Use the key wrap command in the CloudHSM CLI to wrap the private key that’s stored in CloudHSM. Make sure to replace the following placeholder values with your own information:
rsa-oaep specifies the wrapping algorithm.
--payload-filter is used to define the key that you want to wrap out of the HSM. You can use the key reference (for example, key-reference=0x00000000002800c2) or reference key attributes, such as the key label. In our example, we used the key label ec-priv-import-to-kms.
--wrapping-filter is used to define the key that you will use to wrap out the payload key. This should be the wrapping key that you imported previously from AWS KMS, which was labeled kms-wrapping-key in Step 3.3.
--hash-function defines the hash function used as part of the OAEP encryption. This should match the wrapping algorithm that you specified when you got the import parameters from AWS KMS. In our example, it should be SHA-256 because we selected RSAES_OAEP_SHA_256 as the wrapping algorithm previously.
--mgf defines the mask generation function used as part of the OAEP encryption. The mask hash function must match the signing mechanism hash function, which is SHA-256 in this example.
--path defines the path to the binary file where the wrapped key data will be saved. In this example, we name the file EncryptedECC_P256KeyMaterial.bin but you can specify a different name.
You can also use the CloudHSM CLI to export the public key of your private key. You will use this key for testing later. Make sure to replace the placeholder values <ec-priv-import-to-kms> and <KeyName.pem> with your own information.
Now that you’ve wrapped the private key from CloudHSM, you can import it into AWS KMS.
Note that you have the option to set an expiration time for your imported key. After the expiration time passes, AWS KMS deletes your imported key automatically.
To import the wrapped private key to AWS KMS
If you have been using the CLI or API, the import token is base64 encoded. You must decode the token from base64 to binary format before it can be used. You can use OpenSSL to do this.
openssl enc -d -base64 -A -in ImportToken.b64 -out ImportToken.bin
Run the following command to import the wrapped private key. Make sure to replace <KMS KeyID> with the key ID of the KMS key that you created in Step 1.
Test whether your private key was imported successfully
The nature of asymmetric cryptography means that a digital signature produced by your private key should produce the same signature on the same message, regardless of the tool that you used to perform the signing operation. To verify that your imported private key functions the same in both CloudHSM and AWS KMS, you can perform a signing operation and compare the signature on CloudHSM and AWS KMS to make sure that they are the same.
Another way to check that your imported private key functions are the same in AWS KMS is to perform a signing operation and then verify the signature by using the corresponding public key that you exported from CloudHSM in Step 4. We will show you how to use this method to check that your private key was imported successfully.
To test that your private key was imported
Create a simple message in a text file and encode it in base64.
If successful, you should see a message that says Verified OK.
Conclusion
In this post, you learned how to import an asymmetric key into AWS KMS from CloudHSM by using the CloudHSM CLI.
Although this post focused on migrating keys from CloudHSM, you can also follow the general directions to import your asymmetric key from elsewhere. When you import a private key, make sure that the imported key matches the key spec and the wrapping algorithm that you choose in AWS KMS.
If you have feedback about this post, submit comments in the Comments section below. If you have questions about this post, contact AWS Support.
This blog post shows you how to share encrypted Amazon Simple Storage Service (Amazon S3) buckets across accounts on a multi-tenant data lake. Our objective is to show scalability over a larger volume of accounts that can access the data lake, in a scenario where there is one central account to share from. Most use cases involve multiple groups or customers that need to access data across multiple accounts, which makes data lake solutions inherently multi-tenant. Therefore, it becomes very important to associate data assets and set policies to manage these assets in a consistent way. The use of AWS Key Management Service (AWS KMS) simplifies seamless integration with AWS services and offers improved data protection to ultimately enable data lake services (for example, Amazon EMR, AWS Glue, or Amazon Redshift).
To further enable access at scale, you can use AWS Identity and Access Management (IAM) to restrict access to all IAM principals in your organization in AWS Organizations through the aws:PrincipalOrgID condition key. When used in a role trust policy, this key enables you to restrict access to IAM principals in your organization when assuming the role to gain access to resources in your account. This is more scalable than adding every role or account that needs access in the trust policy’s Principal element, and automatically includes future accounts that you may add to your organization.
A data lake that is built on AWS uses Amazon S3 as its primary storage location; Amazon S3 provides an optimal foundation for a data lake because of its virtually unlimited scalability and high durability. AWS Lake Formation can be used as your authorization engine to manage or enforce permissions to your data lake with integrated services such as Amazon Athena, Amazon EMR, and Amazon Redshift Spectrum. For AWS services that integrate with Lake Formation and honor Lake Formation permissions, see the Lake Formation Developer Guide.
This post focuses on services that are not integrated with Lake Formation or where Lake Formation is not enabled on the account; in these cases, direct access for S3 buckets is required for defining and enforcing access control policies. You will learn how to use attribute-based access control (ABAC) as an authorization strategy that defines fine-grained permissions based on attributes, where fewer IAM roles are required to be provisioned, which helps scale your authorization needs. By using ABAC in conjunction with S3 bucket policies, you can authorize users to read objects based on one or more tags that are applied to S3 objects and to the IAM role session of your users based on key-value pair attributes, named session tags. ABAC reduces the number of policies, because session tags are easier to manage and establish a differentiation in job policies. The session tags will be passed when you assume an IAM role or federate a user (through your identity provider) in AWS Security Token Service (AWS STS). This enables administrators to configure a SAML-based identity provider (IdP) to send specific employee attributes as tags in AWS. As a result, you can simplify the creation of fine-grained permissions for employees to get access only to the AWS resources with matching tags.
For simplicity, in this solution you will be using an AWS Command Line Interface (AWS CLI) request for temporary security credentials when generating a session. You will apply the global aws:PrincipalOrgID condition key in your resource-based policies to restrict access to accounts in your AWS organization. This key will restrict access even though the Principal element uses the wildcard character * which applies to all AWS principals in the Principal element. We will suggest additional controls where feasible.
Cross-account access
From a high-level overview perspective, the following items are a starting point when enabling cross-account access. In order to grant cross-account access to AWS KMS-encrypted S3 objects in Account A to a user in Account B, you must have the following permissions in place (objective #1):
The bucket policy in Account A must grant access to Account B.
The AWS KMS key policy in Account A must grant access to the user in Account B.
By establishing these permissions, you will learn how to maintain entitlements (objective #2) at the bucket or object level, explore cross-account bucket sharing at scale, and overcome limitations such as inline policy size or bucket policy file size (you can learn more details in the Policies overview section). As an extension, you:
Enable granular permissions.
Grant access to groups of resources by tags.
Configuration options can be challenging for cross-account access, especially when the objective is to scale across a large number of accounts to a multi-tenant data lake. This post offers to orchestrate the various configurations options in such a way that both objectives #1 and #2 are met and challenges are addressed. Note that although not all AWS services support tag-based authorization today, we are seeing an increase in support for ABAC.
Solution overview
Our objective is to overcome challenges and design backwards with scalability in mind. The following table depicts the challenges, and outlines recommendations for a better design.
Challenge
Recommendation detail
Use employee attributes from your corporate directory
You can configure your SAML-based or web identity provider to pass session tags to AWS. When your employees federate into AWS, their attributes are applied to their resulting principal in AWS. You can then use ABAC to allow or deny permissions based on those attributes.
Enable granular permissions
ABAC requires fewer policies, because differentiation in job policies is given through session tags, which are easier to manage. Permissions are granted automatically based on attributes.
Grant access to resources by tags
When you use ABAC, you can allow actions on all resources, but only if the resource tag matches the principal’s tag and/or the organization’s tag. It’s best practice to grant least privilege.
Not all services support tag-based authorization
Check for service updates and design around the limitations.
Scale with innovation
ABAC permissions scale with innovation, because it’s not necessary for the administrator to update existing policies to allow access to new resources.
Architecture overview
Figure 1: High-level architecture
The high-level architecture in Figure 1 is designed to show you the advantages of scaling ABAC across accounts and to reflect on a common model that applies to most large organizations.
Solution walkthrough
Here is a brief introduction to the basic components that make up the solution:
Identity provider (IdP) – Can be either on-premises or in the cloud. Your administrators configure your SAML-based IdP to allow workforce users federated access to AWS resources using credentials from your corporate directory (backed by Active Directory). Now you can configure your IdP to pass in user attributes as session tags in federated AWS sessions. These tags can also be transitive, persisting even across subsequent role assumptions.
Central governance account – Helps to establish the access control policies. It takes in the user’s attributes from the IdP and grants permission to access resources. The X-Acct Control Manager is a collection of IAM roles with trust boundaries that grants access to the SAML role by role re-assumption, also known as role chaining. The governance account manages access to the SAML role and trust relationship by using OpenID Connect (OIDC) to allow users to assume roles and pass session tags. This account’s primary purpose is to manage permissions for secure data access. This account can also consume data from the lake if necessary.
Multiple accounts to connect to a multi-tenant data lake – Mirrors a large organization with a multitude of accounts that would like cross-account read access. Each account uses a pre-pave data manager role (one that has been previously established) that can tag or untag any IAM roles in the account, with the cross-account trust allowing users to assume a role to a specific central account. Any role besides the data manager should be prevented from tagging or untagging IAM principals to help prevent unauthorized changes.
Member Analytics organizational unit (OU) – Is where the EMR analytics clusters are connecting to the data in the consumptions layer to visualize by using business intelligence (BI) tools such as Tableau. Access to the shared buckets is granted through bucket and identity policies. Multiple accounts may also have access to buckets within their own accounts. Since this is a consumer account, this account is only joining the lake to consume data from the lake and will not be contributing any data to the data lake.
Central Data Lake OU – Is the account that owns the data stored on Amazon S3. The objects are encrypted, which will require the IAM role to have permissions to the specified AWS KMS key in the key policy. AWS KMS supports the use of the aws:ResourceTag/tag-key global condition context key within identity policies, which lets you control access to AWS KMS keys based on the tags on the key.
Prerequisites
For using SAML session tags for ABAC, you need to have the following:
Access to a SAML-based IdP where you can create test users with specific attributes.
For simplicity, you will be using an AWS CLI request for temporary security credentials when generating a session.
You’ll be passing session tags using AssumeRoleWithSAML.
AWS accounts where users can sign in. There are five accounts for interaction defined with accommodating policies and permission, as outlined in Figure 1. The numerals listed here refer to the labels on the figure:
IdP account – IAM user with administrative permission (1)
Central governance account – Admin/Writer ABAC policy (2)
Sample accounts to connect to multi-tenant data lake – Reader ABAC policy (3)
Member Analytics OU account – Assume roles in shared bucket (4)
Central Data Lake OU account – Pave (that is create) or update virtual private cloud (VPC) condition and principals/PrincipalOrgId in a shared bucket (5)
AWS resources, such as Amazon S3, AWS KMS, or Amazon EMR.
Any third-party software or hardware, such as BI tools.
Our objective is to design an AWS perimeter where access is allowed only if necessary and sufficient conditions are met for getting inside the AWS perimeter. See the following table, and the blog post Establishing a data perimeter on AWS for more information.
Boundary
Perimeter objective
AWS services used
Identity
Only My Resources Only My Networks
Identity-based policies and SCPs
Resource
Only My IAM Principals Only My Networks
Resource-based policies
Network
Only My IAM Principals Only My Resources
VPC endpoint (VPCE) policies
There are multiple design options, as described in the whitepaper Building A Data Perimeter on AWS, but this post will focus on option A, which is a logical AND (∧) conjunction of principal organization, resource, and network:
(Only My aws:PrincipalOrgID) ∧ (Only My Resource) ∧ (Only My Network)
(Only My IAM Principals) ∧ (Only My Resource) ∧ (Only My Network)
(Only My aws:PrincipalOrgID) ∧ (Only My IAM Principals) ∧ (Only My Resource) ∧ (Only My Network)
Policies overview
In order to properly design and consider control points as well as scalability limitations, the following table shows an overview of the policies applied in this post. It outlines the design limitations and briefly discusses the proposed solutions, which are described in more detail in the Establish an ABAC policy section.
Policy type
Sample policies
Limitations to overcome
Solutions outlined in this blog
IAM user policy
AllowIamUserAssumeRole
AllowPassSessionTagsAndTransitive
IAMPolicyWithResourceTagForKMS
Inline JSON policy document is limited to (2048 bytes).
For using KMS keys, accounts are limited to specific AWS Regions.
Enable session tags, which expire and require credentials.
It is a best practice to grant least privilege permissions with AWS Identity and Access Management (IAM) policies.
S3 bucket policy
Principals-only-from-given-Org
Access-to-specific-VPCE-only
KMS-Decrypt-with-specific-key
DenyUntaggedData
The bucket policy has a 20 KB maximum file size.
Data exfiltration or non-trusted writing to buckets can be restricted by a combination of policies and conditions.
Use aws:PrincipalOrgID to simplify specifying the Principal element in a resource-based policy.
No manual updating of account IDs required, if they belong to the intended organization.
~ VPCE policy
DenyNonApprovedIPAddresses VPCEndpointsNonAdmin
DenyNonSSLConnections
DenyIncorrectEncryptionKey
DenyUnEncryptedObjectUploads
aws:PrincipalOrgID opens up broadly to accounts with single control—requiring additional controls.
Make sure that principals aren’t inadvertently allowed or denied access.
Restrict access to VPC with endpoint policies and deny statements.
KMS key policy
Allow-use-of-the-KMS-key-for-organization
Listing all AWS account IDs in an organization.
Maximum key policy document size is 32 KB, which applies to KMS key.
Changing a tag or alias might allow or deny permission to a KMS key.
Specify the organization ID in the condition element, instead of listing all the AWS account IDs.
AWS owned keys do not count against these quotas, so use these where possible.
Assure visibility of API operations
By using a combination of these policies and conditions, you can work to mitigate accidental or intentional exfiltration of data, IAM credentials, and VPC endpoints. You can also alleviate writing to a bucket that is owned by a non-trusted account by using even more restrictive policies for write operations. For example, use the s3:ResourceAccount condition key to filter access to trusted S3 buckets that belong only to specific AWS accounts.
Today, the scalability of cross-account bucket sharing is limited by the current allowed S3 bucket policy size (20 KB) and KMS key policy size (32 KB). Cross-account sharing also may increase risk, unless the appropriate guardrails are in place. The aws:PrincipalOrgID condition helps by allowing sharing of resources such as buckets only to accounts and principals within your organization. If ABAC is also used for enforcement, tags used for authorization also need to be governed across all participating accounts; this includes protecting them from modification and also helps ensure only authorized principals can use ABAC when gaining access.
Figure 2 demonstrates a sample scenario for the roles from a specific organization in AWS Organizations, including multiple application accounts (Consumer Account 1, Consumer Account 2) with defined tags accessing an S3 bucket that is owned by Central Data Lake Account.
Figure 2: Sample scenario
Establish an ABAC policy
AWS has published additional blog posts and documentation for various services and features that are helpful supplements to this post. For more information, see the following resources:
Federate the user with permissions to assume roles with the same tags. By way of tagging the users, they automatically get access to assume the correct role, if they work only on one project and team.
Create the customer managed policy to attach to the federated user that uses ABAC to allow role assumption.
The federated user can assume a role only when the user and role tags are matching. More detailed instructions for defining permissions to access AWS resources based on tags are available in Create the ABAC policy in the IAM tutorial: Define permissions to access AWS resources based on tags.
Policy sample to allow the user to assume the role
The AllowUserAssumeRole statement in the following sample policy allows the federated user to assume the role test-session-tags with the attached policy. When that federated user assumes the role, they must pass the required session tags. For more information about federation, see Identity providers and federation in the AWS Identity and Access Management User Guide.
Allow cross-account access to an AWS KMS key. This is a key policy to allow principals to call specific operations on KMS keys.
Using ABAC with AWS KMS provides a flexible way to authorize access without editing policies or managing grants. Additionally, the aws:PrincipalOrgID global condition key can be used to restrict access to all accounts in your organization. This is more scalable than having to list all the account IDs in an organization within a policy. You accomplish this by specifying the organization ID in the condition element with the condition key aws:PrincipalOrgID. For detailed instructions about changing the key policy by using the AWS Management Console, see Changing a key policy in the AWS KMS Developer Guide.
You should use these features with care so that principals aren’t inadvertently allowed or denied access.
Policy sample to allow a role in another account to use a KMS key
To grant another account access to a KMS key, update its key policy to grant access to the external account or role. For instructions, see Allowing users in other accounts to use a KMS key in the AWS KMS Developer Guide.
The accounts are limited to roles that have an access-project=CDO5951 tag. You might attach this policy to roles in the example Alpha project.
Note: when using ABAC to grant access to an external account, you need to ensure that the tags used for ABAC are protected from modification across your organization.
Configure the S3 bucket policy.
For cross-account permissions to other AWS accounts or users in another account, you must use a bucket policy. Bucket policy is limited to a size of 20KB. For more information, see Access policy guidelines.
The idea of the S3 bucket policy is based on data classification, where the S3 bucket policy is used with deny statements that apply if the user doesn’t have the appropriate tags applied. You don’t need to explicitly deny all actions in the bucket policy, because a user must be authorized in both their identity policy and the S3 bucket policy in a cross-account scenario.
Policy sample for the S3 bucket
You can use the Amazon S3 console to add a new bucket policy or edit an existing bucket policy. For detailed instructions to create or edit a bucket policy, see Adding a bucket policy using the Amazon S3 console in the Amazon S3 User Guide. The following sample policy restricts access only to principals from organizations as listed in the policy and a specific VPC endpoint. It is important to test that all the AWS services involved in a solution can access this S3 bucket. For more information, see Resource-based policy examples in the whitepaper Building A Data Perimeter on AWS.
To create an interface endpoint, you must specify the VPC in which to create the interface endpoint, and the service to which to establish the connection.
Configure the SAML IdP (if you have one) or post in commands manually.
Typically, you configure your SAML IdP to pass in the project, cost-center, and department attributes as session tags. For more information, see Passing session tags using AssumeRoleWithSAML.
The following assume-role AWS CLI command helps you perform and test this request.
This example request assumes the test-session-tags role for the specified duration with the included session policy, session tags, external ID, and source identity. The resulting session is named my-session.
Cleanup
To avoid unwanted charges to your AWS account, follow the instructions to delete the AWS resources that you created during this walkthrough.
Conclusion
This post explains how to share encrypted S3 buckets across accounts at scale by granting access across a large number of accounts to a multi-tenant data lake. The approach does not use Lake Formation, which may have advantages for use-cases requiring fine-grained access control. Instead, this solution uses a central governance account combining role-chaining with session tags to produce data for the lake. Permissions are granted through these tags. For read-only consumption of data by multiple accounts, cross-account read-only access is granted through Amazon EMR analytics clusters that access the data, visualizing them though BI tools. Access to the shared buckets is restricted through bucket and identity policies. Through the use of multiple AWS services and IAM features such as KMS key policies, IAM policies, S3 bucket policies, and VPCE policies, this solution enables controls that help secure access to the data, while enabling the users to use ABAC for access.
This approach is focused on scalability; you can generalize and repurpose the steps for different requirements and projects. As a result, this scalable solution for services not integrated with AWS Lake Formation can be customized with AWS KMS by way of combining with ABAC to authorize access without editing policies or managing grants. For services that honor Lake Formation permissions, you can use the Lake Formation Developer Guide to more easily set up integrated services to encrypt and decrypt data.
In summary, the design provided here is feasible for large projects, with appropriate controls to allow scalability potentially across more than 1,000 accounts.
If you have feedback about this post, submit comments in the Comments section below. If you have questions about this post, contact AWS Support.
Want more AWS Security news? Follow us on Twitter.
The collective thoughts of the interwebz
Manage Consent
To provide the best experiences, we use technologies like cookies to store and/or access device information. Consenting to these technologies will allow us to process data such as browsing behavior or unique IDs on this site. Not consenting or withdrawing consent, may adversely affect certain features and functions.
Functional
Always active
The technical storage or access is strictly necessary for the legitimate purpose of enabling the use of a specific service explicitly requested by the subscriber or user, or for the sole purpose of carrying out the transmission of a communication over an electronic communications network.
Preferences
The technical storage or access is necessary for the legitimate purpose of storing preferences that are not requested by the subscriber or user.
Statistics
The technical storage or access that is used exclusively for statistical purposes.The technical storage or access that is used exclusively for anonymous statistical purposes. Without a subpoena, voluntary compliance on the part of your Internet Service Provider, or additional records from a third party, information stored or retrieved for this purpose alone cannot usually be used to identify you.
Marketing
The technical storage or access is required to create user profiles to send advertising, or to track the user on a website or across several websites for similar marketing purposes.