All posts by Marco Frattallone

Standardizing construct properties with AWS CDK Property Injection

Post Syndicated from Marco Frattallone original https://aws.amazon.com/blogs/devops/standardizing-construct-properties-with-aws-cdk-property-injection/

Standardizing CDK construct properties across a large organization requires repetitive manual effort that scales poorly as teams and repositories grow. Development teams working with AWS Cloud Development Kit (AWS CDK) must apply the same configuration properties across similar resources to meet security, compliance, and operational standards but manual configuration leads to drift, maintenance burden, and compliance gaps. In this post, you learn how to use Property Injection, a feature introduced in AWS CDK v2.196.0, to automatically apply default properties to constructs without modifying existing code.

The Challenge of Infrastructure Standardization

Organizations implementing infrastructure as code face a fundamental tension between developer productivity and operational consistency. CDK provides abstractions for defining cloud resources, but ensuring compliance with organizational security policies, compliance requirements, and operational standards requires repetitive manual configuration.
Consider this scenario: an organization’s security policy requires that all SecurityGroups disable outbound traffic by default. Development teams must apply these settings to every SecurityGroup:


new SecurityGroup(stack, 'api-sg', {
  vpc: myVpc,
  allowAllOutbound: false,        // Required by security policy
  allowAllIpv6Outbound: false     // Required by security policy
});

new SecurityGroup(stack, 'db-sg', {
  vpc: myVpc,
  allowAllOutbound: false,        // Same configuration repeated
  allowAllIpv6Outbound: false     // Same configuration repeated
});

This manual approach creates four specific problems:

  • Configuration drift: Teams omit required properties or apply them inconsistently
  • Maintenance burden: Policy updates require coordinated changes across multiple repositories and teams
  • Developer friction: Repetitive configuration tasks slow development velocity and increase cognitive load
  • Compliance gaps: Manual processes introduce human error, creating security or compliance violations

Custom construct libraries address these challenges but require refactoring every construct instantiation in existing code and create learning curves for development teams already familiar with standard CDK patterns.

Introducing Property Injection

AWS CDK Property Injection addresses these challenges by automatically applying default properties to constructs without requiring changes to existing code.

Property Injection is a feature introduced in AWS CDK v2.196.0 that intercepts construct creation and automatically applies organizational defaults. With this approach, you can enforce standards consistently while preserving existing development workflows and code patterns.

After implementing Property Injection, the same SecurityGroup creation requires only the vpc parameter, security defaults are applied automatically:

// Your existing code remains unchanged
new SecurityGroup(stack, 'my-sg', {
  vpc: myVpc
  // Security defaults applied automatically by Property Injection
});

The key benefits of this approach include:

  • Zero-impact adoption: Existing CDK code continues to work without modification
  • Centralized policy management: Standards are defined once and applied automatically
  • Consistent enforcement: Policies are applied uniformly across all applications and teams
  • Reduced maintenance overhead: Policy updates require changes in only one location
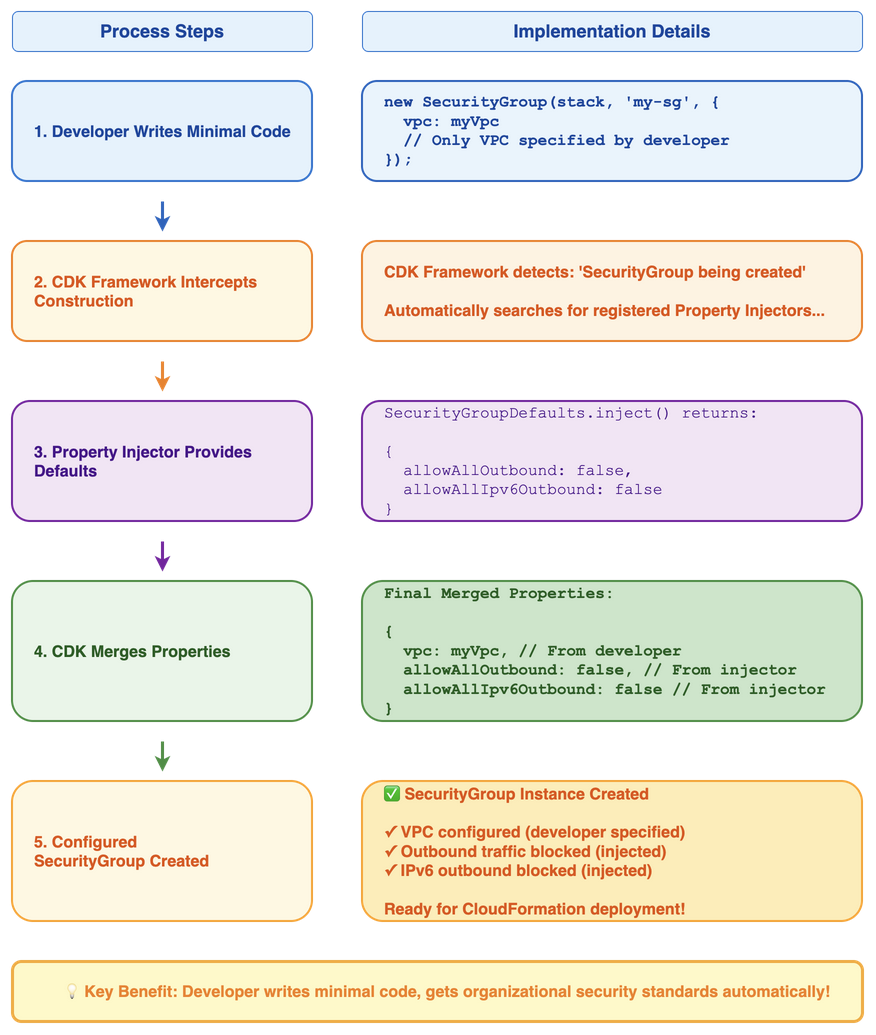
This diagram shows the five-step Property Injection process in a clear two-column format. The left column outlines each process step, while the right column shows the corresponding implementation details with properly formatted TypeScript code. The flow demonstrates how CDK intercepts SecurityGroup creation, applies organizational security defaults through property injectors, merges them with developer-specified properties, and creates a fully configured SecurityGroup that meets both developer requirements and organizational standards.

Figure 1: CDK Property Injection Mechanism

Property Injection operates transparently within CDK, intercepting construct creation to apply predefined defaults before merging them with any properties explicitly provided by developers. This ensures that organizational standards are consistently applied while maintaining the flexibility for developers to override defaults when specific use cases require it.

Understanding the Implementation Approach

Property Injection works by implementing the IPropertyInjector interface, which allows you to define default properties for specific construct types. These injectors are registered with CDK stacks and automatically apply their defaults during construct instantiation.
The implementation follows three steps: define the defaults you want to apply, register the injector with your stack, and let CDK handle the automatic application of these defaults to matching constructs.

Implementation Guide

This section shows you how to implement Property Injection for SecurityGroup constructs.

Step 1: Create a Property Injector

Create a class that implements the IPropertyInjector interface:

import { IPropertyInjector, InjectionContext } from 'aws-cdk-lib';
import { SecurityGroup, SecurityGroupProps } from 'aws-cdk-lib/aws-ec2';

export class SecurityGroupDefaults implements IPropertyInjector {
  readonly constructUniqueId: string;

  constructor() {
    this.constructUniqueId = SecurityGroup.PROPERTY_INJECTION_ID;
  }

  inject(originalProps: SecurityGroupProps, context: InjectionContext): SecurityGroupProps {
    return {
      // Apply organizational defaults
      allowAllIpv6Outbound: false,
      allowAllOutbound: false,
      // Original properties override defaults when specified
      ...originalProps,
    };
  }
}

Step 2: Add the Injector to Your Stack

Apply the injector to your CDK stack:

import { Stack } from 'aws-cdk-lib';
import { SecurityGroupDefaults } from './security-defaults';

const stack = new Stack(app, 'MyStack', {
  propertyInjectors: [
    new SecurityGroupDefaults()
  ]
});

Step 3: Use Constructs Normally

Create constructs as usual. The injector applies defaults automatically:

// This SecurityGroup receives the injected defaults:
// - allowAllOutbound: false
// - allowAllIpv6Outbound: false
new SecurityGroup(stack, 'my-sg', {
  vpc: myVpc
});

// You can override defaults when necessary
new SecurityGroup(stack, 'special-sg', {
  vpc: myVpc,
  allowAllOutbound: true  // Overrides the injected default
});
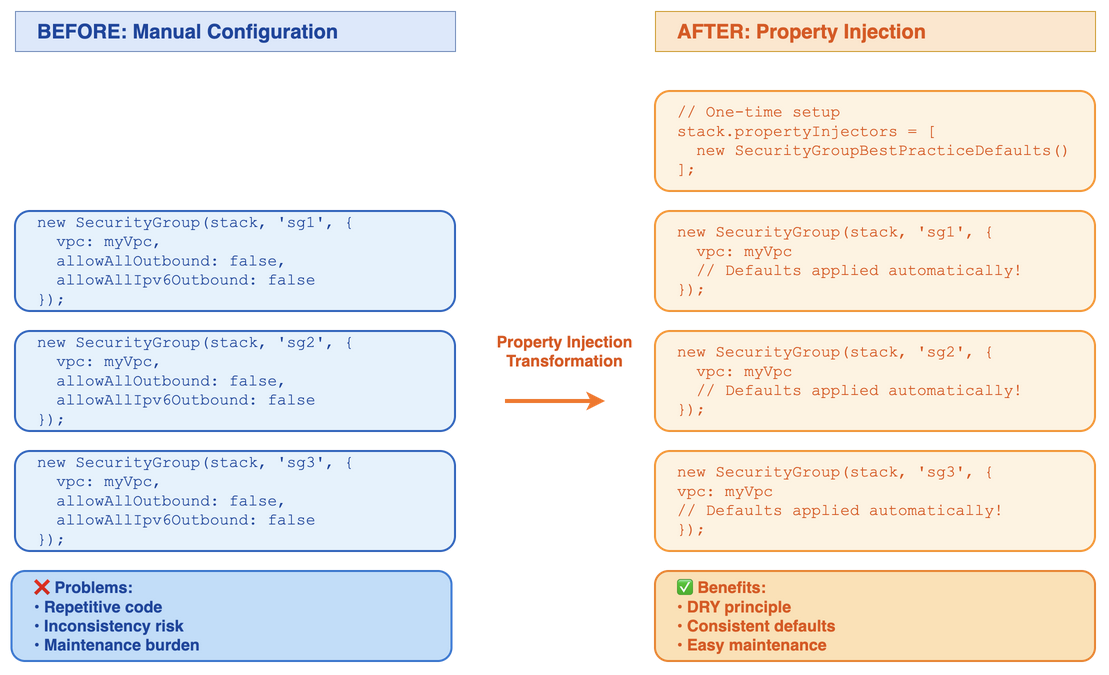
This side-by-side comparison shows the difference between manual configuration and Property Injection. The left side (Before) shows three SecurityGroup definitions, each requiring manual specification of allowAllOutbound: false and allowAllIpv6Outbound: false, leading to repetitive code, inconsistency risk, and maintenance burden. The right side (After) shows the same SecurityGroups created with the VPC parameter alone after a one-time Property Injection setup, demonstrating the DRY principle, consistent defaults, and reduced maintenance.

Figure 2: CDK Code Before vs After Property Injection

Property Injection vs L2 Constructs

You can achieve the same enforcement of default properties by creating custom L2 constructs with built-in defaults. However, Property Injection is better suited for standardizing existing codebases without refactoring, while L2 Constructs are better suited for new projects where you want custom APIs and multi-resource abstractions.
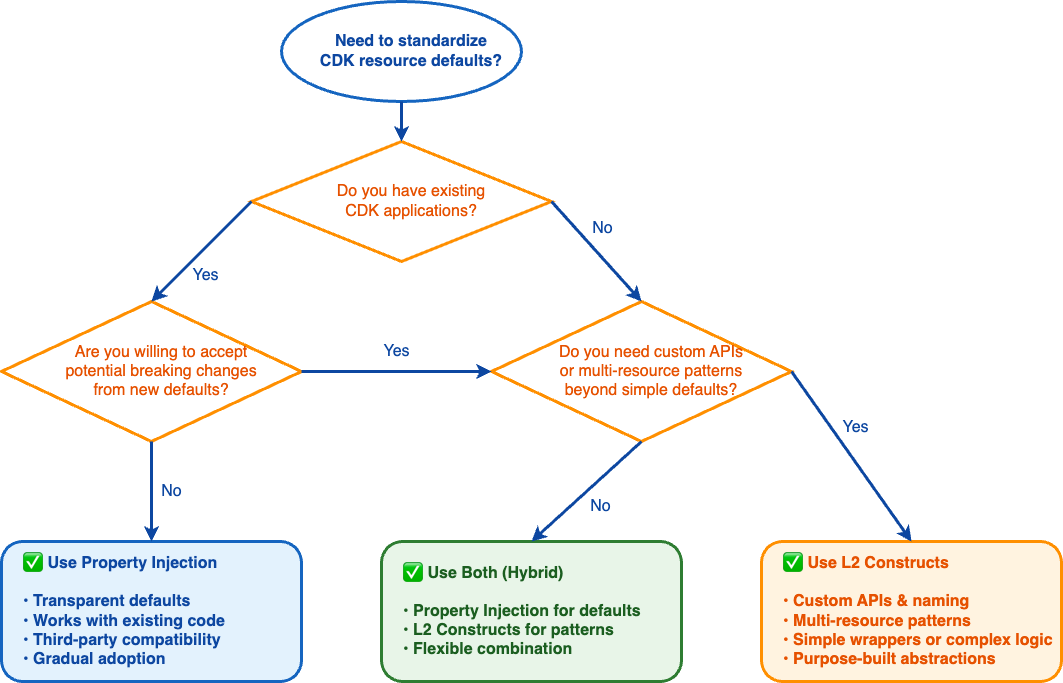
This decision tree guides the selection between Property Injection and L2 Constructs for CDK standardization. Starting with existing CDK applications, it evaluates willingness to accept potential breaking changes from new defaults. If breaking changes are acceptable or no existing code exists, it assesses whether custom APIs, naming improvements, or multi-resource patterns are needed beyond simple defaults. The tree leads to three outcomes: Property Injection (blue) for transparent defaults with existing code compatibility, L2 Constructs (orange) for custom APIs and purpose-built abstractions, or a Hybrid approach (green) combining both techniques for maximum flexibility.

Figure 3: Decision Tree – Property Injection vs L2 Constructs

Implementation Comparison

Consider an application with multiple SecurityGroup instantiations that need standardized security defaults.

L2 Construct approach requires creating a custom construct and updating each instantiation:

// Step 1: Create custom L2 construct
export class SecureSecurityGroup extends SecurityGroup {
  constructor(scope: Construct, id: string, props: SecurityGroupProps) {
    super(scope, id, {
      allowAllOutbound: false,
      allowAllIpv6Outbound: false,
      ...props
    });
  }
}

// Step 2: Update each instantiation throughout your codebase
// Change from:
new SecurityGroup(stack, 'sg1', { vpc: myVpc })
new SecurityGroup(stack, 'sg2', { vpc: myVpc })
new SecurityGroup(stack, 'sg3', { vpc: myVpc })

// To:
new SecureSecurityGroup(stack, 'sg1', { vpc: myVpc })
new SecureSecurityGroup(stack, 'sg2', { vpc: myVpc })
new SecureSecurityGroup(stack, 'sg3', { vpc: myVpc })

Property Injection approach requires one-time stack configuration:

// Step 1: Add injector to stack configuration
stack.propertyInjectors = [new SecurityGroupDefaults()];

// Step 2: Existing SecurityGroup calls receive defaults automatically
new SecurityGroup(stack, 'sg1', { vpc: myVpc })  // Gets defaults
new SecurityGroup(stack, 'sg2', { vpc: myVpc })  // Gets defaults  
new SecurityGroup(stack, 'sg3', { vpc: myVpc })  // Gets defaults

Key Differences

Property Injection works with existing construct calls, requiring no changes to how developers instantiate SecurityGroups or other constructs. This approach overrides constructs from external libraries and can be implemented without modifying existing code. Developers continue using familiar CDK APIs without learning new interfaces.

L2 Constructs require updating all constructor calls throughout your codebase. This approach cannot modify third-party construct creation since you must change each instantiation to use your custom construct. Implementation requires refactoring existing code and developers must learn your custom construct APIs instead of standard CDK interfaces. L2 constructs serve multiple purposes beyond complex business logic – simple L2 constructs provide domain-specific naming conventions and cleaner APIs, while complex L2 constructs orchestrate three or more resources and implement business rules.

When to Choose Each Approach

Choose Property Injection when you need to standardize existing infrastructure. Property Injection excels in scenarios where you already have CDK applications deployed and need to apply consistent defaults retroactively. Property Injection works transparently with existing code, requiring no changes to how developers instantiate constructs. This makes it useful when you have existing CDK applications that you want to standardize without disrupting current development workflows.

Property Injection also solves the challenge of applying defaults to constructs from third-party libraries. Since you cannot modify external library code, Property Injection enforces organizational standards on any construct type, regardless of its source. Additionally, when you want to implement standards without changing existing code, Property Injection operates at the framework level, automatically applying defaults during construct instantiation without requiring developers to modify their existing implementations.

Choose L2 Constructs when you need custom APIs or multi-resource patterns. L2 Constructs provide the right abstraction when you want to create purpose-built interfaces that differ from standard CDK APIs. This includes simple wrappers with domain-specific naming, complex business logic, validation rules, or multi-resource orchestration patterns. L2 Constructs excel when you want to create opinionated APIs that simplify common patterns by hiding complexity behind intuitive interfaces.

L2 Constructs suit new application development where you can design the API from the start. This approach creates purpose-built abstractions that match your organization’s specific use cases and terminology. Unlike Property Injection, which applies defaults to existing construct APIs, with L2 Constructs you can design entirely new APIs that directly represent your business domain and operational patterns.

Implementation Patterns

Stack Integration Methods

The CDK provides two methods for adding Property Injectors to stacks:
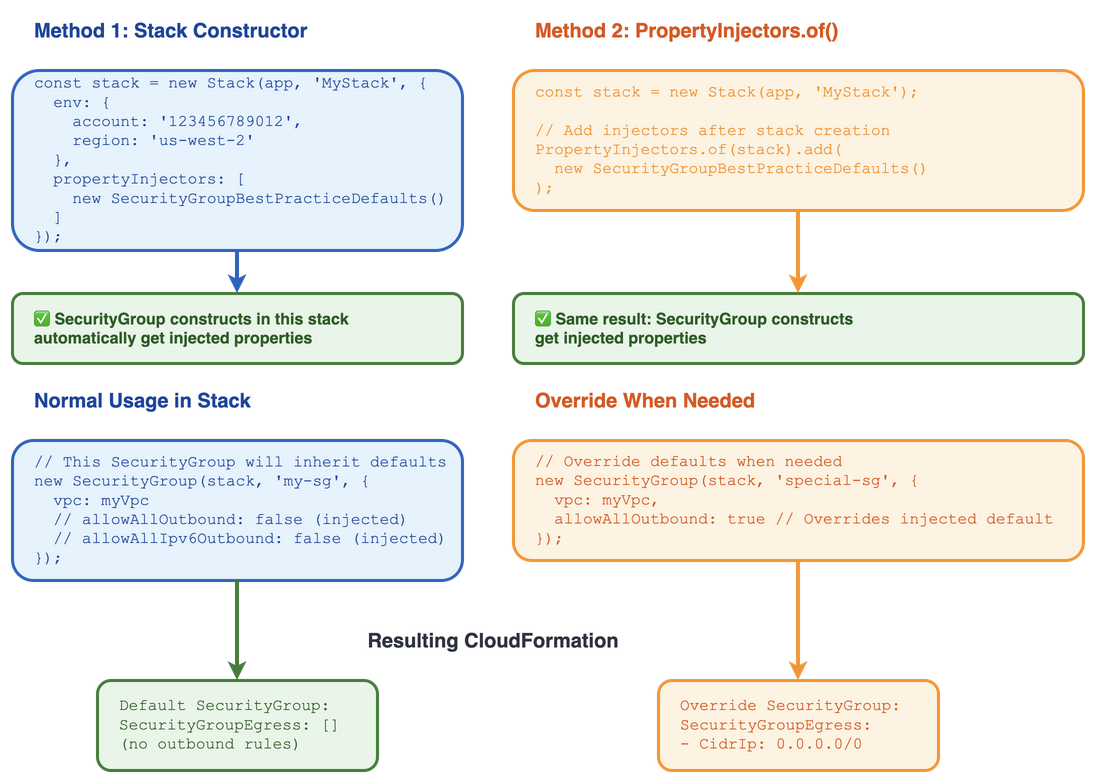
This diagram demonstrates two methods for adding Property Injectors to CDK stacks. Method 1 (blue) shows adding injectors directly in the Stack constructor’s propertyInjectors array. Method 2 (orange) shows using PropertyInjectors.of(stack).add() after stack creation. Both methods produce identical results with green checkmarks indicating success. The diagram includes usage examples showing normal SecurityGroup instantiation (blue) that inherits defaults automatically, and override scenarios (orange) where developers explicitly override injected defaults. The bottom section shows the resulting CloudFormation output: default SecurityGroups have empty egress rules (green), while overridden ones include outbound traffic rules (orange).

Figure 4: CDK Stack Integration Methods

Method 1: Stack Constructor

const stack = new Stack(app, 'MyStack', {
  propertyInjectors: [new SecurityGroupDefaults()]
});

Method 2: PropertyInjectors.of()

const stack = new Stack(app, 'MyStack');
PropertyInjectors.of(stack).add(new SecurityGroupDefaults());

Both methods produce the same result. Choose the method that best fits your existing code structure. For more details, see the PropertyInjectors API documentation.

Organization-Wide Implementation

For organization-wide standardization, create a shared library of injectors:

// @myorg/cdk-injectors package
export const ORGANIZATION_INJECTORS: IPropertyInjector[] = [
  new SecurityGroupDefaults(),
  new LambdaFunctionDefaults(),
  new S3BucketDefaults(),
];

// Teams import and use the shared injectors
import { ORGANIZATION_INJECTORS } from '@myorg/cdk-injectors';

const stack = new Stack(app, 'TeamStack', {
  propertyInjectors: ORGANIZATION_INJECTORS
});

Scope Hierarchy

Property Injectors can be applied at different levels in the CDK construct tree:
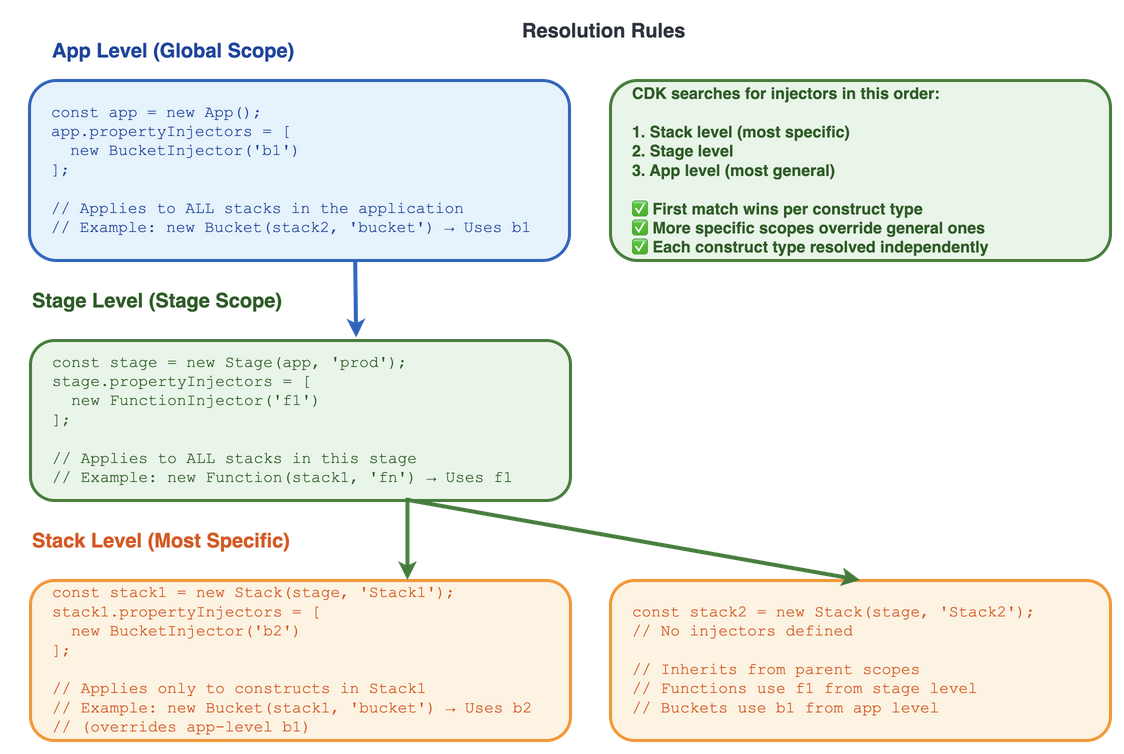
This diagram illustrates the three-level hierarchy of Property Injector scopes in CDK with integrated resolution examples. The App level (blue) shows a BucketInjector ‘b1’ that applies globally, with an example showing how Stack2 buckets use this injector. The Stage level (green) demonstrates a FunctionInjector ‘f1’ that applies to all stacks within the stage, including an example of Stack1 functions using this injector. The Stack level (orange) shows two stacks: Stack1 with its own BucketInjector ‘b2’ that overrides the app-level injector, and Stack2 with no injectors that inherits from parent scopes. The Resolution Rules box (green) explains that CDK searches from most specific (stack) to most general (app), with the first match winning per construct type. Arrows show the hierarchical relationship between scopes.

    Figure 5: CDK Scope Hierarchy & Injector Resolution
  • App level: Applies to all stacks in the application
  • Stage level: Applies to all stacks within a specific stage
  • Stack level: Applies only to constructs within a specific stack

CDK searches for applicable injectors starting from the construct’s immediate parent scope and moving upward. The first matching injector for each construct type is used.

Best Practices

When implementing Property Injection, begin with high-impact constructs like SecurityGroups, VPCs, and Lambda functions that require repetitive configuration.

These constructs have the highest frequency of misconfiguration and the most direct compliance impact, making them the most valuable targets for early adoption.

Document your defaults by explaining what properties your injectors provide and why. Include examples and link to relevant policies that drive the requirements. With this documentation, developers can understand standards and make informed override decisions.

Write automated tests using CDK testing utilities to verify that injectors apply expected defaults. Test both standard scenarios and cases where developers override properties to prevent regressions when updating injector logic.

Version injectors carefully using semantic versioning principles because changes affect all applications. Coordinate updates across teams and provide migration guides for breaking changes or changes to default values.

Design override mechanisms so that developers can handle edge cases while benefiting from organizational standards. Property Injection operates as defaults, not restrictions, so design injectors to merge gracefully with developer-specified properties.

Limitations and Considerations

Property Injection operates as a default mechanism rather than a compliance enforcement system. Developers retain the ability to override injected properties, which means organizations cannot rely solely on Property Injection for strict compliance requirements. For teams that need mandatory compliance, combine Property Injection with CDK Aspects or AWS Config rules to validate and enforce standards.

The feature works exclusively with L2 constructs, as documented in the official AWS CDK guidance. The IPropertyInjector interface targets specific L2 construct types, and L1 (CloudFormation) constructs use different instantiation patterns that bypass the property injection mechanism entirely. Organizations with L1 construct usage need alternative standardization approaches.

Property Injection introduces debugging complexity because injected properties do not appear directly in application code. Developers troubleshooting construct behavior must understand which injectors apply to specific construct types and how those injectors modify properties. This hidden behavior requires documentation that lists each injector, the properties it sets, and the policy it enforces, along with clear naming conventions to maintain code clarity.

The feature requires CDK v2.196.0 or later, which affects adoption timelines for organizations using older CDK versions. Teams must plan upgrade paths and test compatibility before implementing Property Injection across their applications.

Conclusion

Property Injection provides a mechanism for applying consistent default properties to CDK constructs without requiring changes to existing code. This approach reduces repetitive configuration, improves consistency, and simplifies maintenance of CDK applications.
Property Injection is the right choice for organizations that need to standardize construct configurations across existing codebases while preserving developer workflows. When combined with proper testing and documentation, Property Injection becomes a reliable foundation for infrastructure governance across your organization.
About the authors:

Put Cheung

Put Cheung is a Senior Software Development Engineer at AWS Security. He is a part of a team that is making it easier for builders to configure AWS Resources securely. AWS CDK Property Injection is an important step toward this goal.

Rico Huijbers

Rico Huijbers is a Software Engineer at Amazon Web Services. He is extremely lazy and is therefore on a quest to eradicate the need for repetitive manual work from software engineering. Rico loves working on AWS CDK—it’s the tool he wishes he had 5 years earlier.

Marco Frattallone

Marco Frattallone is a Senior Technical Account Manager at AWS focused on supporting Partners. He works closely with Partners to help them build, deploy, and optimize their solutions on AWS, providing guidance and leveraging best practices. Marco focuses on helping Partners adopt emerging AWS services and translate technical capabilities into business outcomes. Outside work, he enjoys outdoor cycling, sailing, and exploring new cultures.

Managing Amazon Q Developer Profiles and Customizations in Large Organizations

Post Syndicated from Marco Frattallone original https://aws.amazon.com/blogs/devops/managing-amazon-q-developer-profiles-and-customizations-in-large-organizations/

As organizations scale their development efforts, AI coding assistants that understand organization-specific patterns and standards lead to more efficient development processes and higher quality software delivery. Amazon Q Developer Pro helps address this challenge by allowing organizations to customize the AI assistant with their proprietary code and development practices. Through Amazon Q Developer profiles, teams can efficiently manage access to Amazon Q customizations across different regions and AWS Identity Centers.

In this post, we will explore different approaches for implementing and managing Amazon Q Developer profiles and Amazon Q customizations across large organizations. Using an example with multiple business units, we will explore methods for managing access controls and customization governance while addressing security and compliance requirements.

Amazon Q customization is now available in both the US East (N. Virginia) and EU Central (Frankfurt) regions, giving teams more flexibility to create and deploy customizations closer to their operational hubs while meeting regional data residency requirements.

This blog is not intended to provide recommendations on how to structure your AWS accounts or divide Q Developer subscriptions. Rather, our aim is to explore the full capabilities of Q Developer Customizations in a comprehensive scenario that shows the current art of the possible.

A distributed Amazon Q Developer Pro subscriptions scenario

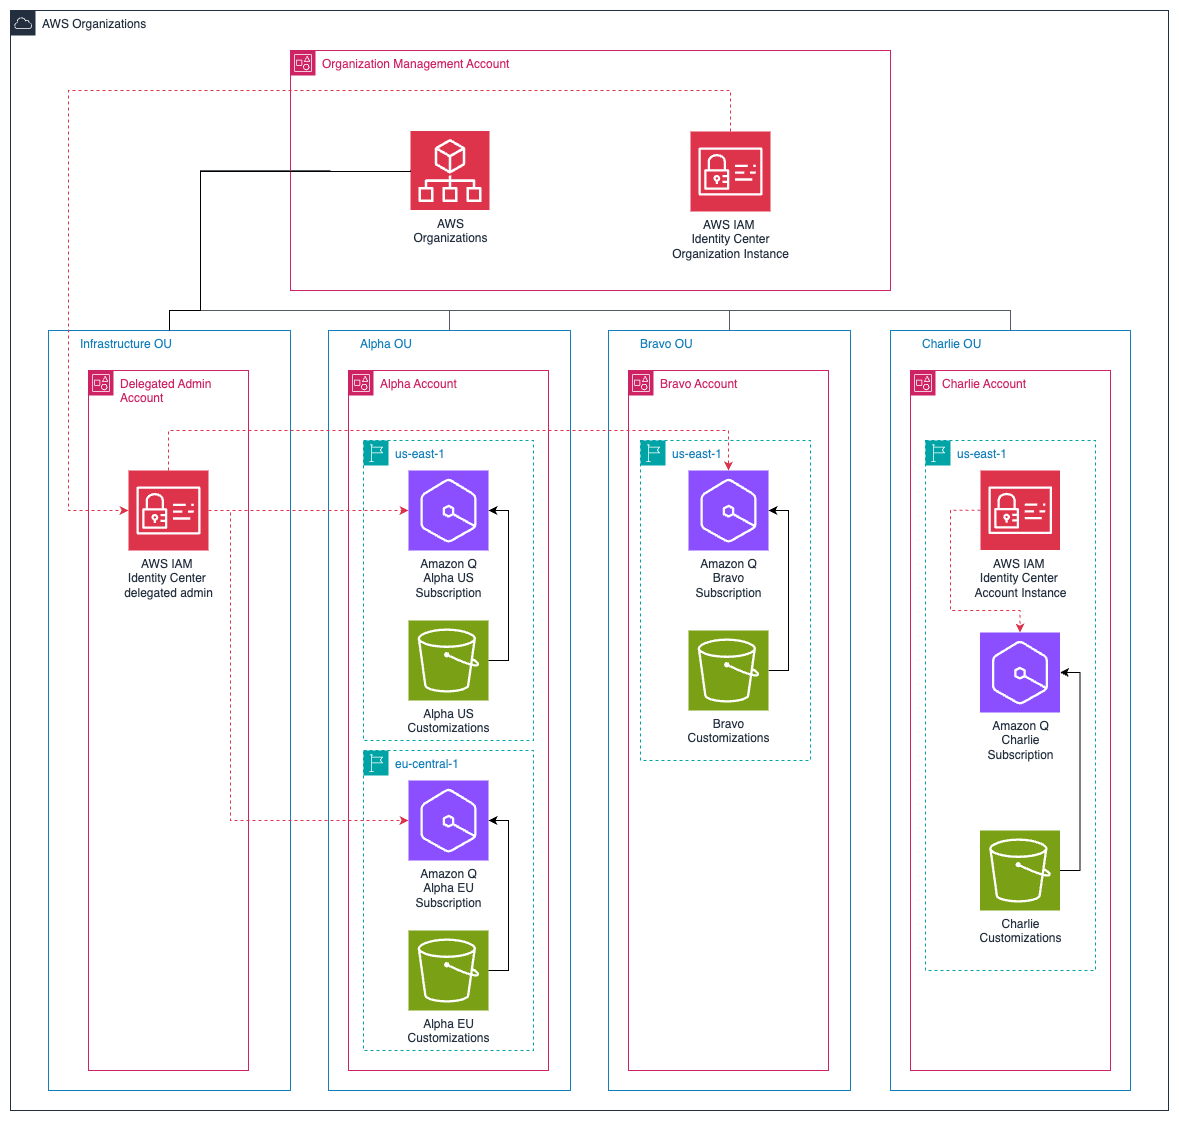
The following diagram illustrates a sample AWS Organizations structure with a Management Account and four Organizational Units (OUs). This is a common enterprise scenario with three business units, each business unit requiring their own Amazon Q Developer Pro subscription and customizations.

Diagram showing AWS Organizations structure with a Management Account at the top, containing AWS Organizations, IAM Identity Center, Amazon Q, Management Customizations, and AWS Cost & Usage Report. Below are four Organizational Units (OUs): Infrastructure, Alpha, Bravo, and Charlie. The structure illustrates the hierarchical relationship and resource allocation across different OUs and regions within an AWS organization.

Figure 1: AWS Organizations Structure and Resource Hierarchy

The Infrastructure OU has a Delegated Admin Account with delegated access to the AWS IAM Identity Center. There are three additional OUs: Alpha, Bravo, and Charlie, each with at least one Amazon Q Developer Pro subscription. Alpha account has Amazon Q Developer subscriptions both in US East (N. Virginia) and EU Central (Frankfurt) region.

Think of each business unit as its own ecosystem within your organization. When you provide dedicated Q Developer Pro subscriptions to different OUs, you’re essentially giving each unit its own personalized AI assistant. This separation is valuable because it allows each team to work independently while maintaining their specific requirements and workflows.

The Charlie OU maintains its own account instance of IAM Identity Center for Amazon Q Developer Pro. In most cases, we recommend using an organization instance of IAM Identity Center with Amazon Q Developer Pro, there are a few situations where member account instances might make sense, for example: when you do not have a single identity provider, or when you haven’t yet decided to deploy it to the whole organization and want to use Amazon Q just for the AWS account you control.

Note: When a developer has a user within an Amazon Q profile tied to two different IAM Identity Center instances (Bravo and Charlie), they will have two user subscriptions and be billed twice. However, if they belong to two different Amazon Q profiles in two different accounts (Alpha and Bravo) but under the same IAM Identity Center, they will only be billed once.

In our example, the Charlie OU requires additional operational overhead in managing separate credentials and authentication flows. Additionally, the dashboard and administrative settings will only be associated with users and groups within this account.
From an administrative perspective, instead of trying to manage one centralized configuration that attempts to serve everyone’s needs, you can distribute administration to each business unit and delegate responsibility to individual teams.

It’s like having different specialized departments in a hospital – while they’re all part of the same organization and can work together when needed, each department has its own specialized tools and protocols that help them perform their specific functions more effectively.

A strategic approach to Customizations through Q Developer profiles

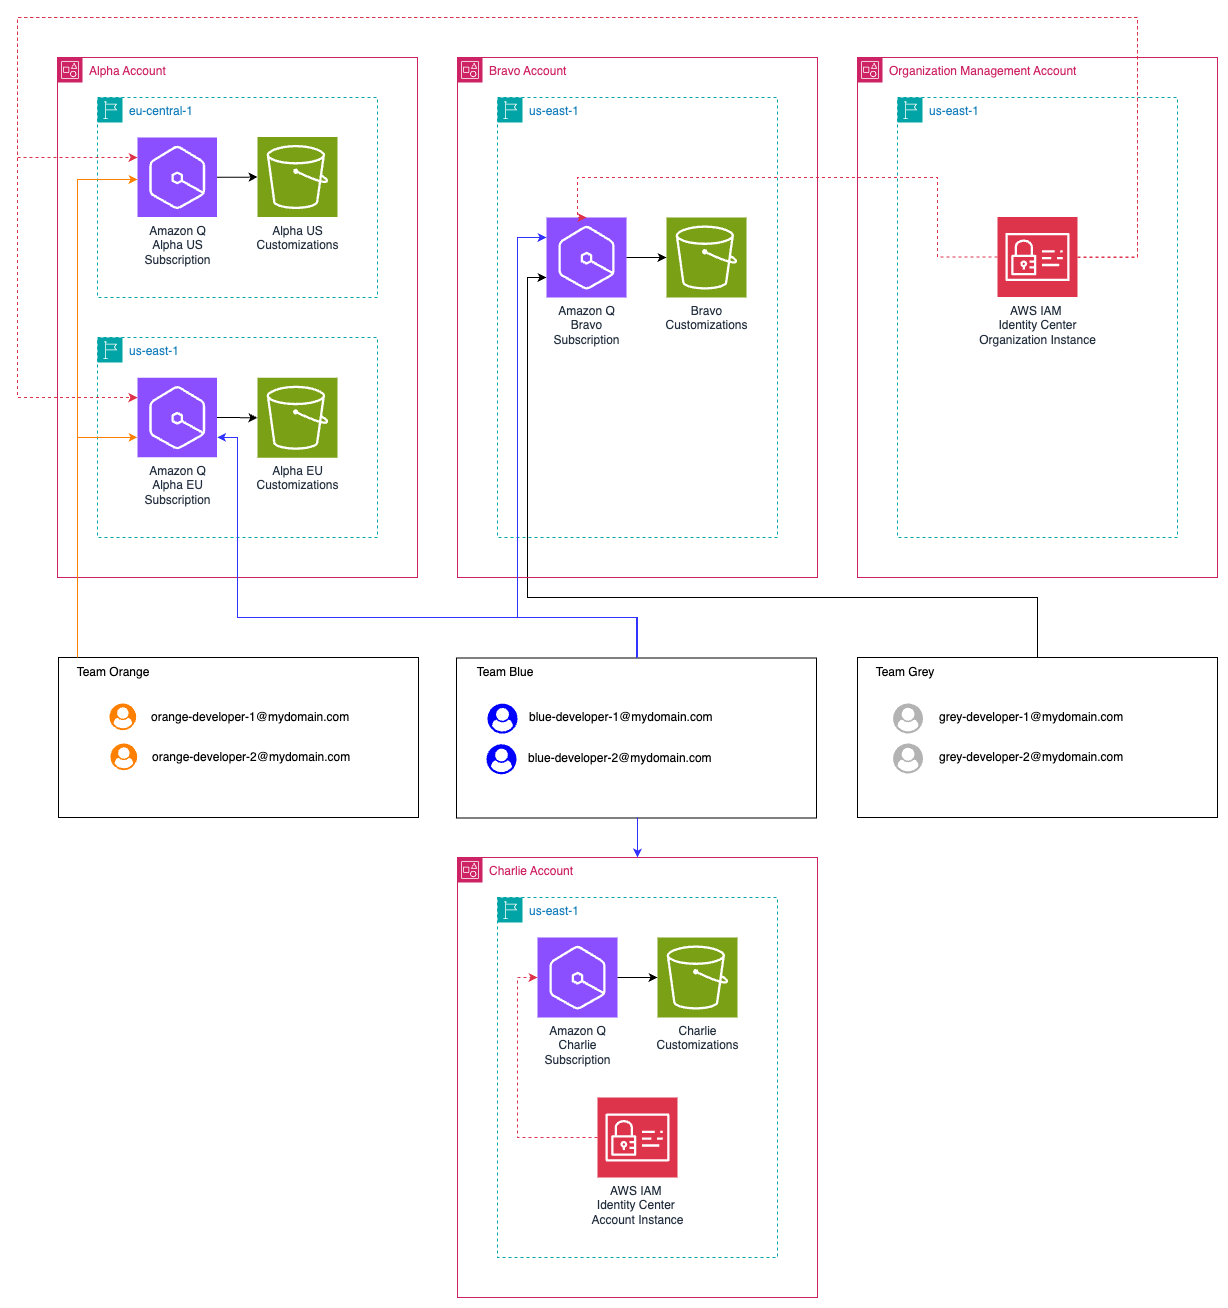
A diagram illustrating the structure of an AWS IAM Identity Center organization with multiple Amazon Q Developer Pro subscriptions and customizations. Each Q Developer Pro Subscription has its own set of users representing developers. Team orange developers have access to Alpha Q Subscription and customizations, Team blue developers have access to Alpha, Bravo and Charlie Q Subscription and customizations, Team Grey developers have only access to Bravo Subscription and customizations. The organization has also an AWS IAM Identity Center instance, with separate Amazon Q Developer Pro subscription and customizations. Team bravo developers are duplicated between the two IAM Identity Centers.

Figure 2 Developers association to Amazon Q Developer Pro Subscriptions, Customizations and IAM Identity Centers

Amazon Q Developer profiles are the way developers connect to different Amazon Q Developer subscriptions through their IDE. Each profile represents a unique combination of an Amazon Q Developer subscription and its associated customizations. After authentication, developers can simply select or switch between profiles in their IDE to access different customizations.

Let’s walk through some scenarios in this architecture.

Scenario 1 – Users accessing two different customizations tied to a single IAM Identity Instance in the management account

Developers from the Orange team with access to Alpha account customizations can configure two different Amazon Q Developer profiles in their IDE:

  • A “US Profile” connected to the US East subscription in the Alpha account
  • An “EU Profile” connected to the EU Central subscription in the Alpha account

Switching between different sets of customizations involves selecting the relevant profile within their IDE.

Screenshot of IDE interface showing the Amazon Q Developer customizations panel. Developer switch between US and EU Profiles and their customizations

Figure 3 IDE showing customizations available for Team Orange developers switching between US and EU Profile and their customizations

Note: While developers can access multiple customizations through different Amazon Q Developer profiles, they only incur a single user subscription cost since they are using the organization instance of IAM Identity Center. This is because the subscription is tied to their user identity in the IAM Identity Center organization instance, not to the number of profiles or customizations they access.

Scenario 2 – Users accessing two different customizations tied to a single IAM Identity Instance in the management account
Similarly, developers from the Blue team can also configure multiple profiles:

  • One profile for accessing Alpha and Bravo customizations through the management account AWS IAM Identity Center instance
  • A separate profile for accessing Charlie customizations through the AWS IAM Identity Center member account Instance

When developers have access to multiple customizations within the same IAM Identity Center configuration and region, they can switch between profiles in their IDE without requiring reauthentication.

Screenshot of IDE interface showing the Amazon Q Developer customizations panel. When authenticated through the AWS IAM Identity Center Organization, Blue developers can see both Alpha and Bravo customizations.

Figure 4 IDE showing customizations available for Team Blue developers when authenticated to AWS IAM Identity center Organization

However, as demonstrated in the blue developers’ case, switching between profiles that use different IAM Identity Center configurations (Organization vs Account Instance) still requires reauthentication.

Note: In this scenario, developers will incur two separate user subscription charges since they are accessing customizations through two different IAM Identity Center configurations (organization and account instance). As mentioned above, this scenario is not recommended except for situations it might make sense and is shown here purely to illustrate how the authentication and profile switching mechanisms work across different IAM Identity Center configurations.

Screenshot of IDE interface showing the Amazon Q Developer customizations panel. When authenticated through the AWS IAM Identity Center Instance, Blue developers can see only Charlie customizations.

Figure 5 IDE showing customizations available for Team Blue developers when authenticated to AWS IAM Identity center Account Instance

One scenario for creating code customizations specific to each profile is that the developers on the Alpha team might need Q to understand specific libraries and internal coding conventions for Java, while Bravo team developers might need Q to be well-versed in your proprietary technologies and development standards with Python. With separate profiles and customizations, each team gets their own “flavored” version of Q that understands their context.

For Blue developers who have access to Alpha, Bravo and Charlie customizations, they need to set up separate profiles since these customizations belong to different IAM Identity Center configurations and AWS Regions. Switching between these profiles requires reauthentication due to the different IAM Identity Center configurations involved.

Developer Team AWS IAM Identity Center Customizations
Orange Organization instance Alpha customizations in US East (N. Virginia)
Alpha customizations in EU Central (Frankfurt)
Blue Organization instance Alpha customizations in US East (N. Virginia)
Bravo customizations
Account instance Charlie customizations
Grey Organization instance Bravo customizations

You can manage access to specific Amazon Q Developer Pro customizations by adding selected users and groups who already have access to Amazon Q Developer Pro subscriptions within the same Identity Center. This granular access control allows you to create targeted customizations that are only accessible to specific team members or groups within your organization.

Conclusion

In this post, we explored comprehensive strategies for implementing Amazon Q Developer customizations across large organizations. We demonstrated how Amazon Q Developer profiles provide a flexible way to manage access to different customizations across AWS regions and IAM Identity Center configurations. By integrating proprietary code repositories, establishing customization governance, and implementing continuous feedback loops, enterprises can maximize the value of their AI-powered development assistant while maintaining code quality and development standards.

The path forward depends on where you are in your Amazon Q Developer customization journey. If you’re just starting, begin with a clear assessment of your codebase and map out your customization approach before implementation. For existing users, review your current customizations and profile configurations to identify optimization opportunities.

In both cases, implement the customization governance we discussed, tailoring them to your specific development patterns and team structures. Remember that customization evolves with your codebase – regular refinements help ensure your AI assistant remains effective as your applications grow and development practices mature. Whether you’re new to Amazon Q Developer customizations or optimizing existing implementations, these practices can help develop an AI assistant that truly understands and aligns with your organization’s unique development environment.

Ready to get started? Visit the Amazon Q Developer guide to learn more about setting up profiles and customizations for your organization. If you need help planning your customization strategy, contact your AWS account team or find an AWS Partner in the AWS Partner Network.

About the authors:

Marco Frattallone

Marco Frattallone is a Senior Technical Account Manager at AWS focused on supporting Partners. He works closely with Partners to help them build, deploy, and optimize their solutions on AWS, providing guidance and leveraging best practices. Marco is passionate about technology and enables Partners stay at the forefront of innovation. Outside work, he enjoys outdoor cycling, sailing, and exploring new cultures.

Francesco Martini

Francesco Martini is a Senior Technical Account Manager at AWS. He helps AWS customers build reliable and cost-effective systems and achieve operational excellence while running workloads on AWS. He is a builder and a technology enthusiast with a background as a full-stack developer. He is passionate about sports in general, especially soccer and tennis.

Unlocking AWS Console: Diagnosing Errors with Amazon Q Developer

Post Syndicated from Marco Frattallone original https://aws.amazon.com/blogs/devops/unlocking-aws-console-diagnosing-errors-with-amazon-q-developer/

Introduction

Developers, IT Operators, and in some cases, Site Reliability Engineers (SREs) are responsible for deploying and operating infrastructure and applications, as well as responding to and resolving incidents effectively and in a timely manner. Effective incident management requires quick diagnosis, root cause analysis, and implementation of corrective actions. Diagnosing the root cause can be challenging in the context of modern systems that involve multiple resources deployed across distributed environments. Amazon Q Developer, a generative AI-powered assistant, can help simplify this process by diagnosing errors you receive in the AWS Management Console.

Amazon Q Developer can save you critical time when dealing with production issues by helping to diagnose errors related to your AWS environment. These errors could be the result of potential misconfiguration across multiple resources, and usually requires you to navigate between several service consoles to identify the root cause. Amazon Q Developer applies machine learning models to automate diagnosis of errors that arise in the AWS Console interface. This reduces the mean time to repair (MTTR) and minimizes the impact of incidents on business operations.

This blog post explores the Amazon Q Developer feature to diagnose errors in AWS Console while working with AWS services. We describe how this feature works in order to provide you guidance on troubleshooting. We take a look behind-the-scenes to show the processes that power this feature.

Diagnose with Amazon Q

The Diagnose with Amazon Q feature is activated when an error occurs in the console for an AWS service that is currently supported by this functionality, and a user with appropriate permissions clicks the Diagnose with Amazon Q button next to the error message. Amazon Q provides a natural language explanation that analyzes the root cause of the error. With a second click on Help me resolve, Amazon Q displays an ordered list of instructions which can be used to resolve the error condition. Once completed, you can provide feedback on whether the resolution provided by Amazon Q was helpful.

To make things concrete, we consider two running examples.

Example 1: Assume that you try to delete an S3 bucket which is not empty. This results in an error message:

This bucket is not empty. Buckets must be empty before they can be deleted. To
delete all objects in the bucket, use the empty bucket configuration.

Example 2: Suppose that you try to list objects in a particular S3 bucket, but lack IAM permissions to do so. This results in an error message:

Insufficient permissions to list objects. After you or your AWS administrator has updated your permissions to allow the s3:ListBucketaction, refresh the page. Learn more about Identity and access management in
Amazon S3.

User clicks on “Launch Instances” button In the EC2 service console in the AWS Management console. User enters all the required information, and clicks on “Launch Instance” button. This results in “Instance launch failed” error appearing in the console along with a “Diagnose with Amazon Q” button. User clicks on the button. this brings up a new window titled “Diagnose console errors with Amazon Q”. Soon an “Analysis” section appears with the message describing the issue with IAM permissions to launch new EC2 instances using natural language. User clicks on “Help me resolve” button. After few seconds, “Resolution” section along with the steps to resolve the error appears.

Diagnose with Amazon Q IAM permissions related to EC2 instance launch error

Behind the Scenes: How Amazon Q generates a diagnosis

When you click on Diagnose with Amazon Q button next to the error message in the AWS Management Console, Amazon Q generates an Analysis that expresses the root cause of the error in natural language. This step is assisted by Large Language Models (LLMs) and is based on context information only. The context provided to the LLM includes the error message shown in the console, the URL of the triggering action, and the IAM role of the user signed in the AWS Console. The service always operates within the permissions granted by your role as you operate in the AWS Console, ensuring that privileges are never escalated beyond what are assigned to you.

When you click on Help me resolve button after you have reviewed the analysis, Amazon Q retrieves additional information about the state of the resources in the AWS Account where the error occurred. This is accomplished by interrogating the customer account in various ways. In this phase, the system actively decides which information is still missing and issues interrogation requests against internal services to fulfil the information need. Interrogation is not needed for simple errors, such as Example 1 above, but becomes essential in order to resolve more complex errors, where information from the context proves insufficient.

Given the context, error analysis, user permissions, and results of account interrogation, Amazon Q generates step-by-step Resolution instructions. This step is assisted by LLMs.

After implementing and validating the steps provided by Amazon Q to resolve the error in the console, you have the option to provide feedback of your experience.

A flow diagram illustrating an error resolution process using Amazon Q. The process begins with an error. The user then diagnoses the issue with Amazon Q, which gets context information from the AWS Console and provide an Analysis. The user requests help to resolve the error. The system enriches the prompt interrogation the signed-in user's account. The model generates step-by-step resolution instructions. These instructions go through a validation process before being presented to the user for implementation.

Diagram showing Interactions between User, AWS Console and Amazon Q Developer

Context Information

Contextual information helps the LLMs to generate more relevant and informed outputs. Context is provided to Amazon Q as input from the console automatically. As the basis for all further analysis and decisions, it should be as rich as possible. At a minimum, Amazon Q obtains the error message, the URL for the triggering action, and the IAM role that the signed-in user assumes. The system automatically extracts relevant identifiers from the context. In our running Example 1, the URL may be https://s3.console.aws.amazon.com/s3/bucket/my-bucket-123456/delete?region=us-west-2, from which Amazon Q extracts aws_region = "us-west-2" and s3_bucket_name = "my-bucket-123456".

Beyond this minimum context, Amazon Q can obtain additional information from the console, pertaining to what the user sees on the screen when the error happens, such as content of text fields or widgets in the current UI. Amazon Q can also make use of specific context provided by the underlying service. In the case of Example 2 above, the bucket name is extracted from the URL, the action s3:ListBucket from the error message, and Amazon Q may obtain additional information from IAM about related policies and accept or deny statements.

Interrogating the signed-in user’s Account

Diagnose with Amazon Q functionality is not just a passive receiver of context information, it has built-in capabilities of actively asking for additional information. This includes developing an understanding of resources in the AWS account, and their relationship with the resource experiencing the error. Such interrogation queries are planned by a subsystem based on context information. It provides a low-latency and deterministic approach to find resources and their relationships. This relationship context provided to the LLM, such as EBS volumes attached to an EC2 instance or policies included in the attached IAM role, improves the accuracy of root cause analysis for diagnosing the error.

In the simple running Example 1 where error is due to non-empty S3 bucket, the error message and the console URL contain all the necessary information to proceed, and active interrogation is not required. On the other hand, for the IAM permission error in Example 2, it’s helpful to understand the permissions on the IAM role associated with the resource experiencing the error. Amazon Q can fetch identity-level policies for the role and resource-level policies for the affected resource, based on which it can diagnose the cause of the error, using internal IAM services. To be concrete, the URL for Example 2 may be https://s3.console.aws.amazon.com/s3/buckets/my-bucket-123456?region=us-west-2&bucketType=general&tab=objects, from which Amazon Q extracts region and S3 bucket name. It can also extract the action s3:ListBucket from the error message itself. Based on this information, Amazon Q can fetch bucket policies for my-bucket-123456, identity-level policies for the role, then scan those for presence or absence of the s3:ListBucket action, or call internal IAM services to provide additional information about the cause of access being denied.

This subsystem uses AWS Cloud Control API (CCAPI) which is called on your behalf by Amazon Q with the permissions granted by your IAM Role. As part of onboarding to Amazon Q, the AmazonQFullAccess managed policy is attached to the Role that can access Amazon Q. This managed policy contains the ListResources and GetResource CCAPI IAM permissions. This ensures all Roles given that managed policy will have access to the CCAPI read and list endpoints. If you do not attach the AmazonQFullAccess managed policy to the required roles, you will need to attach the ListResources and GetResource permission directly to the role.

Generating Step-by-step Resolution Instructions

At this point, all acquired information is synthesized by Amazon Q in order to generate useful and actionable resolution instructions. As an illustration, possible sample instructions for the running examples under consideration are listed below. As the models are updated and improved over time, the responses can change.

For Example 1, sample instructions could look like:

  1. Navigate to the S3 console, click “Buckets”, and select the my-bucket-123456 bucket
  2. Click on the “Empty” tab.
  3. If your bucket contains a large number of objects, creating a lifecycle rule to delete all objects in the bucket might be a more efficient way of emptying your bucket
  4. Type “permanently delete” in text input field and confirm that all objects are to be removed.
  5. Retry deleting the my-bucket-123456 S3 bucket.

For Example 2, you may obtain:

  1. Go to the IAM console. Edit the IAM policy attached to the role ReadOnly
  2. Allow for the s3:ListBucket action for resource being the S3 bucket ARN arn:aws:s3:::my-bucket-123456.
  3. Save the updated IAM policy
  4. Refresh the S3 console page to list the objects in the bucket my-bucket-123456

Note that the instructions contain information inferred from the context, such as bucket name my-bucket-123456, instead of placeholders. Instructions returned by Diagnose with Amazon Q are complete and fine-grained enough in order to be followed without any extra effort. In fact, while the service makes use of an LLM to synthesize resolution instructions, Amazon Q uses post-processing to correct frequently occurring mistakes. For example, in Example 2 above, the LLM may have returned the ARN as arn:aws:s3:<region>::<bucket_name>, which would be corrected to what is shown above.

The instructions returned for Example 2 above assume that the reason for the user not being able to list objects is a missing Allow statement in the policies attached to the ReadOnly role. Other root causes could be a Deny statement in a policy attached to the S3 bucket, or to the ReadOnly role. Diagnose with Amazon Q can use account interrogation in order to identify the correct root cause and propose the right resolution. In the example above, it can fetch the policies attached to the ReadOnly role and check whether s3:ListBucket is missing indeed, or fetch policies attached to the bucket bucket-123456.

Validation

One goal for Diagnose with Amazon Q is to attain wide coverage of AWS rapidly, while keeping the quality bar high, so that you obtain useful, actionable advice where ever you obtain an error. An important prerequisite to attain this goal is a robust and flexible evaluation system. Evaluating systems based on Generative AI is challenging due to the large output space (natural language) and non-deterministic behavior.

In a nutshell, our validation system is based on building a large dataset of errors, where each record has a certain number of annotations. Each record contains the context (templatized error message and console URL; meaning that bucket-123456 is replaced by {{s3_bucket_name}}, us-west-2 by {{aws_region}}). Annotations include Infrastructure as Code (CloudFormation) descriptions of the erroneous account state and the triggering action, as well as ground truth responses obtained from expert annotators. These records allow us to simulate the behaviour of variants of our system without human interactions and many times faster than real time (by way of parallelization). We are also developing automated validation metrics for comparing ground truth annotations and system responses, based on which offline evaluations can be run fully automatically.

This validation system allows us to rapidly validate new ideas by comparing them against the current state, while also guarding against regressions. While human experts are still needed to provide annotations of error records, we actively innovate to speed up and simplify these tasks, by building annotation tools which avoid natural language input, have validations built in, and are rather asking to correct system output than providing ground truth annotations from scratch.

Conclusion

The Diagnose with Amazon Q feature of Amazon Q Developer allows you to determine the cause of an error in the AWS Console without needing to navigate to multiple service consoles. By providing tailored, step-by-step instructions specific to your AWS account and error context, Amazon Q Developer empowers you to troubleshoot and resolve issues efficiently. This helps your organization achieve greater operational efficiency, reduce downtime, improve service quality, and free up valuable human resources enabling them to focus on higher-value activities. We also provide you details on how AI and machine learning capabilities work behind the scenes to enable this functionality.

About the authors

Matthias Seeger, Principal Applied Scientist, AWS NGDE Science

Matthias Seeger is a Principal Applied Scientist at AWS.

Marco Frattallone, Sr. TAM, AWS Enterprise Support

Marco Frattallone is a Senior Technical Account Manager at AWS focused on supporting Partners. He works closely with Partners to help them build, deploy, and optimize their solutions on AWS, providing guidance and leveraging best practices. Marco is passionate about technology and helps Partners stay at the forefront of innovation. Outside work, he enjoys outdoor cycling, sailing, and exploring new cultures.

Surabhi Tandon, Sr EAE, AWS Support

Surabhi Tandon is a Senior Technical Account Manager at Amazon Web Services (AWS). She supports enterprise customers achieve operational excellence and help them with their cloud journey on AWS by providing strategic technical guidance. Surabhi is a builder with interest in Generative AI, automation, and DevOps. Outside of work, she enjoys hiking, reading and spending time with family and friends.