Post Syndicated from Pratip Bagchi original https://aws.amazon.com/blogs/devops/modernizing-and-containerizing-a-legacy-mvc-net-application-with-entity-framework-to-net-core-with-entity-framework-core-part-2/
This is the second post in a two-part series in which you migrate and containerize a modernized enterprise application. In Part 1, we walked you through a step-by-step approach to re-architect a legacy ASP.NET MVC application and ported it to .NET Core Framework. In this post, you will deploy the previously re-architected application to Amazon Elastic Container Service (Amazon ECS) and run it as a task with AWS Fargate.
Overview of solution
In the first post, you ported the legacy MVC ASP.NET application to ASP.NET Core, you will now modernize the same application as a Docker container and host it in the ECS cluster.
The following diagram illustrates this architecture.
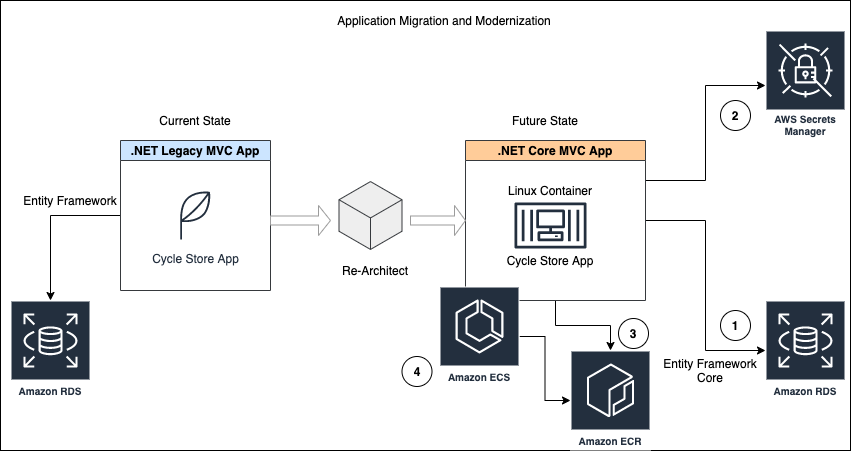
You first launch a SQL Server Express RDS (1) instance and create a Cycle Store database on that instance with tables of different categories and subcategories of bikes. You use the previously re-architected and modernized ASP.NET Core application as a starting point for this post, this app is using AWS Secrets Manager (2) to fetch database credentials to access Amazon RDS instance. In the next step, you build a Docker image of the application and push it to Amazon Elastic Container Registry (Amazon ECR) (3). After this you create an ECS cluster (4) to run the Docker image as a AWS Fargate task.
Prerequisites
For this walkthrough, you should have the following prerequisites:
- An AWS account.
- An AWS Identity and Access Management (IAM) user with
AdministratorAccess. For instructions, see this deep link to create an IAM role with Administrator access. - AWS Tools for Windows. Please follow these steps to set up your AWS profile.
- .NET Core 3.1 SDK installed. For instructions, see Download .NET Core 3.1.
- Microsoft Visual Studio 2017 or later (Visual Studio code can be an alternative).
- SQL Server Management Studio to connect to SQL Server instance.
- ASP.NET application development experience.
This post implements the solution in Region us-east-1.
Source Code
Clone the source code from the GitHub repo. The source code folder contains the re-architected source code and the AWS CloudFormation template to launch the infrastructure, and Amazon ECS task definition.
Setting up the database server
To make sure that your database works out of the box, you use a CloudFormation template to create an instance of Microsoft SQL Server Express and AWS Secrets Manager secrets to store database credentials, security groups, and IAM roles to access Amazon Relational Database Service (Amazon RDS) and Secrets Manager. This stack takes approximately 15 minutes to complete, with most of that time being when the services are being provisioned.
- On the AWS CloudFormation console, choose Create stack.
- For Prepare template, select Template is ready.
- For Template source, select Upload a template file.
- Upload
SqlServerRDSFixedUidPwd.yaml, which is available in the GitHub repo. - Choose Next.

- For Stack name, enter
SQLRDSEXStack. - Choose Next.
- Keep the rest of the options at their default.
- Select I acknowledge that AWS CloudFormation might create IAM resources with custom names.
- Choose Create stack.

- When the status shows as
CREATE_COMPLETE, choose the Outputs tab. - Record the value for the
SQLDatabaseEndpointkey.

- Connect the database from the SQL Server Management Studio with the following credentials:
User id: DBUserandPassword:DBU$er2020


Setting up the CYCLE_STORE database
To set up your database, complete the following steps:
- On the SQL Server Management console, connect to the DB instance using the ID and password you defined earlier.
- Under File, choose New.
- Choose Query with Current Connection.Alternatively, choose New Query from the toolbar.

- Open
CYCLE_STORE_Schema_data.sqlfrom the GitHub repository and run it.

This creates the CYCLE_STORE database with all the tables and data you need.
Setting up the ASP.NET MVC Core application
To set up your ASP.NET application, complete the following steps:
- Open the re-architected application code that you cloned from the GitHub repo. The Dockerfile added to the solution enables Docker support.
- Open the
appsettings.Development.jsonfile and replace the RDS endpoint present in theConnectionStringssection with the output of the AWS CloudFormation stack without the port number which is:1433for SQL Server.
The ASP.NET application should now load with bike categories and subcategories. See the following screenshot.

Setting up Amazon ECR
To set up your repository in Amazon ECR, complete the following steps:
- On the Amazon ECR console, choose Repositories.
- Choose Create repository.
- For Repository name, enter
coretoecsrepo. - Choose Create repository

- Copy the repository URI to use later.
- Select the repository you just created and choose View push commands.

- In the folder where you cloned the repo, navigate to the
AdventureWorksMVCCore.Webfolder. - In the View push commands popup window, complete steps 1–4 to push your Docker image to Amazon ECR.


The following screenshot shows completion of Steps 1 and 2 and ensure your working directory is set to AdventureWorksMVCCore.Web as below.

The following screenshot shows completion of Steps 3 and 4.

Setting up Amazon ECS
To set up your ECS cluster, complete the following steps:
-
- On the Amazon ECS console, choose Clusters.
- Choose Create cluster.
- Choose the Networking only cluster template.
- Name your cluster
cycle-store-cluster. - Leave everything else as its default.
- Choose Create cluster.
- Select your cluster.
- Choose Task Definitions and choose Create new Task Definition.
- On the Select launch type compatibility page choose FARGATE and click Next step.
- On the Configure task and container definitions page, scroll to the bottom of the page and choose Configure via JSON.
- In the text area, enter the task definition JSON (
task-definition.json) provided in the GitHub repo. Make sure to replace [YOUR-AWS-ACCOUNT-NO] intask-definition.jsonwith your AWS account number on the line number 44, 68 and 71. The task definition file assumes that you named your repository ascoretoecsrepo. If you named it something else, modify this file accordingly. It also assumes that you are usingus-east-1as your default region, so please consider replacing the region in thetask-definition.jsonon line number 15 and 44 if you are not usingus-east-1region.
- Choose Save.
- On the Task Definitions page, select
cycle-store-td. - From the Actions drop-down menu, choose Run Task.

- Choose Launch type is equal to Fargate.
- Choose your default VPC as Cluster VPC.
- Select at least one Subnet.
- Choose Edit Security Groups and select
ECSSecurityGroup(created by the AWS CloudFormation stack).
- Choose Run Task


Running your application
Choose the link under the task and find the public IP. When you navigate to the URL http://your-public-ip, you should see the .NET Core Cycle Store web application user interface running in Amazon ECS.
See the following screenshot.

Cleaning up
To avoid incurring future charges, delete the stacks you created for this post.
- On the AWS CloudFormation console, choose Stacks.
- Select
SQLRDSEXStack. - In the Stack details pane, choose Delete.
Conclusion
This post concludes your journey towards modernizing a legacy enterprise MVC ASP.NET web application using .NET Core and containerizing using Amazon ECS using the AWS Fargate compute engine on a Linux container. Portability to .NET Core helps you run enterprise workload without any dependencies on windows environment and AWS Fargate gives you a way to run containers directly without managing any EC2 instances and giving you full control. Additionally, couple of recent launched AWS tools in this area.
- Insight and assistance for porting from .NET Framework to .NET Core
https://aws.amazon.com/porting-assistant-dotnet/ - Containerize and migrate existing applications
https://aws.amazon.com/app2container/
About the Author
 |
Saleha Haider is a Senior Partner Solution Architect with Amazon Web Services. |
 |
Pratip Bagchi is a Partner Solutions Architect with Amazon Web Services. |