Post Syndicated from Michael Tran original https://aws.amazon.com/blogs/devops/diving-deeper-into-projen-exploring-advanced-features/
We will be highlighting Projen’s powerful features that cater to various aspects of project management and development. We’ll examine how Projen enhances polyglot programming within Amazon Web Services (AWS) Cloud Development Kit constructs. We’ll also touch on its built-in support for common development tools and practices.
In our previous blog, we introduced you to the basics of getting started with Projen. Projen is a powerful project generator that simplifies the management of complex software configurations. In our prior blog, we discussed developing a new AWS cloud development kit (CDK) construct library project. For consistency, we will continue using this construct library project as our example while exploring linting, dependency management, and test coverage. It’s important to note that these practices are equally applicable to CDK applications and other project types.
AWS CDK Polyglot Construct Library
The AWS Cloud Development Kit (AWS CDK) is an open-source software development framework that allows developers to define cloud infrastructure using familiar programming languages. In a CDK application, constructs serve as the foundational elements, allowing developers to represent either a single AWS resource or a complex combination of resources. These constructs are not only reusable but can be incorporated into other AWS CDK projects, promoting efficient and scalable development practices.
Projen and Polyglot Programming
Projen leverages the power of the JSII library, enabling developers to write constructs once and generate equivalent constructs across multiple programming languages. This feature streamlines the development process, especially when working with teams that have expertise in different languages.
Automated Publishing with Projen
With its publisher module, Projen automates the distribution of c
ructs to various package managers. This process can be integrated into a GitHub workflow, such as a build job, which triggers the publication of the library to the designated package managers.
Starting with Projen
Initiating an AWS CDK construct library project is straightforward through the Projen command npx projen new <project_type>. By executing the command npx projen new awscdk-construct, you initialize a new project complete with a projenrc file. This file contains the essential configuration for a CDK construct library, setting the stage for further customization and development.
import { awscdk } from 'projen';
const project = new awscdk.AwsCdkConstructLibrary({
  author: 'github username',
  authorAddress: 'github email',
  cdkVersion: '2.1.0',
  defaultReleaseBranch: 'main',
  jsiiVersion: '~5.0.0',
  name: 'cdkconstruct',
  projenrcTs: true,
  repositoryUrl: 'https://github.com/*****/cdkconstruct.git',

  // deps: [],                /* Runtime dependencies of this module. */
  // description: undefined,  /* The description is just a string that helps people understand the purpose of the package. */
  // devDeps: [],             /* Build dependencies for this module. */
  // packageName: undefined,  /* The "name" in package.json. */
});
project.synth();
A release.yml file is generated by projen under the github>workflow directory. This file has the details of the public registry where the construct needs to be published. By default, it will add the details for npm.
release_npm:
    name: Publish to npm
The construct can be developed in typescript under src/main.ts, our previous blog shows how to create one. If the construct needs to be published to other public registries (such as Maven for java, Pypi for python), then a projenrc file can be updated to synthesize a new release.yml file.
For example, to publish a construct developed in typescript to Maven (so that it can be used in a java application) add publishToMaven API to the projenrc file.
const project = new awscdk.AwsCdkConstructLibrary({
  author: 'github username',
  authorAddress: 'github email',
  cdkVersion: '2.1.0',
  defaultReleaseBranch: 'main',
  jsiiVersion: '~5.0.0',
  name: 'cdkconstruct',
  projenrcTs: true,
  repositoryUrl: 'https://github.com/*****/cdkconstruct.git',
  publishToMaven: {
    javaPackage: 'com.cdk.hello',
    mavenArtifactId: 'cdk-construct-jsii',
    mavenGroupId: 'com.cdk.hello',
    mavenServerId: 'github',
    mavenRepositoryUrl: 'https://maven.pkg.github.com/example/hello-jsii',
  },
});
Run npx projen and the release.yml will be updated with Maven central details.
release_maven:
    name: Publish to Maven Central
    needs: release
    ....
Similarly, it can be published to other registries.
publishToPypi:
publishToMaven:
publishToNuGet:
publishToGo:
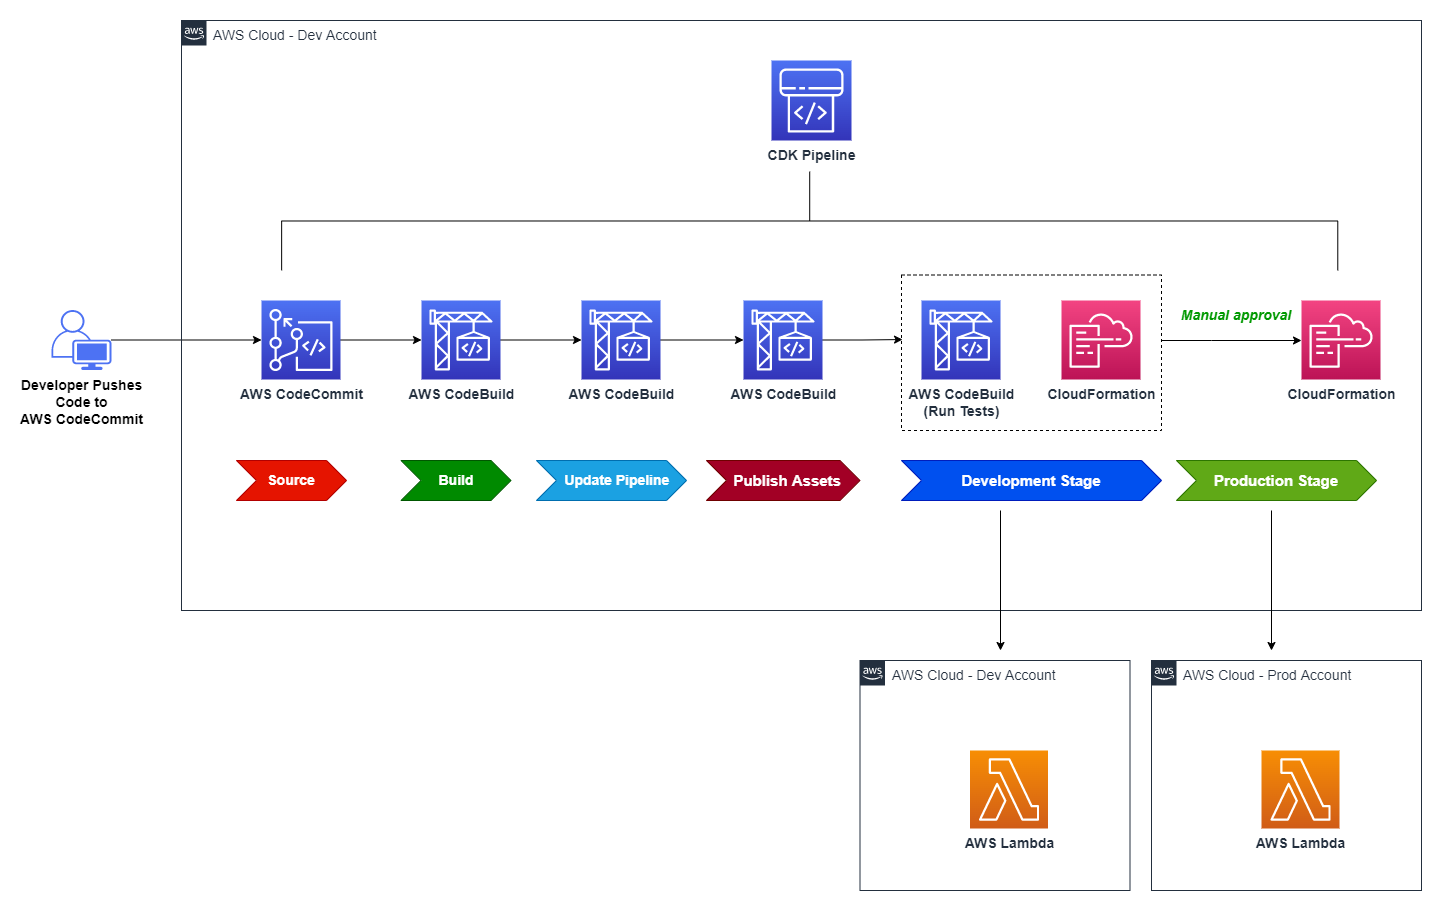
This way the construct is built once and published to multiple registries with different programming languages.

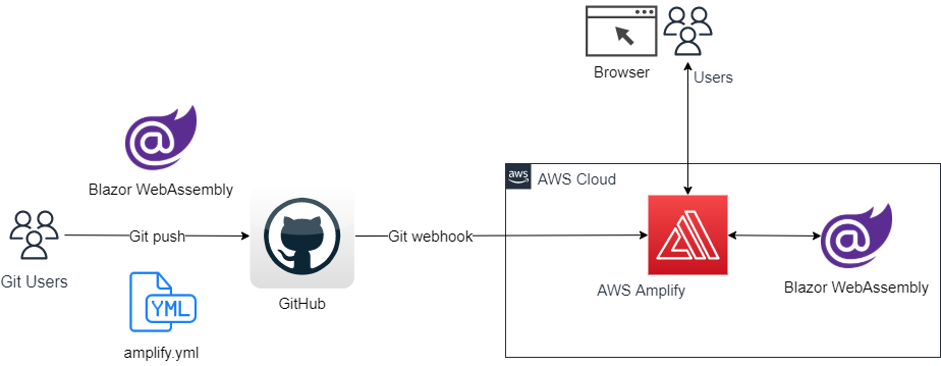
Figure 1: High-level Architecture showing publication to multiple public registries
Linting, Dependency Management & Test Coverage
Projen streamlines the setup process by generating a comprehensive package.json file. This file includes pre-configured dependencies for ESLint and Jest, enabling developers to maintain coding standards and ensure robust test coverage right from the start. ESLint, a widely adopted static code analysis utility, empowers developers to enforce consistent coding practices by analyzing the source code and identifying potential errors, bugs, and stylistic issues. Additionally, Jest equips developers with a comprehensive suite of tools for writing and executing unit tests, facilitating comprehensive test coverage for their codebase. While Projen provides Jest as the default testing framework, it offers developers the flexibility to incorporate alternative testing frameworks based on their project requirements.
Following with the awscdk-construct from the previous section, under test>main.test.ts a default test file is created, which can be updated for writing test cases. A default package.json is generated in the root directory.
{
  "name": "projen_hello",
  "scripts": {
    "build": "npx projen build",
    "bundle": "npx projen bundle",
    "clobber": "npx projen clobber",
    "compile": "npx projen compile",
    "default": "npx projen default",
    "deploy": "npx projen deploy",
    "destroy": "npx projen destroy",
    "diff": "npx projen diff",
    "eject": "npx projen eject",
    "eslint": "npx projen eslint",
    "package": "npx projen package",
    "post-compile": "npx projen post-compile",
    "post-upgrade": "npx projen post-upgrade",
    "pre-compile": "npx projen pre-compile",
    "synth": "npx projen synth",
    "synth:silent": "npx projen synth:silent",
    "test": "npx projen test",
    "test:watch": "npx projen test:watch",
    "upgrade": "npx projen upgrade",
    "watch": "npx projen watch",
    "projen": "npx projen"
  },
  "devDependencies": {
    "@types/jest": "^29.5.4",
    "@types/node": "^16",
    "@typescript-eslint/eslint-plugin": "^6",
    "@typescript-eslint/parser": "^6",
    "aws-cdk": "^2.1.0",
    "esbuild": "^0.19.2",
    "eslint": "^8",
    "eslint-import-resolver-node": "^0.3.9",
    "eslint-import-resolver-typescript": "^3.6.0",
    "eslint-plugin-import": "^2.28.1",
    "jest": "^29.7.0",
    "jest-junit": "^15",
    "npm-check-updates": "^16",
    "projen": "^0.73.17",
    "ts-jest": "^29.1.1",
    "ts-node": "^10.9.1",
    "typescript": "^5.2.2",
    "webpack": "5.88.2"
  },
  "dependencies": {
    "aws-cdk-lib": "^2.1.0",
    "constructs": "^10.0.5"
  },
  "license": "Apache-2.0",
  "version": "0.0.0",
  "jest": {
    "testMatch": [
      "<rootDir>/src/**/__tests__/**/*.ts?(x)",
      "<rootDir>/(test|src)/**/*(*.)@(spec|test).ts?(x)"
    ],
    "clearMocks": true,
    "collectCoverage": true,
    "coverageReporters": [
      "json",
      "lcov",
      "clover",
      "cobertura",
      "text"
    ],
    "coverageDirectory": "coverage",
    "coveragePathIgnorePatterns": [
      "/node_modules/"
    ],
    "testPathIgnorePatterns": [
      "/node_modules/"
    ],
    "watchPathIgnorePatterns": [
      "/node_modules/"
    ],
    "reporters": [
      "default",
      [
        "jest-junit",
        {
          "outputDirectory": "test-reports"
        }
      ]
    ],
    "preset": "ts-jest",
    "globals": {
      "ts-jest": {
        "tsconfig": "tsconfig.dev.json"
      }
    }
  },
  "//": "~~ Generated by projen. To modify, edit .projenrc.ts and run \"npx projen\"."
}
Projen can be extensively configured. For example, if you need to configure webpack as a module bundler, then you need to add a webpack.config.js file and update the projenrc file project.
The other dependencies can be updated in package.json by adding deps in the projenrc.ts file.
const project = new awscdk.AwsCdkTypeScriptApp({
  cdkVersion: '2.1.0',
  defaultReleaseBranch: 'main',
  name: 'projen_hello',
  projenrcTs: true,

  deps:[
   "express",
  ],

  // add webpack dependencies
  devDeps:[
    "webpack",
    "webpack-cli",
    "ts-loader",
  ]
});

// update pre-configured build tasks and execute webpack
project.buildTask.reset
project.buildTask.exec('npx projen');
project.buildTask.exec('npx projen test');
project.buildTask.exec('npx webpack');
Run npx projen build to synthesize a package.json.
Continuous Integration and Continuous Delivery (CI/CD)
When you create a project using Projen, it comes equipped with an automated build process that triggers upon the submission of a pull request. This is one of the key, “out-of-the-box” features that streamlines development workflows.
Projen orchestrates this process through GitHub Actions, utilizing a sequence of tasks predefined in the project’s base ‘Project’ class.
When a build is initiated, it systematically carries out several sub-tasks:
- Synthesis: It starts by synthesizing all the project files, ensuring they are up-to-date and correctly configured.
- Bundling: Next, it bundles the necessary assets for the project.
- Compilation: The project’s code is then compiled.
- Testing: Following compilation, Projen runs the suite of tests defined for the project.
- Packaging: Finally, it packages everything together, preparing it for deployment or distribution.
Projen manages these steps by auto-generating a build.yml file, which it places within the workflow directory of your project’s structure. This YAML file contains all the instructions for the GitHub Actions to execute the build process.
For instance, when you run the command npx projen new awscdk-app-ts, Projen sets up a TypeScript application for AWS CDK. It automatically creates a ‘build.yml’ file through the default projenrc file, which can be found in the github/workflow folder of your project repository. This automated process is designed to save time and reduce manual errors, making it an essential feature for efficient project management.
 .github
   workflow
    build.yml
A Projen build is self-mutating because files generated by Projen are part of the source directory. To ensure that a pull request branch always represents the final state of the repository, you can enable the mutableBuild option in your project configuration (currently only supported for projects derived from NodeProject).
The build process can be customized by adding any task in the project class, which can execute a shell command.
const buildproject = project.addTask('build');
buildproject.exec('npm run build');
You can spawn a subtask as well.
const buildproject = project.addTask('world');
buildproject.exec('echo world!');

const testproject = project.addTask('test');
testproject.exec('npm test');
testproject.spawn(buildproject);
The Task also supports the condition option that determines if the condition is true before running the task.
const hello = project.addTask('hello', {
  condition: '[ -n "$CI" ]', // only execute if the CI environment variable is defined
  exec: 'echo running in a CI environment'
});
Releases and Versioning
Projen uses Conventional Commits to generate semantic versioning of the releases automatically. This means that based on the commit message format, it can create the release version automatically.
Initially, the project is released under version 0.0.0. Anything may change at any time and public APIs should not be considered stable. Commits marked as a breaking change will increase the minor version. All other commits will increase the patch version.
You need to manually promote the major version to 1 once your project is considered stable. For major versions 1 and above, if a release includes fix commits only, it will increase the patch version. If a release includes any feat commits, then the new version will be a minor version.
Commit Messages                     Release versions

feat: <Message>                     1.0.X (Patch)
fix: <Message>                      1.X.0 (Minor)
BREAKING CHANGE: <Message>          X.0 (Major)
API Documentation
One of the nice, out-of-the-box features that comes with Projen for AWS CDK constructs is the creation of API documentation for your constructs. By leveraging jsii-docgen, Projen’s build step will generate API documentation (API.md) from the comments in your code.
This feature is powerful for several reasons. Firstly, it ensures that documentation is kept up-to-date with the codebase, as the API documentation is generated directly from the source code comments. This reduces the risk of discrepancies between the code and its documentation, which can lead to misunderstandings and errors in usage.
Secondly, it streamlines the development process by automating a task that is often tedious and time-consuming. Developers can focus more on writing code and less on updating documentation manually.
Thirdly, it promotes better coding practices, as developers are encouraged to write clear and detailed comments in their code. This not only benefits the generation of documentation, but also helps any new developers who may work on the codebase in the future to understand the code more quickly and thoroughly.
Moreover, having readily available and accurate documentation can significantly enhance the developer experience. It makes it more straightforward for users of the CDK constructs to understand the functionality, parameters, return types, and the structure of the code they are working with.
In the context of team collaboration and open-source projects, this feature is especially beneficial. It ensures that anyone who contributes to the codebase is able to generate and view the latest documentation without any additional setup or configuration, facilitating smoother collaboration and integration processes.
Let’s recap all of the features that Projen can introduce into your project right out of the box:
- Projen’s automation for linting and testing to maintain high code quality from the beginning.
- Automated API documentation feature to keep your project’s documentation synchronized with the latest code changes.
- Polyglot capabilities to cater to a diverse development team, ensuring flexibility in language preference.
- The publisher module to streamline the release process across multiple package managers, saving time and reducing the scope for human error.
- A list of awesome projects developed with Projen for inspiration or use as a template.
Conclusion
As we wrap up our deep dive into some of the advanced features of Projen within AWS CDK, it’s clear that Projen helps alleviate a lot of the pain points of a new greenfield project. By leveraging Projen, developers can navigate the complexities of polyglot programming, automate the mundane tasks of publishing and documentation, and ensure consistent code quality through linting and testing. Projen elevates the development workflow to a level where efficiency and scalability are the norms, not the exception.
What’s more compelling is Projen’s commitment to developer empowerment. Through its automated systems, it encourages developers to adhere to best practices without the overhead of manual enforcement. Its ability to seamlessly integrate with various package managers and generate detailed API documentation from inline comments signifies a leap in developer tooling.
Contact an AWS Representative to know how we can help accelerate your business.
Further Reading