All posts by Ramesh H Singh

Enforce business glossary classification rules in Amazon SageMaker Catalog

Post Syndicated from Ramesh H Singh original https://aws.amazon.com/blogs/big-data/enforce-business-glossary-classification-rules-in-amazon-sagemaker-catalog/

Organizations are scaling their data catalogs faster than ever. Maintaining consistent metadata standards across teams remains a challenge. Business glossaries define the language of the enterprise—terms like Customer Profile, Transaction, or Confidential Data—but assets are often published without these classifications, leading to inconsistent metadata and poor discoverability.

To address this, Amazon SageMaker Catalog now supports metadata enforcement rules for glossary terms classification (tagging) at the asset level. With this capability, administrators can require that assets include specific business terms or classifications. Data producers must apply required glossary terms or classifications before an asset can be published. This enforces metadata consistency across the catalog and makes sure assets carry the business context needed for effective discovery and governance.

This capability builds on existing metadata rule features for enforcing required metadata fields during asset publishing. The new addition extends those rules to cover glossary term validation, strengthening the link between business language and technical data assets.

In this post, we show how to enforce business glossary classification rules in SageMaker Catalog.

Why metadata enforcement matters

A common governance challenge is the lack of standardized tagging and classification for assets entering enterprise catalogs. Without enforcement, data producers might publish assets missing required business terms (such as data sensitivity level or product domain), resulting in inconsistent metadata that confuses business users, unreliable search and filtering results, and manual cleanup and downstream compliance risks.

By automatically validating metadata at publish time, SageMaker Catalog validates metadata when assets are published. This offers the following key benefits:

  • Assets are classified with approved business terms before publication
  • Validation supports compliance with internal glossary and classification standards
  • Consistent tagging enhances search accuracy and reduces noise
  • Incomplete or incorrectly tagged assets don’t reach consumers

How metadata enforcement works

On the Amazon SageMaker Unified Studio console, administrators navigate to Catalog, Governance, Rules and create metadata rules targeting the asset publishing workflow. Rules can specify required glossary terms or classification fields (for example, Business Unit, PII Category, or Data Sensitivity). Rules can apply organization-wide or within specific domains or projects.

When a producer attempts to publish an asset, SageMaker Catalog checks that the asset includes the required glossary terms or classifications. If any required metadata is missing, the publish action fails with a clear error message. After the metadata is added, the asset can be published successfully.

Enforced tagging makes sure published assets can be searched and filtered using consistent business terminology, improving catalog usability for analysts and business users.

Solution overview

For this post, we explore a financial services use case. Our example a financial services company defines a rule requiring all datasets published from the project to have ‘Finance’ glossary associated:

  • A data producer attempting to publish a new dataset without this tag receives a validation error
  • After applying the correct classification, the dataset publishes successfully
  • Analysts can now filter the catalog to find only Finance datasets or join assets consistently tagged with the same glossary term

In the following sections, we walk through the steps to configure this solution. We create a rule that all assets published from a specific project should have a business unit tag called Finance.

Prerequisites

To test this solution, you should have a SageMaker Unified Studio domain set up with a domain owner or domain unit owner privileges. You should also have an existing project to publish assets and catalog assets. For instructions to create these assets, see the Getting started guide.

In this example, we created a project named financial_analysis and a test table. For instructions to create a table, see Get started with Amazon S3 Tables in Amazon SageMaker Unified Studio. To ingest the sample data to SageMaker Catalog and generate business metadata, see Create an Amazon SageMaker Unified Studio data source for Amazon Redshift in the project catalog.

Create glossary and add terms

Complete the following steps to create a new glossary and add terms:

  1. In SageMaker Unified Studio, on the Discover menu, choose Glossaries.
  2. Choose Create glossary.
  3. Provide details for your glossary, including name, owning project, and optional description.
  4. For Glossary restriction, turn on Enabled.
  5. Choose Create.
  6. Create the term Finance in the Business Unit Details glossary.

Create rule to enforce glossary terms

Complete the following steps to create a rule to define glossary terms:

  1. On the Govern menu, choose Domain units.
  2. On the Rules tab, choose Add.
  3. Add a publishing rule for the Finance project to have the Finance tag for all assets published to the catalog.
  4. Choose Add rule.

    The following screenshot shows the configuration details for your new rule.

Publish asset with enforced rules

Complete the following steps to publish your asset with the enforced rules:

  1. On the financial_analysis project page, go to your asset.
  2. In the Glossary terms section, choose Add terms.

    If you choose Publish without adding the needed term, you get an error stating the Finance term should be assigned.
  3. Choose Finance to add the required term.
  4. Choose Publish asset.

The following screenshot shows the published asset and the required terms in the glossary.

Conclusion

With metadata enforcement rules for glossary terms, SageMaker Catalog brings stronger control and consistency to how organizations publish and manage their data assets. By requiring approved business classifications before publication, teams can make sure assets adhere to enterprise metadata standards, improving governance, discoverability, and trust in shared catalogs. This capability helps organizations scale their catalog governance without adding manual overhead—embedding compliance and quality directly into the publishing workflow.

Metadata enforcement rules for glossary terms are available in AWS Regions where SageMaker Catalog operates. Get started with this capability, refer to the user guide.


About the Authors

Ramesh Singh

Ramesh Singh

Ramesh is a Senior Product Manager Technical (External Services) at AWS in Seattle, Washington, currently with the Amazon SageMaker team. He is passionate about building high-performance ML/AI and analytics products that help enterprise customers achieve their critical goals using cutting-edge technology.

Pradeep Misra

Pradeep Misra

Pradeep is a Principal Analytics and Applied AI Solutions Architect at AWS. He is passionate about solving customer challenges using data, analytics, and AI/ML. Outside of work, he likes exploring new places, trying new cuisines, and playing badminton with his family. He also likes doing science experiments, building LEGOs, and watching anime with his daughters.

Pradyut Singh

Pradyut Singh

Pradyut is a Software Development Engineer at AWS, working with the Amazon SageMaker team with a focus on Data and AI services. Outside of work, he has a passion for travel and enjoys going on long road trips, exploring diverse cuisines and discovering new places along the way.

Manny Pelaez

Manny Pelaez

Manny is a UX Designer at AWS working on Amazon SageMaker Unified Studio. He is passionate about creating intuitive user experiences by listening to customers and focusing on their pain points. Outside of work, he enjoys driving, exploring food, art, sketching, and working on side projects. He also teaches a design course, sharing his expertise with aspiring designers.

Enhanced data discovery in Amazon SageMaker Catalog with custom metadata forms and rich text documentation

Post Syndicated from Ramesh H Singh original https://aws.amazon.com/blogs/big-data/enhanced-data-discovery-in-amazon-sagemaker-catalog-with-custom-metadata-forms-and-rich-text-documentation/

Amazon SageMaker Catalog now supports custom metadata forms and rich text descriptions at the column level, extending existing curation capabilities for business names, descriptions, and glossary term classifications.

With these new features, data stewards can define and capture business-specific metadata directly in individual columns, and authors can use markdown-enabled rich text to provide detailed documentation and business context. Both form fields and formatted descriptions are indexed in real time, making them immediately discoverable through catalog search.

Column-level context is essential for understanding and trusting data. This release helps organizations improve data discoverability, collaboration, and governance by letting metadata stewards document columns using structured and formatted information that aligns with internal standards.

In this post, we show how to enhance data discovery in SageMaker Catalog with custom metadata forms and rich text documentation at the schema level.

Key capabilities

SageMaker Catalog now offers the following key capabilities:

  • Custom metadata forms – Data stewards can now use custom metadata forms to capture organization-specific metadata fields for columns such as Business Owner, Regulatory Classification, Units of Measure, or Approved Use Case. Each field is stored as a key-value pair and indexed for search, enabling business-level queries like “find columns where sensitivity = confidential.”
  • Rich text (markdown) descriptions – Each column supports a markdown-enabled description field. Authors can format text with headings, bullet lists, and hyperlinks to add deeper business or operational context—for example, logic definitions, sample values, or data lineage references.
  • Real-time indexing for search – Custom form values and rich text content are indexed as soon as they are saved. Users can search using a metadata value, keyword, or glossary term across columns.

Solution overview

For this post, we explore a financial services use case. Our example financial services organization defines a column metadata form that includes several fields, as illustrated in the following table.

Field Example Value
Approved Use Case Financial revenue modeling
Business Owner Finance Office
Domain RF

For a dataset column named revenue, the author adds the following markdown description:

# Business Revenue

- Use for Financial Modeling
- Use only for batch use cases

When analysts search for Domain = RF, this column appears in results with complete business context.

In the following sections, we demonstrate how to use to use metadata forms for columns and add rich text descriptions that is searchable.

Prerequisites

To test this solution, you should have an Amazon SageMaker Unified Studio domain set up with a domain owner or domain unit owner privileges. You should also have an existing project to publish assets and catalog assets. For instructions to create these assets, see the Getting started guide.

In this example, we created a project named financial_analysis and a test table. To create a similar table, see Get started with Amazon S3 Tables in Amazon SageMaker Unified Studio. To ingest the sample data to SageMaker Catalog and generate business metadata, see Create an Amazon SageMaker Unified Studio data source for Amazon Redshift in the project catalog.

Create new metadata form

Complete the following steps to create a new metadata form:

  1. In SageMaker Unified Studio, go to your project.
  2. Under Project catalog in the navigation pane, choose Metadata entities.
  3. Choose Create metadata form.
  4. Provide an optional display name, a technical name, and an optional description, then choose Create metadata form.
  5. Define the form fields. In this example, we add the fields Domain, Business Owner, and Approved Use Case.
  6. For Requirement Options, select the configuration for each field. For our use case, we select Always required.
  7. Choose Create field.
  8. Turn on Enabled so the form is visible and can be used for assets.

Attach metadata form to column

Complete the following steps to attach the metadata form to a column:

  1. Under Project catalog in the navigation pane, choose Assets.
  2. Search for and select your asset (for this example, we use the asset business_finance).
  3. On the Schema tab, choose View/Edit next to the revenue field.
  4. Choose Add metadata form.
  5. Choose the form you created and choose Add.
  6. Add details for the metadata form fields

Add additional context as formatted text

Next, we enter a rich text description for each column using the markdown editor, including headings, bullet lists, links, and sample values. Complete the following steps:

  1. Choose Edit next to README for the revenue field where you added the metadata form.
  2. Enter details and choose Save.
  3. Choose Preview to view the formatted README at the column level.

Publish and verify search

Now you’re ready to publish the asset. The metadata form values and markdown descriptions become part of the catalog record and are indexed for search. You can also see the history of revisions on the History tab. Other project users can see the metadata form and rich text description for the published assets and subscribe to the data asset. You can create more data products with these assets, and they will also have the column metadata form and README.

In the catalog search UI, data users can now filter on custom form fields (for example, “Domain = RF”) or search in natural language for text that matches the column description.

Best practices

Consider the following best practices when using this feature:

  • Define metadata forms aligned with your business vocabulary (domains, owners, sensitivity levels) proactively before publishing assets at scale.
  • Make column descriptions actionable—include business definitions, value ranges, logic, update cadence, and dependencies.
  • Verify the catalog indexing is timely; publish changes proactively so search results reflect new metadata.
  • Use governance controls. You can combine column-level metadata with existing asset-level templates and approval workflows to enforce publishing standards.
  • Monitor search usage and metadata completeness; target high-value datasets for complete column-level documentation first.
  • Do not store confidential or sensitive information in your metadata forms.

Conclusion

With column-level metadata forms and rich text descriptions, SageMaker Catalog helps organizations deliver higher-quality metadata, stronger governance, and better data discovery. These features make it straightforward for teams to capture complete business context and for analysts to quickly locate and understand the data they need.

Custom metadata forms and rich text descriptions at the column level are now available in AWS Regions where SageMaker is supported.

To learn more about SageMaker, see the Amazon SageMaker User Guide. Get started with this capability, refer to the user guide.


About the Authors

Ramesh Singh

Ramesh Singh

Ramesh is a Senior Product Manager Technical (External Services) at AWS in Seattle, Washington, currently with the Amazon SageMaker team. He is passionate about building high-performance ML/AI and analytics products that enable enterprise customers to achieve their critical goals using cutting-edge technology.

Pradeep Misra

Pradeep Misra

Pradeep is a Principal Analytics and Applied AI Solutions Architect at AWS. He is passionate about solving customer challenges using data, analytics, and AI/ML. Outside of work, he likes exploring new places, trying new cuisines, and playing badminton with his family. He also likes doing science experiments, building LEGOs, and watching anime with his daughters.

Abbas Makhdum

Abbas Makhdum

Abbas is Head of Product Marketing for Amazon SageMaker Catalog at AWS, where he leads go-to-market strategy and launches for data and AI governance solutions. With deep expertise across data, AI, and analytics, Abbas has also authored a book on data and AI governance with O’Reilly. He is passionate about helping organizations unlock business value by making data and AI more accessible, transparent, and governed.

Harish Panwar

Harish Panwar

Harish is a Software Development Manager at AWS in Bangalore, India. He is leading the Catalog engineering team, which is building data and AI governance solutions. Harish is a veteran in Amazon SageMaker, with deep expertise across SageMaker AI and SageMaker Catalog. He is passionate about creating simple and intuitive AI solutions making AI accessible to everyone.

Enhanced search with match highlights and explanations in Amazon SageMaker

Post Syndicated from Ramesh H Singh original https://aws.amazon.com/blogs/big-data/enhanced-search-with-match-highlights-and-explanations-in-amazon-sagemaker/

Amazon SageMaker now enhances search results in Amazon SageMaker Unified Studio with additional context that improves transparency and interpretability. Users can see which metadata fields matched their query and understand why each result appears, increasing clarity and trust in data discovery. The capability introduces inline highlighting for matched terms and an explanation panel that details where and how each match occurred across metadata fields such as name, description, glossary, and schema. Enhanced search results reduces time spent evaluating irrelevant assets by presenting match evidence directly in search results. Users can quickly validate relevance without analyzing individual assets.

In this post, we demonstrate how to use enhanced search in Amazon SageMaker.

Search results with context

Text matches include keyword match, begins with, synonyms, and semantically related text. Enhanced search displays search result text matches in these locations:

  • Search result: Text matches in each search result’s name, description, and glossary terms are highlighted.
  • About this result panel: A new About this result panel is displayed to the right of the highlighted search result. The panel displays the text matches for the result item’s searchable content including name, description, glossary terms, metadata, business names, and table schema. The list of unique text match values is displayed at the top of the panel for quick reference.

Data catalogs contain thousands of datasets, models, and projects. Without transparency, users can’t tell why certain results appear or trust the ordering. Users need evidence for search relevance and understandability.

Enhanced search with match explanations improves catalog search in four key ways:
1) transparency is increased because users can see why a result appeared and gain trust,
2) efficiency improves since highlights and explanations reduce time spent opening irrelevant assets,
3) governance is supported by showing where and how terms matched, aiding audit and compliance processes, and
4) consistency is reinforced by revealing glossary and semantic relationships, which reduces misunderstanding and improves collaboration across teams.

How enhanced search works

When a user enters a query, the system searches across multiple fields like name, description, glossary terms, metadata, business names and table schema. With enhanced search transparency, each search result includes the list of text matches that were the basis for including the result, including the field that contained the text match, and a portion of the field’s text value before and after the text match, to provide context. The UI uses this information to display the returned text with the text match highlighted.

For example, a steward searches for “revenue forecasting,” and an asset is returned with the name “Sales Forecasting Dataset Q2” and a description that contains “projected sales figures.” The word sales is highlighted in the name and description, in both the search result and the text matches panel, because sales is a synonym for revenue. The About this result panel also shows that forecast was matched in the schema field name sales_forecast_q2.

Solution overview

In this section we demonstrate how to use the enhanced search features. In this example, we will be demonstrating the use in a marketing campaign where we need user preference data. While we have multiple datasets on users, we will demonstrate how enhanced search simplifies the discovery experience.

Prerequisites

To test this solution you should have an Amazon SageMaker Unified Studio domain set up with a domain owner or domain unit owner privileges. You should also have an existing project to publish assets and catalog assets. For instructions to create these assets, see the Getting started guide.

In this example we created a project named Data_publish and loaded data from the Amazon Redshift sample database. To ingest the sample data to SageMaker Catalog and generate business metadata, see Create an Amazon SageMaker Unified Studio data source for Amazon Redshift in the project catalog.

Asset discovery with explainable search

To find assets with explainable search:

  1. Log in to SageMaker Unified Studio.
  2. Enter the search text user-data. While we get the search results in this view, we want to get further details on each of these datasets. Press enter to go to full search.
  3. In full search, search results are returned when there are text matches based on keyword search, starts with, synonym, and semantic search. Text matches are highlighted within the searchable content that is shown for each result: in the name, description, and glossary terms.
  4. To further enhance the discovery experience and find the right asset, you can look at the About this result panel on the right and see the other text matches, for example, in the summary, table name, data source database name, or column business name, to better understand why the result was included.
  5. After examining the search results and text match explanations, we identified the asset named Media Audience Preferences and Engagement as the right asset for the campaign and selected it for analysis.

Conclusion

Enhanced search transparency in Amazon SageMaker Unified Studio transforms data discovery by providing clear visibility into why assets appear in search results. The inline highlighting and detailed match explanations help users quickly identify relevant datasets while building trust in the data catalog. By showing exactly which metadata fields matched their queries, users spend less time evaluating irrelevant assets and more time analyzing the right data for their projects.

Enhanced search is now available in AWS Regions where Amazon SageMaker is supported.

To learn more about Amazon SageMaker, see the Amazon SageMaker documentation.


About the authors

Ramesh H Singh

Ramesh H Singh

Ramesh is a Senior Product Manager Technical (External Services) at AWS in Seattle, Washington, currently with the Amazon DataZone team. He is passionate about building high-performance ML/AI and analytics products that enable enterprise customers to achieve their critical goals using cutting-edge technology.

Pradeep Misra

Pradeep Misra

Pradeep is a Principal Analytics and Applied AI Solutions Architect at AWS. He is passionate about solving customer challenges using data, analytics, and AI/ML. Outside of work, Pradeep likes exploring new places, trying new cuisines, and playing board games with his family. He also likes doing science experiments, building LEGOs and watching anime with his daughters.

Ron Kyker

Ron Kyker

Ron is a Principal Engineer with Amazon DataZone at AWS, where he helps drive innovation, solve complex problems, and set the bar for engineering excellence for his team. Outside of work, he enjoys board gaming with friends and family, movies, and wine tasting.

Rajat Mathur

Rajat Mathur

Rajat is a Software Development Manager at AWS, leading the Amazon DataZone and SageMaker Unified Studio engineering teams. His team designs, builds, and operates services which make it faster and straightforward for customers to catalog, discover, share, and govern data. With deep expertise in building distributed data systems at scale, Rajat plays a key role in advancing the data analytics and AI/ML capabilities of AWS.

Kyle Wong

Kyle Wong

Kyle is a Software Engineer at AWS based in San Francisco, where he works on the Amazon DataZone and SageMaker Unified Studio team. His work has been primarily at the intersection of data, analytics, and artificial intelligence, and he is passionate about developing AI-powered solutions that address real-world customer challenges.

Introducing restricted classification terms for governed classification in Amazon SageMaker Catalog

Post Syndicated from Ramesh H Singh original https://aws.amazon.com/blogs/big-data/introducing-restricted-classification-terms-for-governed-classification-in-amazon-sagemaker-catalog/

Security and compliance concerns are key considerations when customers across industries rely on Amazon SageMaker Catalog. Customers use SageMaker Catalog to organize, discover, and govern data and machine learning (ML) assets. A common request from domain administrators is the ability to enforce governance controls on certain metadata terms that carry compliance or policy significance. Examples include terms used to classify assets with sensitive data (such as PHI in healthcare or PCI in financial services) or terms used to trigger automatic access grants based on regulatory or organizational policies.

AWS announced restricted classification terms in SageMaker Catalog. This new capability allows domain administrators to define governance-controlled terms and enforce which teams and users are authorized to apply them. Restricted classification terms are designed to allow organizations to set standards for consistent classification of sensitive data, help prevent misuse of regulatory tags, and enable downstream workflows such as automatic access grants across the enterprise.

Restricted classification (glossary) terms

Customers have told us that the flexibility of applying glossary terms in SageMaker Catalog has been valuable for collaboration and scale. At the same time, many enterprises—especially in regulated industries—wanted an additional layer of control for certain classifications. For example, terms like PHI (Protected Health Information) in healthcare or PCI (payment card industry) in financial services should only be applied by authorized personnel, because they carry compliance and policy significance. Customers also asked for a way to enforce these governance policies without adding operational overhead. As catalogs grow to thousands of assets, forms, and columns, validating tens of thousands of terms can create performance and compliance challenges. A solution was needed to combine the openness of cataloging with governance precision for sensitive use cases.With this launch, SageMaker Catalog introduces a restricted classification terms section on each asset:

  • Business glossary terms (existing): Open tagging, no restrictions.
  • Restricted glossary terms (new): Only authorized users or groups can apply terms. Unauthorized users can view and filter assets based on these terms but not assign them.

Customer spotlight

As a large-scale organization with diverse data needs, the Business Data Technologies (BDT) team at Amazon manages thousands of assets across business units. Making sure these assets are consistently classified and governed is critical to maintaining compliance and enabling secure data sharing at scale. With restricted classification terms in SageMaker Catalog, the BDT team can now enforce which groups are authorized to apply terms, such as policy-driven classifications for merchants or payment data, while keeping discovery seamless for users.

“Restricted classification terms are instrumental in helping us scale data onboarding and governance across Amazon. By enforcing who can apply policy-related terms in the Amazon SageMaker Catalog, we’re able to accelerate consolidation of data assets across business units without compromising compliance. This facilitates consistent classification, prevents misuse, and allows us to automate downstream access grants—enabling our builders to innovate quickly while maintaining the highest standards of governance.”

– Gerry Moses, Senior Principal Technologist, Business Data Technologies, Amazon

Key benefits

With the introduction of restricted classification terms, customers gain stronger governance controls without losing the flexibility of open cataloging. This capability is designed to provide customers with the following key benefits:

  • Governance enforcement – Sensitive terms such as PHI or PCI can only be applied by approved users or groups, supporting compliance with organizational and regulatory policies.
  • Consistency at scale – Helps prevent misclassification across thousands of assets, maintaining a single source of truth for governed terms across domains and projects.
  • Automatic access workflows – Restricted terms can trigger downstream policies, such as auto-granting access to regulated projects or routing assets to compliance-approved environments.

Sample use case

A pharmaceutical company uses SageMaker Catalog to manage clinical trial data. They define a glossary called Regulated Data Categories with restricted terms like PHI and Genomic Data. Only compliance-approved data stewards are authorized to apply these terms to assets. When applied, the term PHI can automatically trigger policies that restrict access only to approved research groups or environments with HIPAA compliance enabled. This makes sure clinical datasets containing PHI to be consistently tagged and subject to the right access policies, while still discoverable for approved researchers.

A retail bank manages transaction and credit data in its domain catalog. They create a glossary called Data Sensitivity Levels with restricted terms like PCI and Credit Bureau Data. When an authorized risk officer classifies an asset with PCI, SageMaker Catalog can automatically grant access only to members of the bank’s Payments Compliance project. Other users, such as analysts in marketing, can see the classification exists but cannot apply or override it. This approach helps prevent accidental misuse of sensitive financial terms while automating secure access grants aligned with regulatory requirements.

Solution overview

In this section, we will walk through how to create and apply restricted classification terms.

Prerequisites

To follow this post, you should have an Amazon SageMaker Unified Studio domain set up with a domain owner or domain unit owner privileges. You should also have existing projects or permissions to create new projects and business glossaries. For instructions to create them, see the Getting started guide. In this post, we created a project named Clinical Study Trials.

Create a restricted business glossary

In this step, a compliance officer creates a new glossary called Regulated Data Categories and marks it as restricted. Usage grants are given to the Clinical Data Stewardship project.

  1. Log in to your Amazon SageMaker Unified Studio (off-console) portal. Select the project, navigate to Business Glossaries tab and choose Create Glossary.
  2. Enter a name and description for the glossary. Select Restrict this glossary for governed term use and choose Add projects.
  3. Select the projects that should have permissions to tag governed terms to assets. Choose Add policy grant.
  4. Choose Create to create the restricted business glossary.
  5. The Regulated Data Categories business glossary is created and ready to populate.

Add restricted business glossary terms

In this step you will add two terms: PHI and Genomic Data to the glossary.

  1. Choose Create term.
  2. Enter a Name and Description. Turn on Enabled and choose Create term.
  3. Follow the same steps to add the second term and both terms should be available in the glossary.

Apply restricted glossary terms to classify assets

In this step, a data steward will publish a new asset and apply the restricted terms.

  1. Go to the Data Steward project and navigate to the asset where Restricted Terms should be tagged and choose Add terms.
  2. From Regulated Data Categories select PHI and Genomic Data and choose Add terms.
  3. Restricted terms are attached to the asset.

If a project that doesn’t have grants to use restricted term tries to attach restricted terms, you would receive the error Unable to apply restricted terms.

Search and discovery

Data consumers can search for assets and filter by restricted terms filters on the left filters tab (for example, PHI or PCI) to discover governed assets.

Cleanup

If you decide that you no longer need any of the assets first unpublish assets, deleted terms, delete business glossary, delete assets and delete the new projects.

Conclusion

As customers expand their use of SageMaker Catalog, the need for governance becomes clear. From our work with customers in healthcare, life sciences, and financial services, we learned that organizations value the flexibility of open cataloging but need precise controls for terms that carry compliance or policy weight.

Restricted classification terms are designed to bring the best of both worlds: Flexibility for builders to continue tagging and discovering assets, and governance precision to help ensure that sensitive classifications are applied consistently. This capability lays the foundation for future enhancements such as column-level governance and deeper integration with enterprise data governance services. By balancing openness with control, SageMaker Catalog continues to help customers organize, govern, and scale their data and ML assets with confidence.

To learn more and get started, visit the Amazon SageMaker Catalog documentation.


About the authors

Ramesh H Singh

Ramesh H Singh

Ramesh is a Senior Product Manager Technical (External Services) at AWS in Seattle, Washington, currently building the next generation of Amazon SageMaker. He is passionate about building high-performance ML/AI and analytics products that enable enterprise customers to achieve their critical goals using cutting-edge technology.

Pradeep Misra

Pradeep Misra

Pradeep is a Principal Analytics Solutions Architect at AWS. He is passionate about solving customer challenges using data, analytics, and AI/ML. Outside of work, Pradeep likes exploring new places, trying new cuisines, and playing board games with his family. He also likes doing science experiments, building LEGOs and watching anime with his daughters.

Abbas Makhdum

Abbas Makhdum

Abbas is Head of Product Marketing for Amazon SageMaker Catalog at AWS, where he leads go-to-market strategy and launches for data and AI governance solutions. With deep expertise across data, AI, and analytics, Abbas has also authored a book on data governance with O’Reilly. He is passionate about helping organizations unlock business value by making data and AI more accessible, transparent, and governed.

Mohit Dawar

Mohit Dawar

Mohit is a Senior Software Engineer at Amazon Web Services (AWS) working on Amazon DataZone. Over the past 3 years, he has led efforts around the core metadata catalog, generative AI–powered metadata curation, and lineage visualization. He enjoys working on large-scale distributed systems, experimenting with AI to improve user experience, and building tools that make data governance feel effortless.

Use account-agnostic, reusable project profiles in Amazon SageMaker to streamline governance

Post Syndicated from Ramesh H Singh original https://aws.amazon.com/blogs/big-data/use-account-agnostic-reusable-project-profiles-in-amazon-sagemaker-to-streamline-governance/

Amazon SageMaker now supports account-agnostic project profiles, so you can create reusable project templates across multiple AWS accounts and organizational units. In this post, we demonstrate how account-agnostic project profiles can help you simplify and streamline the management of SageMaker project creation while maintaining security and governance features. We walk through the technical steps to configure account-agnostic, reusable project profiles, helping you maximize the flexibility of your SageMaker deployments.

New feature: Account-agnostic project profiles

Previously, SageMaker provided the ability to create project profiles, which required selecting an AWS account and AWS Region at the time of profile creation. This feature provides you the flexibility to insert the AWS account and Region dynamically when creating projects.

SageMaker now supports generic, account-agnostic project profiles (templates) in SageMaker domains, so domain administrators can define project configurations one time and reuse them across multiple AWS accounts and Regions.

Project profiles are no longer tied to a specific AWS account or Region. Instead, platform teams can reference an account pool—a new domain entity that enables dynamic account and Region selection at the time of project creation, based on custom enterprise authorization policies or user-specific logic. This decoupling of profile definitions from static deployment settings is designed to simplify governance, reduce duplication, and accelerate onboarding across large-scale data and machine learning (ML) environments.

Account-agnostic project profiles offer the following key benefits:

  • Project creators benefit from a more flexible experience – During project creation, project creators can select from a personalized list of authorized AWS accounts and Regions, powered by custom resolution strategies or predefined account pools.
  • The feature streamlines project profile governance – This model is intended to enable organizations operating across many different accounts to scale efficiently across those accounts, while preserving organization’s centralized control and permission boundaries.

Customer spotlight

As a large data-driven organization, Bayer AG looks to harness the power of data, analytics, and ML to help researchers and engineers accelerate pharmaceutical innovation. With the ability to create account agnostic templates and reusable templates in SageMaker, the research teams at Bayer can innovate faster without platform and engineering overhead.

At Bayer, we use Amazon SageMaker Unified Studio as a unified, governed workspace that brings together data from multiple AWS accounts—enabling our users to run analytics, build pipelines, and train models as part of their day-to-day work. With the new capability to create account-agnostic templates, our platform team can publish reusable templates once, and teams can select the right authorized AWS account at project creation—without relying on platform hand-offs. This will support faster onboarding, improved agility, and consistent governance as we scale ML across our global operations.

— Avinash Reddy Erupaka, Principal Engineering Lead, Drug Innovation Platform, Bayer

Solution overview

For our example use case, a leading pharmaceutical company has implemented SageMaker to manage their enterprise-wide data governance initiatives. The organization faces the complex challenge of managing thousands of AWS accounts across their global operations.

To streamline this process, their platform administrator needs to develop a system of reusable project profiles that map to specific account pools, organized according to the company’s organizational structure. For instance, they’ve created a specialized Corporate HR project profile tailored to meet the Corporate HR team’s specific requirements, as well as a comprehensive Data Engineer project profile designed for data engineering teams operating across North America, Asia-Pacific, and European Regions. This strategic approach helps data engineers efficiently create new projects using these preconfigured profiles while selecting from pre-authorized account and Region combinations. This structure strikes an optimal balance between operational flexibility and enhanced security and governance features.

In the following sections, we provide a detailed, step-by-step implementation guide for this solution.

Prerequisites

For this walkthrough, you must have the following prerequisites:

  • An AWS account – If you don’t have an account, you can create one. The account should have permission to do the following:
  • SageMaker domain – For instructions, refer to Create a domain – quick setup.
  • AWS CLI installed – The AWS Command Line Interface (AWS CLI) version 2.11 or later.
  • Python installed – Python 3.8 or later (if using custom Lambda handlers).
  • IAM permissions – The following IAM permissions are required:
    • sagemaker:CreateProject
    • sagemaker:CreateProjectProfile
    • datazone:CreateAccountPool

Platform administrator tasks

The platform administrator is responsible for two key setup tasks: creating account pools and establishing project profiles associated with these pools. This section provides the steps to accomplish both crucial processes.

Create account pools

There are two ways to create account pools:

  • For static account sources, provide a list of accounts and Regions
  • For dynamic account sources, use a custom Lambda handler to authorize account and Region pair information

As of this writing, the creation, update, and deletion of account pools are only supported in the AWS CLI.

For creating account pools, use the create-account-pool command and provide the resources. We used the following commands to create account pools for our example use case. Replace the relevant values with your own resources, such as domain identifier, account, and Region.

First, create the account pool hr-accountpool with a single AWS account. In the following command, the parameter MANUAL refers to the mechanism by which an account is chosen from the pool at project creation time. Because the platform admin is manually choosing the accounts, the resolution strategy is set to MANUAL.

aws datazone create-account-pool --domain-identifier dzd_5yxxxxxxxxxxxx --name hr-accountpool --resolution-strategy MANUAL --account-source '{"accounts": [{"awsAccountId": "633xxxxxxxxx", "supportedRegions": ["us-east-1"], "awsAccountName": "HRaccount"}]}'

Next, create the account pool namer-data-engg-pool with multiple AWS accounts. Use the same code to create account pools for the EMEA and APAC Regions:

aws datazone create-account-pool --domain-identifier dzd_5yxxxxxxxxxxxx --name namer-data-engg-pool --resolution-strategy MANUAL --account-source '{"accounts": [{"awsAccountId": "633xxxxxxxxx", "supportedRegions": ["us-east-1"], "awsAccountName": "usaccount1"}, {"awsAccountId": "635xxxxxxxxx ", "supportedRegions": ["us-east-1"], "awsAccountName": "usaccount2"}]}'

You will use these account pools in subsequent steps to create project profiles.

To verify account pool creation, use the following command:

aws datazone list-account-pools --domain-identifier <domain-id>

If you have an external permissioning system, you can use the following custom Lambda command to create your account pool that will dynamically resolve during project creation:

aws datazone create-account-pool --domain-identifier dzd_cdy9yy904sxxxx --name custom- accountpool --resolution-strategy MANUAL --account-source '{"customAccountPoolHandler": {"lambdaFunctionArn": "<<Lambda ARN>>","lambdaExecutionRoleArn": "<<Lambda execution role>>"}}'

Create project profiles and account pool assignments

In this step, we establish project profiles and connect them to authorized account pools. There are three possible scenarios for setting up project profiles.

Scenario 1: Project profile associated with a single account pool

This is the simplest configuration, where one project profile is mapped to a single account pool. In the following steps, we create a project profile for the Corporate HR team and tie it to the HR account pool:

  1. On the SageMaker console, choose Domains in the navigation pane.
  2. On the Project profiles tab, choose Create.
  3. Enter a name and description for your profile.
  4. Choose an appropriate project profile template that aligns with your project’s needs.
  5. Select Choose account and region during project creation.
  6. Select Choose account pool(s) and choose the account pool you created for the HR team.
  7. Leave the remaining settings as default and choose Create project profile.
  8. On the project details page, choose Enable to activate your profile.
  9. Choose Enable in the confirmation pop-up to proceed.

You will see a success message confirming that the Corporate HR profile has been created and linked to one account pool.

On the Project profiles tab, you should now see your newly created Corporate HR profile listed among the available project profiles.

To explore further, navigate to the Corporate HR project profile and choose the Blueprints tab to see a list of available blueprints. Choose a blueprint to view its details.

On the blueprint details page, the blueprint shows as deployable to the single account pool you associated with this project profile.

Scenario 2: Project profile associated with multiple account pools

In this example, we create a project profile for a global Data Engineering team, connecting it to three Regional account pools: NAMER (North America), APAC (Asia Pacific), and EMEA (Europe, Middle East, and Africa). Complete the following steps:

  1. On the SageMaker console, choose Domains in the navigation pane.
  2. On the Project profiles tab, choose Create.
  3. Enter a name and description for your profile.
  4. Choose an appropriate project profile template that aligns with your project’s needs.
  5. Select Choose account and region during project creation.
  6. Select Choose account pool(s) and choose all three Regional pools:
    1. NAMER Data Engineering team
    2. EMEA Data Engineering team
    3. APAC Data Engineering team
  7. Leave the remaining settings as default and choose Create project profile.
  8. On the project details page, choose Enable to activate your profile.
  9. Choose Enable in the confirmation pop-up to proceed.

You will see a success message confirming the Data Engineer profile creation. The profile will show connections to all three Regional account pools.

You can find your new profile listed on the Project profiles tab.

Navigate to your project profile and choose the Blueprints tab to see a list of available blueprints. Choose a blueprint to view its details.

On the blueprint details page, the blueprint shows as deployable to the three account pools you associated with this project profile.

Scenario 3: Project profile with all associated accounts

In this scenario, we create a project profile linked to all the associated accounts for this domain. Complete the following steps:

  1. On the SageMaker console, choose Domains in the navigation pane.
  2. On the Project profiles tab, choose Create.
  3. Enter a name and description for your profile.
  4. Choose an appropriate project profile template that aligns with your project’s needs.
  5. Select Choose account and region during project creation.
  6. Select All associated accounts.
  7. Leave the remaining settings as default and choose Create project profile.

You can find your new profile listed on the Project profiles tab.

Project owner tasks

Now that the administrator has created project profiles for the account pools, project owners can log in to SageMaker to create projects for their account pools. In this section, we demonstrate the procedure to create a project using an account-agnostic project profile with a single account pool. You can use the same procedure to create projects using an account-agnostic project profile with multiple account pools.

For this scenario, Sarah from HR will create a project for the HR team, using the Corporate HR team profile that is associated with the HR account pool.

  1. On the SageMaker portal, choose Create project.
  2. Enter a name and optional description.
  3. Choose the Corporate HR project profile.
  4. Choose Continue.
  5. For Account and AWS Region, choose the HR account.
  6. Choose Continue.
  7. Review the information and choose Create project.

You can view the successfully created project.

Clean up

To clean up resources, complete the following steps:

  1. Delete the projects using the AWS CLI:
    aws sagemaker delete-project --project-name <project-name>

  2. Delete the account pools:
    aws datazone delete-account-pool --domain-identifier <domain-id> --name <pool-name>

Conclusion

In this post, we discussed how account-agnostic project profiles can help organizations simplify and streamline the management of SageMaker project creation while maintaining enhanced security and governance features. To learn more about account-agnostic project profiles in SageMaker, refer to Account pools in Amazon SageMaker Unified Studio, and demo: account-agnostic project profile in Amazon SageMaker.

About the Authors

Ramesh H Singh

Ramesh H Singh

Ramesh is a Senior Product Manager Technical (External Services) at AWS in Seattle, Washington, currently with the Amazon DataZone team. He is passionate about building high-performance ML/AI and analytics products that help enterprise customers achieve their critical goals using cutting-edge technology

Nira Jaiswal

Nira Jaiswal

Nira is a Principal Data Solutions Architect at AWS. Nira works with strategic customers to architect and deploy innovative data and analytics solutions. She excels at designing scalable, cloud-based platforms that help organizations maximize the value of their data investments. Nira is passionate about combining analytics, AI/ML, and storytelling to transform complex information into actionable insights that deliver measurable business value.

Somdeb Bhattacharjee

Somdeb Bhattacharjee

Somdeb is a Senior Solutions Architect specializing in data and analytics. He is part of the global healthcare and life sciences industry at AWS, helping his customers modernize their data platform solutions to achieve their business outcomes.

Brian Ross

Brian Ross

Brian is a Senior Software Development Manager at AWS. He is focused on creating delightful builder experiences for data, analytics and AI, and is currently building the next generation of Amazon SageMaker. He is based out of NYC and thinks you should be, too.

Introducing GenAI-powered business description recommendations for custom assets in Amazon SageMaker Catalog

Post Syndicated from Ramesh H Singh original https://aws.amazon.com/blogs/big-data/introducing-genai-powered-business-description-recommendations-for-custom-assets-in-amazon-sagemaker-catalog/

An organization’s data can come from various sources, including cloud-based pipelines, partner ecosystems, open table formats like Apache Iceberg, software as a service (SaaS) platforms, and internal applications. Although much of this data is business-critical, the ability to make it documented and discoverable at scale continues to challenge teams—especially when assets don’t originate from pre-integrated AWS based sources.

To help bridge this gap, Amazon SageMaker Catalog—part of the next generation of Amazon SageMaker—now supports generative AI-powered recommendations for business descriptions, including table summaries, use cases, and column-level descriptions for custom structured assets registered programmatically. This new capability, powered by large language models (LLMs) in Amazon Bedrock, extends automated metadata generation to the broader spectrum of enterprise data, including Iceberg tables in Amazon Simple Storage Service (Amazon S3) or datasets from third-party and internal applications.

With just a few clicks, you can create AI-generated suggestions, review and refine descriptions, and publish enriched asset metadata directly to the catalog. This helps reduce manual documentation effort, improves metadata consistency, and accelerates asset discoverability across organizations.

This launch is part of our broader investment in generative AI-powered cataloging and metadata intelligence across SageMaker Catalog. By combining machine learning (ML) with human oversight and governance controls, we’re making it straightforward for organizations to scale trusted, usable data across business units.

In this post, we demonstrate how to generate AI recommendations for business descriptions for custom structured assets in SageMaker Catalog.

Challenges when using incomplete metadata for custom and external data

SageMaker Catalog supports automated documentation for assets harvested from AWS-centered services like AWS Glue and Amazon Redshift. These built-in integrations automatically pull schema and generate contextual metadata, making it straightforward for data consumers to discover and understand what’s available.

However, many critical datasets originate outside of these services, such as:

  • Iceberg tables stored in Amazon S3
  • Structured datasets from third-party platforms like Snowflake or Databricks
  • Relational assets manually registered using APIs

As a result, customers had to manually enter business descriptions and column-level context—a process that delays publishing, introduces inconsistency, and undermines the discoverability of important assets.

With this launch, SageMaker Catalog adds support for generative AI-powered metadata generation for custom schema-based data assets registered programmatically through APIs. We use large language models (LLMs) in Amazon Bedrock to automatically generate key elements for custom structured assets. This includes providing a comprehensive table summary, detailed column-level descriptions, and suggesting potential analytical use cases. These automated capabilities help streamline the documentation process, ensuring consistency and efficiency across data assets.

Customer Spotlight

Across industries, customers are managing thousands of structured datasets that don’t originate from AWS-native pipelines. These datasets often lack documentation—not because they’re unimportant, but because documenting them is time-consuming, repetitive, and often deprioritized.

How Amazon’s Finance is revolutionizing data management with AI-powered metadata generation

As a large-scale organization with diverse data needs, Amazon’s Finance team manages thousands of data assets. Within the Finance organization, numerous datasets often lack proper documentation, creating bottlenecks that hinder critical financial analysis and decision-making.

Balaji Kumar Gopalakrishnan, Principal Engineer at Amazon Finance, shares how the AI-powered metadata generation capability is transforming their data management approach:

“As a finance organization, we manage numerous datasets that lack proper documentation, creating bottlenecks for critical financial analysis. The AI-powered auto-documentation capability would be transformative for our team—alleviating the manual documentation effort that delays asset discovery and usability. This would dramatically reduce our time-to-insight for reporting while enforcing consistent metadata standards across all our manually registered assets.”

This empowers teams like Amazon Finance to streamline metadata generation and documentation, making critical financial data easier to access and work with. By automating metadata creation, teams can focus on high-impact analysis, accelerating their decision-making process and improving the overall efficiency of the organization.

Key Benefits

This new feature directly addresses key challenges faced by cataloging teams by enabling them to:

  • Accelerate time to publish: Minimize the delay between data availability and catalog readiness.
  • Improve metadata quality: Ensure consistent, LLM-generated context, regardless of schema authors.
  • Enhance discoverability: Enable quick and easy access to data through rich, searchable descriptions.
  • Build trust: Provide transparent, editable AI suggestions to ensure metadata aligns with organizational needs and domain accuracy.

For data producers, this capability eliminates the need for repetitive, manual documentation, saving valuable time. By automating metadata generation, it also standardizes how metadata is written and structured across assets, resulting in faster publishing and quicker data access for consumers.

On the consumer side, the enhanced metadata offers greater clarity, allowing users to understand the data and its usage at a glance. With complete and curated metadata, they can trust the source, while working more independently and reducing reliance on subject matter experts (SMEs) and data stewards for interpretation.

Solution overview

In this post, we demonstrate how to manually create a structured asset and use the new AI-powered capability to generate business metadata to improve asset usability. The asset we add is a product inventory table with the following columns:

Table : ProductInventory
   Columns :
        productID : string
        name: string
        price: double
        stock_quantity : integer
        shipped_from : integer

Prerequisites

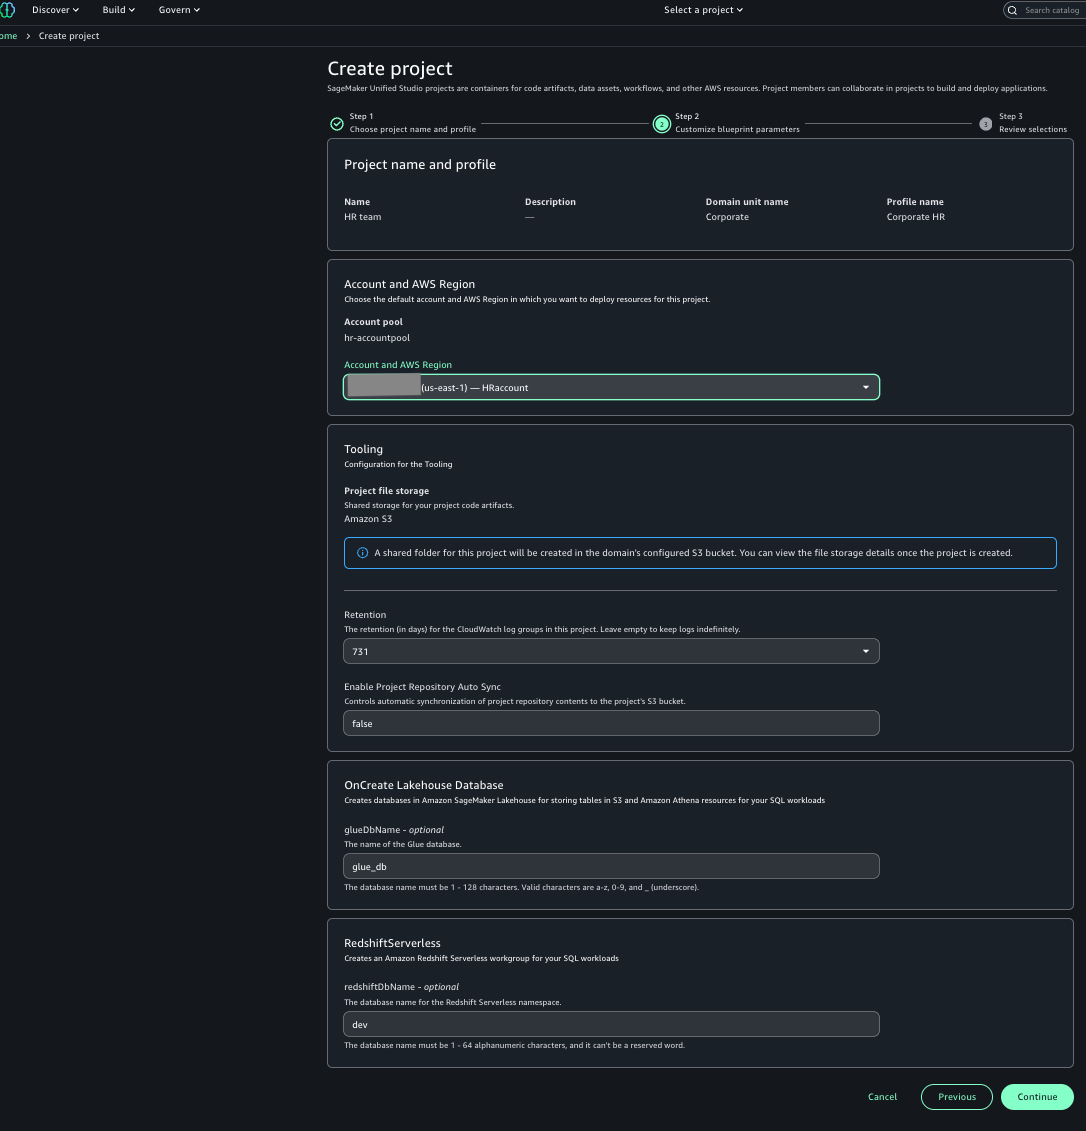
To follow this post, you must have an Amazon SageMaker Unified Studio domain set up with a domain owner or domain unit owner privileges. You must have a project that we will use to publish assets. For instructions, refer to the SageMaker Unified Studio Getting started guide.

Create an asset

Complete the following steps to manually create the asset:

  1. The manually registered asset types need to use the amazon.datazone.RelationalTableFormType form type. Get the latest revision in your domain. Run the following command, replacing the domain-identifier with your domain:
aws datazone  get-form-type --domain-identifier dzd_xxxxf --form-type-identifier amazon.datazone.RelationalTableFormType

The latest revision returned is 7, which we use in the next steps:

{
    "createdAt": "2024-12-23T21:12:50.484000+00:00",
    "createdBy": "SYSTEM",
    "domainId": "dzd_xxxxf",
    "imports": [
        {
            "name": "amazon.datazone.RelationalColumnMixin",
            "revision": "5"
        },
        {
            "name": "amazon.datazone.RelationalTableMixin",
            "revision": "5"
        }
    ],
    "model": {
        "smithy": "$version: \"2.0\"\n\nnamespace amazon.datazone\n\nstructure RelationalColumn with [ RelationalColumnMixin ] {\n\n}\n\nlist RelationalColumns {\n    member: RelationalColumn\n}\n\n@documentation(\"A generic form-type to capture relational table details\")\nstructure RelationalTableFormType with [ RelationalTableMixin ] {\n\n    columns: RelationalColumns\n}"
    },
    "name": "amazon.datazone.RelationalTableFormType",
    "originDomainId": "dzd_amazon_datazone_domain",
    "originProjectId": "dzd_amazon_datazone_domain_project",
    "owningProjectId": "dzd_amazon_datazone_domain_project",
    
    "status": "ENABLED"
}
  1. Create a new asset type that uses the amazon.datazone.RelationalTableFormType revision returned in the previous step:
aws datazone create-asset-type \
>   --domain-identifier dzd_xxxxf \
>   --name MyAssetType \
>   --description "Manually registered custom asset type" \
>   --owning-project-identifier 4zxxxx3r \
>   --forms-input '{"MyCustomForm": {"required": true, "typeIdentifier": "amazon.datazone.RelationalTableFormType","typeRevision":"7"}}'

You will receive a success response similar to the following:

{
    "description": "Manually registered custom asset type",
    "domainId": "dzd_xxxxf",
    "formsOutput": {
        "AssetCommonDetailsForm": {
            "required": false,
            "typeName": "amazon.datazone.AssetCommonDetailsFormType",
            "typeRevision": "6"
        },
        "MyCustomForm": {
            "required": true,
            "typeName": "amazon.datazone.RelationalTableFormType",
            "typeRevision": "7"
        }
    },
    "name": "MyAssetType",
    "revision": "1"
}
  1. Create the asset for the table using the asset type and replacing the domain and project identifiers in your domain. For this example, we also enable businessNameGeneration:
aws datazone create-asset --domain-identifier dzd_xxxxf \
--name ProductInventory \
--owning-project-identifier 4zxxxx3r \
--type-identifier MyAssetType \
--forms-input  '[{
    "content": "{\r\n  \"tableName\": \"ProductInventory\",\r\n  \"columns\": [\r\n    {\r\n      \"columnName\": \"productID\",\r\n      \"dataType\": \"string\"\r\n    },\r\n    {\r\n      \"columnName\": \"name\",\r\n      \"dataType\": \"string\"\r\n    },\r\n    {\r\n      \"columnName\": \"price\",\r\n      \"dataType\": \"double\"\r\n    },\r\n    {\r\n      \"columnName\": \"stock_quantity\",\r\n      \"dataType\": \"integer\"\r\n    },\r\n    {\r\n      \"columnName\": \"shipped_from\",\r\n      \"dataType\": \"string\"\r\n    }\r\n  ]\r\n}",
    "formName": "MyCustomForm",
    "typeIdentifier": "amazon.datazone.RelationalTableFormType"}]'

The following is an example success response after the asset is created:

{
    "createdAt": "2025-06-24T23:47:51.734000+00:00",
    "createdBy": "9665be38-c692-4474-a41f-5d9793040f08",
    "domainId": "dzd_xxxxf",
    "firstRevisionCreatedAt": "2025-06-24T23:47:51.734000+00:00",
    "firstRevisionCreatedBy": "9665be38-c692-4474-a41f-5d9793040f08",
    "formsOutput": [
        {
            "content": "{\"tableName\":\"ProductInventory\",\"columns\":[{\"columnName\":\"productID\",\"dataType\":\"string\"},{\"columnName\":\"name\",\"dataType\":\"string\"},{\"columnName\":\"price\",\"dataType\":\"double\"},{\"columnName\":\"stock_quantity\",\"dataType\":\"integer\"},{\"columnName\":\"shipped_from\",\"dataType\":\"string\"}]}",
            "formName": "MyCustomForm",
            "typeName": "amazon.datazone.RelationalTableFormType"
        }
    ],
    "id": "4e4w5chq6lf3tz",
    "name": "ProductInventory",
    "owningProjectId": "4zxxxx3r",
    "predictionConfiguration": {
        "businessNameGeneration": {
            "enabled": true
        }
    },
    "readOnlyFormsOutput": [],
    "revision": "1",
    "typeIdentifier": "MyAssetType",
    "typeRevision": "1"
}

When an asset is created with businessNameGeneration enabled, it generates the business name predictions asynchronously. After they are generated, they are returned as suggestions under the asset’s readOnlyForms.

Generate business metadata

Complete the following steps to generate metadata:

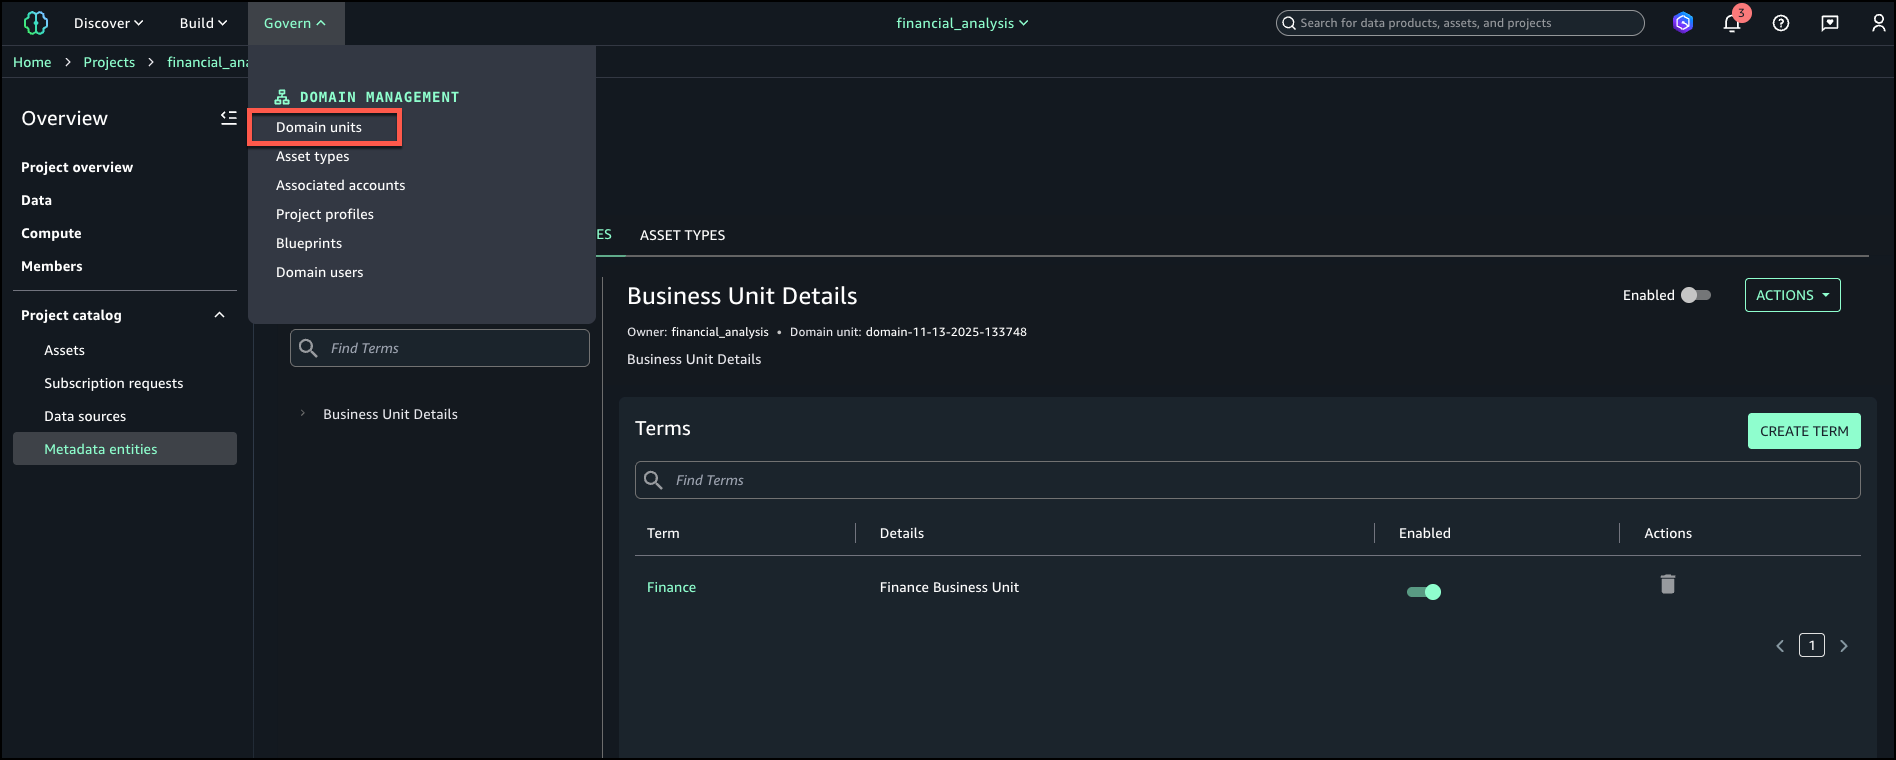
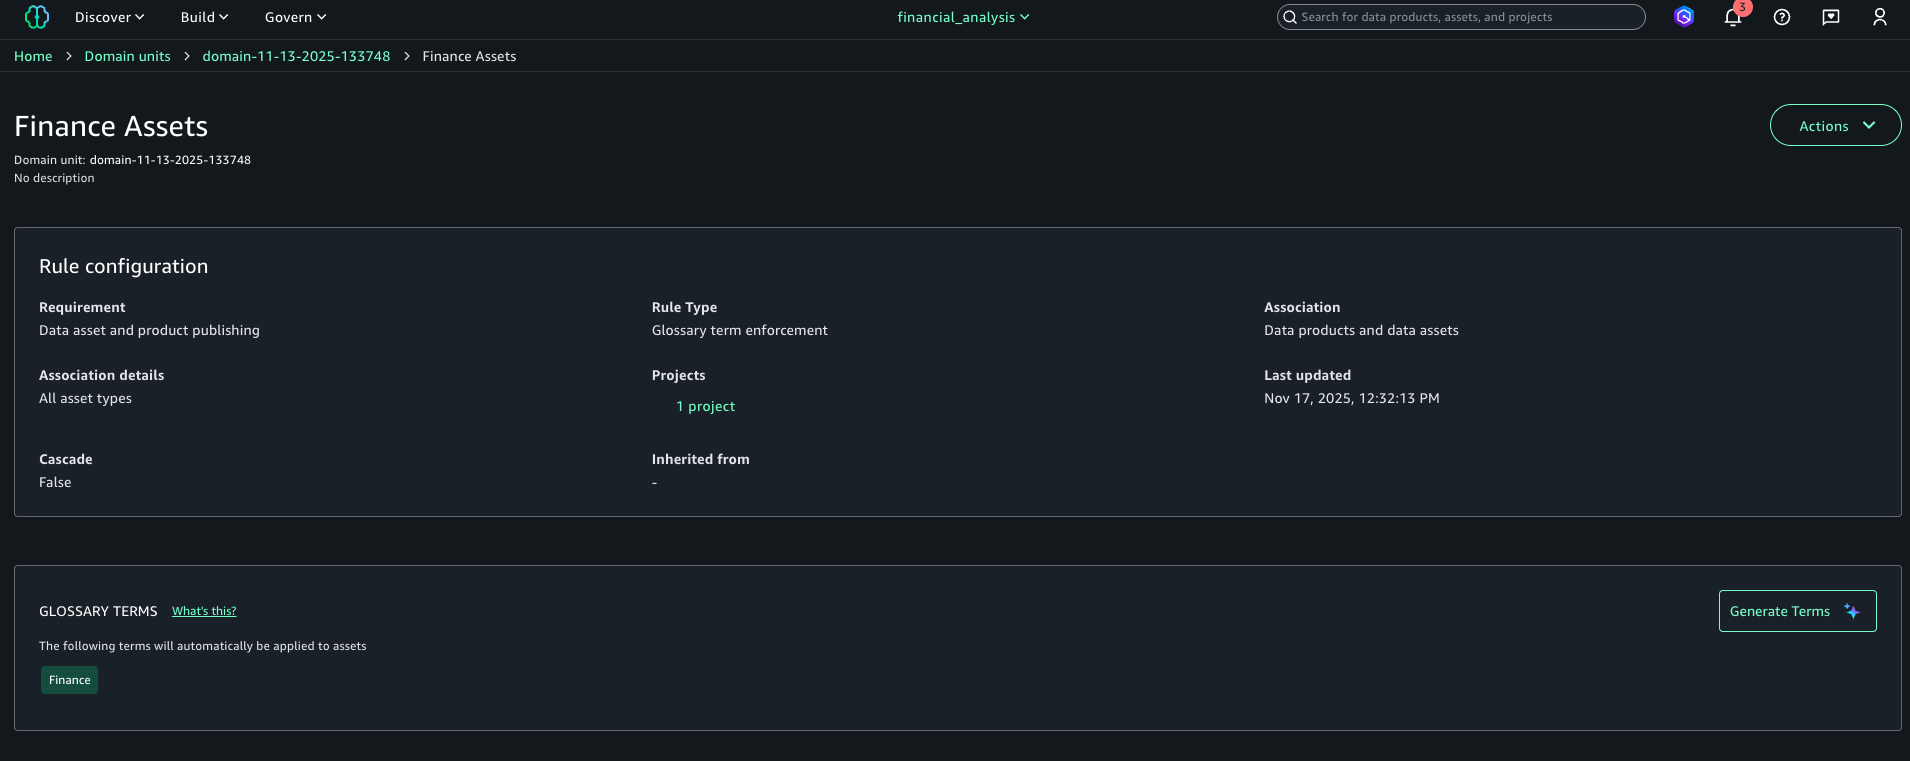
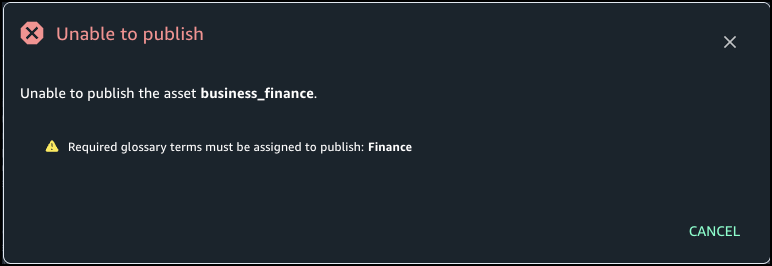
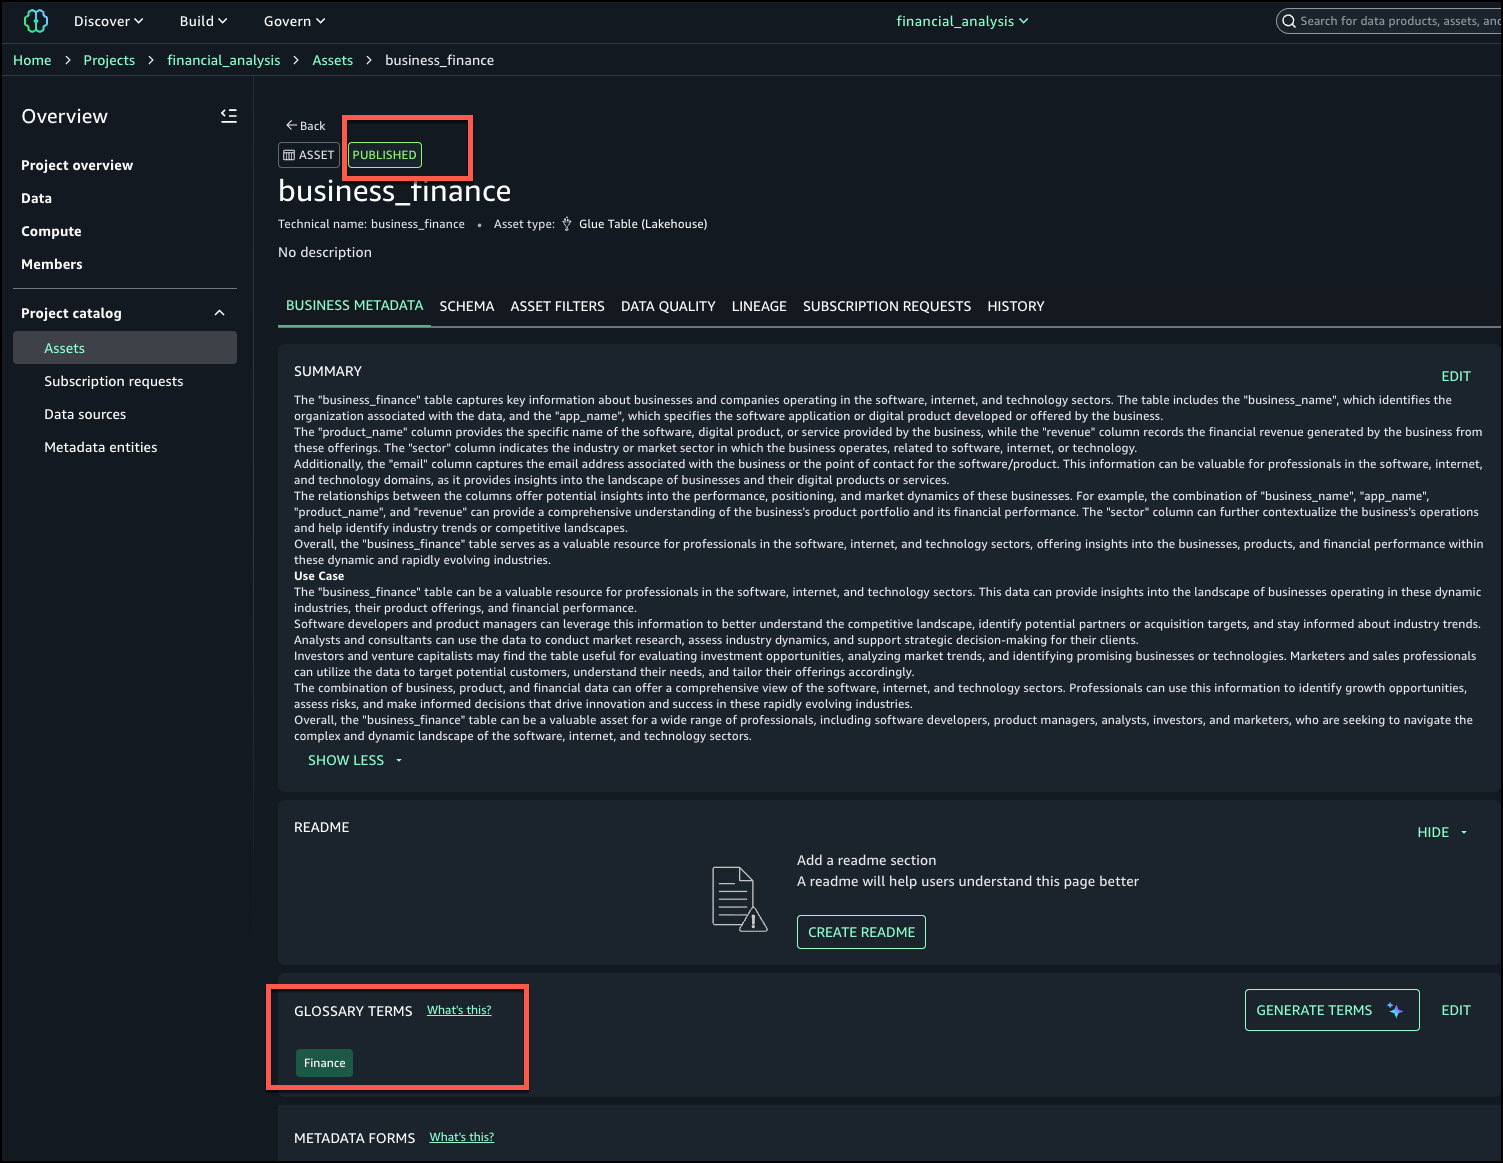
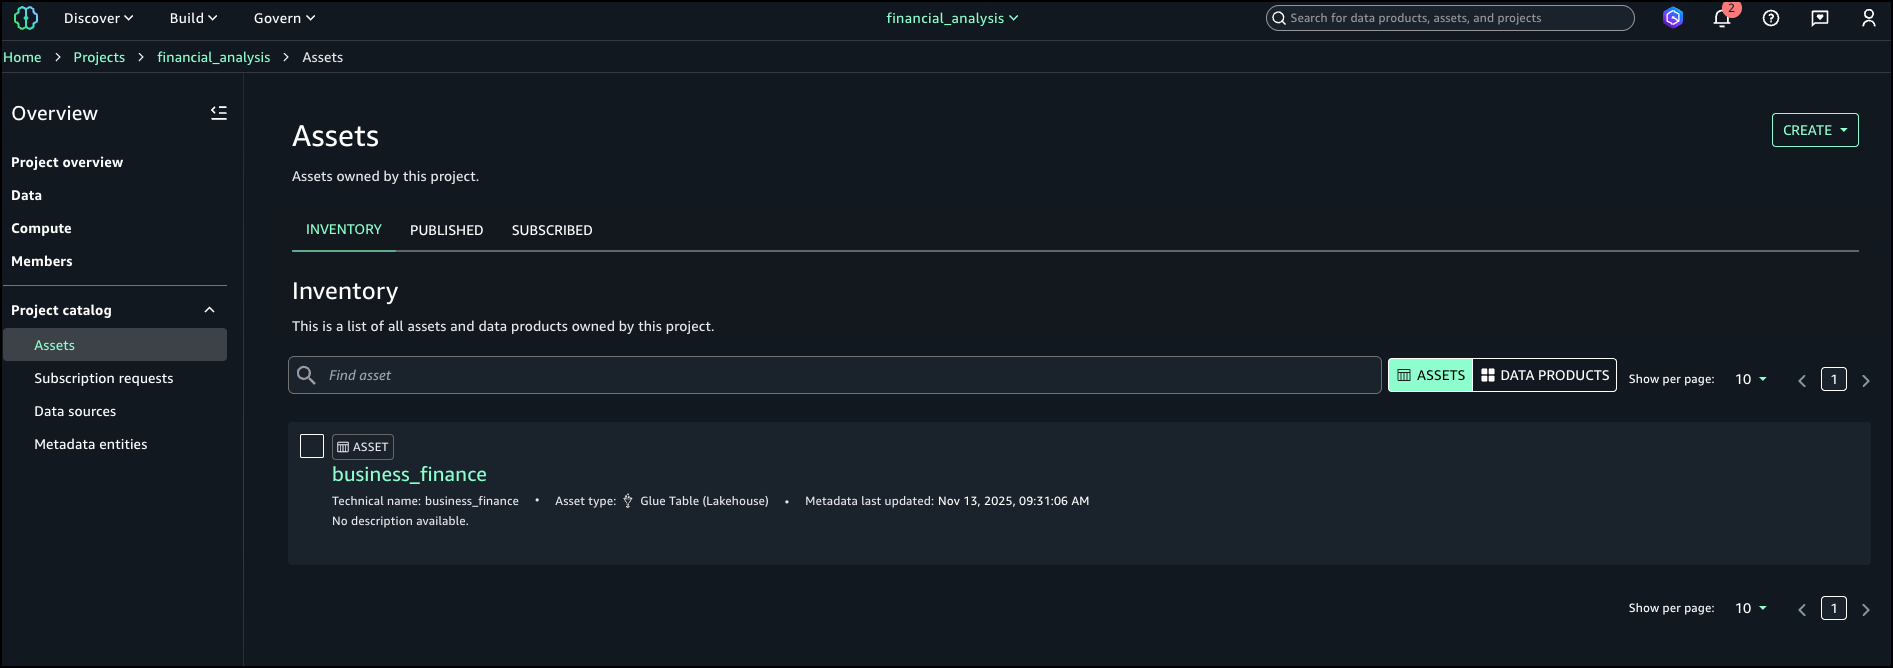
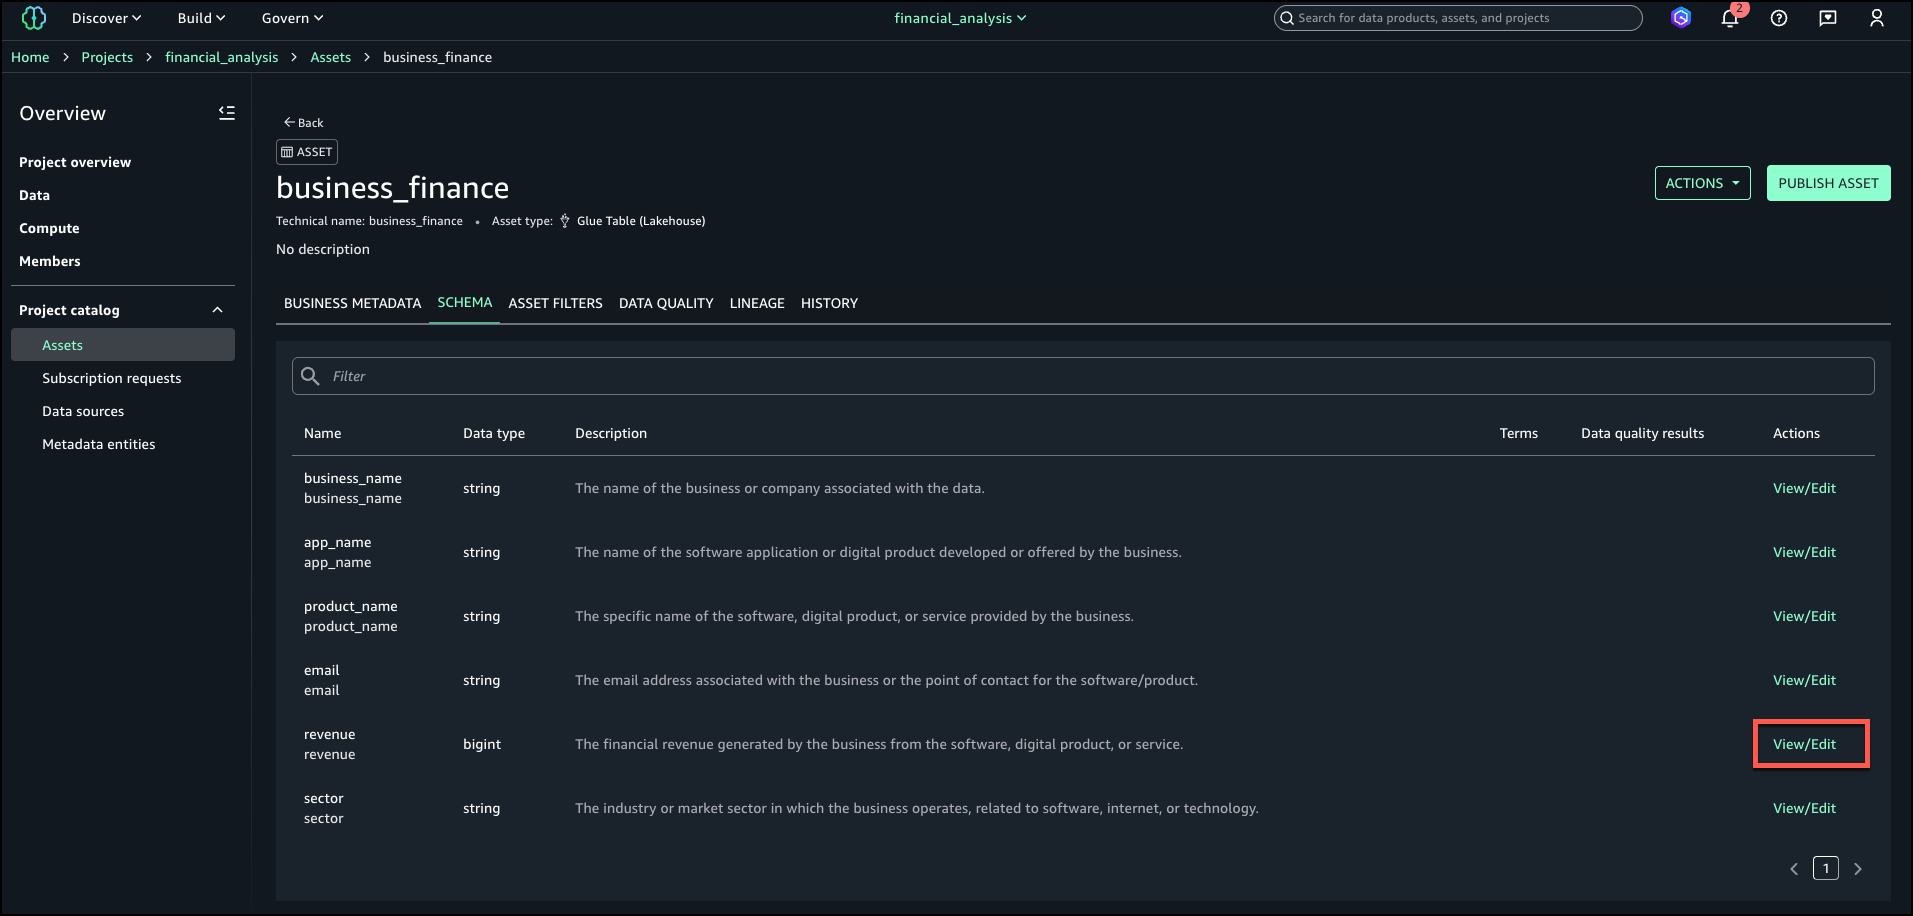
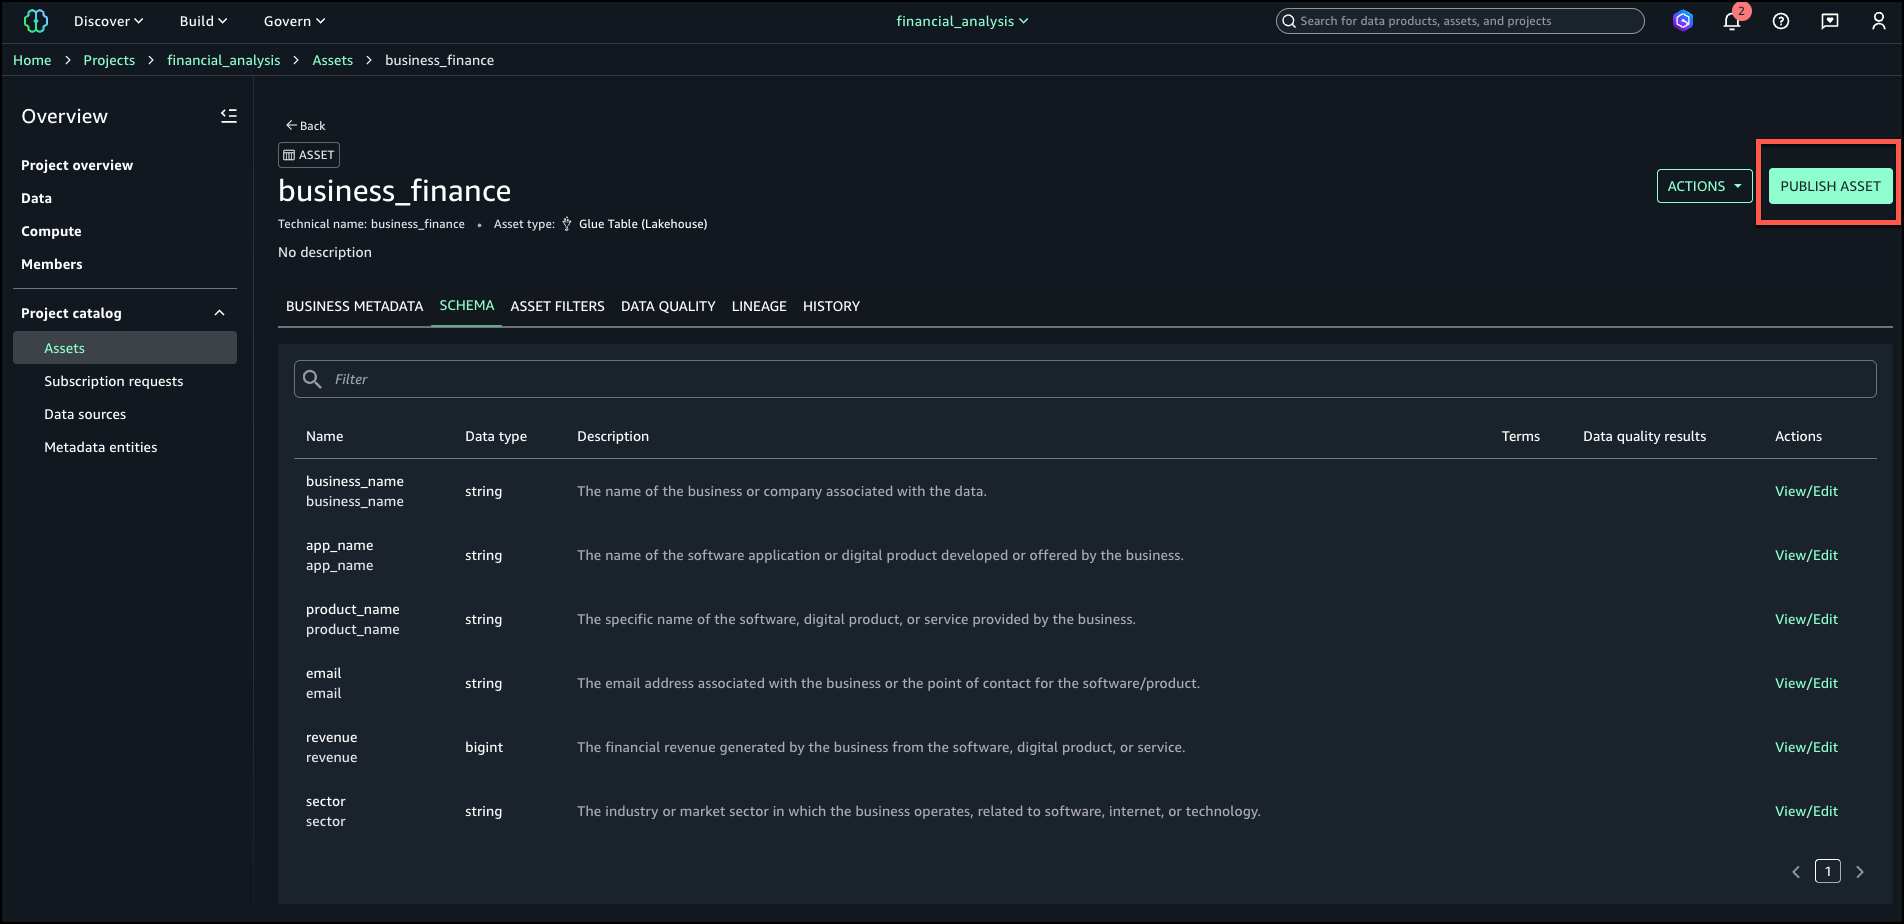
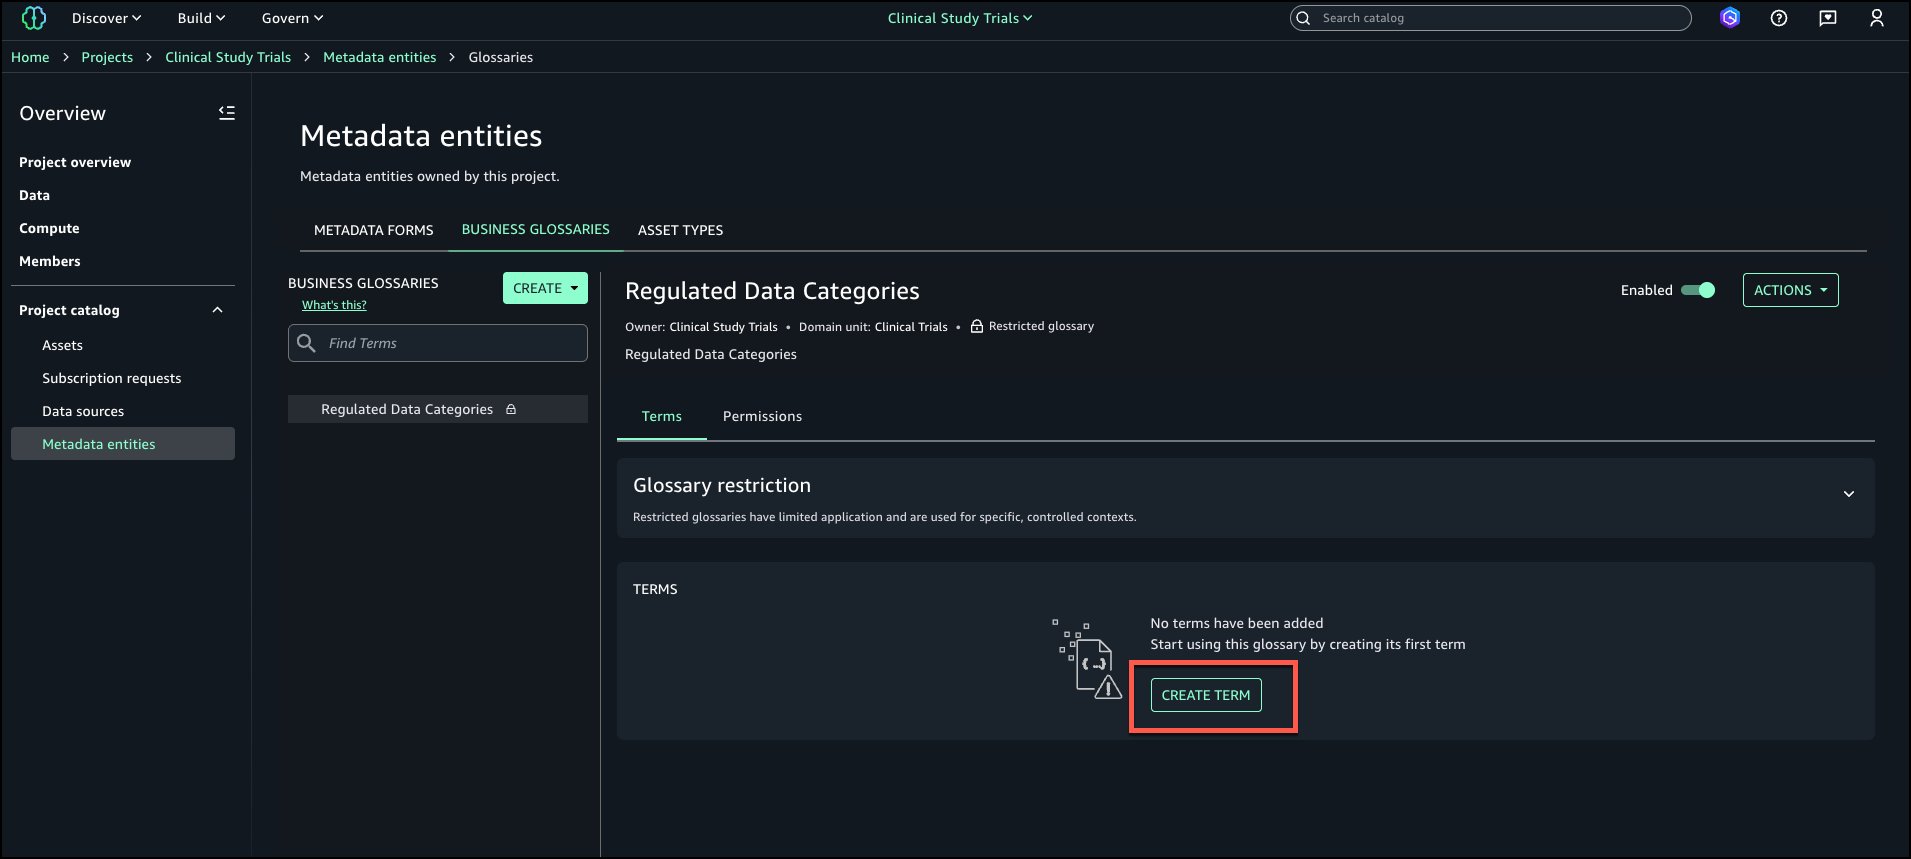
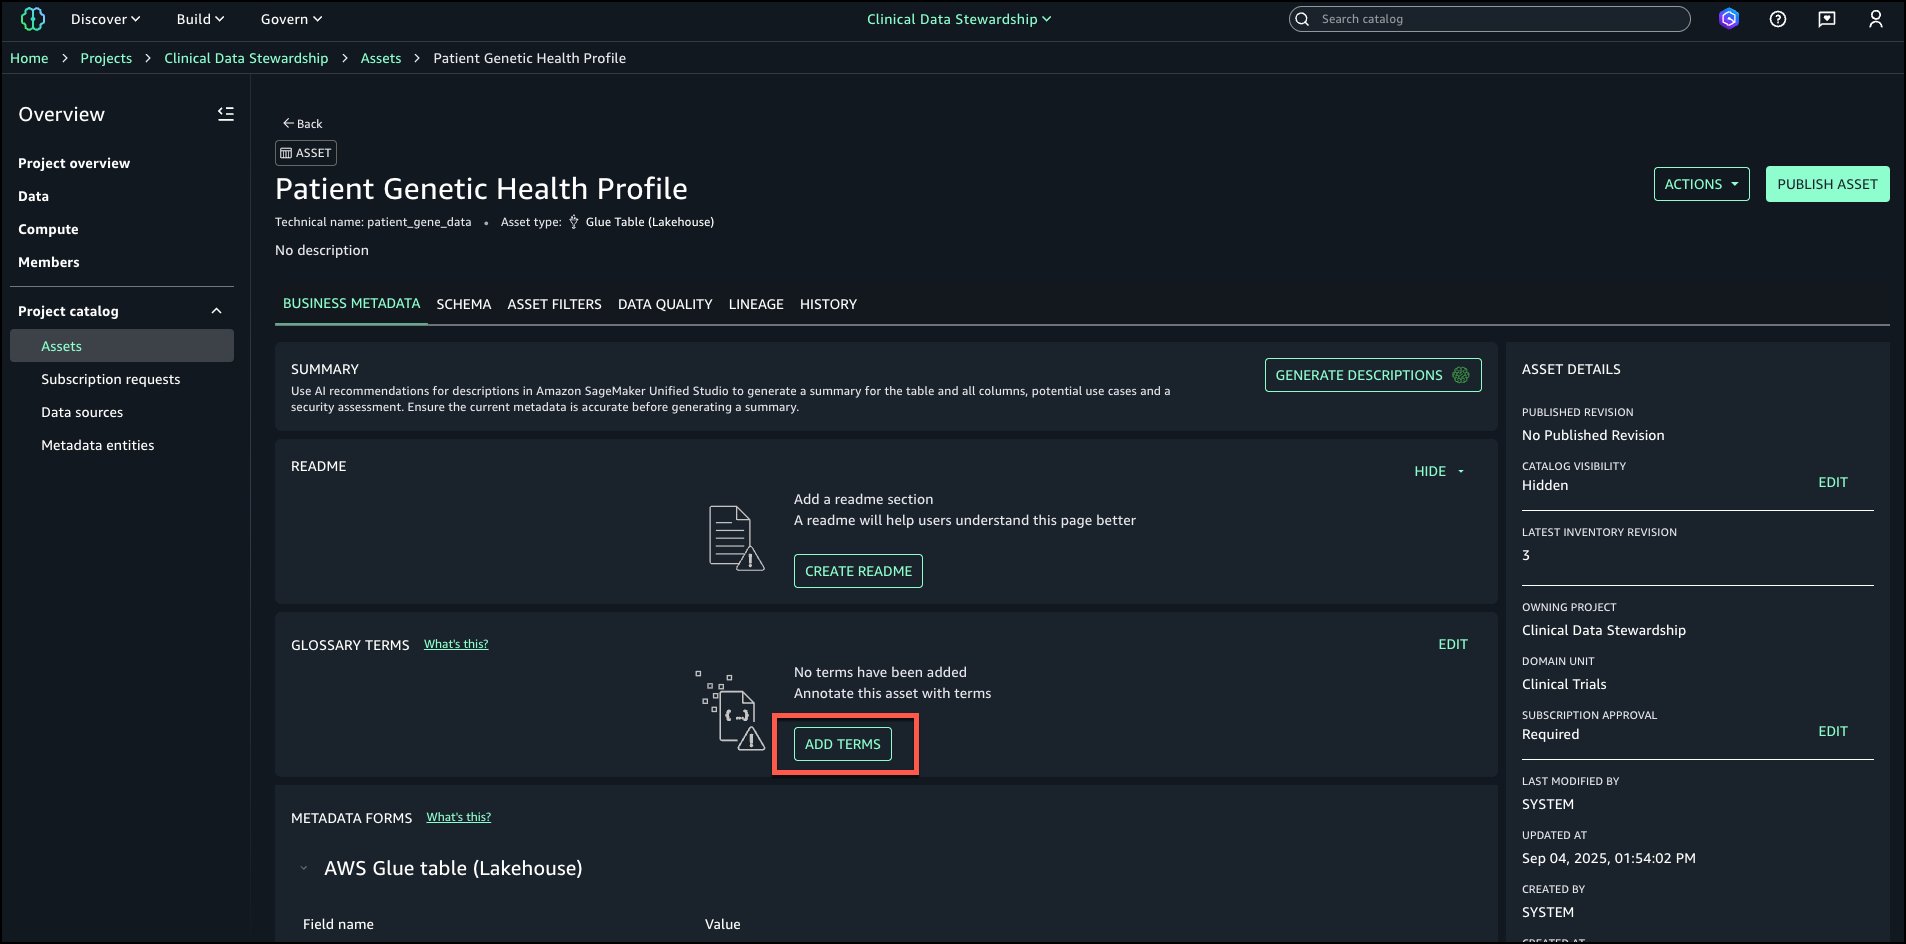
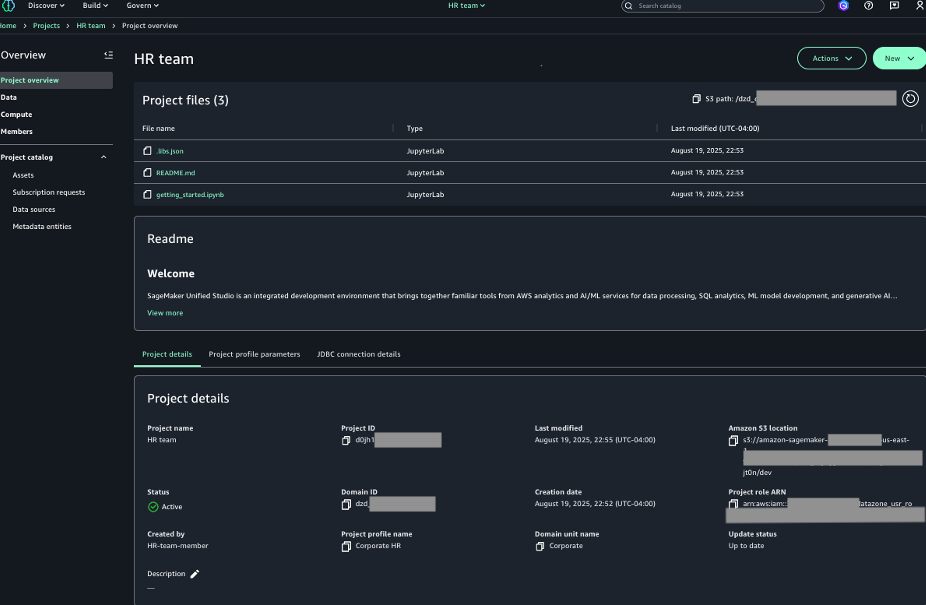
  1. Log in to the SageMaker Unified Studio portal, open the project that you used, and choose Assets in the navigation pane.

The business name is already generated for the asset and columns.

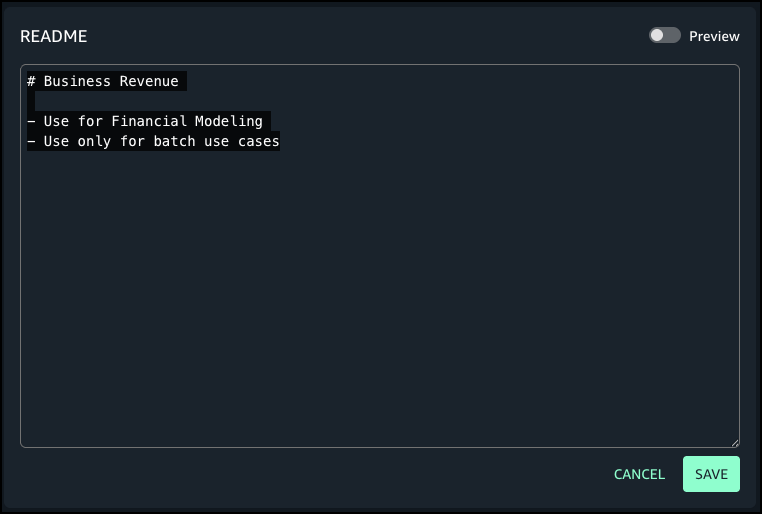
  1. To generate descriptions, choose Generate descriptions.

The following screenshot shows the generated names on the Schema tab.

  1. If you approve of the generated names, choose Accept all.

  1. Choose Accept all again to confirm.

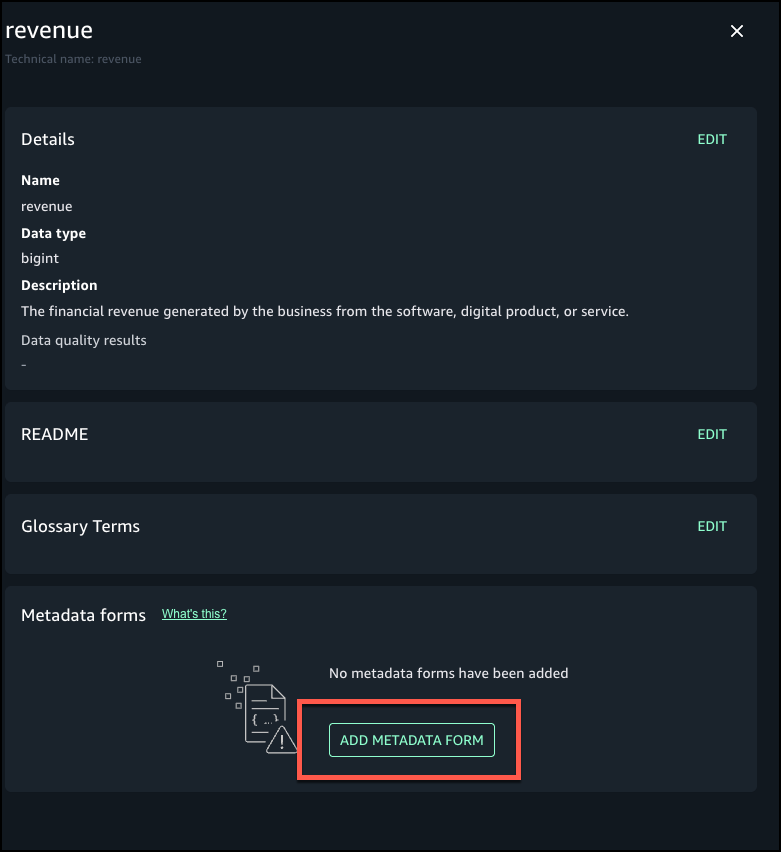
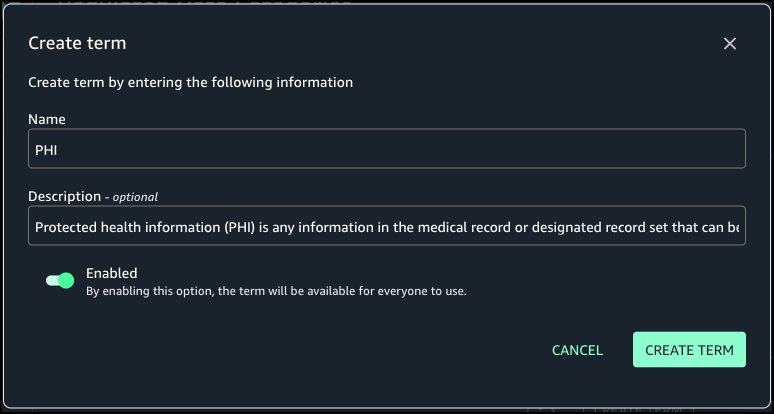
  1. Choose Generate descriptions to create suggested table and column descriptions.

  1. Review the generated recommendations and choose Accept all if it looks accurate.

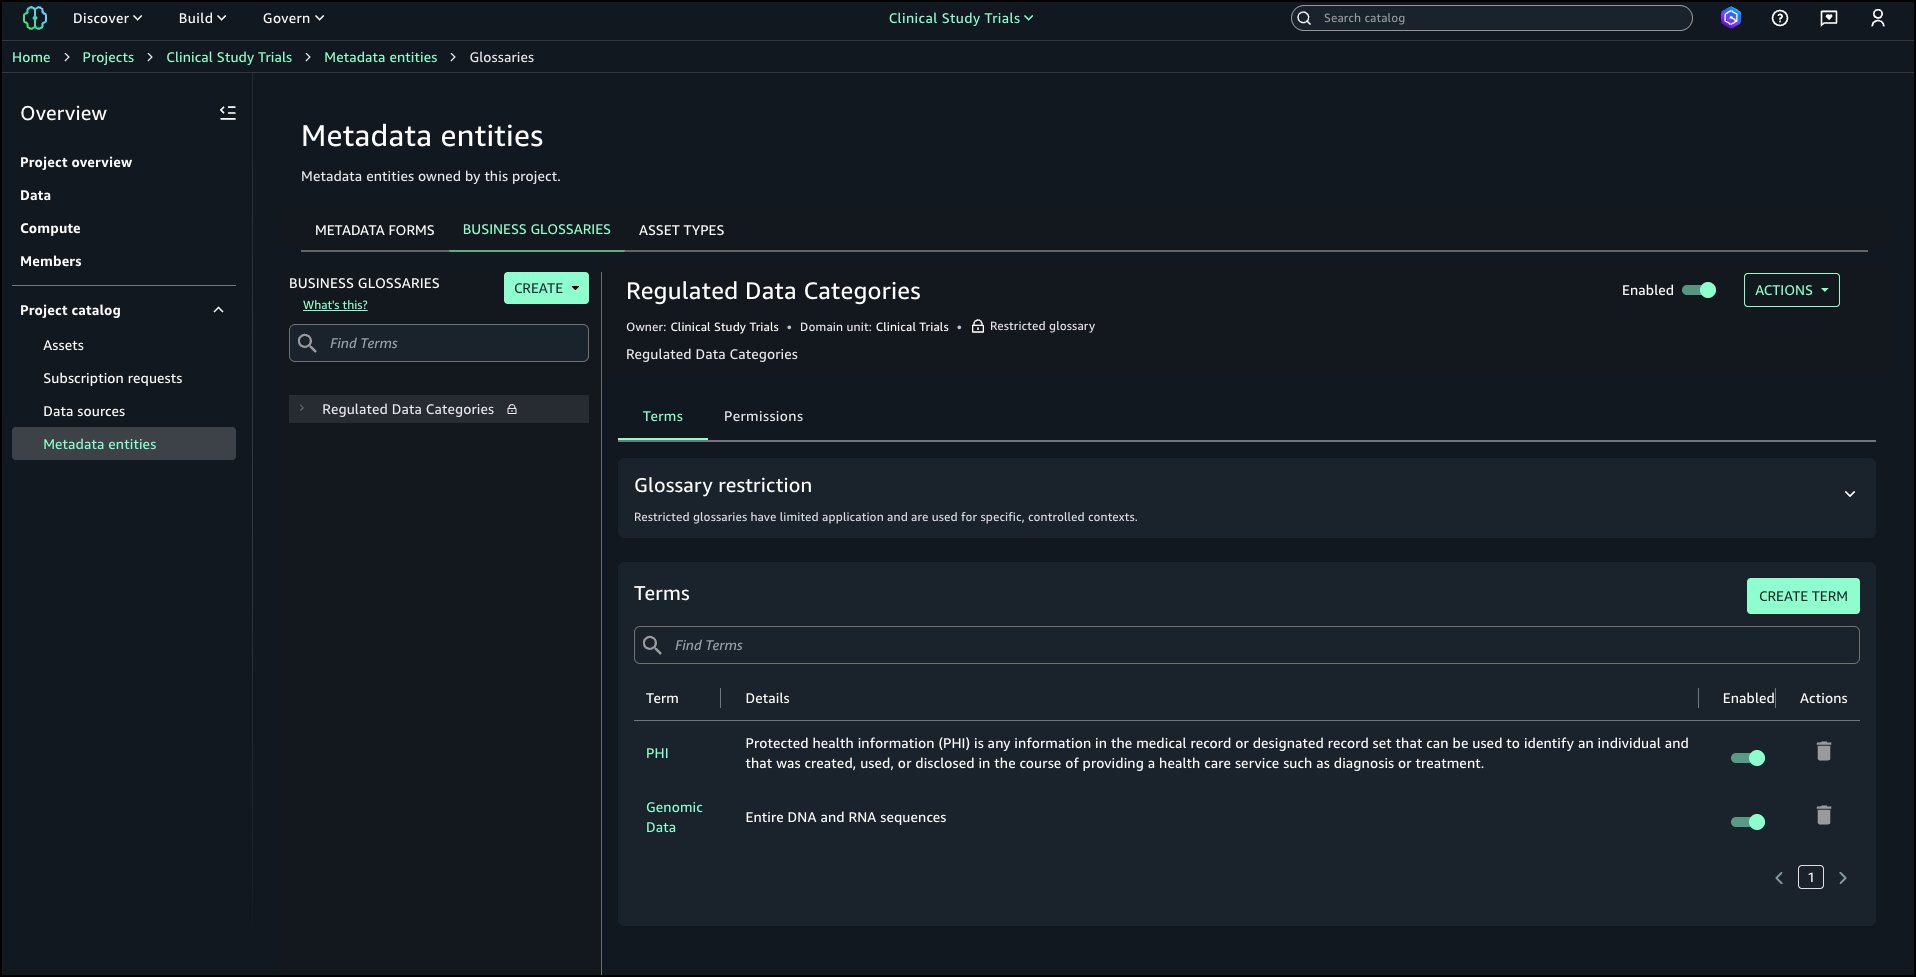
The following screenshot shows the generated descriptions.

Even when assets are registered as custom, you can use this feature to generate business context and seamlessly publish it to SageMaker catalog.

Conclusion

As enterprise data environments become increasingly distributed and sourced from diverse platforms, maintaining metadata quality at scale presents a challenge. This feature uses generative AI to automate the creation of business descriptions, including table summaries, use cases, and column-level metadata, reducing manual effort while preserving alignment with governance requirements.

The feature is available in the next generation of SageMaker through SageMaker Catalog for custom structured assets (with schema) registered programmatically using an API. For implementation details, refer to the product documentation.


About the authors

Ramesh H Singh is a Senior Product Manager Technical (External Services) at AWS in Seattle, Washington, currently with the Amazon SageMaker team. He is passionate about building high-performance ML/AI and analytics products that enable enterprise customers to achieve their critical goals using cutting-edge technology. Connect with him on LinkedIn.

Pradeep Misra PicPradeep Misra is a Principal Analytics Solutions Architect at AWS. He works across Amazon to architect and design modern distributed analytics and AI/ML platform solutions. He is passionate about solving customer challenges using data, analytics, and AI/ML. Outside of work, Pradeep likes exploring new places, trying new cuisines, and playing board games with his family. He also likes doing science experiments, building LEGOs and watching anime with his daughters.

Balaji Kumar Gopalakrishnan is a Principal Engineer at Amazon Finance Technology. He has been with Amazon since 2013, solving real-world challenges through technology that directly impact the lives of Amazon customers. Outside of work, Balaji enjoys hiking, painting, and spending time with his family. He is also a movie buff!

Mohit Dawar is a Senior Software Engineer at AWS working on DataZone and SageMaker Unified Studio. Over the past three years, he has led efforts around the core metadata catalog, generative AI-powered metadata curation, and lineage visualization. He enjoys working on large-scale distributed systems, experimenting with AI to improve user experience, and building tools that make data governance feel effortless. Connect with him on LinkedIn.

Mark Horta is a Software Development Manager at AWS working on DataZone and SageMaker Unified Studio. He is responsible for leading the engineering efforts for SageMaker Catalog focusing on generative-AI metadata generation and curation and data lineage.

Streamline data discovery with precise technical identifier search in Amazon SageMaker Unified Studio

Post Syndicated from Ramesh H Singh original https://aws.amazon.com/blogs/big-data/streamline-data-discovery-with-precise-technical-identifier-search-in-amazon-sagemaker-unified-studio/

We’re excited to introduce a new enhancement to the search experience in Amazon SageMaker Catalog, part of the next generation of Amazon SageMaker—exact match search using technical identifiers. With this capability, you can now perform highly targeted searches for assets such as column names, table names, database names, and Amazon Redshift schema names by enclosing search terms in a qualifier such as double quotes (" "). This yields results with exact precision, dramatically improving the speed and accuracy of data discovery.

In this post, we demonstrate how to streamline data discovery with precise technical identifier search in Amazon SageMaker Unified Studio.

Solving real-world discovery challenges

In large, enterprise-scale environments, discovering the right dataset often hinges on pinpointing specific technical identifiers. Users frequently search for exact terms like "customer_id" or "sales_summary_2023" – but conventional keyword and semantic searches often return related results, instead of the exact match.

With the new qualified search capability, entering "customer_id" will surface only those assets whose technical name matches exactly—eliminating noise, saving time, and improving confidence in discovery. Whether you’re a data analyst seeking a specific metric or a data steward validating metadata compliance, this update delivers a more precise, governed, and intuitive search experience.

Built for complex, high-scale catalogs

This feature builds on existing keyword and semantic search capabilities in SageMaker Unified Studio and adds an important layer of control for customers managing complex data catalogs with intricate naming conventions. By reducing time spent filtering partial matches and improving the relevance of results, this enhancement streamlines workflows and helps maintain metadata quality across domains.

One such customer is NatWest, a global banking leader operating across thousands of assets:

“In our complex data ecosystem, discovering the right assets quickly is paramount. In a data-driven banking environment, the new exact and partial match search capabilities in SageMaker Unified Studio have been transformative. By enabling precise discovery of critical attributes like loan IDs and party IDs across thousands of data assets, we’ve dramatically accelerated insight generation while strengthening our metadata governance. This feature cuts through complexity, reduces search time, minimizes errors, and fosters unprecedented collaboration across our data engineering, analytics, and business teams.”

— Manish Mittal, Data Marketplace Engineering Lead, NatWest

Key benefits

With this new capability, SageMaker Catalog users can:

  • Quickly locate precise data assets – Search using known technical names—like "customer_id" or "revenue_code" – to immediately surface the right datasets without sifting through irrelevant results.
  • Reduce false positives and ambiguous matches – Alleviate confusion caused by keyword or semantic searches that return loosely matched results, improving trust in the search experience.
  • Accelerate productivity across data roles – Analysts, stewards, and engineers can find what they need faster—reducing delays in reporting, validation, and development cycles.
  • Strengthen governance and compliance – Surface and validate critical naming conventions and metadata standards (for example, columns prefixed with "pii_" or "audit_" will return all column names starting with pii or audit) to support policy enforcement and audit readiness.

Example use cases

This feature can help the following roles in different use cases:

  • Data analysts – A business analyst preparing a margin analysis report searches for "profit_margin" to locate the exact field across multiple sales datasets. This reduces time-to-insight and makes sure the right metric is used in reporting.
  • Data stewards – A governance lead searches for terms like "audit_log" or "classified_pii" to confirm that all required classifications and logging conventions are in place. This helps enforce data handling policies and validate catalog health.
  • Data engineers – A platform engineer performs a search for "temp_" or "backup_" to identify and clean up unused or legacy assets created during extract, transform, and load (ETL) workflows. This supports data hygiene and infrastructure cost optimization.

Solution demo

To demonstrate the exact match filter solution, we have ingested an individual asset loaded from the TPC-DS tables and also created data product bundling of assets.

The following screenshot shows an example of the data product.

The following screenshot shows an example of the individual assets.

Next, the data analyst wants to search all assets that have customer login details. The customer login is stored as the "c_login" field in the assets.

With the technical identifier feature, the data analyst directly searches the catalog with the identifier "c_login" to get the required results, as shown in the following screenshot.

The data analyst can verify that the login information is present in the returned result.

Conclusion

The addition of precise technical identifier search in SageMaker Unified Studio reinforces a step toward enhancing data discovery and usability in complex data ecosystems. By providing search capabilities based on technical identifiers, this feature addresses the needs of diverse stakeholders, enabling them to efficiently locate the assets they require.

As data continues to grow in scale and complexity, SageMaker Unified Studio remains committed to delivering features that simplify data management, improve productivity, and enable organizations to unlock actionable insights. Start using this enhanced search capability today and experience the difference it brings to your data discovery journey.

Refer to the product documentation to learn more about how to set up metadata rules for subscription and publishing workflows.


About the Authors

Ramesh H Singh is a Senior Product Manager Technical (External Services) at AWS in Seattle, Washington, currently with the Amazon SageMaker team. He is passionate about building high-performance ML/AI and analytics products that enable enterprise customers to achieve their critical goals using cutting-edge technology. Connect with him on LinkedIn.

Pradeep Misra PicPradeep Misra is a Principal Analytics Solutions Architect at AWS. He works across Amazon to architect and design modern distributed analytics and AI/ML platform solutions. He is passionate about solving customer challenges using data, analytics, and AI/ML. Outside of work, Pradeep likes exploring new places, trying new cuisines, and playing board games with his family. He also likes doing science experiments, building LEGOs and watching anime with his daughters.

Rajat Mathur is a Software Development Manager at AWS, leading the Amazon DataZone and SageMaker Unified Studio engineering teams. His team designs, builds, and operates services which make it faster and easier for customers to catalog, discover, share, and govern data. With deep expertise in building distributed data systems at scale, Rajat plays a key role in advancing AWS’s data analytics and AI/ML capabilities.

Jie Lan is a Software Engineer at AWS based in New York, where he works on the Amazon SageMaker team. He is passionate about developing cutting-edge solutions in the big data and AI space, helping customers leverage cloud technology to solve complex problems.

Enhance data governance with enforced metadata rules in Amazon DataZone

Post Syndicated from Ramesh H Singh original https://aws.amazon.com/blogs/big-data/enhance-data-governance-with-enforced-metadata-rules-in-amazon-datazone/

We’re excited to announce a new feature in Amazon DataZone that offers enhanced metadata governance for your subscription approval process. With this update, domain owners can define and enforce metadata requirements for data consumers when they request access to data assets. By making it mandatory for data consumers to provide specific metadata, domain owners can achieve compliance, meet organizational standards, and support audit and reporting needs.

Many organizations require additional metadata from data consumers during the subscription request process to align with internal workflows and regulatory requirements. With enforced metadata rules, domain unit owners can establish consistent governance practices across all data subscriptions. For example, financial services organizations can mandate specific compliance-related metadata when data consumers request access to sensitive financial data. Similarly, healthcare providers can enforce metadata requirements to align with regulatory standards for patient data access. This feature simplifies the approval process by guiding data consumers through completing mandatory fields and enabling data owners to make informed decisions, ensuring data access requests meet organizational policies.

By streamlining metadata governance, Amazon DataZone empowers customers to meet compliance standards, maintain audit readiness, and simplify access workflows for enhanced efficiency and control. For example, one of our customers, Bristol Myers Squibb (BMS), leverages Amazon DataZone to address their specific data governance needs. Sitikantha Sarangi, Director of Data Engineering and ML Ops Platform at BMS, says:

“At BMS, our teams have been leveraging Amazon DataZone’s comprehensive data governance solution to catalog and enable secure data subscriptions across the organization within governed project environments. With the new custom metadata enforcement feature, we now can more easily navigate our data catalog. This capability allows us to set specific requirements for data consumers, such as providing a compliance certification link or detailing data usage intentions, ensuring that access requests for sensitive data are thoroughly reviewed and approved in alignment with our standards. This customization helps us more efficiently ensure we are appropriately utilizing data while facilitating efficient, secure data sharing across teams.” 

Key benefits

The feature benefits multiple stakeholders. Domain unit owners can ensure compliance by enforcing metadata requirements, granting access only after thorough reviews. Data consumers benefit from a streamlined subscription request process, guided by metadata requirements that reduce complexity. Data producers gain clarity with detailed subscription requests, enabling informed decisions aligned with required standards. Overall, the key benefits are:

  • Enhanced control for domain owners – Admins and domain unit owners can now enforce additional metadata requirements on subscription requests, making sure that data consumers supply essential information for thorough review and compliance checks
  • Custom workflow support – Organizations can build custom workflows for assets by capturing critical metadata from data consumers, such as AWS account IDs or project-specific identifiers, to fulfill access requests

In this post, we walk you through setting up and using metadata enforcement to create seamless, compliant data access workflows.

Solution overview

The solution in this post is composed of two parts. In the first part, we walk through the steps necessary to enforce metadata for subscription requests for managed assets. In the second part, we walk through the steps necessary to request subscriptions for custom assets.

Prerequisites

To follow this post, user should already have Amazon DataZone setup with respective projects to publish and consume the assets. The publisher of the Retail project must have published a shipments data asset in Amazon DataZone. The domain owner or admin must have created a metadata form required for the subscription request.

This feature also supports metadata enforcement for subscription requests of a data product. For instructions on how to set this up, refer to Amazon DataZone data products.

Solution walkthrough: Enhance data governance with enforced metadata rules for Managed Assets

To perform the solution in this post, follow the steps in the next sections.

Metadata enforcement for subscription requests

To enforce metadata for subscription requests, use the following steps.

Step 1: Domain owner configures metadata requirements

Domain unit owners can configure metadata enforcement in Amazon DataZone as follows:

  1. On the Amazon DataZone console, choose Domain to open your domain or domain unit settings.
  2. Choose dataplatform, as shown in the following screenshot.
  3. To add metadata forms for subscription requests, on the RULES tab, choose ADD, as shown in the following screenshot.
  4. Provide the name to the metadata form rule.
  5. Choose ADD ANOTHER METADATA FORM.
  6. Choose from a list of available metadata forms within the domain or domain unit. Search options make navigation straightforward.

You can select multiple forms for enforcement on subscription requests.

  1. Choose Add, as shown in the following screenshot.

Create metadata form rule as below:

  1. In the next screen, you can specify additional settings. You can apply metadata forms across all asset types or limit them to specific asset types. Additionally, choose whether the rule applies to a specific project or all projects within the domain. After the scope is defined as shown in the screenshot, choose ADD RULE.

    Note: Enable metadata enforcement across child domains, with optional permissions allowing child domains to override the parent domain’s enforced forms. This option is available while defining the scope, if the domain owner chooses All projects, as shown in the following screenshot.

Step 2: Data consumer submits subscription request

After metadata enforcement is configured, data consumers follow these steps to request access:

  1. To find and select an asset in the Amazon DataZone catalog, choose MARKETING and then sign in to the Amazon DataZone console as a data consumer. On the search bar, enter the shipments data asset, as shown in following screenshot.
  2. Choose SUBSCRIBE to open the subscription request modal, as shown in the following screenshot.
  3. Choose a project and provide a Reason for request, as shown in the following screenshot.
  4. Fill in the required metadata fields as specified by the domain unit. If mandatory fields are incomplete, they will be highlighted, and the submission will be disabled until resolved. After all the mandatory fields are entered, choose APPLY, as shown in the following screenshot.
  5. Choose Request to submit the subscription request, as shown in the following screenshot.

After submitting, an event is generated in Amazon EventBridge, which can be used in custom workflows outside of Amazon DataZone as needed.

Step 3: Data producer (owner) approves the subscription

After a data consumer submits a subscription request, they review the metadata. The data producer receives the subscription request with all metadata provided by the data consumer.

  1. Sign in to the Amazon DataZone console as a data producer. Choose RETAIL as the
  2. In the navigation pane, choose Incoming requests and find the subscription request. Choose View request, as shown in the following screenshot.
  3. Data producers can review the metadata, including document links and account IDs, to determine if the request meets compliance and workflow requirements before granting access, as shown in the following screenshot.
  4. Under Approval access, choose Full access to provide full access to data. For fine-grain access control, choose Approve with row or column filters. For this post, we choose Full access.
  5. Provide the Decision comment.
  6. Choose APPROVE, as shown in the following screenshot.

Step 4: Data consumer consumes the data

Now, data consumers follow these steps:

  1. After the subscription grants are approved and fulfilled, sign in to the Amazon DataZone console as data consumer from MARKETING project to query the subscribed data.
  2. Choose MARKETING On the Environments tab, choose Query data through Amazon Athena, as shown in the following screenshot.
  3. Query the subscribed data asset shipments in Amazon Athena, with below query and as shown in the screenshot.
    SELECT * from “env_mkt_datalake_sub_db”.“shipments” limit 10;

Solution walkthrough: Enhance data governance with enforced metadata rules for Custom Assets

Customers can manage access grants for unmanaged assets using Amazon DataZone. When a subscription to an asset in the business data catalog is approved by the data owner, Amazon DataZone publishes an event in Amazon EventBridge in the account along with all the necessary information in the payload that you can use to create the access grants between the source and the target. Using metadata enforcement for unmanaged assets, customers can provide all context in the single request.

STEP 1: Create a custom asset type

To create a custom asset type Metrics with an attached metadata form to describe the metric asset type, follow these steps:

Below is an example of a custom asset type – “Metrics” which has two fields 1/Dashboard Link and 2/Calculation

Step 2: Data producer creates a custom asset using the “Metrics” asset type

The data producer creates a Conversion Rate Metric with all metadata along with associated metadata forms by following these steps:

Below is “Conversion Rate Metric” asset created in DataZone. The highlighted boxes show that is an Unmanaged asset and of type “Metrics” that was created in the previous step.

Step 3: Domain owner configures metadata requirements

Domain unit owners can configure metadata enforcement in Amazon DataZone as follows:

  1. On the Amazon DataZone console, choose Domain to open your domain or domain unit settings.
  2. To add metadata forms for subscription requests, on the RULES tab, choose ADD, as shown in the following screenshot.
  3. To select metadata forms, provide the Name to the metadata form rule.
  4. Choose ADD METADATA FORM, as shown in the following screenshot.
  5. Remaining fields can be left as default. For this blog, please set it as shown in below
  6. In the Add metadata form pop-up, enter MetricsRequestForm, as shown in the following screenshot.

  7. Choose ADD Rule as shown above to create the rule for all metrics assets. Below is the screenshot of the rule once created.

Step 4: Admins sets up an EventBridge rule

To set up an EventBridge rule, follow these steps:

  1. Create an EventBridge rule to capture all new subscription requests. Please see the documentation Amazon DataZone events and notifications for details to setup.
  2. Create an AWS Lambda function as a target to action on the event. Please see documentation – Event bus targets in Amazon EventBridge to setup targets.

For this blog, set the below event pattern that triggers the lambda only for new Subscription requests.

{
  "source": ["aws.datazone"],
  "detail-type": ["Subscription Request Created"]
}

Step 5: Data consumer submits subscription request

After metadata enforcement is configured, data consumers follow these steps to request access:

  1. To locate the asset in the Amazon DataZone catalog, sign in to the Amazon DataZone console as a data consumer from the marketing Use the search bar to find the Conversion Rate Metric asset. Choose SUBSCRIBE, as shown in the following screenshot.
  2. Provide details, including the Metrics Request Form associated with the Metrics asset type.
  3. Choose REQUEST, as shown in the following screenshot.

You will receive notification confirming that your subscription request is submitted, as shown in the following screenshot.

For the request, EventBridge will capture the following request event and send it to the setup target:

{
    'version': '0',
    'id': '3fdf59a2-f95c-192f-0901-4025dc6e6a61',
    'detail-type': 'Subscription Request Created',
    'source': 'aws.datazone',
    'account': '1234567890', 
    'time': '2024-11-15T18:57:16Z', 
    'region': 'us-east-1', 
    'resources': [], 
    'detail': 
        {
            'version': '283',
            'internal': None,
            'metadata': 
                {'
                    id': 'cwaxxxlj', 
                    'version': '1',
                    'typeName': 'SubscriptionRequestEntityType',
                    'domain': 'dzd_xxxxxxxxx1z',
                    'user': 'd1xxxxx-eexxx-xxxx-axxxx-0xxxxxxxx8ce',
                    'awsAccountId': '1234567890', 
                    'owningProjectId': '555xxxxxxrmv', 
                    'clientToken': '3bxxxxxxxxxxc91bb76d6'
                }, 
            'data': 
                {
                    'autoApproved': False, 
                    'requesterId': 'd1xxxxx848ce',
                    'reviewerId': '54uxxxxxxd3',
                    'status': 'PENDING',
                    'subscribedListings': [{'id': '6ixxgev', 'item': {'assetListing': {'entityId': 'xxxxxxxxx7', 'entityType': 'Metrics'}}, 'ownerProjectId': '5xxxxxx3', 'version': '2'}], 
                    'subscribedPrincipals': [{'id': '555xxxxxxrmv', 'type': 'PROJECT'}]
                }
            }
}

The data steward and asset owner can get details for the request with the  GetSubscriptionRequestDetails API and view the asset details and form associated with the request:

{
    "id": "cwxxxlj",
    "createdBy": "d17xxxxxxx848ce",
    "domainId": "dzd_xxxxxxz",
    "status": "PENDING",
    "createdAt": "2024-11-15T20:26:01.014000+00:00",
    "updatedAt": "2024-11-15T20:26:01.014000+00:00",
    "requestReason": "Marketing Analytics use case",
    "subscribedPrincipals": [
        {
            "project": {
                "id": "bxxxxx23hj",
                "name": "Marketing"
            }
        }
    ],
    "subscribedListings": [
        {
            "id": "6xxxxxxx1ev",
            "revision": "2",
            "name": "Conversion Rate Metric",
            "description": "Conversion rate calculates the percentage of web visitors who complete a desired action, such as creating an account, placing an order or clicking a link",
            "item": {
                "assetListing": {
                    "entityId": "b8xxxxxd7",
                    "entityRevision": "7",
                    "entityType": "Metrics",
                    "forms": "{\n  \"DZ_Internal_Basic_Form\" : {\n    \"name\" : \"Conversion Rate Metric\",\n    \"description\" : \"Conversion rate calculates the percentage of web visitors who complete a desired action, such as creating an account, placing an order or clicking a link\"\n  },\n  \"amazonstatus\" : {\n    \"publishingPrecedence\" : \"PUBLISHED_INDIVIDUALLY\",\n    \"status\" : \"ACTIVE\"\n  },\n  \"AssetCommonDetailsForm\" : {\n    \"readMe\" : \"Conversion Rate is a key performance metric used in marketing, e-commerce, and digital analytics. It measures the percentage of users or visitors who take a desired action out of the total number of users or visitors. This desired action, known as a \\\"conversion,\\\" can vary depending on the specific goals of a business or campaign.\\n\\n\\nApplications:\\n\\n- E-commerce: Percentage of website visitors who make a purchase\\n- Marketing: Percentage of leads who become customers\\n- Digital Advertising: Percentage of ad viewers who click on an ad or complete a form\\n- Email Marketing: Percentage of email recipients who click a link or perform a desired action\\n\\n\\nImportance:\\n\\n- Measures effectiveness of marketing efforts and user experience\\n- Helps in understanding customer behavior and preferences\\n- Guides optimization efforts for websites, ads, and marketing campaigns\\n- Often used as a key metric for ROI (Return on Investment) calculations\"\n  },\n  \"MarketingMetrics\" : {\n    \"DashboardLink\" : \"www.anycompany.com/marketing/conversion_rate\",\n    \"Calculation\" : \"Conversion rate = Conversions / Total visitors x 100\"\n  },\n  \"amazonmetadata\" : {\n    \"entityVersion\" : \"7\",\n    \"createdAt\" : \"2024-11-15T16:43:15.325935428Z\",\n    \"typeNamespace\" : \"dzd_6xxxxxx1z\",\n    \"sourceCategory\" : \"asset\",\n    \"typeName\" : \"Metrics\",\n    \"entityId\" : \"byxxxxxdolk7\",\n    \"sourceEntityFormDetails\" : [ {\n      \"typeNamespace\" : \"dzd_xxxxx1z\",\n      \"typeVersion\" : \"15\",\n      \"formName\" : \"MarketingMetrics\",\n      \"typeName\" : \"MarketingMetrics\"\n    }, {\n      \"typeNamespace\" : \"amazon.datazone\",\n      \"typeVersion\" : \"10\",\n      \"formName\" : \"DZ_Internal_Basic_Form\",\n      \"typeName\" : \"NamedDataZoneBasicFormType\"\n    }, {\n      \"typeNamespace\" : \"amazon.datazone\",\n      \"typeVersion\" : \"6\",\n      \"formName\" : \"AssetCommonDetailsForm\",\n      \"typeName\" : \"AssetCommonDetailsFormType\"\n    }, {\n      \"typeNamespace\" : \"amazon.datazone.internal\",\n      \"typeVersion\" : \"1\",\n      \"formName\" : \"DZ_Internal_Rendering_Config_Form\",\n      \"typeName\" : \"RenderingConfigFormType\"\n    } ]\n  },\n  \"DZ_Internal_Rendering_Config_Form\" : {\n    \"metadataFormItems\" : [ {\n      \"formName\" : \"MarketingMetrics\",\n      \"collapse\" : false\n    }, {\n      \"formName\" : \"AssetCommonDetailsForm\",\n      \"collapse\" : false\n    } ]\n  }\n}",
                    "glossaryTerms": []
                }
            },
            "ownerProjectId": "54xxxxxd3",
            "ownerProjectName": "Custom-Metrics-Assets"
        }
    ],
    "metadataForms": [
        {
            "formName": "MetricsRequestForm",
            "typeName": "MetricsRequestForm",
            "typeRevision": "5",
            "content": "{\"BusinessUnit\": \"AWS\",\"ContactEmail\": \"[email protected]\",\"Team\": \"DataZone\"}"
        }
    ]
}

The data and asset owner can use these details to orchestrate an approval workflow using the Lambda function. After it has been validated, the asset owner or steward can then call the AcceptSubscriptionRequest API to grant access. The data consumer will be notified after access is approved. The following screenshot shows the notification that the subscription was approved.

Now that the subscription is approved, users can use the dashboard URL to access the metric.

Cleanup

To make sure no additional charges are incurred after testing, delete the Amazon DataZone domain. Refer to Delete Amazon DataZone domains for the process.

Conclusion

The new metadata enforcement rule for subscription requests in Amazon DataZone strengthens data governance by empowering domain unit owners to establish clear metadata requirements for data consumers, streamlining access requests and enhancing data governance. This feature enables organizations to align with the organization’s metadata standards, implement custom workflows, and provide a consistent, governed data access experience.

The feature is supported in all AWS Regions where Amazon DataZone is available at the time of this writing. To check which Regions are available, refer to AWS Services by Region. Check out the video below to learn more about how to set up metadata rules for subscription workflows. Get started with the technical documentation.


About the Authors

Ramesh H Singh is a Senior Product Manager Technical (External Services) at AWS in Seattle, Washington, currently with the Amazon DataZone team. He is passionate about building high-performance ML/AI and analytics products that enable enterprise customers to achieve their critical goals using cutting-edge technology. Connect with him on LinkedIn.

Pradeep Misra PicPradeep Misra is a Principal Analytics Solutions Architect at AWS. He works across Amazon to architect and design modern distributed analytics and AI/ML platform solutions. He is passionate about solving customer challenges using data, analytics, and AI/ML. Outside of work, Pradeep likes exploring new places, trying new cuisines, and playing board games with his family. He also likes doing science experiments, building LEGOs and watching anime with his daughters.

Lakshmi Nair is a Senior Analytics Specialist Solutions Architect at AWS. She specializes in designing advanced analytics systems across industries. She focuses on crafting cloud-based data platforms, enabling real-time streaming, big data processing, and robust data governance.

Santhosh Padmanabhan is a Software Development Manager at AWS, leading the Amazon DataZone engineering team. His team designs, builds, and operates services specializing in data, machine learning, and AI governance. With deep expertise in building distributed data systems at scale, Santhosh plays a key role in advancing AWS’s data governance capabilities.

Streamline AI-driven analytics with governance: Integrating Tableau with Amazon DataZone

Post Syndicated from Ramesh H Singh original https://aws.amazon.com/blogs/big-data/streamline-ai-driven-analytics-with-governance-integrating-tableau-with-amazon-datazone/

Amazon DataZone is a data management service that makes it faster and easier for customers to catalog, discover, share, and govern data stored across AWS, on premises, and from third-party sources. Amazon DataZone recently announced the expansion of data analysis and visualization options for your project-subscribed data within Amazon DataZone using the Amazon Athena JDBC driver.

Collaborating closely with our partners, we have tested and validated Amazon DataZone authentication via the Athena JDBC connection, providing an intuitive and secure connection experience for users. With this integration, you can now seamlessly query your governed data lake assets in Amazon DataZone using popular business intelligence (BI) and analytics tools, including partner solutions like Tableau.

Ali Tore, Senior Vice President of Advanced Analytics at Salesforce, highlighting the value of this integration, says

“We’re excited to partner with Amazon to bring Tableau’s powerful data exploration and AI-driven analytics capabilities to customers managing data across organizational boundaries with Amazon DataZone. This integration enables our customers to seamlessly explore data with AI in Tableau, build visualizations, and uncover insights hidden in their governed data, all while leveraging Amazon DataZone to catalog, discover, share, and govern data across AWS, on premises, and from third-party sources—enhancing both governance and decision-making.”

With this launch, Amazon DataZone strengthens its commitment to empowering enterprise customers with secure, governed access to data across the tools and platforms they rely on. For example, Guardant Health uses Amazon DataZone to democratize data access across its organization, enabling diverse teams to efficiently access, query, and analyze data tailored to their specific needs.

Rajesh Kucharlapati, Senior Director of Data, CRM, and Analytics at Guardant Health, says

“By harmonizing data across multiple business domains, we foster a culture of data sharing. Using Amazon DataZone lets us avoid building and maintaining an in-house platform, allowing our developers to focus on tailored solutions. Leveraging AWS’s managed service was crucial for us to access business insights faster, apply standardized data definitions, and tap into generative AI potential. We also needed an easy connection process for widely-used analytics tools like Tableau, DBeaver, and Domino, directly within Amazon DataZone projects. This new JDBC connectivity feature enables our governed data to flow seamlessly into these tools, supporting productivity across our teams.”

Use case

Amazon DataZone addresses your data sharing challenges and optimizes data availability. Here’s how:

  • Data product creation – As a data producer, you can create and catalog data products while enforcing governance, making your data findable, accessible, interoperable, and reusable (FAIR).
  • Streamlined access – As a data consumer, you can easily locate and subscribe to data from multiple sources within a single project. You can analyze this data using a variety of tools, including built-in AWS options such as Amazon Athena, Amazon Redshift, and Amazon SageMaker.
  • Integration with partner tools – The addition of support for partner analytics tools offers you greater flexibility and efficiency in your workflows. You can now use your tool of choice, including Tableau, to quickly derive business insights from your data while using standardized definitions and decentralized ownership. Refer to the detailed blog post on how you can use this to connect through various other tools.

Prerequisites

To get started, complete these steps:

  1. Download and install the latest Athena JDBC driver for Tableau.
  2. Copy the JDBC connection string from the Amazon DataZone portal into the JDBC connection configuration to establish a connection from Tableau. This will direct you to authenticate using single sign-on with your corporate credentials.

When you’re connected, you can query, visualize, and share data—governed by Amazon DataZone—within Tableau.

The following diagram shows the high-level architecture of the Tableau integration.

Solution walkthrough: Configure Tableau to access project-subscribed data assets

To configure Tableau to access project-subscribed data assets, follow these detailed steps:

  1. Download the latest Athena driver. If Tableau has the Athena driver preinstalled, it could be the older (v2) version. To confirm compatibility with Amazon DataZone, you’ll need the latest (v3) driver that includes the necessary authentication features. To download the latest JDBC driver version x, visit Athena JDBC 3.x driver.
  2. Install the driver. Copy the JDBC driver file to the appropriate folder for your operating system:
    • For macOS: ~/Library/Tableau/Drivers
    • For Windows: C:\Program Files\Tableau\Drivers
  3. On the Amazon DataZone console, select your project, as shown in the following screenshot of DataZone Console.
  4. To capture the JDBC connection parameters, follow these steps:
    1. On the project page, review the connection options under ANALYTICS TOOLS. Choose Connect with JDBC.
    2. In the JDBC parameters dialog box, select Using IDC auth and copy the JDBC URL. Optionally, you can use Using IAM auth to connect with your Amazon DataZone project as an AWS Identity and Access Management (IAM) role (from a server), provided that you are added as a project member within that project. The following screenshot shows the dialog box.
  5. To configure the Tableau desktop for connection, follow these steps:
    1. On the To a Server connection menu, select Other Databases (JDBC).
    2. Paste the copied JDBC URL into the URL field, leaving the other fields (Dialect, Username, Password) unchanged.
  6. To sign in with single sign-on, choose Sign in, as shown in the following screenshot. You’ll be redirected to authenticate with AWS IAM Identity Center. Use the credentials for your AWS single sign-on account.
  7. After you’re signed in, you’ll be prompted to authorize the DataZoneAuthPlugin. Choose Allow access to authorize access to Amazon DataZone from Tableau, as shown in the following screenshot.
  8. After the connection is established, a success message will appear, as shown in the following screenshot.

You can now view your project’s subscribed data directly within Tableau and build dashboards.

Conclusion

Amazon DataZone continues to expand its offerings, providing you with more flexibility in how you access, analyze, and visualize your subscribed data. With support for the Athena JDBC driver, you can now use a wide range of popular BI and analytics tools including Tableau, making governed data within Amazon DataZone more accessible than ever before.

In this post, you learned how the recent enhancements in Amazon DataZone facilitate a seamless connection with Tableau. By integrating Tableau with the comprehensive data governance capabilities of Amazon DataZone, we’re empowering data consumers to quickly and seamlessly explore and analyze their governed data. This integration helps organizations break down silos, foster collaboration, and make informed decisions, all while maintaining the security and control needed in today’s complex, distributed data landscape.

The feature is supported in all AWS commercial Regions where Amazon DataZone is currently available. Check out the video below and the detailed blog post to learn how to connect Amazon DataZone to external analytics tools via JDBC. Get started with our technical documentation.

Related blog posts


About the Authors

Ramesh H Singh is a Senior Product Manager Technical (External Services) at AWS in Seattle, Washington, currently with the Amazon DataZone team. He is passionate about building high-performance ML/AI and analytics products that enable enterprise customers to achieve their critical goals using cutting-edge technology. Connect with him on LinkedIn.

Adiascar Cisneros is a Tableau Senior Product Manager based in Atlanta, GA. He focuses on the integration of the Tableau Platform with AWS services to amplify the value users get from our products and accelerate their journey to valuable, actionable insights. His background includes analytics, infrastructure, network security, and migrations. Follow him on LinkedIn.

Joel Farvault is Principal Specialist SA Analytics for AWS with 25 years’ experience working on enterprise architecture, data governance and analytics, mainly in the financial services industry. Joel has led data transformation projects on fraud analytics, claims automation, and Master Data Management. He leverages his experience to advise customers on their data strategy and technology foundations.

Yogesh Dhimate is a Sr. Partner Solutions Architect at AWS, leading technology partnership with Tableau. Prior to joining AWS, Yogesh worked with leading companies including Salesforce driving their industry solution initiatives. With over 20 years of experience in product management and solutions architecture Yogesh brings unique perspective in cloud computing and artificial intelligence.

Ariana Rahgozar is a Sr. Senior Solutions Architect at AWS, leading customers design and implement technical solutions as part of their cloud journey.

Expanding data analysis and visualization options: Amazon DataZone now integrates with Tableau, Power BI, and more

Post Syndicated from Ramesh H Singh original https://aws.amazon.com/blogs/big-data/expanding-data-analysis-and-visualization-options-amazon-datazone-now-integrates-with-tableau-power-bi-and-more/

Amazon DataZone  now launched authentication supports through the  Amazon Athena JDBC driver, allowing data users to seamlessly query their subscribed data lake assets via popular business intelligence (BI) and analytics tools like Tableau, Power BI, Excel, SQL Workbench, DBeaver, and more. This integration empowers data users to access and analyze governed data within Amazon DataZone using familiar tools, boosting both productivity and flexibility.

Customers use Amazon DataZone to streamline data access and governance by enabling data users to locate and subscribe to data from multiple sources within a single project. Amazon DataZone natively integrates with Amazon-specific options like Amazon Athena, Amazon Redshift, and Amazon SageMaker, allowing users to analyze their project governed data. With this launch of JDBC connectivity, Amazon DataZone expands its support for data users, including analysts and scientists, allowing them to work in their preferred environments—whether it’s SQL Workbench, Domino, or Amazon-native solutions—while ensuring secure, governed access within Amazon DataZone.

Collaborating closely with our partners, we have tested and validated Amazon DataZone authentication via the Athena JDBC connection, providing an intuitive and secure connection experience for users. With this integration, you can now seamlessly query your governed data lake assets in Amazon DataZone using popular business intelligence (BI) and analytics tools, including partner solutions like Tableau.

Ali Tore, Senior Vice President of Advanced Analytics at Salesforce, highlighting the value of this integration, says

“We’re excited to partner with Amazon to bring Tableau’s powerful data exploration and AI-driven analytics capabilities to customers managing data across organizational boundaries with Amazon DataZone. This integration enables our customers to seamlessly explore data with AI in Tableau, build visualizations, and uncover insights hidden in their governed data, all while leveraging Amazon DataZone to catalog, discover, share, and govern data across AWS, on premises, and from third-party sources—enhancing both governance and decision-making.”

With this launch, Amazon DataZone strengthens its commitment to empowering enterprise customers with secure, governed access to data across the tools and platforms they rely on. For example, Guardant Health uses Amazon DataZone to democratize data access across its organization, enabling diverse teams to efficiently access, query, and analyze data tailored to their specific needs.

Rajesh Kucharlapati, Senior Director of Data, CRM, and Analytics at Guardant Health, says

“By harmonizing data across multiple business domains, we foster a culture of data sharing. Using Amazon DataZone lets us avoid building and maintaining an in-house platform, allowing our developers to focus on tailored solutions. Leveraging AWS’s managed service was crucial for us to access business insights faster, apply standardized data definitions, and tap into generative AI potential. We also needed an easy connection process for widely-used analytics tools like Tableau, DBeaver, and Domino, directly within Amazon DataZone projects. This new JDBC connectivity feature enables our governed data to flow seamlessly into these tools, supporting productivity across our teams.”

Getting started

To get started, download and install the latest Athena JDBC driver for your tool of choice. After installation, copy the JDBC connection string from the Amazon DataZone portal into the JDBC connection configuration to establish a connection from your tool. This will direct you to authenticate using single sign-on (SSO) with your corporate credentials. After connecting, you can query, visualize, and share data—governed by Amazon DataZone—within the tools you already know and trust.

In this post, we’ll guide you through connecting various analytics tools to Amazon DataZone using the Athena JDBC driver, enabling seamless access to your subscribed data within your Amazon DataZone projects.

Solution overview

To demonstrate these capabilities, consider a use case where your marketing team wants to drive a campaign that’s focused on product adoption. To achieve this, you need access to sales orders, shipment details, and customer data owned by the retail team. The retail team, acting as the data producer, publishes the necessary data assets to Amazon DataZone, allowing you, as a consumer, to discover and subscribe to these assets.

After the subscription is approved, the data assets become available within your marketing team’s project environment in Amazon DataZone. You can then use your preferred tool (for example, DBeaver, as shown in the following diagram) to perform data exploration.

Prerequisites

To follow along with this post, you need to have the following prerequisites in place:

  1. AWS account – You must have an active AWS account. If you don’t have one, see How do I create and activate a new AWS account?.
  2. Amazon DataZone resources – You need a domain for Amazon DataZone, an Amazon DataZone project, and a new Amazon DataZone project environment (DefaultDataLake environment with a DataLakeProfile).
  3. Publish data assets – As the data producer from the retail team, you must ingest individual data assets into Amazon DataZone. For this use case, create a data source and import the technical metadata of four data assets—customers, order_items, orders, products, reviews, and shipments—from AWS Glue Data Catalog. Ensure the data assets are enriched with business descriptions and published to the catalog.
  4. Subscribe data assets – As a data analyst from the marketing team, you must discover and subscribe to the data assets. The data producer from the retail team will review and approve your subscription. Upon successful fulfillment, the data assets will be added to your data lake environment. For detailed subscription instructions, see the Amazon DataZone User Guide.

The following figure shows the subscribed assets added to the data lake environment in your marketing project.

In the following sections, we will walk you through the steps to configure DBeaver to consume the subscribed assets from Amazon DataZone.

Configuring DBeaver to access subscribed data assets

In this section, you configure DBeaver to access the subscribed assets from the Marketing project

To configure DBeaver:

  1. Connect with JDBC: In the Amazon DataZone portal, navigate to the Marketing project, select the Environments tab and select Connect with JDBC.
    1. Select Marketing from the list in the top navigation are.
    2. Choose Environments
    3. Select Connect with JDBC.

  1. A new screen will display the JDBC connection parameters. Make sure to capture these details for configuring the database connection in DBeaver, including the JDBC URL, Domain ID, Environment ID, Region, and IDC Issuer URL.
  2. Download and install the latest Athena driver:
    • If DBeaver has the Athena driver pre-installed, it might be the older (v2) version. To ensure compatibility with Amazon DataZone, you need the latest driver (v3), which includes the necessary authentication features.
    • Download the latest JDBC driver—version 3.x.
    • To install the latest driver:
      • Go to Database and then to Driver Manager in DBeaver.
      • Select the Athena driver and choose Edit.
      • Choose Download to fetch the latest driver version.
      • If prompted, select the appropriate version and confirm the download.
  1. In the DBeaver SQL client, create a new database connection and select the Athena driver.
  2. In the Driver Properties section, enter the parameters that you captured from Amazon DataZone:
    • CredentialsProvider: The credentials provider to authenticate requests to AWS
    • DataZoneDomainId: The ID of your Amazon DataZone domain
    • DataZoneDomainRegion: The AWS Region where your domain is hosted.
    • DataZoneEnvironmentId: The ID of your DefaultDataLake environment.
    • IdentityCenterIssuerUrl: The issuer URL used by AWS IAM Identity Center for token issuance.
    • OutputLocation: Amazon S3 path for storing query results.
    • Region: The Region where the environment is created.
    • Workgroup: Amazon Athena workgroup of the environment.

  1. Choose Test connection.
  2. You will be redirected to the IAM Identity Center sign-in portal. Sign in with your credentials. If you’re already signed in through single sign-on (SSO), this step will be skipped.
  3. After you sign in, you will be prompted to authorize the DataZoneAuthPlugin. Choose Allow access to authorize access to Amazon DataZone from DBeaver.
  4. After the connection is established, a success message will appear as shown in the screenshot
  5. You can now view and query all subscribed assets directly within DBeaver.

These steps might also apply to other analytics tools and clients that support JDBC connections. If you’re using a different tool, you might need to adapt these instructions accordingly to ensure proper configuration and access to Amazon DataZone data assets.

Integration with other applications

You can use similar steps for other BI and analytics tools that support standard database connections.

Connect to Tableau Desktop

Use the Athena JDBC driver to connect Tableau to Amazon DataZone and visualize your subscribed data.

To connect to Tableau Desktop:

  1. Make sure that you’re using the latest Athena JDBC 3.x driver.
  2. Copy the JDBC driver file and place it in the appropriate folders for your operating system
    • For Mac OS: ~/Library/Tableau/Drivers
    • For Windows: C:\Program Files\Tableau\Drivers 
  3. Open Tableau Desktop. From the To a Server connection menu, select Other Databases (JDBC) to connect to Amazon DataZone.
  4. Paste the JDBC connection string you copied from the DataZone portal into the URL Leave other fields such as Dialect, Username, and Password blank and choose Sign in.
  5. This will redirect you to authenticate with IAM Identity Center. Enter the credentials of the Identity Center user that you used to sign in to the DataZone portal. Authorize the DataZoneAuthPlugin to access Amazon DataZone from Tableau. Once the connection is established with the success message, you now view your project’s subscribed data directly within Tableau and build dashboards.

See the Amazon DataZone and Tableau blog post for step-by-step instructions.

Connect to Microsoft Power BI

Now, let’s look at connecting Amazon DataZone with Microsoft Power BI on Windows.

While Amazon Athena provides a native ODBC driver for connecting to ODBC-compatible tools like Microsoft Power BI, it currently doesn’t support Amazon DataZone authentication. Therefore, in this post, we will use an ODBC-JDBC bridge to connect Amazon DataZone with Microsoft Power BI using the Athena JDBC driver, which supports DataZone authentication.

In this post, we’re using the ZappySys driver as the ODBC-JDBC bridge. This is a third-party solution that requires a separate licensing fee, which isn’t included in the AWS solution. You can choose to use any other solution for ODBC-JDBC bridge.

To connect to Power BI:

  1. Make sure that you have administrator privileges to run the ODBC Data Source Administrator.
  2. From the Windows Start menu, run the ODBC Data Source Administrator (the 64-bit version) using run as Administrator.
  3. Create a New Data Source with the ZappySys JDBC Bridge Driver. You will be prompted to enter your connection details.
  4. Paste the JDBC URL you copied from the DataZone portal in the Connection String, along with the driver class and JDBC driver file. Make sure that you’re using the latest Athena JDBC 3.x driver.
  5. Choose Test Connection. A new dialog window will pop up after the connection is successful.
  6. After configuring the data source, launch Power BI. Create a blank report or use an existing report to integrate the new visuals. Choose Get Data and select the name of the data source you created. This will open a new browser window to authenticate your credentials. Allow access to authorize the DataZone plugin. After authorization is complete, you can build your reports in Microsoft Power BI with the subscribed data assets.

Connect to SQL Workbench

Discover how SQL Workbench can connect to Amazon DataZone for users who prefer a SQL interface to query data lake tables and views subscribed through projects in Amazon DataZone.

To connect to SQL Workbench

  1. Make sure that you’re using the latest Athena JDBC 3.x driver.
  2. Open SQL Workbench/J and choose Manage Drivers.
  3. Select the option to add a new driver. Enter a name for it, such as DatazoneAthenaJDBC, and import the driver you downloaded in the previous steps.
  4. Create a new connection and enter a name it, such as datazone-profile. In the Driver option, select the driver you configured.
  5. For the URL, enter the string jdbc:athena://region=us-east-1; (In the example, the Virginia Region is being used). Choose Extended Properties.
  6. Under Extended Properties, add the following parameters that you copied from the DataZone portal and choose OK. You can also include these parameters in the JDBC (URL) connection string.

    1. The parameters to add are:
      • Workgroup
      • DataZoneEndpointOverride
      • OutputLocation
      • DataZoneDomainId
      • IdentityCenterIssuerURL
      • CredentialsProvider
      • DatazoneEnvironmentId
      • DataZoneDomainRegain

  1. You will be prompted to sign in and authenticate. Allow access and authorization to Amazon DataZone.
  2. After successful connection, in SQL Workbench/J, under Database Explorer, select the desired database. For example, select the database that has access to the subscribed data asset orders. Select the data asset and execute the query.

Cleanup

To ensure no additional charges are incurred after testing, be sure to delete the Amazon DataZone domain. See Delete Amazon DataZone domains for instructions.

Conclusion

Amazon DataZone continues to expand its offerings, providing you with more flexibility to access, analyze, and visualize your subscribed data. With support for the Athena JDBC driver, you can now use a wide range of popular BI and analytics tools, making data accessed through Amazon DataZone more accessible than ever before. Whether you’re using Tableau, Power BI, or other familiar tools, the integration with Amazon DataZone ensures that your data remains secure and accessible to authorized users.

The feature is supported in all AWS commercial Regions where Amazon DataZone is currently available. Watch the video below to learn how to connect Amazon DataZone to external analytics tools via JDBC. Get started with our technical documentation.


About the Authors

Ramesh H Singh is a Senior Product Manager Technical (External Services) at AWS in Seattle, Washington, currently with the Amazon DataZone team. He is passionate about building high-performance ML/AI and analytics products that enable enterprise customers to achieve their critical goals using cutting-edge technology. Connect with him on LinkedIn.

Eric Fleishman is a software engineer at AWS in Seattle. He loves diving into cloud technology and solving complex problems to build impactful solutions. Outside of work, he is all about staying active—whether its snowboarding down the slopes or working out. He enjoys pushing his limits and embracing new challenges.

Theo Tolv is a Senior Analytics Architect based in Stockholm, Sweden. He’s worked with small and big data for most of his career, and has built applications running on AWS since 2008. In his spare time he likes to tinker with electronics and read space opera.

Joel Farvault is Principal Specialist SA Analytics for AWS with 25 years’ experience working on enterprise architecture, data governance and analytics, mainly in the financial services industry. Joel has led data transformation projects on fraud analytics, claims automation, and Master Data Management. He leverages his experience to advise customers on their data strategy and technology foundations.

Lakshmi Nair is a Senior Analytics Specialist Solutions Architect at AWS. She specializes in designing advanced analytics systems across industries. She focuses on crafting cloud-based data platforms, enabling real-time streaming, big data processing, and robust data governance.

Fabricio Hamada is a Senior Data Strategy Solutions Architect at AWS.

Lionel Pulickal is Sr. Solutions Architect at AWS