Post Syndicated from Rana Dutt original https://aws.amazon.com/blogs/big-data/publish-and-enrich-real-time-financial-data-feeds-using-amazon-msk-and-amazon-managed-service-for-apache-flink/
Financial data feeds are real-time streams of stock quotes, commodity prices, options trades, or other real-time financial data. Companies involved with capital markets such as hedge funds, investment banks, and brokerages use these feeds to inform investment decisions.
Financial data feed providers are increasingly being asked by their customers to deliver the feed directly to them through the AWS Cloud. That’s because their customers already have infrastructure on AWS to store and process the data and want to consume it with minimal effort and latency. In addition, the AWS Cloud’s cost-effectiveness enables even small and mid-size companies to become financial data providers. They can deliver and monetize data feeds that they have enriched with their own valuable information.
An enriched data feed can combine data from multiple sources, including financial news feeds, to add information such as stock splits, corporate mergers, volume alerts, and moving average crossovers to a basic feed.
In this post, we demonstrate how you can publish an enriched real-time data feed on AWS using Amazon Managed Streaming for Kafka (Amazon MSK) and Amazon Managed Service for Apache Flink. You can apply this architecture pattern to various use cases within the capital markets industry; we discuss some of those use cases in this post.
Apache Kafka is a high-throughput, low-latency distributed event streaming platform. Financial exchanges such as Nasdaq and NYSE are increasingly turning to Kafka to deliver their data feeds because of its exceptional capabilities in handling high-volume, high-velocity data streams.
Amazon MSK is a fully managed service that makes it easy for you to build and run applications on AWS that use Kafka to process streaming data.
Apache Flink is an opensource distributed processing engine, offering powerful programming interfaces for both stream and batch processing, with first-class support for stateful processing, event time semantics, checkpointing, snapshots and rollback. Apache Flink supports multiple programming languages, Java, Python, Scala, SQL, and multiple APIs with different level of abstraction, which can be used interchangeably in the same application.
Amazon Managed Service for Apache Flink is a fully managed, serverless experience in running Apache Flink applications. Customers can easily build real time Flink applications using any of Flink’s languages and APIs.
In this post, we use a real-time stock quotes feed from financial data provider Alpaca and add an indicator when the price moves above or below a certain threshold. The code provided in the GitHub repo allows you to deploy the solution to your AWS account. This solution was built by AWS Partner NETSOL Technologies.
Solution overview
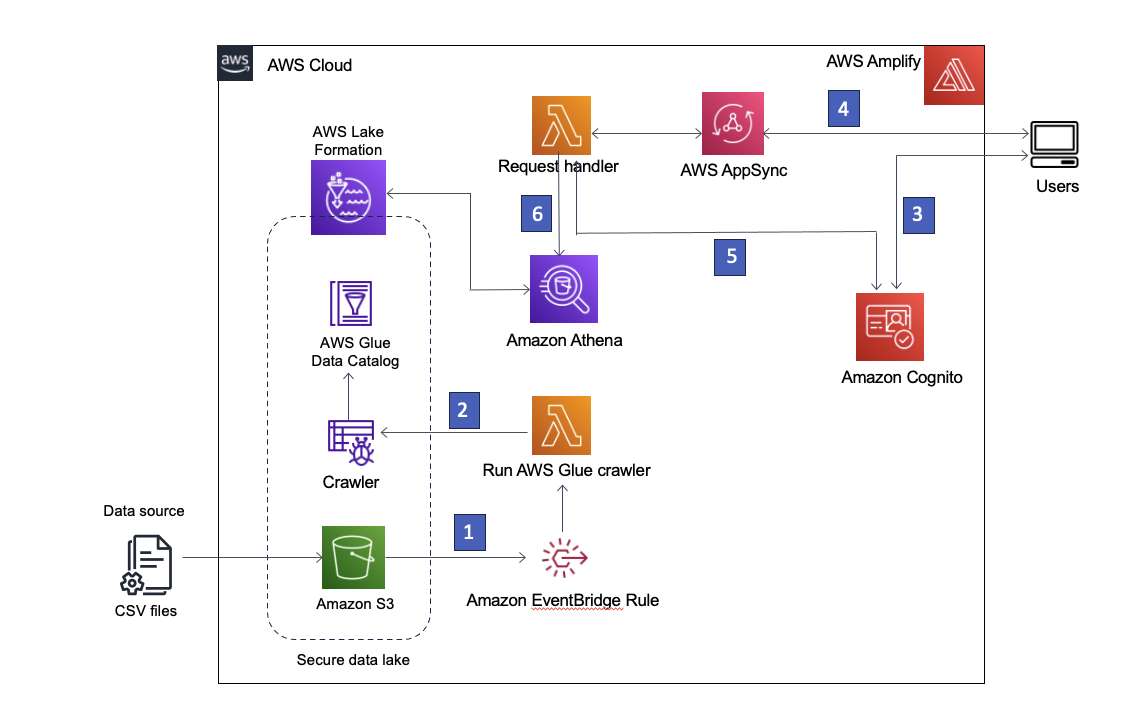
In this solution, we deploy an Apache Flink application that enriches the raw data feed, an MSK cluster that contains the messages streams for both the raw and enriched feeds, and an Amazon OpenSearch Service cluster that acts as a persistent data store for querying the data. In a separate virtual private cloud (VPC) that acts as the customer’s VPC, we also deploy an Amazon EC2 instance running a Kafka client that consumes the enriched data feed. The following diagram illustrates this architecture.

Figure 1 – Solution architecture
The following is a step-by-step breakdown of the solution:
- The EC2 instance in your VPC is running a Python application that fetches stock quotes from your data provider through an API. In this case, we use Alpaca’s API.
- The application sends these quotes using Kafka client library to your kafka topic on MSK cluster. The kafka topic stores the raw quotes.
- The Apache Flink application takes the Kafka message stream and enriches it by adding an indicator whenever the stock price rises or declines 5% or more from the previous business day’s closing price.
- The Apache Flink application then sends the enriched data to a separate Kafka topic on your MSK cluster.
- The Apache Flink application also sends the enriched data stream to Amazon OpenSearch using a Flink connector for OpenSearch. Amazon Opensearch stores the data, and OpenSearch Dashboards allows applications to query the data at any point in the future.
- Your customer is running a Kafka consumer application on an EC2 instance in a separate VPC in their own AWS account. This application uses AWS PrivateLink to consume the enriched data feed securely, in real time.
- All Kafka user names and passwords are encrypted and stored in AWS Secrets Manager. The SASL/SCRAM authentication protocol used here makes sure all data to and from the MSK cluster is encrypted in transit. Amazon MSK encrypts all data at rest in the MSK cluster by default.
The deployment process consists of the following high-level steps:
- Launch the Amazon MSK cluster, Apache Flink application, Amazon OpenSearch Service domain, and Kafka producer EC2 instance in the producer AWS account. This step usually completes within 45 minutes.
- Set up multi-VPC connectivity and SASL/SCRAM authentication for the MSK cluster. This step can take up to 30 minutes.
- Launch the VPC and Kafka consumer EC2 instance in the consumer account. This step takes about 10 minutes.
Prerequisites
To deploy this solution, complete the following prerequisite steps:
- Create an AWS account if you don’t already have one and log in. We refer to this as the producer account.
- Create an AWS Identity and Access Management (IAM) user with full admin permissions. For instructions, refer to Create an IAM user.
- Sign out and sign back in to the AWS Management Console as this IAM admin user.
- Create an EC2 key pair named my-ec2-keypair in the producer account. If you already have an EC2 key pair, you can skip this step.
- Follow the instructions in ALPACA_README to sign up for a free Basic account at Alpaca to get your Alpaca API key and secret key. Alpaca will provide the real-time stock quotes for our input data feed.
- Install the AWS Command Line Interface (AWS CLI) on your local development machine and create a profile for the admin user. For instructions, see Set up the AWS Command Line Interface (AWS CLI).
- Install the latest version of the AWS Cloud Development Kit (AWS CDK) globally:
Deploy the Amazon MSK cluster
These steps create a new provider VPC and launch the Amazon MSK cluster there. You also deploy the Apache Flink application and launch a new EC2 instance to run the application that fetches the raw stock quotes.
- On your development machine, clone the GitHub repo and install the Python packages:
- Set the following environment variables to specify your producer AWS account number and AWS Region:
- Run the following commands to create your
config.pyfile: - Run the following commands to create your
alpaca.conffile: - Edit the
alpaca.conffile and replaceyour_api_keyandyour_secret_keywith your Alpaca API key. - Bootstrap the environment for the producer account:
- Using your editor or integrated development environment (IDE), edit the
config.pyfile:- Update the
mskCrossAccountIdparameter with your AWS producer account number. - If you have an existing EC2 key pair, update the producerEc2KeyPairName parameter with the name of your key pair.
- Update the
- View the
dataFeedMsk/parameters.pyfile:- If you are deploying in a Region other than us-east-1, update the Availability Zone IDs
az1andaz2accordingly. For example, the Availability Zones forus-west-2wouldus-west-2aandus-west-2b. - Make sure that the
enableSaslScramClientAuth,enableClusterConfig, andenableClusterPolicyparameters in theparameters.pyfile are set to False.
- If you are deploying in a Region other than us-east-1, update the Availability Zone IDs
- Make sure you are in the directory where the
app1.pyfile is located. Then deploy as follows: - Check that you now have an Amazon Simple Storage Service (Amazon S3) bucket whose name starts with
awsblog-dev-artifactscontaining a folder with some Python scripts and the Apache Flink application JAR file.
Deploy multi-VPC connectivity and SASL/SCRAM
Complete the following steps to deploy multi-VPC connectivity and SASL/SCRAM authentication for the MSK cluster:
- Set the
enableSaslScramClientAuth,enableClusterConfig, andenableClusterPolicyparameters in theconfig.pyfile to True. - Make sure you’re in the directory where the
config.pyfile is located and deploy the multi-VPC connectivity and SASL/SCRAM authentication for the MSK cluster:
cdk deploy --all --app "python app1.py" --profile {your_profile_name}
This step can take up to 30 minutes.
- To check the results, navigate to your MSK cluster on the Amazon MSK console, and choose the Properties
You should see PrivateLink turned on, and SASL/SCRAM as the authentication type.

- Copy the MSK cluster ARN.
- Edit your
config.pyfile and enter the ARN as the value for themskClusterArnparameter, then save the updated file.
Deploy the data feed consumer
Complete the steps in this section to create an EC2 instance in a new consumer account to run the Kafka consumer application. The application will connect to the MSK cluster through PrivateLink and SASL/SCRAM.
- Navigate to Parameter Store, a capability of AWS Systems Manager, in your producer account.
- Copy the value of the blogAws-dev-mskConsumerPwd-ssmParamStore parameter and update the mskConsumerPwdParamStoreValue parameter in the config.py file.
- Check the value of the parameter named blogAws-dev-getAzIdsParamStore and make a note of these two values.
- Create another AWS account for the Kafka consumer if you don’t already have one, and log in.
- Create an IAM user with admin permissions.
- Log out and log back in to the console using this IAM admin user.
- Make sure you are in the same Region as the Region you used in the producer account. Then create a new EC2 key pair named, for example,
my-ec2-consumer-keypair, in this consumer account. - Update the value of consumerEc2KeyPairName in your
config.pyfile with the name of the key pair you just created. - Open the AWS Resource Access Manager (AWS RAM) console in your consumer account.
- Compare the Availability Zone IDs from the Systems Manager parameter store with the Availability Zone IDs shown on the AWS RAM console.
- Identify the corresponding Availability Zone names for the matching Availability Zone IDs.
- Open the parameters.py file in the dataFeedMsk folder and insert these Availability Zone names into the variables crossAccountAz1 and crossAccountAz2. For example, in Parameter Store, if the values are “use1-az4” and “use1-az6”, then, when you switch to the consumer account’s AWS RAM console and compare, you may find that these values correspond to the Availability Zone names “us-east-1a” and “us-east-1b”. In that case, you need to update the parameters.py file with these Availability Zone names by setting crossAccountAz1 to “us-east-1a” and crossAccountAz2 to “us-east-1b”.
- Set the following environment variables, specifying your consumer AWS account ID:
- Bootstrap the consumer account environment. You need to add specific policies to the AWS CDK role in this case.
You now need to grant the consumer account access to the MSK cluster.
- On the console, copy the consumer AWS account number to your clipboard.
- Sign out and sign back in to your producer AWS account.
- On the Amazon MSK console, navigate to your MSK cluster.
- Choose Properties and scroll down to Security settings.
- Choose Edit cluster policy and add the consumer account root to the Principal section as follows, then save the changes:
- Create the IAM role that needs to be attached to the EC2 consumer instance:
- Deploy the consumer account infrastructure, including the VPC, consumer EC2 instance, security groups, and connectivity to the MSK cluster:
Run the applications and view the data
Now that we have the infrastructure up, we can produce a raw stock quotes feed from the producer EC2 instance to the MSK cluster, enrich it using the Apache Flink application, and consume the enriched feed from the consumer application through PrivateLink. For this post, we use the Flink DataStream Java API for the stock data feed processing and enrichment. We also use Flink aggregations and windowing capabilities to identify insights in a certain time window.
Run the managed Flink application
Complete the following steps to run the managed Flink application:
- In your producer account, open the Amazon Managed Service for Apache Flink console and navigate to your application.
- To run the application, choose Run, select Run with latest snapshot, and choose Run.

- When the application changes to the Running state, choose Open Apache Flink dashboard.

You should see your application under Running Jobs.

Run the Kafka producer application
Complete the following steps to run the Kafka producer application:
- On the Amazon EC2 console, locate the IP address of the producer EC2 instance named
awsblog-dev-app-kafkaProducerEC2Instance. - Connect to the instance using SSH and run the following commands:
You need to start the script during market open hours. This will run the script that creates a connection to the Alpaca API. You should see lines of output showing that it is making the connection and subscribing to the given ticker symbols.
View the enriched data feed in OpenSearch Dashboards
Complete the following steps to create an index pattern to view the enriched data in your OpenSearch dashboard:
- To find the master user name for OpenSearch, open the
config.pyfile and locate the value assigned to the openSearchMasterUsername parameter. - Open Secrets Manager and click on awsblog-dev-app-openSearchSecrets secret to retrieve the password for OpenSearch.
- Navigate to your OpenSearch console and find the URL to your OpenSearch dashboard by clicking on the domain name for your OpenSearch cluster. Click on the URL and sign in using your master user name and password.
- In the OpenSearch navigation bar on the left, select Dashboards Management under the Management section.
- Choose Index patterns, then choose Create index pattern.
- Enter
amzn*in the Index pattern name field to match the AMZN ticker, then choose Next step.

- Select timestamp under Time field and choose Create index pattern.
- Choose Discover in the OpenSearch Dashboards navigation pane.
- With amzn selected on the index pattern dropdown, select the fields to view the enriched quotes data.

The indicator field has been added to the raw data by Amazon Managed Service for Apache Flink to indicate whether the current price direction is neutral, bullish, or bearish.

Run the Kafka consumer application
To run the consumer application to consume the data feed, you first need to get the multi-VPC brokers URL for the MSK cluster in the producer account.
- On the Amazon MSK console, navigate to your MSK cluster and choose View client information.
- Copy the value of the Private endpoint (multi-VPC).

- SSH to your consumer EC2 instance and run the following commands:

You should then see lines of output for the enriched data feed like the following:
In the output above, no significant changes are happening to the stock prices, so the indicator shows “Neutral”. The Flink application determines the appropriate sentiment based on the stock price movement.
Additional financial services use cases
In this post, we demonstrated how to build a solution that enriches a raw stock quotes feed and identifies stock movement patterns using Amazon MSK and Amazon Managed Service for Apache Flink. Amazon Managed Service for Apache Flink offers various features such as snapshot, checkpointing, and a recently launched Rollback API. These features allow you to build resilient real-time streaming applications.
You can apply this approach to a variety of other use cases in the capital markets domain. In this section, we discuss other cases in which you can use the same architectural patterns.
Real-time data visualization
Using real-time feeds to create charts of stocks is the most common use case for real-time market data in the cloud. You can ingest raw stock prices from data providers or exchanges into an MSK topic and use Amazon Managed Service for Apache Flink to display the high price, low price, and volume over a period of time. This is known as aggregates and is the foundation for displaying candlestick bar graphs. You can also use Flink to determine stock price ranges over time.

Stock implied volatility
Implied volatility (IV) is a measure of the market’s expectation of how much a stock’s price is likely to fluctuate in the future. IV is forward-looking and derived from the current market price of an option. It is also used to price new options contracts and is sometimes referred to as the stock market’s fear gauge because it tends to spike higher during market stress or uncertainty. With Amazon Managed Service for Apache Flink, you can consume data from a securities feed that will provide current stock prices and combine this with an options feed that provides contract values and strike prices to calculate the implied volatility.
Technical indicator engine
Technical indicators are used to analyze stock price and volume behavior, provide trading signals, and identify market opportunities, which can help in the decision-making process of trading. Although implied volatility is a technical indicator, there are many other indicators. There can be simple indicators such as “Simple Moving Average” that represent a measure of trend in a specific stock price based on the average of price over a period of time. There are also more complex indicators such as Relative Strength Index (RSI) that measures the momentum of a stock’s price movement. RSI is a mathematical formula that uses the exponential moving average of upward movements and downward movements.
Market alert engine
Graphs and technical indicators aren’t the only tools that you can use to make investment decisions. Alternative data sources are important, such as ticker symbol changes, stock splits, dividend payments, and others. Investors also act on recent news about the company, its competitors, employees, and other potential company-related information. You can use the compute capacity provided by Amazon Managed Service for Apache Flink to ingest, filter, transform, and correlate the different data sources to the stock prices and create an alert engine that can recommend investment actions based on these alternate data sources. Examples can range from invoking an action if dividend prices increase or decrease to using generative artificial intelligence (AI) to summarize several correlated news items from different sources into a single alert about an event.
Market surveillance
Market surveillance is the monitoring and investigation of unfair or illegal trading practices in the stock markets to maintain fair and orderly markets. Both private companies and government agencies conduct market surveillance to uphold rules and protect investors.
You can use Amazon Managed Service for Apache Flink streaming analytics as a powerful surveillance tool. Streaming analytics can detect even subtle instances of market manipulation in real time. By integrating market data feeds with external data sources, such as company merger announcements, news feeds, and social media, streaming analytics can quickly identify potential attempts at market manipulation. This allows regulators to be alerted in real time, enabling them to take prompt action even before the manipulation can fully unfold.
Markets risk management
In fast-paced capital markets, end-of-day risk measurement is insufficient. Firms need real-time risk monitoring to stay competitive. Financial institutions can use Amazon Managed Service for Apache Flink to compute intraday value-at-risk (VaR) in real time. By ingesting market data and portfolio changes, Amazon Managed Service for Apache Flink provides a low-latency, high-performance solution for continuous VaR calculations.
This allows financial institutions to proactively manage risk by quickly identifying and mitigating intraday exposures, rather than reacting to past events. The ability to stream risk analytics empowers firms to optimize portfolios and stay resilient in volatile markets.
Clean up
It’s always a good practice to clean up all the resources you created as part of this post to avoid any additional cost. To clean up your resources, complete the following steps:
- Delete the CloudFormation stacks from the consumer account.
- Delete the CloudFormation stacks from the provider account.
Conclusion
In this post, we showed you how to provide a real-time financial data feed that can be consumed by your customers using Amazon MSK and Amazon Managed Service for Apache Flink. We used Amazon Managed Service for Apache Flink to enrich a raw data feed and deliver it to Amazon OpenSearch. Using this solution as a template, you can aggregate multiple source feeds, use Flink to calculate in real time any technical indicator, display data and volatility, or create an alert engine. You can add value for your customers by inserting additional financial information within your feed in real time.
We hope you found this post helpful and encourage you to try out this solution to solve interesting financial industry challenges.
About the Authors
 Rana Dutt is a Principal Solutions Architect at Amazon Web Services. He has a background in architecting scalable software platforms for financial services, healthcare, and telecom companies, and is passionate about helping customers build on AWS.
 Amar Surjit is a Senior Solutions Architect at Amazon Web Services (AWS), where he specializes in data analytics and streaming services. He advises AWS customers on architectural best practices, helping them design reliable, secure, efficient, and cost-effective real-time analytics data systems. Amar works closely with customers to create innovative cloud-based solutions that address their unique business challenges and accelerate their transformation journeys.
 Diego Soares is a Principal Solutions Architect at AWS with over 20 years of experience in the IT industry. He has a background in infrastructure, security, and networking. Prior to joining AWS in 2021, Diego worked for Cisco, supporting financial services customers for over 15 years. He works with large financial institutions to help them achieve their business goals with AWS. Diego is passionate about how technology solves business challenges and provides beneficial outcomes by developing complex solution architectures.


 Ranjith Rayaprolu is a Senior Solutions Architect at AWS working with customers in the Pacific Northwest. He helps customers design and operate Well-Architected solutions in AWS that address their business problems and accelerate the adoption of AWS services. He focuses on AWS security and networking technologies to develop solutions in the cloud across different industry verticals. Ranjith lives in the Seattle area and loves outdoor activities.
 Justin Leto is a Sr. Solutions Architect at Amazon Web Services with specialization in databases, big data analytics, and machine learning. His passion is helping customers achieve better cloud adoption. In his spare time, he enjoys offshore sailing and playing jazz piano. He lives in New York City with his wife and baby daughter.