Today, we are announcing Cloudflare’s Browser Developer Program, a collaborative initiative to strengthen partnership between Cloudflare and browser development teams.
At Cloudflare, we aim to help build a better Internet. One way we achieve this is by providing website owners with the tools to detect and block unwanted traffic from bots through Cloudflare Challenges or Turnstile. As both bots and our detection systems become more sophisticated, the security checks required to validate human traffic become more complicated. While we aim to strike the right balance, we recognize these security measures can sometimes cause issues for legitimate browsers and their users.
Building a better web together
A core objective of the program is to provide a space for intentional collaboration where we can work directly with browser developers to ensure that both accessibility and security can co-exist. We aim to support the evolving browser landscape, while upholding our responsibility to our customers to deliver the best security products. This program provides a dedicated channel for browser teams to share feedback, report issues, and help ensure that Cloudflare’s Challenges and Turnstile work seamlessly with all browsers.
What the program includes
Browser developers in the program will benefit from:
A two-way communication channel to Cloudflare’s team dedicated to addressing browser-specific concerns, feedback, and issues.
Best practices for building and testing against Cloudflare Challenges and Turnstile.
A private community forum for updates, questions, and discussion between browser developers and Cloudflare engineers.
Early visibility into updates or changes to that may impact how your browser handles Cloudflare Challenges.
(If applicable) Testing integration where we will incorporate your browser into our testing pipeline and monitor its performance with our releases.
This program is designed as a partnership where Cloudflare will, with our best effort, ensure our security products work properly with all browsers, while giving browser developers a voice in how these systems evolve. As an output of this program, we expect to publish clear browser requirements to run Cloudflare Challenges while striking the balance between openness and security.
For end users browsing the web, we continue to support a wide range of browsers. We will continue to update this list based on the insights and collaborations from the Browser Developer Program. We are also committed to ensuring our Challenge interstitial pages and Turnstile provide clear, actionable UI/UX for any error or failed states, making it easier for you to understand and resolve issues you may encounter.
How to apply
If you are working on a browser and want to ensure your users have a seamless experience with Cloudflare-protected websites, we encourage you to apply here.
We’ll ask for basic information about your project and ask you to sign our Browser Developer Program Agreement. In addition, we expect participants to adhere to our Community Code of Conduct and commit to constructive engagement.
Once you’re accepted, you’ll be invited to a private space in the Cloudflare Community where you can engage directly with our team.
Why is this important?
Cloudflare Challenges, a security mechanism to verify whether a visitor is a human or a bot, serve a wide variety of browsers in the world today. Chrome leads with 68.0%, Safari at 8.7%, Firefox at 6.3%, Edge at 4.8%, and Opera at 6.2%. However, the very long tail of browsers that collectively make up the remaining traffic, each representing less than 1% individually but together painting a picture of an incredibly diverse web ecosystem.
Browser traffic distribution, with 100+ browsers comprising the ‘Other’ category
This diversity spans a wide range of environments, each with unique constraints and capabilities:
Emerging and experimental browsers pushing the boundaries of web technology
Privacy-focused browsers such as DuckDuckGo that prioritize user data protection
Embedded browsers inside social media apps like Facebook, Instagram, and TikTok
WebViews used by mobile applications
Gaming and VR browsers such as Oculus for headsets and gaming consoles
Smart device browsers built into classroom displays and home appliances
Supporting this level of diversity poses real engineering challenges. Many of these browsers deviate from standard assumptions. Some lack full support for modern Web APIs, others operate under more stringent data privacy policies, and some are optimized for environments where our script to verify visitors may be hindered or blocked from running properly. These browsers are not bad or malicious. But their behavior may fall outside the typical patterns observed in mainstream browsers, which can lead to problematic or failed Challenge flows which we would like to avoid.
From an engineering perspective, our job is to strike a difficult balance. If our logic is too rigid that it expects only the behaviors of the majority, we risk excluding legitimate users on less conventional platforms. But if we relax our standards too much, we increase the attack surface for abuse. We cannot overfit to the top 5 browsers, nor can we afford to treat all clients as equal in capability or trustworthiness.
The Browser Developer Program is one way to close this gap. By working directly with browser teams, especially those building for niche or emerging environments, we can better understand the constraints they operate under and collaborate to make each of our systems more compatible and resilient.
Join us!
This program is free to join, and is open to any browser developer, no matter the size or the lifecycle stage. Our goal is to listen, learn, and collaborate with browser developers to create a better experience for everyone.
We believe this program will ultimately benefit end users the most. By joining this program, you will help us build solutions that prioritize both the security needs of businesses as well as the diverse ways people access the Internet.
Attackers are increasingly using more sophisticated methods to not just brute force their way into your sites but also simulate real user behavior for targeted harmful activity like account takeovers, credential stuffing, fake account creation, content scraping, and fraudulent transactions. They are no longer trying to simply take your website down or gain access to it, but rather cause actual business harm. There is also the increasing complexity added by attackers rotating IP addresses, routing through proxies, and using VPNs. In this evolving security landscape, meaningful analytics matter. Many traditional CAPTCHA solutions provide simplistic pass or fail trends on challenges without insights into traffic patterns or behavior. Cloudflare Turnstile aims to equip you with more than just basic trends, so you can make informed decisions and stay ahead of the attackers.
We are excited to introduce a major upgrade to Turnstile Analytics. With these upgraded analytics, you can identify harder-to-detect bots faster, and fine-tune your bot security posture with less manual log analysis than before. Turnstile, our privacy-first CAPTCHA alternative, has been helping you protect your applications from automated abuse while ensuring a seamless experience for legitimate users. Now, using enhanced analytics, you can gain deeper insights into your visitor traffic, challenge effectiveness, and potential security threats.
Previously, Turnstile users had limited visibility into what types of bots were being blocked, what specific characteristics were exhibited by bots that were attacking your website, and what identifiable behavior they had. Customers had to manually sift through limited analytics, correlate Siteverify API responses, and cross-reference multiple sources to identify trends. The previous Turnstile analytics dashboard made it difficult to get a bird’s eye view of Turnstile efficacy, identify any patterns of abuse, and drill down on the specifics of an attack to create additional rules and safeguards.
The new Turnstile Analytics surfaces all of this information in one place, making it easier than before to assess your visitor traffic patterns through Turnstile and take immediate action against suspicious activity.
What’s new with Turnstile Analytics?
The main motivation behind this release is to provide actionable insights that further strengthen the layers of protection and to give customers the ability to dissect visitor traffic by the most relevant attributes, so that identifying bot behavior patterns becomes easier. New features of Turnstile Analytics include:
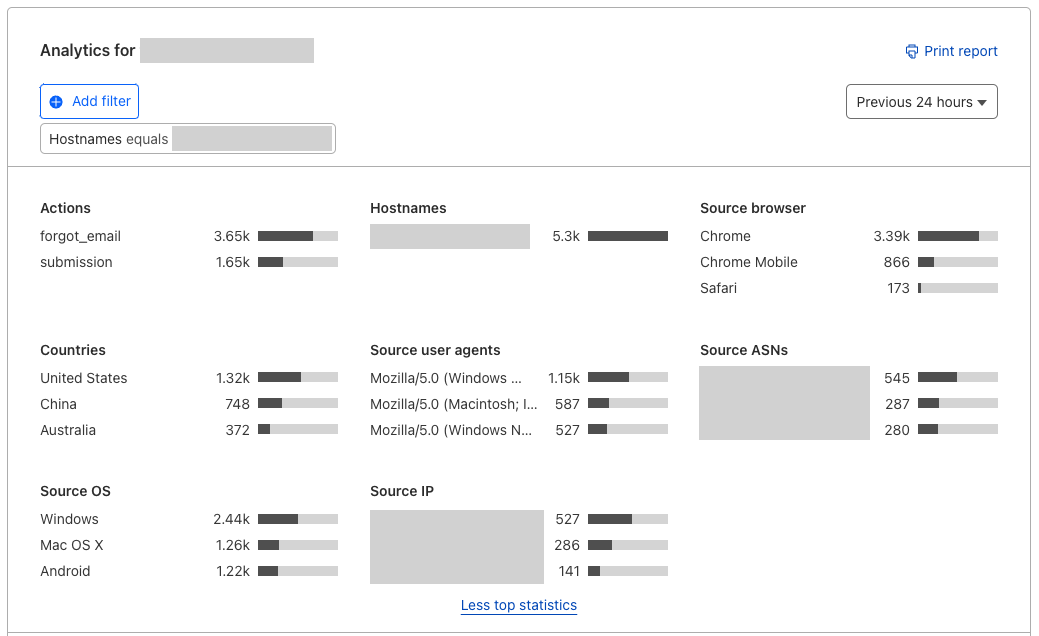
Top statistics
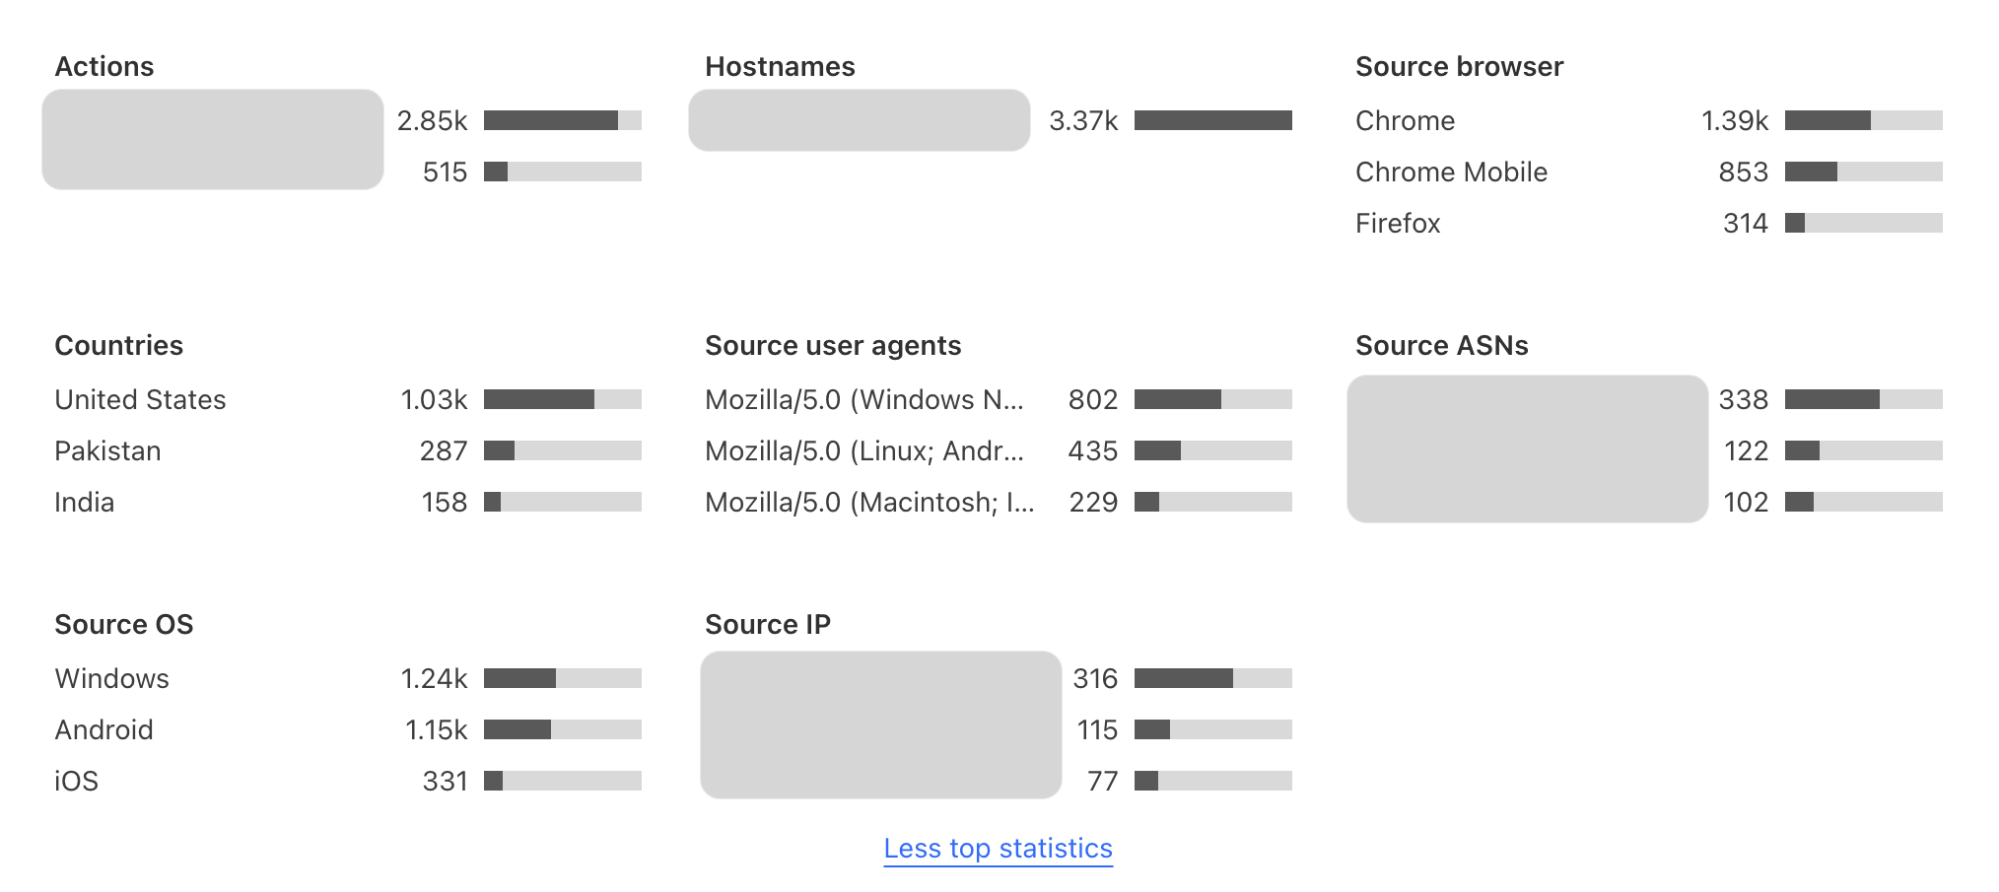
When you click into widget analytics under Turnstile in the Cloudflare Dashboard, you now have enhanced visibility of TopN statistics, and granular views of your traffic. The new TopN section is where you can view the top statistics of attributes such as hostname, autonomous system (ASN), user agent, browser, source IP address, country, and OS. This allows customers to analyze traffic at a more granular level and detect potential anomalies or patterns. You can analyze which browsers, user agents, ASNs, and locations generated the most failed challenges, making it easier to detect bot behavior patterns and anomalies in your visitor traffic. Suspicious IP addresses that have a high challenge failure rate can be proactively mitigated through additional security measures. For instance, if you have WAF custom rules in place based on suspicious IP addresses, you can in turn adjust your WAF custom rules based on the trends you see in Turnstile, strengthening your other layers of security even further.
TopN section of Turnstile Analytics
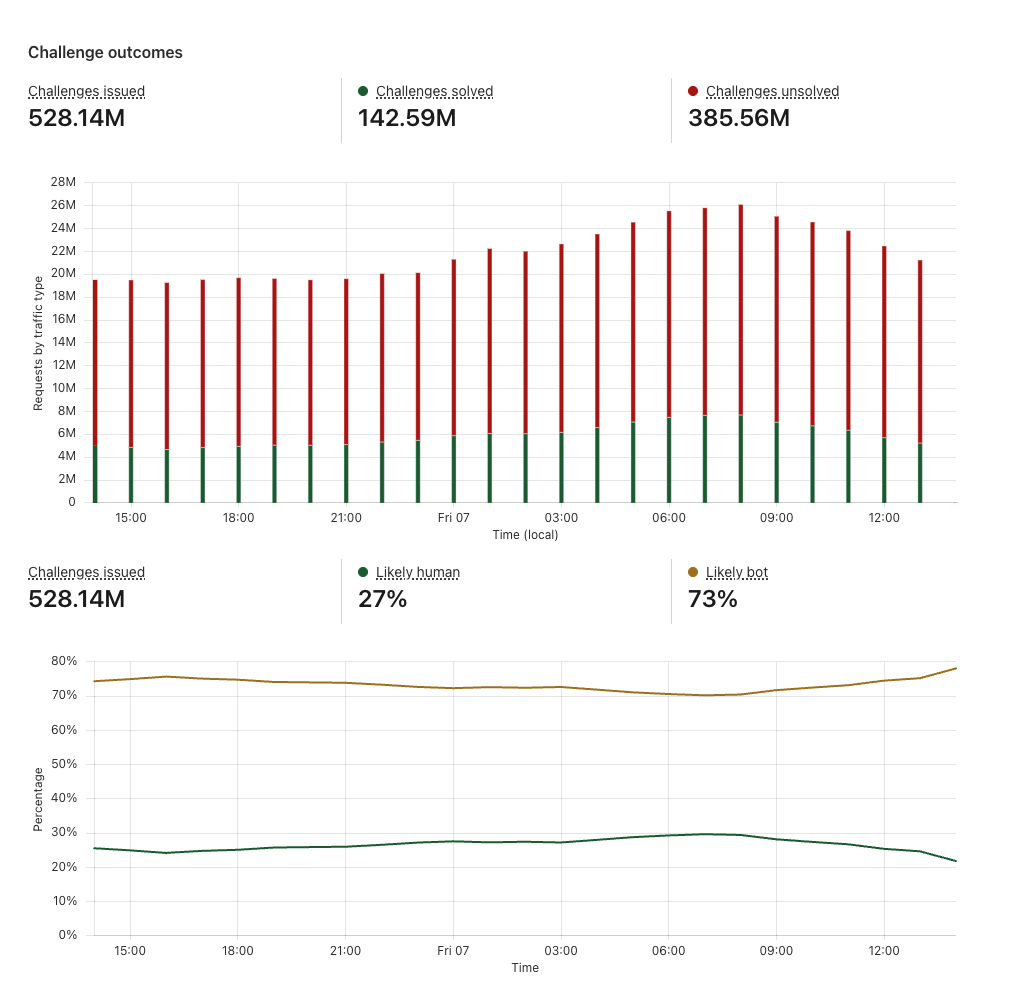
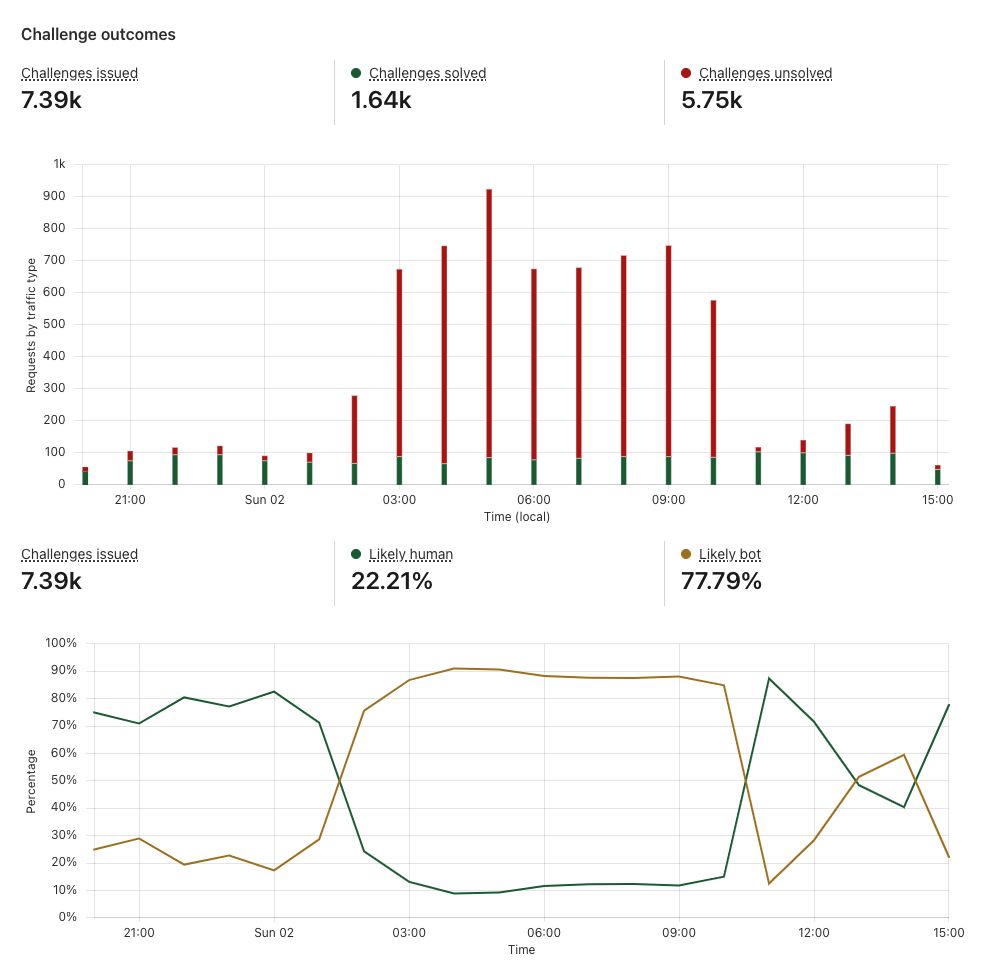
Challenge outcomes
When a visitor encounters Turnstile, it issues a challenge to assess whether the visitor is a human or a bot, based on various signals. The Challenge outcomes section helps you evaluate what portion of your traffic is likely human or likely bots.
The ability to easily monitor the effectiveness of Turnstile by looking at trends of Likely Human and Likely Bot metrics is important for peace of mind, knowing that the bots are being blocked and Turnstile is protecting your sites. But it’s also important to track changes in bot activity over time by monitoring challenge success and failure trends and across different attributes. You can detect anomalies in your traffic pattern and solve rates. For example, a sudden drop in solve rate overlaid with a surge in challenge attempts may indicate an attack. It is crucial to monitor bot behaviors and attacks that may be specific to your industry or to your business through Turnstile Analytics and correlate them with your internal security logs to keep your security rules up to date, to easily investigate any attacks, and to find areas of vulnerability.
Challenge outcomes section of Turnstile Analytics
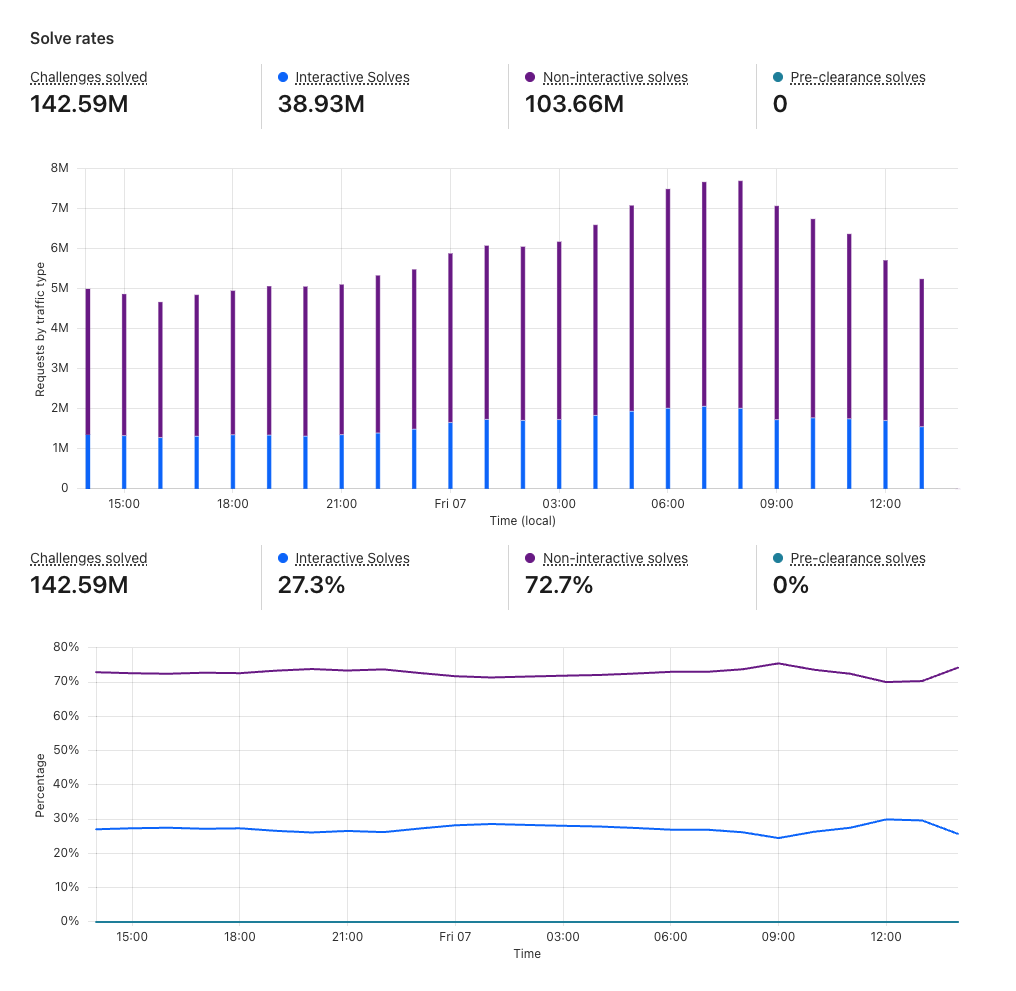
Solve rates
When the visitor successfully solves the challenge, the Solve rates section shows how the visitors have solved the challenge. Solve rates can be broken down into interactive solves, non-interactive solves, and pre-clearance solves. If you are using the managed mode, for example, you can see how many of your visitors required interaction with the widget and were prompted to check the box for Turnstile to verify that they are human.
Solve rates section of Turnstile Analytics
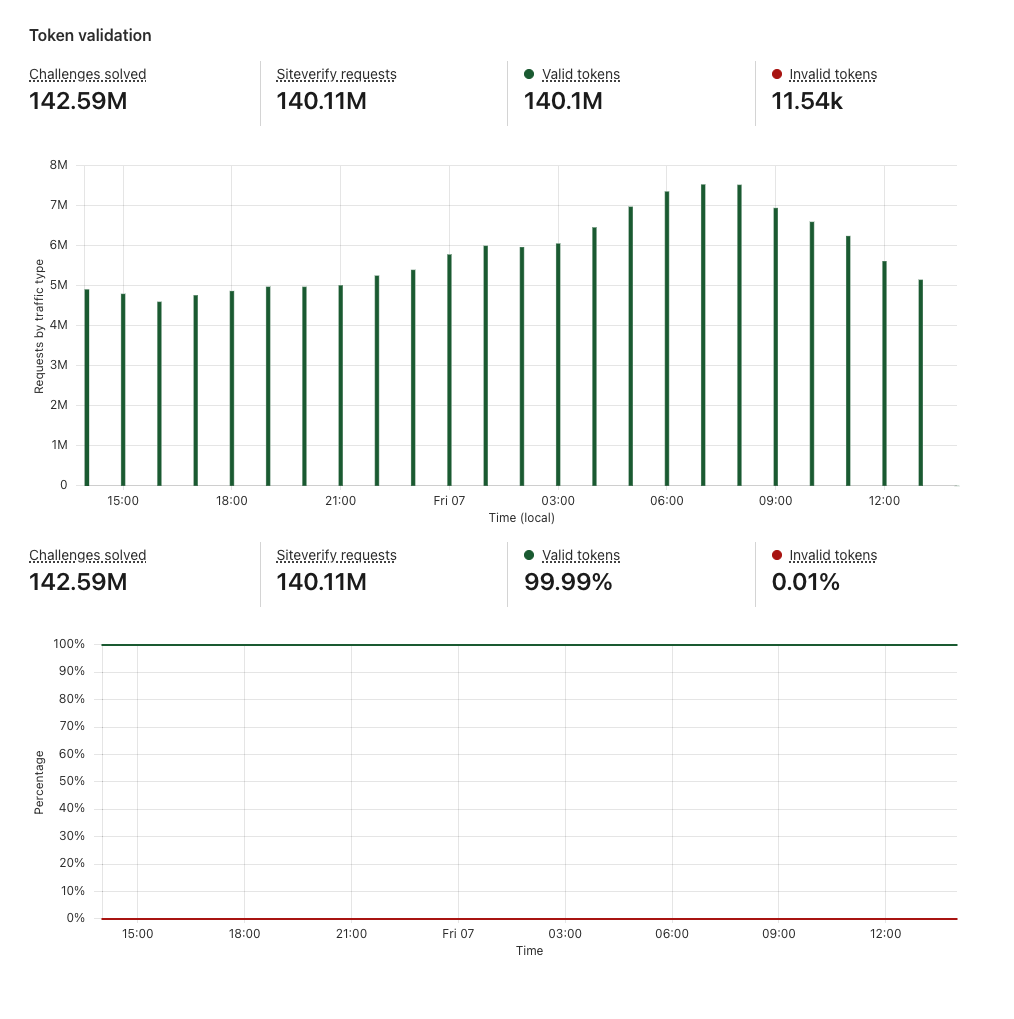
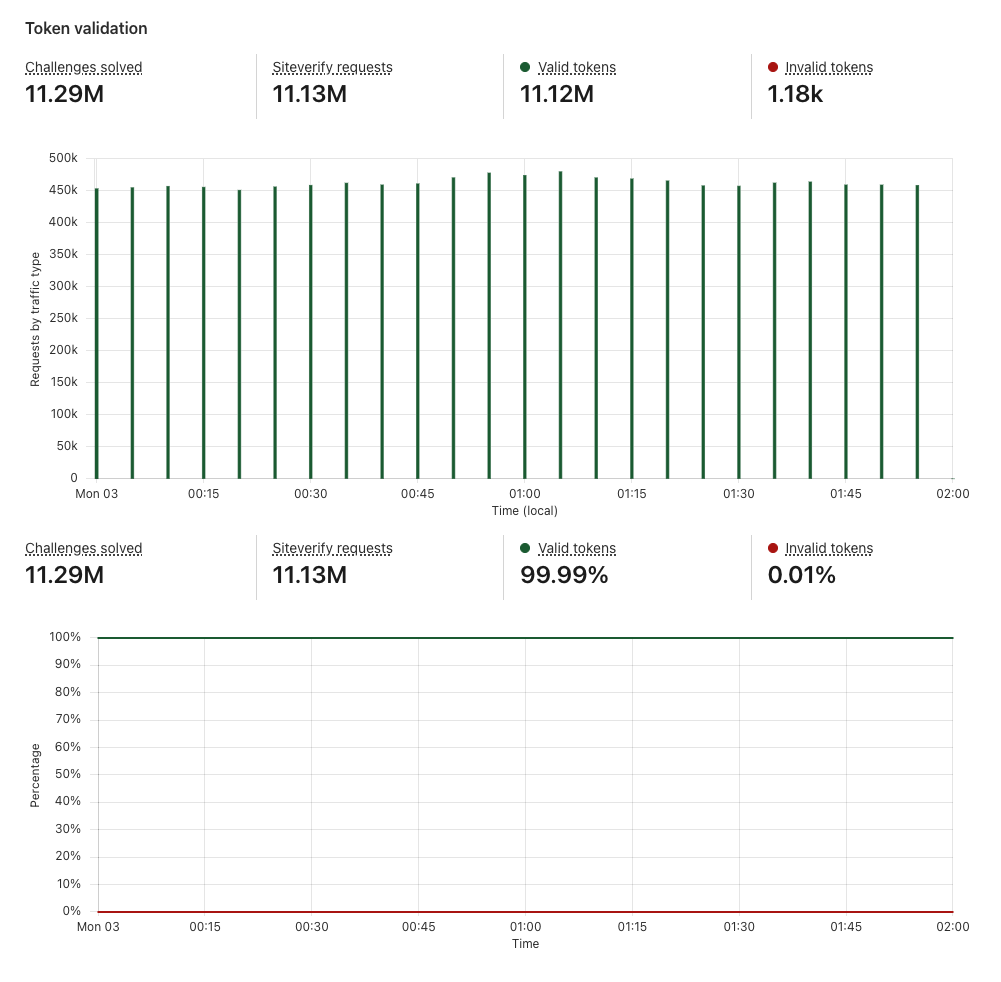
Token validations
After a visitor successfully completes a Turnstile challenge, a token is generated that must be validated via the Siteverify API. The API response provides the ultimate outcome of our bot determination. Only rendering the widget on the client side without calling the Siteverify API for token validation is an incomplete implementation of Turnstile, and your site will not be protected. The Turnstile token that is returned from the challenge stage must be validated via the Siteverify API as we check if the token is valid, whether it has been redeemed already (a single token can only be redeemed once), and whether it has expired.
Token validation section of Turnstile Analytics
Let’s walk through a real world example
Common use cases of Turnstile include protecting login and sign up pages from credential stuffing, account takeover, and fraudulent account creation attacks. Let’s walk through how you can best set up Turnstile on your login pages and interpret your traffic with the new Turnstile analytics.
You can set up two separate widgets for your login and sign up page, or you can set up one widget and use the ‘action‘ field to distinguish traffic between these pages. The ‘cData’ field can be used to pass along custom data to keep track of each individual attempt. This field is useful to track any pertinent information from your business logic such as account ID, session ID, etc. In this case, let’s assume we are passing along a session ID along with the login attempt. This is helpful if you are trying to protect and monitor against account takeover attacks or credential stuffing attacks. cData is a custom data field that is not stored in Cloudflare systems at any time.
Validating the Turnstile token with the Siteverify API
At this point, you have placed the Turnstile widget in your login page. When a visitor visits this page, a Turnstile challenge will be issued and when the visitor completes the challenge, you will receive a Turnstile token that contains the outcome of the challenge. This must be validated via the Siteverify API like below:
// This is the demo secret key.
// In production, we recommend you store your secret key(s) safely.
const SECRET_KEY = "1x0000000000000000000000000000000AA";

async function handlePost(request) {
  const body = await request.formData();
  // Turnstile injects a token in "cf-turnstile-response".
  const token = body.get("cf-turnstile-response");
  const ip = request.headers.get("CF-Connecting-IP");

  // Validate the token by calling the
  // "/Siteverify" API endpoint.
  let formData = new FormData();
  formData.append("secret", SECRET_KEY);
  formData.append("response", token);
  formData.append("remoteip", ip);

  const url = "https://challenges.cloudflare.com/turnstile/v0/siteverify";
  const result = await fetch(url, {
    body: formData,
    method: "POST",
  });

  const outcome = await result.json();
  if (outcome.success) {
    // happy path: let the visitor continue with login/signup
  } else {
    // option 1: custom error page directing the visitor to reach out to support
    // option 2: same as happy path but flag as potential bot
  }
}
As you can see in the code example above, you can control the visitor experience based on the Siteverify outcome. In the case where Siteverify API said the token is valid, it’s straightforward — let the visitor continue to log in and sign up. This can be monitored by the Valid tokens metric in the Token validation section in the new Turnstile Analytics.
If Siteverify returns "success": false, this means that the token was invalid and Turnstile determined the visitor to be a bot. In this case, you have control over what you want the experience to be, such as redirecting the user to a custom error page where they can reach out to support.
You can also flag that session (in this case, “session123”) as suspicious and require the account owner to take action. You can implement the UI so that it seems like the bot was successful in logging in to an account, but block any important actions, such as account changes or purchases. Likewise, you can alert the account owner that there has been a suspicious login attempt.
Turnstile is a building block to help you build out your security defenses, and you can design your logic to fit your priorities across UI, UX, and security.
Interpreting login page analytics
The very first thing to monitor is the Top Statistics section to look out for any anomalous traffic characteristics in the “countries”, “source ASN”, and “source user agents” metrics. By seeing the traffic distribution, you can have a better understanding of your visitors and potentially spot any anomalies. At this point, you can also take a look at “Source browsers”, “Source OS”, and “Countries” to see if that aligns with your visitor demographics. If you have a list of suspicious IP addresses that you maintain, you can cross-reference them to see their success and failure rates.
Example TopN Section
Let’s say you suspect there has been a credential stuffing attack where bots were brute forcing their way into accounts. Below is mock data of what your analytics may look like where the time window is zoomed into the time of the attack.
Example Challenge outcomes section
You can see that time period where the number of challenges unsolved started spiking and the “likely bot” metric shot up. This shows an increase in bot traffic, indicating an attack. However, you can also see that Turnstile was able to catch these bots as they were unable to solve or even complete the challenge.
Let’s look at another example.
Example Token validation section
In this case, of the 11.13M tokens issued in the timeframe, 0.01% of them were invalid. This means that 0.01% of the traffic is considered to be non-legitimate visitors, despite the fact that they received the Turnstile tokens. This is why it is crucial to always validate your tokens through the Siteverify API. What becomes more interesting is if the login credentials these suspicious visitors provided were correct credentials, which could indicate that this is a potential account takeover attack or the accounts in question have been compromised. If the login credentials were incorrect, but the attempts were in a burst, that could indicate credential stuffing attack. By correlating Turnstile analytics with your internal application data such as whether the login attempt had a correct or incorrect password, you can further identify the nature and behavior of the attacker and build out the defenses or mitigate accordingly.
This was an example showing how Turnstile can protect and provide insights on just your login page. Imagine how this could be expanded to other use cases such as your sign-up pages, submit form pages, contact pages, checkout pages, and more.
Looking ahead
We are not planning on stopping here with Turnstile Analytics. Next on our roadmap is to expand Turnstile Analytics to give you more insights around client side and server side errors, so that you can further break down the traffic beyond just the challenge outcomes. We will also be incorporating Ephemeral IDs into the analytics, so that you can filter by Ephemeral ID, see top Ephemeral IDs, and the frequency of their solve attempts.
We have many more exciting things in store for Turnstile for 2025! There is no prerequisite with Turnstile, and our free tier is unlimited in volume, so there is no barrier to get started today. Let’s help make the Internet a more secure, better place, together!
Balancing developer velocity and security against bots is a constant challenge. Deploying your changes as quickly and easily as possible is essential to stay ahead of your (or your customers’) needs and wants. Ensuring your website is safe from malicious bots — without degrading user experience with alien hieroglyphics to decipher just to prove that you are a human — is no small feat. With Pages and Turnstile, we’ll walk you through just how easy it is to have the best of both worlds!
Cloudflare Pages offer a seamless platform for deploying and scaling your websites with ease. You can get started right away with configuring your websites with a quick integration using your git provider, and get set up with unlimited requests, bandwidth, collaborators, and projects.
Cloudflare Turnstile is Cloudflare’s CAPTCHA alternative solution where your users don’t ever have to solve another puzzle to get to your website, no more stop lights and fire hydrants. You can protect your site without having to put your users through an annoying user experience. If you are already using another CAPTCHA service, we have made it easy for you to migrate over to Turnstile with minimal effort needed. Check out the Turnstile documentation to get started.
Alright, what are we building?
In this tutorial, we’ll walk you through integrating Cloudflare Pages with Turnstile to secure your website against bots. You’ll learn how to deploy Pages, embed the Turnstile widget, validate the token on the server side, and monitor Turnstile analytics. Let’s build upon this tutorial from Cloudflare’s developer docs, which outlines how to create an HTML form with Pages and Functions. We’ll also show you how to secure it by integrating with Turnstile, complete with client-side rendering and server-side validation, using the Turnstile Pages Plugin!
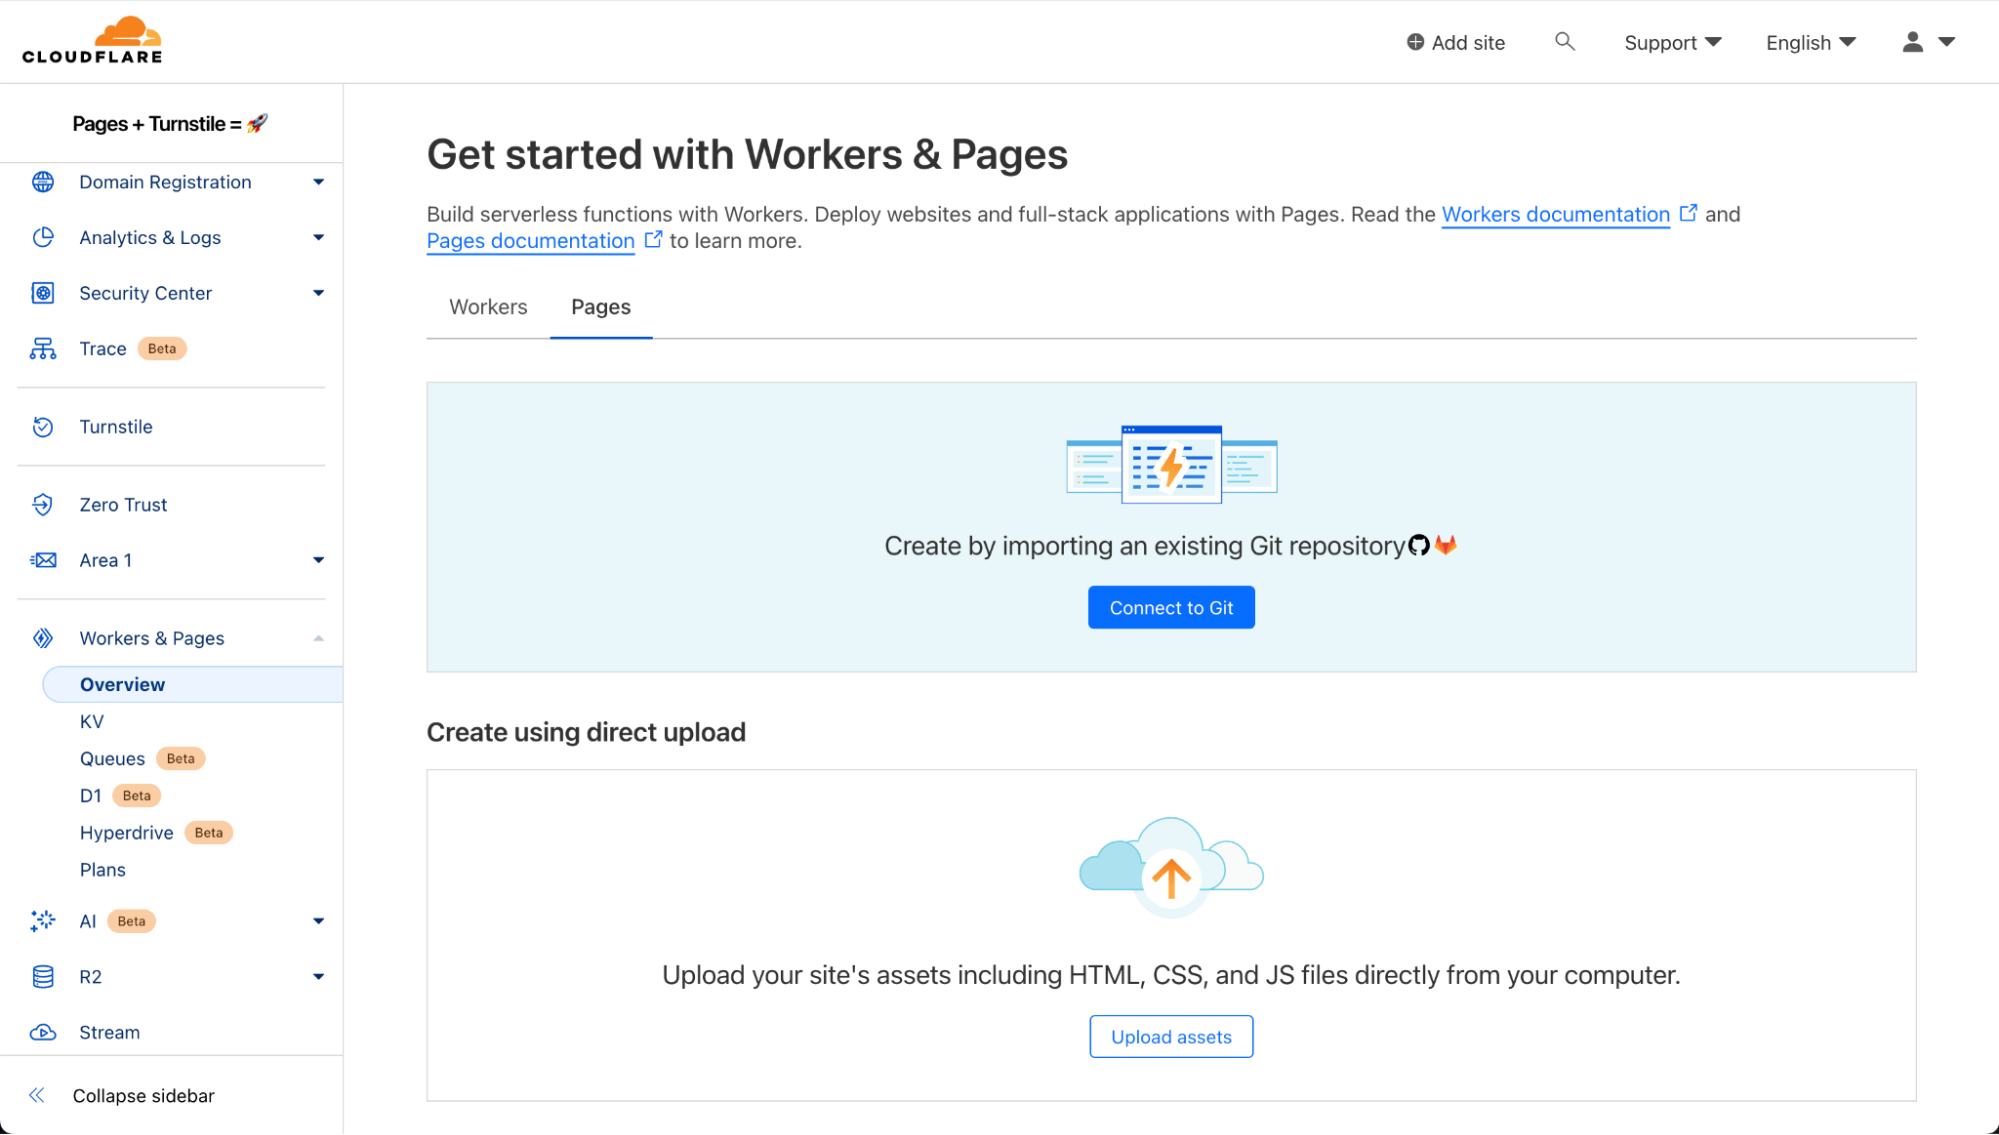
Step 1: Deploy your Pages
On the Cloudflare Dashboard, select your account and go to Workers & Pages to create a new Pages application with your git provider. Choose the repository where you cloned the tutorial project or any other repository that you want to use for this walkthrough.
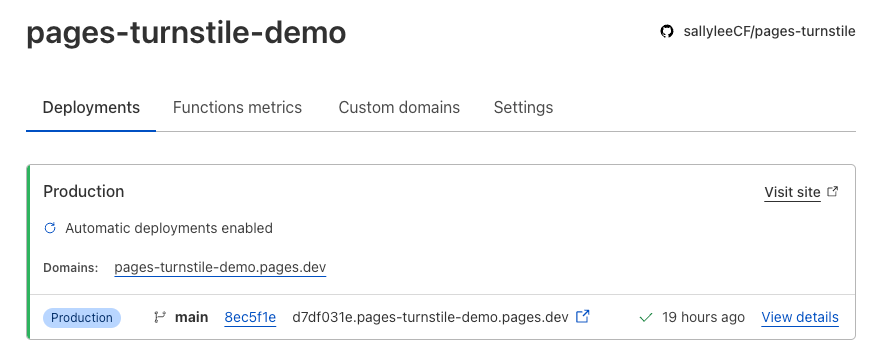
Once you select “Save and Deploy”, all the magic happens under the hood and voilà! The form is already deployed.
Step 2: Embed Turnstile widget
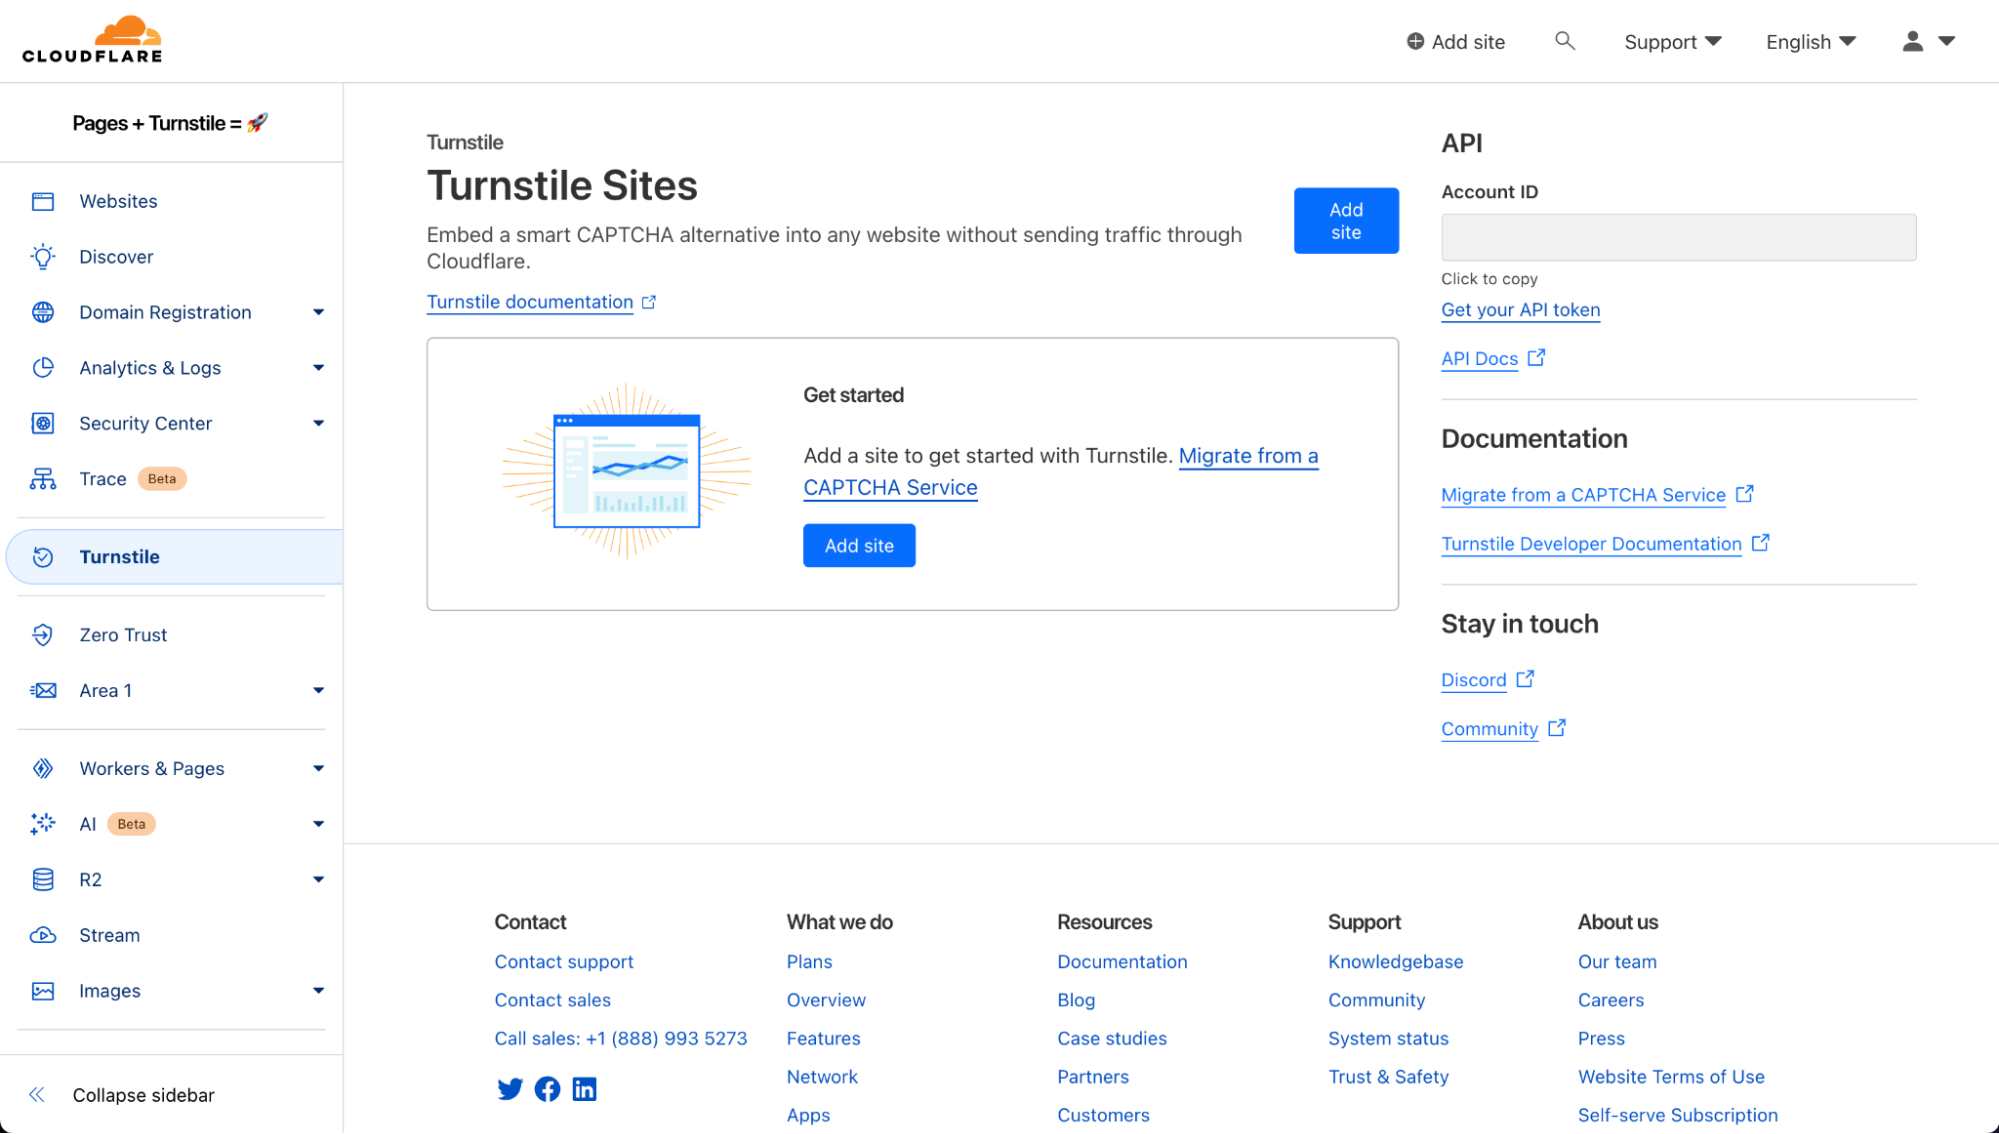
Now, let’s navigate to Turnstile and add the newly created Pages site.
Here are the widget configuration options:
Domain: All you need to do is add the domain for the Pages application. In this example, it’s “pages-turnstile-demo.pages.dev”. For each deployment, Pages generates a deployment specific preview subdomain. Turnstile covers all subdomains automatically, so your Turnstile widget will work as expected even in your previews. This is covered more extensively in our Turnstile domain management documentation.
Widget Mode: There are three types of widget modes you can choose from.
Managed: This is the recommended option where Cloudflare will decide when further validation through the checkbox interaction is required to confirm whether the user is a human or a bot. This is the mode we will be using in this tutorial.
Non-interactive: This mode does not require the user to interact and check the box of the widget. It is a non-intrusive mode where the widget is still visible to users but requires no added step in the user experience.
Invisible: Invisible mode is where the widget is not visible at all to users and runs in the background of your website.
Pre-Clearance setting: With a clearance cookie issued by the Turnstile widget, you can configure your website to verify every single request or once within a session. To learn more about implementing pre-clearance, check out this blog post.
Once you create your widget, you will be given a sitekey and a secret key. The sitekey is public and used to invoke the Turnstile widget on your site. The secret key should be stored safely for security purposes.
Let’s embed the widget above the Submit button. Your index.html should look like this:
<!doctype html>
<html lang="en">
<head>
<meta charset="utf8">
<title>Cloudflare Pages | Form Demo</title>
<meta name="theme-color" content="#d86300">
<meta name="mobile-web-app-capable" content="yes">
<meta name="apple-mobile-web-app-capable" content="yes">
<meta name="viewport" content="width=device-width,initial-scale=1">
<link rel="icon" type="image/png" href="https://www.cloudflare.com/favicon-128.png">
<link rel="stylesheet" href="/index.css">
<script src="https://challenges.cloudflare.com/turnstile/v0/api.js?onload=_turnstileCb" defer></script>
</head>
<body>
<main>
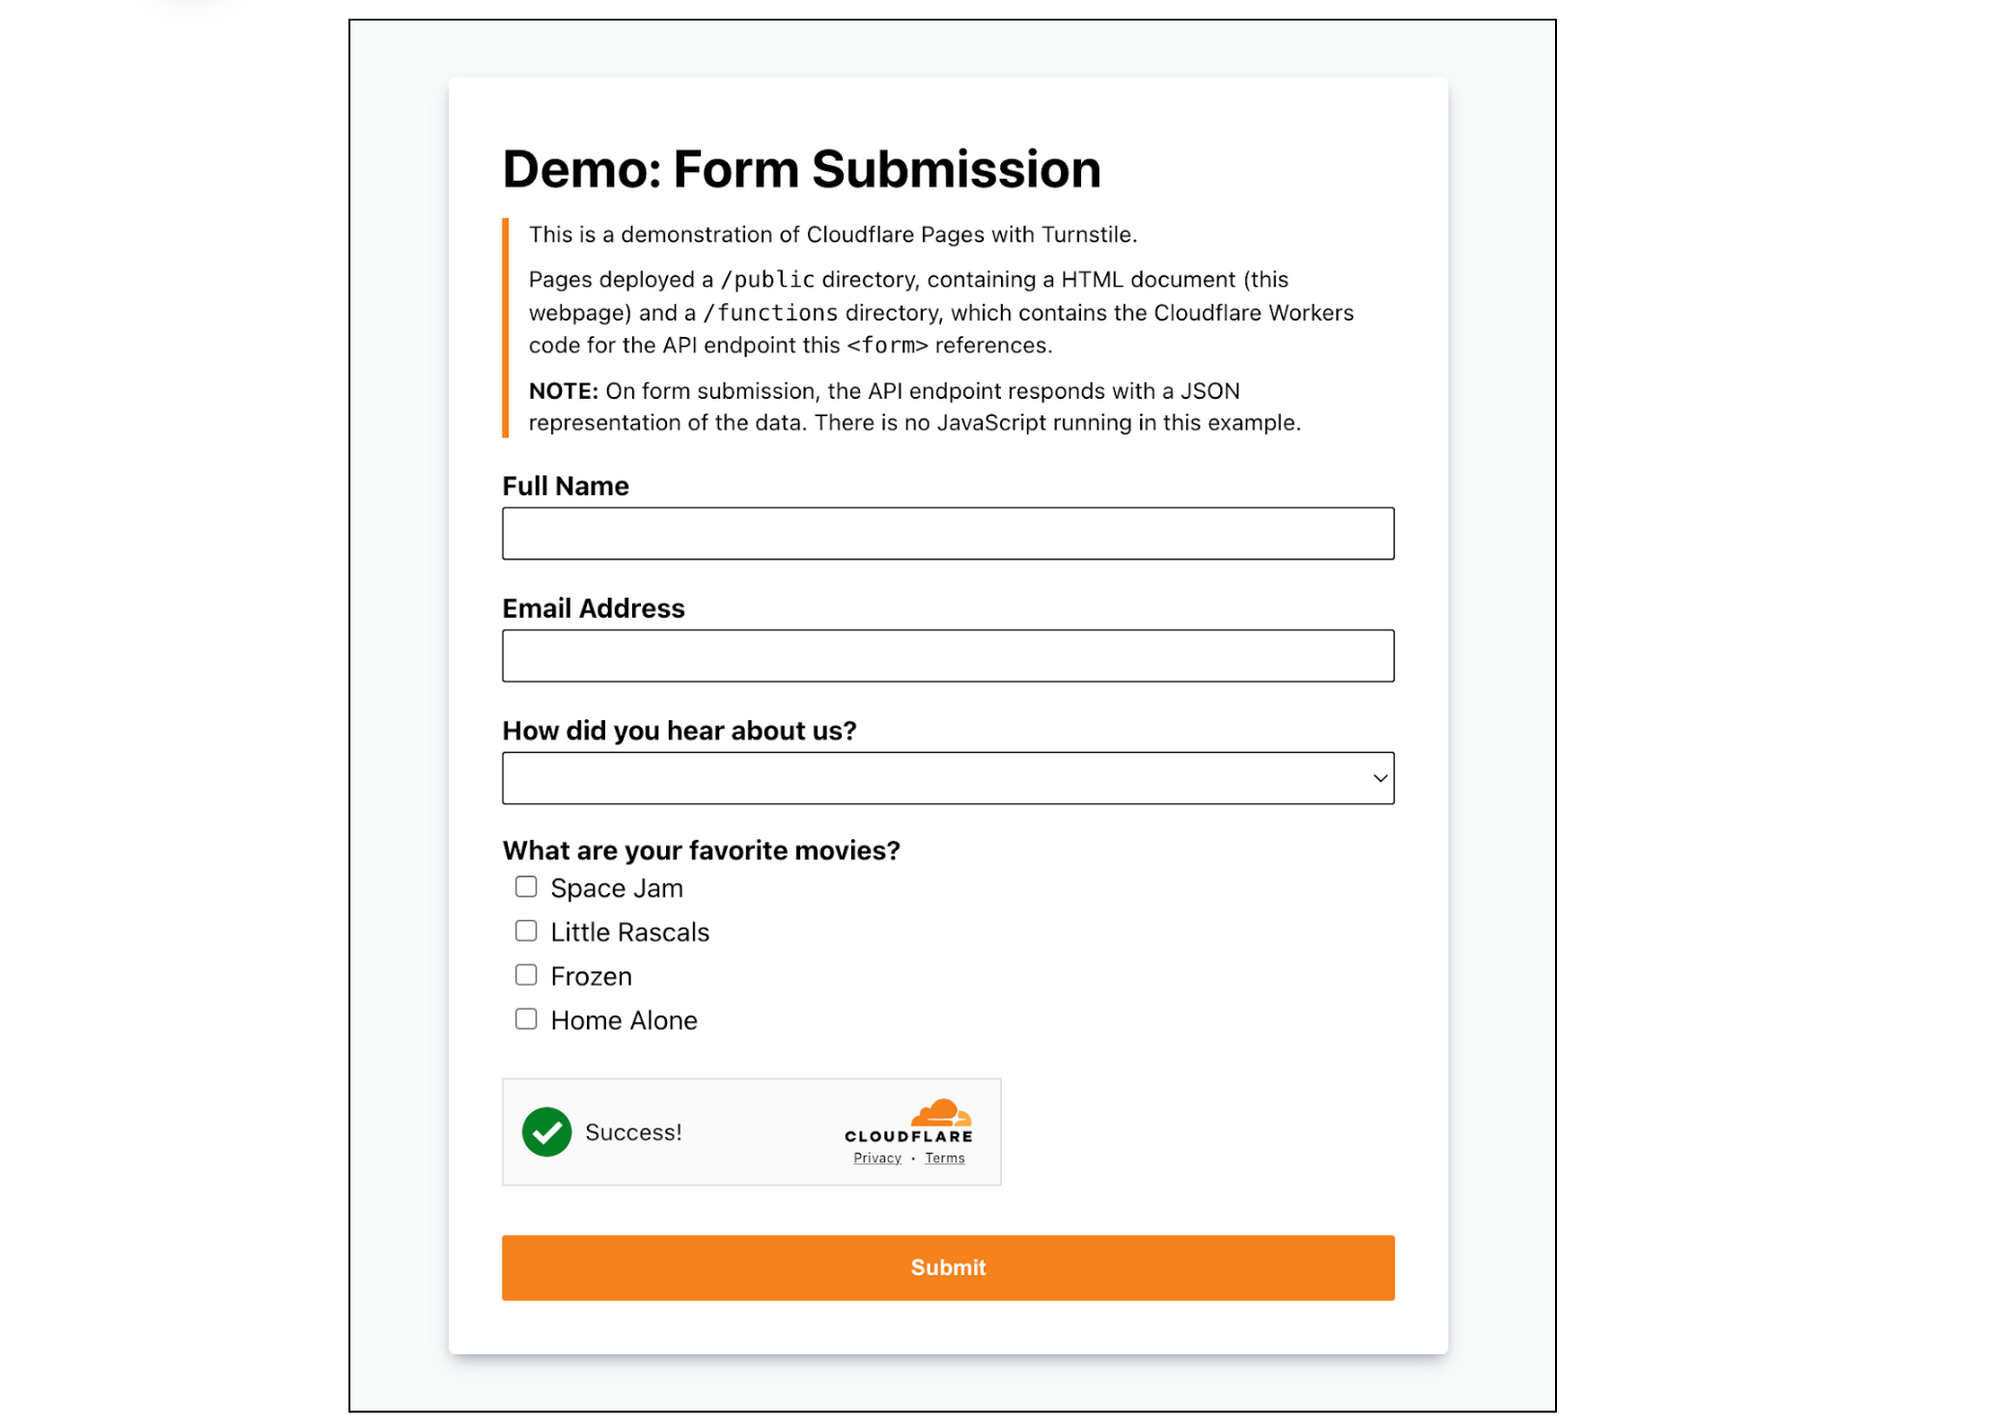
<h1>Demo: Form Submission</h1>
<blockquote>
<p>This is a demonstration of Cloudflare Pages with Turnstile.</p>
<p>Pages deployed a <code>/public</code> directory, containing a HTML document (this webpage) and a <code>/functions</code> directory, which contains the Cloudflare Workers code for the API endpoint this <code><form></code> references.</p>
<p><b>NOTE:</b> On form submission, the API endpoint responds with a JSON representation of the data. There is no JavaScript running in this example.</p>
</blockquote>
<form method="POST" action="/api/submit">
<div class="input">
<label for="name">Full Name</label>
<input id="name" name="name" type="text" />
</div>
<div class="input">
<label for="email">Email Address</label>
<input id="email" name="email" type="email" />
</div>
<div class="input">
<label for="referers">How did you hear about us?</label>
<select id="referers" name="referers">
<option hidden disabled selected value></option>
<option value="Facebook">Facebook</option>
<option value="Twitter">Twitter</option>
<option value="Google">Google</option>
<option value="Bing">Bing</option>
<option value="Friends">Friends</option>
</select>
</div>
<div class="checklist">
<label>What are your favorite movies?</label>
<ul>
<li>
<input id="m1" type="checkbox" name="movies" value="Space Jam" />
<label for="m1">Space Jam</label>
</li>
<li>
<input id="m2" type="checkbox" name="movies" value="Little Rascals" />
<label for="m2">Little Rascals</label>
</li>
<li>
<input id="m3" type="checkbox" name="movies" value="Frozen" />
<label for="m3">Frozen</label>
</li>
<li>
<input id="m4" type="checkbox" name="movies" value="Home Alone" />
<label for="m4">Home Alone</label>
</li>
</ul>
</div>
<div id="turnstile-widget" style="padding-top: 20px;"></div>
<button type="submit">Submit</button>
</form>
</main>
<script>
// This function is called when the Turnstile script is loaded and ready to be used.
// The function name matches the "onload=..." parameter.
function _turnstileCb() {
console.debug('_turnstileCb called');
turnstile.render('#turnstile-widget', {
sitekey: '0xAAAAAAAAAXAAAAAAAAAAAA',
theme: 'light',
});
}
</script>
</body>
</html>
You can embed the Turnstile widget implicitly or explicitly. In this tutorial, we will explicitly embed the widget by injecting the JavaScript tag and related code, then specifying the placement of the widget.
Make sure that the div id you assign is the same as the id you specify in turnstile.render call. In this case, let’s use “turnstile-widget”. Once that’s done, you should see the widget show up on your site!
Now that the Turnstile widget is rendered on the front end, let’s validate it on the server side and check out the Turnstile outcome. We need to make a call to the /siteverify API with the token in the submit function under ./functions/api/submit.js.
First, grab the token issued from Turnstile under cf-turnstile-response. Then, call the /siteverify API to ensure that the token is valid. In this tutorial, we’ll attach the Turnstile outcome to the response to verify everything is working well. You can decide on the expected behavior and where to direct the user based on the /siteverify response.
/**
 * POST /api/submit
 */

import turnstilePlugin from "@cloudflare/pages-plugin-turnstile";

// This is a demo secret key. In prod, we recommend you store
// your secret key(s) safely.
const SECRET_KEY = '0x4AAAAAAASh4E5cwHGsTTePnwcPbnFru6Y';

export const onRequestPost = [
    turnstilePlugin({
    	secret: SECRET_KEY,
    }),
    (async (context) => {
    	// Request has been validated as coming from a human
    	const formData = await context.request.formData()

    	var tmp, outcome = {};
	for (let [key, value] of formData) {
		tmp = outcome[key];
		if (tmp === undefined) {
			outcome[key] = value;
		} else {
			outcome[key] = [].concat(tmp, value);
		}
	}

	// Attach Turnstile outcome to the response
	outcome["turnstile_outcome"] = context.data.turnstile;

	let pretty = JSON.stringify(outcome, null, 2);

      	return new Response(pretty, {
      		headers: {
      			'Content-Type': 'application/json;charset=utf-8'
      		}
      	});
    })
];
Since Turnstile accurately decided that the visitor was not a bot, the response for “success” is “true” and “interactive” is “false”. The “interactive” being “false” means that the checkbox was automatically checked by Cloudflare as the visitor was determined to be human. The user was seamlessly allowed access to the website without having to perform any additional actions. If the visitor looks suspicious, Turnstile will become interactive, requiring the visitor to actually click the checkbox to verify that they are not a bot. We used the managed mode in this tutorial but depending on your application logic, you can choose the widget mode that works best for you.
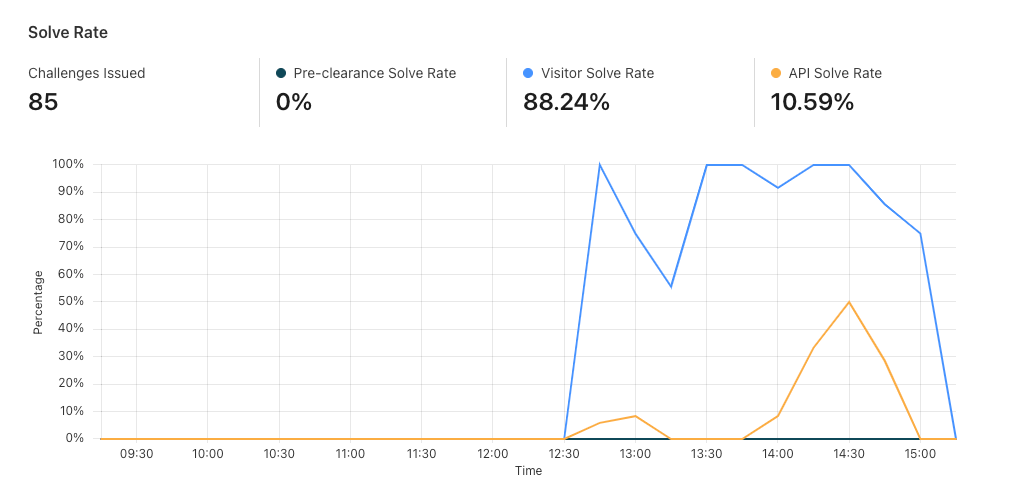
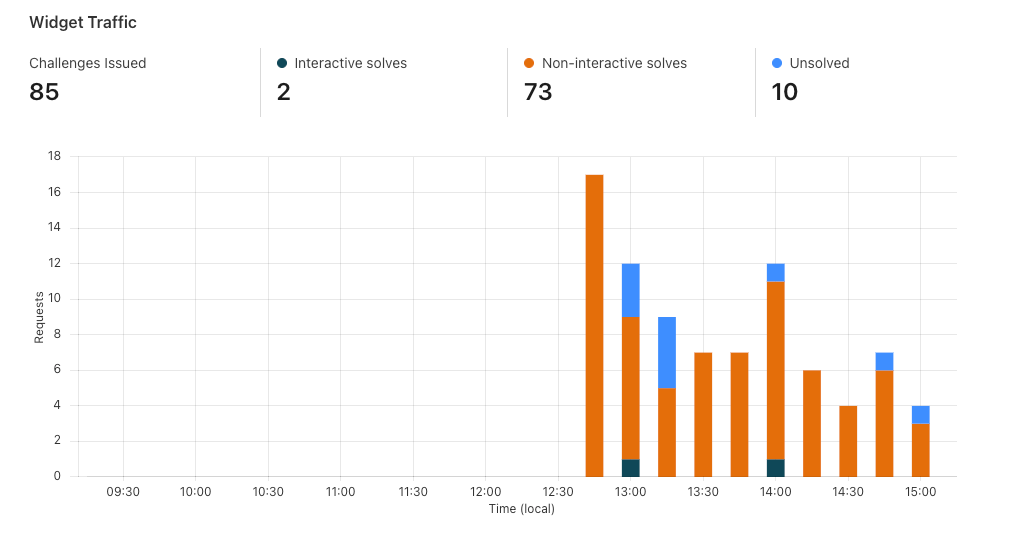
Now that we’ve set up Turnstile, we can head to Turnstile analytics in the Cloudflare Dashboard to monitor the solve rate and widget traffic. Visitor Solve Rate indicates the percentage of visitors who successfully completed the Turnstile widget. A sudden drop in the Visitor Solve Rate could indicate an increase in bot traffic, as bots may fail to complete the challenge presented by the widget. API Solve Rate measures the percentage of visitors who successfully validated their token against the /siteverify API. Similar to the Visitor Solve Rate, a significant drop in the API Solve Rate may indicate an increase in bot activity, as bots may fail to validate their tokens. Widget Traffic provides insights into the nature of the traffic hitting your website. A high number of challenges requiring interaction may suggest that bots are attempting to access your site, while a high number of unsolved challenges could indicate that the Turnstile widget is effectively blocking suspicious traffic.
And that’s it! We’ve walked you through how to easily secure your Pages with Turnstile. Pages and Turnstile are currently available for free for every Cloudflare user to get started right away. If you are looking for a seamless and speedy developer experience to get a secure website up and running, protected by Turnstile, head over to the Cloudflare Dashboard today!
The collective thoughts of the interwebz
Manage Consent
To provide the best experiences, we use technologies like cookies to store and/or access device information. Consenting to these technologies will allow us to process data such as browsing behavior or unique IDs on this site. Not consenting or withdrawing consent, may adversely affect certain features and functions.
Functional
Always active
The technical storage or access is strictly necessary for the legitimate purpose of enabling the use of a specific service explicitly requested by the subscriber or user, or for the sole purpose of carrying out the transmission of a communication over an electronic communications network.
Preferences
The technical storage or access is necessary for the legitimate purpose of storing preferences that are not requested by the subscriber or user.
Statistics
The technical storage or access that is used exclusively for statistical purposes.The technical storage or access that is used exclusively for anonymous statistical purposes. Without a subpoena, voluntary compliance on the part of your Internet Service Provider, or additional records from a third party, information stored or retrieved for this purpose alone cannot usually be used to identify you.
Marketing
The technical storage or access is required to create user profiles to send advertising, or to track the user on a website or across several websites for similar marketing purposes.