Post Syndicated from Korinne Alpers original https://blog.cloudflare.com/full-stack-development-on-cloudflare-workers/
In September 2024, we introduced beta support for hosting, storing, and serving static assets for free on Cloudflare Workers — something that was previously only possible on Cloudflare Pages. Being able to host these assets — your client-side JavaScript, HTML, CSS, fonts, and images — was a critical missing piece for developers looking to build a full-stack application within a single Worker.
Today we’re announcing ten big improvements to building apps on Cloudflare. All together, these new additions allow you to build and host projects ranging from simple static sites to full-stack applications, all on Cloudflare Workers:
-
Cloudflare Workers now provides production ready, generally available (GA) support for React Router v7 (Remix), Astro, Hono, Vue.js, Nuxt, Svelte (SvelteKit), and more, with GA support for more frameworks including Next.js, Angular, and SolidJS (SolidStart) to follow in Q2 2025.
-
You can build complete full-stack apps on Workers without a framework: you can “just use Vite” and React together, and build a backend API in the same Worker. See our Vite + React template for an example.
-
The adapter for Next.js — @opennextjs/cloudflare, introduced in September 2024 as an early alpha, is now v1.0-beta, and will be GA in the coming weeks. Those using the OpenNext adapter will also be able to easily upgrade to the recently announced Next.js Deployments API.
-
The Cloudflare Vite plugin is now v1.0 and generally available. The Vite plugin allows you to run Vite’s development server in the Workers runtime (
workerd), meaning you get all the benefits of Vite, including Hot Module Replacement, while still being able to use features that are exclusive to Workers (like Durable Objects). -
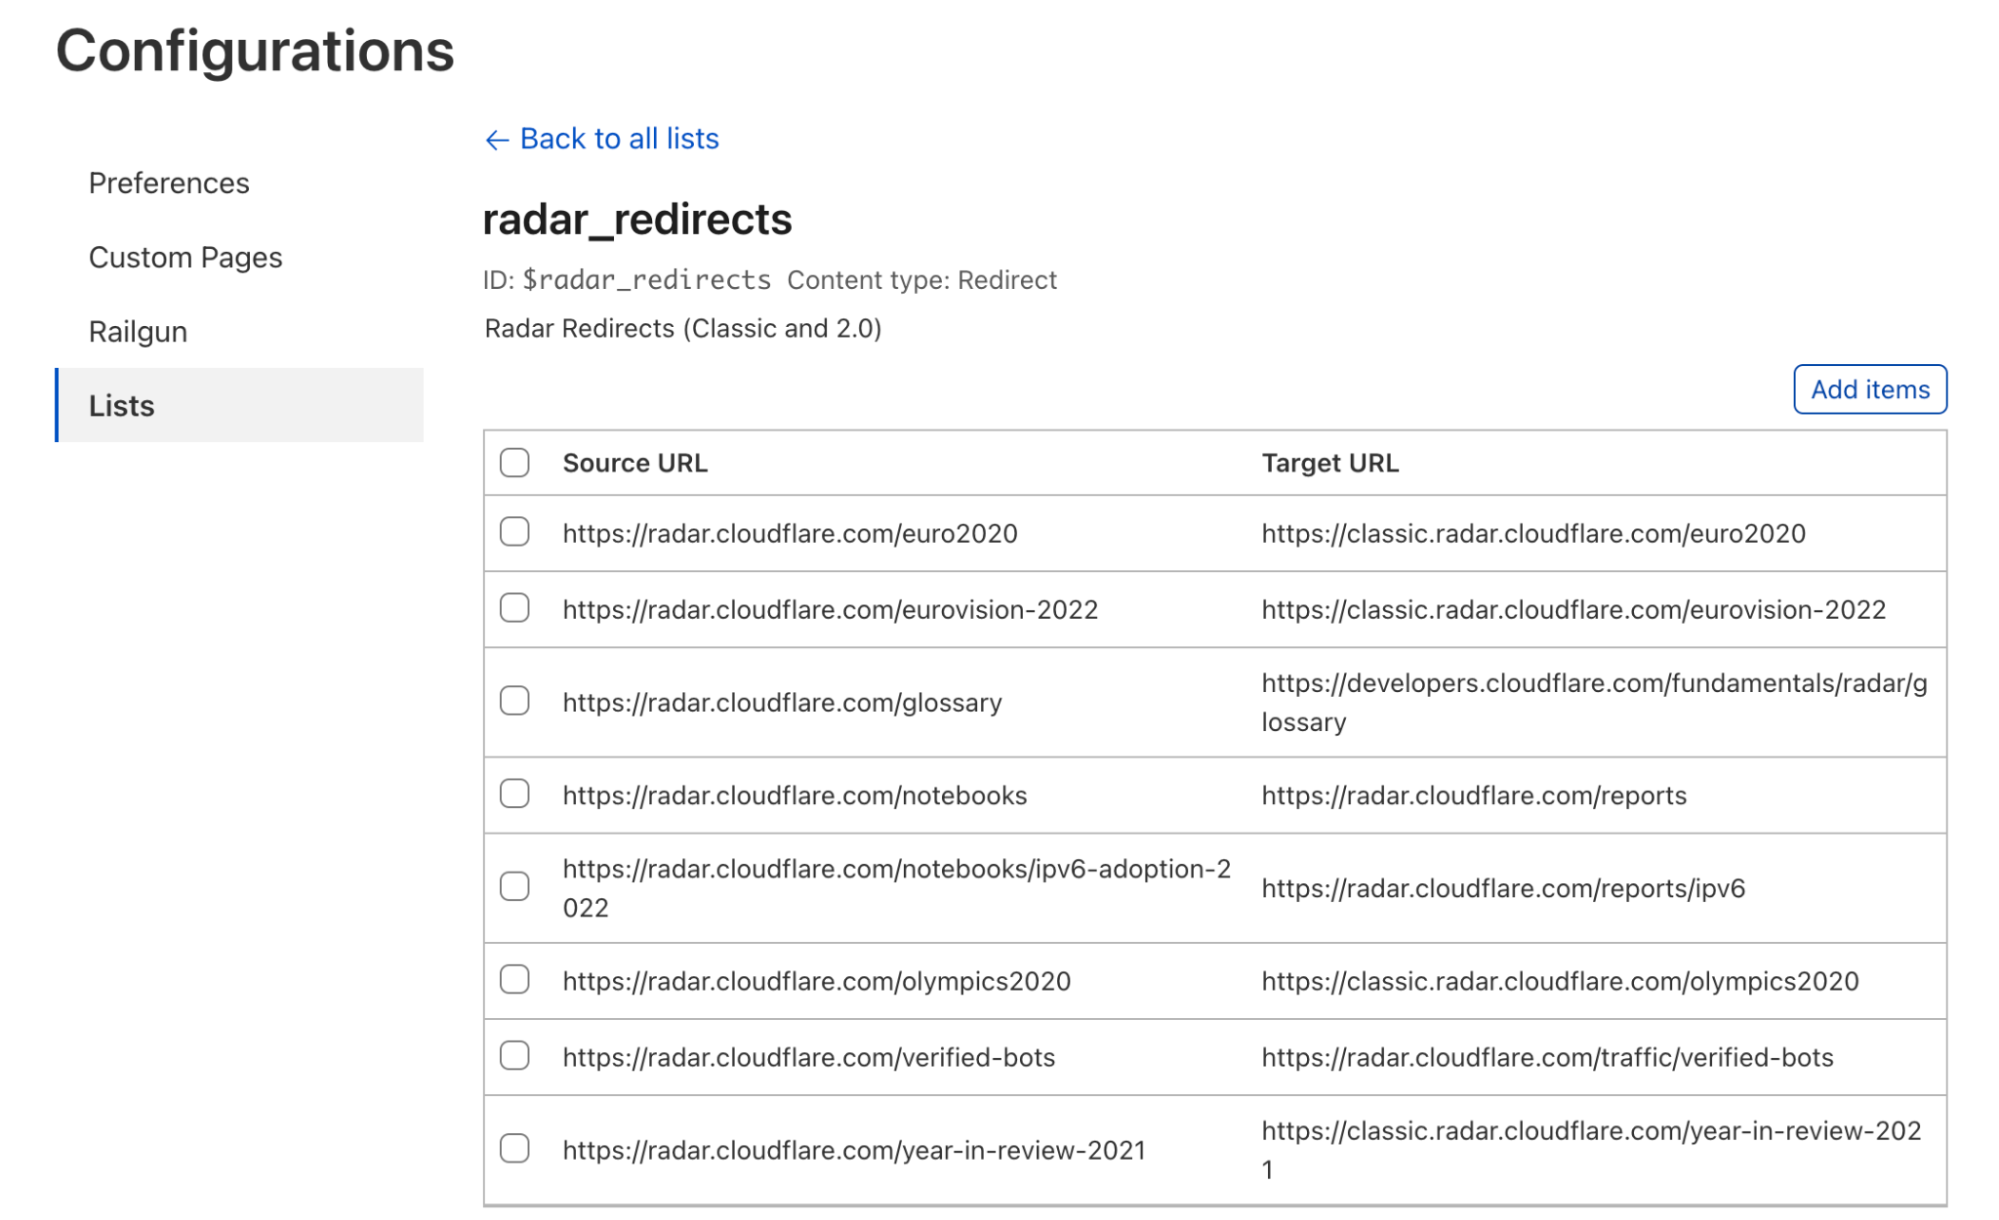
You can now use static _headers and _redirects configuration files for your applications on Workers, something that was previously only available on Pages. These files allow you to add simple headers and configure redirects without executing any Worker code.
-
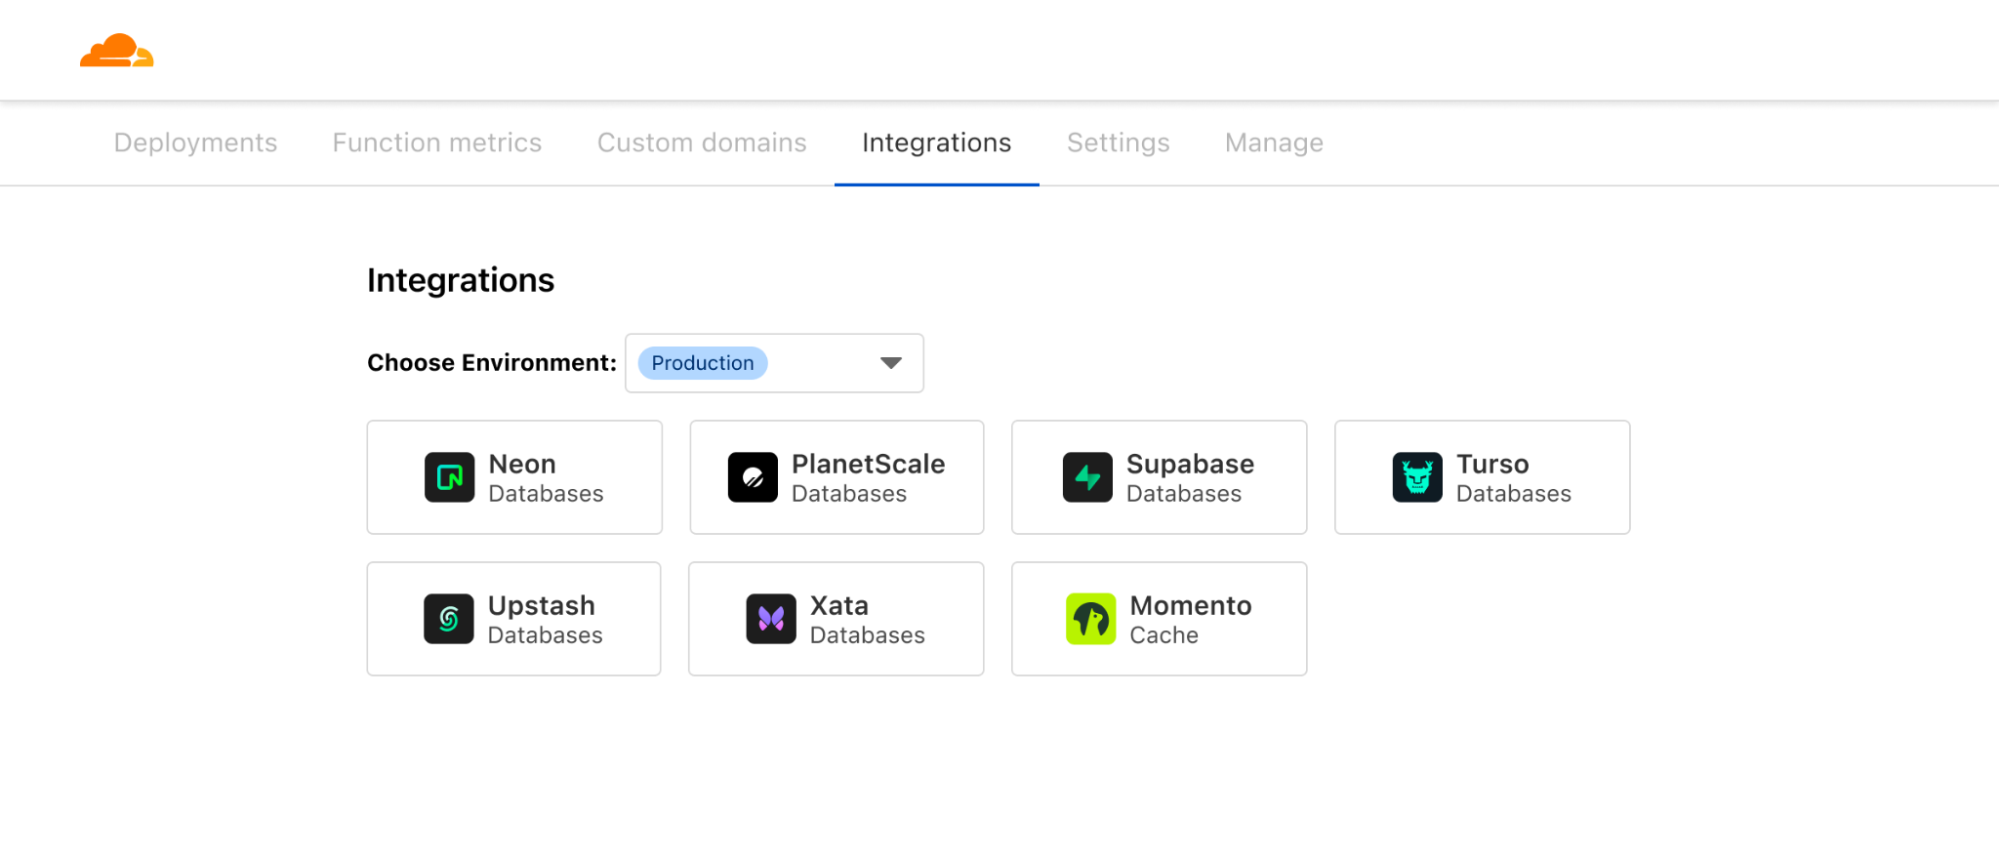
In addition to PostgreSQL, you can now connect to MySQL databases in addition from Cloudflare Workers, via Hyperdrive. Bring your existing Planetscale, AWS, GCP, Azure, or other MySQL database, and Hyperdrive will take care of pooling connections to your database and eliminating unnecessary roundtrips by caching queries.
-
More Node.js APIs are available in the Workers Runtime — including APIs from the
crypto,tls,net, anddnsmodules. We’ve also increased the maximum CPU time for a Workers request from 30 seconds to 5 minutes. -
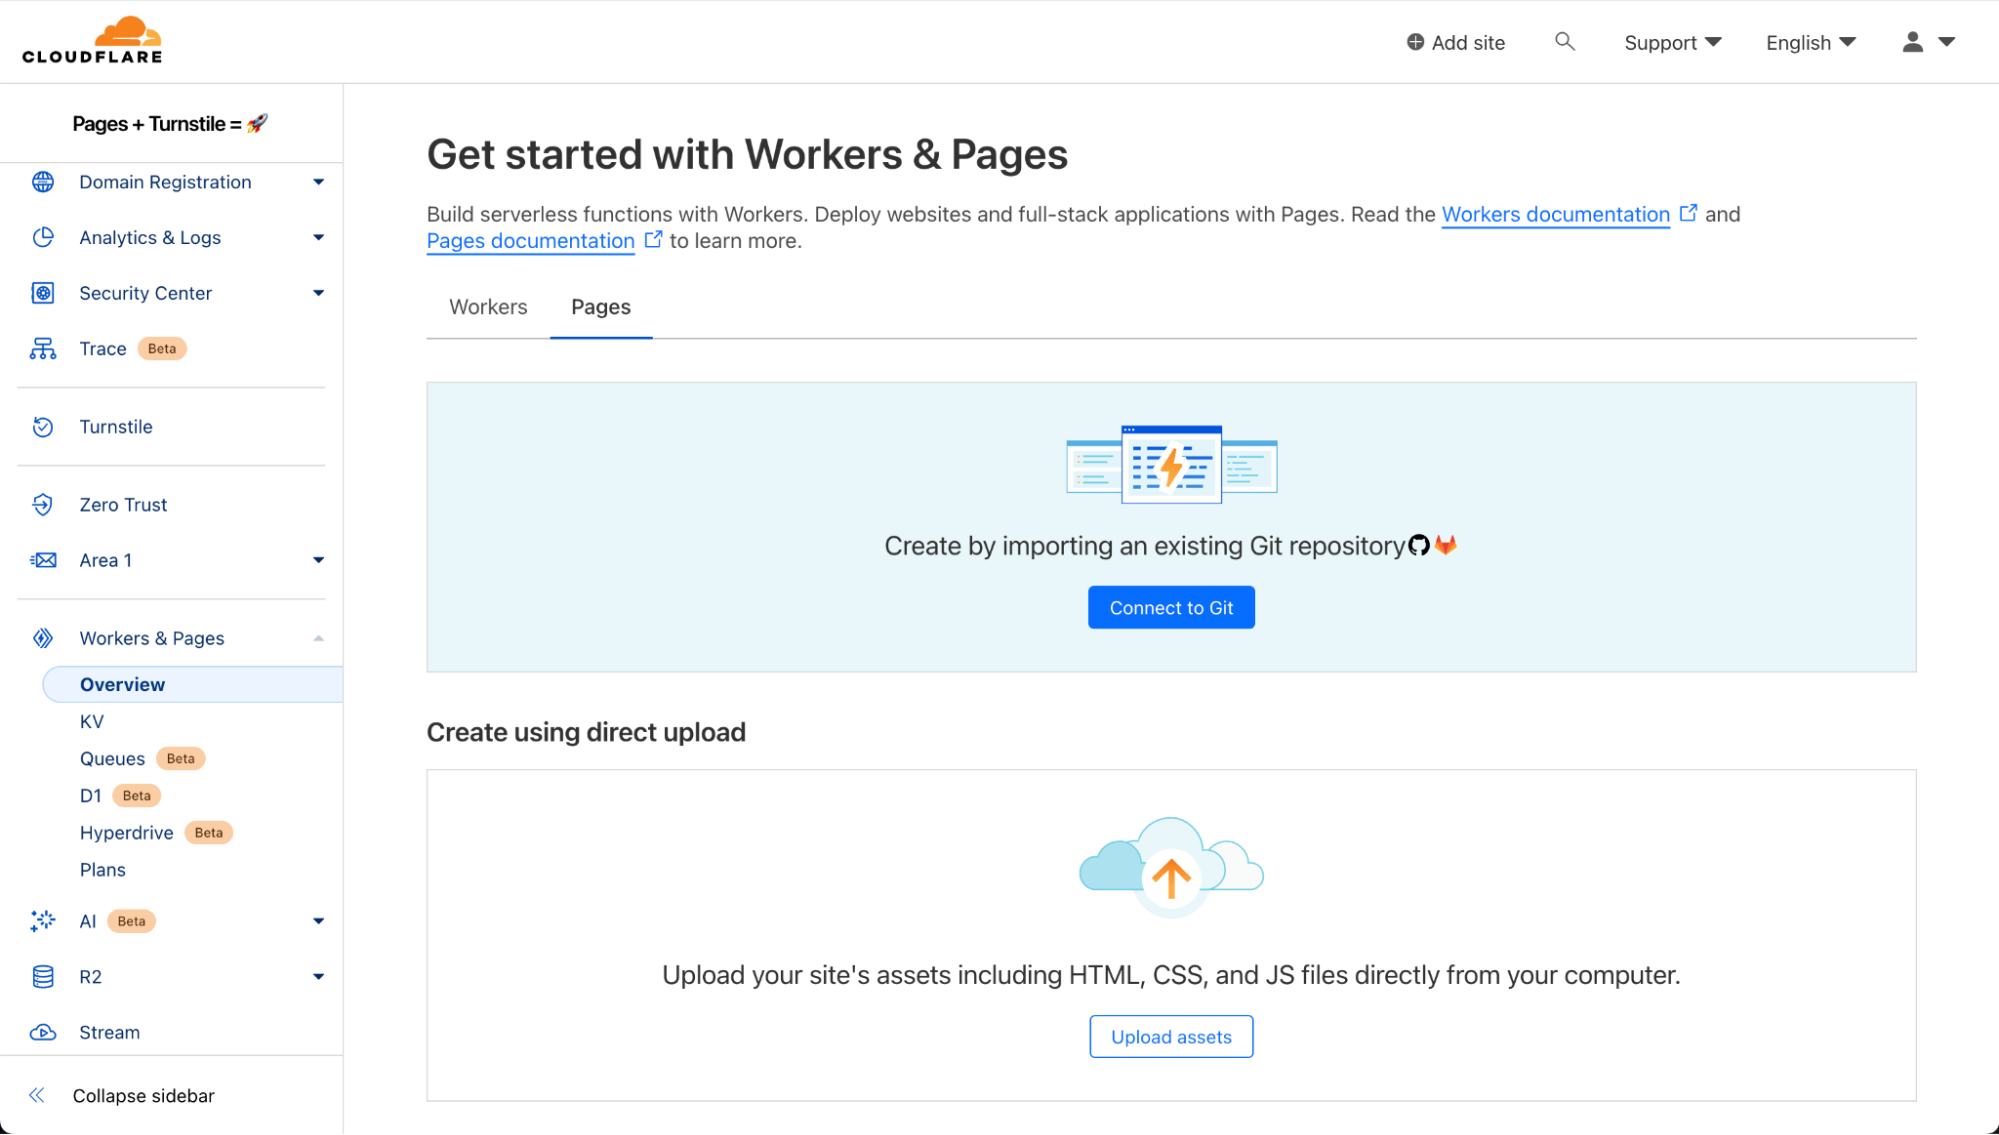
You can now bring any repository from GitHub or GitLab that contains a Worker application, and Workers Builds will take care of deploying the app as a new Worker on your account. Workers Builds is also starting much more quickly (by up to 6 seconds for every build).
-
You can now set up Workers Builds to run on non-production branches, and preview URLs will be posted back to GitHub as a comment.
-
The Images binding in Workers is generally available, allowing you to build more flexible, programmatic workflows.
These improvements allow you to build both simple static sites and more complex server-side rendered applications. Like Pages, you only get charged when your Worker code runs, meaning you can host and serve static sites for free. When you want to do any rendering on the server or need to build an API, simply add a Worker to handle your backend. And when you need to read or write data in your app, you can connect to an existing database with Hyperdrive, or use any of our storage solutions: Workers KV, R2, Durable Objects, or D1.
If you’d like to dive straight into code, you can deploy a single-page application built with Vite and React, with the option to connect to a hosted database with Hyperdrive, by clicking this “Deploy to Cloudflare” button:

Previously, you needed to choose between building on Cloudflare Pages or Workers (or use Pages for one part of your app, and Workers for another) just to get started. This meant figuring out what your app needed from the start, and hoping that if your project evolved, you wouldn’t be stuck with the wrong platform and architecture. Workers was designed to be a flexible platform, allowing developers to evolve projects as needed — and so, we’ve worked to bring pieces of Pages into Workers over the years.
Now that Workers supports both serving static assets and server-side rendering, you should start with Workers. Cloudflare Pages will continue to be supported, but, going forward, all of our investment, optimizations, and feature work will be dedicated to improving Workers. We aim to make Workers the best platform for building full-stack apps, building upon your feedback of what went well with Pages and what we could improve.
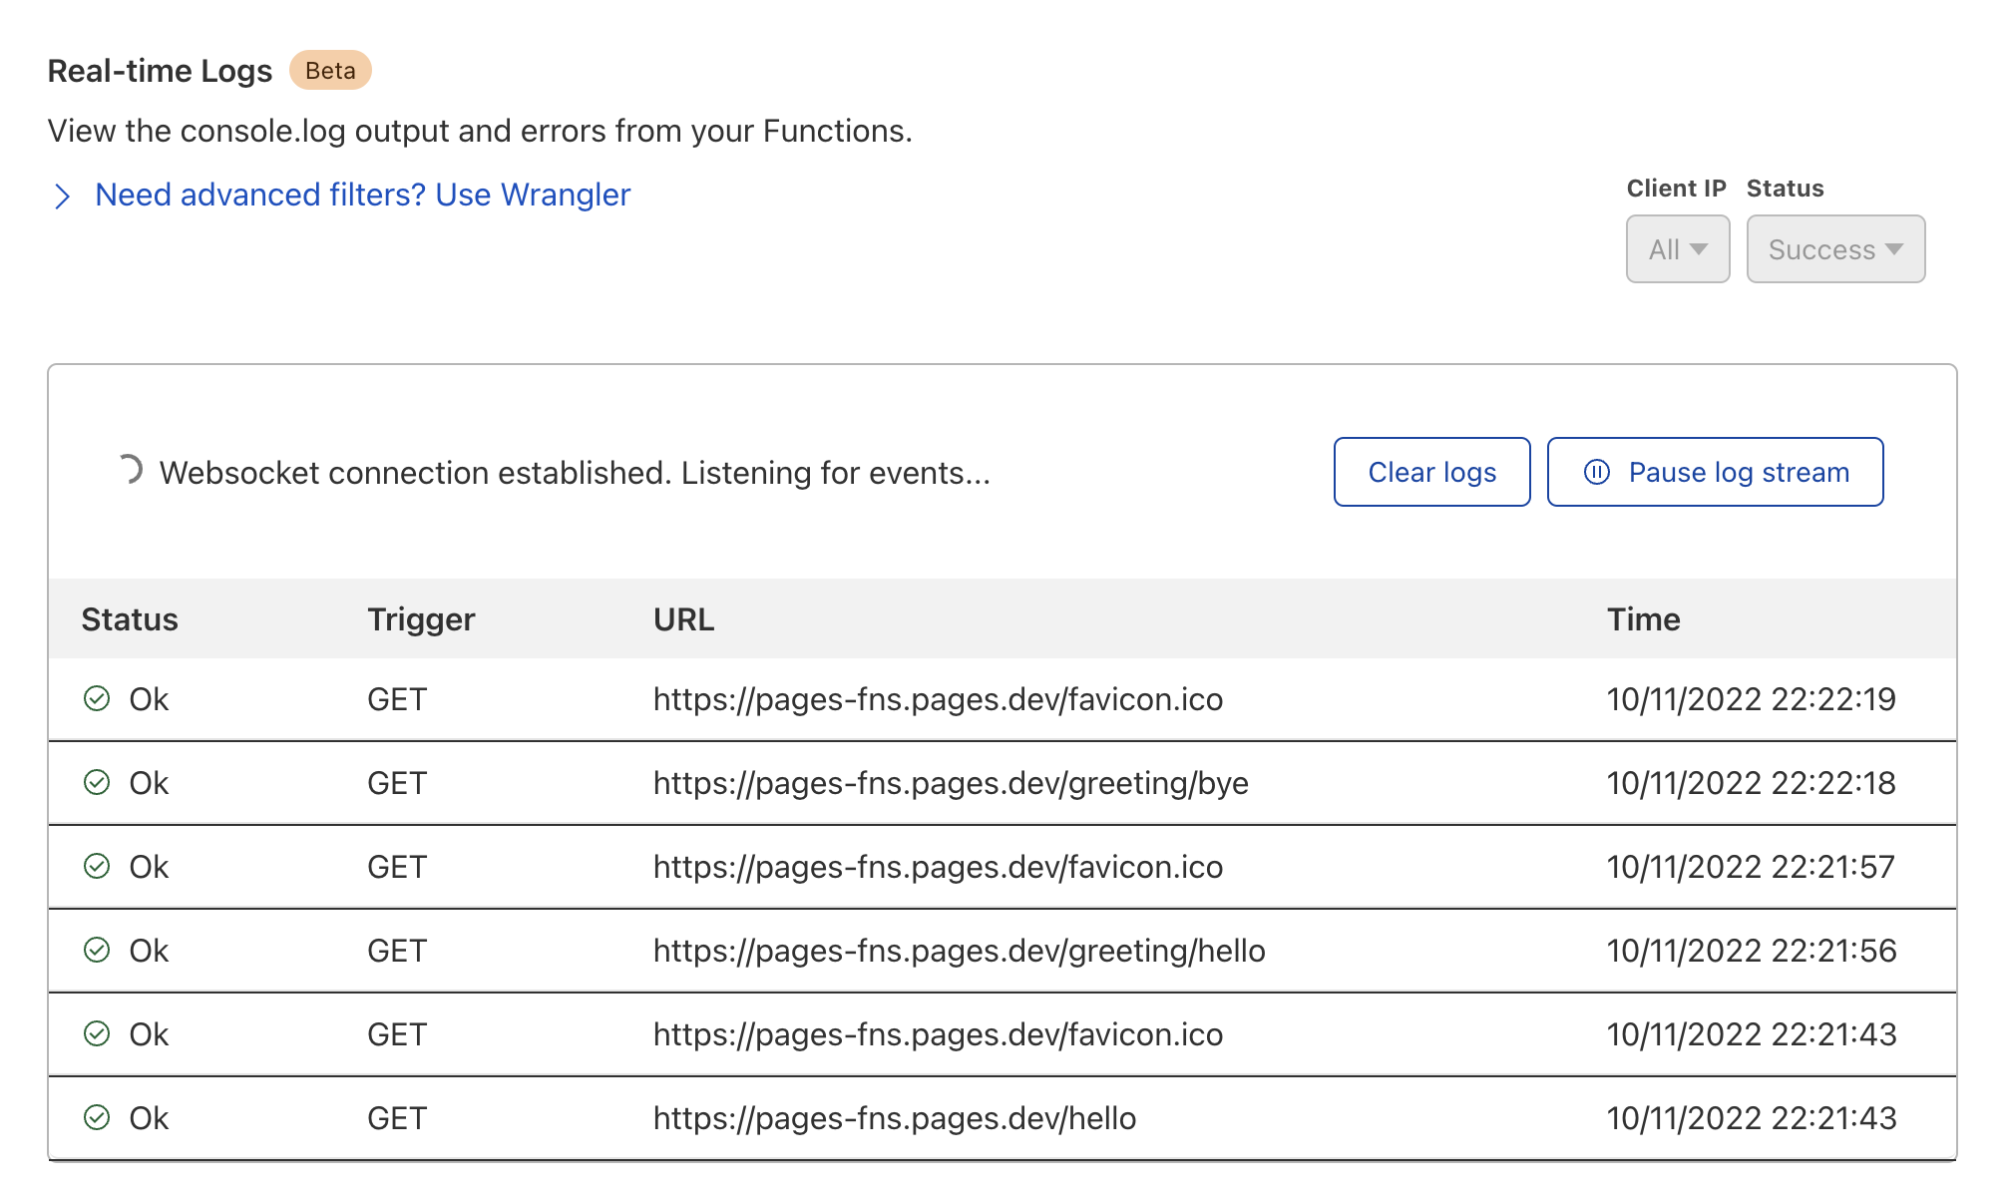
Before, building an app on Pages meant you got a really easy, opinionated on-ramp, but you’d eventually hit a wall if your application got more complex. If you wanted to use Durable Objects to manage state, you would need to set up an entirely separate Worker to do so, ending up with a complicated deployment and more overhead. You also were limited to real-time logs, and could only roll out changes all in one go.
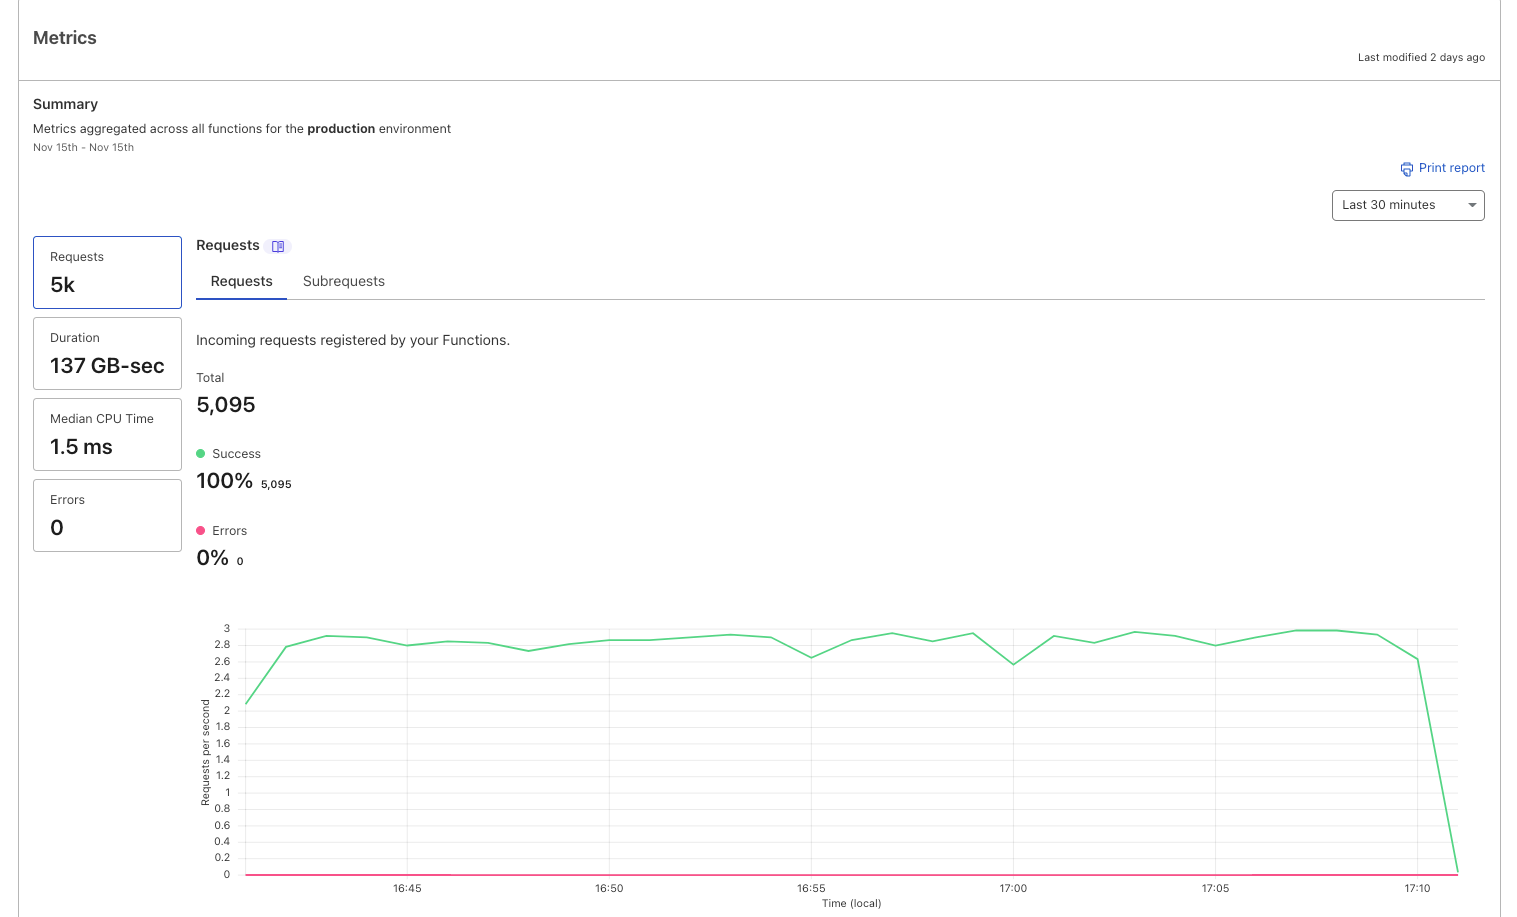
When you build on Workers, you can immediately bind to any other Developer Platform service (including Durable Objects, Email Workers, and more), and manage both your front end and back end in a single project — all with a single deployment. You also get the whole suite of Workers observability tooling built into the platform, such as Workers Logs. And if you want to rollout changes to only a certain percentage of traffic, you can do so with Gradual Deployments.
These latest improvements are part of our goal to bring the best parts of Pages into Workers. For example, we now support static _headers and _redirects config files, so that you can easily take an existing project from Pages (or another platform) and move it over to Workers, without needing to change your project. We also directly integrate with GitHub and GitLab with Workers Builds, providing automatic builds and deployments. And starting today, Preview URLs are posted back to your repository as a comment, with feature branch aliases and environments coming soon.
To learn how to migrate an existing project from Pages to Workers, read our migration guide.
Next, let’s talk about how you can build applications with different rendering modes on Workers.
As a quick primer, here are all the architectures and rendering modes we’ll be discussing that are supported on Workers:
-
Static sites: When you visit a static site, the server immediately returns pre-built static assets — HTML, CSS, JavaScript, images, and fonts. There’s no dynamic rendering happening on the server at request-time. Static assets are typically generated at build-time and served directly from a CDN, making static sites fast and easily cacheable. This approach works well for sites with content that rarely changes.
-
Single-Page Applications (SPAs): When you load an SPA, the server initially sends a minimal HTML shell and a JavaScript bundle (served as static assets). Your browser downloads this JavaScript, which then takes over to render the entire user interface client-side. After the initial load, all navigation occurs without full-page refreshes, typically via client-side routing. This creates a fast, app-like experience.
-
Server-Side Rendered (SSR) applications: When you first visit a site that uses SSR, the server generates a fully-rendered HTML page on-demand for that request. Your browser immediately displays this complete HTML, resulting in a fast first page load. Once loaded, JavaScript “hydrates” the page, adding interactivity. Subsequent navigations can either trigger new server-rendered pages or, in many modern frameworks, transition into client-side rendering similar to an SPA.
Next, we’ll dive into how you can build these kinds of applications on Workers, starting with setting up your development environment.
Before uploading your application, you need to bundle all of your client-side code into a directory of static assets. Wrangler bundles and builds your code when you run wrangler dev, but we also now support Vite with our new Vite plugin. This is a great option for those already using Vite’s build tooling and development server — you can continue developing (and testing with Vitest) using Vite’s development server, all using the Workers runtime.
To get started using the Cloudflare Vite plugin, you can scaffold a React application using Vite and our plugin, by running:
npm create cloudflare@latest my-react-app -- --framework=reactWhen you open the project, you should see a directory structure like this:
...
├── api
│   └── index.ts
├── public
│   └── ...
├── src
│   └── ...
...
├── index.html
├── package.json
├── vite.config.ts
└── wrangler.jsonc
If you run npm run build, you’ll see a new folder appear, named /dist.
...
├── api
│   └── index.ts
├── dist
│   └── ...
├── public
│   └── ...
├── src
│   └── ...
...
├── index.html
├── package.json
├── vite.config.ts
└── wrangler.jsonc
The Vite plugin informs Wrangler that this /dist directory contains the project’s built static assets — which, in this case, includes client-side code, some CSS files, and images.
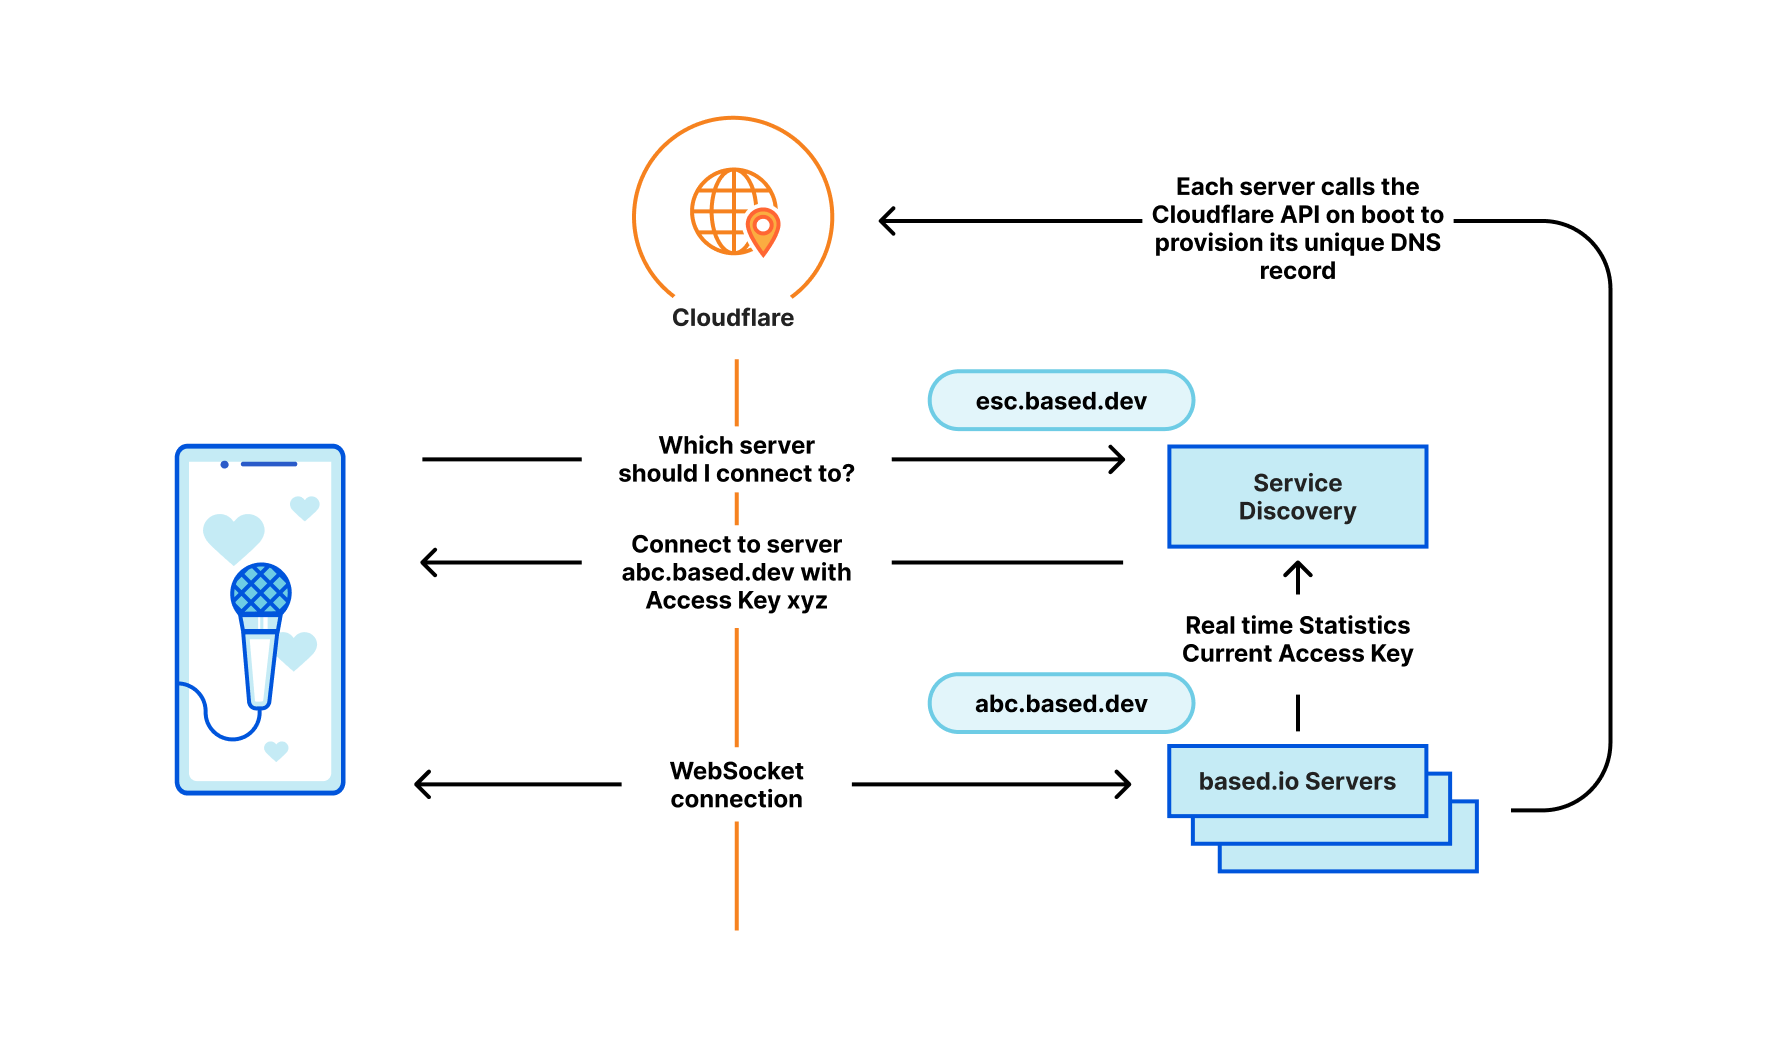
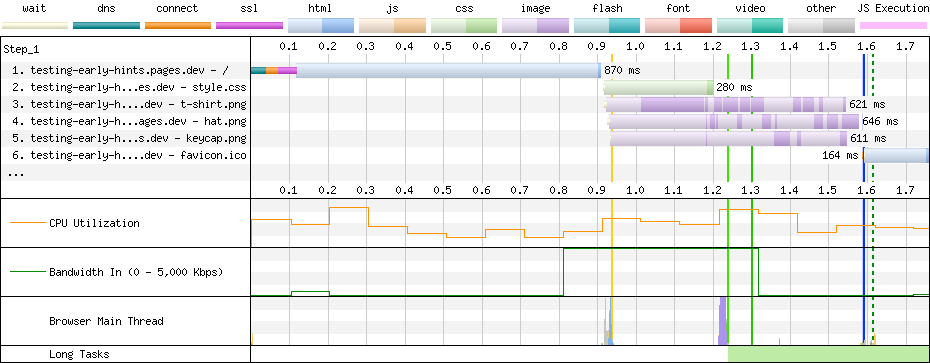
Once deployed, this single-page application (SPA) architecture will look something like this:
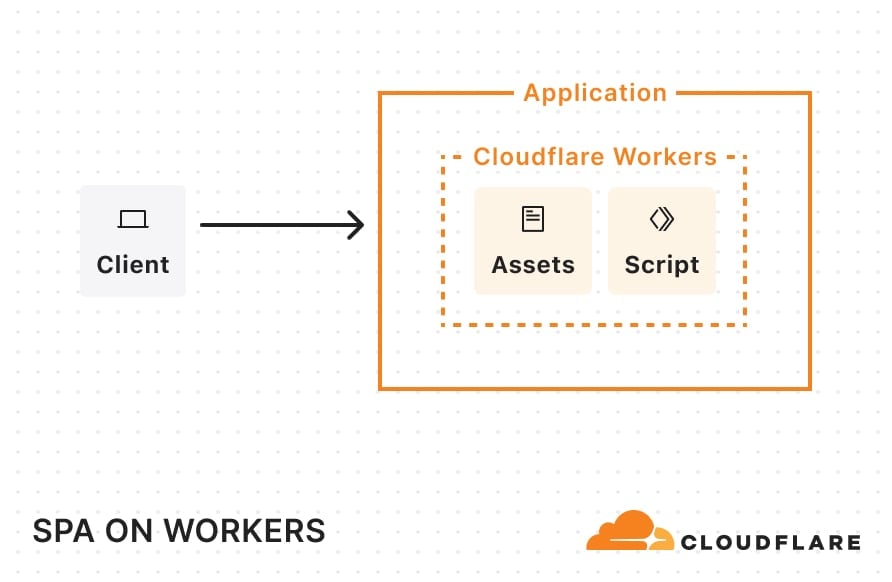
When a request comes in, Cloudflare looks at the pathname and automatically serves any static assets that match that pathname. For example, if your static assets directory includes a blog.html file, requests for example.com/blog get that file.
If you have a static site created by a static site generator (SSG) like Astro, all you need to do is create a wrangler.jsonc file (or wrangler.toml) and tell Cloudflare where to find your built assets:
// wrangler.jsonc

{
  "name": "my-static-site",
  "compatibility_date": "2025-04-01",
  "assets": {
    "directory": "./dist",
  }
}
Once you’ve added this configuration, you can simply build your project and run wrangler deploy. Your entire site will then be uploaded and ready for traffic on Workers. Once deployed and requests start flowing in, your static site will be cached across Cloudflare’s network.
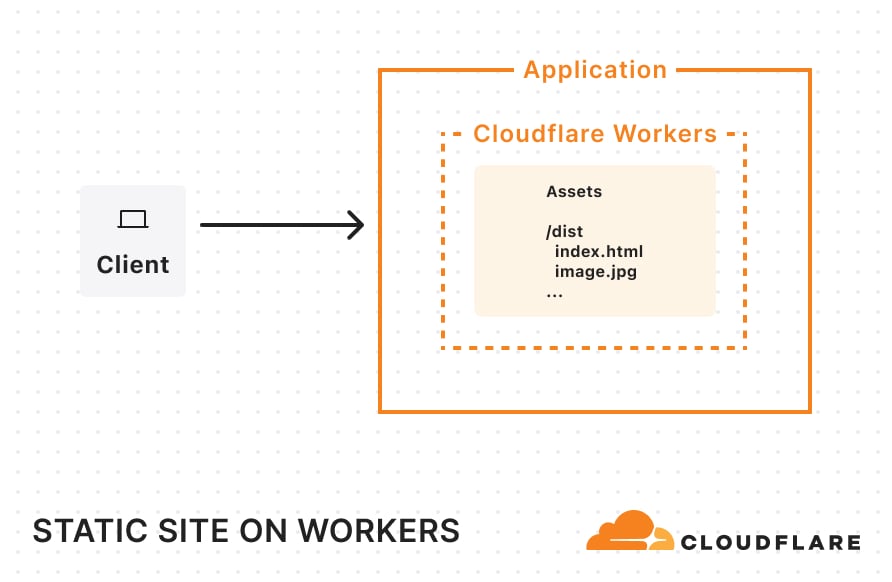
You can try starting a fresh Astro project on Workers today by running:
npm create cloudflare@latest my-astro-app -- --framework=astroYou can see our other supported Frameworks and how to get started in our framework guides.
If you have a single-page application, you can explicitly enable single-page-application mode in your Wrangler configuration:
{
 "name": "example-spa-worker-hyperdrive",
 "main": "api/index.js",
 "compatibility_flags": ["nodejs_compat"],
 "compatibility_date": "2025-04-01",
 },
 "assets": {
   "directory": "./dist",
   "binding": "ASSETS",
   "not_found_handling": "single-page-application"
 },
 "hyperdrive": [
   {
     "binding": "HYPERDRIVE",
     "id": "d9c9cfb2587f44ee9b0730baa692ffec",
     "localConnectionString": "postgresql://myuser:mypassword@localhost:5432/mydatabase"
   }
 ],
 "placement": {
   "mode": "smart"
 }
}
By enabling this, the platform assumes that any navigation request (requests which include a Sec-Fetch-Mode: navigate header) are intended for static assets and will serve up index.html whenever a matching static asset match cannot be found. For non-navigation requests (such as requests for data) that don’t match a static asset, Cloudflare will invoke the Worker script. With this setup, you can render the frontend with React, use a Worker to handle back-end operations, and use Vite to help stitch the two together. This is a great option for porting over older SPAs built with create-react-app, which was recently sunset.
Another thing to note in this Wrangler configuration file: we’ve defined a Hyperdrive binding and enabled Smart Placement. Hyperdrive lets us use an existing database and handles connection pooling. This solves a long-standing challenge of connecting Workers (which run in a highly distributed, serverless environment) directly to traditional databases. By design, Workers operate in lightweight V8 isolates with no persistent TCP sockets and a strict CPU/memory limit. This isolation is great for security and speed, but it makes it difficult to hold open database connections. Hyperdrive addresses these constraints by acting as a “bridge” between Cloudflare’s network and your database, taking care of the heavy lifting of maintaining stable connections or pools so that Workers can reuse them. By turning on Smart Placement, we also ensure that if requests to our Worker originate far from the database (causing latency), Cloudflare can choose to relocate both the Worker—which handles the database connection—and the Hyperdrive “bridge” to a location closer to the database, reducing round-trip times.
SPA example: Worker code
Let’s look at the “Deploy to Cloudflare” example at the top of this blog. In api/index.js, we’ve defined an API (using Hono) which connects to a hosted database through Hyperdrive.
import { Hono } from "hono";
import postgres from "postgres";
import booksRouter from "./routes/books";
import bookRelatedRouter from "./routes/book-related";
const app = new Hono();
// Setup SQL client middleware
app.use("*", async (c, next) => {
// Create SQL client
const sql = postgres(c.env.HYPERDRIVE.connectionString, {
max: 5,
fetch_types: false,
});
c.env.SQL = sql;
// Process the request
await next();
// Close the SQL connection after the response is sent
c.executionCtx.waitUntil(sql.end());
});
app.route("/api/books", booksRouter);
app.route("/api/books/:id/related", bookRelatedRouter);
export default {
fetch: app.fetch,
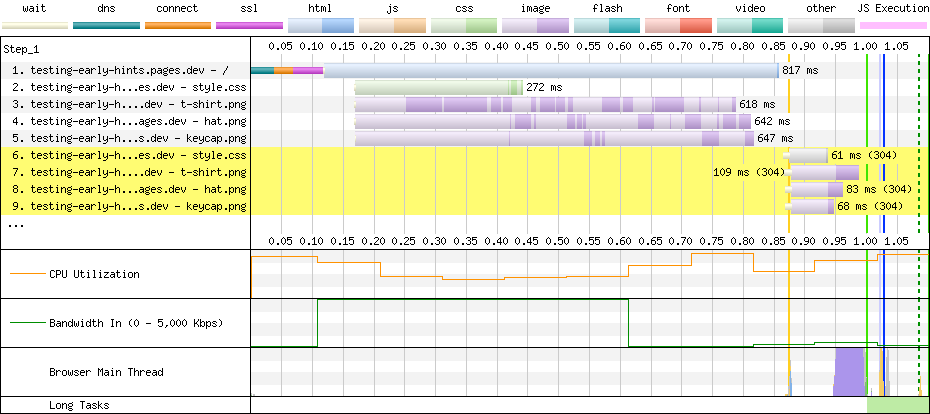
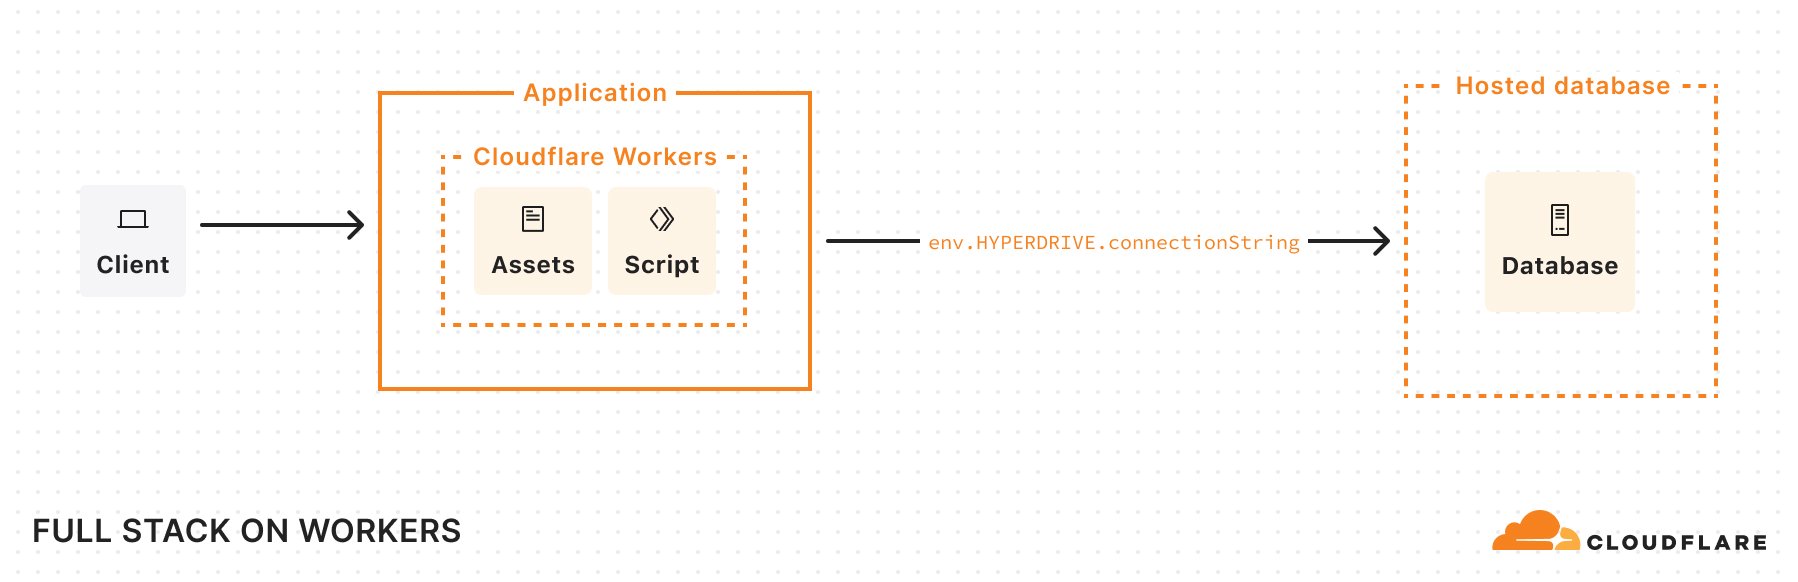
};When deployed, our app’s architecture looks something like this:
If Smart Placement moves the placement of my Worker to run closer to my database, it could look like this:
If you want to handle rendering on the server, we support a number of popular full-stack frameworks.
Here’s a version of our previous example, now using React Router v7’s server-side rendering:
You could also use Next.js with the OpenNext adapter, or any other framework listed in our framework guides.
We’ve also continued to make progress supporting Node.js APIs, recently adding support for the crypto, tls, net, and dns modules. This allows existing applications and libraries that rely on these Node.js modules to run on Workers. Let’s take a look at an example:
Previously, if you tried to use the mongodb package, you encountered the following error:
Error: [unenv] dns.resolveTxt is not implemented yet!This occurred when mongodb used the node:dns module to do a DNS lookup of a hostname. Even if you avoided that issue, you would have encountered another error when mongodb tried to use node:tls to securely connect to a database.
Now, you can use mongodb as expected because node:dns and node:tls are supported. The same can be said for libraries relying on node:crypto and node:net.
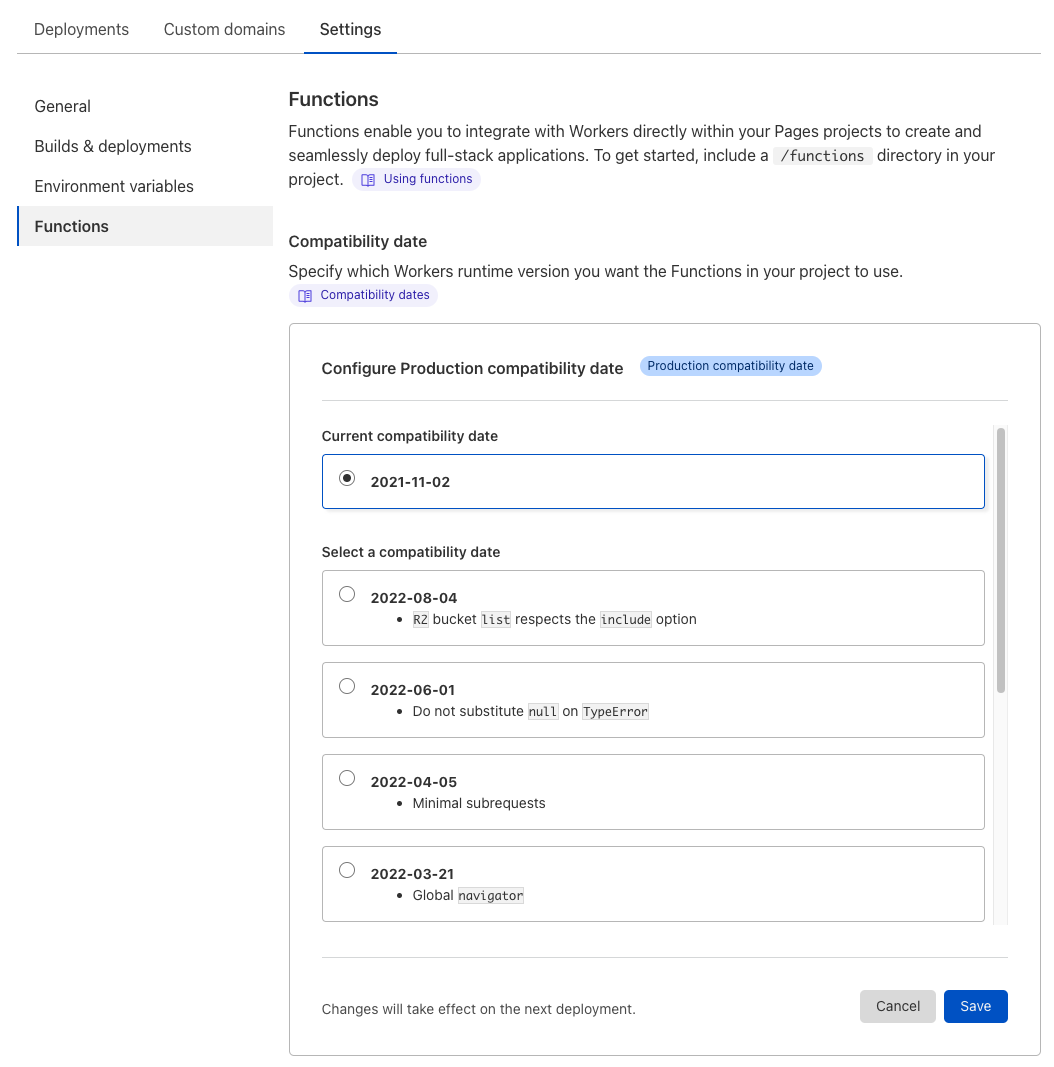
Additionally, Workers now expose environment variables and secrets on the process.env object when the nodejs_compat compatibility flag is on and the compatibility date is set to 2025-04-01 or beyond. Some libraries (and developers) assume that this object will be populated with variables, and rely on it for top-level configuration. Without the tweak, libraries may have previously broken unexpectedly and developers had to write additional logic to handle variables on Cloudflare Workers.
Now, you can just access your variables as you would in Node.js.
const LOG_LEVEL = process.env.LOG_LEVEL || "info";We have also raised the maximum CPU time per Worker request from 30 seconds to 5 minutes. This allows for compute-intensive operations to run for longer without timing out. Say you want to use the newly supported node:crypto module to hash a very large file, you can now do this on Workers without having to rely on external compute for CPU-intensive operations.
We’ve also made improvements to Workers Builds, which allows you to connect a Git repository to your Worker, so that you can have automatic builds and deployments on every pushed change. Workers Builds was introduced during Builder Day 2024, and initially only allowed you to connect a repository to an existing Worker. Now, you can bring a repository and immediately deploy it as a new Worker, reducing the amount of setup and button clicking needed to bring a project over. We’ve improved the performance of Workers Builds by reducing the latency of build starts by 6 seconds — they now start within 10 seconds on average. We also boosted API responsiveness, achieving a 7x latency improvement thanks to Smart Placement.
-
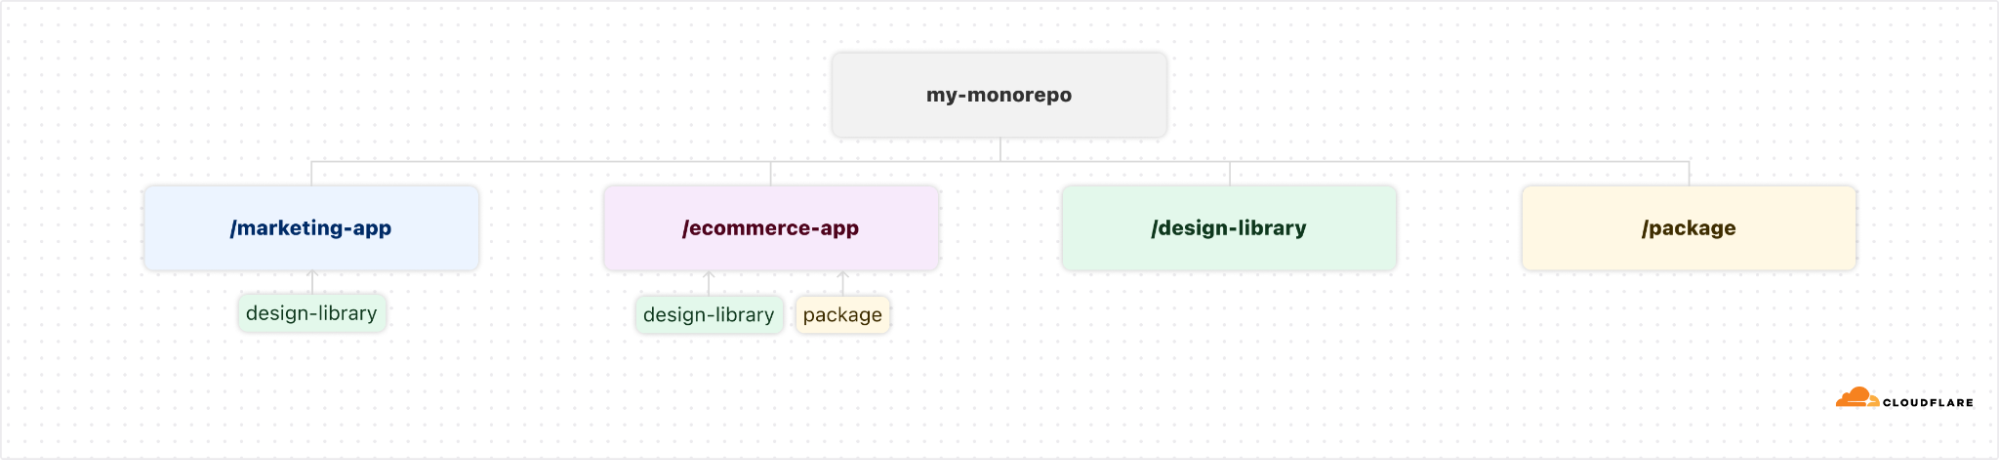
Note: On April 2, 2025, Workers Builds transitioned to a new pricing model, as announced during Builder Day 2024. Free plan users are now capped at 3,000 minutes of build time, and Workers Paid subscription users will have a new usage-based model with 6,000 free minutes included and $0.005 per build minute pricing after. To better support concurrent builds, Paid plans will also now get six (6) concurrent builds, making it easier to work across multiple projects and monorepos. For more information on pricing, see the documentation.
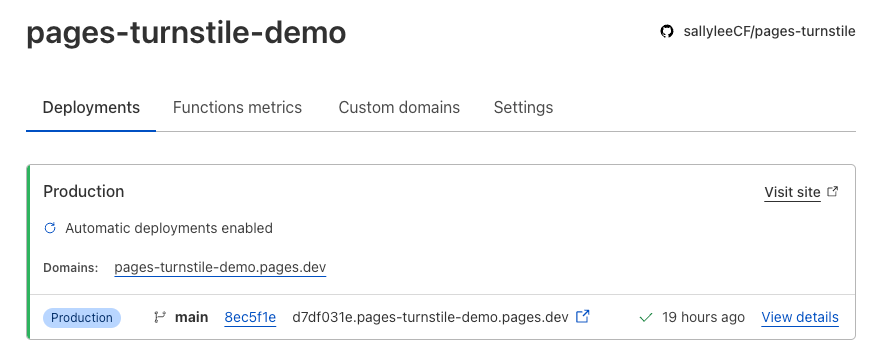
You can also set up Workers Builds to run on non-production branches, and preview URLs will be posted back to GitHub as a comment.
Last week, we wrote a blog post that covers how the Images binding enables more flexible, programmatic workflows for image optimization.
Previously, you could access image optimization features by calling fetch() in your Worker. This method requires the original image to be retrievable by URL. However, you may have cases where images aren’t accessible from a URL, like when you want to compress user-uploaded images before they are uploaded to your storage. With the Images binding, you can directly optimize an image by operating on its body as a stream of bytes.
To learn more, read our guide on transforming an image before it gets uploaded to R2.
We’re excited to see what you’ll build, and are focused on new features and improvements to make it easier to create any application on Workers. Much of this work was made even better by community feedback, and we encourage everyone to join our Discord to participate in the discussion.
Helpful resources to get you started: