All posts by Taylor Smith

Dynamically optimize, clip, and resize video from any origin with Media Transformations

Post Syndicated from Taylor Smith original https://blog.cloudflare.com/media-transformations-for-video-open-beta/

Today, we are thrilled to announce Media Transformations, a new service that brings the magic of Image Transformations to short-form video files wherever they are stored.

Since 2018, Cloudflare Stream has offered a managed video pipeline that empowers customers to serve rich video experiences at global scale easily, in multiple formats and quality levels. Sometimes, the greatest friction to getting started isn’t even about video, but rather the thought of migrating all those files. Customers want a simpler solution that retains their current storage strategy to deliver small, optimized MP4 files. Now you can do that with Media Transformations.

Short videos, big volume

For customers with a huge volume of short video, such as generative AI output, e-commerce product videos, social media clips, or short marketing content, uploading those assets to Stream is not always practical. Furthermore, Stream’s key features like adaptive bitrate encoding and HLS packaging offer diminishing returns on short content or small files.

Instead, content like this should be fetched from our customers’ existing storage like R2 or S3 directly, optimized by Cloudflare quickly, and delivered efficiently as small MP4 files. Cloudflare Images customers reading this will note that this sounds just like their existing Image Transformation workflows. Starting today, the same workflow can be applied to your short-form videos.

What’s in a video?

The distinction between video and images online can sometimes be blurry — consider an animated GIF: is that an image or a video? (They’re usually smaller as MP4s anyway!) As a practical example, consider a selection of product images for a new jacket on an e-commerce site. You want a consumer to know how it looks, but also how it flows. So perhaps the first “image” in that carousel is actually a video of a model simply putting the jacket on. Media Transformations empowers customers to optimize the product video and images with similar tools and identical infrastructure.

How to get started

Any website that is already enabled for Image Transformations is now enabled for Media Transformations. To enable a new zone, navigate to “Transformations” under Stream (or Images), locate your zone in the list, and click Enable. Enabling and disabling a zone for transformations affects both Images and Media transformations.


After enabling Media Transformations on a website, it is simple to construct a URL that transforms a video. The pattern is similar to Image Transformations, but uses the media endpoint instead of the image endpoint:

https://example.com/cdn-cgi/media/<OPTIONS>/<SOURCE-VIDEO>

The <OPTIONS> portion of the URL is a comma-separated list of flags written as key=value. A few noteworthy flags:

  • mode can be video (the default) to output a video, frame to pull a still image of a single frame, or even spritesheet to generate an image with multiple frames, which is useful for seek previews or storyboarding.

  • time specifies the exact start time from the input video to extract a frame or start making a clip

  • duration specifies the length of an output video to make a clip shorter than the original

  • fit, together with height and width allow resizing and cropping the output video or frame.

  • Setting audio to false removes the sound in the output video.

The <SOURCE-VIDEO> is a full URL to a source file or a root-relative path if the origin is on the same zone as the transformation request.

A full list of supported options, examples, and troubleshooting information is available in DevDocs.

A few examples

I used my phone to take this video of the randomness mobile in Cloudflare’s Austin Office and put it in an R2 bucket. Of course, it is possible to embed the original video file from R2 directly:

That video file is almost 30 MB. Let’s optimize it together — a more efficient choice would be to resize the video to the width of this blog post template. Let’s apply a width adjustment in the options portion of the URL:

https://example.com/cdn-cgi/media/width=760/https://pub-d9fcbc1abcd244c1821f38b99017347f.r2.dev/aus-mobile.mp4

That will deliver the same video, resized and optimized:

Not only is this video the right size for its container, now it’s less than 4 MB. That’s a big bandwidth savings for visitors.

As I recorded the video, the lobby was pretty quiet, but there was someone talking in the distance. If we wanted to use this video as a background, we should remove the audio, shorten it, and perhaps crop it vertically. All of these options can be combined, comma-separated, in the options portion of the URL:

https://example.com/cdn-cgi/media/mode=video,duration=10s,width=480,height=720,fit=cover,audio=false/https://pub-d9fcbc1abcd244c1821f38b99017347f.r2.dev/aus-mobile.mp4

The result:

If this were a product video, we might want a small thumbnail to add to the carousel of images so shoppers can click to zoom in and see it move. Use the “frame” mode and a “time” to generate a static image from a single point in the video. The same size and fit options apply:

https://example.com/cdn-cgi/media/mode=frame,time=3s,width=120,height=120,fit=cover/https://pub-d9fcbc1abcd244c1821f38b99017347f.r2.dev/aus-mobile.mp4

Which generates this optimized image:

Try it out yourself using our video or one of your own: 

Input Limits

We are eager to start supporting real customer content, and we will right-size our input limitations with our early adopters. To start:

  • Video files must be smaller than 40 megabytes.

  • Files must be MP4s and should be h.264 encoded.

  • Videos and images generated with Media Transformations will be cached. However, in our initial beta, the original content will not be cached which means regenerating a variant will result in a request to the origin.

How it works

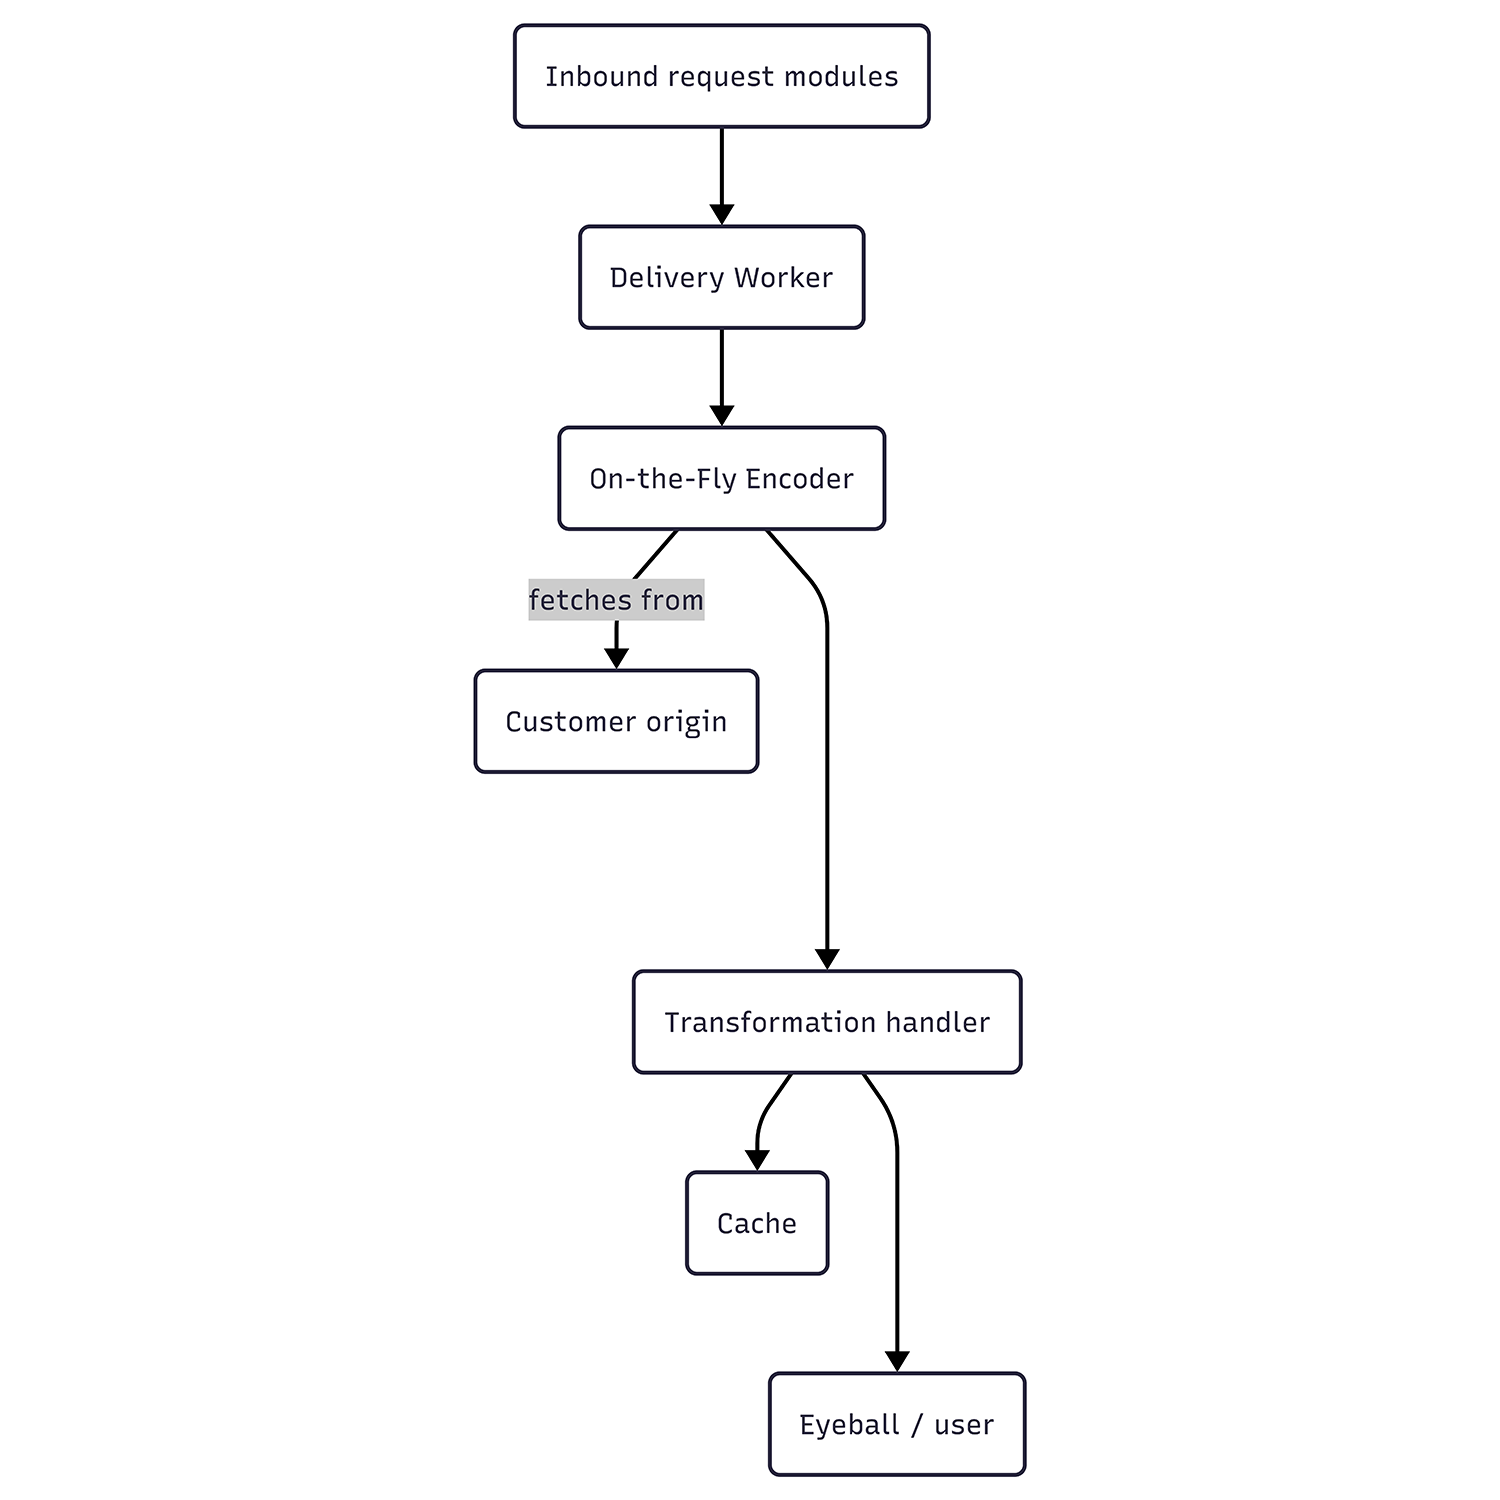
Unlike Stream, Media Transformations receives requests on a customer’s own website. Internally, however, these requests are passed to the same On-the-Fly Encoder (“OTFE”) platform that Stream Live uses. To achieve this, the Stream team built modules that run on our servers to act as entry points for these requests.

These entry points perform some initial validation on the URL formatting and flags before building a request to Stream’s own Delivery Worker, which in turn calls OTFE’s set of transformation handlers. The original asset is fetched from the customer’s origin, validated for size and type, and passed to the same OTFE methods responsible for manipulating and optimizing video or still frame thumbnails for videos uploaded to Stream. These tools do a final inspection of the media type and encoding for compatibility, then generate the requested variant. If any errors were raised along the way, an HTTP error response will be generated using similar error codes to Image Transformations. When successful, the result is cached for future use and delivered to the requestor as a single file. Even for new or uncached requests, all of this operates much faster than the video’s play time.


What it costs

Media Transformations will be free for all customers while in beta. We expect the beta period to extend into Q3 2025, and after that, Media Transformations will use the same subscriptions and billing mechanics as Image Transformations — including a free allocation for all websites/zones. Generating a still frame (single image) from a video counts as 1 transformation. Generating an optimized video is billed as 1 transformation per second of the output video. Each unique transformation is only billed once per month. All Media and Image Transformations cost $0.50 per 1,000 monthly unique transformation operations, with a free monthly allocation of 5,000.

Using this post as an example, recall the two transformed videos and one transformed image above — the big original doesn’t count because it wasn’t transformed. The first video (showing blog post width) was 15 seconds of output. The second video (silent vertical clip) was 10 seconds of output. The preview square is a still frame. These three operations would count as 26 transformations — and they would only bill once per month, regardless of how many visitors this page receives.

Looking ahead

Our short-term focus will be on right-sizing input limits based on real customer usage as well as adding a caching layer for origin fetches to reduce any egress fees our customers may be facing from other storage providers. Looking further, we intend to streamline Images and Media Transformations to further simplify the developer experience, unify the features, and streamline enablement: Cloudflare’s Media Transformations will optimize your images and video, quickly and easily, wherever you need them.

Try it for yourself today using our sample asset above, or get started by enabling Transformations on a zone in your account and uploading a short file to R2, both of which offer a free tier to get you going.

Un experimento rápido: translating Cloudflare Stream captions with Workers AI

Post Syndicated from Taylor Smith original https://blog.cloudflare.com/un-experimento-rapido-translating-cloudflare-stream-captions-with-workers-ai/

Cloudflare Stream launched AI-powered automated captions to transcribe English in on-demand videos in March 2024. Customers’ immediate next questions were about other languages — both transcribing audio from other languages, and translating captions to make subtitles for other languages. As the Stream Product Manager, I’ve thought a lot about how we might tackle these, but I wondered…

What if I just translated a generated VTT (caption file)? Can we do that? I hoped to use Workers AI to conduct a quick experiment to learn more about the problem space, challenges we may find, and what platform capabilities we can leverage.

There is a sample translator demo in Workers documentation that uses the “m2m100-1.2b” Many-to-Many multilingual translation model to translate short input strings. I decided to start there and try using it to translate some of the English captions in my Stream library into Spanish.

Selecting test content

I started with my short demo video announcing the transcription feature. I wanted a Worker that could read the VTT captions file from Stream, isolate the text content, and run it through the model as-is.

The first step was parsing the input. A VTT file is a text file that contains a sequence of numbered “cues,” each with a number, a start and end time, and text content. 

WEBVTT
X-TIMESTAMP-MAP=LOCAL:00:00:00.000,MPEGTS:900000
 
1
00:00:00.000 --> 00:00:02.580
Good morning, I'm Taylor Smith,
 
2
00:00:02.580 --> 00:00:03.520
the Product Manager for Cloudflare
 
3
00:00:03.520 --> 00:00:04.460
Stream. This is a quick
 
4
00:00:04.460 --> 00:00:06.040
demo of our AI-powered automatic
 
5
00:00:06.040 --> 00:00:07.580
subtitles feature. These subtitles
 
6
00:00:07.580 --> 00:00:09.420
were generated with Cloudflare WorkersAI
 
7
00:00:09.420 --> 00:00:10.860
and the Whisper Model,
 
8
00:00:10.860 --> 00:00:12.020
not handwritten, and it took
 
9
00:00:12.020 --> 00:00:13.940
just a few seconds.

Parsing the input

I started with a simple Worker that would fetch the VTT from Stream directly, run it through a function I wrote to deconstruct the cues, and return the timestamps and original text in an easier to review format.

export default {
  async fetch(request: Request, env: Env, ctx): Promise<Response> {
    // Step One: Get our input.
    const input = await fetch(PLACEHOLDER_VTT_URL)
      .then(res => res.text());
 
    // Step Two: Parse the VTT file and get the text
    const captions = vttToCues(input);
 
    // Done: Return what we have.
    return new Response(captions.map(c =>
      (`#${c.number}: ${c.start} --> ${c.end}: ${c.content.toString()}`)
    ).join('\n'));
  },
};

That returned this text:

#1: 0 --> 2.58: Good morning, I'm Taylor Smith,
#2: 2.58 --> 3.52: the Product Manager for Cloudflare
#3: 3.52 --> 4.46: Stream. This is a quick
#4: 4.46 --> 6.04: demo of our AI-powered automatic
#5: 6.04 --> 7.58: subtitles feature. These subtitles
#6: 7.58 --> 9.42: were generated with Cloudflare WorkersAI
#7: 9.42 --> 10.86: and the Whisper Model,
#8: 10.86 --> 12.02: not handwritten, and it took
#9: 12.02 --> 13.94: just a few seconds.

AI-ify

As a proof of concept, I adapted a snippet from the demo into my Worker. In the example, the target language and input text are extracted from the user’s request. In my experiment, I decided to hardcode the languages. Also, I had an array of input objects, one for each cue, not just a string. After interpreting the caption input but before returning a response, I used a map callback to parallelize all the AI.run() calls to translate each cue, so they could execute asynchronously and in-place, then awaited them all to resolve. Ultimately, the AI inference call itself is the simplest part of the script.

await Promise.all(captions.map(async (q) => {
  const translation = await env.AI.run(
    "@cf/meta/m2m100-1.2b",
    {
      text: q.content,
      source_lang: "en",
      target_lang: "es",
    }
  );
 
  q.content = translation?.translated_text ?? q.content;
}));

Then the script returns the translated output in the format from before.

Of course, this is not a scalable or error-tolerant approach for production use because it doesn’t make affordances for rate limiting, failures, or processing bigger throughput. But for a few minutes of tinkering, it taught me a lot.

#1: 0 --> 2.58: Buen día, soy Taylor Smith.
#2: 2.58 --> 3.52: El gerente de producto de Cloudflare
#3: 3.52 --> 4.46: Rápido, esto es rápido
#4: 4.46 --> 6.04: La demostración de nuestro automático AI-powered
#5: 6.04 --> 7.58: Los subtítulos, estos subtítulos
#6: 7.58 --> 9.42: Generado con Cloudflare WorkersAI
#7: 9.42 --> 10.86: y el modelo de susurro,
#8: 10.86 --> 12.02: No se escribió, y se tomó
#9: 12.02 --> 13.94: Sólo unos segundos.

A few immediate observations: first, these results came back surprisingly quickly and the Workers AI code worked on the first try! Second, evaluating the quality of translation results is going to depend on having team members with expertise in those languages. Because — third, as a novice Spanish speaker, I can tell this output has some issues.

Cues 1 and 2 are okay, but 3 is not (“Fast, this is fast” from “[Cloudflare] Stream. This is a quick…”). Cues 5 through 9 had several idiomatic and grammatical issues, too. I theorized that this is because Stream splits the English captions into groups of 4 or 5 words to make them easy to read quickly in the overlay. But that also means sentences and grammatical constructs are interrupted. When those fragments go to the translation model, there isn’t enough context.

Consolidating sentences

I speculated that reconstructing sentences would be the most effective way to improve translation quality, so I made that the one problem I attempted to solve within this exploration. I added a rough pre-processor in the Worker that tries to merge caption cues together and then splits them at sentence boundaries instead. In the process, it also adjusts the timing of the resulting cues to cover the same approximate timeframe.

Looking at each cue in order:

// Break this cue up by sentence-ending punctuation.
const sentences = thisCue.content.split(/(?<=[.?!]+)/g);

// Cut here? We have one fragment and it has a sentence terminator.
const cut = sentences.length === 1 && thisCue.content.match(/[.?!]/);

But if there’s a cue that splits into multiple sentences, cut it up and split the timing. Leave the final fragment to roll into the next cue:

else if (sentences.length > 1) {
  // Save the last fragment for later
  const nextContent = sentences.pop();

  // Put holdover content and all-but-last fragment into the content
  newContent += ' ' + sentences.join(' ');

  const thisLength = (thisCue.end - thisCue.start) / 2;

    result.push({
      number: newNumber,
      start: newStart,
      end: thisCue.start + (thisLength / 2), // End this cue early
      content: newContent,
    });

    // … then treat the next cue as a holdover
    cueLength = 1;
    newContent = nextContent;
    // Start the next consolidated cue halfway into this cue's original duration
    newStart = thisCue.start + (thisLength / 2) + 0.001;
    // Set the next consolidated cue's number to this cue's number
    newNumber = thisCue.number;
  }
}

Applying that to the input, it generates sentence-grouped output, visualized here in green:


There are only 3 “new” cues, each starts at the beginning of a sentence. The consolidated cues are longer and might be harder to read when overlaid on a video, but they are complete grammatical units:

#1: 0 --> 3.755:  Good morning, I'm Taylor Smith, the Product Manager for Cloudflare Stream.
#3: 3.756 --> 6.425:  This is a quick demo of our AI-powered automatic subtitles feature.
#5: 6.426 --> 12.5:  These subtitles were generated with Cloudflare Workers AI and the Whisper Model, not handwritten, and it took just a few seconds.

Translating this “prepared” input the same way as before:

#1: 0 --> 3.755: Buen día, soy Taylor Smith, el gerente de producto de Cloudflare Stream.
#3: 3.756 --> 6.425: Esta es una demostración rápida de nuestra función de subtítulos automáticos alimentados por IA.
#5: 6.426 --> 12.5: Estos subtítulos fueron generados con Cloudflare WorkersAI y el Modelo Whisper, no escritos a mano, y solo tomó unos segundos.

¡Mucho mejor! [Much better!]

Re-exporting to VTT

To use these translated captions on a video, they need to be formatted back into a VTT with renumbered cues and properly formatted timestamps. Ultimately, the solution should automatically upload them back to Stream, too, but that is an established process, so I set it aside as out of scope. The final VTT result from my Worker is this:

WEBVTT
 
1
00:00:00.000 --> 00:00:03.754
Buen día, soy Taylor Smith, el gerente de producto de Cloudflare Stream.
 
2
00:00:03.755 --> 00:00:06.424
Esta es una demostración rápida de nuestra función de subtítulos automáticos alimentados por IA.
 
3
00:00:06.426 --> 00:00:12.500
Estos subtítulos fueron generados con Cloudflare WorkersAI y el Modelo Whisper, no escritos a mano, y solo tomó unos segundos.

I saved it to a file locally and, using the Cloudflare Dashboard, I added it to the video which you may have noticed embedded at the top of this post! Captions can also be uploaded via the API.

More testing and what I learned

I tested this script on a variety of videos from many sources, including short social media clips, 30-minute video diaries, and even a few clips with some specialized vocabulary. Ultimately, I was surprised at the level of prototype I was able to build on my first afternoon with Workers AI. The translation results were very promising! In the process, I learned a few key things that I will be bringing back to product planning for Stream:

We have the tools. Workers AI has a model called “m2m100-1.2b” from Hugging Face that can do text translations between many languages. We can use it to translate the plain text cues from VTT files — whether we generate them or they are user-supplied. We’ll keep an eye out for new models as they are added, too.

Quality is prone to “copy-of-a-copy” effect. When auto-translating captions that were auto-transcribed, issues that impact the English transcription have a huge downstream impact on the translation. Editing the source transcription improves quality a lot.

Good grammar and punctuation counts. Translations are significantly improved if the source content is grammatically correct and punctuated properly. Punctuation is often missing when captions are auto-generated, but not always  — I would like to learn more about how to predict that and if there are ways we can increase punctuation in the output of transcription jobs. My cue consolidator experiment returns giant walls of text if there’s no punctuation on the input.

Translate full sentences when possible. We split our transcriptions into cues of about 5 words for several reasons. However, this produces lower quality output when translated because it breaks grammatical constructs. Translation results are better with full sentences or at least complete fragments. This is doable, but easier said than done, particularly as we look toward support for additional input languages that use punctuation differently.

We will have blind spots when evaluating quality. Everyone on our team was able to adequately evaluate English transcriptions. Sanity-checking the quality of translations will require team members who are familiar with those languages. We state disclaimers about transcription quality and offer tips to improve it, but at least we know what we’re looking at. For translations, we may not know how far off we are in many cases. How many readers of this article objected to the first translation sample above?

Clear UI and API design will be important for these related but distinct workflows. There are two different flows being requested by Stream customers: “My audio is in English, please make translated subtitles” alongside “My audio is in another language, please transcribe captions as-is.” We will need to carefully consider how we shape user-facing interactions to make it really clear to a user what they are asking us to do.

Workers AI is really easy to use. Sheepishly, I will admit: although I read Stream’s code for the transcription feature, this was the first time I’ve ever used Workers AI on my own, and it was definitely the easiest part of this experiment!

Finally, as a product manager, it is important I remain focused on the outcome. From a certain point of view, this experiment is a bit of an XY Problem. The need is “I have audio in one language and I want subtitles in another.” Are there other avenues worth looking into besides “transcribe to captions, then restructure and translate those captions?” Quite possibly. But this experiment with Workers AI helped me identify some potential challenges to plan for and opportunities to get excited about!

I’ve cleaned up and shared the sample code I used in this experiment at https://github.com/tsmith512/vtt-translate/. Try it out and share your experience!

Cloudflare Stream Low-Latency HLS support now in Open Beta

Post Syndicated from Taylor Smith original http://blog.cloudflare.com/cloudflare-stream-low-latency-hls-open-beta/

Cloudflare Stream Low-Latency HLS support now in Open Beta

Cloudflare Stream Low-Latency HLS support now in Open Beta

Stream Live lets users easily scale their live-streaming apps and websites to millions of creators and concurrent viewers while focusing on the content rather than the infrastructure — Stream manages codecs, protocols, and bit rate automatically.

For Speed Week this year, we introduced a closed beta of Low-Latency HTTP Live Streaming (LL-HLS), which builds upon the high-quality, feature-rich HTTP Live Streaming (HLS) protocol. Lower latency brings creators even closer to their viewers, empowering customers to build more interactive features like chat and enabling the use of live-streaming in more time-sensitive applications like live e-learning, sports, gaming, and events.

Today, in celebration of Birthday Week, we’re opening this beta to all customers with even lower latency. With LL-HLS, you can deliver video to your audience faster, reducing the latency a viewer may experience on their player to as little as three seconds. Low Latency streaming is priced the same way, too: $1 per 1,000 minutes delivered, with zero extra charges for encoding or bandwidth.

Broadcast with latency as low as three seconds.

LL-HLS is an extension of the HLS standard that allows us to reduce glass-to-glass latency — the time between something happening on the broadcast end and a user seeing it on their screen. That includes factors like network conditions and transcoding for HLS and adaptive bitrates. We also include client-side buffering in our understanding of latency because we know the experience is driven by what a user sees, not when a byte is delivered into a buffer. Depending on encoder and player settings, broadcasters' content can be playing on viewers' screens in less than three seconds.

On the left, OBS Studio broadcasting from my personal computer to Cloudflare Stream. On the right, watching this livestream using our own built-in player playing LL-HLS with three second latency!

Same pricing, lower latency. Encoding is always free.

Our addition of LL-HLS support builds on all the best parts of Stream including simple, predictable pricing. You never have to pay for ingress (broadcasting to us), compute (encoding), or egress. This allows you to stream with peace of mind, knowing there are no surprise fees and no need to trade quality for cost. Regardless of bitrate or resolution, Stream costs \$1 per 1,000 minutes of video delivered and \$5 per 1,000 minutes of video stored, billed monthly.

Stream also provides both a built-in web player or HLS/DASH manifests to use in a compatible player of your choosing. This enables you or your users to go live using the same protocols and tools that broadcasters big and small use to go live to YouTube or Twitch, but gives you full control over access and presentation of live streams. We also provide access control with signed URLs and hotlinking prevention measures to protect your content.

Powered by the strength of the network

And of course, Stream is powered by Cloudflare's global network for fast delivery worldwide, with points of presence within 50ms of 95% of the Internet connected population, a key factor in our quest to slash latency. We ingest live video close to broadcasters and move it rapidly through Cloudflare’s network. We run encoders on-demand and generate player manifests as close to viewers as possible.

Getting started with LL-HLS

Getting started with Stream Live only takes a few minutes, and by using Live Outputs for restreaming, you can even test it without changing your existing infrastructure. First, create or update a Live Input in the Cloudflare dashboard. While in beta, Live Inputs will have an option to enable LL-HLS called “Low-Latency HLS Support.” Activate this toggle to enable the new pipeline.

Cloudflare Stream Low-Latency HLS support now in Open Beta

Stream will automatically provide the RTMPS and SRT endpoints to broadcast your feed to us, just as before. For the best results, we recommend the following broadcast settings:

  • Codec: h264
  • GOP size / keyframe interval: 1 second

Optionally, configure a Live Output to point to your existing video ingest endpoint via RTMPS or SRT to test Stream while rebroadcasting to an existing workflow or infrastructure.

Stream will automatically provide RTMPS and SRT endpoints to broadcast your feed to us as well as an HTML embed for our built-in player.

Cloudflare Stream Low-Latency HLS support now in Open Beta

This connection information can be added easily to a broadcast application like OBS to start streaming immediately:

Cloudflare Stream Low-Latency HLS support now in Open Beta

During the beta, our built-in player will automatically attempt to use low-latency for any enabled Live Input, falling back to regular HLS otherwise. If LL-HLS is being used, you’ll see “Low Latency” noted in the player.

During this phase of the beta, we are most closely focused on using OBS to broadcast and Stream’s built-in player to watch — which uses HLS.js under the hood for LL-HLS support. However, you may test the LL-HLS manifest in a player of your own by appending ?protocol=llhls to the end of the HLS manifest URL. This flag may change in the future and is not yet ready for production usage; watch for changes in DevDocs.

Sign up today

Low-Latency HLS is Stream Live’s latest tool to bring your creators and audiences together. All new and existing Stream subscriptions are eligible for the LL-HLS open beta today, with no pricing changes or contract requirements — all part of building the fastest, simplest serverless live-streaming platform. Join our beta to start test-driving Low-Latency HLS!

Introducing Low-Latency HLS Support for Cloudflare Stream

Post Syndicated from Taylor Smith original http://blog.cloudflare.com/low-latency-hls-support-for-cloudflare-stream/

Introducing Low-Latency HLS Support for Cloudflare Stream

Introducing Low-Latency HLS Support for Cloudflare Stream

Stream Live lets users easily scale their live streaming apps and websites to millions of creators and concurrent viewers without having to worry about bandwidth costs or purchasing hardware for real-time encoding at scale. Stream Live lets users focus on the content rather than the infrastructure — taking care of the codecs, protocols, and bitrate automatically. When we launched Stream Live last year, we focused on bringing high quality, feature-rich streaming to websites and applications with HTTP Live Streaming (HLS).

Today, we're excited to introduce support for Low-Latency HTTP Live Streaming (LL-HLS) in a closed beta, offering you an even faster streaming experience. LL-HLS will reduce the latency a viewer may experience on their player from highs of around 30 seconds to less than 10 in many cases. Lower latency brings creators even closer to their viewers, empowering customers to build more interactive features like Q&A or chat and enabling the use of live streaming in more time-sensitive applications like sports, gaming, and live events.

Broadcast with less than 10-second latency

LL-HLS is an extension of HLS and allows us to reduce glass-to-glass latency — the time between something happening on the broadcast end and a user seeing it on their screen. This includes everything from broadcaster encoding to client-side buffering because we know the experience is driven by what a user sees, not when a byte is delivered into a buffer. Depending on encoder and player settings, broadcasters' content can be playing on viewers' screens in less than ten seconds.

Our addition of LL-HLS support builds on all the best parts of Stream including simple, predictable pricing. You never have to pay for ingest (broadcasting to us), compute (encoding), or egress. It costs \$5 per 1,000 minutes of video stored per month and \$1 per 1,000 minutes of video viewed per month. This allows you to stream with peace of mind, knowing there are no surprise fees.

Other platforms tack on live recordings as a separate add-on feature, and those recordings only become available minutes or even hours after a live stream ends. With Cloudflare Stream, Live segments are automatically recorded and immediately available for on-demand playback.

Stream also provides both a built-in web player and HLS manifests to use in a compatible player of your choosing. This enables you or your users to go live using the same protocols and tools that broadcasters big and small use to go live to YouTube or Twitch, but gives you full control over access and presentation of live streams.

We also provide access control with signed URLs allowing you to protect your content, sharing with only certain users. This allows you to restrict access so only logged in members can watch a particular video, or only let users watch your video for a limited time period. And of course, Stream is powered by Cloudflare's global network for fast delivery worldwide, with points of presents within 50ms of 95% of the Internet connected population.

Introducing Low-Latency HLS Support for Cloudflare Stream
Left: Broadcasting to Stream Live using OBS. Right: Watching that same Stream. Note the five second difference in the NIST clock between the source and the playback.

Powering the LL-HLS experience involved making several improvements to our underlying infrastructure. One of the largest challenges we encountered was that our existing architecture involved a pipeline with multiple buffers as long as the keyframe interval. This meant Stream Live would introduce a delay of up to five times the keyframe interval. To resolve this, we simplified a portion of our pipeline — now, we work with individual frames rather than whole keyframe-intervals, but without giving up the economies of scale our approach to encoding provides. This decoupling of keyframe interval and internal buffer duration lets us dramatically reduce latency in HLS, with a maximum of twice the keyframe interval.

Getting started with the LL-HLS beta

As we prepare to ship this new functionality, we're looking for beta testers to help us test non-production workloads. To participate in the beta, your application should be configured with these settings:

  • H.264 video codec
  • Constant bitrate
  • Keyframe interval (GOP size) of 2s
  • No B Frames
  • Using the Stream built-in player

Getting started with Stream Live only takes a few minutes. Create a Live Input in the Cloudflare dashboard, then Stream will automatically provide RTMPS and SRT endpoints to broadcast your feed to us as well as an HTML embed for our built-in player and the HLS manifest for a custom player.

Introducing Low-Latency HLS Support for Cloudflare Stream

This connection information can be added easily to a broadcast application like OBS to start streaming immediately:

Introducing Low-Latency HLS Support for Cloudflare Stream

Customers in the LL-HLS beta will need to make a minor adjustment to the built-in player embed code, but there are no changes to Live Input configuration, dashboard interface, API, or existing functionality.

Sign up today

LL-HLS is Stream Live’s latest tool to bring your creators and audiences together. After the beta period, this feature will be generally available to all new and existing Stream subscriptions with no pricing changes or contract requirements — all part of building the fastest, simplest serverless live streaming platform. Join our beta to start test-driving Low-Latency HLS!