All posts by Troy Liljedahl

Stable Diffusion and Backblaze: Create a Masterpiece from a Bucket of Your Own Images

Post Syndicated from Troy Liljedahl original https://www.backblaze.com/blog/stable-diffusion-and-backblaze-create-a-masterpiece-from-a-bucket-of-your-own-images/

AI is really having a moment. There’s DALL-E, Lensa, ChatGPT. Your social media feed is probably full of new avatars and AI-generated haiku. Naturally, we at Backblaze were intrigued by this brave new world of AI-generated content. The technology has been wildly popular, but is not without controversy, raising questions about intellectual property, copyright law, artist disenfranchisement, possible displacement of jobs, and general fear over the rise of the machines. On the other side of that coin, there’s definitely a place for AI in the future of work and life. So, I wanted to experiment with it.

Let’s start with Stable Diffusion.

Stable Diffusion is one of the new text-to-image technologies popping up all over the internet that allows users to input words and phrases and get back amazing pictures created by its deep learning model. What makes Stable Diffusion so interesting is that it has been open sourced to allow anyone to create their own models for text-to-image generation.

Today, I’ll walk through how you can do just that using Backblaze B2 Cloud Storage.

Kicking the Stable Diffusion Tires

After playing with an online instance of Stable Diffusion, I sought out content on some more ways to use the AI tool. I found several examples of how to use Stable Diffusion with your own images like this one and this one. The most common use case for this was taking advantage of AI to create art from a model based on your own face. Sounds cool, right? But what if I also had a bunch more pictures in Backblaze B2 Cloud Storage? Could I do the same thing to create art, graphics, branded images, and more, from my content in the cloud? The answer is a resounding YES.

Use Cases for Stable Diffusion

For me, this was a fun experiment, but we see a number of different ways this set up could be used both individually and for businesses. I started with about 20 images or so as fodder for Stable Diffusion’s algorithm. But, that’s just the beginning.

Let’s say you’re a marketing team at a small company. You could use Stable Diffusion’s paid version and get access to hundreds of thousands of random images from Google, but you really only care about analyzing and generating photos that are relevant to your business. So, you run Stable Diffusion in a cloud compute instance and have it analyze a Backblaze B2 Bucket where you store your own library of images, which you’ve probably been collecting for years. Set up that way, you have your own customized AI engine that analyzes and generates only images that are pertinent to your needs, rather than a bunch of images you don’t care about.

In this experiment, I used Google Colab, which worked well for my needs. But for a real implementation, you could use a Backblaze cloud compute partner like Vultr. Egress between Backblaze and Vultr is free, so the analysis won’t cost you anything beyond what it costs to use the two services.

This could be hugely useful for marketing teams, but we also see the value for individuals or businesses who want to keep their data private but still take advantage of AI technology. This way, you aren’t serving up images on public sites.

So, how does it all work? Let’s get into it.

Getting Started with Stable Diffusion and Backblaze B2

What you’ll need:

  • A Backblaze B2 account. You can sign up for free here.
  • A Google account.
  • A smartphone to take pictures if you don’t have 20 or so pictures of whatever subject you want to use lying around.
  • Whatever software tool you’d like to use to mount Backblaze B2 as a drive on your computer. I use Rclone in this example but any cloud drive software will work.

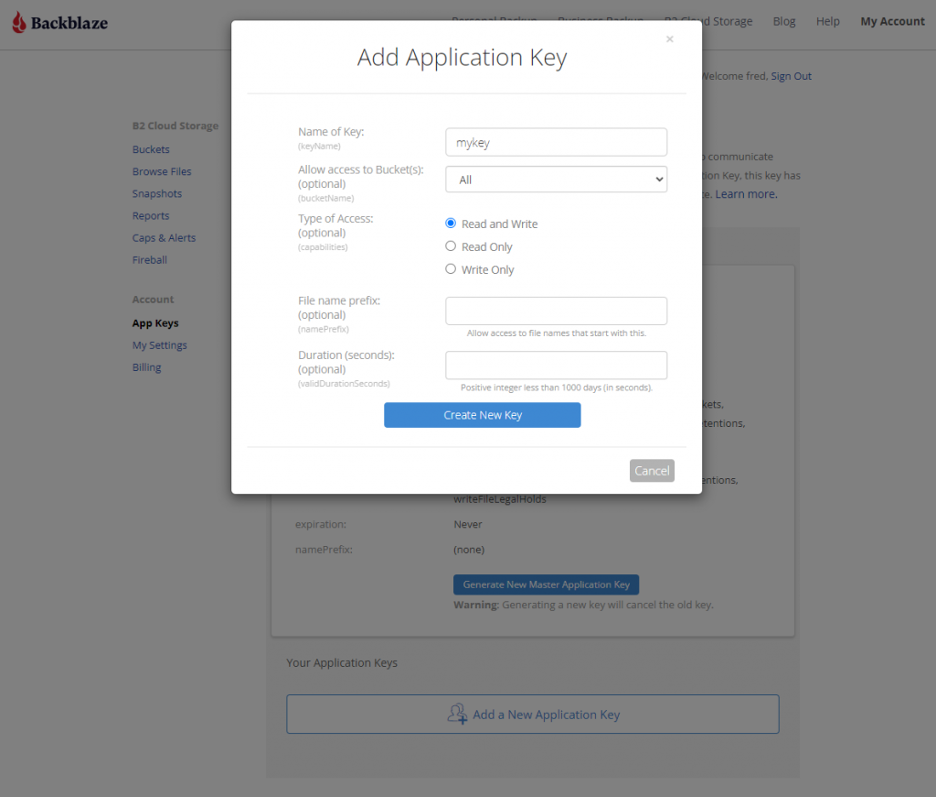
The first thing you’ll need to do is create an account at Hugging Face. Hugging Face is the home of the modern AI community and is where Stable Diffusion lives. In your Hugging Face account, navigate to your Account Settings and go to Access Tokens—we’ll need one of these to allow our environment to use the Stable Diffusion engines.

Now as to the environment, this can be on your own computer, in a virtual machine (VM), really wherever. My favorite (and free) method I found was a Google Colab notebook created by GitHub user TheLastBen that makes the process so incredibly simple that anyone can do this. The Colab notebook also takes advantage of DreamBooth, a Google Research project that provides for incredible detail on the art and images created by a diffusion model. In short, this is the easiest way to get really good looking AI art. You can get started with the Colab notebook here.

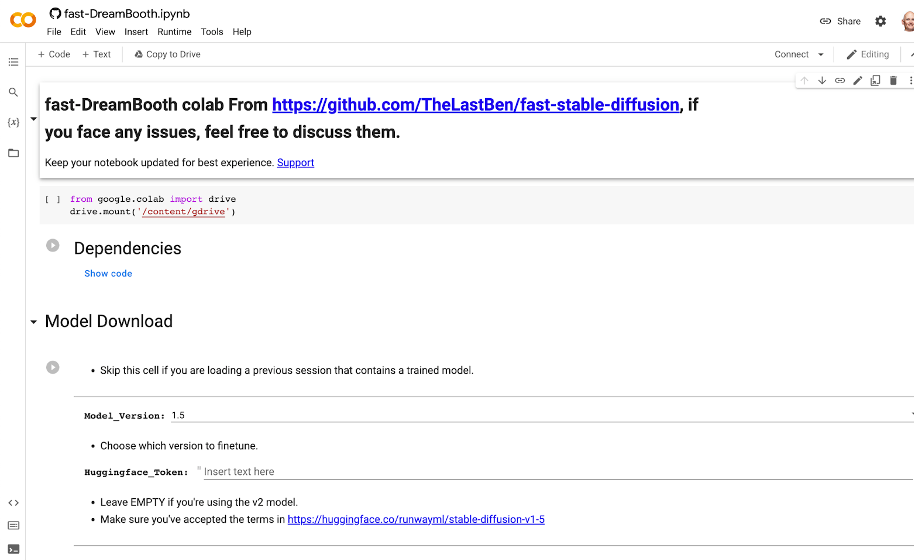
In the Colab notebook there are a ton of different options and a great step-by-step guide that explains them, but I’ll walk you through the basic settings to get going:

  1. First, hit the Play button next to Dependencies.
  2. Once that’s done, copy your User Access Token from your Hugging Face account.
  3. In the Model Download section, paste that User Access Token into the Huggingface_Token field.
  4. Click the Play button for Model Download.
  5. You’ll see the script run below all the fields here. You can proceed when you see “DONE!”
  6. Finally, in the Dreambooth section, provide a name in the Session_Name field. This will be the name of the session that gets saved in your Google Drive. That name can be reused later to skip these steps next time.

Training the Stable Diffusion Model

Now the pictures: You’ll want at least 20 pictures or so for your AI model to analyze in order to avoid creating a bunch of generic person art or nightmare fuel. So bust out your phone and take some selfies! If you have a friend to throw in two or three full body pictures this will help as well. A few optional tips:

  • Use different expressions and angles.
  • Use different backgrounds if you can.
  • Use a square or 1:1 ratio setting. By default, Stable Diffusion’s default image size is 512 x 512 pixels, so using square images makes your input more similar to your desired output.

If you’re an iPhone user, you will need to take one extra step here to save your files in JPEG format. You can find a guide for that in this article.

As you save your photos, make sure the file names include the name you’re going to use when generating your AI art. For example, my photos were all named troy (1).jpg, troy (2).jpg, troy (3).jpg, etc. This is important so that the AI understands what to call you (or your subject) when generating your images.

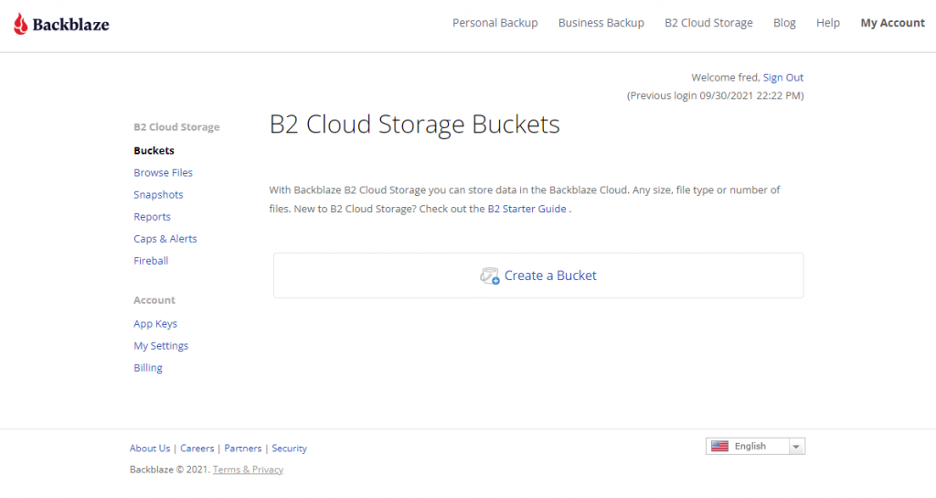
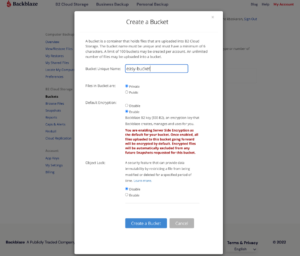
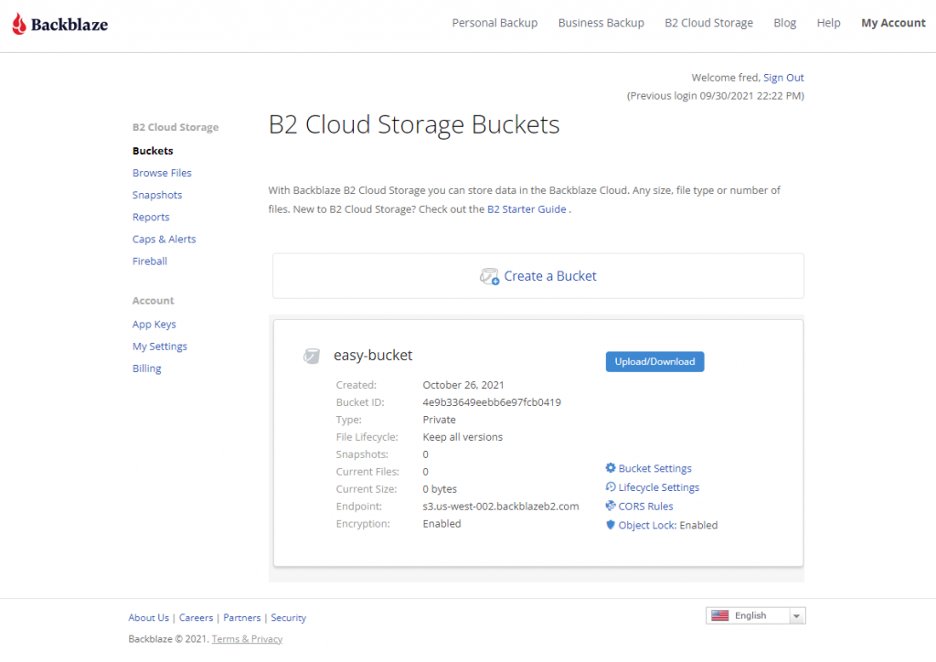
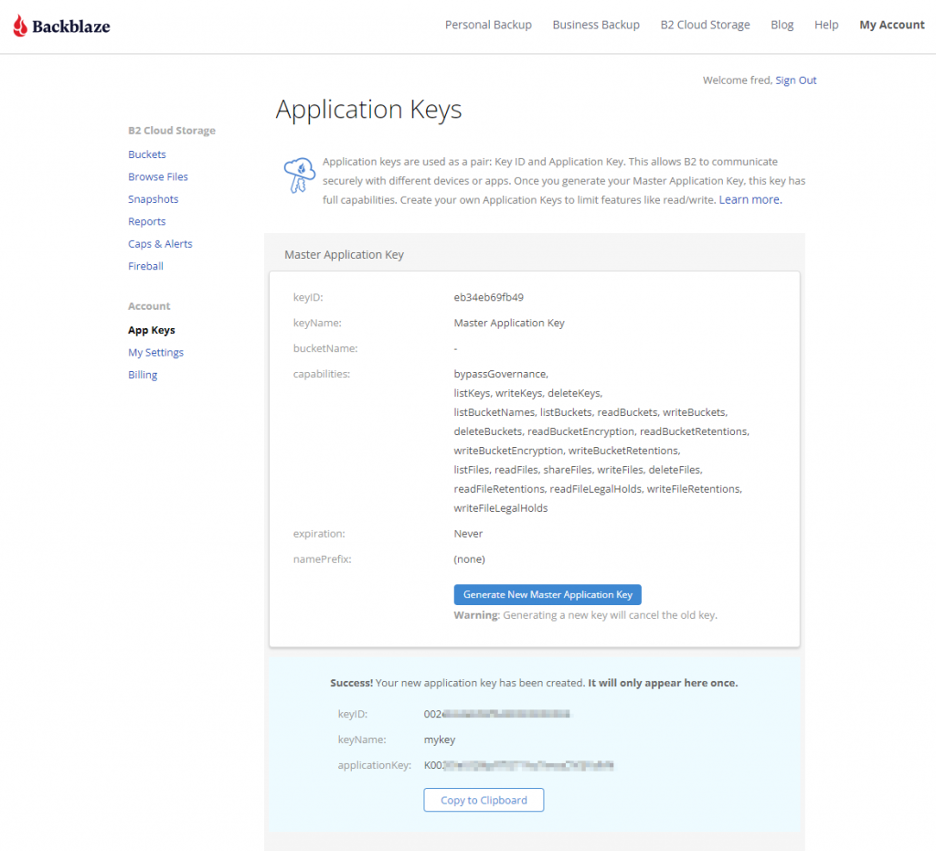
Once you have your photos, it’s time to upload them to a Bucket in Backblaze B2 Cloud Storage. You can easily do this in the Backblaze mobile app or on the Backblaze website.

With your selfies safely in Backblaze B2, make sure you make them accessible on your computer using a tool such as Rclone mount. If you don’t have an account yet, you can check out our guide on how to set up and configure Rclone mount.

You might be wondering why you should upload the photos to a Backblaze B2 Bucket and then mount the Bucket so that we can access it locally, rather than just saving the files to a local folder?

The answer is simple. In this example, we’re working with a few images representing a single subject, so you likely won’t have issues working from your local drive. As you further experiment with more subjects and more images of each subject, you’ll likely outgrow your local drive. Backblaze B2 Cloud Storage scales infinitely so you won’t have to worry about running out of space.

Now, back to the Colab notebook, hit the play button on Instance Images and click the button that shows up to Choose Files. In the pop up, choose your mounted instance of your B2 Bucket and select the photos.

Once they are uploaded, skip the Concept Images section and click the play button for Training. If you’ve done everything right, you should see some ASCII art like this:

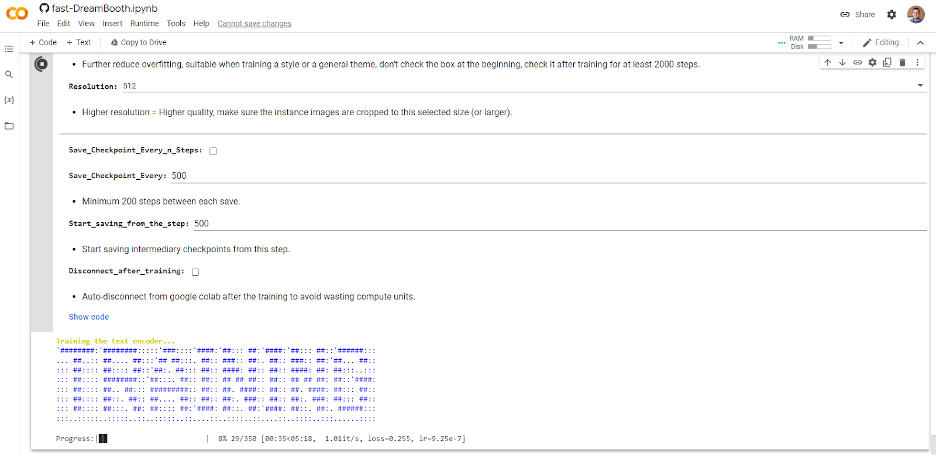
Depending on how many photos you selected, this can take some time. So grab a coffee, go for a walk, listen to a podcast, or perhaps all three.

Creating Your Own AI-Generated Masterpieces

Once complete, click the Play button under Test the Trained Model. This will launch a temporary instance of Stable Diffusion with your new custom model in Gradio, which is an open-source Python library for running machine learning apps. Click the Gradio link generated and we’re ready to start making some AI art.

Again, there are a ton of options and configurations but all you really need to do at this point is enter some text into the Prompt box and click the big Generate button.

Creating prompts for AI art is quickly becoming its own art form. There are tons of resources out there to inspire you, but here are a few prompts I used along with the resulting art.

Pro Tip: You may need to click the Generate button a few times if something looks off. This is totally normal—your new AI friend is learning over time, and it does this by repeating the generation process.

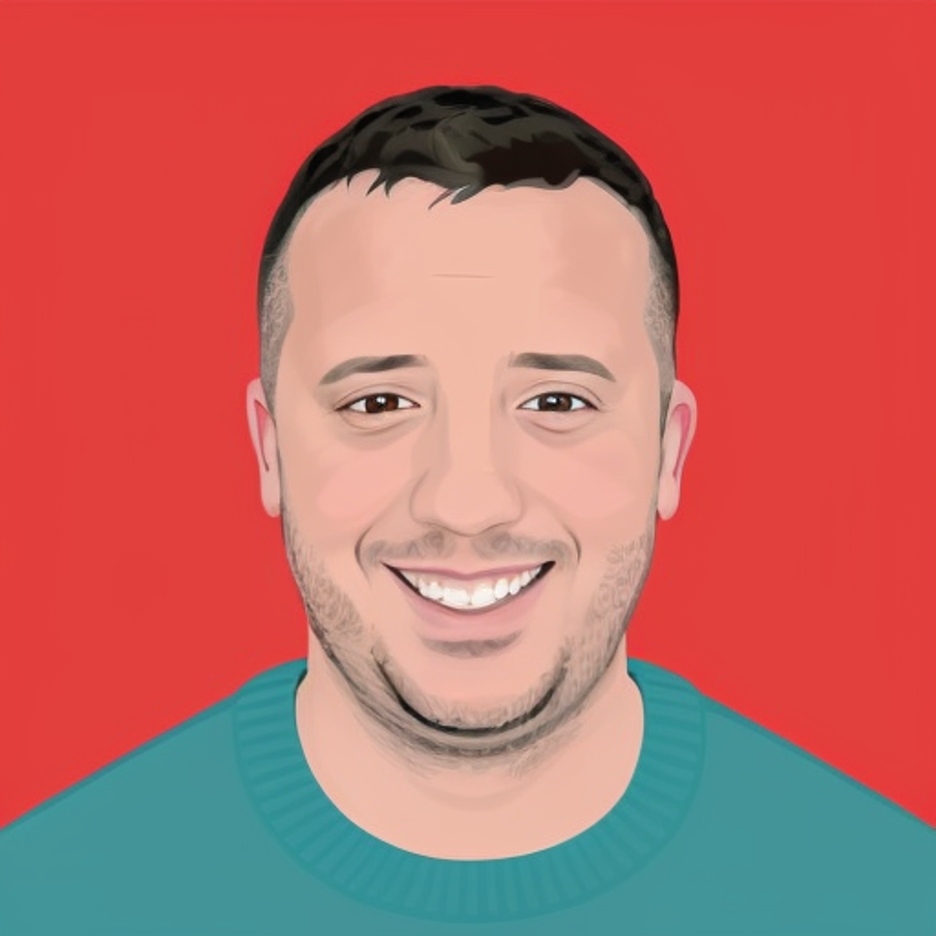
Prompt: “Photo of troy digital painting”

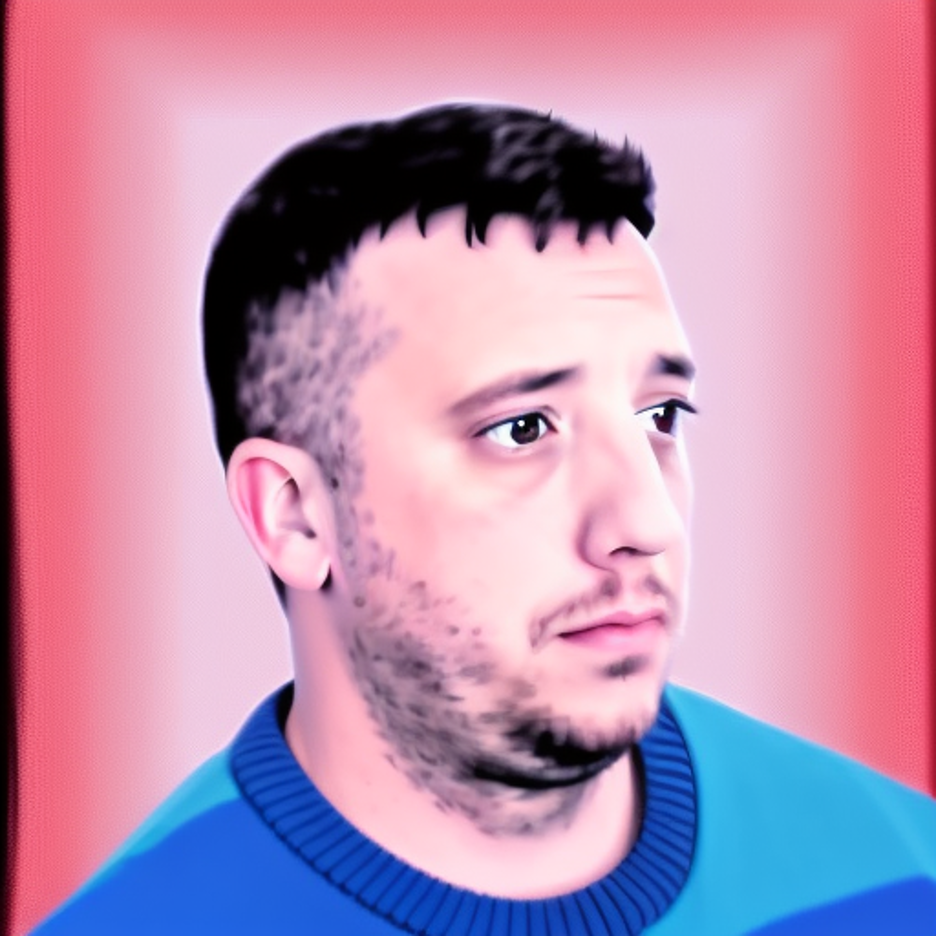
Prompt: “Photo of troy person digital painting”

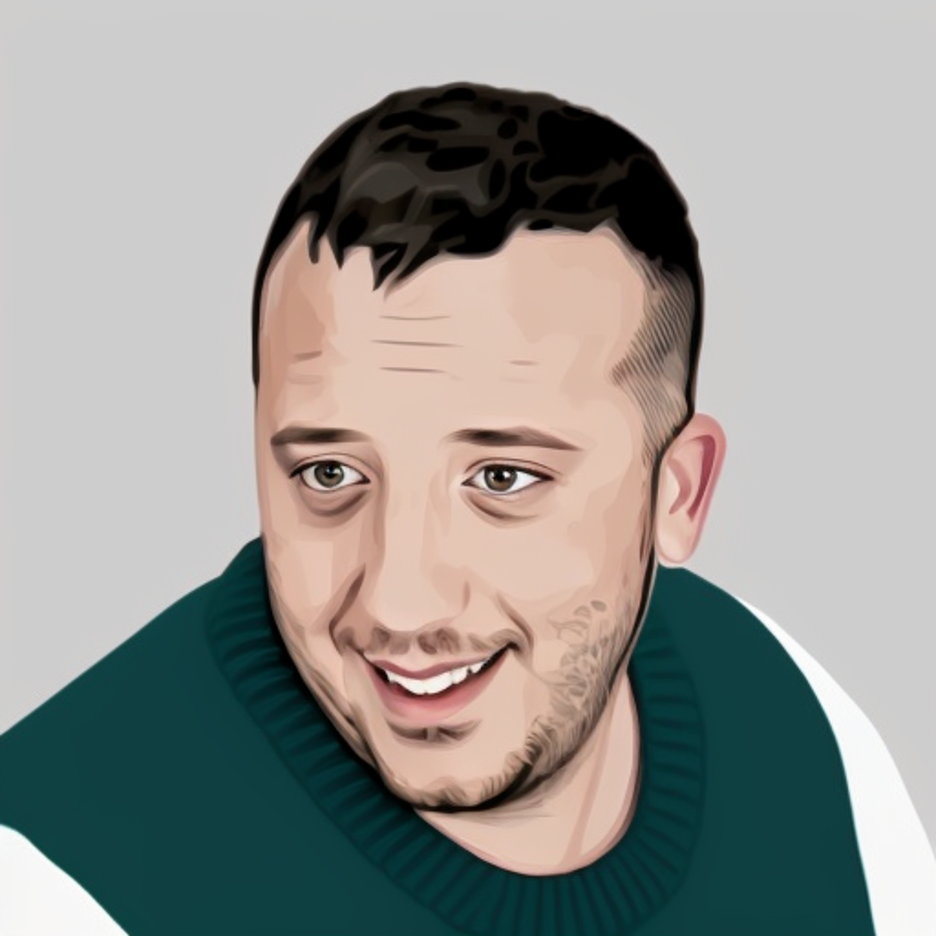
Prompt: “Photo of troy person digital painting asymmetrical headshot smiling”

And finally for something fun…

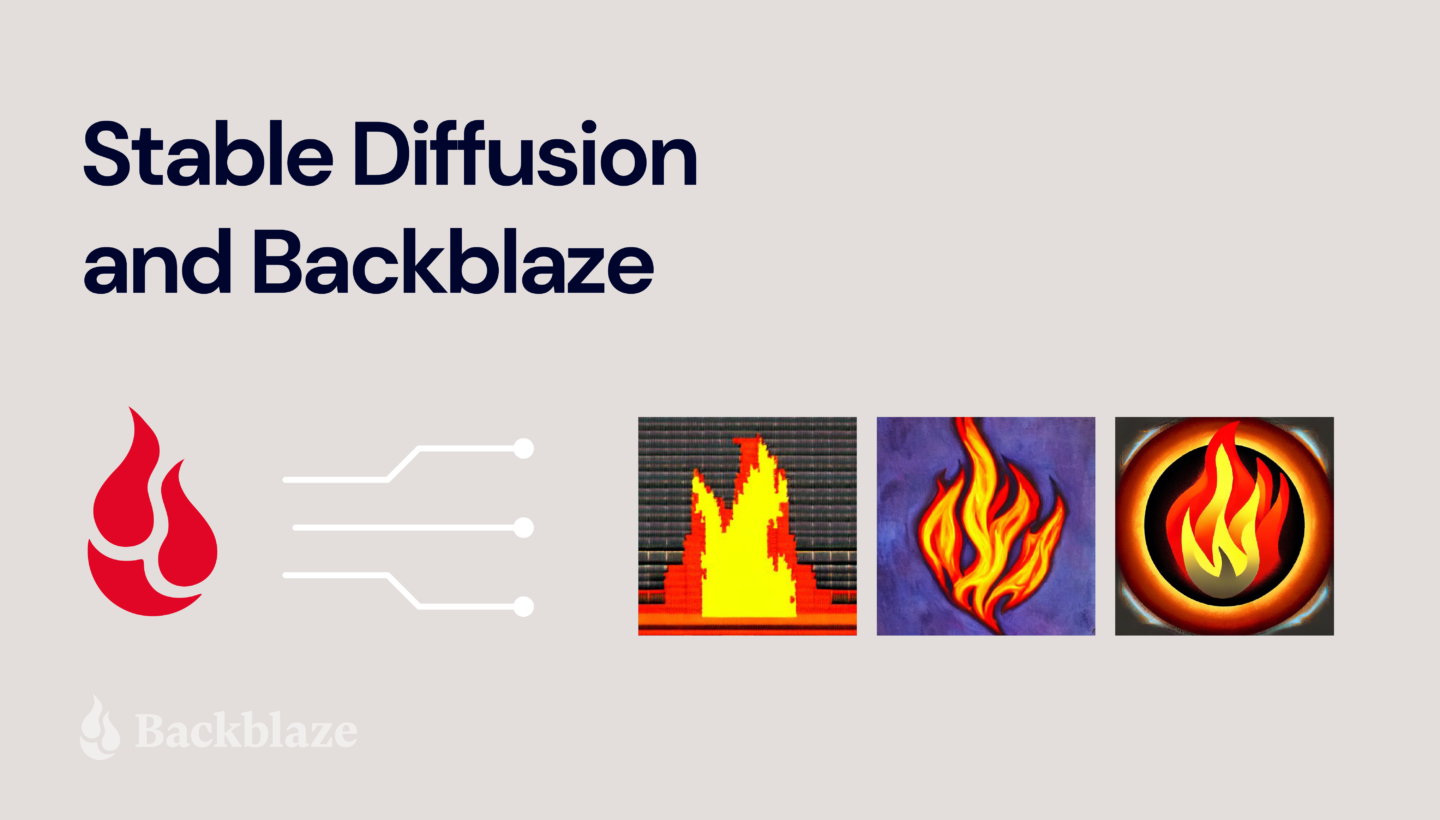
Prompt: ”photo of troy person hand-drawn cartoon”

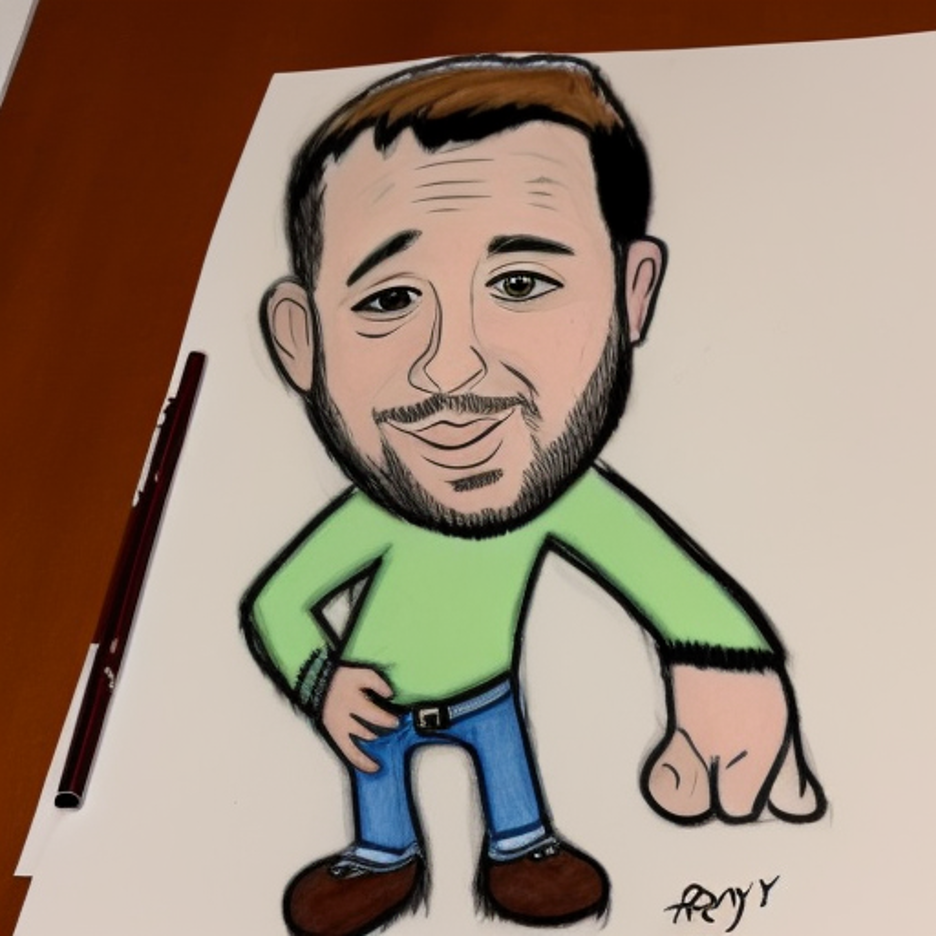
It even has an artist signature! Although I’m not sure who fRny Y is?

So, there you have it. Your very own AI engine, customized to generate versions of your face (or your library of images).

Good luck to all the budding AI artists out there. If you give this a try, we’d love to see your images on social media. You can find us @backblaze on Twitter, Facebook, and LinkedIn. I look forward to seeing what you all create!

The post Stable Diffusion and Backblaze: Create a Masterpiece from a Bucket of Your Own Images appeared first on Backblaze Blog | Cloud Storage & Cloud Backup.

How to Connect Your QNAP NAS to Backblaze B2 Cloud Storage

Post Syndicated from Troy Liljedahl original https://www.backblaze.com/blog/guide-qnap-backup-b2-cloud-storage/

Network attached storage (NAS) devices are a popular solution for data storage, sharing files for remote collaboration purposes, syncing files that are part of a workflow, and more. QNAP, one of the leading NAS manufacturers, makes it incredibly easy to backup and/or sync your business or personal data for these purposes with the inclusion of its application, Hybrid Backup Sync (HBS). HBS consolidates backup, restoration, and synchronization functions into a single application.

Protecting your data with a NAS is a great first step, but you shouldn’t stop there. NAS devices are still vulnerable to any kind of on-premises disaster like fires, floods, and tornados. They’re also not safe from ransomware attacks that might hit your network. To truly protect your data, it’s important to back up or sync to an off-site cloud storage destination like Backblaze B2 Cloud Storage. Backblaze B2 offers a geographically distanced location for your data for $5/TB per month, and you can also embed it into your NAS-based workflows to streamline access across multiple locations.

Read on for more information on whether you should use backup or sync for your purposes and how to connect your QNAP NAS to Backblaze B2 step-by-step. We’ve even provided videos that show you just how easy it is—it typically takes less than 15 minutes!

➔ Download Our Complete NAS Guide

Should I Back Up or Sync?

It’s easy to confuse backup and sync. They’re essentially both making a copy of your data, but they have different use cases. It’s important to understand the difference so you’re getting the right protection and accessibility for your data.

Check out the table below. You’ll see that backup is best for being able to recover from a data disaster, including the ability to access previous versions of data. However, if you’re just looking for a mirror copy of your data, sync functionality is all you need. Sync is also useful as part of remote workflows: you can sync your data between your QNAP and Backblaze B2, and then remote workers can pull down the most up-to-date files from the B2 cloud.

A table comparing Backup vs. Sync

A table comparing Backup vs. Sync.

Because Hybrid Backup Sync provides both functions in one application, you should first identify which feature you truly need. The setup process is similar, but you will need to take different steps to configure backup vs. sync in HBS.

How to Set Up Your Backblaze B2 Account

Now that you’ve determined whether you want to back up or sync your data, it’s time to create your Backblaze B2 Cloud Storage account to securely protect your on-premises data.

If you already have a B2 Cloud Storage account, feel free to skip ahead. Otherwise, you can sign up for an account and get started with 10GB of free storage to test it out.

Ready to get started? You can follow along with the directions in this blog or take a look at our video guides. Greg Hamer, Senior Technical Evangelist, demonstrates how to get your data into B2 Cloud Storage in under 15 minutes using HBS for either backup or sync.

Video: Back Up QNAP to Backblaze B2 Cloud Storage with QNAP Hybrid Backup Sync

Video: Sync QNAP to Backblaze B2 Cloud Storage with QNAP Hybrid Backup Sync

How to Set Up a Bucket, Application Key ID, and Application Key

Once you’ve signed up for a Backblaze B2 Account, you’ll need to create a bucket, Application Key ID, and Application Key. This may sound like a lot, but all you need are a few clicks, a couple names, and less than a minute!

  1. On the Buckets page of your account, click the Create a Bucket button.
  2. An screenshot of the B2 Cloud Storage Buckets page.

  3. Give your bucket a name and enable encryption for added security.
  4. An image showing the Create a Bucket page with security features to be enabled.

  5. Click the Create a Bucket button and you should see your new bucket on the Buckets page.
  6. An image showing a successfully created bucket.

  7. Navigate to the App Keys page of your account and click Add a New Application Key.
  8. Name your Application Key and click the Create New Key button. Make sure that your key has both read and write permissions (the default option).
  9. Your Application Key ID and Application Key will appear on your App Keys page. Important: Make sure to copy these somewhere secure as the Application Key will not appear again!

How to Set Up QNAP’s Hybrid Backup Sync to Work With B2 Cloud Storage

To set up your QNAP with Backblaze B2 sync support, you’ll need access to your B2 Cloud Storage account. You’ll also need your B2 Cloud Storage account ID, Application Key, and bucket name—all of which are available after you log in to your Backblaze account. Finally, you’ll need the Hybrid Backup Sync application installed in QTS. You’ll need QTS 4.3.3 or later and Hybrid Backup Sync v2.1.170615 or later.

To configure a backup or sync job, simply follow the rest of the steps in this integration guide or reference the videos posted above. Once you follow the rest of the configuration steps, you’ll have a set-it-and-forget-it solution in place.

What Can You Do With Backblaze B2 and QNAP Hybrid Backup Sync?

With QNAP’s Hybrid Backup Sync software, you can easily back up and sync data to the cloud. Here’s some more information on what you can do to make the most of your setup.

Hybrid Backup Sync 3.0

QNAP and Backblaze B2 users can take advantage of Hybrid Backup Sync, as explained above. Hybrid Backup Sync is a powerful tool that provides true backup capability with features like version control, client-side encryption, and block-level deduplication. QNAP’s operating system, QTS, continues to deliver innovation and add thrilling new features. The ability to preview backed up files using the QuDedup Extract Tool, a feature first released in QTS 4.4.1, allowed QNAP users to save on bandwidth costs.

You can download the latest QTS update here and Hybrid Backup Sync is available in the App Center on your QNAP device.

Hybrid Mount and VJBOD Cloud

The Hybrid Mount and VJBOD Cloud apps allow QNAP users to designate a drive in their system to function as a cache while accessing B2 Cloud Storage. This allows users to interact with Backblaze B2 just like you would a folder on your QNAP device while using Backblaze B2 as an active storage location.

Hybrid Mount and VJBOD Cloud are both included in the QTS 4.4.1 versions and higher, and function as a storage gateway on a file-based or block-based level, respectively. Hybrid Mount enables Backblaze B2 to be used as a file server and is ideal for online collaboration and file-level data analysis. VJBOD Cloud is ideal for a large number of small files or singular massively large files (think databases!) since it’s able to update and change files on a block-level basis. Both apps offer the ability to connect to B2 Cloud Storage via popular protocols to fit any environment, including server message block (SMB), Apple Filing Protocol (AFP), network file sharing (NFS), file transfer protocol (FTP), and WebDAV.

QuDedup

QuDedup introduces client-side deduplication to the QNAP ecosystem. This helps users at all levels save on space on their NAS by avoiding redundant copies in storage. Backblaze B2 users have something to look forward to as well since these savings carry over to cloud storage via the HBS 3.0 update.

Why Backblaze B2?

QNAP continues to innovate and unlock the potential of B2 Cloud Storage in the NAS ecosystem. If you haven’t given B2 Cloud Storage a try yet, now is the time. You can get started with Backblaze B2 and your QNAP NAS right now, and make sure your NAS is synced securely and automatically to the cloud.

The post How to Connect Your QNAP NAS to Backblaze B2 Cloud Storage appeared first on Backblaze Blog | Cloud Storage & Cloud Backup.

How to Connect Your Synology NAS to Backblaze B2 Cloud Storage

Post Syndicated from Troy Liljedahl original https://www.backblaze.com/blog/how-to-connect-your-synology-nas-to-backblaze-b2-cloud-storage/

You’ve added a Synology Network Attached Storage (NAS) Device to your tech stack, but you may be wondering how to protect your files from ransomware, natural disasters, or accidental deletion. Saving your data to cloud storage can help protect you from the painful consequences of data loss. But now you may be wondering whether to backup or sync your data to the cloud. The answer to that question will largely depend on your own individual needs. If you are looking to keep an additional copy of your regularly changing data at an off-premise location to maintain the 3-2-1 backup strategy, then backing up your data to the cloud is the way to go.

If, however, you need your files in a place where everyone in the organization can access them at any moment, where edits to any files can be shown across all devices in real time or you need up-to-the-minute versions of your files off-site, then syncing your files to the cloud will be sufficient.

Your Synology NAS has applications for either backup—Hyper Backup—or sync—Cloud Sync—which we will explain in greater detail below. Understanding the distinction between the two functions is an important part of setting your tech stack up for success. And setting your tech stack up to connect to Backblaze B2 Cloud Storage, gives you greater security, accessibility and off-site peace of mind at a fifth of the cost of other cloud providers.

Read on to learn the differences between backup and sync, how they work with your Synology NAS, and how to connect your NAS to Backblaze B2.

Backup vs. Sync

As mentioned before, understanding the difference between backup and sync is a crucial step in determining how you will pair your NAS with an offsite cloud storage solution like Backblaze B2. As such, it may help you to have a full understanding of the difference between the two.

A backup lets you create copies of files and other digital assets, which are then sent from a NAS to another device or an off-site storage location such as a public cloud. Allowing for either incremental or full backups of the contents of your NAS on a customized schedule, this method allows you to retain a copy of the most recent version of a file, while also being able to retain previous versions. This can also be an effective strategy to combat malware or ransomware, as you can simply delete infected files and restore from a clean backup. In addition, maintaining storage off-site protects your data from any natural disasters that might befall your immediate vicinity.

By contrast, a sync strategy consists of one or more devices working in unison, updating files in the same way across each device and/or a cloud storage location. The benefits of syncing files come from the ability to instantly see updates on files and provide easy access to changes in files to people across your organization. If you connect your NAS to Backblaze B2, you can easily access and download files anywhere you are through native applications or another Backblaze partner integration like Veeam, Iconik, and Cyberduck. The drawback of syncing is that it does not offer effective protections against accidental deletions, unauthorized access or malware.

There are essentially two different ways to sync your files: one-way or two-way. In a one-way sync, when a file from Location A changes, the same file at Location B is updated; however, if something on the file changes in Location B, the file in Location A will not be updated. On the other hand, in a two-way sync, regardless of where the file changes, the other location will automatically update to mirror the other. And in most cases, this means the entire file will be re-uploaded.

It is not uncommon for an organization to use both backup and sync strategies simultaneously, relying on one over the other as needs change. Thankfully, Synology has two relevant proprietary applications that serve the various needs of backing up and syncing data which can be seen in the table below.  
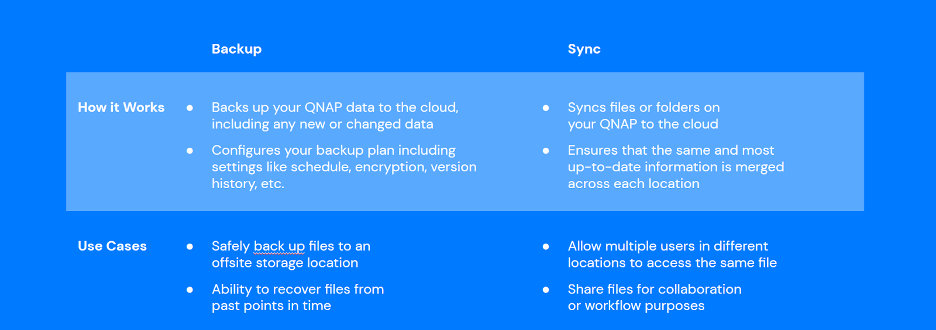
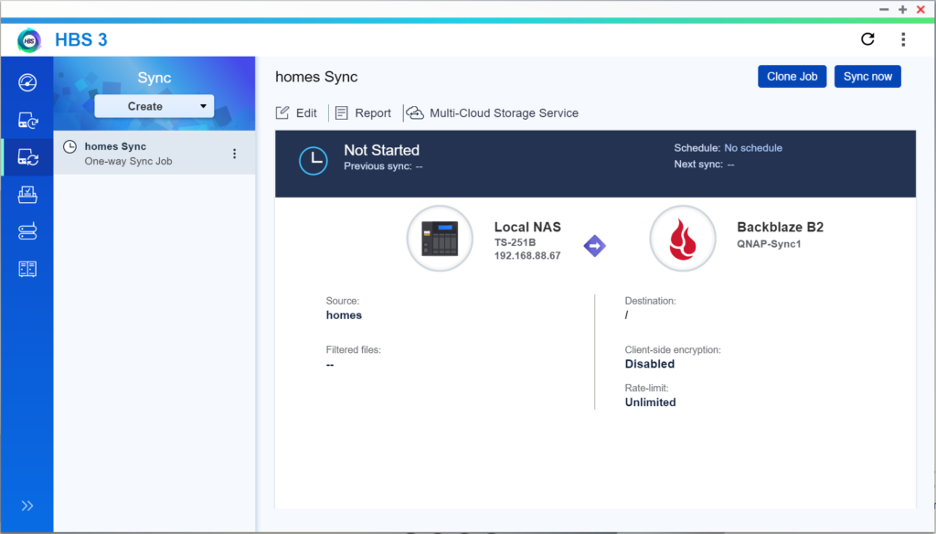
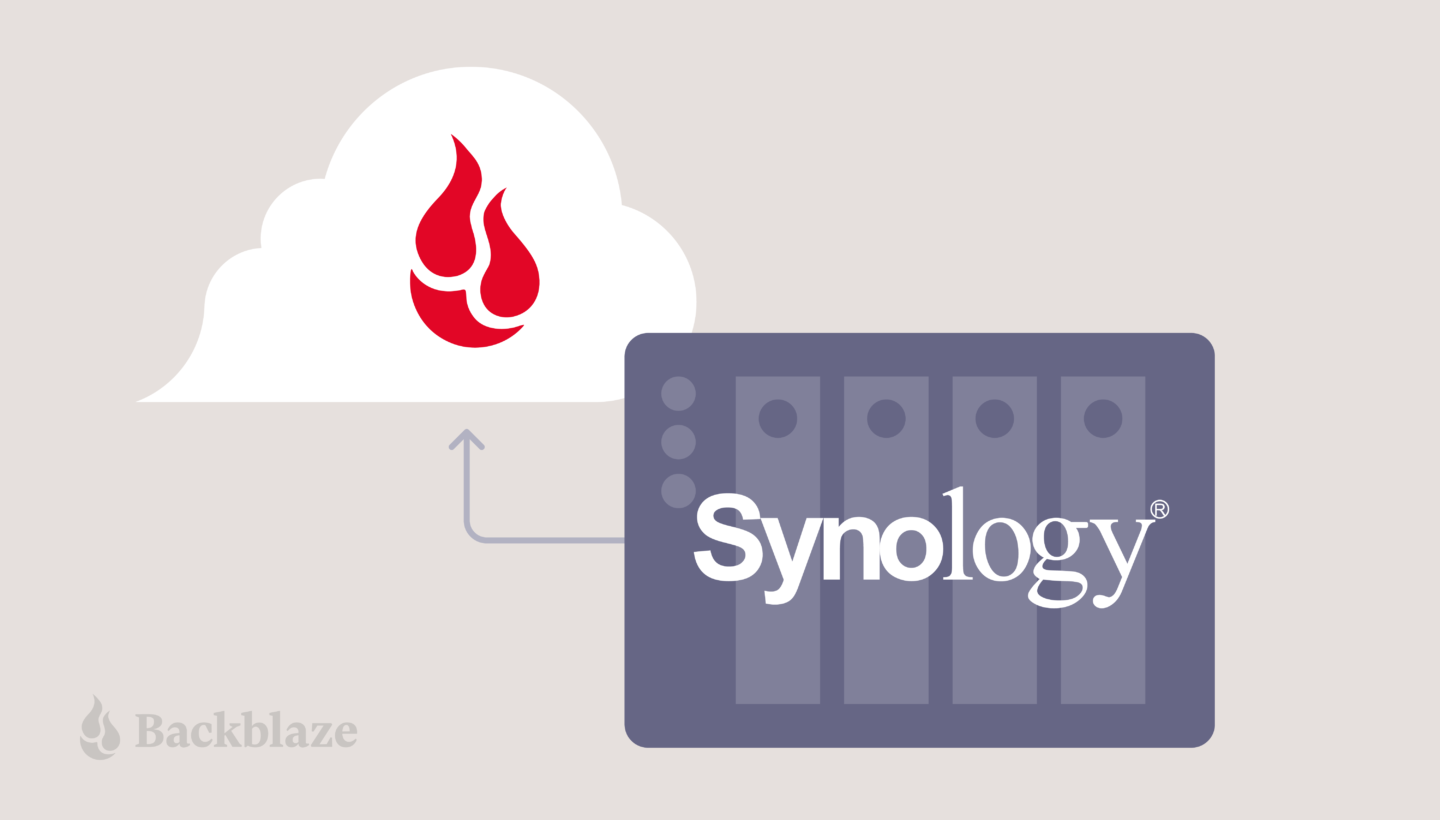
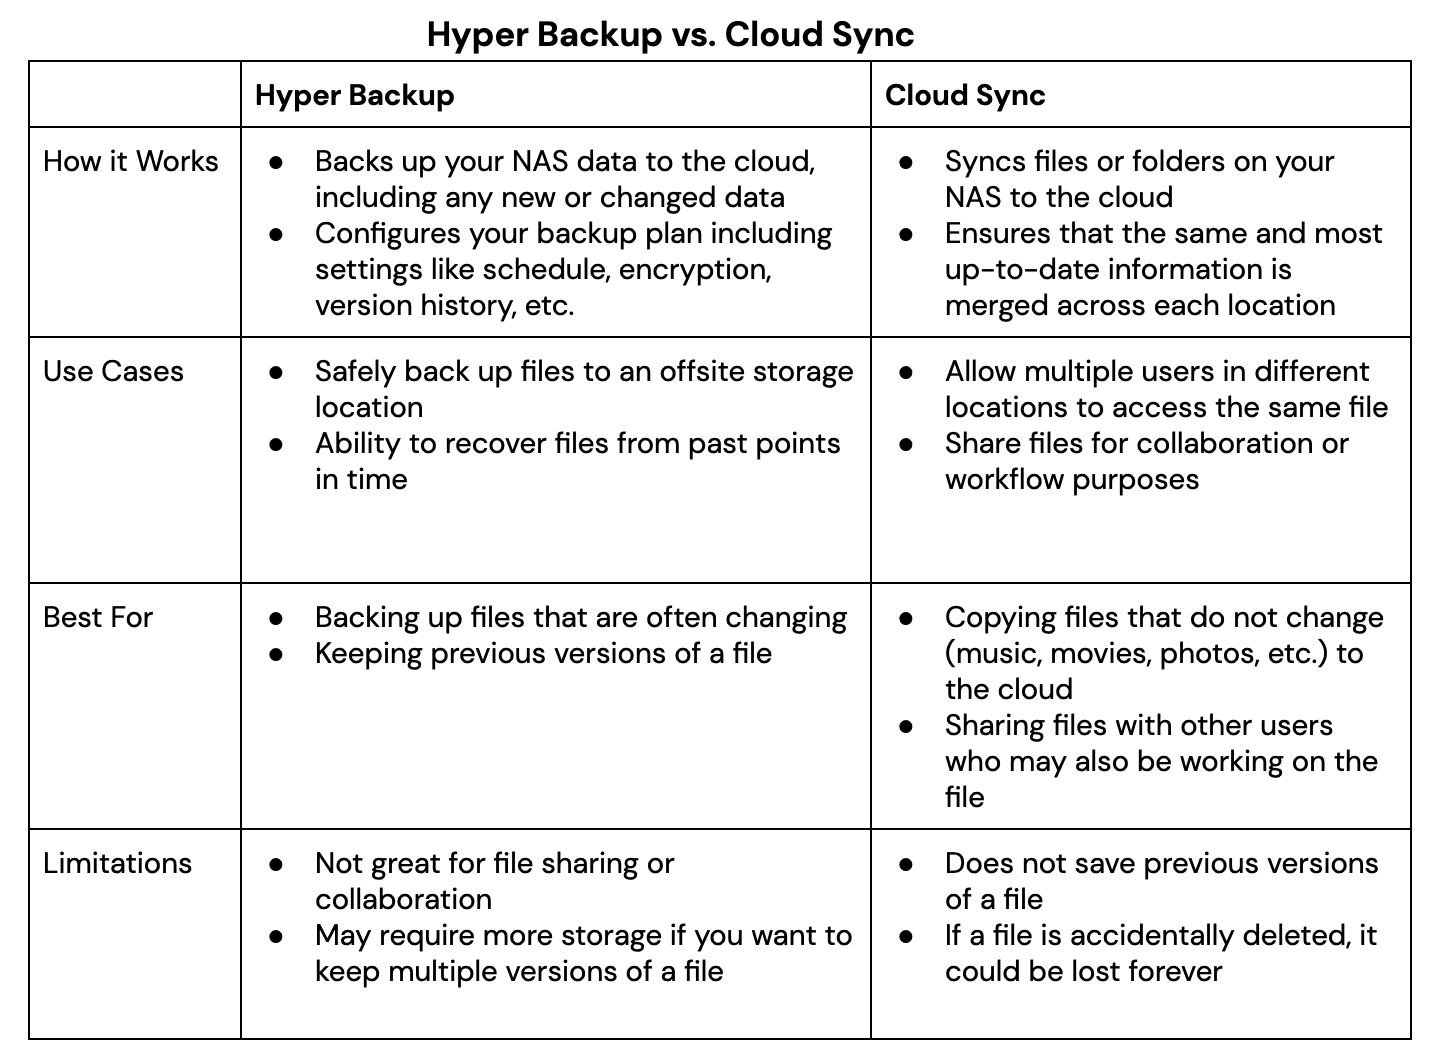
Whether you plan to utilize the backup and sync features Synology offers via Hyper Backup and Cloud Sync, securing your files to the cloud will help you create an effective 3-2-1 Backup Strategy, protecting your digital assets. Now we’ll take a closer look at how you can connect your Synology NAS to Backblaze B2 Cloud Storage.

Setting Up Your B2 Cloud Storage Account

Regardless of whether you use Hyper Backup or Cloud Sync, you can get set up in minutes with B2 Cloud Storage. You can follow along with the directions in this blog or take a look at our video guides. Pat Patterson, Chief Technical Evangelist, demonstrates how to get your data into B2 Cloud Storage in under 10 minutes using either Hyper Backup or Cloud Sync.

Here’s a video tutorial for Hyper Backup:

And here’s one for Cloud Sync:

The first step is to create a Backblaze B2 Cloud Storage account so your data has a location to be securely stored. You can sign up for an account and get started with 10GB of storage for free.

We’ll continue to show the steps after you’ve signed up for a Backblaze B2 Account in order to access your new bucket, Application Key ID, and Application Key. This will only take a few clicks, a couple names, and less than a minute.

  1. On the Buckets page of your account, click the Create a Bucket button.
  2. Give your bucket a name and enable encryption for added security.
  3. Click the Create a Bucket button and you should see your new Bucket on the Buckets page.
  4. Navigate to the App Keys page of your account and click the Add a New Application Key button.
  5. Name your Application Key and click the Create New Key button—make sure that your key has both Read and Write permissions (the default option).
  6. Your Application Key ID and Application Key will appear on your App Keys page. Make sure to copy these somewhere secure as the Application Key will not appear again!

Backing Up or Syncing Your Synology to Backblaze B2

By now you have created the location for your data to be either backed up or synced to and obtained your Application Key.

If you want to backup your data, then follow this integration guide or the video mentioned above that takes you step-by-step on how you can use Hyper Backup to backup your data from your Synology to B2 Cloud Storage.

If syncing your data is what you need, then follow this integration guide or the video mentioned above that takes you through how you can use Cloud Sync to sync your data from your Synology to B2 Cloud Storage.

Once you have built the connection between your Synology to B2 Cloud Storage either through Hyper Backup or Cloud Sync (or both!), you can begin backing up or syncing your data for greater protection and accessibility no matter the location.

Summary

Creating and implementing an effective backup strategy, sync strategy or hybrid of the two can be an effective way to protect your data. A thorough understanding of the benefits, drawbacks and strategies involved, and the ways your Synology NAS can utilize both Hyper Backup and Cloud Sync, will hopefully get you on your way to securing your data.

At a fifth of the price of competitors, with setup that takes less than 10 minutes, Backblaze B2 Cloud Storage is a great complement to your Synology NAS.

The post How to Connect Your Synology NAS to Backblaze B2 Cloud Storage appeared first on Backblaze Blog | Cloud Storage & Cloud Backup.

A Cloud Storage Experiment to Level Up Chia Farming

Post Syndicated from Troy Liljedahl original https://www.backblaze.com/blog/experimenting-cloud-storage-for-chia-mining/

Backblaze B2 Cloud Storage

Anyone that pays attention to the hard drive market as closely as Backblaze does already knows all about the rapid rise in popularity of Chia—the “green” alternative to Bitcoin—and the effect it’s having on global drive supplies. If you haven’t heard about Chia, check out the short note below for more info. But this post is geared for the many Chia farmers out there who’ve already delved into farming and are now facing empty shelves as they seek out storage solutions for their plots.

With this shortage in mind, our team set out to explore an experimental solution that would allow for farming of Chia plots stored in B2 Cloud Storage. We’re happy to announce that it is now possible for Chia farmers to store and farm their plots in Backblaze B2.

So if you’re looking to participate in the Chia sensation without spending a lot on hard-to-find, high-capacity hard drives, there is now an innovative way to get started with an affordable, scalable cloud solution.

Chia vs. Bitcoin: Chia is a new cryptocurrency that employs a proof-of-space algorithm. As opposed to the proof-of-work algorithm supporting Bitcoin—which is both CPU and energy intensive—Chia was developed to minimize energy consumption. The result is a storage intensive form of blockchain. If you’d like to learn more, we recommend going to the source.

The Keys to Winning Chia Challenges

Chia plots are not just lying idle. The Chia network regularly issues matching challenges and quality checks. The quality checks are important to succeed at, but the challenges—where one of every 512 plots is challenged every 10 minutes—are why you’re farming.

If one of your plots is selected for a match challenge, you need to fetch a “full proof” to collect a reward, which requires around 64 hard drive seeks and delivery of the full proof to the rest of the peer-to-peer network in less than 30 seconds, before Chia “time lords” move the blockchain further along.

This presents two problems that might keep you up at night if you’re trying to farm Chia:

  • Problem 1: Where to store plots at scale.
    Given that the current estimated network space occupied by Chia plots is 20 exabytes (and growing exponentially!), chance dictates that just one of your plots will emerge as the winner once in about 96 years. It’s like waiting a lifetime for an ear of corn—not fun. So you want to have a lot of plots to improve your odds—but you need somewhere to keep them that you can afford and that can grow with your farming.
  • Problem 2: Administering the complexity of scaling storage.
    If you solve the storage problem, then you also need a way to quickly and reliably make all of the plots available to be read and quickly presented to the network when you win a challenge. You’ll need to be able to administer that complexity every second of every day for as long as you want to be a farmer. If you wait 96 years for a single ear of corn, it would be a bummer to miss harvest day.

These are the keys to winning the match challenge: Attaining scale and capably administering it.

The Status Quo: Individual Chia Farmers Using HDDs for Storage

For a 7200 RPM HDD with an approximately 10ms read latency, getting a quality check or a full proof takes around 70ms per qualifying plot. Because the Chia kernel caches the first seven reads, the HDD only must perform the 64 seeks when issued a challenge.

If an 18TB drive—which can hold 166 plots at 108GB per plot (using k=32)—is lucky enough to contain a plot that is that magical “one in 512,” the HDD is reasonably fast in performing the necessary read operations, because Chia was designed to use HDDs for Plot Farming. But HDDs can only perform one of those operations at a time, so a desktop must perform the operations sequentially. Even if you’re using an SSD, you still must perform the operations in series. Again, this isn’t an issue for individual drives since HDDs and SSDs are able to perform the operations very quickly within the allotted time frame.

But, even for those lucky enough to find a supply of readily available 18TB drives that haven’t been marked up twice, providing storage for the number of plots a Chia Farmer needs to ensure a reasonable chance for success is going to be labor and capital intensive.

rows of Backblaze storage pods

How to Use Cloud Storage to Scale Your Plots

Chia software was not designed to allow farming with public cloud object storage, and the first tests we ran on Chia plots stored in B2 Cloud Storage proved this out: taking minutes, not the 30 seconds necessary to pass the quality check in time. Unlike with a local storage solution, where quality check reads can be cached by the kernel, performance is degraded in a cloud storage setup to an extent that it affects users’ success rate of winning challenges.

Backblaze B2 Cloud Storage provides object storage, which stores data in discrete objects, negating the need for any nested or hierarchical file structure. This makes B2 Cloud Storage ideal for scaling and use as an origin store, but as a standalone product, object storage is not suited for storing Chia plots. Without caching optimizations to improve performance and a way to read plots concurrently, B2 Cloud Storage would not effectively serve the Chia farming use case. But B2 Cloud Storage is designed to take advantage of parallel operations, or threads, offering some advantages over a standard physical drive if set up correctly for this use case (cough* I wrote about threads here! cough*).

Our team thought it would be interesting to build a tool providing a Chia use case workaround for four compelling reasons:

  • First: Because the Backblaze Storage Cloud provides both of the keys for successful Chia farming: There is no provisioning necessary and Chia Farmers can upload new plots at speed and scale. The Backblaze Storage Cloud cares for nearly 500 billion files with exceptional durability and availability.
  • Second: The cost of storing Chia plots in Backblaze B2 is financially compelling at $5/TB/month. According to Chia Calculator, using B2 Cloud Storage to store plots would be profitable, depending on the network space growth rate and the current price of Chia coin.
  • Third: A Tiger Team of SEs and engineers, including myself, thought it would make for an interesting and useful (and fun) experiment.
  • Finally: The same team believed we could enable Chia farming of plots stored in B2 Cloud Storage by cracking the code of how to parallelize operations in Chia.

With this in mind, our Tiger Team set out to get to work. A tool to mount Backblaze B2 as a filesystem was necessary since Chia doesn’t natively support the Backblaze B2 Native or S3 Compatible APIs. After some testing, our team settled on B2_fuse since our engineers who would be working on this already had some familiarity with the source code.

After deciding on B2_fuse, our engineers added a prefetch algorithm to cache the reads to address the kernel issue mentioned above. This would aid performance, but with reads still carried out one at a time on HDD, there was room for additional improvement. Obviously performing operations in parallel would greatly grow the success rate, and after doing some digging one of our engineers found a PR (pull request) that added parallelized reads and had not yet been merged into the Chia project.

With the caching optimizations in B2_fuse and the added functionality of parallelized reads, the proof time for a Chia plot stored in B2 Cloud Storage was reduced to seconds. This provides for uploading Chia plots to Backblaze B2 and presenting them to the Chia network for farming without the need for an expensive server in a datacenter.

Our successful tests were carried out using a compute instance running in a US West region with a Backblaze B2 account that is also in the US West region. Give it a shot and you could be staring at a whole field of metaphorical crops—all ready for whenever the “one in 512” challenge arrives.

If you want to try this solution, set up a Backblaze B2 account now, and get the updated version of B2_fuse (or contribute to the project) along with instructions on how to get the PR with parallized reads here: https://github.com/Backblaze-B2-Samples/b2fs4chia.

Because this support is experimental and the Backblaze team knows a lot of Chia Farmers will be excited to try it out, we ask that farmers limit their storage of Chia plots to 100 TB at this time, or contact our sales team to discuss anything larger.

Happy farming!

The post A Cloud Storage Experiment to Level Up Chia Farming appeared first on Backblaze Blog | Cloud Storage & Cloud Backup.

Increasing Thread Count: Useful in Sheets and Cloud Storage Speed

Post Syndicated from Troy Liljedahl original https://www.backblaze.com/blog/increasing-thread-count-useful-in-sheets-and-cloud-storage-speed/

As the Solutions Engineering Manager, I have the privilege of getting to work with amazing customers day in and day out to help them find a solution that fits their needs. For Backblaze B2 Cloud Storage, this includes helping them find an application to manage their media—like iconik, or setting up their existing infrastructure with our Backblaze S3 Compatible APIs, or even providing support for developers writing to our B2 Native APIs.

But regardless of the solution, one of the most common questions I get when talking with these customers is, “How do I maximize my performance to Backblaze??” People want to go fast. And the answer almost always comes down to: threads.

What Are Threads?

If you do not know what a thread is used for besides sewing, you’re not alone. First of all, threads go by many different names. Different applications may refer to them as streams, concurrent threads, parallel threads, concurrent upload, multi-threading, concurrency, parallelism, and likely some other names I haven’t come across yet.

But what all these terms refer to when we’re discussing B2 Cloud Storage is the process of uploading files. When you begin to transmit files to Backblaze B2, they are being communicated by threads. (If you’re dying for an academic description of threads, feel free to take some time with this post we wrote about them). Multithreading, not surprisingly, is the ability to upload multiple files (or multiple parts of one file) at the same time. It won’t shock you to hear that many threads are faster than one thread. The good news is that B2 Cloud Storage is built from the ground up to take advantage of multithreading—it is able to take as many threads as you can throw at it for no additional charge and your performance should scale accordingly. But it does not automatically do so, for reasons we’ll discuss right now.

Fine-tuning

Of course, this begs the question, why not just turn everything up to one million threads for UNLIMITED POWER!!!!????

Well, chances are your device can’t handle or take advantage of that many threads. The more threads you have open, the more taxing it will be on your device and your network, so it often takes some trial and error to find the sweet spot to get optimal performance without severely affecting the usability of your device.

Try adding more threads and see how the performance changes after you’ve uploaded for a while. If you see improvements in the upload rate and don’t see any performance issues with your device, then try adding some more and repeating the process. It might take a couple of tries to figure out the optimal number of threads for your specific environment. You’ll be able to rest assured that your data is moving at optimal power (not quite as intoxicating as unlimited power, but you’ll thank me when your computer doesn’t just give up).

How To Increase Your Thread Count

Some applications will take the guesswork out of this process and set the number of threads automatically (like our Backblaze Personal Backup and Backblaze Business Backup client does for users) while others will use one thread unless you say otherwise. Each application that works with B2 Cloud Storage treats threads a little differently. So we’ve included a few examples of how to adjust the number of threads in the most popular applications that work with B2 Cloud Storage—including Veeam, rclone, and SyncBackPro.

If you’re struggling with slow uploads in any of the many other integrations we support, check out our knowledge base to see if we offer a guide on how to adjust the threading. You can also reach out to our support team 24/7 via email for assistance in finding out just how to thread your way to the ultimate performance with B2 Cloud Storage.

Veeam

This one is easy—Veeam automatically uses up to 64 threads per VM (not to be confused with “concurrent tasks”) when uploading to Backblaze B2. To increase threading you’ll need to use per-VM backup files. You’ll find Veeam-recommended settings in the Advanced Settings of the Performance Tier in the Scale-out Repository. (See screenshot below).

Rclone

Rclone allows you to use the --transfers flag to adjust the number of threads up from the default of four. Rclone’s developer team has found that their optimal setting was --transfers 32, but every configuration is going to be different so you may find that another number will work better for you.

rclone sync /Users/Troy/Downloads b2:troydemorclone/downloads/ --transfers 20

Tip: If you like to watch and see how fast each file is uploading, use the --progress (or -P) flag and you’ll see the speeds of each upload thread!

SyncBackPro

SyncBackPro is an awesome sync tool for Windows that supports Backblaze B2 as well the ability to only sync deltas of a file (the parts that have changed). SyncBackPro uses threads in quite a few places across its settings, but the part that concerns how many concurrent threads will upload to Backblaze B2 is in the “Number of upload/download threads to use” setting. You can find this in the Cloud Settings under the Advanced tab. You’ll notice they even throw in a warning letting you know that too many will degrade performance!

Happy Threading!

I hope this guide makes working with B2 Cloud Storage a little faster and easier for you. If you’re able to make these integrations work for your use case, or you’ve already got your threading perfectly calibrated, we’d love to hear about your experience and learnings in the comments.

The post Increasing Thread Count: Useful in Sheets and Cloud Storage Speed appeared first on Backblaze Blog | Cloud Storage & Cloud Backup.