Your QNAP network attached storage (NAS) device helps your business centralize storage capacity, support collaboration, and access files 24/7 from anywhere. If you were relying on individual hard drives or another ad hoc storage solution before, it definitely helps you uplevel your data management practices.
One of the great features of a QNAP NAS device is Hybrid Backup Sync (HBS), its onboard backup utility that allows you to easily store a copy of your data to your NAS and other destinations. You can set regular, automated backups to protect against data loss due to hardware failures or accidental deletion. But, keeping a copy of your data on your NAS alone doesn’t constitute a true backup strategy. For that, you need to follow the 3-2-1 backup rule with at least one copy stored off-site.
This post explains how to set up a 3-2-1 backup strategy with your QNAP NAS. We’ll share the benefits of storing your backups in the cloud, discuss different options for backing up your QNAP NAS, and provide some practical examples of what you can do by combining cloud storage and your NAS.
QNAP NAS and a 3-2-1 backup strategy
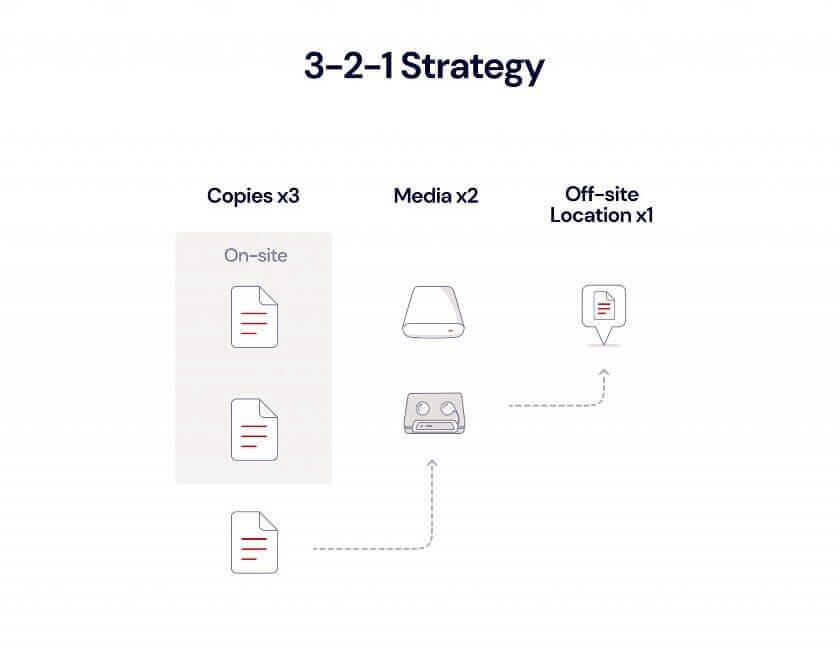
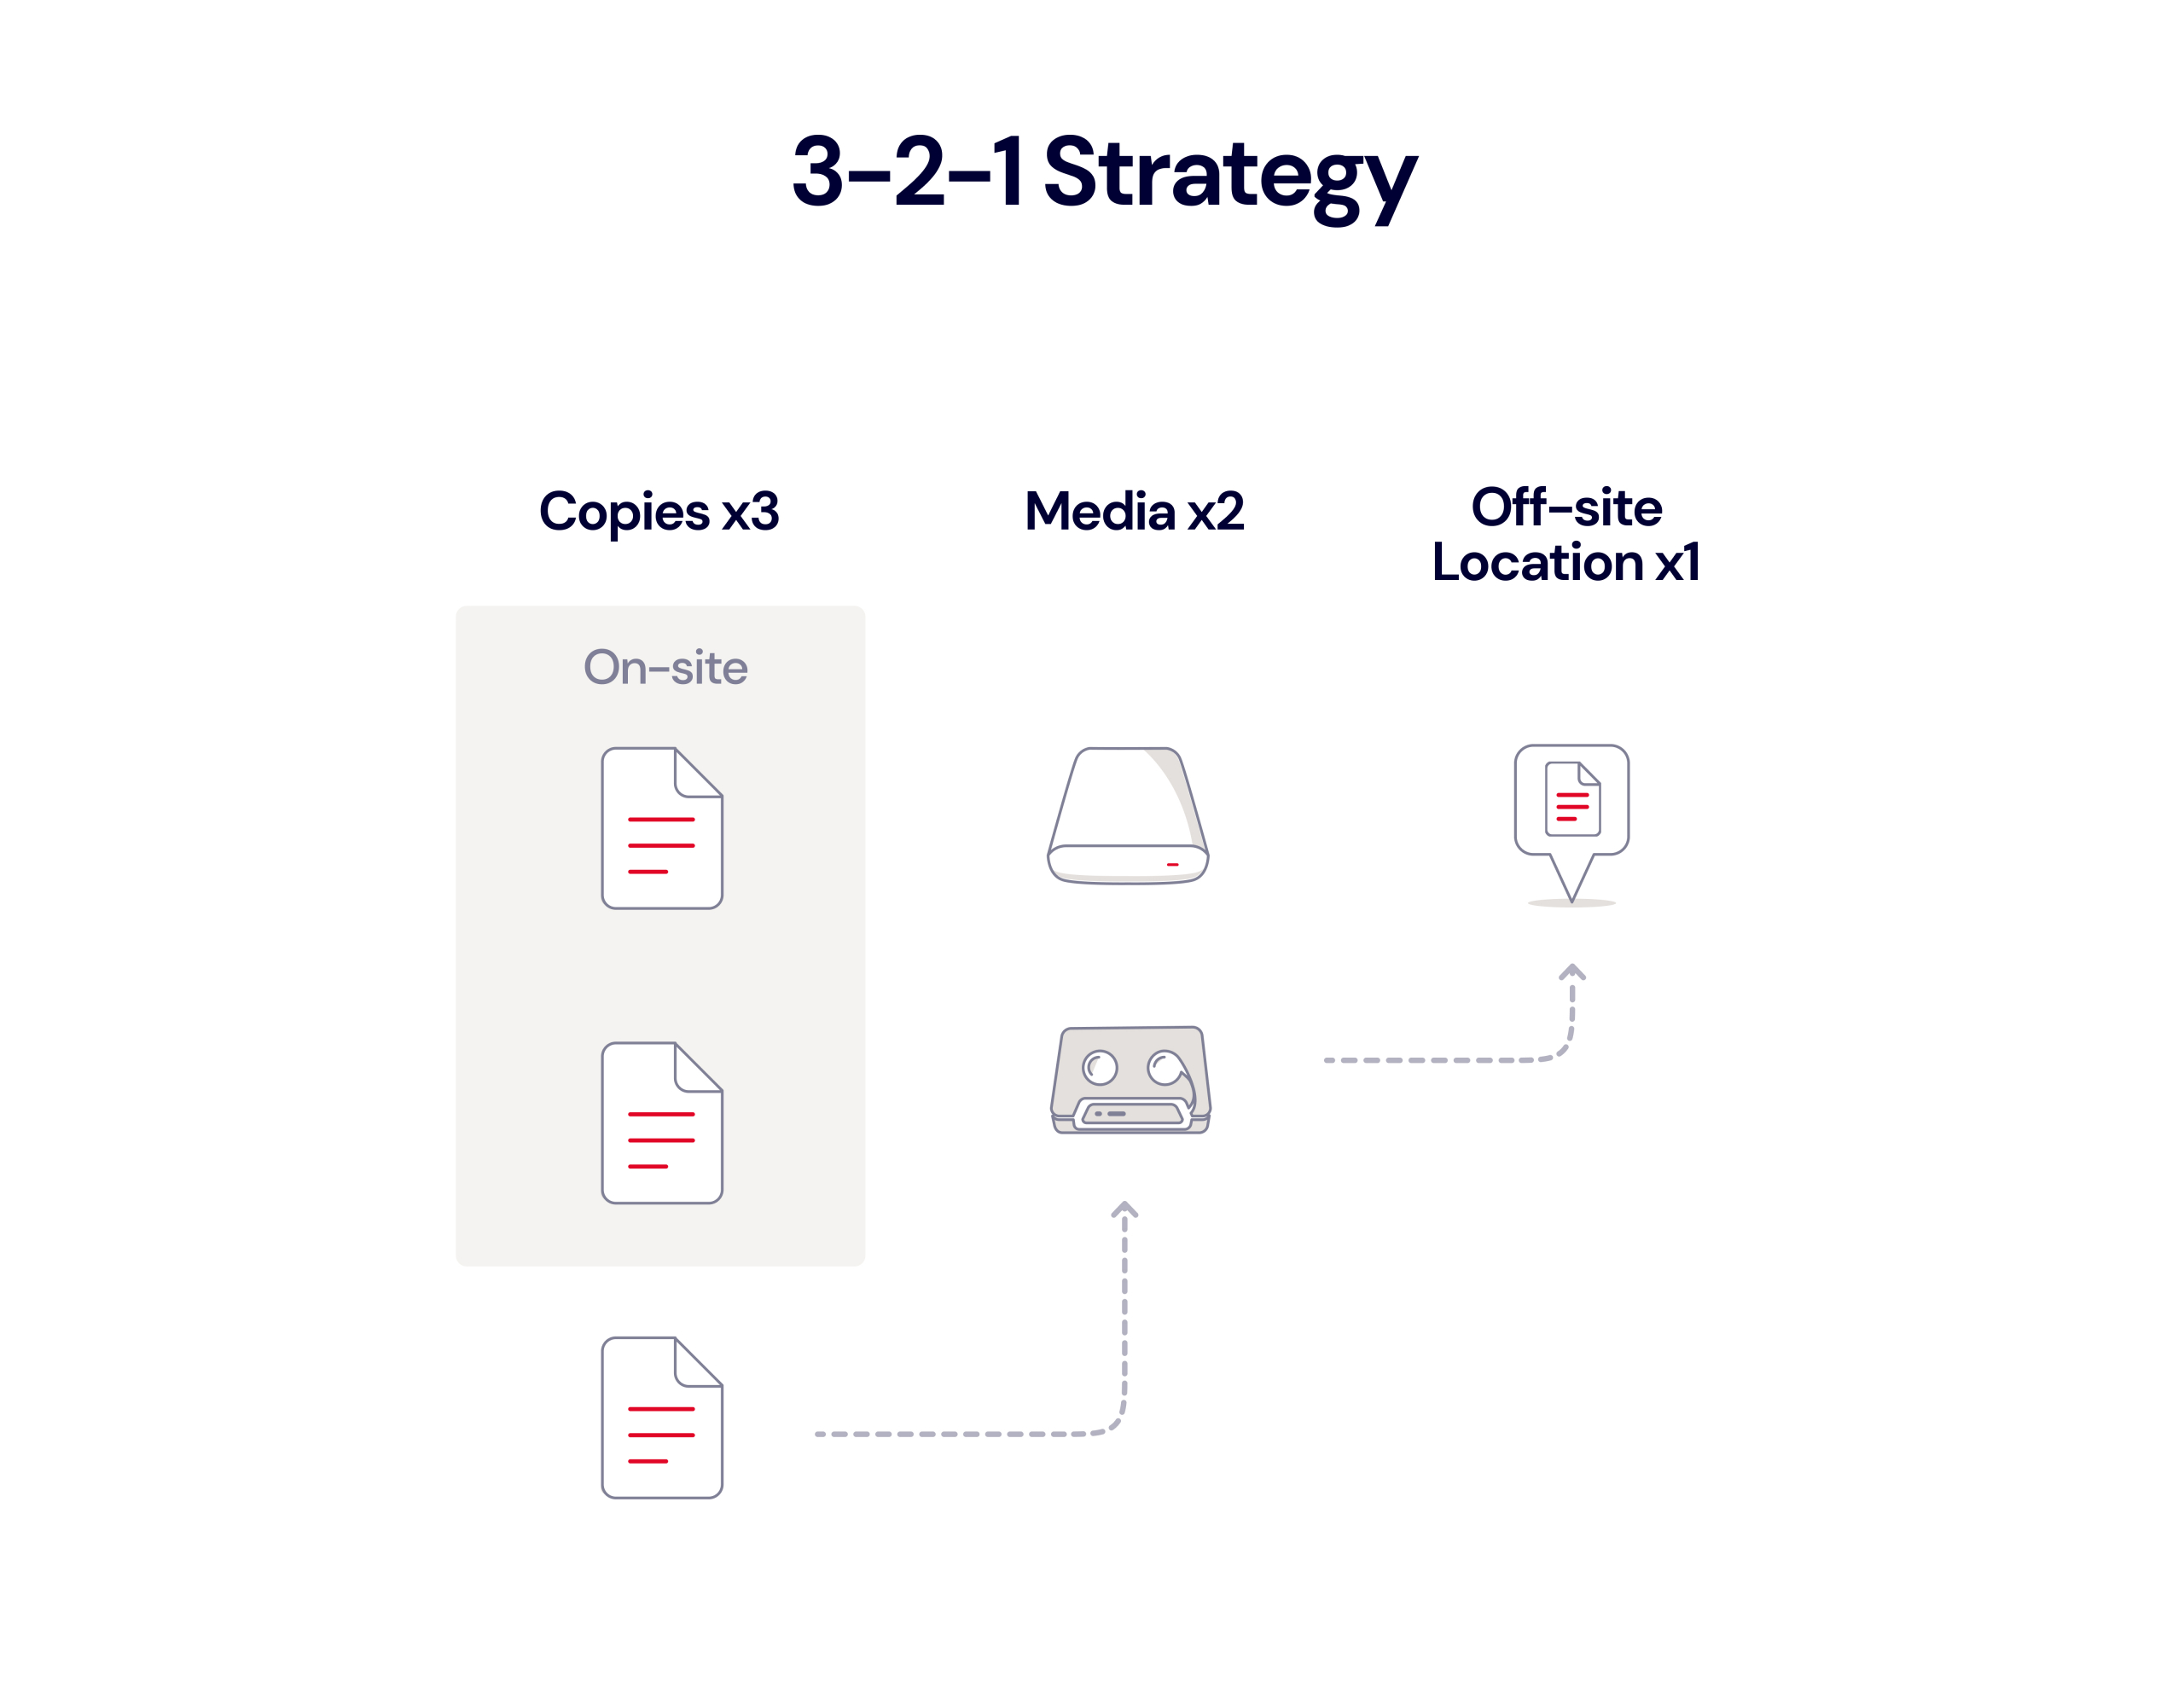
Following the 3-2-1 strategy means having three copies of your data, two of which are stored locally but on different media (aka devices), and one stored off-site.
Your QNAP NAS is your first step towards completing the 3-2-1 strategy. By using it to store data locally, you have two copies on-site. Backing up your QNAP NAS to the cloud completes the 3-2-1 strategy by serving as your off-site storage.
You could maintain an off-site copy on another physical device like another NAS, an external drive, or a file server, but keep in mind, backing up to an external destination other than the cloud will require you to physically separate the backup copy—that is, send your drive via mail or drive it elsewhere in order to ensure geographic separation. Backing up your QNAP NAS to the cloud means you achieve a 3-2-1 strategy without going out of your way to physically separate the copies, and it allows you to easily store data in different regions for greater data resilience and disaster recovery.
The additional benefits of backing your QNAP NAS to the cloud
Backing up your QNAP NAS to the cloud gives you a number of additional benefits, including:
Disaster recovery: Without an off-site backup, your on-site data, including data on your individual workstations and your NAS, is susceptible to data loss. Natural disasters could wipe out your machines, your NAS, and any other backups you might store locally. Cloud backups safeguard your data from physical disasters that could destroy both your NAS and local copies.
Ransomware protection: While QNAP has on-board utilities that allow you to revert to a previous backup, your NAS is still connected to your network and susceptible to ransomware. Cloud backups, especially those configured with Object Lock, provide a layer of security against ransomware attacks that can encrypt or delete data stored on your network-connected NAS.
Protection against hardware failure: Because your NAS is likely set up in a RAID configuration, one drive failure might not affect your data. But, while one drive is down, your data is at a higher risk. If another drive were to fail, you could lose data. Keeping an off-site backup in cloud storage helps you avoid this fate.
Accessibility: With your data in the cloud, your backups are accessible from anywhere. If you’re away from your desk or office and you need to retrieve a file, you can simply log in to your cloud account and copy that file down.
Security: Cloud vendors typically protect customer data by encrypting it as it travels to its final destination and/or when it is at rest on the vendors’ storage servers. Encryption protocols differ between cloud vendors, so make sure to understand them as you’re evaluating cloud providers, especially if you have specific security requirements.
Automation: Your QNAP NAS comes with a built-in backup utility so you can set your cloud backup schedule in advance and avoid human error (like forgetting to back up) in the future.
Scalability: As your data grows, your cloud backups grow with it. With cloud storage, there’s no need to invest in or maintain additional hardware to ensure your data is properly backed up.
How to protect your business data with QNAP
QNAP offers a number of different tools and functionality to help you back up business devices and systems to your NAS, including:
Qsync: Qsync is an on-board backup utility on QNAP devices that allows you to sync computer files to your QNAP NAS. This allows you to back up workstations to your NAS, creating a second, local copy of that data. QNAP NAS also supports Time Machine for Macs.
NetBack PC Agent: A utility specifically for backing up Windows PCs and servers.
Hyper Data Protector: Use Hyper Data Protector to back up multiple VMware and Hyper-V virtual machines (VMs).
File server backup: QNAP devices support multiple protocols, including rsync, FTP, and CIFS for backing up different file servers.
Boxafe: Use Boxafe to back up Google workspace and Microsoft 365 business account data to your NAS.
Snapshot feature: Takes point-in-time copies of data for protection and recovery.
MARS: Use QNAP’s MARS service to back up Google Photos and WordPress databases and files to your NAS.
How to back up your QNAP to the cloud
Once you’ve created a copy of your business data to your QNAP NAS, you can then use QNAP Hybrid Backup Sync to back it up to the cloud. Hybrid Backup Sync supports multi-version backups and allows you to customize retention settings for version management. QNAP’s QuDedup feature deduplicates data, helping you manage your storage footprint. The utility also allows you to manage Time Machine backups for Mac devices.
What can you do with cloud storage and QNAP Hybrid Backup Sync?
The QNAP Hybrid Backup Sync app provides you with a lot of options. You can synchronize in the cloud as little or as much as you want. Here are some practical examples of what you can do with Hybrid Backup Sync and cloud storage working together.
1. Sync the entire contents of your QNAP to the cloud
The QNAP NAS has excellent fault tolerance—it can continue operating even when individual drive units fail—but nothing in life is foolproof. It pays to be prepared in the event of a catastrophe. Now that you know about the 3-2-1 backup strategy, you know how important it is to make sure that you have a copy of your files in the cloud.
2. Sync your most important media files
Using your QNAP to store marketing assets like video and photos? You’ve invested untold amounts of time, money, and effort into producing those media files, so make sure they’re safely and securely synced to the cloud with Hybrid Backup Sync.
3. Back up Time Machine and other local backups
Apple’s Time Machine software provides Mac users with reliable local backup, and many Backblaze customers rely on it to provide that crucial first step in making sure their data is secure. QNAP enables the NAS to act as a network-based Time Machine backup. Those Time Machine files can be synced to the cloud, so you can make sure to have Time Machine files to restore from in the event of a critical failure.
If you use Windows or Linux, you can configure the QNAP NAS as the destination for your Windows or Linux local data backup. That, in turn, can be synced to the cloud from the NAS.
Ready to give it a try?
Hybrid Backup Sync allows you to choose from any number of cloud storage providers as a backup destination, and Backblaze B2 Cloud Storage is one of them. Check out our videos on how to use Hybrid Backup Sync to back up or sync your data to B2 in under 15 minutes.
If you haven’t given cloud storage a try yet, you can get started now and make sure your NAS is synced or backed up securely to the cloud.
If you’re leading IT strategy for a growing enterprise and still weighing network attached storage (NAS) and cloud storage, you’re not alone. And you’re not behind. Even the most seasoned infrastructure pros find themselves re-evaluating their stack as data volumes explode and budgets tighten. Both offer unique benefits, but with overlapping features, it’s easy to see why the choice can be confusing.
Are you looking for greater control with physical access, as in a local NAS setup? Or is off-site backup, flexibility, and scalability through a cloud service provider more aligned with your needs? With plenty of discussions and debates outlining the pros and cons of one or the other, it can be difficult to determine the best storage solution for your specific needs.
This guide walks through clear, actionable insights into NAS and cloud storage, addressing your most pressing questions about storage costs, dedicated machines, data sharing, and performance. Whether the focus is cost, scalability, security, or accessibility, this guide will help identify the ideal storage solution for your business.
What is NAS?
NAS, or network attached storage, is a file-level storage system designed specifically to provide centralized and shared disk storage for users on a local area network (LAN).
Essentially, NAS is a purpose-built computer that operates its own dedicated operating system (OS). It contains one or more storage devices that are configured to create a single shared volume. These storage devices are arranged in a RAID configuration to ensure data redundancy and performance.
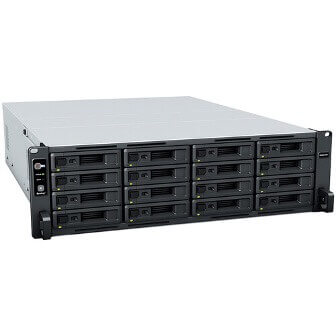
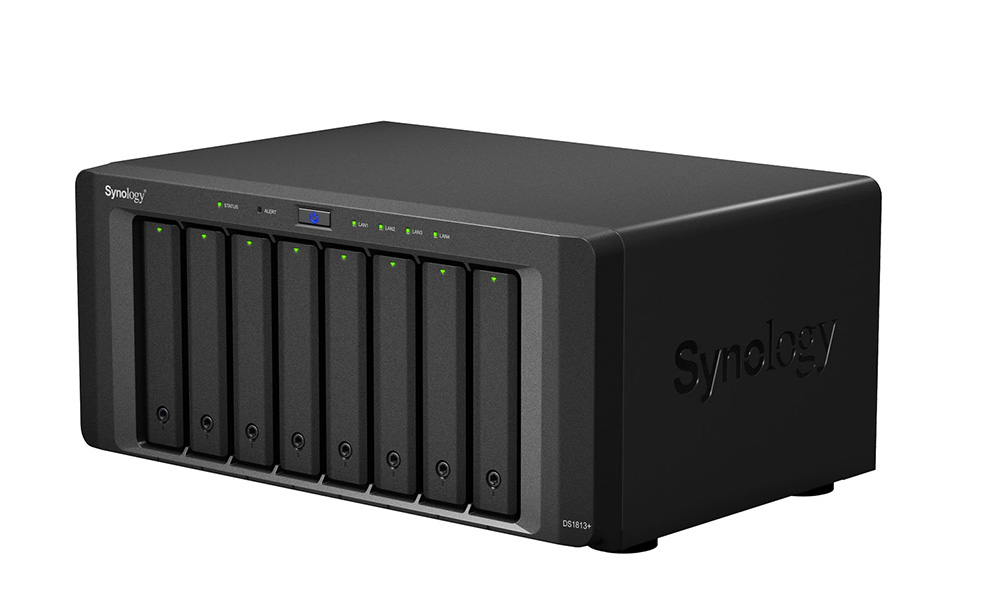
A 16-bay NAS device.
These configurations make NAS ideal for file sharing, data backups, and accessing large files within an organization, making it a cost-effective solution for enterprises that need local storage with physical access.
Many NAS devices, such as Synology NAS or QNAP NAS, come with built-in software for additional functionalities like file syncing, data backups, and offsite backup options to integrate with cloud services.
How does NAS work?
NAS provides access to files using standard network file sharing protocols such as Network File System (NFS) and Server Message Block (SMB). By connecting directly to the local network, NAS allows users to easily store, access, and collaborate on files without overburdening other servers within the network. This separation of file-serving responsibilities helps optimize overall network performance, particularly for high-traffic environments.
NAS systems are generally managed through a web-based utility accessible over the network, offering an intuitive interface for configuration and maintenance. This interface allows administrators to handle tasks such as user permissions, storage allocation, and data redundancy settings—making it simpler to secure and organize shared files across the network.
Advantages of NAS
NAS offers several advantages including faster data access, easier administration, simplified management, and many others. Here’s a breakdown:
Cost effective: NAS devices typically involve an upfront purchase cost that includes access to applications from the NAS provider, like Synology Hyper Backup or QNAP Hybrid Backup Sync. This greatly reduces ongoing subscription fees, though you may incur costs if you want to expand your storage capacity with high-capacity storage drives or increase its performance with updates like more powerful processors, etc.
Data control and security: NAS systems offer extensive control over data storage and security protocols. NAS systems are only accessible on the local network and to user accounts that can be controlled and managed.
Scalable storage: Many NAS systems allow additional drives to be added, providing flexible storage expansion, albeit with the cost of additional drives or device upgrades. Modern NAS devices today offer large storage capacities and advanced features for virtualization and application hosting.
Data redundancy: When equipped with RAID configurations, NAS provides redundancy, ensuring data remains accessible even if one or more hard drives fail.
Better data management tools: Features such as fully automated backups, deduplication, compression, and encryption enhance data storage efficiency and security. NAS systems also support sync workflows for team collaboration, directory services for user and group management, and services like photo or media management.
Compatibility: NAS systems are designed to support different OS environments and are compatible with Windows, Mac, and Linux operating systems. They offer a seamless cross-platform access.
Remote access options: While primarily local, most NAS devices offer secure remote access through VPN or encrypted connections, allowing authorized users to access files from outside the office network when needed.
Limitations of NAS
While NAS offers numerous advantages for centralized file storage, there are some notable limitations to consider:
Initial setup and maintenance:. The configuration process can be complex at enterprise scale, and ongoing maintenance may demand external IT support, adding to operational costs.
Remote access vulnerabilities: NAS systems can be accessed remotely over the internet, creating a private cloud or hybrid cloud solution. While this offers a significant advantage in using your device, just like anything connected to the internet, it also poses security risks. Bad actors can exploit vulnerabilities and gain remote access to the device. To minimize risk, businesses must ensure proper security configurations, use encrypted connections, regularly update firmware, and restrict access to trusted IPs.
Scalability constraints: Although NAS systems allow for storage expansion, they are still limited by the physical capacity of the hardware. Adding storage often involves purchasing high-capacity drives, which can be costly, and for larger expansions, migrating to more powerful NAS devices might be necessary.
Data vulnerability: Data stored on a NAS is susceptible to various threats, including hardware failures, natural disasters, theft, and cyber attacks such as ransomware. While RAID configurations offer some level of data redundancy, they do not protect against all forms of data loss. Regular backups and additional security measures are essential to mitigate these risks.
Performance overheads: As more users and devices access the NAS, network bandwidth and device performance can become bottlenecks. High demand may reduce access speeds, impact data throughput, and reduce efficiency, especially in larger organizations with extensive data needs.
Data recovery challenges: If a NAS drive fails or becomes corrupted, data recovery processes may be complex and require specialized services, which can be costly and time-intensive.
What is cloud storage?
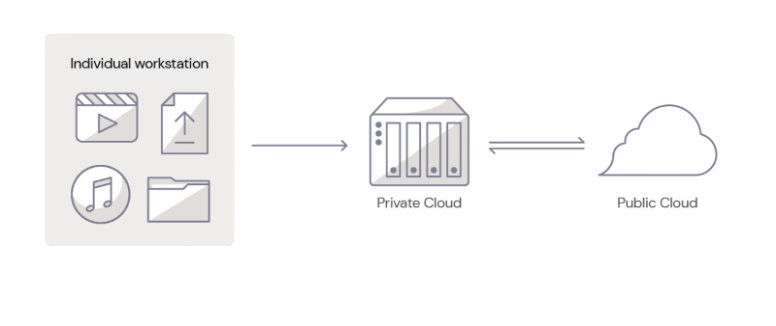
Cloud storage is a model of data storage where data is stored on servers located in off-site locations and accessed via the internet. This setup enables users to store, retrieve, and manage data without requiring local storage infrastructure. There are two main types of cloud: public and private.
Public cloud storage: Hyperscale providers like AWS, Google Cloud, and Azure and specialized cloud providers like Backblaze maintain servers and are responsible for hosting, managing, and securing data. The public cloud is cost-effective and offers scalable storage for multiple users and businesses.
Private cloud storage: Typically managed in-house or by a dedicated third-party provider, private cloud storage is reserved for a single organization. For example, a university may maintain data centers for its community. Private clouds offer enhanced control and security, though they often require more complex management.
What’s the diff: Public vs. private cloud
Public cloud storage services are provided by third-party vendors over the public internet, making them accessible to anyone who wants to purchase or lease storage capacity. These services are designed to offer scalability and reliability, often on a pay-as–you-go basis.
Private cloud storage is dedicated to a single organization where an organization utilizes its own servers and data centers to store data within their own network. It can be hosted on-premises or by a third-party provider, but it’s always behind the organization’s firewall. This model is ideal for businesses that require more control over their data and have stringent security and compliance requirements.
Advantages of public cloud
One of the key benefits of public cloud storage is that it eliminates the need for businesses to buy, manage, and operate their own data center infrastructure. This shift allows companies to move from capital expenditure (CapEx) to operational expenditure (OpEx) model, focusing on paying only for the storage they need when they need it.
Additionally, cloud storage is elastic, enabling businesses to scale their storage capacity up or down more efficiently and strategically than through tactical hardware investments.
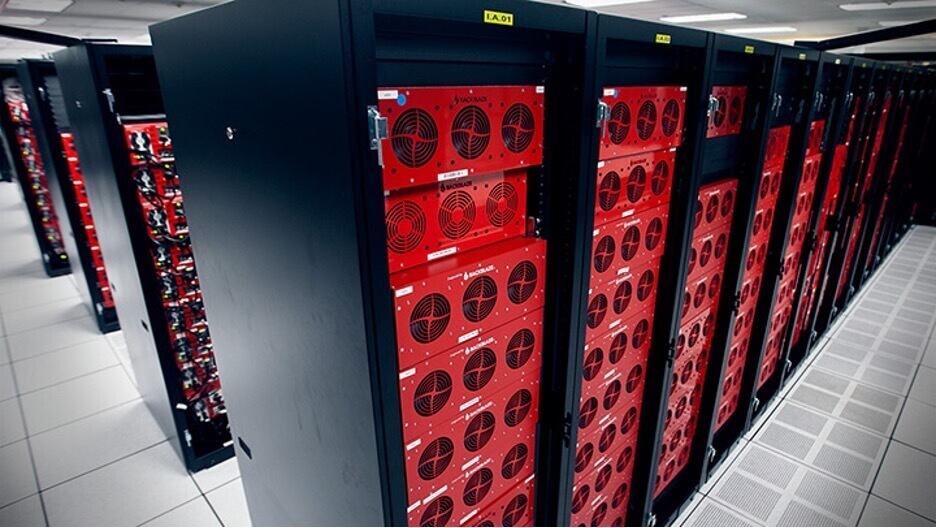
Backblaze servers, providing off-site cloud storage to customers worldwide.
Advantages of private cloud
Private cloud storage allows for customized control and security measures, as organizations have full authority over their data environment. This setup can be highly beneficial for industries with strict data regulations, like finance and healthcare, as it enables better compliance with data privacy laws.
Additionally, private clouds provide reliable performance since resources are not shared with external users, reducing latency issues and enabling faster data access for internal teams.
Types of cloud storage architecture
In addition to the elasticity and scalability benefits of cloud storage, you can also combine on-premises storage and different types of public or private cloud storage to uniquely support your business needs. The primary models of cloud storage are:
Hybrid cloud storage: A hybrid model combines both public and private cloud storage. This allows an organization to decide which data it wants to store in which cloud. Sensitive data and data that must meet strict compliance requirements may be stored in a private cloud or on-premises while less sensitive data is stored in the public cloud. You could also use hybrid cloud to leverage on-premises storage for performance-sensitive tasks, such as using NAS to edit large media files locally, which are later synced to the cloud.
Multi-cloud storage: A multi-cloud model involves using two or more public cloud storage services from different service providers. This model helps businesses leverage the best features of each cloud service while enhancing data availability and redundancy. For example, some companies use multiple cloud providers to host mirrored copies of their active production data. If one of their public clouds suffers an outage, they have mechanisms in place to direct their applications or websites to failover to a second public cloud.
This flexibility in cloud storage architecture allows businesses to balance performance, cost, and security—ensuring critical data is stored securely while remaining accessible and resilient across multiple environments.
How does cloud storage work?
Cloud storage works by allowing users to upload data, such as files, documents, videos, or images to remote servers via the internet.
Public cloud storage providers like Amazon, Google, Microsoft, and Backblaze maintain servers in large data centers. The uploaded data can be accessed and managed through web interfaces or APIs, making it highly accessible and flexible.
Cloud storage offers numerous benefits that can greatly enhance business operations, such as storage space scalability, flexible data sharing options, and built-in data protection through regular backups and client-side encryption. However, there are also a few considerations like data security and storage costs to keep in mind. Next, we’ll look at the advantages and some of the key limitations of cloud-based storage solutions.
Advantages of cloud storage
Cloud storage enables businesses to scale with ease, reduce IT burdens, and access data remotely—offering a reliable, cost-efficient way to manage critical information. Here are some of the advantages of cloud storage:
Off-site protection: Cloud storage provides convenient off-site protection for data, ensuring that in the event of a physical disaster (such as fire or flood), data remains safe and accessible from any location. This supports in data redundancy and business continuity.
Enhanced security: Leading cloud providers invest heavily in advanced security measures—including encryption, multi-factor authentication, Object Lock for immutability, and regular security audits—to protect stored data from unauthorized access and breaches.
Scalability: Cloud storage services offer virtually unlimited storage capacity. Businesses can easily scale their storage needs up or down based on demand without needing to invest in physical hardware.
Accessibility: Data stored in the cloud can be accessed from anywhere with an internet connection, facilitating remote work and data sharing across teams and locations.
Lower maintenance: Cloud providers handle all hardware maintenance, software updates, and security patches, reducing the IT burden of managing storage systems on businesses.
Cost efficiency: Many cloud storage solutions operate on a pay-as-you-go model, allowing businesses to pay only for the storage they use, which can be more cost-effective than local NAS or investing in on-premises hardware.
Limitations of cloud storage
While cloud storage offers flexibility and scalability, it also has some limitations that impose additional considerations like ongoing costs and internet dependence that businesses should evaluate carefully.
Ongoing costs: Unlike on-premises storage solutions such as NAS, cloud storage operates on a subscription-based pricing model. When evaluating cloud storage, businesses should consider the total cost of ownership, including ongoing fees, and weigh these against the benefits of cloud storage.
Dependence on the internet: Cloud storage relies on a stable internet connection for access and data transfer. Any disruptions in internet connectivity can hinder access to critical files and services, potentially impacting business operations. Ensuring reliable internet service and having contingency plans are crucial for minimizing downtime.
NAS vs cloud storage: A side-by-side comparison
The following table provides a side-by-side comparison of NAS and cloud storage, highlighting key aspects such as cost, scalability, security, and performance. This comparison will help you determine which storage solution best aligns with your business requirements and operational workflows.
Aspect
NAS
Cloud Storage
Storage model
File-level storage within a local network
Data stored on remote servers accessed via the internet
Performance
High speed access over a local network; optimal for on-premises work
Dependent on internet speed and latency; suitable for global access and remote teams
Scalability
Limited by physical hardware capacity; requires purchasing new devices for expansion
Virtually unlimited scalability; allowing storage to expand without additional hardware
Cost
Upfront hardware purchase, ongoing investment to expand capacity
Subscription-based, pay-as-you-go model, often with no upfront hardware investment
Maintenance
Requires in-house IT maintenance, updates and troubleshooting
Maintenance handled by cloud provider, reducing IT burden
Security
Controlled in-house, local network security; ideal for high-sensitive data
Enhanced by provider with encryption, multi-factor authentication, and security
Data redundancy
RAID configurations for local redundancy
Built-in data redundancy and disaster recovery options
Accessibility
Limited to local network access or VPN for remote connections
Accessible from anywhere with an internet connection, supporting remote work and collaboration
Compliance
Greater control for compliance in regulated industries; depends on in-house protocols
Many providers offer compliance with standards like GDPR, HIPAA, and SOC 2, ideal for regulated industries
Hybrid cloud: The best of both worlds
A hybrid cloud solution combines the strengths of both NAS and cloud storage. While NAS offers a centralized location to store and access files, the data stored on the NAS is still vulnerable to data disasters such as floods, fires, or hardware failures.
By integrating cloud storage with NAS, you create an off-site backup of your NAS data that securely protects your critical data from virtually any data threat. This approach not only mitigates the risk associated with physical damage to your on-premises NAS equipment but also offers the scalability, flexibility and remote accessibility benefits of cloud storage.
Additionally, this helps you implement 3-2-1 backup protection where three copies of your data are stored in two different storage media (NAS and cloud) with one copy stored off-site in the cloud, protecting against ransomware, hardware failures, natural disasters, and other data threats.
NAS vs. cloud: Which is best for your business?
Choosing between NAS and cloud storage for your business largely depends on your specific use cases and operational needs. NAS provides fast local access, control, and cost efficiency for businesses with stable storage needs and on-premises operations. In contrast, cloud storage offers unparalleled scalability, remote access, and maintenance-free operation, making it ideal for organizations with dynamic storage needs and remote workforces.
However, many businesses find that a combination of both, known as a hybrid cloud solution, offers the best of both worlds by combining the control of NAS with the scalability of cloud storage.
Ultimately, the right choice will depend on a thorough evaluation of your business needs and operational workflows. By understanding the strengths and limitations of both NAS and cloud storage, you can make an informed decision that ensures your data is secure, accessible, and available when you need it.
FAQs about NAS and cloud storage
Is cloud storage better than NAS?
The answer depends on your specific business needs. Cloud storage offers scalability, remote access, and minimal maintenance requirements. NAS, on the other hand, provides fast local access and higher control over data management and security settings. Each solution has its strengths, and the best choice will depend on your priorities regarding data security, access, and cost.
Can I use a NAS as a cloud?
Yes, many modern NAS devices come with built-in features that allow them to function similarly to cloud storage, or to connect to a cloud storage provider of your choice. These NAS systems can be accessed remotely over the internet, creating a private cloud or hybrid cloud solution. However, it requires proper configuration, secure settings and a reliable internet connection to ensure seamless remote access.
Why use NAS instead of a server?
NAS devices are purpose-built for storage, offering simplicity, ease of management, and lower costs compared to traditional servers. While servers are multifunctional and can handle a variety of tasks, they are more complex to set up and maintain. NAS provides a straightforward solution for file sharing, backups, and media streaming without the need for extensive IT infrastructure. This makes NAS an excellent choice for small to medium-sized businesses that primarily need a dedicated storage solution.
Can NAS work without the internet?
Yes, NAS devices are designed to operate within a local area network (LAN) and do not require an internet connection for local access and file sharing. Users can store, access, and collaborate on files within local networks without internet access. However, for remote access or to leverage additional features such as cloud backups, an internet connection is necessary.
Editor’s note: Editor’s note: This post has been updated since it was last published in 2021.
Synology network attached storage (NAS) devices are great for businesses. They enable easy collaboration, speed up restores, make your files accessible 24/7, and give you a level of data protection you probably didn’t have before. Essentially, a NAS device acts as a private cloud, offering centralized access and storage for everything from large files to ongoing projects.
That’s why it’s important to back up your Synology DiskStation to the cloud. While NAS offers a layer of redundancy on-premises if you happen to lose files, it doesn’t fully protect you from things like a natural disaster, a ransomware attack that infiltrates your backups, or multiple hard drive failures. Cloud backups are important for data redundancy and future data recovery, giving you easy access and fast restores.
To keep your data truly safe, the 3-2-1 backup strategy is the industry baseline. Using a 3-2-1 strategy with your NAS means you keep three copies of your data on two different media (like NAS and cloud storage), with one stored off-site. Backing your DiskStation up to the cloud is a great way to achieve that key off-site element. This setup protects against various risks, and ensures your data is available for recovery.
In this post, we’ll explain how to implement a 3-2-1 backup strategy for your Synology NAS, the benefits of backing up to cloud storage, options for backing up your DiskStation, and some practical examples of what you can do by pairing your NAS with cloud storage.
Synology NAS and a 3-2-1 Backup Strategy
The 3-2-1 backup strategy is simple and time-tested. If you are using your Synology NAS to connect and back up computers on your network, that’s the first step—you have two local copies of your data on different mediums. You’d accomplish this by creating a multi-version local copy.
While this setup might seem sufficient, your data is still at risk from NAS device failure. It remains co-located with your primary data, making it vulnerable to disasters or theft. To fully protect your data, you need a third, off-site backup copy.
For your third copy, you could back up your Synology to an external desFor your third copy, you could back up your Synology to an external destination—either another Synology NAS, a file server, or a USB device. Each has pros and cons, and we’ll talk through them for argument’s sake.
Back up to another Synology NAS: If you recently upgraded to a new device, you could store the third copy of your data on your old DiskStation. You get to put the old one to use, and you know it’s compatible.
Back up to a file server: Backing your Synology NAS up to a file server is also an option, but it will take up more storage space for caching than backing up to another DiskStation.
Back up to a USB device: Backing up to a USB device has some limited advantages—the format of your data is readable, so you can plug the USB in anywhere and access your data. However, USB backup won’t back up applications or system files, and it’s a manual rather than an automated process.
With any of these options, you’ll need to physically move your backup device—the old Synology, file server, or USB-connected device—to another location, ideally more than a few miles away, to truly achieve a 3-2-1 backup.
However, backing up your Synology NAS DiskStation to the cloud means you achieve a 3-2-1 strategy without the need to physically separate your backup copies. Backing up your Synology NAS to the cloud means you have both convenience and robust data redundancy.
The Benefits of Backing Up Your Synology DiskStation to the Cloud
In addition to avoiding the lift of a physical move, backing up Synology NAS to the cloud offers a number of other benefits, too, including:
Avoiding data loss: A cloud backup protects against physical disasters, such as floods, hurricanes, and fires, that could compromise your NAS and data on individual workstations. Because the NAS is always connected to your machines, it’s also at risk of infection from ransomware attacks. And finally, the hard drives in your NAS can fail. Because your NAS is likely set up in a RAID configuration, one drive failure might not affect your data. But, while one drive is down, your data is at a higher risk. If another drive were to fail, you could lose data. Having an off-site backup in cloud storage significantly reduces this risk.
Accessibility: With your data in the cloud, your backups are accessible from anywhere. If you’re away from your desk or office and you need to retrieve a file, you can simply log in to your cloud instance and retrieve it remotely.
Security: Cloud vendors typically protect customer data by encrypting it as it travels to its final destination and/or when it’s at rest on the vendors’ storage servers. Encryption protocols differ between cloud vendors, so make sure to understand them as you’re evaluating cloud providers, especially if your organization has specific security requirements.
Automation: Your Synology NAS comes with built-in backup utilities, so you can configure a backup schedule for automated cloud backups . This saves time and ensures your data is always up-to-date.
Scalability: As your data grows, your cloud backups grow with it. With cloud storage, there’s no need to invest in or maintain additional hardware to ensure your data is properly backed up.
Rapid Data Recovery: Cloud storage often offers shorter recovery times than traditional methods, particularly if your NAS device fails or data needs to be restored urgently. Cloud storage solutions can streamline data retrieval, allowing quick access to backed-up files and minimizing downtime.
Multi-Cloud Options: Many cloud providers support multi-cloud setups, allowing you to back up your Synology NAS to multiple cloud destinations. This added redundancy can be a valuable safeguard against any single provider outages, helping to ensure continuous data availability.
File Versioning: Some cloud storage services support file versioning, which is the ability to keep previous versions of files. This is particularly useful if files are accidentally modified or deleted. It can help you restore earlier versions without losing valuable information.
Options for Backing Up Your Synology NAS
Synology offers various backup utilities and methods to protect your data, each suited to different backup needs and environments.
1. Hyper Backup
Hyper Backup is Synology’s built-in backup utility for backing up to any number of external destinations, including public clouds. It enables you to back up not just data stored on your NAS, but also applications and system configurations.
It offers incremental backups to help you manage your storage footprint. After your initial backup, using incremental backups means only files that have been changed will be updated.
It also offers cross-file deduplication to help you further manage your storage footprint. Hyper Backup allows you to back up to external devices as well as cloud services.
2. Cloud Sync
In addition to Hyper Backup, Synology also offers Cloud Sync, which is important for those who need real-time collaboration and file syncing capabilities. Keep in mind that sync is not the same as backup–Cloud Sync does not support application and system configuration file backups, and it only keeps the current version of your files. If someone accidentally deletes that file, it’s gone. If you’re not sure if you’re looking for backup or sync, you can read about the differences between them in this post.
3. Snapshot replication
If your Synology model supports the Btrfs file system, using Snapshot Replication is a bit faster both on the backup side and the restore side than Hyper Backup. Snapshot Replication allows you to back up to the same Synology NAS or another Synology NAS, but not to the cloud.
4. USB copy
USB Copy only copies your data, not applications or system configuration files. It does not support cross-file deduplication, so you might end up with duplicate copies of your files. Additionally, this method is manual, and will require you to be responsible for regular backups as opposed to automating them with Hyper Backup or Snapshot Replication.
What You Can Do With Cloud Sync, Hyper Backup, and Cloud Storage
Using Hyper Backup and Cloud Sync together gives you total control over what gets backed up to cloud storage—you can synchronize in the cloud as little or as much as you want. This flexible approach allows you to customize your backup plan and protect your Synology NAS data based on priority and needs.
Here are some practical examples of what you can do with Cloud Sync, Hyper Backup, and cloud storage working together.
1. Sync or Back Up the Entire Contents of Your DiskStation to the Cloud
The DiskStation has excellent fault-tolerance—it can continue operating even when individual drive units fail. However, for comprehensive protection, syncing and backing up the entire DiskStation to cloud storage ensures that your data remains secure during a disaster or system failure.
2. Sync or Back Up Your Most Important Media Files
If you’re storing essential media files—like videos, music, and photos—on your DiskStation, Cloud Sync or Hyper Backup can ensure these valuable files are safely stored in the cloud. Synology NAS offers data redundancy on-premises, but cloud storage provides an additional off-site backup layer for further protection.
3. Back Up Time Machine
For Mac operations, Synology allows the DiskStation to serve as a network-based Time Machine backup. With Hyper Backup, you can synchronize Time Machine files to the cloud so that in the event of a critical failure, your Time Machine backups are securely stored off-site, ready for a seamless restoration.
Ready to Give It a Try?
Hyper Backup allows you to choose from any number of cloud storage providers as a backup destination, and Backblaze B2 Cloud Storage is one of them.If you haven’t given cloud storage a try yet, you can get started now, and make sure your NAS is synced or backed up securely to the cloud.
FAQs About Synology NAS
How do I back up my Synology NAS to the cloud?
Hyper Backup is Synology’s built-in backup utility for backing up to any number of external destinations, including public clouds. It enables you to back up not just data stored on your NAS, but also applications and system configurations. Additionally, It offers cross-file deduplication to help you further manage your storage footprint and avoid duplicates.
What’s the best way to back up my Synology NAS?
Synology offers a lot of options for backing up your device, including to local volumes, external devices, other Synology systems, rsync servers, or public cloud services like Backblaze B2. The best way to back up your Synology NAS depends on many different factors, but the most important thing to remember is that you should follow a 3-2-1 backup strategy. That means keeping three copies of your data on two different media (i.e. devices) with one off-site. Backing up to the cloud is a great option for data redundancy and long-term protection when handling your off-site backups.
Can I schedule automatic cloud backups from my Synology NAS?
Yes, with Hyper Backup, you can set up automatic backups to many public clouds, including Backblaze B2. It offers incremental backups to help you manage your storage footprint. After your initial backup, using incremental backups means only files that have been changed will be updated.
Which cloud storage providers are compatible with Synology NAS for backup?
Synology is compatible with many public cloud providers, including Backblaze B2, Microsoft Azure, Google Cloud Platform, Amazon S3, and Synology C2 Storage.
How much cloud storage space do I need for my Synology NAS backup?
The amount of cloud storage space needed for your Synology NAS backup depends on factors like the total data size, frequency of backups, and retention policies. Calculate your NAS data size, estimate growth, and choose a cloud plan accordingly. Hyper Backup provides storage estimates, helping you select the right amount of cloud storage space for secure, scalable data backups.
There’s only one truth you need to know about tech: at some point, it will fail. Hard drives die. You get the blue screen of death the day of the big presentation. You lose cell service right when your mom calls. (Or maybe you pretend to lose service right when your mom calls. We won’t judge.) Whatever it is, we’ve all been there.
If you use network attached storage (NAS) for your business or at home, you’re probably well aware of this fact. The redundancy you get from a solid RAID configuration might be one of the reasons you invested in a NAS—to prepare for inevitable drive failures. NAS devices are a great investment for a business for their durability and reliability, but there are things you can do to extend the lifespan of your NAS and get even more out of your investment.
Extending the lifespan of a NAS system isn’t just about preventing hardware failures; it’s crucial for ensuring uninterrupted access to critical data while maximizing ROI on your IT investments. In this blog, you’ll learn about the key factors that influence NAS longevity and get real-world strategies to strengthen and optimize your NAS infrastructure.
Understanding NAS Lifespan
Today’s NAS devices offer faster processing, enhanced performance, and significantly larger storage capabilities than ever before. These technological advancements have paved the way for efficient local data management using NAS in both professional and personal settings.
Despite these advancements, it’s important to acknowledge that NAS devices tend to have a finite lifespan. This limitation is due to several factors, including the physical wear and tear of hardware components, ever-evolving software requirements, and the constant advancement of technology which can render older systems less efficient or incompatible with new standards.
Also, it’s crucial to differentiate between the life expectancy of a NAS device and that of the hard drives within the device. While the NAS itself may continue to function, the hard drives that are subjected to intense read/write operations often have a shorter lifespan. If you want to learn more about hard drive reliability and failure rates, refer to Backblaze’s Hard Drive Stats.
Key Factors Affecting NAS Longevity
From the quality of the hardware to the environment it operates in, multiple elements contribute to the lifespan of NAS. Let’s explore these key factors in detail:
1. Hardware Components: Quality and Durability
One of the key factors that heavily affects the NAS device is the quality of the hardware itself. Additionally, factors such as the processor, memory, and power unit also play crucial roles. High-quality hardware and components from reputable manufacturers tend to last longer and offer better performance and reliability which contribute to the overall lifespan of the NAS.
2. Workload and Usage Intensity
The workload handled by the NAS is a significant determinant of its longevity. Devices that are constantly under heavy load, managing large data transfers, or running intensive applications will likely experience wear and tear more rapidly than those used for lighter tasks.
3. Environmental Factors: Temperature, Humidity, and Corrosion
Operating a NAS in environments with high temperatures or humidity levels can lead to overheating and moisture-related damage. Additionally, locations with high levels of dust or corrosive elements can lead to physical deterioration of components.
4. Quality of Network Environment
The quality and stability of the network environment in which the NAS operates can also affect its lifespan. Frequent network issues or unstable connections can strain the NAS’s hardware and software, potentially leading to earlier failures.
5. Support, Technological Advancements, and Compatibility
Ongoing support and compatibility with new technologies are also vital for the longevity of NAS systems. As technology evolves, older NAS devices may struggle with compatibility issues, rendering them less efficient or even obsolete.
Maintenance and Care for Enhanced Lifespan
Now that we understand the factors that affect NAS longevity, let’s explore how proactive maintenance and care are crucial to extending its lifespan. There are a number of things you can do to keep your NAS functioning properly for the long haul:
Regular Maintenance: Routine cleaning is vital for maintaining NAS efficiency. Dust accumulation can lead to overheating. Regularly cleaning the external vents and fans, and ensuring the device is in a well-ventilated area can prevent thermal issues and prolong the device’s life.
Proactive Drive Replacements: Hard drives are among the most failure-prone components in a NAS. Implementing a regular schedule to check drive health and replacing unhealthy or borderline drives proactively can prevent data loss and reduce the workload on the NAS’s remaining drives, thus preserving its overall integrity.
Updating Software and Patches: Keeping the NAS software and firmware up to date is essential for security and performance. Regular updates often include patches for vulnerabilities, performance enhancements, and new features that can improve the efficiency and longevity of the NAS.
Monitoring NAS Health: Utilizing the tools and built-in functionalities to monitor the health and performance of your NAS also helps extend its lifespan. Many NAS systems come with software that can alert you to issues such as failing drives, high temperatures, or network problems. Keeping an eye on these metrics can help you address potential problems before they escalate.
Environmental Considerations: The operating environment of a NAS plays a significant role in NAS longevity. Keeping your NAS in a stable environment with controlled temperature and humidity levels should be considered to extend its lifespan.
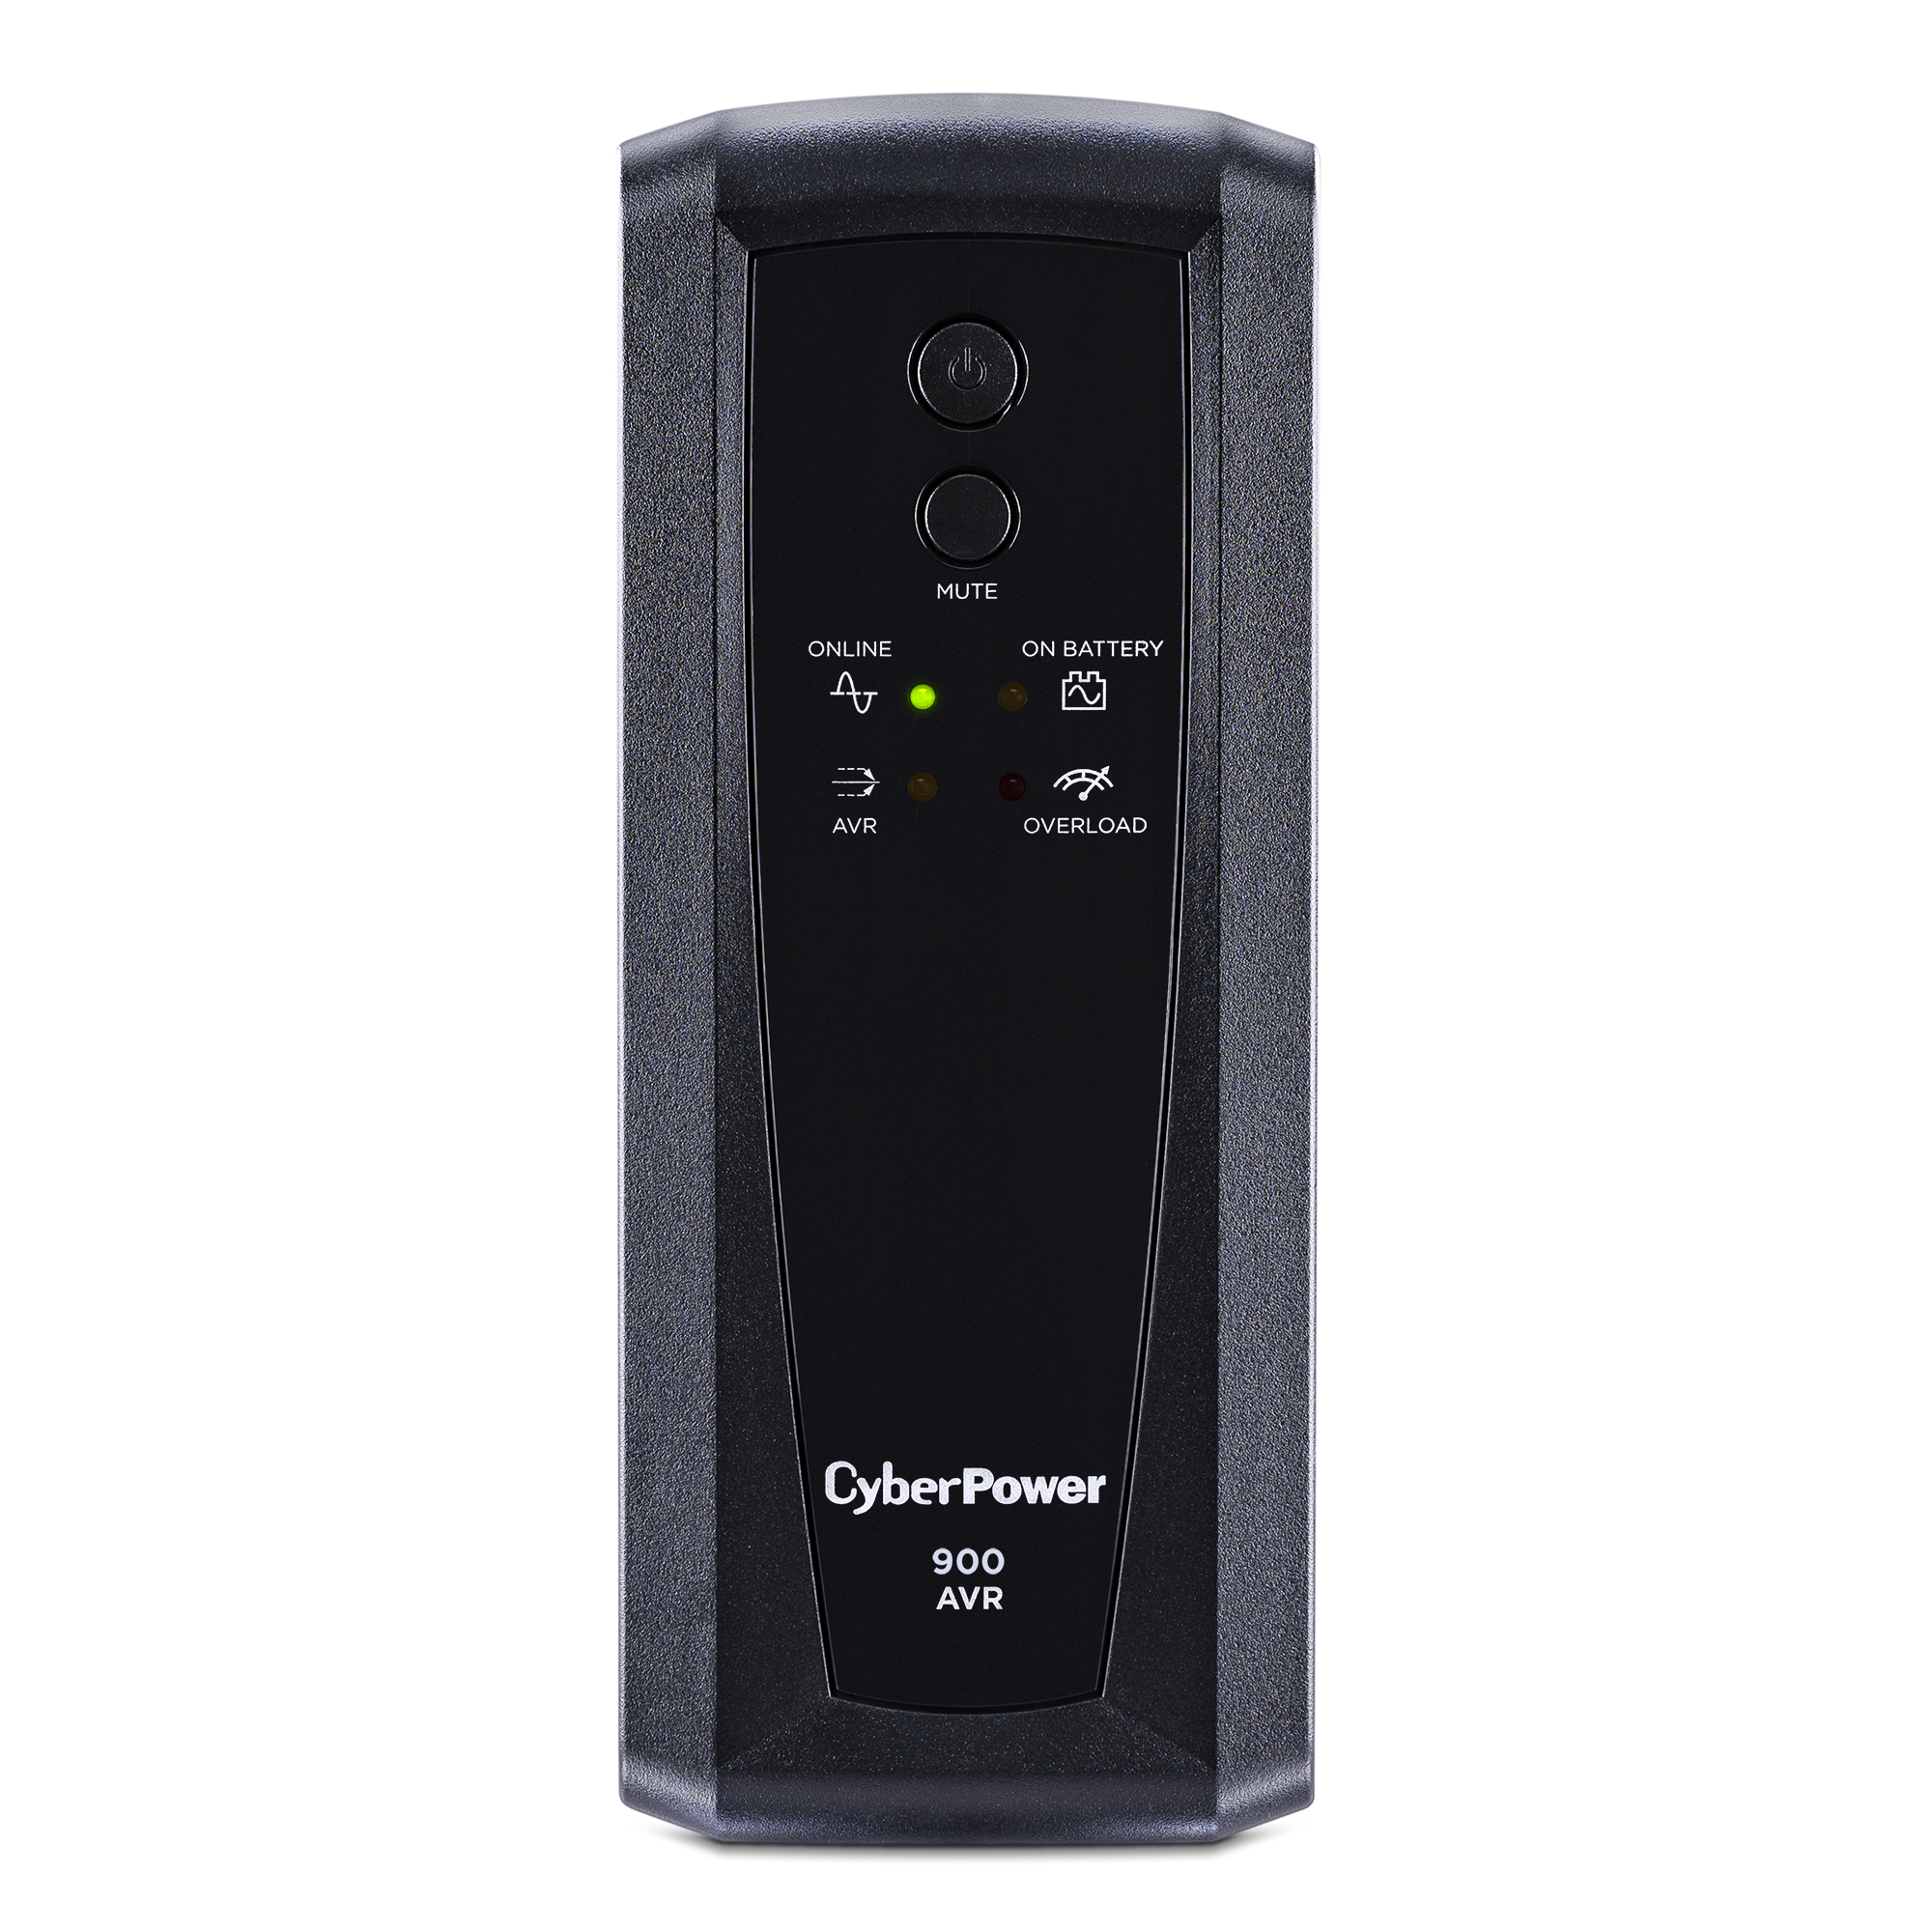
Power Protection: Protect your NAS from power surges and outages using uninterrupted power supply (UPS). This can not only prevent data loss but also help avoid any potential hardware damage caused by electrical issues.
The CyberPower 900 AVR is just one example of a UPS. Source.
Recognizing When to Replace the NAS: Look out for indicators that suggest it’s time to replace your NAS. These include the expiration of the manufacturer’s warranty, noticeable performance declines, increased frequency of repairs, or when the device no longer meets your evolving storage needs. Waiting until a complete failure can be more costly and disruptive.
By adhering to these maintenance and care guidelines, you can significantly enhance the lifespan and reliability of your NAS, ensuring that it continues to serve as a robust and efficient data storage solution for your business or personal needs.
Implementing Fault Tolerance and Off-Loading Data to Cloud
In addition to proactive maintenance and care, there are a few other strategies you can use to extend NAS lifespan such as implementing fault tolerance and adding cloud storage to your backup strategy to offload data from your NAS. Let’s explore them below.
The Importance of Fault Tolerance and RAID Configurations in NAS
Fault tolerance refers to the ability of a NAS to continue operating correctly even if one or more of its hard drives fail. It’s critical for NAS systems to have fault tolerance in place, especially in business environments where data availability and integrity can not be compromised.
RAID (Redundant Array of Independent Disks) plays a pivotal role in achieving fault tolerance. It involves combining multiple hard drives into a single system to improve data redundancy and performance. By doing so, RAID protects against data loss due to single or multiple disk failures, depending on the RAID level implemented.
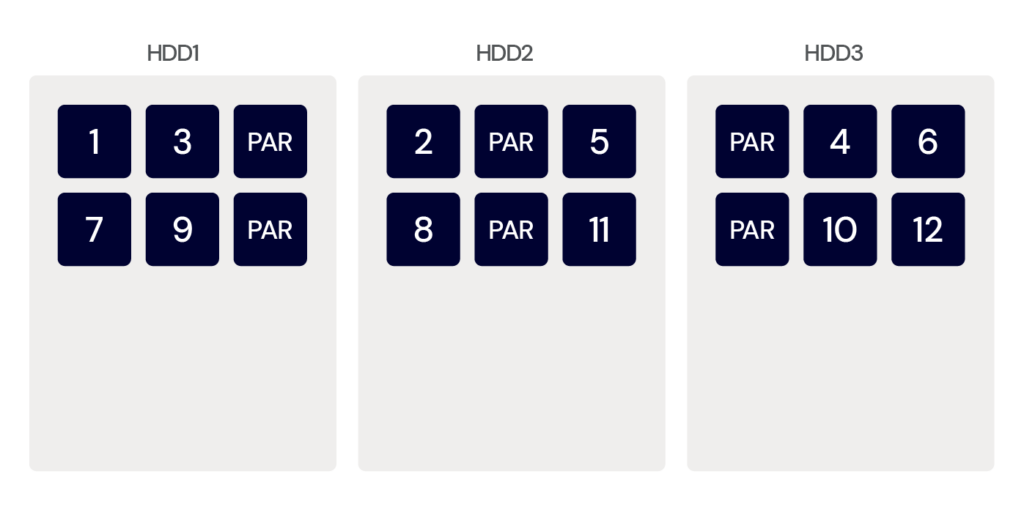
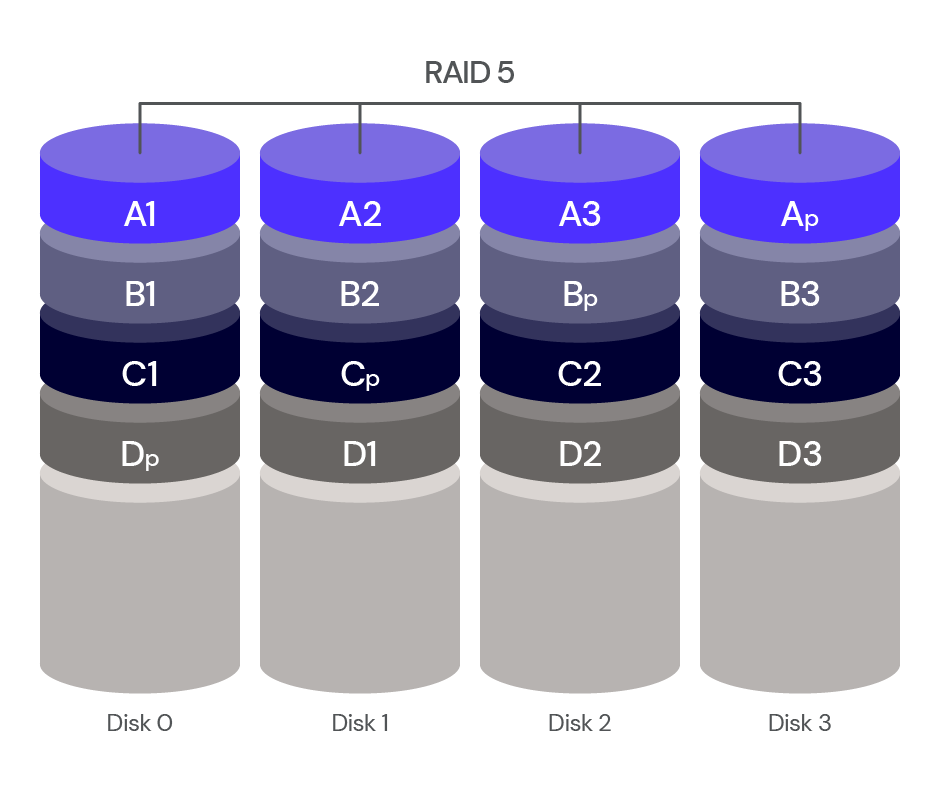
RAID 5: Striping and parity distributed across disks.
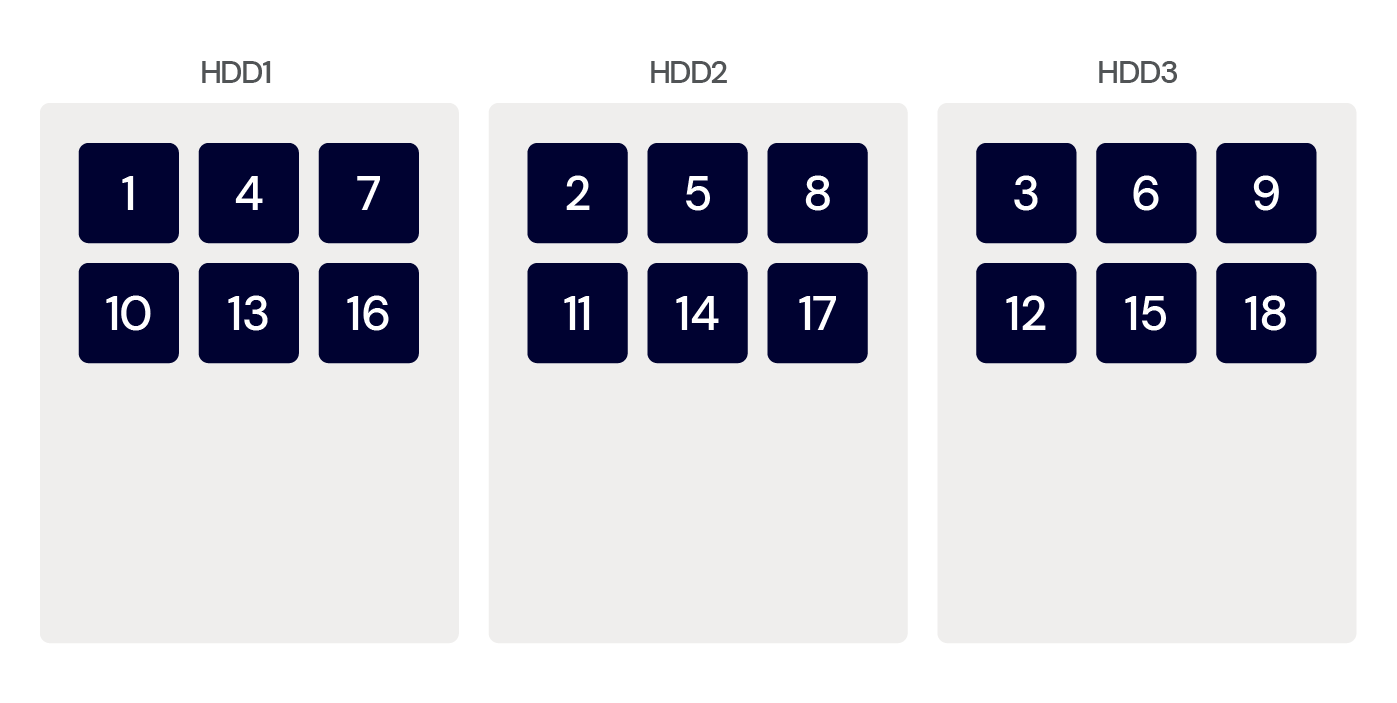
RAID Configurations
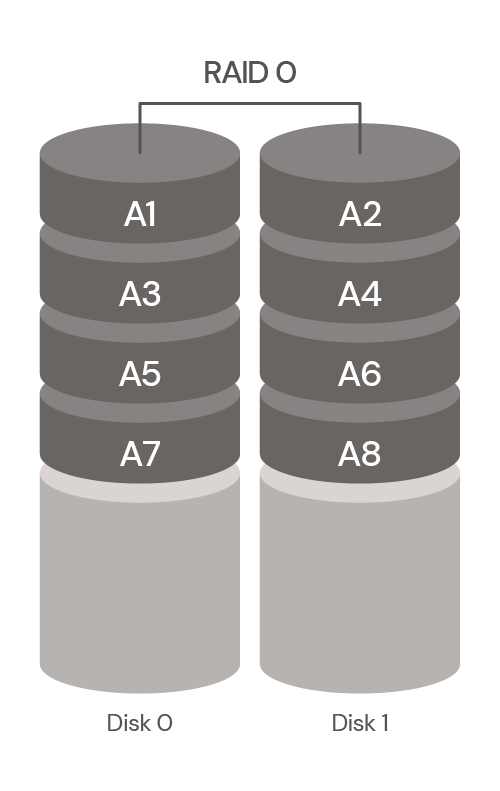
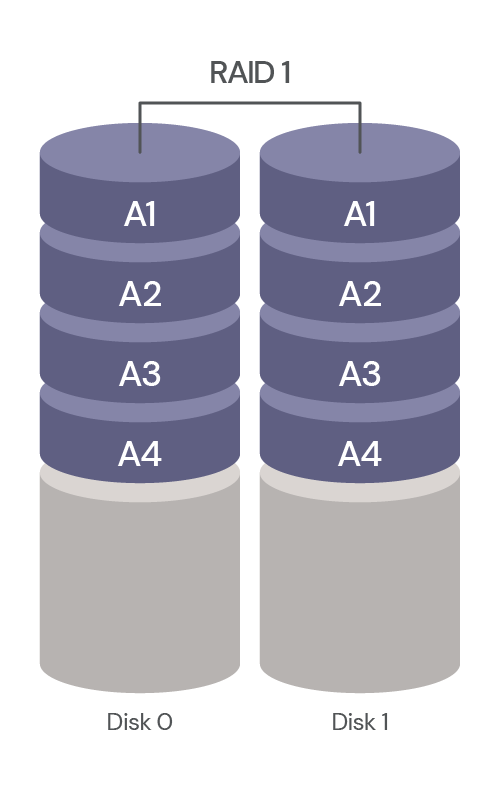
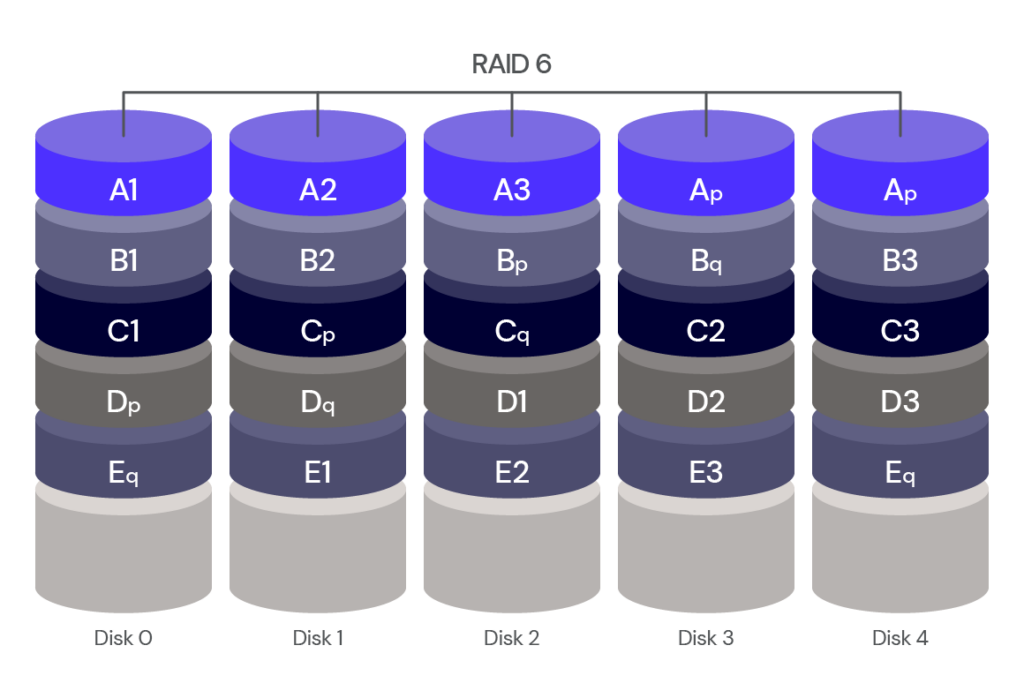
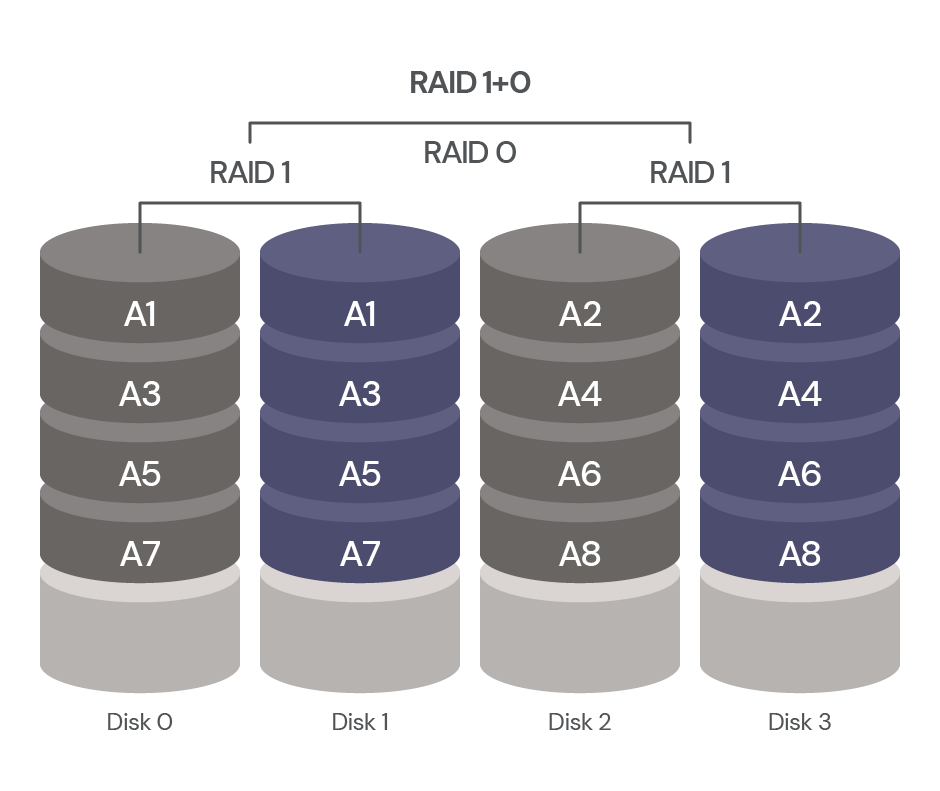
Various RAID configurations offer different balances of data protection, storage efficiency, and performance. Common configurations include RAID 0 (striping), RAID 1 (mirroring), RAID 5 and RAID 6, each with its specific advantages and use cases. For example, RAID 1 is simple and offers data redundancy, while RAID 5 and 6 provide a good balance between storage capacity and data protection. To fully understand which RAID configuration suits your needs, explore our NAS RAID Levels blog which explains how to choose the right RAID level for your NAS data.
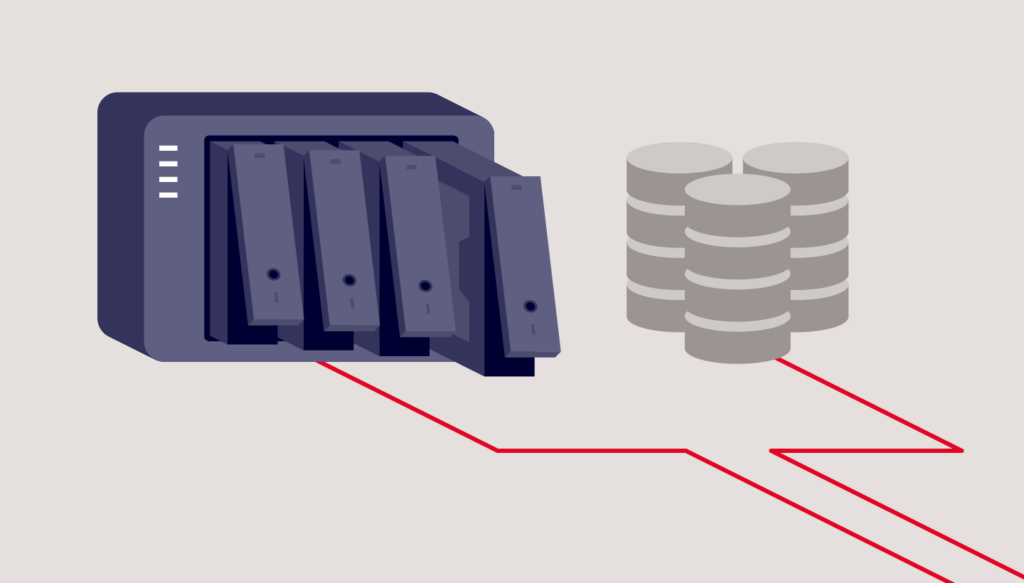
Off-Loading and Backing Up NAS Data to the Cloud
Off-loading data from your NAS to a cloud storage service can significantly reduce the workload on your NAS hardware, thus potentially extending its life. You can consider creating a cloud archive of old data and a system for off-loading data on a regular cadence or as projects close.
The cloud also helps you establish a robust 3-2-1 backup strategy (three total copies of your data, two of which are local but on different mediums, and one copy off-site). This ensures data redundancy and offers enhanced data protection against local disasters, theft, or hardware failure. Many NAS devices, like Synology and QNAP, have built-in backup utilities that back up directly to cloud storage like Backblaze B2.
By integrating fault tolerance through RAID configurations and backing up data to the cloud, you can significantly enhance the data protection capabilities of your NAS. This approach not only ensures data safety but also contributes to the overall health and longevity of your NAS system.
Extending Your NAS Lifespan
Navigating the complexities of NAS systems can be a journey full of learning and adaptation. While NAS offers unparalleled convenience of local storage, it’s essential to recognize that its longevity relies on more than just its initial setup. It requires a proactive approach with diligent maintenance while embracing technological advancements such as fault tolerance and RAID levels. When properly cared for, however, many users find NAS to be a long-lived piece of their tech stack.
But, it doesn’t have to stop there. The integration of cloud storage with NAS systems can significantly help reduce the strain on your local system, and safeguard your NAS data off-site while ensuring you have comprehensive 3-2-1 data protection in place.
It’s time to hear from you. What strategies have you employed to extend the lifespan of your NAS device? Share your stories and tips in the comments below to help others in the NAS community.
Upgrading to a network attached storage (NAS) device puts your data in the digital fast lane. If you’re using one, it’s likely because you want to keep your data close to you, ensuring quick access whenever it’s needed. NAS devices, acting as centralized storage systems connected to local networks, offer a convenient way to access data in just a few clicks.
However, as the volume of data on the NAS increases, its performance can tank. You need to know how to keep your NAS operating at its best, especially with growing data demand.
In this blog, you’ll learn about various factors that can affect NAS performance, as well as practical steps you can take to address these issues, ensuring optimal speed, reliability, and longevity for your NAS device.
Why NAS Performance Matters
NAS devices can function as extended hard disks, virtual file cabinets, or centralized local storage solutions, depending on individual needs.
While NAS offers a convenient way to store data locally, storing the data alone isn’t enough. How quickly and reliably you can access your data can make all the difference if you want an efficient workflow. For example, imagine working on a critical project with your team and facing slow file transfers, or streaming a video on a Zoom call only for it to stutter or buffer continuously.
All these can be a direct result of NAS performance issues, and an increase in stored data can directly undermine the device’s performance. Therefore, ensuring optimal performance isn’t just a technical concern, it’s also a concern that directly affects user experience, productivity, and collaboration.
So, let’s talk about what could potentially cause performance issues and how to enhance your NAS.
Common NAS Performance Issues
NAS performance can be influenced by a variety of factors. Here are some of the most common factors that can impact the performance of a NAS device.
Hardware Limitations:
Insufficient RAM: Especially in tasks like media streaming or handling large files, having inadequate memory can slow down operations.
Slow CPU: An underpowered processor can become a bottleneck when multiple users access the NAS at once or during collaboration with team members.
Drive Speed and Type: Hard disk drives (HDDs) are generally slower compared to solid state drives (SSDs), and your NAS can have either type. If your NAS mainly serves as a hub for storing and sharing files, a conventional HDD should meet your requirements. However, for those seeking enhanced speed and performance, SSDs deliver the performance you need.
Outdated Hardware: Older NAS models might not be equipped to handle modern data demands or the latest software.
Software Limitations:
Outdated Firmware/Software: Not updating to the latest firmware or software can lead to performance issues, or to missing out on optimization and security features.
Misconfigured Settings: Incorrect settings can impact performance. This includes improper RAID configuration or network settings.
Background Processes: Certain background tasks, like indexing or backups, can also slow down the system when running.
Network Challenges:
Bandwidth Limitations: A slow network connection, especially on a Wi-Fi network can limit data transfer rates.
Network Traffic: High traffic on the network can cause congestion, reducing the speed at which data can be accessed or transferred.
Disk Health and Configuration:
Disk Failures: A failing disk in the NAS can slow down performance and also poses data loss risk.
Suboptimal RAID Configuration: Some RAID configurations prioritize redundancy more than performance, which can affect the data storage and access speeds.
External Factors:
Simultaneous User Access: If multiple users are accessing, reading, or writing to the NAS simultaneously, it can strain the system, especially if the hardware isn’t optimized to such traffic from multiple users.
Inadequate Power Supply: Fluctuating or inadequate power can cause the NAS to malfunction or reduce its performance.
Operating Temperature: Additionally, if the NAS is in a hot environment, it might overheat and impact the performance of the device.
Practical Solutions for Optimizing NAS Performance
Understanding the common performance issues with NAS devices is the first critical step. However, simply identifying these issues alone isn’t enough. It’s vital to understand practical ways to optimize your existing NAS setup so you can enhance its speed, efficiency, and reliability. Let’s explore how to optimize your NAS.
Performance Enhancement 1: Upgrading Hardware
There are a few different things you can do on a hardware level to enhance NAS performance. First, adding more RAM can significantly improve performance, especially if multiple tasks or users are accessing the NAS simultaneously.
You can also consider switching to SSDs. While they can be more expensive, SSDs offer faster read/write speeds than traditional HDDs, and they store data in flash memory, which means that they retain information even without power.
Finally, you could upgrade the CPU. For NAS devices that support it, a more powerful CPU can better handle multiple simultaneous requests and complex tasks.
Remember to always keep your NAS operating system and software up-to-date to benefit from the latest performance optimizations and security patches. Schedule tasks like indexing, backups or antivirus scans during off-peak hours to ensure they don’t impact user access during high-traffic times. You also need to make sure you’re using the right RAID configuration for your needs. RAID 5 or RAID 6, for example, can offer a good balance between redundancy and performance.
Performance Enhancement 3: Network Enhancements
Consider moving to faster network protocols, like 10Gb ethernet, or ensuring that your router and switches can handle high traffic. Wherever possible, use wired connections instead of Wi-Fi to connect to the NAS for more stable and faster data access and transfer. And, regularly review and adjust network settings for optimal performance. If you can, it also helps to limit simultaneous access. If possible, manage peak loads by setting up access priorities.
Performance Enhancement 4: Regular Maintenance
Use your NAS device’s built-in tools or third-party software to monitor the health of your disks and replace any that show signs of failure. And, keep the physical environment around your NAS device clean, cool, and well ventilated to prevent overheating.
Leveraging the Cloud for NAS Optimization
After taking the necessary steps to optimize your NAS for improved performance and reliability, it’s worth considering leveraging the cloud to further enhance the performance. While NAS offers convenient local storage, it can sometimes fall short when it comes to scalability, accessibility from different locations, and seamless collaboration. Here’s where cloud storage comes into play.
At its core, cloud storage is a service model in which data is maintained, managed, and backed up remotely, and made available to users over the internet. Instead of relying solely on local storage solutions such as NAS or a server, you utilize the vast infrastructure of data centers across the globe to store your data not just in one physical location, but across multiple secure and redundant environments.
As an off-site storage solution for NAS, the cloud not only completes your 3-2-1 backup plan, but can also amplify its performance. Let’s take a look at how integrating cloud storage can help optimize your NAS.
Off-Loading and Archiving: One of the most straightforward approaches is to move infrequently accessed or archival data from the NAS to the cloud. This frees up space on the NAS, ensuring it runs smoothly, while optimizing the NAS by only keeping data that’s frequently accessed or essential.
Caching: Some advanced NAS systems can cache frequently accessed data in the cloud. This means that the most commonly used data can be quickly retrieved, enhancing user experience and reducing the load on the NAS device.
Redundancy and Disaster Recovery: Instead of duplicating data on multiple NAS devices for redundancy, which can be costly and still vulnerable to local disasters, the data can be backed up to the cloud. In case of NAS failure or catastrophic event, the data can be quickly restored from the cloud, ensuring minimal downtime.
Remote Access and Collaboration: While NAS devices can offer remote access, integrating them with cloud storage can streamline this process, often offering a more user-friendly interface and better speeds. This is especially useful for collaborative environments where multiple users work together on files and projects.
Scaling Without Hardware Constraints: As your data volume grows, expanding a NAS can involve purchasing additional drives or even new devices. With cloud integration, you can expand your storage capacity without these immediate hardware investments, eliminating or delaying the need for physical upgrades and extending the lifespan of your NAS.
In essence, integrating cloud storage solutions with your NAS can create a comprehensive system that addresses the shortcomings of NAS devices, helping you create a hybrid setup that offers the best of both worlds: the speed and accessibility of local storage, and the flexibility and scalability of the cloud.
Getting the Best From Your NAS
At its core, NAS offers an unparalleled convenience of localized storage. However, it’s not without challenges, especially when performance issues come into play. Addressing these challenges requires a blend of hardware optimization, software updates, and smart data management settings.
But, it doesn’t have to stop at your local network. Cloud storage can be leveraged effectively to optimize your NAS. It doesn’t just act as a safety net by storing your NAS data off-site, it also makes collaboration easier with dispersed teams and further optimizes NAS performance.
Now, it’s time to hear from you. Have you encountered any NAS performance issues? What measures have you taken to optimize your NAS? Share your experiences and insights in the comments below.
The terms NAS and SAN can be confusing—the technology is similar and, making matters worse, the acronyms are the reverse of each other. NAS stands for network attached storage and SAN stands for storage area network. They were both developed to solve the problem of making stored data available to many users at once. But, they couldn’t be more different in how they achieve that goal.
The TL/DR:
NAS is a single storage device that serves files over ethernet and is relatively inexpensive. NAS devices are easier for a home user or small business to set up.
A SAN is a tightly coupled network of multiple devices that is more expensive and complex to set up and manage. A SAN is better suited for larger businesses and requires administration by IT staff.
Read on and we’ll dissect the nuances of NAS and SANs to help you make informed decisions about which solution best suits your storage needs.
Check Out Our New Technical Documentation Portal
When you’re working on a storage project, you need to be able to find instructions about the tools you’re using quickly. And, it helps if those instructions are easy to use, easy to understand, and easy to share. Our Technical Documentation Portal has been completely overhauled to deliver on-demand content in a user-friendly way so you can find the information you need. Check out the NAS section, including all of our Integration Guides.
Basic Definitions: What Is NAS?
NAS is a device or devices with a large data storage capacity that provides file-based data storage services to other devices on a network. Usually, they also have a client or web portal interface that’s easy to navigate, as well as services like QNAP’s Hybrid Backup Sync or Synology’s Hyper Backup to help manage your files. In other words, NAS is synonymous with user-friendly file sharing.
NAS with eight drive bays for 3.5″ disk drives.
At its core, NAS operates as a standalone device connected to a network, offering shared access to files and folders. NAS volumes appear to the user as network-mounted volumes. The files to be served are typically contained on one or more hard drives in the system, often arranged in RAID arrays. Generally, the more drive bays available within the NAS, the larger and more flexible storage options you have.
Key Characteristics of NAS:
File-Level Access: NAS provides file-level access, ideal for environments where collaborative work and content sharing are paramount.
Simplicity: NAS solutions offer straightforward setups and intuitive interfaces, making them accessible to users with varying levels of technical expertise.
Scalability: While NAS devices can be expanded by adding more drives, there may be limitations in terms of performance and scalability for large-scale enterprise use.
How NAS Works
The NAS device itself is a network node—much like computers and other TCP/IP devices, all of which maintain their own IP address—and the NAS file service uses the ethernet network to send and receive files. This system employs protocols like network file system (NFS) and server message block (SMB), enabling seamless data exchange between multiple users.
The NAS system and clients connect via your local network—all file service occurs via ethernet.
Benefits of NAS
NAS devices are designed to be easy to manage, making them a popular choice for home users, small businesses, and departments seeking straightforward centralized storage. They offer an easy way for multiple users in multiple locations to access data, which is valuable when users are collaborating on projects or need to share information.
For individual home users, if you’re currently using external hard drives or direct attached storage, which can be vulnerable to drive failure, upgrading to a NAS ensures your data is better protected.
For small business or departments, installing NAS is typically driven by the desire to share files locally and remotely, have files available 24/7, achieve data redundancy, have the ability to replace and upgrade hard drives in the system, and most importantly, support integrations with cloud storage that provide a location for necessary automatic data backups.
NAS offers robust access controls and security mechanisms to facilitate collaborative efforts. Moreover, it empowers non-technical individuals to oversee and manage data access through an embedded web server. Its built-in redundancy, often achieved through RAID configurations, ensures solid data resilience. This technology merges multiple drives into a cohesive unit, mimicking a single, expansive volume capable of withstanding the failure of a subset of its constituent drives.
Summary of NAS Benefits:
Relatively inexpensive.
A self-contained solution.
Easy administration.
Remote data availability and 24/7 access.
Wide array of systems and sizes to choose from.
Drive failure-tolerant storage volumes.
Automatic backups to other devices and the cloud.
Limitations of NAS
The weaknesses of NAS primarily revolve around scalability and performance. If more users need access, the server might struggle to keep pace. If you overprovisioned your NAS, you may be able to add storage. But sooner or later you’ll need to upgrade to a more powerful system with a bigger on-board processor, more memory, and faster and larger network connections.
Another drawback ties back to ethernet’s inherent nature. Ethernet divides data into packets, forwarding them to their destination. Yet, depending on network traffic or other issues, potential delays or disorder in packet transmission can hinder file availability until all packets arrive and are put back in order.
Although minor latency (slowness) is not usually noticed by users for small files, in data-intensive domains like video production, where large files are at play, even milliseconds of latency can disrupt operations, particularly video editing workflows.
Basic Definitions: What Is a SAN?
On the other end of the spectrum, SANs are engineered for high-performance and mission-critical applications. They function by connecting multiple storage devices, such as disk arrays or tape libraries, to a dedicated network that is separate from the main local area network (LAN). This isolation ensures that storage traffic doesn’t interfere with regular network traffic, leading to optimized performance and data availability.
Unlike NAS, a SAN operates at the block level, allowing servers to access storage blocks directly. This architecture is optimized for data-intensive tasks like database management and virtualization or video editing, where low latency and consistent high-speed access are essential.
Key Characteristics of SANs:
Block-Level Access: SANs provide direct access to storage blocks, which is advantageous for applications requiring fast, low-latency data retrieval.
Performance: SANs are designed to meet the rigorous demands of enterprise-level applications, ensuring reliable and high-speed data access.
Scalability: SANs offer greater scalability by connecting multiple storage devices, making them suitable for businesses with expanding storage needs.
How Does a SAN Work?
A SAN is built from a combination of servers and storage over a high speed, low latency interconnect that allows direct Fibre Channel (FC) connections from the client to the storage volume to provide the fastest possible performance. The SAN may also require a separate, private ethernet network between the server and clients to keep the file request traffic out of the FC network for even more performance.
By joining together the clients, SAN server, and storage on a FC network, the SAN volumes appear and perform as if it were a directly connected hard drive. Storage traffic over FC avoids the TCP/IP packetization and latency issues, as well as any LAN congestion, ensuring the highest access speed available for media and mission critical stored data.
The SAN management server, storage arrays, and clients all connect via a FC network—all file serving occurs over Fibre Channel.
Benefits of a SAN
Because it’s considerably more complex and expensive than NAS, a SAN is typically used by businesses versus individuals and typically requires administration by an IT staff.
The primary strength of a SAN is that it allows simultaneous shared access to shared storage that becomes faster with the addition of storage controllers. SANs are optimized for data-intensive applications. For example, hundreds of video editors can simultaneously access tens of GB per second of storage simultaneously without straining the network.
SANs can be easily expanded by adding more storage devices, making them suitable for growing storage needs. Storage resources can be efficiently managed and allocated from a central location. SANs also typically include redundancy and fault tolerance mechanisms to ensure data integrity and availability.
Summary of a SAN’s Benefits:
Extremely fast data access with low latency.
Relieves stress on a local area network.
Can be scaled up to the limits of the interconnect.
Operating system level (“native”) access to files.
Often the only solution for demanding applications requiring concurrent shared access.
Limitations of a SAN
The challenge of a SAN can be summed up in its cost and administration requirements—having to dedicate and maintain both a separate ethernet network for metadata file requests and implement a FC network can be a considerable investment. That being said, a SAN is often the only way to provide very fast data access for a large number of users that also can scale to supporting hundreds of users at the same time.
The Main Differences Between NAS and SANs
NAS
SAN
Use case
Often used in homes and small to medium sized businesses.
Often used in professional and enterprise environments.
Cost
Less expensive.
More expensive.
Ease of administration
Easier to manage.
Requires more IT administration.
How data is accessed
Data accessed as if it were a network-attached drive.
Servers access data as if it were a local hard drive.
Speed
Speed is dependent on local TCP/IP ethernet network, typically 1GbE to 10GbE but can be up to 25GbE or even 40GbE connections, and affected by the number of other users accessing the storage at the same time. Generally slower throughput and higher latency due to the nature of ethernet packetization, waiting for the file server, and latency in general.
High speed using Fibre Channel, most commonly available in 16 Gb/s to 32 Gb/s however newer standards can go up to 128 Gb/s. FC can be delivered via high speed ethernet such as 10Gbit or 40Gbit+ networks using protocols such as FCoE and iSCSI.
Network connection
SMB/CIFS, NFS, SFTP, and WebDAV.
Fibre Channel, iSCSI, FCoE.
Scalability
Lower-end not highly scalable; high-end NAS scale to petabytes using clusters or scale-out nodes.
Can add more storage controllers, or expanded storage arrays allowing SAN admins to scale performance, storage, or both.
Networking method
Simply connects to your existing ethernet network.
Simply connects to your existing ethernet network.
Simply connects to your existing ethernet network.
Entry level systems often have a single point of failure, e.g. power supply.
Fault tolerant network and systems with redundant functionality.
Limitations
Subject to general ethernet issues.
Behavior is more predictable in controlled, dedicated environments.
Choosing the Right Solution
When considering a NAS device or a SAN, you might find it helpful to think of it this way: NAS is simple to set up, easy to administer, and great for general purpose applications. Meanwhile, a SAN can be more challenging to set up and administer, but it’s often the only way to make shared storage available for mission critical and high performance applications.
The choice between a NAS device and a SAN hinges on understanding your unique storage requirements and workloads. NAS is an excellent choice for environments prioritizing collaborative sharing and simple management. In contrast, a SAN shines when performance and scalability are top priorities, particularly for businesses dealing with data-heavy applications.
Ultimately, the decision should factor in aspects such as budget, anticipated growth, workload demands, and the expertise of your IT team. Striking the right balance between ease of use, performance, and scalability will help ensure your chosen storage solution aligns seamlessly with your goals.
Are You Using NAS, a SAN, or Both?
If you are using a NAS device or a SAN, we’d love to hear from you about what you’re using and how you’re using them in the comments.
You probably invested in a network attached storage (NAS) device to centralize your storage, manage data more efficiently, and implement on-site backups. So, keeping that data safe is important to you. Unfortunately, as NAS devices have risen in popularity, cybercriminals have taken notice.
Recent high-profile ransomware campaigns have targeted vast numbers of NAS devices worldwide. These malicious attacks can lock away users’ NAS data, holding it hostage until a ransom is paid—or the user risks losing all their data.
If you are a NAS user, learning how to secure your NAS device against ransomware attacks is critical if you want to protect your data. In this guide, you’ll learn why NAS devices are attractive targets for ransomware and how to safeguard your NAS device from ransomware attacks. Let’s get started.
What Is Ransomware?
To begin, let’s quickly understand what ransomware actually is. Ransomware is a type of malicious software or malware that infiltrates systems and encrypts files. Upon successful infection, ransomware denies users access to their files or systems, effectively holding data hostage.
Its name derives from its primary purpose—to demand a “ransom” from the victim in exchange for restoring access to their data. Ransomware actors often threaten to delete, sell, or leak data if the ransom is not paid.
Ransomware threat messages often imitate law enforcement agencies, claiming that the user violated laws and must pay a fine. Other times, it’s a blunt threat—pay or lose your data forever. This manipulative strategy preys on fears and urgency, often pressuring the unprepared victims into paying the ransom.
The consequences of a ransomware attack can be severe. The most immediate impact is data loss, which can be catastrophic if the encrypted files contain sensitive or critical information. There’s also the financial loss from the ransom payment itself which can range from a few hundred dollars to several million dollars.
Moreover, an attack can cause significant operational downtime, with systems unavailable while the malware is removed and data is restored. For businesses, especially the unprepared, the downtime can be disastrous, leading to substantial revenue loss.
Cybersecurity Ventures expects that by 2031, businesses will fall victim to a ransomware attack every other second. Source.
However, the damage doesn’t stop there. The reputational damage caused by a ransomware attack can make customers, partners, and stakeholders lose trust in a business that falls victim to such an attack, especially if it results in a data breach.
As you can see, ransomware is not just malicious code that disrupts your business, it can cause significant harm on multiple fronts. Therefore, it’s important to understand the basics of ransomware as the first step in building a robust defense strategy for your NAS device.
Types of Ransomware
While the modus operandi of ransomware—to deny access to users’ data and demand ransom—remains relatively constant, there are multiple ransomware variants, each with unique characteristics.
Some of the most common types of ransomware include:
Locker Ransomware
Locker ransomware takes an all-or-nothing approach. It locks users out of their entire system, preventing them from accessing any files, applications, or even the operating system itself.
The only thing the users can access is a ransomware note, demanding payment in exchange for restoring access to their system.
Crypto Ransomware
As its name suggests, crypto ransomware encrypts the users’ files and makes them inaccessible. This type of ransomware does not lock the entire system, but rather targets specific file types such as documents, spreadsheets, and multimedia files. The victims can still use their system but cannot access or open the encrypted files without the encryption key.
Ransomware as a Service (RaaS)
RaaS represents a new business model in the dark world of cybercrime. It is essentially a cloud-based platform where ransomware developers sell or rent their ransomware codes to other cybercriminals, who then distribute and manage the ransomware attacks. The ransomware developers receive a cut of the ransom payments.
Leakware
Leakware steals sensitive or confidential information and threatens to publicize them if ransom is not paid. This type of ransomware is particularly damaging as even if the ransom is paid and the data is not leaked, the mere fact that the data was accessed can have significant legal and reputational implications.
Only 4% of victims who paid ransoms actually got all of their data back. Source.
Scareware
Scareware uses social engineering to trick victims into believing that their system is infected with viruses or other malware. They scare people into visiting spoofed or infected websites or downloading malicious software (malware). While not as directly damaging as other forms of ransomware, scareware can be used as the gateway to a more intricate cyberattack and may not be an attack in and of itself.
Can Ransomware Attack NAS?
Yes, ransomware can and frequently does target NAS devices. These storage solutions, while highly effective and efficient, have certain characteristics that make them attractive to cybercriminals.
Let’s explore some of these reasons in more detail below.
Centralized Storage
NAS devices act as centralized storage locations with all data stored in one place. This makes them an attractive target for ransomware attacks. By infiltrating a single NAS device, bad actors can gain access to a significant amount of company data, maximizing the impact of their attack and the potential ransom.
Security Vulnerabilities
Unlike traditional PCs or servers, NAS devices often lack robust security measures. Most NAS systems may not have an antivirus installed, leaving them exposed to various forms of malware including ransomware. Additionally, outdated firmware can further weaken the device’s defenses, offering potential loopholes for attackers to exploit.
Always Online
NAS devices are designed to be continuously online, allowing for convenient and seamless data access. However, this also means they are constantly exposed to the internet, making them a target for online threats around the clock.
Default Configuration Settings
NAS devices, like many other hardware devices, often come with default configurations that prioritize ease of access over security. For example, they may have simple, easy-to-guess default passwords or open access permissions for all users. Not changing these default settings can leave the devices vulnerable to attacks.
Risk Factors: The Human Element
NAS devices are an easy-to-use, accessible way to expand on-site storage and manage data, making them attractive for people without an IT background to use. However, novice users, and even many of your smartest power users, may not know to follow key best practices to prevent ransomware. As humans, all of us are vulnerable to error. In addition to NAS devices having some unique characteristics that make them prime targets for cybercriminals, you can’t discount the human element in ransomware protection. Understanding the following risks can help you shore up your defenses:
Lack of User Awareness
There is often a lack of awareness among NAS users about the potential security risks associated with these devices. Most users may not realize the importance of regularly updating their NAS systems or implementing security measures. This can result in NAS devices being unprotected, making them easy prey for ransomware attacks.
Insufficient Backup Practices
While NAS devices provide local data storage, it has to be noted that they are not a full 3-2-1 backup solution. Data on NAS devices needs to be backed up off-site to protect against hardware failures, theft, natural disasters, and ransomware attacks. If users don’t have an off-site backup, they risk losing all their data or paying a huge ransom to get access to their NAS data.
Lack of Regular Audits
Conducting regular security checks and audits can help identify and rectify any potential vulnerabilities. But, most NAS users take regular security audits as an afterthought and let security gaps go unnoticed and unaddressed.
Uncontrolled User Access
In some organizations, NAS devices may be accessed by numerous employees, some of whom may not be trained in security best practices. This can increase the chances of ransomware attacks via tactics like phishing emails.
Up to 70% of phishing emails are opened by the recipient. Source.
Neglected Software Updates
NAS device manufacturers often release software updates that include patches for security vulnerabilities. If users neglect to regularly update the software on their NAS devices, they can leave the devices exposed to ransomware attacks that exploit those vulnerabilities.
How Do I Protect My NAS From Ransomware?
Now that you understand the NAS devices vulnerabilities and threats that expose them to ransomware attacks, let’s take a look at some of the practical measures that you can take to protect your NAS from these attacks.
Update regularly: One of the most straightforward yet effective measures you can take is to keep your NAS devices’ applications up-to-date. This includes applying patches, firmware, and operating system updates as soon as they’re available and released by your NAS device manufacturer or backup application provider. These updates often contain security enhancements and fixes for vulnerabilities that could otherwise be exploited by ransomware.
Use strong credentials: Make sure all user accounts, especially admin accounts, are protected by strong, unique passwords. Strong credentials are a simple but effective way to avoid falling victim to brute force attacks that use a trial and error method to crack passwords.
Disable default admin accounts: Like we discussed above, most NAS devices come with default admin accounts with well-known usernames and passwords, making them easy targets for attackers. It’s a good idea to disable all these default accounts or change their credentials.
Limit access to NAS: Most businesses provide wide open access to all their users to access NAS data. However, chances are that not every user needs access to every file on your NAS. Limiting access based on user roles and responsibilities can minimize the potential impact in case of a ransomware attack.
Create different user access levels: Along the same lines of limiting access, consider creating different levels of user access. This can prevent a ransomware infection from spreading if a user with a lower level of access falls victim to an attack.
Block suspicious IP addresses: Consider utilizing network security tools to monitor and block IP addresses that have made multiple failed login attempts and/or seem suspicious. This can help prevent brute force attacks.
Implement a firewall and intrusion detection system: Firewalls can prevent unauthorized access to your NAS, while intrusion detection systems can alert you to any potential security breaches. Both can be crucial ways of defense against ransomware.
Adopt the 3-2-1 backup rule with Object Lock: Like we discussed above, NAS devices offer a centralized storage solution that is local, fast, and easy to share. However, NAS is not a backup solution as it doesn’t protect your data from theft, natural disasters, or hardware failures. Therefore, it’s essential to implement a 3-2-1 backup strategy, where three copies of your data is stored on two different types of storage with one copy stored off-site. This can ensure that you have a secure and uninfected backup even if your NAS is hit by ransomware. The Object Lock feature, available with cloud storage providers such as Backblaze, prevents data from being deleted, ensuring your backup remains intact even in the event of a ransomware attack.
The Role of Cybersecurity Training
While technical measures are a crucial part of NAS ransomware protection, they are only as effective as the people who use them. Human error is often cited as one of the leading causes of successful cyber-attacks, including ransomware.
This is where cybersecurity training comes in, playing an important role in helping individuals identify and avoid threats.
Studies have shown that in 93% of cases, an external attacker can breach an organizations network perimeter and gain access to local network resources. Source.
So, what kind of training can you do to help your staff avoid threats?
Identification training: Provide staff members with the knowledge and tools they need to recognize potential threats. This includes identifying suspicious emails, websites, or software, and understanding the dangers of clicking on unverified links or downloading unknown attachments, and also knowing how to handle and report a suspected threat when one arises.
Understanding human attack vendors: Cybercriminals often target individuals within an organization, exploiting common human weaknesses such as lack of awareness or curiosity. By understanding how these attacks work, employees can be better equipped to avoid falling victim to them.
Preventing attacks: Ultimately, the goal of cyber security training is to prevent attacks. By training staff on how to recognize and respond to potential threats, businesses can drastically reduce their risk of a successful ransomware attack. This not only helps the company’s data but also its reputation and financial well-being.
Also, it is important to remember that cybersecurity training should not be a one-time event. Cyber threats are constantly evolving, so regular training is necessary to ensure that staff members are aware of the latest threats and the best practices for dealing with them.
Protecting Your NAS Data From Threats
Ransomware is an ever evolving threat in our digital world and NAS devices are no exception. With the rising popularity of NAS devices among businesses, cybercriminals have been targeting NAS devices with high profile ransomware campaigns.
Having a comprehensive understanding of the basics of ransomware to recognize why NAS devices are attractive targets is the first step toward protecting your NAS devices from these attacks. By keeping systems and applications updated, enforcing robust credentials, limiting access, employing proactive network security measures, and backing up data, you can create a strong defense line against ransomware attacks.
Additionally, investing in regular cybersecurity training for all users can significantly decrease the risk of an attack being successful due to human error. Remember, cybersecurity is not a one-time effort but a continuous process of learning, adapting, and implementing best practices. Stay informed about the latest NAS ransomware types and tactics, maintain regular audits of your NAS devices, and continuously reevaluate and improve your security measures.
Every step you take towards better security not only protects your NAS data, but sends a strong message to cybercriminals and contributes towards a safer digital ecosystem for all.
Projects and technologies come and go, and with each new tool comes new workflow changes. But changing the way you move media around can be tough. Maybe you’ve always done things a certain way, and using a new tool feels like too much of a learning curve especially when you’re pressed for time. But the way you’ve always done things isn’t always the best, easiest, or fastest way. Sometimes you need to change the status quo to level up your media operations.
As a freelance editor, I worked on a recent project that presented some challenges that demanded new approaches to media storage challenges you might also be facing. I solved them with the cloud—but not an all-in-one cloud. My solution was a mix of cloud tools, including Adobe Premiere Pro, which gives me customization and flexibility—the best of all worlds in media workflows.
Right Opportunity at the Right Time
Last year I had the opportunity to serve as a digital imaging technician (DIT) on the set of an indie film titled “Vengeance” produced by Falcon Pictures. The role of a DIT can vary. In many instances you’re simply a data wrangler making backups of the data being shot. In others, you work in the color space of the project creating color corrected dailies on set. For “Vengeance”, I was mostly data wrangling.
“Vengeance” was an 11-day shoot in the mountains of Northern California near Bass Lake. While the rest of the crew spent their days hiking around with equipment, I was stationed back at home base with my DIT cart. With a lot of free time, I found myself logging data as it came in. Logging clip names soon turned into organizing bins and prepping the project for editing. And, while I was not the editor on the project, I was happy to help edit while I was on set.
The Challenge
A few months after my work as DIT ended, it became clear that “Vengeance” needed a boost in post-production. The editing was a bit stuck—they had no assistant editor to complete logging and to sound sync all the footage. So, I was asked to help out. The only problem: I needed to be able to share my work with another editor who lived 45 miles away.
Editing “Vengeance” in Adobe Premiere Pro.
Evaluating the World of Workflows and Cloud Tools
So we began to evaluate a few different solutions. It was clear that Adobe Premiere Pro would be used, but data storage was still a big question. We debated a few methods for sharing media:
The traditional route: Sharing a studio. With the other editor 45 miles away, commuting and scheduling time with each other was going to be cumbersome.
Email: We could email project files back and forth as we worked, but how would we keep track of versioning? Project bloat was a big concern.
Sharing a shuttle drive. Or what I’m calling “Sneakernet 2.0.” This is a popular method, but far from efficient.
Google Drive or Dropbox: Another popular option, but also one that comes with costs and service limitations like rate limiting.
None of these options were great, so we went back to the drawing board.
The Solution: A Hybrid Workflow Designed for Our Needs
To come to a final decision for this workflow, we made a list of our needs:
The ability to share a Premiere Pro project file for updates.
The ability to share media for the project.
No exchanging external hard drives.
No driving (a car).
Changes need to be real time.
Based on those needs, here’s where we landed.
Sharing Project Files
Adobe recently released a new update to its Team Projects features within Premiere Pro. Team Projects allows you to host a Premiere Pro project in the Adobe cloud and share it with other Adobe Creative Cloud users. This gave us the flexibility to share a single project and share updates in real time. This means no emailing of project files, versioning issues, or bloated files. That left the issues of the media. How do we share media?
Sharing Media Files
You may think that it would be obvious to share files in the Adobe Creative Cloud where you get 100GB free. And while 100GB may be enough storage for .psd and .ai files, 100GB is nothing for video, especially when we are talking about RED (.r3d) files which start off as approximately 4GB chunks and can quickly add up to terabytes of footage.
So we put everything in a Backblaze B2 Bucket. All the .r3d source files went directly from my Synology network attached storage (NAS) into a Backblaze B2 Bucket using the Synology Cloud Sync tool. In addition to the source files, I used Adobe Media Encoder to generate proxy files of all the .r3d files. This folder of proxy files also synced with Backblaze automatically.
Making Changes in Real Time
What was great about this solution is that all of the uploading is done automatically via a seamless Backblaze + Synology integration, and the Premiere Pro Team Project had a slew of publish functions perfect for real-time updates. And because the project files and proxies are stored in the cloud, I could get to them from several computers. I spent time at my desktop PC logging and syncing footage, but was also able to move to my couch and do the same from my MacBook Pro. I never had to move hard drives around, copy projects files, or worry about version control.
The other editor was able to connect to my Backblaze B2 Bucket using Cyberduck, a cloud storage browser for Mac. Using Cyberduck, he was able to pull down all the proxy files I created and share any files that he created. So, we were synced for the entire duration of the project.
Once the technology was configured, I was able to finish logging for “Vengeance”, sync all the sound, build out stringouts and assemblies, and even a rough cut of every scene for the entire movie, giving the post-production process the boost it needed.
The Power of Centralized Storage for Media Workflows
Technology is constantly evolving, and, in most circumstances, technology makes how we work a lot easier. For years filmmakers have worked on projects by physically moving our source material, whether it was on film reels, tapes, or hard drives. The cloud changed all that.
The key to getting “Vengeance” through post-production was our centralized approach to file management. Files existed in Backblaze already, we simply brought Premiere Pro to the data rather than moving the huge amount of files to Premiere Pro via the Creative Cloud.
The mix of technologies lets us create a customized flow that works for us. Creative Cloud had the benefit of providing a project sharing mechanism, and Backblaze provided a method of sharing media (Synology and Cyberduck) regardless of the tooling each editor had.
Once we hit picture lock, the centralized files will serve as a distribution point for VFX, color, and sound, making turnover a breeze. It can even be used as a distribution hub—check out how American Public Television uses Backblaze to distribute their finished assets.
Centralizing in the cloud not only made it easy for me to work from home, it allowed us to collaborate on a project with ease eliminating the overhead of driving, shuttle drive delivery (Sneakernet 2.0), and version control. The best part? A workflow like this is affordable for any size production and can be set up in minutes.
Have you recently moved to a cloud workflow? Let us know what you’re using and how it went in the comments.
Whether you’re protecting your business against drive failures or optimizing performance, choosing the right RAID level for your NAS is important for data safety and efficiency. A simple question inspired this blog: At what size of RAID should you have a two-drive tolerance instead of one for your NAS device? The answer isn’t complex per se, but there were enough “if/thens” that we thought it warranted a bit more explanation.
So today, I’m explaining everything you need to know to choose the right RAID level for your needs, including their benefits, drawbacks, and different use cases.
Refresher: What’s NAS? What Is RAID?
NAS stands for network attached storage. It is an excellent solution for organizations and users that require shared access to large amounts of data. NAS provides cost-effective, centralized storage that can be accessed by multiple users, from different locations, simultaneously. However, as the amount of data stored on NAS devices grows, the risk of data loss also increases.
This is where RAID levels come into play. RAID stands for redundant array of independent disks (or “inexpensive disks” depending on who you ask). It’s crucial for NAS users to understand the different RAID levels so they can effectively protect data while ensuring optimal performance of their NAS system.
Both NAS devices and RAID are disk arrays. That is, they are a set of several hard disk drives (HDDs) and/or solid state drives (SSDs) that store large amounts of data, orchestrating the drives to work as one unit. The biggest difference is that NAS is configured to work over your network. That means that it’s easy to configure your NAS device to support RAID levels—you’re combining the RAID’s data storage strategy and the NAS’s user-friendly network capabilities to get the best of both worlds.
This combination allows NAS users to implement RAID types that align with their needs, whether for data redundancy, increased write performance, or a balance of both. With proper configuration, a NAS device equipped with RAID provides both flexibility and enhanced data protection.
What Is RAID Storage?
RAID was first introduced by researchers at the University of California, Berkeley in the late 1980s. The original paper, “A Case for Redundant Arrays of Inexpensive Disks (RAID)”, was authored by David Patterson, Garth A. Gibson, and Randy Katz, where they introduced the concept of combining multiple smaller disks into a single larger disk array for improved performance and data redundancy.
They also argued that the top-performing mainframe disk drives of the time could be beaten on performance by an array of the inexpensive drives. Since then, RAID has become a widely used data storage technology in the data storage industry, and many different levels of RAID levels evolved over time.
RAID storage is now utilized in systems ranging from NAS devices to enterprise-grade data centers, offering configurations that balance write performance, data protection, and fault tolerance. This flexibility makes RAID an important part of storage architectures, helping businesses and individuals store and protect their data blocks efficiently.
Different Types of RAID Storage Techniques
Before we learn more about the different types of RAID levels, it’s important to understand the different types of RAID storage techniques so that you will have a better understanding of how RAID levels work.
There are essentially three types of RAID storage techniques—striping, mirroring, and parity. Depending on the level, RAID systems combine these methods in different ways to achieve varying balances of performance, redundancy, and storage efficiency.
Striping
Striping distributes your data over multiple drives. If you use a NAS device, striping spreads the blocks that comprise your files across the available hard drives simultaneously. This allows you to create one large drive, giving you faster read and write access since data can be stored and retrieved concurrently from multiple disks. However, striping doesn’t provide any redundancy whatsoever, and it’s typically found in systems where performance is prioritized over data redundancy. If a single drive fails in the storage array, all data on the device can be lost. Striping is usually used in combination with other techniques, as we’ll explore below.
Striping
Mirroring
As the name suggests, mirroring makes a copy of your data. Data is written simultaneously to two disks, thereby providing redundancy by having two copies of the data. Even if one disk fails, your data can still be accessed from the other disk.
Mirroring
There’s also a performance benefit here for reading data—you can request blocks concurrently from the drives (e.g. you can request block 1 from HDD1 at the same time as block 2 from HDD2). The disadvantage is that mirroring requires twice as many disks for the same total storage capacity. Mirroring is typically used in RAID levels such as RAID 1 and RAID 10.
Parity
Parity is all about error detection and correction. The system creates an error correction code (ECC) and stores the code along with the data on the disk. This code allows the RAID controller to detect and correct errors that may occur during data transmission or storage, thereby reducing the risk of data corruption or data loss due to disk failure. If a drive fails, you can install a new drive and the NAS device will restore your files based on the previously created ECC.
Parity is commonly used in RAID 5 and RAID 6, and the latter uses double parity, meaning that two sets of parity data are stored for additional protection.
Parity
What Is RAID Fault Tolerance?
In addition to the different RAID storage techniques, the other essential factor to consider before choosing a RAID level is RAID fault tolerance.” RAID fault tolerance refers to the ability of a RAID configuration to continue functioning even in the event of a hard disk failure.
In other words, fault tolerance gives you an idea of how many drives you can afford to lose in a RAID level configuration, but continue to access or re-create the data.
Different RAID levels offer varying degrees of fault tolerance and redundancy, and it’s essential to understand the trade-offs in storage capacity, performance, and cost as we’ll cover next.
What Are the Different RAID Levels?
RAID levels are standardized by the Storage Networking Industry Association (SNIA) and are assigned a number based on how they affect data storage and redundancy.
While RAID levels evolved over time, the standard RAID levels available today are RAID 0, RAID 1, RAID 5, RAID 6, and RAID 10. In addition to RAID configurations, non-RAID drive architectures also exist like JBOD, which we’ll explain first.
Now that you understand the basics of RAID storage, let’s take a look at the different RAID level configurations for NAS devices, including their benefits, use cases, and degree of fault tolerance.
JBOD: Simple Arrangement, Data Written Across All Drives
JBOD, also referred to as “Just a Bunch of Disks” or “Just a Bunch of Drives”, is a storage configuration where multiple drives are combined as one logical volume. In JBOD, data is written in a sequential way, across all drives without any RAID configuration. This approach allows for flexible and efficient storage utilization, but it does not provide any data redundancy or fault tolerance.
JBOD: Just a bunch of disks.
JBOD has no fault tolerance to speak of. On the plus side, it’s the simplest storage arrangement, and all disks are available for use. But, there’s no data redundancy and no performance improvements.
RAID 0: Striping, Data Evenly Distributed Over All Disks
RAID 0, also referred to as a “stripe set” or “striped volume”, stores the data evenly across all disks. Blocks of data are written to each disk in the array in turn, resulting in faster read and write speeds. However, RAID 0 doesn’t provide fault tolerance or redundancy. The failure of one drive can cause the entire storage array to fail, resulting in total loss of data.
RAID 0 also has no fault tolerance. There are some pros: it’s easy to implement, you get faster read/write speeds, and it’s cost effective. But there’s no data redundancy and an increased risk of data loss.
RAID 0 is typically used in scenarios where speed is critical but data safety isn’t a priority, such as video editing or temporary storage of unimportant files.
RAID 0: Data evenly distributed across two drives.
Raid 0: The Math
We can do a quick calculation to illustrate how RAID 0, in fact, increases the chance of losing data. To keep the math easy, we’ll assume an annual failure rate (AFR) of 1%. This means that, out of a sample of 100 drives, we’d expect one of them to fail in the next year; that is, the probability of a given drive failing in the next year is 0.01.
Now, the chance of the entire RAID array failing–its AFR–is the chance that any of the disks fail. The way to calculate this is to recognize that the probability of the array surviving the year is simply the product of the probability of each drive surviving the year. Note: we’ll be rounding all results in this article to two significant figures.
Multiply the possibility of one drive failing by the number of drives you have. In this example, there are two.
0.99 x 0.99 = 0.98
Subtract that result from one to calculate the percentage. So, the AFR is:
1 – 0.98 = 0.02, or 2%
So the two-drive RAID array is twice as likely to fail as a single disk.
For larger arrays, the risk increases exponentially as the number of drives increases, which makes RAID 0 unsuitable for critical or long-term data storage.
RAID 1: Mirroring, Exact Copy of Data on Two or More Disks
RAID 1 uses disk mirroring to create an exact copy of a set of data on two or more disks to protect data from disk failure. The data is written to two or more disks simultaneously, resulting in disks that are identical copies of each other. If one disk fails, the data is still available on the other disk(s). The array can be repaired by installing a replacement disk and copying all the data from the remaining drive to the replacement. However, there is still a small chance that the remaining disk will fail before the copy is complete.
RAID 1 has a fault tolerance of one drive. Advantages include data redundancy and improved read performance. Disadvantages include reduced storage capacity compared to disk potential. It also requires twice as many disks as RAID 0.
RAID 1: Exact copy of data on two or more disks.
RAID 1: The Math
To calculate the AFR for a RAID 1 array, we need to take into account the time needed to repair the array—that is, to copy all of the data from the remaining good drive to the replacement. This can vary widely depending on the drive capacity, write speed, and whether the array is in use while it is being repaired.
For simplicity, let’s assume that it takes a day to repair the array, leaving you with a single drive. The chance that the remaining good drive will fail during that day is simply (1/365) x AFR:
(1/365) x 0.01 = 0.000027
Now, the probability that the entire array will fail is the probability that one drive will fail and also the remaining good drive fail during that one-day repair period:
0.01 x 0.000027 = 0.00000027
Since there are two drives, and so two possible ways for this to happen, we need to combine the probabilities as we did in the RAID 0 case:
1 – (1 – 0.00000027) x 2 = 0.00000055 = 0.000055%
That’s a tiny fraction of the AFR for a single disk—out of two million RAID arrays, we’d expect just one of them to fail over the course of a year, as opposed to 20,000 out of a population of two million single disks.
This calculation highlights how RAID 1 dramatically reduces the likelihood of data loss, making it a safer option than RAID 0 for critical data storage.
When AFRs are this small, we often flip the numbers around and talk about reliability in terms of “number of nines.” Reliability is the probability that a device will survive the year. Then, we just count the nines after the decimal point, disregarding the remaining figures. Our single drive has reliability a of 0.99, or two nines, and the RAID 0 array has just a single nine with a reliability of 0.98.
The reliability of this two-drive RAID 1 array, given our assumption that it will take a day to repair the array, is:
1 – 0.00000055 = 0.99999945
Counting the nines, we’d also call this six nines.
RAID 5: Striping and Parity With Error Correction
RAID 5 uses a combination of disk striping and parity to distribute data evenly across multiple disks, along with creating an error correction code. Parity, the error correction information, is calculated and stored in one block per stripe set. This way, even if there is a disk failure, the data can be reconstructed using error correction.
RAID 5 also has a fault tolerance of one drive. On the plus side, you get data redundancy and improved performance. It’s a cost-effective solution for those who need redundancy and performance. On the minus side, you only get limited fault tolerance: RAID 5 can only tolerate one disk failure. If two disks fail, data will be lost.
RAID 5 is well-suited for environments like web hosting or file servers where storage efficiency and reliability are critical but not at the cost of excessive redundancy.
RAID 5: Striping and parity distributed across disks.
RAID 5: The Math
Let’s do the math. The array fails when one disk fails, and any of the remaining disks fail during the repair period. A RAID 5 array requires a minimum of three disks. We’ll use the same numbers for AFR and repair time as we did previously.
We’ve already calculated the probability that either disk fails during the repair time as 0.000027.
And, given that there are three ways that this can happen, the AFR for the three-drive RAID array is:
1 – (1 – 0.000027)3 = 0.000082 = 0.0082%
To calculate the durability, we’d perform the same operation as previous sections (1 – AFR), which gives us four nines. That’s much better durability than a single drive, but much worse than a two-drive RAID 1 array. We’d expect 164 of two million three-drive RAID 5 arrays to fail. The tradeoff is in cost-efficiency—67% of the three-drive RAID 5 array’s disk space is available for data, compared with just 50% of the RAID 1 array’s disk space.
Increasing the number of drives to four increases the available space to 75%, but, since the array is now vulnerable to any of the three remaining drives failing, it also increases the AFR, to 0.033%, or just one nine.
RAID 6: Striping and Dual Parity With Error Correction
RAID 6 uses disk striping with dual parity. As with RAID 5, blocks of data are written to each disk in turn, but RAID 6 includes two parity blocks in each stripe set. This provides additional data protection compared to RAID 5, and a RAID 6 array can withstand two drive failures and continue to function.
With RAID 6, you get a fault tolerance of two drives. Advantages include higher data protection and improved performance. Disadvantages include reduced write speed. Due to dual parity, write transactions are slow. It also takes longer to repair the array because of its complex structure.
RAID 6 is ideal for large-scale environments like enterprise data centers where drive failures are more likely, and downtime is unacceptable.
RAID 6: Striping and dual parity with error correction.
RAID 6: The Math
The calculation for a four-drive RAID 6 array is similar to the four-drive RAID 5 case, but this time, we can calculate the probability that any two of the remaining three drives fail during the repair. First, the probability that a given pair of drives fail is:
(1/365) x (1/365) = 0.0000075
There are three ways this can happen, so the probability that any two drives fail is:
1 – (1 – 0.0000075)3 = 0.000022
So the probability of a particular drive failing, then a further two of the remaining three failing during the repair is:
0.01 * 0.000022 = 0.00000022
There are four ways that this can happen, so the AFR for a four-drive RAID array is therefore:
1 – (1 – 0.000000075)4 = 0.0000009, or 0.00009%
Subtracting our result from one, we calculate six nines of durability. We’d expect just two drives out of approximately two million to fail within a year. It’s not surprising that the AFR is similar to RAID 1, since, with a four-drive RAID 6 array, 50% of the storage is available for data.
As with RAID 5, we can increase the number of drives in the array, with a corresponding increase in the AFR. A five-drive RAID 6 array allows use of 60% of the storage, with an AFR of 0.00011%, or five nines; two of our approximately two million drives would fail.
RAID 1+0: Striping and Mirroring for Protection and Performance
RAID 1+0, also known as RAID 10, is a combination of RAID 0 and RAID 1, in which it combines both striping and mirroring to provide enhanced data protection and improved performance. In RAID 1+0, data is striped across multiple mirrored pairs of disks. This means that if one disk fails, the other disk on the mirrored pair can still provide access to the data.
RAID 1+0 requires a minimum of four disks, of which two will be used for striping and two for mirroring, allowing you to combine the speed of RAID 0 with the dependable data protection of RAID 1. It can tolerate multiple disk failures as long as they are not in the same mirrored pair of disks.
With RAID 1+0, you get a fault tolerance of one drive per mirrored set. This gives you high data protection and improved performance over RAID 1 or RAID 5. However, it comes at a higher cost as it requires more disks for data redundancy. Your storage capacity is also reduced (only 50% of the total disk space is usable).
RAID 10: Striping and mirroring for protection and performance.
The below table shows a quick summary of the different RAID levels, their storage methods, and their fault tolerance levels.
RAID Level
Storage Method
Fault Tolerance
Advantages
Disadvantages
JBOD
Just a bunch of disks
None
Simplest storage arrangement.
All disks are available for use.
No data redundancy.
No performance improvements.
RAID 0
Block-level striping
None
Easy to implement.
Faster read and write speeds.
Cost-effective.
No data redundancy.
Increased risk of data loss.
RAID 1
Mirroring
One drive
Data redundancy.
Improved read performance.
Reduced storage capacity compared to disk potential.
Requires twice as many disks.
RAID 5
Block-level striping with distributed parity
One drive
Data redundancy.
Improved performance.
Cost-effective for those who need redundancy and performance.
Limited fault tolerance.
RAID 6
Block-level striping with dual distributed parity
Two drives
Higher data protection.
Improved performance.
Reduced write speed: Due to dual parity, write transactions are slow.
Repairing the array takes longer because of its complex structure.
RAID 1+0
Block-level striping with mirroring
One drive per mirrored set
High data protection.
Improved performance over RAID 1 and RAID 5.
Higher cost, as it requires more disks for data redundancy.
Reduced storage capacity.
How Many Parity Disks Do I Need?
We’ve limited ourselves to the standard RAID levels in this article. It’s not uncommon for NAS vendors to offer proprietary RAID configurations offering features such as the ability to combine different sizes of disks into a single array, but the calculation usually comes down to fault tolerance, which is the same as the number of parity drives in the array.
The common case of a four-drive NAS device, assuming a per-drive AFR of 1% and a repair time of one day:
RAID Level
Storage Method
Fault Tolerance Level
Notes
RAID 2
Bit-level striping, variable number of dedicated parity disks
Variable
More complex than RAID 5 and 6 with negligible gains.
RAID 3
Byte-level striping, dedicated parity drive
One drive
Again, more complex than RAID 5 and 6 with no real benefit.
RAID 4
Block-level striping, dedicated parity drive
One drive
The dedicated parity drive is a bottleneck for writing data, and there is no benefit over RAID 5.
RAID 5, dedicating a single disk to parity, is a good compromise between space efficiency and reliability. Its AFR of 0.033% equates to an approximately one in 3000 chance of failure per year. If you prefer longer odds, then you can move to mirroring or two parity drives, giving you odds of between one in one million and one in three million.
A note on our assumptions: In our calculations, we assume that it will take one day to repair the array in case of disk failure. So, as soon as the disk fails, the clock is ticking! If you have to go buy a disk, or wait for an online order to arrive, that repair time increases, with a corresponding increase in the chances of another disk failing during the repair. A common approach is to buy a NAS device that has space for a “hot spare”, so that the replacement drive is always ready for action. If the NAS device detects a drive failure, it can immediately bring the hot spare online and start the repair process, minimizing the chances of a second, catastrophic, failure.
Even the Highest RAID Level Still Leaves You Vulnerable
Like we said, answering the question “What RAID level do you need?” isn’t super complex, but there are a lot of if/thens. Now, you should have a good understanding of the different RAID levels, the fault tolerance they provide, and their pros and cons. But, even with the highest RAID level, your data could still be vulnerable.
While different RAID levels offer different levels of data redundancy, they are not enough to provide complete data protection for NAS devices. RAID provides protection against physical disk failures by storing multiple copies of NAS data on different disks to achieve fault tolerance objectives. However, it does not protect against the broader range of events that could result in data loss, including natural disasters, theft, or ransomware attacks. Neither does RAID protect against user error. If you inadvertently delete an important file from your NAS device, it’s gone from that array, no matter how parity disks you have.
Of course, that assumes you have no backup files. To ensure complete NAS data protection, it’s important to implement additional measures for a complete backup strategy, such as off-site cloud backup—not that we’re biased or anything. Cloud storage solutions are an effective tool to protect your NAS data with a secure, off-site cloud backup, ensuring your data is secured against various data loss threats or other events that could affect the physical location of the NAS.
At the end of the day, taking a multi-layered approach is the safest way to protect your data. RAID is an important component to achieve data redundancy, but additional measures should also be taken for increased cyber resilience.
We’d love to hear from you about any additional measures you’re taking to protect your NAS data besides RAID. Share your thoughts and experiences in the comments below.
With recent reports showing the global NAS market size is projected to grow from $26 billion to $82.9 billion in 2030, it’s clear that NAS isn’t going anywhere. So, let’s talk about how to choose an enterprise-level NAS solution.
What Is an Enterprise NAS?
Enterprise NAS is a large-scale data storage system that is connected to a local network to provide data storage and access to the organization. It’s designed for large-scale business environments that require high-capacity storage, superior performance, and advanced data management capabilities.
Compared with home-use NAS devices, enterprise NAS devices often come with superior hardware specifications, including powerful processors, large amounts of memory (RAM), and numerous drive bays to accommodate vast amounts of data.
How Do Enterprises Use NAS Devices?
Enterprises use NAS devices for a wide range of use cases and applications:
File storage and sharing: NAS devices provide a centralized platform for storing and sharing files across a network. This fosters collaboration, as employees can easily access shared files regardless of their physical location.
Data protection: With built-in redundancy features, NAS devices offer robust data protection. This ensures data remains safe and accessible even in the event of a disk failure.
Disaster recovery: Snapshot and replication features allow for quick restoration of data minimizing downtime and data loss from hardware failures, cyberattacks, or natural disasters. However, it’s important to note that NAS devices alone don’t provide this protection—they’re subject to the same vulnerabilities as all on-premises devices. Rather, this benefit comes from a NAS setup that tiers to the cloud.
Hosting business applications: Businesses can also use NAS devices to host business applications. Much the same as how you would use a server, since these devices can handle high volumes of data traffic and support multiple connections, they are well suited for running enterprise-level applications that require high availability and performance.
Running virtual machines (VMs): Virtualization software providers, like VMware, support running their products on NAS. With proper configuration, including potentially adding RAM to your device, you can easily spin up virtual machines using NAS.
Using NAS as a file server: NAS devices can function as dedicated file servers, offering high-performance, stable environments, which are useful for businesses with large user bases requiring concurrent access to shared files.
Archiving: Long-term storage and archiving is another key application of NAS devices in the enterprise. There are benefits to having archival data on-premises. It can reduce recovery times in case you need to restore from backups.
Enterprise NAS vs. Server Area Networks (SAN)
As you’re choosing how to create an enterprise-level storage system, it’s important to know the differences between NAS and SAN. The short answer: From the perspective of the user, there’s not much difference. From the perspective of the person managing the system, SAN setups are more complex and have more customization options, particularly in your network connections.
However, NAS companies have done an excellent job of adding functionality to NAS devices, making those features easily manageable. Since they’re less complex, they may be easier for your internal IT team to manage—and that can translate to OpEx savings and more time for your IT team to stay on top of challenges in an ever-changing tech landscape.
What Is the Difference Between Entry-Level, Mid-Market, and Enterprise NAS Devices?
NAS devices can be grouped into three major categories based on factors such as storage capacity, performance, and scalability. The following table provides a side-by-side comparison of the key features and differences between entry-level, mid-market, and enterprise NAS devices.
Feature
Entry-Level NAS
Mid-Market NAS
Enterprise NAS
Storage Capacity
Up to a few terabytes.
Can range from a few terabytes to tens of terabytes.
Usually hundreds of terabytes or more, scalable to meet enterprise needs.
Performance
Adequate for home use and basic file sharing.
Enhanced performance for small to medium businesses with higher data traffic.
High-performance systems designed to handle heavy workloads and concurrent access.
Reliability & Redundancy
Basic redundancy usually with RAID 1 or RAID 5 options.
More advanced redundancy options, including multiple RAID configurations.
Highly reliable with advanced redundancy features (RAID, replication, etc.).
Scalability
Limited scalability.
Moderate scalability, depending on model.
Highly scalable with clustering options.
Advanced Features
Basic features like media streaming, remote access, and basic data redundancy.
More advanced features like virtualization, data encryption, access control, and snapshot capability.
Enterprise-grade features like high-speed data transfers, advanced backup and disaster recovery options, deduplication, encryption, and virtualization support.
How Do I Choose an Enterprise NAS Device?
Now that you understand the difference between the different types of NAS devices and their respective features, it’s crucial to understand your specific business needs before choosing an enterprise NAS device. There are several aspects to consider, so let’s take them one by one.
1. Storage Capacity
One of the first things to consider is the amount of storage your enterprise requires. This isn’t just about your current needs, but also about the projected growth of your data over time. In a NAS system, storage is defined by the number of drives, the total amount of shared volume they create, and their striping scheme. A striping scheme defines where data is stored and what kinds of redundancies it has, and is also known as RAID levels that are usually defined like so: RAID 0, 1 5, 6, etc.
There are a few ways to add storage to a NAS device.
You can add drives to your NAS unit if you originally provisioned one with extra bays. This is most applicable to entry-level units.
You can purchase another NAS device and network it with your first device. On the enterprise level, you’ll likely have a more complex architecture of connected NAS devices acting as clusters or nodes on your network.
Finally, cloud-connected NAS devices mean that you can provision both primary and backup data to the cloud, so your setup is infinitely scalable. This means you can also nimbly add more storage on a short time frame—no need to wait for hardware upgrades (though you may still want to make upgrades in the longer term).
2. Data Access Speeds
The speed at which data can be accessed from your NAS device is another crucial factor. NAS devices are built to be directly connected to your local area network (LAN) and usually require a direct ethernet connection. An entry-level NAS system will have a gigabit ethernet connection (1GigE), and is suitable for entry-level or home NAS users.
But for enterprises that want to provide frequent and intensive data access to a large number of users, NAS vendors offer higher capacity ethernet connections on their systems. Some vendors offer 2.5 Gb/s or 5 Gb/s connections on their systems, but they usually require that you get a compatible network switch, USB adapters, or expansion cards. Still other NAS systems provide the option of Thunderbolt connections in addition to ethernet connections to provide higher bandwidth—up to 40GigE—and are good for systems that need to edit large files directly on the NAS.
3. Scalability
As your business grows, your data needs will likely increase. Therefore, it’s essential that your NAS device has the ability to grow with your business. You may not know exactly how much data you’ll need in a year or five, but you can certainly make an estimate based on your product roadmap, current rate of growth, and so on. And, we put together this handy NAS Buyer’s Guide so you can compare that potential growth to existing NAS features.
With any good backup strategy, you’ll want to set up recurring and automatic backups of all your systems. Also, in complex environments like a business, backups are just as much about data management—that is, knowing where all your data is stored (the shared file system vs. employee workstations vs. the cloud) and how to back it up effectively.
Enterprise NAS devices provide advanced data protection and backup features to protect NAS data against data loss and enhance accessibility. These include advanced RAID configurations (i.e. on what server and how redundant your data storage is), automated backup features, cloud storage integrations, enterprise grade encryption features, advanced backup and disaster recovery options, data deduplication, encryption, and virtualization support, etc.
Other features to look for can include snapshot technology, which allows capturing the state of the system at different points in time, and replication features which enable copying of data from one NAS device to another for redundancy.
5. Evaluating Total Cost of Ownership
When evaluating an investment in an enterprise NAS device, it’s important to not limit your focus on the initial purchase price of the NAS device itself. Keep in mind that with a NAS device, you’ll need to purchase hard drives (HDDs) or solid-state drives (SSDs) (and possibly other devices) to complete your setup.
Depending on the kind of data durability you want to create, the storage hardware cost can add up if you’re aiming for high capacity storage with advanced RAID configurations. Also, make sure to take into account energy consumption, software licenses, labor and IT costs, and maintenance costs.
6. Vendor Support and Warranty
One of the often ignored and underestimated parts of selecting an enterprise NAS device is the support and warranty provided by the NAS vendors. Enterprise NAS devices are complex pieces of technology. NAS devices, in general, are designed to be user-friendly, but once you’re networking NAS devices on the enterprise level, things get more complex.
When you encounter an issue, addressing the challenges as quickly as possible can mean the difference between prolonged downtime and quick resolution. Of course, this means having in-house IT support, but it’s also absolutely critical to choose an enterprise NAS vendor that provides robust support and a good warranty to ensure the resilience and longevity of your enterprise NAS solution.
Level Up: Connect Your Enterprise NAS to the Cloud
Okay, so you’ve chosen your enterprise NAS and devised your on-site, connected NAS solution. In industry parlance, what you’ve essentially done is to create a private cloud: storage dedicated solely to your organization, but accessible from anywhere. But, if you only have on-site storage, your data is vulnerable to theft, natural disasters, fire, and so on; and, as we mentioned above, you always want to have multiple copies of your data with at least one copy stored off-site.
The easiest way to achieve this is to connect your NAS to a public cloud service provider (CSP) like Backblaze. Make sure that you take into account the location of the CSP’s data centers to ensure that you have adequate geographic separation between your data. And, once connected to a CSP, you can take advantage of services like cloud replication to create yet another redundant copy of your data automatically.
Beyond backups, data storage on your NAS vs. in the cloud can have performance (speed) differences. This has implications on both your internal workflows and your external workflows. Take the use case of a media and entertainment company: when you’re editing files, you’re typically working with large, raw files that take time to transmit. That means that on-site storage can be faster for your team. But, teams have become more remote, and you might be using freelancers.
The great news is that most NAS devices have data management and syncing features, as noted above. A NAS hybrid cloud setup lets your employees or freelancers access remotely. They can access data via cloud storage, and your NAS client takes care of making sure all versions are up-to-date.
Once you have your business’ hybrid cloud setup, then you’ve opened up several opportunities to enhance how you store, manage, and use your data.
Store your data closer to delivery endpoints for faster speeds. If you’re creating, editing, or delivering large files like you would in the media and entertainment industry, the physical location of your data makes a difference to how fast you can deliver it to the end user. Depending on where your endpoints are located and what region you choose, using cloud storage as an active archive allows you to store data closer to delivery endpoints for fast access.
Integrate your NAS device with software as a service (SaaS) tools. In our SaaS landscape, all of our programs are internet-connected, and all of them need to be connected to storage. Many of these tools have their own clouds (like Google Drive or Adobe Creative Cloud) that you can bypass by connecting your own cloud storage account. Your NAS client then has excellent sync tools to keep your files updated as necessary, and, since that file is on your network instead of the tool’s cloud, it will be protected by your backup rules.
Actively strengthen your backups. We’ve talked about the need for geographic separation, and storing in the cloud is the easiest way to do this. (People used to ship tape backups back in the distant past of the 1990s and early 2000s.) You can also set up different rules for your different files. Your primary storage obviously needs to be modifiable, but you can use tools like Object Lock to set immutable rules on your backups as well.
Scale your storage flexibly. One of the biggest challenges of on-site storage is that adding more storage means buying more drives—it’s not an instant solution—and you’re more vulnerable to fluctuations in the supply chain. (Remember the Thailand Drive Crisis?) While you want to plan for future storage needs, cloud storage lets you add more storage immediately should you have unexpected needs.
Sum Up and Get Started
As you can see, having a clear understanding of your business needs is crucial before you build your storage strategy. Choosing an enterprise NAS is not only about getting a device that works now, but one that will continue to serve your business efficiently as your organization grows and evolves. A well thought-out enterprise NAS selection can boost your data management, provide robust data protection, and support your business’s growth goals.
If you have any questions or thoughts, please feel free to share them in the comments.
In today’s fast-paced media landscape, efficient collaboration is essential for success. With teams managing large files between geographically dispersed team members on tight deadlines, the need for a robust, flexible storage solution has never been greater. Hybrid cloud storage addresses this need by combining the power of on-premises solutions, like network attached storage (NAS) devices, with cloud storage, creating an ideal setup for enhanced productivity and seamless collaboration.
In this post, I’ll walk you through some approaches for optimizing media workflows using hybrid cloud storage. You’ll learn how to unlock fast local storage, easy file sharing and collaboration, and enhanced data protection, which are all essential components for success in the media and entertainment industry.
Plus, we’ll share specific media workflows for different types of collaboration scenarios and practical steps you can take to get started with your hybrid cloud approach today using Synology NAS and Backblaze B2 Cloud Storage as an example.
Common Challenges for Media Teams
Before we explore a hybrid cloud approach that combines NAS devices with cloud storage, let’s first take a look at some of the common challenges media teams face, including:
Data storage and accessibility.
File sharing and collaboration.
Security and data protection.
Data Storage and Accessibility Challenges
It’s no secret that recent data growth has been exponential. This is no different for media files. Cameras are creating larger and higher-quality files. There are more projects to shoot and edit. And editors and team members require immediate access to those files due to the high demand for fresh content.
File Sharing and Collaboration Challenges
Back in 2020, everyone was forced to go remote and the workforce changed. Now you can hire freelancers and vendors from around the world. This means you have to share assets with external contributors, and, in the past, this used to exclusively mean shipping hard drives to said vendors (and sometimes, it can still be necessary). Different contractors, freelancers, and consultants may use different tools and different processes.
Security and Data Protection Challenges
Data security poses unique challenges for media teams due to the industry’s specific requirements including managing large files, storing data on physical devices, and working with remote teams and external stakeholders. The need to protect sensitive information and intellectual property from data breaches, accidental deletions, and device failures adds complexity to data protection initiatives.
How Does Hybrid Cloud Help Media Teams Solve These Challenges?
As a quick reminder, the hybrid cloud refers to a computing environment that combines the use of both private cloud and public cloud resources to achieve the benefits of each platform.
A private cloud is a dedicated and secure cloud infrastructure designed exclusively for a single tenant or organization. It offers a wide range of benefits to users. With NAS devices, organizations can enjoy centralized storage, ensuring all files are accessible in one location. Additionally, it offers fast local access to files that helps streamline workflows and productivity.
The public cloud, on the other hand, is a shared cloud infrastructure provided by cloud storage companies like Backblaze. With public cloud, organizations can scale their infrastructure up or down as needed without the up-front capital costs associated with traditional on-premises infrastructure.
By combining cloud storage with NAS, media teams can create a hybrid cloud solution that offers the best of both worlds. Private local storage on NAS offers fast access to large files while the public cloud securely stores those files in remote servers and keeps them accessible at a reasonable price.
How To Get Started With A Hybrid Cloud Approach
If you’d like to get started with a hybrid cloud approach, using NAS on-premises is an easy entry point. Here are a few tips to help you choose the right NAS device for your data storage and collaboration needs.
Storage Requirements: Begin by assessing your data volume and growth rate to determine how much storage capacity you’ll need. This will help you decide the number of drives required to support your data growth.
Compute Power: Evaluate the NAS device’s processor, controller, and memory to ensure it can handle the workloads and deliver the performance you need for running applications and accessing and sharing files.
Network Infrastructure: Consider the network bandwidth, speed, and port support offered by the NAS device. A device with faster network connectivity will improve data transfer rates, while multiple ports can facilitate the connection of additional devices.
Data Collaboration: Determine your requirements for remote access, sync direction, and security needs. Look for a NAS device that provides secure remote access options, and supports the desired sync direction (one-way or two-way) while offering data protection features such as encryption, user authentication, and access controls.
By carefully reviewing these factors, you can choose a NAS device that meets your storage, performance, network, and security needs. If you’d like additional help choosing the right NAS device, download our complete NAS Buyer’s Guide.
Real-World Examples: Using Synology NAS + Backblaze B2
Let’s explore a hybrid cloud use case. To discuss specific media workflows for different types of collaboration scenarios, we’re going to use Synology NAS as the private cloud and Backblaze B2 Cloud Storage as the public cloud as examples in the rest of this article.
Scenario 1: Working With Distributed Teams Across Locations
In the first scenario, let’s assume your organization has two different locations with your teams working from both locations. Your video editors work in one office, while a separate editorial team responsible for final reviews operates from the second location.
To facilitate seamless collaboration, you can install a Synology NAS device at both locations and connect them to Backblaze B2 using Cloud Sync.
Here’s a video guide that demonstrates how to synchronize Synology NAS to Backblaze B2 using cloud sync.
This hybrid cloud setup allows for fast local access, easy file sharing, and real-time synchronization between the two locations, ensuring that any changes made at one site are automatically updated in the cloud and mirrored at the other site.
Scenario 2: Working With Distributed Teams
In this second scenario, you have teams working on your projects from different regions, let’s say the U.S. and Europe. Downloading files from different parts of the world can be time-consuming, causing delays and impacting productivity. To solve this, you can use Backblaze B2 Cloud Replication. This allows you to replicate your data automatically from your source bucket (U.S. West) to a destination bucket (EU Central).
Source files can be uploaded into B2 Bucket on the U.S. West region. These files are then replicated to the EU Central region so you can move data closer to your team in Europe for faster access. Vendors and teams in Europe can configure their Synology NAS devices with Cloud Sync to automatically sync with the replicated files in the EU Central data center.
Scenario 3: Working With Freelancers
In both scenarios discussed so far, file exchanges can occur between different companies or within the same company across various regions of the world. However, not everyone has access to these resources. Freelancers make up a huge part of the media and entertainment workforce, and not every one of them has a Synology NAS device.
But that’s not a problem!
In this case, you can still use a Synology NAS to upload your project files and sync them with your Backblaze B2 Bucket. Instead of syncing to another NAS or replicating to a different region, freelancers can access the files in your Backblaze B2 Bucket using third-party tools like Cyberduck.
This approach allows anyone with an internet connection and the appropriate access keys to access the required files instantly without needing to have a NAS device.
Scenario 4: Working With Vendors
In this final scenario, which is similar to the first one, you collaborate with another company or vendor located elsewhere instead of working with your internal team. Both parties can install their own Synology NAS device at their respective locations, ensuring centralized access, fast local access, and easy file sharing and collaboration.
The two NAS devices are then connected to a Backblaze B2 Bucket using Cloud Sync, allowing for seamless synchronization of files and data between the two companies.
Whenever changes are made to files by one company, the updated files are automatically synced to Backblaze B2 and subsequently to the other company’s Synology NAS device. This real-time synchronization ensures that both companies have access to the latest versions of the files, allowing for increased efficiency and collaboration.
Making Hybrid Cloud Work for Your Production Team
As you can see, there are several different ways you can move your media files around and get them in the hands of the right people—be it another one of your offices, vendors, or freelancers. The four scenarios discussed here are just a few common media workflows. You may or may not have the same scenario. Regardless, a hybrid cloud approach provides you with all the tools you need to customize your workflow to best suit your media collaboration needs.
In addition to Synology NAS, Backblaze B2 Cloud Storage integrates seamlessly with other NAS devices such as Asustor, Ctera, Dell Isilon, iOsafe, Morro Data, OWC JellyFish, Panzura, QNAP, TrueNAS, and more. Regardless of which NAS device you use, getting started with a hybrid cloud approach is simple and straightforward with Backblaze B2.
Hybrid Cloud Unlocks Collaboration and Productivity for Media Teams
Easing collaboration and boosting productivity in today’s fast-paced digital landscape is vital for media teams. By leveraging a hybrid cloud storage solution that combines the power of NAS devices with the flexibility of cloud storage, organizations can create an efficient, scalable, and secure solution for managing their media assets.
This approach not only addresses storage capacity and accessibility challenges, but also simplifies file sharing and collaboration, while ensuring data protection and security. Whether you’re working within your team from different locations, collaborating with external partners, or freelancers, a hybrid cloud solution offers a seamless, cost-effective, and high-performance solution to optimize your media workflows and enhance productivity in the ever-evolving world of media and entertainment.
We’d love to hear about other different media workflow scenarios. Share with us how you collaborate with your media teams and vendors in the comments below.
To provide the best experiences, we use technologies like cookies to store and/or access device information. Consenting to these technologies will allow us to process data such as browsing behavior or unique IDs on this site. Not consenting or withdrawing consent, may adversely affect certain features and functions.
Functional
Always active
The technical storage or access is strictly necessary for the legitimate purpose of enabling the use of a specific service explicitly requested by the subscriber or user, or for the sole purpose of carrying out the transmission of a communication over an electronic communications network.
Preferences
The technical storage or access is necessary for the legitimate purpose of storing preferences that are not requested by the subscriber or user.
Statistics
The technical storage or access that is used exclusively for statistical purposes.The technical storage or access that is used exclusively for anonymous statistical purposes. Without a subpoena, voluntary compliance on the part of your Internet Service Provider, or additional records from a third party, information stored or retrieved for this purpose alone cannot usually be used to identify you.
Marketing
The technical storage or access is required to create user profiles to send advertising, or to track the user on a website or across several websites for similar marketing purposes.