All posts by Vijay Menon

Field Notes: Setting Up Disaster Recovery in a Different Seismic Zone Using AWS Outposts

Post Syndicated from Vijay Menon original https://aws.amazon.com/blogs/architecture/field-notes-setting-up-disaster-recovery-in-a-different-seismic-zone-using-aws-outposts/

Recovering your mission-critical workloads from outages is essential for business continuity and providing services to customers with little or no interruption. That’s why many customers replicate their mission-critical workloads in multiple places using a Disaster Recovery (DR) strategy suited for their needs.

With AWS, a customer can achieve this by deploying multi Availability Zone High-Availability setup or a multi-region setup by replicating critical components of an application to another region.  Depending on the RPO and RTO of the mission-critical workload, the requirement for disaster recovery ranges from simple backup and restore, to multi-site, active-active, setup. In this blog post, I explain how AWS Outposts can be used for DR on AWS.

In many geographies, it is possible to set up your disaster recovery for a workload running in one AWS Region to another AWS Region in the same country (for example in US between us-east-1 and us-west-2). For countries where there is only one AWS Region, it’s possible to set up disaster recovery in another country where AWS Region is present. This method can be designed for the continuity, resumption and recovery of critical business processes at an agreed level and limits the impact on people, processes and infrastructure (including IT). Other reasons include to minimize the operational, financial, legal, reputational and other material consequences arising from such events.

However, for mission-critical workloads handling critical user data (PII, PHI or financial data), countries like India and Canada have regulations which mandate to have a disaster recovery setup at a “safe distance” within the same country. This ensures compliance with any data sovereignty or data localization requirements mandated by the regulators. “Safe distance” means the distance between the DR site and the primary site is such that the business can continue to operate in the event of any natural disaster or industrial events affecting the primary site. Depending on the geography, this safe distance could be 50KM or more. These regulations limit the options customers have to use another AWS Region in another country as a disaster recovery site of their primary workload running on AWS.

In this blog post, I describe an architecture using AWS Outposts which helps set up disaster recovery on AWS within the same country at a distance that can meet the requirements set by regulators. This architecture also helps customers to comply with various data sovereignty regulations in a given country. Another advantage of this architecture is the homogeneity of the primary and disaster recovery site. Your existing IT teams can set up and operate the disaster recovery site using familiar AWS tools and technology in a homogenous environment.

Prerequisites

Readers of this blog post should be familiar with basic networking concepts like WAN connectivity, BGP and the following AWS services:

Architecture Overview

I explain the architecture using an example customer scenario in India, where a customer is using AWS Mumbai Region for their mission-critical workload. This workload needs a DR setup to comply with local regulation and the DR setup needs to be in a different seismic zone than the one for Mumbai. Also, because of the nature of the regulated business, the user/sensitive data needs to be stored within India.

Following is the architecture diagram showing the logical setup.

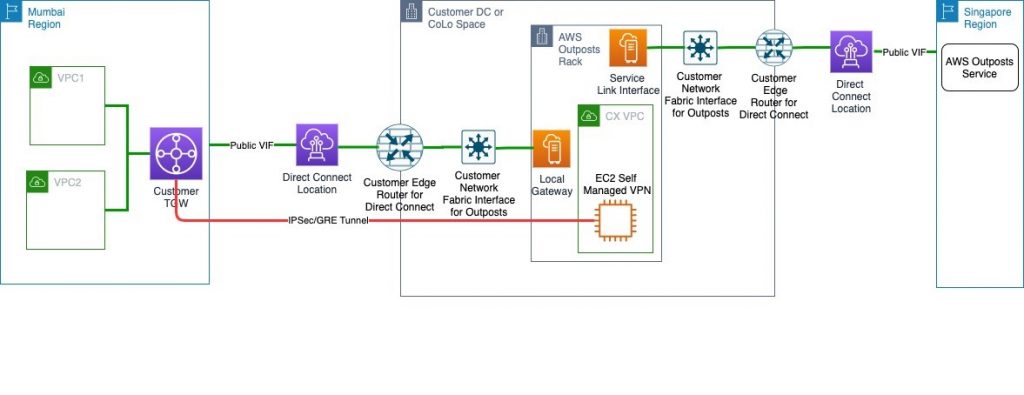
This solution is similar to a typical AWS Outposts use case where a customer orders the Outposts to be installed in their own Data Centre (DC) or a CoLocation site (Colo). It will follow the shared responsibility model described in AWS Outposts documentation.

The only difference is that the AWS Outpost parent Region will be the closest Region other than AWS Mumbai, in this case Singapore. Customers will then provision an AWS Direct Connect public VIF locally for a Service Link to the Singapore Region. This ensures that the control plane stays available via the AWS Singapore Region even if there is an outage in AWS Mumbai Region affecting control plane availability. You can then launch and manage AWS Outposts supported resources in the AWS Outposts rack.

For data plane traffic, which should not go out of the country, the following options are available:

  • Provision a self-managed Virtual Private Network (VPN) between an EC2 instances running router AMI in a subnet of AWS Outposts and AWS Transit Gateway (TGW) in the primary Region.
  • Provision a self-managed Virtual Private Network (VPN) between an EC2 instances running router AMI in a subnet of AWS Outposts and Virtual Private Gateway (VGW) in the primary Region.

Note: The Primary Region in this example is AWS Mumbai Region. This VPN will be provisioned via Local Gateway and DX public VIF. This ensures that data plane traffic will not traverse any network out of the country (India) to comply with data localization mandated by the regulators.

Architecture Walkthrough

  1. Make sure your data center (DC) or the choice of collocate facility (Colo) meets the requirements for AWS Outposts.
  2. Create an Outpost and order Outpost capacity as described in the documentation. Make sure that you do this step while logged into AWS Outposts console of the AWS Singapore Region.
  3. Provision connectivity between AWS Outposts and network of your DC/Colo as mentioned in AWS Outpost documentation.  This includes setting up VLANs for service links and Local Gateway (LGW).
  4. Provision an AWS Direct Connect connection and public VIF between your DC/Colo and the primary Region via the closest AWS Direct Connect location.
    • For the WAN connectivity between your DC/Colo and AWS Direct Connect location you can choose any telco provider of your choice or work with one of AWS Direct Connect partners.
    • This public VIF will be used to attach AWS Outposts to its parent Region in Singapore over AWS Outposts service link. It will also be used to establish an IPsec GRE tunnel between AWS Outposts subnet and a TGW or VGW for data plane traffic (explained in subsequent steps).
    • Alternatively, you can provision separate Direct Connect connection and public VIFs for Service Link and data plane traffic for better segregation between the two. You will have to provision sufficient bandwidth on Direct Connect connection for the Service Link traffic as well as the Data Plane traffic (like data replication between primary Region and AWS outposts).
    • For an optimal experience and resiliency, AWS recommends that you use dual 1Gbps connections to the AWS Region. This connectivity can also be achieved over Internet transit; however, I recommend using AWS Direct Connect because it provides private connectivity between AWS and your DC/Colo  environment, which in many cases can reduce your network costs, increase bandwidth throughput, and provide a more consistent network experience than Internet-based connections.
  5. Create a subnet in AWS Outposts and launch an EC2 instance running a router AMI of your choice from AWS Marketplace in this subnet. This EC2 instance is used to establish the IPsec GRE tunnel to the TGW or VGW in primary Region.
  6. Add rules in security group of these EC2 instances to allow ISAKMP (UDP 500), NAT Traversal (UDP 4500), and ESP (IP Protocol 50) from VGW or TGW endpoint public IP addresses.
  7. NAT (Network Address Translation) the EIP assigned in step 5 to a public IP address at your edge router connecting to AWS Direct connect or internet transit. This public IP will be used as the customer gateway to establish IPsec GRE tunnel to the primary Region.
  8. Create a customer gateway using the public IP address used to NAT the EC2 instances step 7. Follow the steps in similar process found at Create a Customer Gateway.
  9. Create a VPN attachment for the transit gateway using the customer gateway created in step 8. This VPN must be a dynamic route-based VPN. For steps, review Transit Gateway VPN Attachments. If you are connecting the customer gateway to VPC using VGW in primary Region then follow the steps mentioned at How do I create a secure connection between my office network and Amazon Virtual Private Cloud?.
  10. Configure the customer gateway (EC2 instance running a router AMI in AWS Outposts subnet) side for VPN connectivity. You can base this configuration suggested by AWS during the creation of VPN in step 9. This suggested sample configuration can be downloaded from AWS console post VPN setup as discussed in this document.
  11. Modify the route table of AWS outpost Subnets to point to the EC2 instance launched in step 5 as the target for any destination in your VPCs in the primary Region, which is AWS Mumbai in this example.

At this point, you will have end-to-end connectivity between VPCs in a primary Region and resources in an AWS Outposts. This connectivity can now be used to replicate data from your primary site to AWS Outposts for DR purposes. This  keeps the setup compliant with any internal or external data localization requirements.

Conclusion

In this blog post, I described an architecture using AWS Outposts for Disaster Recovery on AWS in countries without a second AWS Region. To set up disaster recovery, your existing IT teams can set up and operate the disaster recovery site using the familiar AWS tools and technology in a homogeneous environment. To learn more about AWS Outposts, refer to the documentation and FAQ.

Field Notes provides hands-on technical guidance from AWS Solutions Architects, consultants, and technical account managers, based on their experiences in the field solving real-world business problems for customers.

Field Notes: How to Identify and Block Fake Crawler Bots Using AWS WAF

Post Syndicated from Vijay Menon original https://aws.amazon.com/blogs/architecture/field-notes-how-to-identify-and-block-fake-crawler-bots-using-aws-waf/

In this blog post, we focus on how to identify fake bots using these AWS services: AWS WAF, Amazon Kinesis Data Firehose, Amazon S3 and AWS Lambda. We use fake Google/Bing bots to demonstrate, but the principles can be applied to other popular crawlers like Slurp Bot from Yahoo, DuckDuckBot from DuckDuckGo, Alexa crawler from Alexa internet ranking service.

For industries like media, online retailors, news or social websites, content is critical and often sets them apart from other competitors. These companies put in a significant amount of effort to make the content as visible and accessible as possible. To do that these companies rely on crawler bots, so that legitimate users searching for content can find the content easily. Crawler bots are useful for indexing the site pages and helping make the content more searchable and improve rankings.

However, this capability can be misused. So it is important to distinguish between genuine crawler bots and fake ones that are doing more than just indexing your site. It’s important to properly identify good and bad actors so that you can stop the bad ones without impacting the ability of good ones, and at scale. This helps in driving more traffic, visitors, and more revenue from your websites.

Identifying bots

There are two primary sources of information required to identify a fake bot:

  • HTTP Header User-Agent: Fake bots try to present themselves as real bots, for example as Google or Bing, by using the same user agent string used by Google or Bing.
  • IP Address: You can look at the source IP address of the incoming request and determine if it belongs to the search engine provider network like Google or Bing. You can do this by performing a forward and reverse look up and comparing the results. These methods are well documented by the search engine providers Google and Bing.

Solution Overview

The solution leverages the capabilities of AWS WAF. Our demonstration application is a static website hosted on Amazon S3 fronted by Amazon CloudFront. This means that we can provide permission of access to the S3 bucket only to CloudFront using origin access identity.

The logs are streamed in near real time using Amazon Kinesis Data Firehose, inspected using a Lambda function to help identify fake bots before storing the logs on Amazon S3. The Lambda function does two things:

  1. Inspect the traffic using the rules to identify bad or fake bots. In this case it uses forward and reverse DNS lookup results of the Client IP address of packets with User-Agent string resembling GoogleBot or BingBot.
  2. Once identified as a fake bot, the Lambda function updates AWS WAF IP-Set to permanently block the requests coming from IP addresses of fake bots.

Note: For the sake of this demonstration, we are using a static website hosted on Amazon S3 with CloudFront. This requires the AWS WAF and IP-Set used by AWS WAF to be of scope ‘CLOUDFRONT’. You can modify it to use scope ‘REGIONAL’ if you chose to protect your web properties behind Application Load Balancer or API Gateway.

Solution Architecture

WAF Solution Architecture

Prerequisites

Readers of this blog post should be familiar with HTTP and the following AWS services:

For this walkthrough, you should have the following:

  • AWS Account
  • AWS Command Line Interface (AWS CLI): You need AWS CLI installed and configured on the workstation from where you are going to try the steps mentioned below.
  • Credentials configured in AWS CLI should have the required IAM permissions to spin up and modify the resources mentioned in this post.
  • Make sure that you deploy the solution to us-east-1 Region and your AWS CLI default Region is us-east-1. If us-east-1 is not the default Region, reference the Regions explicitly while executing AWS CLI commands using --region us-east-1 switch.
  • Amazon S3 bucket in us-east-1 region

Walkthrough

1.     Create an Amazon S3 static Website and put it behind an Amazon CloudFront distribution. You can follow these steps. Note down the CloudFront distribution ID. We will use it in subsequent steps.

2.     Download and unzip the file containing CloudFormation template and lambda function code from here to a folder in your local workstation. You will need to run all of the subsequent commands from this folder.

3.     Zip the lambda function lambda_function.py and upload it to an Amazon S3 bucket of your choice in us-east-1. Note the bucket name as it will be used in the subsequent steps. The blog uses waf-logs-fake-bots-us-east-1 for reference as the S3 bucket name.

$ zip lambda_function.py lambda_function.py.zip
$ aws s3 cp lambda_function.py.zip s3://waf-logs-fake-bots-us-east-1/

4.     Create the resources required for this blog post by deploying the AWS CloudFormation template and running the below command:

aws cloudformation create-stack \
--stack-name FakeBotBlockBlog \
--template-body file://BotBlog.yml \
--parameters ParameterKey=KinesisBufferIntervalSeconds,ParameterValue=900 ParameterKey=KinesisBufferSizeMB,ParameterValue=3 ParameterKey=IPSetName,ParameterValue=BlockFakeBotIPSet ParameterKey=IPSetScope,ParameterValue=CLOUDFRONT ParameterKey=S3BucketWithDeploymentPackage,ParameterValue=waf-logs-fake-bots-us-east-1 ParameterKey=DeploymentPackageZippedFilename,ParameterValue=lambda_function.py.zip \
--capabilities CAPABILITY_IAM \
--region us-east-1

You need to provide the following information, and you can change the parameters based on your specific needs:

a.     KinesisBufferIntervalSeconds and KinesisBufferSizeMB. These will define the interval at which Kinesis Firehose ships the logs to Amazon S3, the Default is 900 seconds and 3MB respectively, whichever is met first.

b.     IPSetName. Name of the IP Set which will be used to record the client IP address of fake bots. Default value is BlockFakeBotIPSet.

c.     IPSetScope. Scope of the IP Set. I am using CLOUDFRONT and associate it with the CloudFront distribution created in step 1. You can choose to make it REGIONAL in which case WebACLassociation will need to be with an ALB or an API Gateway.

d.     S3BucketWithDeploymentPackage. Name of S3 bucket used in step 3. The blog assumes waf-logs-fake-bots-us-east-1.

e.     DeploymentPackageZipedFilename. Lambda function filename without the file extension. For example, the blog assumes lambda_function.py.zip is available on the Amazon S3 bucket and uses this value for this parameter.

Some stack templates might include resources that can affect permissions in your AWS account, for example, by creating new AWS Identity and Access Management (IAM) role. For those stacks, you must explicitly acknowledge this by specifying CAPABILITY_IAM or CAPABILITY_NAMED_IAM value for the –capabilities parameter.

Stack creation will take you approximately 5-7 minutes. Check the status of the stack by executing the below command every few minutes. You should see StackStatus value as CREATE_COMPLETE.

Example:

aws cloudformation describe-stacks --stack-name FakeBotBlockBlog | grep StackStatus

The CloudFormation template will create the following resources:

  • IP Set for AWS WAF
  • WebACL with rules to block the client IP addresses of fake bots, and an AWS-managed common rule set.
  • Lambda function to help detect fake bots and modify the AWS WAF IP Set to block them
  • Kinesis Firehose delivery stream, which will use the above Lambda function for processing
  • IAM roles with required permissions for the Lambda function and Kinesis Firehose
  • S3 bucket for AWS WAF logs

5.     Enable logging for the WebACL using AWS CLI. For this you need the ARN of the WebACL and Kinesis Firehose. You can find that information from the output of the CloudFormation stack created in step 4 using the below AWS CLI command

aws cloudformation describe-stacks --stack-name FakeBotBlockBlog

Please note the 2 ARNs and run the following commands by replacing (1) ResourceArn value with WebACL ARN and (2) LogDestinationConfigs value with Kinesis Firehose delivery stream ARN.

Example:

aws wafv2 put-logging-configuration –-logging-configuration ResourceArn=arn:aws:wafv2:us-east-1:123456789012:global/webacl/FakeBotWebACL/259ea98f-24ba-4acd-8803-3e7d02e8d482,LogDestinationConfigs=arn:aws:firehose:us-east-1:123456789012:deliverystream/aws-waf-logs-FakeBotBlockBlog --region us-east-1

6.     Associate CloudFront distribution with this WebACL: Sign in to the AWS Management Console and open the AWS WAF and Shield console at https://console.aws.amazon.com/wafv2/homev2/web-acls?region=global .

  • Click on the WebACL created earlier in this procedure
  • Navigate to ‘Associated AWS resources’ tab and select Add AWS resources
  • In the subsequent screen, select the CloudFront distribution created in step 1
  • Select Add

Note: If you are using an ALB or API Gateway for your web property, then you need to use REGIONAL WebACL and IP Set.  Review the procedure to associate an ALB or API Gateway to the WebACL.

You can monitor WebACL performance from the Overview section of WebACL from the AWS WAF and Shield console.

Testing

To test, you will need to generate some traffic which will trigger the lambda function to detect and block the fake bots created earlier in this blog. The web traffic can be generated from the local machine or from an EC2 instance with access to the internet using curl. Manually set the user agent to resemble Googlebot by running the following command from shell:

Replace http://www.awsdemodesign.com/ with the URL of your CloudFront distribution you created in step 1 of the walkthrough.

for i in {1..1000}; do curl -I -A "Mozilla/5.0 (compatible; Googlebot/2.1; +http://www.google.com/bot.html)" http://www.awsdemodesign.com/; done

Initially you will see HTTP1.1/ 200 OK response. This will trigger Lambda and modify the IP Set to include your public IP address to be blocked. You can verify that by inspecting the IP set from AWS WAF and Shield console.

  • Sign in to the AWS Management Console and open the AWS WAF and Shield console
  • Click on IP Set created earlier in this blog. In the subsequent screen you can see your public IP address in the list of IP addresses.

If you run the curl command again, you will see that the response now is HTTP/1.1 403 Forbidden.

Clean Up

  • Disassociate the CloudFront Distribution from WebACL
  • Delete the S3 bucket and CloudFront Distribution created in Step 1
  • Empty and delete the S3 bucket created by the CloudFormation stack for AWS WAF logs.
  • Delete CloudFormation stack created in Step 4.

Conclusion

In this blog post, we demonstrated how you can set up and inspect incoming web traffic using AWS Lambda, AWS WAF native logging capabilities, and Kinesis Firehose to help detect and block bad or fake bots at scale. Furthermore, the solution outlined in this post provides a framework which can be extended to identify similar unwanted traffic impersonating as other good bots.

Field Notes provides hands-on technical guidance from AWS Solutions Architects, consultants, and technical account managers, based on their experiences in the field solving real-world business problems for customers.