Tag Archives: Apache HBase

Detect and resolve HBase inconsistencies faster with AI on Amazon EMR

Post Syndicated from Yu-Ting Su original https://aws.amazon.com/blogs/big-data/detect-and-resolve-hbase-inconsistencies-faster-with-ai-on-amazon-emr/

HBase operations teams spend hours manually correlating logs, metadata, and consistency reports to identify root causes. Traditional approaches require deep expertise and extensive investigation across scattered data sources, directly impacting MTTR and operational efficiency. As HBase deployments scale and expertise becomes increasingly scarce, organizations face mounting pressure to maintain service reliability while managing growing operational complexity. The manual nature of troubleshooting creates bottlenecks that delay incident resolution, increase operational costs, and risk service degradation during critical business periods.

In this post, we show you how to build an AI-powered troubleshooting solution using Amazon OpenSearch Service vector search and intelligent analysis. This solution reduces HBase inconsistency resolution from hours to minutes and root cause identification from days to hours through natural language queries over operational data. This democratizes HBase troubleshooting capabilities across teams and reducing dependency on specialized expertise.

Solution overview

The solution addresses HBase troubleshooting challenges through data processing, vector search, and AI-powered analysis. It processes operational data from Amazon EMR clusters, generates semantic vector embeddings, and enables natural language queries for intelligent troubleshooting.
Key components include:

  • Amazon EMR HBase: Runs HBase workloads with Amazon S3 as the HBase rootdir for durable, scalable storage
  • Data Processing: Extracts and processes HBase logs, HBCK reports, and metadata with vector embeddings
  • Amazon OpenSearch Service: Provides vector search capabilities with k-NN algorithms for semantic analysis
  • AI Analysis Interface: Enables natural language queries with context-aware recommendations
  • Custom Knowledge Base: Supports organization-specific runbooks and troubleshooting procedures by ingesting Git repositories via Kiro CLI‘s /knowledge add command, enabling the AI assistant to reference custom operational guides alongside HBase source code and operational tools
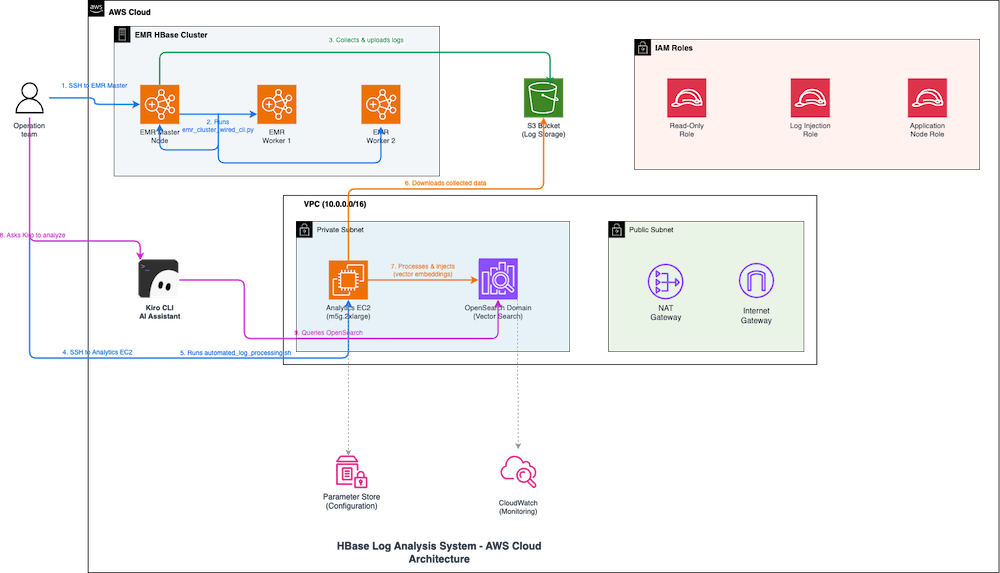
AWS cloud architecture diagram showing an HBase log analysis system with EMR cluster, VPC networking, IAM roles, Lambda functions, OpenSearch domain, and supporting services for scalable log processing and analytics.

The preceding diagram illustrates how the HBase log analysis system troubleshoots inconsistencies through automated workflows across AWS services.

When an operations team needs to investigate HBase issues, the engineer connects over SSH to the Amazon EMR primary node and runs the error collection script, which gathers logs from HBase master and RegionServer nodes and uploads them to Amazon S3. Next, the engineer connects to the Analytics Amazon Elastic Compute Cloud (Amazon EC2) instance and executes the automated processing script, which downloads logs from Amazon S3, generates semantic vector embeddings, and injects them into Amazon OpenSearch Service for k-NN-based semantic search. The engineer then queries the Kiro CLI AI Assistant using natural language to investigate. Kiro searches Amazon OpenSearch Service for relevant log entries and uses Amazon Bedrock to analyze patterns, correlate errors across components, and provide actionable recommendations. This reduces troubleshooting time from hours to minutes. The system operates within an Amazon Virtual Private Cloud (Amazon VPC) with private subnets for Amazon EMR and Analytics Amazon EC2, AWS Identity and Access Management (AWS IAM) roles for access control, Parameter Store for configuration, and Amazon CloudWatch for monitoring.

Prerequisites

For this walkthrough, you need the following prerequisites:

AWS account setup

  • An AWS account with administrative access for initial deployment
  • AWS Command Line Interface (AWS CLI) configured with administrative credentials

Required AWS IAM permissions

For infrastructure deployment

Your deployment user or role needs the following permissions:

  • Your deployment user or role requires sufficient access to AWS CloudFormation, Amazon S3, AWS IAM, and AWS System Manager.
  • The user or role must have the ability to create AWS CloudFormation stacks.

Infrastructure deployment:

  • For infrastructure deployment, you need AWS CloudFormation stack management permissions.
  • You also require sufficient access to create and manage the following resources:
    • Amazon OpenSearch Service domains
    • Amazon EC2 instances, Amazon VPCs, security groups, and networking components
    • AWS IAM roles and policies
    • AWS Systems Manager Parameter Store entries
    • Amazon CloudWatch Logs groups
    • Amazon S3 bucket for access logs and session logs

Runtime service roles

The AWS CloudFormation stack automatically creates two specialized AWS IAM roles designed with least-privilege access principles.

The first role is the Amazon OpenSearch Service Role, which manages Amazon VPC networking and Amazon CloudWatch logging for the Amazon OpenSearch Service domain.

The second role is the Application Role, which provides minimal Amazon OpenSearch Service and Amazon S3 access specifically for log processing applications and secure log ingestion operations.

Network requirements

  • Amazon VPC with private subnets for secure Amazon OpenSearch Service deployment
  • NAT Gateway for outbound internet access from private subnets
  • Security groups configured for HTTPS-only communication

Running Kiro CLI on Amazon EC2

Kiro platform requirements:

Kiro subscription

  • Active Kiro License: Valid subscription to Kiro platform
  • User Account: Registered Kiro user account with appropriate permissions
  • API Access: Kiro API keys or authentication tokens for CLI access

AWS Identity Center integration

  • AWS IAM Identity Center Setup: AWS IAM Identity Center enabled in your AWS organization
  • Permission Sets: Configured permission sets for Kiro users with appropriate AWS access
  • User Assignment: Users assigned to relevant AWS accounts and permission sets
  • SAML/OIDC Configuration: Identity provider integration if using external identity systems

Additional prerequisites

  • Python 3.7+ and Node.js installed locally
  • Python 3.11+ for AWS Lambda runtime environment (required for OpenSearch MCP server compatibility)
  • Sufficient service quotas for Amazon OpenSearch Service instances and Amazon EC2 resources
  • Recommended access to the analysis instance via AWS Systems Manager Session Manager (recommended). Amazon EMR clusters running HBase workloads
  • EMR_EC2_Default_Role of Amazon EMR EC2 instance profile can execute describe-stacks on AWS CloudFormation stacks in us-east-1
  • Basic familiarity with HBase operations

The deployment follows AWS security best practices with resource-specific permissions, regional restrictions, and encrypted data storage. All AWS IAM policies implement least-privilege access patterns to help secure operation of the log analysis pipeline.

Walkthrough

This walkthrough demonstrates deploying and configuring the AI-powered HBase troubleshooting solution in five key steps:

  1. Deploy AWS infrastructure using AWS CloudFormation
  2. Configure Amazon EMR analysis log collection
  3. Process and index HBase data
  4. Enable AI-powered analysis
  5. Add custom knowledge base (optional)

The complete solution is available in our GitHub repository.

Step 1: Deploy the infrastructure

Deploy the required AWS infrastructure including Amazon OpenSearch Service domain, Amazon EC2 instances, and AWS IAM roles.

To deploy the infrastructure

  1. Deploy AWS CloudFormation stack. Please update [email protected] to an email address for security alerts and Advanced Intrusion Detection Environment (AIDE) reports:
# Deploy to development environment
aws cloudformation create-stack \
  --stack-name dev-hbase-log-analysis \
  --template-body file://cloudformation/hbase-log-analysis-simple.yaml \
  --parameters \
    ParameterKey=EnvironmentName,ParameterValue=dev \
    ParameterKey=EC2InstanceType,ParameterValue=m7g.xlarge \
    ParameterKey=SecurityAlertEmail,[email protected] \
  --capabilities CAPABILITY_IAM \
  --region us-east-1
# Wait for deployment to complete (~15-20 minutes)
aws cloudformation wait stack-create-complete \
  --stack-name dev-hbase-log-analysis \
  --region us-east-1
  1. Note the deployment outputs including Amazon OpenSearch Service endpoint and Amazon EC2 instance details in the AWS CloudFormation console.
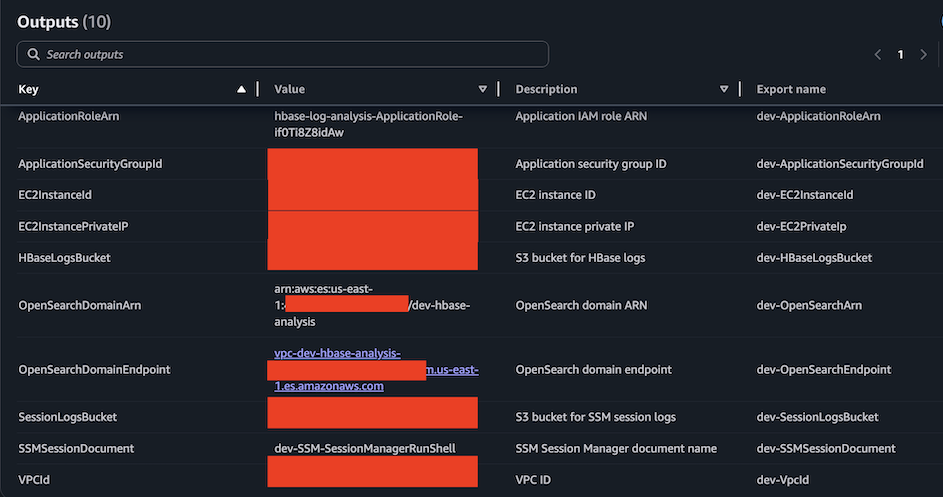
AWS CloudFormation stack outputs table displaying infrastructure resource identifiers including IAM roles, EC2 instances, security groups, S3 buckets, OpenSearch domain configuration, and VPC details for an HBase log analysis application in the development environment.

The deployment creates:

  • Amazon OpenSearch Service domain with vector search capabilities
  • Amazon EC2 instance for data processing and AI analysis
  • AWS IAM roles with appropriate permissions
  • Security groups and Amazon VPC configuration

Step 2: Connect to Amazon EC2 instance and set up system

Connect to the Amazon EC2 instance using AWS Systems Manager (SSM) and set up the required components.

To connect and set up the system

  1. Run the following commands to get the instance ID from AWS CloudFormation outputs and connect via AWS Systems Manager (SSM):
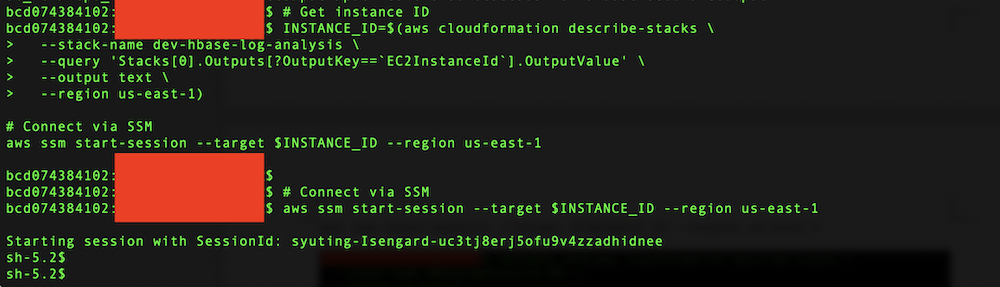
# Get instance ID
INSTANCE_ID=$(aws cloudformation describe-stacks \
  --stack-name dev-hbase-log-analysis \
  --query 'Stacks[0].Outputs[?OutputKey==`EC2InstanceId`].OutputValue' \
  --output text \
  --region us-east-1)
# Connect via SSM
aws ssm start-session --target $INSTANCE_ID --region us-east-1

Terminal screenshot showing AWS CLI commands to retrieve an EC2 instance ID from CloudFormation stack outputs and establish an AWS Systems Manager Session Manager connection to the instance in the us-east-1 region.

  1. Clone the repository and run automated setup:
# On EC2 instance
sudo su - ec2-user

# Re-install aws cli
sudo dnf remove awscli -y

# For ARM64 (Graviton instances - default)
curl "https://awscli.amazonaws.com/awscli-exe-linux-aarch64.zip" -o "awscliv2.zip"

# For x86_64 (if using non-Graviton instances)
# curl "https://awscli.amazonaws.com/awscli-exe-linux-x86_64.zip" -o "awscliv2.zip"

unzip awscliv2.zip
sudo ./aws/install

# update $PATH in ~/.bashrc
echo 'export PATH=$PATH:/usr/local/bin/' >> ~/.bashrc

# Reload ~/.bashrc
source ~/.bashrc

# Fork and clone the source code repository on GitHub: sample-emr-hbase-inconsistencies-detection-recovery-mcp-kiro
git clone https://github.com/YOUR_USERNAME/sample-emr-hbase-inconsistencies-detection-recovery-mcp-kiro.git hbase-analysis
cd hbase-analysis

# Run automated setup
chmod +x ./scripts/setup/automated-system-setup.sh
./scripts/setup/automated-system-setup.sh \
  --emr-version emr-7.12.0 \
  --stack-name dev-hbase-log-analysis \
  --region us-east-1

The automated setup script installs:

  • System dependencies (awscli, git, unzip)
  • uv package manager and OpenSearch MCP Server
  • Kiro CLI and configuration with AWS IAM Identity Center authentication. The script will automatically add Apache HBase open source repo and Apache HBase open source operational tools to knowledge bases
  • HBase source repositories for your Amazon EMR version
  • Python dependencies and MCP server configuration
  1. Add your own knowledge base to Kiro CLI

To enhance Kiro CLI’s analysis capabilities with Apache HBase open-source repositories, your organization’s HBase runbooks and troubleshooting guides, you can add your own knowledge base repositories. Here are the commands. Please periodically validate and maintain your runbook contents so that they remain accurate and up-to-date, reflecting any changes in your HBase environment, configurations, or operational procedures.:

# Navigate to the HBase repositories directory
cd /opt/hbase-repositories
# Clone your organization's HBase runbook repository
git clone <runbook-repository-url> <your-own-runbook-repo>
# Example:
# git clone https://github.com/your-org/hbase-runbooks.git hbase-runbooks
# git clone https://gitlab.company.com/ops/hbase-troubleshooting.git hbase-troubleshooting
# Add your custom repositories to Kiro CLI knowledge base manually (run these commands inside kiro-cli):
echo "/knowledge add --name \"Your custom HBase knowledge base\" --path /opt/hbase-repositories/<your-own-runbook-repo>" | kiro-cli
# Example:
# echo "/knowledge add --name \"Company HBase runbooks\" --path /opt/hbase-repositories/hbase-runbooks" | kiro-cli
# echo "/knowledge add --name \"HBase troubleshooting guides\" --path /opt/hbase-repositories/hbase-troubleshooting" | kiro-cli

Step 3: Configure Amazon EMR log analysis collection

Set up data collection from your Amazon EMR clusters to gather HBase logs, metadata, and consistency reports using the recommended direct collection method.
To configure Amazon EMR log analysis collection

  1. On your Amazon EMR cluster primary node, run the following commands to download the collection scripts:
# On EMR primary node
sudo su - hadoop

# Fork and clone the source code repository on GitHub: sample-emr-hbase-inconsistencies-detection-recovery-mcp-kiro
git clone https://github.com/YOUR_USERNAME/sample-emr-hbase-inconsistencies-detection-recovery-mcp-kiro.git hbase-analysis
cd hbase-analysis
  1. Run the interactive collection wizard:
# Run collection wizard
python3 scripts/utilities/emr_log_collection/emr_cluster_wizard_v2.py

Input the parameters like the EMR cluster’s jobflow ID, the log analysis Amazon S3 bucket name, and the lookback hours. The default value of the lookback hours is 4 hours.
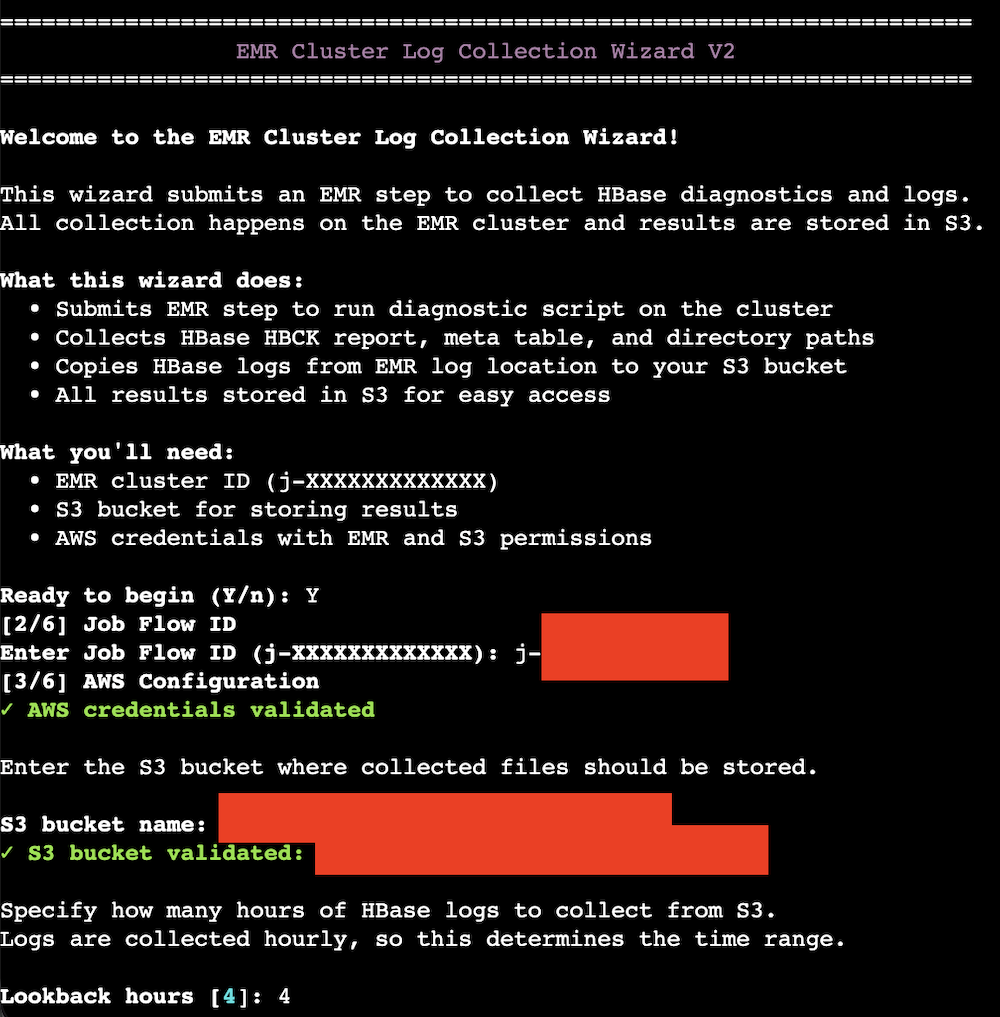
Terminal screenshot of EMR Cluster Log Collection Wizard V2 showing an interactive command-line interface for configuring HBase diagnostic log collection from Amazon EMR clusters, with step indicators, input fields for job flow ID and S3 bucket, validation confirmations, and lookback hour configuration.

  1. The collection wizard performs these actions:
  • Collects HBase logs from local filesystem. Please reference to prerequisites for the access permission.
  • Runs sudo -u hbase hbase hbck -details (or hbck2 for HBase 2.x)
  • Runs hdfs dfs -ls -R /hbase or aws s3 ls <hbase-root-dir> –recursive
  • Runs hbase shell <<< 'scan "hbase:meta"'
  • Creates properly named files matching analysis system requirements
  • Uploads to Amazon S3 with correct naming conventions

Here’s the data collection summary:
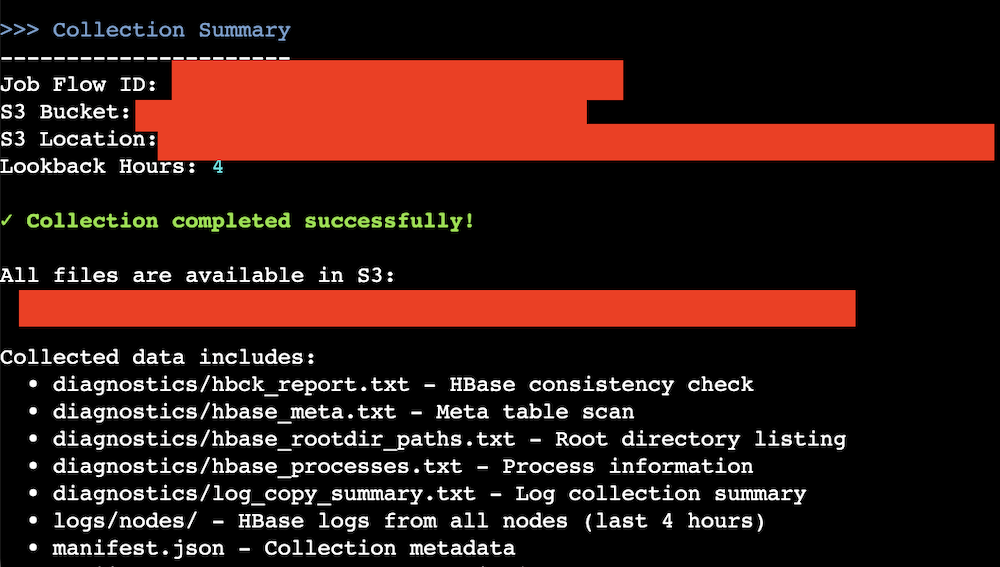
Terminal screenshot showing EMR Cluster Log Collection Wizard V2 completion summary with job flow ID, S3 bucket location, 4-hour lookback period, green success confirmation message, S3 file path, and detailed listing of seven collected diagnostic files including HBCK reports, HBase meta table scans, root directory paths, process information, log collection summary, node logs from all servers, and collection metadata in JSON format.

You can check the uploaded contents through AWS CLI.

aws s3 ls s3://<log-path> --recursive

Here’s a screenshot of the outputs.

Terminal screenshot showing AWS CLI command output listing HBase diagnostic files and logs collected from an EMR cluster and stored in Amazon S3, displaying timestamps, file sizes, and complete S3 object paths including diagnostics directory with HBCK reports, meta table scans, root directory listings, process information, and logs directory with compressed application logs from HBase master and regionserver nodes.

  1. On the Analysis Amazon EC2 instance, download collected files to the Analysis Amazon EC2 instance.
# On analytics EC2 instance
sudo su - ec2-user

# Download logs from S3
mkdir -p /tmp/hbase-log-analysis
cd /tmp/hbase-log-analysis
aws s3 sync s3://<S3-BUCKET-NAME>/emr-logs/<EMR-JOBFLOW-ID>/ .

You can get your jobflow ID from Amazon EMR console:

Amazon EMR clusters management dashboard displaying a table with clusters, showing one cluster entry named "test" in waiting status with green indicator, creation time, elapsed time, normalized instances, along with filter controls, search functionality, pagination showing page 1, and action buttons for View details, Terminate, Clone, and Create cluster operations.

The generated files (hbase-hbase-master-ip-xxx-xxx-xxx-xxx.ec2.internal.log.gz, hbase-hbase-regionserver-ip-xxx-xxx-xxx-xxx.ec2.internal.log.gz, hbck_report.txt, hbase_rootdir_paths.txt, hbase_meta.txt, hbase_processes.txt, log_copy_summary.txt) should be aligned with the automated processing script requirements as following.
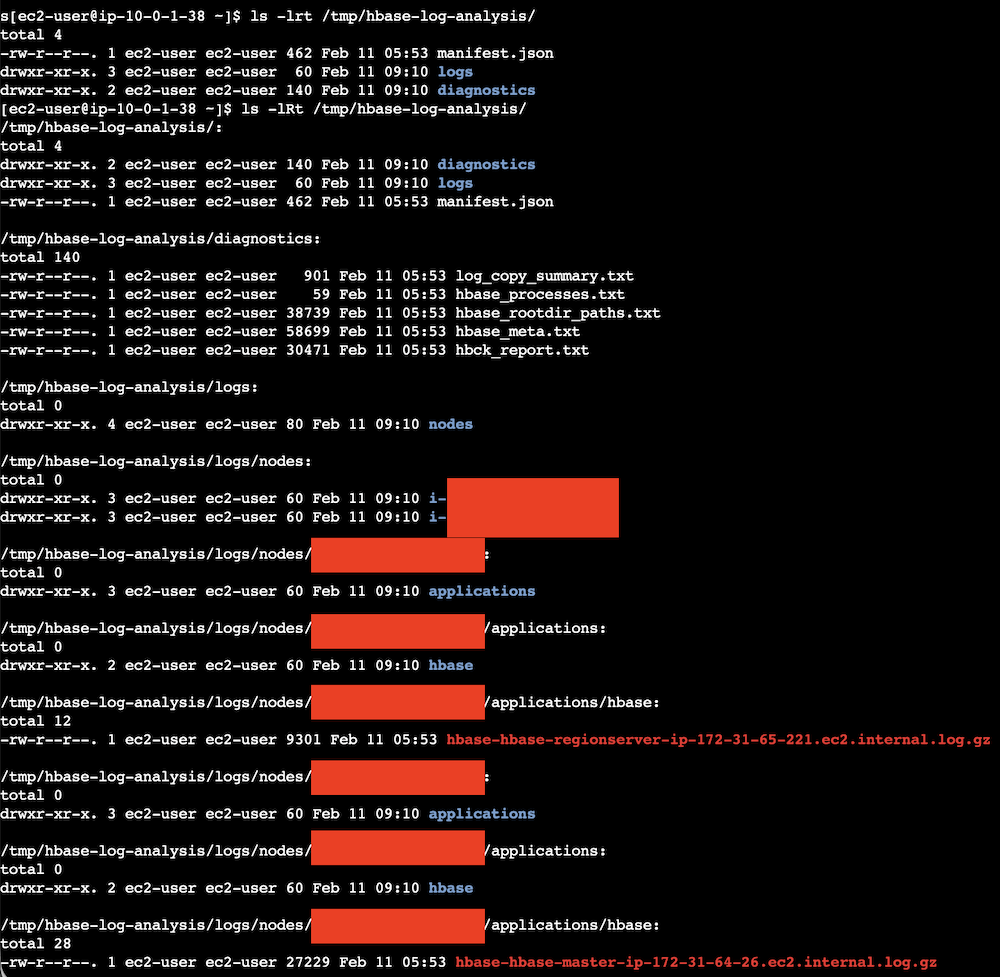
Terminal screenshot showing recursive ls -lRt command output listing HBase diagnostic files and logs in /tmp/hbase-log-analysis/ directory, displaying file permissions, ownership by ec2-user, file sizes, timestamps, and complete directory structure including diagnostics directory with text files (manifest.json, HBCK report, meta table scan, process information, root directory paths, log copy summary), logs directory with nested nodes subdirectory containing redacted instance IDs, and applications/hbase subdirectories with compressed RegionServer and Master log files.

Step 4: Process and index data

Process the collected HBase data and create vector embeddings for intelligent search capabilities.To process and index the data, please navigate to the project directory on the Analysis EC2 instance, and run automated-log-processing.sh:

sudo su – ec2-user
cd ~/hbase-analysis
chmod +x ./scripts/processing/automated-log-processing.sh
./scripts/processing/automated-log-processing.sh \
  --job-flow-id j-YOUR-JOB-FLOW-ID \
  --stack-name dev-hbase-log-analysis

The processing scripts extract and parse HBase logs and generate dimensional vector embeddings from HBase log messages using sentence transformer models to enable semantic search beyond keyword matching. The system uses the all-MiniLM-L6-v2 model by default (producing 384-dimensional embeddings), but supports configurable models with different embedding dimensions, automatically adapting the OpenSearch vector index to match the chosen model’s output. The system processes comprehensive HBase operational data including region operations, compaction activities, Write-Ahead Log events, memstore operations, and cluster management information from HMaster and RegionServer logs. Vector embeddings capture error messages, exception stack traces, performance warnings, and multi-line log entries through intelligent text preprocessing. This semantic representation enables advanced troubleshooting where users can query conceptually for “region server performance issues” or “memory pressure” and receive contextually relevant results across different log files and time periods. The vector search capabilities support error correlation by grouping similar exceptions, performance analysis by identifying related bottlenecks, and operational pattern recognition. Each log entry is stored in Amazon OpenSearch Service with original metadata (timestamp, log level, source file, job flow ID) alongside the embedding vector, enabling both structured queries and AI-powered semantic analysis. This approach transforms raw HBase logs into a searchable knowledge base supporting anomaly detection, trend analysis, and predictive insights for proactive cluster management and troubleshooting.

All scripts use AWS IAM authentication automatically. Here’s a screenshot of the data processing outputs.
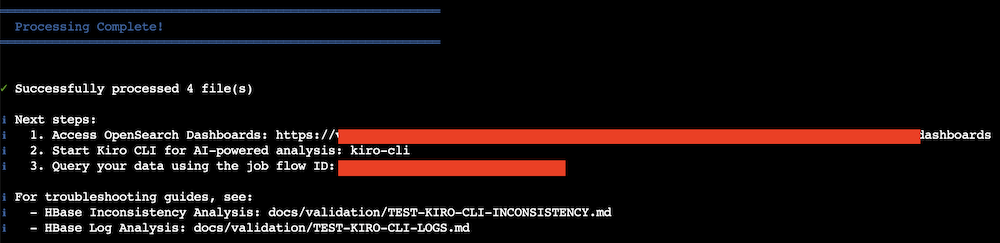
Terminal screenshot showing successful completion of HBase log analysis processing, green checkmark, confirmation message "Successfully processed 4 file(s)", and next steps section displaying three numbered instructions with redacted URLs for accessing OpenSearch Dashboards, starting Kiro CLI for AI-powered analysis, and querying data using job flow ID, followed by troubleshooting documentation references for HBase inconsistency analysis and log analysis guides.

Step 5: Enable AI-powered analysis

Configure the AI analysis interface to enable natural language queries against your HBase operational data.

To set up AI-powered analysis

  1. Launch Kiro CLI (already configured by automated setup):

kiro-cliCheck mcp and knowledge bases. /mcp list

Terminal screenshot showing MCP list command output displaying one configured MCP server named "opensearch-mcp-server" with command "uvx" in green and white text on dark background with pink shell prompt, featuring a purple "Configured MCP Servers" header with checkbox icon and green horizontal separator line.

/knowledge show

Terminal screenshot showing "/knowledge show" command output displaying Agent kiro_default's knowledge base with repositories: Apache HBase source code, and HBase operational tools

If you cannot see these 2 knowledge bases, you can manually add them through the following commands:

# Note: Large repositories (~500MB) may take a while to index. Check progress with: /knowledge show
/knowledge add --name "HBase operational tools" --path /opt/hbase-repositories/hbase-operator-tools"
/knowledge add --name "Apache HBase source code" --path /opt/hbase-repositories/hbase"
  1. Use natural language queries to analyze your HBase data. The AI analysis uses both the OpenSearch MCP Server for querying indexed data and the Filesystem knowledge bases for accessing HBase source code. You can add your custom runbooks for Kiro’s reference as well.

For HBase inconsistency analysis:

# HBase Inconsistency Detection and Remediation Guidelines
## Search Strategy
- Use fuzzy search for case variations/typos, term query for exact region IDs, match_phrase for paths, query_string for logs
- Always use .keyword subfields for exact text matching
- Cross-reference filesystem (wildcard: {"wildcard": {"path": "*<region_id>*"}}) with hbase:meta (match: {"match": {"row_key": "<region_id>"}})
- The total region count in hbase meta must match the total matched document count of wildcard path like "*/.regioninfo" in hbase rootdir path.  
- All terms of region_name.keyword for a region encoded name must match a wildcard path like "*/.regioninfo"
- All terms of table_name.keyword for a table must match a wildcard path like "*/.tabledesc*"
- 1595e783b53d99cd5eef43b6debb2682 is the master store region that will locate in <hbase-root-dir>/MasterData/data/master/store/1595e783b53d99cd5eef43b6debb2682/
- May cross check with the raw logs in /tmp/hbase-log-analysis/
## Issue Types
Orphan regions, missing .regioninfo, missing/extra regions in hbase:meta, rowkey holes, stuck RIT, master initialization failures
## Analysis Steps
### 1. Cross-Reference Meta vs Filesystem
- Filesystem regions NOT in hbase:meta → ORPHAN REGION
- Meta regions NOT in filesystem → MISSING REGION
### 2. Validate Region Chain Continuity
- Sort regions by STARTKEY, verify region[i].ENDKEY == region[i+1].STARTKEY
- First STARTKEY must be '', last ENDKEY must be ''
- Gaps → ROWKEY HOLE
### 3. Check Region States
- state != 'OPEN' → Check RIT
- Missing server assignment → UNASSIGNED
- Multiple servers → SPLIT BRAIN
- "deployed_servers" field must have only one region server address like "ip-xxx-xxx-xxx-xxx.ec2.internal,16020,1770781485397" . The value should not be null or have multiple values. 
### 4. Validate .regioninfo Files
- Missing .regioninfo in region directory → CORRUPT REGION
### 5. Cross-Check HBCK Report
- Compare orphan counts, RIT regions, filesystem vs meta region counts
### 6. Analyze Logs
- Search: "updating hbase:meta row=<region>", "STUCK", "RIT", "Failed" + "<region>", "Split"/"Merge" + "<region>"
## Remediation
- Reference knowledge bases: "Apache HBase source code", "HBase operational tools"
- Use hbck2: /usr/lib/hbase-operator-tools/hbase-hbck2.jar
- Prefix commands with sudo -u hbase
- Use aws s3 for S3-based rootdir
- Wait 300s after creating holes before hbck fixMeta (catalog janitor cycle)
- Use unassign instead of deprecated close_region
- If the region does not have .regioninfo in  <hbase-root-dir>/data/<namespace>/<table-name>/<region-encoded-name>/ but hbase:meta has that region's information and that region has been deployed on a healthy region server, you can use hbase shell to unassign and assign the region to re-generate .regioninfo
- Always add "sudo -u hbase hbase" before "hbase shell" and "hbase hbck" commands
## Job flow
Target: <your-job-flow-id>
Inconsistency to detect: All kinds of inconsistencies

You can trust or input “y” or “t” to grant Kiro to search through mcp and knowledge bases.

Terminal screenshot showing MCP tool execution authorization prompt.

You may get some outputs like this: Kiro checked for any HBase issue.

Terminal screenshot showing HBase database query results for user table entries with server configuration details and an HBase Inconsistency Detection Framework analysis report

Kiro summarized the examination results.
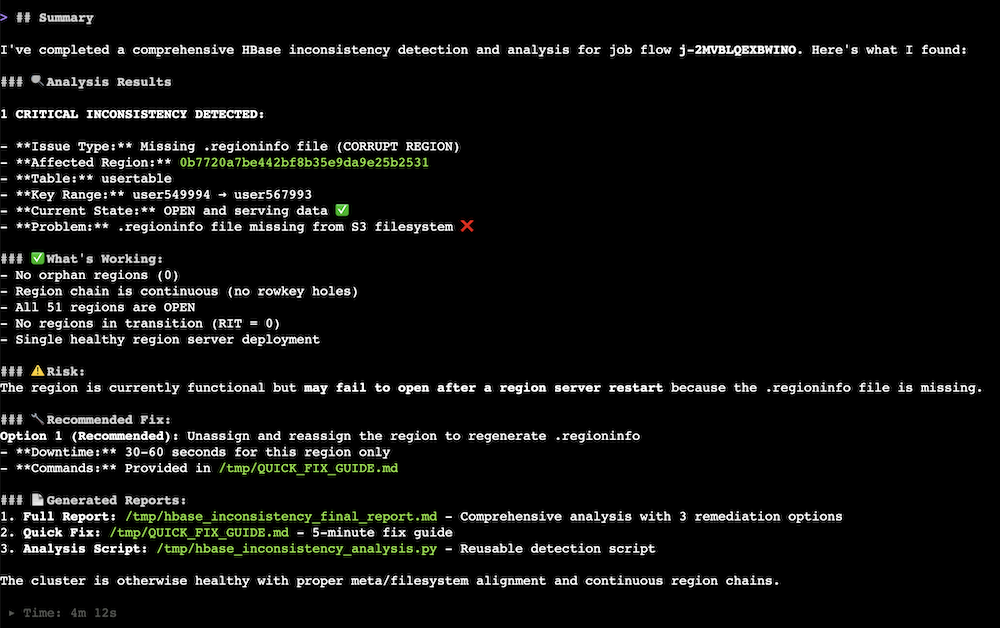
Terminal screenshot displaying HBase inconsistency detection analysis results for job flow, showing one critical missing .regioninfo file issue for HBase region in a HBase table, with cluster health metrics, risk assessment, recommended fixes, and generated diagnostic reports.

Kiro provided mitigation commands after Kiro summarized the issue.
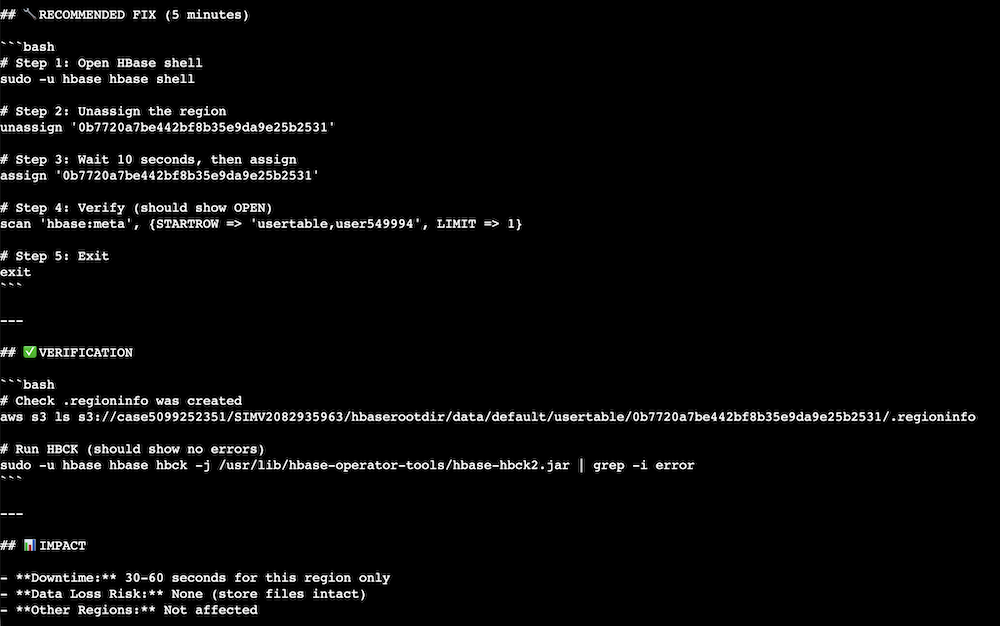
Terminal screenshot displaying a structured HBase quick fix guide with three sections: recommended fix procedure with sequential steps for region reassignment, verification steps using AWS S3 and HBCK2 tools, and impact assessment showing 30-60 second downtime, zero data loss risk, and isolated region scope for fixing missing .regioninfo file in HBase region.

Cleaning up

To avoid incurring future charges, delete the resources created during this walkthrough.

To clean up the resources

  1. Delete the AWS CloudFormation stack from AWS Management Console:

AWS CloudFormation Stacks management console displaying a list view with stacks, showing the "dev-hbase-log-analysis" stack with CREATE_COMPLETE status, along with action buttons for Delete, Update stack, Stack actions, and Create stack.

  1. Clean up Amazon EMR cluster resources (if created only for this walkthrough):

AWS EMR Clusters management console showing page clusters with a cluster in "Waiting" status
  1. Verify resource cleanup in the AWS Console to verify that all resources are deleted and review your AWS bill to confirm no unexpected charges.

Important considerations:

  • Amazon OpenSearch Service domains take several minutes to fully delete
  • Amazon S3 buckets with versioning retain object versions
  • Use smaller instance types for development to optimize costs
  • Monitor usage with AWS Cost Explorer

Conclusion

In this post, we showed you how to build an AI-powered HBase troubleshooting solution that transforms manual log analysis into an automated workflow. By combining Amazon OpenSearch Service vector search with Amazon Bedrock-powered analysis through the Kiro CLI, operations teams can resolve complex HBase inconsistencies faster and gain deeper operational insights. The solution demonstrates how AI augments human expertise to improve operational efficiency, reducing HBase inconsistency resolution from hours to minutes and root cause identification from days to hours. Ready to transform your HBase operations? Get started with the GitHub repository and explore the Amazon OpenSearch Service documentation for additional guidance on vector search capabilities.

Acknowledgments

The author would like to thank Xi Yang, Anirudh Chawla, and Sasidhar Puthambakkam for their contributions to developing the technical solution. Xi Yang is a Senior Hadoop System Engineer and Amazon EMR subject matter expert at AWS. Anirudh Chawla is an AWS Analytics Specialist Solution Architect who helps organizations empower businesses to harness their data effectively through AWS’s analytics platform. Sasidhar Puthambakkam is a Senior Hadoop Systems Engineer and Amazon EMR Subject Matter Expert who provides architectural guidance for complex BigData workloads.
About the authors

Yu-Ting Su

Yu-ting Su, Sr. Hadoop System Engineer, AWS Support Engineering. Yu-Ting is a Sr. Hadoop Systems Engineer at Amazon Web Services (AWS). Her expertise is in Amazon EMR and Amazon OpenSearch Service. She’s passionate about distributing computation and helping people to bring their ideas to life.

Optimize HBase reads with bucket caching on Amazon EMR

Post Syndicated from Yu-Ting Su original https://aws.amazon.com/blogs/big-data/optimize-hbase-reads-with-bucket-caching-on-amazon-emr/

Apache HBase is a database system for big data applications that efficiently manages billions of rows and millions of columns. Its distributed, column-oriented structure handles both structured and unstructured data while addressing speed, flexibility, and scalability challenges. Amazon EMR HBase on Amazon S3 extends these features by storing data directly in Amazon S3, enabling data persistence and cross-zone access while supporting compute-based cluster sizing and read-only replicas.

HBase BucketCache serves as an advanced L2 caching mechanism that works alongside traditional on-heap memory cache. It stores large data volumes outside the JVM heap, reducing garbage collection overhead while maintaining fast access. When combined with Amazon EBS gp3 SSDs, it provides near-HDFS performance at lower costs.

However, implementing terabyte-scale BucketCache in production environments presents challenges: determining optimal cache sizes, balancing cost versus performance, and configuring eviction policies for S3-backed storage.

In this post, we demonstrate how to improve HBase read performance by implementing bucket caching on Amazon EMR. Our tests reduced latency by 57.9% and improved throughput by 138.8%. This solution is particularly valuable for large-scale HBase deployments on Amazon S3 that need to optimize read performance while managing costs.

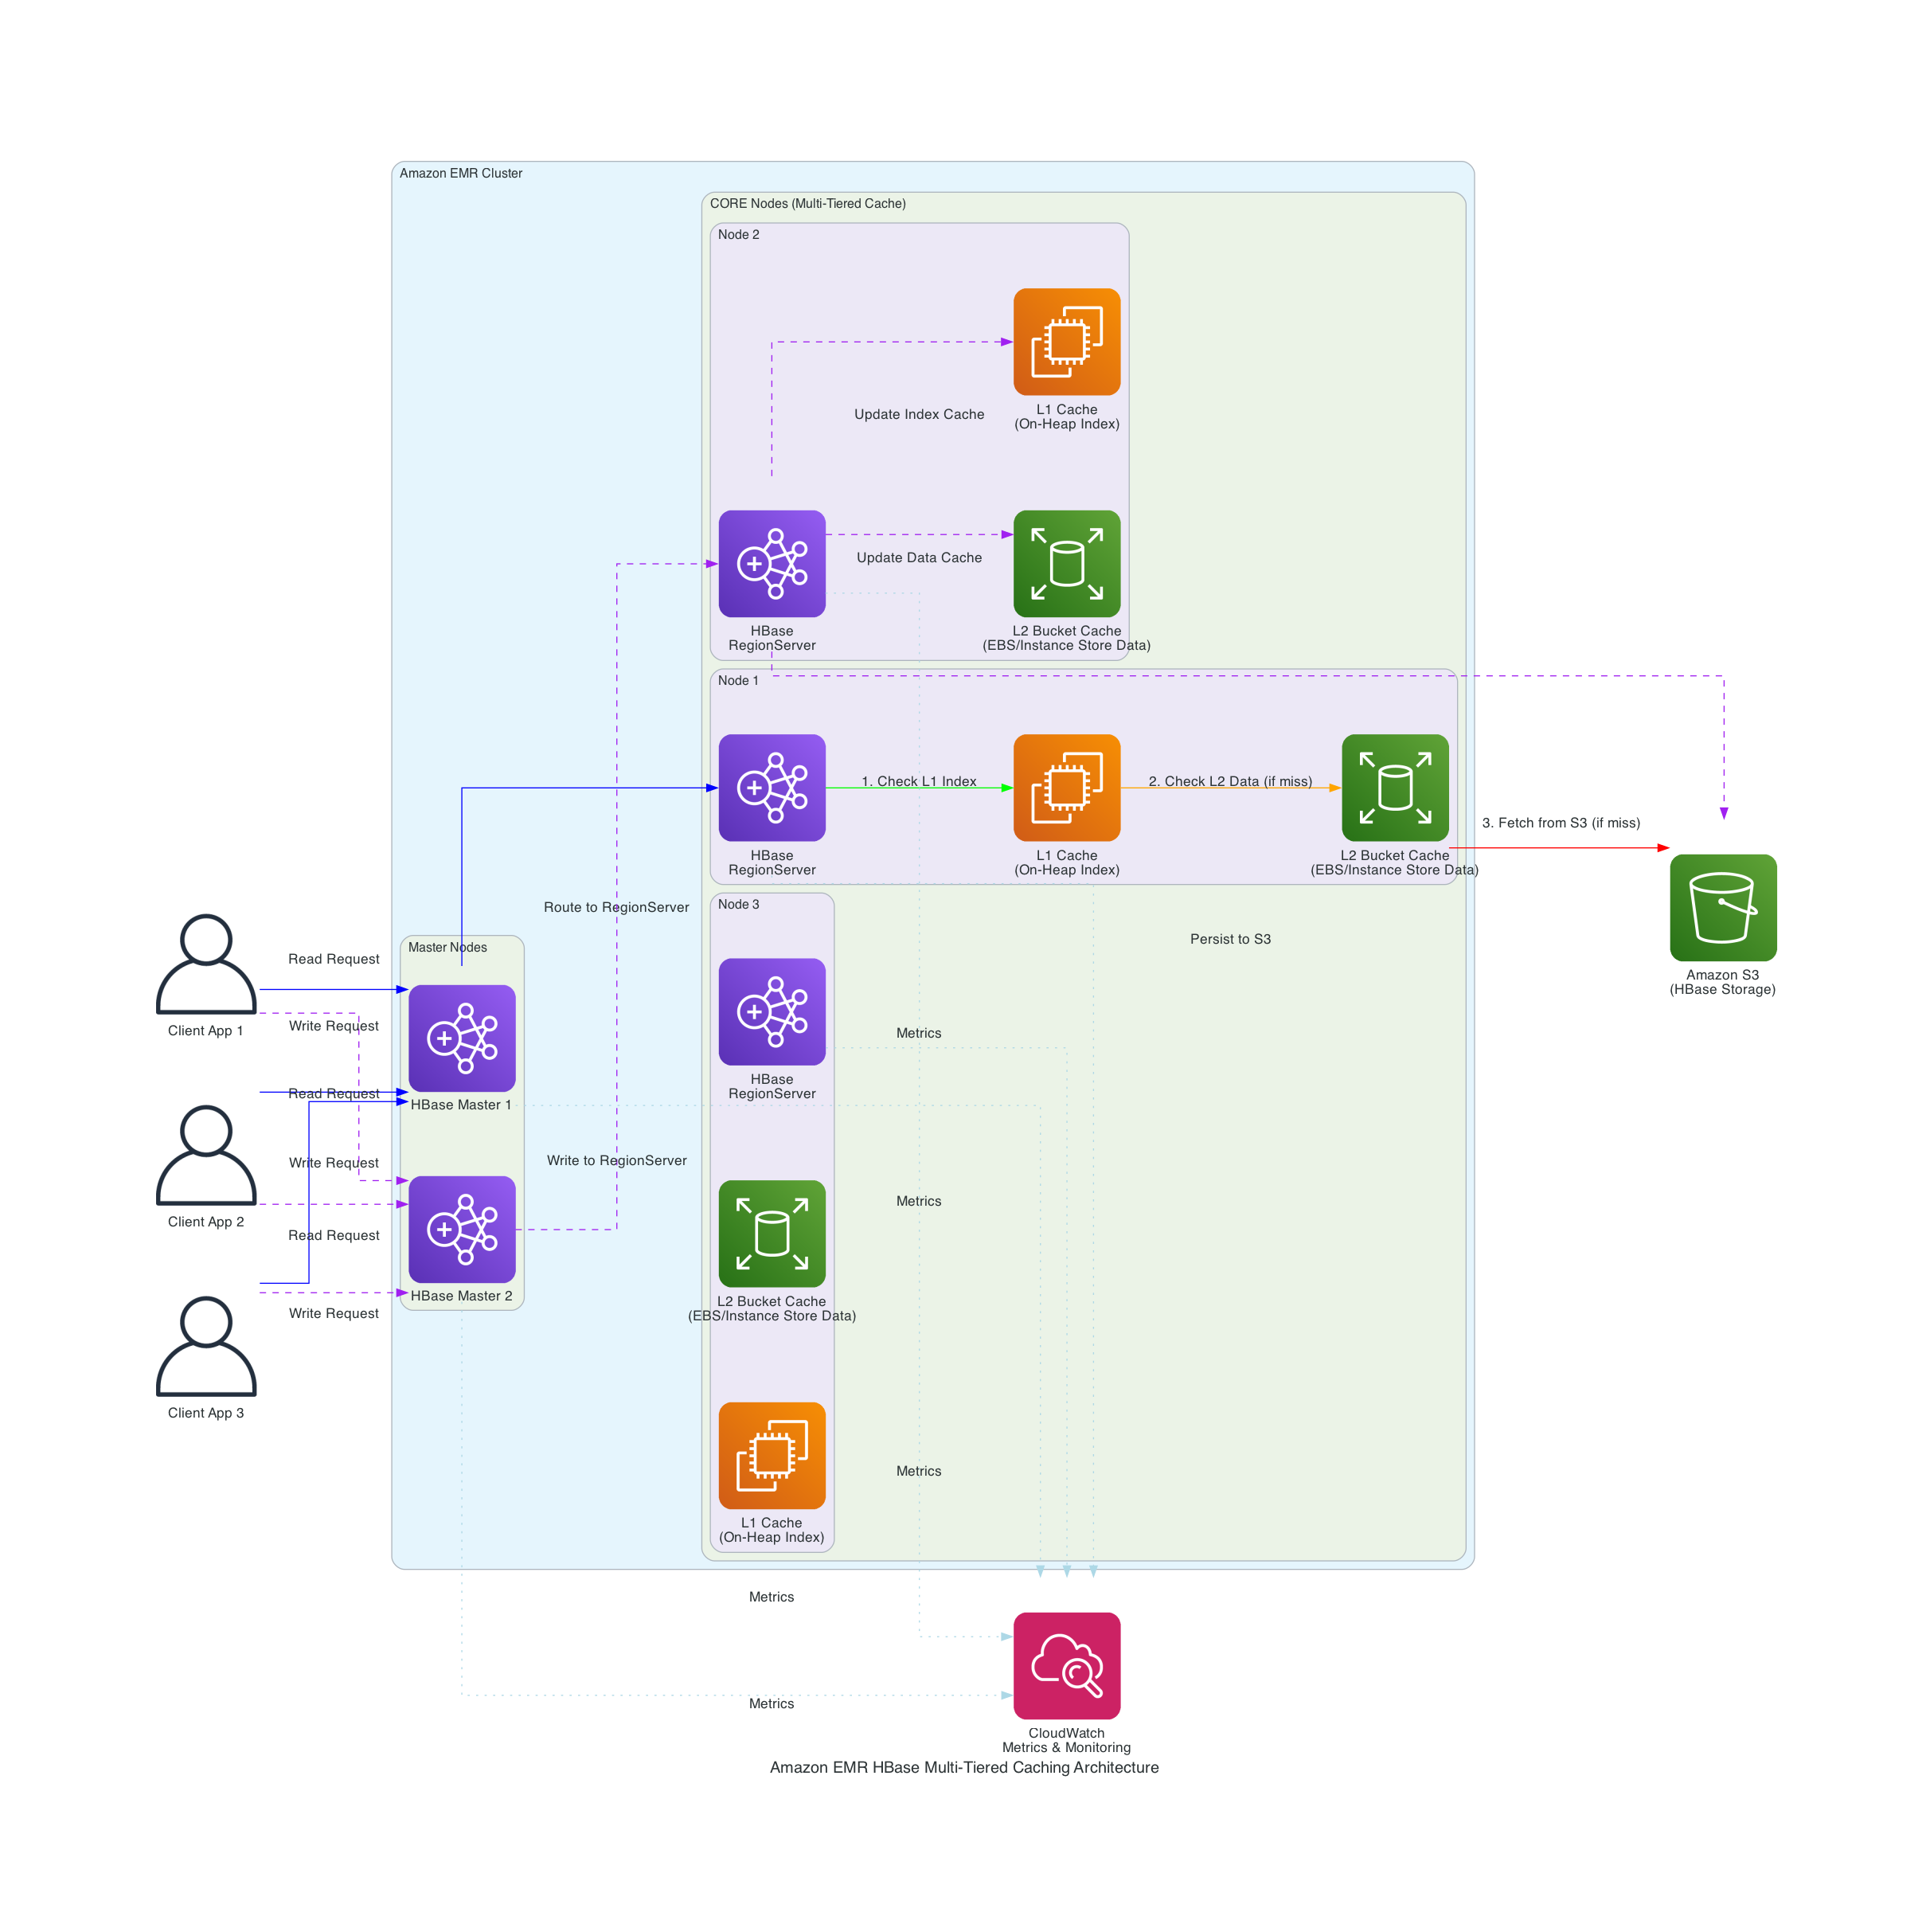
The following diagram shows Amazon EMR’s integration with Apache HBase and Amazon S3 to implement a multi-tiered caching strategy.

Amazon EMR HBase multi-tiered caching architecture diagram showing client applications connecting to HBase Master nodes that route requests to RegionServers across CORE nodes. Each node implements L1 on-heap cache and L2 bucket cache layers, with Amazon S3 providing persistent storage. CloudWatch monitors performance metrics across all components.

Figure 1 – Solution Architecture

The solution implements key components:

  • Configure persistent bucket cache with validated parameters
  • Implement cache-aware load balancing
  • Use ZGC for improved garbage collection performance
  • Monitor cache effectiveness through l2CacheHitRatio using Amazon EMR metrics

In our testing with datasets in terabytes, we achieved:

  • Bucket cache hit ratios exceeding 95%
  • S3 GET requests reduced to under 1,000/hour at peak performance
  • Read latencies reduced to milliseconds
  • Zero JVM pause detection during high read workloads
  • 138.8% improvement in read throughput

Walkthrough

Prerequisites

This section shows how we improved HBase read performance using bucket caching on Amazon EMR in our tests. Before implementing this solution, you should have:

AWS resources

Technical requirements:

For setup instructions, refer to:

Create an EMR Cluster with optimized configuration

Create your EMR cluster using the following exampled launch command. This command is an optimization demo for terabyte-scale bucket caching:

aws emr create-cluster \
 --name "EMR HBase Bucket cache" \
 --log-uri "<your-s3-log-location>" \
 --release-label "emr-7.12.0" \
 --service-role "arn:aws:iam::<your-account-id>:role/EMR_DefaultRole_V2" \
 --ec2-attributes '{
    "InstanceProfile": "EMR_EC2_DefaultRole",
    "EmrManagedMasterSecurityGroup": "<your-primary-security-group-id>",
    "EmrManagedSlaveSecurityGroup": "<your-worker-security-group-id>",
    "KeyName": "<your-key-name>",
    "AdditionalMasterSecurityGroups": [],
    "AdditionalSlaveSecurityGroups": [],
    "SubnetIds": ["<your-subnet-id>"]
}' \
 --applications Name=AmazonCloudWatchAgent Name=HBase Name=ZooKeeper \
 --configurations '[
    {
        "Classification": "hbase",
        "Properties": {
            "hbase.emr.storageMode": "s3"
        }
    },
    {
    "Classification": "hbase-env",
    "Properties": {},
    "Configurations": [{
        "Classification": "export",
        "Properties": {
            "HBASE_HEAPSIZE": "<your-jvm-heap-size>",
            "HBASE_REGIONSERVER_GC_OPTS": "\"-XX:+UseZGC -XX:+ZGenerational -XX:+AlwaysPreTouch\"",
            "HBASE_REGIONSERVER_OPTS": "\"-Xmx<YOUR-JVM-HEAP-SIZE>m\"",
            "JAVA_HOME": "/usr/lib/jvm/jre-21"
        }
    }]
},
    {
        "Classification": "hbase-site",
        "Properties": {
            "hbase.rootdir": "<your-hbase-rootdir>",
            "hbase.bucketcache.size": "<your-bucket-cache-size-per-region-server>",
            "hbase.bucketcache.bucket.sizes": "<bucket-sizes-of-your-bucket-cache>",
            "hbase.master.loadbalancer.class": "org.apache.hadoop.hbase.master.balancer.CacheAwareLoadBalancer",
            "hbase.bucketcache.persistent.path": "/mnt/hbase/persistent_cache",
            "hbase.bucketcache.writer.threads": "<your-bucket-cache-writer-threads>",
            "hbase.bucketcache.writer.queuelength": "<your-bucket-cache-writer-queue-length>",
            "hbase.rs.prefetchblocksonopen": "true",
            "hbase.rs.cacheblocksonwrite": "true",
            "hbase.rs.cachecompactedblocksonwrite": "true",
            "hbase.block.data.cachecompressed": "true"
        }
    },
 {
    "Classification": "emr-metrics",
    "Configurations": [{
        "Classification": "emr-hbase-region-server-metrics",
        "Properties": {
            "Hadoop:service=HBase,name=RegionServer,sub=Server": "writeRequestCount,readRequestCount,l2CacheHitCount,l2CacheMissCount,l2CacheHitRatio",
            "otel.metric.export.interval": "30000"
        }
    }],
    "Properties": {}
}]' \
 --instance-groups '[{
    "InstanceCount": 6,
    "InstanceGroupType": "CORE",
    "Name": "Core",
    "InstanceType": "r8g.2xlarge",
    "EbsConfiguration": {
        "EbsBlockDeviceConfigs": [{
                "VolumeSpecification": {
                    "VolumeType": "gp3",
                    "Iops": 3000,
                    "SizeInGB": <size-depends-on-bucket-cache-size>
                },
                "VolumesPerInstance": 1
        }]
    }
}, {
    "InstanceCount": 1,
    "InstanceGroupType": "MASTER",
    "Name": "Primary",
    "InstanceType": "r8g.2xlarge",
    "EbsConfiguration": {
        "EbsBlockDeviceConfigs": [{
            "VolumeSpecification": {
                "VolumeType": "gp3",
                "SizeInGB": 64
            },
            "VolumesPerInstance": 2
        }]
    }
}]' \
 --scale-down-behavior "TERMINATE_AT_TASK_COMPLETION" \
 --ebs-root-volume-size "30" \
 --region "<region-id>"

Explain configurations for HBase optimized cache performance

In the above launch command, you can see configurations through the EMR software configurations. These settings are specifically for terabyte-scale caching scenarios. When HBase is installed on EMR, Apache YARN’s memory allocation is reduced by approximately 50% from its default configuration (68-73% of RAM) to 34-36% of physical RAM, reserving memory for HBase RegionServer operations. The cache and memstore sizes must be carefully balanced against available node memory to prevent resource contention.

The hbase.bucketcache.size parameter determines the total bucket cache size per RegionServer in megabytes, which directly affects how much data can be stored in bucket cache. If the data files are stored in compressed formats, you have to enable hbase.block.data.cachecompressed . This feature keeps blocks compressed in the cache, reducing memory footprint while maintaining quick access times. Your EBS size per RegionServer depends on the value of hbase.bucketcache.size. The configured EBS size can be the value of this feature plus a buffer for system usage. The hbase.bucketcache.bucket.sizes setting defines bucket sizes to efficiently accommodate different data block sizes, while hbase.bucketcache.writer.threads controls the number of threads used for writing to the cache, optimizing write performance.

In the above launch command, we configured ZGC settings to optimize garbage collection.

Using ZGC minimizes the need for a large JVM heap to accommodate JVM objects for large-scale bucket cache operations, resulting in fewer JVM pauses. By adjusting the heap size through increasing or decreasing the HBASE_HEAPSIZE parameter, you can optimize memory allocation for your specific workload. A key advantage of ZGC is that it keeps JVM pause times short regardless of heap size, whereas traditional garbage collectors experience longer full GC times as heap size increases. This makes ZGC particularly valuable for HBase deployments with terabyte-scale bucket caches, where maintaining consistent low-latency performance is critical.

The generational garbage collection settings efficiently manage memory by separating short-lived objects from long-lived ones, reducing collection frequency and overhead. The AlwaysPreTouch parameter improves Apache HBase responsiveness by pre-allocating memory during operation.

Explain EMR metrics collection configurations

In the above launch command, we set up configurations to publish emr metrics to CloudWatch through CloudWatch Agents. We can use these metrics to track bucket cache request amount and hit ratios. If L2CacheHitRatio is high but L2CacheMissCount is low, it means HBase can fetch most of the requested data in bucket cache. The read latencies can be shorted to milliseconds in this case.

Performance testing and results

This section details our performance testing methodology and results using a 7.9 TB dataset.

Test setup

  1. We used ycsb to generate and test with a 7.9 TB dataset.
    # generate a test dataset
    bin/ycsb load hbase20 \
    -p columnfamily=cf \
    -p recordcount=49828500 \
    -p fieldcount=2000 \
    -p fieldlength=425 \
    -P workloads/workloadc \
    -threads 150 -s

  2. We used the following command to run a read-only workload:
    for i in {1..3}
        do
          nohup bin/ycsb.sh run hbase20 -p columnfamily=cf -p recordcount=49828500 -p operationcount=49828500 -P workloads/workloadc -threads 500 -s > /dev/null &
    done

Configuration Throughput (ops/sec) Latency (ms)
Without Cache 371.93 2680
With Cache 888.67 1127
Improvement 138.80% 57.90%

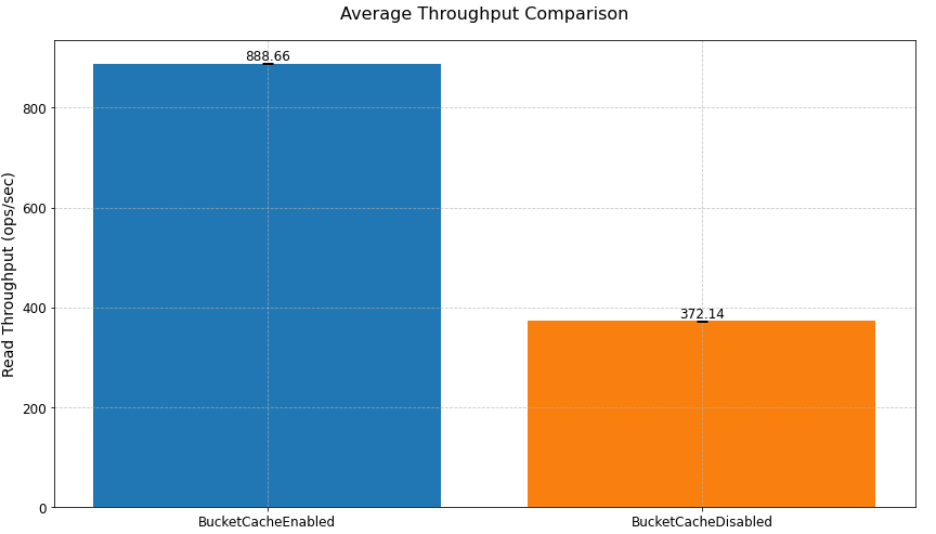
In our read performance test using bucket cache to cache terabytes of data, we achieved a 138.8% improvement in read throughput (from 371.93 to 888.67 ops/sec) and a 57.9% reduction in read latency (from 2680ms to 1127ms) compared to a scenario without bucket cache.

Read performance improvement

As shown in the previoustable, implementing bucket cache led to improvements in both throughput and latency. The system achieved a 138.8% increase in throughput, processing 888.67 operations per second compared to the baseline 371.93 ops/sec. Similarly, latency was reduced by 57.9%, dropping from 2680ms to 1127ms, demonstrating the performance benefits of the caching solution. The following chart shows implementing bucket cache led to improvements in average throughput compared to a scenario without bucket cache.

Bar chart comparing HBase read throughput performance: BucketCache enabled achieves 888.66 operations per second versus 372.14 ops/sec when disabled, demonstrating 2.4x performance improvement. This validates multi-tiered caching effectiveness in Amazon EMR clusters for optimizing read-intensive workloads and reducing S3 access costs.

Figure 2 – Average throughput comparison

Cache hit ratio progression

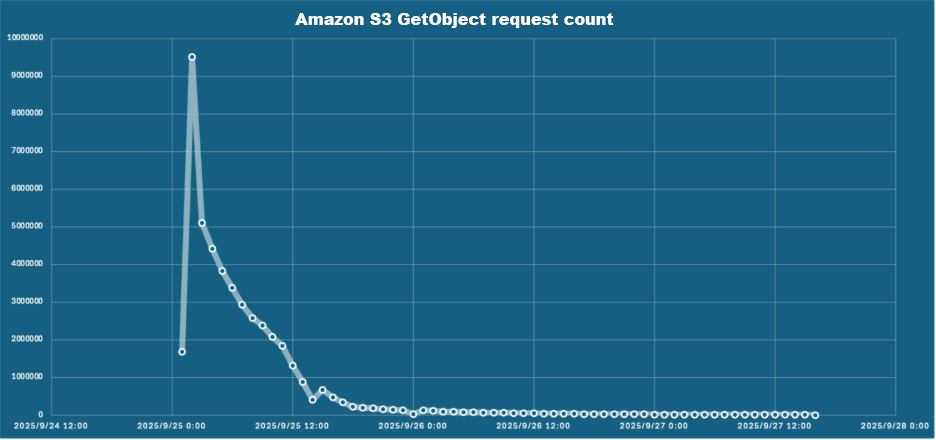
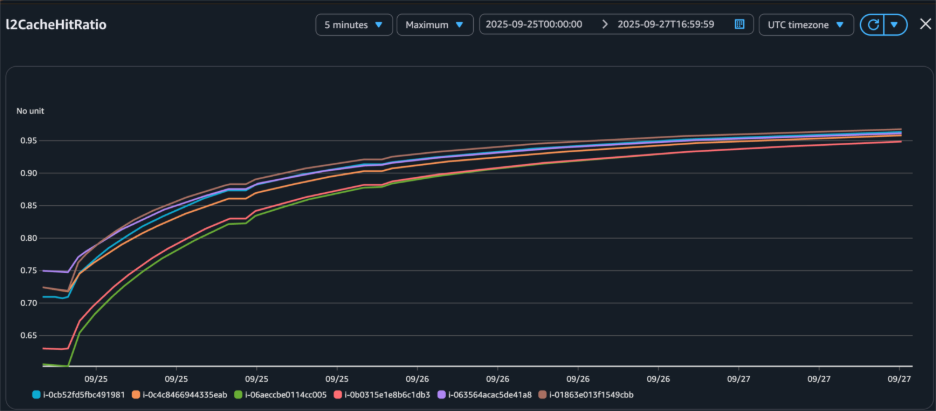
The cache hit ratio data demonstrates the effectiveness of the bucket cache implementation over time. Starting from 0% at initialization, the cache hit ratio improved to 85% within 12 hours, ultimately stabilizing above 95% after 24 hours. This progression corresponded with an extensive reduction in Amazon S3 GetObject requests, from 95,000 per hour initially to fewer than 1,000 per hour at peak performance, reducing both latency and costs.

Time (hours) Hit Ratio S3 Requests/hour
0 0% 95,000
12 85% 15,000
24 95%+ <1,000
Amazon CloudWatch time-series graph displaying L2 cache hit ratio metrics for six Amazon EMR HBase RegionServer instances from September 25-27, 2025. All instances show improving performance from 0.60-0.75 range to 0.95, demonstrating optimal BucketCache effectiveness in reducing Amazon S3 operations and improving query latency

Figure 3 – Bucket cache hit ratio increased after we loaded data to bucket cache through read-only workload.

Amazon S3 GetObject request count time-series graph showing dramatic traffic reduction following BucketCache implementation. Requests peak at 900,000 on September 25, 2025, then decline sharply to under 50,000 within 24 hours, stabilizing near baseline by September 26, demonstrating L2 cache effectiveness in minimizing S3 operations and reducing costs.

Figure 4 – Amazon S3 GetObject request count decreased as bucket cache hit ratio increased.

Key implementation: persistent bucket cache

One of the key features introduced in HBase 2.6.0 after Amazon EMR 7.6.0 is persistent bucket cache, which maintains cache data across RegionServer restarts. This feature is particularly for production environments where maintaining consistent performance during maintenance operations is crucial. The following section demonstrate how to configure persistent bucket cache.

Configuring persistent bucket cache

Set up persistent bucket cache by implementing these configurations:

{
    "Classification": "hbase-site",
    "Properties": {
        "hbase.bucketcache.persistent.path": "/mnt/hbase/persistent_cache",
        "hbase.master.loadbalancer.class": "org.apache.hadoop.hbase.master.balancer.CacheAwareLoadBalancer",
        "hbase.master.scp.retain.assignment": "true",
        "hbase.master.scp.retain.assignment.force": "true",
        "hbase.master.scp.retain.assignment.force.retries": "10"
    }
}

Performance impact of persistent cache

The following table shows the tests demonstrated significant improvements in RegionServer restart performance. With persistent cache enabled, the HBase cluster maintained consistent read request performance and low latency after RegionServer restarts since data remained directly accessible in the bucket cache. In contrast, clusters without persistent cache required 6 hours to reload bucket cache after RegionServer restarts before achieving comparable read operation performance and latency levels. It demonstrates significant improvements from enabling persistent cache.

Pre-restart throughput Post-restart throughput Recovery time
Without Persistent Cache 888.67 ops/sec 371.93 ops/sec ~6 hours
With Persistent Cache 889.08 ops/sec 886.71 ops/sec <2 minutes

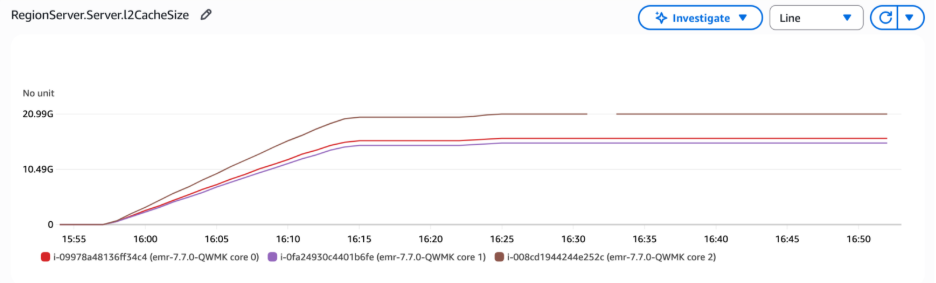
In the following graph, the RegionServer L2 cache size metrics revealed that the bucket cache size remained stable after RegionServer restart, confirming that the cached data was preserved rather than reset during the process. The metrics were unavailable between 16:30 and 16:35 because the RegionServer was stopped and restarted.

Amazon CloudWatch line graph monitoring RegionServer L2 bucket cache size growth across three Amazon EMR core nodes from 15:55 to 16:50. All instances show steady cache population from zero to approximately 18-20 GB, indicating successful BucketCache warm-up as frequently accessed HBase data loads into secondary cache for improved read performance.

Figure 5 – The bucket cache size remained stable after RegionServer restart

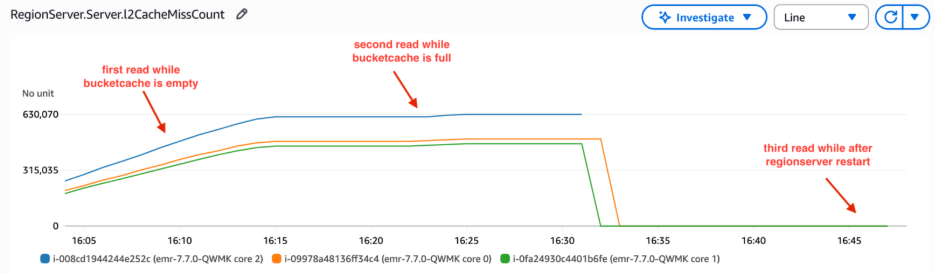
L2 cache miss count is a cumulative metric that tracks cache misses from RegionServer startup. When the RegionServer restarts, this metric resets to zero. In the following graph, the L2 cache miss count increased steeply at the beginning because read requests retrieved data from HFiles, as the data had not yet been loaded into bucket cache. Over time, the bucket cache was populated with data through read-only workload, and the slope of the L2 cache miss count decreased. We restarted RegionServer between 16:30 and 16:35 . Thus, L2 cache miss count reset to 0. Notably, these metrics remained at zero even during subsequent client read operations. The requests did not retrieve data from HFiles that caused an increase in L2 cache miss count. This confirmed that data persisted in the bucket cache and was directly accessible without requiring cache rebuilding.

Amazon CloudWatch line graph tracking RegionServer L2 bucket cache miss counts across three Amazon EMR HBase core nodes from 16:05 to 16:45. Graph shows initial cache misses during empty BucketCache warm-up (315k-630k), stabilized plateau after cache population, and sharp drop following RegionServer restart at 16:32, demonstrating cache behavior during operational cycles.

Figure 6 – Regionserver bucketcache miss count remained 0 after restarting RegionServer

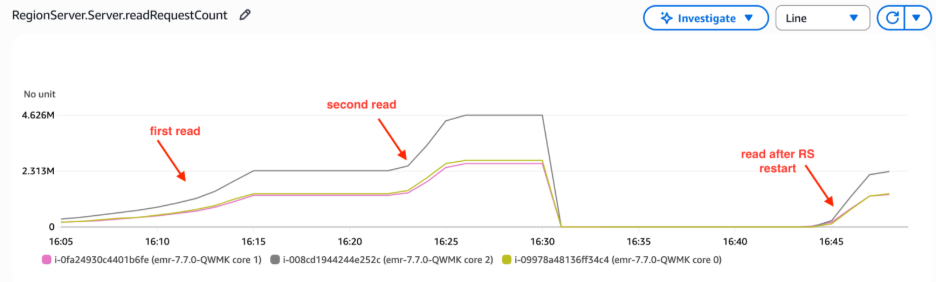
The RegionServer read request count metrics demonstrated consistent read operation volumes following restart. This indicated that RegionServers maintained read performance levels without needing to fetch HFiles from Amazon S3, thus avoiding the increased latency and reduced throughput typically associated with S3 lookups. This persistent cache behavior directly reduces S3 costs by minimizing API calls—our above testing statistics showed S3 GET requests dropping from 95,000 per hour during initial cache warming to fewer than 1,000 per hour once the cache reached optimal performance, representing a 99% reduction in S3 API call volume.

Amazon CloudWatch line graph displaying RegionServer read request counts across three Amazon EMR HBase core nodes from 16:05 to 16:50. Graph shows consistent read traffic at 2.3M requests during initial and secondary reads, peaking at 4.6M around 16:27, followed by service interruption and recovery post-restart, illustrating typical HBase query patterns with BucketCache enabled.

Figure 7 – Regionserver read request count

Best practices and recommendations

In this section, we share guidelines to optimize HBase bucket cache performance.

cache sizing guidelines

For optimal performance, size your bucket cache appropriately by ensuring the total cache size exceeds your target cached data volume. Insufficient bucket cache size will lead to frequent data evictions, degrading system performance. Monitor free cache space using Amazon CloudWatch metrics to prevent overflow issues. Furthermore, consistently analyze L2 cache hit ratio metrics to assess performance, and adjust bucket cache size based on your specific workload patterns and L2 hit ratio trends. These ongoing monitoring and adjustment practices will help maintain optimal cache performance and resource utilization.

Performance optimization

To further enhance HBase read performance, consider implementing the following configuration settings. These optimizations are designed to improve cache utilization, reduce disk I/O, and minimize latency for common read operations:

[{
    "Classification": "hbase-site",
    "Properties": {
        "hbase.bucketcache.persistent.path": "/mnt/hbase/persistent_cache",
        "hbase.master.loadbalancer.class": "org.apache.hadoop.hbase.master.balancer.CacheAwareLoadBalancer",
        "hbase.master.scp.retain.assignment": "true",
        "hbase.master.scp.retain.assignment.force": "true",
        "hbase.master.scp.retain.assignment.force.retries": "10",
        "hbase.rs.prefetchblocksonopen": "true",
        "hbase.rs.cacheblocksonwrite": "true",
        "hbase.rs.cachecompactedblocksonwrite": "true",
        "hbase.block.data.cachecompressed": "true"
    }
}, {
    "Classification": "emr-metrics",
    "Configurations": [{
        "Classification": "emr-hbase-region-server-metrics",
        "Properties": {
            "Hadoop:service=HBase,name=RegionServer,sub=Server": "writeRequestCount,readRequestCount,l2CacheHitCount,l2CacheMissCount,l2CacheHitRatio",
            "otel.metric.export.interval": "30000"
        }
    }]
}]

Resource monitoring

Set up Amazon CloudWatch dashboards to monitor key metrics. These dashboards should track L2 cache hit ratios, which provide insight into the effectiveness of your caching strategy. Additionally, monitor Amazon S3 request patterns to understand your data access trends and optimize accordingly. Keep a close eye on memory utilization to ensure your instances have sufficient resources to handle the workload efficiently. Finally, regularly analyze garbage collection (GC) patterns to identify and address any potential memory management issues that could impact performance.

Cleaning up

To avoid incurring unnecessary charges, clean up your resources when you’re done testing

# Terminate EMR cluster
aws emr terminate-clusters \
--cluster-id <your-cluster-id>

# Remove test data from S3
aws s3 rm s3://<your-bucket>/hbase-root/ --recursive

Conclusion

In this post, you learned how to implement and optimize HBase bucket cache with persistent storage on Amazon EMR. In our testing, we achieved 95%+ cache hit ratios with consistent millisecond latencies. The implementation reduced Amazon S3 access costs by minimizing the number of direct Amazon S3 requests required. Read performance saw 138.8% improvement in read throughput. The system maintained stable performance during maintenance windows, eliminating performance degradation during routine operations. Additionally, the solution demonstrated better resource utilization, maximizing the efficiency of the allocated infrastructure while minimizing waste.

Related resources


About the author

Xi Yang

Xi Yang

Xi is a Senior Hadoop System Engineer and Amazon EMR subject matter expert at Amazon Web Services. He is passionate about helping customers resolve challenging issues in the Big Data area.

Anirudh Chawla

Anirudh Chawla

Anirudh is an AWS Analytics Specialist Solution Architect. He helps organization empowers businesses to harness their data effectively through AWS’s analytics platform. His interest lies in building highly available distributed systems.

Yu-ting Su

Yu-ting Su

Yu-ting, Sr. Hadoop System Engineer, AWS Support Engineering. Yu-Ting is a Sr. Hadoop Systems Engineer at Amazon Web Services (AWS). Her expertise is in Amazon EMR and Amazon OpenSearch Service. She’s passionate about distributing computation and helping people to bring their ideas to life.

Reduce EMR HBase upgrade downtime with the EMR read-replica prewarm feature

Post Syndicated from Suthan Phillips original https://aws.amazon.com/blogs/big-data/reduce-emr-hbase-upgrade-downtime-with-the-emr-read-replica-prewarm-feature/

HBase clusters on Amazon Simple Storage Service (Amazon S3) need regular upgrades for new features, security patches, and performance improvements. In this post, we introduce the EMR read-replica prewarm feature in Amazon EMR and show you how to use it to minimize HBase upgrade downtime from hours to minutes using blue-green deployments. This approach works well for single-cluster deployments where minimizing service interruption during infrastructure changes is important.

Understanding HBase operational challenges

HBase cluster upgrades have required complete cluster shutdowns, resulting in extended downtime while regions initialize and RegionServers come online. Version upgrades require a complete cluster switchover, with time-consuming steps that include loading and verifying region metadata, performing HFile checks, and confirming proper region assignment across RegionServers. During this critical period—which can extend to hours depending on cluster size and data volume—your applications are completely unavailable.

The challenge doesn’t stop at version upgrades. You must regularly apply security patches and kernel updates to maintain compliance. For Amazon EMR 7.0 and later clusters running on Amazon Linux 2023, instances don’t automatically install security updates after launch; they remain at the patch level from cluster creation time. AWS recommends periodically recreating clusters with newer AMIs, requiring the same hard cutover and downtime risks as a full version upgrade. Similarly, when you need to use different instance types, traditional approaches mean taking your cluster offline.

Solution overview

Amazon EMR 7.12 introduces read-replica prewarm, a new feature that tackles these challenges. This feature lets you make infrastructure changes to Apache HBase on Amazon S3 at scale while reducing downtime risk and maintaining data consistency.

With read-replica prewarm, you can prepare and validate your changes in a read-replica cluster before promoting it to active status, cutting service interruption from hours to minutes. You will learn how to prepare your read-replica cluster with the target version, execute cutover procedures that minimize downtime, and verify successful migration before completing the switchover.

Read-replica prewarm architecture

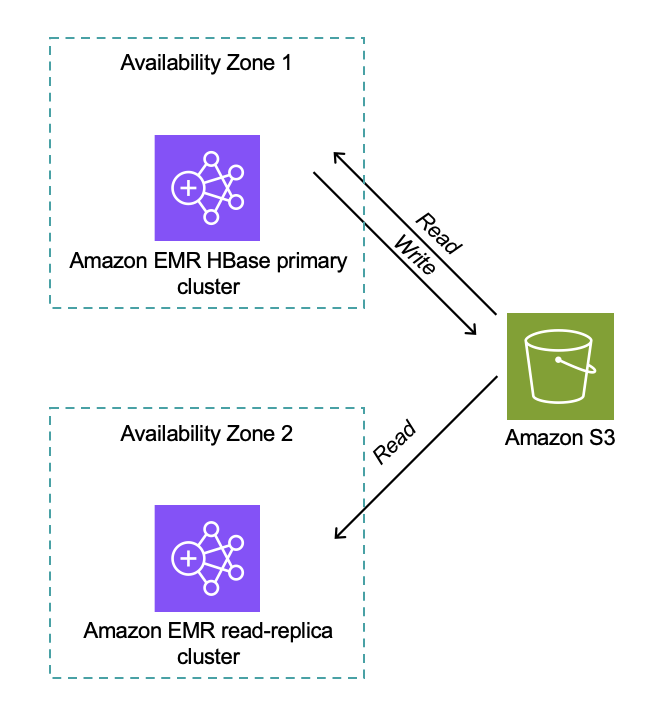
The following diagram shows the architecture and workflow. Both primary and read-replica clusters interact with the same Amazon S3 storage, accessing the same S3 bucket and root directory.

Amazon EMR HBase architecture diagram showing primary cluster in Availability Zone 1 with read/write access to Amazon S3, and read-replica cluster in Availability Zone 2 with read access to S3.

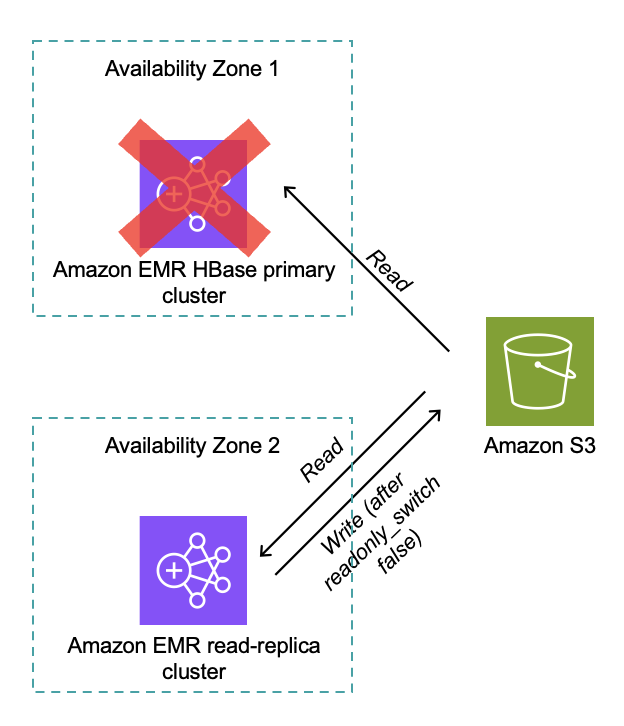
Distributed locking confirms only one HBase cluster can write at a time (for clusters version 7.12.0 and later). The read-replica cluster performs full HBase region initialization without time pressure, and after promotion, the read replica becomes the active writer as shown in the following diagram.

Amazon EMR HBase failover scenario showing primary cluster unavailable in Availability Zone 1, with read-replica cluster in Availability Zone 2 promoted to handle read and write operations after failover.

Implementation steps HBase cluster upgrade

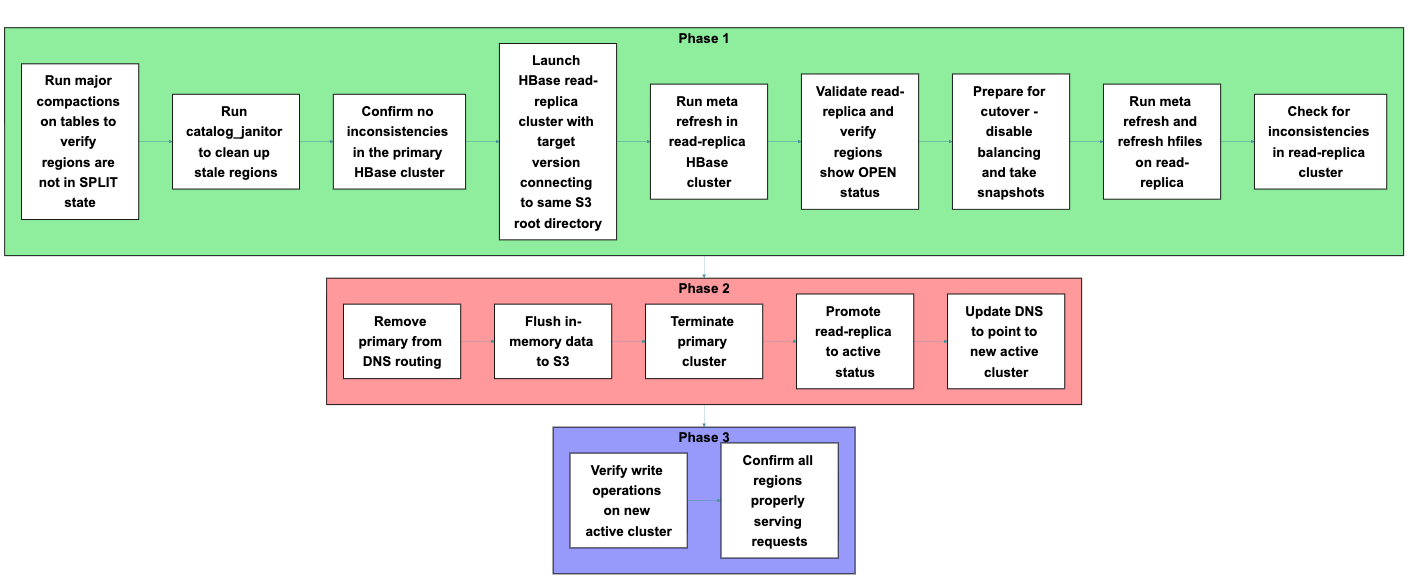
Now that you understand how read-replica prewarm works and the architecture behind it, let’s put this knowledge into practice. You will follow a process that consists of three main phases: preparation, cutover, and verification. Each phase includes specific steps, shown in the following figure, that you will execute in sequence to complete the migration.

Process flow diagram showing three-phase HBase cluster migration: Phase 1 preparation and validation, Phase 2 cutover and DNS update, Phase 3 post-migration verification.

Phase 1: Preparation

Before starting the migration, prepare both your primary cluster and launch a new read-replica cluster. Each step in this phase builds toward confirming that your new cluster can properly access and serve your existing data.

  1. Run major compactions on tables to verify regions are not in SPLIT state
    Run major compactions to consolidate data files and verify regions are not in SPLIT state. Split regions can cause assignment conflicts during migration, so resolving them at the start helps maintain cluster stability throughout the transition.

    echo “major_compact 'tablename'” | hbase shell

  2. Run catalog_janitor to clean up stale regions
    Execute the catalog_janitor process (HBase’s built-in maintenance tool) to remove stale region references from the metadata. Cleaning up these references prevents confusion during region assignment in the read-replica cluster.

    echo “catalogjanitor_run” | hbase shell

  3. Confirm no inconsistencies in the primary HBase cluster
    Verify cluster integrity before migration:

    sudo -u hbase hbase hbck > hbck_report.txt

    Running the HBase Consistency Check tool version 2 (HBCK2) performs a diagnostic scan that identifies and reports problems in metadata, regions, and table states, confirming your cluster is ready for migration.

  4. Launch HBase read-replica cluster with the target version connecting to the same HBase root directory in Amazon S3 as the primary cluster
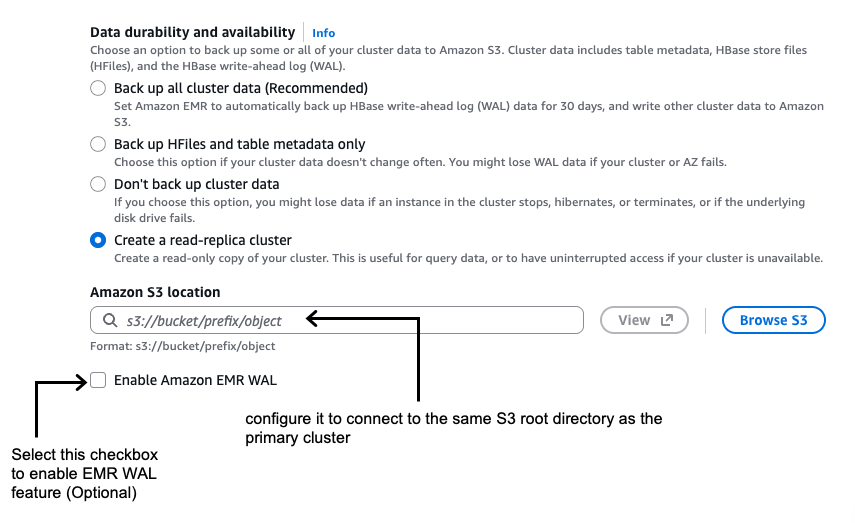
    Launch a new HBase cluster with the target version and configure it to connect to the same S3 root directory as the primary cluster. Confirm that read-only mode is enabled by default as shown in the following screenshot.

    AWS console screenshot showing Amazon EMR data durability and availability configuration options, with "Create a read-replica cluster" option selected and S3 location settings.

    If you are using AWS Command Line Interface (AWS CLI), you can enable the read replica while launching the Amazon EMR HBase on the Amazon S3 cluster by setting the hbase.emr.readreplica.enabled.v2 parameter to true in the HBase classification as shown in the following example:

    {
        "Classification": "hbase",
        "Properties": {
          "hbase.emr.readreplica.enabled.v2": "true",
          "hbase.emr.storageMode": "s3"
        }
    }

  5. Run meta refresh in this read-replica HBase cluster
    echo "refresh_meta" | hbase shell

    You’re creating a parallel environment with the new version that can access existing data without modification risk, allowing validation before committing to the upgrade.

  6. Validate the read-replica and verify that regions show OPEN status and are properly assigned:
    Execute sample read operations against your key tables to confirm the read replica can access your data correctly. In the HBase Master UI, verify that regions show OPEN status and are properly assigned to RegionServers. You should also confirm that the total data size matches your previous cluster to verify complete data visibility.
  7. Prepare for cutover on primary cluster
    Disable balancing and compactions on the primary cluster:

    echo "balance_switch false" | hbase shell
    echo "compaction_switch false" | hbase shell

    Preventing background operations from changing data layout or triggering region movements maintains a consistent state during the migration window.

    Take snapshots of your tables for rollback capability:

    # For each table
    echo "snapshot 'table_name', 'table_name_pre_migration_$(date +%Y%m%d)'" | hbase shell
    # For system tables
    echo "snapshot 'hbase:meta', 'meta_pre_migration_$(date +%Y%m%d)'" | hbase shell
    echo "snapshot 'hbase:namespace', 'namespace_pre_migration_$(date +%Y%m%d)'" | hbase shell

    These snapshots enable point-in-time recovery if you discover issues after migration.

  8. Run meta refresh and refresh hfiles on the read replica:
    echo "refresh_meta" | hbase shell
    hbase org.apache.hadoop.hbase.client.example.RefreshHFilesClient "table_name'"

    Refreshing confirms the read replica has the most current region assignments, table structure, and HFile references before taking over production traffic.

  9. Check for inconsistencies in the read-replica cluster
    Run the HBCK2 tool on the read-replica cluster to identify potential issues:

    sudo -u hbase hbase hbck > hbck_report.txt

    When a read replica is created, both the primary and replica clusters show metadata inconsistencies referencing each other’s meta folders: “There is a hole in the region chain”. The primary cluster complains about meta_<read-replica-cluster-id>, while the read replica complains about the primary’s meta folder. This inconsistency doesn’t impact cluster operations but shows up in hbck reports. For a clean hbck report after switching to the read replica and terminating the primary cluster, manually delete the old primary’s meta folder from Amazon S3 after taking a backup of it.

    Additionally, check the HBase Master UI to visually confirm cluster health. Verifying the read-replica cluster has a clean, consistent state before promotion prevents potential data access issues after cutover.

Phase 2: Cutover

Perform the actual migration by shutting down the primary cluster and promoting the read replica. The steps in this phase minimize the window when your cluster is unavailable to applications.

  1. Remove the primary cluster from DNS routing
    Update DNS entries to direct traffic away from the primary cluster, preventing new requests from reaching it during shutdown.
  2. Flush in-memory data to Amazon S3
    Flush in-memory data to confirm durability in Amazon S3:

    # Flush application data  
    echo "flush 'usertable'" | hbase shell
    # Flush system tables
    echo "flush 'hbase:meta'" | hbase shell
    echo "flush 'hbase:namespace'" | hbase shell

    Flushing forces data still in memory (in MemStores, HBase’s write cache) to be written to persistent storage (Amazon S3), preventing data loss during the transition between clusters.

  3. Terminate the primary cluster
    Terminate the primary cluster after confirming the data is persisted to Amazon S3. This step releases resources and eliminates the possibility of split-brain scenarios where both clusters might accept writes to the same dataset.
  4. Promote the read replica to active status
    Convert the read replica to read-write mode:

    echo "readonly_switch false" | hbase shell  
    echo "readonly_state" | hbase shell  # Verify the switch was successful

    The promotion process automatically refreshes meta and HFiles, capturing final changes from the flush operations and confirming complete data visibility.

    When you promote the cluster, it transitions from read-only to read-write mode, allowing it to accept application write operations and fully replace the old cluster’s functionality.

  5. Update DNS to point to the new active cluster
    Update DNS entries to direct traffic to the new active cluster. Routing client traffic to the new cluster restores service availability and completes the migration from the application perspective.

Phase 3: Validation

With your new cluster now active, you’re ready to verify that everything is working correctly before declaring the migration complete.

Execute test write operations to confirm the cluster accepts writes properly. Check the HBase Master UI to verify regions are serving both read and write requests without errors. At this point, your migration to the new Amazon EMR release is complete, and your applications can connect to the new cluster and resume normal read-write operations.

Key benefits

The read-replica prewarm approach delivers several important advantages over traditional HBase upgrade methods. Most notably, you can reduce service interruption from hours to minutes by preparing your new cluster in parallel with your running production environment.

Before committing to the upgrade, you can thoroughly test that data is readable and accessible in the new version. The system loads and assigns regions before activation, eliminating the lengthy startup time that traditionally causes extended downtime. This pre-warming process means your new cluster is ready to serve traffic immediately upon promotion.

You also gain the ability to validate multiple aspects of your deployment before cutover, including data integrity, read performance, cluster stability, and configuration correctness. This validation happens while your production cluster continues serving traffic, reducing the risk of discovering issues during your maintenance window.

For testing and validation workflows, you can run parallel testing environment by creating multiple HBase read replicas. However, you should verify that only one HBase cluster remains in read-write mode to the Amazon S3 data store to prevent data corruption and consistency issues.

Rollback procedures

Always thoroughly test your HBase rollback procedures before implementing upgrades in production environments.

When rolling back HBase clusters in Amazon EMR, you have two primary options.

  • Option 1 involves launching a new cluster with the previous HBase version that points to the same Amazon S3 data location as the upgraded cluster. This approach is straightforward to implement, preserves data written before and after the upgrade attempt, and offers faster recovery with no additional storage requirements. However, it risks encountering data compatibility issues if the upgrade modified data formats or metadata structures, potentially leading to unexpected behavior.
  • Option 2 takes a more cautious approach by launching a new cluster with the previous HBase version and restoring from snapshots taken before the upgrade. This method guarantees a return to a known, consistent state, eliminates version compatibility risks, and provides complete isolation from corruption introduced during the upgrade process. The tradeoff is that data written after the snapshot was taken will be lost, and the restoration process requires more time and planning.

For production environments where data integrity is paramount, the snapshot-based approach (option 2) is generally preferred despite the potential for some data loss.

Considerations

  • Store file tracking migration: Migrating from Amazon EMR 7.3 (or earlier) requires disabling and dropping the hbase:storefile table on the primary cluster, then flushing metadata. When launching the new read-replica cluster, configure the DefaultStoreFileTracker implementation using the hbase.store.file-tracker.impl property. When operational, run change_sft commands to switch tables to FILE tracking method, providing seamless data file access during migration.
  • Multi-AZ deployments: Consider network latency and Amazon S3 access patterns when deploying read replicas across Availability Zones. Cross-AZ data transfer might impact read latency for the read-replica cluster.
  • Cost impact: Running parallel clusters during migration incurs additional infrastructure costs until the primary cluster is terminated.
  • Disabled tables: The disabled state of tables in the primary cluster is a cluster-specific administrative property that isn’t propagated to the read-replica cluster. If you want them disabled in the read replica, you must explicitly disable them.
  • Amazon EMR 5.x cluster upgrade: Direct upgrade from Amazon EMR 5.x to Amazon EMR 7.x using this feature isn’t supported because of the major HBase version change from 1.x to 2.x. For upgrading from Amazon EMR 5.x to Amazon EMR 7.x, follow the steps in our best practices: AWS EMR Best Practices – HBase Migration

Conclusion

In this post, we showed you how the read-replica prewarm feature of Amazon EMR 7.12 improves HBase cluster operations by minimizing the hard cutover constraints that make infrastructure changes challenging. This feature gives you a consistent blue-green deployment pattern that reduces risk and downtime for version upgrades and security patches.

When you can thoroughly validate changes before committing to them and reduce service interruption from hours to minutes, you can maintain HBase infrastructure more confidently and efficiently. You can now take a more proactive approach to cluster maintenance, security compliance, and performance optimization with greater confidence in your operational processes.

To learn more about Amazon EMR and HBase on Amazon S3, visit the Amazon EMR documentation. To get started with read replicas, see the HBase on Amazon S3 guide .


About the authors

Suthan Phillips

Suthan Phillips

Suthan is a Senior Analytics Architect at AWS, where he helps customers design and optimize scalable, high-performance data solutions that drive business insights. He combines architectural guidance on system design and scalability with best practices to provide efficient, secure implementation across data processing and experience layers. Outside of work, Suthan enjoys swimming, hiking, and exploring the Pacific Northwest.

Ramesh Kandasamy

Ramesh Kandasamy

Ramesh is an Engineering Manager at Amazon EMR. He is a long tenured Amazonian dedicated to solve distributed systems problems.

Mehul Gulati

Mehul Gulati

Mehul is a Software Development Engineer for Amazon EMR at Amazon Web Services. His expertise spans big data systems including HBase, Hive, Tez, and distributed storage solutions. His customer obsession and focus on reliability helps Amazon EMR deliver reliable and efficient big data processing capabilities to customers.

Enhancing data durability in Amazon EMR HBase on Amazon S3 with the Amazon EMR WAL feature

Post Syndicated from Suthan Phillips original https://aws.amazon.com/blogs/big-data/enhancing-data-durability-in-amazon-emr-hbase-on-amazon-s3-with-the-amazon-emr-wal-feature/

Apache HBase, an open source NoSQL database, enables quick access to massive datasets. Amazon EMR, from version 5.2.0, lets you use HBase on Amazon Simple Storage Service (Amazon S3). This combines HBase’s speed with the durability advantages of Amazon S3. Also, it helps achieve the data lake architecture benefits such as the ability to scale storage and compute requirements separately. We see our customers choosing Amazon S3 over Hadoop Distributed File Systems (HDFS) when they want to achieve greater durability, availability, and simplified storage management. Amazon EMR continually improves HBase on Amazon S3, focusing on performance, availability, and reliability.

Despite these durability benefits of HBase on Amazon S3 architecture, a critical concern remains regarding data recovery when the Write-Ahead Log (WAL) is lost. Within the EMR framework, HBase data attains durability when it’s flushed, or written, to Amazon S3. This flushing process is triggered by reaching specific size and time thresholds or through manual initiation. Until data is successfully flushed to S3, it persists within the WAL, which is stored in HDFS. In this post, we dive deep into the new Amazon EMR WAL feature to help you understand how it works, how it enhances durability, and why it’s needed. We explore several scenarios that are well-suited for this feature.

HBase WAL overview

Each RegionServer in HBase is responsible for managing data from multiple tables. These tables are horizontally partitioned into regions, where each region represents a contiguous range of row keys. A RegionServer can host multiple such regions, potentially from different tables. At the RegionServer level, there is a single, shared WAL that records all write operations across all regions and tables in a sequential, append-only manner. This shared WAL makes sure durability is maintained by persisting each mutation before applying it to in-memory structures, enabling recovery in case of unexpected failures. Within each region, the memory structure of the MemStore is further divided by column families, which are the fundamental units of physical storage and I/O in HBase. Each column family maintains:

  • Its own MemStore, which holds recently written data in memory for fast access and buffering before it flushes to disk.
  • A set of HFiles, which are immutable data files stored on HDFS (or Amazon S3 in HBase on S3 mode) that hold the persistent, flushed data.

Although all column families within a region are served by the same RegionServer process, they operate independently in terms of memory buffering, flushing, and compaction. However, they still share the same WAL and RegionServer-level resources, which introduces a degree of coordination, hence they operate semi-independently within the broader region context. This architecture is shown in the following diagram.

Architecture diagram of HBase Region Server showing WAL, two regions with in-memory Memstores and persistent HFiles

Understanding the HBase write process: WAL, MemStore, and HFiles

The HBase write path initiates when a client issues a write request, typically through an RPC call directed to the appropriate RegionServer that hosts the target region. Upon receiving the request, the RegionServer identifies the correct HBase region based on the row key and forwards the KeyValue pair accordingly. The write operation follows a two-step process. First, the data is appended to the WAL, which promotes durability by recording every change before it’s committed to memory. The WAL resides on HDFS by default and exists independently on each RegionServer. Its primary purpose is to provide a recovery mechanism in the event of a failure, particularly for edits that have not yet been flushed to disk. When the WAL append is successful, the data is written to the MemStore, an in-memory store for each column family within the region. The MemStore accumulates updates until it reaches a predefined size threshold, controlled by the hbase.hregion.memstore.flush.size parameter (default is 128 MB). When this threshold is exceeded, a flush is triggered.Flushing is handled asynchronously by a background thread in the RegionServer. The thread writes the contents of the MemStore to a new HFile, which is then persisted to long-term storage. In Amazon EMR, the location of this HFile depends on the deployment mode: for HBase on Amazon S3, HFiles are stored in Amazon S3, but for HBase on HDFS, they’re stored in HDFS.This workflow is shown in the following diagram.

HBase write process workflow showing data path through WAL, Memstore, and HFile with AWS services

A region server serves multiple regions, and they all share a common WAL. The WAL records all data changes, storing them in local HDFS. Puts and deletes are initially logged to the WAL by the region server before being recorded in the MemStore for the affected store. Scan and get operations in HBase don’t require the use of the WAL. In the event of a region server crash or unavailability before MemStore flushing, the WAL is crucial for replaying data changes, which promotes data integrity. Because this log by default resides on a replicated filesystem, it enables an alternate server to access and replay the log, requiring nothing from the physically failed server for a complete recovery. When a RegionServer fails abruptly, HBase initiates an automated recovery process orchestrated by the HMaster. First, the ZooKeeper session timeout detects the RegionServer failure, notifying the HMaster. The HMaster then identifies all regions previously hosted on the failed RegionServer and marks them as unassigned. The WAL files from the failed RegionServer are split by region, and these split WAL files are distributed to the new RegionServers that will host the reassigned regions. Each new RegionServer replays its assigned WAL segments to recover the MemStore state that existed before the failure, preventing data loss. When WAL replay is complete, the regions become operational on their new RegionServers, and the recovery process concludes.

HBase recovery workflow from RegionServer failure through WAL splitting to regions online

The effectiveness of the HDFS WAL model relies on the successful completion of the write request in the WAL and the subsequent data replication in HDFS. In cases where some nodes are terminated, HDFS can still recover from the WAL files, allowing HBase to autonomously heal by replaying data from the WALs and rebalancing the regions. However, if all CORE nodes are simultaneously terminated, achieving complete cluster recovery is a challenge because the data to replay from the WAL is lost. The issue arises when WALs are lost due to CORE node shutdown (for example, all three replicas of a file block). In this scenario, HBase enters a loop attempting to replay data from the WALs. Unfortunately, the absence of available blocks in this case causes the HBase server crash procedure to fail and retry indefinitely.

Amazon EMR WAL

To address the mentioned challenge of HDFS WAL and to provide data durability in HBase, Amazon EMR introduces a new EMR WAL feature starting from versions emr-7.0 and emr-6.15. This feature facilitates the recovery of data that hasn’t been flushed to Amazon S3 (HFile). Using this feature provides thorough backup for your HBase clusters. Behind the scenes, the RegionServer writes WAL data to EMR WAL, which is a service outside the EMR cluster. With this feature enabled, concerns about loss of WAL data in HDFS are alleviated. Also, in the event of cluster or Availability Zone failure issues, you can create a new cluster, directing it to the same Amazon S3 root directory and EMR WAL workspace. This enables the automatic recovery of data in the WAL in the order of minutes. Recovery of unflushed data is supported for a duration of 30 days, after which remaining unflushed data is deleted. This workflow is shown in the following diagram.

Detailed sequence diagram of HBase write operations with EMR WAL service integration and S3 storage

Key benefits

Upon enabling EMR WAL, the WALs are located external to the EMR cluster. The key benefits are:

  • High availability – You can remain confident about data integrity even in the face of Availability Zone failures. Their HFiles are stored in Amazon S3, and the WALs are externally stored in EMR WAL. This setup enables cluster recovery and WAL replay in the same or a different Availability Zone within the region. However, for true high availability with zero downtime, relying solely on EMR WAL is not sufficient because recovery still involves brief interruptions. To provide seamless failover and uninterrupted service, HBase replication across multiple Availability Zones is essential along with EMR WAL, providing robust zero-downtime high availability.
  • Data durability improvement – Customers no longer need to concern themselves with potential data loss in scenarios involving WAL data corruption in HDFS or the removal of all replicas in HDFS due to instance terminations.

The following flow diagram compares the sequence of events with and without EMR WAL enabled.

HBase write process and failure recovery workflow with EMR WAL and S3 integration

Key EMR WAL features

In this section, we explore the key enhancements introduced in the EMR WAL service across recent Amazon EMR versions. From grouping multiple HBase regions into a single EMR WAL to advanced configuration options, these new capabilities address specific usage scenarios.

Grouping multiple HBase regions into a single Amazon EMR WAL

In Amazon EMR versions up to 7.2, a separate EMR WAL is created for each region, which can become expensive due to the EMR-WAL-WALHours pricing model, especially when the HBase cluster contains many regions. To address this, starting from Amazon EMR 7.3, we introduced the EMR WAL grouping feature, which enables consolidating multiple HBase regions per EMR WAL, offering significant cost savings (over 99% cost savings in our sample evaluation) and improved operational efficiency. By default, each HBase RegionServer has two Amazon EMR WALs. If you have many regions per RegionServer and want to increase throughput, you can customize the number of WALs per RegionServer by configuring the hbase.wal.regiongrouping.numgroups property. For instance, to set 10 EMR WALs per HBase RegionServer, you can use the following configuration:

[
  {
    "Classification": "hbase-site",
    "Properties": {
      "hbase.wal.regiongrouping.numgroups": "10"
    }
  }
]

The two HBase system tables hbase:meta and hbase:master (masterstore) don’t participate in the WAL grouping mechanisms.

In a performance test using m5.8xlarge instances with 1,000 regions per RegionServer, we observed a significant increase in throughput as the number of WALs grew from 1 to 20 per RegionServer (from 1,570 to 3,384 operations per sec). This led to a 54% improvement in average latency (from 40.5 ms to 18.8 ms) and a 72% reduction in 95th percentile latency (from 231 ms to 64 ms). However, beyond 20 WALs, we noted diminishing returns, with only slight performance improvements between 20 and 50 WALs, and average latency stabilized around 18.7ms. Based on these results, we recommend maintaining a lower region density (around 10 regions per WAL) for optimal performance. Nonetheless, it’s crucial to fine-tune this configuration according to your specific workload characteristics and performance requirements and conduct tests in your lower environment to validate the best setup.

Configurable maximum record size in EMR WAL

Until Amazon EMR version 7.4, the EMR WAL had a record size limit of 4 MB, which was insufficient for some customers. Starting from EMR 7.5, the maximum record size in EMR WAL is configurable through the emr.wal.max.payload.size property. The default value is set to 1 GB. The following is an example of how to set the maximum record size to 2 GB:

[
  {
    "Classification": "hbase-site",
    "Properties": {
      "emr.wal.max.payload.size": "2147483648"
    }
  }
]

AWS PrivateLink support

EMR WAL supports AWS PrivateLink, if you want to keep your connection within the AWS network. To set it up, create a virtual private cloud (VPC) endpoint using the AWS Management Console or AWS Command Line Interface (AWS CLI) and select the service labeled com.amazonaws.region.emrwal.prod. Make sure your VPC endpoint uses the same security groups as the EMR cluster. You have two DNS configuration options: enabling private DNS, which uses the standard endpoint format and automatically routes traffic privately, or using the provided VPC endpoint-specific DNS name for more explicit control. Regardless of the DNS option chosen, both methods mean that traffic remains within the AWS network, enhancing security. To implement this in the EMR cluster, update your cluster configuration to use the PrivateLink endpoint, as shown in the following code sample (for private DNS):

[
    {
        "Classification": "hbase-site",
        "Properties": {
            "emr.wal.client.endpoint": "https://prod.emrwal.region.amazonaws.com"
        }
    }
]

For more details, refer to Access Amazon EMR WAL through AWS PrivateLink in the Amazon EMR documentation.

Encryption options for WAL in Amazon EMR

Amazon EMR automatically encrypts data in transit in the EMR WAL service. You can enable server-side encryption (SSE) for WAL (data at rest) with two key management options:

  • SSE-EMR-WAL: Amazon EMR manages the encryption keys
  • SSE-KMS-WAL: You use an AWS Key Management Service (AWS KMS) key for encryption policies

EMR WAL cross-cluster replication

From EMR 7.5, EMR WAL supports cross-cluster replay, allowing clusters in an active-passive HBase replication setup to use EMR WAL.

For more details on the setup, refer to EMR WAL cross-cluster replication in the Amazon EMR documentation.

EMR WAL enhancement: Minimizing CPU load from HBase sync threads

Starting from EMR 7.9, we’ve implemented code optimizations in EMR WAL to address the high CPU utilization caused by sync threads used by HBase processes to write WAL edits, leading to improved CPU efficiency.

Sample use cases benefitting from this feature

Based on our customer interactions and feedback, this feature can help in the following scenarios.

Continuity during service disruptions

If your business demands disaster recovery with no data loss for an HBase on an S3 cluster due to unexpected service disruptions, such as an Availability Zone failure, the newly introduced feature means you don’t have to rely on a persistent event store solution using Amazon Managed Streaming for Apache Kafka (Amazon MSK) or Amazon Kinesis. Without EMR WAL, you had to set up a complex event-streaming pipeline to retain the most recently ingested data and enable replay from the point of failure. This new feature eliminates that dependency by storing Hbase WALs in the EMR WAL service.

Note: During an Availability Zone (AZ) failure or service-level issue, make sure to fully terminate the original Hbase cluster before launching a new one that points to the same S3 root directory. Running two active Hbase clusters that access the same S3 root can lead to data corruption.

Upgrading to the latest EMR releases or cluster rotations

Without EMR WAL, moving to the latest EMR version or managing cluster rotations with HBase on Amazon S3 necessitated manual interruptions for data flushing to S3. With the new feature, the requirement for data flushing is eliminated. However, during cluster termination and the subsequent launch of a new HBase cluster, there is an inevitable service downtime, during which data producers or ingestion pipelines must handle write disruptions or buffer incoming data until the system is fully restored. Also, the downstream services should account for temporary unavailability, which can be mitigated using a read replica cluster.

Overcoming HDFS challenges during HBase auto scaling

Without EMR WAL feature, having HDFS for your WAL files was a requirement. When implementing custom auto scaling for your HBase clusters, it sometimes resulted in WAL data corruption due to issues linked to HDFS. This is because, to prevent data loss, data blocks had to be moved to different HDFS nodes when one HDFS node was being decommissioned. When nodes continued to be terminated swiftly during scale-down process without allowing sufficient time for graceful decommissioning, it could result in WAL data corruption issues, primarily attributed to missing blocks.

Addressing HDFS disk space issues due to old WALs

When a WAL file is no longer required for recovery, indicating that HBase has made sure all data within the WAL file has been flushed, it’s transferred to the oldWALs folder for archival purposes. The log remains in this location until all other references to the WAL file are completed. In HBase use cases with high write activity, some customers have expressed concerns about the oldWALs directory (/usr/hbase/oldWALs) expanding and occupying excessive disk space and eventually causing disk space issues. With the complete relocation of these WALs to an external EMR WAL service, you will no longer encounter this issue.

Assessing HBase in Amazon EMR clusters with and without EMR WAL for fault tolerance

We conducted a data durability test employing two scripts. The first was for installing YCSB, creating a pre-split table, and loading 8 million records on the master node. The second was for terminating a core node every 90 seconds after a 3-minute wait, totaling five terminations. Two EMR clusters with eight core nodes each were created, one configured with EMR WAL enabled and the other as a standard EMR HBase cluster with the WAL stored in HDFS. After completion of EMR steps, a count was run on the HBase table. In the EMR cluster with EMR WAL enabled, all records were successfully inserted without corruption. In the cluster not using EMR WALs, regions in HBase remained “OPENING” if the node hosting the meta was terminated. For other core node terminations, inserts failed, resulting in a lower record count during validation.

Understanding when EMR WAL read charges apply in HBase

In HBase, standard table read operations such as Get and Scan don’t access WALs. Therefore, EMR WAL read (GiB) charges are only incurred during operations that involve reading from WALs, such as:

  • Restoring data from EMR WALs in a newly launched cluster
  • Replaying WALs to recover data on a crashed RegionServer
  • Performing HBase replication, which involves reading WALs to replicate data across clusters

In a normal scenario, you’re billed only for the following two components related to EMR WAL usage:

  • EMR-WAL-WALHours – Represents the hourly cost of WAL storage, calculated based on the number of WALs maintained. You can use the EMRWALCount metric in Amazon CloudWatch to monitor the number of WALs and track associated usage over time.
  • EMR-WAL-WriteRequestGiB – This reflects the volume of data written to the WAL service, charged by the amount of data written in GiB.

For further details on pricing, refer to Amazon EMR pricing and Amazon EMR Release Guide.

To monitor and analyze EMR WAL related costs in the AWS Cost and Usage Reports (CUR), look under product_servicecode = ‘ElasticMapReduce’, where you’ll find the following product_usagetype entries associated with WAL usage:

  • USE1-EMR-WAL-ReadRequestGiB
  • USE1-EMR-WAL-WALHours
  • USE1-EMR-WAL-WriteRequestGiB

The prefix USE1 indicates the Region (in this case, us-east-1) and will vary depending on where your EMR cluster is deployed.

Summary

This new EMR WAL feature allows you to improve durability of your Amazon EMR HBase on S3 clusters, addressing critical workload scenarios by eliminating the need for streaming solutions for Availability Zone level service disruptions, streamlining processes for upgrading or rotating clusters, preventing data corruption during HBase auto scaling or node termination events, and resolving disk space issues associated with old WALs. Because many of the EMR WAL features are added on the latest releases of Amazon EMR, we recommend that customers use Amazon EMR version 7.9 or later to fully benefit from these improvements.


About the authors

Suthan Phillips is a Senior Analytics Architect at AWS, where he helps customers design and optimize scalable, high-performance data solutions that drive business insights. He combines architectural guidance on system design and scalability with best practices to ensure efficient, secure implementation across data processing and experience layers. Outside of work, Suthan enjoys swimming, hiking and exploring the Pacific Northwest.

Implement Amazon EMR HBase Graceful Scaling

Post Syndicated from Yu-Ting Su original https://aws.amazon.com/blogs/big-data/implement-amazon-emr-hbase-graceful-scaling/

Apache HBase is a massively scalable, distributed big data store in the Apache Hadoop ecosystem. We can use Amazon EMR with HBase on top of Amazon Simple Storage Service (Amazon S3) for random, strictly consistent real-time access for tables with Apache Kylin. It ingests data through spark jobs and queries the HTables through Apache Kylin cubes. The HBase cluster uses HBase write-ahead logs (WAL) instead of Amazon EMR WAL.

A time goes by, companies may want to scale in long-running Amazon EMR HBase clusters because of issues such as Amazon Elastic Compute Cloud (Amazon EC2) scheduling events and budget concerns. Another issue is that companies may use Spot Instances and auto scaling for task nodes for short-term parallel computation power, like MapReduce tasks and spark executors. Amazon EMR also runs HBase region servers on task nodes for Amazon EMR on S3 clusters. Spot interruptions will lead to an unexpected shutdown on HBase region servers. For an Amazon EMR HBase cluster without enabling write-ahead logs (WAL) for Amazon EMR feature, an unexpected shutdown on HBase region servers will cause WAL splits with server recovery process, and it will bring extra load to the cluster and sometimes makes HTables inconsistent.

For these reasons, administrators look for a way to scale-in Amazon EMR HBase cluster gracefully and stop all HBase region servers on the task nodes.

This post demonstrates how to gracefully decommission target region servers programmatically. The scripts do the following tasks. The script also tests successfully in Amazon EMR 7.3.0, Amazon EMR 6.15.0, and 5.36.2.

  • Automatically move the HRegions through a script
  • Raise the decommission priority
  • Decommission HBase region servers gracefully
  • Prevent Amazon EMR provisioning region servers on task nodes by Amazon EMR software configurations
  • Prevent Amazon EMR provisioning region servers on task nodes by Amazon EMR steps

Overview of solution

For graceful scaling in, the script uses HBase built-in graceful_stop.sh to move regions to other region servers to avoid WAL splits when decommissioning nodes. The script uses HDFS CLI and web interface to make sure there are no missing and corrupted HDFS block during the scaling events. To prevent Amazon EMR provisions HBase region servers on task nodes, administrators need to specify software configurations per instance groups when launching a cluster. For existing clusters, administrators can either use a step to terminate HBase region servers on task nodes, or reconfigure the task instance group’s HBase storagerootdir.

Solution

For a running Amazon EMR cluster, administrators can use AWS Command Line Interface (AWS CLI) to issue a modify-instance-groups with EC2InstanceIdsToTerminate to terminate specified instances immediately. But terminating an instance in this way can cause a data loss and unpredictable cluster behavior when HDFS blocks have not enough copies or there are ongoing tasks on those decommissioned nodes. To avoid these risks, administrators can send a modify-instance-groups with a new instance request count without a specific instance ID that administrators want to terminate. This command triggers a graceful decommission process on the Amazon EMR side. However, Amazon EMR only supports graceful decommission for YARN and HDFS. Amazon EMR doesn’t support graceful decommission for HBase.

Hence, administrators can try method 1, as described later in this post, to raise the decommission priority of the decommission targets as the first step. In case tweaking the decommissions priority didn’t work, move forward to the second approach, method 2. Method 2 is to stop the resizing request, and move the HRegions manually before terminating the target core nodes. Note that Amazon EMR is a managed service. Amazon EMR service will terminate the EC2 instance after anyone stops it or detach its Amazon Elastic Block Store (Amazon EBS) volumes. Therefore, don’t try to detach EBS volumes on the decommission targets and attach them to new nodes.

Method 1: Decommission HBase region servers through resizing

To decommission Hadoop nodes, administrators can add decommission targets to HDFS’s and YARN’s exclude list, which were dfs.hosts.exclude and yarn.nodes.exclude.xml. However, Amazon EMR disallows manual update to these files. The reason is that the Amazon EMR service daemon, master instance controller, is the only valid process to update these two files on master nodes. Manual updates to these two files will be reset.

Thus, one of the most accessible ways to raise a core node’s decommission priority according to Amazon EMR is having less instance controller heartbeat.

As the first step, pass move_regions to the following script on Amazon S3, blog_HBase_graceful_decommission.sh, as an Amazon EMR step to move HRegions to other region servers and shutdown processes of region server and instance controller. Please also provide targetRS and S3Path to blog_HBase_graceful_decommission.sh. targetRS represents to the private DNS of the decommission target region server. S3Path represents the location of the region migration script.

This step needs to be run in off-peak hours. After all HRegions on the target region server are moved to other nodes, splitting WAL activities after stopping the HBase region server will generate a very low workload to the cluster because it serves 0 regions.

For more information , refer to blog_HBase_graceful_decommission.sh.

Taking a closer look at the move_regions option in blog_HBase_graceful_decommission.sh, this script disables the region balancer and moves the regions to other region servers. The script retrieves Secure Shell (SSH) credentials from AWS Secrets Manager to access worker nodes.

In addition, the script included some AWS CLI operations. Please make sure the instance profile, EMR_EC2_DefaultRole, can operate the following APIs and have SecretsManagaerReadWrite permission.

Amazon EMR APIs:

  • describe-cluster
  • list-instances
  • modify-instance-groups

Amazon S3 APIs:

  • cp

Secrets Manager APIs:

  • get-secret-value

In Amazon EMR 5.x, HBase on Amazon S3 will make the master node also work as a region server hosting hbase:meta regions. This script will get stuck when trying to move non-hbase:meta HRegions to the master. To automate the script, the parameter, maxthreads, is increased to move regions through multiple threads. By moving regions in a while loop, one of the threads got a runtime error because it tries to move non-hbase:meta HRegions to the master node. Other threads can keep on moving HRegions to other region servers. After the only stuck thread timed out after 300 seconds, it moves forward to the next run. After six retries, manual actions will be required, such as using a move action through the HBase shell for the remaining regions’ movement or resubmitting the step.

The following is the syntax to use the script to invoke the move_regions function through blog_HBase_graceful_decommission.sh as an Amazon EMR step:

Step type: Custom JAR
Name: Move HRegions
JAR location :s3://<region>.elasticmapreduce/libs/script-runner/script-runner.jar
Main class :None
Arguments :s3://yourbucket/your/step/location/blog_HBase_graceful_decommission.sh move_regions <your-secret-id> <targetRS: target_region_server_private_DNS> <S3Path: S3 location>
Action on failure:Continue

Here’s an Amazon EMR step example to move regions:

Step type: Custom JAR
Name: Move HRegions
JAR location :s3://us-west-2.elasticmapreduce/libs/script-runner/script-runner.jar
Main class :None
Arguments :s3://yourbucket/your/step/location/blog_HBase_graceful_decommission.sh move_regions your-secret-id ip-172-0-0-1.us-west-2.compute.internal s3://yourbucket/yourpath/
Action on failure:Continue

In the HBase web UI, the target region server will serve 0 regions after the evacuation, as shown in the following screenshot.

After that, the stop_RS_IC function in the script stopped the HBase region server and instance controller process on the decommission target after making sure that there is no running YARN container on that node.

Note that the script is for Amazon EMR 5.30.0 and later release versions. For Amazon EMR 4.x-5.29.0 release versions, stop_RS_IC in the script needs to be updated by referring to How do I restart a service in Amazon EMR? In the AWS Knowledge Center. Also, in Amazon EMR versions earlier than 5.30.0, Amazon EMR uses a service nanny to watch the status of other processes. If a service nanny automatically restarts the instance controller, please stop the service nanny using the stop_RS_IC function before stopping the instance controller on that node. Here’s an example:

if [ "\$runningContainers" -eq 0 ]; then
        echo "0 container is running on \${targetRS}" | tee -a /tmp/graceful_stop.log;
        echo "Shutdown IC" | tee -a /tmp/graceful_stop.log;
        sudo /etc/init.d/service-nanny stop | tee -a /tmp/graceful_stop.log;
        sudo /etc/init.d/instance-controller stop | tee -a /tmp/graceful_stop.log;
        sudo /etc/init.d/instance-controller status | tee -a /tmp/graceful_stop.log;
else
        echo "Still have \${runningContainers} containers running on \${targetRS}" | tee -a /tmp/graceful_stop.log;
     	echo "Not to shutdown IC" | tee -a /tmp/graceful_stop.log;
fi

After the step is successfully completed, scale in and define (current core node amount is −1) as the desired target node amount using the Amazon EMR console. Amazon EMR might pick up the target core node to decommission it because the instance controller isn’t running on that node. There can be a few minutes of delay for Amazon EMR to detect the heartbeat loss of that target node through polling the instance controller. Thus, make sure the workload is very low and there will be no container to the target node for a while.

Stopping the instance controller merely increases the decommissioning priority. But method 1 doesn’t guarantee that the target core node will be picked up as the decommissioning target by Amazon EMR. If Amazon EMR doesn’t pick up the decommission target as the decommissioning victim after using method 1, administrators can stop the resize activity using the AWS Management Console. Then, proceed to method 2.

Method 2: Manually decommission the target core nodes

Administrators can terminate the node using the EC2InstanceIdsToTerminate option in the modify-instance-groups API. But this action will directly terminate the EC2 instance and will risk losing HDFS blocks. To mitigate the risk of having a data loss, administrators can use the following steps in off-peak hours with zero or very few running jobs.

First, run the move_hregions function through blog_HBase_graceful_decommission.sh as an Amazon EMR step in method 1. The function moves HRegions to other region servers and stopped the HBase region server as well as the instance controller process.

Then, run the terminate_ec2 function in blog_HBase_graceful_decommission.sh as an Amazon EMR step. To run this function successfully, please provide the target instance group ID and target instance ID to the script. This function merely terminates one node at a time by specifying the EC2InstanceIdsToTerminate option in the modify-instance-groups API. This makes sure that the core nodes are not terminated back-to-back and lowered the risks of missing HDFS blocks. It inspects HDFS and makes sure all HDFS blocks had at least two copies. If an HDFS block have only one copy, the script will exit with an error message similar to, “Some HDFS blocks have only 1 copy. Please increase HDFS replication factor through the following command for existing HDFS blocks.”

$ hdfs dfs -setrep -R -w 2 <the-file-or-directory-you-want-to-modify>

To make sure all upcoming HDFS blocks have at least two copies, reconfigure the core instance group with the following software configuration:

[{
    "classification": "hdfs-site",
    "properties": {
        "dfs.replication": "2"
    },
    "configurations": []
}]

In addition, the terminateEC2 function compares the metadata of the replicating blocks before and after terminating the core node using hdfs dfsadmin -report. This makes sure no under-replicating, corrupted, or missing HDFS block increased.

The terminateEC2 function tracked decommission status. The script will complete after the decommission completes. It can take some time to recover HDFS blocks. The elapsed time depends on several factors such as the total number of blocks, I/O, bandwidth, HDFS handler amount, and name node resources. If there are many HDFS blocks to be recovered, it may take a few hours to complete. Before running the script, please make sure that the instance profile, EMR_EC2_DefaultRole, have permission of elasticmapreduce:ModifyInstanceGroups.

The following is the syntax to use the script to invoke the terminate_ec2 function through blog_HBase_graceful_decommission.sh as an Amazon EMR step:

Step type: Custom JAR
Name: Terminate EC2
JAR location :s3://<region>.elasticmapreduce/libs/script-runner/script-runner.jar
Main class :None
Arguments :s3://yourbucket/your/step/location/blog_HBase_graceful_decommission.sh terminate_ec2 <your-secret-id> <instance_groupID> <target_EC2_Instance_ID>
Action on failure:Continue

Here’s an Amazon EMR step example to move regions:

Step type: Custom JAR
Name: Terminate EC2
JAR location :s3://us-west-2.elasticmapreduce/libs/script-runner/script-runner.jar
Main class :None
Arguments :s3://yourbucket/your/step/location/blog_HBase_graceful_decommission.sh terminate_ec2 your-secret-id ig-ABCDEFGH12345 i-1234567890abcdef
Action on failure:Continue

While invoking terminate_ec2, the script checks HDFS Name Node Web UI for the decommission target to understand how many blocks need to be recovered on other nodes after submitting the decommission request. Here are the steps:

  1. On the Amazon EMR console, version 6.x, find HDFS NameNode web UI. For example, enter http://<master-node-public-DNS>:9870
  2. On the top menu bar, choose Datanodes
  3. In the In operation section, check the on-service data nodes and the total number of data blocks on the nodes, as shown in the following screenshot.
  4. To view the HDFS decommissioning progress, go to Overview, as shown in the following screenshot.

On the Datanodes page, the decommission target node will not have a green checkmark, and the node will be in the Decommissioning section, as shown in the following screenshot.

The step’s STDOUT also reveals the decommission status:

Hostname: ip-172-31-4-197.us-west-2.compute.internal
Decommission Status : Decommission in progress

The decommission target will transit from Decommissioning to Decommissioned in the HDFS NameNode web UI, as shown in the following screenshot.

The decommissioned target will appear in the Dead datanodes section in the step’s STDOUT after the process is completed:

Dead datanodes (1):
Name: 172.31.4.197:50010 (ip-172-31-4-197.us-west-2.compute.internal)
Hostname: ip-172-31-4-197.us-west-2.compute.internal
Decommission Status : Decommissioned
Configured Capacity: 62245027840 (57.97 GB)
DFS Used: 394412032 (376.14 MB)
Non DFS Used: 0 (0 B)
DFS Remaining: 61179640063 (56.98 GB)
DFS Used%: 0.63%
DFS Remaining%: 98.29%
Configured Cache Capacity: 0 (0 B)
Cache Used: 0 (0 B)
Cache Remaining: 0 (0 B)
Cache Used%: 100.00%
Cache Remaining%: 0.00%
Xceivers: 0
Last contact: Tue Jan 14 06:09:17 UTC 2025

After the target node is decommissioned, the hdfs dfsadmin report will be displayed in the last section in the step’s STDOUT . There should be no difference between rep_blocks_${beforeDate} and rep_blocks_${afterDate} as described in the script. It means no additional amount of under-replicated, missing, or corrupt blocks after the decommission. In HBase web UI, the decommissioned region server will be moved to dead region servers. The dead region server records will be reset after restarting HMaster during routine maintenance.

After the Amazon EMR step is completed without errors, please repeat the preceding steps to decommission the next target core node because administrators may have more than one core nodes to decommission.

After administrators complete all decommission tasks, administrators can manually enable the HBase balancer through the HBase shell again:

$ echo "balance_switch true" | sudo -u hbase hbase shell
## To make sure balance_switch is enabled, submit the same command again. The output should say it’s already in “true” status.
$ echo "balance_switch true" | sudo -u hbase hbase shell

Prevent Amazon EMR from provisioning HBase region servers on task nodes

For new clusters, configure HBase settings for master and core groups only and keep the HBase settings empty when launching an Amazon EMR HBase on an S3 cluster. This prevents provisioning HBase region servers on task nodes.

For example, define configurations for applications other than HBase settings in the software configuration textbox in the Software settings section on the Amazon EMR console, as shown in the following screenshot.

Image 007

Then, configure HBase settings in Node configuration – optional for each instance group in the Cluster configuration – required section, as shown in the following screenshot.

Image 008

For master and core instance groups, HBase configurations will be like the following screenshot.

Image 009

Here’s a json formatted example:

[
    {
        "Classification": "hbase",
        "Properties": {
            "hbase.emr.storageMode": "s3"
         }
    },
    {
        "Classification": "hbase-site",
        "Properties": {
            "hbase.rootdir": "s3://my/HBase/on/S3/RootDir/"
        }
    }
]

For task instance groups, there will be no HBase configuration, as shown in the following screenshot.

Image 010

Here’s a json formatted example:

[]

Here’s an example in AWS CLI:

$ aws emr create-cluster \
--applications Name=Hadoop Name=HBase Name=ZooKeeper \
... (skip) \
--instance-groups '[ {"InstanceCount":1,"EbsConfiguration":{"EbsBlockDeviceConfigs":[{"VolumeSpecification":{"SizeInGB":32,"VolumeType":"gp2"},"VolumesPerInstance":2}]},"InstanceGroupType":"MASTER","InstanceType":"m5.xlarge","Configurations":[{"Classification":"hbase","Properties":{"hbase.emr.storageMode":"s3"}},{"Classification":"hbase-site","Properties":{"hbase.rootdir":"s3://my/HBase/on/S3/RootDir/"}}],"Name":"Master - 1"},\
{"InstanceCount":1,"EbsConfiguration":{"EbsBlockDeviceConfigs":[{"VolumeSpecification":{"SizeInGB":32,"VolumeType":"gp2"},"VolumesPerInstance":2}]},"InstanceGroupType":"TASK","InstanceType":"m5.xlarge","Name":"Task - 3"},\
{"InstanceCount":2,"EbsConfiguration":{"EbsBlockDeviceConfigs":[{"VolumeSpecification":{"SizeInGB":64,"VolumeType":"gp2"},"VolumesPerInstance":1}],"EbsOptimized":true},"InstanceGroupType":"CORE","InstanceType":"m5.2xlarge","Configurations":[{"Classification":"hbase","Properties":{"hbase.emr.storageMode":"s3"}},{"Classification":"hbase-site","Properties":{"hbase.rootdir":"s3://my/HBase/on/S3/RootDir/"}}],"Name":"Core - 2"}]' --configurations '[{"Classification":"hdfs-site","Properties":{"dfs.replication":"2"}}]' \
--auto-scaling-role Amazon EMR_AutoScaling_DefaultRole \
... (skip) \
--scale-down-behavior TERMINATE_AT_TASK_COMPLETION --region us-west-2

Stop decommission the HBase region servers on task nodes

For an existing Amazon EMR HBase on an S3 cluster, pass stop_and_check_task_rs to blog_HBase_graceful_decommission.sh as an Amazon EMR step to stop HBase region servers on nodes in a task instance group. The script requirs a task instance group ID and an S3 location to place sharing scripts for task nodes.

The following is the syntax to pass stop_and_check_task_rs to blog_HBase_graceful_decommission.sh as an Amazon EMR step:

Step type: Custom JAR
Name: Stop Hbase Region servers on Task Nodes
JAR location: s3://<region>.elasticmapreduce/libs/script-runner/script-runner.jar
Arguments: s3://yourbucket/your/step/location/blog_HBase_graceful_decommission.sh stop_and_check_task_rs <your-secret-id> <instance_groupID> <S3Path: S3 location>
Action on failure:Continue

Here’s an Amazon EMR step example to stop HBase regions on nodes in a task group:

Step type: Custom JAR
Name: Stop Hbase Region servers on Task Nodes
JAR location :s3://us-west-2.elasticmapreduce/libs/script-runner/script-runner.jar
Main class :None
Arguments :s3://yourbucket/your/step/location/ blog_HBase_graceful_decommission.sh your-secret-id stop_and_check_task_rs ig-ABCDEFGH12345 s3://yourbucket/yourpath/
Action on failure:Continue

This step above not only stops HBase region servers on existing task nodes. To avoid provisioning HBase region servers on new task nodes, the script also reconfigures and scales in the task group. Here are the steps:

  1. Using the move_regions function, in blog_HBase_graceful_decommission.sh, move HRegions on the task group to other nodes and stop region servers on those task nodes.

After making sure that the HBase region servers are stopped at these task nodes, the script reconfigures the task instance group. The reconfiguration details are to let HBase rootdir point to a non-existing location. These settings only apply to the task group. Here’s an example:

[
    {
        "Classification": "hbase-site",
        "Properties": {
            "hbase.rootdir": "hdfs://non/existing/location"
        }
    },
    {
        "Classification": "hbase",
        "Properties": {
            "hbase.emr.storageMode": "hdfs"
        }
    }
]

When the task group’s state returns to RUNNING, the script scales in these task nodes to 0. New task nodes in the upcoming scaling out events will not run HBase region servers.

Conclusion

These scaling steps demonstrate how to handle Amazon EMR HBase scaling gracefully. The functions in the script can help administrators to resolve problems when companies want to gracefully scale the Amazon EMR HBase on S3 clusters without Amazon EMR WAL.

If you have a similar request to scale in an Amazon EMR HBase on an S3 cluster gracefully because the cluster doesn’t enable Amazon EMR WAL, you can refer to this post. Please test the steps in the testing environment for verifications first. After you confirm the steps can meet your production requirements, you can proceed and apply the steps to production environment.


About the Authors

Image 011Yu-Ting Su is a Sr. Hadoop Systems Engineer at Amazon Web Services (AWS). Her expertise is in Amazon EMR and Amazon OpenSearch Service. She’s passionate about distributing computation and helping people to bring their ideas to life.

Image 012Hsing-Han Wang is a Cloud Support Engineer at Amazon Web Services (AWS). He focuses on Amazon EMR and AWS Lambda. Outside of work, he enjoys hiking and jogging, and he is also an Eorzean.

Image 013Cheng Wang is a Technical Account Manager at AWS who has over 10 years of industry experience, focusing on enterprise service support, data analysis, and business intelligence solutions.

Chris Li is an Enterprise Support manager at AWS. He leads a team of Technical Account Managers to solve complex customer problems and implement well-structured solutions.