Tag Archives: AWS Deep Learning AMIs

Deploy LLMs on Amazon EKS using vLLM Deep Learning Containers

Post Syndicated from Vishal Naik original https://aws.amazon.com/blogs/architecture/deploy-llms-on-amazon-eks-using-vllm-deep-learning-containers/

Organizations face significant challenges when deploying large language models (LLMs) efficiently at scale. Key challenges include optimizing GPU resource utilization, managing network infrastructure, and providing efficient access to model weights.When running distributed inference workloads, organizations often encounter complexity in orchestrating model operations across multiple nodes. Common challenges include effectively distributing model components across available GPUs, coordinating seamless communication between processing units, and maintaining consistent performance with low latency and high throughput.

vLLM is an open source library for fast LLM inference and serving. The vLLM AWS Deep Learning Containers (DLCs) are optimized for customers deploying vLLMs on Amazon Elastic Compute Cloud (Amazon EC2), Amazon Elastic Container Service (Amazon ECS), and Amazon Elastic Kubernetes Service (Amazon EKS), and are provided at no additional charge. These containers package a preconfigured, pre-tested environment that functions seamlessly out of the box, includes the necessary dependencies such as drivers and libraries for running vLLMs efficiently, and offers built-in support for Elastic Fabric Adapter (EFA) for high-performance multi-node inference workloads. You don’t have to build the inference environment from scratch anymore. Instead, you can install the vLLM DLC and it will automatically set up and configure the environment, and you can start deploying the inference workloads at scale.

In this post, we demonstrate how to deploy the DeepSeek-R1-Distill-Qwen-32B model using AWS DLCs for vLLMs on Amazon EKS, showcasing how these purpose-built containers simplify deployment of this powerful open source inference engine. This solution can help you solve the complex infrastructure challenges of deploying LLMs while maintaining performance and cost-efficiency.

AWS DLCs

AWS DLCs provide generative AI practitioners with optimized Docker environments to train and deploy generative AI models in their pipelines and workflows across Amazon EC2, Amazon EKS, and Amazon ECS. AWS DLCs are targeted for self-managed machine learning (ML) customers who prefer to build and maintain their AI/ML environments on their own, want instance-level control over their infrastructure, and manage their own training and inference workloads. DLCs are available as Docker images for training and inference, and also with PyTorch and TensorFlow.DLCs are kept current with the latest version of frameworks and drivers, are tested for compatibility and security, and are offered at no additional cost. They are also quickly customizable by following our recipe guides. Using AWS DLCs as a building block for generative AI environments reduces the burden on operations and infrastructure teams, lowers TCO for AI/ML infrastructure, accelerates the development of generative AI products, and helps the generative AI teams focus on the value-added work of deriving generative AI-powered insights from the organization’s data.

Solution overview

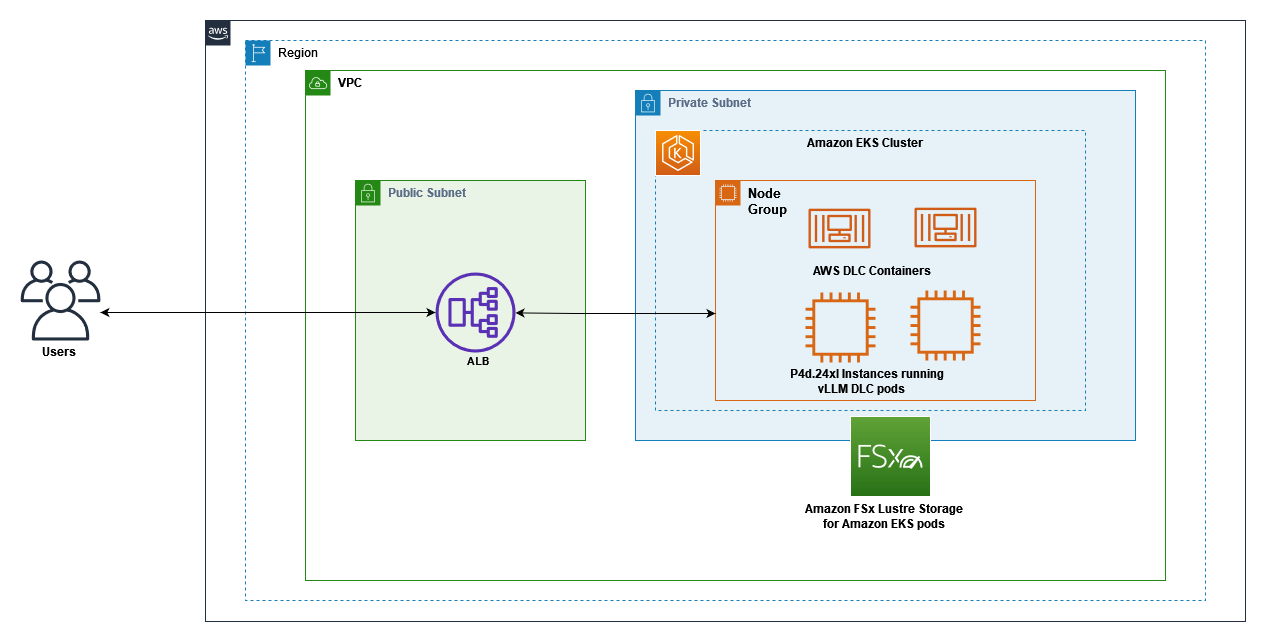
The following diagram shows the interaction between Amazon EKS, GPU-enabled EC2 instances with EFA networking, and Amazon FSx for Lustre storage. Client requests flow through the Application Load Balancer (ALB) to the vLLM server pods running on EKS nodes, which access model weights stored on FSx for Lustre. This architecture provides a scalable, high-performance solution for serving LLM inference workloads with optimal cost-efficiency.

The following diagram illustrates the DLC stack on AWS. The stack demonstrates a comprehensive architecture from EC2 instance foundation through container runtime, essential GPU drivers, and ML frameworks like PyTorch. The layered diagram shows how CUDA, NCCL, and other critical components integrate to support high-performance deep learning workloads.

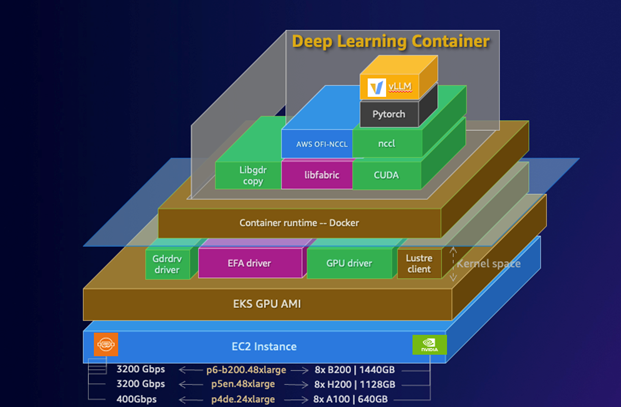
The vLLM DLCs are specifically optimized for high-performance inference, with built-in support for tensor parallelism and pipeline parallelism across multiple GPUs and nodes. This optimization enables efficient scaling of large models like DeepSeek-R1-Distill-Qwen-32B, which would otherwise be challenging to deploy and manage. The containers also include optimized CUDA configurations and EFA drivers, facilitating maximum throughput for distributed inference workloads. This solution uses the following AWS services and components:

  • AWS DLCs for vLLMs – Pre-configured, optimized Docker images that simplify deployment and maximize performance
  • EKS cluster – Provides the Kubernetes control plane for orchestrating containers
  • P4d.24xlarge instancesEC2 P4d instances with 8 NVIDIA A100 GPUs each, configured in a managed node group
  • Elastic Fabric Adapter – Network interface that enables high-performance computing applications to scale efficiently
  • FSx for Lustre – High-performance file system for storing model weights
  • LeaderWorkerSet pattern – Custom Kubernetes resource for deploying vLLM in a distributed configuration
  • AWS Load Balancer Controller – Manages the ALB for external access

By combining these components, we create an inference system that delivers low-latency, high-throughput LLM serving capabilities with minimal operational overhead.

Prerequisites

Before getting started, make sure you have the following prerequisites:

This solution can be deployed in AWS Regions where Amazon EKS, P4d instances, and FSx for Lustre are available. This guide uses the us-west-2 Region. The complete deployment process takes approximately 60–90 minutes.

Clone our GitHub repository containing the necessary configuration files:

# Clone the repository
git clone https://github.com/aws-samples/sample-aws-deep-learning-containers.git
cd vllm-samples/deepseek/eks

Create an EKS cluster

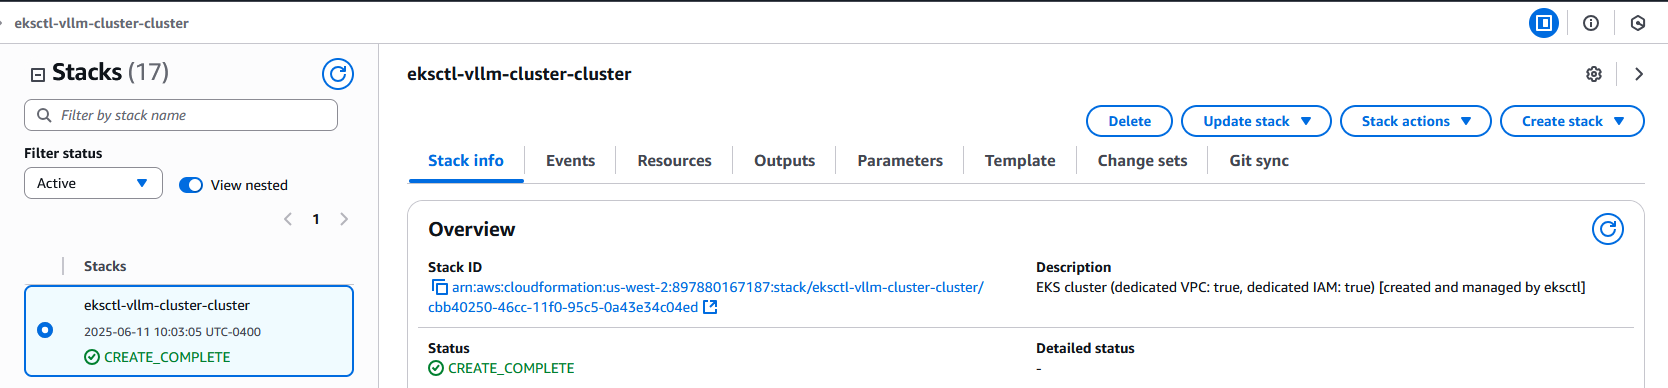
First, we create an EKS cluster in the us-west-2 Region using the provided configuration file. This sets up the Kubernetes control plane that will orchestrate our containers. The cluster is configured with a VPC, subnets, and security groups optimized for running GPU workloads.

# Update the region in eks-cluster.yaml if needed
sed -i "s|region: us-east-1|region: us-west-2|g" eks-cluster.yaml

# Create the EKS cluster
eksctl create cluster -f eks-cluster.yaml --profile vllm-profile

This will take approximately 15–20 minutes to complete. During this time, eksctl creates a CloudFormation stack that provisions the necessary resources for your EKS cluster, as shown in the following screenshot.

You can validate the cluster creation with the following code:

# Verify cluster creation
eksctl get cluster --profile vllm-profile
Expected output:
NAME            REGION          EKSCTL CREATED
vllm-cluster    us-west-2       True

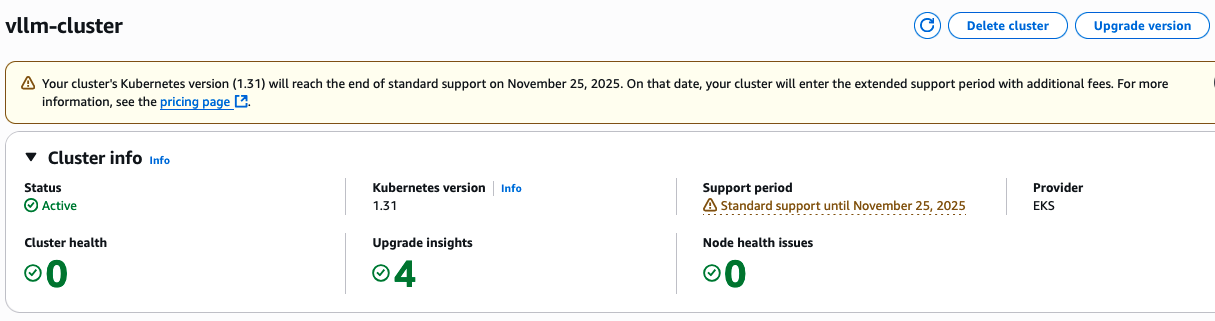
You can also see the cluster created on the Amazon EKS console.

Create a node group with EFA support

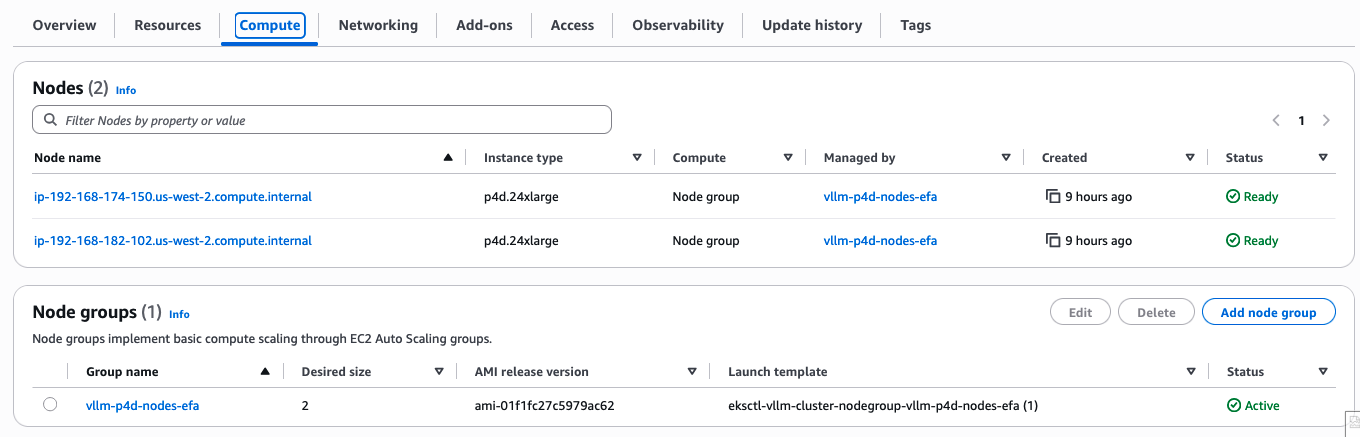
Next, we create a managed node group with P4d.24xlarge instances that have EFA enabled. These instances are equipped with 8 NVIDIA A100 GPUs each, providing substantial computational power for LLM inference. When deploying EFA-enabled instances like p4d.24xlarge for high-performance ML workloads, you must place them in private subnets to facilitate secure, optimized networking. By dynamically identifying and using a private subnet’s Availability Zone in your node group configuration, you can maintain proper network isolation while supporting the high-throughput, low-latency communication essential for distributed training and inference with LLMs. We identify the Availability Zone using the following code:

# Get the VPC ID from the EKS cluster
VPC_ID=$(aws --profile vllm-profile eks describe-cluster --name vllm-cluster \
  --query "cluster.resourcesVpcConfig.vpcId" --output text)

# Find the one of private subnet's availability zone
PRIVATE_AZ=$(aws --profile vllm-profile ec2 describe-subnets \
  --filters "Name=vpc-id,Values=$VPC_ID" "Name=map-public-ip-on-launch,Values=false" \
  --query "Subnets[0].AvailabilityZone" --output text)
echo "Selected private subnet AZ: $PRIVATE_AZ"

# update the nodegroup_az section with the private AZ value
sed -i "s|availabilityZones: \[nodegroup_az\]|availabilityZones: \[\"$PRIVATE_AZ\"\]|g" large-model-nodegroup.yaml

# Verify the change
grep "availabilityZones" large-model-nodegroup.yaml

# Create the node group with EFA support
eksctl create nodegroup -f large-model-nodegroup.yaml --profile vllm-profile

This will take approximately 10–15 minutes to complete. The EFA configuration is particularly important for multi-node deployments, because it enables high-throughput, low-latency networking between nodes. This is crucial for distributed inference workloads where communication between GPUs on different nodes can become a bottleneck. After the node group is created, configure kubectl to connect to the cluster:

# Configure kubectl to connect to the cluster
aws eks update-kubeconfig --name vllm-cluster --region us-west-2 --profile vllm-profile

Verify that the nodes are ready:

# Check node status
kubectl get nodes

The following is an example of the expected output:

NAME                                            STATUS   ROLES    AGE     VERSION
ip-192-168-xx-xx.us-west-2.compute.internal     Ready    <none>   5m      v1.31.7-eks-xxxx
ip-192-168-yy-yy.us-west-2.compute.internal     Ready    <none>   5m      v1.31.7-eks-xxxx

You can also see the node group created on the Amazon EKS console.

Check NVIDIA device pods

Because we’re using an Amazon EKS optimized AMI with GPU support (ami-0ad09867389dc17a1), the NVIDIA device plugin is already included in the cluster, so there’s no need to install it separately. Verify that the NVIDIA device plugin is running:

# Check NVIDIA device plugin pods
kubectl get pods -n kube-system | grep nvidia

The following is an example of the expected output:

nvidia-device-plugin-daemonset-xxxxx 1/1 Running 0 3m48s 
nvidia-device-plugin-daemonset-yyyyy 1/1 Running 0 3m48s

Verify that GPUs are available in the cluster:

# Check available GPUs
kubectl get nodes -o json | jq '.items[].status.capacity."nvidia.com/gpu"'

The following is our expected output:

"8"
"8"

Create an FSx for Lustre file system

For optimal performance, we create an FSx for Lustre file system to store our model weights. FSx for Lustre provides high-throughput, low-latency access to data, which is essential for loading large model weights efficiently. We use the following code:

# Create a security group for FSx Lustre
FSX_SG_ID=$(aws --profile vllm-profile ec2 create-security-group --group-name fsx-lustre-sg \
  --description "Security group for FSx Lustre" \
  --vpc-id $(aws --profile vllm-profile eks describe-cluster --name vllm-cluster \
  --query "cluster.resourcesVpcConfig.vpcId" --output text) \
  --query "GroupId" --output text)

echo "Created security group: $FSX_SG_ID"

# Add inbound rules for FSx Lustre
aws --profile vllm-profile ec2 authorize-security-group-ingress --group-id $FSX_SG_ID \
  --protocol tcp --port 988-1023 \
  --source-group $(aws --profile vllm-profile eks describe-cluster --name vllm-cluster \
  --query "cluster.resourcesVpcConfig.clusterSecurityGroupId" --output text)

aws --profile vllm-profile ec2 authorize-security-group-ingress --group-id $FSX_SG_ID \
     --protocol tcp --port 988-1023 \
     --source-group $FSX_SG_ID

# Create the FSx Lustre filesystem
SUBNET_ID=$(aws --profile vllm-profile eks describe-cluster --name vllm-cluster \
  --query "cluster.resourcesVpcConfig.subnetIds[0]" --output text)

echo "Using subnet: $SUBNET_ID"

FSX_ID=$(aws --profile vllm-profile fsx create-file-system --file-system-type LUSTRE \
  --storage-capacity 1200 --subnet-ids $SUBNET_ID \
  --security-group-ids $FSX_SG_ID --lustre-configuration DeploymentType=SCRATCH_2 \
  --tags Key=Name,Value=vllm-model-storage \
  --query "FileSystem.FileSystemId" --output text)

echo "Created FSx filesystem: $FSX_ID"

# Wait for the filesystem to be available (typically takes 5-10 minutes)
echo "Waiting for filesystem to become available..."
aws --profile vllm-profile fsx describe-file-systems --file-system-id $FSX_ID \
  --query "FileSystems[0].Lifecycle" --output text

# You can run the above command periodically until it returns "AVAILABLE"
# Example: watch -n 30 "aws --profile vllm-profile fsx describe-file-systems --file-system-id $FSX_ID --query FileSystems[0].Lifecycle --output text"

# Get the DNS name and mount name
FSX_DNS=$(aws --profile vllm-profile fsx describe-file-systems --file-system-id $FSX_ID \
  --query "FileSystems[0].DNSName" --output text)

FSX_MOUNT=$(aws --profile vllm-profile fsx describe-file-systems --file-system-id $FSX_ID \
  --query "FileSystems[0].LustreConfiguration.MountName" --output text)

echo "FSx DNS: $FSX_DNS"
echo "FSx Mount Name: $FSX_MOUNT"

The file system is configured with 1.2 TB of storage capacity, SCRATCH_2 deployment type for high performance, and security groups that allow access from our EKS nodes. You can also check the FSx for Lustre file system on the FSx for Lustre console.

Install the AWS FSx CSI Driver

To mount the FSx for Lustre file system in our Kubernetes pods, we install the AWS FSx CSI Driver. This driver enables Kubernetes to dynamically provision and mount FSx for Lustre volumes.

# Add the AWS FSx CSI Driver Helm repository
helm repo add aws-fsx-csi-driver https://kubernetes-sigs.github.io/aws-fsx-csi-driver/
helm repo update

# Install the AWS FSx CSI Driver
helm install aws-fsx-csi-driver aws-fsx-csi-driver/aws-fsx-csi-driver --namespace kube-system

Verify that the AWS FSx CSI Driver is running:

# Check AWS FSx CSI Driver pods
kubectl get pods -n kube-system | grep fsx

The following is an example of the expected output:

fsx-csi-controller-xxxx     4/4     Running   0          24s
fsx-csi-controller-yyyy     4/4     Running   0          24s
fsx-csi-node-xxxx              3/3     Running   0          24s
fsx-csi-node-yyyy              3/3     Running   0          24s

Create Kubernetes resources for FSx for Lustre

We create the necessary Kubernetes resources to use our FSx for Lustre file system:

# Update the storage class with your subnet and security group IDs
sed -i "s|<subnet-id>|$SUBNET_ID|g" fsx-storage-class.yaml
sed -i "s|<sg-id>|$FSX_SG_ID|g" fsx-storage-class.yaml

# Update the PV with your FSx Lustre details
sed -i "s|<fs-id>|$FSX_ID|g" fsx-lustre-pv.yaml
sed -i "s|<fs-id>.fsx.us-west-2.amazonaws.com|$FSX_DNS|g" fsx-lustre-pv.yaml
sed -i "s|<mount-name>|$FSX_MOUNT|g" fsx-lustre-pv.yaml

# Apply the Kubernetes resources
kubectl apply -f fsx-storage-class.yaml
kubectl apply -f fsx-lustre-pv.yaml
kubectl apply -f fsx-lustre-pvc.yaml

Verify that the resources were created successfully:

# Check storage class
kubectl get sc fsx-sc

# Check persistent volume
kubectl get pv fsx-lustre-pv

# Check persistent volume claim
kubectl get pvc fsx-lustre-pvc

The following is an example of the expected output:

NAME     PROVISIONER      RECLAIMPOLICY   VOLUMEBINDINGMODE   ALLOWVOLUMEEXPANSION   AGE
fsx-sc   fsx.csi.aws.com   Retain          Immediate           false                  1m

NAME             CAPACITY   ACCESS MODES   RECLAIM POLICY   STATUS   CLAIM                  STORAGECLASS   REASON   AGE
fsx-lustre-pv   1200Gi     RWX            Retain           Bound    default/fsx-lustre-pvc  fsx-sc                  1m

NAME             STATUS   VOLUME           CAPACITY   ACCESS MODES   STORAGECLASS   AGE
fsx-lustre-pvc   Bound    fsx-lustre-pv   1200Gi     RWX            fsx-sc         1m

These resources include:

  • A StorageClass that defines how to provision FSx for Lustre volumes
  • A PersistentVolume that represents our existing FSx for Lustre file system
  • A PersistentVolumeClaim that our pods will use to mount the file system

Install the AWS Load Balancer Controller

To expose our vLLM service to the outside world, we install the AWS Load Balancer Controller. This controller manages ALBs for our Kubernetes services and ingresses. Refer to Install AWS Load Balancer Controller with Helm for addition details.

# Download the IAM policy document
curl -o iam-policy.json https://raw.githubusercontent.com/kubernetes-sigs/aws-load-balancer-controller/main/docs/install/iam_policy.json

# Create the IAM policy
aws --profile vllm-profile iam create-policy --policy-name AWSLoadBalancerControllerIAMPolicy --policy-document file://iam-policy.json

# Create an IAM OIDC provider for the cluster
eksctl utils associate-iam-oidc-provider --profile vllm-profile --region=us-west-2 --cluster=vllm-cluster --approve

# Create an IAM service account for the AWS Load Balancer Controller
ACCOUNT_ID=$(aws --profile vllm-profile sts get-caller-identity --query "Account" --output text)
eksctl create iamserviceaccount \
  --profile vllm-profile \
  --cluster=vllm-cluster \
  --namespace=kube-system \
  --name=aws-load-balancer-controller \
  --attach-policy-arn=arn:aws:iam::$ACCOUNT_ID:policy/AWSLoadBalancerControllerIAMPolicy \
  --override-existing-serviceaccounts \
  --approve

# Install the AWS Load Balancer Controller using Helm
helm repo add eks https://aws.github.io/eks-charts
helm repo update

# Install the CRDs
kubectl apply -f https://raw.githubusercontent.com/aws/eks-charts/master/stable/aws-load-balancer-controller/crds/crds.yaml

# Install the controller
helm install aws-load-balancer-controller eks/aws-load-balancer-controller \
  -n kube-system \
  --set clusterName=vllm-cluster \
  --set serviceAccount.create=false \
  --set serviceAccount.name=aws-load-balancer-controller

Verify that the AWS Load Balancer Controller is running:

# Check AWS Load Balancer Controller pods
kubectl get pods -n kube-system | grep aws-load-balancer-controller
# Install the LeaderWorkerSet controller
   helm install lws oci://registry.k8s.io/lws/charts/lws \
     --version=0.6.1 \
     --namespace lws-system \
     --create-namespace \
     --wait --timeout 300s

Configure security groups for the ALB

We create a dedicated security group for the ALB and configure it to allow inbound traffic on port 80 from our client IP addresses. We also configure the node security group to allow traffic from the ALB security group to the vLLM service port.

# Create security group for the ALB
USER_IP=$(curl -s https://checkip.amazonaws.com)

VPC_ID=$(aws --profile vllm-profile eks describe-cluster --name vllm-cluster \
  --query "cluster.resourcesVpcConfig.vpcId" --output text)

ALB_SG=$(aws --profile vllm-profile ec2 create-security-group \
  --group-name vllm-alb-sg \
  --description "Security group for vLLM ALB" \
  --vpc-id $VPC_ID \
  --query "GroupId" --output text)

echo "ALB security group: $ALB_SG"

# Allow inbound traffic on port 80 from your IP
aws --profile vllm-profile ec2 authorize-security-group-ingress \
  --group-id $ALB_SG \
  --protocol tcp \
  --port 80 \
  --cidr ${USER_IP}/32

# Get the node group security group ID
NODE_INSTANCE_ID=$(aws --profile vllm-profile ec2 describe-instances \
  --filters "Name=tag:eks:nodegroup-name,Values=vllm-p4d-nodes-efa" \
  --query "Reservations[0].Instances[0].InstanceId" --output text)

NODE_SG=$(aws --profile vllm-profile ec2 describe-instances \
  --instance-ids $NODE_INSTANCE_ID \
  --query "Reservations[0].Instances[0].SecurityGroups[0].GroupId" --output text)

echo "Node security group: $NODE_SG"

# Allow traffic from ALB security group to node security group on port 8000 (vLLM service port)
aws --profile vllm-profile ec2 authorize-security-group-ingress \
  --group-id $NODE_SG \
  --protocol tcp \
  --port 8000 \
  --source-group $ALB_SG

# Update the security group in the ingress file
sed -i "s|<sg-id>|$ALB_SG|g" vllm-deepseek-32b-lws-ingress.yaml

Verify that the security groups were created and configured correctly:

# Verify ALB security group
aws --profile vllm-profile ec2 describe-security-groups --group-ids $ALB_SG --query "SecurityGroups[0].IpPermissions"
The following is the expected output for the ALB security group:
[
    {
        "FromPort": 80,
        "IpProtocol": "tcp",
        "IpRanges": [
            {
                "CidrIp": "USER_IP/32"
            }
        ],
        "ToPort": 80
    }
]
# Verify node security group rules
aws --profile vllm-profile ec2 describe-security-groups --group-ids $NODE_SG --query "SecurityGroups[0].IpPermissions"

Deploy the vLLM server

Finally, we deploy the vLLM server using the LeaderWorkerSet pattern. The AWS DLCs provide an optimized environment that minimizes the complexity typically associated with deploying LLMs.The vLLM DLCs come preconfigured with the following features:

  • Optimized CUDA libraries for maximum GPU utilization
  • EFA drivers and configurations for high-speed node-to-node communication
  • Ray framework setup for distributed computing
  • Performance-tuned vLLM installation with support for tensor and pipeline parallelism

This prepackaged solution dramatically reduces deployment time, the need for complex environment setup, dependency management, and performance tuning that would otherwise require specialized expertise.

# Deploy the vLLM server
# First, verify that the AWS Load Balancer Controller is running
kubectl get pods -n kube-system | grep aws-load-balancer-controller

# Wait until the controller is in Running state
# If it's not running, check the logs:
# kubectl logs -n kube-system deployment/aws-load-balancer-controller

# Apply the LeaderWorkerSet
kubectl apply -f vllm-deepseek-32b-lws.yaml

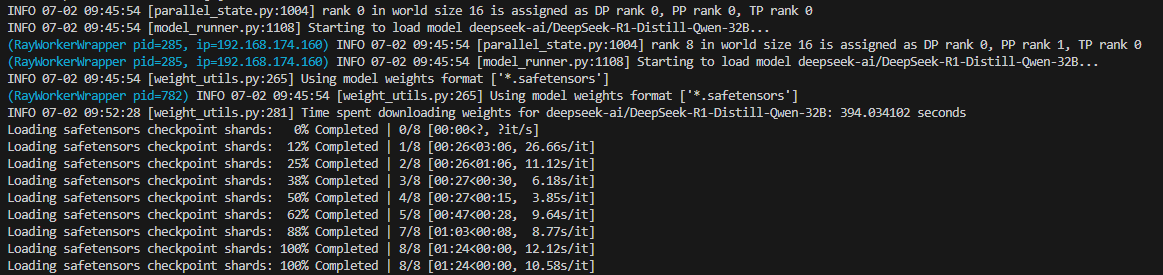
The deployment will start immediately, but the pod might remain in ContainerCreating state for several minutes (5–15 minutes) while it pulls the large GPU-enabled container image. After the container starts, it will take additional time (10–15 minutes) to download and load the DeepSeek model.You can monitor the progress with the following code:

# Monitor pod status
kubectl get pods

# Check pod logs
kubectl logs -f <pod-name>
Here is the out put of one of the pods
Kubectl logs -f vllm-deepseek-32b-lws-0  

The following is the expected output when pods are running:

NAME                      READY   STATUS    RESTARTS   AGE 
vllm-deepseek-32b-lws-0  1/1     Running   0          10m
vllm-deepseek-32b-lws-0-1  1/1     Running   0          10m

We also deploy an ingress resource that configures the ALB to route traffic to our vLLM service:

# Apply the ingress (only after the controller is running)
kubectl apply -f vllm-deepseek-32b-lws-ingress.yaml

You can check the status of the ingress with the following code:

# Check ingress status
kubectl get ingress

The following is an example of the expected output:

NAME                       CLASS   HOSTS   ADDRESS                                                                  PORTS   AGE
vllm-deepseek-32b-lws-ingress  alb     *       k8s-default-vllmdeep-xxxxxxxx-xxxxxxxxxx.us-west-2.elb.amazonaws.com     80      5m

Test the deployment

When the deployment is complete, we can test our vLLM server. It provides the following API endpoints:

  • /v1/completions – For text completions
  • /v1/chat/completions – For chat completions
  • /v1/embeddings – For generating embeddings
  • /v1/models – For listing available models
# Test the vLLM server
# Get the ALB endpoint
export VLLM_ENDPOINT=$(kubectl get ingress vllm-deepseek-32b-lws-ingress -o jsonpath='{.status.loadBalancer.ingress[0].hostname}')
echo "vLLM endpoint: $VLLM_ENDPOINT"

# Test the completions API
curl -X POST http://$VLLM_ENDPOINT/v1/completions \
  -H "Content-Type: application/json" \
  -d '{
      "model": "deepseek-ai/DeepSeek-R1-Distill-Qwen-32B",
      "prompt": "Hello, how are you?",
      "max_tokens": 100,
      "temperature": 0.7
  }'

The following is an example of the expected output:

{
  "id": "cmpl-xxxxxxxxxxxxxxxxxxxxxxxx",
  "object": "text_completion",
  "created": 1717000000,
  "model": "deepseek-ai/DeepSeek-R1-Distill-Qwen-32B",
  "choices": [
    {
      "index": 0,
      "text": " I'm doing well, thank you for asking! How about you? Is there anything I can help you with today?",
      "logprobs": null,
      "finish_reason": "length",
      "stop_reason": null,
      "prompt_logprobs": null
    }
  ],
  "usage": {
    "prompt_tokens": 5,
    "total_tokens": 105,
    "completion_tokens": 100
  }
}

You can also test the chat completions API:

# Test the chat completions API
curl -X POST http://$VLLM_ENDPOINT/v1/chat/completions \
  -H "Content-Type: application/json" \
  -d '{
      "model": "deepseek-ai/DeepSeek-R1-Distill-Qwen-32B",
      "messages": [{"role": "user", "content": "What are the benefits of using FSx Lustre with EKS?"}],
      "max_tokens": 100,
      "temperature": 0.7
  }'

If you encounter errors, check the logs of the vLLM pods:

# Troubleshooting
kubectl logs -f <pod-name>

Performance considerations

In this section, we discuss different performance considerations.

Elastic Fabric Adapter

EFA provides significant performance benefits for distributed inference workloads:

  • Reduced latency – Lower and more consistent latency for communication between GPUs across nodes
  • Higher throughput – Higher throughput for data transfer between nodes
  • Improved scaling – Better scaling efficiency across multiple nodes
  • Better performance – Significantly improved performance for distributed inference workloads

FSx for Lustre integration

Using FSx for Lustre for model storage provides several benefits:

  • Persistent storage – Model weights are stored on the FSx for Lustre file system and persist across pod restarts
  • Faster loading – After the initial download, model loading is much faster
  • Shared storage – Multiple pods can access the same model weights
  • High performance – FSx for Lustre provides high-throughput, low-latency access to the model weights

Application Load Balancer

Using the AWS Load Balancer Controller with ALB provides several advantages:

  • Path-based routing – ALB supports routing traffic to different services based on the URL path
  • SSL/TLS termination – ALB can handle SSL/TLS termination, reducing the load on your pods
  • Authentication – ALB supports authentication through Amazon Cognito or OIDC
  • AWS WAF – ALB can be integrated with AWS WAF for additional security
  • Access logs – ALB can log the requests to an Amazon Simple Storage Service (Amazon S3) bucket for auditing and analysis

Clean up

To avoid incurring additional charges, clean up the resources created in this post. Run the provided ./cleanup.sh script to clean the Kubernetes resources (ingress, LeaderworkerSet, PersistentVolumeClaim, PersistentVolume, AWS Load Balancer Controller, and storage class), IAM resources, the FSX for Lustre file system, and the EKS cluster:

chmod +x cleanup.sh
./cleanup.sh

For more detailed cleanup instructions, including troubleshooting CloudFormation stack deletion failures, refer to the README.md file in the GitHub repository.

Conclusion

In this post, we demonstrated how to deploy the DeepSeek-R1-Distill-Qwen-32B model on Amazon EKS using vLLMs, with GPU support, EFA, and FSx for Lustre integration. This architecture provides a scalable, high-performance system for serving LLM inference workloads.AWS Deep Learning Containers for vLLM provide a streamlined, optimized environment that simplifies LLM deployment by minimizing the complexity of environment configuration, dependency management, and performance tuning. By using these preconfigured containers, organizations can reduce deployment timelines and focus on deriving value from their LLM applications.By combining AWS DLCs with Amazon EKS, P4d instances with NVIDIA A100 GPUs, EFA, and FSx for Lustre, you can achieve optimal performance for LLM inference while maintaining the flexibility and scalability of Kubernetes.This solution helps organizations:

  • Deploy LLMs efficiently at scale
  • Optimize GPU resource utilization with container orchestration
  • Improve networking performance between nodes with EFA
  • Accelerate model loading with high-performance storage
  • Provide a scalable, high performance inference API

The complete code and configuration files for this deployment are available in our GitHub repository. We encourage you to try it out and adapt it to your specific use case.


About the authors

Field Notes: Launch a Fully Configured AWS Deep Learning Desktop with NICE DCV

Post Syndicated from Ajay Vohra original https://aws.amazon.com/blogs/architecture/field-notes-launch-a-fully-configured-aws-deep-learning-desktop-with-nice-dcv/

You want to start quickly when doing deep learning using GPU-activated Elastic Compute Cloud (Amazon EC2) instances in the AWS Cloud. Although AWS provides end-to-end machine learning (ML) in Amazon SageMaker, working at the deep learning frameworks level, the quickest way to start is with AWS Deep Learning AMIs (DLAMIs), which provide preconfigured Conda environments for most of the popular frameworks.

DLAMIs make it straightforward to launch Amazon EC2 instances, but these instances do not automatically provide the high-performance graphics visualization required during deep learning research. Additionally, they are not preconfigured to use AWS storage services or SageMaker. This post explains how you can launch a fully-configured deep learning desktop in the AWS Cloud. Not only is this desktop preconfigured with the popular frameworks such as TensorFlow, PyTorch, and Apache MXNet, but it is also enabled for high-performance graphics visualization. NICE DCV is the remote display protocol used for visualization. In addition, it is preconfigured to use AWS storage services and SageMaker.

Overview of the Solution

The deep learning desktop described in this solution is ready for research and development of deep neural networks (DNNs) and their visualization. You no longer need to set up low-level drivers, libraries, and frameworks, or configure secure access to AWS storage services and SageMaker. The desktop has preconfigured access to your data in a Simple Storage Service (Amazon S3) bucket, and a shared Amazon Elastic File System (Amazon EFS) is automatically attached to the desktop. It is automatically configured to access SageMaker for ML services, and provides you with the ability to prepare the data needed for deep learning, and to research, develop, build, and debug your DNNs. You can use all the advanced capabilities of SageMaker from your deep learning desktop. The following diagram shows the reference architecture for this solution.

Reference Architecture to Launch a Fully Configured AWS Deep Learning Desktop with NICE DCV

Figure 1 – Architecture overview of the solution to launch a fully configured AWS Deep Learning Desktop with NICE DCV

The deep learning desktop solution discussed in this post is contained in a single AWS CloudFormation template. To launch the solution, you create a CloudFormation stack from the template. Before we provide a detailed walkthrough for the solution, let us review the key benefits.

DNN Research and Development

During the DNN research phase, there is iterative exploration until you choose the preferred DNN architecture. During this phase, you may prefer to work in an isolated environment (for example, a dedicated desktop) with your favorite integrated development environment (IDE) (for example, Visual Studio Code or PyCharm). Developers like the ability to step through code the IDE Debugger. With the increasing support for imperative programming in modern ML frameworks, the ability to step through code in the research phase can accelerate DNN development.

The DLAMIs are preconfigured with NVIDIA GPU drivers, NVIDIA CUDA Toolkit, and low-level libraries such as Deep Neural Network library (cuDNN). Deep learning ML frameworks such as TensorFlow, PyTorch, and Apache MXNet are preconfigured.

After you launch the deep learning desktop, you need to install and open your favorite IDE, clone your GitHub repository, and you can start researching, developing, debugging, and visualizing your DNN. The acceleration of DNN research and development is the first key benefit for the solution described in this post.

Screenshot showing Developing on deep learning desktop with Visual Studio Code IDE

Figure 2 – Developing on deep learning desktop with Visual Studio Code IDE

Elasticity in number of GPUs

During the research phase, you need to debug any issues using a single GPU. However, as the DNN is stabilized, you horizontally scale across multiple GPUs in a single machine, followed by scaling across multiple machines.

Most modern deep learning frameworks support distributed training across multiple GPUs in a single machine, and also across multiple machines. However, when you use a single GPU in an on-premises desktop equipped with multiple GPUs, the idle GPUs are wasted. With the deep learning desktop solution described in this post, you can stop the deep learning desktop instance, change its Amazon EC2 instance type to another compatible type, restart the desktop, and get the exact number of GPUs you need at the moment. The elasticity in the number of GPUs in the deep learning desktop is the second key benefit for the solution described in this post.

Integrated access to storage services 

Since the deep learning desktop is running in AWS Cloud, you have access to all of the AWS data storage options, including the S3 object store, the Amazon EFS, and the Amazon FSx file system for Lustre. You can build your favorite data pipeline and it will be supported by one or more data storage options. You can also easily use ML-IO library, which is a high-performance data access library for ML tasks with support for multiple data formats. The integrated access to highly durable and scalable object and file system storage services for accessing ML data is the third key benefit for the solution described in this post.

Integrated access to SageMaker

Once you have a stable version of your DNN, you need to find the right hyperparameters that lead to model convergence during training. Having tuned the hyperparameters, you need to run multiple trials over permutations of datasets and hyperparameters to fine-tune your models. Finally, you may need to prune and compile the models to optimize inference. To compress the training time, you may need to do distributed data parallel training across multiple GPUs in multiple machines. For all of these activities, the deep learning desktop is preconfigured to use SageMaker. You can use jupyter-lab notebooks running on the desktop to launch SageMaker training jobs for distributed training in infrastructure automatically managed by SageMaker.

Submitting a SageMaker training job from deep learning desktop using Jupyter Lab notebook

Figure 3 – Submitting a SageMaker training job from deep learning desktop using Jupyter Lab notebook

The SageMaker training logs, TensorBoard summaries, and model checkpoints can be configured to be written to the Amazon EFS attached to the deep learning desktop. You can use the Linux command tail to monitor the logs, or start a TensorBoard server from the Conda environment on the deep learning desktop, and monitor the progress of your SageMaker training jobs. You can use a Jupyter Lab notebook running on the deep learning desktop to load a specific model checkpoint available on the Amazon EFS, and visualize the predictions from the model checkpoint, even while the SageMaker training job is still running.

 Locally monitoring the TensorBoard summaries from SageMaker training job

Figure 4 – Locally monitoring the TensorBoard summaries from SageMaker training job

SageMaker offers many advanced capabilities, such as profiling ML training jobs using Amazon SageMaker Debugger, and these services are easily accessible from the deep learning desktop. You can manage the training input data, training model checkpoints, training logs, and TensorBoard summaries of your local iterative development, in addition to the distributed SageMaker training jobs, all from your deep learning desktop. The integrated access to SageMaker services is the fourth key use case for the solution described in this post.

Prerequisites

To get started, complete the following steps:

Walkthrough

The complete source and reference documentation for this solution is available in the repository accompanying this post. Following is a walkthrough of the steps.

Create a CloudFormation stack

Create a stack on the CloudFormation console in your selected AWS Region using the CloudFormation template in your cloned GitHub repository. This CloudFormation stack creates IAM resources. When you are creating a CloudFormation stack using the console, you must confirm: I acknowledge that AWS CloudFormation might create IAM resources.

To create the CloudFormation stack, you must specify values for the following input parameters (for the rest of the input parameters, default values are recommended):

  • DesktopAccessCIDR – Use the public internet address of your laptop as the base value for the CIDR.
  • DesktopInstanceType – For deep leaning, the recommended value for this parameter is p3.2xlarge, or larger.
  • DesktopVpcId – Select an Amazon Virtual Private Cloud (VPC) with at least one public subnet.
  • DesktopVpcSubnetId – Select a public subnet in your VPC.
  • DesktopSecurityGroupId – The specified security group must allow inbound access over ports 22 (SSH) and 8443 (NICE DCV) from your DesktopAccessCIDR, and must allow inbound access from within the security group to port 2049 and all network ports required for distributed SageMaker training in your subnet.
  • If you leave it blank, the automatically-created security group allows inbound access for SSH, and NICE DCV from your DesktopAccessCIDR, and allows inbound access to all ports from within the security group.
  • KeyName – Select your SSH key pair name.
  • S3Bucket – Specify your S3 bucket name. The bucket can be empty.

Visit the documentation on all the input parameters.

Connect to the deep learning desktop

  • When the status for the stack in the CloudFormation console is CREATE_COMPLETE, find the deep learning desktop instance launched in your stack in the Amazon EC2 console,
  • Connect to the instance using SSH as user ubuntu, using your SSH key pair. When you connect using SSH, if you see the message, “Cloud init in progress. Machine will REBOOT after cloud init is complete!!”, disconnect and try again in about 15 minutes.
  • The desktop installs the NICE DCV server on first-time startup, and automatically reboots after the install is complete. If instead you see the message, “NICE DCV server is enabled!”, the desktop is ready for use.
  • Before you can connect to the desktop using the NICE DCV client, you need to set a new password for user ubuntu using the Bash command:
    sudo passwd ubuntu 
  • After you successfully set the new password for user ubuntu, exit the SSH connection. You are now ready to connect to the desktop using a suitable NICE DCV client (a non–web browser client is recommended) using the user ubuntu, and the new password.
  • NICE DCV client asks you to specify the server host and port to connect. For the server host, use the public IPv4 DNS address of the desktop Amazon EC2 instance available in Amazon EC2 console.
  • You do not need to specify the port, because the desktop is configured to use the default NICE DCV server port of 8443.
  • When you first login to the desktop using the NICE DCV client, you will be asked if you would like to upgrade the OS version. Do not upgrade the OS version!

Develop on the deep learning desktop

When you are connected to the desktop using the NICE DCV client, use the Ubuntu Software Center to install Visual Studio Code, or your favorite IDE. To view the available Conda environments containing the popular deep learning frameworks preconfigured on the desktop, open a desktop terminal, and run the Bash command:

conda env list

The deep learning desktop instance has secure access to the S3 bucket you specified when you created the CloudFormation stack. You can verify access to the S3 bucket by running the Bash command (replace ‘your-bucket-name’ following with your S3 bucket name):

aws s3 ls your-bucket-name 

If your bucket is empty, a successful initiation of the previous command will produce no output, which is normal.

An Amazon Elastic Block Store (Amazon EBS) root volume is attached to the instance. In addition, an Amazon EFS is mounted on the desktop at the value of EFSMountPath input parameter, which by default is /home/ubuntu/efs. You can use the Amazon EFS for staging deep learning input and output data.

Use SageMaker from the deep learning desktop

The deep learning desktop is preconfigured to use SageMaker. To get started with SageMaker examples in a JupyterLab notebook, launch the following Bash commands in a desktop terminal:

mkdir ~/git
cd ~/git
git clone https://github.com/aws/amazon-sagemaker-examples.git
jupyter-lab

This will start a ‘jupyter-lab’ notebook server in the terminal, and open a tab in your web browser. You can explore any of the SageMaker example notebooks. We recommend starting with the example Distributed Training of Mask-RCNN in SageMaker using Amazon EFS found at the following path in the cloned repository:

advanced_functionality/distributed_tensorflow_mask_rcnn/mask-rcnn-scriptmode-efs.ipynb

The preceding SageMaker example requires you to specify a subnet and a security group. Use the preconfigured OS environment variables as follows:

security_group_ids = [ os.environ['desktop_sg_id'] ] 
subnets = [ os.environ['desktop_subnet_id' ] ] 

Stopping and restarting the desktop

You may safely reboot, stop, and restart the desktop instance at any time. The desktop will automatically mount the Amazon EFS at restart.

Clean Up

When you no longer need the deep learning desktop, you may delete the CloudFormation stack from the CloudFormation console. Deleting the stack will shut down the desktop instance, and delete the root Amazon EBS volume attached to the desktop. The Amazon EFS is not automatically deleted when you delete the stack.

Conclusion

In this post, we showed how to launch a desktop pre-configured with the popular machine learning frameworks for research and development of deep learning neural networks.  NICE-DCV was used for high performance visualization related to deep learning. AWS storage services were used for highly scalable access to deep learning data.  Finally, Amazon SageMaker was used for the distributed training of deep learning data.

Field Notes provides hands-on technical guidance from AWS Solutions Architects, consultants, and technical account managers, based on their experiences in the field solving real-world business problems for customers.