Post Syndicated from Will Matos original https://aws.amazon.com/blogs/devops/open-sourcing-adaptive-workflows-for-ai-driven-development-life-cycle-ai-dlc/
AI-Driven Development Life Cycle (AI-DLC) holds the promise of unlocking the full potential of AI in software development. By emphasizing AI-led workflows and human-centric decision-making, AI-DLC can deliver velocity and quality. However, realizing these gains hinges on how organizations effectively integrate AI into their engineering workflows.
Through our work with engineering teams across industries, we have identified three recurring challenges. These challenges consistently limit the effectiveness of AI in accelerating modern software development. The first challenge is one-size-fits-all workflows. These workflows force every project through the same rigid sequence of steps. The second challenge is the lack of flexible depth in workflow stages. This leads to over-engineering or insufficient rigor. The third challenge is tools that over-automate. These tools unintentionally divert humans away from critical validation and oversight responsibilities.
Achieving true, sustainable productivity requires the process and AI coding agents to become adaptive to context, flexible in depth, and collaborative by design. In this blog, we’ll show you how AI-DLC’s core principles address these three challenges, transforming them from productivity blockers into opportunities for adaptive, human-centered development. We’ll describe how AI-DLC enables workflows that adapt to the problem at hand by intelligently selecting stages, modulating depth, and embedding human oversight at every critical decision point.
We will also introduce our open-source Amazon Q Developer/Kiro Rules implementation, which brings AI-DLC principles to life through adaptive workflow scaffolds. This allows you to start applying these principles in your own projects and experience AI-native development that accelerates delivery without compromising engineering discipline or human judgment.
How does AI-DLC address these challenges?
Let’s explore how AI-DLC addresses these challenges.
1. The “One-Size-Fits-All” Workflow Problem
Software development has never been a linear process. In practice, different projects follow distinct pathways with their own checkpoints and deliverables. Consider these examples:
- A simple defect fix doesn’t require elaborate requirements analysis and planning
- A pure infrastructure porting project doesn’t warrant application design with domain modeling
- A new feature or service addition demands different steps than applying a security patch
Yet, many modern Agentic coding tools provide hard-wired, opinionated workflows that ignore this diversity. Regardless of intent or scope, every project is forced through the same rigid sequence of steps—even when some add little or no value. This rigidity introduces friction, wastes time, and reduces productivity. The result: artificial ceremonies, unnecessary artifacts, redundant approvals, and process overhead that impede velocity.
How AI-DLC addresses this challenge:
AI-DLC addresses this challenge through the Principle 10 (No Hard-Wired, Opinionated SDLC Workflows) as defined in the AI-DLC Method Definition Paper.
“AI-DLC avoids prescribing opinionated workflows for different development pathways (such as new system development, refactoring, defect fixes, or microservice scaling). Instead, it adopts a truly AI-First approach where AI recommends the Level 1 Plan based on the given pathway intention.“
2. Lack of Flexible Depth Within Each Stage
True adaptivity must go beyond the breadth of a workflow and extend into its depth and intensity. This is how human experts intuitively plan software projects today.
Even when workflows are flexible, many tools fail to modulate the depth of engagement at each stage. For example, building a lightweight utility function doesn’t require full-scale Domain-Driven Design or detailed architectural modeling. When an AI coding agent compels teams to follow these steps regardless of need, the consequence is wasted effort and an over-engineered product. Developers spend cycles reviewing artifacts as the tools dictate rather than delivering business value.
How AI-DLC addresses this challenge:
Through the same principle 10, AI-DLC adapts both the breadth (choice of stages) and the depth of each stage to match the complexity of the intent and context. For example, the complexity of the requirements determines whether a conceptual design is sufficient or whether a full architectural deep dive is required in the Design stage.
Humans validate and adjust this AI-proposed breadth and depth, ensuring that each stage’s rigor matches the scope of the challenge. This elasticity—balancing breadth and depth—is essential for sustaining true velocity without sacrificing engineering discipline.
3. Tools that Reduce the Emphasis on Human Oversight
As AI tools automate more of the Software Development Life Cycle (SDLC), a new risk has emerged: process atrophy. Developers, excited by automation, often drift into passive execution—allowing AI to “decide everything.” The result is a loss of reflection, weakened oversight, and erosion of shared understanding. AI tools must not only automate work but also amplify the significance of human judgment. They should remind practitioners that “human in the loop” is not a checkbox—it is the cornerstone of trust, accountability, and correctness in AI-native development. Equally critical are the rituals and rhythms that sustain collaborative engineering.
How AI-DLC addresses this challenge:
AI-DLC addresses this challenge by requiring a collaborative human-in-the-loop cycle at every stage of the workflow. In this loop, AI generates a plan to execute a task, and relevant stakeholders assemble, review, and validate it.
These rituals, defined as Mob Elaboration and Mob Construction in AI-DLC, ensure that AI’s suggestions are not blindly accepted. Approved plans are executed, and stakeholders again review and validate the final artifacts. The AI-DLC workflow records every human action and approval, embedding reflection to ensure that humans remain the compass, guiding AI’s acceleration.
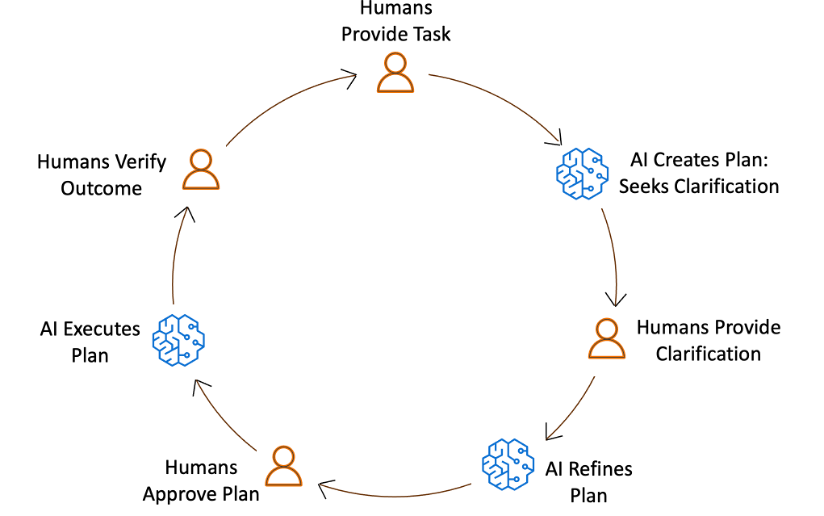
Figure 1: AI-DLC workflow: Humans decide and validate, AI plans and executes.
Effective tooling must therefore emphasize:
- Promoting for stakeholder collaboration: The system should explicitly call for collaborative rituals involving stakeholders
- Auditability: Every AI-generated plan and artifact should surface rationale and invite review, recording every human oversight and interaction
- Flow awareness: Tools should detect when automation races ahead of human validation and deliberately slow down to emphasize critical checkpoints
The goal is not to suppress automation but to embed critical human ownership.
From Principles to Practice
The ideas we outlined — adaptive workflows, flexible depth, and embedded human oversight — are compelling in theory and validated by all engineering teams we’ve engaged. The critical question is: How do we operationalize these ideas into practice without reintroducing the rigidity we seek to eliminate?
One approach is manual prompt engineering: crafting structured prompts that guide AI assistants through the AI-DLC workflow step by step. Each prompt encodes the role AI should assume, the task at hand, the governance requirements, and the audit trail expectations. This structured approach transforms a simple AI interaction into a disciplined workflow that embodies AI-DLC principles.
This approach, while promising, faces its own limitations. Crafting intricate prompts demands discipline and expertise, posing barriers to widespread adoption. Moreover, humans become responsible for maintaining workflow adaptability, selecting the appropriate prompt at the right moment, and ensuring collaborative checkpoints are honored. This places the burden of orchestration back on practitioners, diverging from our core principle of truly AI-native development, where AI itself drives adaptive decision-making.
The question arises: How can we embed AI-DLC principles directly into the execution layer, making adaptivity and collaboration inherent properties of the system rather than manual responsibilities?
Steering for Productivity
The answer lies in workflow scaffolds. These are Rules or Steering customizations for AI Coding Agents. They operationalize AI-DLC principles within the tools. This is done while maintaining transparency, audibility, and modifiability. Our implementation uses Rules/Steering Files. These serve as the foundation of this execution layer. It transforms AI from a passive assistant into an adaptive decision engine.
Rather than requiring developers to craft elaborate prompts, AI-Driven development begins with a simple statement of intent. From there, the workflow scaffolds evaluate context, assess complexity, and dynamically construct an appropriate development pathway. The core workflow definition, including a library of stages and decision heuristics for when and how to apply them, empowers AI to continuously tailor the development process to the nature of the work at hand.
Each AI-DLC phase (Inception, Construction, Operations) evaluates the depth at which it should execute, resulting in a process that adapts to the problem rather than forcing the problem to adapt to the process. This approach yields several critical outcomes:
- Adaptive decisioning: The workflow conforms to the problem’s shape, intelligently skipping or deepening stages based on contextual assessment rather than predetermined rules.
- Transparent checkpoints: Human approvals are embedded at every decision gate, preserving oversight while maintaining velocity. The system doesn’t just automate; it orchestrates collaboration.
- End-to-end traceability: Every artifact, decision, and conversation is logged, creating a continuous, inspectable trail of reasoning that supports both accountability and continuous improvement.
The result is a process that is context-aware, scalable, and self-correcting – capable of supporting everything from a single-line defect fix to a comprehensive system modernization, all while maintaining the rigor and human judgment that define engineering excellence.
Build, Test, and Evolve with Us
We’re open-sourcing the AI-DLC workflow, implemented as Amazon Q Rules and Kiro Steering Files, so organizations everywhere can experience AI-DLC in practice and build production-grade systems. We invite developers, architects, and engineering leaders to:
- Apply the steering rules in real-world projects, whether brownfield or greenfield. Refer to our companion AI-DLC workflow walkthrough blog for step-by-step instructions on how to build using AI-DLC in Amazon Q Developer.
- Observe how the process adapts to your project’s size, scope, and intent.
- Share your experience through our GitHub repository, where you can open issues, propose improvements, and contribute ideas.
Your feedback will help evolve this into a foundation for AI-native software development – one that accelerates delivery without sacrificing rigor or human judgment. Together, we can redefine what software engineering looks like in the age of AI: not scripted but steered.
Conclusion
AI-DLC addresses multiple challenges limiting AI’s effectiveness in software development such as rigid workflows, inflexible workflow depth, and tools that reduce human oversight. AI-DLC enables adaptive workflows that intelligently select stages, modulate depth, and embed human oversight at critical decision points. This approach, implemented through open-source tools like Amazon Q Developer Rules and Kiro Steering, accelerates delivery while maintaining engineering discipline and human judgment.
AI-DLC emphasizes human oversight and collaboration in AI-driven software development. Workflow scaffolds, embed AI-DLC principles into the execution layer, enabling adaptive decision-making, transparent checkpoints, and end-to-end traceability. Open-sourcing the AI-DLC workflow allows organizations to experience AI-DLC in practice and contribute to its evolution.
Ready to get started? Visit our GitHub repository to download the AI-DLC workflow and join the AI-Native Builders Community to contribute to the future of software development.
About the authors:


 Speaking of following people, AWS Builder Center makes it really straightforward to connect and engage with others, serving as the central hub for the AWS technical community. It brings together all the different ways that you can connect with fellow builders. For example, the Who to Follow section introduces you to AWS Heroes, Community Builders, and active community members who are sharing their knowledge and expertise in your areas of interest.


 AWS Builder Center gives you a more personalized and comprehensive way to showcase your AWS journey. Your unique profile comes with a custom URL and shareable QR code, making it straightforward to connect with others and share your presence in the AWS community.