Post Syndicated from Jake Massimo original https://aws.amazon.com/blogs/security/aws-lc-fips-3-0-first-cryptographic-library-to-include-ml-kem-in-fips-140-3-validation/
 We’re excited to announce that AWS-LC FIPS 3.0 has been added to the National Institute of Standards and Technology (NIST) Cryptographic Module Validation Program (CMVP) modules in process list. This latest validation of AWS-LC introduces support for Module Lattice-Based Key Encapsulation Mechanisms (ML-KEM), the new FIPS standardized post-quantum cryptographic algorithm. This is a significant step towards enhancing the long-term confidentiality of our most sensitive customer workflows, including U.S. federal government communications.
This validation makes AWS LibCrypto (AWS-LC) the first open source cryptographic module to provide post-quantum algorithm support within the FIPS module. Organizations that require FIPS-validated cryptographic modules—such as those operating under FedRAMP, FISMA, HIPAA, and other federal compliance frameworks—can now use these algorithms within AWS-LC.
This announcement is part of the long-term promise made by AWS-LC of continuous validation to obtain new FIPS 140-3 certificates. AWS-LC obtained its first certificate in October 2023 for AWS-LC-FIPS 1.0. A subsequent version of the library, AWS-LC-FIPS 2.0, was certified in October 2024. In this post, we discuss our FIPS-validation of post-quantum cryptographic algorithm ML-KEM, the performance improvements of existing algorithms in AWS-LC FIPS 2.0 and 3.0, and the new algorithm support added for version 3.0. We also discuss how you can use the new algorithms to implement hybrid post-quantum cipher suites, along with configuration options that you can set up today to help protect against future threats.
FIPS post-quantum cryptography
Large-scale quantum computers pose a threat to the long-term confidentiality of the data that we protect under public-key cryptography today. In what’s known as a record-now, decrypt-later attack, an adversary records internet traffic today, capturing key exchanges and encrypted communication. Then, when a sufficiently powerful quantum computer is available, the adversary can retroactively recover shared secrets and encryption keys by solving the underlying hardness problem.
ML-KEM is one of the new key encapsulation mechanisms that’s being standardized by NIST in an effort to protect the uses of public key cryptography from quantum threats. Much like RSA, Diffie-Hellman (DH), or Elliptic-curve Diffie-Hellman (ECDH) key exchange, it works by establishing a shared secret between two parties. However, unlike RSA or DH, ML-KEM bases the key exchange on an underlying problem that is believed to be hard for quantum computers to solve.
Today, we don’t know how to build such a large-scale quantum computer. Significant scientific research is needed before such a computer can be built. However, you can mitigate the risk of record-now, decrypt-later attacks by introducing post-quantum algorithms such as ML-KEM into your key exchange protocols today. We recommend adopting a hybrid key exchange approach that combines a traditional key exchange method—such as ECDH—with ML-KEM to hedge against current and future adversaries. Later in this post, we show you how you can implement hybrid post-quantum cipher suites today to protect against future threats.
AWS-LC FIPS 3.0 includes the ML-KEM algorithm for all three provided parameter sets, ML-KEM-512, ML-KEM-768, and ML-KEM-1024. The three parameter sets provide differing levels of security strength as specified by NIST (see FIPS 203 [9, Sect. 5.6] or the post-quantum security evaluation criteria). ML-KEM-768 is recommended for general-purpose use cases, ML-KEM-1024 is designed for applications that require a higher security level or adherence to explicit directives such as the Commercial National Security Algorithm Suite (CNSA) 2.0 for National Security System owners and operators.
| Algorithm | NIST security category | Public key (B) | Private key (B) | Ciphertext (B) |
| ML-KEM-512 | 1 | 800 | 1632 | 768 |
| ML-KEM-768 | 3 | 1184 | 2400 | 1088 |
| ML-KEM-1024 | 5 | 1568 | 3168 | 1568 |
Table 1. Security strength category, public key, private key, and ciphertext sizes in bytes for the three parameter sets of ML-KEM
Integration with s2n-tls
ML-KEM is now available in our open source TLS implementation, s2n-tls, through hybrid key exchange for TLS 1.3 (draft-ietf-tls-hybrid-design). We’ve also added support for hybrid ECDHE-ML-KEM key agreement for TLS 1.3 (draft-kwiatkowski-tls-ecdhe-mlkem), along with new key share identifiers for Curve x25519 and ML-KEM-768.
For hybrid key establishment in FIPS 140-approved mode, one component algorithm must be a NIST-approved mechanism (detailed in NIST post-quantum FAQs). With ML-KEM added to the list of NIST-approved algorithms, you can now include non-FIPS standardized algorithms like Curve x25519 in hybrid cipher suites. By configuring your TLS cipher suite to use ML-KEM-768 and x25519 (draft-kwiatkowski-tls-ecdhe-mlkem), you can use x25519 within a FIPS-validated cryptographic module for the first time. This can facilitate more efficient key exchange through the highly optimized and functionally verified Curve x25519 implementation provided by AWS-LC.
New algorithms and new implementations
Two integral parts of our commitment to continuous validation of AWS-LC FIPS are to include new algorithms as approved cryptographic services and new implementations of existing algorithms that provide performance improvements and functional correctness.
New algorithms
We’re committed to continually validating new algorithms so that builders can adopt FIPS-validated cryptography by including the latest revisions of approved cryptographic algorithms and supporting new primitives. Validating new algorithms in their latest standardized revision helps ensure that our cryptographic tool-kit is providing high-assurance implementations that achieve compliance with globally recognized standards.
In AWS-LC FIPS 3.0 we’ve added the latest member of the Secure Hash Algorithm standard SHA-3 to the module. The SHA-3 family is a cryptographic primitive used to support a variety of algorithms. In AWS-LC FIPS 3.0, we’ve integrated ECDSA and RSA signature generation and verification with SHA-3 and within the post-quantum algorithm ML-KEM. In AWS-LC, ML-KEM calls into our FIPS-validated SHA-3 functions, which provide optimized implementations of SHA-3 and SHAKE hashing procedures. This means that as we continually refine and optimize our AWS-LC SHA-3 implementation, we’ll continue to see performance increases across algorithms that use the primitive, such as ML-KEM.
EdDSA is a digital signature algorithm based on elliptic curves using the curve Ed25519. It was added to NIST’s updated Digital Signature Standard (DSS), FIPS 186-5. This signature algorithm is now offered as part of the AWS-LC 3.0 FIPS module. For key agreement, the Single-step Key Derivation Function (SSKDF) used to derive keys from a shared secret (SP 800-56Cr2) is available both in the digest-based and HMAC-based specifications. It can be used, for example, to derive a key from a shared secret produced by KMS when using ECDH. Further keys can be derived from that original key using a Key-based Key Derivation Function (KBKDF)—SP 800-108r1—which is available using a counter-mode based on HMAC.
Performance improvements
We focused on increasing the performance of public-key cryptography algorithms widely used in transport protocols such as the TLS protocol. For example, RSA signatures on Graviton2 are 81 percent faster for bit-length 2048, 33 percent for 3072, and 94 percent for 4096, with added formal verification of functional correctness of the main operation. Using Intel’s AVX512 Integer Fused Multiply Add (IFMA) instructions—available starting from 3rd Gen Intel Xeon—Intel developers contributed an RSA implementation that employs these instruction and the wide AVX512 registers, which are twice as fast as the existing implementation.
We increased throughput for EdDSA signing by an average of 108 percent and for verifying by 37 percent. This average is taken over three environments: Graviton2, Graviton3, and Intel Ice Lake (Intel Xeon Platinum 8375C CPU). This boost in performance is achieved by integrating assembly implementations of the core operation for each target from the s2n-bignum library. That, in addition to the careful constant-time implementation of the core operations, is how each one has been proven to be functionally correct.
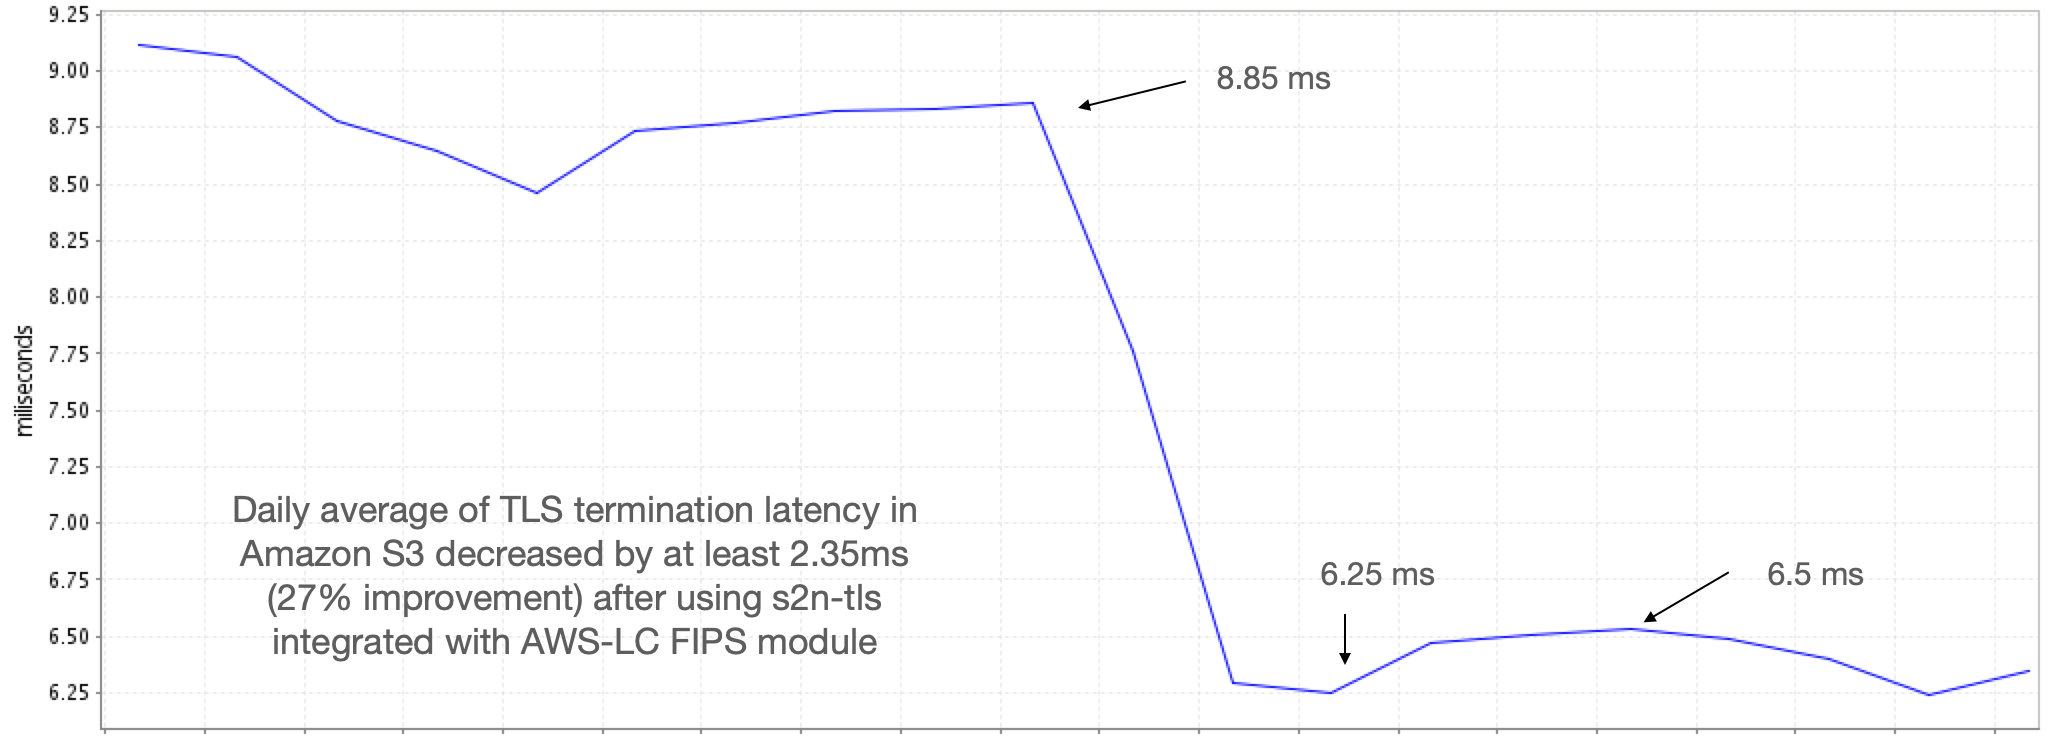
In Figure 1 that follows, we highlight the percentage of performance improvements compared to AWS-LC FIPS 1.0 in versions 2.0 and 3.0. The improvements achieved in 2.0 are maintained in 3.0 and are not repeated in the graph. The graph also includes symmetric-key improvements. In AES-256-GCM, which is widely used in TLS to encrypt the communication after the session has been established, the increase is on average 115 percent across Intel Ice Lake and Graviton4 to encrypt a 16 KB message. In AES-256-XTS, which is used in disk storage, encrypting a 256 B input is 360 percent faster on Intel Ice Lake and 90 percent faster on Graviton4.

Figure 1: Graph of performance improvements in versions 2.0 and 3.0 of AWS-LC FIPS
How to use ML-KEM today
You can configure both s2n-tls and AWS-LC TLS libraries to enable hybrid post-quantum security with ML-KEM today by enabling X25519MLKEM768 and SecP256r1MLKEM768 for key exchange. We’ve integrated support for both of these hybrid algorithms in AWS-LC libssl and s2n-tls using each library’s exisiting TLS configuration APIs. To negotiate a TLS connection, use one of the following commands:
# AWS-LC Client CLI Example
./aws-lc/build/tool/bssl s_client -curves X25519MLKEM768:SecP256r1MLKEM768:X25519 -connect <hostname>:<port>
# S2N-tls Client CLI Example
./s2n/build/bin/s2nc -c default_pq -i <hostname> <port>Conclusion
In this post, we described the ongoing development, optimization, and validation of the cryptography that we provide to our customers and products through our open source cryptographic library, AWS-LC. We introduced the addition of FIPS-validated post-quantum algorithms and provided configuration options to begin using these algorithms today to protect against future threats.
AWS-LC-FIPS 3.0 is part of our commitment to continually validate new versions of AWS-LC as we add new algorithms within the FIPS boundary as they become specified, and as we raise the performance and formal verification bar on existing algorithms. Through this commitment, we continue to support the wider developer community of Rust, Java and Python developers by providing integrations into the AWS Libcrypto for Rust (aws-lc-rs) and ACCP 2.0 libraries. We facilitate integration into CPython so that you can build against AWS-LC and use it for all cryptography in the Python standard library. We enabled rustls to provide FIPS support.
If you have feedback about this post, submit comments in the Comments section below. If you have questions about this post, contact AWS Support.