Post Syndicated from Rakesh Singh original https://aws.amazon.com/blogs/security/secure-and-automated-domain-membership-management-for-ec2-instances-with-no-internet-access/
In this blog post, I show you how to deploy an automated solution that helps you fully automate the Active Directory join and unjoin process for Amazon Elastic Compute Cloud (Amazon EC2) instances that don’t have internet access.
Managing Active Directory domain membership for EC2 instances in Amazon Web Services (AWS) Cloud is a typical use case for many organizations. In a dynamic environment that can grow and shrink multiple times in a day, adding and removing computer objects from an Active Directory domain is a critical task and is difficult to manage without automation.
AWS seamless domain join provides a secure and reliable option to join an EC2 instance to your AWS Directory Service for Microsoft Active Directory. It’s a recommended approach for automating joining a Windows or Linux EC2 instance to the AWS Managed Microsoft AD or to an existing on-premises Active Directory using AD Connector, or a standalone Simple AD directory running in the AWS Cloud. This method requires your EC2 instances to have connectivity to the public AWS Directory Service endpoints. At the time of writing, Directory Service doesn’t have PrivateLink endpoint support. This means you must allow traffic from your instances to the public Directory Service endpoints via an internet gateway, network address translation (NAT) device, virtual private network (VPN) connection, or AWS Direct Connect connection.
At times, your organization might require that any traffic between your VPC and Directory Service—or any other AWS service—not leave the Amazon network. That means launching EC2 instances in an Amazon Virtual Private Cloud (Amazon VPC) with no internet access and still needing to join and unjoin the instances from the Active Directory domain. Provided your instances have network connectivity to the directory DNS addresses, the simplest solution in this scenario is to run the domain join commands manually on the EC2 instances and enter the domain credentials directly. Though this process can be secure—as you don’t need to store or hardcode the credentials—it’s time consuming and becomes difficult to manage in a dynamic environment where EC2 instances are launched and terminated frequently.
VPC endpoints enable private connections between your VPC and supported AWS services. Private connections enable you to privately access services by using private IP addresses. Traffic between your VPC and other AWS services doesn’t leave the Amazon network. Instances in your VPC don’t need public IP addresses to communicate with resources in the service.
The solution in this blog post uses AWS Secrets Manager to store the domain credentials and VPC endpoints to enable private connection between your VPC and other AWS services. The solution described here can be used in the following scenarios:
- Manage domain join and unjoin for EC2 instances that don’t have internet access.
- Manage only domain unjoin if you’re already using seamless domain join provided by AWS, or any other method for domain joining.
- Manage only domain join for EC2 instances that don’t have internet access.
This solution uses AWS CloudFormation to deploy the required resources in your AWS account based on your choice from the preceding scenarios.
Note: If your EC2 instances can access the internet, then we recommend using the seamless domain join feature and using scenario 2 to remove computers from the Active Directory domain upon instance termination.
The solution described in this blog post is designed to provide a secure, automated method for joining and unjoining EC2 instances to an on-premises or AWS Managed Microsoft AD domain. The solution is best suited for use cases where the EC2 instances don’t have internet connectivity and the seamless domain join option cannot be used.
How this solution works
This blog post includes a CloudFormation template that you can use to deploy this solution. The CloudFormation stack provisions an EC2 Windows instance running in an Amazon EC2 Auto Scaling group that acts as a worker and is responsible for joining and unjoining other EC2 instances from the Active Directory domain. The worker instance communicates with other required AWS services such as Amazon Simple Storage Service (Amazon S3), Secrets Manager, and Amazon Simple Queue Service (Amazon SQS) using VPC endpoints. The stack also creates all of the other resources needed for this solution to work.
Figure 1 shows the domain join and unjoin workflow for EC2 instances in an AWS account.
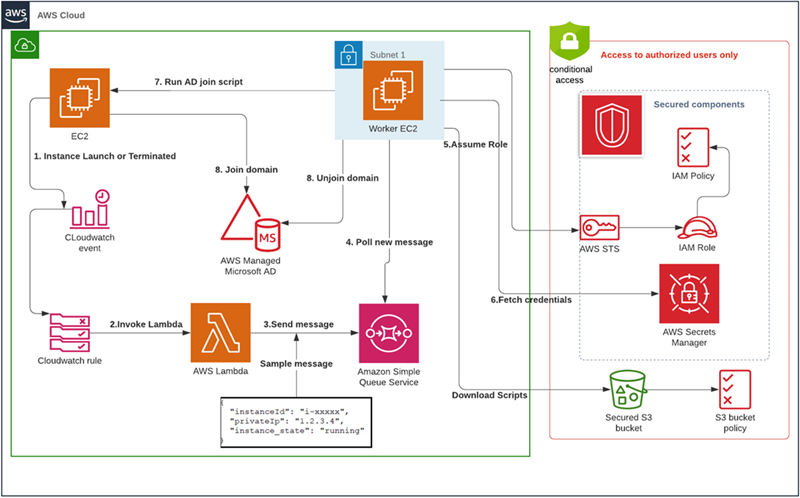
Figure 1: Workflow for joining and unjoining an EC2 instance from a domain with full protection of Active Directory credentials
The event flow in Figure 1 is as follows:
- An EC2 instance is launched or terminated in an account.
- An Amazon CloudWatch Events rule detects if the EC2 instance is in running or terminated state.
- The CloudWatch event triggers an AWS Lambda function that looks for the tag JoinAD: true to check if the instance needs to join or unjoin the Active Directory domain.
- If the tag value is true, the Lambda function writes the instance details to an Amazon Simple Queue Service (Amazon SQS) queue.
- A standalone, highly secured EC2 instance acts as a worker and polls the Amazon SQS queue for new messages.
- Whenever there’s a new message in the queue, the worker EC2 instance invokes scripts on the remote EC2 instance to add or remove the instance from the domain based on the instance operating system and state.
In this solution, the security of the Active Directory credentials is enhanced by storing them in Secrets Manager. To secure the stored credentials, the solution uses resource-based policies to restrict the access to only intended users and roles.
The credentials can only be fetched dynamically from the EC2 instance that’s performing the domain join and unjoin operations. Any access to that instance is further restricted by a custom AWS Identity and Access Management (IAM) policy created by the CloudFormation stack. The following policies are created by the stack to enhance security of the solution components.
- Resource-based policies for Secrets Manager to restrict all access to the stored secret to only specific IAM entities (such as the EC2 IAM role).
- An S3 bucket policy to prevent unauthorized access to the Active Directory join and remove scripts that are stored in the S3 bucket.
- The IAM role that’s used to fetch the credentials from Secrets Manager is restricted by a custom IAM policy and can only be assumed by the worker EC2 instance. This prevents every entity other than the worker instance from using that IAM role.
- All API and console access to the worker EC2 instance is restricted by a custom IAM policy with an explicit deny.
- A policy to deny all but the worker EC2 instance access to the credentials in Secrets Manager. With the worker EC2 instance doing the work, the EC2 instances that need to join the domain don’t need access to the credentials in Secrets Manager or to scripts in the S3 bucket.
Prerequisites and setup
Before you deploy the solution, you must complete the following in the AWS account and Region where you want to deploy the CloudFormation stack.
- AWS Managed Microsoft AD with an appropriate DNS name (for example, test.com). You can also use your on premises Active Directory, provided it’s reachable from the Amazon VPC over Direct Connect or AWS VPN.
- Create a DHCP option set with on-premises DNS servers or with the DNS servers pointing to the IP addresses of directories provided by AWS.
- Associate the DHCP option set with the Amazon VPC that you’re going to use with this solution.
- Any other Amazon VPCs that are hosting EC2 instances to be domain joined must be peered with the VPC that hosts the relevant AWS Managed Microsoft AD. Alternatively, AWS Transit Gateway can be used to establish this connectivity.
- Make sure to have the latest AWS Command Line Interface (AWS CLI) installed and configured on your local machine.
- Create a new SSH key pair and store it in Secrets Manager using the following commands. Replace <Region> with the Region of your deployment. Replace <MyKeyPair> with any custom name or leave it default.
Bash:
PowerShell:
Note: Don’t change the name of the secret, as other scripts in the solution reference it. The worker EC2 instance will fetch the SSH key using GetSecretValue API to SSH or RDP into other EC2 instances during domain join process.
Deploy the solution
With the prerequisites in place, your next step is to download or clone the GitHub repo and store the files on your local machine. Go to the location where you cloned or downloaded the repo and review the contents of the config/OS_User_Mapping.json file to validate the instance user name and operating system mapping. Update the file if you’re using a user name other than the one used to log in to the EC2 instances. The default user name used in this solution is ec2-user for Linux instances and Administrator for Windows.
The solution requires installation of some software on the worker EC2 instance. Because the EC2 instance doesn’t have internet access, you must download the latest Windows 64-bit version of the following software to your local machine and upload it into the solution deployment S3 bucket in subsequent steps.
Note: This step isn’t required if your EC2 instances have internet access.
Once done, use the following steps to deploy the solution in your AWS account:
Steps to deploy the solution:
- Create a private Amazon Simple Storage Service (Amazon S3) bucket using this documentation to store the Lambda functions and the domain join and unjoin scripts.
- Once created, enable versioning on this bucket using the following documentation. Versioning lets you keep multiple versions of your objects in one bucket and helps you easily retrieve and restore previous versions of your scripts.
- Upload the software you downloaded to the S3 bucket. This is only required if your instance doesn’t have internet access.
- Upload the cloned or downloaded GitHub repo files to the S3 bucket.
- Go to the S3 bucket and select the template name secret-active-dir-solution.json, and copy the object URL.
- Open the CloudFormation console. Choose the appropriate AWS Region, and then choose Create Stack. Select With new resources.
- Select Amazon S3 URL as the template source, paste the object URL that you copied in Step 5, and then choose Next.
- On the Specify stack details page, enter a name for the stack and provide the following input parameters. You can modify the default values to customize the solution for your environment.
- ADUSECASE – From the dropdown menu, select your required use case. There is no default value.
- AdminUserId – The canonical user ID of the IAM user who manages the Active Directory credentials stored in Secrets Manager. To learn how to find the canonical user ID for your IAM user, scroll down to Finding the canonical user ID for your AWS account in AWS account identifiers.
- DenyPolicyName – The name of the IAM policy that restricts access to the worker EC2 instance and the IAM role used by the worker to fetch credentials from Secrets Manager. You can keep the default value or provide another name.
- InstanceType – Instance type to be used when launching the worker EC2 instance. You can keep the default value or use another instance type if necessary.
- Placeholder – This is a dummy parameter that’s used as a placeholder in IAM policies for the EC2 instance ID. Keep the default value.
- S3Bucket – The name of the S3 bucket that you created in the first step of the solution deployment. Replace the default value with your S3 bucket name.
- S3prefix – Amazon S3 object key where the source scripts are stored. Leave the default value as long as the cloned GitHub directory structure hasn’t been changed.
- SSHKeyRequired – Select true or false based on whether an SSH key pair is required to RDP into the EC2 worker instance. If you select false, the worker EC2 instance will not have an SSH key pair.
- SecurityGroupId – Security group IDs to be associated with the worker instance to control traffic to and from the instance.
- Subnet – Select the VPC subnet where you want to launch the worker EC2 instance.
- VPC – Select the VPC where you want to launch the worker EC2 instance. Use the VPC where you have created the AWS Managed Microsoft AD.
- WorkerSSHKeyName – An existing SSH key pair name that can be used to get the password for RDP access into the EC2 worker instance. This isn’t mandatory if you’re using user name and password based login or AWS Systems Manager Session Manager. This is required only if you have selected true for the SSHKeyRequired parameter.

Figure 2: Defining the stack name and input parameters for the CloudFormation stack
- Enter values for all of the input parameters, and then choose Next.
- On the Options page, keep the default values and then choose Next.
- On the Review page, confirm the details, acknowledge that CloudFormation might create IAM resources with custom names, and choose Create Stack.
- Once the stack creation is marked as CREATE_COMPLETE, the following resources are created:
- An EC2 instance that acts as a worker and runs Active Directory join scripts on the remote EC2 instances. It also unjoins instances from the domain upon instance termination.
- A secret with a default Active Directory domain name, user name, and a dummy password. The name of the default secret is myadcredV1.
- A Secrets Manager resource-based policy to deny all access to the secret except to the intended IAM users and roles.
- An EC2 IAM profile and IAM role to be used only by the worker EC2 instance.
- A managed IAM policy called DENYPOLICY that can be assigned to an IAM user, group, or role to restrict access to the solution resources such as the worker EC2 instance.
- A CloudWatch Events rule to detect running and terminated states for EC2 instances and trigger a Lambda function that posts instance details to an SQS queue.
- A Lambda function that reads instance tags and writes to an SQS queue based on the instance tag value, which can be true or false.
- An SQS queue for storing the EC2 instance state—running or terminated.
- A dead-letter queue for storing unprocessed messages.
- An S3 bucket policy to restrict access to the source S3 bucket from unauthorized users or roles.
- A CloudWatch log group to stream the logs of the worker EC2 instance.

Test the solution
Now that the solution is deployed, you can test it to check if it’s working as expected. Before you test the solution, you must navigate to the secret created in Secrets Manager by CloudFormation and update the Active Directory credentials—domain name, user name, and password.
To test the solution
- In the CloudFormation console, choose Services, and then CloudFormation. Select your stack name. On the stack Outputs tab, look for the ADSecret entry.
- Choose the ADSecret link to go to the configuration for the secret in the Secrets Manager console. Scroll down to the section titled Secret value, and then choose Retrieve secret value to display the default Secret Key and Secret Value as shown in Figure 3.

Figure 3: Retrieve value in Secrets Manager
- Choose the Edit button and update the default dummy credentials with your Active Directory domain credentials.(Optional) Directory_ou is used to store the organizational unit (OU) and directory components (DC) for the directory; for example, OU=test,DC=example,DC=com.

Note: instance_password is an optional secret key and is used only when you’re using user name and password based login to access the EC2 instances in your account.
Now that the secret is updated with the correct credentials, you can launch a test EC2 instance and determine if the instance has successfully joined the Active Directory domain.
Create an Amazon Machine Image
Note: This is only required for Linux-based operating systems other than Amazon Linux. You can skip these steps if your instances have internet access.
As your VPC doesn’t have internet access, for Linux-based systems other than Amazon Linux 1 or Amazon Linux 2, the required packages must be available on the instances that need to join the Active Directory domain. For that, you must create a custom Amazon Machine Image (AMI) from an EC2 instance with the required packages. If you already have a process to build your own AMIs, you can add these packages as part of that existing process.
To install the package into your AMI
- Create a new EC2 Linux instance for the required operating system in a public subnet or a private subnet with access to the internet via a NAT gateway.
- Connect to the instance using any SSH client.
- Install the required software by running the following command that is appropriate for the operating system:
- For CentOS:
- For RHEL:
- For Ubuntu:
- For SUSE:
- For Debian:
- Follow Manually join a Linux instance to install the AWS CLI on Linux.
- Create a new AMI based on this instance by following the instructions in Create a Linux AMI from an instance.
You now have a new AMI that can be used in the next steps and in future to launch similar instances.
For Amazon Linux-based EC2 instances, the solution will use the mechanism described in How can I update yum or install packages without internet access on my EC2 instances to install the required packages and you don’t need to create a custom AMI. No additional packages are required if you are using Windows-based EC2 instances.
To launch a test EC2 instance
- Navigate to the Amazon EC2 console and launch an Amazon Linux or Windows EC2 instance in the same Region and VPC that you used when creating the CloudFormation stack. For any other operating system, make sure you are using the custom AMI created before.
- In the Add Tags section, add a tag named JoinAD and set the value as true. Add another tag named Operating_System and set the appropriate operating system value from:
- AMAZON_LINUX
- FEDORA
- RHEL
- CENTOS
- UBUNTU
- DEBIAN
- SUSE
- WINDOWS
- Make sure that the security group associated with this instance is set to allow all inbound traffic from the security group of the worker EC2 instance.
- Use the SSH key pair name from the prerequisites (Step 6) when launching the instance.
- Wait for the instance to launch and join the Active Directory domain. You can now navigate to the CloudWatch log group named /ad-domain-join-solution/ created by the CloudFormation stack to determine if the instance has joined the domain or not. On successful join, you can connect to the instance using a RDP or SSH client and entering your login credentials.
- To test the domain unjoin workflow, you can terminate the EC2 instance launched in Step 1 and log in to the Active Directory tools instance to validate that the Active Directory computer object that represents the instance is deleted.
Solution review
Let’s review the details of the solution components and what happens during the domain join and unjoin process:
1) The worker EC2 instance:
The worker EC2 instance used in this solution is a Windows instance with all configurations required to add and remove machines to and from an Active Directory domain. It can also be used as an Active Directory administration tools instance. This instance is continuously running a bash script that is polling the SQS queue for new messages. Upon arrival of a new message, the script performs the following tasks:
- Check if the instance is in running or terminated state to determine if it needs to be added or removed from the Active Directory domain.
- If the message is from a newly launched EC2 instance, then this means that this instance needs to join the Active Directory domain.
- The script identifies the instance operating system and runs the appropriate PowerShell or bash script on the remote EC2.
- Similarly, if the instance is in terminated state, then the worker will run the domain unjoin command locally to remove the computer object from the Active Directory domain.
- If the worker fails to process a message in the SQS queue, it sends the unprocessed message to a backup queue for debugging.
- The worker writes logs related to the success or failure of the domain join to a CloudWatch log group. Use /ad-domain-join-solution to filter for all other logs created by the worker instance in CloudWatch.
2) The worker bash script running on the instance:
This script polls the SQS queue every 5 seconds for new messages and is responsible for following activities:
- Fetching Active Directory join credentials (user name and password) from Secrets Manager.
- If the remote EC2 instance is running Windows, running the Invoke-Command PowerShell cmdlet on the instance to perform the Active Directory join operation.
- If the remote EC2 instance is running Linux, running realm join command on the instance to perform the Active Directory join operation.
- Running the Remove-ADComputer command to remove the computer object from the Active Directory domain for terminated EC2 instances.
- Storing domain-joined EC2 instance details—computer name and IP address—in an Amazon DynamoDB table. These details are used to check if an instance is already part of the domain and when removing the instance from the Active Directory domain.
More information
Now that you have tested the solution, here are some additional points to be noted:
- The Active Directory join and unjoin scripts provided with this solution can be replaced with your existing custom scripts.
- To update the scripts on the worker instance, you must upload the modified scripts to the S3 bucket and the changes will automatically synchronize on the instance.
- This solution works with single account, Region, and VPC combination. It can be modified to use across multiple Regions and VPC combinations.
- For VPCs in a different account or Region, you must share your AWS Managed Microsoft AD with another AWS account when the networking prerequisites have been completed.
- The instance user name and operating system mapping used in the solution is based on the default user name used by AWS.
- You can use AWS Systems Manager with VPC endpoints to log in to EC2 instances that don’t have internet access.
The solution is protecting your Active Directory credentials and is making sure that:
- Active Directory credentials can be accessed only from the worker EC2 instance.
- The IAM role used by the worker EC2 instance to fetch the secret cannot be assumed by other IAM entities.
- Only authorized users can read the credentials from the Secrets Manager console, through AWS CLI, or by using any other AWS Tool—such as an AWS SDK.
The focus of this solution is to demonstrate a method you can use to secure Active Directory credentials and automate the process of EC2 instances joining and unjoining from an Active Directory domain.
- You can associate the IAM policy named DENYPOLICY with any IAM group or user in the account to block that user or group from accessing or modifying the worker EC2 instance and the IAM role used by the worker.
- If your account belongs to an organization, you can use an organization-level service control policy instead of an IAM-managed policy—such as DENYPOLICY—to protect the underlying resources from unauthorized users.
Conclusion
In this blog post, you learned how to deploy an automated and secure solution through CloudFormation to help secure the Active Directory credentials and also manage adding and removing Amazon EC2 instances to and from an Active Directory domain. When using this solution, you incur Amazon EC2 charges along with charges associated with Secrets Manager pricing and AWS PrivateLink.
You can use the following references to help diagnose or troubleshoot common errors during the domain join or unjoin process.
- Troubleshoot remote operations in PowerShell
- Troubleshooting AWS Managed Microsoft AD
- How to troubleshoot errors that occur when you join Windows-based computers to a domain
- Troubleshooting Linux domain join errors
If you have feedback about this post, submit comments in the Comments section below.
Want more AWS Security how-to content, news, and feature announcements? Follow us on Twitter.