Post Syndicated from Rakesh Singh original https://aws.amazon.com/blogs/devops/use-openid-connect-with-aws-toolkit-for-azure-devops-to-perform-aws-codedeploy-deployments/
Introduction
Many organizations with workloads hosted on AWS leverage the advantage of AWS services like AWS CloudFormation, AWS CodeDeploy, and other AWS developer tools while integrating with their existing development workflows. These customers seek to maintain their preferred version control systems, such as GitHub, and continue using their established continuous integration and continuous deployment (CI/CD) pipelines from popular solutions, like Azure DevOps.
In this blog post, we will guide you through the process of using OpenID Connect (OIDC) provider in AWS Identity and Access Management with AWS Toolkit for Azure DevOps to deploy a sample web application using AWS CloudFormation Create/Update Stack task and perform a Blue/Green deployment on Amazon Elastic Compute Cloud (Amazon EC2) instances using AWS CodeDeploy Application Deployment task from an Azure Pipeline. This approach enables organizations to leverage AWS’s cloud capabilities while preserving the familiarity and continuity of their existing CI/CD in Azure DevOps.
AWS Toolkit for Azure DevOps is an extension for Microsoft Azure DevOps and Microsoft Azure DevOps Server that makes it easy to manage and deploy applications using AWS. It provides tasks that enable integration with many AWS services. It can also run commands using the AWS Tools for Windows PowerShell module and the AWS Command Line Interface (AWS CLI).
Solution Overview
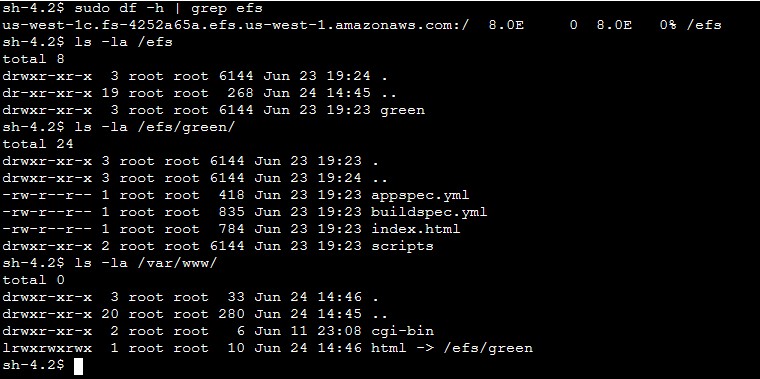
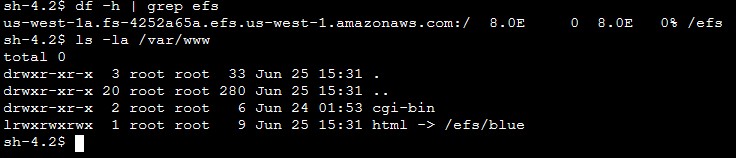
For this blog post, we use Azure Repos as version control. Our Continuous Integration/Continuous Deployment (CI/CD) pipeline is in Azure DevOps. We use AWS CloudFormation to deploy a sample web application and the required infrastructure in AWS. We then use the AWS CodeDeploy Blue/Green deployment method to deploy a newer version of the code to the sample web application running on Amazon EC2 instances in AWS.
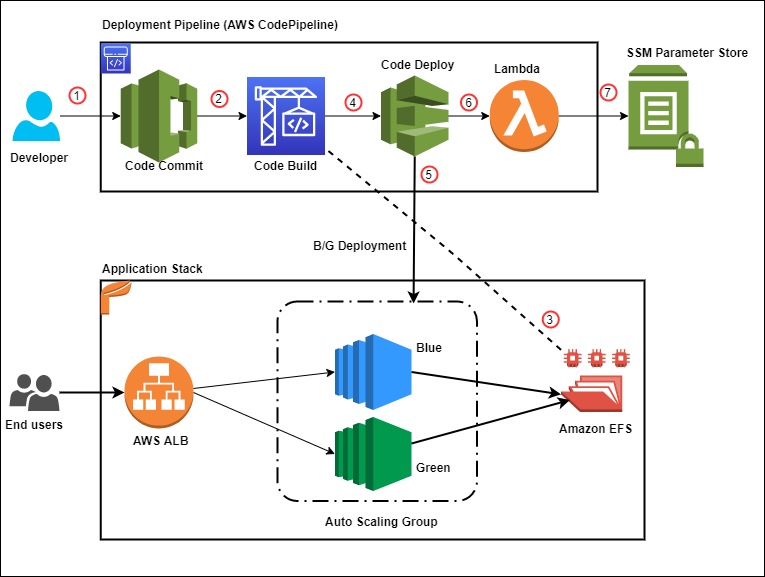
For build agent, we have used self-hosted Linux agent running on Ubuntu virtual machine with a user-assigned managed identity in Azure. Azure DevOps customers opt for self-hosted agents when their requirements surpass the capabilities offered by Microsoft-hosted agents. Instead of storing and securing long-term credentials, the Azure Pipeline tasks get temporary credential information from AWS Security Token Service (AWS STS) through an OpenID Connect (OIDC) provider in AWS Identity and Access Management (IAM) to access AWS resources. Figure 1 shows the solution architecture that explains the setup. The sample application code and the CloudFormation template used in this example are available in this GitHub repository.
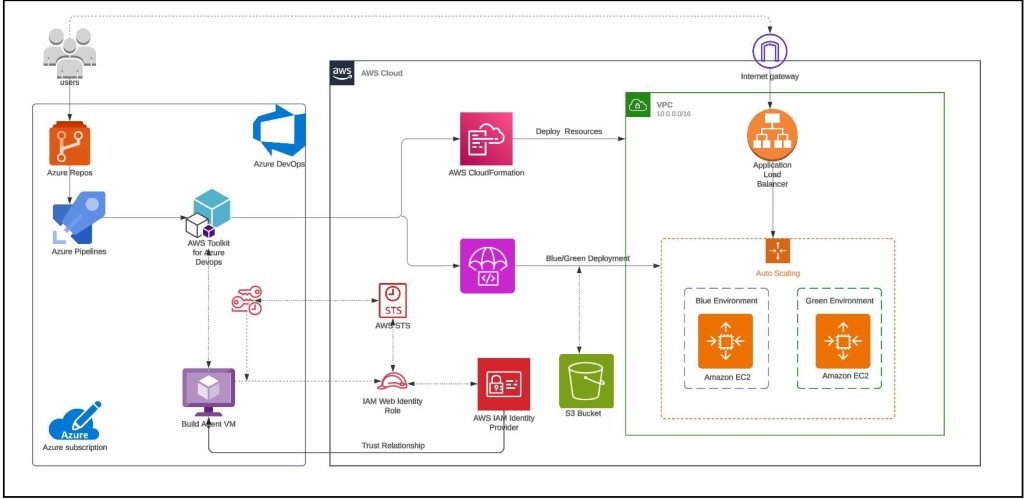
Figure 1 – Sample solution architecture
The solution architecture involves the following steps:
- User pushes code to an Azure Repo that automatically runs an Azure DevOps Pipeline.
- The pipeline agent acquires AWS STS provided temporary security credentials using OpenID Connect (OIDC) and assuming an IAM Role with the permissions. The IAM Role’s trust policy allows the Azure Pipelines OIDC Identity Provider to assume the role.
- Pipeline tasks use the temporary credentials to invoke CloudFormation to provision resources defined in the template.
- The subsequent pipeline task starts a CodeDeploy Blue/Green deployment
Note: You can also use Amazon EC2 Instances to run the self-hosted Azure DevOps agent. For build agents running on EC2 instances, the tasks can automatically get credential and region information from instance metadata associated with the Amazon EC2 instance. To use Amazon EC2 instance metadata credentials, the instance must have started with an instance profile that references a role that grants permissions to the task. This allows the role to make calls to AWS on your behalf. For more information, see Using an IAM role to grant permissions to applications running on Amazon EC2 instances.
Prerequisites
You must have the followings before you begin:
- An AWS account.
- Access to an AWS account with administrator or PowerUser (or equivalent) AWS Identity and Access Management (IAM) role policies attached.
- The AWS Toolkit for Azure DevOps installed in your Azure DevOps organization.
- A private Amazon Simple Storage Service (Amazon S3) bucket. This bucket will store deployment artifacts for CodeDeploy.
Optional (required only if are not using Amazon EC2 Instances for running self-hosted Azure Devops agent):
- An Azure account and subscription.
- In your Azure account, ensure there’s an existing managed identity or create a new one for testing this solution. You can find more information on Configure managed identities for Azure resources on a VM using the Azure portal.
- Create A Linux (Ubuntu) VM in Azure and attach the managed identity created in Step 2.
- Install jq and AWS Command Line Interface (AWS CLI) version 2 on your virtual machine for testing.
Solution Walkthrough
Step 1: Create a new project in Azure DevOps
- Sign in to your organization (https://dev.azure.com/{yourorganization}).
- Select New Project and enter the information into the form provided and select Create.
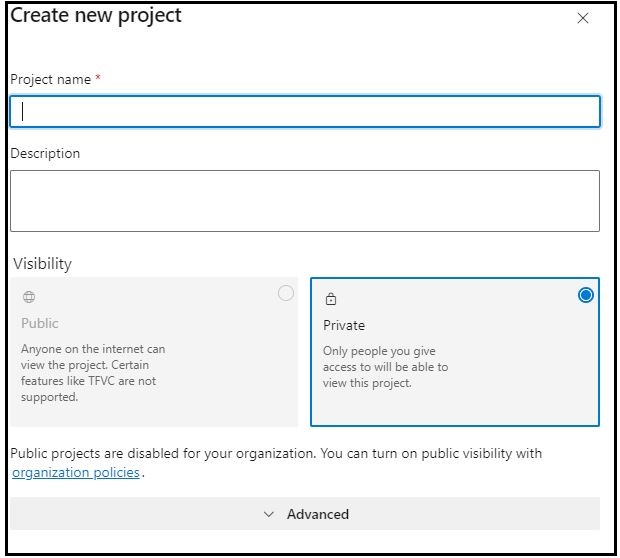
Figure 2 – Create a new Azure DevOps Project.
Step 2: Create a new Git repo for your Azure DevOps project and import the content from this sample GitHub repository as per Import a Git repo instructions.
Note: Skip Step 3 through Step 6 if you are running the Azure DevOps agent on Amazon EC2 Instances
Step 3: Register a new application in Azure
- In the Azure portal, select Microsoft Entra ID.
- Select App registrations.
- Choose New registration.
- Enter a name for your application and then select an option in Supported account types (in this example, we chose Accounts in this Organization directory only). Leave the other options as is. Then choose Register.
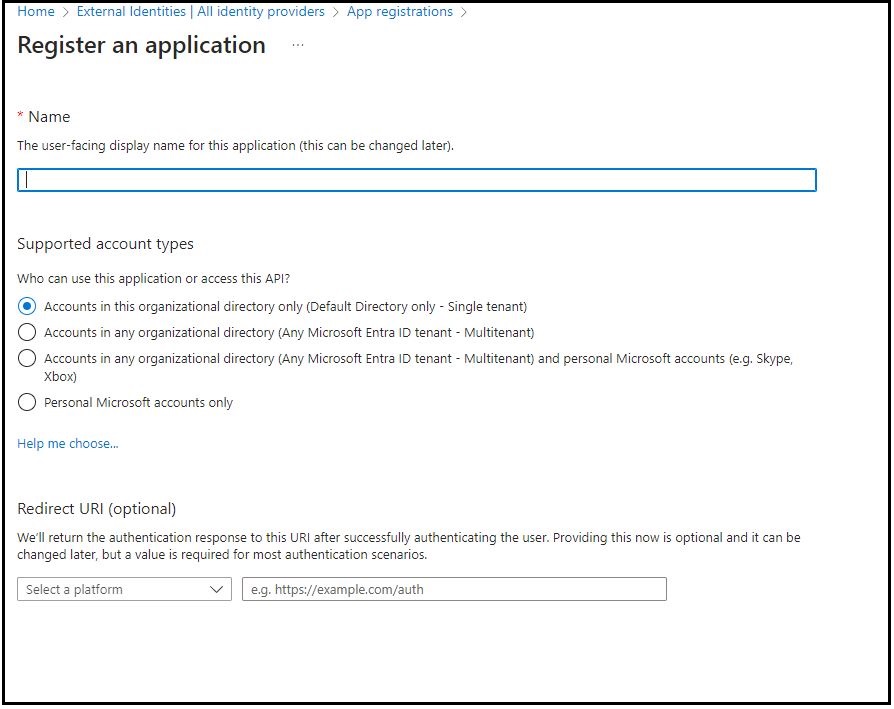
Figure 3 – Register an application in Microsoft Entra ID.
Step 4: Configure the application ID URI
- In the Azure portal, select Microsoft Entra ID.
- Select App registrations.
- On the App registrations page, select All applications and choose the newly registered application.
- On the newly registered application’s overview page, choose Application ID URI and then select Add.
- On the Edit application ID URI page, enter the value of the URI, which looks like urn://<name of the application> or api://<name of the application>.
- You will use the application ID URI as the audience in the identity provider (idP) section of AWS.
Step 5: Follow the Creating and managing an OIDC provider (console) page to create an identity provider in IAM.
- For Provider URL, enter https://sts.windows.net/<Microsoft Entra Tenant ID>. Replace <Microsoft Entra Tenant ID> with your Tenant ID from Azure. This allows only identities from your Azure tenant to access your AWS resources.
- For Audience use the application ID URI from enterprise application configured in Step 4.
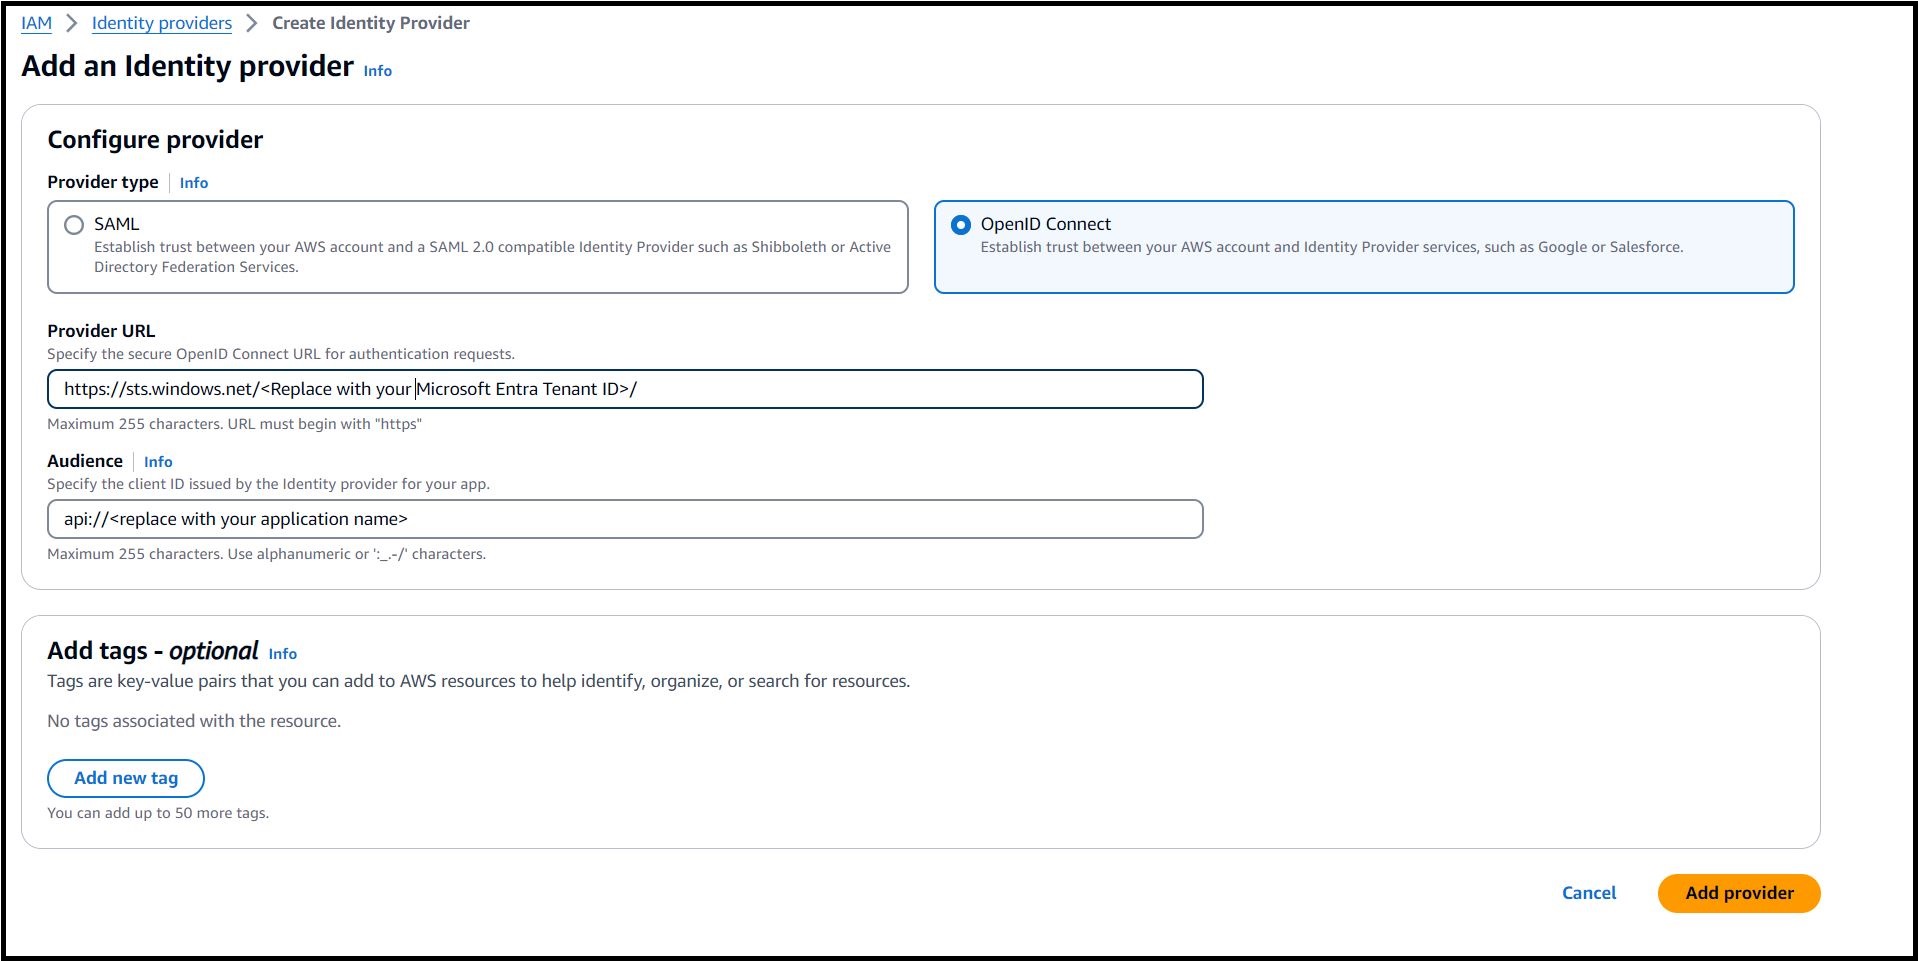
Figure 4 – Configure OpenID Connect provider in AWS.
Step 6: Create an IAM Web Identity Role and associate it with the IdP established in Step 5. Select the specific audience that was created previously. Ensure you grant the desired permissions to this role and keep the principle of least privilege in mind when associating the IAM policy with the IAM Role.
- Open the IAM console.
- In the navigation pane, choose Identity providers, and then select the provider you created in Step 5.
- Click on Assign Role and select ‘Create a new role’.
- Select Web identity and chose the Audience from the drop down as depicted in Figure 5.
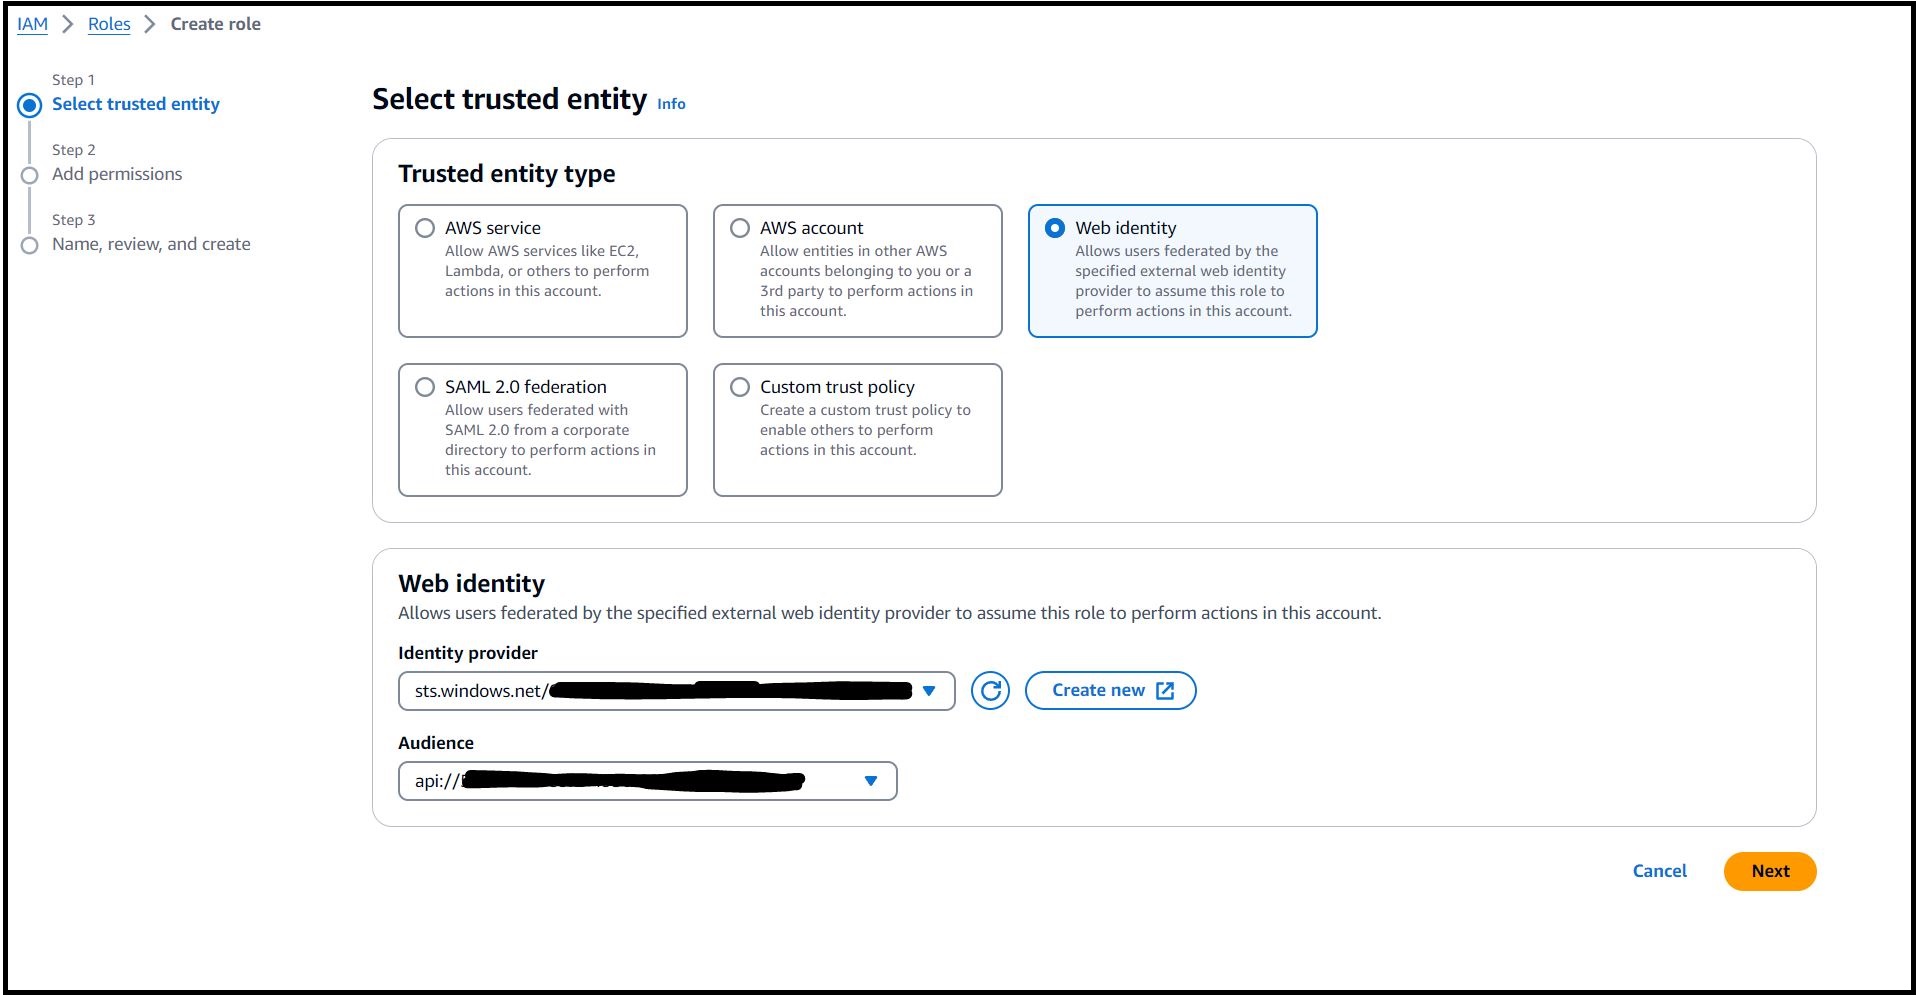
Figure 5 – Create an IAM Web Identity Role in AWS.
- Click on Next and choose one or more policies to attach to your new role.
- Click on Next.
- Enter a role name and validate the trust policy to make sure that only the intended identities assume the role, provide an audience (aud) as the condition in the role trust policy for this IAM role.
{
    "Version": "2012-10-17",
    "Statement": [
        {
            "Effect": "Allow",
            "Principal": {
                "Federated": "arn:aws:iam::<AWS Account ID>:oidc-provider/sts.windows.net/<Microsoft Entra Tenant ID>/"
            },
            "Action": "sts:AssumeRoleWithWebIdentity",
            "Condition": {
                "StringEquals": {
                    "sts.windows.net/<Microsoft Entra Tenant ID>/:aud": "<Application ID URI>"
                }
            }
        }
    ]
}
Step 7: Install Azure Pipeline agent on the Ubuntu VM.
- In this example, we used the following commands to install the latest version of the agent on the VM: Note: 3.241.0 is the current agent version as of publication. Configure and run the agent as per Self-hosted Linux agents instructions.
mkdir myagent && cd myagent
wget https://vstsagentpackage.azureedge.net/agent/3.241.0/vsts-agent-linux-arm64-3.241.0.tar.gz
tar zxvf vsts-agent-linux-arm64-3.241.0.tar.gz
Note: 3.241.0 is the current agent version as of publication.
- Configure and run the agent as per Self-hosted Linux agents instructions.
Step 8: Validate if the agent is installed correctly and shows as online.
- Sign in to your organization (https://dev.azure.com/{yourorganization}).
- Choose Azure DevOps, Organization settings.
- Choose Agent pools.
- Select the pool on the right side of the page and then click Agents.

Figure 6- Self-hosted agent installed on Ubuntu VM in Azure
Step 9: Create new Azure Pipelines by following the Create your first pipeline instructions. In this example, we have defined three pipeline tasks as below within the Azure Pipeline.
- Bash Script: Task 1 runs a bash script to establish connectivity with AWS that allows authentication through a service principal in Microsoft Entra ID to get temporary credentials using AssumeRoleWithWebIdentity. Note: This task is not required if you use Amazon EC2 Instances to run a self-hosted Azure DevOps agent.
- task: Bash@3
  inputs:
    targetType: 'inline'
    script: |
      AUDIENCE="<replace with application ID URI configured in step 4>"
      ROLE_ARN="<replace with IAM Role ARN created in step 6>"
      access_token=$(curl "http://169.254.169.254/metadata/identity/oauth2/token?api-version=2018-02-01&resource=${AUDIENCE}" -H "Metadata:true" -s| jq -r '.access_token')
      credentials=$(aws sts assume-role-with-web-identity --role-arn ${ROLE_ARN} --web-identity-token ${access_token} --role-session-name AWSAssumeRole | jq '.Credentials' | jq '.Version=1')
      AccessKeyId=$(echo "$credentials" | jq -r '.AccessKeyId')
      SecretAccessKey=$(echo "$credentials" | jq -r '.SecretAccessKey')
      SessionToken=$(echo "$credentials" | jq -r '.SessionToken')
      echo "##vso[task.setvariable variable=AWS.AccessKeyID]$AccessKeyId"
      echo "##vso[task.setvariable variable=AWS.SecretAccessKey]$SecretAccessKey"
      echo "##vso[task.setvariable variable=AWS.SessionToken]$SessionToken"
We have specified no long-term AWS credentials to be used by the tasks in the build agent environment. The tasks are fetching temporary credentials from the named variables in our build- AWS.AccessKeyID, AWS.SecretAccessKey, and AWS.SessionToken.
The IAM authentication and authorization process is as follows:
- Azure VM gets an Azure access token from the user assigned managed identity and sends it to AWS STS to retrieve temporary security credentials.
- An IAM role created with a valid Azure tenant audience and subject validates that it sourced the claim from a trusted entity and sends temporary security credentials to the requesting Azure VM.
- Azure VM accesses AWS resources using the AWS STS provided temporary security credentials.
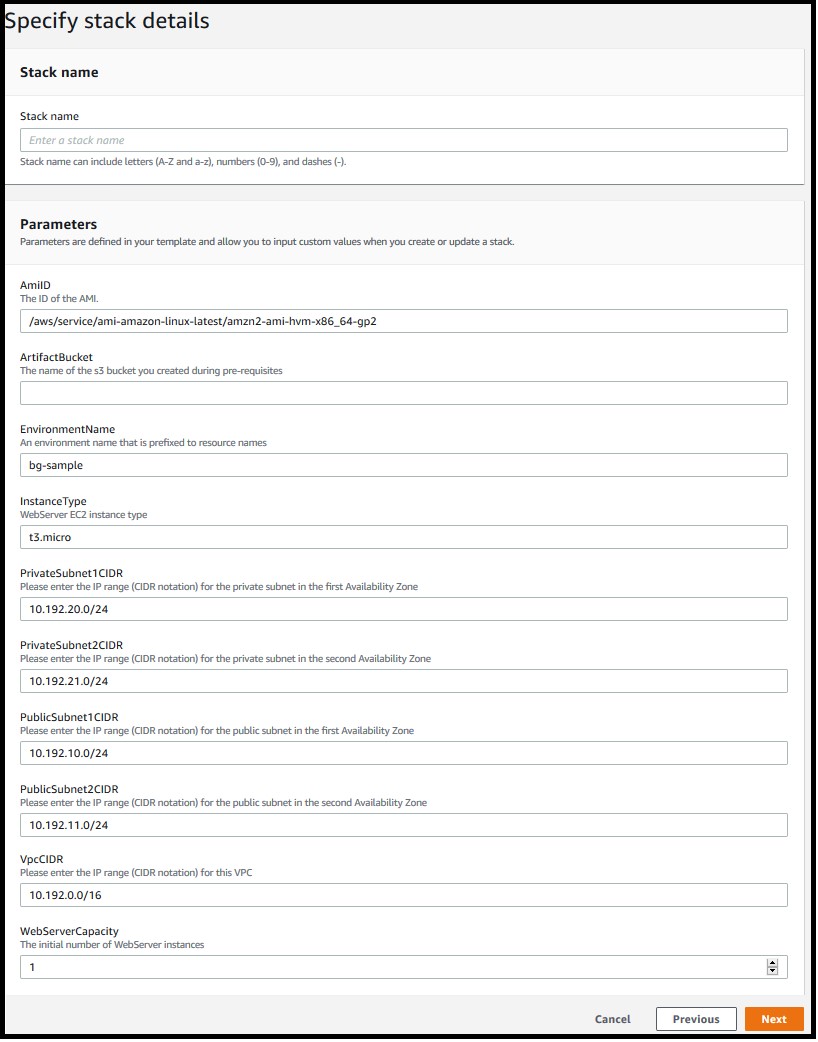
- AWS CloudFormation Create/Update Stack: Task 2 creates a new AWS CloudFormation stack or updates the stack if it exists. In the example below, we deployed a new CloudFormation stack to provision AWS resources using a template file named deploy-app-to-aws.yml:
    - task: CloudFormationCreateOrUpdateStack@1
      inputs:
        regionName: 'us-east-1'
        stackName: 'aws-sample-app'
        templateSource: 'file'
        templateFile: 'deploy-app-to-aws.yml'
- AWS CodeDeploy Application Deployment: Task 3 deploys an application to Amazon EC2 instance(s) using AWS CodeDeploy. The below example Azure DevOps pipeline task deploys to a CodeDeploy application named ‘aws-toolkit-for-azure-devops‘ and a CodeDeploy deployment group named ‘my-sample-bg-deployment-group‘ in the US East 1 (N. Virginia) region. It took the deployment package from the Azure DevOps pipeline workspace, uploaded to an S3 bucket, and any existing file with the same name is overwritten.
    - task: CodeDeployDeployApplication@1
      inputs:
        regionName: 'us-east-1'
        applicationName: 'aws-toolkit-for-azure-devops'
        deploymentGroupName: 'my-sample-bg-deployment-group'
        deploymentRevisionSource: 'workspace'
        bucketName: '<Replace with your S3 bucket name>'
        fileExistsBehavior: OVERWRITE
Expanding on the Inputs used in the pipeline tasks:
- regionName: The AWS region where the CloudFormation stack will be created or updated.
- stackName: This parameter specifies the name of the CloudFormation stack. Here, it’s set to ‘aws-sample-app‘.
- templateSource: This parameter specifies the source of the CloudFormation template. Here, it’s set to ‘file‘, which means the template is a local file.
- templateFile: This parameter specifies the path to the CloudFormation template file.
- applicationName: This parameter specifies the name of the CodeDeploy application to be used for deployment.
- deploymentGroupName: This parameter specifies the name of the CodeDeploy deployment group to which the application will be deployed.
- deploymentRevisionSource: Specifies the source of the revision to be deployed. Here, it’s set to ‘workspace‘, which means the task will create or use an existing zip archive in the location specified to Revision Bundle, upload the archive to an S3 bucket and supply the key of the S3 object to CodeDeploy as the revision source.
- bucketName: This parameter specifies the name of the S3 bucket where the deployment package will be uploaded.
- fileExistsBehavior: This parameter specifies the behavior- how AWS CodeDeploy should handle files that already exist in a deployment target location. Here, it’s set to ‘OVERWRITE‘, which means it will overwrite the existing file with the new source file.
To use “S3” as deploymentRevisionSource, you may define your task as below:
trigger:
  branches:
    include:
    - main
stages:
- stage: __default
  jobs:
  - job: Job
    steps:
    - task: AWSShellScript@1
      inputs:
        regionName: 'us-east-1'
        scriptType: 'inline'
        inlineScript: |
          zip -r  $(Build.BuildNumber).zip .
          aws s3 cp $(Build.BuildNumber).zip s3://<Replace with your S3 bucket name>/
    - task: CodeDeployDeployApplication@1
      inputs:
        regionName: 'us-east-1'
        applicationName: 'aws-toolkit-for-azure-devops'
        deploymentGroupName: 'my-sample-bg-deployment-group'
        deploymentRevisionSource: 's3'
        bucketName: '<Replace with your S3 bucket name>'
        bundleKey: $(Build.BuildNumber).zip
Step 10: Run and validate the pipeline.
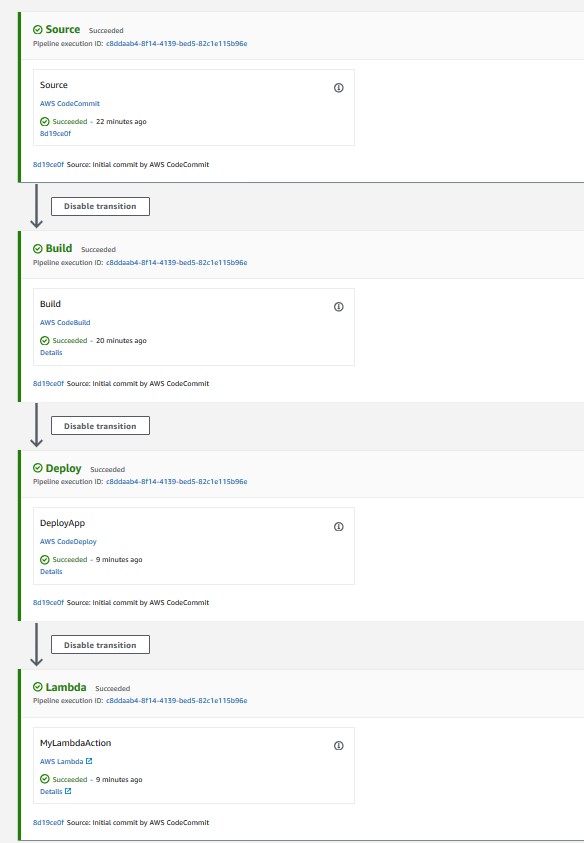
The pipeline will run automatically when a change is pushed to main branch. From the pipeline run summary you can view the status of your run, both while it is running and when it is complete. Refer View and manage your pipelines for more details.
- Navigate to your Azure Devops project (https://dev.azure.com/{yourorganization}/{yourproject}).
- Select Pipelines from the left-hand menu to go to the pipelines landing page.
- Choose Recent to view recently run pipelines (the default view).
- Select a pipeline to manage that pipeline and view the runs.
- Choose Runs and choose a job to see the steps for that job.
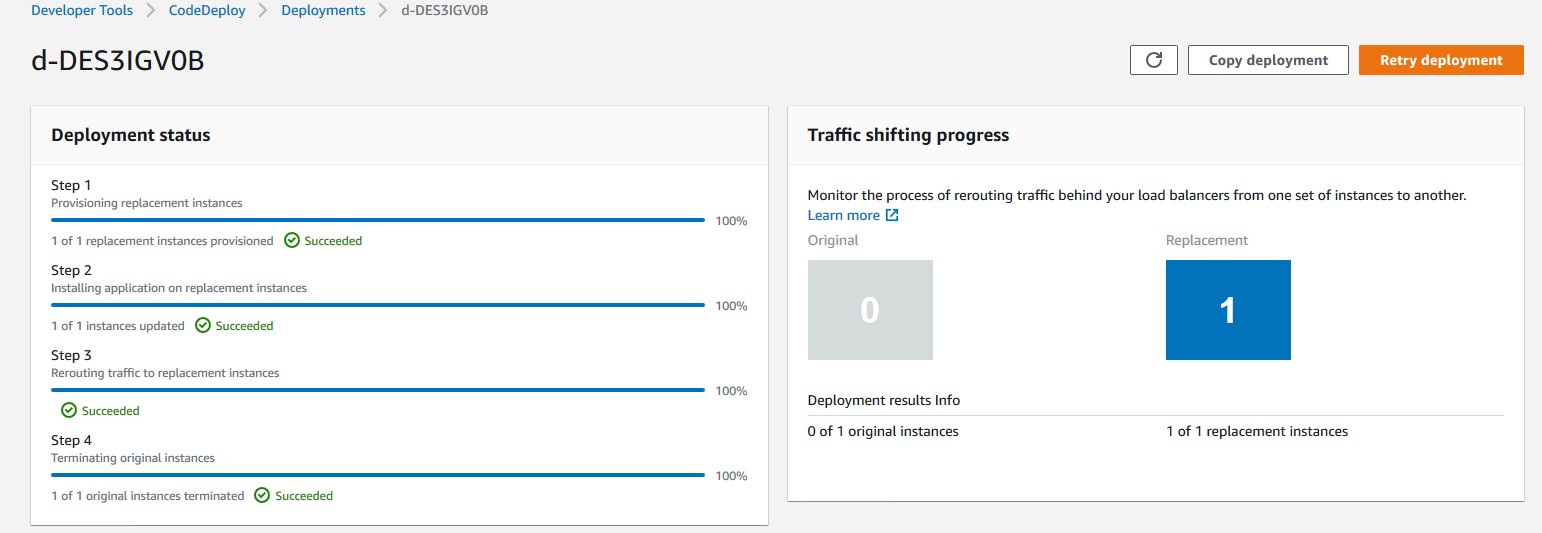
Upon successful completion of the pipeline execution, you can validate the deployment status in the CodeDeploy console. In this example, the successful CodeDeploy deployment looks like:
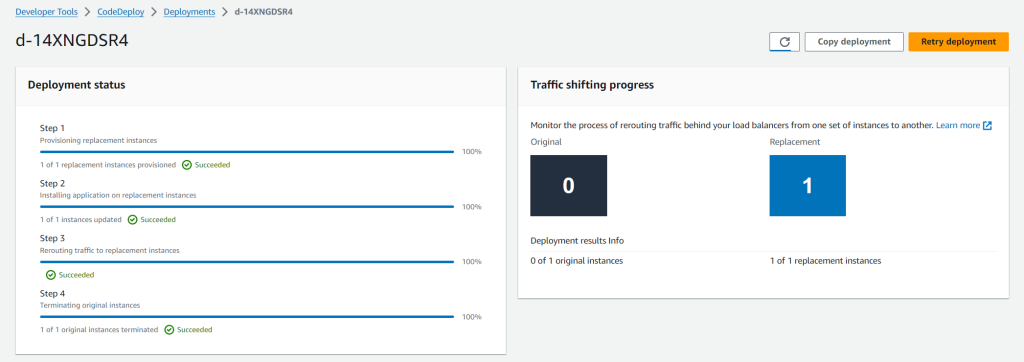
Figure 7: CodeDeploy Deployment details in AWS console
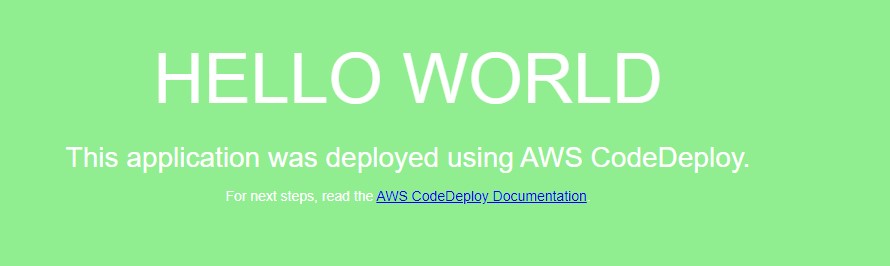
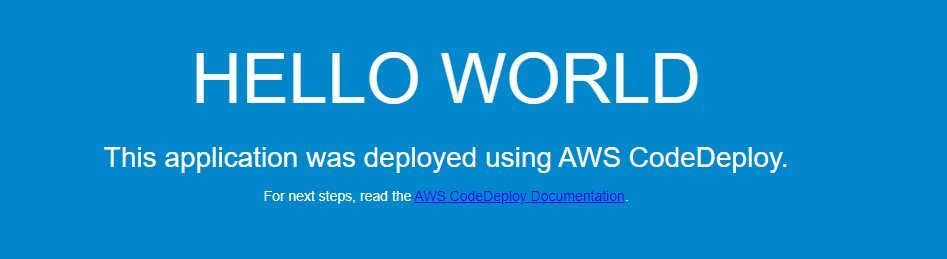
You can also validate the website URL in a browser to confirm if it’s working as expected. After completing the pipeline execution, hit the website URL on a browser to check if it’s working.
- On the CloudFormation stack ‘aws-sample-app‘ Outputs tab, look for the WebsiteURL key and click on the URL.
- For a successful deployment, it will open a default page similar to Figure 8 below.
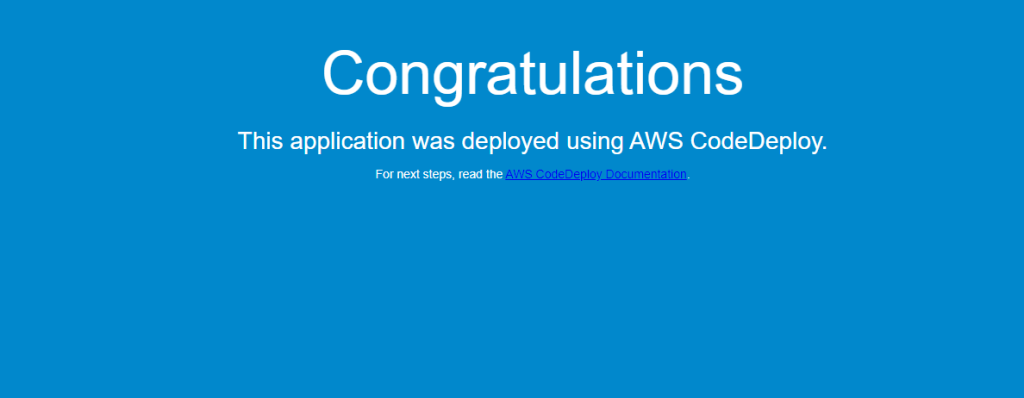
Figure 8: Sample application home page
Cleanup
After you have tested and verified your pipeline, remove all resources created for this example to avoid incurring any unintended expenses.
- Delete the CloudFormation stack. You can delete the stack manually from the AWS Console or use your Azure DevOps pipeline by adding a CloudFormationDeleteStack task.
- Delete the resources created in Azure.
- Delete the VM instance.
- Delete the user-assigned managed identity.
- Delete the enterprise application.
Conclusion
In this blog post, we showed how to leverage the AWS Toolkit for Azure DevOps extension to deploy resources to your AWS account from Azure DevOps and perform a Blue/Green deployment using AWS CodeDeploy. We explored obtaining temporary credentials in AWS Identity and Access Management (IAM) by leveraging the AWS Security Token Service (AWS STS) with Azure managed identities and Azure App Registration. This approach enhances security by eliminating the need to store long-term credentials, adhering to best practices for credential management. For customers looking to host their code on GitHub and deploy to AWS, they can leverage GitHub Actions with AWS CodeBuild’s support for managed GitHub Action runners. This integration potentially helps to reduce costs and simplifying the operational overhead associated with CI/CD processes.


 Rakesh Singh