Post Syndicated from Grab Tech original https://engineering.grab.com/dex-in-action
Introduction
Grab, Southeast Asia’s leading superapp, has created many internal applications to support its diverse range of internal and external business needs. Authentication1 and authorisation2 serve as fundamental components of application development, as robust identity and access management are essential for all systems.
We recognised the need for a centralised internal system to manage access, authentication, and authorisation. This system would streamline access management, ensure compliance with audit requirements, enhance developer velocity, and simplify authentication and authorisation processes for both developers and business operations.
Grab created Concedo to fulfill this requirement by providing a mechanism for services to configure their access control based on their specific role to permission matrix (R2PM)3. This allows for quick and easy integration with Concedo, enabling developers to expedite the shipping of their systems without investing excessive time in building the authentication and authorisation module.
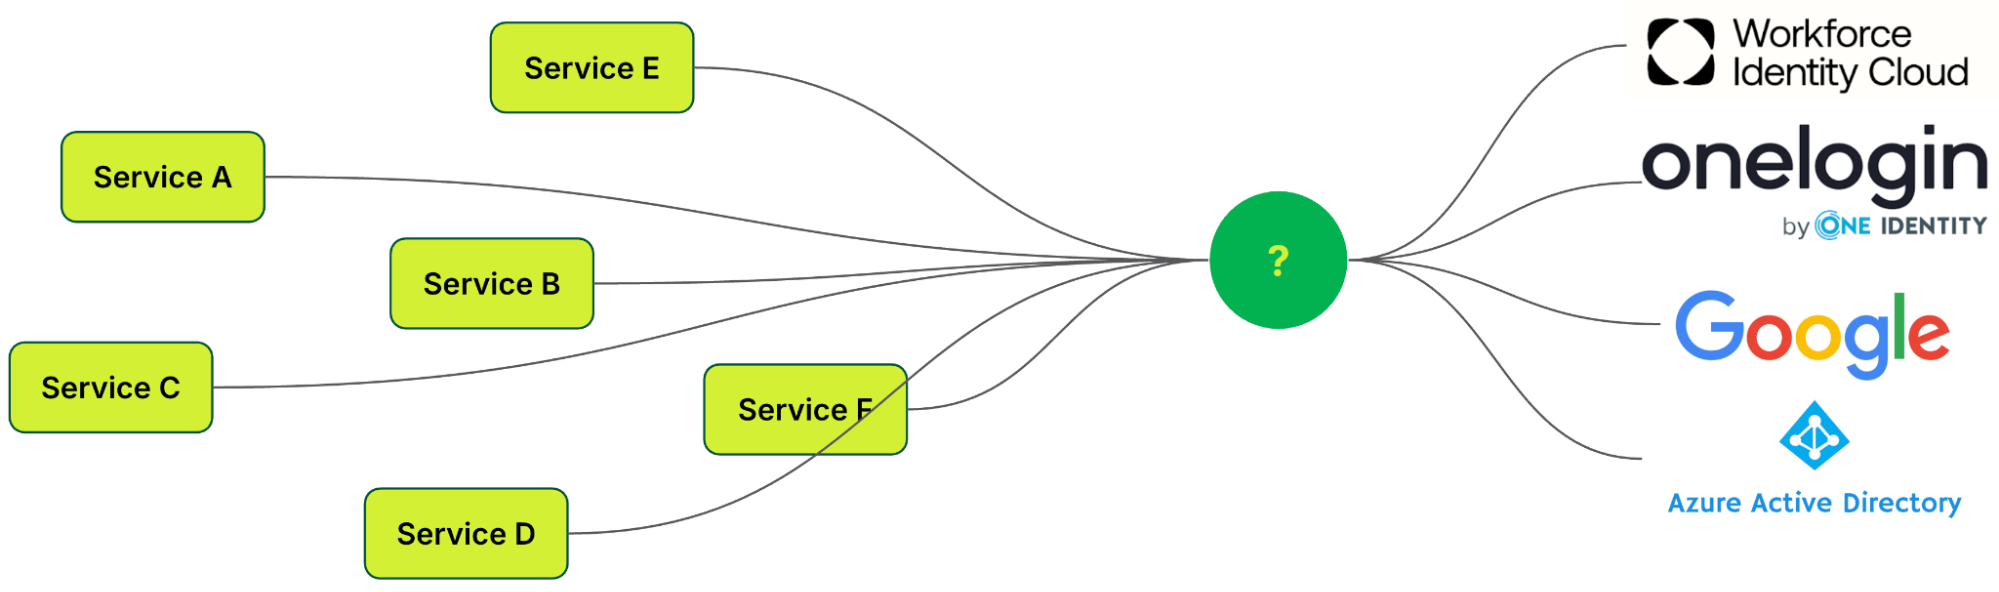
The authentication mechanism, based on Google’s OAuth2.04, includes custom features that enhance identity for service integration. However, this customisation isn’t standard, creating integration challenges with external platforms like Databricks and Datadog. These platforms then use their own authentication and authorisation, resulting in a fragmented and undesirable sign-on experience for users.
The inconsistency in user experience also resulted in complications. The lack of standardisation led to difficulties in establishing authentication and authorisation for individual applications. Additionally, it created substantial administrative overhead due to the necessity of managing multiple identities. The absence of standardisation also hindered transparency in access control across all applications.
This led us to inquire how a standardised protocol could be established to function seamlessly across all applications, regardless of whether they were developed internally or sourced from external platforms.
Choosing among industry standards
We wanted to build a platform to serve both authentication and authorisation, providing a seamless integration and user sign-on experience. We then asked ourselves, “What are the current industry standards we can leverage on?”.
- Security Assertion Markup Language (SAML): An authentication protocol which leverages heavily on session cookies to manage each authentication session.
- Open Authorisation (OAuth): An authorisation protocol which focuses on granting access for particular details rather than providing user identity information.
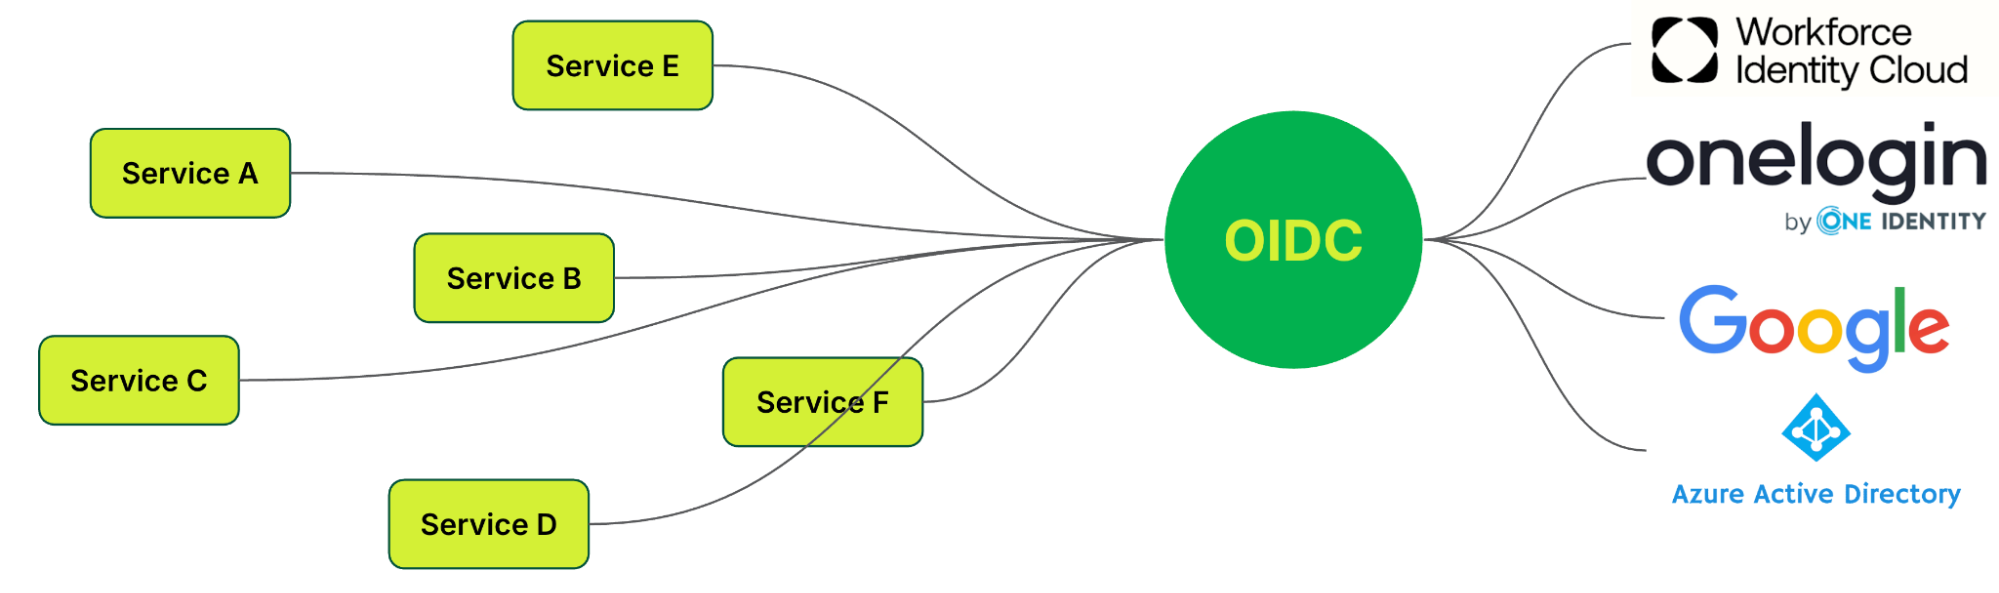
- OpenID Connect (OIDC)5: An authentication protocol built on OAuth 2.0, enabling single sign-on (SSO). OIDC unifies and standardises user authentication, making it a solution for organisations with numerous applications.
OIDC enhances user experience by redirecting them to an identity provider (IdP) like Google or Microsoft for authentication when accessing an application. Upon successful verification, the IdP sends a secure token with the user’s identity information back to the application, granting access without the need for additional credentials.
With OIDC, authentication and authorisation are fully implemented, enabling seamless integration across platforms, including mobile, API, and browser-based applications, while also providing SSO functionality.
OIDC seemed like an ideal solution, but it came with potential drawbacks:
- OIDC relies on trusting a third-party authentication service. Any disruption to this service could result in downtime.
- Compromised credentials could affect access to multiple services.
In the following section, we will explore our strategies in mitigating these challenges effectively.
Implementing the chosen standard
With OIDC chosen as the standard, the focus shifted to implementation.
We have always been a supporter of open source projects. Rather than building a platform from the ground up, we leveraged existing solutions while seeking opportunities to contribute back to the open source community.
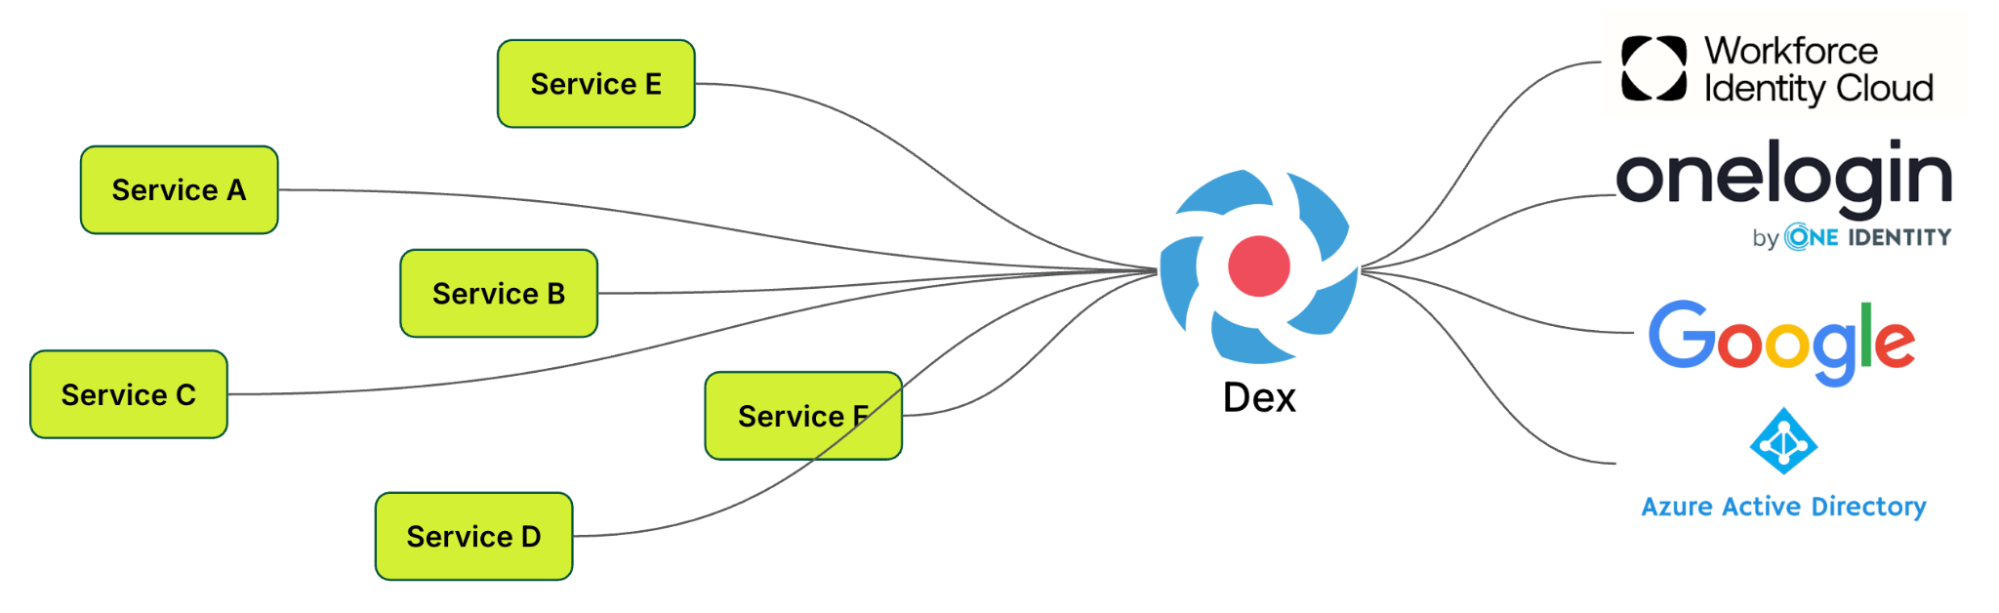
The team explored Cloud Native Computing Foundation (CNCF) projects and discovered Dex – A federated OpenID connect provider that aims to allow integration of any IdP into an application using OIDC. Dex was selected as our open-source platform of choice due to its alignment with our high-level objectives.
How Dex works
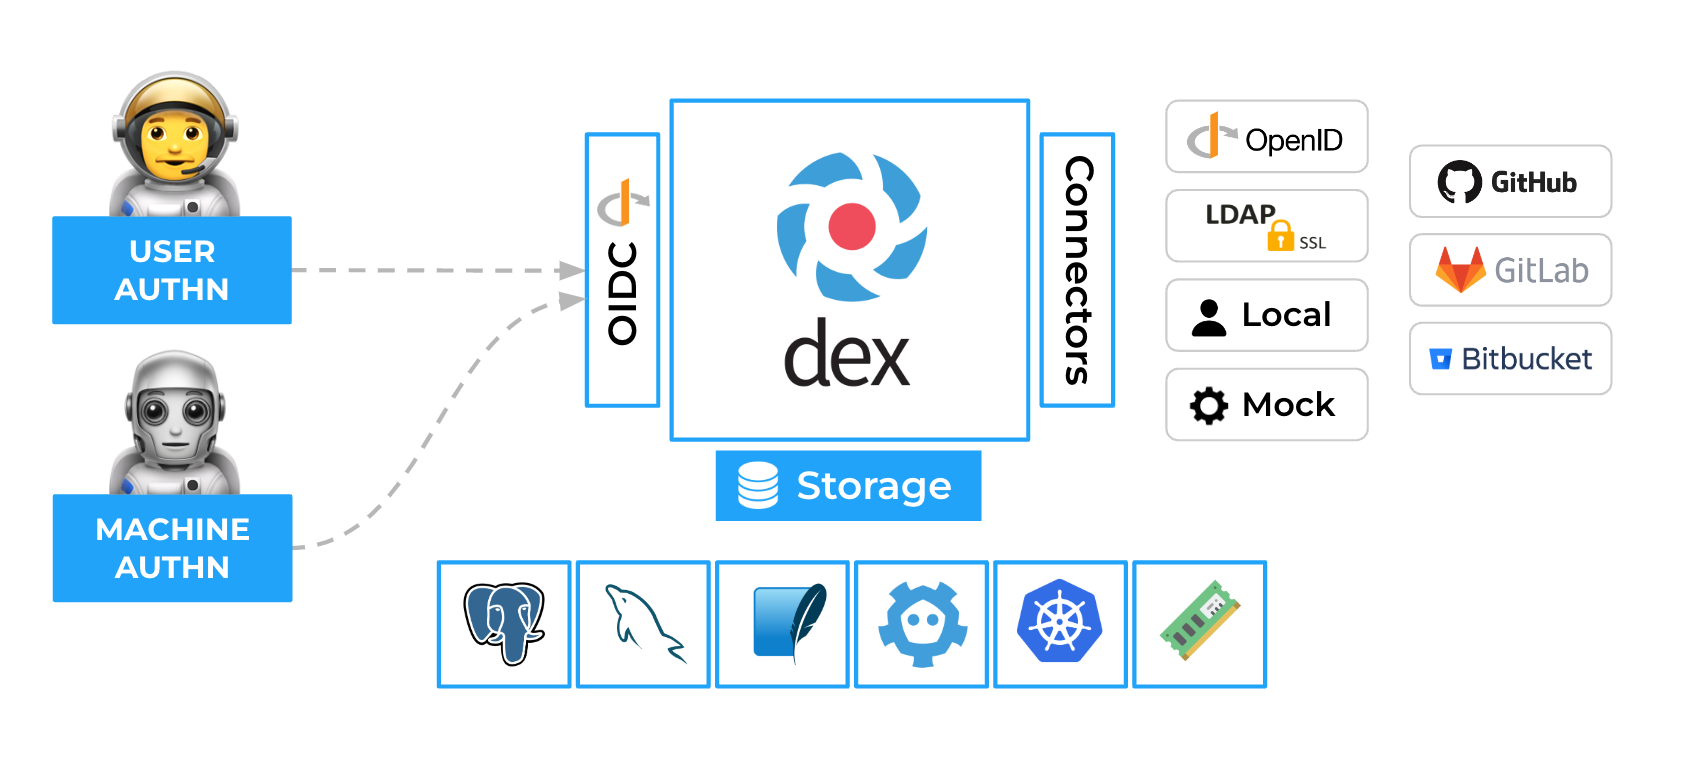
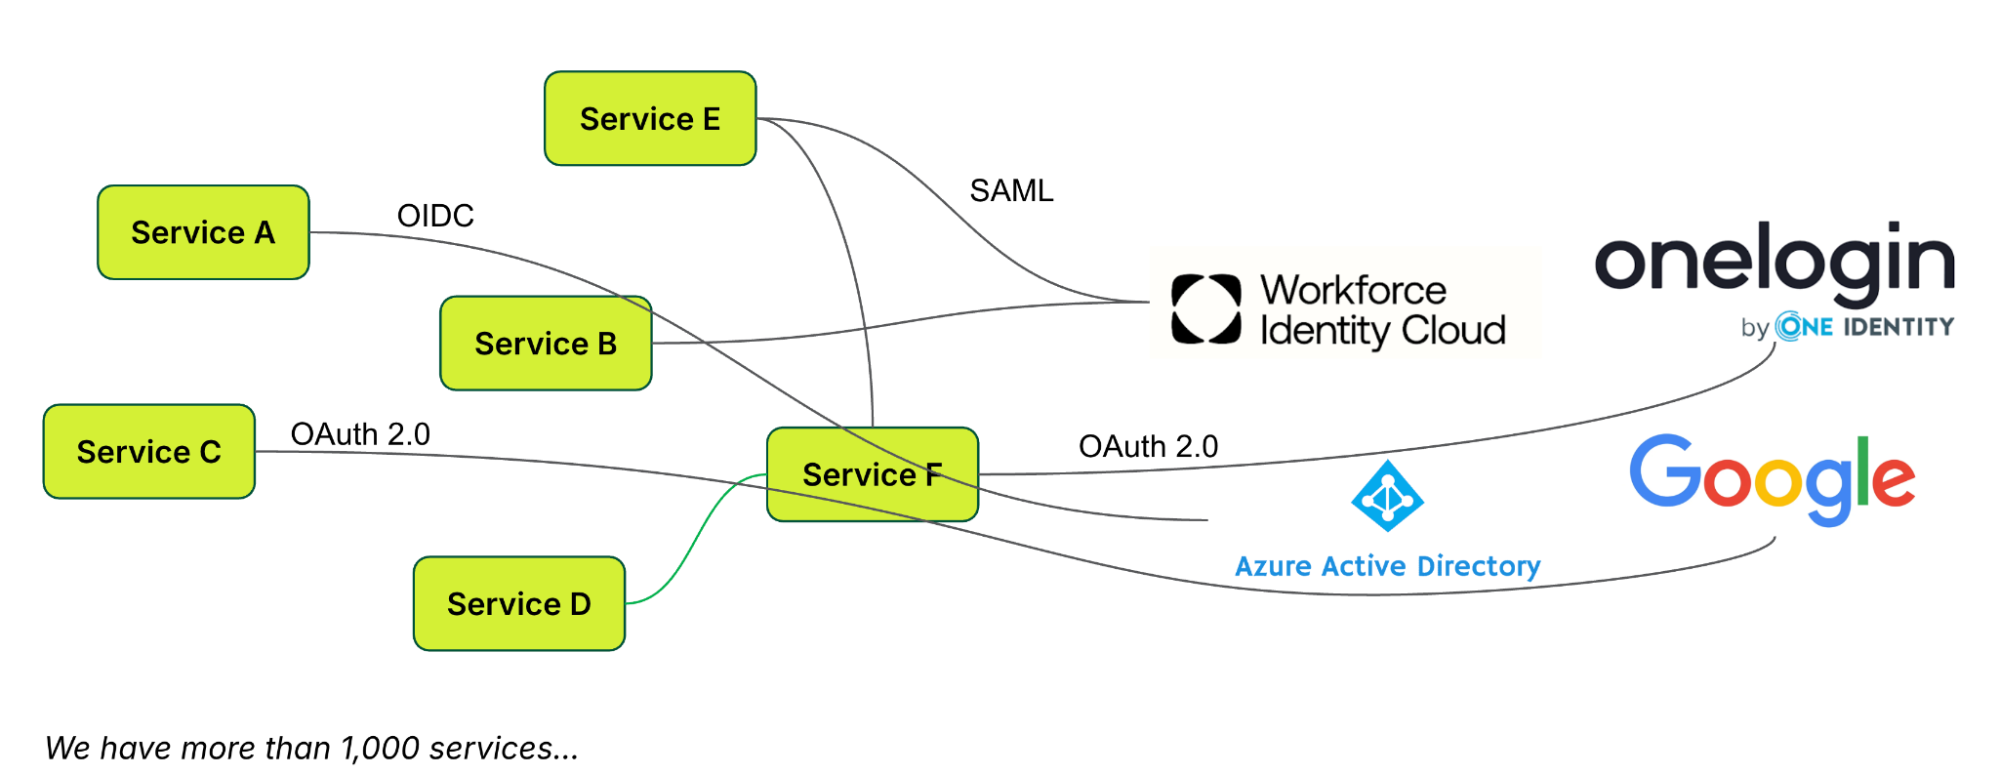
When a user or machine tries to access a protected application or service, they are redirected to Dex for authentication. Dex acts as a middleman (identity aggregator) between the user and various IdPs to establish an authenticated session.
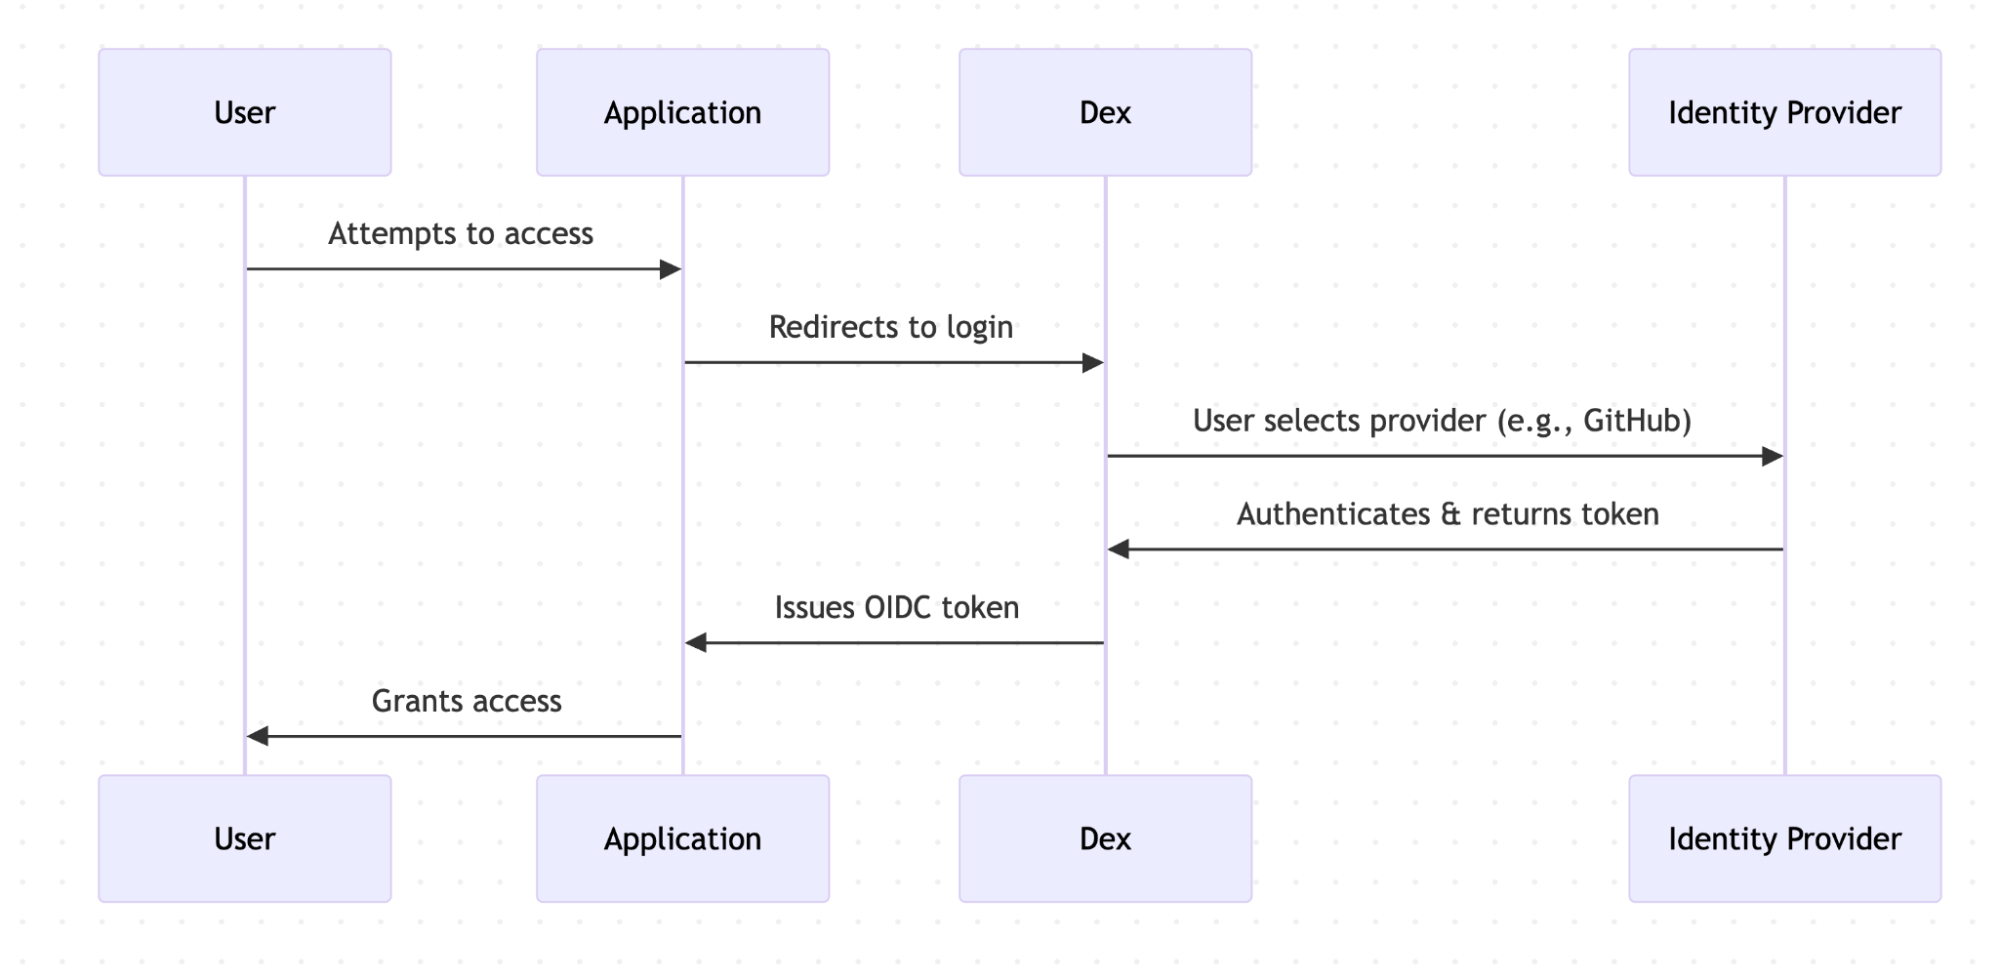
Dex’s key features include enabling SSO experiences, allowing users to access multiple applications after authenticating through a single provider. Dex also supports multiple IdP use cases and provides standardised OIDC authentication tokens.
Dex implementation separated application authentication concerns, established a single source of truth for identity, enabled new IdP additions, ensured adherence to security best practices, and provided scalability for deployments of all sizes.
How Dex is streamlining authentication and authorisation
Token delegation
When services communicate with each other, one service often assigns an identity to ensure that authorisation can be carried out on a specific service. For example, in figure 7, a service account or robot account is typically used as an identity so that service B can identify the caller.
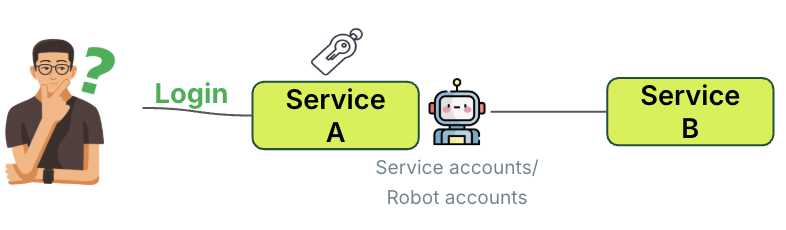
Although service accounts are the recommended approach for enabling Service B to identify the caller, they come with challenges that must be addressed:
- Service account compromise: Service accounts often have high-level privileges and typically broad access to Service B. If compromised, they pose a significant security risk, making careful management essential.
- Access control issue: The other approach creates unnecessary complexity by requiring Service A to handle user-level permissions for Service B. This violates the principle of separation of concerns.
To address this issue, Dex introduced a token exchange feature.
The token exchange process involves two main components; token minting and trust relationship.
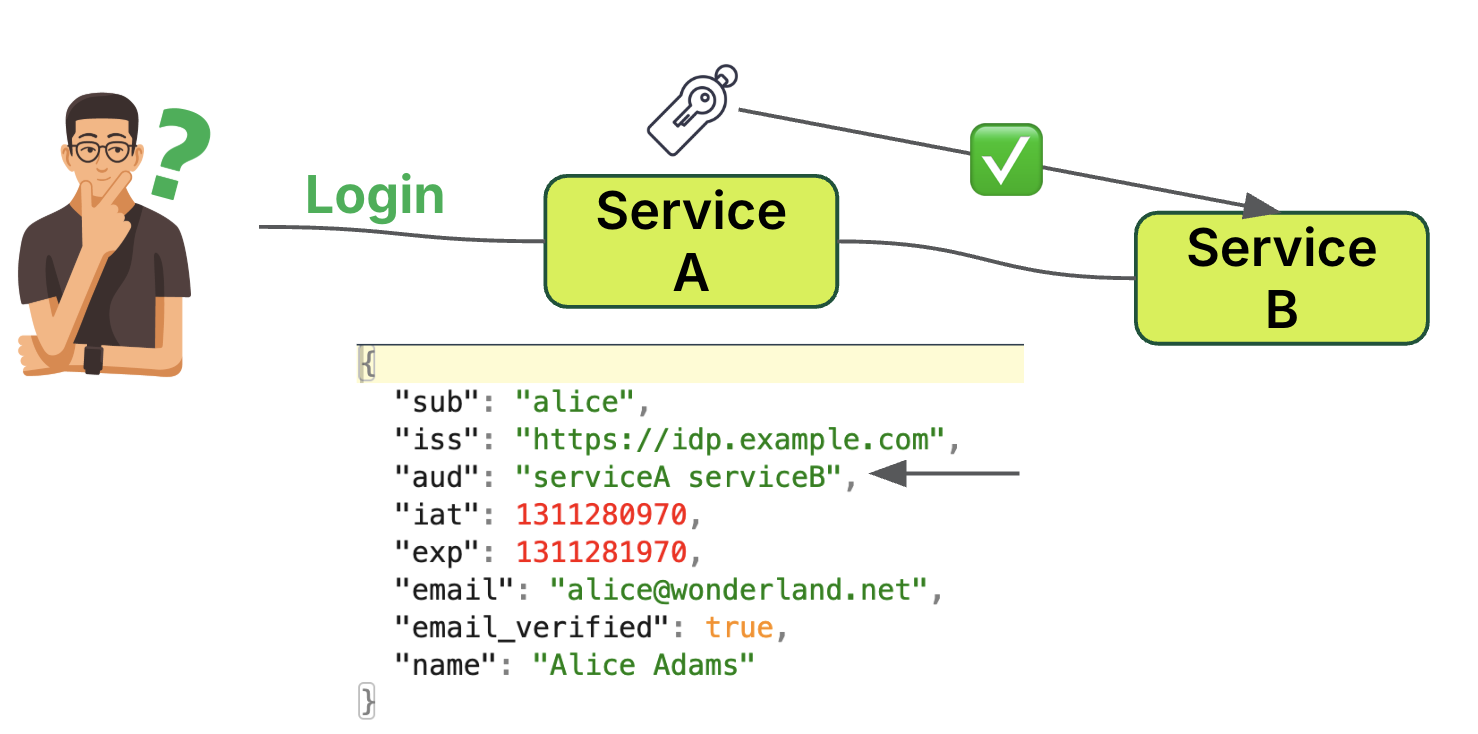
Token minting
- The user (Alice) logs into Service A.
- Service A, acting as a trusted peer, is authorised to mint tokens.
- Service A generates a token valid for both Service A and Service B. This is reflected in the token’s “aud” (audience) field: “aud”: “serviceA serviceB”
Trust relationship
- Service B must be configured to trust Service A as a peer.
- Service B accepts tokens minted by Service A.
This approach differs from the service account-based scenario by using a trust-based peer relationship. Service A is authorised to mint tokens for Service B providing a more sophisticated but preferred method. The token is properly scoped for both services, ensuring a clear audit trail of token issuance, while reducing token manipulation risks.
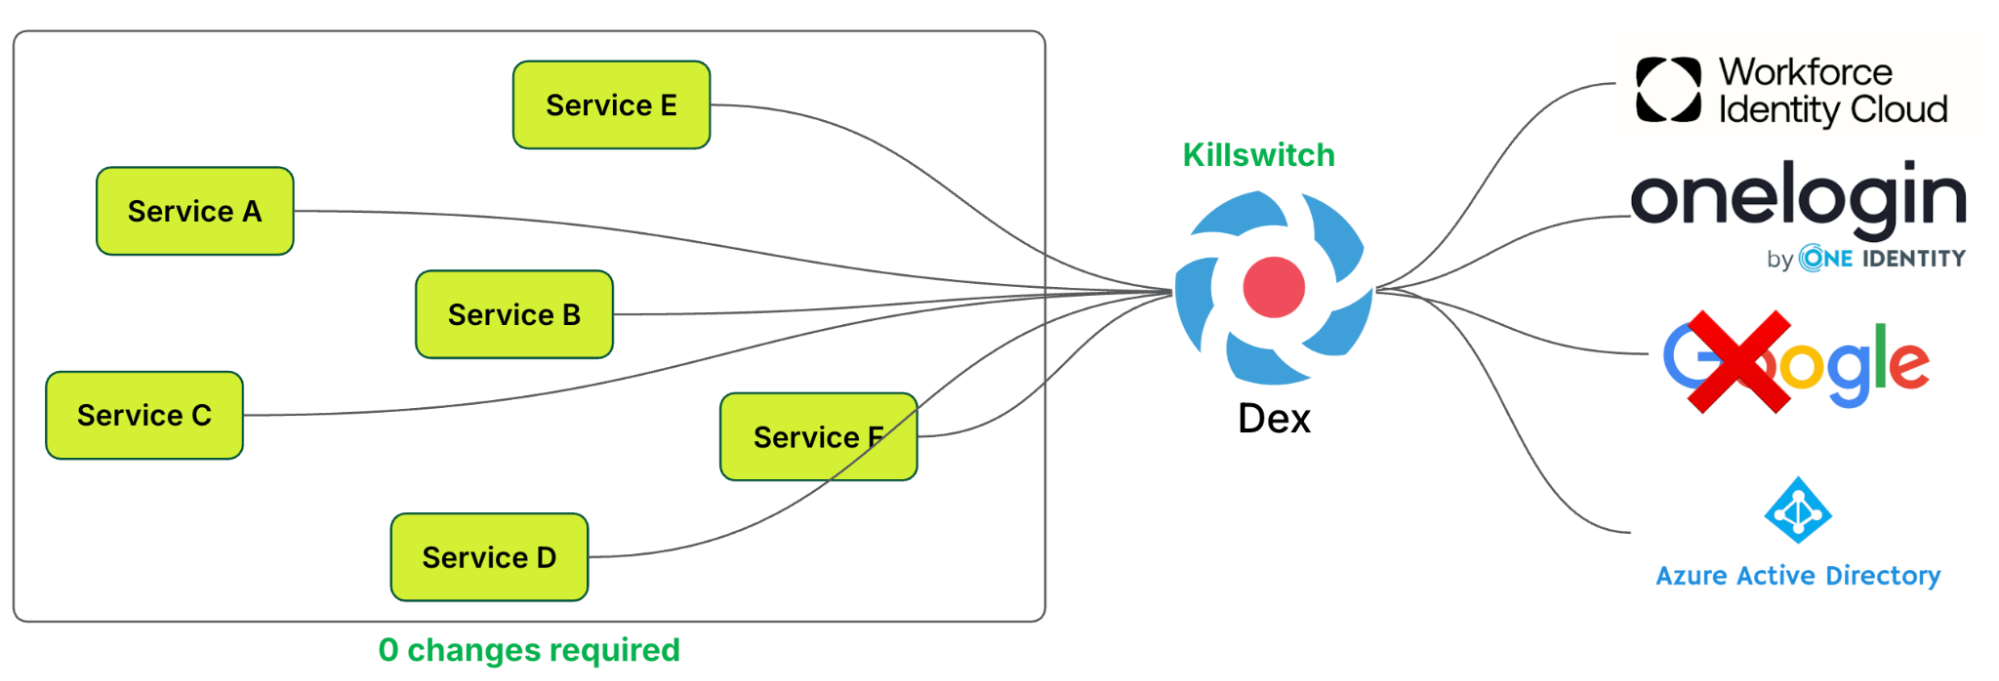
Kill switch
As highlighted earlier,
OIDC relies on trusting a third-party authentication service. Any disruption to this service could result in downtime.
Dex’s ability to support multiple IdPs enables traffic to be shifted to a different IdP if one, such as Google, experiences an outage. This “kill switch” mechanism ensures that integrated services are not disrupted and do not require any changes to mitigate the issue. It is only triggered during specific IdP outages.
Looking forward
Following the successful implementation of Dex as the unified authentication provider, the next phase in enhancing our identity and access management infrastructure is to leverage this robust identity foundation to establish a unified and simplified authorisation model. This initiative is driven by the recognition that the current authorisation landscape remains fragmented and complex, leading to potential inefficiencies and security vulnerabilities.
By centralising authorisation and aligning it with the unified identity provided by Dex, we can streamline access control, improve user experience, and strengthen security across our applications and services. This will involve consolidating authorisation policies, standardising access control mechanisms, and simplifying the management of user permissions.
Shoutout to the awesome Concedo team for driving Dex integration and to our leadership for steering the way toward a simpler, unified authentication and authorisation journey!
Join us
Grab is a leading superapp in Southeast Asia, operating across the deliveries, mobility and digital financial services sectors. Serving over 800 cities in eight Southeast Asian countries, Grab enables millions of people everyday to order food or groceries, send packages, hail a ride or taxi, pay for online purchases or access services such as lending and insurance, all through a single app. Grab was founded in 2012 with the mission to drive Southeast Asia forward by creating economic empowerment for everyone. Grab strives to serve a triple bottom line – we aim to simultaneously deliver financial performance for our shareholders and have a positive social impact, which includes economic empowerment for millions of people in the region, while mitigating our environmental footprint.
Powered by technology and driven by heart, our mission is to drive Southeast Asia forward by creating economic empowerment for everyone. If this mission speaks to you, join our team today!
Definition of terms
-
Authentication: Who you are. Making sure you are who you say you are by verifying your identity. ↩
-
Authorisation: What you can do. Defining the resources or actions you are allowed to access or perform after your identity has been verified. ↩
-
Role-to-Permission Matrix (R2PM): A structured framework used to map roles within an organisation to the permissions or access rights each role has in a system, application, or process. This matrix serves as a critical component in access control and identity management, ensuring that users have appropriate access based on their roles while minimising the risk of unauthorised access. ↩
-
Open Authorisation (OAuth 2.0): Protocol for authorisation. For example, Google Login on third-party portals allows your identity to remain with Google, but third-party portals can obtain limited access to specific data such as your profile photo. ↩
-
OpenID Connect (OIDC): Identity protocol built on top of OAuth 2.0. On top of authorisation provided by OAuth 2.0, it verifies and provides a trusted identity. ↩