Post Syndicated from Darryn Hendricks original https://aws.amazon.com/blogs/security/how-to-bulk-import-users-and-groups-from-csv-into-aws-sso/
When you connect an external identity provider (IdP) to AWS Single Sign-On (SSO) using Security Assertion Markup Language (SAML) 2.0 standard, you must create all users and groups into AWS SSO before you can make any assignments to AWS accounts or applications. If your IdP supports user and group provisioning by way of the System for Cross-Domain Identity Management (SCIM), we strongly recommend using SCIM to simplify ongoing lifecycle management for your users and groups in AWS SSO.
If your IdP doesn’t yet support automatic provisioning, you will need to create your users and groups manually in AWS SSO. Although manual creation of users and groups is the least complicated option to get started, it can be tedious and prone to errors.
In this post, we show you how to use a comma-separated values (CSV) file to bulk create users and groups in AWS SSO.
How it works
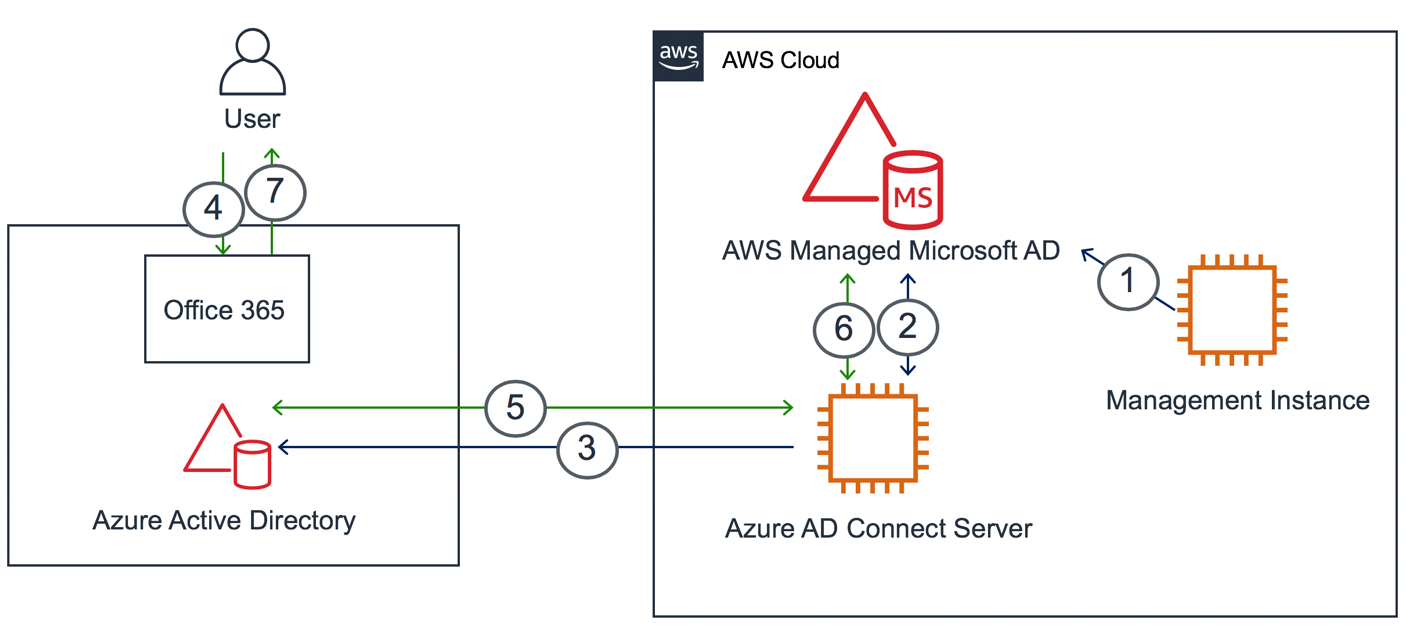
AWS SSO supports automatic provisioning of user and group information from an external IdP into AWS SSO using the SCIM protocol. For this solution, you use a PowerShell script to simulate a SCIM server, to provision users and groups from a CSV file into AWS SSO. You create and populate the CSV file with your user and group information that is then used by the PowerShell script. Next, on your Windows, Linux, or macOS system with PowerShell Core installed, you run the PowerShell script. The PowerShell script reads users and groups from the CSV file and then programmatically creates the users and groups in AWS SSO using your SCIM configuration for AWS SSO.
Assumptions
In this blog post, we assume the following:
- You already have an AWS SSO-enabled account (free). For more information, see Enable AWS SSO.
- You have the permissions needed to add users and groups in AWS SSO.
- You configured a SAML IdP with AWS SSO, as described in How to Configure SAML 2.0 for AWS Single Sign-On.
- You’re using a Windows, MacOS, or Linux system with PowerShell Core installed.
- If you’re not using a system with PowerShell Core installed, you’re using a Windows 7 or later system, with PowerShell 4.0 or later installed.
Note: This article was authored and the code tested on a Microsoft Windows Server 2019 system with PowerShell installed.
Enable automatic provisioning
In this step, you enable automatic provisioning in AWS SSO. You use the automatic provisioning endpoints for AWS SSO to connect and create users and groups in AWS SSO.
To enable automatic provisioning in AWS SSO
-
- On the AWS SSO Console, go to the Single Sign-On page and then go to Settings.
- Change the provisioning from Manual to SCIM by selecting Enable automatic provisioning.
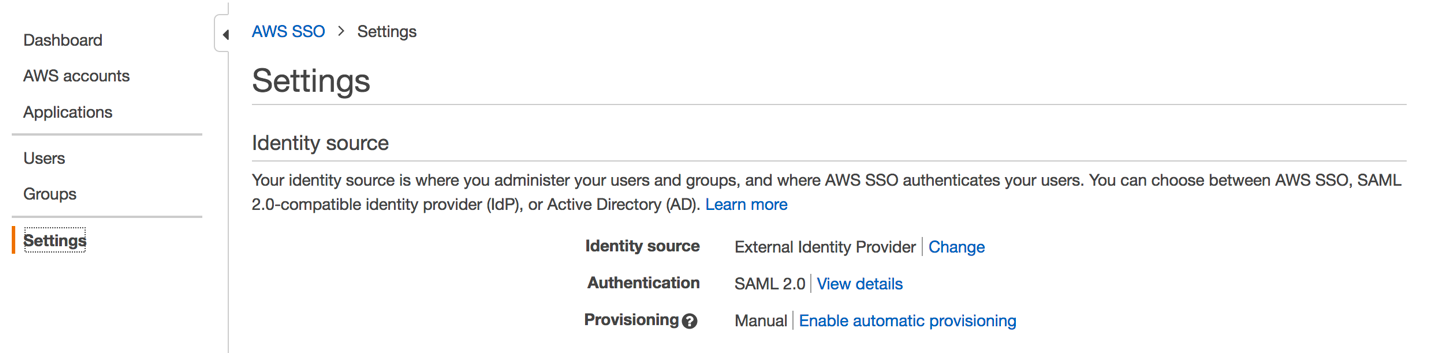
Figure 1: Enable automatic provisioning
-
- Copy the SCIM endpoint and the Access token (you can have up to two access token IDs). You use these values later.
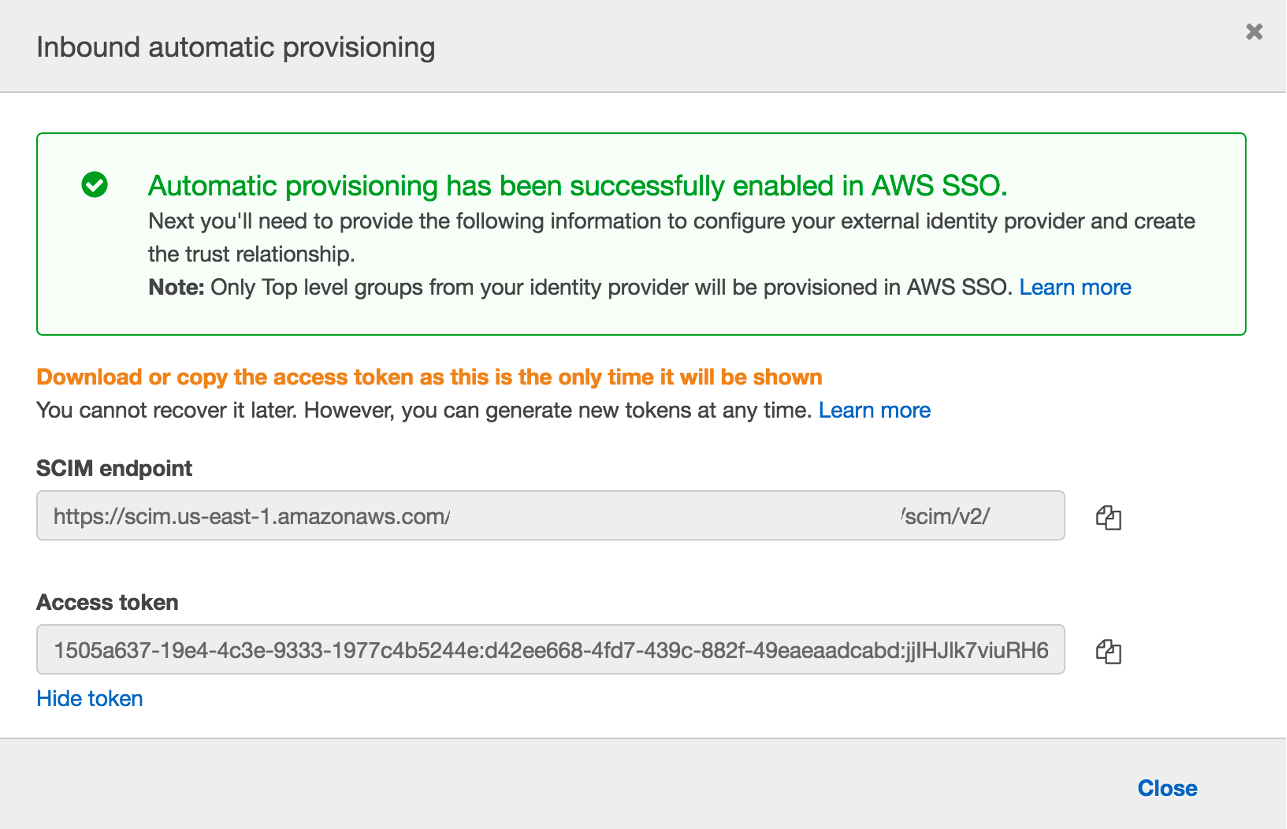
Figure 2: Copy the SCIM endpoint and access token
Bulk create users and groups into AWS SSO
In this section, you create your users and groups from a CSV file into AWS SSO. To do this, you create a CSV file with your users’ profile information (for example: first name, last name, display name, and other values.). You also create a PowerShell script to connect to AWS SSO and create the users and groups from the CSV file in AWS SSO.
To bulk create your users from a CSV file
-
- Create a file called csv-example-users.csv with the following column headings: firstName, lastName, userName, displayName, emailAddress, and memberOf.
Note: The memberOf column will include all the groups you want to add the user to in AWS SSO. If the group you plan to add a user to isn’t in AWS SSO, the script automatically creates the group for you. If you want to add a user to multiple groups, you can add the group names separated by semicolons in the memberOf column.
-
- Populate the CSV file csv-example-users.csv with the users you want to create in AWS SSO.
Note: Before you populate the CSV file, take note of the existing users, groups, and group membership in AWS SSO. Make sure that none of the users or groups in the CSV file already exists in AWS SSO.
Note: For this to work, every user in the csv-example-users.csv must have a firstName, lastName, userName, displayName, and emailAddress value specified. If any of these values are missing, that user isn’t created. The userName and emailAddress values must not contain any spaces.
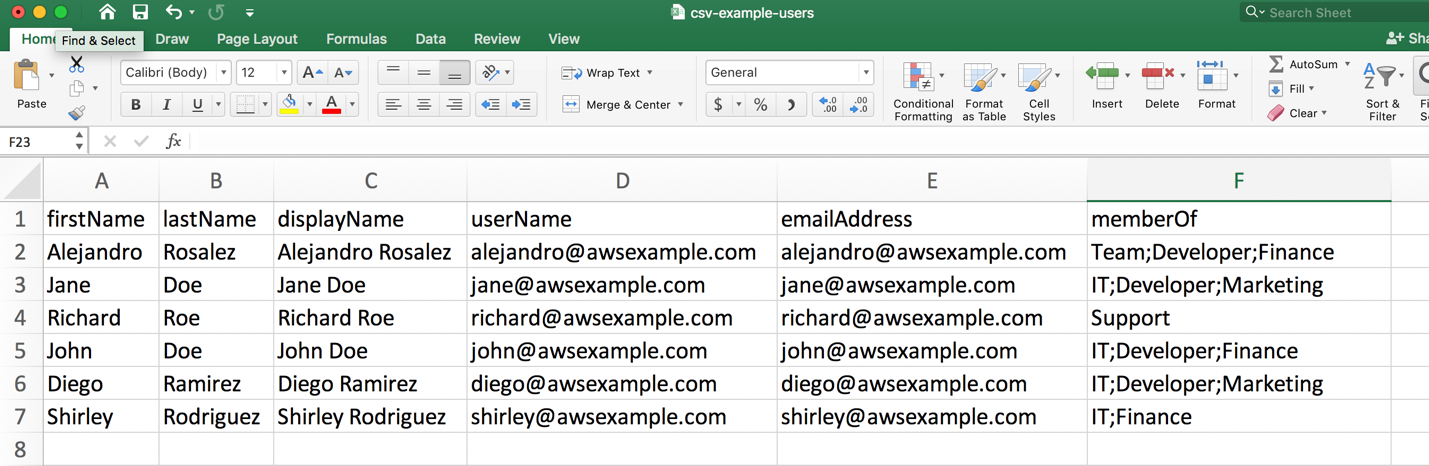
Figure 3: Create the CSV file and populate it with the users to create in AWS SSO
- Next, create a create_users.ps1 file and copy the following PowerShell code to it. Use a text editor like Notepad or TextEdit to edit the create_users.ps1 file.
- Replace <SCIMENDPOINT> with the SCIM endpoint value you copied earlier.
- Replace <BEARERTOKEN> with the Access token value you copied earlier.
- Replace <CSVLOCATION> with the location of your CSV file (for example, C:\Users\testuser\Downloads\csv-example-users.csv. Relative paths are also accepted).
- Use Windows PowerShell to run the script create_users.ps1, as shown in the following figure.

Figure 4: Run PowerShell script to create users from CSV in AWS SSO
- Use the AWS SSO console to verify that the users and groups were successfully created. In the AWS SSO console, select Users from the left menu, as shown in figure 5.

Figure 5: View the newly created users in AWS SSO console
- Use the AWS SSO console to verify that the groups were successfully created. In the AWS SSO console, select Groups from the left menu, as shown in figure 6.

Figure 6: View the newly created groups in AWS SSO console


Your users, groups, and group memberships have been created in AWS SSO. You can now manage access for your identities in AWS SSO across your own applications, third-party applications (SaaS), and Amazon Web Services (AWS) environments.
How to run the PowerShell scripts on Linux and macOS
While this post focuses on running the PowerShell script on a Windows system. You can also run the PowerShell script on a Linux or macOS system that has PowerShell Core installed. You can then follow the steps in this post to create the required CSV files for creating a user and group and adding a user to a group. Then, on your Linux or macOS system, you can run the PowerShell script using the following command.
Conclusion
In this post, we showed you how to programmatically create users and groups from a CSV file into AWS SSO. This solution isn’t a replacement for automatic provisioning. However, it can help you to quickly get up and running with AWS SSO by reducing the administration burden of manually creating users in AWS SSO.
If you have feedback about this post, submit comments in the Comments section below.
Want more AWS Security how-to content, news, and feature announcements? Follow us on Twitter.