This post is the second in a two-part series about sharing practical NAS tips and tricks to help readers with their own home or office NAS setups. Check out Part One where Backblazer Vinodh Subramanian walks through how he set up a NAS system at home to manage files and back up devices. And read on to learn how Backblazer James Flores uses a NAS to manage media files as a professional filmmaker.
The modern computer has been in existence for decades. As hardware and software have advanced, 5MB of data has gone from taking up a room and weighing a literal ton to being orders of magnitude more compact than what you would find on a typical smartphone. No matter how much storage there is, though, we—I know I am not alone—have been generating content to fill the space. Industry experts say that we reached 64.2 zettabytes of data created, captured, copied, and consumed globally in 2020, and we’re set to reach more than 180 zettabytes in 2025. And a lot of that is media—from .mp3s and .jpgs to .movs, we all have a stock pile of files sitting somewhere.
If you’re creating content you probably have this problem to the 10th power. I started out creating content by editing videos in high school, and my content collection has only grown from there. After a while, the mix of physical media formats had amassed into a giant box stuffed with VHS tapes, DVCPRO tapes, Mini DVs, DVDs, CD-ROMs, flash drives, external hard disk drives (HDDs), internal laptop HDDs, an Apple TimeCapsule, SD cards, and, more recently, USB 3.0 hard drives. Needless to say, it’s unruly at best, and a huge data loss event waiting to happen at worst.
Today, I’m walking through how I solved a problem most of us face: running into the limits of storage.
The Origin Story
My collection of media started because of video editing. Then, when I embarked on an IT career, the amount of data I was responsible for only grew, and my new position came with the (justifiable) paranoia of data loss. In the corporate setting, a network attached storage device (NAS) quickly became the norm—a huge central repository of data accessible to any one on the network and part of the domain.
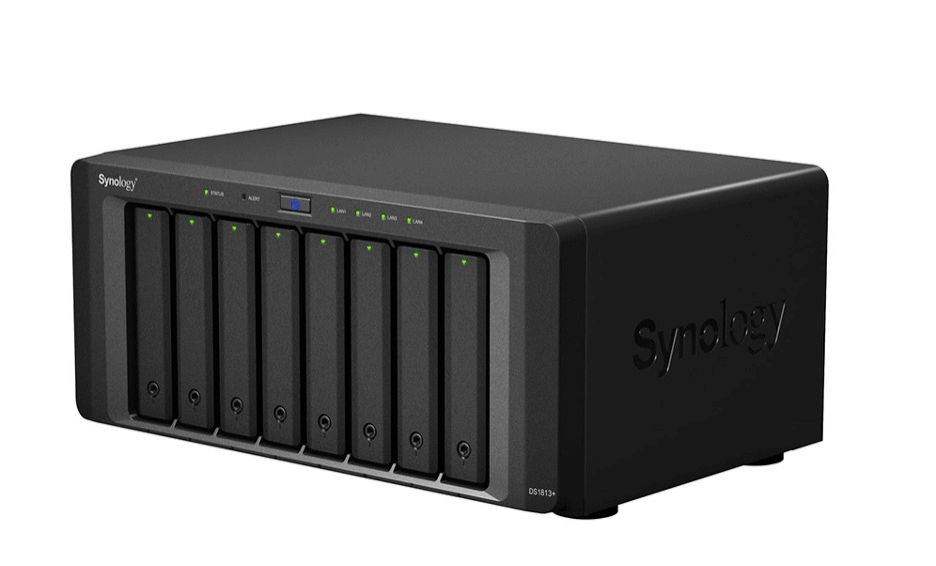
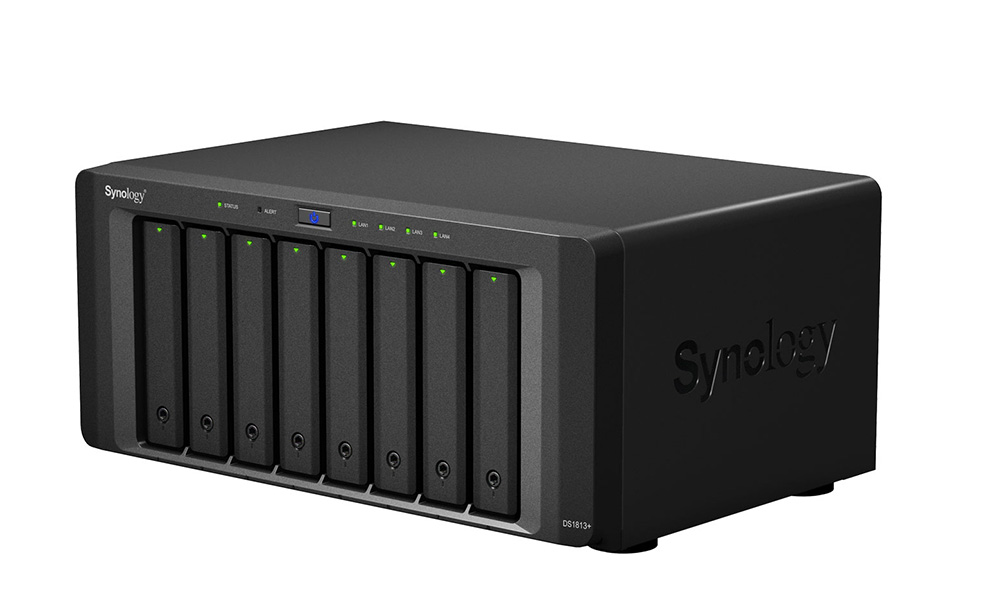
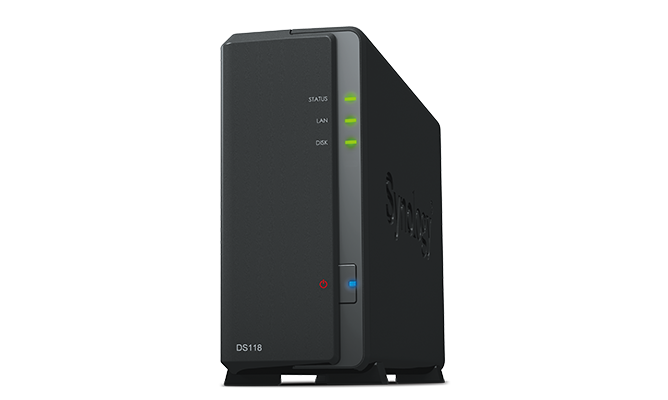
A Synology NAS.
Meanwhile in 2018, I returned to creating content again in full swing. What started with small webinar edits on a Macbook Air quickly turned into scripted productions complete with custom graphics and 4K raw footage. And thus the data bloat continued.
But this time (informed by my IT background), the solution was easy. Instead of burning data to several DVDs and keeping them in a shoebox, I used larger volume storage like hard drives (HDDs) and NAS devices. After all, HDDs are cheap and relatively reliable.
And, I had long since learned that a good backup strategy is key. Thus, I embarked on making my backup plan an extension of my data management plan.
The Plan
The plan was simple. I wanted to have a 4TB NAS to use as a backup location and to extend my internal storage in case I needed to. After all, my internal drive was 7TB—who’s going to use more than that? (I thought at the time, unable to see my own future.) Setting up NAS is relatively simple: it replicated a standard IT setup, with a switch, a static IP address, and some cables.
But first, I needed hardwired network access in my office which is far away from my router. As anyone who works with media knows, accessing a lot of large files over wifi just isn’t fun. Luckily my house was pre-wired with CAT5—CAT5 cables that were terminated as phone lines. (Who uses a landline these days?) After terminating the cables with CAT5E adapters, installing a small 10-port patch panel and a new switch, I had a small network where my entire office was hardwired to my router/modem.
As far as the NAS goes, I chose a Synology DS214+, a simple two-bay NAS. After all, I didn’t expect to really use it all. I worked primarily off of my internal storage, then files were archived to this Synology device. I could easily move them back and forth between my primary and secondary storage because I’d created my internal network, and life was good.
Data Bloat Strikes Again
Fast forward to 2023. Now, I’m creating content routinely for two different companies, going to film school, and flexing my freelance editing skills on indie films. Even with the extra storage I’d built in for myself, I am at capacity yet again. Not only have I filled up Plan A on my internal drive, but now my Plan B NAS is nearing capacity. And, where are those backups being stored? My on-prem-only solution wasn’t cutting it.
This wasn’t me—but I get it.
Okay, New Plan
So what’s next?
Since I’m already set up for it, there’s a good argument to expand the NAS. But is that really scalable? In an office full of film equipment, a desk, a lightboard, and who knows what else in the future, do I really need another piece of equipment that will run all day?
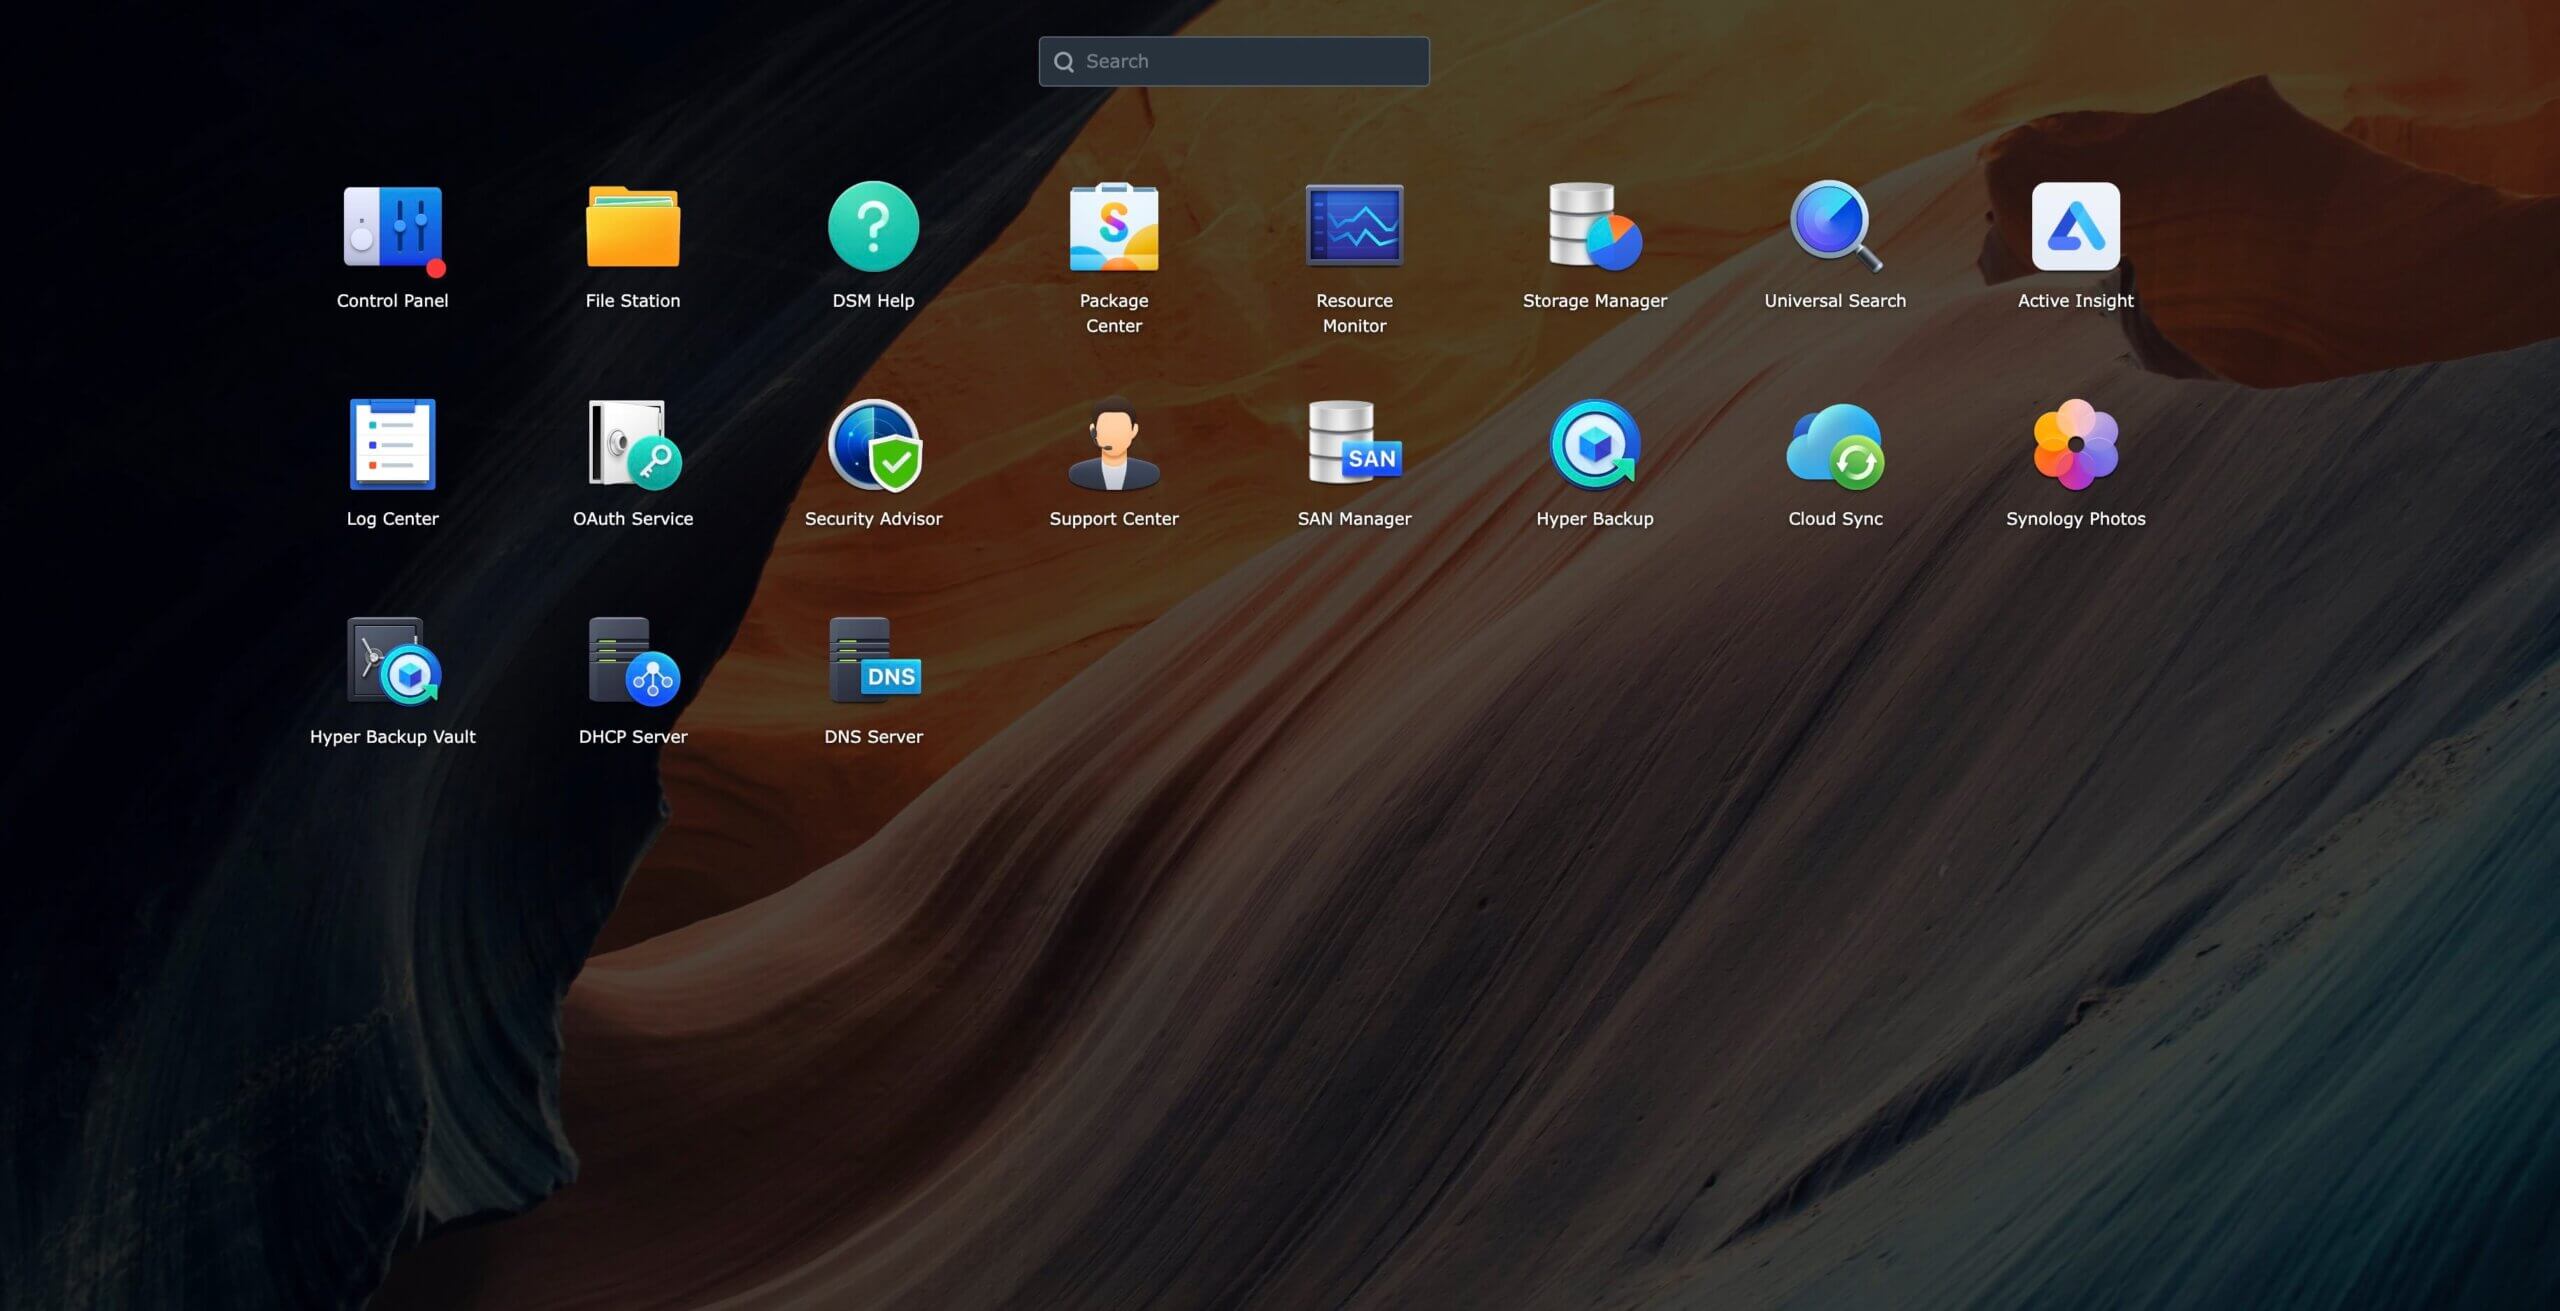
Like all things tech, the answer is in the cloud. Synology’s NAS was already set up for cloud-based workflows, which meant that I got the best of both worlds: the speed of on-prem and the flexibility of the cloud.
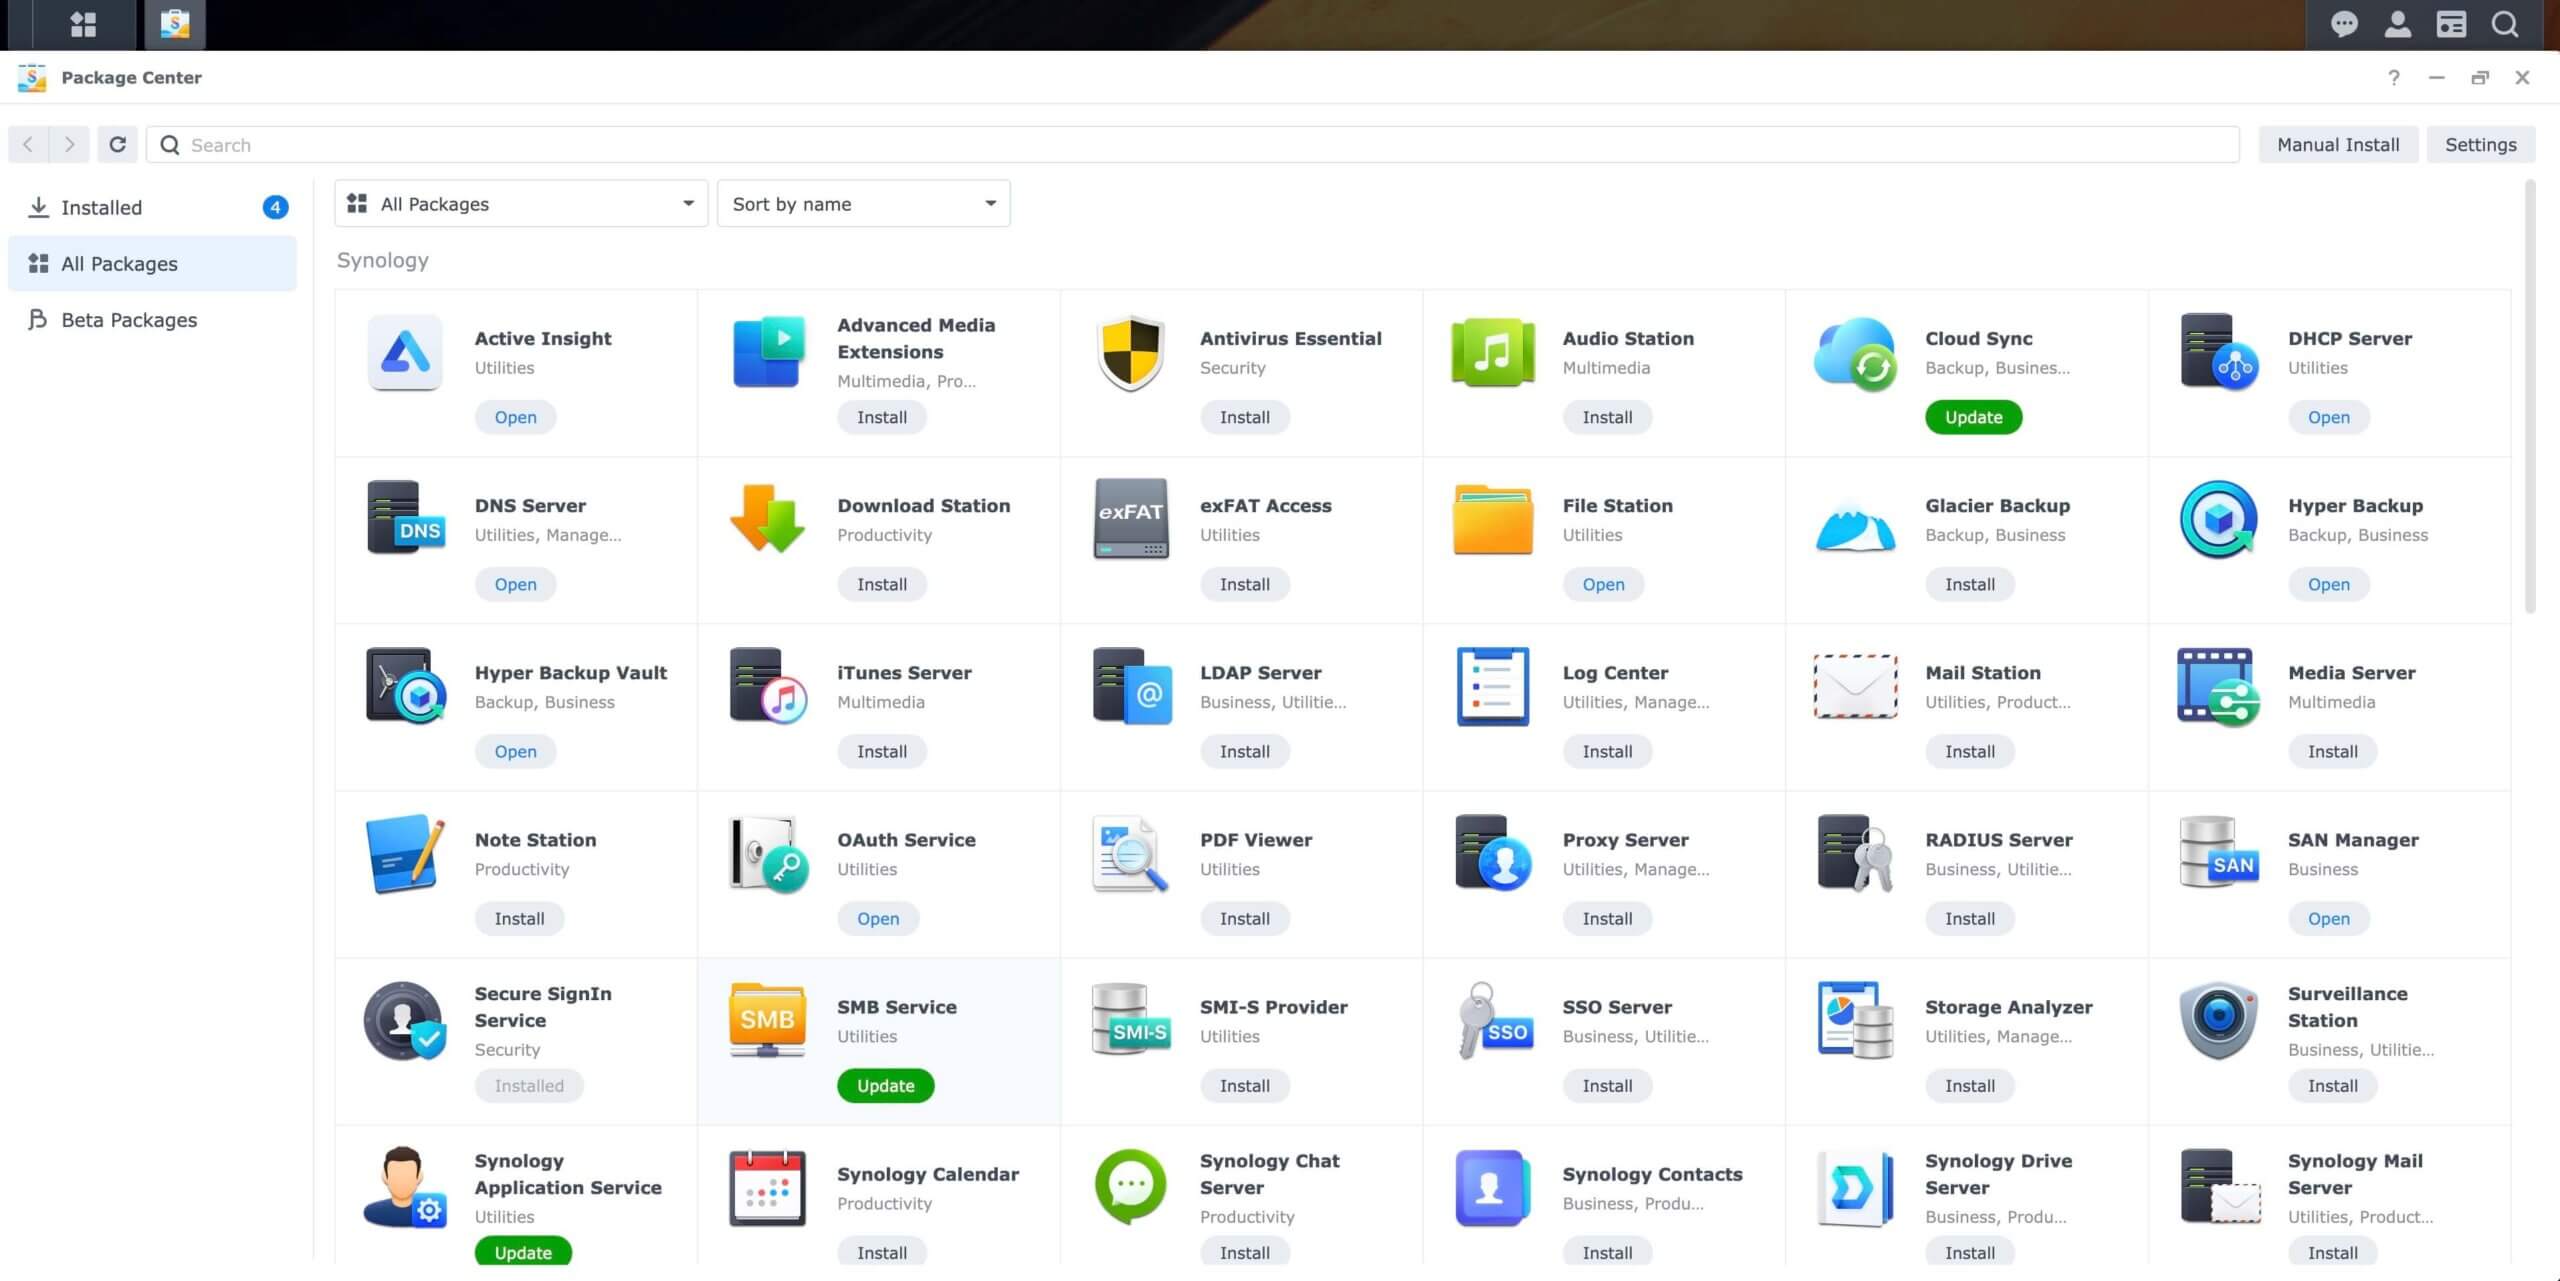
Synology has its own marketplace with add-on packages which are essentially apps that let you add functionality to your device. Using their Cloud Sync app, you can sync an entire folder on your NAS to a cloud object storage provider. For me that means: Instead of buying another NAS device (hardware I have to maintain) or some other type of external storage (USB drives, LTO tapes), I purchase cloud storage, set up Cloud Sync to automatically sync data to Backblaze B2 Cloud Storage, and my data is set. It’s accessible from anywhere, I can easily create off-site backups, and I am not adding hardware to my jam-packed office.
I Need a Hero
This is great for my home office and the small projects I do in my spare time but how is this simple setup being used to modernize media workflows?
A big sticking point for media folks is what we talked about before—that large files can take up too much bandwidth to work well on wifi. However, as the cloud has become more accessible to all, there are many products today on the market designed to solve that problem for media teams specifically.
Up Amongst the Clouds
One problem though: Many of these tools push their own cloud storage. You could opt to play cloud storage hopscotch: sign up for the free tier of Google Drive, drag and drop files (and hope the browser keeps the connection going), hit capacity, then jump to the next cloud storage provider’s free tier and fill that up. With free accounts across the internet, all of the sudden you have your files stored all over the place, and you may not even remember where they all are. So, instead of my cardboard box full of various types of media, we end up with media in silos across different cloud providers.
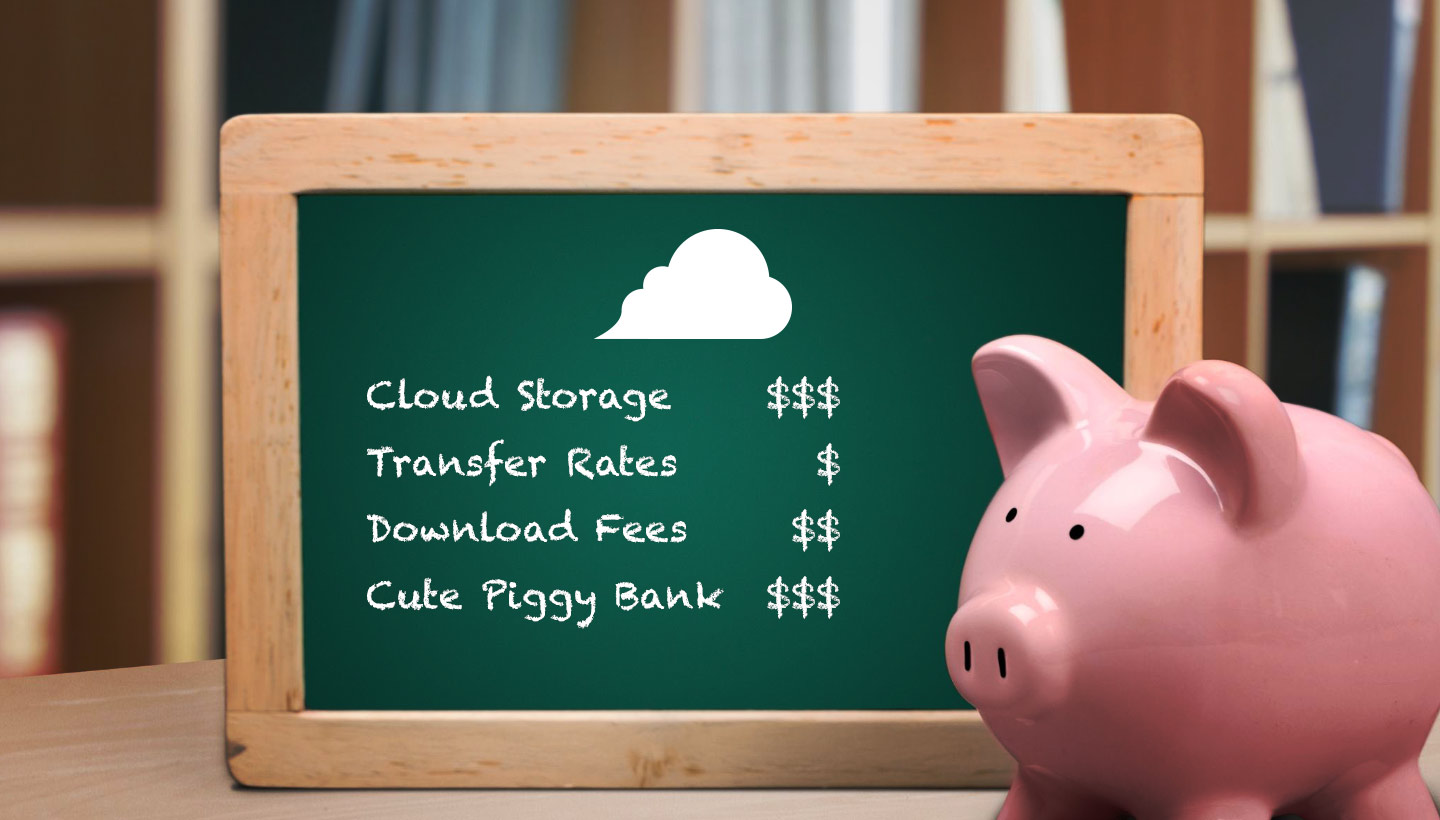
And you can’t forget the cost. Cloud storage used to be all about the big guys. Beyond the free tiers, pricing was designed for big business, and many cloud storage providers have tiered pricing based on your usage, charges for downloads, throttled speeds, and so on. But, the cost of storage per GB has only decreased over the years, so (in theory), the cost of cloud storage should have gone down. (And I can’t resist a shameless plug here: At Backblaze, storage is ⅕ the cost of other cloud providers.)
It should be news to no one that COVID changed a lot in the media and entertainment industry, bringing remote work to our front door, and readily-available cloud products are powering those remote workflows. However, when you’re storing in each individual tool, it’s like when you have a USB drive over here, and an external hard drive over there.
As the media tech stack has evolved, a few things have changed. You have more options when it comes to choosing your cloud storage provider. And, cloud storage providers have made it a priority for tools to talk to each other through APIs. Here’s a good example: now that my media files are synced to and backed up with Synology and Backblaze, they are also readily accessible for other applications to use. This could be direct access to my Backblaze storage with a nonlinear editing system (NLE) or any modern workflow automation tool. Storing files in the cloud is only an entry point for a whole host of other cloud workflow hacks that can make your life immensely easier.
These days, you can essentially “bring your own storage” (BYOS, let’s make it a thing). Now, the storage is the foundation of how I can work with other tools, and it all happens invisibly and easily. I go about my normal tasks, and my files follow me.
With many tools, it’s as simple as pointing your storage to Backblaze. When that’s not an option, that’s when you get into why APIs matter, a story for another day (or another blog post). Basically, with the right storage, you can write your own rules that your tools + storage execute, which means that things like this LucidLink, iconik, and Backblaze workflow are incredibly easy.
Headline: Cloud Saves the (Media) World
So that’s the tale of how and why I set up my home NAS, and how that’s naturally led me to cloud storage. The “how” has gotten easier over the years. It’s still important to have a hard-wired internet connection for my NAS device, but now that you can sync to the cloud and point your other tools to use those synced files, you have the best of both worlds: a hybrid cloud workflow that gives you maximum speed with the ability to grow your storage as you need to.
Are you using NAS to manage your media at home or for a creative team? We’d love to hear more about your setup and how it’s working for you.
Network attached storage (NAS) devices offer centralized data storage solutions, enabling users to easily protect and access their data locally. You can think of a NAS device as a powerful computer that doesn’t have a display or keyboard. NAS can function as extended hard disks, virtual file cabinets, or centralized storage systems depending on individual needs. While NAS devices provide local data protection, a hybrid setup with cloud storage offers off-site protection by storing files on geographically remote servers.
This blog is the first in a two part series that will focus on home NAS setups, exploring how two Backblazers set up their NAS devices and connected them to the cloud. We’ll aim to present actionable setup tips and explain what each of our data storage needs are so that you can create your own NAS setup strategy.
I’m Vinodh, your first user. In this post, I will walk you through how I use a Synology Single-Bay NAS device and Backblaze B2 Cloud Storage.
Why Did I Need a NAS Device At My Home?
Before I share my NAS setup, let’s take a look at some of the reasons why I needed a NAS device to begin with. Knowing that will give you a better understanding of what I’m trying to accomplish with NAS.
My work at Backblaze involves guiding customers through all things NAS and cloud storage. I use a single-bay NAS device to understand its features and performance. I also create demos, test use cases, and develop marketing materials and back them up on my NAS and in the cloud to achieve the requirements of a 3-2-1 backup strategy. That strategy recommends that you have three copies of data stored in two different locations with one copy off-site.
Additionally, I use my NAS setup to off-load the (stunning!) photos and videos from my wife’s and my iPhones to free up space and protect them safely in the cloud. Lastly, I’d also like to mention that I work remotely and collaborate with people as part of my regular work, but today we’re going to talk about how I back up my files using a hybrid cloud storage setup that combines Synology NAS and Backblaze B2. Combining NAS and cloud storage is a great backup and storage solution for both business and personal use, providing a layer of protection in the event of hardware failures, accidental deletions, natural disasters, or ransomware attacks.
Now that you understand a little bit about me and what I’m trying to accomplish with my NAS device, let’s jump into my setup.
What Do I Need From My NAS Device?
Needless to say, there are multiple ways to set up a NAS device. But, the most common setup is for backing up your local devices (computer, phones, etc.) to your NAS device. A basic setup like this, with a few computers and devices backing up to the same NAS device, protects data in that you have a second copy of your data stored locally. However, the data can still be lost if there is hardware failure, theft, fire, or any other unexpected event that poses a threat to your home. This means that your backup strategy needs something more in order to truly protect your data.
Off-site protection with cloud storage solves this problem. So, when I planned my NAS setup, I wanted to make sure I had a NAS device that integrates well with a cloud storage provider to achieve a 3-2-1 backup strategy.
Now that we’ve talked about my underlying data protection strategy, here are the devices and tools I used to create a complete 3-2-1 NAS backup setup at my home:
Devices with data:
MacBook Pro–1
iPhone–2
Storage products:
Synology Device–1
Seagate 4TB internal hard disk drive–1
Backblaze B2 Cloud Storage
Applications:
Synology Hyper Backup
Synology Photos
What Did I Want to Back Up on My NAS Device?
My MacBook Pro is where I create test use cases, demos, and all the files I need to do my job, such as blog posts, briefs, presentation decks, ebooks, battle cards, and so on. In addition to creating files, I also download webinars, infographics, industry reports, video guides, and any other information that I find useful to support our sales and marketing efforts. As I mentioned previously, I want to protect this business data both locally (for quick access) and in the cloud (for off-site protection). This way, I can not only secure the files, but also remotely collaborate with people from different locations so everyone can access, review, and edit the files simultaneously to ensure timely and consistent messaging.
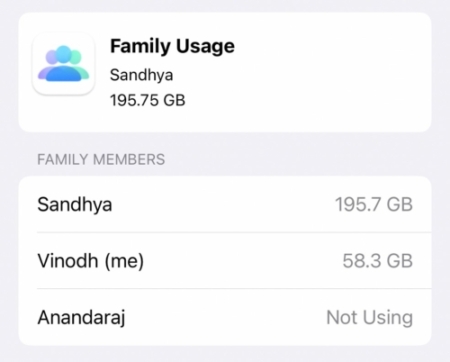
Meanwhile, my wife and I each have an iPhone 12 with 128GB storage space. Clearly, a total of 256GB is not enough for us—it only takes six to nine months for us to run out of storage on our devices. Once in a while, I clean up the storage space to make sure my phone runs at optimal speed by removing any duplicate or unwanted photos or movies. However, my wife doesn’t like to delete anything as she often wants to look back and remember that one time we went to that one place with those friends. But, she has hundreds of pictures of that one place with those friends. As a result, our iPhone family usage is almost always at capacity.
Our shared storage.
As you can see, being able to off-load pictures and movies from our phones to a local device would give us quick access, protect our memories in the cloud, and free up our iPhone storage.
How I Set Up My NAS Device
To accomplish all that, I set up a Synology Single-Bay NAS Diskstation (Model: DS118) which is powered by a 64-bit quad-core processor and 1GB DDR4 memory. As we discussed above, a NAS device is basically a computer without a display and keyboard.
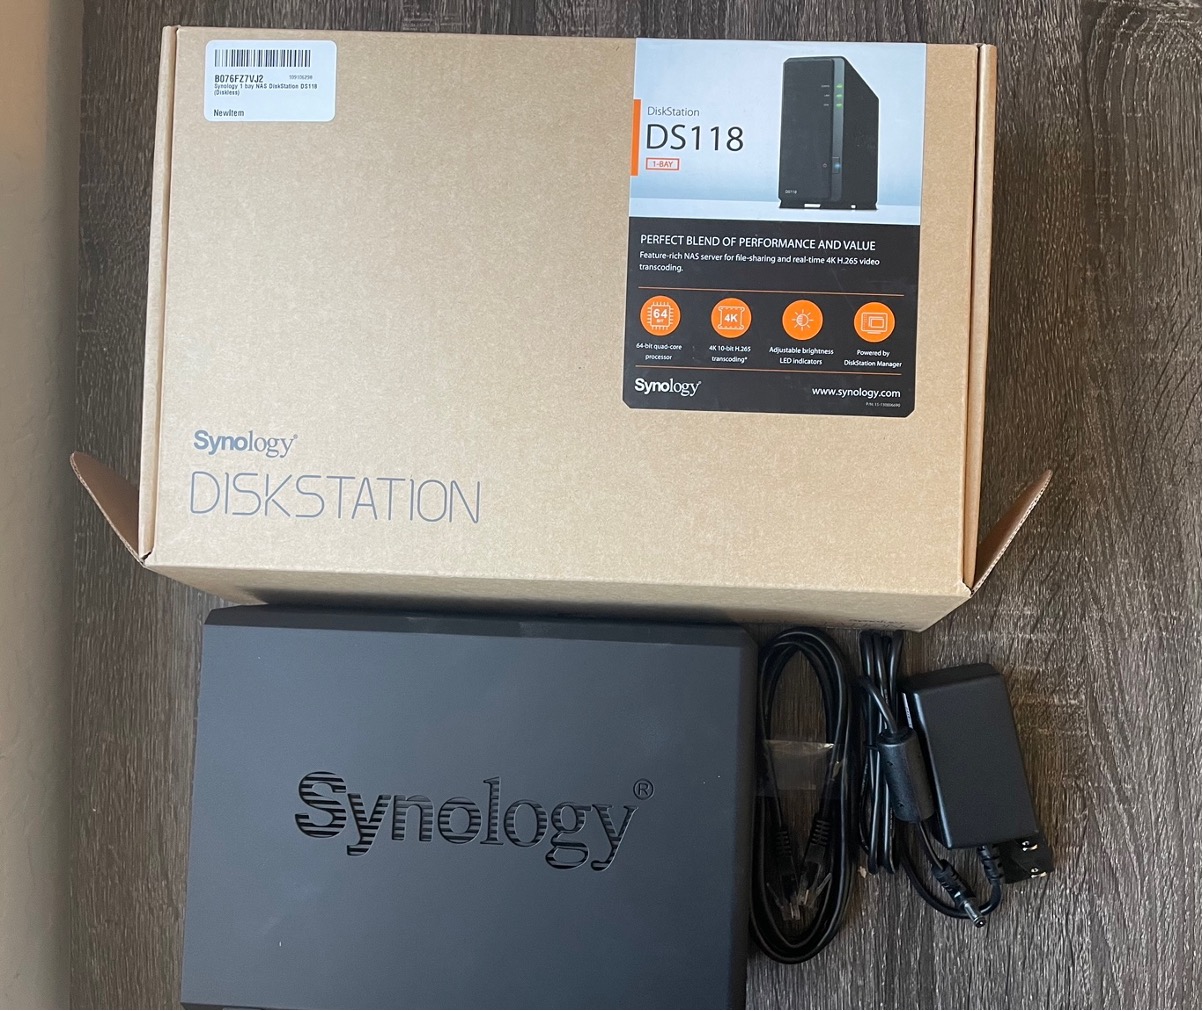
Unboxing my Synology NAS.
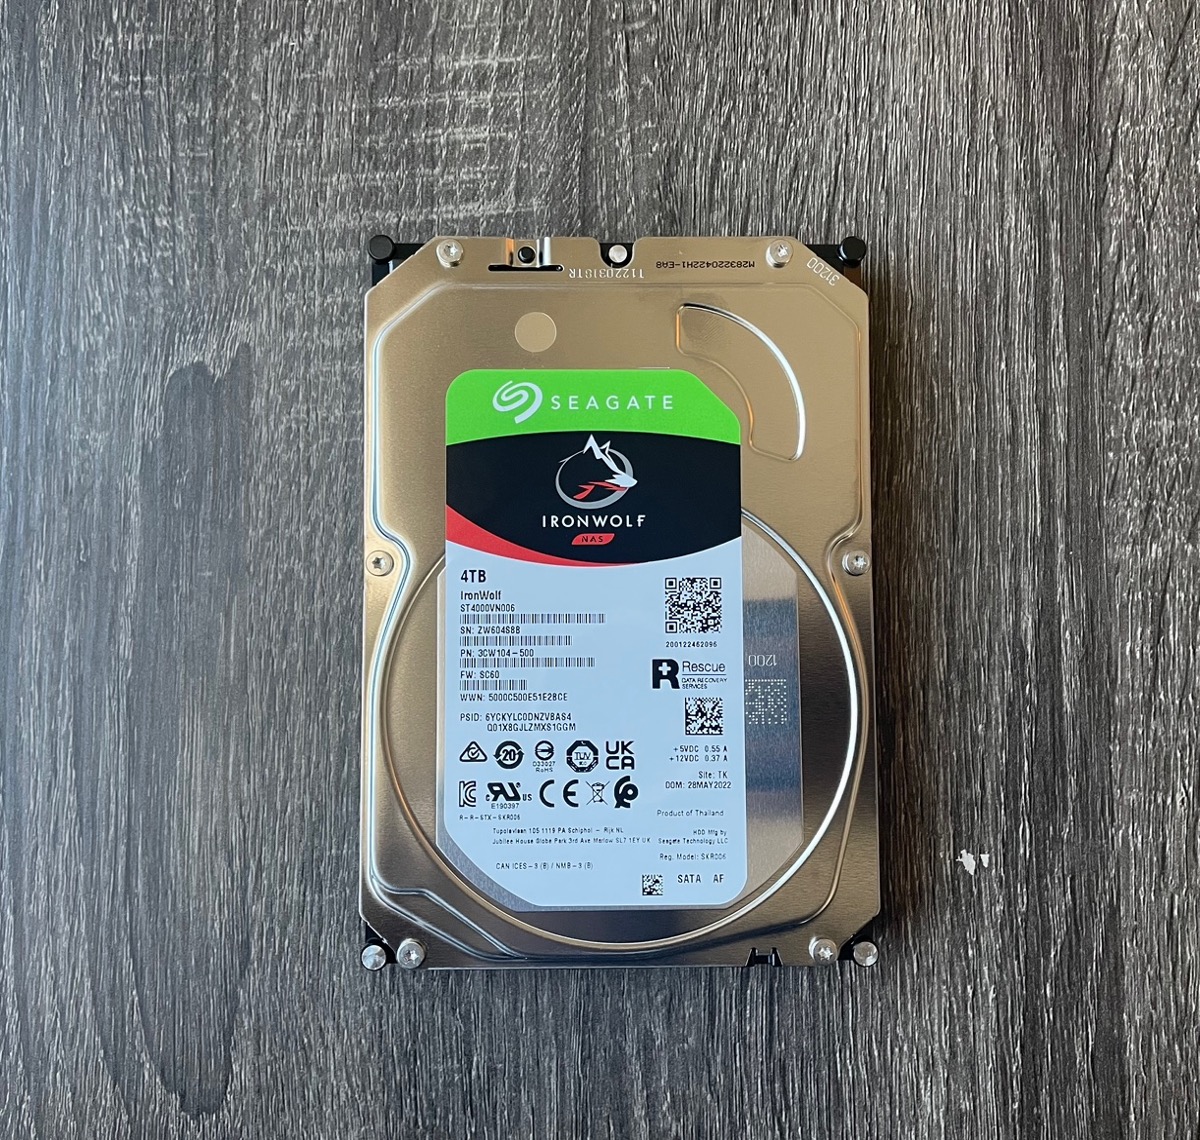
Most NAS devices are diskless, meaning we’d need to buy hard disk drives (HDD) and install them on the NAS device. Also, it is important to note that NAS devices work differently than a typical computer. A NAS device is always running even if you turn off your computer or laptop. A regular hard disk drive may not support this operating pressure. Therefore, it’s essential that we get NAS drives that are suitable for NAS devices. For my NAS device, I got a 4TB HDD from Seagate. You can look up compatible drives on Synology’s compatibility list. When you buy your NAS, the manufacturer should give you a list of which hard drives are compatible, and you can always check out Drive Stats if you want to read up on how long drives last.
A 4TB Seagate HDD.
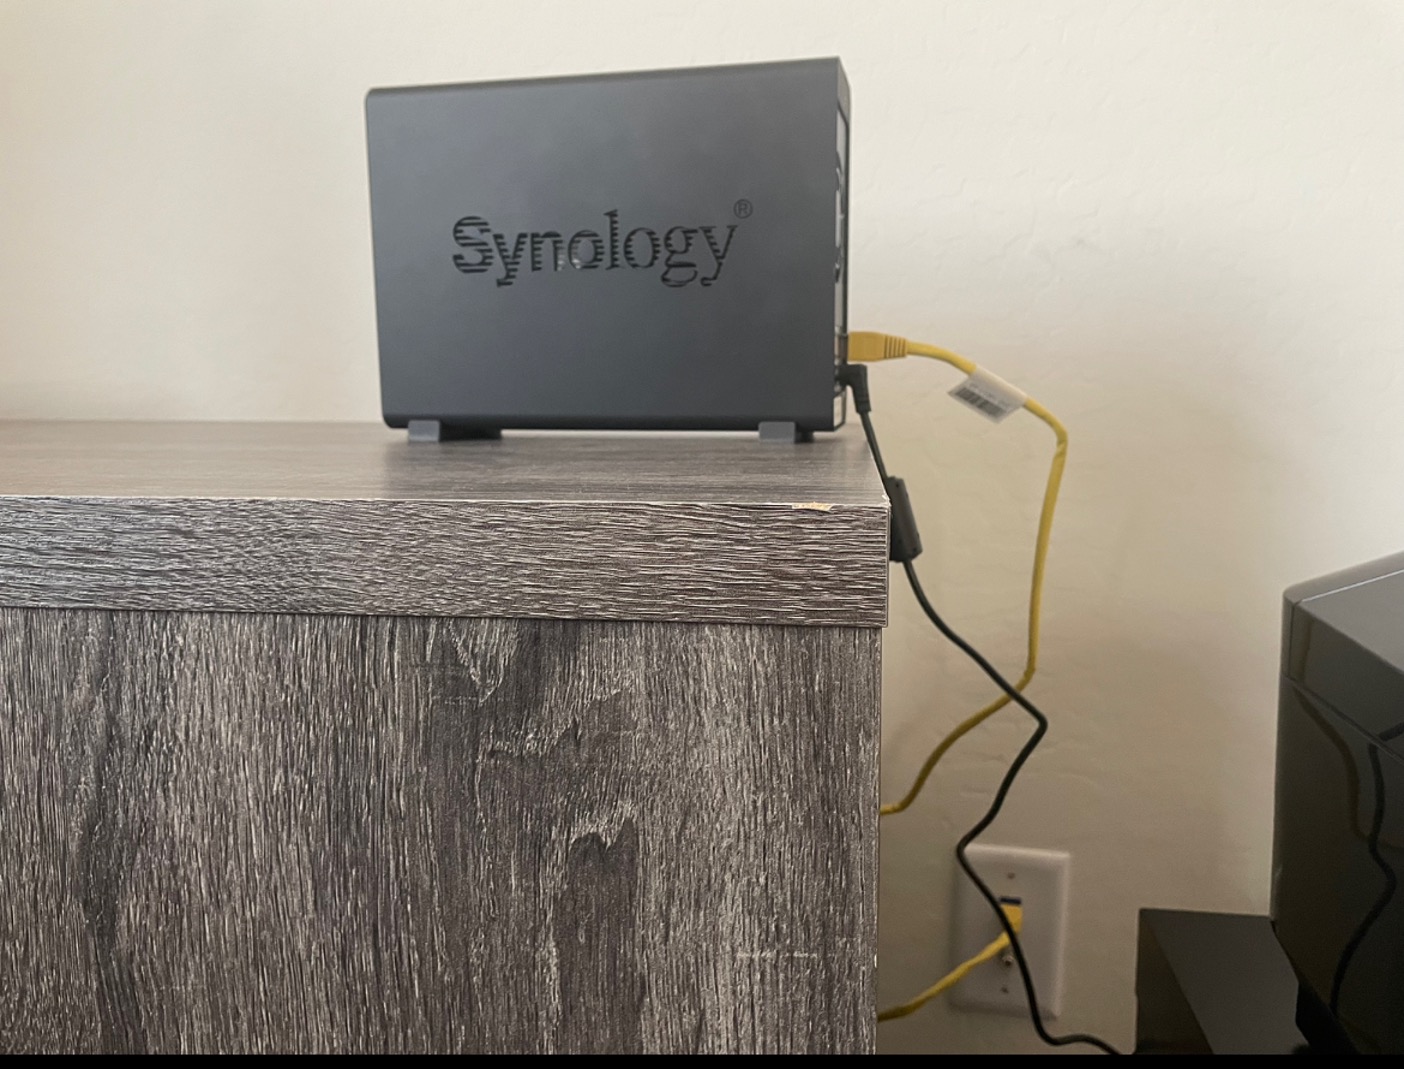
After getting the NAS device and HDD, the next item I wanted to figure out is where to keep it. NAS devices typically plug into routers rather than desktops or laptops. With help from my internet service provider, I was able to connect all rooms in our house with an ethernet connection that’s attached to the router. For now, I set up the NAS device in my home office on a spare desk connected to the router via an RJ45 cable.
My Synology NAS in its new home with an Ethernet connection.
In addition to protecting data locally on the NAS device, I also use B2 Cloud Storage for off-site protection. Every NAS has its own software that helps you set up how your backups occur from your personal devices to your NAS, and that software will also have a way to back up to the cloud. On a Synology NAS, that software is called Hyper Backup, and we’ll talk a little bit more about it below.
How I Back Up My Computer to My NAS Device
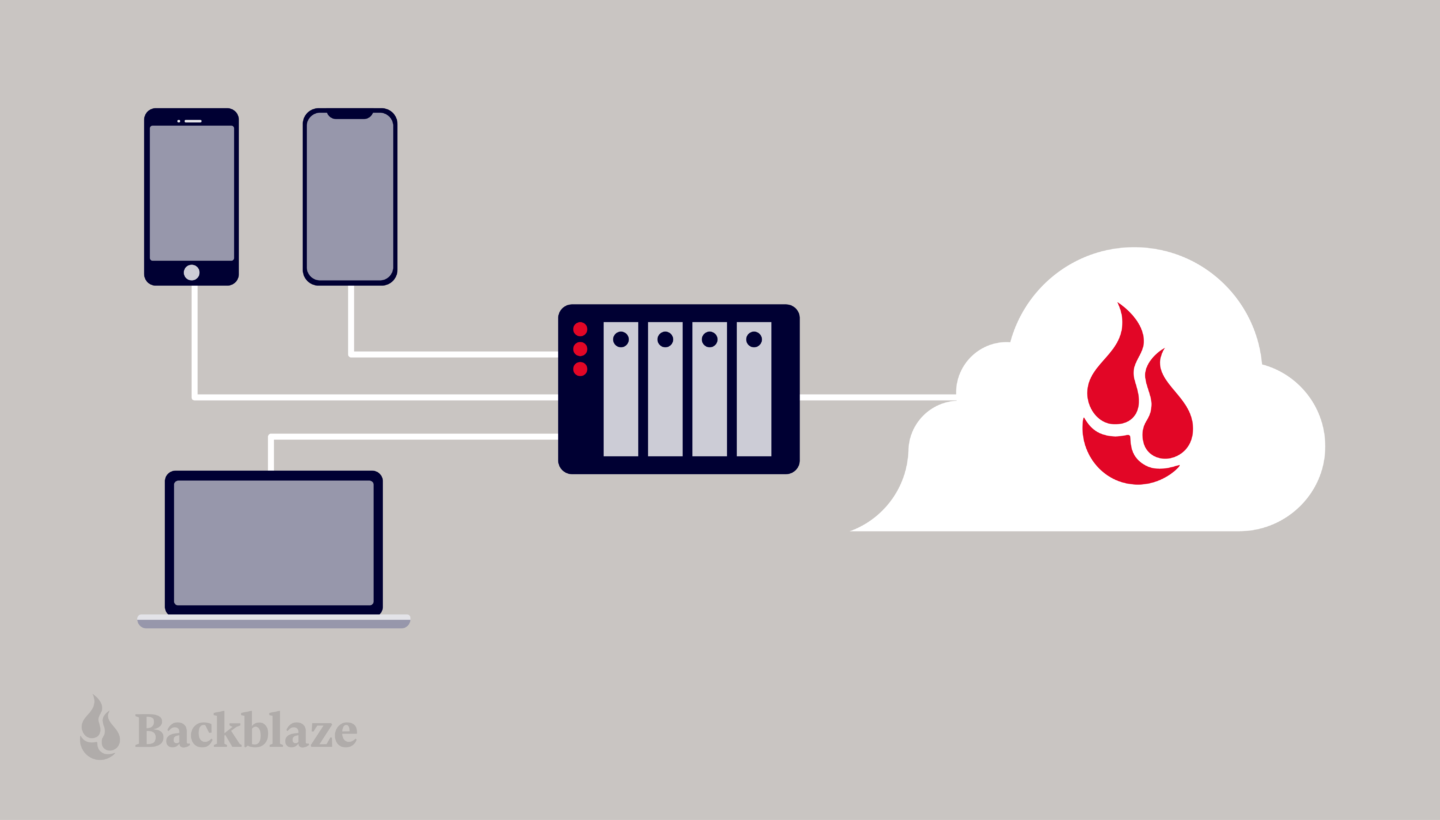
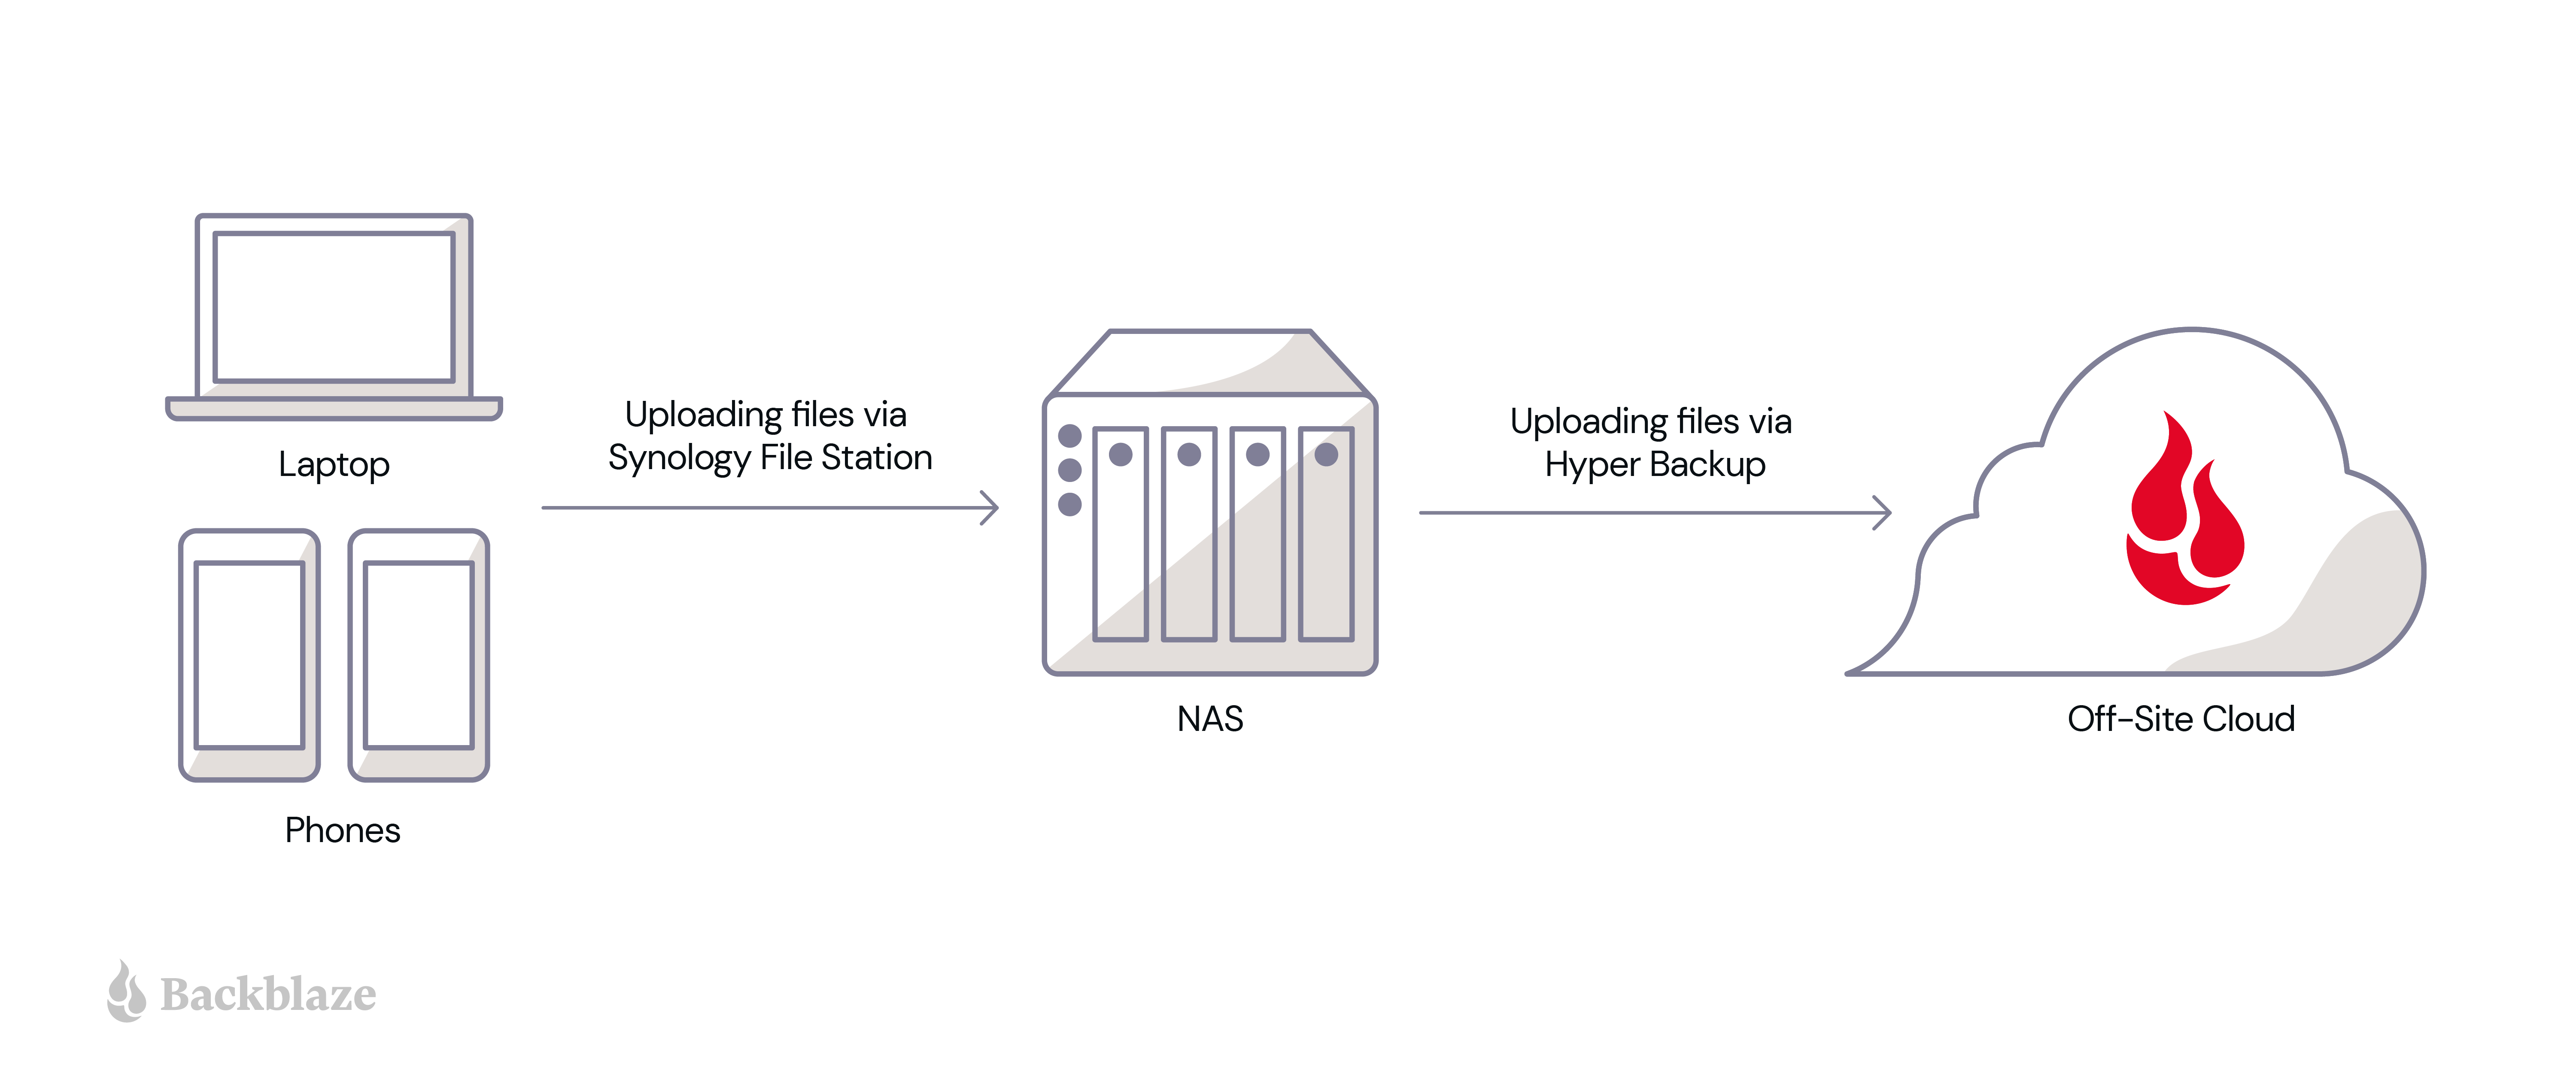
The above diagram shows how I use a hybrid setup using Synology NAS and B2 Cloud Storage to protect data locally and off-site.
First, I use Synology File Station to upload critical business data to the NAS device. After I configure B2 Cloud Storage with Hyper Backup, all files uploaded to the NAS device automatically get uploaded and stored in B2 Cloud Storage.
Getting set up with B2 Cloud Storage is a simple process. Check out this video demonstration that shows how to get your NAS data to B2 Cloud Storage in 10 minutes or less.
How I Back Up iPhone Photos and Videos to My NAS Device
That takes care of our computer backups. Now on to photo storage. To off-load photos and movies and create more storage space on my phone, I installed the application “Synology Photos” on my and my wife’s iPhones. Now, whenever we take a picture or shoot a movie on our phones, the Synology Photos application automatically stores a copy of the files to the NAS device. And, the Hyper Backup application then copies those photos and movies to B2 Cloud Storage automatically.
This setup has enabled us to not worry about storage space on our phones. Even if we delete those pictures and movies, we can still access them quickly via the NAS device over our local area network (LAN). But most importantly, a copy of those memories is protected off-site in the cloud, and I can access that cloud storage copy easily from anywhere in the world.
Lessons Learned: What I’d Do Differently The Next Time
So, what can you take from my experience setting up a NAS device at home? I learned a few things along the way that you might find useful. Here is my advice if I were to do things differently the second time around:
Number of bays: I opted for a single bay NAS device for my home setup. After using the device for about three months now, I realize how much space it saved on my MacBook and iPhones. If I were to do it again, I’d choose a NAS device with four or more bays for increased storage options.
Check for Ethernet connectivity: Not all rooms in my house were wired for Ethernet connectivity, and I did not realize that until I started setting up the NAS device. I needed to get in touch with my internet service provider to provide Ethernet connectivity in all rooms—which delayed the setup by two weeks. If you’re looking to set up a NAS device at home, ensure the desired location in your home has an Ethernet connection.
Location: I initially wanted to set up my NAS device in the laundry room. However, I realized NAS devices require a space that is well ventilated with minimum exposure to heat, dust, or moisture. Therefore, I’d chosen to set up the NAS device at my office room instead. Consider factors like ventilation, accessibility, and dust exposure of the location for the longevity and performance of your NAS device.
So, whether you are a home user who wants additional storage, a small business owner who wants to create a centralized file storage system, or an IT admin for a mid-size or enterprise organization who wants to securely protect your critical business data both on-premises and off-site storage, the use of a NAS device along with cloud storage provides the protection you need to secure your data.
What’s Next: Looking Forward to Part Two
In part one of this series, we’ve learned how setting up a NAS device at home and connecting it to the cloud can effectively back up and protect critical business data and personal files while accomplishing a 3-2-1 backup strategy. Stay tuned for part two, where James Flores will share with us how he utilizes a hybrid NAS and cloud storage solution to back up, work on, and share media files with users from different locations. In the meantime, we’d love to hear about your experience setting up and using NAS devices with cloud storage. Please share your comments and thoughts below.
Network attached storage (NAS) devices are a popular solution for data storage, sharing files for remote collaboration purposes, syncing files that are part of a workflow, and more. QNAP, one of the leading NAS manufacturers, makes it incredibly easy to backup and/or sync your business or personal data for these purposes with the inclusion of its application, Hybrid Backup Sync (HBS). HBS consolidates backup, restoration, and synchronization functions into a single application.
Protecting your data with a NAS is a great first step, but you shouldn’t stop there. NAS devices are still vulnerable to any kind of on-premises disaster like fires, floods, and tornados. They’re also not safe from ransomware attacks that might hit your network. To truly protect your data, it’s important to back up or sync to an off-site cloud storage destination like Backblaze B2 Cloud Storage. Backblaze B2 offers a geographically distanced location for your data for $5/TB per month, and you can also embed it into your NAS-based workflows to streamline access across multiple locations.
Read on for more information on whether you should use backup or sync for your purposes and how to connect your QNAP NAS to Backblaze B2 step-by-step. We’ve even provided videos that show you just how easy it is—it typically takes less than 15 minutes!
Should I Back Up or Sync?
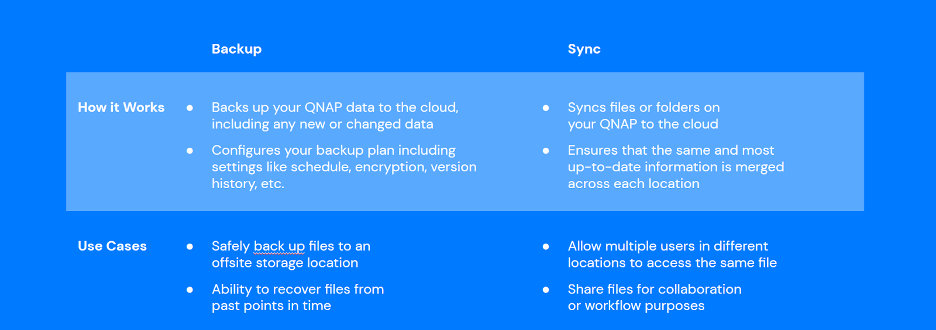
It’s easy to confuse backup and sync. They’re essentially both making a copy of your data, but they have different use cases. It’s important to understand the difference so you’re getting the right protection and accessibility for your data.
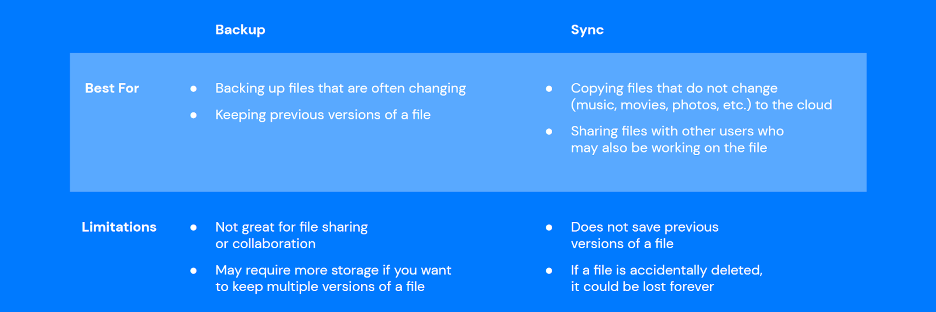
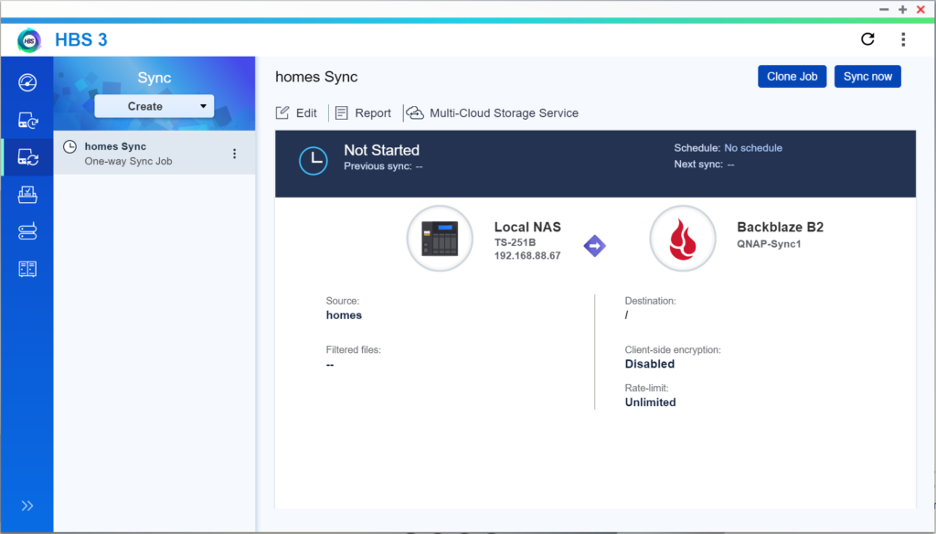
Check out the table below. You’ll see that backup is best for being able to recover from a data disaster, including the ability to access previous versions of data. However, if you’re just looking for a mirror copy of your data, sync functionality is all you need. Sync is also useful as part of remote workflows: you can sync your data between your QNAP and Backblaze B2, and then remote workers can pull down the most up-to-date files from the B2 cloud.
Because Hybrid Backup Sync provides both functions in one application, you should first identify which feature you truly need. The setup process is similar, but you will need to take different steps to configure backup vs. sync in HBS.
How to Set Up Your Backblaze B2 Account
Now that you’ve determined whether you want to back up or sync your data, it’s time to create your Backblaze B2 Cloud Storage account to securely protect your on-premises data.
If you already have a B2 Cloud Storage account, feel free to skip ahead. Otherwise, you can sign up for an account and get started with 10GB of free storage to test it out.
Ready to get started? You can follow along with the directions in this blog or take a look at our video guides. Greg Hamer, Senior Technical Evangelist, demonstrates how to get your data into B2 Cloud Storage in under 15 minutes using HBS for either backup or sync.
Video: Back Up QNAP to Backblaze B2 Cloud Storage with QNAP Hybrid Backup Sync
Video: Sync QNAP to Backblaze B2 Cloud Storage with QNAP Hybrid Backup Sync
How to Set Up a Bucket, Application Key ID, and Application Key
Once you’ve signed up for a Backblaze B2 Account, you’ll need to create a bucket, Application Key ID, and Application Key. This may sound like a lot, but all you need are a few clicks, a couple names, and less than a minute!
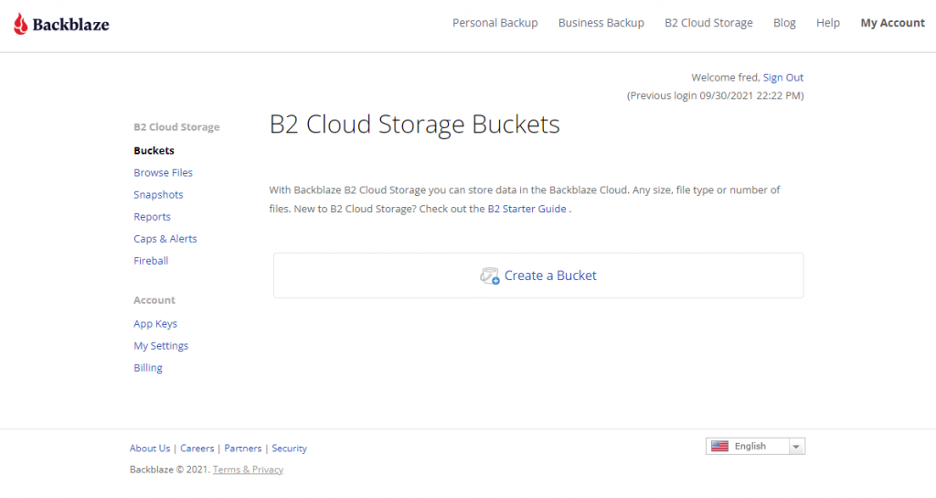
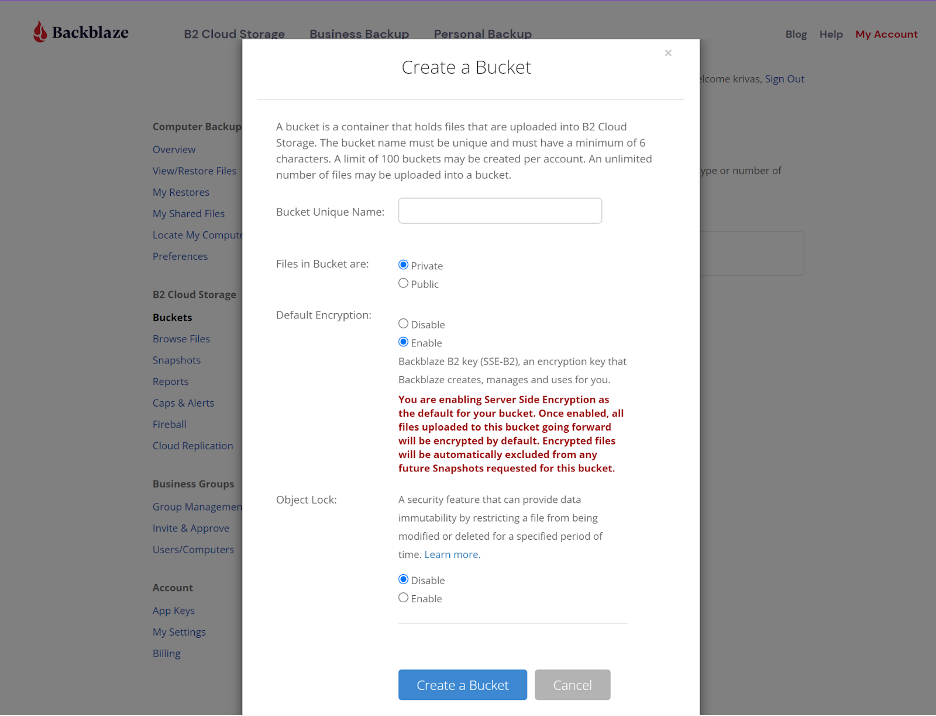
On the Buckets page of your account, click the Create a Bucket button.
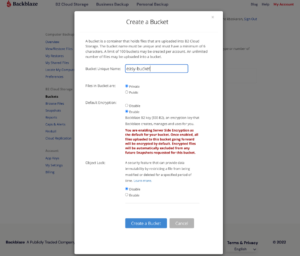
Give your bucket a name and enable encryption for added security.
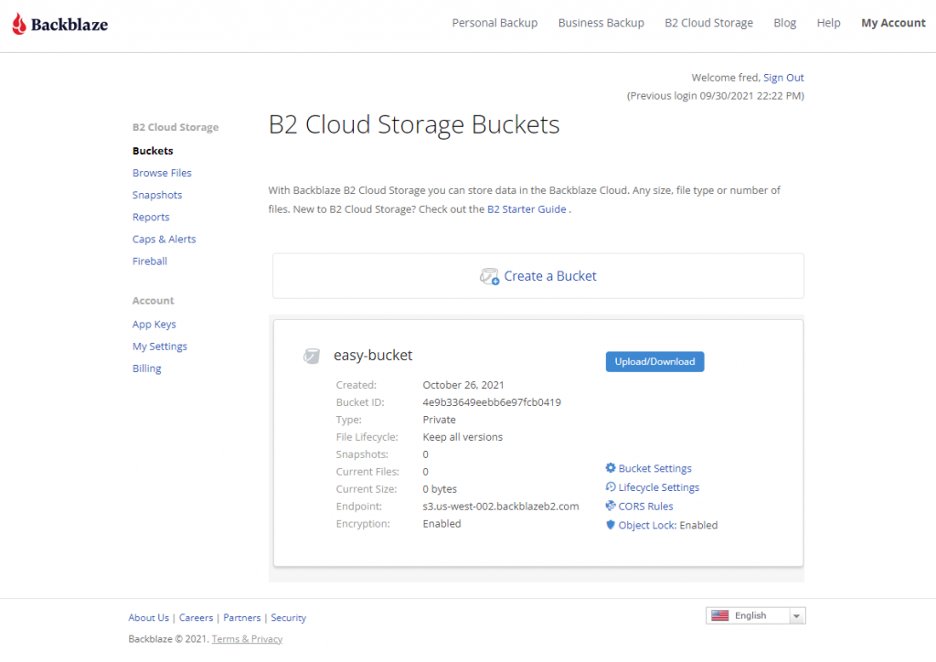
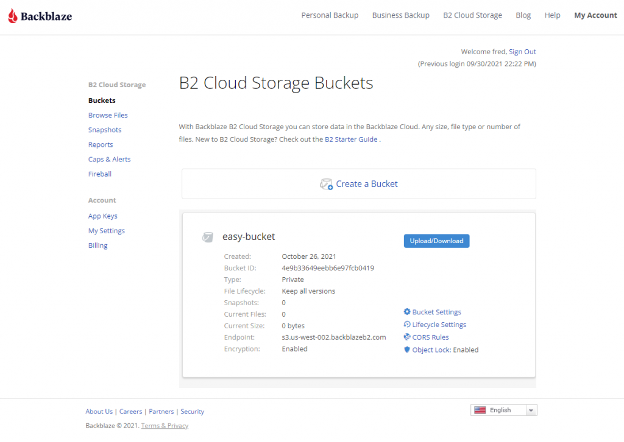
Click the Create a Bucket button and you should see your new bucket on the Buckets page.
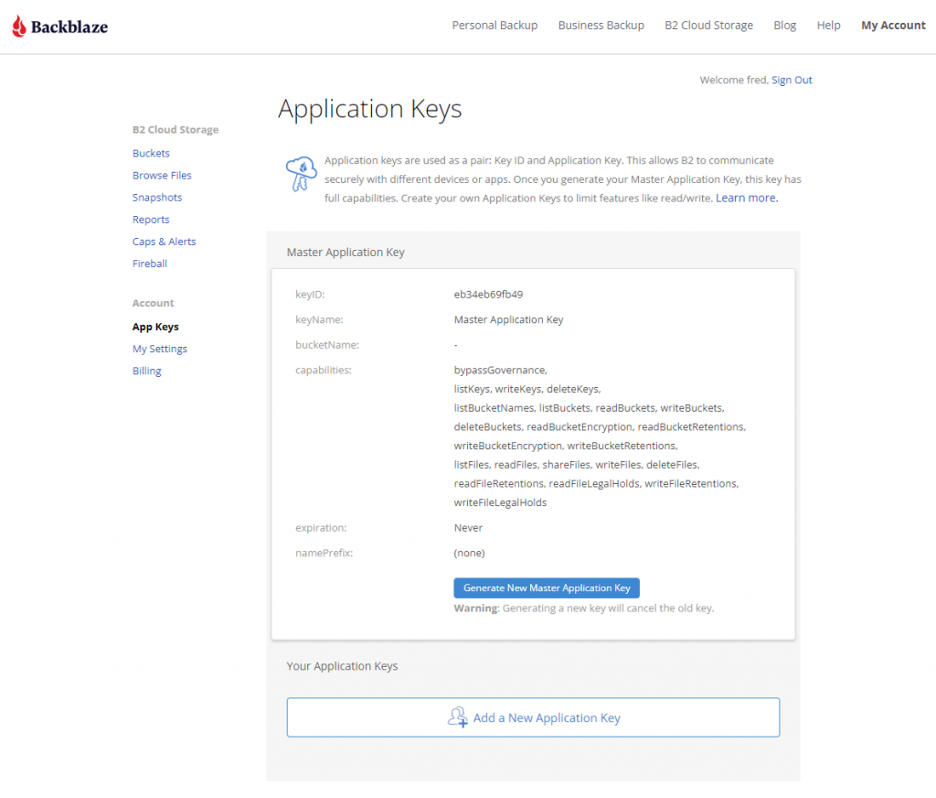
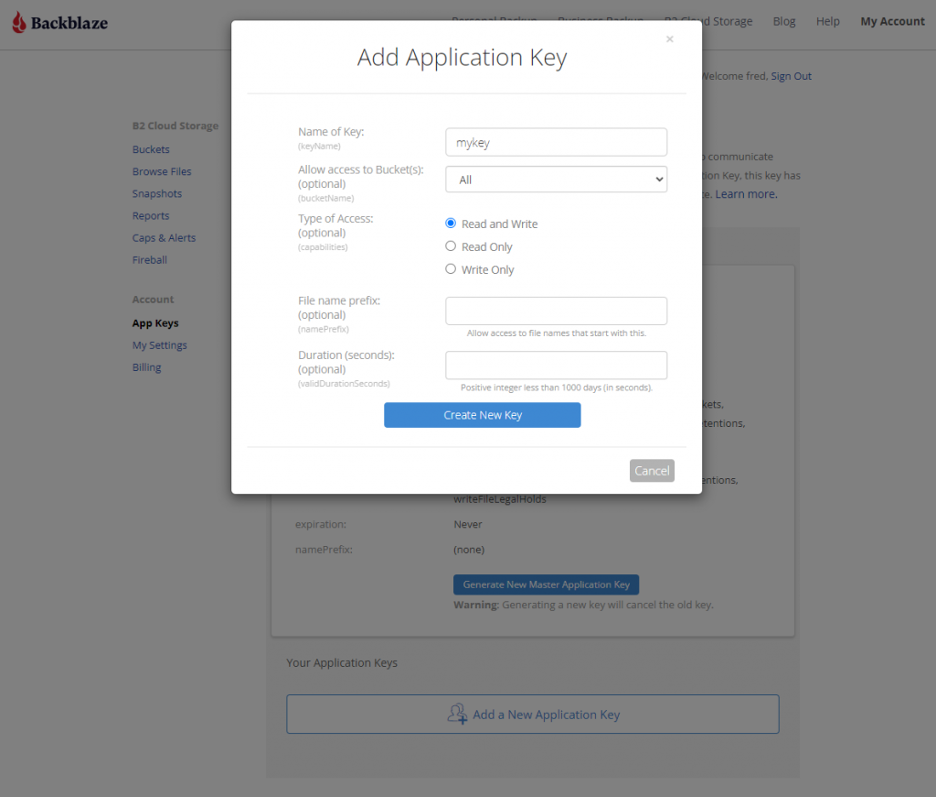
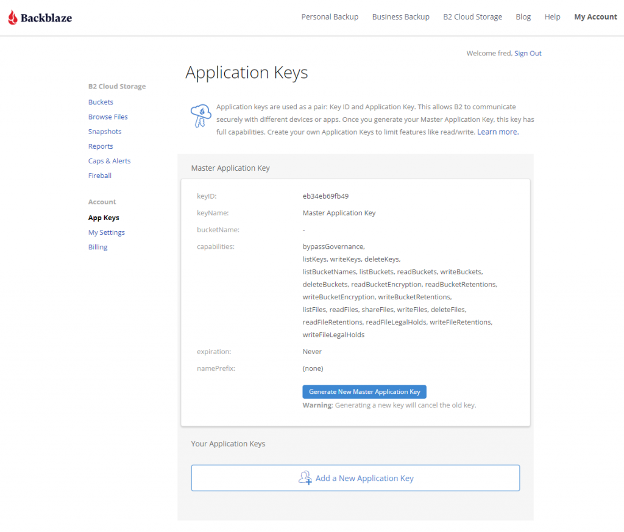
Navigate to the App Keys page of your account and click Add a New Application Key.
Name your Application Key and click the Create New Key button. Make sure that your key has both read and write permissions (the default option).
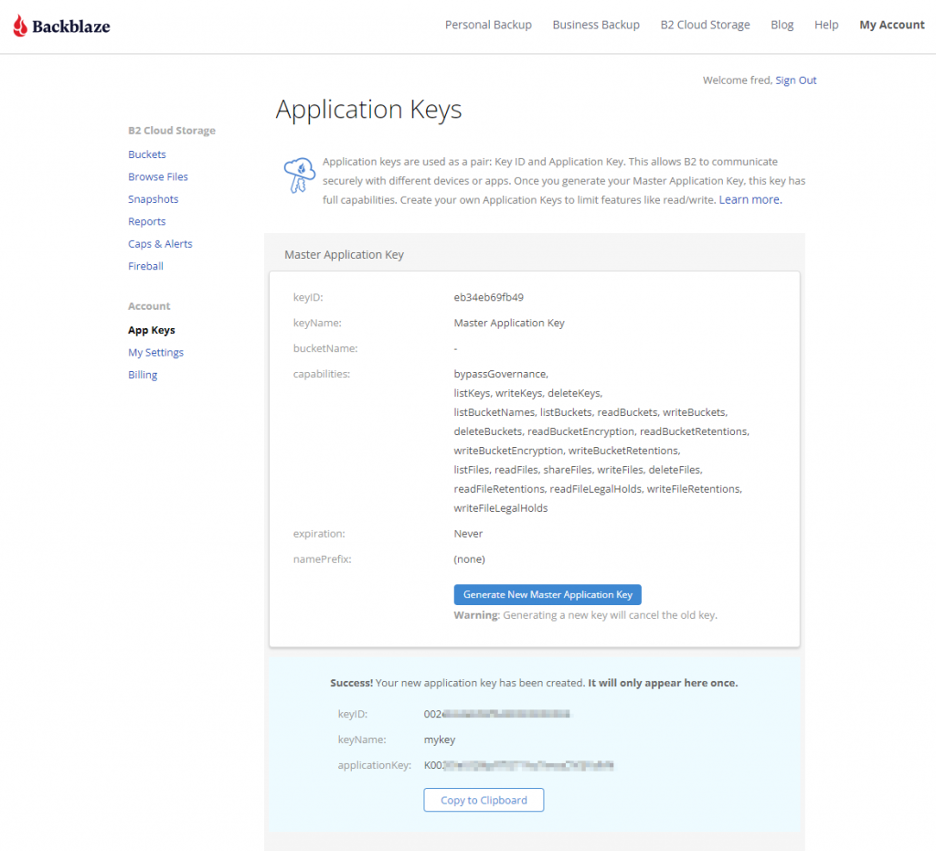
Your Application Key ID and Application Key will appear on your App Keys page. Important: Make sure to copy these somewhere secure as the Application Key will not appear again!
How to Set Up QNAP’s Hybrid Backup Sync to Work With B2 Cloud Storage
To set up your QNAP with Backblaze B2 sync support, you’ll need access to your B2 Cloud Storage account. You’ll also need your B2 Cloud Storage account ID, Application Key, and bucket name—all of which are available after you log in to your Backblaze account. Finally, you’ll need the Hybrid Backup Sync application installed in QTS. You’ll need QTS 4.3.3 or later and Hybrid Backup Sync v2.1.170615 or later.
To configure a backup or sync job, simply follow the rest of the steps in this integration guide or reference the videos posted above. Once you follow the rest of the configuration steps, you’ll have a set-it-and-forget-it solution in place.
What Can You Do With Backblaze B2 and QNAP Hybrid Backup Sync?
With QNAP’s Hybrid Backup Sync software, you can easily back up and sync data to the cloud. Here’s some more information on what you can do to make the most of your setup.
Hybrid Backup Sync 3.0
QNAP and Backblaze B2 users can take advantage of Hybrid Backup Sync, as explained above. Hybrid Backup Sync is a powerful tool that provides true backup capability with features like version control, client-side encryption, and block-level deduplication. QNAP’s operating system, QTS, continues to deliver innovation and add thrilling new features. The ability to preview backed up files using the QuDedup Extract Tool, a feature first released in QTS 4.4.1, allowed QNAP users to save on bandwidth costs.
You can download the latest QTS update here and Hybrid Backup Sync is available in the App Center on your QNAP device.
Hybrid Mount and VJBOD Cloud
The Hybrid Mount and VJBOD Cloud apps allow QNAP users to designate a drive in their system to function as a cache while accessing B2 Cloud Storage. This allows users to interact with Backblaze B2 just like you would a folder on your QNAP device while using Backblaze B2 as an active storage location.
Hybrid Mount and VJBOD Cloud are both included in the QTS 4.4.1 versions and higher, and function as a storage gateway on a file-based or block-based level, respectively. Hybrid Mount enables Backblaze B2 to be used as a file server and is ideal for online collaboration and file-level data analysis. VJBOD Cloud is ideal for a large number of small files or singular massively large files (think databases!) since it’s able to update and change files on a block-level basis. Both apps offer the ability to connect to B2 Cloud Storage via popular protocols to fit any environment, including server message block (SMB), Apple Filing Protocol (AFP), network file sharing (NFS), file transfer protocol (FTP), and WebDAV.
QuDedup
QuDedup introduces client-side deduplication to the QNAP ecosystem. This helps users at all levels save on space on their NAS by avoiding redundant copies in storage. Backblaze B2 users have something to look forward to as well since these savings carry over to cloud storage via the HBS 3.0 update.
Why Backblaze B2?
QNAP continues to innovate and unlock the potential of B2 Cloud Storage in the NAS ecosystem. If you haven’t given B2 Cloud Storage a try yet, now is the time. You can get started with Backblaze B2 and your QNAP NAS right now, and make sure your NAS is synced securely and automatically to the cloud.
You’ve added a Synology Network Attached Storage (NAS) Device to your tech stack, but you may be wondering how to protect your files from ransomware, natural disasters, or accidental deletion. Saving your data to cloud storage can help protect you from the painful consequences of data loss. But now you may be wondering whether to backup or sync your data to the cloud. The answer to that question will largely depend on your own individual needs. If you are looking to keep an additional copy of your regularly changing data at an off-premise location to maintain the 3-2-1 backup strategy, then backing up your data to the cloud is the way to go.
If, however, you need your files in a place where everyone in the organization can access them at any moment, where edits to any files can be shown across all devices in real time or you need up-to-the-minute versions of your files off-site, then syncing your files to the cloud will be sufficient.
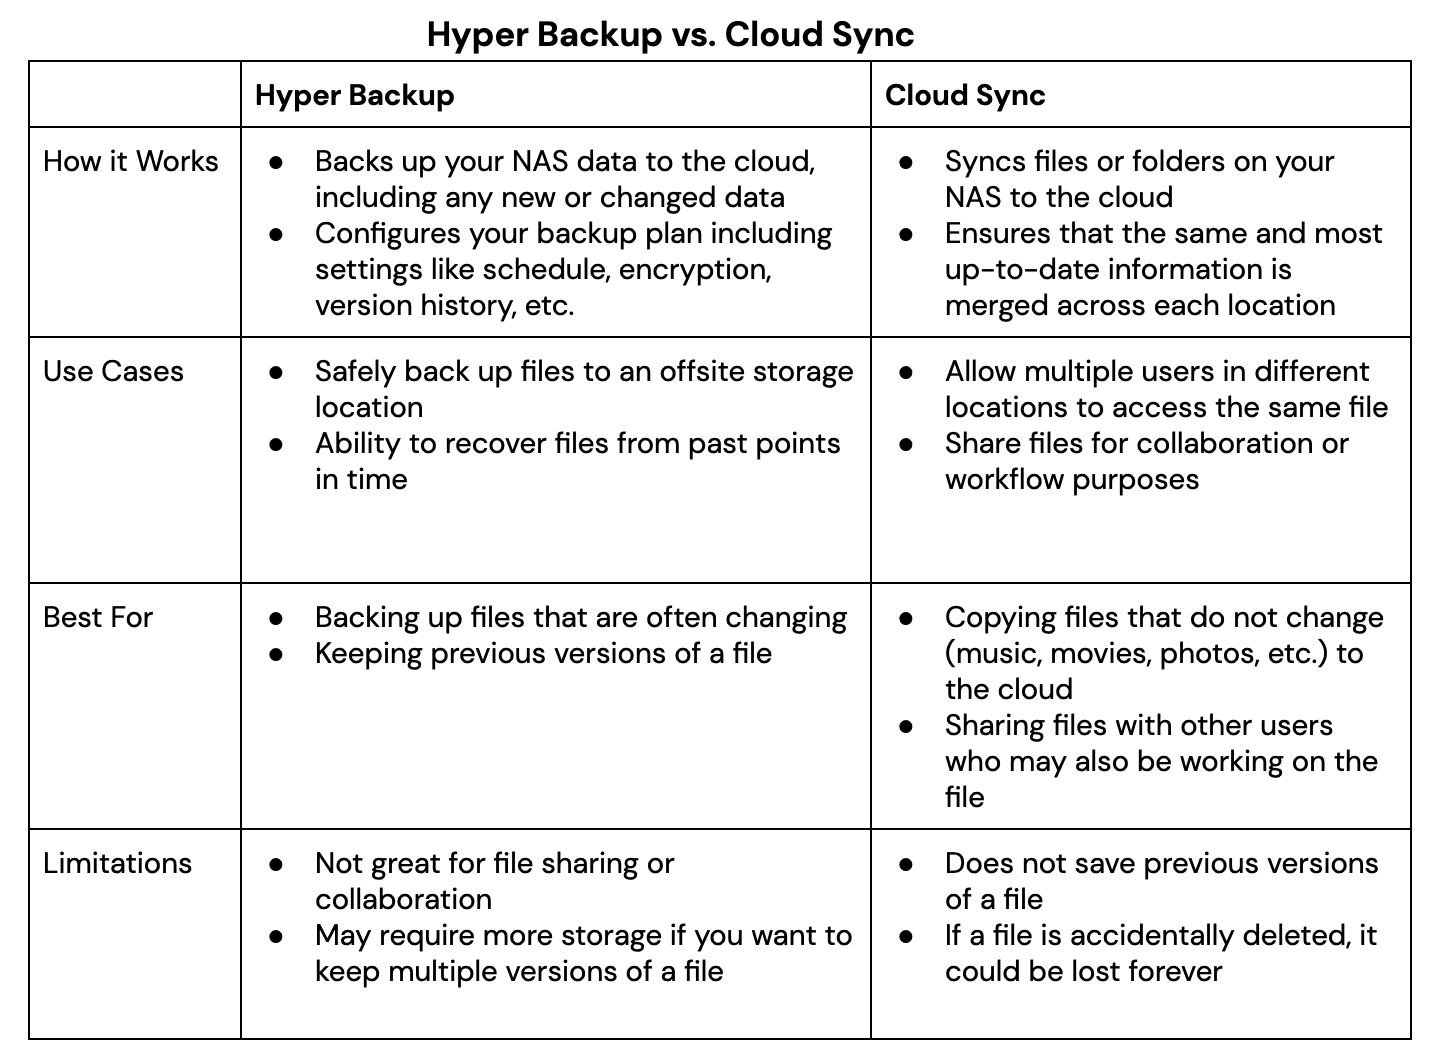
Your Synology NAS has applications for either backup—Hyper Backup—or sync—Cloud Sync—which we will explain in greater detail below. Understanding the distinction between the two functions is an important part of setting your tech stack up for success. And setting your tech stack up to connect to Backblaze B2 Cloud Storage, gives you greater security, accessibility and off-site peace of mind at a fifth of the cost of other cloud providers.
Read on to learn the differences between backup and sync, how they work with your Synology NAS, and how to connect your NAS to Backblaze B2.
Backup vs. Sync
As mentioned before, understanding the difference between backup and sync is a crucial step in determining how you will pair your NAS with an offsite cloud storage solution like Backblaze B2. As such, it may help you to have a full understanding of the difference between the two.
A backup lets you create copies of files and other digital assets, which are then sent from a NAS to another device or an off-site storage location such as a public cloud. Allowing for either incremental or full backups of the contents of your NAS on a customized schedule, this method allows you to retain a copy of the most recent version of a file, while also being able to retain previous versions. This can also be an effective strategy to combat malware or ransomware, as you can simply delete infected files and restore from a clean backup. In addition, maintaining storage off-site protects your data from any natural disasters that might befall your immediate vicinity.
By contrast, a sync strategy consists of one or more devices working in unison, updating files in the same way across each device and/or a cloud storage location. The benefits of syncing files come from the ability to instantly see updates on files and provide easy access to changes in files to people across your organization. If you connect your NAS to Backblaze B2, you can easily access and download files anywhere you are through native applications or another Backblaze partner integration like Veeam, Iconik, and Cyberduck. The drawback of syncing is that it does not offer effective protections against accidental deletions, unauthorized access or malware.
There are essentially two different ways to sync your files: one-way or two-way. In a one-way sync, when a file from Location A changes, the same file at Location B is updated; however, if something on the file changes in Location B, the file in Location A will not be updated. On the other hand, in a two-way sync, regardless of where the file changes, the other location will automatically update to mirror the other. And in most cases, this means the entire file will be re-uploaded.
It is not uncommon for an organization to use both backup and sync strategies simultaneously, relying on one over the other as needs change. Thankfully, Synology has two relevant proprietary applications that serve the various needs of backing up and syncing data which can be seen in the table below. Whether you plan to utilize the backup and sync features Synology offers via Hyper Backup and Cloud Sync, securing your files to the cloud will help you create an effective 3-2-1 Backup Strategy, protecting your digital assets. Now we’ll take a closer look at how you can connect your Synology NAS to Backblaze B2 Cloud Storage.
Setting Up Your B2 Cloud Storage Account
Regardless of whether you use Hyper Backup or Cloud Sync, you can get set up in minutes with B2 Cloud Storage. You can follow along with the directions in this blog or take a look at our video guides. Pat Patterson, Chief Technical Evangelist, demonstrates how to get your data into B2 Cloud Storage in under 10 minutes using either Hyper Backup or Cloud Sync.
Here’s a video tutorial for Hyper Backup:
And here’s one for Cloud Sync:
The first step is to create a Backblaze B2 Cloud Storage account so your data has a location to be securely stored. You can sign up for an account and get started with 10GB of storage for free.
We’ll continue to show the steps after you’ve signed up for a Backblaze B2 Account in order to access your new bucket, Application Key ID, and Application Key. This will only take a few clicks, a couple names, and less than a minute.
On the Buckets page of your account, click the Create a Bucket button.
Give your bucket a name and enable encryption for added security.
Click the Create a Bucket button and you should see your new Bucket on the Buckets page.
Navigate to the App Keys page of your account and click the Add a New Application Key button.
Name your Application Key and click the Create New Key button—make sure that your key has both Read and Write permissions (the default option).
Your Application Key ID and Application Key will appear on your App Keys page. Make sure to copy these somewhere secure as the Application Key will not appear again!
Backing Up or Syncing Your Synology to Backblaze B2
By now you have created the location for your data to be either backed up or synced to and obtained your Application Key.
If you want to backup your data, then follow this integration guide or the video mentioned above that takes you step-by-step on how you can use Hyper Backup to backup your data from your Synology to B2 Cloud Storage.
If syncing your data is what you need, then follow this integration guide or the video mentioned above that takes you through how you can use Cloud Sync to sync your data from your Synology to B2 Cloud Storage.
Once you have built the connection between your Synology to B2 Cloud Storage either through Hyper Backup or Cloud Sync (or both!), you can begin backing up or syncing your data for greater protection and accessibility no matter the location.
Summary
Creating and implementing an effective backup strategy, sync strategy or hybrid of the two can be an effective way to protect your data. A thorough understanding of the benefits, drawbacks and strategies involved, and the ways your Synology NAS can utilize both Hyper Backup and Cloud Sync, will hopefully get you on your way to securing your data.
At a fifth of the price of competitors, with setup that takes less than 10 minutes, Backblaze B2 Cloud Storage is a great complement to your Synology NAS.
As network attached storage (NAS) devices have become more advanced, NAS have large storage capacities, include advanced features for virtualization and application hosting, and are one of the more scalable and cost-effective storage options for businesses of all sizes and in a variety of industries.
NAS devices are popular for many types of workflows, including media, enterprise, and backup and archive. Whether you’re a long-time user or first-time buyer, the number of choices and features NAS systems offer today are overwhelming, especially when you’re trying to buy something that will work now and in the future.
This post aims to make your process a little easier. The following content will help you:
Review the benefits of a NAS system.
Navigate the options you’ll need to choose from.
Understand the reason to pair your NAS with cloud storage.
How Can NAS Benefit Your Business?
There are multiple benefits that a NAS system can provide to users on your network, but we’ll recap a few of the key advantages here.
More Storage: It’s a tad obvious, but the primary benefit of a NAS system is that it will provide a significant addition to your storage capacity if you’re relying on workstations and hard drives. NAS systems create a single storage volume from several drives (often arranged in a RAID scheme).
Data Redundancy: Many NAS systems are equipped with RAID (Redundant Array of Independent Disks) configurations, which provide redundancy. This means that even if one or more hard drives fail, the data remains accessible and the system continues to function. While RAID provides protection against physical disk failures, it does not protect against the broader range of events that could result in data loss, including natural disasters, theft, or ransomware attacks. Learn more about RAID configurations in our NAS RAID guide.
Security and Speed: Beyond protection from drive failure, NAS also provides security for your data from outside actors as it is only accessible on your local office network and to user accounts which you can control. Not only that, but it generally works as fast as your local office network speeds. And, there are several ways to optimize NAS performance over time, which gives them a longer shelf life than other types of hardware.
Better Data Management Tools. Fully automated backups, deduplication, compression, and encryption are just a handful of the functions you can put to work on a NAS system—all of which make your data storage more efficient and secure. You can also configure sync workflows to ease collaboration for your team, enable services to manage your users and groups with directory services, and even add services like photo or media management.
If this all sounds useful for your business, read on to learn more about bringing these benefits in-house.
The Network Attached Storage (NAS) Buyer’s Guide
How do you evaluate the differences between different NAS vendors? Or even within a single company’s product line? We’re here to help. This tour of the major components of a NAS system will help you to develop a list for the sizing and features of a system that will fit your needs.
Choosing a NAS: The Components
How your NAS performs is dictated by the components that make up the system, and capability of future upgrades. Let’s walk through the different options.
NAS Storage Capacity: How Many Bays Do You Need?
One of the first ways to distinguish between different NAS systems is the number of drive bays a given system offers, as this determines how many disks the system can hold. Generally speaking, the larger the number of drive bays, the more storage you can provide to your users and the more flexibility you have around protecting your data from disk failure.
In a NAS system, storage is defined by the number of drives, the shared volume they create, and their striping scheme (e.g. RAID 0, 1, 5, 6, etc.). For example, a single drive gives no additional performance or protection.
Two (or more) drives allow the option of simple mirroring. Mirroring is also referred to as RAID 1, when one volume is built from two drives, allowing for the failure of one of those drives without data loss.
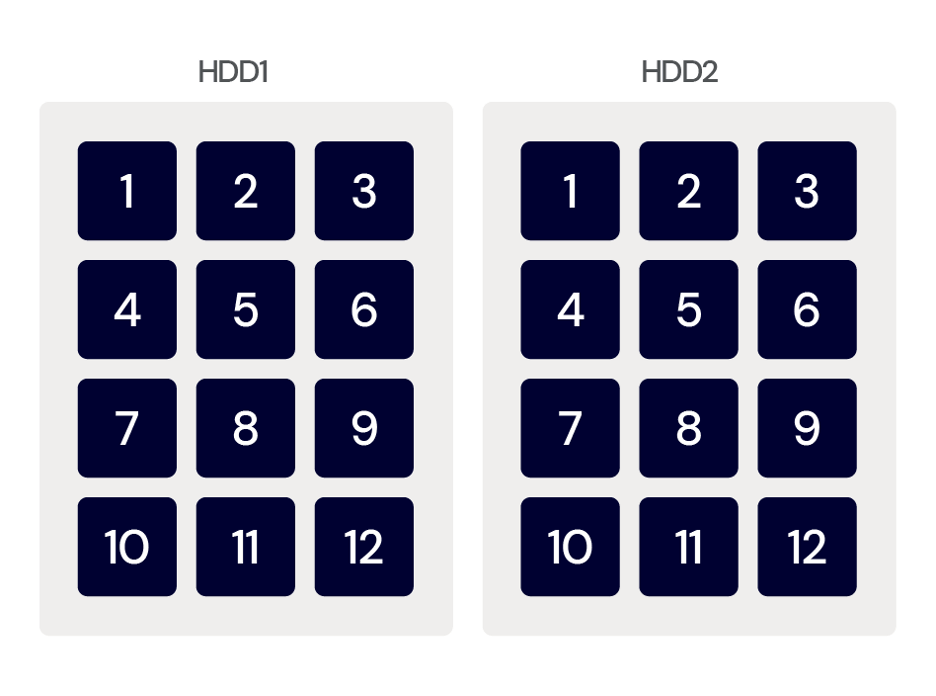
Mirroring: Data is written simultaneously to two disks, providing redundancy by having two copies of the data. But, mirroring also requires twice as many disks for the same total storage capacity.
Mirroring: Data is written simultaneously to two disks, providing redundancy by having two copies of the data. But, mirroring also requires twice as many disks for the same total storage capacity.
Mirroring: Data is written simultaneously to two disks, providing redundancy by having two copies of the data. But, mirroring also requires twice as many disks for the same total storage capacity.
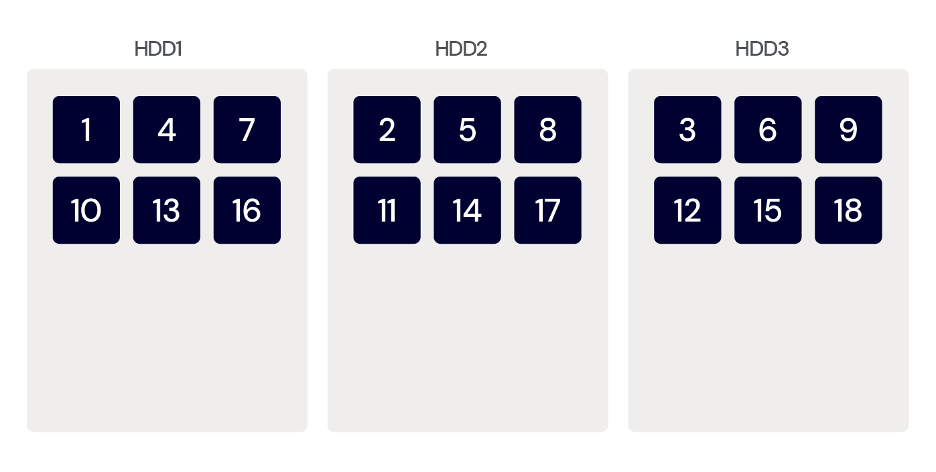
More than two drives also allow for striping—referred to as RAID 0—when one volume is “stretched” across two drives, making a single, larger drive that also gives some performance improvement, but increases risk because the loss of one drive means that the entire volume will be unavailable.
Striping distributes your data over multiple drives. However, striping doesn’t provide any redundancy, and usually is used in combination with other storage techniques.
Striping distributes your data over multiple drives. However, striping doesn’t provide any redundancy, and usually is used in combination with other storage techniques.
Striping distributes your data over multiple drives. However, striping doesn’t provide any redundancy, and usually is used in combination with other storage techniques.
Refresher: How Does RAID Work Again?
A redundant array of independent disks, or RAID, combines multiple hard drives into one or more storage volumes. RAID distributes data and parity (drive recovery information) across the drives in different ways, and each layout provides different degrees of data protection. Learn more about different RAID levels and how to choose the right RAID level in our NAS RAID guide.
Three drives are the minimum for RAID 5, which can survive the loss of one drive, though four drives are a more common NAS system configuration. Five drives allow for RAID 6, which can survive the loss of two drives. Six to eight drives are very common NAS configurations that allow more storage, space, performance, and even drive sparing—the ability to designate a stand-by drive to immediately rebuild a failed drive.
Many believe that, if you’re in the market for a NAS system with multiple bays, you should opt for capacity that allows for RAID 6 if possible. RAID 6 can survive the loss of two drives, and delivers performance nearly equal to RAID 5 with better protection.
It’s understandable to think, “Why do I need to prepare in case two drives fail?” Well, when a drive fails and you replace it with a fresh drive, the rebuilding process to restore that drive’s data and parity information can take a long time. Though it’s rare, it’s possible to have another drive fail during the rebuilding process. In that scenario, if you have RAID 6, you’re likely going to be okay. On the other hand, if you have RAID 5, you may have just lost data.
NAS Drives: Should I Buy a NAS that Includes Drives?
Buyer’s Note: Some systems are sold without drives. Should you buy NAS with or without drives? That decision usually boils down to the size and type of drives you’d like to have.
When buying a NAS system with drives provided:
The drives are usually covered by the manufacturer’s warranty as part of the complete system.
The drives are typically bought directly from the manufacturer’s supply chain and shipped directly from the hard drive manufacturer.
If you choose to buy drives separately from your NAS:
The drives may be a mix of drive production runs, and have been in the supply chain longer. Match the drive capacities and models for the most predictable performance across the RAID volume.
Choose drives rated for NAS systems—NAS vendors publish lists of supported drive types. Here’s a list from QNAP, for example.
Check the warranty and return procedures, and if you are moving a collection of older drives into your NAS, you may also consider how much of the warranty has already run out.
Buyer Takeaway: Choose a system that can support RAID 5 or RAID 6 to allow a combination of more storage space, performance, and drive failure protection. But be sure to check whether the NAS system is sold with or without drives.
Choosing the Right Drive for Your NAS: Hard Disk Drives (HDD) vs. Solid State Drives (SSD)
While most default to using HDDs in NAS drive bays, as NAS have gotten more advanced and the prices of SSDs have dropped, many NAS are compatible with SSDs as well. Some models, like the Synology DiskStation DS923+ can even support both HDDs and SSDs in the same NAS device, giving you maximum flexibility to manage your data.
There are benefits to each drive type, and which one you’d choose depends on your standard workflows. Here’s a breakdown of when you’d choose an HDD vs. an SSD for your NAS device:
Feature
HDD
SSD
Cost per Gigabyte
Lower
Higher
Capacity
Higher (up to 20TB+ per drive)
Lower (typically up to 8TB per drive)
Speed
Slower read/write speeds
Faster read/write speeds
Durability (Moving Parts)
Less durable due to spinning disks
More durable from a hardware perspective; however, limited write cycles can decrease longevity
Noise Level
Can generate noticeable noise due to spinning disks
Silent operation
Power Consumption
(Idle) 2–5 watts
(Active) 2–6 watts
(Idle) 0.5–1 watt
(Active) 2–3 watts
Ideal Use Cases
– Bulk data storage (e.g., media, library, backups)
– Archival storage
– Applications with frequent data access
– Performance-critical applications (e.g., video editing, databases)
– Frequently accessed files
– Applications requiring fast loading times
For cost-effective bulk storage and archival needs, HDDs are the clear choice. Their high capacity per gigabyte makes them ideal for storing large media files, backups, and infrequently accessed data. On the other hand, if you prioritize speed and performance for applications like video editing, databases, or frequently accessed files, SSDs are a better option. They offer significantly faster read/write speeds, resulting in quicker loading times and a smoother overall user experience.
And, you can always have your cake and eat it, too. A hybrid approach lets you leverage the strengths of both technologies: HDDs for bulk storage and SSDs for performance-critical tasks. As we mentioned above, some devices support both drive types, or you can create separate storage and processing pools within your storage architecture.
Buyer takeaway: Ultimately, choosing the right option comes down to budget and use case.
Selecting Drive Capacity for NAS: What Size of Drives Should You Buy?
You can quickly estimate how much storage you’ll need by adding up the hard drives and external drives of all the systems you’ll be backing up in your office, adding the amount of shared storage you’ll want to provide to your users, and factor in any growing demand you project for shared storage.
If you have any historical data under management from previous years, you can calculate a simple growth rate. Generally, plan for systems that are two to four times your current data capacity. For example, if your total storage needs (including hard drives, external drives, and shared storage) amount to 20TB, double that to 40TB to account for growth. Then, divide by a common hard drive size, such as 10TB, indicating that you’ll need at least a four-bay NAS system. With that in mind, you can start shopping for four bay systems and larger.
Formula 1:
((Number of NAS Users x Hard Drive Size ) + Shared Storage) * Growth Factor = NAS Storage Needed
Example: There are six users in an office that will each be backing up their 2TB workstations and laptops. The team will want to use another 6TB of shared storage for documents, images, and videos for everyone to use. Multiplied times a growth factor of two, you’d start shopping for NAS systems that offer at least 36TB of storage.
Example: Continuing the example above, when looking for a new NAS system using 12TB drives, accounting for two additional drives for RAID 6, you’d look for NAS systems that can support five or more drive bays of 12TB hard drives.
(( 36TB / 12TB ) + 2 additional drives ) = 5 drive bays and up
If your budget allows, opting for larger drives and more drive bays will give you more storage overhead that you’ll surely grow into over time. Factor in, however, that if you go too big, you’re paying for unused storage space for a longer period of time. And if you use GAAP accounting, you’ll need to capitalize that investment over the same time window as a smaller NAS system which will hit your bottom line on an annual basis. This is the classic CapEx vs. Opex dilemma you can learn more about here.
If your cash budget is tight you can always purchase a NAS system with more bays but smaller drives, which will significantly reduce your upfront pricing. You can then replace those drives in the future with larger ones when you need them. Hard drive prices generally fall over time, so they will likely be less expensive in the future. You’ll end up purchasing two sets of drives over time, which will be less cash-intensive at the outset, but likely more expensive in the long run.
Similarly, you can partially fill the drive bays. If you want to get an eight bay system, but only have the budget for six drives, just add the other drives later. One of the best parts of NAS systems is the flexibility they allow you for right-sizing your shared storage approach.
Buyer Takeaway: Estimate how much storage you’ll need, add the amount of shared storage you’ll want to provide to your users, and factor in growing demand for shared storage—then balance long term growth potential against cash flow.
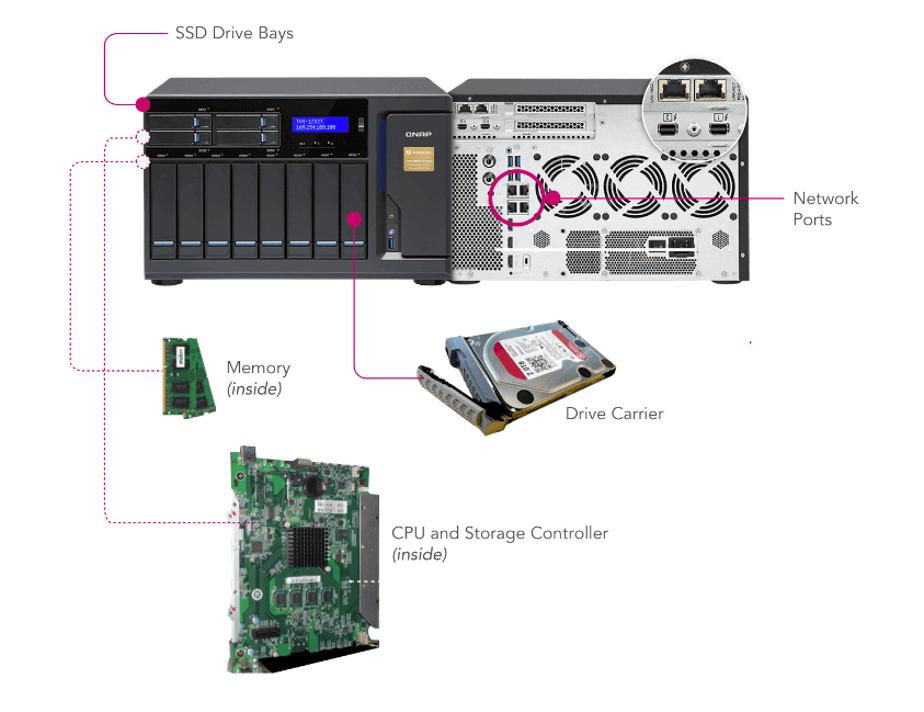
Processor, Controllers, and Memory: What Performance Levels Do You Require?
Is it better to have big onboard processors or controllers? Smaller, embedded chips common in smaller NAS systems provide basic functionality, but might bog down when serving many users or crunching through deduplication and encryption tasks, which are options with many backup solutions. Larger NAS systems typically stored in IT data center racks usually offer multiple storage controllers that can deliver the fastest performance and even failover capability.
Processor: Provides compute power for the system operation, services, and applications.
Controller: Manages the storage volume presentation and health.
Memory: Improves speed of applications and file serving performance.
ARM and Intel Atom chips are suitable for basic systems. For more demanding tasks such as encryption, deduplication, and running on-board applications, processors such as the Intel Corei3 and Corei5 remain reliable options. Additionally, the latest intel Corei7 and i9 processors offer even greater performance for these tasks. Many rack-mounted NAS systems feature Intel Xeon or AMD EPYC server-class processors, providing robust capabilities for enterprise level storage solutions.
So if you’re just looking for basic storage expansion, the entry-level systems with more modest, basic chips will likely suit you just fine. If deduplication, encryption, sync, and other functions many NAS systems offer as optional tools are part of your future workflow, this is one area where you shouldn’t cut corners.
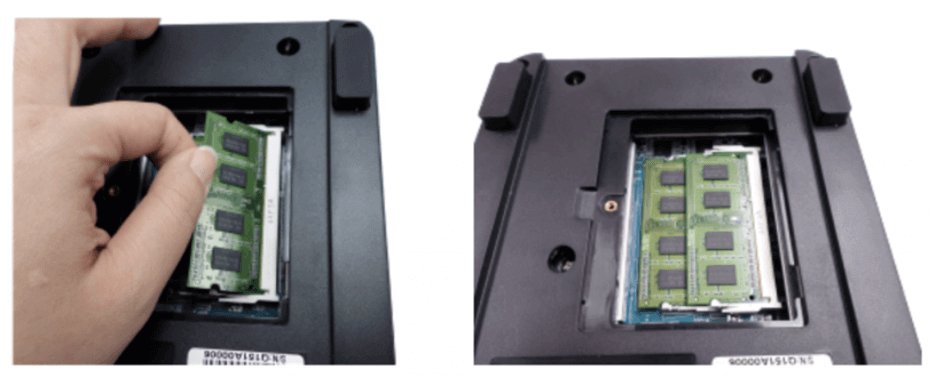
Adding memory modules to your NAS can be a simple performance upgrade.
Adding memory modules to your NAS can be a simple performance upgrade.
Adding memory modules to your NAS can be a simple performance upgrade.
If you have the option to expand the system memory, this can be an easy performance upgrade. Generally, the higher the ratio of memory to drives will benefit the performance of reading and writing to disk and the speed of on-board applications.
Buyer Takeaway: Entry-level NAS systems provide good basic functionality, but you should ensure your components are up to the challenge if you plan to make heavy use of deduplication, encryption, compression, and other functions.
Network and Connections: What Capacity for Speed Do You Need?
A basic NAS typically includes a Gigabit Ethernet connection (1GigE), which provides a throughput of 1 Gb/s, equivalent to 125 MB/s from your storage system. This bandwidth is usually sufficient for serving a few users. However, with increasing data demands, many modern NAS systems now come with built-in 2.5GigE or even 10GigE connections, offering higher throughput to support more users and faster data access. Additionally, most systems include expansion ports, allowing you to upgrade to 10GigE or higher network cards as your needs grow.
An example of a small 10GigE add-in card that can boost your NAS network performance.
An example of a small 10GigE add-in card that can boost your NAS network performance.
An example of a small 10GigE add-in card that can boost your NAS network performance.
While modern NAS systems offer 2.5 Gb/s, 5 Gb/s, or even 10Gb/s connections on their systems for significantly better performance than 1GigE connections, you’d require a compatible network switch, and possibly, USB adapters or expansion cards for every system that will connect to that NAS via the switch. If your office is already wired for 10GigE, make sure your NAS is also 10GigE. Otherwise, the more network ports in the back of the system, the better. If you aren’t ready to get a 10GigE capable system now, but you think you might be in the future, select a system that has expansion capability.
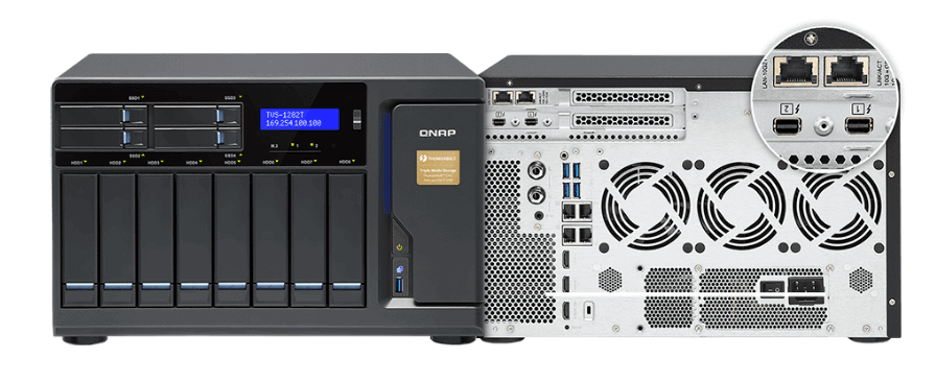
Some systems provide another option of Thunderbolt connections in addition to Ethernet connections. These allow laptops and workstations with Thunderbolt ports to directly connect to the NAS and offer much higher bandwidth—up to 40GigE (5 GB/s)—and are good for systems that need to edit large files directly on the NAS, such as is often the case in video editing. If you’ll be directly connecting systems that need the fastest possible speeds, select a system with Thunderbolt ports, one per Thunderbolt-connected user.
Some NAS systems offer not only multiple network ports, but faster connections as well, such as Thunderbolt.
Some NAS systems offer not only multiple network ports, but faster connections as well, such as Thunderbolt.
Some NAS systems offer not only multiple network ports, but faster connections as well, such as Thunderbolt.
Buyer Takeaway: It’s best to have more network ports in the back of your system. Or, select a system with network expansion card capability.
Caching and Hybrid Drive Features: How Fast Do You Need to Serve Files?
Many of the higher-end NAS systems can complement standard 3.5” hard drives with higher performing, smaller form factor SSD or M.2 drives. These smaller, faster drives can dramatically improve the NAS file serving performance by caching files in most recent, or most frequently requested files. By combining these different types of drives, the NAS can deliver both improved file serving performance, and large capacity.
As the number of users you support in each office grows, these capabilities will become more important as a relatively simple way to boost performance. Like we mentioned earlier, you can purchase a system with these slots unpopulated and add them in later.
Buyer Takeaway: Combine different types of drives, like smaller form factor SSD or M.2 storage with 3.5” hard drives to gain improved file serving performance.
Operating System: What Kind of Management Features Do You Require?
The NAS operating systems of the major vendors generally provide the same services in an operating system (OS)-like interface delivered via an on-board web server. By simply typing in your NAS’s IP address, you can sign in and manage your system’s settings, create and manage the storage volumes, set up groups of users on your network who have access, configure and monitor backup and sync tasks, and more.
Synology Diskstation Manager
Synology Diskstation Manager
Synology Diskstation Manager
If there are specific user management features in your IT environment that you need, or want to test how the NAS OS works, you can test them by spinning up a demonstration virtual machine offered by some NAS vendors. You can test service configuration and get a feel for the interface and tools, but obviously as a virtual environment you won’t be able to manage hardware directly. Here are some options:
Buyer Takeaway: The on-board NAS OS looks similar to a Mac or PC OS to make it easy to navigate system setup and maintenance and allows you to manage settings, storage, and tasks.
Solutions: What Added Services Do You Require?
While the onboard processor and memory on your NAS are primarily for file service, backup, and sync tasks, you can also install other solutions directly onto it. For instance, QNAP and Synology—two popular NAS providers—have app stores accessible from their management software where you can select applications to download and install on your NAS. You might be interested in a backup and sync solution such as Archiware, or integrating with CMS solutions like Joomla or WordPress.
Synology add-on packages.
Synology add-on packages.
Synology add-on packages.
However, beyond backup solutions, you’d benefit from installing mission-critical apps onto a dedicated system rather than on your NAS. For a small number of users, running applications directly on the NAS can be a good temporary use or a pathway to testing something out. But if the application becomes very busy, it could impact the other services of the NAS. Big picture, native apps on your NAS can be useful, but don’t overdo it.
Buyer Takeaway: The main backup and sync apps from the major NAS vendors are excellent—give them a good test drive, but know that there are many excellent backup and sync solutions available as well.
Why Adding Cloud Storage to Your NAS Offers Additional Benefits
When you pair cloud storage with your NAS, you gain access to features that complement the security of your data and your ability to share files both locally and remotely.
To start with, cloud storage provides off-site backup protection. This aligns your NAS setup with the industry standard for data protection: a 3-2-1 backup strategy—which ensures that you have three copies of your data, the source data and two backups. One backup copy is stored on your NAS, and the second backup copy is stored off-site, such as in the cloud. And in the event of data loss, you can restore your systems directly from the cloud even if all the systems in your office are knocked out or destroyed.
While data sent to the cloud is encrypted in-flight via SSL, you can also encrypt your backups so that they are only openable with your team’s encryption key. The cloud can also give you advanced storage options for your backup files like WORM (Write Once, Read Many) or immutability—making your data immutable for a defined period of time—or set custom data lifecycle rules at the bucket level to help match your ideal backup workflow.
Additionally, cloud storage provides valuable access to your data and documents from your NAS through sync capabilities. In case anyone on your team needs to access a file when they are away from the office, or as is more common now, in case your entire team is working from home, they’ll be able to access the files that have been synced to the cloud through your NAS’s secure sync program. You can even sync across multiple locations using the cloud as a two-way sync to quickly replicate data across locations. For employees collaborating across great distances, this helps to ensure they’re not waiting on the internet to deliver critical files—they’re already on-site. The only caveat: It’s important to remember that sync is not backup and to incorporate that into your overall data management strategy.
Refresher: What’s the Difference Between Cloud Sync, Cloud Backup, and Cloud Storage?
Sync services allow multiple users across multiple devices to access the same file. Backup stores a copy of those files somewhere remote from your work environment, oftentimes in an off-site server like cloud storage. While they serve different purposes, they can work well together when properly coordinated. You can read more about the differences in this blog post.
Ready to Set Up Your NAS with Cloud Storage?
To summarize, here are a few things to remember when shopping for a NAS system:
Consider how much storage you’ll need for both local backup and for shared user storage.
Look for a system with three to five drive bays at minimum.
Check that the NAS system is sold with drives—if not, you’ll have to source enough of the same size drives.
Opt for a system that lets you upgrade the memory and network options.
Choose a system that meets your needs today; you can always upgrade in the future.
Coupled with cloud storage like Backblaze B2 Cloud Storage, which works with a wide range of NAS systems including Synology, QNAP, TrueNAS, OWC Jellyfish, and more, you gain necessary backup protection and restoration from the cloud, as well as the capability to sync across locations.
Have more questions about NAS features or how to implement a NAS system in your environment? Ask away in the comments.
To provide the best experiences, we use technologies like cookies to store and/or access device information. Consenting to these technologies will allow us to process data such as browsing behavior or unique IDs on this site. Not consenting or withdrawing consent, may adversely affect certain features and functions.
Functional
Always active
The technical storage or access is strictly necessary for the legitimate purpose of enabling the use of a specific service explicitly requested by the subscriber or user, or for the sole purpose of carrying out the transmission of a communication over an electronic communications network.
Preferences
The technical storage or access is necessary for the legitimate purpose of storing preferences that are not requested by the subscriber or user.
Statistics
The technical storage or access that is used exclusively for statistical purposes.The technical storage or access that is used exclusively for anonymous statistical purposes. Without a subpoena, voluntary compliance on the part of your Internet Service Provider, or additional records from a third party, information stored or retrieved for this purpose alone cannot usually be used to identify you.
Marketing
The technical storage or access is required to create user profiles to send advertising, or to track the user on a website or across several websites for similar marketing purposes.


 Whether you plan to utilize the backup and sync features Synology offers via Hyper Backup and Cloud Sync, securing your files to the cloud will help you create an effective