Tag Archives: Resolver DNS Firewall

Prevent data exfiltration: AWS egress controls for cloud workloads

Post Syndicated from Meriem SMACHE original https://aws.amazon.com/blogs/security/prevent-data-exfiltration-aws-egress-controls-for-cloud-workloads/

When securing an Amazon Web Services (AWS) environment, teams naturally prioritize inbound controls, firewalls, WAFs, and access policies, because that’s where the most visible threats originate. Outbound traffic, on the other hand, tends to get less attention. It’s often left open by default to avoid breaking application dependencies and because the risk feels less immediate. But overlooking egress means missing a key layer of defense. Without visibility into what’s leaving your network, it’s harder to detect unintended data flows, whether from misconfigured services, overly broad permissions, or workloads with unauthorized access.

Real-world incidents highlight why egress controls deserve attention across both traditional cloud workloads and emerging AI-driven architectures.

In traditional cloud environments, application-level security issues remain a persistent threat. For example, when CVE-2025-55182 (React2Shell) was publicly disclosed in December 2025, multiple organized groups began exploitation attempts within hours, targeting unpatched React Server Components to achieve remote code execution. After a workload is accessed by an unauthorized party, they typically establish outbound command-and-control channels and begin exfiltrating data. Without egress controls in place, that outbound traffic can flow freely, and the unauthorized access might go unnoticed until a compliance audit, customer complaint, or incident notification forces discovery.

Agentic AI systems introduce a new dimension to this risk. The OWASP Top 10 for Agentic Applications identifies threats such as Agent Goal Hijack (ASI01), where unauthorized parties manipulate an autonomous agent’s objectives to silently exfiltrate data, and Unexpected Code Execution (ASI05), where an agent with unauthorized access generates and runs potentially damaging code that establishes reverse shells or transfers sensitive data to external endpoints. As organizations deploy AI agents with access to tools, APIs, and code interpreters, these agents become high-value targets, and their outbound network activity must be constrained with the same rigor as any other workload.

In both scenarios, the common thread is unauthorized outbound traffic. In this post, we show you how to implement layered egress detection and protection using AWS services working together to reduce unauthorized data transfer risk, whether the source is an application with unauthorized access or a manipulated AI agent.

Architecture overview
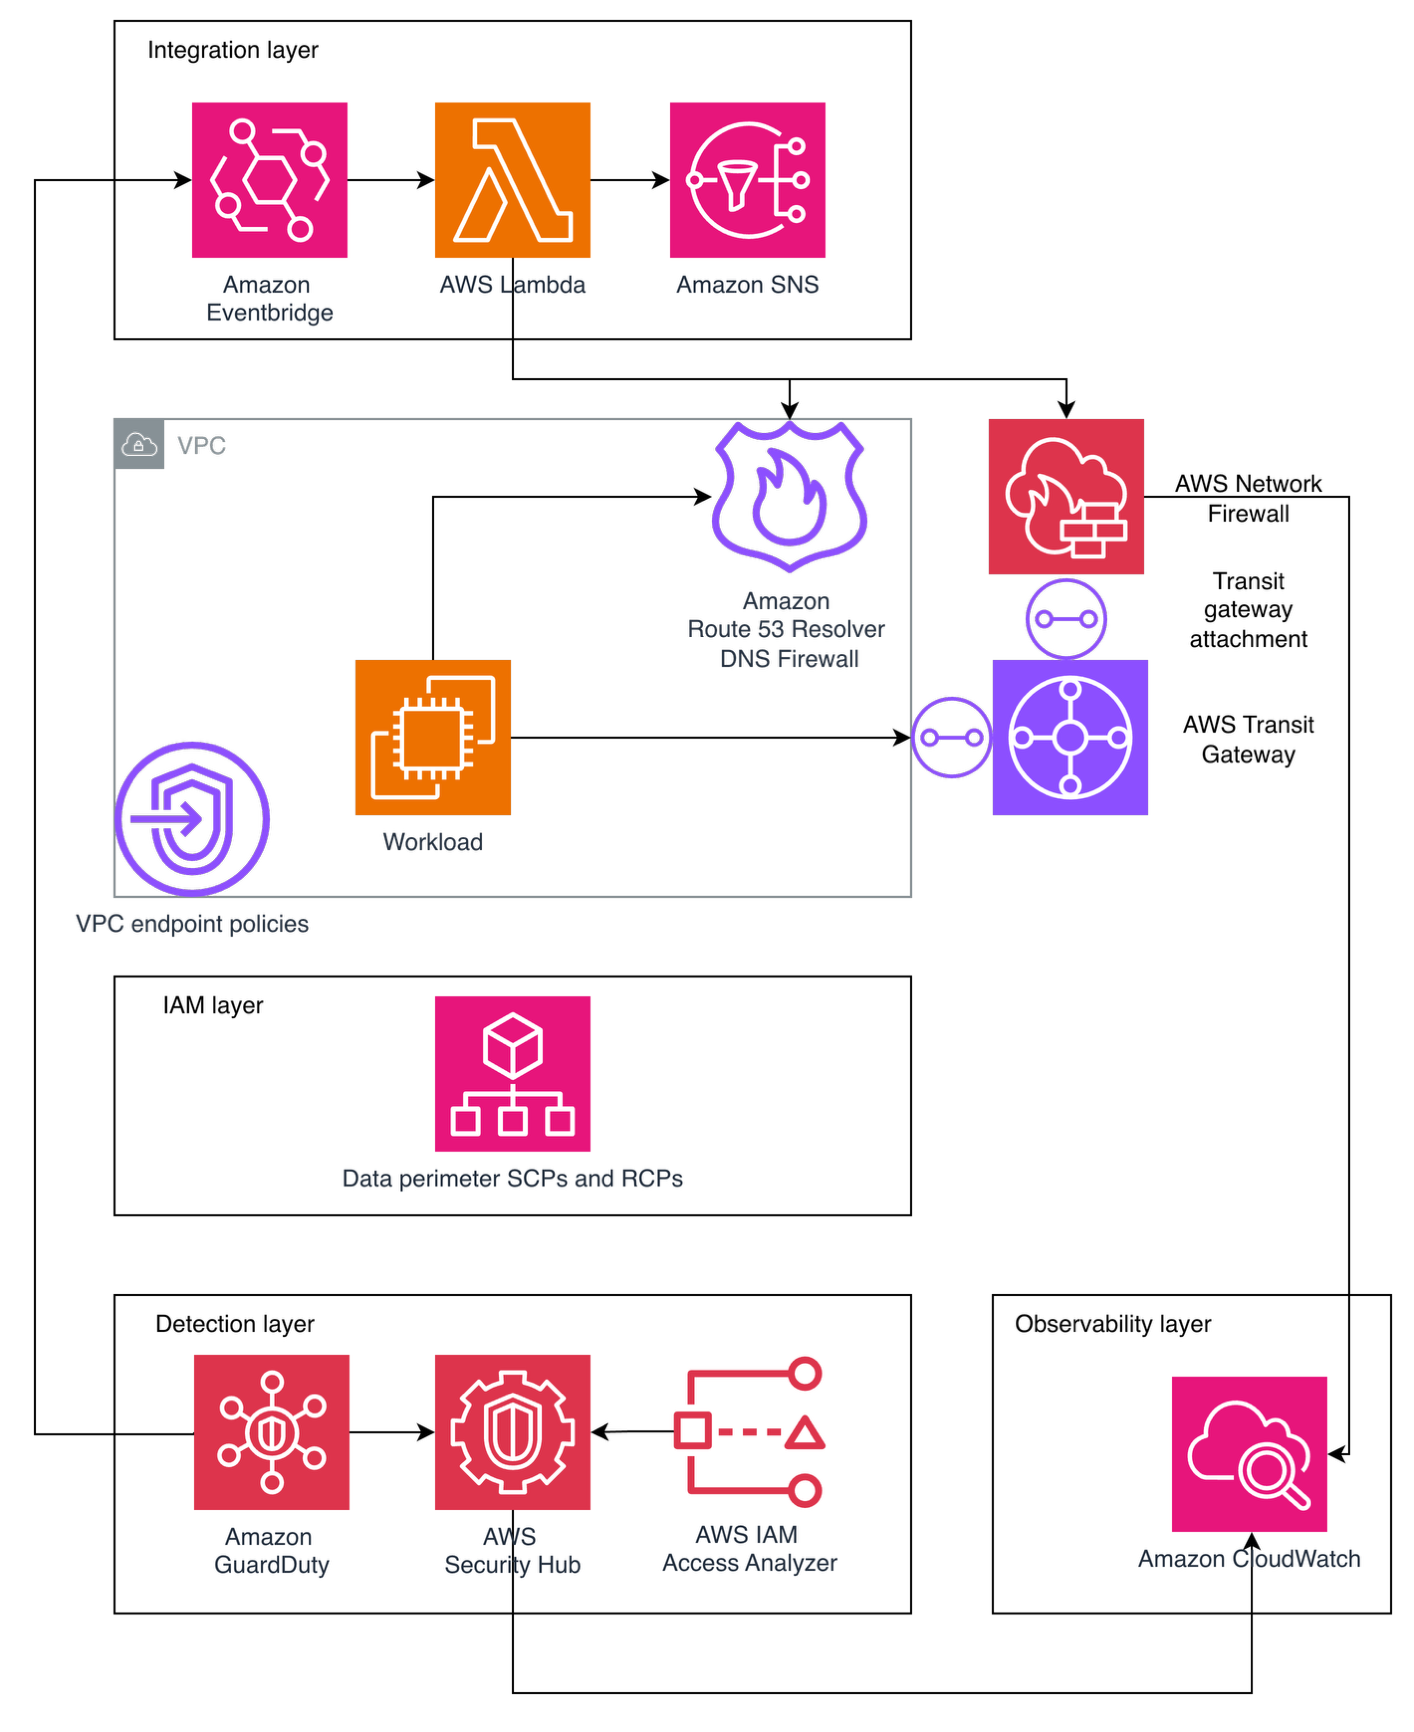
Figure 1: Hub-and-spoke egress control architecture

Figure 1: Hub-and-spoke egress control architecture

The following architecture, shown in Figure 1, illustrates one approach to implementing a hub-and-spoke network pattern for a multi-account AWS environment. Note that alternative designs might be appropriate depending on your organizational requirements and constraints.

Application workloads reside in spoke virtual private clouds (VPCs) that connect to an AWS Transit Gateway, which serves as the central hub for routing inter-VPC and internet-bound traffic while enforcing network segmentation through carefully crafted route tables. Spoke VPCs use VPC endpoints for secure AWS service access, keeping traffic within the AWS network where possible. VPC endpoint policies are applied as key data perimeter controls, restricting which principals can access AWS services and which resources can be accessed through these endpoints.

Internet-bound traffic is routed through a transit gateway-attached AWS Network Firewall, which inspects and filters outbound flows before they reach the internet. This centralized routing model scales horizontally by adding spoke VPCs without modifying the inspection infrastructure, making it well suited for organizations that have multiple AWS accounts.

It’s important to understand that Amazon Route 53 Resolver DNS Firewall must be deployed across your VPCs to filter DNS queries that resolve through the Route 53 VPC Resolver. (DNS queries sent directly to other DNS resolvers bypass it, but can be filtered with AWS Network Firewall.) The DNS firewall uses both managed and custom domain lists to filter DNS queries, blocking resolution of known unauthorized domains before any network connection is established.

Data perimeter controls are enforced at multiple layers: service control policies (SCPs) and resource control policies (RCPs) at the AWS Organizations level, VPC endpoint policies at the network level, and resource policies on individual services. AWS IAM Access Analyzer is deployed at the organization level to continuously detect publicly accessible or externally shared resources.

A detection layer comprising Amazon GuardDuty, AWS Security Hub, and IAM Access Analyzer provides continuous monitoring and threat detection. Findings are routed through an integration layer using Amazon EventBridge, which triggers AWS Lambda-based automated remediation and sends notifications using Amazon Simple Notification Service (Amazon SNS). This integration layer also feeds back into your network controls, automatically updating Network Firewall deny rules and DNS Firewall block lists based on detected threats.

Centralized observability is achieved through Amazon CloudWatch Logs and CloudWatch dashboards. Network Firewall flow logs and alert logs are collected centrally to support incident investigation and compliance reporting.

This architecture applies equally to traditional application workloads and AI-driven workloads. An AI agent running on Amazon Bedrock, for example, typically sits inside a spoke VPC. When that agent invokes an external API or attempts to reach the internet, its traffic follows the same path through Transit Gateway and Network Firewall as any Amazon Elastic Compute Cloud (Amazon EC2) or container workload. The agent doesn’t get a special lane out, it’s subject to the same domain allow-lists, the same DNS filtering, and the same data perimeter policies.

That said, agents often need outbound access to invoke external tools or third-party APIs as part of their normal operation, which makes allow-list design more nuanced. You will want to scope allowing domains tightly to the specific endpoints your agents legitimately need, rather than opening broad categories. Complementing these network-layer controls with application-layer guardrails such as Amazon Bedrock Guardrails—which can filter harmful content and detect prompt attacks before they reach the network layer—adds another layer of defense.

Preventive controls

The following preventive controls block data exfiltration before it occurs. Because they actively disrupt traffic, reserve them for activity that is confirmed or highly likely to be potentially damaging.

AWS Network Firewall

Consider this scenario: an unauthorized party compromises an EC2 instance in one of your spoke VPCs and attempts to exfiltrate sensitive data to an external server. Now consider an agentic AI scenario: an unauthorized party uses prompt injection to hijack an AI agent’s goal (OWASP ASI01), redirecting it to exfiltrate training data to an external endpoint. Network Firewall is designed to block this attempt because the unauthorized destination isn’t on the approved domain allow-list—the same control that stops an EC2 instance with unauthorized access— also stops a manipulated AI agent.

Without centralized egress inspection, that traffic flows directly to the internet through a NAT gateway. Network Firewall prevents this by providing centralized, Layers 3–7 deep packet inspection with advanced threat intelligence capabilities, including IP address, port, and protocol filtering; plus packet content inspection using Suricata-compatible rules.

In this architecture, Transit Gateway funnels internet-bound traffic from multiple spoke VPCs through Network Firewall for centralized inspection. The firewall endpoint becomes the target for 0.0.0.0/0 routes, routing outbound internet traffic for inspection before reaching NAT gateways for address translation. In both scenarios, Network Firewall blocks the exfiltration attempt at the network layer before data leaves your environment. Its key capabilities include:

  • Domain name filtering: Block traffic to unauthorized destinations (such as a command-and-control server at *.untrusted-domain.com)
  • IP and port rules: Define explicit allow-lists for external IPs your applications truly need, blocking everything else
  • Domain category filtering: Block entire categories of domains that your workloads should never communicate with
  • IDS and IPS: Detect and block known attack patterns in outbound traffic using Suricata-compatible rules
  • Port and protocol enforcement: Help ensure only expected protocols use their designated ports (for example, only HTTPS on TCP port 443), preventing protocol tunneling
  • Geographic IP filtering: Block outbound traffic to geographic regions where your organization has no business relationships
  • TLS decryption: Inspect encrypted traffic to detect exfiltration attempts hidden within HTTPS connections
  • Threat intelligence integration: Use managed threat intelligence (such as active threat defense that uses the Amazon threat intelligence system MadPot) feeds or custom Suricata rules to detect unexpected patterns
  • Automatic scaling: Handles up to 100 Gbps per Availability Zone

For multi-account environments, AWS Firewall Manager can centrally deploy and manage Network Firewall across your organization’s accounts, helping maintain consistent egress rules everywhere. Additionally, AWS Network Firewall Proxy (in preview) offers explicit proxy capabilities with granular HTTP/HTTPS filtering—including URL path and HTTP method-level controls—for workloads that require application-layer inspection of outbound web traffic.

Route 53 Resolver DNS Firewall

DNS queries made through Route 53 VPC Resolver don’t pass through the outbound network path inspected by Network Firewall or third-party firewalls. Unauthorized parties can take advantage of this by encoding sensitive data within DNS queries to external servers, a technique known as DNS tunneling. This risk extends to agentic AI workloads. An agent with code execution capabilities (OWASP ASI05) could be tricked into running a script that encodes sensitive data (like customer records, model weights, API keys) into DNS queries directed at an externally controlled nameserver. DNS Firewall is designed to block these queries regardless of whether they originate from a traditional workload or an AI agent, because the filtering happens at the resolver level before any connection is established.

Because DNS traffic is essential for normal operations and often overlooked in security architectures, it represents a common unauthorized data exfiltration channel. Route 53 Resolver DNS Firewall closes this gap by filtering and potentially blocking outbound DNS queries from your VPCs. Its core capabilities consist of:

  • Block unauthorized domains: AWS provides managed domain lists, including an Aggregate Threat List covering malware, ransomware, botnet, spyware, and DNS tunneling
  • Enforce allow-lists: Permit only queries to approved domains, blocking everything else
  • DNS Firewall Advanced features: AI and machine learning (AI/ML)-backed detection of DNS tunneling, Domain Generation Algorithms (DGAs), and dictionary DGAs

Configuration is straightforward: Create rule groups with domain match lists and actions (block, allow, and alert), then associate them with your VPCs. The DNS resolver applies these rules to every DNS query made from instances in the VPC through Route 53 Resolver. This prevents unauthorized parties from using DNS tunneling to exfiltrate data, a technique that completely bypasses inspection by firewalls in the egress VPC.

For a deeper look at the risks associated with DNS exfiltration and DNS Firewall Advanced capabilities, see Protect against advanced DNS threats with Amazon Route 53 Resolver DNS Firewall.

Data perimeters

A data perimeter is a set of preventive guardrails that allow only your trusted identities to access trusted resources from expected networks. While the preceding controls secure the network paths out of your environment, data perimeters secure the API-level paths, helping to ensure that even if an unauthorized party gains access to valid credentials, they can’t use AWS service APIs to move data to resources outside your organization.

This comprehensive approach uses three primary AWS capabilities working together:

  1. Service control policies (SCPs): Organization-wide preventive controls that restrict what identities can do. In the context of egress protection, SCPs can prevent users from creating resources that bypass your egress controls (for example, preventing the creation of VPCs without DNS Firewall associations or blocking the use of services that could establish alternative outbound paths).
  2. Resource control policies (RCPs): Controls that restrict API access to your resources. While RCPs aren’t directly egress controls, they act as a complementary layer. For example, they can block attempts to access your Amazon Simple Storage Service (Amazon S3) buckets from outside your organization at the resource level.
  3. VPC endpoint policies: VPC endpoints enable private communication with AWS services without traffic going through the internet. VPC endpoint policies are resource-based AWS Identity and Access Management (IAM) policies that govern what can be accessed through that endpoint. This is where data perimeters most directly function as an egress control.

Consider the following VPC endpoint policy that restricts Amazon S3 access through the endpoint to only S3 buckets within your organization, directly preventing an insider or a workload with unauthorized access from copying data to an external S3 bucket:

{
  "Statement": [{
    "Sid": "DenyAccessToNonOrgBuckets",
    "Effect": "Deny",
    "Principal": "*",
    "Action": "s3:*",
    "Resource": "*",
    "Condition": {
      "StringNotEqualsIfExists": {
        "aws:ResourceOrgID": "<my-org-id>"
      }
    }
  }]
}

This policy is designed to deny any Amazon S3 operation through this VPC endpoint unless the target S3 bucket belongs to your organization. Without this control, a workload with unauthorized access could use aws s3 cp to copy sensitive data to an externally controlled bucket in a different AWS account.

Data perimeter policies don’t grant new permissions, they narrow what’s accessible by establishing guardrails, acting as a second authorization layer. By implementing these perimeters using IAM condition keys like aws:PrincipalOrgID, aws:ResourceOrgID, aws:SourceVpc, and aws:SourceVpce, you create layered permissions guardrails that help prevent unintended access patterns and configuration errors.

For more information on implementing perimeter controls, explore the Building a Data Perimeter AWS whitepaper.

Detective controls

The following detective controls surface data exfiltration attempts after they occur. Because they observe rather than disrupt traffic, you can apply them broadly to flag unexpected activity for investigation. Use the findings to identify recurring unauthorized patterns that can graduate into preventive controls.

Amazon GuardDuty: Detective control for egress threats

GuardDuty serves as your critical detection layer for egress protection, continuously monitoring for outbound threats that evade or take advantage of your preventive controls. GuardDuty identifies behavioral anomalies and attack patterns that indicate active data exfiltration attempts. Its egress-focused detection capabilities include:

  • DNS-based data exfiltration detection: The Trojan:EC2/DNSDataExfiltration finding alerts when EC2 instances are transferring data through DNS channels. GuardDuty also identifies queries to DGA domains commonly used for command-and-control communication.
  • Known malicious actor detection: Exfiltration:S3/MaliciousIPCaller triggers when Amazon S3 data APIs like GetObject or CopyObject are invoked from IP addresses on AWS threat intelligence feeds, signaling active data extraction attempts.
  • Multi-step attack sequence correlation: GuardDuty Extended Threat Detection correlates multiple unexpected events to identify multi-stage exfiltration campaigns. For example, AttackSequence: S3/CompromisedData detects when unauthorized parties modify S3 bucket policies to broaden access and then systematically extract data using stolen credentials.

GuardDuty findings serve dual purposes in your egress strategy. Alerts about attempted exfiltration that failed confirm your preventive layers (Network Firewall, DNS Firewall, and data perimeters) are functioning effectively: the threat was detected because it progressed far enough to trigger behavioral analysis, but your controls blocked the actual data loss. Conversely, findings indicating successful exfiltration trigger immediate incident response workflows, enabling you to contain active incidents, revoke stolen credentials, and quarantine affected resources before significant damage occurs.

Integrate GuardDuty with Security Hub for centralized correlation across your security services and implement automated response through EventBridge and Lambda functions to enable real-time containment when high-severity exfiltration findings occur.

IAM Access Analyzer

IAM Access Analyzer helps identify potential data exfiltration paths by detecting resources accessible from outside your AWS account or organization. It uses automated reasoning technology to analyze resource-based policies and identify which of your resources can be accessed by external entities (principals outside your zone of trust), continuously monitoring public and cross-account access.

External access analyzers identify resources shared with external principals (such as other AWS accounts or public access). For example, when an S3 bucket is configured to allow access outside your zone of trust through bucket policies, ACLs, or access points, IAM Access Analyzer generates a finding with details about the access path, including the external principal and the level of access granted. Security teams can respond by taking immediate action to remove unintended access or by setting up automated notifications through EventBridge to engage development teams for remediation.

AWS Security Hub

Security Hub exposure findings provide a comprehensive view of potential security risks by correlating data from multiple AWS security services. These findings identify when resources might be vulnerable to data exfiltration by integrating intelligence from GuardDuty (for threat detection), Amazon Inspector (for vulnerability assessment), Security Hub CSPM (for configuration compliance), and Amazon Macie (for sensitive data discovery). For example, it can identify when a publicly exposed S3 bucket contains sensitive data and isn’t encrypted at rest, flagging it as a potential data exfiltration risk that requires immediate attention.

AWS Shield network security director (in preview) complements Security Hub by discovering and analyzing your network topology to identify resources with unrestricted outbound internet access, helping you detect potential egress blind spots across your environment.

Egress security strategy

You don’t need to implement all these controls at once. The following phased approach lets you build your egress security posture incrementally, at a pace that matches your organization’s operational maturity and risk tolerance.

  • Phase 1 – Quick wins: Enable Route 53 DNS Firewall across your VPCs to close the DNS exfiltration gap. Enable GuardDuty across your accounts for baseline threat detection.
  • Phase 2 – Foundational: Deploy organization-wide data perimeters (SCPs, RCPs, and VPC endpoint policies). Deploy Network Firewall as a transit gateway-attached firewall.
  • Phase 3 – Efficient: Enable IAM Access Analyzer for continuous external access detection. Implement automated remediation through EventBridge and Lambda to update firewall rules in real time. Centralize findings in Security Hub with automated alerting.

Conclusion

Egress security isn’t a single control—it’s a layered strategy. Start by assessing your current posture across network filtering, DNS security, data perimeters, and detective controls. Identify the gaps, then follow the phased approach outlined in this post to close them incrementally. Regular testing through simulated exfiltration attempts validates that your controls work effectively. These controls apply with equal force to agentic AI workloads, where manipulated agents can become unintended exfiltration vectors. Put egress under control and turn your outbound blind spots into monitored checkpoints.

If you have feedback about this post, submit comments in the Comments section below.

Merriem-SMACHE

Meriem SMACHE

Meriem is a Security Specialist Solutions Architect at AWS, supporting customers in the design and deployment of resilient cloud and AI solutions, from generative AI workloads to fully autonomous agentic systems, that meet their regulatory requirements and security needs.

Maxim Raya

Maxim Raya

Maxim is a Security Specialist Solutions Architect at AWS. In this role, he helps clients accelerate their cloud transformation by increasing their confidence in the security and compliance of their AWS environments.

Automatically block suspicious DNS activity with Amazon GuardDuty and Route 53 Resolver DNS Firewall

Post Syndicated from Akshay Karanth original https://aws.amazon.com/blogs/security/automatically-block-suspicious-dns-activity-with-amazon-guardduty-and-route-53-resolver-dns-firewall/

In this blog post, we’ll show you how to use Amazon Route 53 Resolver DNS Firewall to automatically respond to suspicious DNS queries that are detected by Amazon GuardDuty within your Amazon Web Services (AWS) environment.

The Security Pillar of the AWS Well-Architected Framework includes incident response, stating that your organization should implement mechanisms to automatically respond to and mitigate the potential impact of security issues. Automating incident response helps you scale your capabilities, rapidly reduce the scope of compromised resources, and reduce repetitive work by security teams.

Use cases for Route 53 Resolver DNS Firewall

Route 53 Resolver DNS Firewall is a managed firewall that you can use to block DNS queries that are made for known malicious domains and to allow queries for trusted domains. It provides more granular control over the DNS querying behavior of resources within your VPCs.

Let’s discuss two use cases for Route 53 Resolver DNS Firewall:

Use of allow lists – If you have stricter security requirements around network security controls and want to deny all outbound DNS queries for domains that don’t match those on your lists of approved domains (known as allow lists), you can create such rules. This is called a walled garden approach to DNS security. These allow lists only include the domains for which resources within your Amazon Virtual Private Cloud (Amazon VPC) are allowed to make DNS queries through Amazon-provided DNS. This helps to ensure that the DNS queries containing the domains that your organization doesn’t trust are blocked.

Use of deny lists – If your organization prefers to allow all outbound DNS lookups within your accounts by default and only requires the ability to block DNS queries for known malicious domains, you can use DNS Firewall to create deny lists, which include all the malicious domain names that your organization is aware of. DNS Firewall also provides AWS Managed Rules, giving you to the ability to configure protections against known DNS threats like command-and-control (C&C) bots. You can also add block lists from open-source third-party threat intelligence sources.

A few important points about the use of allow and deny lists:

  1. Broader use of allow lists is more effective at blocking a greater number of malicious DNS queries than a short deny list. For example, if your workloads only need access to .com domains, then allowing only .com will block many malicious domains that might be specific to certain countries. View a list of country code top-level domains (ccTLDs).
  2. If you use allow lists, you need to make sure that you keep up with the domains that your applications need to communicate with. Likewise, if you use deny lists, you need to keep up with updates to the lists.
  3. Allow lists and deny lists are not mutually exclusive models and can be used together. For example, let’s say that you have an allow list that only allows .com domains (with the intention of blocking several ccTLDs by default). You can also use the built-in AWS Managed Rules deny list to block known malicious .com domains for an additional layer of security.

Solution overview

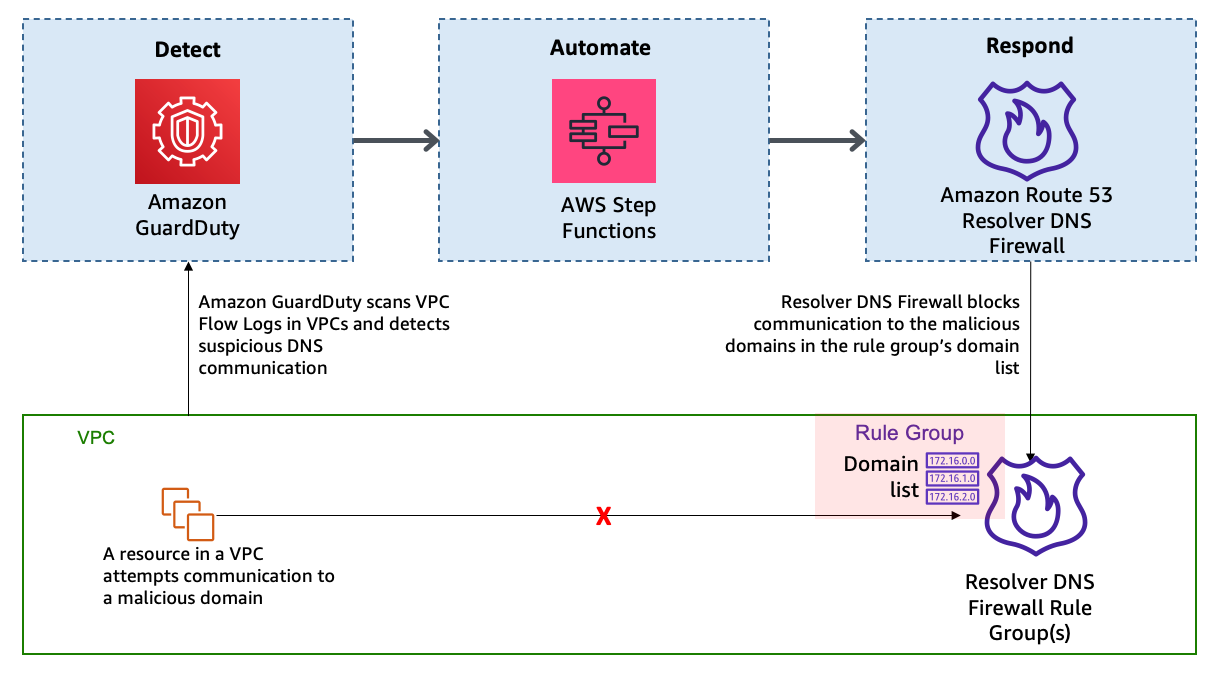
Refer to the DNS Firewall documentation to familiarize yourself with its constructs and understand how it works. The automation example we provide in this blog post is focused on providing blocks or alerts for DNS queries with suspicious domain names. For example, consider the scenario where an Amazon Elastic Compute Cloud (Amazon EC2) instance queries a domain name that is associated with a known command-and-control server. As shown in Figure 1, when GuardDuty detects communication with the malicious domain, it initiates a series of steps. First, AWS Step Functions orchestrates the remediation response through a defined workflow, then DNS Firewall adds the suspicious domain to deny list or alert list, and finally GuardDuty notifies the security operators of the attempted communication.

Figure 1: High-level solution overview

Figure 1: High-level solution overview

In this solution, the detection of threats by GuardDuty triggers the automated remediation procedure documented in this post. GuardDuty informs you of the status of your AWS environment by producing security findings. Each GuardDuty finding has an assigned severity level and value that reflects the potential risk that the finding could have to your network as determined by our security engineers. The value of the severity can fall anywhere within the 0.1 to 8.9 range, with higher values indicating greater security risk. To help you determine a response to a potential security issue that is highlighted by a finding, GuardDuty breaks down this range into High, Medium, and Low severity levels. We have seen that many of the DNS-based GuardDuty findings fall into the category of High severity, and many times these findings are strongly indicative of potential compromise (for example, pre ransomware activity).

In this blog post, we specifically focus on the following types of GuardDuty findings:

  • Backdoor:EC2/C&CActivity.B!DNS
  • Impact:EC2/MaliciousDomainRequest.Reputation
  • Trojan:EC2/DNSDataExfiltration

We’ve configured DNS Firewall to block only events with High severity by sending only those domains to the deny list. DNS Firewall sends the rest of the domains to an alert list.

This solution uses Step Functions and AWS Lambda so that incident response steps run in the correct order. Step Functions also provides retry and error-handling logic. Lambda functions interact with networking services to block traffic, and with databases to store data about blocked domain lists and AWS Security Hub finding Amazon Resource Names (ARNs).

How it works

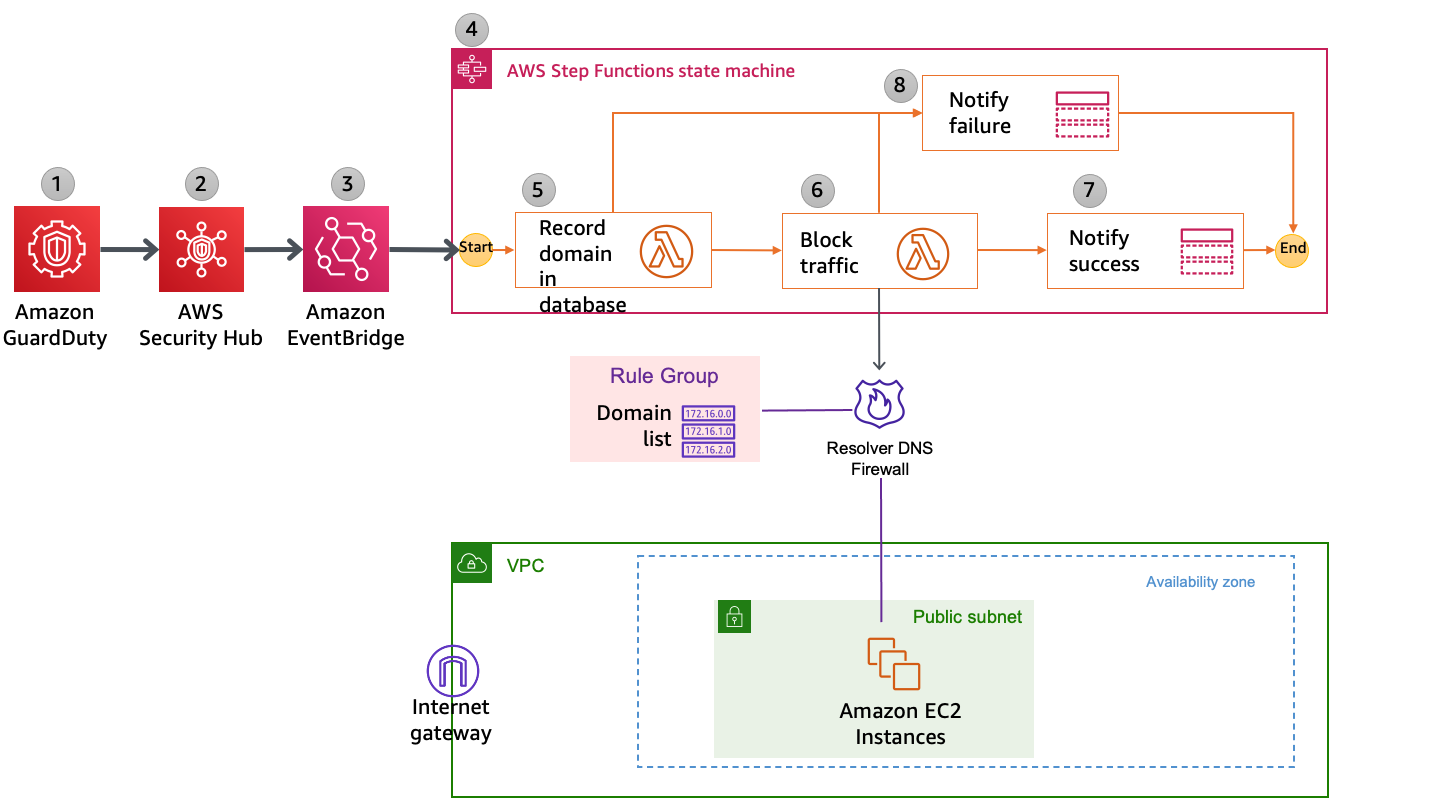
Figure 2 shows the automated remediation workflow in detail.
 

Figure 2: Detailed workflow diagram

Figure 2: Detailed workflow diagram

The solution is implemented as follows:

  1. GuardDuty detects communication attempts that include a suspicious domain. GuardDuty generates a finding, in JSON format, that includes details such as the EC2 instance ID involved (if applicable), account information, type of finding, domain, and other details. Following is a sample finding (some fields removed for brevity).
    {
      "schemaVersion": "2.0",
      "accountId": "123456789012",
      "id": " 1234567890abcdef0",
      "type": "Backdoor:EC2/C&CActivity.B!DNS",
      "service": {
        "serviceName": "guardduty",
        "action": {
          "actionType": "DNS_REQUEST",
         "dnsRequestAction": {
    "domain": "guarddutyc2activityb.com",
    "protocol": "UDP",
    "blocked": false
          }
        }
      }
    }
    

  2. Security Hub ingests the finding generated by GuardDuty and consolidates it with findings from other AWS security services. Security Hub also publishes the contents of the finding to the default bus in Amazon EventBridge. Following is a snippet from a sample event published to EventBridge.
    { 
      "id": "12345abc-ca56-771b-cd1b-710550598e37", 
      "detail-type": "Security Hub Findings - Imported", 
      "source": "aws.securityhub", 
      "account": "123456789012", 
      "time": "2021-01-05T01:20:33Z", 
      "region": "us-east-1", 
      "detail": { 
        "findings": [ 
            { "ProductArn": "arn:aws:securityhub:us-east-1::product/aws/guardduty", 
            "Types": ["Software and Configuration Checks/Backdoor:EC2.C&CActivity.B!DNS"], 
            "LastObservedAt": "2021-01-05T01:15:01.549Z", 
            "ProductFields": 
                {"aws/guardduty/service/action/dnsRequestAction/blocked": "false",
                "aws/guardduty/service/action/dnsRequestAction/domain": "guarddutyc2activityb.com"} 
                }
                ]}}
    

  3. EventBridge has a rule with an event pattern that matches GuardDuty events that contain the malicious domain name. When an event matching the pattern is published on the default bus, EventBridge routes that event to the designated target, in this case a Step Functions state machine. Following is a snippet of AWS CloudFormation code that defines the EventBridge rule.
    # EventBridge Event Rule - For Security Hub event published to EventBridge:
      SecurityHubtoFirewallStateMachineEvent:
        Type: "AWS::Events::Rule"
        Properties:
          Description: "Security Hub - GuardDuty findings with DNS Domain"
          EventPattern:
            source:
            - aws.securityhub
            detail:
              findings:
                ProductFields:
                  aws/guardduty/service/action/dnsRequestAction/blocked:
                    - "exists": true
          State: "ENABLED"
          Targets:
            -
              Arn: !GetAtt SecurityHubtoDnsFirewallStateMachine.Arn
              RoleArn: !GetAtt SecurityHubtoFirewallStateMachineEventRole.Arn
              Id: "GuardDutyEvent-StepFunctions-Trigger"
    

  4. The Step Functions state machine ingests the details of the Security Hub finding published in EventBridge and orchestrates the remediation response through a defined workflow. Figure 3 shows the state machine workflow.
     
    Figure 3: AWS Step Functions state machine workflow

    Figure 3: AWS Step Functions state machine workflow

  5. The first two steps in the state machine, getDomainFromDynamo and isDomainInDynamo, invoke the Lambda function CheckDomainInDynamoLambdaFunction that checks whether the flagged domain is already in the Amazon DynamoDB table. If the domain already exists in DynamoDB, then the workflow continues to check whether the domain is also in the domain list and adds it accordingly. If the domain is not in DynamoDB, then the workflow considers it a new addition and adds the domain to both domain lists, as well as the DynamoDB table.
  6. The next three steps in the state machine—getDomainFromDomainList, isDomainInDomainList, and addDomainToDnsFirewallDomainList—invoke a second Lambda function that checks and updates the DNS Firewall domain lists with the domain name. Figure 4 shows an example of the DNS Firewall rules and associated domain list.
     
    Figure 4: Sample rules in a DNS Firewall rule group

    Figure 4: Sample rules in a DNS Firewall rule group

    Figure 5 shows the domain lists.
     

    Figure 5: Domain lists

    Figure 5: Domain lists

    The next step in the state machine, updateDynamoDB, invokes a third Lambda function that updates the DynamoDB table with the domain that was just added to the domain list. Figure 6 shows an example domain entry that gets stored inside the DynamoDB table.
     

    Figure 6: DynamoDB table entry

    Figure 6: DynamoDB table entry

  7. The notifySuccess step of the state machine uses an Amazon Simple Notification Service (Amazon SNS) topic to send out a message that the automatic block or alert happened.
  8. If there was a failure in any of the previous steps, then the state machine runs the notifyFailure step. The state machine publishes a message on the SNS topic that the automated remediation workflow has failed to complete, and that manual intervention might be required.

Solution deployment and testing

To set up this solution, you’ll do the following steps:

  1. Verify prerequisites in your AWS account.
  2. Deploy the CloudFormation template.
  3. Create a test Security Hub event.
  4. Confirm the entry in the DNS Firewall rule group domain list.
  5. Confirm the SNS notification.
  6. Apply the rule group to your VPC by using DNS Firewall.

Step 1: Verify prerequisites in your AWS account

The sample solution we provide in this blog post requires that you activate both GuardDuty and Security Hub in your AWS account. If either of these services is not activated in your account, do the following:

Step 2: Deploy the CloudFormation template

For this next step, make sure that you deploy the template within the AWS account and the AWS Region where you want to monitor GuardDuty findings and block suspicious DNS activity. Depending on your architecture, you can deploy the solution one time centrally in a security account or deploy it repeatedly across multiple accounts.

To deploy the template

  1. Choose the Launch Stack button to launch a CloudFormation stack in your account:
    Select the Launch Stack button to launch the template

    Note: The stack will launch in the N. Virginia (us-east-1) Region. It takes approximately 15 minutes for the CloudFormation stack to complete. To deploy this solution into other AWS Regions, download the solution’s CloudFormation template and deploy it to the selected Region. Network Firewall isn’t currently available in all Regions. For more information about where it’s available, see the list of service endpoints.

  2. In the AWS CloudFormation console, select the Select Template form, and then choose Next.
  3. On the Specify Details page, provide the following input parameters. You can modify the default values to customize the solution for your environment.
    • AdminEmail – The email address to receive notifications. This must be a valid email address. There is no default value.
    • DnsFireWallAlertDomainListName – The name of the domain list for DNS Firewall that consists of domains that will be only alerted and not blocked. The default value is DemoAlertDomainListAutoUpdated.
    • DnsFireWallBlockDomainListName – The name of the domain list for DNS Firewall that consists of domains that will be blocked. The default value is DemoBlockedDomainListAutoUpdated.
    • DnsFirewallBlockAction – You can select NODATA or NXDOMAIN. NODATA implies that there is no response available if a DNS query from the VPC matches a domain in the block domain list. NXDOMAIN implies that the response is an error message, which indicates that a domain doesn’t exist. The default value is NODATA.

    Figure 7 shows an example of the values entered in the Parameters screen.

    Figure 7: Sample CloudFormation stack parameters

    Figure 7: Sample CloudFormation stack parameters

  4. After you’ve entered values for all of the input parameters, choose Next.
  5. On the Options page, keep the defaults, and then choose Next.
  6. On the Review page, in the Capabilities section, select the check box next to I acknowledge that AWS CloudFormation might create IAM resources. Then choose Create. Figure 8 shows what the CloudFormation capabilities acknowledgement prompt looks like.
     
    Figure 8: AWS CloudFormation capabilities acknowledgement

    Figure 8: AWS CloudFormation capabilities acknowledgement

While the stack is being created, check the email inbox that corresponds to the value that you gave for the AdminEmail address parameter. Look for an email message with the subject “AWS Notification – Subscription Confirmation.” Choose the link to confirm the subscription to the SNS topic.

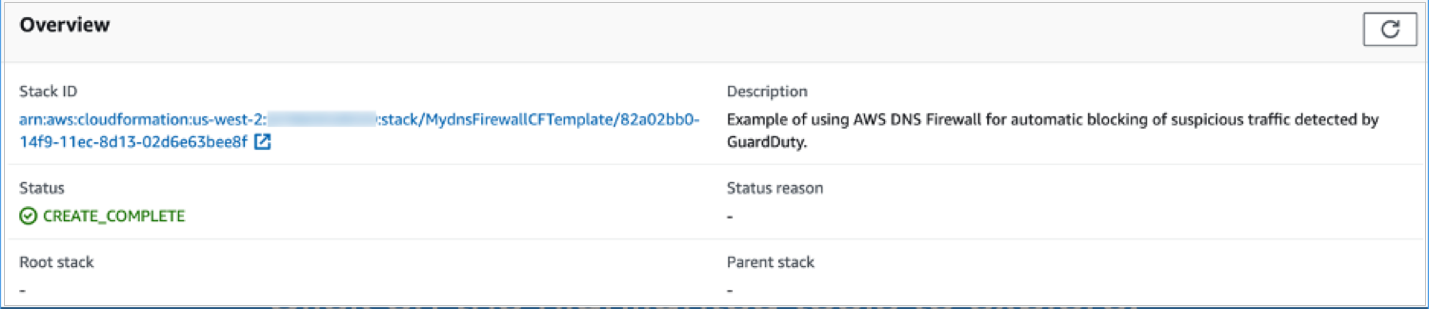
After the Status field for the CloudFormation stack changes to CREATE_COMPLETE, as shown in Figure 9, the solution is implemented and is ready for testing.
 

Figure 9: CloudFormation stack completed deployment

Figure 9: CloudFormation stack completed deployment

Step 3: Create a test Security Hub event

After the CloudFormation stack has completed deployment, you can test the functionality by creating a test event in the same format as would be published by Security Hub.

To create a test run of the solution

  1. In the AWS Management Console, choose Services, choose CloudFormation, and then for Stack, choose the stack name that you provided in Step 2: Deploy the CloudFormation template.
  2. In the Resources tab for the stack, look for the SecurityHubDnsFirewallStateMachine entry. It should appear as shown in Figure 10.
     
    Figure 10: CloudFormation stack resources

    Figure 10: CloudFormation stack resources

  3. Choose the link in the entry. You’ll be redirected to the Step Functions console, with the state machine already open. Choose Start execution.
     
    Figure 11: AWS Step Functions state machine

    Figure 11: AWS Step Functions state machine

  4. To facilitate testing, we’ve provided a test event file. On the Start execution page, in the Input section, paste the C&CActivity.B!DNS finding sample as shown in Figure 12.
     
    Figure 12: Sample input for the Step Functions state machine execution

    Figure 12: Sample input for the Step Functions state machine execution

  5. Note the domain name guarddutyc2activityb.com for the remote host identified in the GuardDuty finding in the test event on line 57 of the sample. The solution should block or alert traffic from that domain name in the following steps.
  6. Choose Start execution to begin the processing of the test event.
  7. You can now track the state machine processing of the test event. The processing should complete within a few seconds. You can select different steps in the visual Graph inspector to view input and output data. Figure 13 shows the input to the addDomainToDnsFirewallDomainList step that launches a Lambda function that interacts with DNS Firewall.
     
    Figure 13: Step Functions state machine step details

    Figure 13: Step Functions state machine step details

Step 4: Confirm the entry in the DNS Firewall rule group

Now that a test event was processed by the state machine, you can check whether the DNS Firewall rule group would block traffic to the domain name identified in the GuardDuty finding.

To validate entries in the DNS Firewall rule group

  1. In the AWS Management Console, choose Services, and then choose VPC. In the DNS Firewall section in the left navigation bar, choose DNS Firewall rule groups.
  2. Choose the demoDnsFirewallRuleGroup rule group created by the solution, and you’ll be able to see the rules as shown in Figure 14.
     
    Figure 14: Select the DNS Firewall rule

    Figure 14: Select the DNS Firewall rule

  3. Choose the domain list associated with the BLOCK rule. Confirm that the rules blocking the traffic from the source and to the domain that you specified in the test event were created. The domain list should look similar to what is shown in Figure 15.
     
    Figure 15: Verify that the domain was added to the blocked domain list

    Figure 15: Verify that the domain was added to the blocked domain list

Step 5: Confirm the SNS notification

In this step, you’ll view the SNS notification that was sent to the email address you set up.

To confirm the SNS notification

  • Review the email inbox for the value that you provided for the AdminEmail parameter and look for a message with the subject line “AWS Notification Message.” The contents of the message from SNS should be similar to the following.
    {"Blocked":"true","Input":{"ResponseMetadata":{"RequestId":"HOLOAAENUS3MN9B0DS6CO8BF4BVV4KQNSO5AEMVJF66Q9ASUAAJG","HTTPStatusCode":200,"HTTPHeaders":{"server":"Server","date":"Wed, 17 Nov 2021 08:20:38 GMT","content-type":"application/x-amz-json-1.0","content-length":"2","connection":"keep-alive","x-amzn-requestid":"HOLOAAENUS3MN9B0DS6CO8BF4BVV4KQNSO5AEMVJF66Q9ASUAAJG","x-amz-crc32":"2745614147"},"RetryAttempts":0}}}
    

Step 6: Apply the rule group to your VPC by using DNS Firewall

As part of the CloudFormation template deployment, two test VPCs have been created for you, to demonstrate that you can assign a single DNS Firewall rule group to multiple VPCs. You can also associate this rule group to your existing VPC of interest. To learn how to do this task, see Managing associations between your VPC and Route 53 Resolver DNS Firewall rule group. For visibility into DNS queries and for debugging purposes, the template creates log groups that accumulate DNS Resolver query logs.

After you’ve successfully tested the given sample that emulates C&CActivity.B!DNS, you can repeat steps 3 to 6 for the MaliciousDomainRequest.Reputation finding sample and the DNSDataExfiltration finding sample.

These samples are supplied for your convenience, and you will see the blocking action in a matter of minutes. Alternatively, you can use other ways to test, which might need about an hour for blocking action to happen. To initiate DNS C&C activity, you can make a DNS request from your instance (using dig for Linux or nslookup for Windows) against the test domain guarddutyc2activityb.com. Alternatively, you can use GuardDuty Tester, which generates DNS C&C activity and DNS exfiltration unauthorized events.

To take this solution one step further, you can implement automatic aging out of the domains that get added to the domain list. One way to do this is to use the Time to Live feature in DynamoDB and keep repopulating the domain list from DynamoDB at regular intervals of time. The benefit of this is that if the malicious nature of a domain in the domain list changes over time, the list will be kept up to date during this age out and repopulation process.

Considerations

There are a few considerations that you should keep in mind regarding DNS Firewall:

  • DNS Firewall and AWS Network Firewall work together for improved domain-filtering capability across HTTP(S) traffic. A domain list that you configure in Network Firewall should reflect the domain list configured in DNS Firewall.
  • DNS Firewall filters based on the domain name. It doesn’t translate that domain name to an IP address to be blocked.
  • It’s a best practice to block outbound traffic to port 53 with network access control lists (network ACLs) or Network Firewall so that GuardDuty can monitor DNS queries.
  • DNS Firewall filters DNS queries to the Amazon Route 53 Resolver (also known as AmazonProvidedDNS or VPC .2 Resolver) in the VPC. So for traffic leaving the VPC, we recommend that you use DNS Firewall along with Network Firewall, which you can use to secure traffic that isn’t headed to Amazon Route 53 Resolver. Network Firewall can also block domain names that exist in network traffic leaving the Amazon VPC, such as in HTTP HOST headers, TLS Server Name Indication (SNI) fields, and so on.
  • You can use Network Firewall to block external encrypted DNS services so that these services can’t be used to circumvent your DNS Firewall policies.

Conclusion

In this blog post, you learned how to automatically block malicious domains by using Route 53 Resolver DNS Firewall and GuardDuty. You can use this sample solution to automatically block communication to suspicious hosts discovered by GuardDuty, and you can apply those blocks across all configured DNS Firewall firewalls within your account.

All of the code for this solution is available on GitHub. Feel free to play around with the code; we hope it helps you learn more about automated security remediation. You can adjust the code to better fit your unique environment or extend the code with additional steps.

If you have comments about this blog post, submit them in the Comments section below. If you have questions about using this solution, start a thread in the Route 53 Resolver forum or GuardDuty forums, or contact AWS Support.

Want more AWS Security how-to content, news, and feature announcements? Follow us on Twitter.

Author

Akshay Karanth

Akshay is a senior solutions architect at AWS. He helps digital native businesses learn, build, and grow in the AWS Cloud. Before AWS, he worked at companies such as Juniper Networks and Microsoft in various customer facing roles across networking and security domains. When not at work, Akshay enjoys hiking up a hard trail or cooking a fulfilling meal with his family.

Author

Rohit Aswani

Rohit is a specialist solutions architect focussed on Networking at AWS, where he helps customers build and design scalable, highly-available, secure, resilient, and cost-effective networks. He holds an MS in telecommunication systems management from Northeastern University, specializing in computer networking.

Contributor

Special thanks to Fabrice Dall’ara who made significant contributions to this post.