Post Syndicated from Tyler Klimas original https://aws.amazon.com/blogs/compute/sharing-capacity-blocks-for-ml-across-your-aws-organization/
When your data science team reserves GPU instances for a two-week training job but completes it in four days, that capacity has the potential to sit unused while your computer vision team waits another week to start their project. Now you can eliminate this GPU waste and scheduling conflict by sharing Capacity Blocks for ML across your AWS Organization. This scheduling mismatch between teams creates bottlenecks that delay product launches, increase infrastructure costs, and slow your ability to deliver machine learning (ML) powered features to customers. With cross-account sharing for Amazon Elastic Compute Cloud (Amazon EC2) Capacity Blocks for ML, you can now distribute reserved graphics processing unit (GPU) capacity across teams based on actual demand rather than rigid scheduling predictions. This means your computer vision team can use the capacity as soon as the data science team is done.
In this post, we’ll show you how to configure cross-account sharing for Capacity Blocks for ML, set up monitoring for your shared resources, and optimize instance utilization through alerting. By increasing the utilization rates and reducing over-provisioning, you improve your resource efficiency and cost optimization for your organization.
You can reduce idle resources in your ML team’s account by sharing capacity with other teams waiting for GPUs. Additionally, you can maintain Capacity Blocks for ML centrally. This lets you control which teams have access to the capacity and helps you reduce waste and bottlenecks in your organization. Before starting into the tutorial, let’s review how Capacity Blocks for ML and AWS RAM work together.
Overview
Capacity Blocks for ML let you reserve GPU-based accelerated compute instances ahead of time for short duration ML workloads. When you launch instances in Capacity Blocks for ML, Amazon EC2 automatically places the instances in Amazon EC2 UltraClusters, giving you low-latency, petabit scale networking. UltraClusters provide the high performance networking your training workloads require.
You see exactly when GPU capacity is available and schedule your Capacity Blocks for ML to start when it makes sense for your project. You pay upfront for the entire reservation period. This makes Capacity Blocks for ML useful when you need GPUs for days to months. It provides predictable capacity without long-term commitments.
When you purchase Capacity Blocks for ML, you can share it with other accounts in your AWS Organization using AWS Resource Access Manager (AWS RAM). With AWS RAM, you can share AWS resources across accounts within your organization. When you share with other accounts, those accounts become consumer accounts that can launch instances using your capacity. As the owner account, you pay the upfront reservation cost and retain ownership. If you’re launching instances from a consumer account, you are responsible for additional costs such as operating system licensing charges. Capacity Blocks can be shared to multiple accounts simultaneously, with the entire Capacity Block reservation being shared on a first come, first served basis.
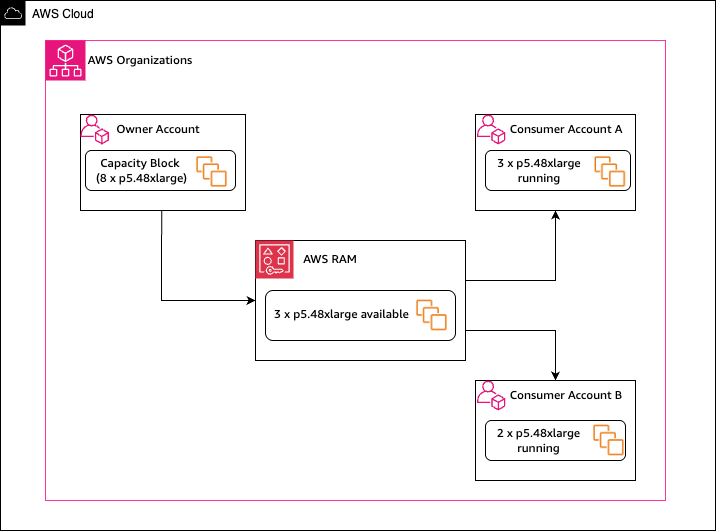
Figure 1: Capacity Block sharing using Resource Access Manager.
With the share feature, you benefit from flexible GPU capacity management when your priorities shift, or teams finish work at different times. Now, when your data science team completes experimentation early, your other teams can use that capacity for production training. If priorities shift mid-quarter, you can move capacity where it’s needed most.
In this tutorial, you’ll share a Capacity Block for ML across accounts and then create an alarm to monitor utilization when it drops below a threshold. Before you start, complete the following prerequisites.
Prerequisites
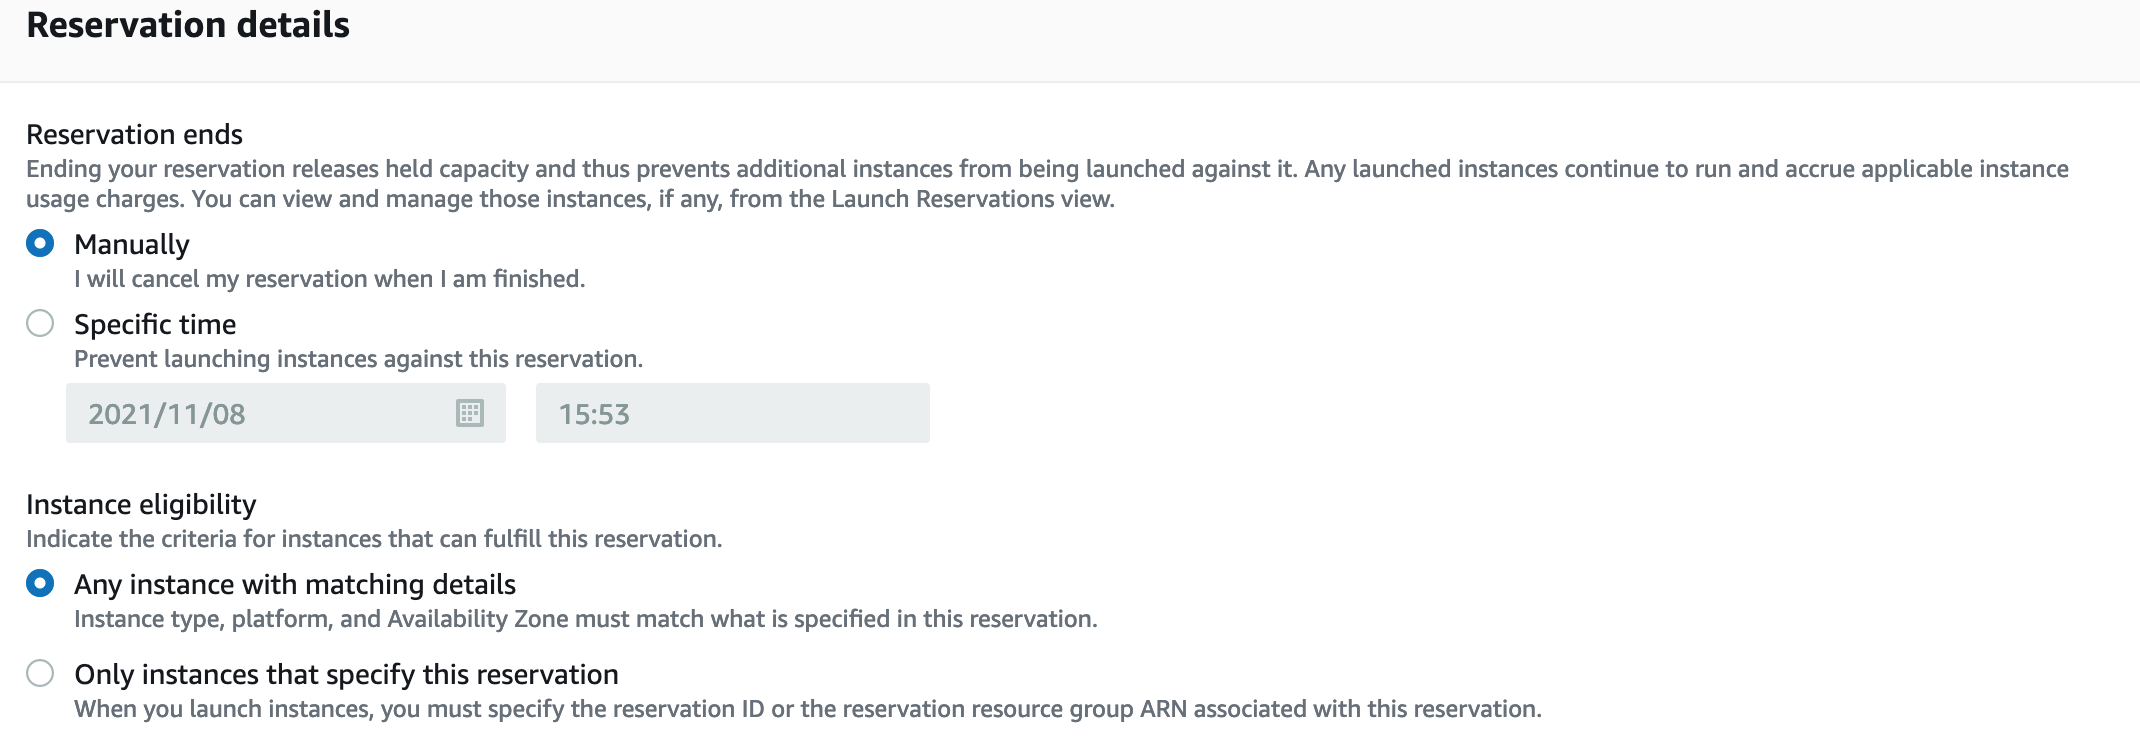
To share Capacity Blocks for ML, you must first find and purchase a Capacity Block. Only standard Capacity Blocks for ML can be shared using AWS RAM. UltraServer Capacity Blocks are not eligible for sharing.
You can share Capacity Blocks only within your AWS Organization. Verify the owner of the Capacity Blocks as well as the consumer(s) are within the same organization. For guidance, see Creating and configuring an organization.
Before sharing Capacity Blocks, you must configure resource sharing with AWS Organizations. Only the management account with the following required AWS Identity and Access Management (IAM) permissions can enable resource sharing within an Organization:
ram:EnableSharingWithAwsOrganization
iam:CreateServiceLinkedRole
organizations:EnableAWSServiceAccess
organizations:DescribeOrganization
Using the AWS Management Console of the management account:
- Navigate to the AWS RAM console.
- In the left navigation pane, choose Settings.
- Select Enable sharing with AWS Organizations.
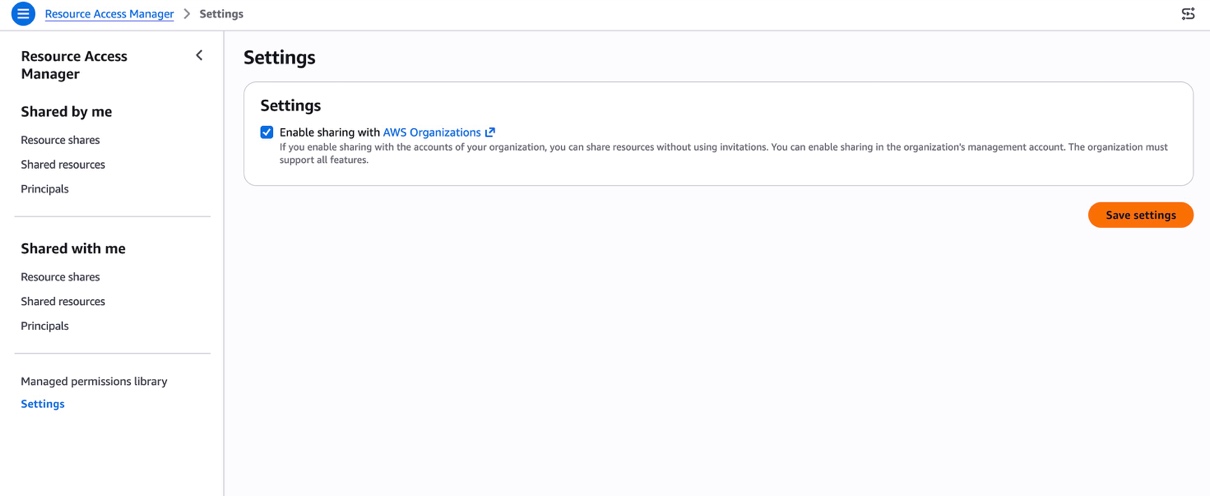
Figure 2: Enable sharing with AWS Organizations in AWS RAM.
Using the AWS Command Line Interface (CLI):
- Run this command to give AWS RAM trusted access to your organization’s account structure:
aws organizations enable-aws-service-access --service-principal ram.amazonaws.com - Turn on resource sharing within your organization so accounts and OUs can access shared resources without manual acceptance:
aws ram enable-sharing-with-aws-organization
After you turn on sharing in your organization, you need the following IAM permissions to create resource shares:
ram:CreateResourceShare
ram:AssociateResourceShare
ram:GetResourceShares
Now that you’ve completed the prerequisites, you’ll learn how to share the Capacity Blocks for ML to other accounts of your organization.
Tutorial
You’ll complete this sharing process in four steps:
- Create a resource share.
- Attach Capacity Block to the resource share.
- Verify the share in your consumer account.
- Monitor the resource share.
Verify Capacity Reservation (console)
- In your Capacity Block owner’s account, navigate to the Amazon EC2 console.
- In the left navigation pane, choose Capacity Reservations.
- Confirm your Capacity Blocks for ML is in Active or Scheduled state.
- If you have a Resource share already configured, choose Actions, Share and select your Resource share.

Figure 3: EC2 Capacity Reservation
Share Capacity Blocks for ML (console)
You now will create a Resource Share and associate the following resources.
- Navigate to the AWS RAM console in your Capacity Block owner’s account.
- In the left navigation pane, choose Resource shares.
- Choose Create resource share.
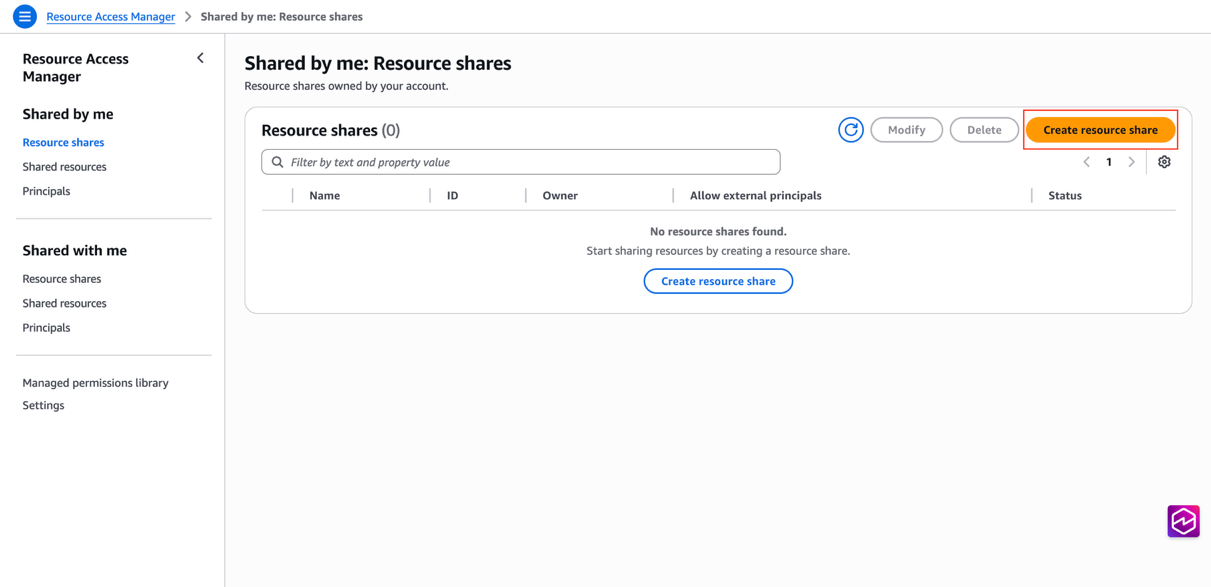
Figure 4: Create Resource share in AWS RAM
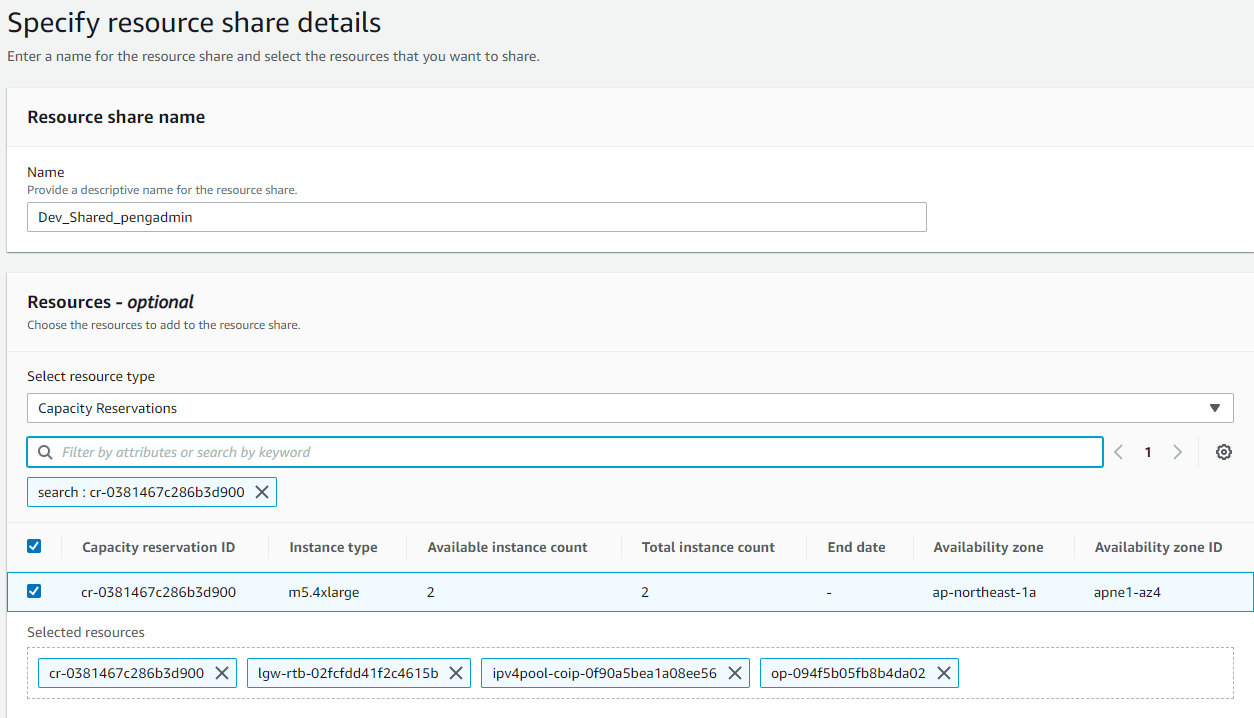
- Enter a name for your resource share.
- Under Select resource type, choose Capacity Reservations.
- Select your Capacity Block from the list.
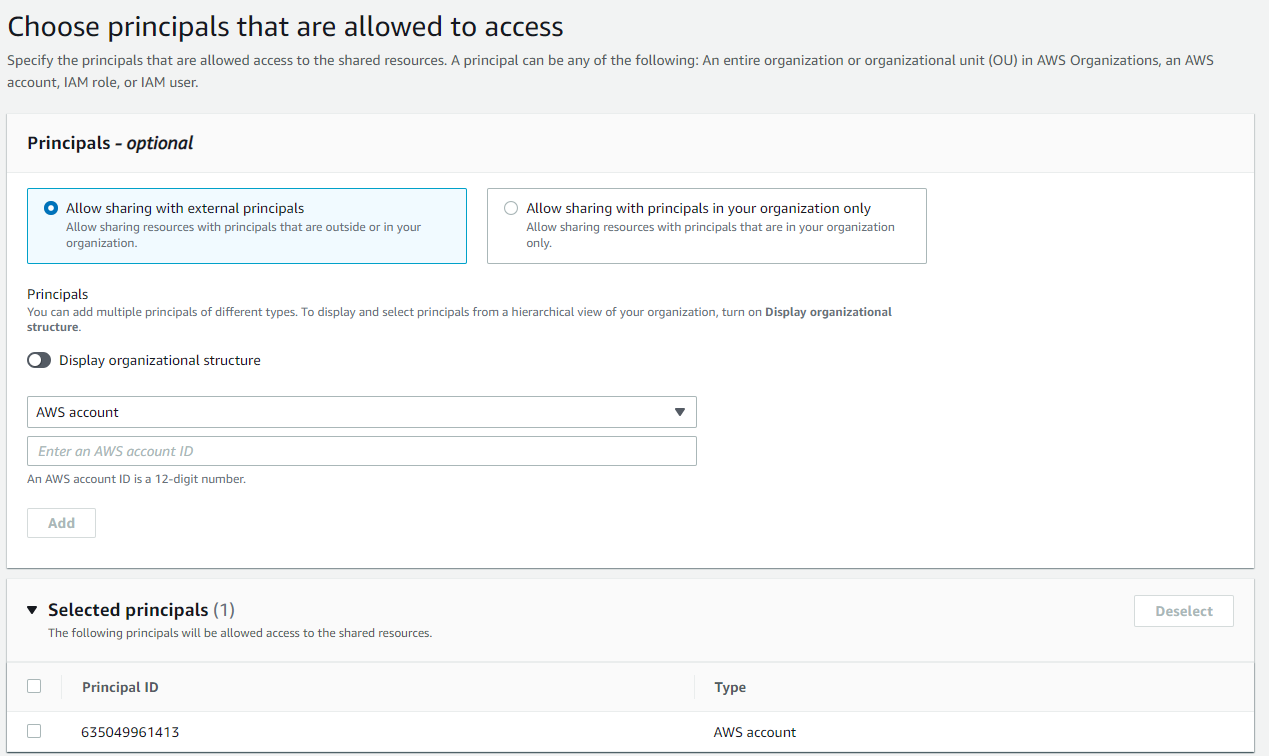
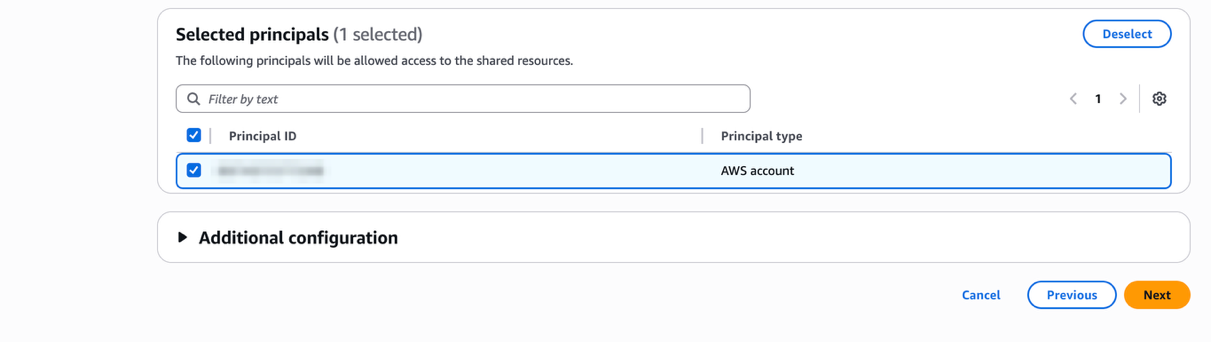
- Under Principals, specify the accounts, organizational units, or organization to share with.
 Figure 5: Select principals to share resources with
 - Choose Create resource share.
Share Capacity Blocks for ML (AWS CLI)
Replace the placeholder values in the following CLI commands below with your actual values:
- arn:aws:ec2:us-east-2:123456789012:capacity-reservation/cr-1234abcd56EXAMPLE → Your Capacity Reservation ARN
- 111122223333 → The AWS account ID of the principal you’re sharing with
- arn:aws:ram:us-east-2:123456789012:resource-share/7ab63972-b505-7e2a-420d-6f5d3EXAMPLE → Your RAM resource share ARN
- Create resource share with Capacity Block and principals:
    aws ram create-resource-share \
         --name capacity-block-share \
         --resource-arns arn:aws:ec2:us-east-2:123456789012:capacity-reservation/cr-1234abcd56EXAMPLE \
--principals 111122223333- To add a Capacity Block to existing resource share:
    aws ram associate-resource-share \
         --resource-share-arn arn:aws:ram:us-east-2:123456789012:resource-share/7ab63972-b505-7e2a-420d-6f5d3EXAMPLE \
         --resource-arns arn:aws:ec2:us-east-2:123456789012:capacity-reservation/cr-1234abcd56EXAMPLE
Access and Launch shared Capacity Blocks (console)
After you add the Capacity Block to a resource share, your consumer accounts automatically gain access when you share the Capacity Block within the same AWS Organization.
- Navigate to the AWS RAM console in your consumer account.
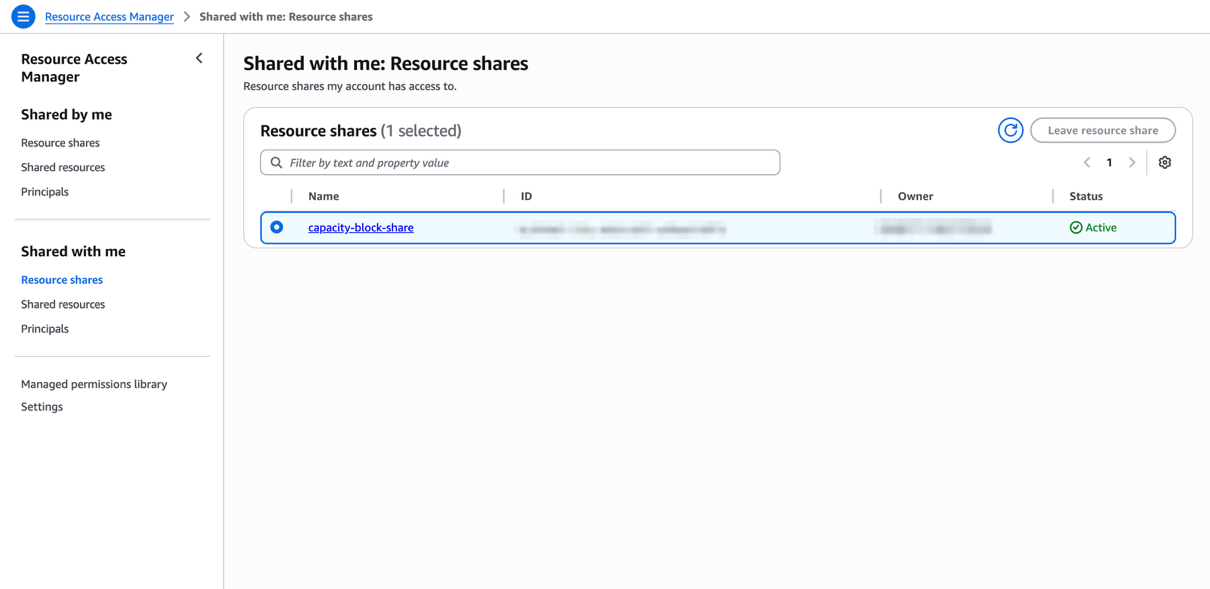
- In the left navigation pane, choose Shared with me, Resource shares. Verify the Resource share is Active.
 Figure 6: In your consumer account, verify the resource share
 - Navigate to the Amazon EC2 console. In the left navigation pane, choose Capacity Reservations.
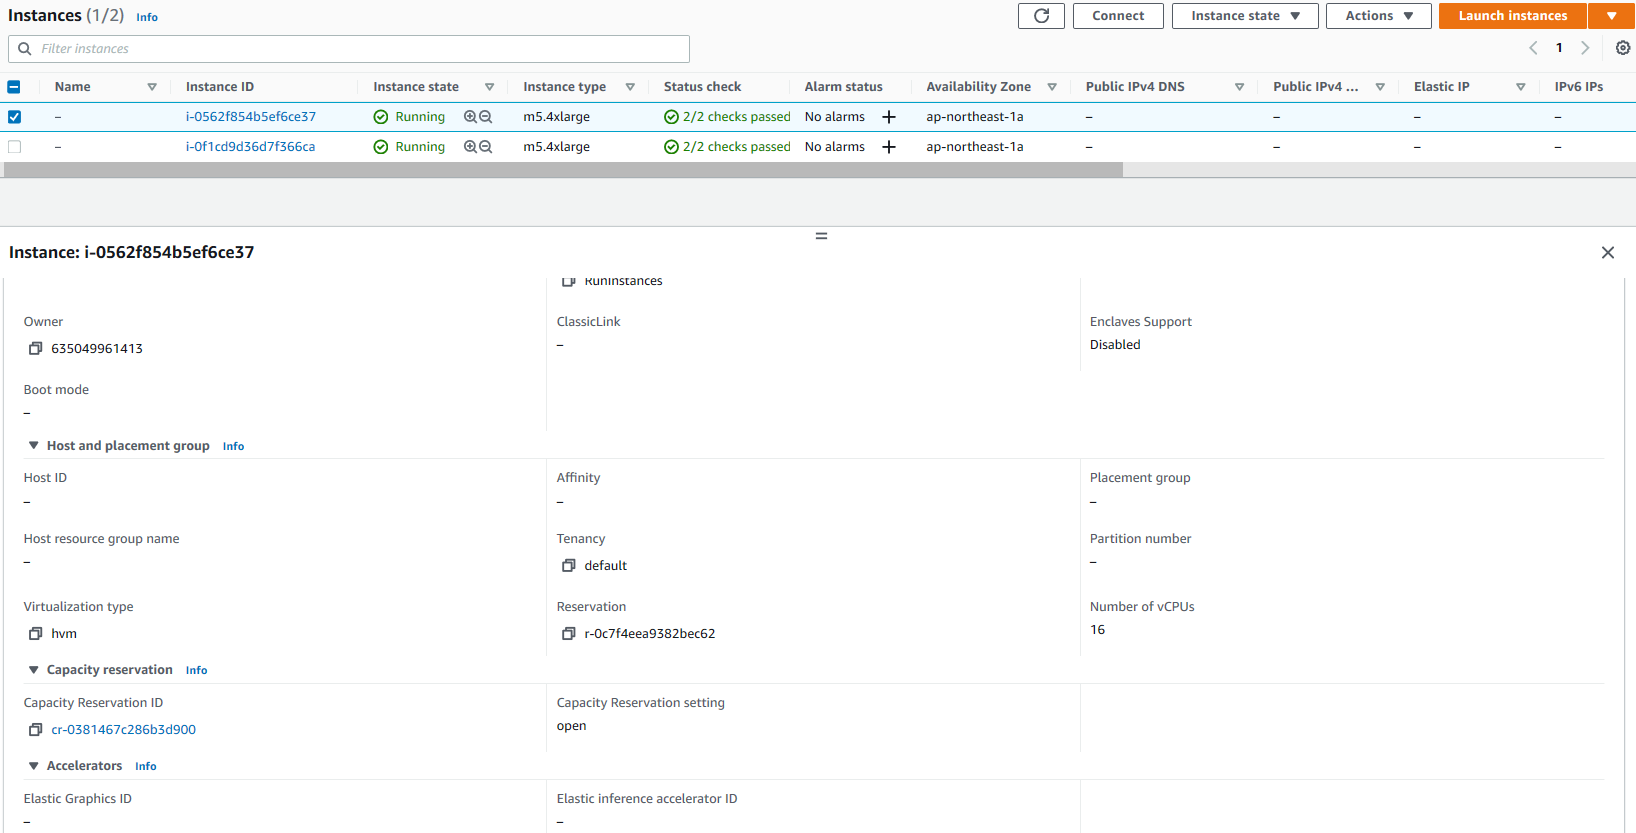
- Confirm the shared Capacity Block appears and is in Active or Scheduled state. Because sharing is asynchronous, the Capacity Block may take a few moments to appear even after the resource share shows Active.
- Navigate to the Amazon EC2 console and choose Launch instance.
- Configure your instance as required (AMI, instance type, key pair, etc.).
- Under Advanced details, for Purchasing option, choose Capacity Blocks.
- For Capacity reservation, choose Specify Capacity Reservation.
- For Capacity reservation targeted ID, select or enter your Capacity Block reservation ID.
- Launch the instance.
Access shared Capacity Blocks (AWS CLI)
Replace the placeholder values in the following CLI commands below with your actual values:
- ami-0abcdef1234567890 → Your AMI ID
- cr-0c54f6734d944345a → Your Capacity Reservation ID
- List resource shares in your consumer account:
aws ram get-resource-shares --resource-owner OTHER-ACCOUNTS- Verify that capacity reservation is available:
aws ec2 describe-capacity-reservations- Launch EC2 instance from Capacity Block:
    aws ec2 run-instances \
         --image-id ami-0abcdef1234567890 \
         --count 1 \
         --instance-type p5.48xlarge \
         --key-name my-key-pair \
         --subnet-id subnet-0abcdef1234567890 \
         --instance-market-options MarketType='capacity-block' \
         --capacity-reservation-specification CapacityReservationTarget={CapacityReservationId=cr-0c54f6734d944345a}
Monitor usage (console)
You can create Amazon CloudWatch alarms to proactively identify low utilization of your Capacity Block. This helps you to improve the usage of your capacity reservation. This section shows you how to create an Amazon Simple Notification Service (Amazon SNS) email notification when the number of running instances drops below a certain threshold.
In addition to monitoring usage, AWS CloudTrail logs capture API events related to your Capacity Block, including the CapacityReservationId. As the owner, you can see which accounts are consuming instances and when.
Step 1: Create an SNS Topic for Notifications
- Open the Amazon SNS console.
- In the left navigation pane, choose Topics.
- Choose Create topic.
- For Type, select Standard.
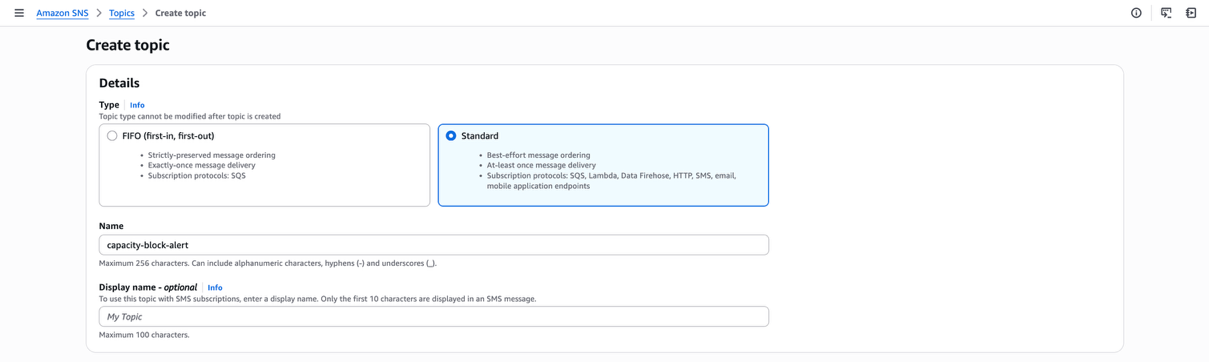
Figure 7: Create SNS Topic
- For Name, enter
capacity-block-alerts. - Choose Create topic.
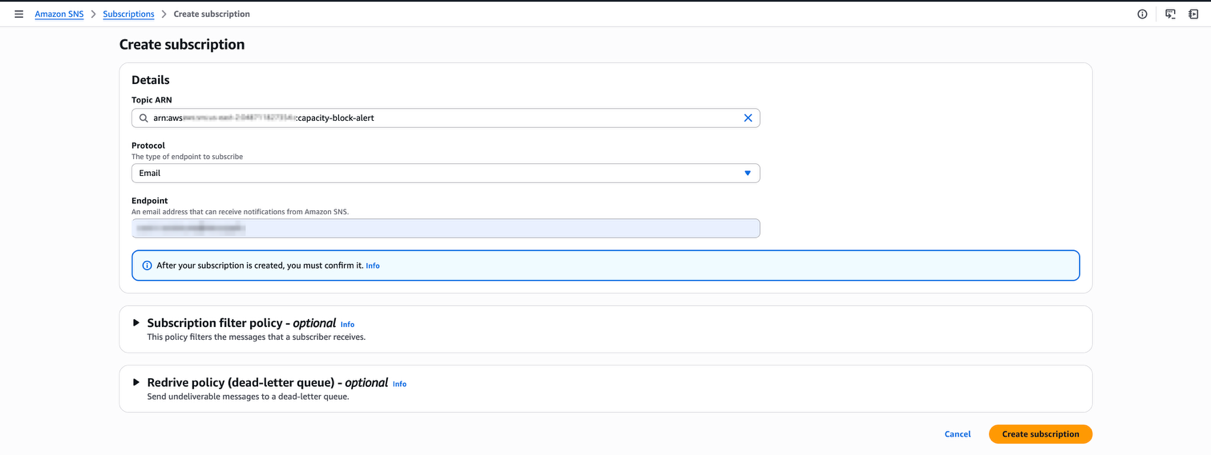
Step 2: Create an SNS Subscription:
- In the left navigation pane, choose Create subscription.
 Figure 8: Create SNS Subscription
 - For Protocol, choose Email.
- For Endpoint, enter your email address.
- Choose Create subscription.
Step 3: Create the CloudWatch Alarm
- Navigate to the Amazon CloudWatch console.
- In the left navigation pane, choose Alarms, All alarms.
- Choose Create alarm.
- Choose Select metric.
- Choose EC2 Capacity Reservations.
- Choose By Capacity Reservation.
- Find your Capacity Block ID (e.g., cr-12345678abcdef).
- Select the checkbox next to InstanceUtilization.
- Choose Select metric.
Step 4: Configure the Metric
- Under Metric:
- For Statistic: Select Average.
- For Period: Select 5 minutes.
- Under Conditions choose Threshold type: Select Static.
- Whenever InstanceUtilization is…: Select Lower than…: Enter 20 (This metric is measured in percentage).
- Choose Next.
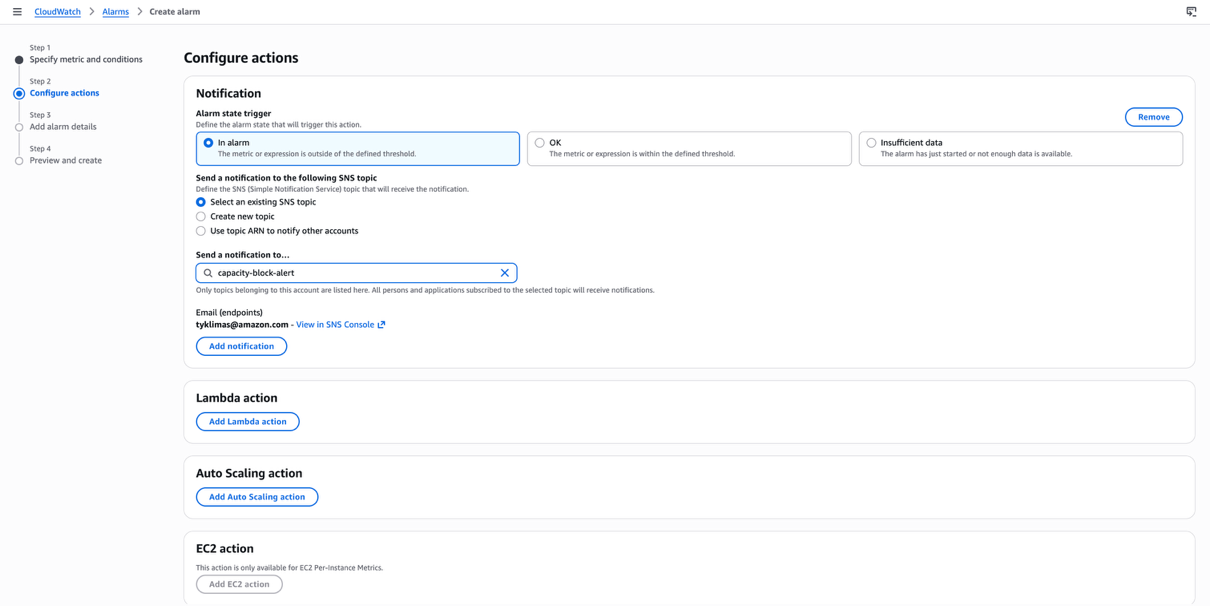
Step 5: Configure Actions
- Under Notifications:
- Alarm state trigger: Select In alarm.
- Select an SNS topic: Choose Select an existing SNS topic.
- Send a notification to…: Select capacity-block-alerts.
 Figure 9: Configure CloudWatch Alarm
 - Choose Next.
Step 6: Name and Create Alarm
- For Alarm name, enter: CapacityBlock-LowUtilization-cr-123456789abcdef.
- For Alarm description, enter: Alert when Capacity Block utilization drops below 20%.
- Choose Next.
- Review your configuration and choose Create alarm.
Monitor usage (AWS CLI)
Replace the placeholder values in the following CLI commands below with your actual values:
- 123456789012 → Your 12-digit AWS account number
- cr-0c54f6734d944345a → Your Capacity Reservation ID
- 7ab63972-b505-7e2a-420d-6f5d3EXAMPLE → Your RAM resource share ID
- [email protected] → Your email address for notifications
- Create the SNS topic:
    aws sns create-topic \
--name capacity-block-alerts- Using the TopicArn from the output, subscribe your email:
    aws sns subscribe \
        --topic-arn arn:aws:sns:us-east-2:123456789012:capacity-block-alerts \
        --protocol email \
--notification-endpoint [email protected]- Create the full CloudWatch alarm:
    aws cloudwatch put-metric-alarm \
        --alarm-name "CapacityBlock-LowUtilization-cr-1234EXAMPLE" \
        --alarm-description "Alert when Capacity Block utilization drops below 20%" \
        --namespace "AWS/EC2CapacityReservations" \
        --metric-name "InstanceUtilization" \
        --dimensions Name=CapacityReservationId,Value=cr-0c54f6734d944345a \
        --statistic Average \
        --period 300 \
        --evaluation-periods 1 \
        --threshold 20 \
        --comparison-operator LessThanThreshold \
        --alarm-actions arn:aws:sns:us-east-2:123456789012:capacity-block-alerts
Clean up (console)
As the owner of the Capacity Block, you retain the ability to modify the resource share. However, owners cannot modify instances that consumers launch into Capacity Blocks they have shared. This section outlines how to clean up your previous work.
Using the AWS Management Console:
Stop sharing the Capacity Block
- Navigate to AWS RAM console.
- In the left navigation, choose Shared by me, Resource shares.
- Select your resource share.
- Choose Modify.
- Remove the Capacity Block from the resource share or delete the entire resource share.
Delete the CloudWatch Alarm
- Navigate to the Amazon CloudWatch console.
- In the left navigation, choose Alarms, All alarms.
- Select the alarm you created.
- Choose Actions, Delete.
- Confirm deletion.
Delete the SNS Topic and Subscription
- Navigate to the Amazon SNS console.
- In the left navigation, choose Subscriptions.
- Select the subscription and choose Delete.
- In the left navigation, choose Topics.
- Select capacity-block-alerts and choose Delete.
- Confirm deletion.
Clean up (AWS CLI)
Replace the placeholder values in the following CLI commands below with your actual values:
- 123456789012 → Your 12-digit AWS account number
- 7ab63972-b505-7e2a-420d-6f5d3EXAMPLE → Your RAM resource share ID
- cr-0c54f6734d944345a → Your Capacity Reservation ID
- a1b2c3d4-5678-90ab-cdef-EXAMPLE → Your SNS subscription ID
- Remove the Capacity Block from the resource share
aws ram disassociate-resource-share \ --resource-share-arn arn:aws:ram:us-east-2:123456789012:resource-share/7ab63972-b505-7e2a-420d-6f5d3EXAMPLE \ --resource-arns arn:aws:ec2:us-east-2:123456789012:capacity-reservation/cr-0c54f6734d944345a - Delete the resource share
aws ram delete-resource-share \ --resource-share-arn arn:aws:ram:us-east-2:123456789012:resource-share/7ab63972-b505-7e2a-420d-6f5d3EXAMPLE - Delete the CloudWatch Alarm
aws cloudwatch delete-alarms \ --alarm-names "CapacityBlock-LowUtilization-cr-123456789" - Delete the SNS Topic and Subscription
- List subscriptions to get the subscription ARN
aws sns list-subscriptions-by-topic \ --topic-arn arn:aws:sns:us-east-2:123456789012:capacity-block-alerts - Delete the subscription
aws sns unsubscribe \ --subscription-arn arn:aws:sns:us-east-2:123456789012:capacity-block-alerts:a1b2c3d4-5678-90ab-cdef-EXAMPLE - Delete the Topic
    aws sns delete-topic \
         --topic-arn arn:aws:sns:us-east-2:123456789012:capacity-block-alerts
- List subscriptions to get the subscription ARN
Conclusion
In this post, we showed you how to share Capacity Blocks for ML across your AWS Organization using AWS RAM. We covered configuring the AWS RAM integration with Organizations, creating resource shares, and accessing shared Capacity Blocks for ML from consumer accounts. Finally, we showed you how to monitor and alert on low instance utilization.
By sharing Capacity Blocks across your organization, you can reduce idle GPU capacity, eliminate scheduling bottlenecks between teams, and maximize the return on your reserved compute investment. To take this further, consider building dashboards in Amazon CloudWatch to track utilization trends across multiple Capacity Blocks.
You can get started by purchasing Capacity Blocks for ML and sharing it across your organization today. For more details on other resources you can share with AWS RAM, visit the Shareable AWS resources in the user guide. If you have questions, contact your AWS account team or leave a comment below.