Earning and maintaining customer trust is an ongoing commitment at Amazon Web Services (AWS). Our customers’ security requirements drive the scope and portfolio of the compliance reports, attestations, and certifications we pursue. We’re excited to announce that AWS has achieved authorization under the Information System Security Management and Assessment Program (ISMAP) program, effective from April 1, 2022 to March 31, 2023. The authorization scope covers a total of 145 AWS services (an increase of 22 services over the previous authorization) across 22 AWS Regions, including the Asia Pacific (Tokyo) Region and the Asia Pacific (Osaka) Region. This is the second time AWS has undergone an assessment since ISMAP was first published by the ISMAP steering committee in March 2020.
ISMAP is a Japanese government program for assessing the security of public cloud services. The purpose of ISMAP is to provide a common set of security standards for cloud service providers (CSPs) to comply with as a baseline requirement for government procurement. ISMAP introduces security requirements for cloud domains, practices, and procedures that CSPs must implement. CSPs must engage with an ISMAP-approved third-party assessor to assess compliance with the ISMAP security requirements in order to apply as an ISMAP-registered CSP. The ISMAP program will evaluate the security of each CSP and register those that satisfy the Japanese government’s security requirements. Upon successful ISMAP registration of CSPs, government procurement departments and agencies can accelerate their engagement with the registered CSPs and contribute to the smooth introduction of cloud services in government information systems.
The achievement of this authorization demonstrates the proactive approach AWS has taken to help customers meet compliance requirements set by the Japanese government and to deliver secure AWS services to our customers. Service providers and customers of AWS can use the ISMAP authorization of AWS services to support their own ISMAP authorization programs. The full list of 145 ISMAP-authorized AWS services is available on the AWS Services in Scope by Compliance Program webpage, and you can also use the ISMAP Customer Package on AWS Artifact. You can confirm the AWS ISMAP authorization status and find detailed scope information on the ISMAP Portal.
As always, we are committed to bringing new services and Regions into the scope of our ISMAP program, based on your business needs. If you have any questions, don’t hesitate to contact your AWS Account Manager.
If you have feedback about this post, submit comments in the Comments section below. Want more AWS Security how-to content, news, and feature announcements? Follow us on Twitter.
Amazon Simple Notification Service (Amazon SNS) now supports message signatures based on Secure Hash Algorithm 256 (SHA256) hashing. Amazon SNS signs the messages that are delivered from your Amazon SNS topic so that subscribed HTTP endpoints can verify the authenticity of the messages. In this blog post, we will show you how to enable message signatures based on SHA256 for your Amazon SNS topics.
About message signing verification
To verify the authenticity of a message sent to your HTTP endpoint by Amazon SNS, you can verify the message signature. There are two cases where we recommend verifying the authenticity of the message. The first is when Amazon SNS sends a message to an HTTP endpoint that you subscribed to a topic. The second is when Amazon SNS sends a confirmation message to your HTTP endpoint after the Subscribe or the Unsubscribe API actions. For more information, see Verifying the signatures of Amazon SNS messages in the Amazon SNS Developer Guide.
Amazon SNS now supports two message signature versions:
Signature version 1 – Amazon SNS creates the signature based on the SHA1 hash of the message.
Signature version 2 – Amazon SNS creates the signature based on the SHA256 hash of the message.
Amazon SNS adds the SignatureVersion property to the JSON payload of messages delivered to HTTP endpoints, as shown in the following code snippet. For more information on the JSON payload format, see Parsing message formats in the Amazon SNS Developer Guide.
What to consider before you enable message signatures based on SHA256 for your Amazon SNS topic
As an Amazon SNS topic owner, before you enable SHA256 support for your topic, we recommend communicating with the owners of the HTTP endpoints that are subscribed to your topic. They might need to update their message signature verification logic to accommodate the new signature version. If the endpoint owners are using the AWS SDK feature for verifying the Amazon SNS message signatures, they need to make sure that they are using one of the following versions of the AWS SDK: Java 1.12.285, JavaScript 0.3.5, Ruby 1.54.0, PHP 1.8.0 or .NET 3.7.3.96.
How to enable message signatures based on SHA256 for your Amazon SNS topic
Amazon SNS topic owners can now enable message signatures based on SHA256 hashing. In this post, you learned how to choose the hashing algorithm, either SHA256 or SHA1, for your SNS topic. For more information, see Verifying the signatures of Amazon SNS messages in the Amazon SNS Developer Guide, and SetTopicAttributes in the Amazon SNS API Reference.
For more serverless learning resources, visit Serverless Land.
If you have feedback about this post, submit comments in the Comments section below. If you have questions about this post, contact AWS Support.
Want more AWS Security how-to content, news, and feature announcements? Follow us on Twitter.
AWS Certificate Manager (ACM) is a service that lets you efficiently provision, manage, and deploy public and private SSL/TLS certificates for use with AWS services and your internal connected resources. The certificates issued by ACM can then be used to secure network communications and establish the identity of websites on the internet or resources on private networks.
So why might you want to import a certificate into ACM, rather than using a certificate issued by ACM? According to the AWS Certificate Manager User Guide topic Importing certificates into AWS Certificate Manager, “you might do this because you already have a certificate from a third-party certificate authority (CA), or because you have application-specific requirements that are not met by ACM issued certificates.”
In this blog post, I’ll list 10 reasons why you might want to import a certificate into ACM, including what specific requirements you might have, and why you might want to use a certificate signed by a third-party CA in the first place.
1. To use an ECDSA certificate for faster TLS connections
Imported Elliptic Curve Digital Signature Algorithm (ECDSA) certificates use smaller keys than ACM issued public RSA certificates, allowing for TLS connections to be established faster. For this reason, ECDSA certificates are particularly useful for systems with limited processing resources, such as Internet of Things (IoT) devices. ACM supports imported certificates with ECDSA in 256, 384, and 521 bit variations. If you want to use an ECDSA certificate for your public-facing web application, you need to get a third-party certificate and then import it into ACM. For more information about supported cryptographic algorithms for imported certificates, see Prerequisites for importing certificates in the AWS Certificate Manager User Guide.
2. To control your certificate’s renewal cycle
When you import a certificate into ACM, you have greater control over its renewal cycle simply because you can re-import it as frequently as you want. You also have control over how often your imported certificate’s private key can be rotated. As a best practice, you should rotate your certificate’s private key based on your certificate’s usage frequency.
Note: When you re-import your certificate, to maintain the existing associations during renewal, ensure that you specify the existing certificate’s Amazon Resource Name (ARN). For more information and step-by-step instructions, see Reimporting a certificate in the AWS Certificate Manager User Guide.
3. To use certificate pinning
You might have an application that requires certificate pinning, which is the practice of bypassing the typical hierarchical model of trust that is governed by certificate authorities. With certificate pinning, a host’s identity is trusted based on a specific certificate or public key. As a certificate pinning best practice, AWS recommends that public certificates issued by ACM should not be pinned because ACM will generate a new public/private key pair at the next renewal phase, which essentially replaces the pinned certificate with a new one, causing service disruption along the process. If you want to use certificate pinning, you can pin an imported certificate because imported certificates are not subject to managed renewal, thereby reducing the risk of production impact.
4. To use a higher-assurance certificate
You might want to use a higher-assurance certificate, such as an organization validation (OV) or extended validation (EV) certificate. Certificates issued by ACM currently only support domain validation (DV). If the domain you want to protect is an application that requires OV or EV, you can import OV or EV certificates into ACM by using a third-party certificate of either type. You can use the ACM API action ImportCertificate to import OV or EV certificates into ACM.
5. To use a self-signed certificate
For internal testing environments where your developers want speed and flexibility, self-signed certificates are issued faster and effortlessly. However, it’s important to know that self-signed certificates are not trusted by default, which means that self-signed certificates need to be installed inside the trust stores of the intended clients, to avoid the risk of your users getting into the habit of ignoring browser warnings. For more information, see the additional requirements for self-signed certificates in Prerequisites for importing certificates in the AWS Certificate Manager User Guide.
6. To use an IP address for the certificate’s subject
By design, the subject field of an ACM certificate can only identify a fully qualified domain name (FQDN). If you want to use an IP address for the certificate’s subject, then you can create the certificate and import it to ACM.
7. To exceed the number of domains allowed by the ACM quotas
Certificates issued by ACM are subject to the ACM service quotas. The default quota for ACM is 10 domain names for each ACM certificate, and you can request an increase to the quota up to a maximum of 100 domain names for each certificate. However, if you import certificates, they are not subject to the quotas, and you can use a public certificate with more than 100 FQDNs in its domain scope without having to go through the process of requesting any limit increases.
8. To use a private certificate issued by ACM Private CA with the IssueCertificate API action
Certificates provisioned with the IssueCertificate API action have a private status and cannot be associated directly with an AWS integrated service, such as an internal Application Load Balancer. Instead, a private certificate issued by AWS Certificate Manager Private Certificate Authority (ACM Private CA) with the IssueCertificate API action needs to be exported and then imported into ACM before the association can be made. The same is true for certificate templates as well, which are configuration templates that can be passed as parameters to the IssueCertificate API action as a means to have greater control over the private certificate’s extensions.
9. To use a private certificate issued by your on-premises CA
You might want to use a private certificate issued by your on-premises CA instead of using ACM Private CA. To administer your internal public key infrastructure (PKI), AWS generally recommends that you use ACM Private CA. However, you might still come across scenarios where a certificate signed by your on-premises CA is better suited for your specific needs. For example, you might want to have a common root of trust, for consistency and interoperability purposes across a hybrid PKI solution. Furthermore, using an external parent CA with ACM Private CA also allows you to enforce CA name constraints. For more information, see Signing private CA certificates with an external CA in the AWS Certificate Manager Private Certificate Authority User Guide.
10. To use a certificate for something other than securing a public website
In this blog post, you learned about some of the reasons you might want to import a certificate into AWS Certificate Manager (ACM). For more information about importing certificates into ACM and step-by-step instructions, see Importing certificates into AWS Certificate Manager in the AWS Certificate Manager User Guide. For the latest pricing information, see the AWS Certificate Manager Pricing page on the AWS website. You can also use the AWS pricing calculator to estimate costs.
If you have feedback about this post, submit comments in the Comments section below. If you have questions about this post, start a new thread on the AWS Certificate Manager forum or contact AWS Support.
Want more AWS Security news? Follow us on Twitter.
The AWS HITRUST Compliance Team is excited to announce that 154 Amazon Web Services (AWS) services are certified for the Health Information Trust Alliance (HITRUST) Common Security Framework (CSF) v9.6 for the 2022 cycle.
These 154 AWS services were audited by a third-party assessor and certified under the HITRUST CSF. The full list is now available on the AWS Services in Scope by Compliance Program page. As an AWS customer, you can view and download our HITRUST CSF certification at any time through AWS Artifact.
AWS HITRUST CSF certification is available for customer inheritance
As an AWS customer, you can deploy business solutions into the AWS Cloud environment and inherit the AWS HITRUST CSF certification, provided that your organization uses only in-scope services, and you properly apply the controls that your organization is responsible for as detailed in the HITRUST Shared Responsibility and Inheritance Program.
With 154 AWS services receiving HITRUST certification, as an AWS customer you can tailor your security control baselines to a variety of factors—including, but not limited to, your regulatory requirements and your organization type. The HITRUST CSF is widely adopted by leading organizations in a variety of industries as part of their approach to security and privacy. For more information, see the HITRUST website.
As always, we value your feedback and questions and are committed to helping you achieve and maintain the highest standard of security and compliance. Feel free to contact the team through AWS Compliance Contact Us. If you have feedback about this post, please submit comments in the Comments section below.
Want more AWS Security how-to content, news, and feature announcements? Follow us on Twitter.
AWS Certificate Manager (ACM) is a managed service that lets you provision, manage, and deploy public and private Secure Sockets Layer/Transport Layer Security (SSL/TLS) certificates for use with Amazon Web Services (AWS) and your internal connected resources. Starting October 11, 2022, at 9:00 AM Pacific Time, public certificates obtained through ACM will be issued from one of the multiple intermediate certificate authorities (CAs) that Amazon manages. In this blog post, we share important details about this change and how you can prepare.
What is changing and why?
Public certificates that you request through ACM are obtained from Amazon Trust Services, which is a public certificate authority (CA) that Amazon manages. Like other public CAs, Amazon Trust Services CAs have a structured trust hierarchy. The public certificate issued to you, also known as the leaf certificate, can chain to one or more intermediate CAs and then to the Amazon Trust Services root CA. The Amazon Trust Services root CA is trusted by default by most and operating systems. This is why Amazon can issue public certificates that are trusted by these systems.
Starting October 11, 2022 at 9:00 AM Pacific Time, public certificates obtained through ACM will be issued from one of the multiple intermediate CAs that Amazon manages. These intermediate CAs chain to an existing Amazon Trust Services root CA. With this change, leaf certificates issued to you will be signed by different intermediate CAs. Before this change, Amazon maintained a limited number of intermediate CAs and issued and renewed certificates from the same intermediate CAs.
Amazon is making this change to create a more resilient and agile certificate infrastructure that will help us respond more quickly to future requirements. This change also presents an opportunity to correct a known issue related to delayed revocation of a subordinate CA and help minimize the scope of impact for new risks that might emerge in the future.
What can I do to prepare?
Most customers won’t experience an impact from this change. Browsers and most applications will continue to work just as they do now, because these services trust the Amazon Trust Services root CA and not a specific intermediate CA. If you’re using one of the standard operating systems and web browsers that are listed in the next section of this post, you don’t need to take any action.
If you use intermediate CA information through certificate pinning, you will need to make changes and pin to an Amazon Trust Services root CA instead of an intermediate CA or leaf certificate. Certificate pinning is a process in which your application that initiates the TLS connection only trusts a specific public certificate through one or more certificate variables that you define. If the pinned certificate is replaced, your application won’t initiate the connection. AWS recommends that you don’t use certificate pinning because it introduces an availability risk. However, if your use case requires certificate pinning, AWS recommends that you pin to an Amazon Trust Services root CA instead of an intermediate CA or leaf certificate. When you pin to an Amazon Trust Services root CA, you should pin to all of the root CAs shown in the following table.
To test that your trust store contains the Amazon Trust Services root CA, see the preceding table, which lists the Amazon Trust Services root CA certificates, and choose each test URL in the table. If the test URL works, you should see a message that says Expected Status: Good, along with the certificate chain. If the test URL doesn’t work, you will receive an error message that indicates the connection has failed.
What should I do if the Amazon Trust Services CAs are not in my trust store?
If your application is using a custom trust store, you must add the Amazon Trust Services root CAs to your application’s trust store. The instructions for doing this vary based on the application or service. Refer to the documentation for the application or service that you’re using.
If your tests of any of the test URLs failed, you must update your trust store. The simplest way to update your trust store is to upgrade the operating system or browser that you’re using.
The following operating systems use the Amazon Trust Services CAs:
Amazon Linux (all versions)
Microsoft Windows versions, with updates installed, from January 2005, Windows Vista, Windows 7, Windows Server 2008, and newer versions
Mac OS X 10.4 with Java for Mac OS X 10.4 Release 5, Mac OS X 10.5, and newer versions
Red Hat Enterprise Linux 5 (March 2007 release), Linux 6, and Linux 7 and CentOS 5, CentOS 6, and CentOS 7
Ubuntu 8.10
Debian 5.0
Java 1.4.2_12, Java 5 update 2, and all newer versions, including Java 6, Java 7, and Java 8
Modern browsers trust Amazon Trust Services CAs. To update the certificate bundle in your browser, update your browser. For instructions on how to update your browser, see the update page for your browser:
The Windows operating system manages certificate bundles for Internet Explorer and Microsoft Edge, so to update your browser, you must update Windows.
Where can I get help?
If you have questions, contact AWS Support or your technical account manager (TAM), or start a new thread on the AWS re:Post ACM Forum. If you have feedback about this post, submit comments in the Comments section below.
Want more AWS Security news? Follow us on Twitter.
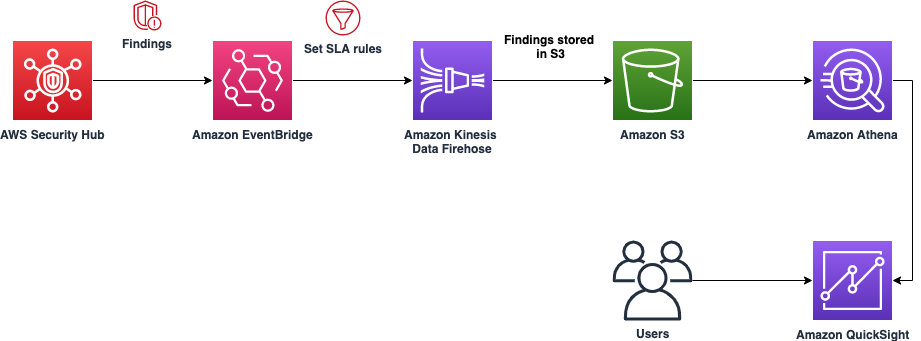
This blog post shows how to set up an Amazon Elastic Kubernetes Service (Amazon EKS) cluster such that the applications hosted on the cluster can have their outbound internet access restricted to a set of hostnames provided by the Server Name Indication (SNI) in the allow list in the AWS Network Firewall rules. For encrypted web traffic, SNI can be used for blocking access to specific sites in the network firewall. SNI is an extension to TLS that remains unencrypted in the traffic flow and indicates the destination hostname a client is attempting to access over HTTPS.
This post also shows you how to use Network Firewall to collect hostnames of the specific sites that are being accessed by your application. Securing outbound traffic to specific hostnames is called egress filtering. In computer networking, egress filtering is the practice of monitoring and potentially restricting the flow of information outbound from one network to another. Securing outbound traffic is usually done by means of a firewall that blocks packets that fail to meet certain security requirements. One such firewall is AWS Network Firewall, a managed service that you can use to deploy essential network protections for all of your VPCs that you create with Amazon Virtual Private Cloud (Amazon VPC).
Example scenario
You have the option to scan your application traffic by the identifier of the requested SSL certificate, which makes you independent from the relationship of the IP address to the certificate. The certificate could be served from any IP address. Traditional stateful packet filters are not able to follow the changing IP address of the endpoints. Therefore, the host name information that you get from the SNI becomes important in making security decisions. Amazon EKS has gained popularity for running containerized workloads in the AWS Cloud, and you can restrict outbound traffic to only the known hostnames provided by SNI. This post will walk you through the process of setting up the EKS cluster in two different subnets so that your software can use the additional traffic routing in the VPC and traffic filtering through Network Firewall.
Solution architecture
The architecture illustrated in Figure 1 shows a VPC with three subnets in Availability Zone A, and three subnets in Availability Zone B. There are two public subnets where Network Firewall endpoints are deployed, two private subnets where the worker nodes for the EKS cluster are deployed, and two protected subnets where NAT gateways are deployed.
Figure 1: Outbound internet access through Network Firewall from Amazon EKS worker nodes
The workflow in the architecture for outbound access to a third-party service is as follows:
The outbound request originates from the application running in the private subnet (for example, to https://aws.amazon.com) and is passed to the NAT gateway in the protected subnet.
The HTTPS traffic received in the protected subnet is routed to the AWS Network Firewall endpoint in the public subnet.
The network firewall computes the rules, and either accepts or declines the request to pass to the internet gateway.
If the request is passed, the application-requested URL (provided by SNI in the non-encrypted HTTPS header) is allowed in the network firewall, and successfully reaches the third-party server for access.
The VPC settings for this blog post follow the recommendation for using public and private subnets described in Creating a VPC for your Amazon EKS cluster in the Amazon EKS User Guide, but with additional subnets called protected subnets. Instead of placing the NAT gateway in a public subnet, it will be placed in the protected subnet, and the Network Firewall endpoints in the public subnet will filter the egress traffic that flows through the NAT gateway. This design pattern adds further checks and could be a recommendation for your VPC setup.
As suggested in Creating a VPC for your Amazon EKS cluster, using the Public and private subnets option allows you to deploy your worker nodes to private subnets, and allows Kubernetes to deploy load balancers to the public subnets. This arrangement can load-balance traffic to pods that are running on nodes in the private subnets. As shown in Figure 1, the solution uses an additional subnet named the protected subnet, apart from the public and private subnets. The protected subnet is a VPC subnet deployed between the public subnet and private subnet. The outbound internet traffic that is routed through the protected subnet is rerouted to the Network Firewall endpoint hosted within the public subnet. You can use the same strategy mentioned in Creating a VPC for your Amazon EKS cluster to place different AWS resources within private subnets and public subnets. The main difference in this solution is that you place the NAT gateway in a separate protected subnet, between private subnets, and place Network Firewall endpoints in the public subnets to filter traffic in the network firewall. The NAT gateway’s IP address is still preserved, and could still be used for adding to the allow list of third-party entities that need connectivity for the applications running on the EKS worker nodes.
To see a practical example of how the outbound traffic is filtered based on the hosted names provided by SNI, follow the steps in the following Deploy a sample section. You will deploy an AWS CloudFormation template that deploys the solution architecture, consisting of the VPC components, EKS cluster components, and the Network Firewall components. When that’s complete, you can deploy a sample app running on Amazon EKS to test egress traffic filtering through AWS Network Firewall.
Deploy a sample to test the network firewall
Follow the steps in this section to perform a sample app deployment to test the use case of securing outbound traffic through AWS Network Firewall.
Prerequisites
The prerequisite actions required for the sample deployment are as follows:
Make sure you have the AWS CLI installed, and configure access to your AWS account.
Copy the necessary CloudFormation templates and the sample eksctl config files from the blog’s Amazon S3 bucket to your local file system. You can do this by using the following AWS CLI S3 cp command. aws s3 cp s3://awsiammedia/public/sample/803-network-firewall-to-filter-outbound-traffic/config.yaml . aws s3 cp s3://awsiammedia/public/sample/803-network-firewall-to-filter-outbound-traffic/lambda_function.py . aws s3 cp s3://awsiammedia/public/sample/803-network-firewall-to-filter-outbound-traffic/network-firewall-eks-collect-all.yaml . aws s3 cp s3://awsiammedia/public/sample/803-network-firewall-to-filter-outbound-traffic/network-firewall-eks.yaml .
Important: This command will download the S3 bucket contents to the current directory on your terminal, so the “.” (dot) in the command is very important.
Once this is complete, you should be able to see the list of files shown in Figure 2. (The list includes config.yaml, lambda_function.py, network-firewall-eks-collect-all.yaml, and network-firewall-eks.yaml.)
Figure 2: Files downloaded from the S3 bucket
Deploy the VPC architecture with AWS Network Firewall
In this procedure, you’ll deploy the VPC architecture by using a CloudFormation template.
To deploy the VPC architecture (AWS CLI)
Deploy the CloudFormation templatenetwork-firewall-eks.yaml, which you previously downloaded to your local file system from the Amazon S3 bucket.
You can do this through the AWS CLI by using the create-stack command, as follows.
Note: The initially allowed hostnames for egress filtering are passed to the network firewall by using the parameter key NetworkFirewallAllowedWebsites in the CloudFormation stack. In this example, the allowed hostnames are .amazonaws.com, .docker.io, and docker.com.
Make a note of the subnet IDs from the stack outputs of the CloudFormation stack after the status goes to Create_Complete.
Note: For simplicity, the CloudFormation stack name is AWS-Network-Firewall-Multi-AZ, but you can change this name to according to your needs and follow the same naming throughout this post.
To deploy the VPC architecture (console)
In your account, launch the AWS CloudFormation template by choosing the following Launch Stack button. It will take approximately 10 minutes for the CloudFormation stack to complete.
Note: The stack will launch in the N. Virginia (us-east-1) Region. To deploy this solution into other AWS Regions, download the solution’s CloudFormation template, modify it, and deploy it to the selected Region.
Deploy and set up access to the EKS cluster
In this step, you’ll use the eksctl CLI tool to create an EKS cluster.
There are two methods for creating an EKS cluster. Method A uses the eksctl create cluster command without a configuration (config) file. Method B uses a config file.
Note: Before you start, make sure you have the VPC subnet details available from the previous procedure.
Method A: No config file
You can create an EKS cluster without a config file by using the eksctl create cluster command.
From the CLI, enter the following commands. eksctl create cluster \ --vpc-private-subnets=<private-subnet-A>,<private-subnet-B> \ --vpc-public-subnets=<public-subnet-A>,<public-subnet-B>
Make sure that the subnets passed to the --vpc-public-subnets parameter are protected subnets taken from the VPC architecture CloudFormation stack output. You can verify the subnet IDs by looking at step 2 in the To deploy the VPC architecture section.
Method B: With config file
Another way to create an EKS cluster is by using the following config file, with more options with the name (cluster.yaml in this example).
Create a file named cluster.yaml by adding the following contents to it.
Run the following command to create an EKS cluster using the eksctl tool and the cluster.yaml config file. eksctl create cluster -f cluster.yaml
To set up access to the EKS cluster
Before you deploy a sample Kubernetes Pod, make sure you have the kubeconfig file set up for the EKS cluster that you created in step 2 of To deploy an EKS cluster by using the eksctl tool. For more information, see Create a kubeconfig for Amazon EKS. You can use eksctl to do this, as follows.
Now you can test access to a non-allowed website in the AWS Network Firewall stateful rules, using these steps.
First, install the cURL tool on the sample Pod you created previously. cURL is a command-line tool for getting or sending data, including files, using URL syntax. Because cURL uses the libcurl library, it supports every protocol libcurl supports. On the Pod where you have obtained a shell to a running container, run the following command to install cURL. apk install curl
Access a website using cURL. curl -I https://aws.amazon.com
This gives a timeout error similar to the following.
curl -I https://aws.amazon.com
 curl: (28) Operation timed out after 300476 milliseconds with 0 out of 0 bytes received
Navigate to the AWS CloudWatch console and check the alert logs for Network Firewall. You will see a log entry like the following sample, indicating that the access to https://aws.amazon.com was blocked.
The error shown here occurred because the hostname www.amazon.com was not added to the Network Firewall stateful rules allow list.
When you deployed the network firewall in step 1 of the To deploy the VPC architecture procedure, the values provided for the CloudFormation parameter NetworkFirewallAllowedWebsites were just .amazonaws.com, .docker.io, .docker.com and not aws.amazon.com.
Update the Network Firewall stateful rules
In this procedure, you’ll update the Network Firewall stateful rules to allow the aws.amazon.com domain name.
To update the Network Firewall stateful rules (console)
In the AWS CloudFormation console, locate the stack you used to create the network firewall earlier in the To deploy the VPC architecture procedure.
Select the stack you want to update, and choose Update. In the Parameters section, update the stack by adding the hostname aws.amazon.com to the parameter NetworkFirewallAllowedWebsites as a comma-separated value. See Updating stacks directly in the AWS CloudFormation User Guide for more information on stack updates.
To test the outbound access to the aws.amazon.com hostname
Get a shell to a running container in the sample Pod that you deployed earlier, by using the following command. kubectl attach amazon-linux -c alpine -i -t
On the terminal where you got a shell to a running container in the sample Pod, run the following cURL command. curl -I https://aws.amazon.com
The response should be a success HTTP 200 OK message similar to this one. curl -Ik https://aws.amazon.com HTTP/2 200 content-type: text/html;charset=UTF-8 server: Server
If the VPC subnets are organized according to the architecture suggested in this solution, outbound traffic from the EKS cluster can be sent to the network firewall and then filtered based on hostnames provided by SNI.
Collecting hostnames provided by the SNI
In this step, you’ll see how to configure the network firewall to collect all the hostnames provided by SNI that are accessed by an already running application—without blocking any access—by making use of CloudWatch and alert logs.
Select the stack to update, and then choose Update.
Choose Replace current template and upload the template network-firewall-eks-collect-all.yaml. (This template should be available from the files that you downloaded earlier from the S3 bucket in the Prerequisites section.) Choose Next. See Updating stacks directly for more information.
To configure the network firewall (AWS CLI)
Update the CloudFormation stack by using the network-firewall-eks-collect-all.yaml template file that you previously downloaded from the S3 bucket in the Prerequisites section, using the update-stack command as follows. aws cloudformation update-stack --stack-name AWS-Network-Firewall-Multi-AZ \ --template-body file://network-firewall-eks-collect-all.yaml \ --capabilities CAPABILITY_NAMED_IAM
To check the rules in the AWS Management Console
In the AWS Management Console, navigate to the Amazon VPC console and locate the AWS Network Firewall tab.
Select the network firewall that you created earlier, and then select the stateful rule with the name log-all-tls.
The rule group should appear as shown in Figure 4, indicating that the logs are captured and sent to the Alert logs.
Figure 4: Network Firewall rule groups
To test based on stateful rule
On the terminal, get the shell for the running container in the Pod you created earlier. If this Pod is not available, follow the instructions in the To deploy a sample Pod on the EKS clusterprocedure to create a new sample Pod.
Run the cURL command to aws.amazon.com. It should return HTTP 200 OK, as follows. curl -Ik https://aws.amazon.com/ HTTP/2 200 content-type: text/html;charset=UTF-8 server: Server date: ------ ---------- --------------
Navigate to the AWS CloudWatch Logs console and look up the Alert logs log group with the name /AWS-Network-Firewall-Multi-AZ/anfw/alert.
You can see the hostnames provided by SNI within the TLS protocol passing through the network firewall. The CloudWatch Alert logs for allowed hostnames in the SNI looks like the following example.
Figure 5: Architecture to collect and capture hostnames by using Network Firewall
Sample Lambda code
The sample Lambda code from Figure 5 is shown following, and is written in Python 3. The sample collects the hostnames that are provided by SNI and captured in Network Firewall. Network Firewall logs the hostnames provided by SNI in the CloudWatch Alert logs. Then, by creating a CloudWatch logs subscription filter, you can send logs to the Lambda function for further processing, for example to invoke SNS notifications.
import json
import gzip
import base64
import boto3
import sys
import traceback
sns_client = boto3.client('sns')
def lambda_handler(event, context):
    try:
        decoded_event = json.loads(gzip.decompress(base64.b64decode(event['awslogs']['data'])))
        body = '''
        {filtermatch}
        '''.format(
            loggroup=decoded_event['logGroup'],
            logstream=decoded_event['logStream'],
            filtermatch=decoded_event['logEvents'][0]['message'],
        )
        # print(body)# uncomment this for debugging
        filterMatch = json.loads(body)
        data = []
        if 'http' in filterMatch['event']:
            data.append(filterMatch['event']['http']['hostname'])
        elif 'tls' in filterMatch['event']:
            data.append(filterMatch['event']['tls']['sni'])
        result = 'Trying to reach ' + 1*' ' + (data[0]) + 1*' ' 'via Network Firewall' + 1*' '  + (filterMatch['firewall_name'])
        # print(result)# uncomment this for debugging
        message = {'HostName': result}
        send_to_sns = sns_client.publish(
            TargetArn='<SNS-topic-ARN>', #Replace with the SNS topic ARN
            Message=json.dumps({'default': json.dumps(message),
                            'sms': json.dumps(message),
                            'email': json.dumps(message)}),
            Subject='Trying to reach the hostname through the Network Firewall',
            MessageStructure='json')
    except Exception as e:
        print('Function failed due to exception.')
        e = sys.exc_info()[0]
        print(e)
        traceback.print_exc()
        Status="Failure"
        Message=("Error occured while executing this. The error is %s" %e)
Clean up
In this step, you’ll clean up the infrastructure that was created as part of this solution.
To delete the Kubernetes workloads
On the terminal, using the kubectl CLI tool, run the following command to delete the sample Pod that you created earlier. kubectl delete pods amazon-linux
Note: Clean up all the Kubernetes workloads running on the EKS cluster. For example, if the Kubernetes service of type LoadBalancer is deployed, and if the EKS cluster where it exists is deleted, the LoadBalancer will not be deleted. The best practice is to clean up all the deployed workloads.
On the terminal, using the eksctl CLI tool, delete the created EKS cluster by using the following command. eksctl delete cluster --name filter-egress-traffic-test
To delete the CloudFormation stack and AWS Network Firewall
Navigate to the AWS CloudFormation console and choose the stack with the name AWS-Network-Firewall-Multi-AZ.
By following the VPC architecture explained in this blog post, you can protect the applications running on an Amazon EKS cluster by filtering the outbound traffic based on the approved hostnames that are provided by SNI in the Network Firewall Allow list.
Additionally, with a simple Lambda function, CloudWatch Logs, and an SNS topic, you can get readable hostnames provided by the SNI. Using these hostnames, you can learn about the traffic pattern for the applications that are running within the EKS cluster, and later create a strict list to allow only the required outbound traffic. To learn more about Network Firewall stateful rules, see Working with stateful rule groups in AWS Network Firewall in the AWS Network Firewall Developer Guide.
If you have feedback about this post, submit comments in the Comments section below. If you have questions about this post, contact AWS Support.
Want more AWS Security news? Follow us on Twitter.
A protection group is a resource that you create by grouping your Shield Advanced protected resources, so that the service considers them to be a single protected entity. A protection group can contain many different resources that compose your application, and the resources may be part of multiple protection groups spanning different AWS Regions within an AWS account. Common patterns that you might use when designing protection groups include aligning resources to applications, application teams, or environments (such as production and staging), and by product tiers (such as free or paid). For more information about setting up protection groups, see Managing AWS Shield Advanced protection groups.
Why should you consider using a protection group?
The benefits of protection groups differ for infrastructure layer (layer 3 and layer 4) events and application layer (layer 7) events. For layer 3 and layer 4 events, protection groups can reduce the time it takes for Shield Advanced to begin mitigations. For layer 7 events, protection groups add an additional reporting mechanism. There is no change in the mechanism that Shield Advanced uses internally for detection of an event, and you do not lose the functionality of individual resource-level detections. You receive both group-level and individual resource-level Amazon CloudWatch metrics to consume for operational use. Let’s look at the benefits for each layer in more detail.
Layers 3 and 4: Accelerate time to mitigate for DDoS events
For infrastructure layer (layer 3 and layer 4) events, Shield Advanced monitors the traffic volume to your protected resource. An abnormal traffic deviation signals the possibility of a DDoS attack, and Shield Advanced then puts mitigations in place. By default, Shield Advanced observes the elevation of traffic to a resource over multiple consecutive time intervals to establish confidence that a layer 3/layer 4 event is under way. In the absence of a protection group, Shield Advanced follows the default behavior of waiting to establish confidence before it puts mitigation in place for each resource. However, if the resources are part of a protection group, and if the service detects that one resource in a group is targeted, Shield Advanced uses that confidence for other resources in the group. This can accelerate the process of putting mitigations in place for those resources.
Consider a case where you have an application deployed in different AWS Regions, and each stack is fronted with a Network Load Balancer (NLB). When you enable Shield Advanced on the Elastic IP addresses associated with the NLB in each Region, you can optionally add those Elastic IP addresses to a protection group. If an actor targets one of the NLBs in the protection group and a DDoS attack is detected, Shield Advanced will lower the threshold for implementing mitigations on the other NLBs associated with the protection group. If the scope of the attack shifts to target the other NLBs, Shield Advanced can potentially mitigate the attack faster than if the NLB was not in the protection group.
Note: This benefit applies only to Elastic IP addresses and Global Accelerator resource types.
Layer 7: Reduce false positives and improve accuracy of detection for DDoS events
Shield Advanced detects application layer (layer 7) events when you associate a web access control list (web ACL) in AWS WAF with it. Shield Advanced consumes request data for the associated web ACL, analyzes it, and builds a traffic baseline for your application. The service then uses this baseline to detect anomalies in traffic patterns that might indicate a DDoS attack.
When you group resources in a protection group, Shield Advanced aggregates the data from individual resources and creates the baseline for the whole group. It then uses this aggregated baseline to detect layer 7 events for the group resource. It also continues to monitor and report for the resources individually, regardless of whether they are part of protection groups or not.
Shield Advanced provides three types of aggregation to choose from (sum, mean, and max) to aggregate the volume data of individual resources to use as a baseline for the whole group. We’ll look at the three types of aggregation, with a use case for each, in the next section.
Note: Traffic aggregation is applicable only for layer 7 detection.
Case 1: Blue/green deployments
Blue/green is a popular deployment strategy that increases application availability and reduces deployment risk when rolling out changes. The blue environment runs the current application version, and the green environment runs the new application version. When testing is complete, live application traffic is directed to the green environment, and the blue environment is dismantled.
During blue/green deployments, the traffic to your green resources can go from zero load to full load in a short period of time. Shield Advanced layer 7 detection uses traffic baselining for individual resources, so newly created resources like an Application Load Balancer (ALB) that are part of a blue/green operation would have no baseline, and the rapid increase in traffic could cause Shield Advanced to declare a DDoS event. In this scenario, the DDoS event could be a false positive.
Figure 1: A blue/green deployment with ALBs in a protection group. Shield is using the sum of total traffic to the group to baseline layer 7 traffic for the group as a single unit
In the example architecture shown in Figure 1, we have configured Shield to include all resources of type ALB in a single protection group with aggregation type sum. Shield Advanced will use the sum of traffic to all resources in the protection group as an additional baseline. We have only one ALB (called blue) to begin with. When you add the green ALB as part of your deployment, you can optionally add it to the protection group. As traffic shifts from blue to green, the total traffic to the protection group remains the same even though the volume of traffic changes for the individual resources that make up the group. After the blue ALB is deleted, the Shield Advanced baseline for that ALB is deleted with it. At this point, the green ALB hasn’t existed for sufficient time to have its own accurate baseline, but the protection group baseline persists. You could still receive a DDoSDetected CloudWatch metric with a value of 1 for individual resources, but with a protection group you have the flexibility to set one or more alarms based on the group-level DDoSDetected metric. Depending on your application’s use case, this can reduce non-actionable event notifications.
Note: You might already have alarms set for individual resources, because the onboarding wizard in Shield Advanced provides you an option to create alarms when you add protection to a resource. So, you should review the alarms you already have configured before you create a protection group. Simply adding a resource to a protection group will not reduce false positives.
Case 2: Resources that have traffic patterns similar to each other
Client applications might interact with multiple services as part of a single transaction or workflow. These services can be behind their own dedicated ALBs or CloudFront distributions and can have traffic patterns similar to each other. In the example architecture shown in Figure 2, we have two services that are always called to satisfy a user request. Consider a case where you add a new service to the mix. Before protection groups existed, setting up such a new protected resource, such as ALB or CloudFront, required Shield Advanced to build a brand-new baseline. You had to wait for a certain minimum period before Shield Advanced could start monitoring the resource, and the service would need to monitor traffic for a few days in order to be accurate.
Figure 2: Deploying a new service and including it in a protection group with an existing baseline. Shield is using the mean aggregation type to baseline traffic for the group.
For improved accuracy of detection of level 7 events, you can cause Shield Advanced to inherit the baseline of existing services that are part of the same transaction or workflow. To do so, you can put your new resource in a protection group along with an existing service or services, and set the aggregation type to mean. Shield Advanced will take some time to build up an accurate baseline for the new service. However, the protection group has an established baseline, so the new service won’t be susceptible to decreased accuracy of detection for that period of time. Note that this setting will not stop Shield Advanced from sending notifications for the new service individually; however, you might prefer to take corrective action based on the detection for the group instead.
Case 3: Resources that share traffic in a non-uniform way
Consider the case of a CloudFront distribution with an ALB as origin. If the content is cached in CloudFront edge locations, the traffic reaching the application will be lower than that received by the edge locations. Similarly, if there are multiple origins of a CloudFront distribution, the traffic volumes of individual origins will not reflect the aggregate traffic for the application. Scenarios like invalidation of cache or an origin failover can result in increased traffic at one of the ALB origins. This could cause Shield Advanced to send “1” as the value for the DDoSDetected CloudWatch metric for that ALB. However, you might not want to initiate an alarm or take corrective action in this case.
Figure 3: CloudFront and ALBs in a protection group with aggregation type max. Shield is using CloudFront’s baseline for the group
You can combine the CloudFront distribution and origin (or origins) in a protection group with the aggregation type set to max. Shield Advanced will consider the CloudFront distribution’s traffic volume as the baseline for the protection group as a whole. In the example architecture in Figure 3, a CloudFront distribution fronts two ALBs and balances the load between the two. We have bundled all three resources (CloudFront and two ALBs) into a protection group. In case one ALB fails, the other ALB will receive all the traffic. This way, although you might receive an event notification for the active ALB at the individual resource level if Shield detects a volumetric event, you might not receive it for the protection group because Shield Advanced will use CloudFront traffic as the baseline for determining the increase in volume. You can set one or more alarms and take corrective action according to your application’s use case.
Conclusion
In this blog post, we showed you how AWS Shield Advanced provides you with the capability to group resources in order to consider them a single logical entity for DDoS detection and mitigation. This can help reduce the number of false positives and accelerate the time to mitigation for your protected applications.
A Shield Advanced subscription provides additional capabilities, beyond those discussed in this post, that supplement your perimeter protection. It provides integration with AWS WAF for level 7 DDoS detection, health-based detection for reducing false positives, enhanced visibility into DDoS events, assistance from the Shield Response team, custom mitigations, and cost-protection safeguards. You can learn more about Shield Advanced capabilities in the AWS Shield Advanced User Guide.
If you have feedback about this blog post, submit comments in the Comments section below. You can also start a new thread on AWS Shield re:Post to get answers from the community.
Want more AWS Security news? Follow us on Twitter.
The step-up authentication solution discussed in Part 1 uses a reference implementation that you can use for demonstration and learning purposes. You can also review the implementation code in the step-up-auth GitHub repository. The reference implementation includes a web application that you can use in the following sections to test the step-up implementation. Additionally, the implementation contains a sample privileged API action /transfer and a non-privileged API action /info, and two step-up authentication solution API operations /initiate-auth, and /respond-to-challenge. The web application invokes these API operations to demonstrate how to perform step-up authentication.
You must have AWS credentials files that contain a profile with your account secret key and access key to perform the deployment. Make sure that your account has enough privileges to create, update, or delete the following resources:
A two-factor authentication (2FA) mobile application, such as Google Authenticator, is installed on your mobile device.
Deploy the step-up solution
You can deploy the solution by using the AWS CDK, which will create a working reference implementation of the step-up authentication solution.
To deploy the solution
Build the necessary resources by using the build.sh script in the deployment folder. Run the build script from a terminal window, using the following command: cd deployment && ./build.sh
Deploy the solution by using the deploy.sh script that is present in the deployment folder, using the following command. Be sure to replace the required environment variables with your own values. export AWS_REGION=<your AWS Region of choice, for example us-east-2> export AWS_ACCOUNT=<your account number> export AWS_PROFILE=<a valid profile in .aws/credentials that contains the secret/access key to your account> export NODE_ENV=development export ENV_PREFIX=dev
The account you specify in the AWS_ACCOUNT environment variable is used to bootstrap the AWS CDK deployment. Set AWS_PROFILE to point to your profile. Make sure that your account has sufficient privileges, as described in the prerequisites.
The NODE_ENV environment variable can be set to development or production. This variable controls the log output that the Lambda functions generate. The ENV_PREFIX environment variable allows you to prefix all resources with a tag, which enables a multi-tenant deployment of this solution.
Still in the deployment folder, deploy the stack by using the following command: ./deploy.sh
Make note of the CloudFront distribution URL that follows Sample Web App URL, as shown in Figure 1. In the next section, you will use this CloudFront distribution URL to load the sample web app in a web browser and test the step-up solution
Figure 1: The output of the deployment process
After the deployment script deploy.sh completes successfully, the AWS CDK creates the following resources in your account:
An Amazon Cognito user pool that is used as a user registry.
An Amazon API Gateway API that contains three resources:
A protected resource that requires step-up authentication.
An initiate-auth resource to start the step-up challenge response.
A respond-to-challenge resource to complete the step-up challenge.
An API Gateway Lambda authorizer that is used to protect API actions.
The following Amazon DynamoDB tables:
A setting table that holds the configuration mapping of the API operations that require elevated privileges.
A session table that holds temporary, user-initiated step-up sessions and their current status.
A React web UI that demonstrates how to invoke a privileged API action and go through step-up authentication.
Test the step-up solution
In order to test the step-up solution, you’ll use the sample web application that you deployed in the previous section. Here’s an overview of the actions you’ll perform to test the flow:
In the AWS Management Console, create items in the setting DynamoDB table that point to privileged API actions. After the solution deployment, the setting DynamoDB table is called step-up-auth-setting-<ENV_PREFIX>. For more information about ENV_PREFIX variable usage in a multi-tenant environment, see Deploy the step-up solution earlier in this post.
As discussed, in the Data design section in Part 1 of this series, the Lambda authorizer treats all API invocations as non-privileged (that is, they don’t require step-up authentication) unless there is a matching entry for the API action in the setting table. Additionally, you can switch a privileged API action to a non-privileged API action by simply changing the stepUpState attribute in the setting table. Create an item in the DynamoDB table for the sample /transfer API action and for the sample /info API action. The /transfer API action will require step-up authentication, whereas the /info API action will be a non-privileged invocation that does not require step-up authentication. Note that there is no need to define a non-privileged API action in the table; it is there for illustration purposes only.
If you haven’t already, install Google Authenticator or a similar two-factor authentication (2FA) application on your mobile device.
Using the sample web application, register a new user in Amazon Cognito.
Log in to the sample web application by using the registered new user.
Configure the preferred multi-factor authentication (MFA) settings for the logged in user in the application. This step is necessary so that Amazon Cognito can challenge the user with a one-time password (OTP).
Using the sample web application, invoke the sample /transfer privileged API action that requires step-up authentication.
The Lambda authorizer will intercept the API request and return a 401 Unauthorized response status code that the sample web application will handle. The application will perform step-up authentication by prompting you to provide additional security credentials, specifically the OTP. To complete the step-up authentication, enter the OTP, which is sent through short service message (SMS) or by using an authenticator mobile app.
Invoke the sample /transfer privileged API action again in the sample web application, and verify that the API invocation is successful.
The following instructions assume that you’ve installed a 2FA mobile application, such as Google Authenticator, on your mobile device. You will configure the 2FA application in the following steps and use the OTP from this mobile application when prompted to enter the step-up challenge. You can configure Amazon Cognito to send you an SMS with the OTP. However, you must be aware of the Amazon Cognito throttling limits. See the Additional considerations section in Part 1 of this series. Read these limits carefully, especially if you set the user’s preferred MFA setting to SMS.
On the left nav pane, under Tables, choose Explore items. In the right pane, choose the table named step-up-auth-setting* and choose Create item, as shown in Figure 2.
Figure 2: Choose the step-up-auth-setting* table and choose Create item button
In the Edit item screen as shown in Figure 3, ensure that JSON is selected, and the Attributes button for View DynamoDB JSON is off.
Figure 3: Edit an item in the table – select JSON and turn off View DynamoDB JSON button
To create an entry for the /info API action, copy the following JSON text:
Paste the copied JSON text for the /transfer API action in the Attributes text area, as shown in Figure 4, and choose Create item.
Figure 5: Create an entry for the /transfer API action
Open your web browser and load the CloudFront URL that you made note of in step 4 of the Deploy the step-up solution procedure.
On the login screen of the sample web application, enter the information for a new user. Make sure that the email address and phone numbers are valid. Choose Register. You will be prompted to enter a verification code. Check your email for the verification code, and enter it at the sample web application prompt.
You will be sent back to the login screen. Log in as the user that you just registered. You will see the welcome screen, as shown in Figure 6.
Figure 6: Welcome screen of the sample web application
In the left nav pane choose Setting, choose the Configure button to the right of Software Token, as shown in Figure 7. Use your mobile device camera to capture the QR code on the screen in your 2FA application, for example Google Authenticator.
Figure 7: Configure Software Token screen with QR code
Enter the temporary code from the 2FA application into the web application and choose Submit. You will see the message Software Token successfully configured!
Still in the Setting menu, next to Select Preferred MFA, choose Software Token. You will see the message User preferred MFA set to Software Token, as shown in Figure 8.
Figure 8: Completed Software Token setup
In the left nav pane choose StepUp Auth. In the right pane, choose Invoke Transfer API. You should see Response: 401 authorization challenge, as shown in Figure 9.
Figure 9: The step-up API invocation returns an authorization challenge
On your mobile device, open the 2FA application, copy the OTP code from the 2FA application, and enter the code into the Enter OTP field, as shown in Figure 9. Choose Submit.
This sends the OTP to the respond-to-challenge endpoint. After the OTP is verified, the endpoint will return a success or failure message. Figure 10 shows a successful OTP verification. You are prompted to invoke the /transfer privileged API action again.
Figure 10: The OTP prompt during step-up API invocation
Invoke the transfer API action again by choosing Invoke Transfer API. You should see a success message as shown in Figure 11.
Figure 11: A successful step-up API invocation
Congratulations! You’ve successfully performed step-up authentication.
Conclusion
In the previous post in this series, Implement step-up authentication with Amazon Cognito, Part 1: Solution overview, you learned about the architecture and implementation details for the step-up authentication solution. In this blog post, you learned how to deploy and test the step-up authentication solution in your AWS account. You deployed the solution by using scripts from the step-up-auth GitHub repository that use the AWS CDK to create resources in your account for Amazon Cognito, Amazon API Gateway, a Lambda authorizer, and Amazon DynamoDB. Finally, you tested the end-to-end solution on a sample web application by invoking a privileged API action that required step-up authentication. Using the 2FA application, you were able to pass in an OTP to complete the step-up authentication and subsequently successfully invoke the privileged API action.
If you have feedback about this post, submit comments in the Comments section below. If you have any questions about this post, start a thread on the Amazon Cognito forum.
Want more AWS Security news? Follow us on Twitter.
In this blog post, you’ll learn how to protect privileged business transactions that are exposed as APIs by using multi-factor authentication (MFA) or security challenges. These challenges have two components: what you know (such as passwords), and what you have (such as a one-time password token). By using these multi-factor security controls, you can implement step-up authentication to obtain a higher level of security when you perform critical transactions. In this post, we show you how you can use AWS services such as Amazon API Gateway, Amazon Cognito, Amazon DynamoDB, and AWS Lambda functions to implement step-up authentication by using a simple rule-based security model for your API resources.
Previously, identity and access management solutions have attempted to deliver step-up authentication by retrofitting their runtimes with stateful server-side management, which doesn’t scale in the modern-day stateless cloud-centered application architecture. We’ll show you how to use a pluggable, stateless authentication implementation that integrates into your existing infrastructure without compromising your security or performance. The Amazon API Gateway Lambda authorizer is a pluggable serverless function that acts as an intermediary step before an API action is invoked. This Lambda authorizer, coupled with a small SDK library that runs in the authorizer, will provide step-up authentication.
The reference architecture in this post uses a purpose-built step-up authorization workflow engine, which uses a custom SDK. The custom SDK uses the DynamoDB service as a persistent layer. This workflow engine is generic and can be used across any API serving layers, such as API Gateway or Elastic Load Balancing (ELB) Application Load Balancer, as long as the API serving layers can intercept API requests to perform additional actions. The step-up workflow engine also relies on an identity provider that is capable of issuing an OAuth 2.0 access token.
There are three parts to the step-up authentication solution:
An API serving layer with the capability to apply custom logic before applying business logic.
An OAuth 2.0–capable identity provider system.
A purpose-built step-up workflow engine.
The solution in this post uses Amazon Cognito as the identity provider, with an API Gateway Lambda authorizer to invoke the step-up workflow engine, and DynamoDB as a persistent layer used by the step-up workflow engine. You can see a reference implementation of the API Gateway Lambda authorizer in the step-up-auth GitHub repository. Additionally, the purpose-built step-up workflow engine provides two API endpoints (or API actions), /initiate-auth and /respond-to-challenge, which are realized using the API Gateway Lambda authorizer, to drive the API invocation step-up state.
Note: If you decide to use an API serving layer other than API Gateway, or use an OAuth 2.0 identity provider besides Amazon Cognito, you will have to make changes to the accompanying sample code in the step-up-auth GitHub repository.
Solution architecture
Figure 1 shows the high-level reference architecture.
First, let’s talk about the core components in the step-up authentication reference architecture in Figure 1.
Identity provider
In order for a client application or user to invoke a protected backend API action, they must first obtain a valid OAuth token or JSON web token (JWT) from an identity provider. The step-up authentication solution uses Amazon Cognito as the identity provider. The step-up authentication solution and the accompanying step-up API operations use the access token to make the step-up authorization decision.
Protected backend
The step-up authentication solution uses API Gateway to protect backend resources. API Gateway supports several different API integration types, and you can use any one of the supported API Gateway integration types. For this solution, the accompanying sample code in the step-up-auth GitHub repository uses Lambda proxy integration to simulate a protected backend resource.
Data design
The step-up authentication solution relies on two DynamoDB tables, a session table and a setting table. The session table contains the user’s step-up session information, and the setting table contains an API step-up configuration. The API Gateway Lambda authorizer (described in the next section) checks the setting table to determine whether the API request requires a step-up session. For more information about table structure and sample values, see the Step-up authentication data design section in the accompanying GitHub repository.
The session table has the DynamoDB Time to Live (TTL) feature enabled. An item stays in the session table until the TTL time expires, when DynamoDB automatically deletes the item. The TTL value can be controlled by using the environment variable SESSION_TABLE_ITEM_TTL. Later in this post, we’ll cover where to define this environment variable in the Step-up solution design details section; and we’ll cover how to set the optimal value for this environment variable in the Additional considerations section.
Authorizer
The step-up authentication solution uses a purpose-built request parameter-based Lambda authorizer (also called a REQUEST authorizer). This REQUEST authorizer helps protect privileged API operations that require a step-up session.
The authorizer verifies that the API request contains a valid access token in the HTTP Authorization header. Using the access token’s JSON web token ID (JTI) claim as a key, the authorizer then attempts to retrieve a step-up session from the session table. If a session exists and its state is set to either STEP_UP_COMPLETED or STEP_UP_NOT_REQUIRED, then the authorizer lets the API call through by generating an allow API Gateway Lambda authorizer policy. If the set-up state is set to STEP_UP_REQUIRED, then the authorizer returns a 401 Unauthorized response status code to the caller.
If a step-up session does not exist in the session table for the incoming API request, then the authorizer attempts to create a session. It first looks up the setting table for the API configuration. If an API configuration is found and the configuration status is set to STEP_UP_REQUIRED, it indicates that the user must provide additional authentication in order to call this API action. In this case, the authorizer will create a new session in the session table by using the access token’s JTI claim as a session key, and it will return a 401 Unauthorized response status code to the caller. If the API configuration in the setting table is set to STEP_UP_DENY, then the authorizer will return a deny API Gateway Lambda authorizer policy, therefore blocking the API invocation. The caller will receive a 403 Forbidden response status code.
The authorizer uses the purpose-built auth-sdk library to interface with both the session and setting DynamoDB tables. The auth-sdk library provides convenient methods to create, update, or delete items in tables. Internally, auth-sdk uses the DynamoDB v3 Client SDK.
Initiate auth endpoint
When you deploy the step-up authentication solution, you will get the following two API endpoints:
The initiate step-up authentication endpoint (described in this section).
The respond to step-up authentication challenge endpoint (described in the next section).
When a client receives a 401 Unauthorized response status code from API Gateway after invoking a privileged API operation, the client can start the step-up authentication flow by invoking the initiate step-up authentication endpoint (/initiate-auth).
The /initiate-auth endpoint does not require any extra parameters, it only requires the Amazon Cognito access_token to be passed in the Authorization header of the request. The /initiate-auth endpoint uses the access token to call the Amazon Cognito API actions GetUser and GetUserAttributeVerificationCode on behalf of the user.
After the /initiate-auth endpoint has determined the proper multi-factor authentication (MFA) method to use, it returns the MFA method to the client. There are three possible values for the MFA methods:
MAYBE_SOFTWARE_TOKEN_STEP_UP, which is used when the MFA method cannot be determined.
SOFTWARE_TOKEN_STEP_UP, which is used when the user prefers software token MFA.
SMS_STEP_UP, which is used when the user prefers short message service (SMS) MFA.
Let’s take a closer look at how /initiate-auth endpoint determines the type of MFA methods to return to the client. The endpoint calls Amazon Cognito GetUser API action to check for user preferences, and it takes the following actions:
Determines what method of MFA the user prefers, either software token or SMS.
If the user’s preferred method is set to software token, the endpoint returns SOFTWARE_TOKEN_STEP_UP code to the client.
If the user’s preferred method is set to SMS, the endpoint sends an SMS message with a code to the user’s mobile device. It uses the Amazon Cognito GetUserAttributeVerificationCode API action to send the SMS message. After the Amazon Cognito API action returns success, the endpoint returns SMS_STEP_UP code to the client.
When the user preferences don’t include either a software token or SMS, the endpoint checks if the response from Amazon Cognito GetUser API action contains UserMFASetting response attribute list with either SOFTWARE_TOKEN_MFA or SMS_MFA keywords. If the UserMFASetting response attribute list contains SOFTWARE_TOKEN_MFA, then the endpoint returns SOFTWARE_TOKEN_STEP_UP code to the client. If it contains SMS_MFA keyword, then the endpoint invokes the Amazon Cognito GetUserAttributeVerificationCode API action to send the SMS message (as in step 3). Upon successful response from the Amazon Cognito API action, the endpoint returns SMS_STEP_UP code to the client.
If the UserMFASetting response attribute list from Amazon Cognito GetUser API action does not contain SOFTWARE_TOKEN_MFA or SMS_MFA keywords, then the endpoint looks for phone_number_verified attribute. If found, then the endpoint sends an SMS message with a code to the user’s mobile device with verified phone number. The endpoint uses the Amazon Cognito GetUserAttributeVerificationCode API action to send the SMS message (as in step 3). Otherwise, when no verified phone is found, the endpoint returns MAYBE_SOFTWARE_TOKEN_STEP_UP code to the client.
The flowchart shown in Figure 2 illustrates the full decision logic.
Figure 2: MFA decision flow chart
Respond to challenge endpoint
The respond to challenge endpoint (/respond-to-challenge) is called by the client after it receives an appropriate MFA method from the /initiate-auth endpoint. The user must respond to the challenge appropriately by invoking /respond-to-challenge with a code and an MFA method.
The /respond-to-challenge endpoint receives two parameters in the POST body, one indicating the MFA method and the other containing the challenge response. Additionally, this endpoint requires the Amazon Cognito access token to be passed in the Authorization header of the request.
If the MFA method is SMS_STEP_UP, the /respond-to-challenge endpoint invokes the Amazon Cognito API action VerifyUserAttribute to verify the user-provided challenge response, which is the code that was sent by using SMS.
If the MFA method is SOFTWARE_TOKEN_STEP_UP or MAYBE_SOFTWARE_TOKEN_STEP_UP, the /respond-to-challenge endpoint invokes the Amazon Cognito API action VerifySoftwareToken to verify the challenge response that was sent in the endpoint payload.
After the user-provided challenge response is verified, the /respond-to-challenge endpoint updates the session table with the step-up session state STEP_UP_COMPLETED by using the access_token JTI. If the challenge response verification step fails, no changes are made to the session table. As explained earlier in the Data design section, the step-up session stays in the session table until the TTL time expires, when DynamoDB will automatically delete the item.
Deploy and test the step-up authentication solution
Otherwise, you can continue reading the rest of this post to review the details and code behind the step-up authentication solution.
Step-up solution design details
Now let’s dig deeper into the step-up authentication solution. Figure 3 expands on the high-level solution design in the previous section and highlights the sequence of events that must take place to perform step-up authentication. In this section, we’ll break down these sequences into smaller parts and discuss each by going over a detailed sequence diagram.
Let’s group the step-up authentication flow in Figure 3 into three parts:
Create a step-up session (steps 1-6 in Figure 3)
Initiate step-up authentication (steps 7-8 in Figure 3)
Respond to the step-up challenge (steps 9-12 in Figure 3)
In the next sections, you’ll learn how the user’s API requests are handled by the step-up authentication solution, and how the user state is elevated by going through an additional challenge.
Create a step-up session
After the user successfully logs in, they create a step-up session when invoking a privileged API action that is protected with the step-up Lambda authorizer. This authorizer determines whether to start a step-up challenge based on the configuration within the DynamoDB setting table, which might create a step-up session in the DynamoDB session table. Let’s go over steps 1–6, shown in the architecture diagram in Figure 3, in more detail:
Step 1 – It’s important to note that the user must authenticate with Amazon Cognito initially. As a result, they must have a valid access token generated by the Amazon Cognito user pool.
Step 2 – The user then invokes a privileged API action and passes the access token in the Authorization header.
Step 3 – The API action is protected by using a Lambda authorizer. The authorizer first validates the token by invoking the Amazon Cognito user pool public key. If the token is invalid, a 401 Unauthorized response status code can be sent immediately, prompting the client to present a valid token.
Step 4 – The authorizer performs a lookup in the DynamoDB setting table to check whether the current request needs elevated privilege (also known as step-up privilege). In the setting table, you can define which API actions require elevated privilege. You can additionally bundle API operations into a group by defining the group attribute. This allows you to further isolate privileged API operations, especially in a large-scale deployment.
Step 5 – If an API action requires elevated privilege, the authorizer will check for an existing step-up session for this specific user in the session table. If a step-up session does not exist, the authorizer will create a new entry in the session table. The key for this table will be the JTI claim of the access_token (which can be obtained after token verification).
Step 6 – If a valid session exists, then authorization will be given. Otherwise an unauthorized access response (401 HTTP code) will be sent back from the Lambda authorizer, indicating that the user requires elevated privilege.
Figure 4 highlights these steps in a sequence diagram.
Figure 4: Sequence diagram for creating a step-up session
Initiate step-up authentication
After the user receives a 401 Unauthorized response status code from invoking the privileged API action in the previous step, the user must call the /initiate-auth endpoint to start step-up authentication. The endpoint will return the response to the user or the client application to supply the temporary code. Let’s go over steps 7 and 8, shown in the architecture diagram in Figure 3, in more detail:
Step 7 – The client application initiates a step-up action by calling the /initiate-auth endpoint. This action is protected by the API Gateway built-in Amazon Cognito authorizer, and the client needs to pass a valid access_token in the Authorization header.
Step 8 – The call is forwarded to a Lambda function that will initiate the step-up action with the end user. The function first calls the Amazon Cognito API action GetUser to find out the user’s MFA settings. Depending on which MFA type is enabled for the user, the function uses different Amazon Cognito API operations to start the MFA challenge. For more details, see the Initiate auth endpoint section earlier in this post.
Figure 5 shows these steps in a sequence diagram.
Figure 5: Sequence diagram for invoking /initiate-auth to start step-up authentication
Respond to the step-up challenge
In the previous step, the user receives a challenge code from the /initiate-auth endpoint. Depending on the type of challenge code, user must respond by sending a one-time password (OTP) to the /respond-to-challenge endpoint. The /respond-to-challenge endpoint invokes an Amazon Cognito API action to verify the OTP. Upon successful verification, the /respond-to-challenge endpoint marks the step-up session in the session table to STEP_UP_COMPLETED, indicating that the user now has elevated privilege. At this point, the user can invoke the privileged API action again to perform the elevated business operation. Let’s go over steps 9–12, shown in the architecture diagram in Figure 3, in more detail:
Step 9 – The client application presents an appropriate screen to the user to collect a response to the step-up challenge. The client application calls the /respond-to-challenge endpoint that contains the following:
An access_token in the Authorization header.
A step-up challenge type.
A response provided by the user to the step-up challenge.
This endpoint is protected by the API Gateway built-in Amazon Cognito authorizer.
Step 10 – The call is forwarded to the Lambda function, which verifies the response by calling the Amazon Cognito API action VerifyUserAttribute (in the case of SMS_STEP_UP) or VerifySoftwareToken (in the case of SOFTWARE_TOKEN_STEP_UP), depending on the type of step-up action that was returned from the /initiate-auth API action. The Amazon Cognito response will indicate whether verification was successful.
Step 11 – If the Amazon Cognito response in the previous step was successful, the Lambda function associated with the /respond-to-challenge endpoint inserts a record in the session table by using the access_token JTI as key. This record indicates that the user has completed step-up authentication. The record is inserted with a time to live (TTL) equal to the lesser of these values: the remaining period in the access_token timeout, or the default TTL value that is set in the Lambda function as a configurable environment variable, SESSION_TABLE_ITEM_TTL. The /respond-to-challenge endpoint returns a 200 status code after successfully updating the session table. It returns a 401 Unauthorized response status code if the operation failed or if the Amazon Cognito API calls in the previous step failed. For more information about the optimal value for the SESSION_TABLE_ITEM_TTL variable, see the Additional considerations section later in this post.
Step 12 – The client application can re-try the original call (using the same access token) to the privileged API operations, and this call should now succeed because an active step-up session exists for the user. Calls to other privileged API operations that require step-up should also succeed, as long as the step-up session hasn’t expired.
Figure 6 shows these steps in a sequence diagram.
Figure 6: Invoke the /respond-to-challenge endpoint to complete step-up authentication
Additional considerations
This solution uses several Amazon Cognito API operations to provide step-up authentication functionality. Amazon Cognito applies rate limiting on all API operations categories, and rapid calls that exceed the assigned quota will be throttled.
The step-up flow for a single user can include multiple Amazon Cognito API operations such as GetUser, GetUserAttributeVerificationCode, VerifyUserAttribute, and VerifySoftwareToken. These Amazon Cognito API operations have different rate limits. The effective rate, in requests per second (RPS), that your privileged and protected API action can achieve will be equivalent to the lowest category rate limit among these API operations. When you use the default quota, your application can achieve 25 SMS_STEP_UP RPS or up to 50 SOFTWARE_TOKEN_STEP_UP RPS.
Certain Amazon Cognito API operations have additional security rate limits per user per hour. For example, the GetUserAttributeVerificationCode API action has a limit of five calls per user per hour. For that reason, we recommend 15 minutes as the minimum value for SESSION_TABLE_ITEM_TTL, as this will allow a single user to have up to four step-up sessions per hour if needed.
Conclusion
In this blog post, you learned about the architecture of our step-up authentication solution and how to implement this architecture to protect privileged API operations by using AWS services. You learned how to use Amazon Cognito as the identity provider to authenticate users with multi-factor security and API Gateway with an authorizer Lambda function to enforce access to API actions by using a step-up authentication workflow engine. This solution uses DynamoDB as a persistent layer to manage the security rules for the step-up authentication workflow engine, which helps you to efficiently manage your rules.
If you have feedback about this post, submit comments in the Comments section below. If you have any questions about this post, start a thread on the Amazon Cognito forum.
Want more AWS Security news? Follow us on Twitter.
After the solution is deployed, it works as follows:
The scheduled rule invokes the Lambda function every 5 minutes to fetch the latest domain list available.
The Lambda function fetches the list from URLhaus, parses the data retrieved, formats the data, uploads the list of domains into the S3 bucket, and invokes the Route 53 Resolver DNS Firewall importFirewallDomains API action.
The domain list is then updated.
Implementation steps
As a first step, create your own domain list on the Route 53 Resolver DNS Firewall. Having your own domain list allows you to have full control of the list of domains to which you want to apply actions, as defined within rule groups.
To create your own domain list
In the Route 53 console, in the left menu, choose Domain lists in the DNS firewall section.
Choose the Add domain list button, enter a name for your owned domain list, and then enter a placeholder domain to initialize the domain list.
Choose Add domain list to finalize the creation of the domain list.
Figure 2: Expected view of the console
The list from URLhaus contains more than a thousand records. You will use the ImportFirewallDomains endpoint to upload this list to DNS Firewall. The use of the ImportFirewallDomains endpoint requires that you first upload the list of domains and make the list available in an S3 bucket that is located in the same AWS Region as the owned domain list that you just created.
Follow the steps in the topic Creating an execution role in the IAM console to create an execution role. After step 4, when you configure permissions, choose Create Policy, and then create and add an IAM policy similar to the following example. This policy needs to:
(Optional) If you decide to use the example provided by AWS:
After cloning the repository: Build the layer following the instruction included in the readme.md and the provided script.
Zip the lambda.
In the left menu, select Layers then Create Layer. Enter a name for the layer, then select Upload a .zip file. Choose to upload the layer (node-axios-layer.zip).
As a compatible runtime, select: Node.js 16.x.
Select Create
In the Lambda console, in the same Region as your domain list, choose Create function, and then do the following:
Choose your desired runtime and architecture.
(Optional) To use the code provided by AWS: Select Node.js 16.x as the runtime.
Choose Change the default execution role.
Choose Use an existing role, and then pick the role that you just created.
After the Lambda function is created, in the left menu of the Lambda console, choose Functions, and then select the function you created.
For Code source, you can either enter the code of the Lambda function or choose the Upload from button and then choose the source for the code. AWS provides an example of functioning code on GitHub under a MIT-0 license.
(optional) To use the code provided by AWS:
Choose the Upload from button and upload the zipped code example.
After the code is uploaded, edit the default Runtime settings: Choose the Edit button and set the handler to be equal to: LambdaRpz.handler
Edit the default Layers configuration, choose the Add a layer button, select Specify an ARN and enter the ARN of the layer created during the optional step 2.
Edit the environment variables of the function: Select the Edit button and define the three following variables:
Key : FirewallDomainListId | Value : <domain-list-id>
Key : region | Value : <region>
Key : s3Prefix | Value : <DNSFW-BUCKET-NAME>
The code that you place in the function will be able to fetch the list from URLhaus, upload the list as a file to S3, and start the import of domains.
For the Lambda function to be invoked every 5 minutes, next you will create a scheduled rule with Amazon EventBridge.
To automate the invoking of the Lambda function
In the EventBridge console, in the same AWS Region as your domain list, choose Create rule.
For Rule type, choose Schedule.
For Schedule pattern, select the option A schedule that runs at a regular rate, such as every 10 minutes, and under Rate expression set a rate of 5 minutes.
Figure 3: Console view when configuring a schedule
To select the target, choose AWS service, choose Lambda function, and then select the function that you previously created.
After the solution is deployed, your domain list will be updated every 5 minutes and look like the view in Figure 4.
Figure 4: Console view of the created domain list after it has been updated by the Lambda function
If you haven’t done so already, create an S3 bucket to store the artifacts in the Region where you wish to deploy. This name of this bucket will then be referenced as ParamS3ArtifactBucket with a value of <DOC-EXAMPLE-BUCKET-ARTIFACT>
Clone the repository locally. git clone https://github.com/aws-samples/amazon-route-53-resolver-firewall-automation-examples-2
Build the Lambda function layer. From the /layer folder, use the provided script. . ./build-layer.sh
Zip and upload the artifact to the bucket created in step 1. From the root folder, use the provided script. . ./zipupload.sh <ParamS3ArtifactBucket>
Deploy the AWS CloudFormation stack by using either the AWS CLI or the CloudFormation console.
To deploy by using the AWS CLI, from the root folder, type the following command, making sure to replace <region>, <DOC-EXAMPLE-BUCKET-ARTIFACT>, <DNSFW-BUCKET-NAME>, and <DomainListName>with your own values.
In the CloudFormation console, choose Create stack, and then choose With new resources (standard).
On the creation screen, choose Template is ready, and upload the provided DNSFWStack.cfn.yaml file.
Enter a stack name and configure the requested parameters with your desired configuration and outcomes. These parameters include the following:
The name of your firewall domain list.
The name of the S3 bucket that contains Lambda artifacts.
The name of the S3 bucket that will be created to contain the files with the domain information from URLhaus.
Acknowledge that the template requires IAM permission because it will create the role for the Lambda function and manage its IAM policy, and then choose Create stack.
After a few minutes, all the resources should be created and the CloudFormation stack is now deployed. After 5 minutes, your domain list should be updated, as shown in Figure 5.
Figure 5: Console view of CloudFormation after the stack has been deployed
Conclusions and cost
In this blog post, you learned about creating and automating the update of a domain list that you fully control. To go further, you can extend and replicate the architecture pattern to fetch domain names from other sources by editing the source code of the Lambda function.
For cost information, see the AWS Pricing Calculator. This solution will be invoked 60 (minutes) * 24 (hours) * 30 (days) / 5 (minutes) = 8,640 times per month, invoking the Lambda function that will run for an average of 400 minutes, storing an average of 0.5 GB in Amazon S3, and creating a domain list that averages 1,500 domains. According to our public pricing, and without factoring in the AWS Free Tier, this will incur the estimated total cost of $1.43 per month for the filtering of 1 million DNS requests.
If you have feedback about this post, submit comments in the Comments section below. If you have questions about this post, contact AWS Support.
Want more AWS Security news? Follow us on Twitter.
If you use AWS IAM Identity Center (successor to AWS Single Sign-On) as your identity source, you create and manage your users and groups manually in the IAM Identity Center console. However, you may prefer to automate this process to save time, spend less administrative effort, and to scale effectively as your organization grows. If you use IAM Identity Center with a supported identity provider (IdP) or Microsoft Active Directory (AD), you may want to check if the right users and groups have synced into IAM Identity Center. You can do this manually, but now you can use the new APIs to make the process easier by setting up automated checks that query this information from IAM Identity Center and notify you only when you need to intervene.
This post explains how you can use IAM Identity Center APIs to automate managing users and groups in a scalable manner and gain better visibility into users and groups in the Identity Center directory. These automations can help you save time and reduce administrative effort. We will provide some background on how IAM Identity Center works and how you can use the new APIs to help simplify your workflows.
Background
IAM Identity Center allows you to centrally manage access to all of your AWS accounts within AWS Organizations or your applications. Using IAM Identity Center is the AWS recommendation for managing the workforce identities of the human users in your organization who access AWS resources. It provides you with the flexibility to create and manage users and groups in the Identity Center directory, or bring in your users and groups from a different identity source such as Active Directory or an external identity provider (IdP). After IAM Identity Center is configured, you can look up users or groups to grant them single sign-on access to AWS accounts, applications, or both. By signing-in once in the IAM Identity Center portal, your users can access their assigned AWS accounts, as well as Identity Center enabled applications such as Amazon SageMaker Studio or Amazon EMR Studio, as well as cloud applications such as Jira, Salesforce, and Tableau.
While IAM Identity Center simplifies user access, you may prefer to manage these users and groups at scale, and audit their access regularly to meet your security requirements. You may also want to automate the process of giving users access to AWS and the resources they need to do their job. Previously, you could only manage identities in the Identity Center directory manually by using the IAM Identity Center console. Now, you can use the new Identity Center APIs to build automation that manages the Identity Center directory users and groups for you.
With these Identity Center APIs, you can build automated workflows to do the following tasks:
Provision and de-provision users and groups.
Add new members to a group or remove them from a group.
Query information about users and groups in the Identity Center directory.
Update information about users and groups.
Find out which users are members of which groups.
You can create automated workflows using the APIs to define who has access to AWS accounts or applications through IAM Identity Center, and provide them with the right resources to do their job. Automating workflows can save you time and can reduce your administrative effort. With the new APIs, you can auto-generate reports about users and their IAM Identity Center access configurations. These automated reports can provide you with greater visibility to evaluate your security posture.
Provision, manage, and de-provision users and groups in IAM Identity Center
As your enterprise grows, you may want to automate your administrative tasks to reduce manual effort, save time, and scale efficiently. If you’re a cloud administrator or IT administrator who manages which employees in your organization need access to AWS as part of their job role, or what AWS resources they need so they can develop applications, now you can set up automated workflows that manage this for you.
Consider the following scenario. Your organization uses the Identity Center directory as the source for user information, and a new data scientist joins your company. You want them to be granted access to log in to AWS automatically based on their job role. After they log in, you want them to have access to the AWS resources and applications that you have approved for their job role, including Amazon SageMaker, AWS Managed Grafana, and multiple S3 buckets. Previously, you had to use the AWS Management Console to manually create a new user object and then add the new data scientist to the AWS_Data_Science group. With the new APIs, you can set up an automated workflow that creates a new user and adds the user to relevant groups in the Identity Center directory, as soon as the new data scientist is added to your human resources (HR) system.
A sample AWS Identity Store operations python script called identitystore_operations.py is available in the iam-identitycenter-identitystoreapi-operations GitHub repository. This sample program shows you how you can automate Identity Store operations to create a new user, add the user to a group, list group memberships, and update the user’s group memberships operations. This sample program requires the AWS SDK for Python (Boto3). For instructions to install the AWS SDK for Python, see the Boto3 Quickstart.
The following is an example to see all supported operations available in the sample script.
python identitystore_operations.py —h
The following is example output:
usage: identitystore_operations.py [-h]
{create_user,create_group,adduser_to_group,delete_group,list_members,list_membership}
...
positional arguments:
{create_user,create_group,adduser_to_group,delete_group,list_members,list_membership}

options:
-h, --help show this help message and exit
Next is an example of how you can create the new user John Doe in the Identity Center directory and add the user to an existing AWS_Data_Science group.
python identitystore_operations.py create_user --identitystoreid d-123456a7890 --username johndoe --givenname John --familyname Doe --groupname AWS_Data_Science
The following is example output:
User:johndoe with UserId:12345678-9012-3456-789a-bcdef021345a created successfully
User:johndoe added to Group:AWS_Data_Science successfully
To continue with this example, consider a scenario where the data scientist transitions to a role as an applied scientist, and needs access to additional AWS applications and resources. Rather than using the IAM Identity Center console to manually update the user’s information and add them to the AWS_Applied_Scientists group, you can now use automation to update the user and provide them with the access they need.
The following is an example of how the previously-created user johndoe can be added to the AWS_Applied_Scientists group.
User:johndoe added to Group:AWS_Applied_Scientists successfully
Finally for this scenario, consider that this employee leaves your company. Rather than using the IAM Identity Center console to manually delete their user object, now your automation can delete the user as soon as they are removed from your HR system.
Evaluate your security posture in IAM Identity Center
To maintain visibility across AWS, it is a best practice to regularly audit and evaluate the security controls for any service that you use. It’s also a best practice to identify the AWS accounts or applications that an employee can access. Having access to this information helps you maintain and improve your company’s security posture. As a cloud administrator, you may need to submit periodic reports to auditors enumerating the employees who have access to AWS. If you or your IT team manage users and groups in a different source system, you also need to track whether the right users and groups are synced into AWS.
The following is an example of how you can find the members of the AWS_Applied_Scientists group.
For example, consider a scenario in which you use Active Directory as your identity source. You want to confirm that the right set of users and groups have been synced into the Identity Center directory. After the users and groups are confirmed, you are required to submit this list of users and groups with access to AWS to auditors every quarter. Rather than manually verifying which employees have access to AWS and manually creating a list for the auditors, now you can use the new APIs to create a workflow that automatically queries the users and groups in the Identity Center directory, compares it to your list of intended Active Directory users and groups who should have AWS access, and provides you the information about whether there are any users or groups who have access that was not intended. Additionally, you can set up a script to generate reports every quarter for the auditors.
The following is an example of how you can find the group memberships of the specific user johndoe.
User :johndoe is a member of the following groups
AWS_Data_Science
AWS_Applied_Scientists
Conclusion
In this post, you learned how to use IAM Identity Center APIs to automate managing users and groups in a scalable manner and gain better visibility into users and groups in the Identity Center directory.
The IAM Identity Center APIs for user and group management expand the capabilities of existing Identity Store APIs, helping you build scalable workflows. They help your IT and cloud teams save time and reduce administrative effort through automation.
If you have feedback about this post, submit comments in the Comments section below. If you have questions about this post, start a new thread on AWS IAM Identity Center re:Post or contact AWS Support.
Want more AWS Security news? Follow us on Twitter.
Amazon Macie is a fully managed data security and data privacy service that uses machine learning and pattern matching to discover and help you protect your sensitive data in Amazon Web Services (AWS). The data that is available within your AWS account can grow rapidly, which increases your need to verify that all sensitive data is identified and protected. Macie provides you with the ability to use both managed data identifiers and custom data identifiers, but enabling these identifiers for every job could result in a large number of security findings that might not take into account how data is used within your AWS account. So that you can tailor the detection and creation of findings within Macie, Macie now has an allow list feature available for use with your scanning jobs.
In this blog post, we show you how to set up an allow list in Macie and run a Macie scan that uses the allow list to ignore the specified values when creating sensitive data findings. The allow list feature can help your sensitive data management team by reducing false positives due to data text or formats in your environment that do not require action. This makes it easier for your team to focus on Macie findings that need to be reviewed and remediated. By increasing the overall confidence in findings presented by Macie, you can improve the performance of automated workflows and solutions.
Prerequisites
To get started, you’ll need the following prerequisites:
You can configure allow lists with either regular expressions (regex) or predefined text. Use a predefined text allow list if you have a list of specific values you want to exclude, like a list of example fake names or addresses that are used in test data sets. Alternatively, if you don’t have the exact values but know the pattern to exclude, you can use a regex allow list. Some use cases for a regex allow list could be to exclude tracking IDs or public reference numbers that could resemble a Macie managed data identifier or custom data identifier.
It is important to note that allow lists, and S3 objects if using predefined text, must be created in the same AWS account where the Macie job is created.
If Macie jobs are created from the Macie delegated administrator AWS account to scan member AWS accounts, then the allow lists must be centrally configured in the Macie delegated administrator account.
If Macie jobs are created from the member AWS account to scan buckets within the same AWS account, then the allow lists must be configured in the same AWS account where the Macie job is created.
To create an allow list by using the Amazon Macie Console
If you’re creating a regex allow list, choose Regular expression. For List settings, enter the following settings for the allow list.
For Name, enter the name of the list.
For Description, enter a description (optional).
For Regular expression, enter the regular expression. Macie will not create findings for any matches on the allow list regex.
Evaluate with sample data if needed to test your regex. Macie provides an Evaluate option so you can test your regex against sample data sets to make sure it’s working as expected.
If you’re creating a predefined text allow list, choose Predefined text. For this option, you will need to create a plaintext file and upload the file to an Amazon Simple Storage Service (Amazon S3) bucket. Once you upload the file, you can then reference the Amazon S3 object in the allow list.
Enter the name of the list.
Enter a description for the list (optional).
Enter the S3 bucket name.
Enter the S3 object name of the plaintext file.
Note: The Macie service-linked role must have the ability to read the S3 object for the predefined text. When you run Macie jobs that use allow lists with predefined text, the Macie service-linked role will read the S3 object. If there is any error reading the S3 object, the Macie job will continue to run without using the predefined text allow list. You will need to periodically check your allow lists to make sure they are in an OK status. You can check the status of each allow list in the Amazon Macie console or via the AWS CLI using the get-allow-list API.
More information and explanation for status of allow list can be found in the Amazon Macie User Guide.
Choose Create to create the allow list.
Note: An allow list must be stored in an S3 bucket in the same AWS account and AWS Region as your Macie account. Macie cannot access an allow list if it is stored in a different Region or account.
Below is an example of creating an allow list that uses a regular expression to specify a text pattern to ignore. Like other Macie resources, the DependsOn attribute is a required dependency for creating a Macie allow list.
To create or manage an allow list by using the AWS CLI
In the AWS CLI, run the following commands to create an allow list with a regular expression. aws macie2 create-allow-list \ --criteria '{"regex":"<insert-regex-expression>"}' \ --name "<insert-allow-list-name>" \ --description "<insert-allow-list-description>"
In the AWS CLI, run the following commands to create an allow list with predefined text. aws macie2 create-allow-list \ --criteria '{"s3WordsList":{"bucketName":"<DOC-EXAMPLE-BUCKET>","objectKey":"<OBJECT-EXAMPLE-KEY>"}}' \ --name "<insert-allow-list-name>" \ --description "<insert-allow-list-description>"
In the AWS CLI, run the following commands to update an existing allow list. aws macie2 update-allow-list --id <GUID-for-Macie-allow-list> example --description <insert-new-description>
In the AWS CLI, run the following commands to delete an existing allow list. aws macie2 delete-allow-list --id <GUID-for-Macie-allow-list> example --ignoreJobChecks false
In the AWS CLI, run the following commands to get existing allow lists. aws macie2 get-allow-list –id <GUID-for-Macie-allow-list>
After you create allow lists, you can create and run sensitive data discovery jobs in Macie. This will enable you to review, analyze, and compare findings about the affected resources in Amazon S3 buckets with or without allow lists.
Option 1: Create a Macie job with the allow list by using the console
In the navigation pane, choose Jobs, and then choose Create job.
On the Choose Amazon S3 buckets page, choose Select specific buckets.
Note: Macie displays a list of all the buckets managed by your AWS account, including members if configured, in the current Region.
Under Select Amazon S3 buckets, optionally choose Refresh to retrieve the latest bucket metadata from Amazon S3.
In the table, select each bucket you want the job to analyze, and then choose Next.
Review and optionally adjust the list of S3 buckets that you selected for the job, and then choose Next.
Refine the scope of the job, if needed. Use these settings to specify how often you want the job to run and the depth and scope of the job’s analysis, and then choose Next.
Select any managed data identifiers you want to use, and then choose Next.
Select any custom data identifiers that you want to use, and then choose Next.
Select the allow lists that you created to ignore either predefined text or regular expression patterns for any objects in the job, and then choose Next.
Figure 1: Selecting allow lists for a Macie job
In General settings, enter a name for the job. You can also enter a description and assign tags to the job. Choose Next.
Review and create the job, and then choose Submit.
Option 2: Create a Macie job with the allow list by using the AWS CLI
In the AWS CLI, run the following command. aws macie2 create-classification-job \ --generate-cli-skeleton > <insert-macie-job-input-json>
Input the GUID for the Macie allow list as part of the Macie job input in the JSON file.
Run the following command. aws macie2 create-classification-job \ --cli-input-json file://<insert-macie-job-input-json>
Review Macie findings before and after allow lists
It is important to note that for any existing jobs you configured in your AWS account or organization prior to the Macie allow list feature being released, you will need to recreate those Macie jobs and reference the allow lists you want the job to use. This is only required if you want to have existing jobs use allow lists.
Before you run a Macie job that uses predefined text allow lists, verify that existing Amazon Key Management Service (AWS KMS) keys that are used to encrypt buckets and S3 bucket policy grant the Macie service-linked role the necessary permissions to decrypt the S3 objects.
Figure 2 shows an example of predefined text allow lists for sensitive data discovery jobs, that include credit card numbers, Social Security Numbers (SSNs), and first and last names. The values in the S3 object allow lists will not create Macie findings when the sensitive data discovery job inspects S3 objects.
Figure 2: Example list of existing allow lists
Figure 3 shows a sensitive data discovery job that does not include the predefined text allow lists.
Figure 3: Macie job example without allow list configured
Since there are no allow lists configured, Macie creates findings for credit card numbers, United States SSNs, and names, as shown in Figure 4.
Figure 4: Macie job scan without allow list results
Figure 5 shows a sensitive data discovery job that does include the use of a predefined text allow lists.
Figure 5: Macie job example with allow list configured
Because we have configured an allow list for this job, Macie creates no findings for credit card numbers, United States SSNs, and names. Figure 6 shows the lack of findings.
Figure 6: Macie job results with allow list configured
Conclusion
In this post, we walked through how to create, manage, and use Macie allow lists with your Macie jobs. Reducing Macie false-positive findings can help your security team to efficiently identify and protect sensitive data within your AWS environment.
Now that we’ve showed you how to create an allow list in Macie, you can use this feature to tailor Macie in your AWS environment, based on your use cases and workloads. After you’ve reduced the false positives in your environment, you can start looking at how to add in automation to respond to Macie findings with allow lists configured.
Amazon Web Services (AWS) is pleased to announce that 20 additional AWS services have achieved Provisional Authority to Operate (P-ATO) from the Federal Risk and Authorization Management Program (FedRAMP) Joint Authorization Board (JAB). The following are the 20 AWS services with FedRAMP authorization for the U.S. federal government and organizations with regulated workloads:
AWS App Mesh provides application-level networking to help your services communicate with each other across multiple types of compute infrastructure.
AWS Audit Manager helps you to continuously audit your AWS usage to simplify how risk and compliance are assessed with regulations and industry standards.
AWS Chatbot is an interactive agent that helps you monitor, operate, and troubleshoot AWS workloads in your chat channels.
Amazon Chime SDK is a collection of client software development kits that use resources in your AWS account to add collaborative audio calling, video calling, and screen share features to your web or mobile applications.
AWS Cloud9 is a cloud-based integrated development environment (IDE) that helps you write, run, and debug your code with just a browser.
Amazon Detective helps you analyze, investigate, and quickly identify the root cause of potential security issues or suspicious activities.
EC2 Image Builder simplifies the building, testing, and deployment of virtual machine and container images for use on AWS or on-premises.
Amazon FinSpace is a data management and analytics service that is purpose built for the financial services industry (FSI).
AWS Firewall Manager is a security management service that allows you to centrally configure and manage firewall rules across your accounts and applications in AWS Organizations.
Amazon Forecast is a fully managed service that uses machine learning to deliver highly accurate forecasts.
Amazon MQ is a managed message broker service for Apache ActiveMQ and RabbitMQ to help you set up and operate message brokers on AWS.
Amazon Neptune is a fast, reliable, fully managed graph database service that helps you build and run applications that work with highly connected datasets.
Amazon Quantum Ledger Database (Amazon QLDB) is a purpose-built ledger database that provides a complete and cryptographically verifiable history of changes made to your application data.
Amazon Timestream is a fast, scalable, and serverless time series database service for AWS IoT Core and operational applications that can help you to store and analyze trillions of events per day up to 1,000 times faster and at as little as 1/10th the cost of relational databases.
AWS is continually expanding the scope of our compliance programs to help customers use authorized services for sensitive and regulated workloads. AWS now offers 123 AWS services authorized in the AWS US East/West Regions under FedRAMP Moderate Authorization, and 105 services authorized in the AWS GovCloud (US) Regions under FedRAMP High Authorization.
With AWS Security Hub you are able to manage your security posture in AWS, perform security best practice checks, aggregate alerts, and automate remediation. Now you are able to use Amazon Simple Notification Service (Amazon SNS) to subscribe to the new Security Hub Announcements topic to receive updates about new Security Hub services and features, newly supported standards and controls, and other Security Hub changes.
Introducing the Security Hub Announcements topic
Amazon SNS follows the publish/subscribe (pub/sub) messaging model, in which notifications are delivered to you by using a push mechanism that eliminates the need for you to periodically check or poll for new information and updates. You can now use this push mechanism to receive notifications about Security Hub by subscribing to the dedicated Security Hub Announcements topic.
The Security Hub Announcements topic publishes the following types of notifications:
General notifications
Upcoming standards and controls
New AWS Regions supported
New standards and controls
Updated standards and controls
Retired standards and controls
Updates to the AWS Security Finding Format (ASFF)
New integrations
New features
Changes to existing features
How to use the Security Hub Announcements topic
You can subscribe to the SNS topic for Security Hub Announcements to receive notification messages about newly released finding types, updates to the existing finding types, and other functionality changes. By subscribing to the SNS topic, you will receive Security Hub Announcements messages as soon as they are published. The notifications are available in all protocols that Amazon SNS supports, such as email and SMS. For more information about supported protocols in Amazon SNS, see Subscribing to an Amazon SNS topic.
The Security Hub Announcements topic is available in all AWS Regions in the aws and aws-cn partitions, but is not yet available in the AWS GovCloud (US) Regions (the aws-us-gov partition). Later in this post, we’ll show you how to subscribe to the Security Hub Announcements topic in a specific AWS Region by using the topic Amazon Resource Name (ARN) for that Region. The SNS topic messages are the same across Regions in a partition, so you can choose to subscribe to only one Region in a partition to avoid receiving duplicate information.
However, if you want to invoke an AWS Lambda function in reaction to a Security Hub Announcements message, you must subscribe to the topic ARN that is in the same Region as the Lambda function. The Lambda function can receive the SNS topic message payload as an input parameter and manipulate the information in the message, publish the message to other SNS topics, or send the message to other AWS services. For more information, see Subscribing a function to a topic in the Amazon SNS Developer Guide.
The same is true if you want to subscribe an Amazon Simple Queue Service (Amazon SQS) queue to the Security Hub Announcements topic, you must use a topic ARN that is in the same Region as the SQS queue. The SQS queue can be used to persist announcement SNS topic messages in the queue for other applications to process at a later time. For more information, see Subscribing an Amazon SQS queue to an Amazon SNS topic in the Amazon SQS Developer Guide.
IAM permissions
Your user account must have sns::subscribe AWS Identity and Access Management (IAM) permissions to subscribe to an SNS topic. For more information on IAM permissions for Amazon SNS, see Using identity-based policies with Amazon SNS.
Subscribe to the Security Hub Announcements topic
The following is the list of Security Hub Announcements topic ARNs for each currently supported Region. The examples in this post use the US West (Oregon) Region (us-west-2), but you can update the procedures with one of the following ARNs to use a different supported Region.
The two procedures that follow show you how to subscribe an email address to the Security Hub Announcements topic by using the AWS Management Console and the AWS CLI.
To subscribe an email address to the Security Hub Announcements topic (console)
For Endpoint, enter an email address that you can use to receive the notification.
Choose Create subscription.
In your email application, open the message from AWS Notifications and open the link to confirm your subscription. Your web browser displays a confirmation response from Amazon SNS, similar to that shown in Figure 1.
The following steps show you how to subscribe an email address to the Security Hub Announcements topic by using the AWS Command Line Interface (AWS CLI).
To subscribe an email address to the Security Hub Announcements topic (AWS CLI)
Run the following command in the AWS CLI, replacing <[email protected]> with your email address, and optionally replacing the ARN and reference to us-west-2 if you want to use a different Region: aws sns --region us-west-2 subscribe --topic-arn arn:aws:sns:us-west-2:393883065485:SecurityHubAnnouncements --protocol email --notification-endpoint<[email protected]>
In your email application, open the message from AWS Notifications and open the link to confirm your subscription.
Your web browser displays a confirmation response from Amazon SNS, similar to that shown in Figure 1.
Example subscription responses
The following sections contain examples of a message announcing new standard controls supported by Security Hub in email and sqs protocol types.
Example message from an email subscription (protocol type: email)
{"AnnouncementType":"NEW_STANDARDS_CONTROLS", “Title”:”[New Controls] 36 new Security Hub controls added to the AWS Foundational Security Best Practices standard”, "Description":"We have added 36 new controls to the AWS Foundational Security Best Practices standard. These include controls for Amazon Auto Scaling (AutoScaling.3, AutoScaling.4, AutoScaling.6), AWS CloudFormation (CloudFormation.1), Amazon CloudFront (CloudFront.10), Amazon Elastic Compute Cloud (Amazon EC2) (EC2.23, EC2.24, EC2.27), Amazon Elastic Container Registry (Amazon ECR) (ECR.1, ECR.2), Amazon Elastic Container Service (Amazon ECS) (ECS.3, ECS.4, ECS.5, ECS.8, ECS.10, ECS.12), Amazon Elastic File System (Amazon EFS) (EFS.3, EFS.4), Amazon Elastic Kubernetes Service (Amazon EKS) (EKS.2), Elastic Load Balancing (ELB.12, ELB.13, ELB.14), Amazon Kinesis (Kinesis.1), AWS Network Firewall (NetworkFirewall.3, NetworkFirewall.4, NetworkFirewall.5), Amazon OpenSearch Service (Opensearch.7), Amazon Redshift (Redshift.9), Amazon Simple Storage Service (Amazon S3) (S3.13), Amazon Simple Notification Service (SNS.2), AWF WAF (WAF.2, WAF.3, WAF.4, WAF.6, WAF.7, WAF.8). If you enabled the AWS Foundational Security Best Practices standard in an account and configured Security Hub to automatically enable new controls, these controls are enabled by default. Availability of controls can vary by Region."}
Example message from an SQS queue subscription (protocol type: sqs)
The following message shows the additional metadata included with an SQS subscription to the Security Hub Announcements topic. For more information about the metadata included in an SNS topic message delivered to an SQS queue, see Fanout to Amazon SQS Queues.
{
  "Type" : "Notification",
  "MessageId" : "c9c03e46-69df-5c3c-84e9-6520708ac394",
  "TopicArn" : "arn:aws:sns:us-west-2:393883065485:SecurityHubAnnouncements",
  "Message" : "{\"AnnouncementType\":\"NEW_STANDARDS_CONTROLS\",\"Title\":\"[New Controls] 36 new Security Hub controls added to the AWS Foundational Security Best Practices standard\",\"Description\":\"We have added 36 new controls to the AWS Foundational Security Best Practices standard. These include controls for Amazon Auto Scaling (AutoScaling.3, AutoScaling.4, AutoScaling.6), AWS CloudFormation (CloudFormation.1), Amazon CloudFront (CloudFront.10), Amazon Elastic Compute Cloud (Amazon EC2) (EC2.23, EC2.24, EC2.27), Amazon Elastic Container Registry (Amazon ECR) (ECR.1, ECR.2), Amazon Elastic Container Service (Amazon ECS) (ECS.3, ECS.4, ECS.5, ECS.8, ECS.10, ECS.12), Amazon Elastic File System (Amazon EFS) (EFS.3, EFS.4), Amazon Elastic Kubernetes Service (Amazon EKS) (EKS.2), Elastic Load Balancing (ELB.12, ELB.13, ELB.14), Amazon Kinesis (Kinesis.1), AWS Network Firewall (NetworkFirewall.3, NetworkFirewall.4, NetworkFirewall.5), Amazon OpenSearch Service (Opensearch.7), Amazon Redshift (Redshift.9), Amazon Simple Storage Service (Amazon S3) (S3.13), Amazon Simple Notification Service (SNS.2), AWF WAF (WAF.2, WAF.3, WAF.4, WAF.6, WAF.7, WAF.8). If you enabled the AWS Foundational Security Best Practices standard in an account and configured Security Hub to automatically enable new controls, these controls are enabled by default. Availability of controls can vary by Region. \"}",
  "Timestamp" : "2022-08-04T18:59:33.319Z",
  "SignatureVersion" : "1",
  "Signature" : "GdKokPEUexpKZn5da5u/p5eZF1cE3JUyL0uPVKmPnDzd3orkk5jJ211VsOflUFi6V9lSXF/V6RBpQN/9f3+JBFBprng7BRQwT9I4jSa1xOn1L3xKXEVGvWI6nl1oDqBl21Pj3owV+NZ+Exd2W0dpgg8B1LG4bYq5T73MjHjWGtelcBa15TpIz/+rynqanXCKCvc/50V/XZLjA5M7gU6Dzs9CULIjkdEpCsw5FvSxbtkEd6Ktx4LH7Zq6FlPKNli3EaEHRKh9uYPo6sR/yvF4RWg3E9O4dVsK7A8uTdR+pwVCU1M601KMRxO1OWF8VIdvyPINJND8Nu/70GRA2L+MRA==",
  "SigningCertURL" : "https://sns.us-west-2.amazonaws.com/SimpleNotificationService-56e67fcb41f6fec09b0196692625d385.pem",
  "UnsubscribeURL" : "https://sns.us-west-2.amazonaws.com/?Action=Unsubscribe&SubscriptionArn=arn:aws:sns:us-west-2:393883065485:SecurityHubAnnouncements:1eb29a83-8726-4366-891c-293ad5e35a53"
}
Note: You need to set up the SQS access policy in order for SNS to push message to the SNS queue. For more information, see Basic examples of Amazon SQS policies.
Available now
The SNS topic for Security Hub Announcements is available today in the Regions described in this post. Subscribe now to stay informed of Security Hub updates. With Amazon SNS, there is no minimum fee, and you pay only for what you use. For more information, see the Amazon SNS pricing page.
If you have feedback about this post, submit comments in the Comments section below. If you have questions about this post, contact AWS Support. You can also start a new thread on AWS Security Hub re:Post to get answers from the community.
Want more AWS Security news? Follow us on Twitter.
The NIST 800-53 framework is a regulatory standard that defines the minimum baseline of security controls for U.S. federal information systems. In 2020, NIST released Revision 5 of the framework to improve security standards for industry partners and government agencies. The set of NIST 800-53 controls provides a foundation for additional laws and regulations within the U.S. government.
AWS meets the NIST 800-53 Revision 4 regulatory standards mandated by government authorities. NIST added numerous security enhancements, such as privacy and supply chain management, to Revision 5 to keep abreast of emerging threats to federal information systems.
In preparation for federal regulators to accept NIST 800-53 Revision 5 as the new requirement standard, AWS has begun efforts to adapt to the new security controls, processes, and procedures. AWS security compliance teams have analyzed the new requirements and launched a project to implement the updates. Although AWS is not required to migrate to the new Revision 5 standard until NIST announces the official regulatory compliance deadline, we are already taking steps to meet the deadline.
AWS Network Firewall helps make it easier for you to secure virtual networks at scale inside Amazon Web Services (AWS). Without having to worry about availability, scalability, or network performance, you can now deploy Network Firewall with the AWS Firewall Manager service. Firewall Manager allows administrators in your organization to apply network firewalls across accounts. This post will take you through different deployment models and demonstrate with step-by-step instructions how this can be achieved.
Here’s a quick overview of the services used in this blog post:
Amazon Virtual Private Cloud (Amazon VPC) is a logically isolated virtual network. It has inbuilt network security controls and routing between VPC subnets by design. An internet gateway is a horizontally scaled, redundant, and highly available VPC component that allows communication between your VPC and the internet.
AWS Transit Gateway is a service that connects your VPCs to each other, to on-premises networks, to virtual private networks (VPNs), and to the internet through a central hub.
AWS Network Firewall is a service that secures network traffic at the organization and account levels. AWS Network Firewall policies govern the monitoring and protection behavior of these firewalls. The specifics of these policies are defined in rule groups. A rule group consists of rules that define reusable criteria for inspecting and processing network traffic. Network Firewall can support thousands of rules that can be based on a domain, port, protocol, IP address, or pattern matching.
AWS Firewall Manager is a security management service that acts as a central place for you to configure and deploy firewall rules across AWS Regions, accounts, and resources in AWS Organizations. Firewall Manager helps you to ensure that all firewall rules are consistently enforced, even as new accounts and resources are created. Firewall Manager integrates with AWS Network Firewall, Amazon Route 53 Resolver DNS Firewall, AWS WAF, AWS Shield Advanced, and Amazon VPC security groups.
Deployment models overview
When it comes to securing multiple AWS accounts, security teams categorize firewall deployment into centralized or distributed deployment models. Firewall Manager supports Network Firewall deployment in both modes. There are multiple additional deployment models available with Network Firewall. For more information about these models, see the blog post Deployment models for AWS Network Firewall.
Centralized deployment model
Network Firewall can be centrally deployed as an Amazon VPC attachment to a transit gateway that you set up with AWS Transit Gateway. Transit Gateway acts as a network hub and simplifies the connectivity between VPCs as well as on-premises networks. Transit Gateway also provides inter-Region peering capabilities to other transit gateways to establish a global network by using the AWS backbone. In a centralized transit gateway model, Firewall Manager can create one or more firewall endpoints for each Availability Zone within an inspection VPC. Network Firewall deployed in a centralized model covers the following use cases:
Filtering and inspecting traffic within a VPC or in transit between VPCs, also known as east-west traffic.
Filtering and inspecting ingress and egress traffic to and from the internet or on-premises networks, also known as north-south traffic.
Distributed deployment model
With the distributed deployment model, Firewall Manager creates endpoints into each VPC that requires protection. Each VPC is protected individually and VPC traffic isolation is retained. You can either customize the endpoint location by specifying which Availability Zones to create firewall endpoints in, or Firewall Manager can automatically create endpoints in those Availability Zones that have public subnets. Each VPC does not require connectivity to any other VPC or transit gateway. Network Firewall configured in a distributed model addresses the following use cases:
Protect traffic between a workload in a public subnet (for example, an EC2 instance) and the internet. Note that the only recommended workloads that should have a network interface in a public subnet are third-party firewalls, load balancers, and so on.
Protect and filter traffic between an AWS resource (for example Application Load Balancers or Network Load Balancers) in a public subnet and the internet.
Deploying Network Firewall in a centralized model with Firewall Manager
The following steps provide a high-level overview of how to configure Network Firewall with Firewall Manager in a centralized model, as shown in Figure 1.
Create an Inspection VPC in each Firewall Manager member account. Firewall Manager will use these VPCs to create firewalls. Follow the steps to create a VPC.
Create the stateless and stateful rule groups that you want to centrally deploy as an administrator. For more information, see Rule groups in AWS Network Firewall.
Build and deploy Firewall Manager policies for Network Firewall, based on the rule groups you defined previously. Firewall Manager will now create firewalls across these accounts.
Finish deployment by updating the related VPC route tables in the member account, so that traffic gets routed through the firewall for inspection.
Figure 1: Network Firewall centralized deployment model
The following steps provide a detailed description of how to configure Network Firewall with Firewall Manager in a centralized model.
To deploy network firewall policy centrally with Firewall Manager (console)
Sign in to your Firewall Manager delegated administrator account and open the Firewall Manager console under AWS WAF and Shield services.
In the navigation pane, under AWS Firewall Manager, choose Security policies.
On the Filter menu, select the AWS Region where your application is hosted, and choose Create policy. In this example, we choose US East (N. Virginia).
As shown in Figure 2, under Policy details, choose the following:
For AWS services, choose AWS Network Firewall.
For Deployment model, choose Centralized.
Figure 2: Network Firewall Manager policy type and Region for centralized deployment
Choose Next.
Enter a policy name.
In the AWS Network Firewall policy configuration pane, you can choose to configure both stateless and stateful rule groups along with their logging configurations. In this example, we are not creating any rule groups and keep the default configurations, as shown in Figure 3. If you would like to add a rule group, you can create rule groups here and add them to the policy.
For Inspection VPC configuration, select the account and add the VPC ID of the inspection VPC in each of the member accounts that you previously created, as shown in Figure 4. In the centralized model, you can only select one VPC under a specific account as the inspection VPC.
Figure 4: Inspection VPC configuration
For Availability Zones, select the Availability Zones in which you want to create the Network Firewall endpoint(s), as shown in Figure 5. You can select by Availability Zone name or Availability Zone ID. Optionally, if you want to specify the CIDR for each Availability Zone, or specify the subnets for firewall subnets, then you can add the CIDR blocks. If you don’t provide CIDR blocks, Firewall Manager queries your VPCs for available IP addresses to use. If you provide a list of CIDR blocks, Firewall Manager searches for new subnets only in the CIDR blocks that you provide.
Figure 5: Network Firewall endpoint Availability Zones configuration
Choose Next.
For Policy scope, choose VPC, as shown in Figure 6.
For Resource cleanup, choose Automatically remove protections from resources that leave the policy scope. When you select this option, Firewall Manager will automatically remove Firewall Manager managed protections from your resources when a member account or a resource leaves the policy scope. Choose Next.
For Policy tags, you don’t need to add any tags. Choose Next.
Review the security policy, and then choose Create policy.
To route traffic for inspection, you manually update the route configuration in the member accounts. Exactly how you do this depends on your architecture and the traffic that you want to filter. For more information, see Route table configurations for AWS Network Firewall.
Note: In current versions of Firewall Manager, centralized policy only supports one inspection VPC per account. If you want to have multiple inspection VPCs in an account to inspect multiple firewalls, you cannot deploy all of them through Firewall Manager centralized policy. You have to manually deploy to the network firewalls in each inspection VPC.
Deploying Network Firewall in a distributed model with Firewall Manager
The following steps provide a high-level overview of how to configure Network Firewall with Firewall Manager in a distributed model, as shown in Figure 7.
Create a new VPC with a desired tag in each Firewall Manager member account. Firewall Manager uses these VPC tags to create network firewalls in tagged VPCs. Follow these steps to create a VPC.
Create the stateless and stateful rule groups that you want to centrally deploy as an administrator. For more information, see Rule groups in AWS Network Firewall.
Build and deploy Firewall Manager policy for network firewalls into tagged VPCs based on the rule groups that you defined in the previous step.
Finish deployment by updating the related VPC route tables in the member accounts to begin routing traffic through the firewall for inspection.
Figure 7: Network Firewall distributed deployment model
The following steps provide a detailed description how to configure Network Firewall with Firewall Manager in a distributed model.
To deploy Network Firewall policy distributed with Firewall Manager (console)
Create new VPCs in member accounts and tag them. In this example, you launch VPCs in the US East (N. Virginia) Region. Create a new VPC in a member account by using the VPC wizard, as follows.
Choose VPC with a Single Public Subnet. For this example, select a subnet in the us-east-1a Availability Zone.
Add a desired tag to this VPC. For this example, use the key Network Firewall and the value yes. Make note of this tag key and value, because you will need this tag to configure the policy in the Policy scope step.
Sign in to your Firewall Manager delegated administrator account and open the Firewall Manager console under AWS WAF and Shield services.
In the navigation pane, under AWS Firewall Manager, choose Security policies.
On the Filter menu, select the AWS Region where you created VPCs previously and choose Create policy. In this example, you choose US East (N. Virginia).
For AWS services, choose AWS Network Firewall.
For Deployment model, choose Distributed, and then choose Next.
Figure 8: Network Firewall Manager policy type and Region for distributed deployment
Enter a policy name.
On the AWS Network Firewall policy configuration page, you can configure both stateless and stateful rule groups, along with their logging configurations. In this example you are not creating any rule groups, so you choose the default configurations, as shown in Figure 9. If you would like to add a rule group, you can create rule groups here and add them to the policy.
Figure 9: Network Firewall policy configuration
Choose Next.
In the Configure AWS Network Firewall Endpoint section, as shown in Figure 10, you can choose Custom endpoint configuration or Automatic endpoint configuration. In this example, you choose Custom endpoint configuration and select the us-east-1a Availability Zone. Optionally, if you want to specify the CIDR for each Availability Zone or specify the subnets for firewall subnets, then you can add the CIDR blocks. If you don’t provide CIDR blocks, Firewall Manager queries your VPCs for available IP addresses to use. If you provide a list of CIDR blocks, Firewall Manager searches for new subnets only in the CIDR blocks that you provide.
Figure 10: Network Firewall endpoint Availability Zones configuration
Choose Next.
For AWS Network Firewall route configuration, choose the following options, as shown in Figure 11. This will monitor the route configuration using the administrator account, to help ensure that traffic is routed as expected through the network firewalls.
For Route management, choose Monitor.
Under Traffic type, for Internet gateway, choose Add to firewall policy.
Select the checkbox for Allow required cross-AZ traffic, and then choose Next.
Important: Be careful when defining the policy scope. Each policy creates Network Firewall endpoints in all the VPCs and their Availability Zones that are within the policy scope. If you select an inappropriate scope, it could result in the creation of a large number of network firewalls and incur significant charges for AWS Network Firewall.
For Resource cleanup, select the Automatically remove protections from resources that leave the policy scope check box, and then choose Next.
For Policy tags, you don’t need to add any tags. Choose Next.
Review the security policy, and then choose Create policy.
To route traffic for inspection, you need to manually update the route configuration in the member accounts. Exactly how you do this depends on your architecture and the traffic that you want to filter. For more information, see Route table configurations for AWS Network Firewall.
Clean up
To avoid incurring future charges, delete the resources you created for this solution.
To delete Firewall Manager policy (console)
Sign in to your Firewall Manager delegated administrator account and open the Firewall Manager console under AWS WAF and Shield services
In the navigation pane, choose Security policies.
Choose the option next to the policy that you want to delete.
Choose Delete all policy resources, and then choose Delete. If you do not select Delete all policy resources, then only the firewall policy on the administrator account will be deleted, not network firewalls deployed in the other accounts in AWS Organizations.
In this blog post, you learned how you can use either a centralized or a distributed deployment model for Network Firewall, so developers in your organization can build firewall rules, create security policies, and enforce them in a consistent, hierarchical manner across your entire infrastructure. As new applications are created, Firewall Manager makes it easier to bring new applications and resources into a consistent state by enforcing a common set of security rules.
If you have feedback about this post, submit comments in the Comments section below. If you have questions about this post, start a new thread on the AWS Firewall Manager re:Post or contact AWS Support.
Want more AWS Security news? Follow us on Twitter.
Maintaining AWS Identity and Access Management (IAM) resources is similar to keeping your garden healthy over time. Having visibility into your IAM resources, especially the resources that are no longer used, is important to keep your AWS environment secure. Proactively detecting and responding to unused IAM roles helps you prevent unauthorized entities from gaining access to your AWS resources. In this post, I will show you how to apply resource tags on IAM roles and deploy serverless technologies on AWS to detect unused IAM roles and to require the owner of the IAM role (identified through tags) to take action.
You can use this solution to check for unused IAM roles in a standalone AWS account. As you grow your workloads in the cloud, you can run this solution for multiple AWS accounts by using AWS Organizations. In this solution, you use AWS Control Tower to create an AWS Organizations organization with a Security organizational unit (OU), and a Security account in this OU. In this blog post, you deploy the solution in the Security account belonging to a Security OU of an organization.
For more information and recommended best practices, see the blog post Managing the multi-account environment using AWS Organizations and AWS Control Tower. Following this best practice, you can create a Security OU, in which you provision one or more Security and Audit accounts that are dedicated for security automation and audit activities on behalf of the entire organization.
Solution architecture
The architecture diagram in Figure 1 demonstrates the solution workflow.
Figure 1: Solution workflow for standalone account or member account of an AWS Organization.
The solution is triggered periodically by an Amazon EventBridgescheduled rule and invokes a series of actions. You specify the frequency (in number of days) when you create the EventBridge rule. There are two options to run this solution, based on the needs of your organization.
Option 1: For a standalone account
Choose this option if you would like to check for unused IAM roles in a single AWS account. This AWS account might or might not belong to an organization or OU. In this blog post, I refer to this account as the standalone account.
You should deploy the solution to the standalone Security account, which has appropriate admin permission to audit other accounts and manage security automation.
Because this solution uses AWS CloudFormationStackSets, you need to grant self-managed permissions to create stack sets in standalone accounts. Specifically, you need to establish a trust relationship between the standalone Security account and the standalone account by creating the AWSCloudFormationStackSetAdministrationRole IAM role in the standalone Security account, and the AWSCloudFormationStackSetExecutionRole IAM role in the standalone account.
You need to have AWS Security Hub enabled in your standalone Security account, and you need to deploy the solution in the same AWS Region as your Security Hub dashboard.
You need a tagging enforcement in place for IAM roles. This solution uses an IAM tag key Owner to identify the email address of the owner. The value of this tag key should be the email address associated with the owner of the IAM role. If the Owner tag isn’t available, the notification email is sent to the email address that you provided in the parameter ITSecurityEmail when you provisioned the CloudFormation stack.
This solution uses Amazon Simple Email Service (Amazon SES) to send emails to the owner of the IAM roles. The destination address needs to be verified with Amazon SES. With Amazon SES, you can verify identity at the individual email address or at the domain level.
An EventBridge rule triggers the AWS Lambda function LambdaCheckIAMRole in the standalone Security account. The LambdaCheckIAMRolefunction assumes a role in the standalone account. This role is named after the Cloudformation stack name that you specify when you provision the solution. Then LambdaCheckIAMRole calls the IAM API action GetAccountAuthorizationDetails to get the list of IAM roles in the standalone account, and parses the data type RoleLastUsed to retrieve the date, time, and the Region in which the roles were last used. If the last time value is not available, the IAM role is skipped. Based on the CloudFormation parameter MaxDaysForLastUsed that you provide, LambdaCheckIAMRole determines if the last time used is greater than the MaxDaysForLastUsed value. LambdaCheckIAMRole also extracts tags associated with the IAM roles, and retrieves the email address of the IAM role owner from the value of the tag key Owner. If there is no Owner tag, then LambdaCheckIAMRole sends an email to a default email address provided by you from the CloudFormation parameter ITSecurityEmail.
Option 2: For all member accounts that belong to an organization or an OU
Choose this option if you want to check for unused IAM roles in every member account that belongs to an AWS Organizations organization or OU.
Prerequisites
You need to have an AWS Organizations organization with a dedicated Security account that belongs to a Security OU. For this blog post, I refer to this account as the Security account.
You should deploy the solution to the Security account that has appropriate admin permission to audit other accounts and to manage security automation.
Because this solution uses CloudFormation StackSets to create stack sets in member accounts of the organization or OU that you specify, the Security account in the Security OU needs to be granted CloudFormation delegated admin permission to create AWS resources in this solution.
You need Security Hub enabled in your Security account, and you need to deploy the solution in the same Region as your Security Hub dashboard.
You need tagging enforcement in place for IAM roles. This solution uses the IAM tag key Owner to identify the owner email address. The value of this tag key should be the email address associated with the owner of the IAM role. If the Owner tag isn’t available, the notification email will be sent to the email address that you provided in the parameter ITSecurityEmail when you provisioned the CloudFormation stack.
This solution uses Amazon SES to send emails to the owner of the IAM roles. The destination address needs to be verified with Amazon SES. With Amazon SES, you can verify identity at the individual email address or at the domain level.
An EventBridge rule triggers the Lambda function LambdaGetAccounts in the Security account to collect the account IDs of member accounts that belong to the organization or OU. LambdaGetAccounts sends those account IDs to an SNS topic. Each account ID invokes the Lambda function LambdaCheckIAMRole once.
Similar to the process for Option 1, LambdaCheckIAMRole in the Security account assumes a role in the member account(s) of the organization or OU, and checks the last time that IAM roles in the account were used.
In both options, if an IAM role is not currently used, the function LambdaCheckIAMRole generates a Security Hub finding, and performs BatchImportFindings for all findings to Security Hub in the Security account. At the same time, the Lambda function starts an AWS Step Functions state machine execution. Each execution is for an unused IAM role following this naming convention: [target-account-id]-[unused IAM role name]-[time the execution created in Unix format]
You should avoid running this solution against special IAM roles, such as a break-glass role or a disaster recovery role. In the CloudFormation parameter RolePatternAllowedlist, you can provide a list of role name patterns to skip the check.
Use a Step Functions state machine to process approval
Figure 2 shows the state machine workflow for owner approval.
Figure 2: Owner approval state machine workflow
After the solution identifies an unused IAM role, it creates a Step Functions state machine execution. Figure 2 demonstrates the workflow of the execution. After the execution starts, the first Lambda taskNotifyOwner (powered by the Lambda function NotifyOwnerFunction) sends an email to notify the IAM role owner. This is a callback task that pauses the execution until a taskToken is returned. The maximum pause for a callback task is 1 year. The execution waits until the owner responds with a decision to delete or keep the role, which is captured by a private API endpoint in Amazon API Gateway. You can configure a timeout to avoid waiting for callback task execution.
With a private API endpoint, you can build a REST API that is only accessible within your Amazon Virtual Private Cloud (Amazon VPC), or within your internal network connected to your VPC. Using a private API endpoint will prevent anyone from outside of your internal network from selecting this link and deleting the role. You can implement authentication and authorization with API Gateway to make sure that only the appropriate owner can delete a role.
If the owner denies role deletion, then the role remains intact until the next automation cycle runs, and the state machine execution stops immediately with a Fail status. If the owner approves role deletion, the next Lambda task Approve (powered by the function ApproveFunction) checks again if the role is not currently used. If the role isn’t in use, the Lambda task Approve attaches an IAM policy DenyAllCheckUnusedIAMRoleSolution to deny the role to perform any actions, and waits for 30 days. During this wait time, you can restore the IAM role by removing the IAM policy DenyAllCheckUnusedIAMRoleSolution from the role. The Step Functions state machine execution for this role is still in progress until the wait time expires.
After the wait time expires, the state machine execution invokes the Validate task. The Lambda function ValidateFunction checks again if the role is not in use after the amount of time calculated by adding MaxDaysForLastUsed and the preceding wait time. It also checks if the IAM policy DenyAllCheckUnusedIAMRoleSolution is attached to the role. If both of these conditions are true, the Lambda function follows a process to detach the IAM policies and delete the role permanently. The role can’t be recovered after deletion.
Note: To restore a role that has been marked for deletion, detach the DenyAll IAM policy from the role.
To deploy the solution using the AWS CLI
Clone git repo from AWS Samples to get source code and CloudFormation templates.
git clone https://github.com/aws-samples/aws-blog-automate-iam-role-deletion
cd /aws-blog-automate-iam-role-deletion
Run the AWS CLI command below to upload CloudFormation templates and Lambda code to a S3 bucket in the Security Account. The S3 bucket needs to be in the same Region where you will deploy the solution.
To deploy the solution for a single account, use the following commands. Be sure to replace <YOUR_BUCKET_NAME> and <PATH_TO_UPLOAD_CODE> with your own values.
#Deploy solution for a single target AWS Account
aws cloudformation package \
--template-file solution_scope_account.yml \
--s3-bucket <YOUR_BUCKET_NAME> \
--s3-prefix <PATH_TO_UPLOAD_CODE> \
--output-template-file solution_scope_account.template
To deploy the solution for an organization or OU, use the following commands. Be sure to replace <YOUR_BUCKET_NAME> and <PATH_TO_UPLOAD_CODE> with your own values.
#Deploy solution for an Organization/OU
aws cloudformation package \
--template-file solution_scope_organization.yml \
--s3-bucket <YOUR_BUCKET_NAME> \
--s3-prefix <PATH_TO_UPLOAD_CODE> \
--output-template-file solution_scope_organization.template
Validate the template generated by the CloudFormation package.
To validate the solution for a single account, use the following commands.
#Deploy solution for a single target AWS Account
aws cloudformation validate-template —template-body file://solution_scope_account.template
To validate the solution for an organization or OU, use the following commands.
#Deploy solution for an Organization/OU
aws cloudformation validate-template —template-body file://solution_scope_organization.template
Deploy the solution in the same Region that you use for Security Hub. The stack takes 30 minutes to complete deployment.
To deploy the solution for a single account, use the following commands. Be sure to replace all of the placeholders with your own values.
#Deploy solution for a single target AWS Account
aws cloudformation deploy \
--template-file solution_scope_account.template \
--stack-name <UNIQUE_STACK_NAME> \
--region <REGION> \
--capabilities CAPABILITY_NAMED_IAM CAPABILITY_AUTO_EXPAND \
--parameter-overrides AccountId='<STANDALONE ACCOUNT ID>' \
Frequency=<DAYS> MaxDaysForLastUsed=<DAYS> \
ITSecurityEmail='<YOUR IT TEAM EMAIL>' \
RolePatternAllowedlist='<ALLOWED PATTERN>'
To deploy the solution for an organization, run the following commands to create CloudFormation stack in the Security Account of the organization.
The solution is triggered by an EventBridge scheduled rule, so it doesn’t perform the checks immediately. To test the solution right away after the CloudFormation stacks are successfully created, follow these steps.
To manually trigger the automation for a single account
Navigate to the AWS Lambda console and choose the function <CloudFormation stackname>-LambdaCheckIAMRole.
Choose Test.
Choose New event.
For Name, enter a name for the event, and provide the current time in UTC Date Time format YYYY-MM-DDTHH:MM:SSZ. For example{“time”: “2022-01-22T04:36:52Z”}. The Lambda function uses this value to calculate how much time has passed since the last time that a role was used. Figure 5 shows an example of configuring a test event.
Figure 5: Configure test event for standalone account
Choose Test.
To manually trigger the automation for an organization or OU
Choose the function [CloudFormation stackname]-LambdaGetAccounts.
Choose Test.
Choose New event.
For Name, enter a name for the event. Leave the default values for the remaining fields.
Choose Test.
Respond to unused IAM roles
After you’ve triggered the Lambda function, the automation runs the necessary checks. For each unused IAM role, it creates a Step Functions state machine execution.
To see the list of Step Functions state machine executions
Choose state machine [CloudFormation stackname]OnwerApprovalStateMachine.
Under the Executions tab, you will see the list of executions in running state following this naming convention: [target-account-id]-[unused IAM role name]-[time the execution created in Unix format]. Figure 6 shows an example list of executions.
Figure 6: Each unused IAM role generates an execution in the Step Functions state machine
Each execution sends out an email notification to the IAM role owner (if available through the Owner tag) or to the IT security email address that you provided in the CloudFormation stack parameter ITSecurityEmail. The email content is:
Subject: Please take action on this unused IAM Role

Hello!

This IAM Role arn:aws:iam::<AWS account>:role/<role name> is not in use for
more than 60 days.

Can you please delete the role by following this link: Approve link

Or keep this role by following this link: Deny Link
In the email, the Approve link and Deny link is the hyperlink to a private API endpoint with a parameter taskToken. If you try to access these links publicly, they won’t work. When you access the link, the taskToken is provided to the private API endpoint, which updates the Step Functions state machine.
To test the approval action using an API Gateway test
Navigate to the AWS Step Functions console. Under State machines, choose the state machine that has the name [CloudFormation stackname]OwnerApprovalStateMachine
On the Executions tab, there is a list of executions. Each execution represents a workflow for one IAM role, as shown in Figure 6. Choose the execution name that includes the IAM role name in the email that you received earlier.
Scroll down to Execution event history.
Expand the Step Notify Owner, enter TaskScheduled, find the item taskToken, and copy its value to a notepad, as shown in Figure 7.
Choose the API that has a name similar to [CloudFormation stackname]-PrivateAPIGW-[unique string]-ApprovalEndpoint.
Choose which action to test: Deny or Approve.
To test the Deny action, under /deny resource, choose the GET method.
To test the Approve action, under /approve resource, choose the GET method.
Choose Test.
Under Query Strings, enter taskToken= and paste the taskToken you copied earlier from the state machine execution. Figure 8 shows how to pass the taskToken to API Gateway.
Figure 8: Provide taskToken to API Gateway Method
Choose Test. After you test, the state machine resumes the workflow and finishes the automation. You won’t be able to change the action.
Navigate to the AWS Step Functions console. Choose the state machine and go to the state machine execution.
If you choose to deny the role deletion, the execution immediately stops as Fail.
If you choose to approve the role deletion, the execution moves to the Wait task. This task removes IAM policies associated to the role and waits for a period of time before moving to the next task. By default, the wait time is 30 days. To change this number, go to the Lambda function [CloudFormation stackname]ApproveFunction, and update the variable wait_time_stamp.
After the waiting period expires, the state machine triggers the Validate task to do a final validation on the role before deleting it. If the Validate task decides that the role is being used, it leaves the role intact. Otherwise, it deletes the role permanently.
Conclusion
In this blog post, you learned how serverless services such as Lambda, Step Functions, and API Gateway can work together to build security automation. We recommend testing this solution as a starting point. Then, you can build more features on top of the sample code and templates to customize it to perform checks, following guidance from your IT security team.
Here are a few suggestions that you can take to extend this solution.
This solution uses a private API Gateway to handle the approval response from the IAM role owner. You need to establish private connectivity between your internal network and AWS to invoke a private API Gateway. For instructions, see How to invoke a private API.
Your organization can use AWS Security Hub to gain a comprehensive view of your security and compliance posture across your Amazon Web Services (AWS) environment. Security Hub receives security findings from AWS security services and supported third-party products and centralizes them, providing a single view for identifying and analyzing security issues. Security Hub correlates findings and breaks them down into five severity categories: INFORMATIONAL, LOW, MEDIUM, HIGH, and CRITICAL. In this blog post, we provide step-by-step instructions for tracking Security Hub findings in each severity category against service-level agreements (SLAs) through visual dashboards.
SLAs are defined collaboratively by the Business, IT, and Security and Compliance teams within an organization. You can track Security Hub findings against your specific SLAs, and any findings that are in breach of an SLA can be escalated. You can also apply automation to alert the owners of the resources and remediate common security findings to improve your overall security posture.
Prerequisites
Security Hub uses service-linked AWS Config rules to perform security checks behind the scenes. To support these controls, you must enable AWS Config on all accounts, including the administrator and member accounts, in each AWS Region where Security Hub is enabled.
In this solution, you will learn two different ways to track your findings in Security Hub against the pre-defined SLA for each severity category.
Option 1: Use custom insights
Security Hub offers managed insights, which include a collection of related findings that identify a security issue that requires attention and intervention. You can view and take action on the insight findings. In addition to the managed insights, you can create custom insights to track issues and findings related to your resources in your environment.
Create a custom insight for SLA tracking
In this example, you set an SLA of 30 days for HIGH severity findings. This example will provide you with a view of the HIGH severity findings that were generated within the last 30 days and haven’t been resolved.
To create a custom insight to view HIGH severity findings from the last 30 days
On the Insights page, choose Create insight, as shown in Figure 1.
Figure 1: Create insight in the Security Hub console
On the Create insight page, in the search box, leave the following default filters: Workflow status is NEW, Workflow status is NOTIFIED, and Record state is ACTIVE, as show in Figure 2.
To select the required grouping attribute for the insight, choose the search box to display the filter options. In the search box, choose the following filters and settings:
Choose the Group by filter, and select WorkflowStatus.
Figure 2: Create insights using filters
Choose the Severity label filter and enter HIGH.
Choose the Created at filter and enter 30 to indicate the number of days you want to set as your SLA.
Choose Create insight again.
For Insightname, enter a meaningful name (for this example, we entered UnresolvedHighSevFindings), and then choose Create insight again.
You can repeat the same steps for other finding severities – CRITICAL, MEDIUM, LOW, and INFORMATIONAL; you can change the number of days you specify for the Created at filter to meet your SLA requirements; or specify different workflow status settings. Note that the workflow status can have the following values:
NEW – The initial state of a finding before you review it.
NOTIFIED – Indicates that the resource owner has been notified about the security issue.
SUPPRESSED – Indicates that you have reviewed the finding and no action is required.
RESOLVED – Indicates that the finding has been reviewed and remediated.
Your custom insight will show the findings that meet the criteria you defined. For more information about creating custom insights, see Module 2: Custom Insights in the Security Hub Workshop.
Option 2: Build visualizations for Security Hub findings data by using Amazon QuickSight
We hear from our customers that your organizations are looking for a solution where you can quickly visualize the status of your Security Hub findings, to see which findings you need to take action on (NEW and NOTIFIED) and which you do not (SUPPRESSED and RESOLVED). You can achieve this by building a data analytics pipeline that uses Amazon EventBridge, Amazon Kinesis Data Firehose, Amazon Simple Storage Service (Amazon S3), Amazon Athena, and Amazon QuickSight. The data analytics pipeline enables you to detect, analyze, contain, and mitigate issues quickly.
This solution integrates Security Hub with EventBridge to set SLA rules to a specified period of your choice for each severity level. For example, you can set the SLA to 5 days for CRITICAL severity findings, 10 days for HIGH severity findings, 14 days for MEDIUM severity findings, 30 days for LOW severity findings, and 60 days for INFORMATIONAL severity findings.
Architecture overview
Figure 3 shows the architectural overview of the QuickSight solution workflow.
Figure 3: Architecture diagram for option 2, the QuickSight solution
In the QuickSight solution, Security Hub publishes the findings to EventBridge, and then an EventBridge rule (based on the SLA) is configured to deliver the findings to Kinesis Data Firehose. For example, if the SLA is 14 days for all MEDIUM severity findings, then those findings will be filtered by the rule and sent to Kinesis Data Firehose. Security Hub findings follow the AWS Security Finding Format (ASFF).
The following is a sample EventBridge rule that filters the Security Hub findings for MEDIUM severity and workflow status NEW, before publishing the findings to Kinesis Data Firehose, and then finally to Amazon S3 for storage. A workflow status of NEW and NOTIFIED should be included to catch all findings that require action.
After the findings are exported and stored in Amazon S3, you can use Athena to run queries on the data and you can use Amazon QuickSight to display the findings that violate your organization’s SLA. With Athena, you can create views of the original table as a logical table. You can also create a view for CRITICAL, HIGH, MEDIUM, LOW, and INFORMATIONAL severity findings.
The QuickSight dashboard shown in Figure 4 is an example that shows all the MEDIUM severity findings that should be resolved within a 14 day SLA.
Figure 4: QuickSight table showing medium severity findings over a 14-day SLA
Using QuickSight, you can create different types of data visualizations to represent the exported Security Hub findings, which enables the decision makers in your organization to explore and interpret information in an interactive visual environment. For example, Figure 5 shows findings categorized by service.
Figure 5: QuickSight visual showing MEDIUM severity findings for each service
As another example, Figure 6 shows findings categorized by severity.
Figure 6: QuickSight visual showing findings by severity
Over time, your organization might discover that there are certain findings that should be tracked at a lower or higher severity level than what is auto-generated from Security Hub. You can implement EventBridge rules with AWS Lambda functions to automatically update the severity of the findings as soon as they are generated.
Figure 7: Create an EventBridge rule in the console
Define the event pattern, including the finding generator ID or any other identifying fields for which you want to redefine the severity. Review the fields in the format, and choose your desired filters. The following is a sample of the event pattern.
Specify the target as a Lambda function that will host the code to update the finding severity.
Figure 8: Select a target Lambda function
In the Lambda function, use the BatchUpdateFindings API action to update the severity label as desired.
The following example Lambda code will update finding severity to INFORMATIONAL. This function requires Amazon CloudWatch write permissions, and requires permissions to invoke the Security Hub API action BarchUpdateFindings.
import logging
import json, boto3
import botocore.exceptions as boto3exceptions

logger = logging.getLogger()
logger.setLevel(os.environ.get('LOGLEVEL', 'INFO').upper())

def lambda_handler(event, context):

    finding_id = ""
    product_arn = ""

    logger.info(event)

    for finding in event['detail']['findings']:

        #determine and log this Finding's ID
        finding_id = finding["Id"]
        product_arn = finding["ProductArn"]
        logger.info("Finding ID: " + finding_id)


        #determine and log this Finding's resource type
        resource_type = finding["Resources"][0]["Type"]
        logger.info("Resource Type is: " + resource_type)

        try:
            sec_hub_client = boto3.client('securityhub')
            response = sec_hub_client.batch_update_findings(
                FindingIdentifiers=[
                {
                    'Id': finding_id,
                    'ProductArn': product_arn
                }
                ],
                    Severity={"Label": "INFORMATIONAL"}

                )

        except boto3exceptions.ClientError as error:
            logger.exception(f"Client error invoking batch update findings {error}")
        except boto3exceptions.ParamValidationError as error:
            logger.exception(f"The parameters you provided are incorrect: {error}")

    return {"statusCode": 200}
The finding is generated with a new severity level, as updated in the Lambda function. For example, Figure 9 shows a finding that is generated as MEDIUM by default, but the configured EventBridge rule and Lambda function update the severity level to INFORMATIONAL.
Figure 9: Security Hub findings generated with updated severity level
Conclusion
This blog post walked you through two different solutions for setting up and tracking the SLAs for the findings generated by Security Hub. Reporting Security Hub findings for a given SLA in a dashboard view can help you prioritize findings and track whether findings are being remediated on time. This post also provided example code that you can use to modify the Security Hub severity for a specific finding. To further extend the solution and enable custom actions to remediate the findings, see the following:
Since the broad launch of our multi-factor authentication (MFA) security key program, customers have been enthusiastic about the program and how they will use it to improve their organizations’ security posture. Given the level of interest, we’re expanding eligibility for the program to allow more US-based AWS account root users and payer accounts to take advantage of the offer. Previously, eligibility required that US-based root users and payer accounts spend a minimum of $100 per month over the past 3 months. Now, we are expanding eligibility to US-based root users and payer accounts who have spent a minimum of $300 over the past 3 months. If you are a US-based customer who meets the expanded eligibility requirements, we encourage you to place an order for your free security key. As a reminder, you can use the following steps to order your free key.
To order your free security key
Confirm your eligibility at the ordering portal. You will be prompted to sign in if you haven’t already. Sign in with your AWS account root user or payer account credentials.
Choose your free security key from the available options.
Provide your email address for order confirmation and your shipping address.
Place your order.
MFA as a core security best practice is one of the key messages emphasized at the recent AWS re:Inforce conference. Using MFA is one of the simplest ways for anyone, personally or professionally, to help improve their security online. For example, if credentials become compromised on GitHub, users have an extra layer of protection if MFA is enabled. Or, if your login details are compromised for your bank account, MFA acts a second factor to protect your account.
If you’re not eligible for a free security key at this time, but would still like a security key, check out our MFA recommendations. These are available for purchase from many sellers, including Amazon. For more information about the MFA program, see our Free MFA Security Key page.
If you have feedback about this post, submit comments in the Comments section below. If you have questions about this post, contact AWS Support.
Want more AWS Security news? Follow us on Twitter.
AWS Security Hub is a central dashboard for security, risk management, and compliance findings from AWS Audit Manager, AWS Firewall Manager, Amazon GuardDuty, IAM Access Analyzer, Amazon Inspector, and many other AWS and third-party services. You can use the insights from Security Hub to get an understanding of your compliance posture across multiple AWS accounts. It is not unusual for a single AWS account to have more than a thousand Security Hub findings. Multi-account and multi-Region environments may have tens or hundreds of thousands of findings. With so many findings, it is important for you to get a summary of the most important ones. Navigating through duplicate findings, false positives, and benign positives can take time.
In this post, we demonstrate how to export those findings to comma separated values (CSV) formatted files in an Amazon Simple Storage Service (Amazon S3) bucket. You can analyze those files by using a spreadsheet, database applications, or other tools. You can use the CSV formatted files to change a set of status and workflow values to align with your organizational requirements, and update many or all findings at once in Security Hub.
The solution described in this post, called CSV Manager for Security Hub, uses an AWS Lambda function to export findings to a CSV object in an S3 bucket, and another Lambda function to update Security Hub findings by modifying selected values in the downloaded CSV file from an S3 bucket. You use an Amazon EventBridge scheduled rule to perform periodic exports (for example, once a week). CSV Manager for Security Hub also has an update function that allows you to update the workflow, customer-specific notation, and other customer-updatable values for many or all findings at once. If you’ve set up a Region aggregator in Security Hub, you should configure the primary CSV Manager for Security Hub stack to export findings only from the aggregator Region. However, you may configure other CSV Manager for Security Hub stacks that export findings from specific Regions or from all applicable Regions in specific accounts. This allows application and account owners to view their own Security Hub findings without having access to other findings for the organization.
How it works
CSV Manager for Security Hub has two main features:
Export Security Hub findings to a CSV object in an S3 bucket
Update Security Hub findings from a CSV object in an S3 bucket
Overview of the export function
The overview of the export function CsvExporter is shown in Figure 1.
Figure 1: Architecture diagram of the export function
Figure 1 shows the following numbered steps:
In the AWS Management Console, you invoke the CsvExporter Lambda function with a test event.
The export function calls the Security Hub GetFindings API action and gets a list of findings to export from Security Hub.
The export function converts the most important fields to identify and sort findings to a 37-column CSV format (which includes 12 updatable columns) and writes to an S3 bucket.
Overview of the update function
To update existing Security Hub findings that you previously exported, you can use the update function CsvUpdater to modify the respective rows and columns of the CSV file you exported, as shown in Figure 2. There are 12 modifiable columns out of 37 (any changes to other columns are ignored), which are described in more detail in Step 3: View or update findings in the CSV file later in this post.
Figure 2: Architecture diagram of the update function
Figure 2 shows the following numbered steps:
You download the CSV file that the CsvExporter function generated from the S3 bucket and update as needed.
You upload the CSV file that contains your updates to the S3 bucket.
In the AWS Management Console, you invoke the CsvUpdater Lambda function with a test event containing the URI of the CSV file.
CsvUpdater reads the updated CSV file from the S3 bucket.
CsvUpdater identifies the minimum set of updates and invokes the Security Hub BatchUpdateFindings API action.
Step 1: Use the CloudFormation template to deploy the solution
You can find the latest code in the aws-security-hub-csv-manager GitHub repository, where you can also contribute to the sample code. The following commands show how to deploy the solution by using the AWS CDK. First, the AWS CDK initializes your environment and uploads the AWS Lambda assets to an S3 bucket. Then, you deploy the solution to your account by using the following commands. Replace <INSERT_AWS_ACCOUNT> with your account number, and replace <INSERT_REGION> with the AWS Region that you want the solution deployed to, for example us-east-1.
Choose the following Launch Stack button to open the AWS CloudFormation console pre-loaded with the template for this solution:
In the Parameters section, as shown in Figure 3, enter your values.
Figure 3: CloudFormation template variables
For What folder for CSV Manager for Security Hub Lambda code, leave the default Code. For What folder for CSV Manager for Security Hub exports, leave the default Findings.
These are the folders within the S3 bucket that the CSV Manager for Security Hub CloudFormation template creates to store the Lambda code, as well as where the findings are exported by the Lambda function.
For Frequency, for this solution you can leave the default value cron(0 8 ? * SUN *). This default causes automatic exports to occur every Sunday at 8:00 AM local time using an EventBridge scheduled rule. For more information about how to update this value to meet your needs, see Schedule Expressions for Rules in the Amazon CloudWatch Events User Guide.
The values you enter for the Regions field depend on whether you have configured an aggregation Region in Security Hub.
If you have configured an aggregation Region, enter only that Region code, for example eu-north-1, as shown in Figure 3.
If you haven’t configured an aggregation Region, enter a comma-separated list of Regions in which you have enabled Security Hub, for example us-east-1, eu-west-1, eu-west-2.
If you would like to export findings from all Regions where Security Hub is enabled, leave the Regions field blank. Regions where Security Hub is not enabled will generate a message and will be skipped.
Choose Next.
The CloudFormation stack deploys the necessary resources, including an EventBridge scheduling rule, AWS System Managers Automation documents, an S3 bucket, and Lambda functions for exporting and updating Security Hub findings.
After you deploy the CloudFormation stack
After you create the CSV Manager for Security Hub stack, you can do the following:
Perform a bulk update of Security Hub findings by following the instructions in Step 3: View or update findings in the CSV file later in this post. You can make changes to one or more of the 12 updatable columns of the CSV file, and perform the update function to update some or all Security Hub findings.
Step 2: Export Security Hub findings to a CSV file
You can export Security Hub findings from the AWS Lambda console. To do this, you create a test event and invoke the CsvExporter Lambda function. CsvExporter exports all Security Hub findings from all applicable Regions to a single CSV file in the S3 bucket for CSV Manager for Security Hub.
To export Security Hub findings to a CSV file
In the AWS Lambda console, find the CsvExporter Lambda function and select it.
On the Code tab, choose the down arrow at the right of the Test button, as shown in Figure 4, and select Configure test event.
Figure 4: The down arrow at the right of the Test button
To create an empty test event, on the Configure test event page, do the following:
Choose Create a new event.
Enter an event name; in this example we used testEvent.
For Template, leave the default hello-world.
For Event JSON, enter the JSON object {} as shown in Figure 5.
Figure 5: Creating an empty test event
Choose Save to save the empty test event.
To invoke the Lambda function, choose the Test button, as shown in Figure 6.
Figure 6: Test button to invoke the Lambda function
On the Execution Results tab, note the following details, which you will need for the next step.
Locate the CSV object that matches the value of “exportKey” (in this example, DOC-EXAMPLE-OBJECT) in the S3 bucket that matches the value of “bucket” (in this example, DOC-EXAMPLE-BUCKET).
Now you can view or update the findings in the CSV file, as described in the next section.
Step 3: (Optional) Using filters to limit CSV results
In your test event, you can specify any filter that is accepted by the GetFindings API action. You do this by adding a filter key to your test event. The filter key can either contain the word HighActive (which is a predefined filter configured as a default for selecting active high-severity and critical findings, as shown in Figure 8), or a JSON filter object.
Figure 8 depicts an example JSON filter that performs the same filtering as the HighActive predefined filter.
To use filters to limit CSV results
In the AWS Lambda console, find the CsvExporter Lambda function and select it.
On the Code tab, choose the down arrow at the right of the Test button, as shown in Figure 7, and select Configure test event.
Figure 7: The down arrow at the right of the Test button
To create a test event containing a filter, on the Configure test event page, do the following:
Choose Create a new event.
Enter an event name; in this example we used filterEvent.
For Template, select testEvent,
For Event JSON, enter the following JSON object, as shown in Figure 8.
Locate the CSV object that matches the value of “exportKey” (in this example, DOC-EXAMPLE-OBJECT) in the S3 bucket that matches the value of “bucket” (in this example, DOC-EXAMPLE-BUCKET).
The results in this CSV file should be a filtered set of Security Hub findings according to the filter you specified above. You can now proceed to step 4 if you want to view or update findings.
Step 4: View or update findings in the CSV file
You can use any program that allows you to view or edit CSV files, such as Microsoft Excel. The first row in the CSV file are the column names. These column names correspond to fields in the JSON objects that are returned by the GetFindings API action.
Warning: Do not modify the first two columns, Id (column A) or ProductArn (column B). If you modify these columns, Security Hub will not be able to locate the finding to update, and any other changes to that finding will be discarded.
You can locally modify any of the columns in the CSV file, but only 12 columns out of 37 columns will actually be updated if you use CsvUpdater to update Security Hub findings. The following are the 12 columns you can update. These correspond to columns C through N in the CSV file.
Column name
Spreadsheet column
Description
Criticality
C
An integer value between 0 and 100.
Confidence
D
An integer value between 0 and 100.
NoteText
E
Any text you wish
NoteUpdatedBy
F
Automatically updated with your AWS principal user ID.
CustomerOwner*
G
Information identifying the owner of this finding (for example, email address).
CustomerIssue*
H
A Jira issue or another identifier tracking a specific issue.
CustomerTicket*
I
A ticket number or other trouble/problem tracking identification.
ProductSeverity**
J
A floating-point number from 0.0 to 99.9.
NormalizedSeverity**
K
An integer between 0 and 100.
SeverityLabel
L
One of the following:
INFORMATIONAL
LOW
MEDIUM
HIGH
HIGH
CRITICAL
VerificationState
M
One of the following:
UNKNOWN — Finding has not been verified yet.
TRUE_POSITIVE — This is a valid finding and should be treated as a risk.
FALSE_POSITIVE — This an incorrect finding and should be ignored or suppressed.
BENIGN_POSITIVE — This is a valid finding, but the risk is not applicable or has been accepted, transferred, or mitigated.
Workflow
N
One of the following:
NEW — This is a new finding that has not been reviewed.
NOTIFIED — The responsible party or parties have been notified of this finding.
RESOLVED — The finding has been resolved.
SUPPRESSED — A false or benign finding has been suppressed so that it does not appear as a current finding in Security Hub.
* These columns are stored inside the UserDefinedFields field of the updated findings. The column names imply a certain kind of information, but you can put any information you wish.
** These columns are stored inside the Severity field of the updated findings. These values have a fixed format and will be rejected if they do not meet that format.
Columns with fixed text values (L, M, N) in the previous table can be specified in mixed case and without underscores—they will be converted to all uppercase and underscores added in the CsvUpdater Lambda function. For example, “false positive” will be converted to “FALSE_POSITIVE”.
Step 5: Create a test event and update Security Hub by using the CSV file
If you want to update Security Hub findings, make your changes to columns C through N as described in the previous table. After you make your changes in the CSV file, you can update the findings in Security Hub by using the CSV file and the CsvUpdater Lambda function.
Use the following procedure to create a test event and run the CsvUpdater Lambda function.
To create a test event and run the CsvUpdaterLambda function
In the AWS Lambda console, find the CsvUpdater Lambda function and select it.
On the Code tab, choose the down arrow to the right of the Test button, as shown in Figure 10, and select Configure test event.
Figure 10: The down arrow to the right of the Test button
To create a test event as shown in Figure 11, on the Configure test event page, do the following:
Choose Create a new event.
Enter an event name; in this example we used testEvent.
Replace <s3ObjectUri> with the full URI of the S3 object where the updated CSV file is located.
Replace <aggregationRegionName> with your Security Hub aggregation Region, or the primary Region in which you initially enabled Security Hub.
Figure 11: Create and save a test event for the CsvUpdater Lambda function
Choose Save.
Choose the Test button, as shown in Figure 12, to invoke the Lambda function.
Figure 12: Test button to invoke the Lambda function
To verify that the Lambda function ran successfully, on the Execution Results tab, review the results for “message”: “Success”, as shown in the following example. Note that the results may be thousands of lines long.
The processed array lists every successfully updated finding by Id and ProductArn.
If any of the findings were not successfully updated, their Id and ProductArn appear in the unprocessed array. In the previous example, no findings were unprocessed.
The value s3://DOC-EXAMPLE-BUCKET/DOC-EXAMPLE-OBJECT is the URI of the S3 object from which your updates were read.
Cleaning up
To avoid incurring future charges, first delete the CloudFormation stack that you deployed in Step 1: Use the CloudFormation template to deploy the solution. Next, you need to manually delete the S3 bucket deployed with the stack. For instructions, see Deleting a bucket in the Amazon Simple Storage Service User Guide.
Conclusion
In this post, we showed you how you can export Security Hub findings to a CSV file in an S3 bucket and update the exported findings by using CSV Manager for Security Hub. We showed you how you can automate this process by using AWS Lambda, Amazon S3, and AWS Systems Manager. Full documentation for CSV Manager for Security Hub is available in the aws-security-hub-csv-manager GitHub repository. You can also investigate other ways to manage Security Hub findings by checking out our blog posts about Security Hub integration with Amazon OpenSearch Service, Amazon QuickSight, Slack, PagerDuty, Jira, or ServiceNow.
If you have feedback about this post, submit comments in the Comments section below. If you have questions about this post, start a new thread on the Security Hub re:Post. To learn more or get started, visit AWS Security Hub.
Want more AWS Security news? Follow us on Twitter.
The collective thoughts of the interwebz
Manage Consent
To provide the best experiences, we use technologies like cookies to store and/or access device information. Consenting to these technologies will allow us to process data such as browsing behavior or unique IDs on this site. Not consenting or withdrawing consent, may adversely affect certain features and functions.
Functional
Always active
The technical storage or access is strictly necessary for the legitimate purpose of enabling the use of a specific service explicitly requested by the subscriber or user, or for the sole purpose of carrying out the transmission of a communication over an electronic communications network.
Preferences
The technical storage or access is necessary for the legitimate purpose of storing preferences that are not requested by the subscriber or user.
Statistics
The technical storage or access that is used exclusively for statistical purposes.The technical storage or access that is used exclusively for anonymous statistical purposes. Without a subpoena, voluntary compliance on the part of your Internet Service Provider, or additional records from a third party, information stored or retrieved for this purpose alone cannot usually be used to identify you.
Marketing
The technical storage or access is required to create user profiles to send advertising, or to track the user on a website or across several websites for similar marketing purposes.