Post Syndicated from Brian van Baekel original https://blog.zabbix.com/monitor-new-zabbix-releases-natively/28105/
In this blog post, I’ll guide you through building your own template to monitor the latest Zabbix releases directly from the Zabbix UI. Follow the simple walkthrough to know how.
Introduction
With the release of Zabbix 7.0, it is possible to see which Zabbix version you are running and what the latest version is:

A great improvement obviously but (at least in 7.0.0rc1) I am missing the triggers to notify me and perhaps also really interesting, there is nothing available about older versions.
Once I saw the above screenshot, I became curious about where that data actually came from, and what’s available. A quick deep-dive into the sourcecode ( https://git.zabbix.com/projects/ZBX/repos/zabbix/browse/ui/js/class.software-version-check.js#18 ) gave away the URL that is used for this feature: https://services.zabbix.com/updates/v1 Once you visit that URL you will get a nice JSON formatted output:
{
  "versions": [
    {
      "version": "5.0",
      "end_of_full_support": true,
      "latest_release": {
        "created": "1711361454",
        "release": "5.0.42"
      }
    },
    {
      "version": "6.0",
      "end_of_full_support": false,
      "latest_release": {
        "created": "1716274679",
        "release": "6.0.30"
      }
    },
    {
      "version": "6.4",
      "end_of_full_support": false,
      "latest_release": {
        "created": "1716283254",
        "release": "6.4.15"
      }
    }
  ]
}
And as you may know, Zabbix is quite good at parsing JSON formatted data. So, I built a quick template to get this going and be notified once a new version is released.
In the examples below I used my 6.4 instance, but this also works on 6.0 and of course 7.0.
Template building
Before we jump into the building part, it’s important to think of the best approach for this template. I think there are 2:
- Create 1 HTTP item and a few dependent items for the various versions
- Create 1 HTTP item, a LLD rule and a few item prototypes.
I prefer the LLD route, as that is making the template as dynamic as possible (less time to maintain it) but also more fun to build!
Let’s go.
First, you go to Data Collection -> Templates and create a new template there:
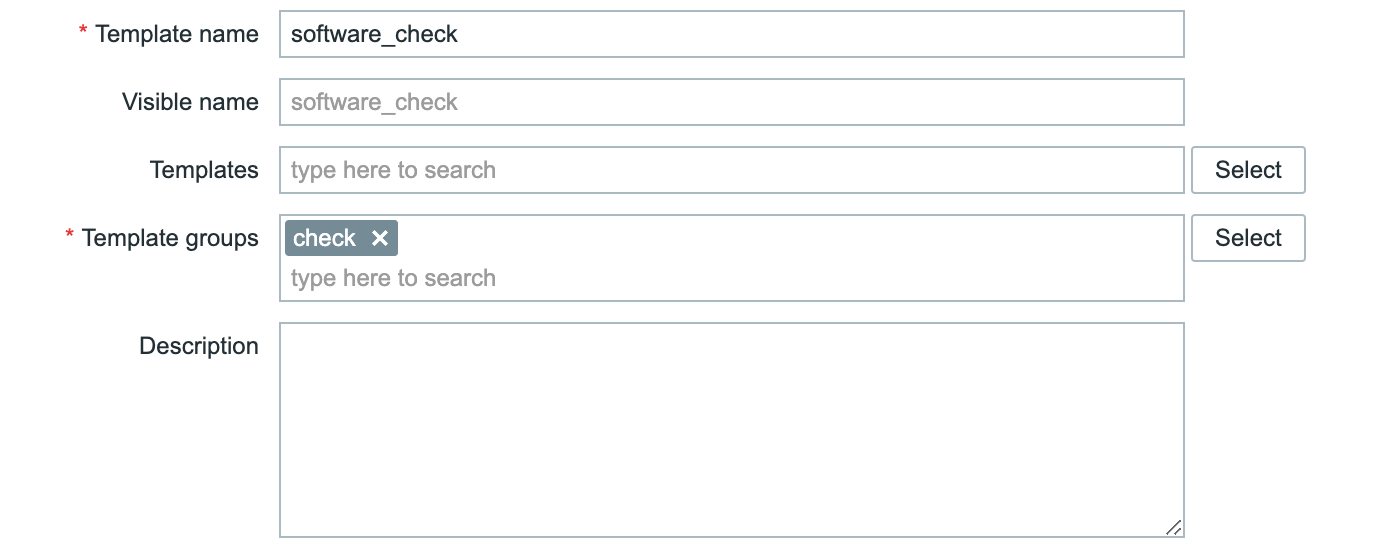
Of course, you can change the name of the template and the group. It’s completely up to you.
Once the template is created, it’s still an empty shell and we need to populate it. We will start with a normal item of type HTTP agent:
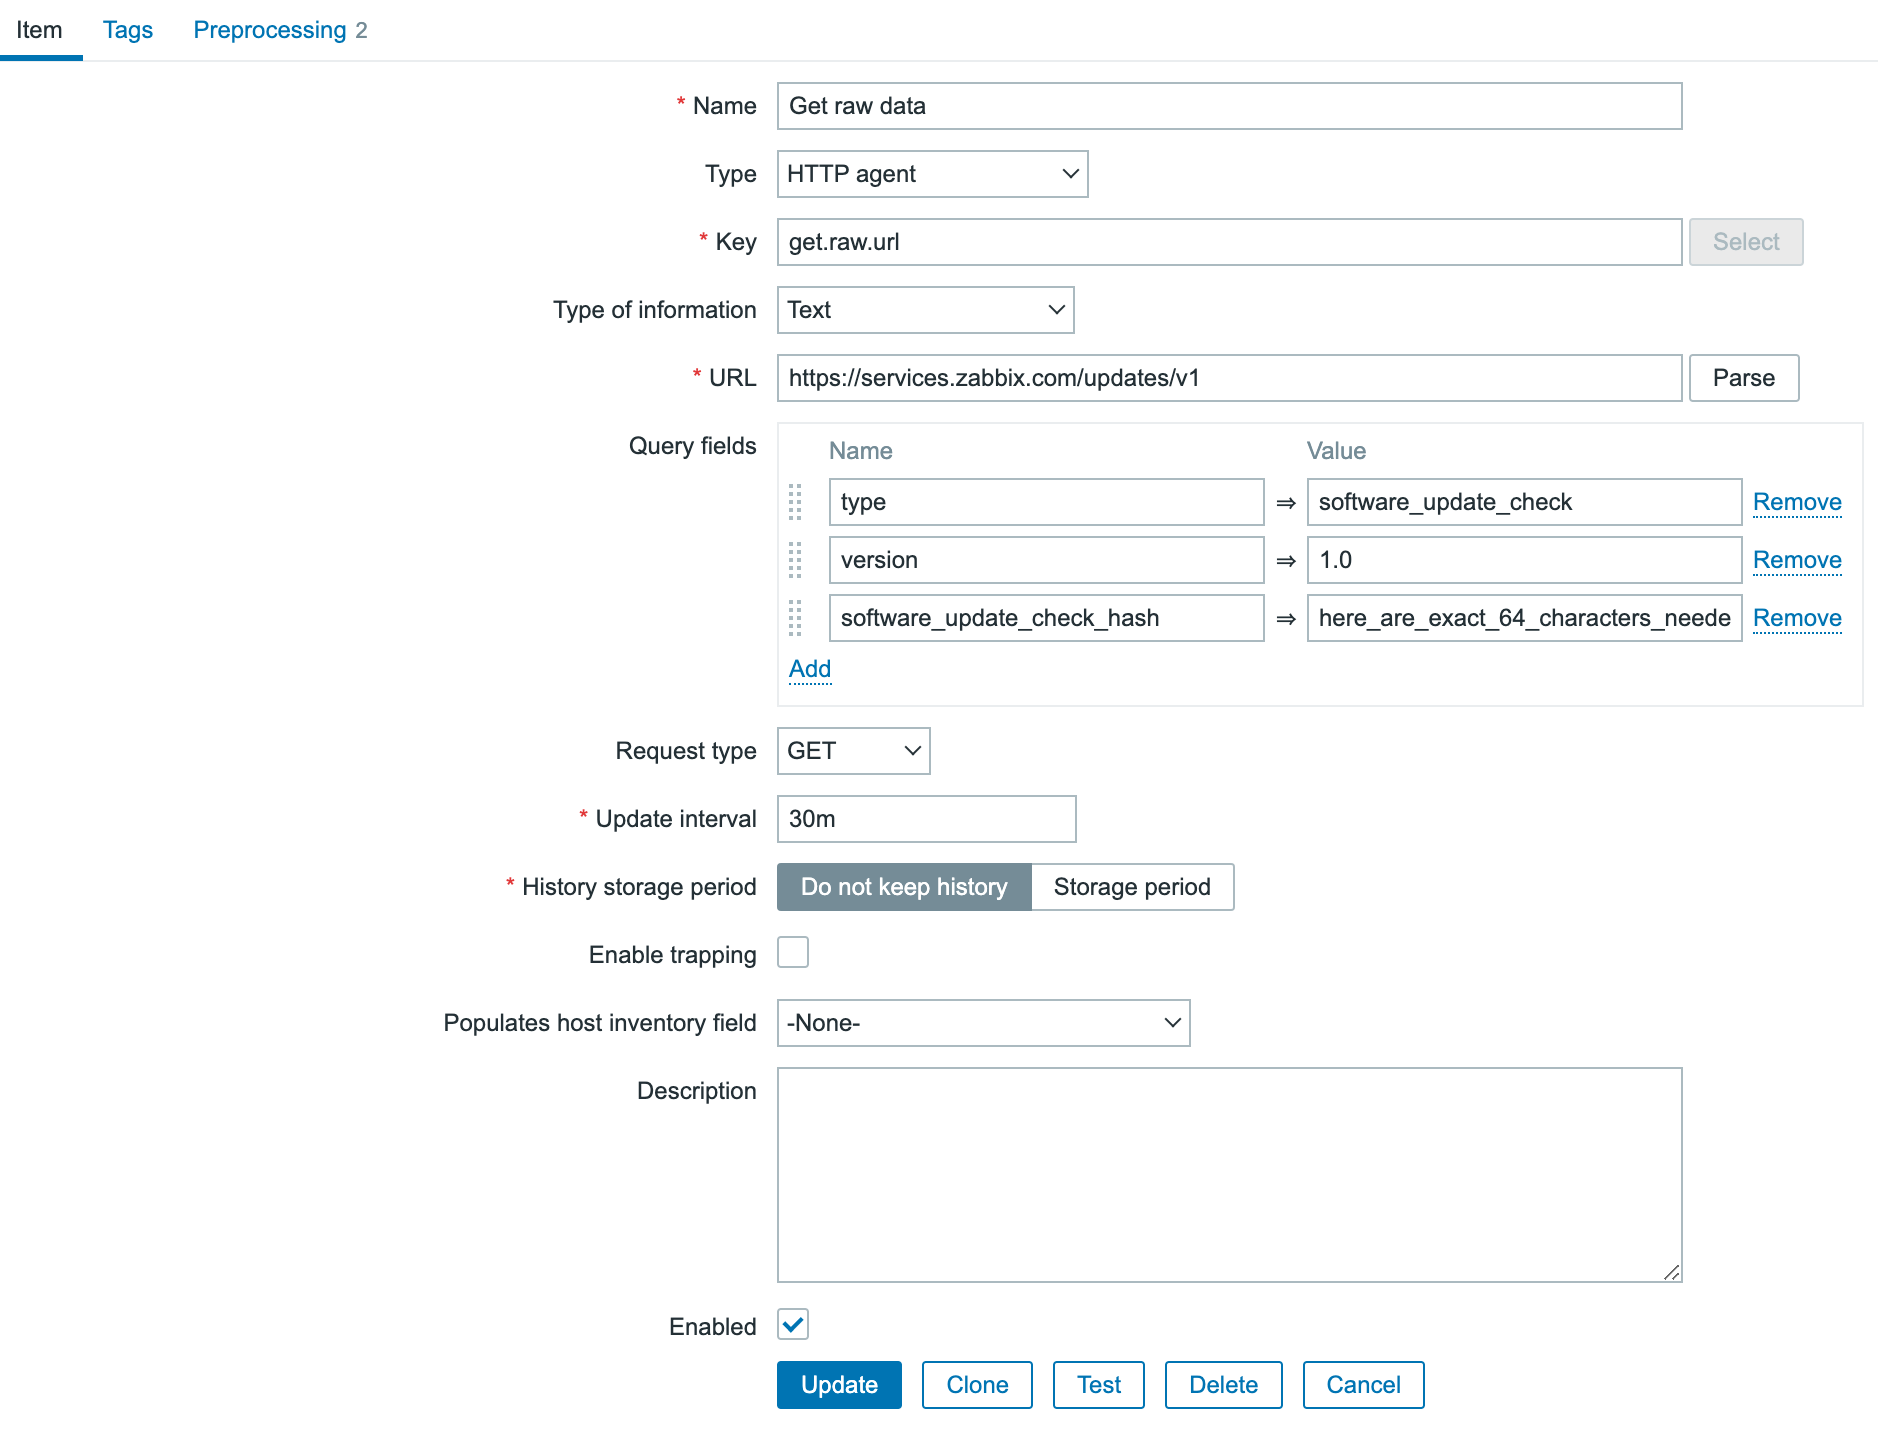
(note: screenshot is truncated)
We need to add 3 query fields:
- ‘type’ with value ‘software_update_check’
- ‘version’ with value ‘1.0’
- ‘software_update_check_hash’ with a 64 characters: you can do funny things here
 for the example i just used ‘here_are_exact_64_characters_needed_as_a_custom_hash_for_zabbix_’
 for the example i just used ‘here_are_exact_64_characters_needed_as_a_custom_hash_for_zabbix_’
As we go for the LLD route, I already set the “History Storage period” to “Do not keep history”. If you are building the template, it’s advised to keep the history and make sure you’ve got data to work with for the rest of the template. Once everything works, go back to this item and make sure to change the History storage period.
In the above screenshot, you can see I applied 2 preprocessing steps already.
The first is to replace the text ‘versions’ with ‘data’. This is done because Zabbix expects an array ‘data’ for its LLD logic. That ‘data’ is not available, so I just replaced the text ‘versions’. Quick and dirty.
The second preprocessing step is a “discard unchanged with heartbeat”. As long as there is no new release, I do not care about the data that came in, yet I want to store it once per day to make sure the item is still working. With this approach, we monitor the URL every 30 minutes so we get ‘quick’ updates but still do not use a lot of disk space.
The result of the preprocessing configuration:

Now it’s time to hit the “test all steps” button and see if everything works. The result you’ll get is:
{
  "data": [
    {
      "version": "5.0",
      "end_of_full_support": true,
      "latest_release": {
        "created": "1711361454",
        "release": "5.0.42"
      }
    },
    {
      "version": "6.0",
      "end_of_full_support": false,
      "latest_release": {
        "created": "1716274679",
        "release": "6.0.30"
      }
    },
    {
      "version": "6.4",
      "end_of_full_support": false,
      "latest_release": {
        "created": "1716283254",
        "release": "6.4.15"
      }
    }
  ]
}
This is almost identical to the information directly from the URL, except that ‘versions’ is replaced by ‘data’. Great. So as soon as you save this item we will monitor the releases now (don’t forget to link the template to a host otherwise nothing will happen)!
At the same time, this information is absolutely not useful at all, as it’s just a text portion. We need to parse it, and LLD is the way to go.
In the template, we go to “Discovery rules” and click on “Create discovery rule” in the upper right corner.
Now we create a new LLD rule, which is not going to query the website itself, but will get its information from the HTTP agent we’ve just created.
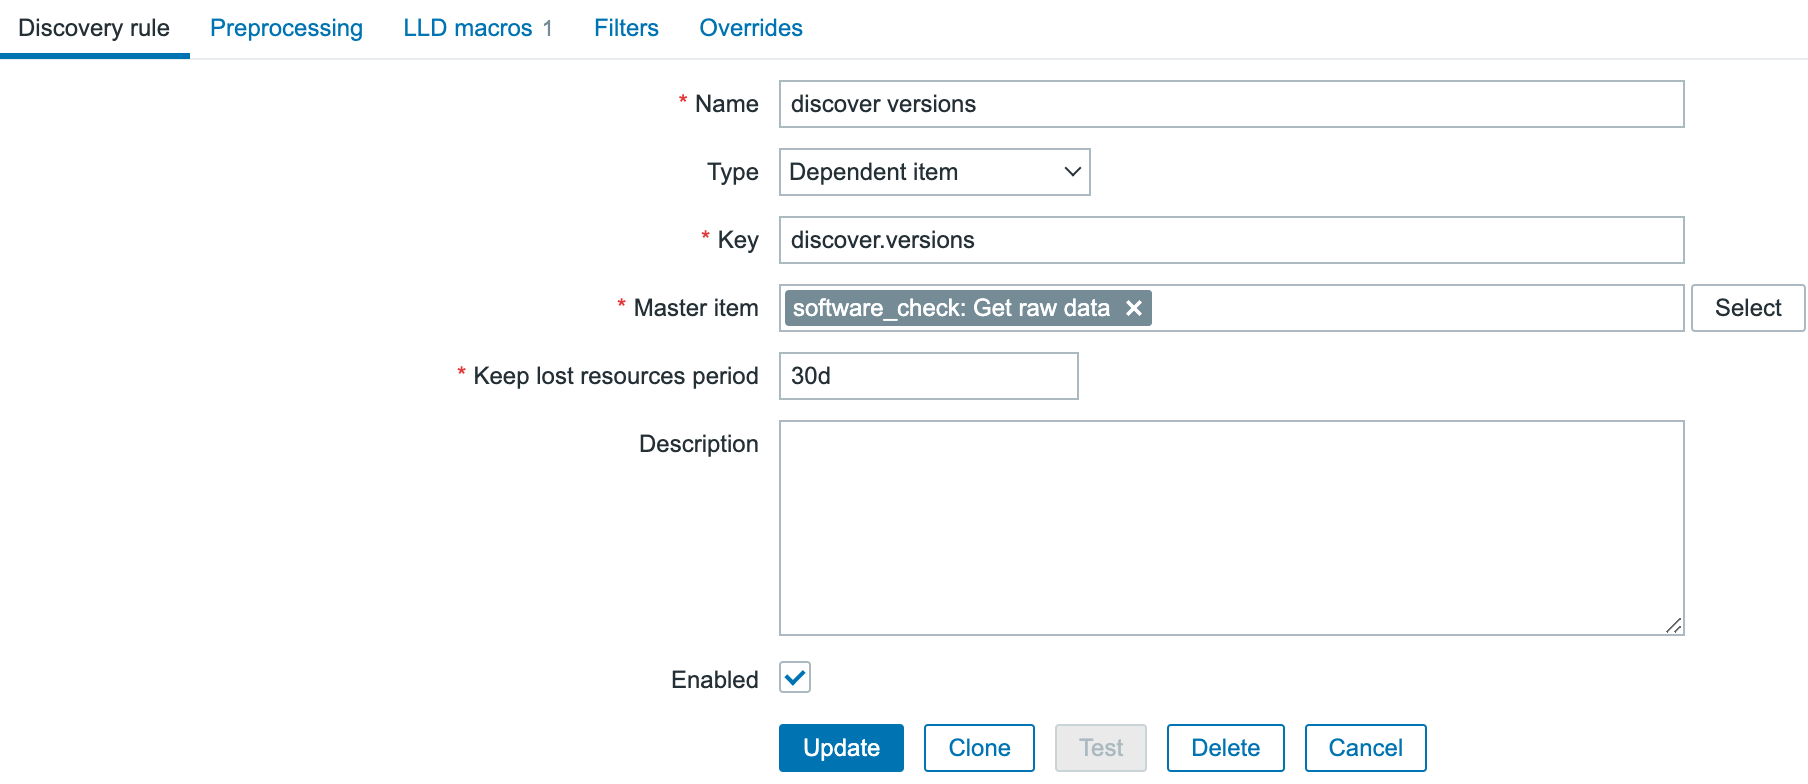
In the above screenshot, you see how it’s configured. a name, type ‘Dependent item’ some key just because Zabbix requires a key, and the Master item is the HTTP agent item we just created.
Now all data from the http agent item is pushed into the LLD rule as soon as it’s received, and we need to create LLD macros out of it. So in the Discovery rule, you jump to the 3rd tab ‘LLD macros’ and add a new macro there:
{#VERSION} with JSONPATH$..version.first()

Once this is done save the LLD rule and let’s create some item prototypes.
The first item prototype is the most complicated, the rest are “copy/paste”, more or less.
We create a new item prototype that looks like this:

As the type is dependent and it is getting all its information from the HTTP agent master item, there is preprocessing needed to filter out only that specific piece of information that is needed. You go to the preprocessing tab and add a JSONpath step there:
For copy/paste purposes: $.data.[?(@.version=='{#VERSION}’)].latest_release.created.first()
There is quite some magic happening in that step. We tell it to use a JSONpath to find the correct value, but there is also a lookup:
[?(@.version=='{#VERSION}')]
What we are doing here is telling it to go into the data array, look for an array ‘version’ with the value {#VERSION}. Of course that {#VERSION} LLD macro is going to be replaced dynamically by the discovery rule with the correct version. Once it found the version object, go in and find the object ‘latest_release’ and from that object we want the value of ‘created’. Now we will get back the epoch time of that release, and in the item we parse that with Unit unixtime.
Save the item, and immediately clone it to create the 2nd item prototype to get the support state:

Here we change the type of information and of course the preprocessing should be slightly different as we are looking for a different object:

JSONPath:
$.data.[?(@.version=='{#VERSION}')].end_of_full_support.first()
Save this item as well, and let’s create our last item to get the minor release number presented:

The preprocessing is again slightly different:

JSONPath:
$.data.[?(@.version=='{#VERSION}')].latest_release.release.first()
At this point you should have 1 master item, 1 LLD rule and 3 Item prototypes.
Now, create a new host, and link this template to it. Fairly quick you should see data coming in and everything should be nicely parsed:

The only thing that is missing now is a trigger to get alerted once a new version has been released, so let’s go back into the template, discovery rule and find the trigger prototypes. Create a new one that looks like this:
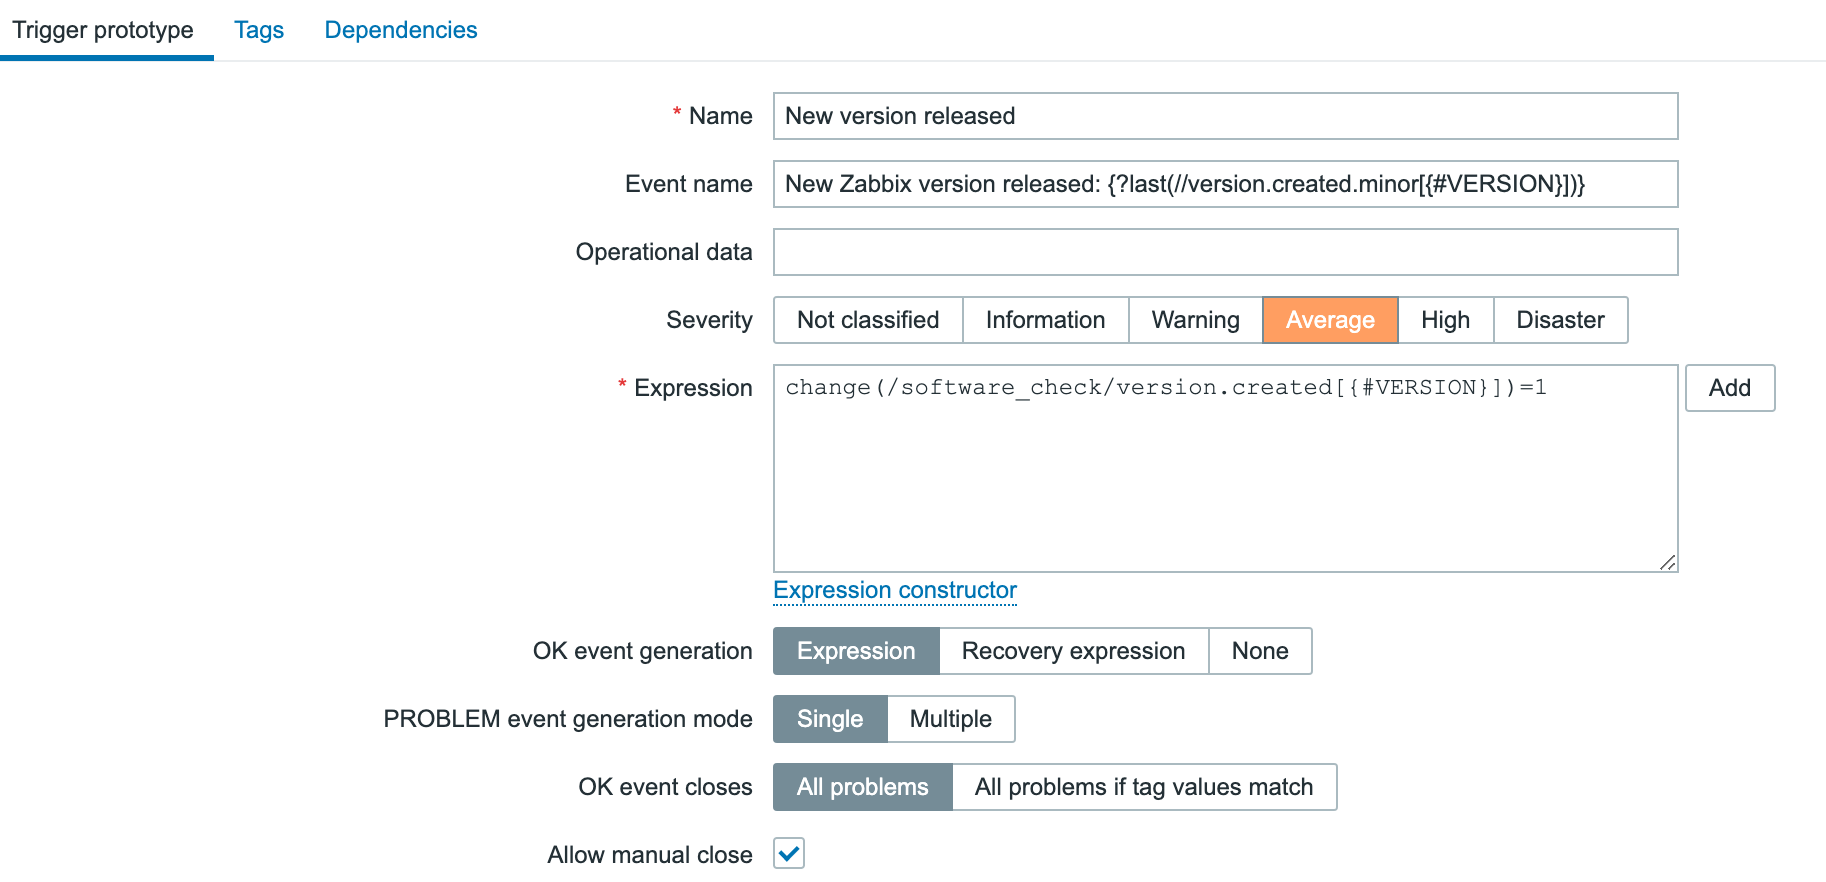
Since we populated the even name as well, our problem name will reflect the most recent version already:

Enjoy your new template! 
The post Monitor new Zabbix releases natively appeared first on Zabbix Blog.

