Post Syndicated from Nikunj Vaidya original https://aws.amazon.com/blogs/devops/gaining-operational-insights-with-aiops-using-amazon-devops-guru/
Amazon DevOps Guru offers a fully managed AIOps platform service that enables developers and operators to improve application availability and resolve operational issues faster. It minimizes manual effort by leveraging machine learning (ML) powered recommendations. Its ML models take advantage of AWS’s expertise in operating highly available applications for the world’s largest e-commerce business for over 20 years. DevOps Guru automatically detects operational issues, predicts impending resource exhaustion, details likely causes, and recommends remediation actions.
This post walks you through how to enable DevOps Guru for your account in a typical serverless environment and observe the insights and recommendations generated for various activities. These insights are generated for operational events that could pose a risk to your application availability. DevOps Guru uses AWS CloudFormation stacks as the application boundary to detect resource relationships and co-relate with deployment events.
Solution overview
The goal of this post is to demonstrate the insights generated for anomalies detected by DevOps Guru from DevOps operations. If you don’t have a test environment and want to build out infrastructure to test the generation of insights, then you can follow along through this post. However, if you have a test or production environment (preferably spawned from CloudFormation stacks), you can skip the first section and jump directly to section, Enabling DevOps Guru and injecting traffic.
The solution includes the following steps:
1. Deploy a serverless infrastructure.
2. Enable DevOps Guru and inject traffic.
3. Review the generated DevOps Guru insights.
4. Inject another failure to generate a new insight.
As depicted in the following diagram, we use a CloudFormation stack to create a serverless infrastructure, comprising of Amazon API Gateway, AWS Lambda, and Amazon DynamoDB, and inject HTTP requests at a high rate towards the API published to list records.

When DevOps Guru is enabled to monitor your resources within the account, it uses a combination of vended Amazon CloudWatch metrics and specific patterns from its ML models to detect anomalies. When an anomaly is detected, it generates an insight with the recommendations.
The generation of insights is dependent upon several factors. Although this post provides a canned environment to reproduce insights, the results may vary depending upon traffic pattern, timings of traffic injection, and so on.
Prerequisites
To complete this tutorial, you should have access to an AWS Cloud9 environment and the AWS Command Line Interface (AWS CLI).
Deploying a serverless infrastructure
To deploy your serverless infrastructure, you complete the following high-level steps:
1. Create your IDE environment.
2. Launch the CloudFormation template to deploy the serverless infrastructure.
3. Populate the DynamoDB table.
1. Creating your IDE environment
We recommend using AWS Cloud9 to create an environment to get access to the AWS CLI from a bash terminal. AWS Cloud9 is a browser-based IDE that provides a development environment in the cloud. While creating the new environment, ensure you choose Linux2 as the operating system. Alternatively, you can use your bash terminal in your favorite IDE and configure your AWS credentials in your terminal.
When access is available, run the following command to confirm that you can see the Amazon Simple Storage Service (Amazon S3) buckets in your account:
aws s3 lsInstall the following prerequisite packages and ensure you have Python3 installed:
sudo yum install jq -y

export AWS_REGION=$(curl -s \
169.254.169.254/latest/dynamic/instance-identity/document | jq -r '.region')

sudo pip3 install requests
Clone the git repository to download the required CloudFormation templates:
git clone https://github.com/aws-samples/amazon-devopsguru-samples
cd amazon-devopsguru-samples/generate-devopsguru-insights/
2. Launching the CloudFormation template to deploy your serverless infrastructure
To deploy your infrastructure, complete the following steps:
- Run the CloudFormation template using the following command:
aws cloudformation create-stack --stack-name myServerless-Stack \
--template-body file:///$PWD/cfn-shops-monitoroper-code.yaml \
--capabilities CAPABILITY_IAM CAPABILITY_NAMED_IAM
The AWS CloudFormation deployment creates an API Gateway, a DynamoDB table, and a Lambda function with sample code.
- When it’s complete, go to the Outputs tab of the stack on the AWS CloudFormation console.
- Record the links for the two APIs: one of them to list the table contents and other one to populate the contents.
3. Populating the DynamoDB table
Run the following commands (simply copy-paste) to populate the DynamoDB table. The below three commands will identify the name of the DynamoDB table from the CloudFormation stack and populate the name in the populate-shops-dynamodb-table.json file.
dynamoDBTableName=$(aws cloudformation list-stack-resources \
--stack-name myServerless-Stack | \
jq '.StackResourceSummaries[]|select(.ResourceType == "AWS::DynamoDB::Table").PhysicalResourceId' | tr -d '"')
sudo sed -i s/"<YOUR-DYNAMODB-TABLE-NAME>"/$dynamoDBTableName/g \
populate-shops-dynamodb-table.jsonaws dynamodb batch-write-item \
--request-items file://populate-shops-dynamodb-table.jsonThe command gives the following output:
{
"UnprocessedItems": {}
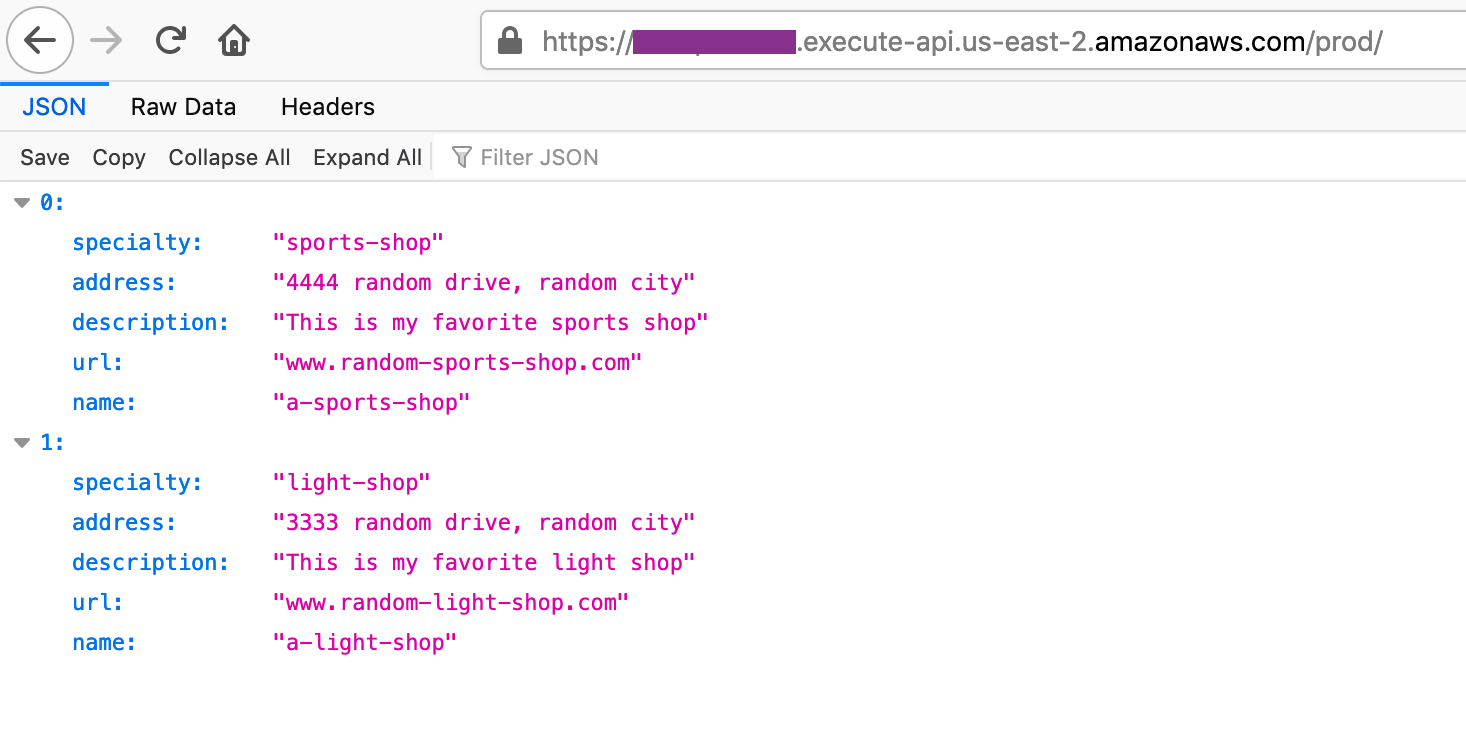
}This populates the DynamoDB table with a few sample records, which you can verify by accessing the ListRestApiEndpointMonitorOper API URL published on the Outputs tab of the CloudFormation stack. The following screenshot shows the output.
Enabling DevOps Guru and injecting traffic
In this section, you complete the following high-level steps:
1. Enable DevOps Guru for the CloudFormation stack.
2. Wait for the serverless stack to complete.
3. Update the stack.
4. Inject HTTP requests into your API.
1. Enabling DevOps Guru for the CloudFormation stack
To enable DevOps Guru for CloudFormation, complete the following steps:
- Run the CloudFormation template to enable DevOps Guru for this CloudFormation stack:
aws cloudformation create-stack \
--stack-name EnableDevOpsGuruForServerlessCfnStack \
--template-body file:///$PWD/EnableDevOpsGuruForServerlessCfnStack.yaml \
--parameters ParameterKey=CfnStackNames,ParameterValue=myServerless-Stack \
--region ${AWS_REGION}- When the stack is created, navigate to the Amazon DevOps Guru console.
- Choose Settings.
- Under CloudFormation stacks, locate myServerless-Stack.
If you don’t see it, your CloudFormation stack has not been successfully deployed. You may remove and redeploy the EnableDevOpsGuruForServerlessCfnStack stack.
Optionally, you can configure Amazon Simple Notification Service (Amazon SNS) topics or enable AWS Systems Manager integration to create OpsItem entries for every insight created by DevOps Guru. If you need to deploy as a stack set across multiple accounts and Regions, see Easily configure Amazon DevOps Guru across multiple accounts and Regions using AWS CloudFormation StackSets.
2. Waiting for baselining of resources
This is a necessary step to allow DevOps Guru to complete baselining the resources and benchmark the normal behavior. For our serverless stack with 3 resources, we recommend waiting for 2 hours before carrying out next steps. When enabled in a production environment, depending upon the number of resources selected to monitor, it can take up to 24 hours for it to complete baselining.
Note: Unlike many monitoring tools, DevOps Guru does not expect the dashboard to be continuously monitored and thus under normal system health, the dashboard would simply show zero’ed counters for the ongoing insights. It is only when an anomaly is detected, it will raise an alert and display an insight on the dashboard.
3. Updating the CloudFormation stack
When enough time has elapsed, we will make a configuration change to simulate a typical operational event. As shown below, update the CloudFormation template to change the read capacity for the DynamoDB table from 5 to 1.

Run the following command to deploy the updated CloudFormation template:
aws cloudformation update-stack --stack-name myServerless-Stack \
--template-body file:///$PWD/cfn-shops-monitoroper-code.yaml \
--capabilities CAPABILITY_IAM CAPABILITY_NAMED_IAM
4. Injecting HTTP requests into your API
We now inject ingress traffic in the form of HTTP requests towards the ListRestApiEndpointMonitorOper API, either manually or using the Python script provided in the current directory (sendAPIRequest.py). Due to reduced read capacity, the traffic will oversubscribe the dynamodb tables, thus inducing an anomaly. However, before triggering the script, populate the url parameter with the correct API link for the ListRestApiEndpointMonitorOper API, listed in the CloudFormation stack’s output tab.
After the script is saved, trigger the script using the following command:
python sendAPIRequest.pyMake sure you’re getting an output of status 200 with the records that we fed into the DynamoDB table (see the following screenshot). You may have to launch multiple tabs (preferably 4) of the terminal to run the script to inject a high rate of traffic.

After approximately 10 minutes of the script running in a loop, an operational insight is generated in DevOps Guru.
Reviewing DevOps Guru insights
While these operations are being run, DevOps Guru monitors for anomalies, logs insights that provide details about the metrics indicating an anomaly, and prints actionable recommendations to mitigate the anomaly. In this section, we review some of these insights.
Under normal conditions, DevOps Guru dashboard will show the ongoing insights counter to be zero. It monitors a high number of metrics behind the scenes and offloads the operator from manually monitoring any counters or graphs. It raises an alert in the form of an insight, only when anomaly occurs.
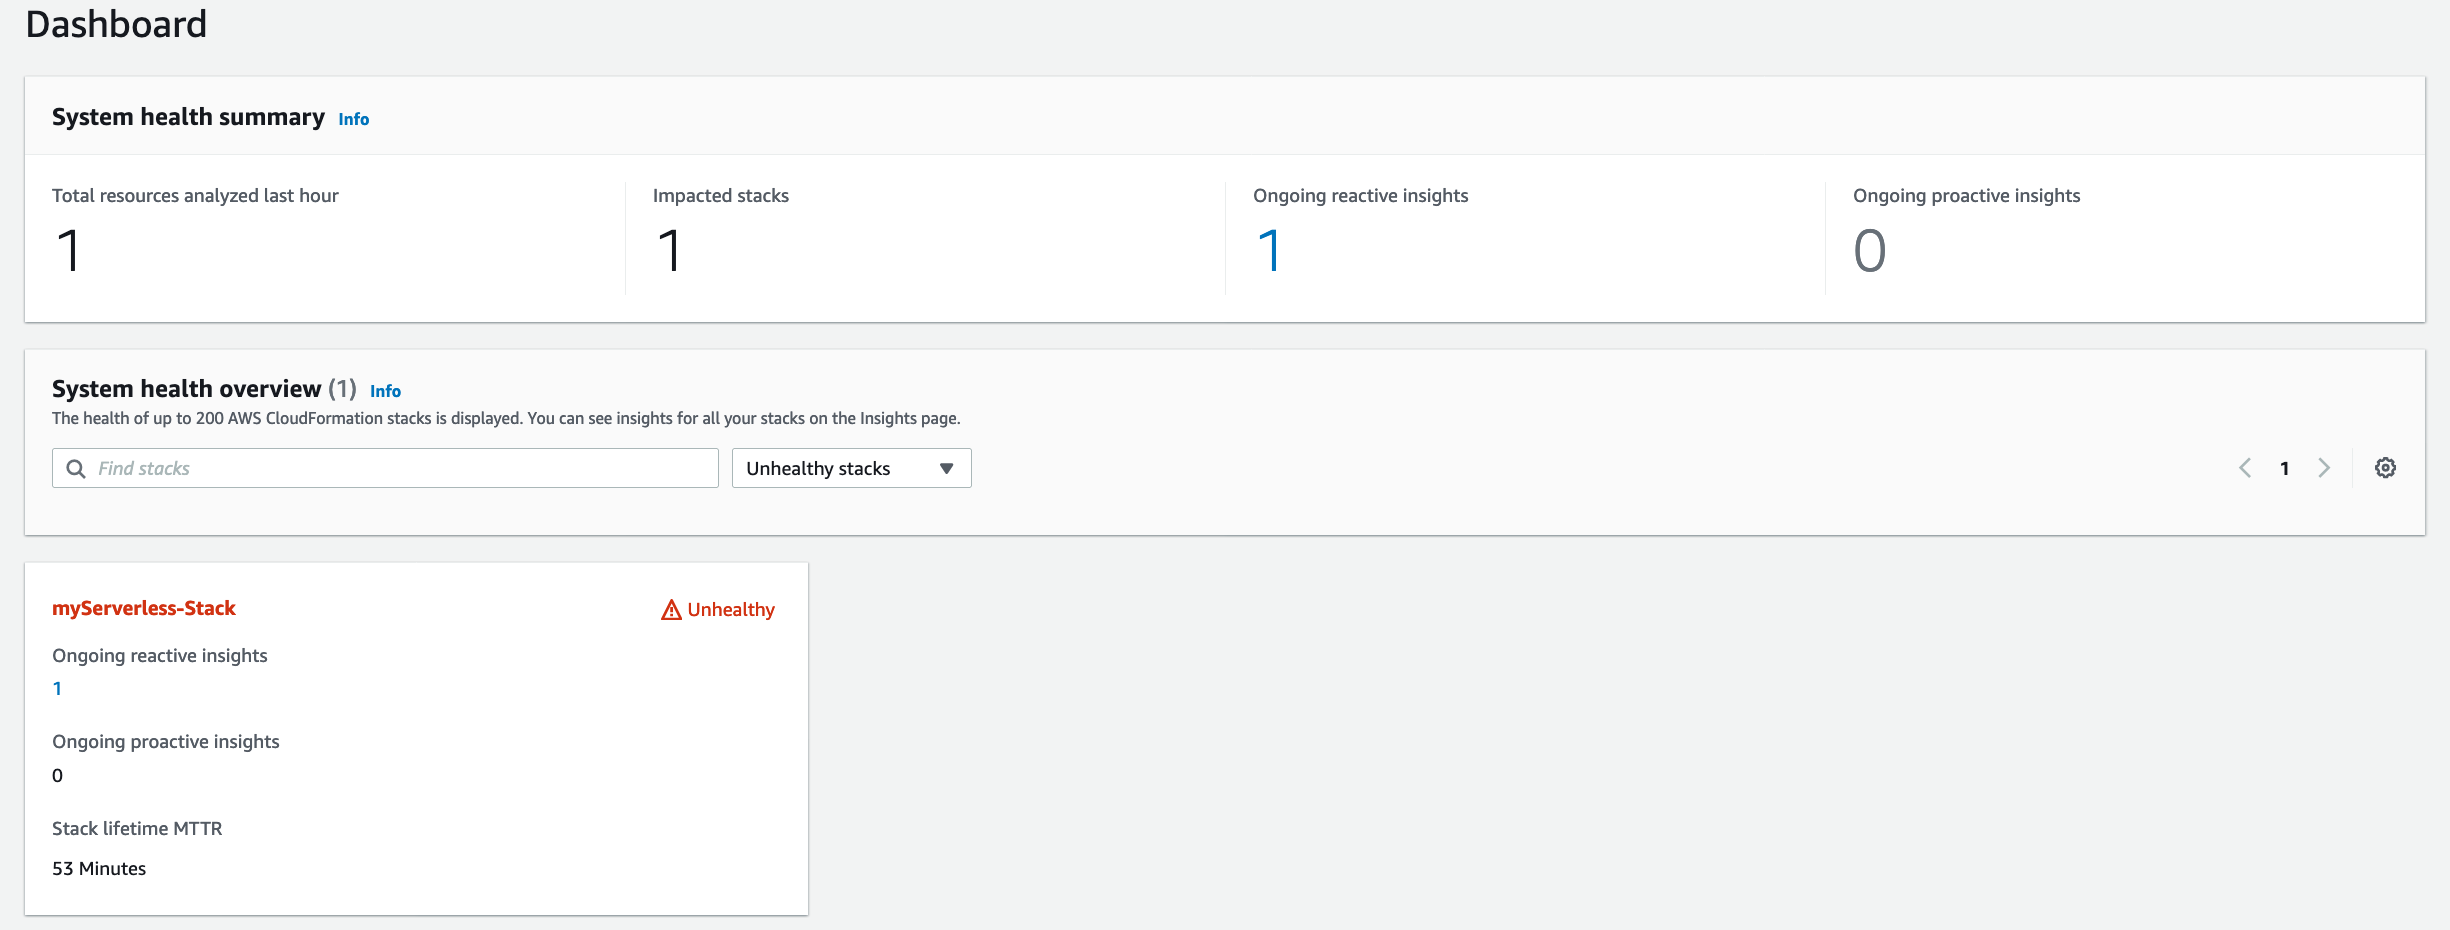
The following screenshot shows an ongoing reactive insight for the specific CloudFormation stack. When you choose the insight, you see further details. The number under the Total resources analyzed last hour may vary, so for this post, you can ignore this number.
The insight is divided into four sections: Insight overview, Aggregated metrics, Relevant events, and Recommendations. Let’s take a closer look into these sections.
The following screenshot shows the Aggregated metrics section, where it shows metrics for all the resources that it detected anomalies in (DynamoDB, Lambda, and API Gateway). Note that depending upon your traffic pattern, lambda settings, baseline traffic, the list of metrics may vary. In the example below, the timeline shows that an anomaly for DynamoDB started first and was followed by API Gateway and Lambda. This helps us understand the cause and symptoms, and prioritize the right anomaly investigation.

Initially, you may see only two metrics listed, however, over time, it populates more metrics that showed anomalies. You can see the anomaly for DynamoDB started earlier than the anomalies for API Gateway and Lambda, thus indicating them as after effects. In addition to the information in the preceding screenshot, you may see Duration p90 and IntegrationLatency p90 (for Lambda and API Gateway respectively, due to increased backend latency) metrics also listed.
Now we check the Relevant events section, which lists potential triggers for the issue. The events listed here depend on the set of operations carried out on this CloudFormation stack’s resources in this Region. This makes it easy for the operator to be reminded of a change that may have caused this issue. The dots (representing events) that are near the Insight start portion of timeline are of particular interest.

If you need to delve into any of these events, just click of any of these points, and it provides more details as shown below screenshot.
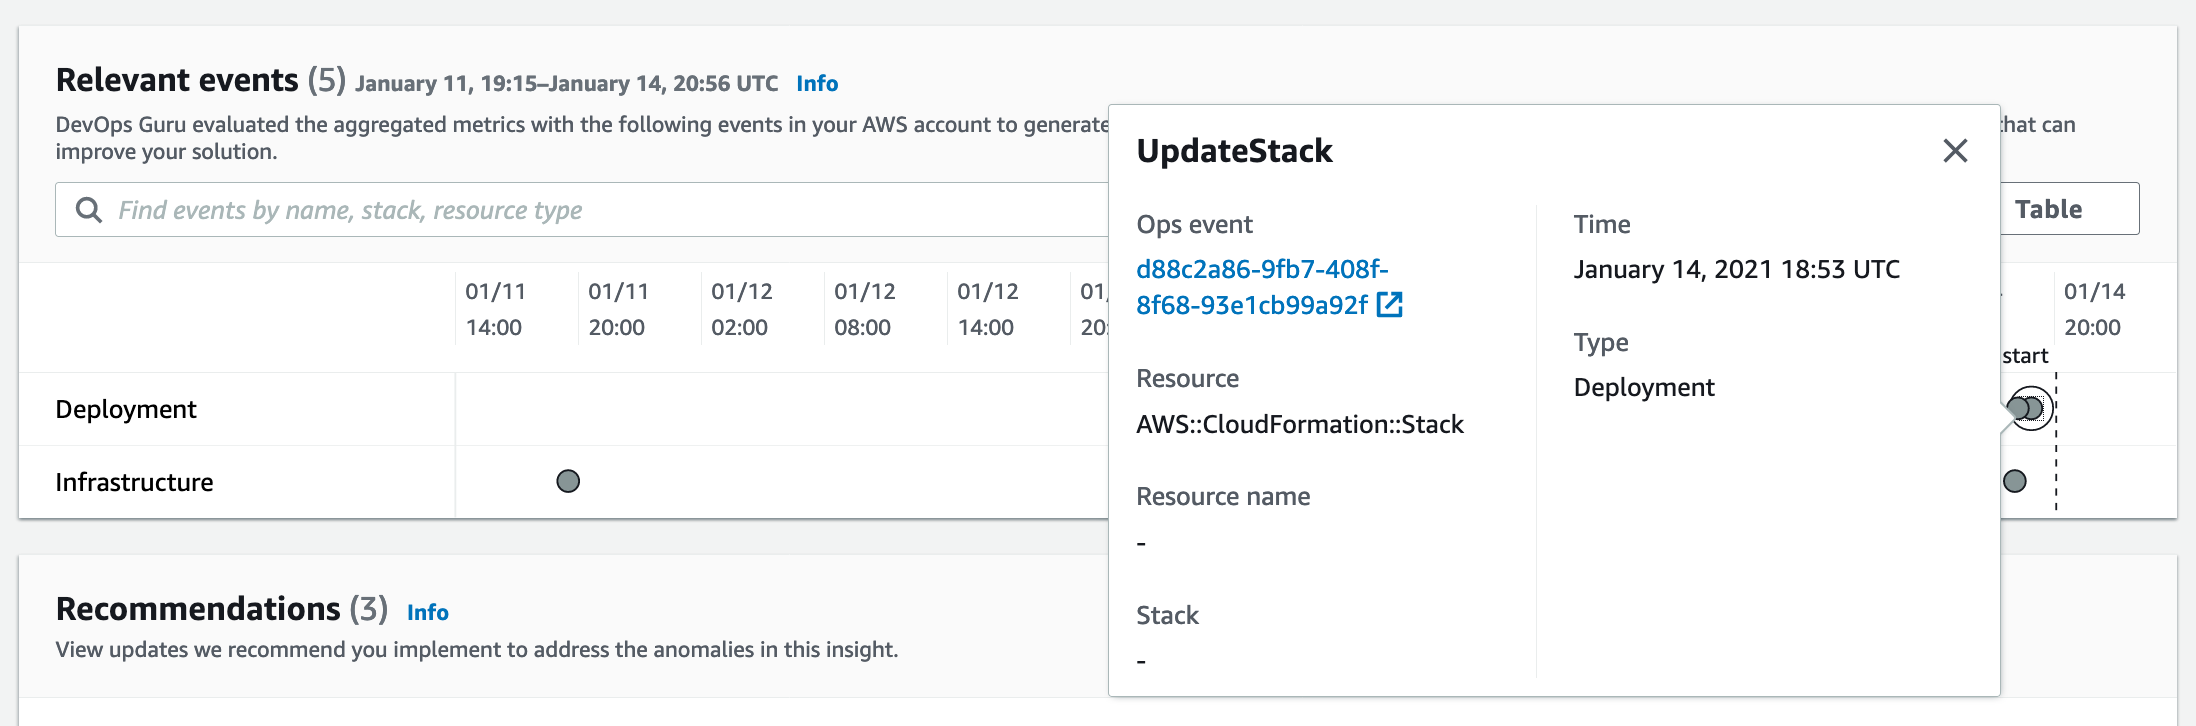
You can choose the link for an event to view specific details about the operational event (configuration change via CloudFormation update stack operation).
Now we move to the Recommendations section, which provides prescribed guidance for mitigating this anomaly. As seen in the following screenshot, it recommends to roll back the configuration change related to the read capacity for the DynamoDB table. It also lists specific metrics and the event as part of the recommendation for reference.

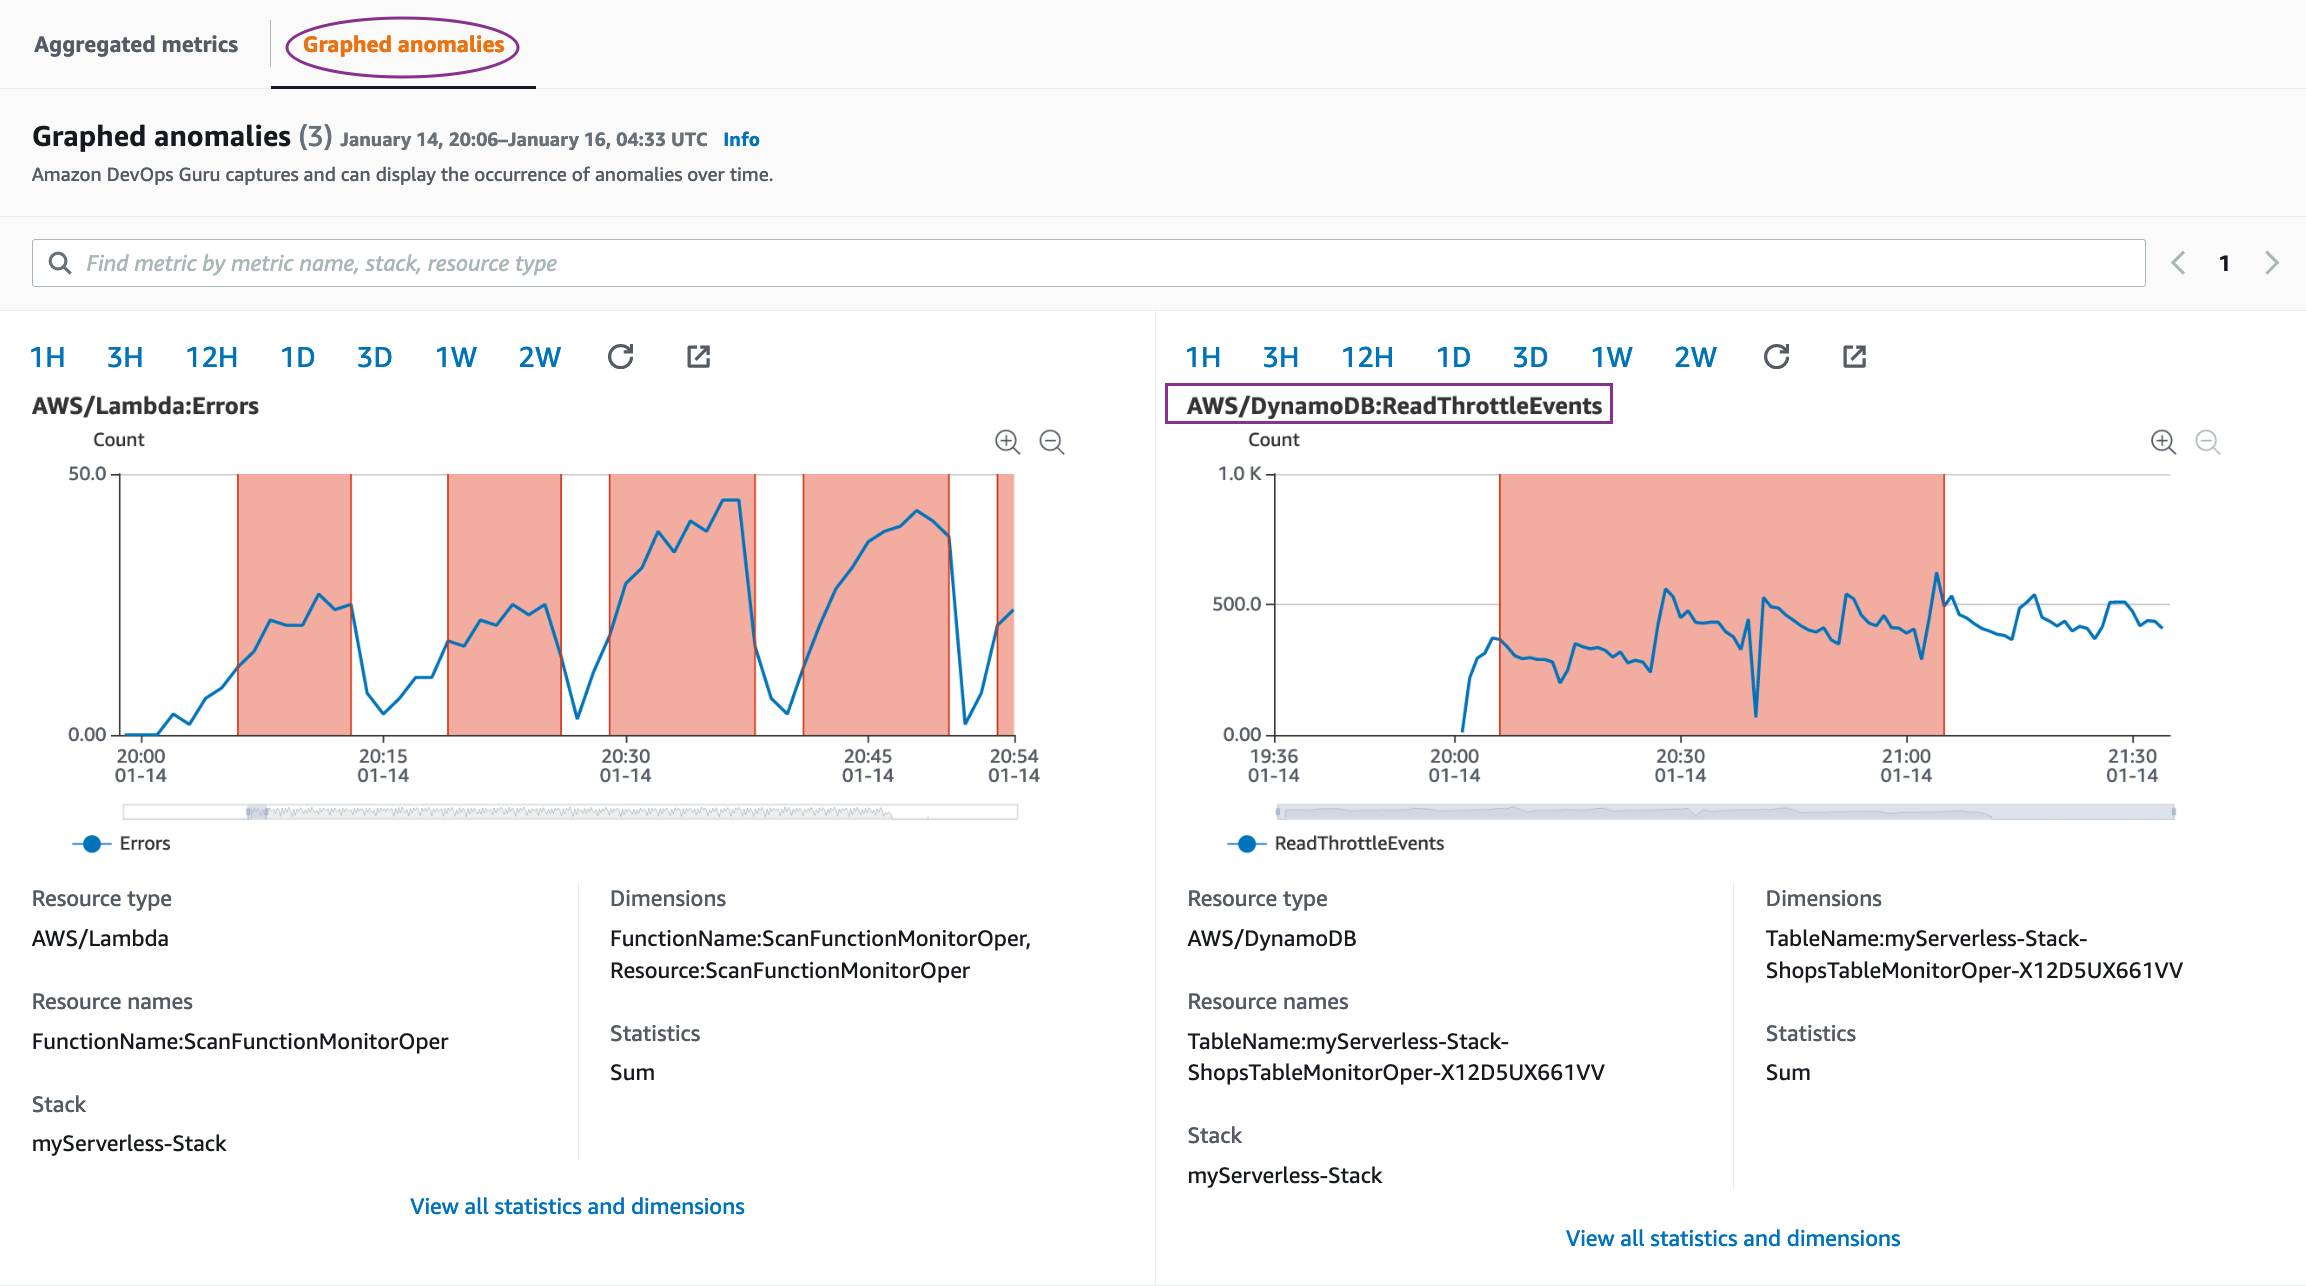
Going back to the metric section of the insight, when we select Graphed anomalies, it shows you the graphs of all related resources. Below screenshot shows a snippet showing anomaly for DynamoDB ReadThrottleEvents metrics. As seen in the below screenshot of the graph pattern, the read operations on the table are exceeding the provisioned throughput of read capacity. This clearly indicates an anomaly.
Let’s navigate to the DynamoDB table and check our table configuration. Checking the table properties, we notice that our read capacity is reduced to 1. This is our root cause that led to this anomaly.

If we change it to 5, we fix this anomaly. Alternatively, if the traffic is stopped, the anomaly moves to a Resolved state.
The ongoing reactive insight takes a few minutes after resolution to move to a Closed state.
Note: When the insight is active, you may see more metrics get populated over time as we detect further anomalies. When carrying out the preceding tests, if you don’t see all the metrics as listed in the screenshots, you may have to wait longer.
Injecting another failure to generate a new DevOps Guru insight
Let’s create a new failure and generate an insight for that.
1. After you close the insight from the previous section, trigger the HTTP traffic generation loop from the AWS Cloud9 terminal.
We modify the Lambda functions’s resource-based policy by removing the permissions for API Gateway to access this function.
2. On the Lambda console, open the function ScanFunctionMonitorOper.
3. On the Permissions tab, access the policy.

4. Save a copy of the policy offline as a backup before making any changes.
5. Note down the “Sid” values for the “AWS:SourceArn” that ends with prod/*/ and prod/*/*.
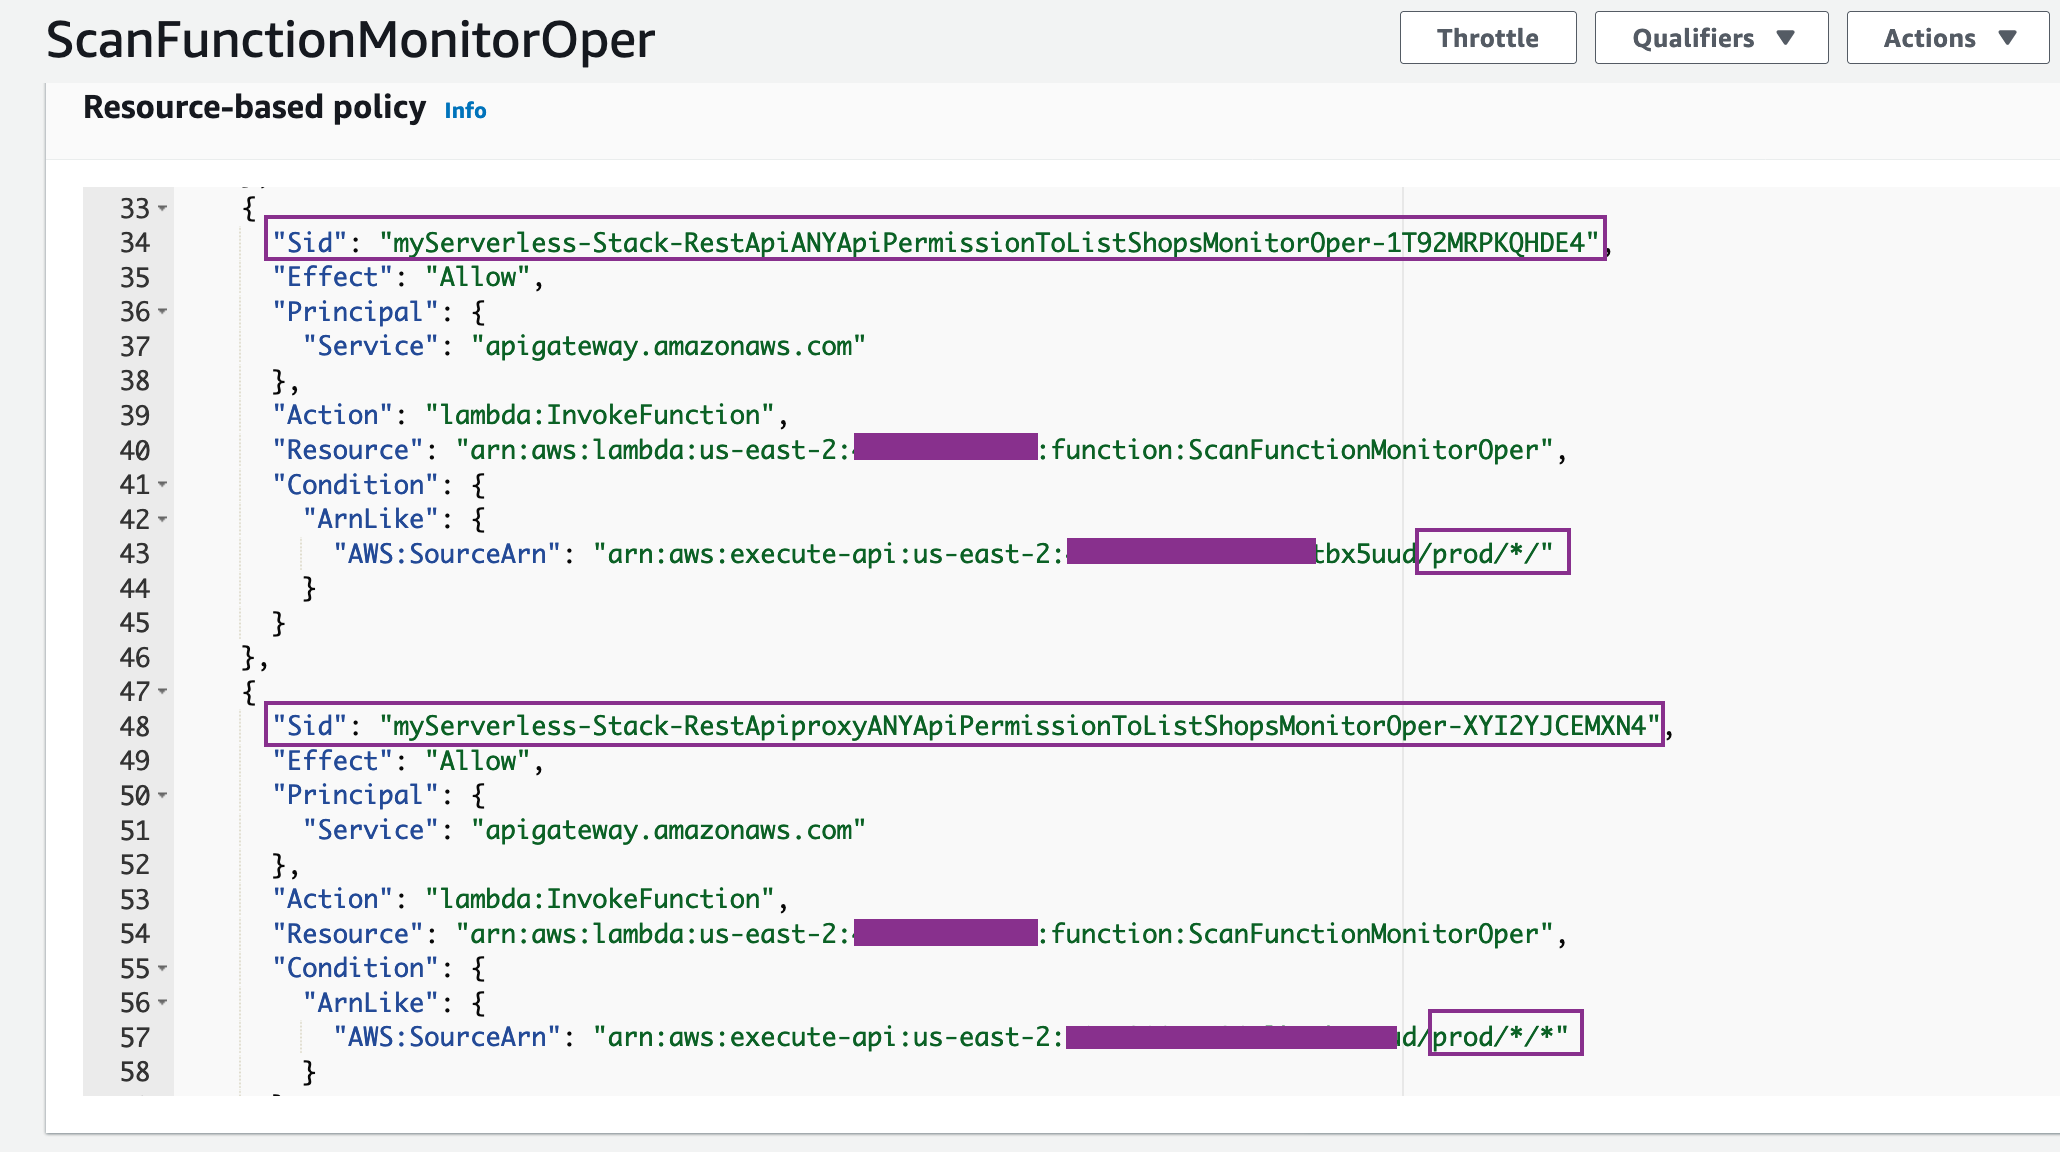
6. Run the following command to remove the “Sid” JSON statements in your Cloud9 terminal:
aws lambda remove-permission --function-name ScanFunctionMonitorOper \
--statement-id <Sid-value-ending-with-prod/*/>
7. Run the same command for the second Sid value:
aws lambda remove-permission --function-name ScanFunctionMonitorOper \
--statement-id <Sid-value-ending-with-prod/*/*>
You should see several 5XX errors, as in the following screenshot.

After less than 8 minutes, you should see a new ongoing reactive insight on the DevOps Guru dashboard.
Let’s take a closer look at the insight. The following screenshot shows the anomalous metric 5XXError Average of API Gateway and its duration. (This insight shows as closed because I had already restored permissions.)
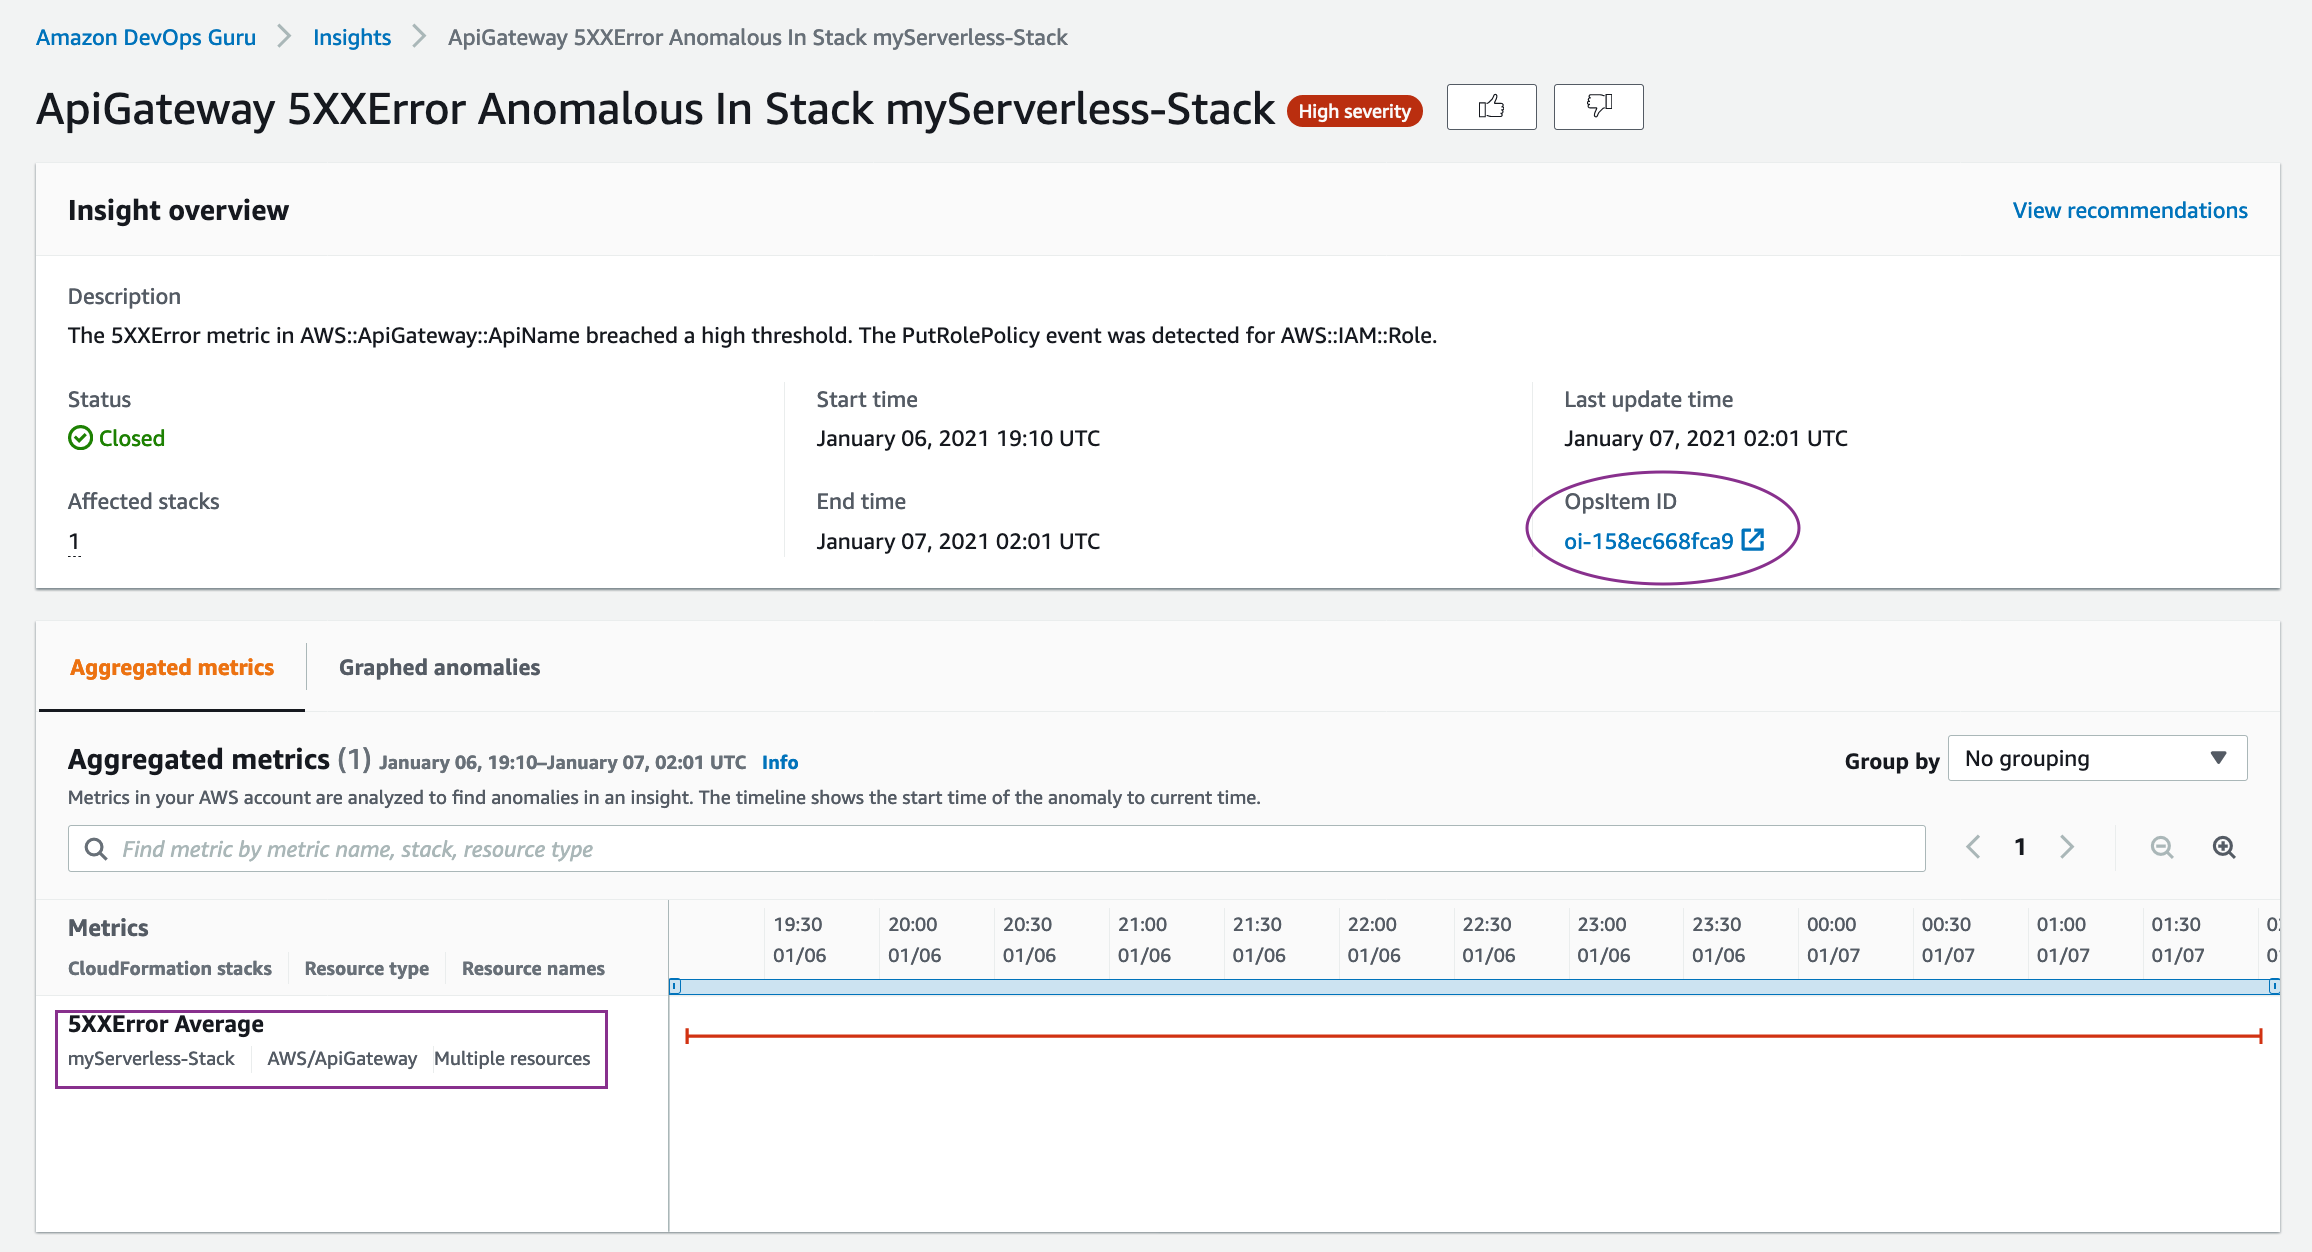
If you have configured to enable creating OpsItem in Systems Manager, you would see the link to OpsItem ID created in the insight, as shown above. This is an optional configuration, which will enable you to track the insights in the form of open tickets (OpsItems) in Systems Manager OpsCenter.
The recommendations provide guidance based upon the related events and anomalous metrics.
After the insight has been generated, reviewed, and verified, restore the permissions by running the following command:
aws lambda add-permission --function-name ScanFunctionMonitorOper  \
--statement-id APIGatewayProdPerm --action lambda:InvokeFunction \
--principal apigateway.amazonaws.com
If needed, you can insert the condition to point to the API Gateway ARN to allow only specific API Gateways to access the Lambda function.
Cleaning up
After you walk through this post, you should clean up and un-provision the resources to avoid incurring any further charges.
1. To un-provision the CloudFormation stacks, on the AWS CloudFormation console, choose Stacks.
2. Select each stack (EnableDevOpsGuruForServerlessCfnStack and myServerless-Stack) and choose Delete.
3. Check to confirm that the DynamoDB table created with the stacks is cleaned up. If not, delete the table manually.
4. Un-provision the AWS Cloud9 environment.
Conclusion
This post reviewed how DevOps Guru can continuously monitor the resources in your AWS account in a typical production environment. When it detects an anomaly, it generates an insight, which includes the vended CloudWatch metrics that breached the threshold, the CloudFormation stack in which the resource existed, relevant events that could be potential triggers, and actionable recommendations to mitigate the condition.
DevOps Guru generates insights that are relevant to you based upon the pre-trained machine-learning models, removing the undifferentiated heavy lifting of manually monitoring several events, metrics, and trends.
I hope this post was useful to you and that you would consider DevOps Guru for your production needs.