Post Syndicated from Kaspars Mednis original https://blog.zabbix.com/build-zabbix-server-ha-cluster-in-10-minutes-by-kaspars-mednis-zabbix-summit-online-2021/18155/
With the native Zabbix server HA cluster feature added in Zabbix 6.0 LTS, it is now possible to quickly configure and deploy a multi-node Zabbix Server HA cluster without using any external tools. Let’s take a look at how we can deploy a Zabbix server HA cluster in just 10 minutes.
The full recording of the speech is available on the official Zabbix Youtube channel.
Why Zabbix needs HA
Let’s dive deeper into what high availability is and try to define what the term High availability entails:
- A system runs in high availability mode if it does not have a single point of failure
- A single point of failure is a component failure of which halts the whole system
- Redundancy is a requirement in systems that use high availability. In our case, we need a redundant component to which we can fail-over in case if the currently active component encounters an issue.
- The failover process needs to be transparent and automated
In the case of the Zabbix components, the single point of failure is our Zabbix server. Even though Zabbix in itself is very stable, you can still encounter scenarios when a crash happens due to OS level issues or something more trivial – like running out of disk space. If your Zabbix server goes down, all of the data collection, problem detection, and alerting is stopped. That’s why it’s important to have some form of high availability and redundancy for this particular Zabbix component.
How to choose HA for Zabbix
Before the addition of native HA cluster support in Zabbix 6.0 LTS it was possible to use 3rd party HA solutions for Zabbix. This caused an ongoing discussion – which 3rd party solution should I use and how should I configure it for Zabbix components? On top of this, you would also have a new layer of software that requires proper expertise to deploy, configure and manage. There are also cloud-based HA options, but most of the time these incur an extra cost.
Not having the required expertise for the 3rd party high availability tools can cause unwanted downtimes or, at worst, can cause inconsistencies in the Zabbix DB backend. Here are some of the potential scenarios that can be caused by a misconfigured high availability solution:
- The automatic failover may not be configured properly
- A split-brain scenario with two nodes running concurrently, potentially causing inconsistencies in the Zabbix database backend
- Misconfigured STONITH (Shoot the other node in the head) scenarios – potentially causing both nodes to go down
Native Zabbix HA solution
Zabbix 6.0 LTS native high availability solution is easy to set up and all of the required steps are documented in the Zabbix documentation. The native solution does not require any additional expertise and will continue to be officially supported, updated, and improved by Zabbix. Native high availability solution doesn’t require any new software components – the high availability solution stores the information about the Zabbix server node status in the Zabbix database backend.
How Zabbix cluster works
To enable the native high availability cluster for our servers, we first need to start the Zabbix server component in the high availability mode. To achieve this, we need to look at the two new parameters in the /etc/zabbix/zabbix_server.conf configuration file:
- HANodeName – specify an arbitrary name for your Zabbix server cluster node
- ExternalAddress – specify the address of the cluster node
Once you have made the changes and added these parameters, don’t forget to restart the Zabbix server cluster nodes to apply the changes.
Zabbix HA Node name
Let’s take a look at the HANodeName parameter. This is the most important configuration parameter – it is mandatory to specify it if you wish to run your Zabbix server in the high availability mode.
- This parameter is used to specify the name of the particular cluster mode
- If the HANodeName is not specified, Zabbix server will not start in the cluster mode
- The node name needs to be unique on each of your nodes
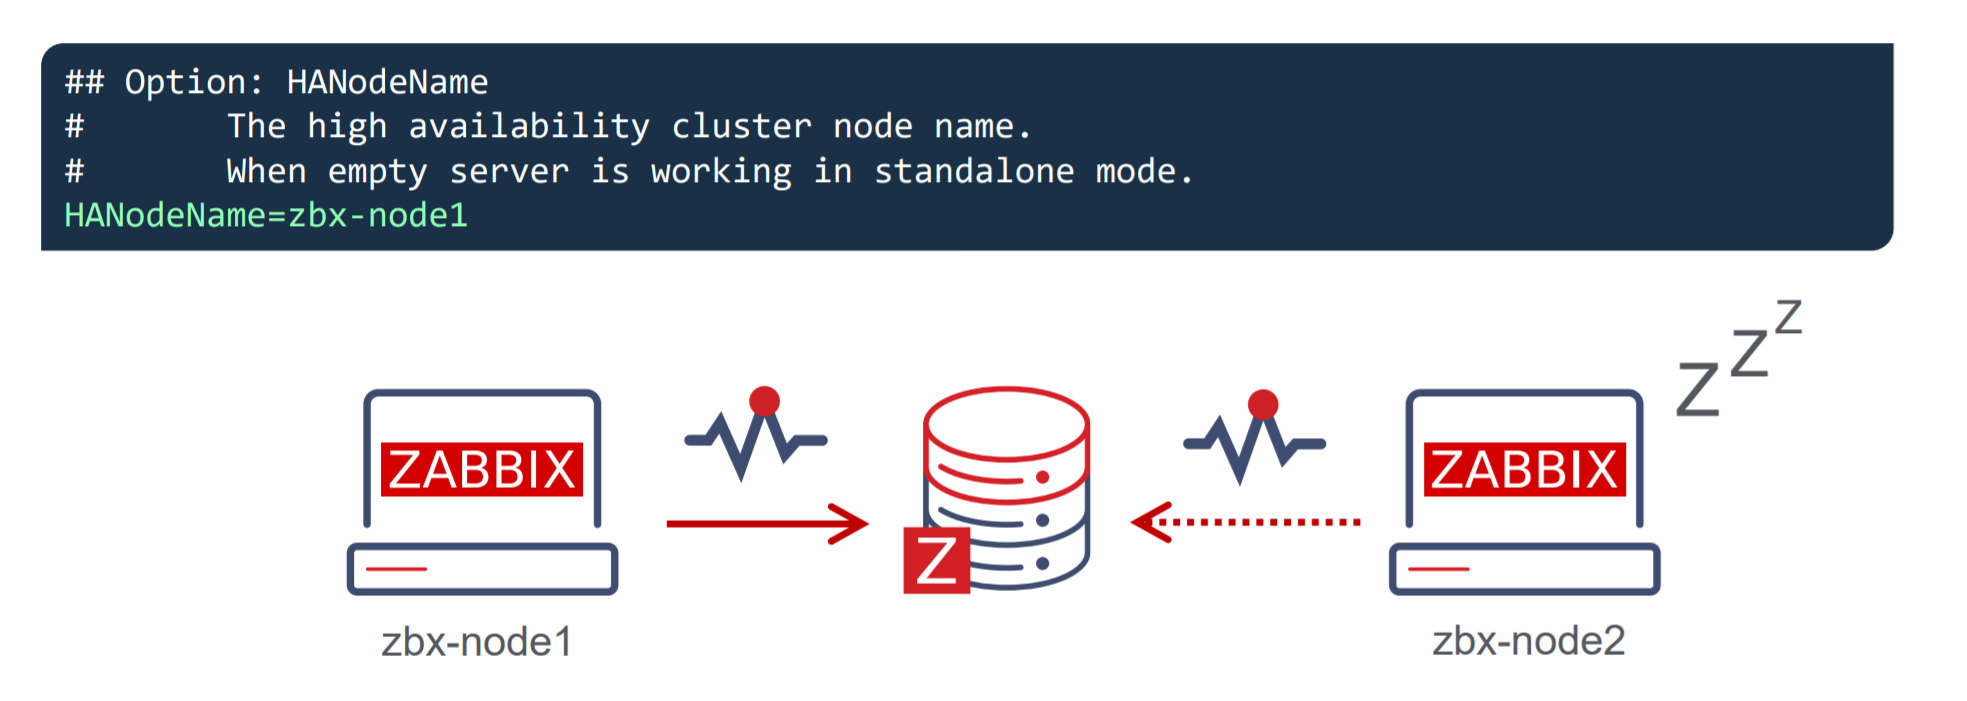 In our example, we can observe a two-node cluster, where zbx-node1 is the active node and zbx-node2 is the standby node. Both of these nodes will send their heartbeats to the Zabbix database backend every 5 seconds. If one node stops sending its heartbeat, another node will take over.
Zabbix HA Node External Address
The second parameter that you will also need to specify is the ExternalAddress parameter.
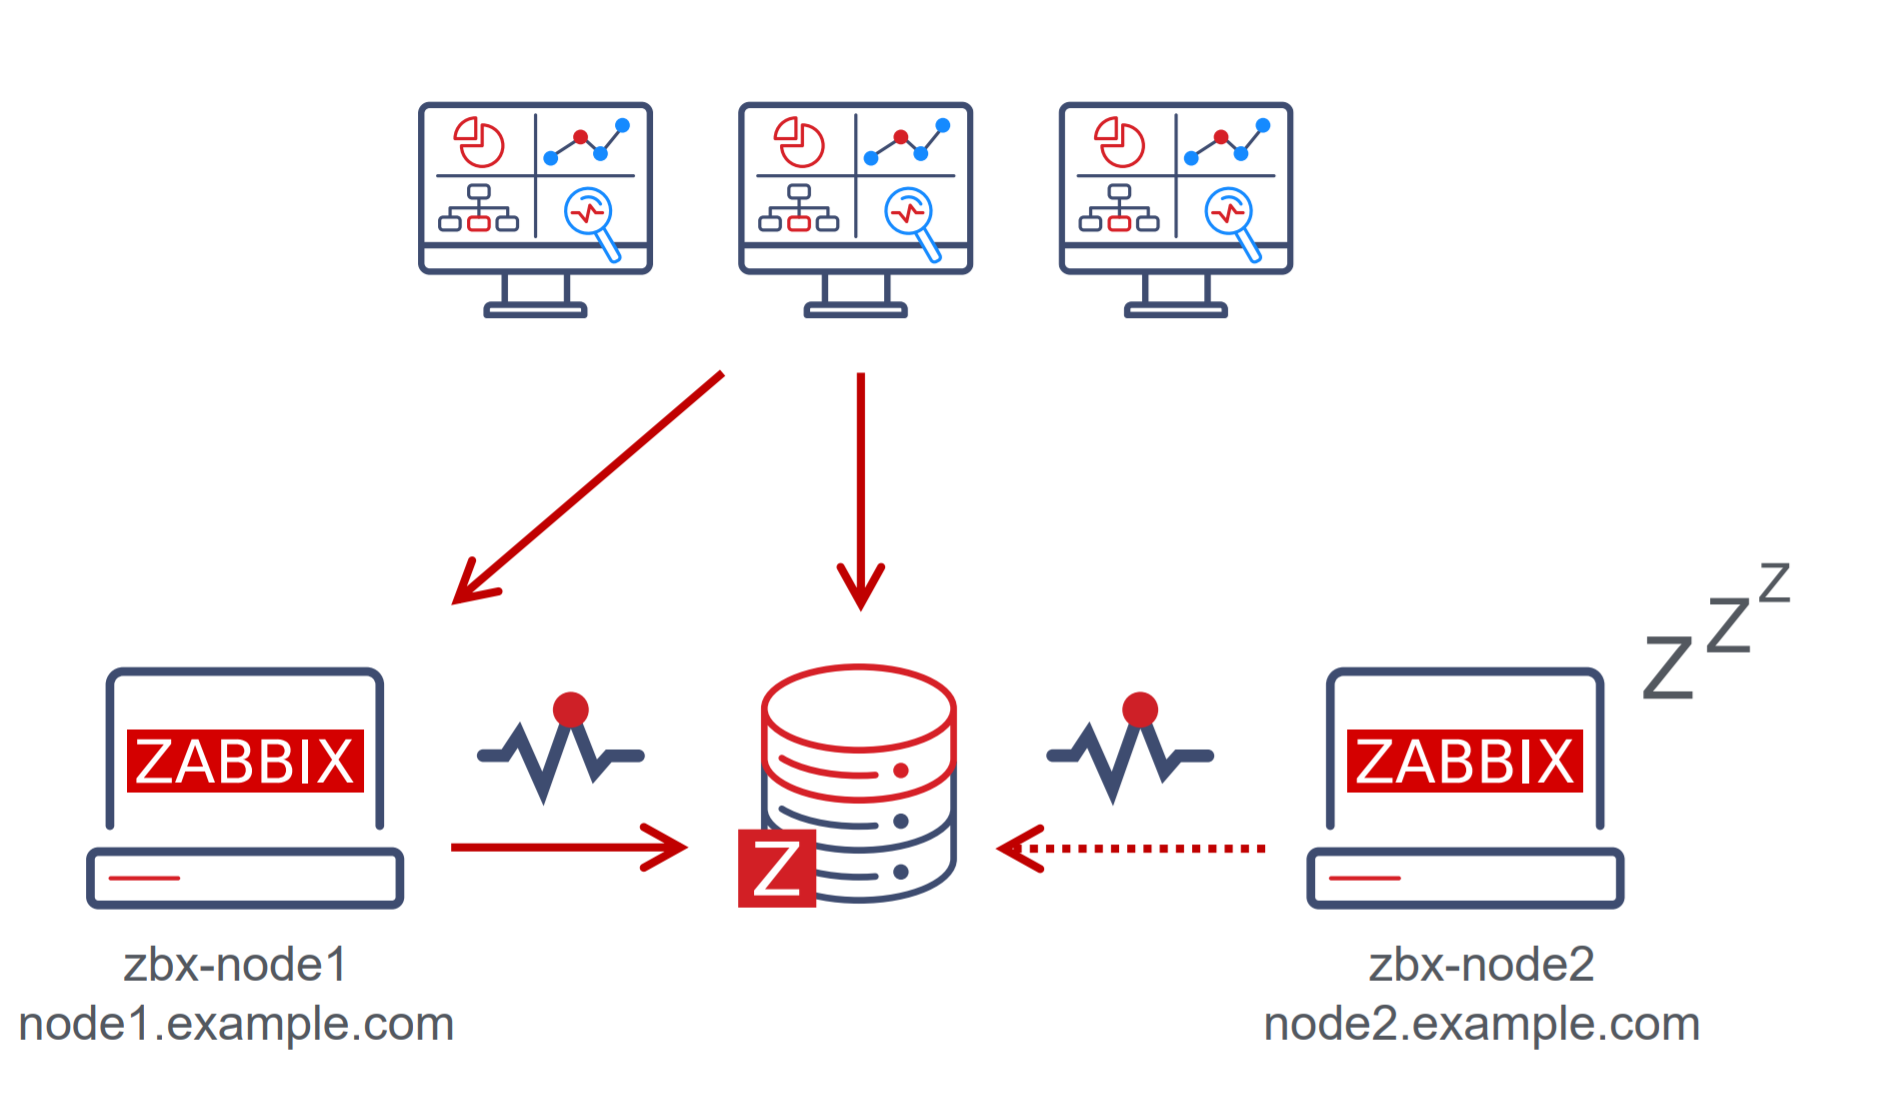
 In our example, we are using the address node1.example.com. The purpose of this parameter is to let the Zabbix frontend know the address of the currently active Zabbix server since the Zabbix frontend component also constantly communicates with the Zabbix server component. If this parameter is not specified, the Zabbix frontend might not be able to connect to the active Zabbix server node.
Zabbix frontend setup
Seasoned Zabbix users might know that the Zabbix frontend has its own configuration file, which usually contains the Zabbix server address and the Zabbix server port for establishing connections from the Zabbix frontend to the Zabbix server.  If you are using the Zabbix high availability cluster, then you will have to comment these parameters out since instead of being static, now they depend on the currently active Zabbix server node and will be obtained from the Zabbix backend database.
Putting it all together
In the above example, we can see that we have two nodes – zbx-node1, which is currently active and zbx-node2. These nodes can be reachable by using the external addresses – node1.example.com and node2.example.com for zbx-node1 and zbx-node2 respectively. We can see that we also have deployed multiple frontends. Each of these frontend nodes will connect to the Zabbix backend database, read the address of the currently active node and proceed to connect to that node.
Zabbix HA node types
Zabbix server high availability cluster nodes can have one of the following multiple statuses:
- Active – The currently active node. Only one node can be active at a time
- Standby – The node is currently running in standby mode. Multiple nodes can have this status
- Shutdown – The node was previously detected, but it has been gracefully shut down
- Unreachable – Node was previously detected but was unexpectedly lost without a shutdown. This can be caused by many different reasons, for example – the node crashing or having network issues
In normal circumstances, you will have an active node and one or more standby nodes. Nodes in shutdown mode are also expected if, for example, you’re performing some maintenance tasks on these nodes. On the other hand, if an active node becomes unreachable, this is when one of the standby nodes will take over.
Zabbix HA Manager
How can we check which node is currently active and which nodes are running in standby mode? First off, we can see this in the Zabbix frontend – we will take a look at this a bit later. We can also check the node status from the command line. On every node – no matter active or standby, you will see that the zabbix_server and ha manager processes have been started. The ha manager process is responsible for checking the high availability node status in the database every 5 seconds and is responsible for taking over if the active node fails.
 On the other hand, the currently active Zabbix server node will have many other processes – data collector processes such as pollers and trappers, history and configuration syncers, and many other Zabbix child processes.
Zabbix HA node status
The System information widget has received some changes in Zabbix 6.0 LTS. It is now capable of displaying the status of your Zabbix server high availability cluster and its individual nodes.
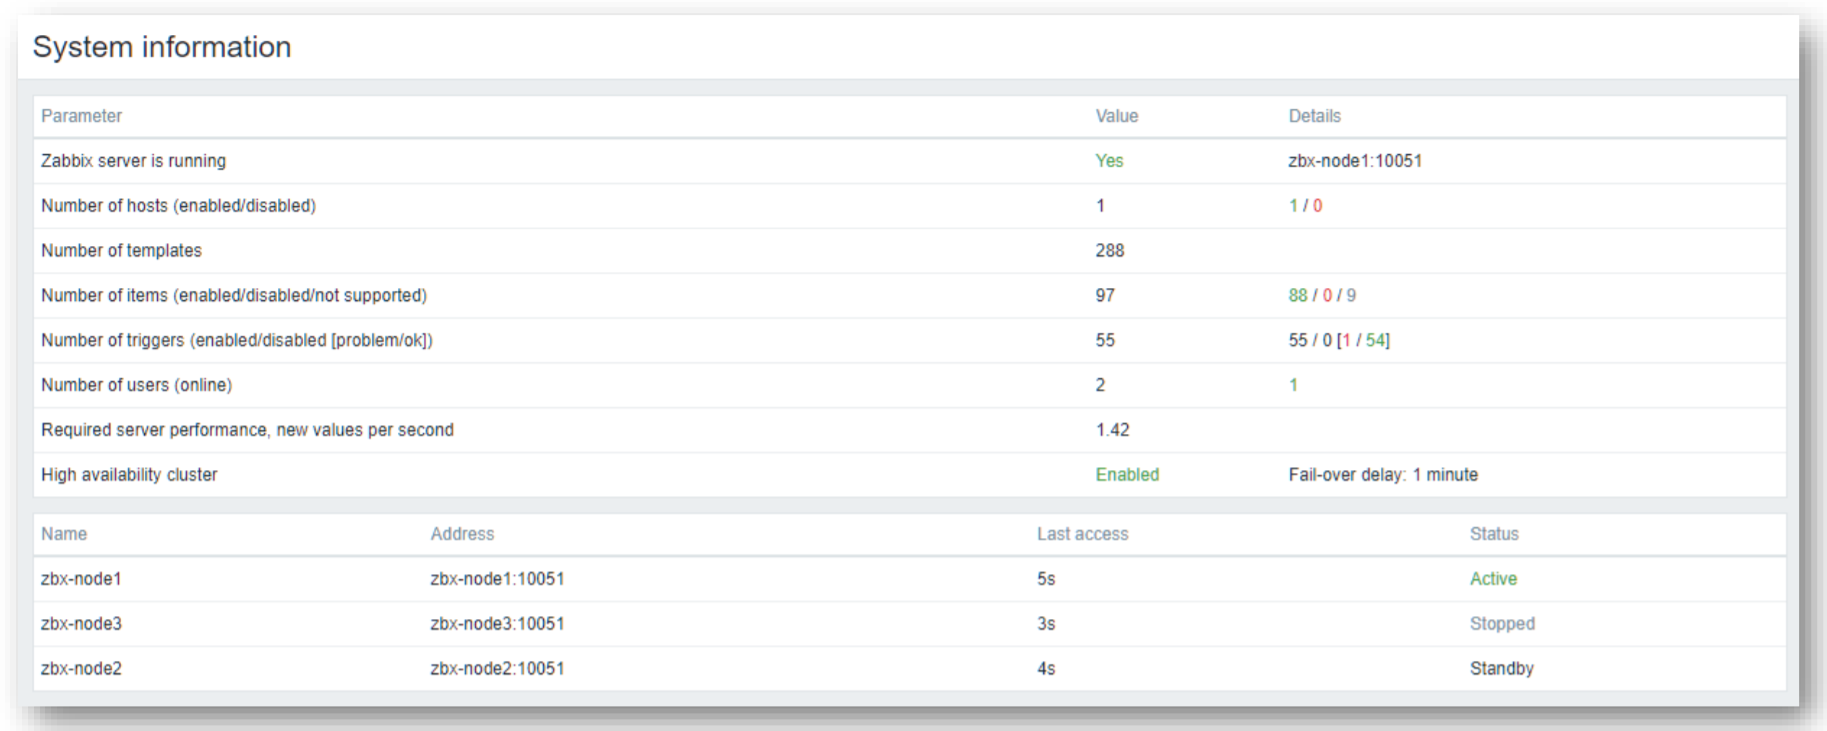 The widget can display the current cluster mode, which is enabled in our example and provides a list of all cluster nodes. In our example, we can see that we have 3 nodes – 1 active node,1 stopped node, and 1 node running in standby mode. This way we can not only see the status of our nodes but also their names, addresses, and last access times.
Switching Zabbix HA node
The witching between nodes is done manually. Once you stop the currently active Zabbix server node, another node will automatically take over. Of course, you need to have at least one more node running in standby status, so it can take over from the failed active node.
How failover works?
All nodes report their status every 5 seconds. Whenever you shut down a node, it goes into a shutdown state and in 5 seconds another node will take over. But if a node fails the workflow is a bit different. This is where something called a failover delay is taken into account. By default, this failover delay is 1 minute. The standby node will wait for one minute for the failed active node to update its status and if in one minute the active node is still not visible, then the standby node will take over.
Zabbix cluster tuning
It is possible to adjust the failover delay by using the ha_set_failover_delay runtime command. The supported range of the failover delay is from 10 seconds to 15 minutes. In most cases the default value of 1 minute will work just fine, but there could be some exceptions and it very much depends on the specifics of your environment.
 We can also remove a node by using the ha_remove_node runtime command. This command requires us to specify the ID of the node that we wish to remove.
Connecting agents and proxies
Connecting Zabbix agents to your cluster
Now let’s talk about how we can connect Zabbix agents and proxies to your Zabbix cluster. First, let’s take a look at the passive Zabbix agent configuration.
- Passive Zabbix agents require all nodes to be written in the configuration file under the Server parameter
- Nodes are specified in a comma-separated list
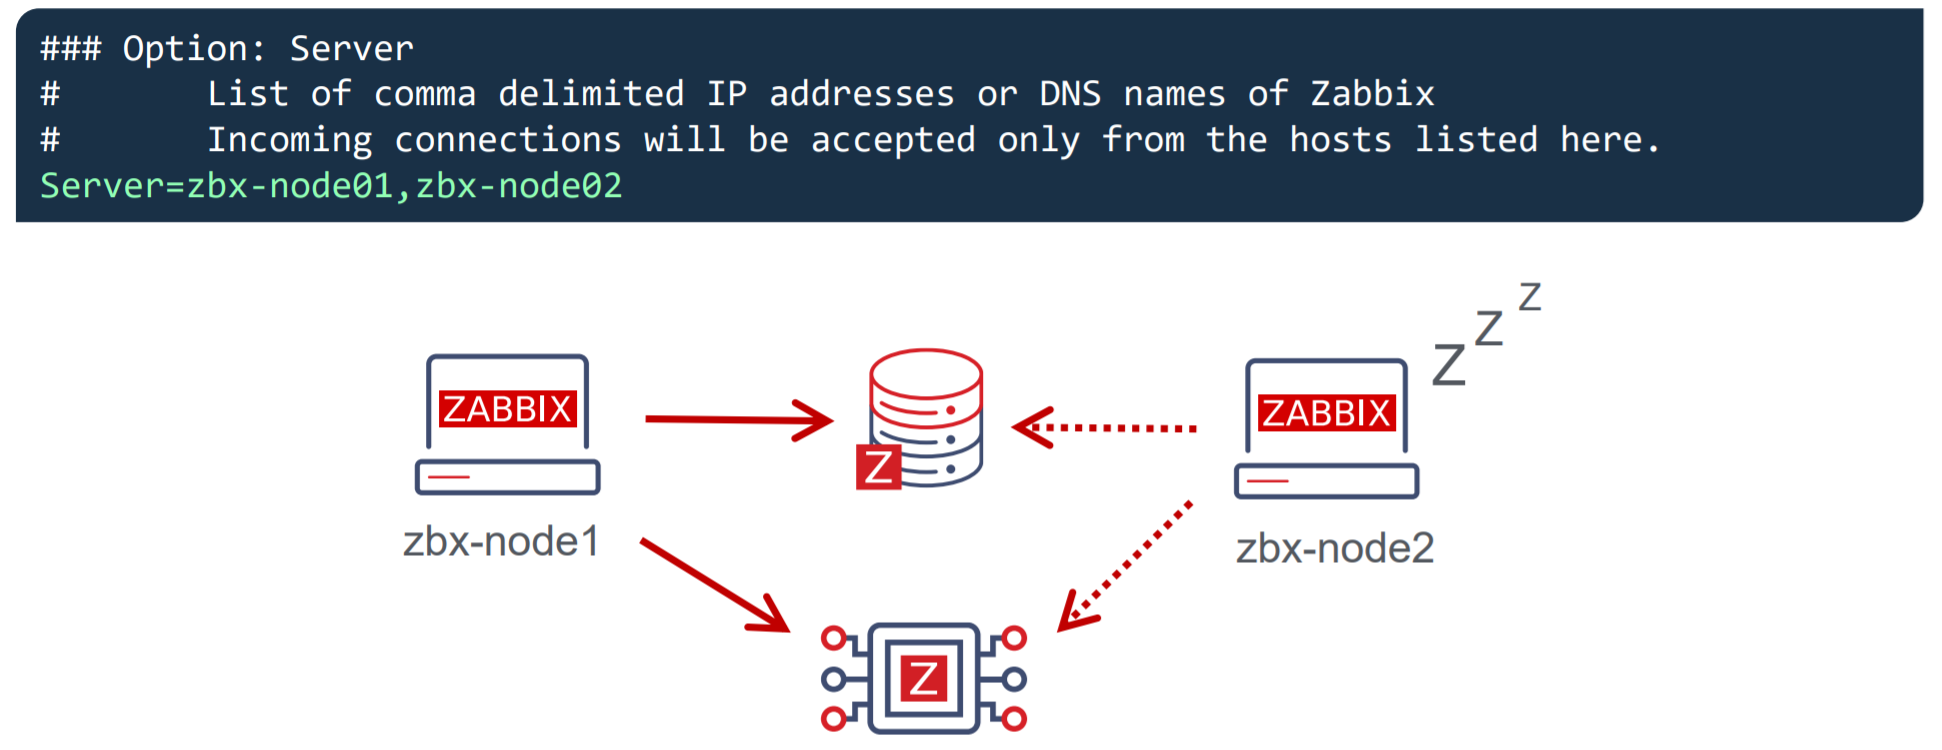 Once you specify the list of all nodes, the passive Zabbix agent will accept connections from all of the specified nodes.
What about the active Zabbix agents?
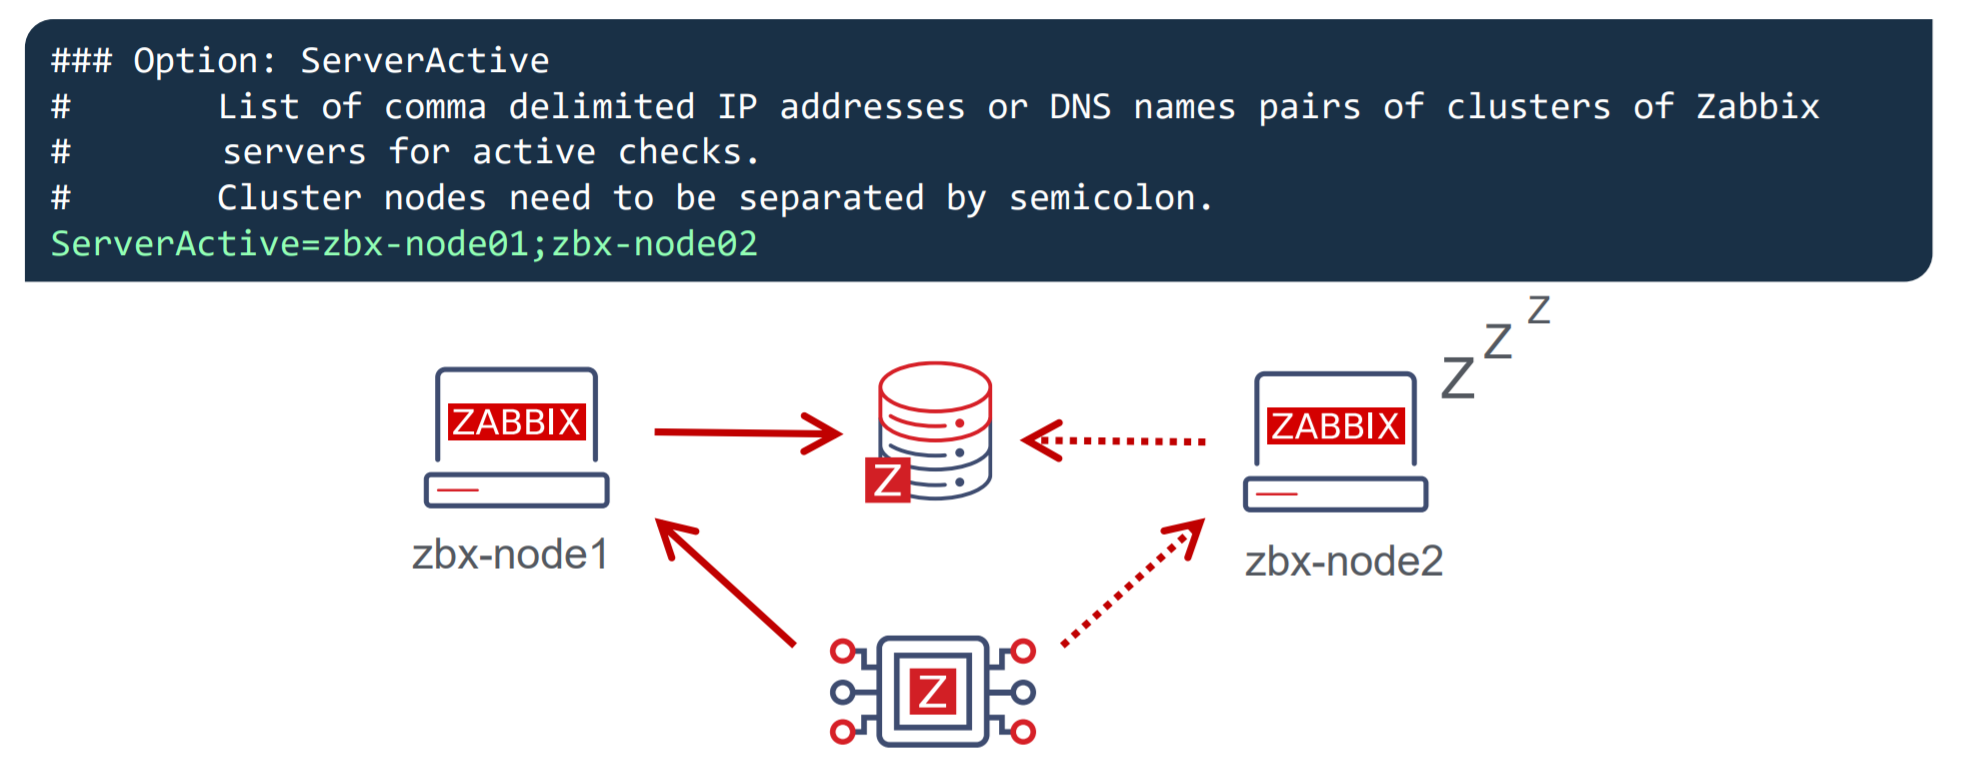
- Active Zabbix agents require all nodes to be written in the configuration file under the ServerActive parameter
- Nodes need to be separated by semicolons
Notice the difference – comma-separated list for passive Zabbix agents and nodes separated by semicolons for active Zabbix agents!
Connecting Zabbix proxies to your cluster
Proxy configuration is very similar to the agent configuration. Once again – we can have a proxy running either in passive mode or active mode.
For the passive Zabbix proxies, we need to list our cluster nodes under the Server parameter in the proxy configuration file. These nodes should be specified in a comma-separated list. This way the proxies will accept connections from any Zabbix server node. As for the active Zabbix proxies – we need once again to list our nodes under the Server parameter, but this time the node names will be separated by semicolons.
Conclusion – Setting up Zabbix HA cluster
Let’s conclude by going through all of the steps that are required to set up a Zabbix server HA cluster.
- Start Zabbix server in high availability mode on all of your Zabbix server cluster nodes – this can be done by providing the HANodeName parameter in the Zabbix server configuration file
- Comment out the $ZBX_SERVER and $ZBX_SERVER_PORT in the frontend configuration file
- List your cluster nodes in the Server and/or ServerActive parameters in the Zabbix agent configuration file for all of the Zabbix agents
- List your cluster nodes in the Server parameter for all of your Zabbix proxies
- For other monitoring types, such as SNMP – make sure your endpoints accept connections from all of the Zabbix server cluster nodes
- And that’s it – Enjoy!
Zabbix HA workshop and training
Wish to learn more about the Zabbix server high availability cluster and get some hands-on experience with the guidance of a Zabbix certified trainer? Take a look at the following options!
- The Zabbix server high availability workshop will be hosted shortly after the release of Zabbix 6.0 LTS, which is currently planned for January 2022. One of the workshop sessions will be focused specifically on Zabbix server high availability cluster configuration and troubleshooting.
- Zabbix Certified professional training course covers the Zabbix server HA cluster configuration and troubleshooting. This is also a great opportunity to discuss your own Zabbix use cases and infrastructure with a Zabbix certified trainer. Feel free to check out our Zabbix training page to learn more!
Questions
Q: What about the high availability for the Zabbix frontend? Is it possible to set it up?
A: This is already supported since Zabbix 5.2. All you have to do is deploy as many Zabbix frontend nodes as you require and don’t forget to properly configure the external address so the Zabbix frontends are able to connect to the Zabbix servers and that’s all!
Q: Does high availability cause a performance impact on the network or the Zabbix backend database?
A: No, this should not be the case. The heartbeats that the cluster nodes send to the database backend are extremely small messages that get recorded in one of the smaller Zabbix database tables, so the performance impact should be negligible.
Q: What is the best practice when it comes to migrating from a 3rd party solution such as PCS/Corosync/Pacemaker to the native Zabbix server high availability cluster? Any suggestions on how that can be achieved?
A: The most complex part here is removing the existing high availability solution without breaking anything in the existing environment. Once that is done, all you have to do is upgrade your Zabbix instance to Zabbix 6.0 LTS and follow the configuration steps described in this post. Remember, that if you’re performing an upgrade instead of a fresh install, the configuration files will not have the new configuration parameters so they will have to be added in manually.
