Post Syndicated from Jonathan Nguyen original https://aws.amazon.com/blogs/security/use-security-hub-custom-actions-to-remediate-s3-resources-based-on-macie-discovery-results/
The amount of data available to be collected, stored and processed within an organization’s AWS environment can grow rapidly and exponentially. This increases the operational complexity and the need to identify and protect sensitive data. If your security teams need to review and remediate security risks manually, it would either take a large team or the actions might not be timely. There is also a chance that with manual operation, a step could be missed or the incorrect action could be taken. As a result, your security teams will need an automated and scalable way to support these operations efficiently.
Amazon Macie is a fully managed data security and data privacy service that uses machine learning and pattern matching to discover and protect your sensitive data in AWS. Macie generates findings for sensitive data in an S3 object or a potential issue with the security or privacy of an S3 bucket. AWS Security Hub allows you to gain a centralized view into the security posture across your AWS environment by aggregating security findings from various AWS services and partner products, including Amazon Macie. Security Hub also includes the custom actions feature, which you can use to create actions for response and remediation to selected findings within the Security Hub console in an efficient and consistent manner.
It is important for your security teams to create effective and standardized mechanisms for taking action against Macie findings to ensure that data remains secure. By using Security Hub custom actions, you can have predefined actions for the security team to take against Macie findings without having to manually find and remediate the resources.
This blog post provides you with an example solution for responding to Macie sensitive data findings and policy findings in Security Hub by using custom actions. I will walk through the components of the solution, as well as opportunities where resources can be customized for your specific use case.
Prerequisites
You must have AWS Security Hub and Amazon Macie enabled in the AWS account where you are deploying this solution.
Solution overview
In this solution, you’ll use a combination of Security Hub custom actions, Amazon EventBridge, and AWS Lambda to take action on Macie findings in Security Hub. You will be working with the findings within the same AWS account where you deployed the solution.
Macie generates two categories of findings relating to different resources, which will require different remediation actions.
- Policy finding is a detailed report of a potential policy violation or issue with the security or privacy of an Amazon Simple Storage Service (Amazon S3) bucket.
- Sensitive data finding is a detailed report of sensitive data in an S3 object.
A full list of Macie finding types can be found in the Macie User guide.
For the two Macie finding categories, there is an associated Security Hub custom action:
- Custom action for sensitive data finding (S3 object) – When the security team selects this custom action, the action invokes a Lambda function that will take the following steps on the S3 object in the Macie finding:
- Tag the object with the Security Hub finding ID
- Encrypt the S3 object with a different customer-managed KMS key
- Update the Security Hub finding workflow status to RESOLVED
- Custom action for policy finding (S3 bucket). When you select this this custom action, it invokes a Lambda function that will take the following steps on the S3 bucket in the Macie finding:
- Tag the object with the Security Hub finding ID
- Update the S3 bucket configuration to:
- Enable default encryption
- Enable public access block
- Update the Security Hub finding workflow status to RESOLVED
The solution is configured to take action within the AWS account where the finding and corresponding resource is generated. In order to enable cross-account remediation, you will need to deploy an additional IAM role for the automation to assume and provision a KMS key to use for encryption.
Note: The custom actions in this solution are meant to be examples of actions to take against Macie policy and sensitive data findings. These actions will be different depending on your use-case and environment. You will also need to review and update the associated Lambda function execution role IAM policies accordingly.
Solution architecture
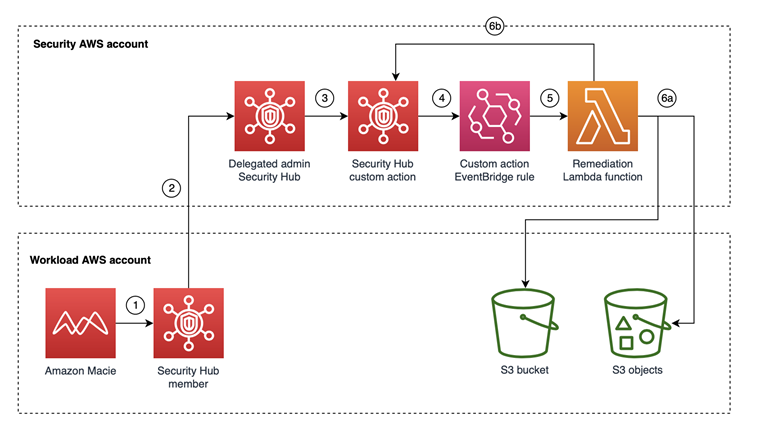
Figure 1: Resources deployed in the Security AWS account taking action on resources identified in the Workload AWS account
Figure 1 shows the architecture for the solution. The workflow is as follows:
- A Macie job runs and creates findings, which are sent to Security Hub in the same AWS account as the Macie finding.
- The delegated administrator Security Hub account combines findings across all member Security Hub accounts, including Macie findings.
- The security team reviews the Macie findings in the Security Hub delegated administrator account and determines to take remediation actions for a finding by selecting the finding and then selecting the appropriate Security Hub custom action.
- The Security Hub custom action sends the finding to the EventBridge rule, which is linked to the Lambda function.
- The EventBridge rule invokes the Lambda function to take action against the resources from the Macie finding.
- The Lambda function will:
- Take action for the S3 resource
- Mark the Macie finding as resolved in the delegated administrator Security Hub account
The solution is currently intended to work in a single Region. In order to enable this solution across Regions, you will need to change the Remediation Lambda function code for any regional resources used for remediation actions (i.e. AWS Key Management Service).
Deploy the solution
You can deploy the solution through either the AWS Management Console or the AWS Cloud Development Kit (AWS CDK).
To deploy the solution by using the AWS Management Console
- In your security tooling account, launch the AWS CloudFormation template by choosing the following Launch Stack button. It will take approximately 10 minutes for the CloudFormation stack to complete.

Note: The stack will launch in the N. Virginia (us-east-1) Region. To deploy this solution into other AWS Regions, download the solution’s CloudFormation template, modify it, and deploy it to the selected Region.
- (OPTIONAL) If you want to enable cross-account remediation, launch the following AWS CloudFormation template in the AWS account where you want to be able to take remediation actions. You can also use AWS CloudFormation StackSets if deploying to multiple AWS accounts.
To deploy the solution by using AWS CDK
You can find the latest code in our GitHub repository, where you can also contribute to the sample code. The following commands show how to deploy the solution by using the AWS CDK. First, the CDK initializes your environment and uploads the AWS Lambda assets to Amazon S3. Then, you can deploy the solution to your account. Make sure to replace <AWS_ACCOUNT> with the account number, and replace <REGION> with the AWS Region that you want the solution deployed to.
- Run the following commands in your terminal while authenticated in the security tooling AWS account:
cdk bootstrap aws://<Security_Tooling_AWS_ACCOUNT>/<REGION>
cdk deploy MacieRemediationStack
- (OPTIONAL) If you want to enable cross-account remediation, Run the following commands in your terminal while authenticated to member AWS account:
cdk bootstrap aws://<Member_AWS_ACCOUNT>/<REGION>
cdk deploy MacieRemediationIAMStack –parameters solutionaccount=<Security_Tooling_AWS_ACCOUNT>
Solution walkthrough and validation
Now that you’ve successfully deployed the solution, you can see things in action. You have two options for testing the workflow on your own:
- Use a sample event, generated by a Macie finding in Security Hub, and invoke the Lambda function that is tied to the Security Hub custom action.
Note: If using sample events, you can replace the values for the resources with real resources. Otherwise, you will not be able to see the Lambda function successfully take action because the resource in your sample event may not exist.
- Generate demo Macie findings in Security Hub by using this sample data for Amazon Macie.
I have existing findings for Macie generated in my AWS account, and in the procedures in this section, I’ll walk through taking action against these.
Note: If you set up Macie and Security Hub in a delegated administrator and member model that ingests findings from other AWS accounts, the IAM remediation roles for the S3 bucket and S3 objects must be deployed in the member accounts.
Review deployed resources in the AWS console
Before taking action on your sample findings, review the deployed resources that you’ll use.
To review deployed resources
- In the AWS account console where the automation was deployed, go to Security Hub, choose Settings, and then choose Custom actions. You should see two custom actions:
- Macie Policy Finding
- arn:aws:securityhub:<region>:<account-id>:action/custom/MacieS3BucketPolicy
- Macie Data Finding
- arn:aws:securityhub:<region>:<account-id>:action/custom/MacieSensitiveData

Figure 2: Custom actions in Security Hub
- arn:aws:securityhub:<region>:<account-id>:action/custom/MacieSensitiveData
- Macie Policy Finding
- Navigate to the EventBridge console and then choose Rules. You should see four rules:
- Disabled – These are disabled by default during deployment
- Autoremediate_Macie_Policy_Finding
- Autoremediate_Macie_Sensitive_Data_Finding

Figure 3: Disabled EventBridge rules for autoremediation of Macie findings in Security Hub
- Enabled – These are enabled by default during deployment:
- Custom_Action_Macie_Policy_Finding
- Custom_Action_Macie_Sensitive_Data_Finding

Figure 4: Enabled EventBridge rules tied to the Security Hub custom actions
In the enabled EventBridge rules, you should see the corresponding Security Hub custom action Amazon Resource Names (ARNs) in the rule event pattern.
Figure 5: Enabled EventBridge rule event pattern for the Security Hub custom action
- Disabled – These are disabled by default during deployment


Take action on an Amazon Macie object or policy finding
Each Security Hub custom action invokes a corresponding Lambda function that is configured as a target in the EventBridge rule. The Lambda function parses the information in the Macie finding from Security Hub to take action.
Each Security Hub custom action is specific to either an S3 object or an S3 bucket. If you attempt a custom action meant for an S3 object against a Macie policy finding, this will successfully initiate the custom action, but the Lambda function that is invoked will be unsuccessful.
If the Macie finding is specific to an S3 object, the title will display “The S3 object …,” whereas if the Macie finding is for a policy finding, the title will display information for an S3 bucket.
To take action on findings
- In the AWS account console where the automation was deployed, navigate to AWS Security Hub, and then choose Findings.
- Filter the findings by setting Product Name to Macie.

Figure 6: Filter for Macie findings in Security Hub
- Select the checkbox for either a Macie policy finding or a sensitive data finding; this will select a custom action. After you select the action, there is no confirmation step, and the action will invoke the Lambda function.

Figure 7: Validate Custom Action has sent the finding to Amazon CloudWatch Events (EventBridge rule)


Review and validate the Security Hub custom action on target resources
In order to validate or troubleshoot the solution, you need to review whether the Lambda function was able to take action against the resources in the Security Hub finding for Macie.
To validate or troubleshoot the custom action
- For validation of sensitive data finding remediation, review S3 object configuration:
- Navigate to the Amazon S3 console.
- Choose the S3 object in the Macie finding.
- Choose the Properties tab and review the following fields:
- Tags should be set to SH_Finding_ID.
- AWS KMS key ARN should be set to the KMS key with the alias `macie_key`
- Click on the KMS key ARN and validate the key’s alias is the key deployed in the solution
- For validation of policy finding remediation, review the S3 bucket configuration:
- Navigate to the Amazon S3 console.
- Choose the S3 bucket in the Macie finding.
- Choose the Properties tab and review the following fields:
- Tags should be set to SH_Finding_ID.
- Default Encryption should be set to Enabled.
- Choose the Permissions tab and review the following fields:
- Block public access should be set to On.
- For troubleshooting, you can review the CloudWatch logs for the Lambda function:
- Navigate to the CloudWatch console.
- Choose /aws/lambda/Remediate_Macie_S3_Bucket.
- Choose the most recent log stream and review the logs to see what actions were taken on the resources.
Next steps and customization
The solution in this post has a custom action for an S3 object and an S3 bucket, and is meant to serve as a template. You could modify the Lambda functions associated with the custom actions to take different or additional actions that are specific to your environment and data classification.
Additionally, I walked through specific Security Hub custom actions for Macie policy (bucket) or sensitive data (objects) findings. If you have defined actions to take for both, you could consolidate the custom actions and invoke a Lambda function that parses information from the Security Hub Macie finding to determine if it is a policy or sensitive data finding.
The two disabled EventBridge rules deployed as part of the solution are examples that can be leveraged for auto-remediation. After you use Security Hub’s custom actions to remediate findings, your security team could start to see a trend where you always want to take specific actions and enable the EventBridge rules to take action without requiring your security team to select a custom action in Security Hub in the AWS console.
- Autoremediate_Macie_Policy_Finding
- Autoremediate_Macie_Sensitive_Data_Finding
Conclusion
In this post, you deployed a solution to allow your security team to take automated actions against a Macie sensitive data and policy finding from Security Hub by using custom actions in the AWS console. We walked through what the solution does and how the solution can be customized to your use case.
If you have feedback about this post, submit comments in the Comments section below. If you have any questions about this post, start a thread on the AWS Security Hub forum or Amazon Macie forum.
Want more AWS Security news? Follow us on Twitter.